Do-it-yourself floor shelf in 45 minutes: 270 photos, drawings and layouts
 DIY shelf for books or flowers
Editor’s word:
Here you will learn how to make a do-it-yourself floor shelf for books, flowers, toys, shoes and storage of various other things. Step-by-step photos, detailed instructions, drawings and layouts
Article menu:
Floor shelves made of different materials:
- ... made of wood (in general, according to the article, 250 variants of photo shelves with step-by-step photos that are included in other sections are scattered)
- ... from pipes (A selection of 80 step-by-step photos of making shelves from pipes with your own hands)
- ... made of bricks and boards (chic shelf with great step by step photos)
- ... from boxes (4 do-it-yourself shelf models with a master class)
- ... of glass bottles (2 options with step by step photos)
- ... from the stairs (2 master classes)
Different types of floor shelves:
- angular
three master classes with step by step photos how to make a floor corner shelf with your own hands - rack
step-by-step photos how to make a rack with your own hands (see also sections in other sections) - Art Nouveau
there are 2 models of floor shelves with step by step photos - shelves and pipe racks
5 most popular options - for flowers
several master classes of flower shelves that you can do with your own hands at the end of the photo gallery section with 180 photos - for shoes
a couple of options for floor shelves for shoes, which you will learn how to do with your own hands from the step-by-step photos shown there with instructions and drawings - shelving - secret door
Photo Galleries:
- 80 photos of floor flower shelves
(which you can do yourself. A small photo gallery of interesting options) - 50 schemes and drawings of floor shelves for shoes(excellent mock-ups of instructions for making shelves for shoes with your own hands in the gallery)
- 245 photos of floor shelves
(large photo gallery of shelves that you can do yourself)
... made of wood
Section: Wooden floor shelves
Do-it-yourself floor shelf for books in 45 minutes !!!
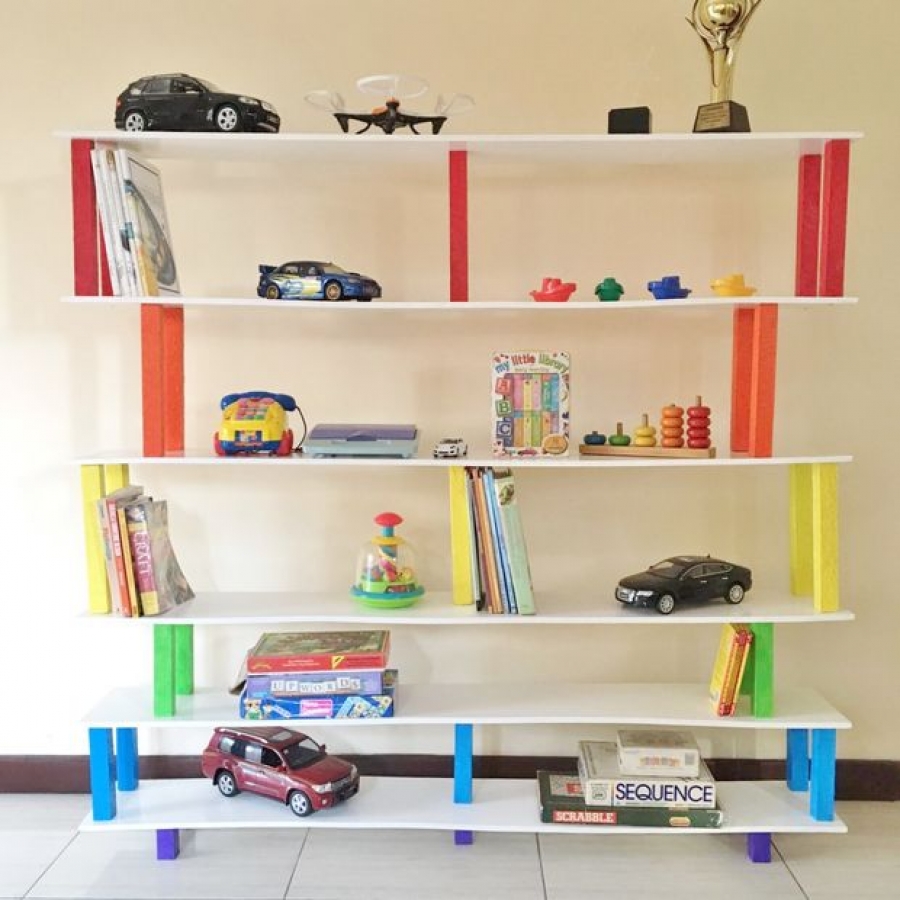
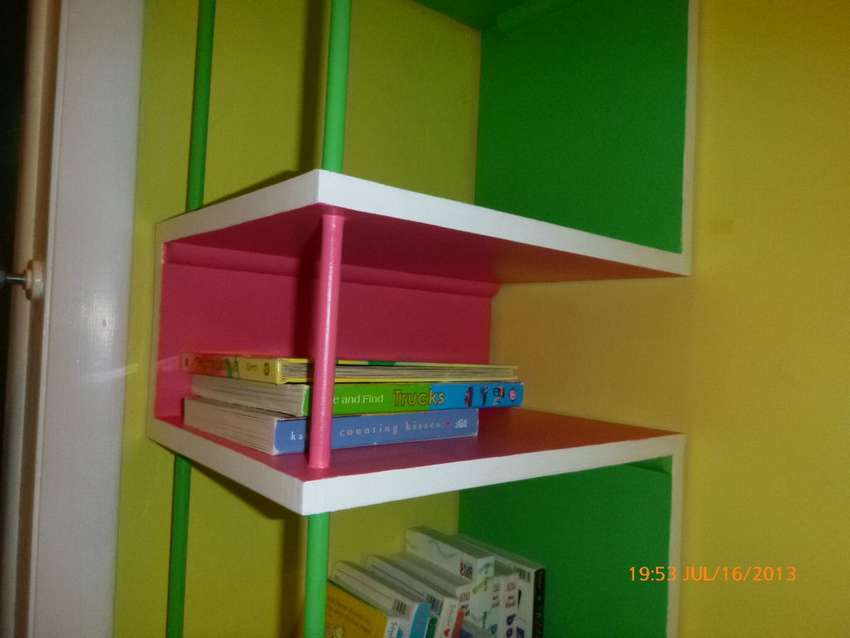
Bookshelf RAINBOW

The author claims that it took him no more than 45 minutes to create this shelf. All the rest of the time was spent on painting and polishing the boards and bars. The shelf is made in rainbow colors.
Look below for step-by-step photos of the author’s photo master class.


https://i.expert-h.com/en/polki/napolnaya-polka-svoimi-rukami-foto#sigFreeId914097505e
The author suggested a good way to give the texture to the columns, for this they should be painted, then sprinkled with sand and painted again.
 DIY wooden bookcase
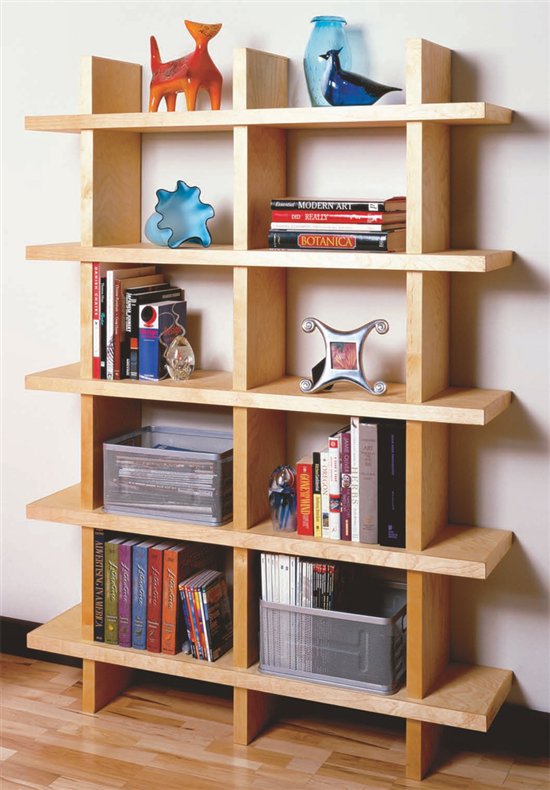
Fresh, clean lines, simple, durable construction and modern design of this shelving is suitable for the interior of any room. The credo of many great architects of the 20th century was "the shape corresponds to the function", the bookcase presented confirms this. The sturdy shelves are mounted on the same sturdy racks. No decorations, extra details, even the back does not overshadow the ideal geometry.
The design is really surprisingly simple, so making a modern wooden shelving with your own hands is quite real. Long threaded rods are hidden inside and firmly bind the entire rack.
There are no corners to cut, no traditional grooves. Finishing is also practically unnecessary, because all parts are processed before assembly. The rack is made of laminated plywood, so it looks solid, as if made of solid wood. You will need a saw, a planer, a jointer, a drilling machine, a drill, and you can see the assembly order in step-by-step photographs.


https://i.expert-h.com/en/polki/napolnaya-polka-svoimi-rukami-foto#sigFreeId052e06d78a
 The size of the rack can be made at your discretion.. Do you want it to be in the entire wall (even around the window) With enough shelves to fit the whole library? You can do it! Cabinet shelves can be easily made anysize. Need a little bookcase? There are no problems either. Read the drawings, adhering to the proportions, you can assemble any size designby only changing the distance between the holes or simply reducing and increasing the number of shelves.


https://i.expert-h.com/en/polki/napolnaya-polka-svoimi-rukami-foto#sigFreeId9646d4260e
Corner bookshelf floor (cabinet)
(do it yourself in 2 hours !!! drawings and step-by-step photos of manufacturing)
 The author claims that he managed to make all the details of the shelf and assemble the entire structure in 2 hours. The rest of the time was spent on painting, varnishing and drying.
The very design of such a shelf of the shelf suggests that no nails will be needed to make it. Importantso that all the shelves sit very tightly in their places, so that the shelf does not swing. If the connecting holes have failed and some shelves are loose in their places, then the shelves in these places can be screwed on, or, as the author advises, just drive pieces and pieces of wood into the grooves.
We also recommend that you do not forget to screw the shelf to the wall so that it does not fall inadvertently)))


https://i.expert-h.com/en/polki/napolnaya-polka-svoimi-rukami-foto#sigFreeId427920e792
Sliding shelving


https://i.expert-h.com/en/polki/napolnaya-polka-svoimi-rukami-foto#sigFreeIdf34a053acc
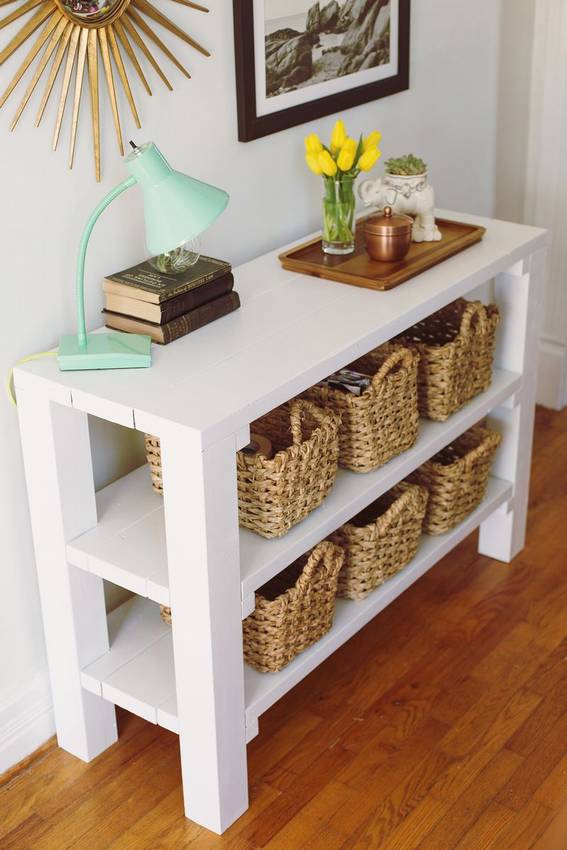 Floor shelf or table with shelves in the kitchen
Most likely this option relates more to tables than to shelves. But still, we placed this model here, because We hope that this option of personal organization will be interesting to you, and most importantly useful, because when arranging a home, one must keep in mind all the options !!!
See below for step-by-step photos of the master class


https://i.expert-h.com/en/polki/napolnaya-polka-svoimi-rukami-foto#sigFreeId7e6a36ea28
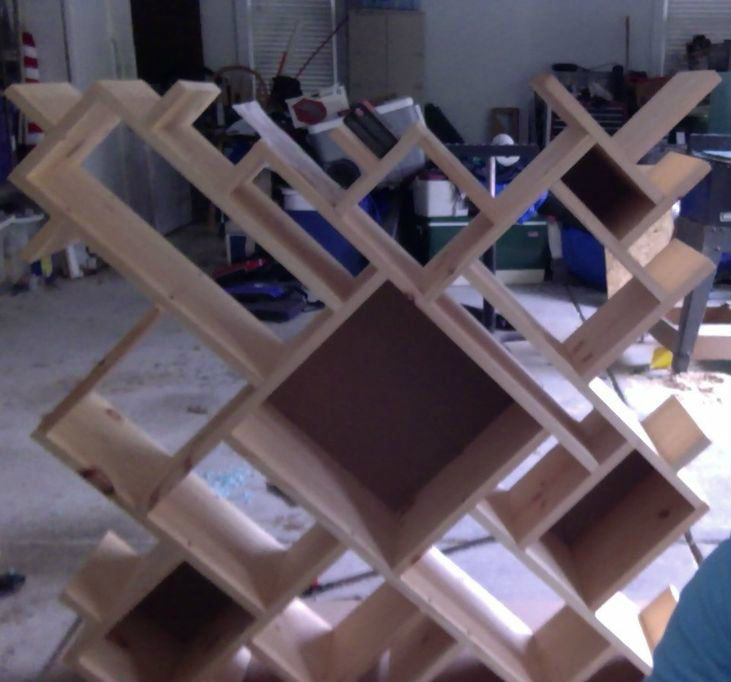
Large wooden home bookcase
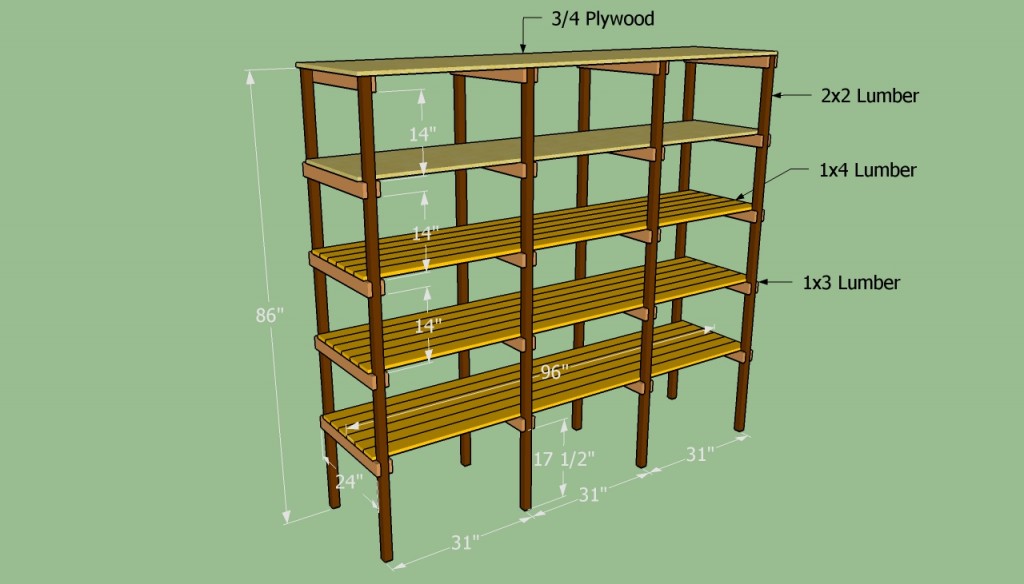 With these step-by-step photos, you can easily make your own such a huge and simple wooden bookcase that is suitable for a garage, for home, for a store, for storing toys, for flowers, for books and for storing old unnecessary things in the back room


https://i.expert-h.com/en/polki/napolnaya-polka-svoimi-rukami-foto#sigFreeId7384f4c4a7
DIY portable shelf
 A great option for a simple wooden shelf for shoes, which you can easily make with your own hands from wood. This shelf has a large surface area, which means you can put more of your shoes on it. Also, this shelf is perfect for toys, books, tools, shoes and other things. The shelf is characterized by high mobility, which means that you can put it at any time to where it may suddenly be needed.


https://i.expert-h.com/en/polki/napolnaya-polka-svoimi-rukami-foto#sigFreeIded1a42e29e
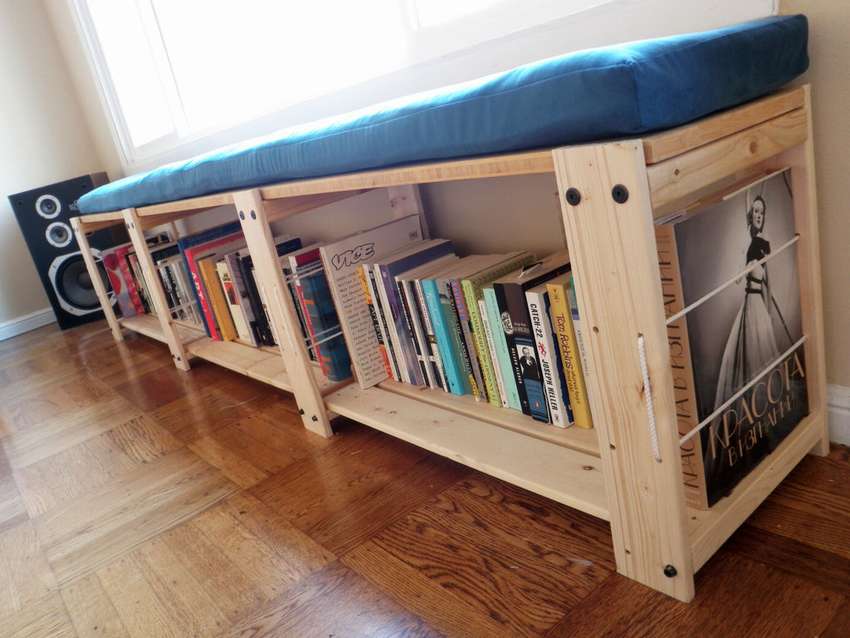
Shelf bench for shoes, toys and books
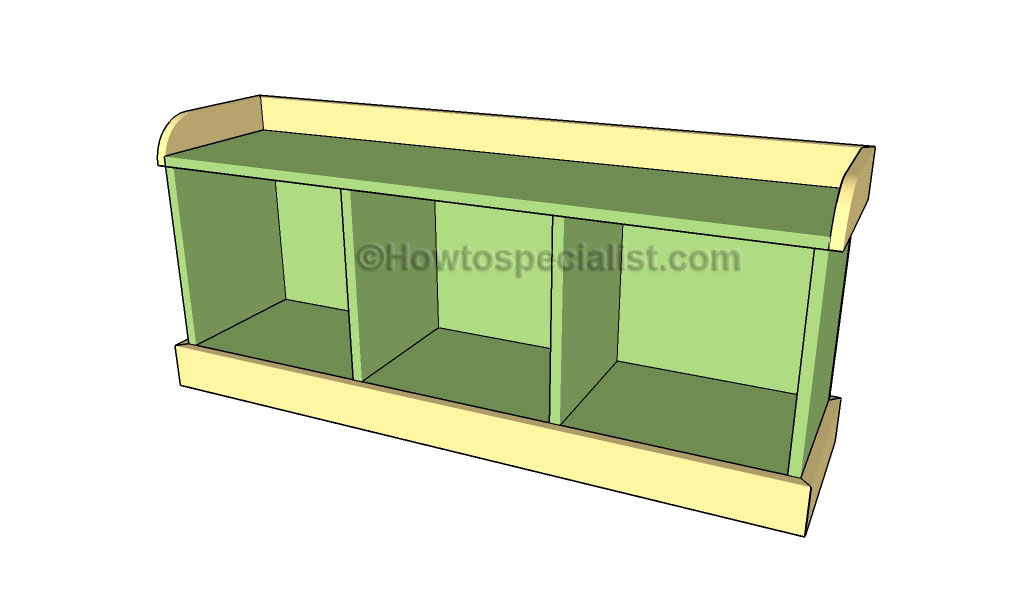 It’s easy for you to make such a simple wooden shelf in the hallway with your own hands. See step-by-step photos below on how to do this. Shelf bench fit in the hallway for shoes, in the bathroom, in the nursery for toys, in the room for books, magazines and newspapers.


https://i.expert-h.com/en/polki/napolnaya-polka-svoimi-rukami-foto#sigFreeId3a58fb0409
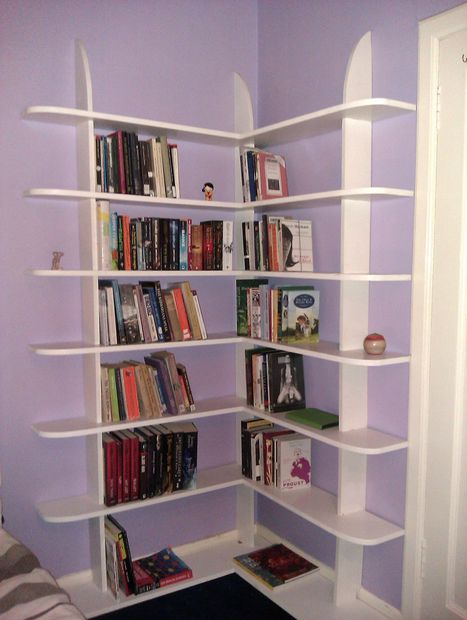
Corner Bookshelf for children.
Step-by-step photo of manufacture
 Let's look at how you can make such a corner bookshelf for your children’s room with your own hands. The author of the photo took 10 days to make this shelf. A day for each level, for sawing (he sawed everything at once), painting, installation. The levels are kept with glue, cox glue for 24 hours. Please note that when installing the shelf, the corner part of the plinth is removed so that the shelf fits snugly against the wall. The author also attached the top of the shelf to the wall for stability (this is not shown in the photo). See step-by-step photos of the master class below.


https://i.expert-h.com/en/polki/napolnaya-polka-svoimi-rukami-foto#sigFreeIdb71d8f5d03
Secret door - cupboard and bookshelf
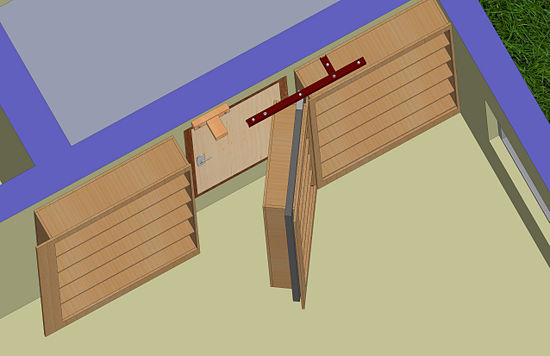 Let's see how to make a secret door in an apartment, for example, in a closet, in the dressing room, in the wall.
If you want to make a secret room, or to hide some unsightly part of the apartment, in order to make a more aesthetic look, then follow the instructions below in step-by-step photos.
Do not use loops because your the design must withstand up to 450 kg! The author of the photo advises using bolts as pivot pins to be welded in the frame.
IMPORTANT fix the frame vertically, for this you should use a plumb line. First attach the top mount to the ceiling, and then plumb the bottom mount (see photo).
See the step-by-step photo of the manufacture:


https://i.expert-h.com/en/polki/napolnaya-polka-svoimi-rukami-foto#sigFreeIdccd2b9105c
Do not forget to install wooden stop above the door (see photo). Attach a magnet to this stop to keep the door pressed against the wall. Be careful when choosing a magnet, it should attract not too much and not too weak.
IMPORTANT!!!: according to fire safety rules: all entrances to rooms in which stoves or gas stoves and gas pipes are located should be clearly visible.
Do-it-yourself corner shelf in the hallway.
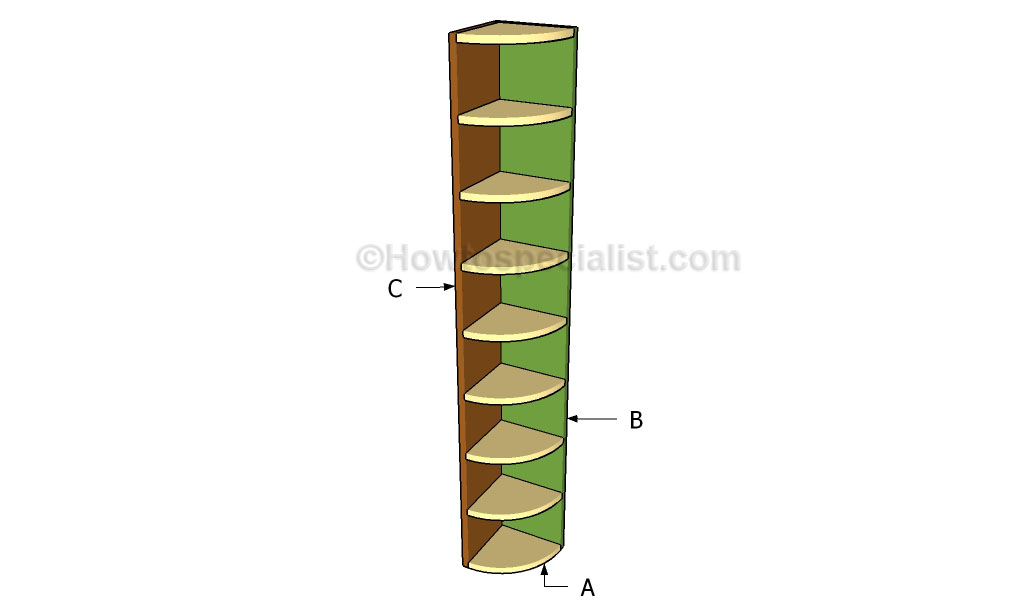 Let's see how to make a simple wooden corner shelf with rounded shelves to your apartment. This shelf is suitable for books, magazines, for shoes in the hallway, for soap accessories in the bathroom, for tools in the garage and also for kitchen utensils in the kitchen.


https://i.expert-h.com/en/polki/napolnaya-polka-svoimi-rukami-foto#sigFreeId2372e42de1
section: ... from pipes
Floor shelves from pipes
(Shelf) Bookcase from water pipes do it yourself
When choosing which pipes to make the rack, the author of the photo had difficulties:
- PVC cheap, easy to process, but not elastic enough - will not withstand heavy loadswhich the rack suggests. PVC pipes are suitable for small shelves
- Galvanized steel pipes, more expensive than PVC, strong, durable, but harder to handle.
- Copper pipesare fairly easy to process, stronger than PVC and reasonably affordable.
Therefore, the author's choice fell on copper pipes ....
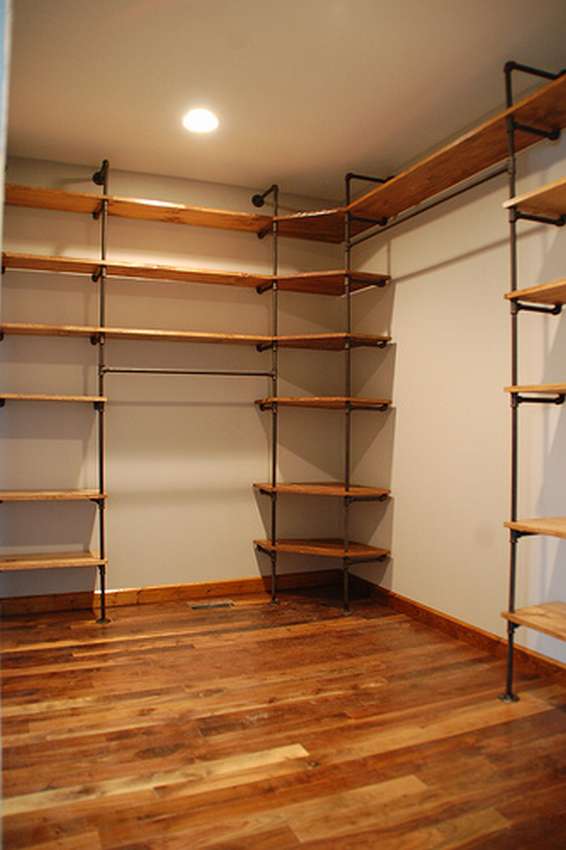
 Attention in this design I am absent back diagonal beams, which usually give stability to wooden shelves, here they are replaced by horizontal supports, which are located under the massive shelves (see photo). The diagonal supports are removed for aesthetics to fully open the back wall. In this case, it is still worth attaching the rack to the wall, which will give additional stability.
This pipe rack can be used for books, flowers, toys, a children's room, perfect for tools in the garage, for shoes, as well as for garden tools in the country
See the rest in the visual step-by-step guide below, presented as a gallery.


https://i.expert-h.com/en/polki/napolnaya-polka-svoimi-rukami-foto#sigFreeIda714c3c1b8
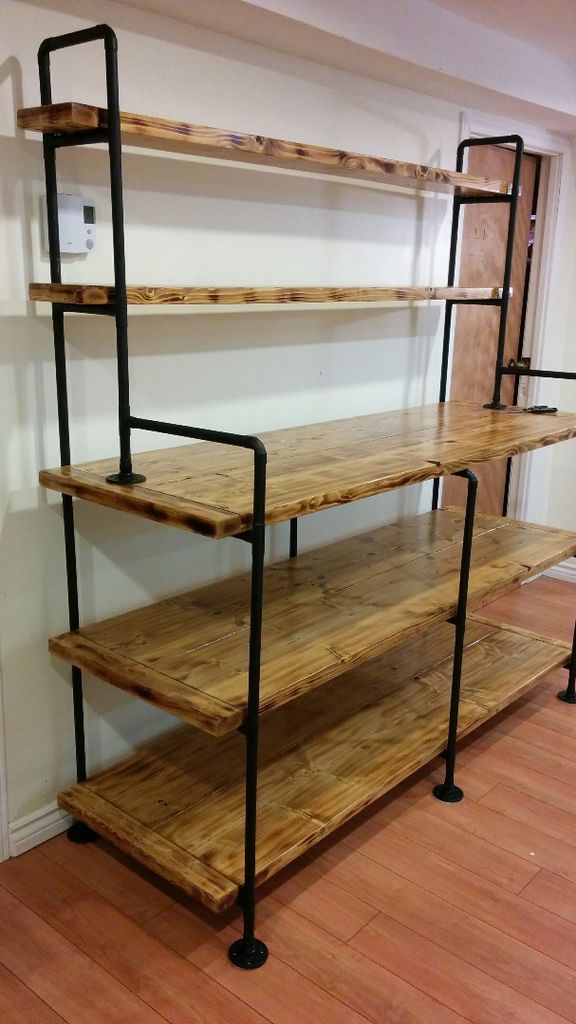
Big do-it-yourself pipe rack
 Let's consider how to assemble such a large rack from metal pipes. This rack is perfect for a garage or pantry.
Our shelving is done from ordinary gas pipes.
Flushing: After purchasing the pipe, wash it with either soap and water or brake fluid. After the side racks are assembled, they should be painted with spray paint.
In the shelves we drill holes slightly larger than the diameter of the pipes, and before installing them on the pipes, we coat the boards with varnish.
The problem is to connect the hangers between the shelves (see photo 11), the fact is that here it is necessary to connect two shelves with a pipe, but when screwing in, one part is screwed in and the other screwed out, because no left thread. In general, if you decide to make the same suspension for the shoulders, then you have to break your brain.


https://i.expert-h.com/en/polki/napolnaya-polka-svoimi-rukami-foto#sigFreeIda98dd57c6d
Shelf shelf from floor to ceiling on struts

As you can see from the step-by-step photos below, the author of the photo made an interesting option of fastening shelves with compression systems. Unscrewing the bolts at the ends of the pipes, you can fix the shelf between the floor and the ceiling, thereby our shelf can do perfectly without the wall as a support, and can also be placed in any open place in the room.


https://i.expert-h.com/en/polki/napolnaya-polka-svoimi-rukami-foto#sigFreeId89a363f397
.... another option for such a shelf
Rack of 3 pipes from floor to ceiling.
This shelf from galvanized pipes belongs to racks, her plus isthat she fixed in the apartment without a single hole !!! in a wall or ceiling, and can be located away from walls. The method of fastening our shelf is based on the clamps between the floor and the ceiling. 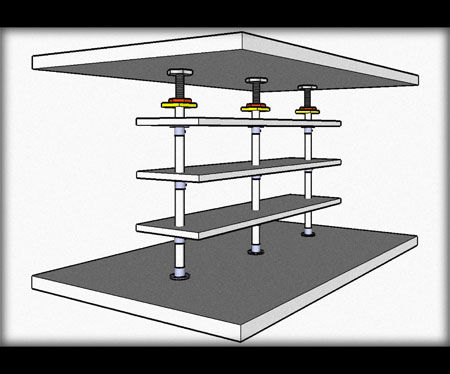 According to the author of the photo, making this shelf with your own hands is not at all difficult. So let's look at the features ...
For the rack, the author used flanges, which, unfortunately, had an inner lip.Therefore, the first thing the author had to remove this part of the flange so that the pipes would pass freely inside the flange (see photo 2 - 7).
Next, we cut the pipes necessary for us to be long. When measuring the length of pipes that we need, we must take into account the width of the clamp that will stand between the pipes. This clip should not be too short or too long !!!
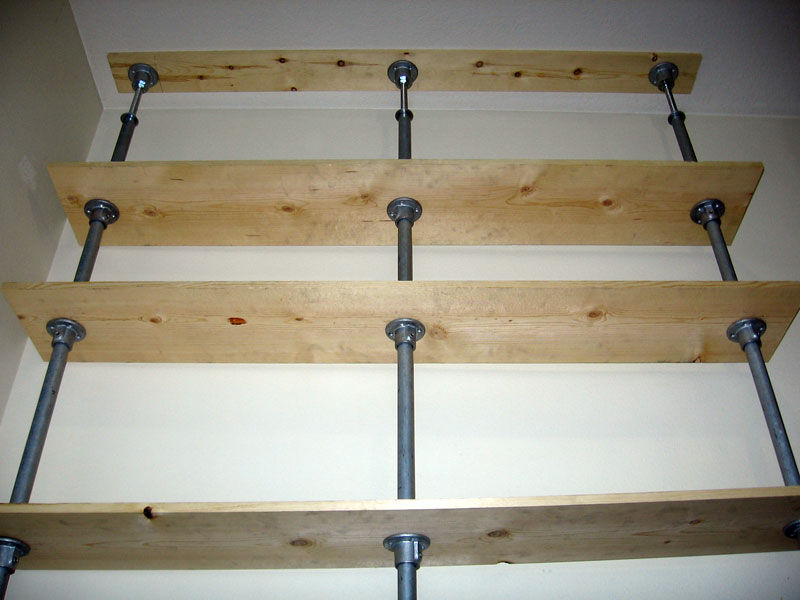 The author made a clamp between two pipes (short and long) at the top of the rack, under the stream. But later he came to the conclusion that a short pipe is not needed here, the clamp can be arranged in such a way that it will rest directly against the flange. The presence of a small pipe weakens the stability of the rack (see photo 11). Do not forget to rinse the pipes in soapy water before installation.
Next, cut holes in the shelves for pipes. The author advises putting all the shelves on top of each other, and on the marked upper shelf, as by patternDrill all three holes in all the shelves at once.
Mounting a shelf is not difficult, just collect the shelf from the bottom according to the step-by-step photos of the master class located below in the gallery.


https://i.expert-h.com/en/polki/napolnaya-polka-svoimi-rukami-foto#sigFreeId306c2582f7
Section:
Cardboard and newspaper floor shelves
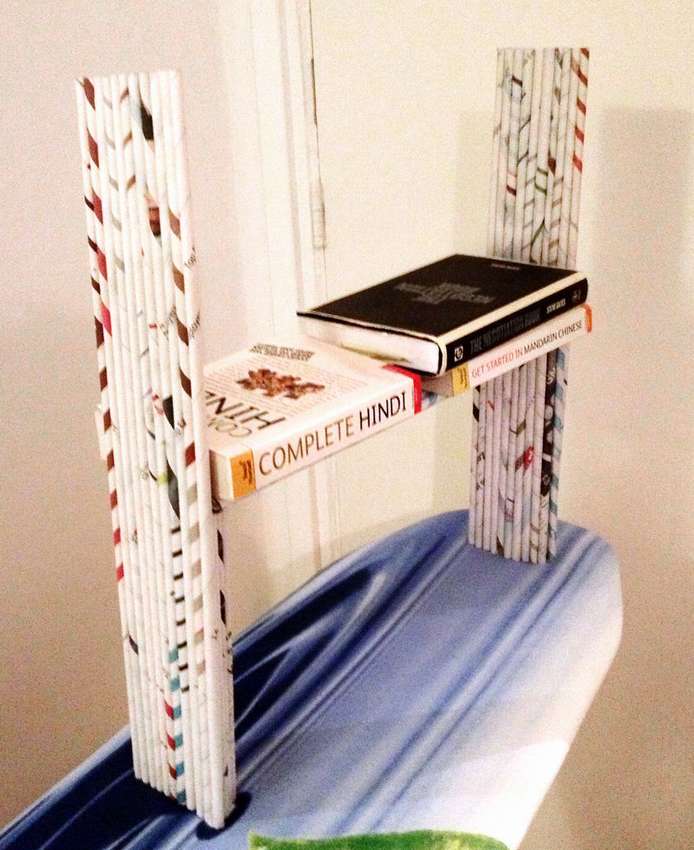 Very simple and at the same time strong shelf for books from newspapers. This shelf will appeal to people watching the environment, because here things that are out of use are reused, as well as this shelf is completely biodegradable.
The tubes rolled up from newspapers turn out to be strong enough to make FURNITURE from them !!!
In total, you will need approximately 60-70 sheets of newspapers or 60-70 tubes that can be made while watching a movie.
See the walkthrough for creating such a shelf below.


https://i.expert-h.com/en/polki/napolnaya-polka-svoimi-rukami-foto#sigFreeId6e3cec0e8f
Shelf rack cardboard boxes do it yourself step by step
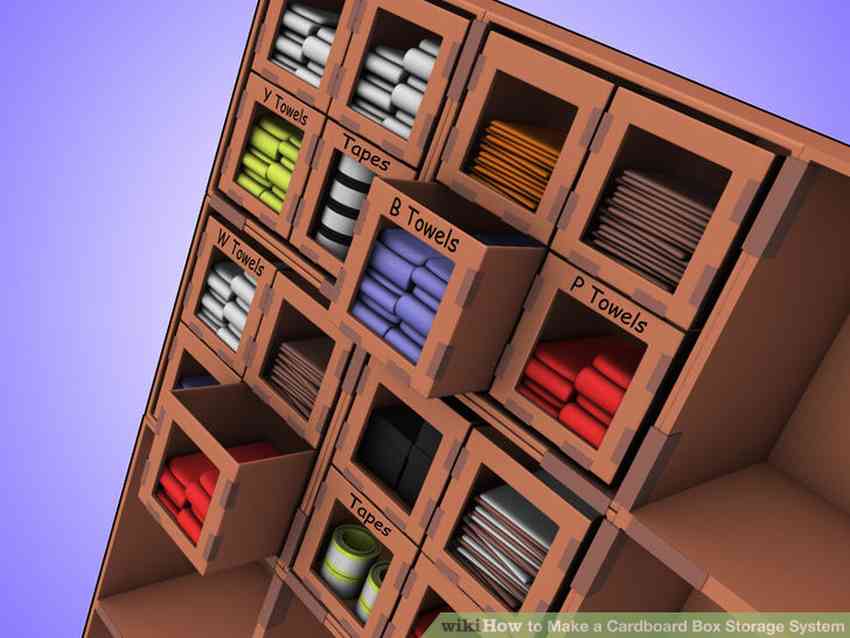 See a master class on how to make this shoe rack from the photo above.
Minuses:
- not very reliable
- not tight
Pros:
- cheap
- simply
In this design, two types of boxes are used.
- these are the large shelves that are made
- it's narrow of which drawers are made
All boxes are fastened with ordinary tape.


https://i.expert-h.com/en/polki/napolnaya-polka-svoimi-rukami-foto#sigFreeIdb2aa748db8
Tips:
- light items should be placed on the upper shelves, larger and heavier ones on the lower.
- when you cut large boxes, as shown in the pictures, then from these scraps you can make additional shelves for small items inside the shelves, for this you just need to make cuts in the trim and connect the trim with a grill.
- Also, these scraps can be used as additional supports inside the boxes, in problem areas.
.... from boxes
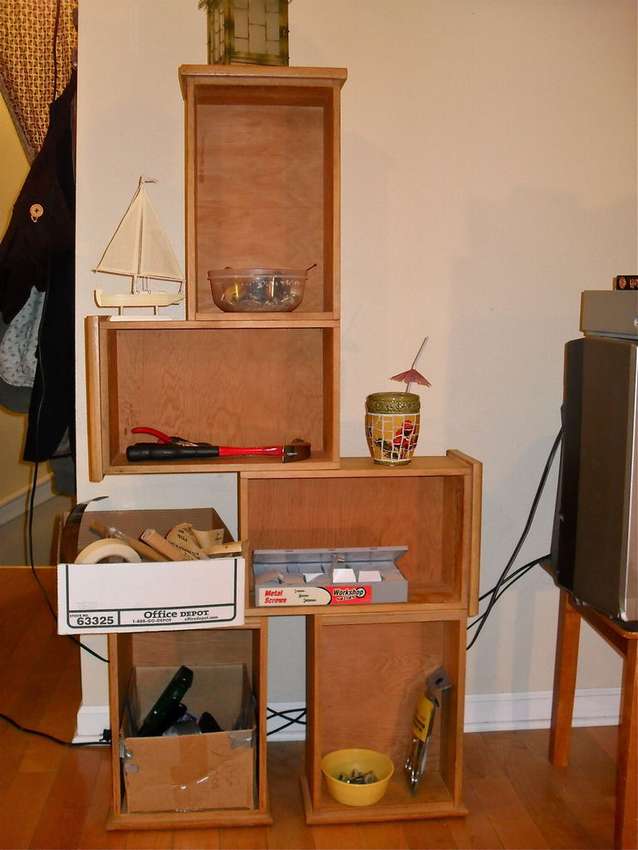
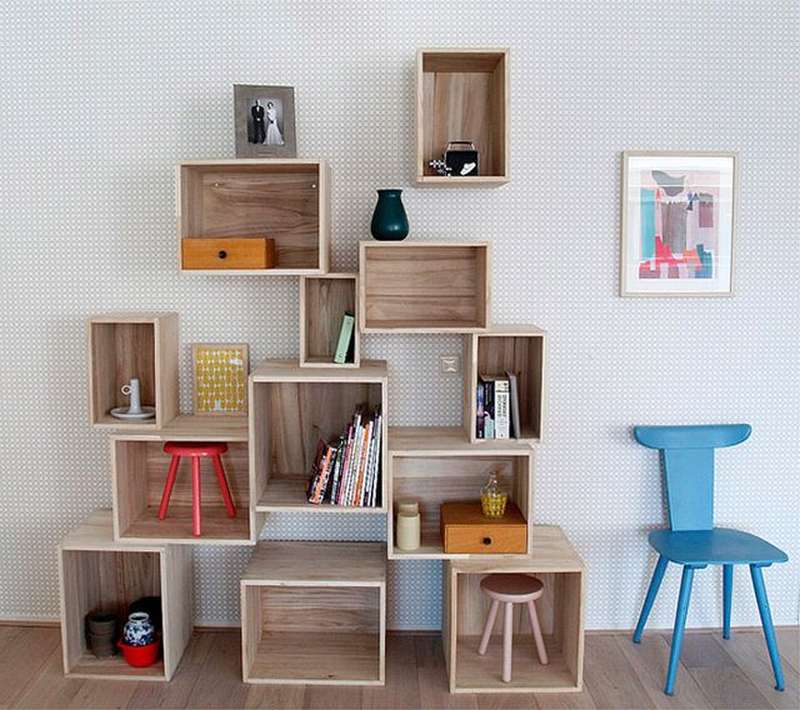
Section: Shelves from boxes from a table or bedside table with step by step photos
It so happened that the author’s neighbor decided to throw out some old furniture and asked the author if he needed anything. The author took only drawers from the curbstone, for a long time they gathered dust in the garage, until such a shelf was made of them. Just arrange the drawers as you like and fasten them with screws. Painting at will.
Section:
In the modern style:
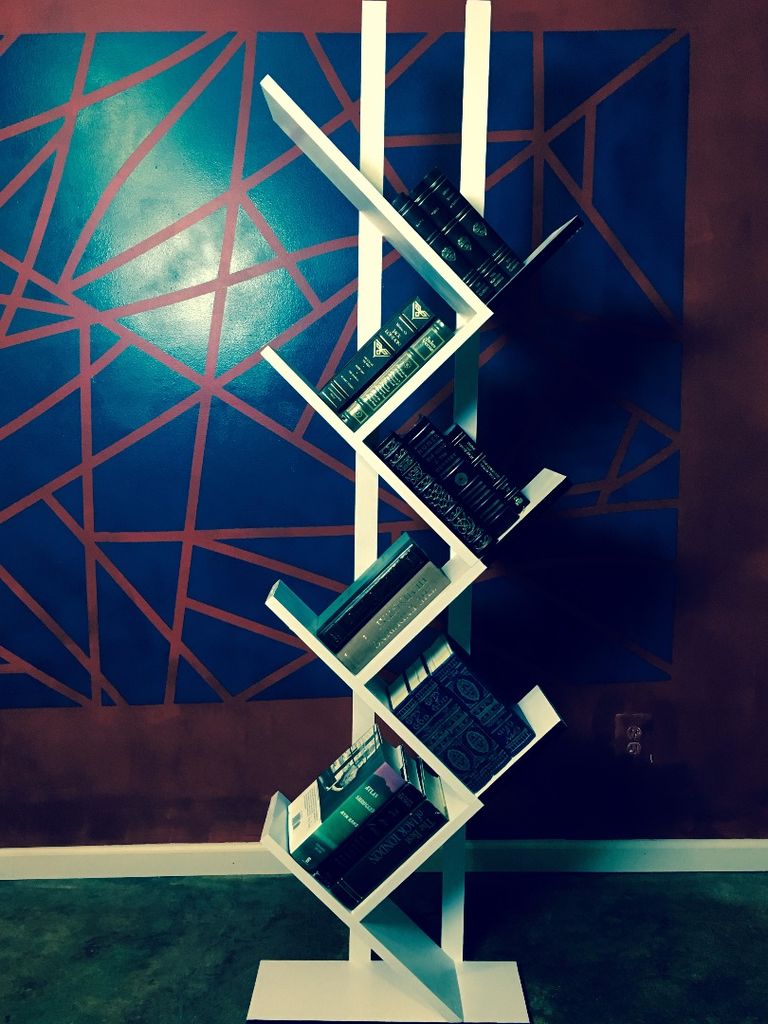
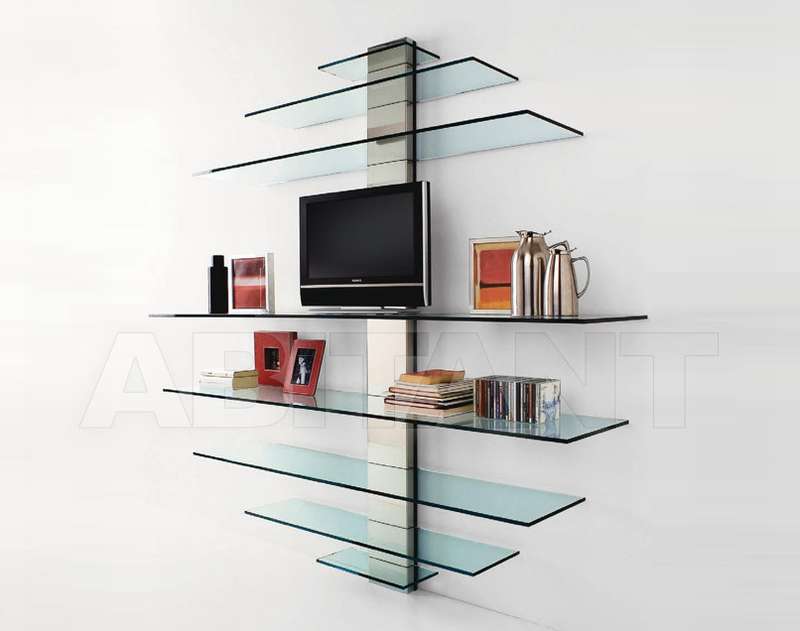
Do-it-yourself modern bookshelf
(Which in the store costs $ 2000)
Again this Art Nouveau shelf. A student from Server Carolina, not having enough special funds to buy, decided to make a shelf that, like a pedestal, would contain some of his things. He also wanted the regiment to look modern. After a long search, he found a prototype shelf that cost $ 2,000 in a store. So this one the student made a similar shelf for himself at a cost of $ 20. 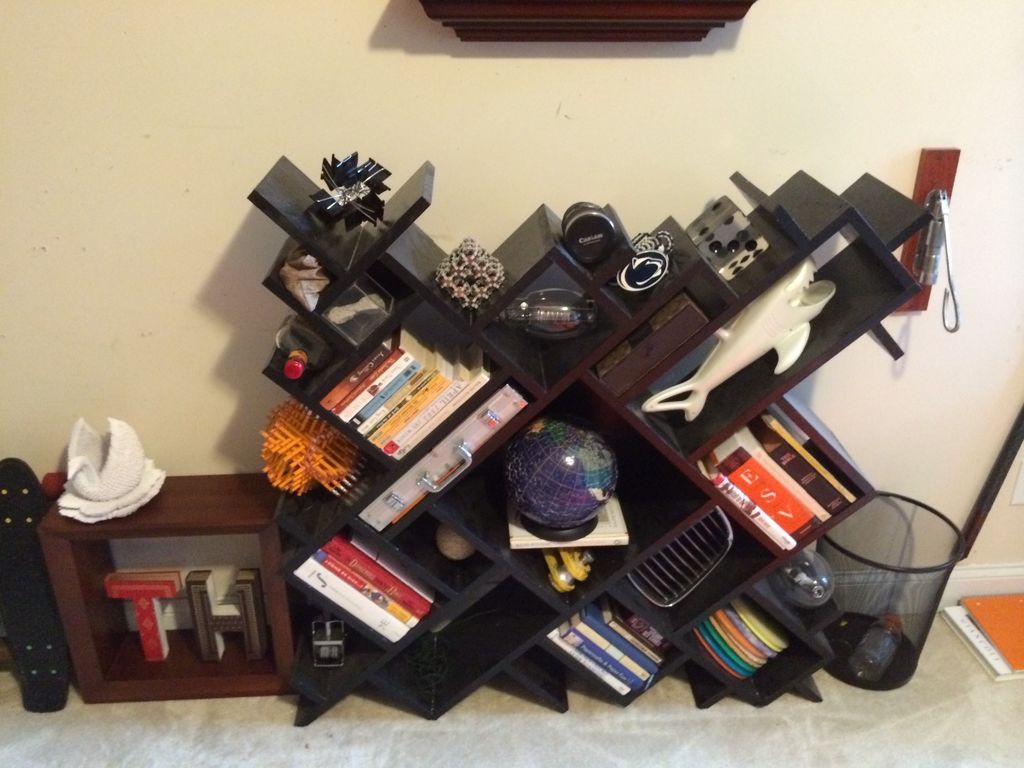 Of course, it didn’t work the first time, because due to the many shelves, I forgot to take into account the thickness of one of the boards. But in the end, after filling up the pits with the putty from the screws, and painting, a modern and presentable shelf was obtained.
 |
 |
All boards of the shelf are located at an angle of 90 degrees. to each other. The shelf itself is relative to the floor at an angle of 45 degrees.
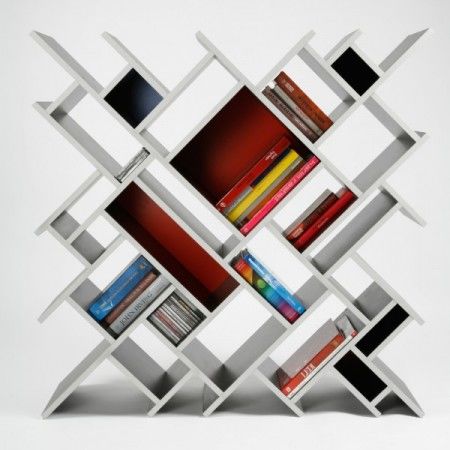
Art Nouveau shelf
The author calls his shelf ULTIMATE (Ultra Modern). The combination of right angles to irregular symmetry makes this shelf truly Ultra Modern. Some side edges are painted black to give an accent.
Since the shelf is very simple, then, in principle, there is nothing more to be said about creating the shelf, what would you not be able to learn from the step-by-step photos of the master class located below in the gallery.
This shelf is perfect for books, CDs, etc.


https://i.expert-h.com/en/polki/napolnaya-polka-svoimi-rukami-foto#sigFreeIdee0bb4e49c
5 most popular pipe shelves and racks
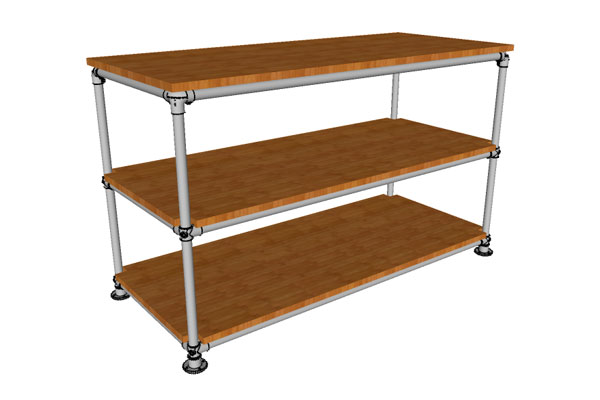
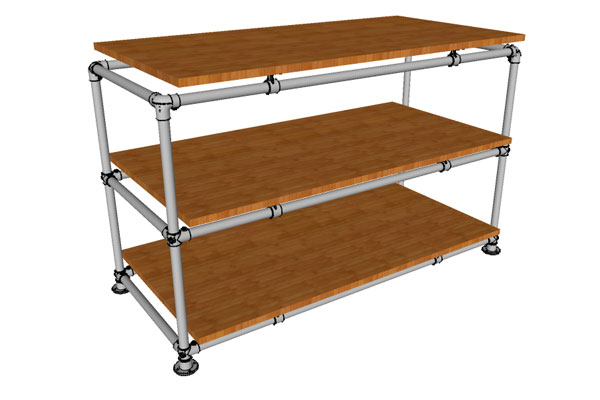
Do-it-yourself simple pipe rack
 A simple rack that you can easily make if you have the appropriate material. The peculiarity is that shelves just lie on pipes without any cuts, unlike the following option. All spare parts can be bought in the store, so the size and shape of the rack completely depend on your desires. This rack from treb is perfect in the garage for tools, in the nursery for toys, in the bathroom, in the kitchen for kitchen utensils.


https://i.expert-h.com/en/polki/napolnaya-polka-svoimi-rukami-foto#sigFreeIdf85d4e64f2
Tight pipe shelf
 The peculiarity of this shelf is that the pipes surround the shelves, as it were. In the shelves cuts are made in the cornersthrough which pipes pass. This type of shelf is suitable for places where you need to save space, for example, in the kitchen. Also, this option is perfectly converted into a shelf.


https://i.expert-h.com/en/polki/napolnaya-polka-svoimi-rukami-foto#sigFreeIdaa89a33d2a
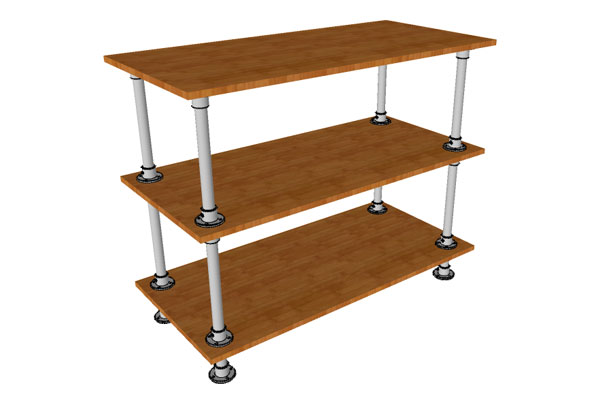
Shelf made of pipes with "flying" shelves
 Feature. This pipe shelf is that the shelves no longer lie on the pipes, but are mounted on props. The supports, in turn, are attached to the pipes, which in turn creates the appearance of levitation, shelves, as it were, hover over the structure. These shelves are suitable for "prominent" places in the house, for example, in the living room, common room, bring an aesthetic decorative effect.


https://i.expert-h.com/en/polki/napolnaya-polka-svoimi-rukami-foto#sigFreeId81baf8b311
Shelf "plug"
 The simplest shelf from this list is that it uses only two varieties of metal parts for the frame. This is a pipe and a flange (see photo). This shelf is usually free-standing.


https://i.expert-h.com/en/polki/napolnaya-polka-svoimi-rukami-foto#sigFreeIde72b6544b8
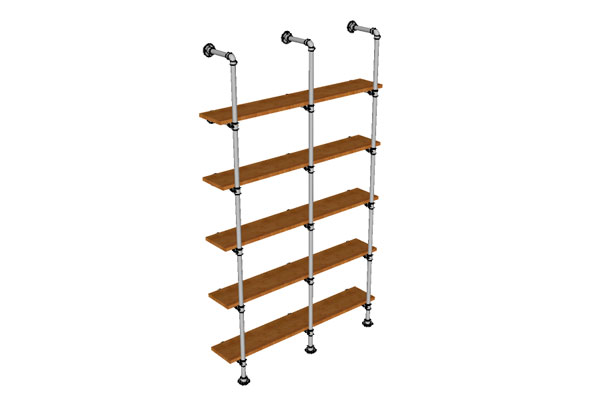
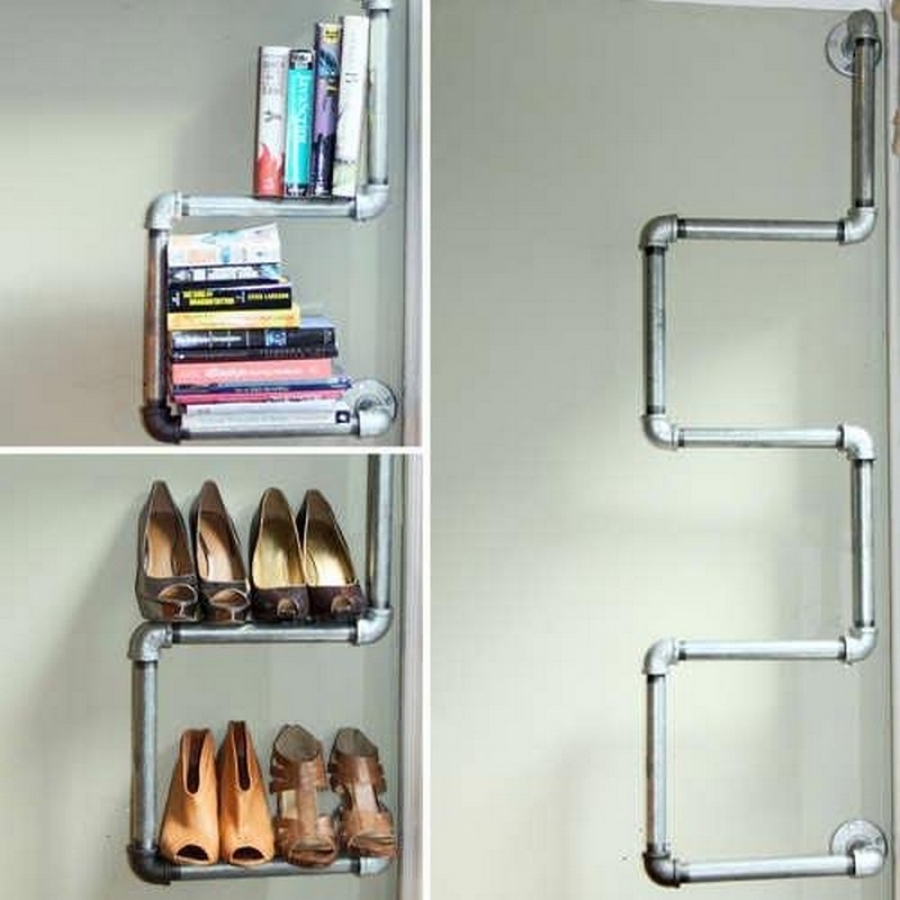
Pipe wall shelf
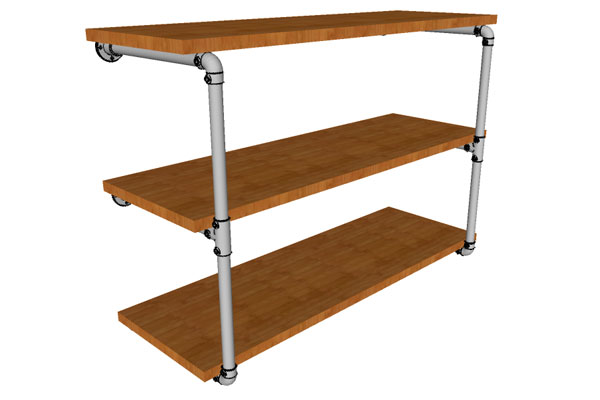 This shelf attached to the wall. The design uses 4 varieties of metal parts (see photo). The assembly and installation of the shelf does not present anything difficult, see how this is done using the step-by-step photos below.


https://i.expert-h.com/en/polki/napolnaya-polka-svoimi-rukami-foto#sigFreeId1784345458
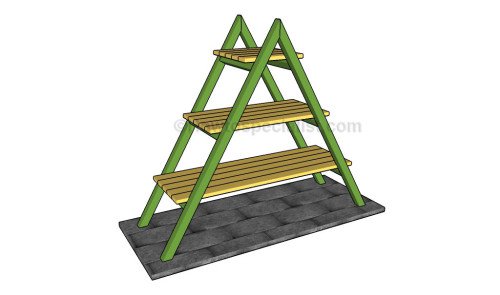
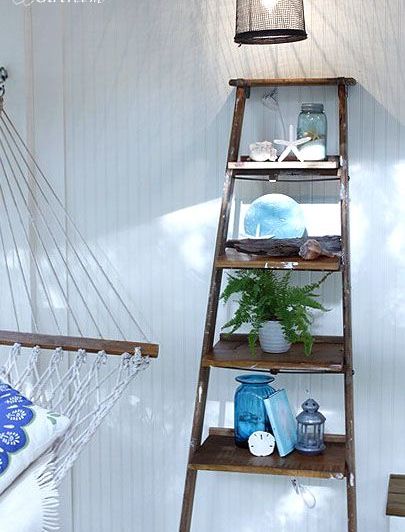
Floor shelf from stairs
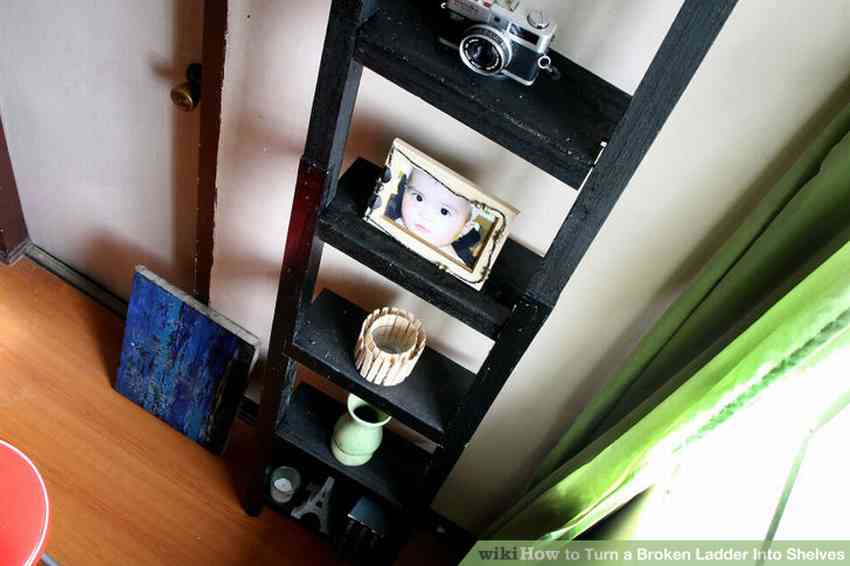 An old and broken ladder can easily become a functional shelving or shelf. It is worth sanding the stairs, pinning down the sawn boards in place of the shelves and fixing against the wall. This shelf-ladder will be a great design solution for your room


https://i.expert-h.com/en/polki/napolnaya-polka-svoimi-rukami-foto#sigFreeId8a00b5a351
 A shelf made of wooden stairs, of course, is a classic. You have probably already seen many photos of such structures. But, nevertheless, they always look original, if beautifully designed, it will be appropriate even in the living room. You can keep everything on it, from books to dishes, and a great advantage, you can always rearrange it in another place. In this photo, another version of the floor shelf from the stairs and step-by-step photos of manufacturing.
It remains only to find the old staircase and prepare the boards for the shelves. The assembly work is not complicated, the main thing is to make the right measurements.


https://i.expert-h.com/en/polki/napolnaya-polka-svoimi-rukami-foto#sigFreeIdac19e0c7f2
Do-it-yourself hidden shelf behind the refrigerator
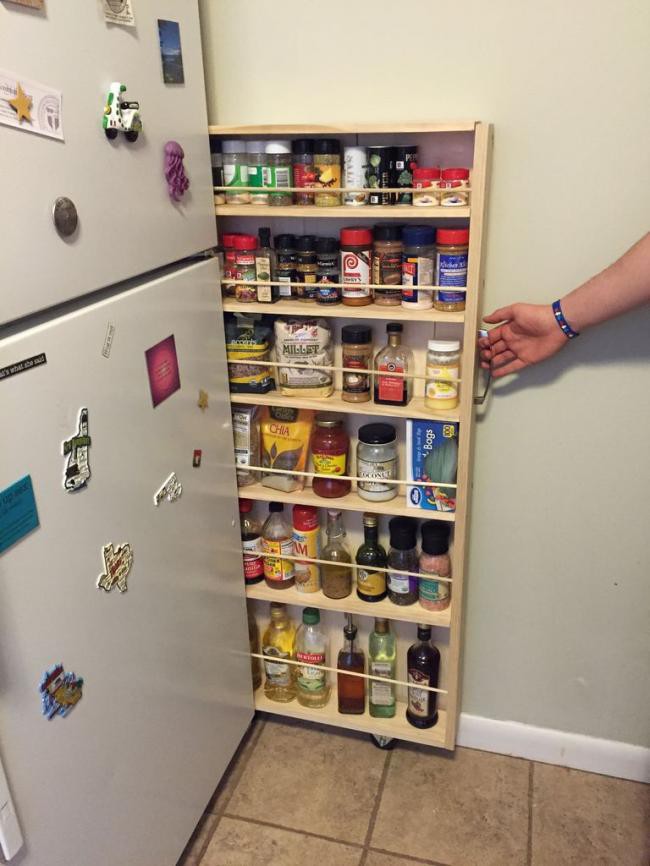 Such a shelf can easily be made not only for the refrigerator, but also for other problem areas of your apartment, for example, for the bathroom.
Below you can see step-by-step photos of how to do it yourself, we just add the following:
- - the refrigerator, like the wall, can be scratched, so you should think of guides.
- - In the instructions for the refrigerator, it is not in vain that they advise leaving space between the walls of the refrigerator and the walls of the room, this is necessary for air circulation, so that warm air disappears somewhere. Therefore, such a shelf may be acceptable for an old refrigerator, in which the cooling part is behind, but for modern - such a shelf is unacceptable, since they have a cooling part mounted in the side walls.


https://i.expert-h.com/en/polki/napolnaya-polka-svoimi-rukami-foto#sigFreeIde53e4bcd0c
Floor shelves for flowers:
Floor wooden shelf flower stand
 You can put this wooden shelf for flowers both at home, in the apartment, and in the country on the street. Using the step-by-step photos of the master class below, you can simply figure out how to make such a floor shelf for flowers with your own hands. The author advises to additionally fasten all the places of fastening screws or nails with water-resistant glue to give the shelf strength. Also cover the shelf with paint and stain


https://i.expert-h.com/en/polki/napolnaya-polka-svoimi-rukami-foto#sigFreeIdc3c849de16
Floor pipe shelf for flowers
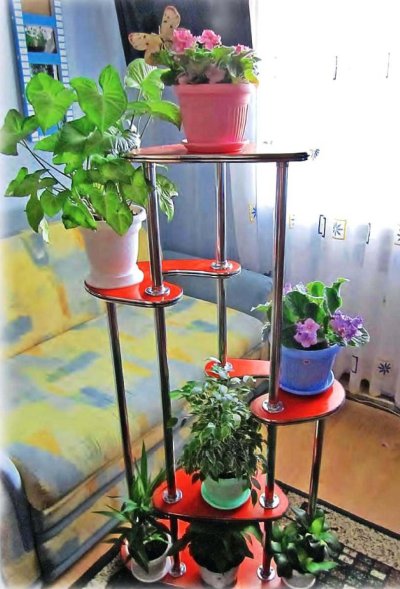 A pipe floor shelf like this one has many advantages. - takes up little space, flower pots are placed compactly, accessible access to each flower and each plant has space for growth. And most importantly, it is very beautiful. You probably think how much such a shelf in the store? But this shelf is made by hand., however, with the cost of fittings.
To make such a shelf with our own hands, we need:
- Plywood, 20 mm thick;
- Five meter chrome pipes;
- Bushings, flanges, furniture bolts;
- Filling for wood and car enamel
- Yes, you will also need to buy a furniture edge for decoration.
All these things will have to be spent, but still DIY assembled shelf will cost three times cheaperthan you would pay for the finished product.
The dimensions and proportions of the surface can be made according to this drawing.

Further, all the work shown on step by step photosso there shouldn’t be any problems with the assembly. It is just necessary to carefully process the surfaces of the shelves, paint and glue the decorative edging. Then you need to prepare the racks, you can choose the height arbitrarily and cut it with an ordinary hacksaw, but installing on the flanges is no longer a problem.


https://i.expert-h.com/en/polki/napolnaya-polka-svoimi-rukami-foto#sigFreeId2ae536f5cf
If you coped with this shelf, you can develop your options in the future.
80 photos of floor flower shelves
Floor shelves for flowers, one of the most common options, although they need a separate place, but such coasters are mobile, you can rearrange, if necessary, anywhere. In addition, it is easier to care for plants. In this gallery there are several examples of floor shelves, you can use for your interior.


https://i.expert-h.com/en/polki/napolnaya-polka-svoimi-rukami-foto#sigFreeId7ccf56689e
DIY flower shelf
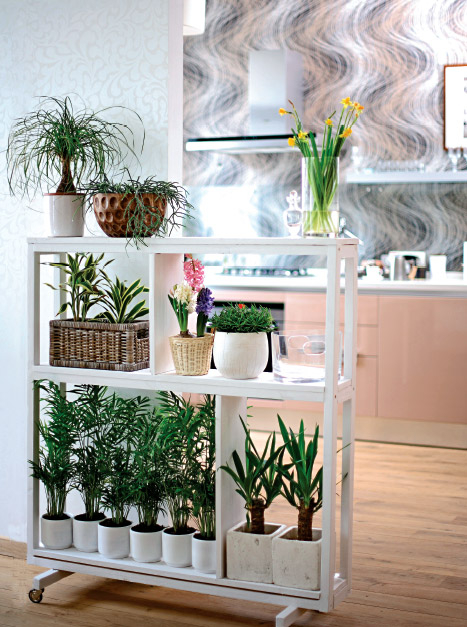 Shelves can be different, but you can always come up with something original. We offer you to make a flower shelf-screen with your own handsA very handy thing to share room space. And this is not just a mobile partition, but also a rack for flowers, so it will perform two functions at once.
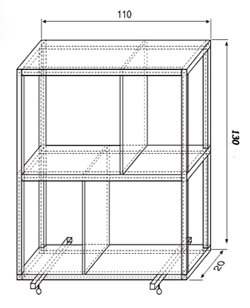 The dimensions of the screen can be chosen arbitrarily, you can do, for example, according to this scheme. We will need:
- two 20 mm boards 2.5 meters long;
- 5 pieces of wooden blocks;
- self-tapping screws, clamping screws, beech spikes;
- glue, putty, acrylic paint.
First of all, we make two side frames. Then, in the corners and for the middle shelf, we make holes for confirmations, and in the ends of the bars that go under the vertical posts, we drill holes for the spikes.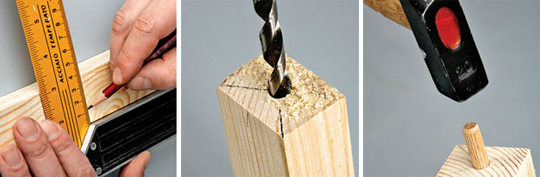
We also drill holes at the ends of the crossbars and put wooden spikes on the glue. We tighten the vertical racks and crossbars with screws, we put the short crossbars on the spikes. We close all the cracks with putty. Then these places must be sanded (when the putty is dry).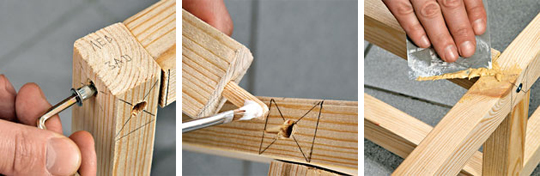
Cooking shelves. To do this, cut the corners at the lower and middle shelves and fasten to the frame with screws. We strengthen the partitions with the help of confirmations. Then we fasten the crossbars under the wheels.
It remains to paint and arrange flower pots.
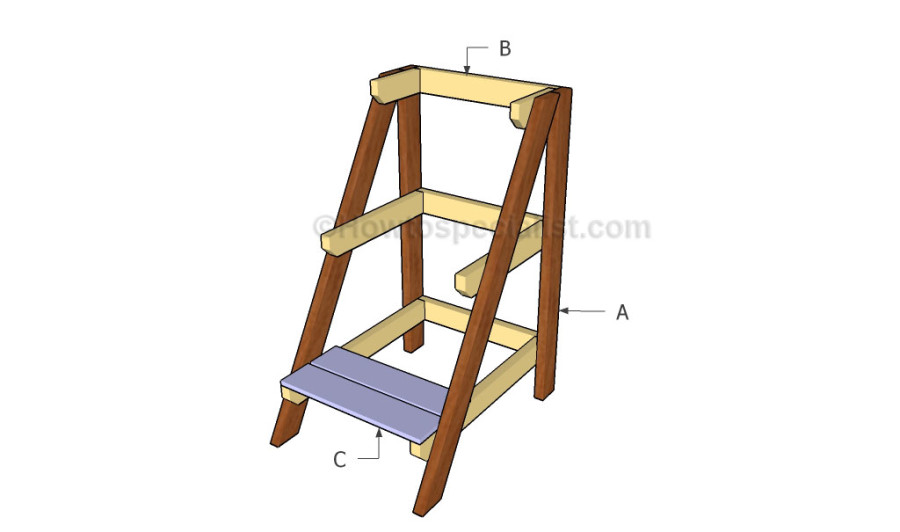
DIY shoe floor shelves for shoes with step by step photos
DIY shoe rack
 Put together four planks and making an ordinary shoe shelf is not at all difficultbut what if you add a little twist. How do you like this option? So to say three in one, compact, creative, on wheels. Customize the sizes of the main and internal shelves as you need, well, mobility, it’s very convenient.
These step-by-step photos will help you build this fun shelf.
Operating procedure
- We determine the total area of the shelf, this is after we returned from the store with new wheels.
- We prepare the material, measure, saw, grind.
- We remove the dimensions of the internal shelves and the height of the racks. It all depends on what kind of shoes will be stored on the shelf, everything can be provided, from slippers to boots.
- We make blanks according to sizes, you see how everything is beautifully laid out in the photograph.
- In the corners we drill holes for screws
- We fasten the parts first of the internal shelves, then the main ones.
- For the wheels, four holes for the bolts are necessary, they can be made in advance and at the endDo not tighten the bolts.


https://i.expert-h.com/en/polki/napolnaya-polka-svoimi-rukami-foto#sigFreeIdcd1dcea2c5
The shelf is ready, further decorative work is at your discretion. You can paint, beat the upper shelf with a cloth, this is to your taste.
Do-it-yourself bench bench for books or shoes
 This shelf bench is also perfect for toys, for spare parts or tools in the garage.
In general, the author of the photo bought a rack in IKEA and something he did not like about this rack. As a result, he made a bench out of it.
We did not begin to lay out the whole process of alteration, because it is unlikely that you will buy a rack to make a bench out of it. Therefore, we have placed only the most necessary photos, so that you would simply familiarize yourself with this option. From the photo you can do the same just from the boards.


https://i.expert-h.com/en/polki/napolnaya-polka-svoimi-rukami-foto#sigFreeId5a7e14925b
Beautifully thread threads for book support
Schemes and drawings of floor shelves for shoes
A shoe rack is not a wardrobe or a sofa; it is easy to make it yourself. It is much easier to do this if you already have a finished project.. Of course, you can draw a sketch yourself if you have experience in this matter, but it’s easier to use ready-made schemes, why reinvent the wheel.
For example, according to this scheme, making a shoe cabinet is not at all difficult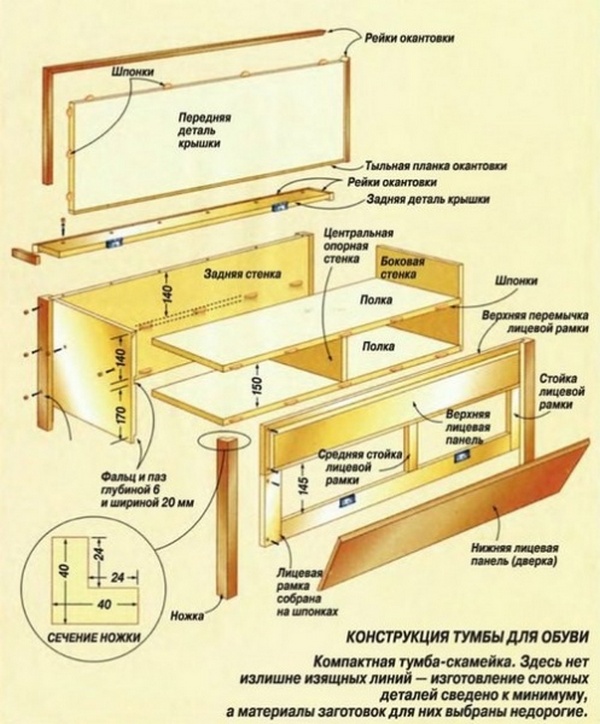
There are many types of shoe shelves - the main ones can be attributed Bona, Slim, Coupe, Stand, or shoe rack - galoshnitsa. 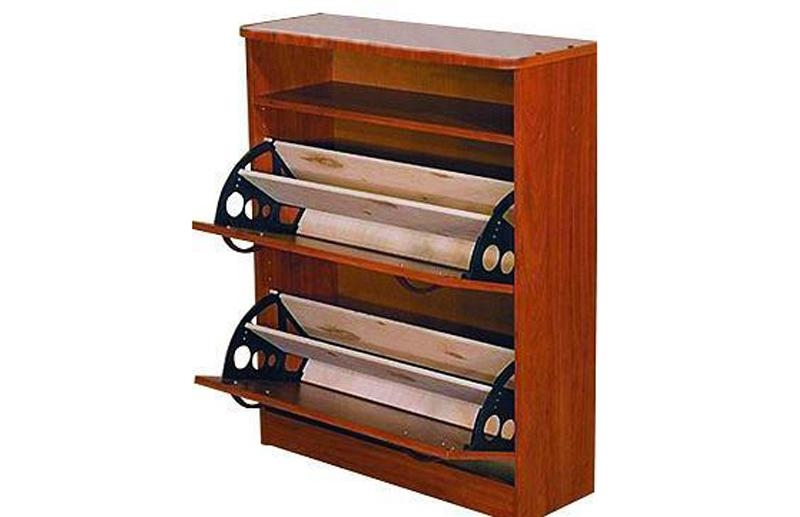 For the manufacture of some of them, various mechanisms are often necessary, but today it is not a problem to buy any accessories in a furniture store. To save space often use slim shelves, although they have design features, but you can also make such a shelf yourself if you wish. Of course, making it yourself is quite difficult; you need to purchase a lot of different accessories. It's easier to buy ready-made and assemble it yourself. How this is done, you can look at this detailed diagram.
In this collection you can find schemes of various types of shelvesIf you have experience working with wood structures, these drawings can help with proportions and sizes.


https://i.expert-h.com/en/polki/napolnaya-polka-svoimi-rukami-foto#sigFreeIda32bc8148c
You may also need schemes, drawings and sketches of other floor shelvesdo-it-yourselfers


https://i.expert-h.com/en/polki/napolnaya-polka-svoimi-rukami-foto#sigFreeIdbb8d915166
Floor shelves made of bricks and boards
Do it yourself
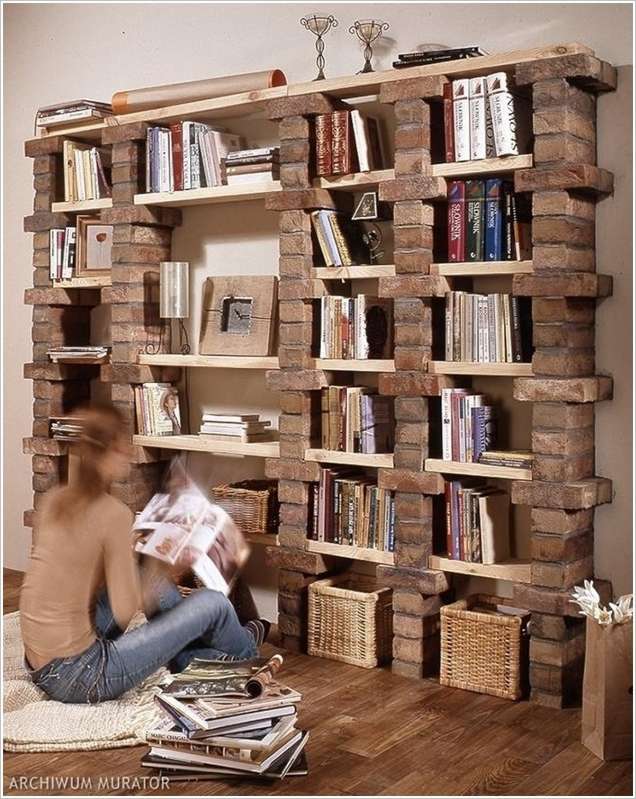 The advantage of this library is a very simple design that can be made
yourself near one of the walls of the apartment. The columns are made of high-strength (clinker) brick of manual molding of brown-olive color. They are kept on a clinker mortar and are additionally attached to the wall with steel anchors located in every fourth layer of the masonry. 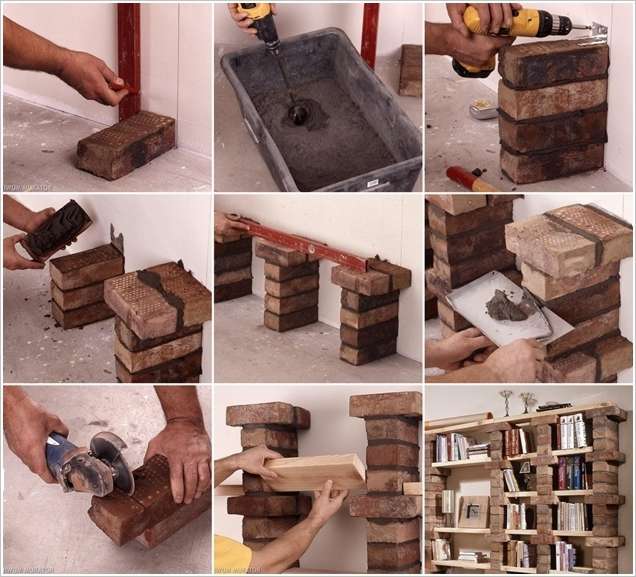 Wooden shelves are covered with a layer of colorless matte varnish. Thanks to this, they look natural and are protected from dirt.
Remove the flooring in the places where the posts will be installed so that it does not deform.
(See step-by-step photos with recommendations)


https://i.expert-h.com/en/polki/napolnaya-polka-svoimi-rukami-foto#sigFreeId51aeffa93f
do-it-yourself beer
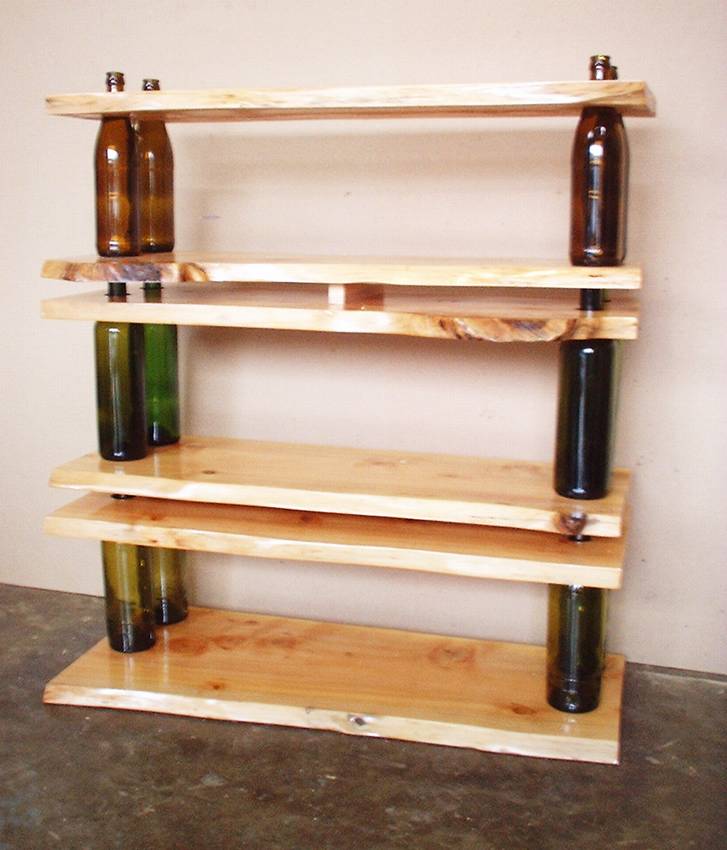 Let's look at how to make a floor shelf (rack) of beer glass bottles with your own hands. If you already have four beer bottles (or from champagne) and two boards, then consider that you have already done half the work. Of course, in addition to this, you still need inexpensive fasteners, which you can buy in almost any hardware store.
 Choose long-necked beer bottles.
Shelf boards are sanded and dark lacquered.
Surprisingly, such floor shelves made of glass bottles are durable because they can support the weight of an adult.
Having put one such shelf on another you will receive a rack from glass bottles.
See step-by-step photos of the master class:


https://i.expert-h.com/en/polki/napolnaya-polka-svoimi-rukami-foto#sigFreeIda97b865871
Great photo gallery
There are many options for floor shelves, some of which can be found in this collection. There are very interesting solutions, you can use something for your interior.


https://i.expert-h.com/en/polki/napolnaya-polka-svoimi-rukami-foto#sigFreeId5410b56597
= What can I make shelves of:
|
from wood
Example: DIY flower shelves 230 |
from metal pipes
Example: Do-it-yourself pipe shelves |
from PVC pipes |
|
from cardboard
Example: Cardboard box shelving unit |
from paper | plasterboard |
|
from glass
Example: Shelves in Art Nouveau style 180 photo do-it-yourself |
from old boxes
|
from pallets pallets |
| stainless steel | from glass | from old stairs |
| From bars |
from bottles
Example: Glass bottle shelves |
from snags and branches Example: Book shelf made of twigs and snags |
|
made of bricks
|
from newspapers
Example: Newspaper shelf |
From cans
Example: Do-it-yourself shelves in the kitchen: 456 photo drawings instructions |

= Methods of fastening shelves:
|
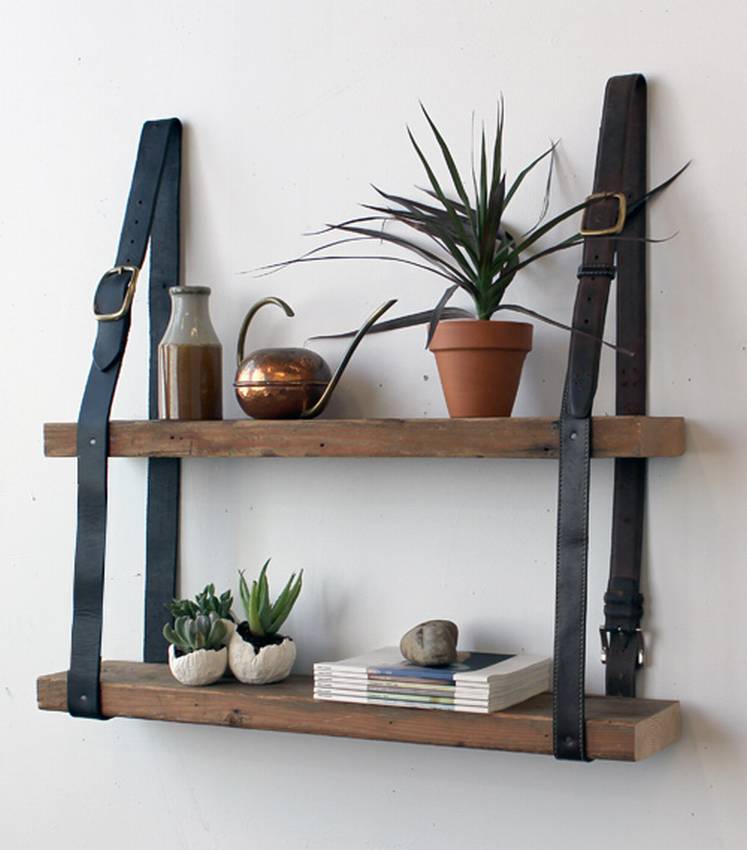
On the straps
Example: Shelves for books on belts |
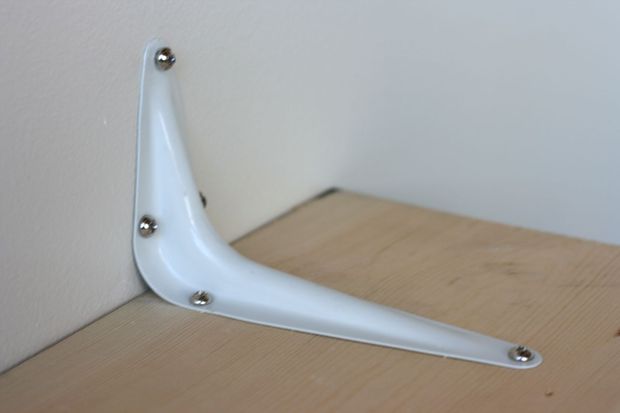
On brackets
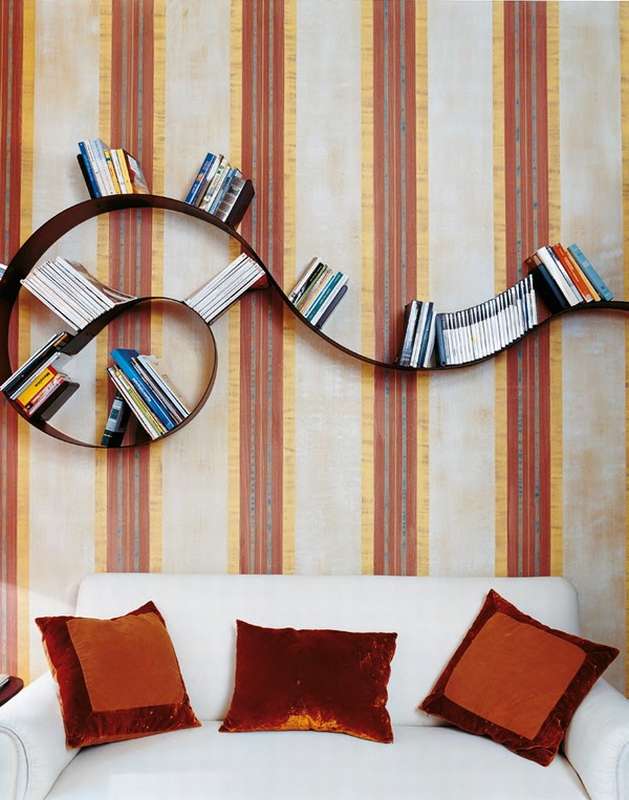
Example: Inverted bookshelf |
On hinges (hidden shelves) or articulated spiers
Example: Secret door - bookcase and shelfg |
| On the strings | On the ropes | On the pins |
|
On the clamps
Example: Rack of 3 pipes from floor to ceiling. |
On perforated rails | |
= What are the shelves:
|
Corner |
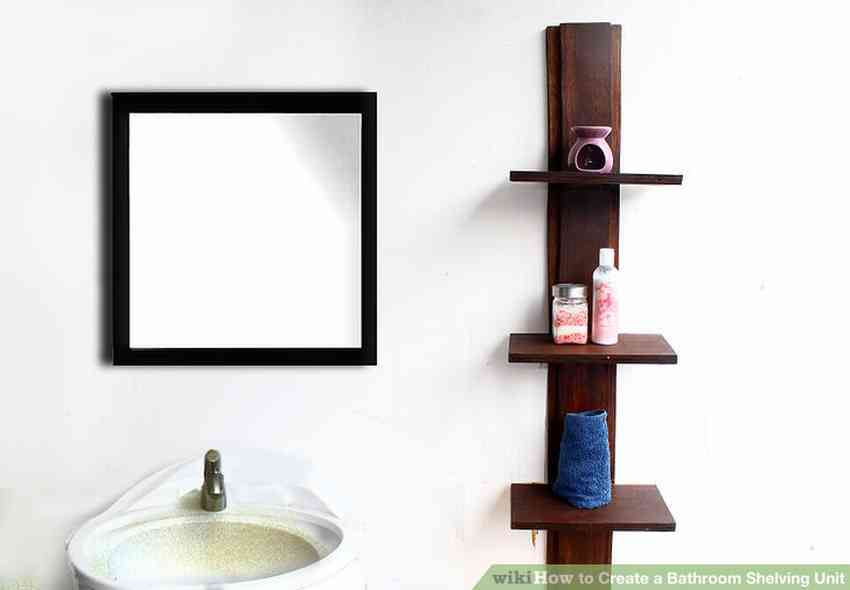
Wall mounted
Example: Wooden shelf for bathroomss |
Mounted
|
| Outboard |
Floor
Example: DIY shelf in 45 minutes |
Under the ceiling
|
|
Shelving
Example: Do-it-yourself pipe racks: 180 photos, instructions, diagrams |
Whatnot |
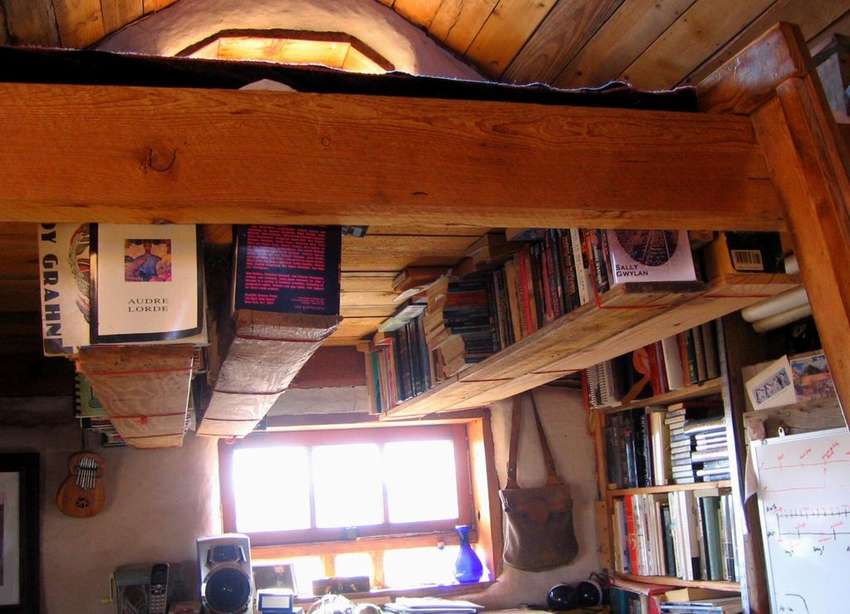
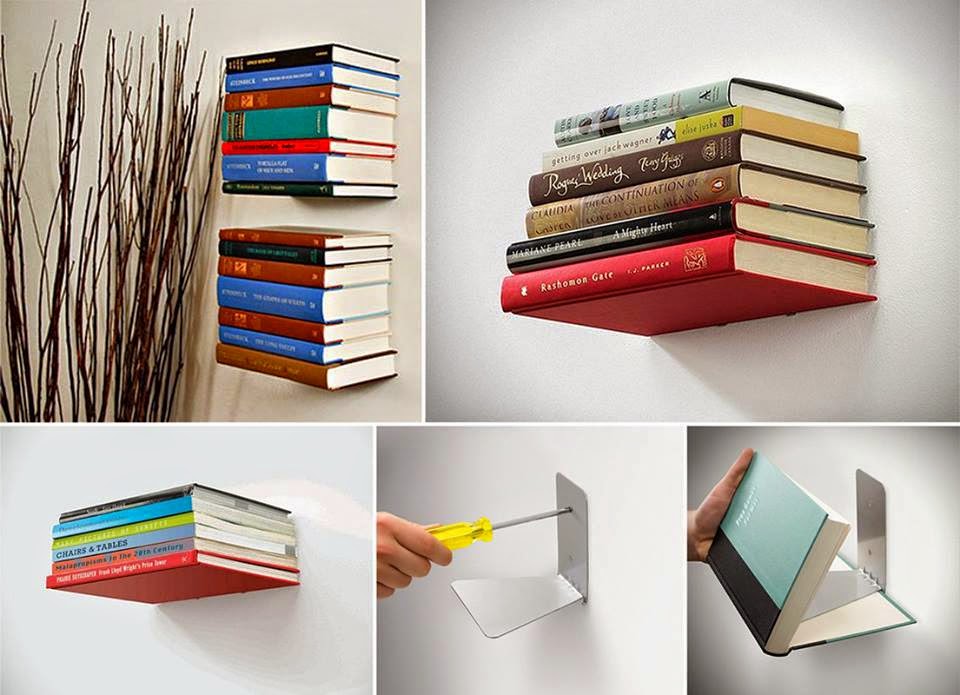
Shelf - Invisible
Example: Invisible bookshelf |
- Brick grill: 44 drawings, 18 projects + photos
- Collapsible barbecue: 50 drawings, 20 master classes +300 DIY photos
- ✿ Flowerbeds:> 34 turn-based master classes + photos (248 ideas) - do-it-yourself
- DIY sauna in the apartment: bathroom, balcony, storage room. Projects and photos
- Shelves in the bath with your own hands: +200 photo. Drawings of bench benches in the steam room