Do-it-yourself bookshelf 180 photos: drawings and step-by-step photos
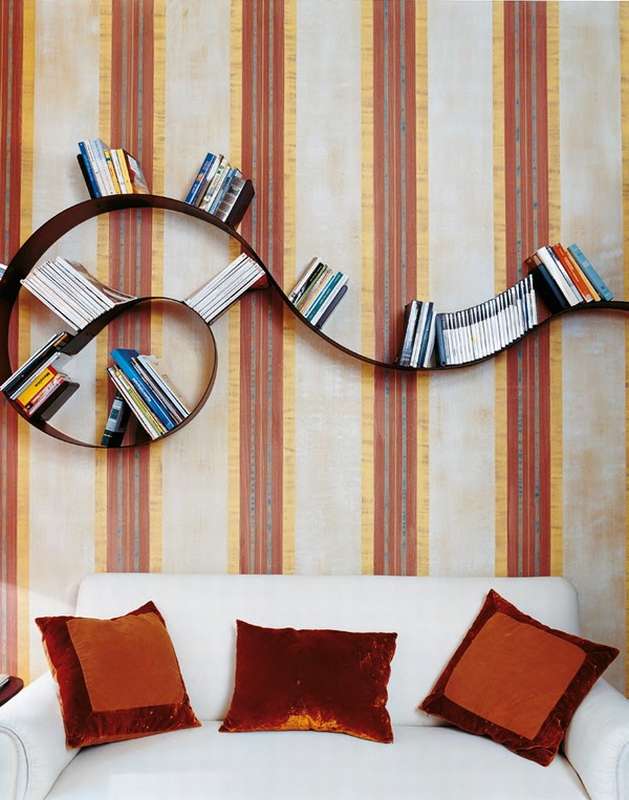
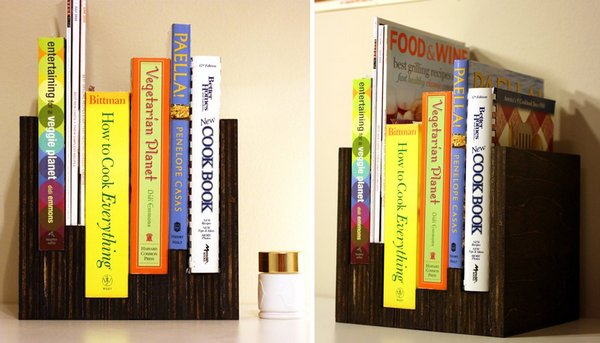
 Original bookshelf
Article menu:
(clickable)
- Wooden bookshelves 4 master classes
- Do-it-yourself cardboard shelves for books and newspapers
- 68 drawings of bookshelves
- DIY step-by-step photos of making bookshelves with your own hands
- Shelves for books from pipes 40 photos
- The 5 most popular pipe shelves and bookcases
- Shelves for books on belts
- Bookshelves from drawers 3 options
- Shelves for books made of bricks and boards
- ... of glass bottles
- 230 photos of bookshelves, large photo gallery
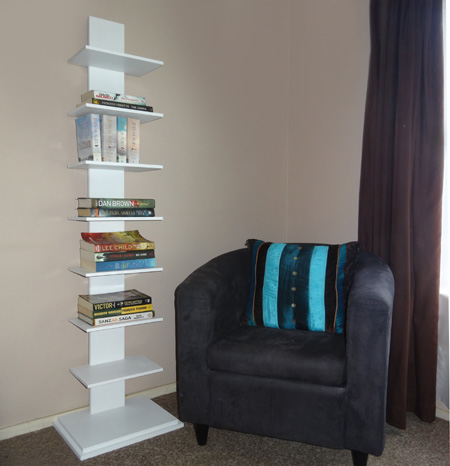
Wooden bookshelves
Sliding bookcase


https://i.expert-h.com/en/polki/knizhnaya-polka#sigFreeIdc43f821595
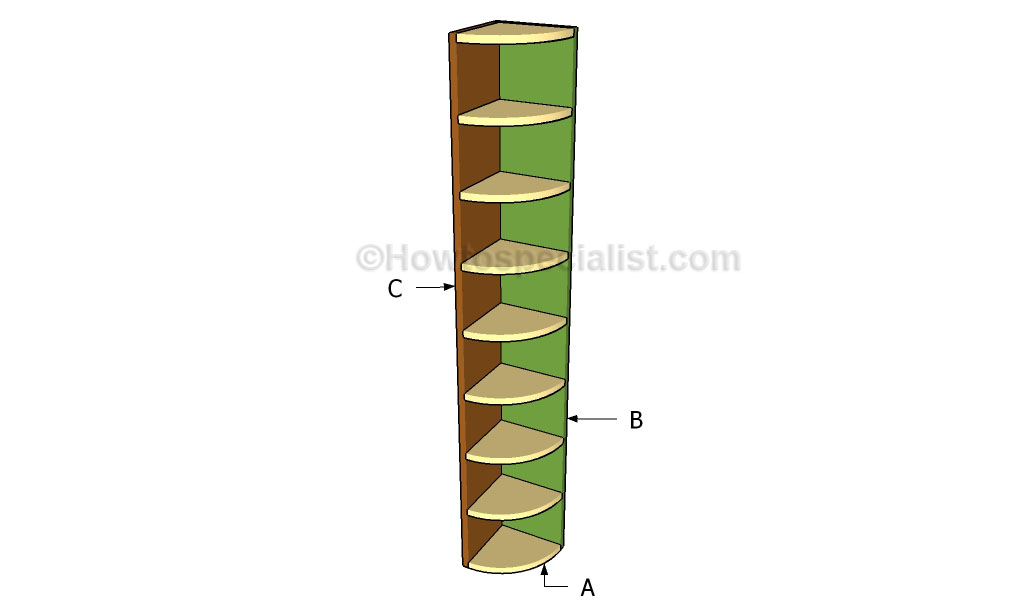
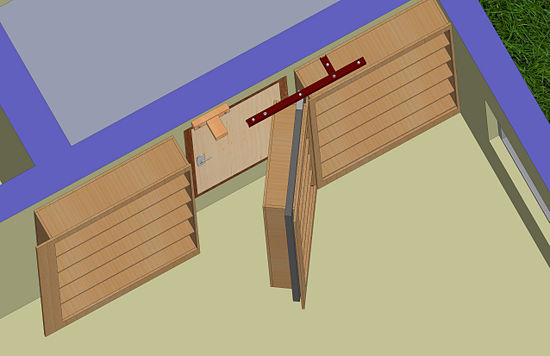
Corner bookshelf floor (cabinet)
(do it yourself in 2 hours !!! drawings and step-by-step photos of manufacturing)
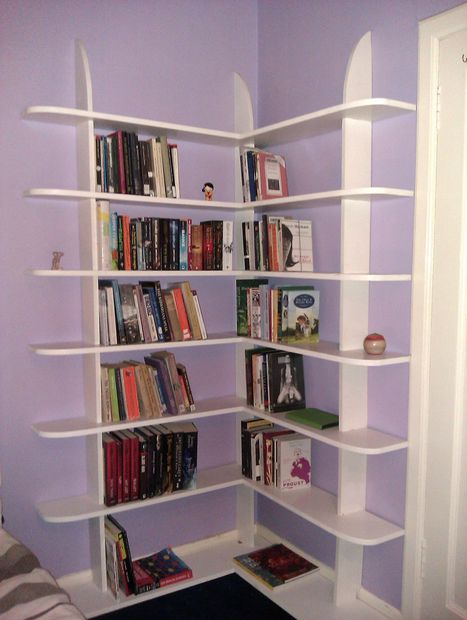 The author claims that he managed to make all the details of the shelf and assemble the entire structure in 2 hours. The rest of the time was spent on painting, varnishing and drying.
The very design of such a shelf of the shelf suggests that no nails will be needed to make it. Importantso that all the shelves sit very tightly in their places, so that the shelf does not swing. If the connecting holes have failed and some shelves are loose in their places, then the shelves in these places can be screwed on, or, as the author advises, just drive pieces and pieces of wood into the grooves.
We also recommend that you do not forget to screw the shelf to the wall so that it does not fall inadvertently)))


https://i.expert-h.com/en/polki/knizhnaya-polka#sigFreeId03d06dd766
Do-it-yourself floor shelf for books in 45 minutes !!!
Bookshelf RAINBOW
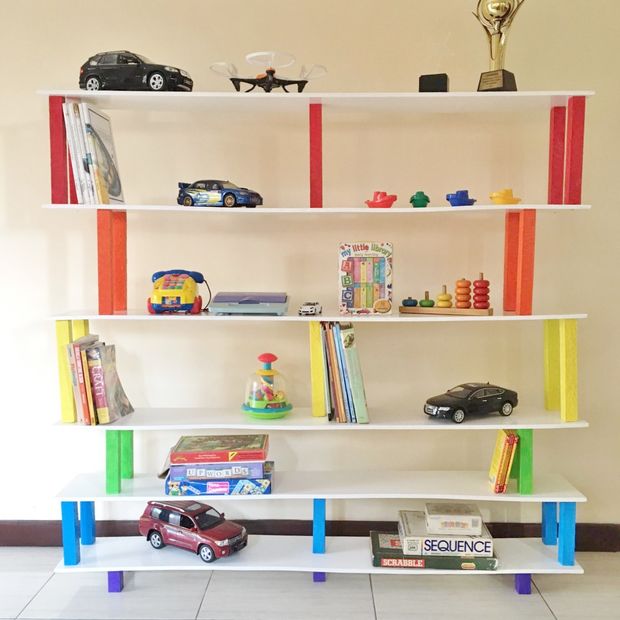
The author claims that it took him no more than 45 minutes to create this shelf. All the rest of the time was spent on painting and polishing the boards and bars. The shelf is made in rainbow colors.
Look below for step-by-step photos of the author’s photo master class.


https://i.expert-h.com/en/polki/knizhnaya-polka#sigFreeId243077fd4c
The author suggested a good way to give the texture to the columns, for this they should be painted, then sprinkled with sand and painted again.
 Floor shelf for books
A small apartment does not always have a place for a bookcase, so often a good alternative is DIY bookshelf. Of course, the options may be different, but this stylish and practical shelf has its advantages. Firstly her easy to assemble, make sure of this by looking at the step-by-step photos of the master class, secondly, the design looks light and airy, it fits perfectly into any interior and then, this shelf is easier relocate.


https://i.expert-h.com/en/polki/knizhnaya-polka#sigFreeIdec7e5110d1
 Simple do-it-yourself shelf for a nursery
Functional and at the same time you can make a simple shelf for a children's room with your own hands. It can be installed above a table or bed, it will be a great place to store children's toys and other things. It can also be used for other rooms, such as in the hallway and even in the bathroom. When installing, place part of the trimmer in the place where you will drill holes to reduce the number of chips on the underside.


https://i.expert-h.com/en/polki/knizhnaya-polka#sigFreeId8556c9af0f
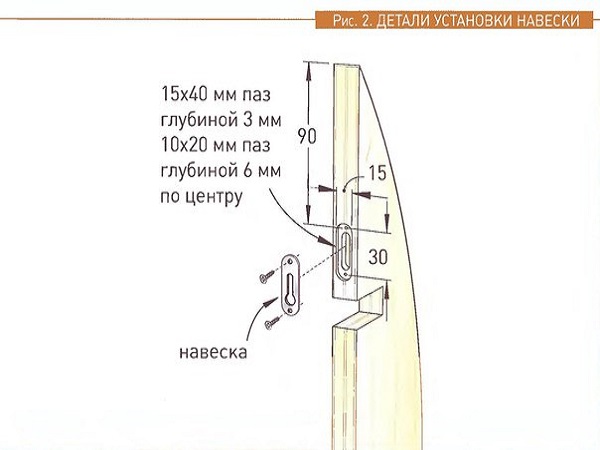
Shelf made of plywood (MDF) for books and souvenirs. Drawing scheme
 A bookshelf made of plywood, which you can easily make with your own hands according to the drawings indicated below.
1) We cut 5 blanks of the shelf from plywood (see drawing). To do this, it is convenient to make a template from hardboard or durable cardboard and circle it on plywood, and then cut out the details.
2 ) On vertical racks at the back, we outline the location of the hinges and with a groove cutter (chisel, etc.), carefully cut out the grooves under them, constantly checking the accuracy of their location and the compliance with the metal hinges.
3) The outer ends of the plywood are glued with an edge band of veneer.
 4) We assemble the entire structure with PVA glue and self-tapping screws, first check to see if the angle is 90 degrees.
5) We cover our hinged shelves with stain or varnish and screw in the hinges.
This shelf will look great also from solid pine or other wood species. The main interest and desire.
Photo from Wood Magazine
Glowing !!! wooden shelf
Author idea designer Matt Brown
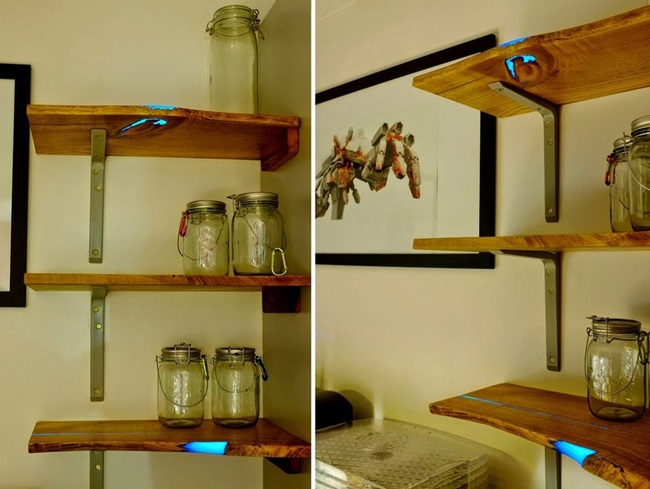 To make such a magical glowing bookshelf with your own hands you will need embossed boards (with knots, notches, cracks of an unusual shape) and a mixture of polyester resins and fluorescent, luminescent pigments, you can buy on Ali.aliexpress.com/w/wholesale-pigment -resin.html
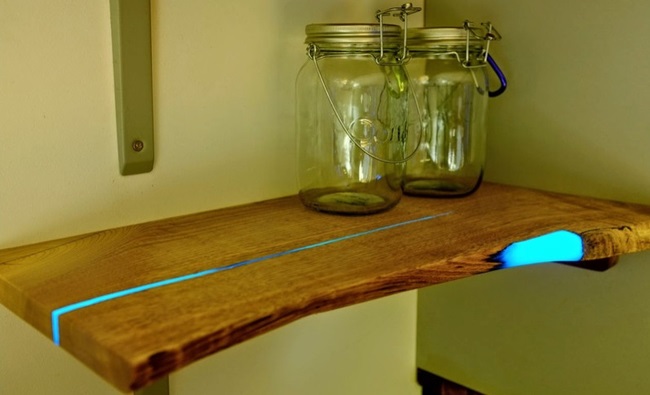 Pour the mixture into the cracks and seal the cracks with tape. When pouring, use the level so that the shelf is completely horizontal when pouring. Also, when pouring, make sure that the mixture does not spill over the edges of the cracks.
The next step is grinding. When everything dries, you can remove the tape and gently grind the surface.
Having finished grinding, cover the shelf with varnish-fixer in 8-9 layers
In the dark, the shelf will shine!


https://i.expert-h.com/en/polki/knizhnaya-polka#sigFreeIdb978e70f07
If you distribute shelves with such luminous elements throughout the room, you get a beautiful planetarium.
Large bookcase made of wood
 With these step-by-step photos, you can easily make such a huge and simple wooden bookcase with your own hands, which is suitable for a garage, for home, for a store, for storing toys, for flowers, for books and for storing old unnecessary things in the back room


https://i.expert-h.com/en/polki/knizhnaya-polka#sigFreeId7384f4c4a7
Corner shelf for books with your own hands in the hallway.
 Let's see how to make a simple wooden corner shelf with rounded shelves to your apartment. This shelf is suitable for books, magazines, for shoes in the hallway, for soap accessories in the bathroom, for tools in the garage and also for kitchen utensils in the kitchen.


https://i.expert-h.com/en/polki/knizhnaya-polka#sigFreeId996a0dbe9f
Do-it-yourself portable bookcase
 A great option for a simple wooden shelf for books, which you can easily make with your own hands from wood. This shelf has a large surface area, which means you can put more of your shoes on it. Also, this shelf is perfect for shoes, books, tools, flowers and other things. The shelf is characterized by high mobility, which means that you can put it at any time to where it may suddenly be needed.


https://i.expert-h.com/en/polki/knizhnaya-polka#sigFreeIdf176e69125
Shelf bench for books and magazines
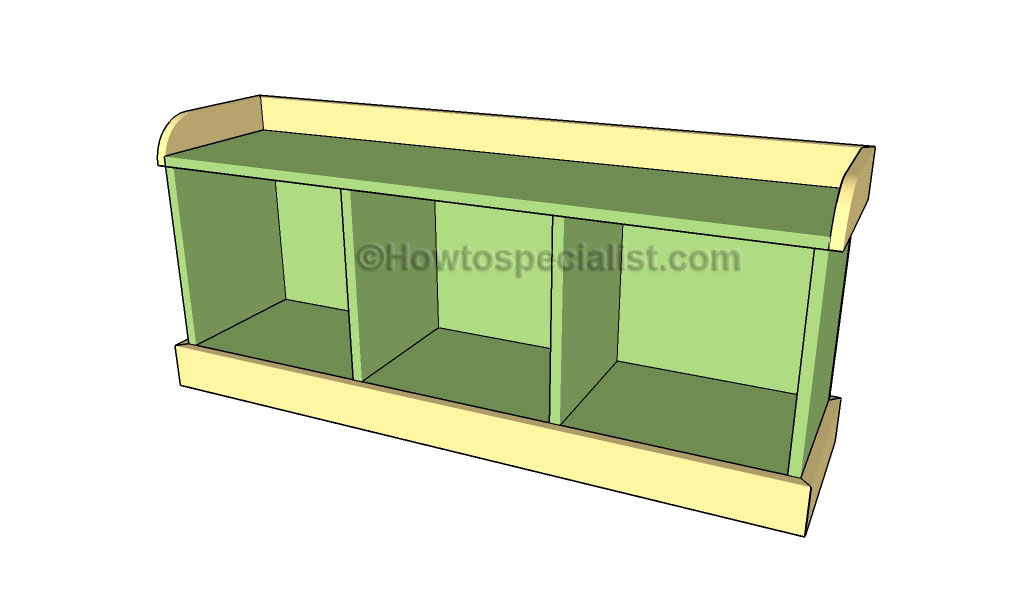 It’s easy for you to make such a simple wooden shelf in the hallway with your own hands. See step-by-step photos below on how to do this. Shelf bench fit in the hallway for shoes, in the bathroom, in the nursery for toys, in the room for books, magazines and newspapers.


https://i.expert-h.com/en/polki/knizhnaya-polka#sigFreeIdb70ec56cdd
Folding wall shelf
 Shown here how to make a folding shelf on the wall for books. The structure is made of wood panels arranged horizontally, like a regular shelf, but if necessary, they can be rotated 90 ° vertically. At the expense of practicality and functionality, you can bet, but it’s cool and takes up little space. In addition, no large costs are required, the author made this folding shelf using two sheets of laminated plywood, which used to be part of the old table. In general, the idea is this.
A folding shelf on the wall consists of long planks (which work like shelves), alternating with short planks (which work as supports).

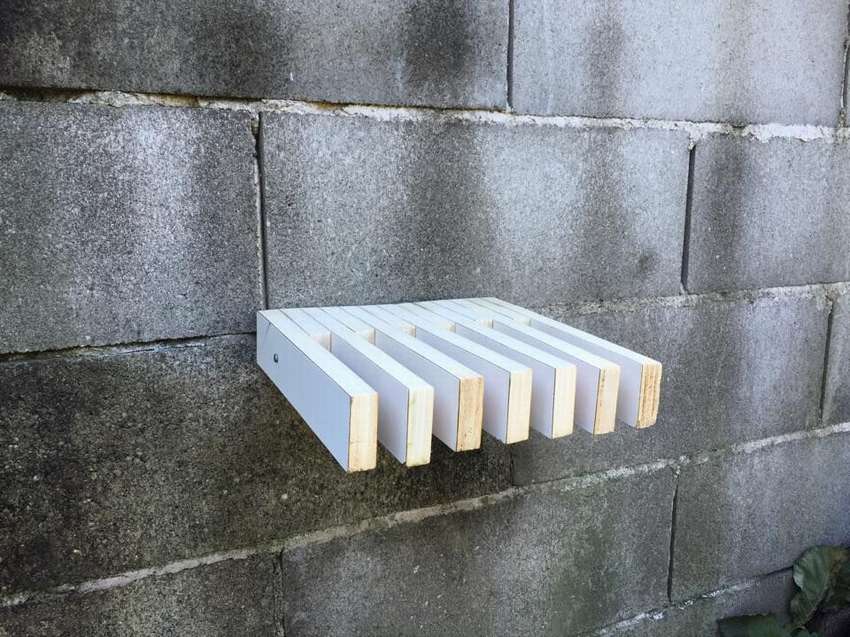 Photos of two positions. At the beginning of each long part there is a triangle, this is a stop block. It is cut at an angle of 45 °, and allows the shelf to fold vertically and lock in a horizontal position. Stop blocks alternate with short parts that serve as a support. They allow long parts to rotate freely 90 °, staying in place and not clinging to other parts.
Take 2 cm thick laminated plywood. To make a shelf (26 cm x 25 cm) x 5 cm from 2 cm thick laminated plywood you will need 13 parts:
- 7x (26 cm x 5 cm) for shelf and retainer blocks
- 6x (10 cm x 5 cm) for support legs
To smoothly cut all the parts, the author marked all the pieces and fastened the laminated plywood to the workbench. The photo shows a shear test done before cutting plywood to make sure the measurements are correct.


https://i.expert-h.com/en/polki/knizhnaya-polka#sigFreeId3a95533ed4
The holes for the rod are located at half height (2.5 cm) and at a distance of 7.5 cm on one side. To mark them in the right place, take the bar and make two small ones 5 cm and 10 cm above and on the lower edges.
- Install the stop block.
- Drill holes in the remaining trims.
Note. If you use a stop block, you can quickly make many holes in one place in different areas, measuring and marking only one of them.
How to install the hinge
The hinge allows you to connect the support strips with long rails so that they can rotate up and down 90 °. If you do not have a threaded rod, you can use the handle of the bucket as a hinge. Just straighten it using a vise.
Stop blocks are the most important part of the shelf. To make them, saw off each of the 7 long rails at an angle of 45 °. You can do it as an author, holding all 7 pieces, to evenly cut in the same place.
Note. Be sure to mark the number on both parts (shelf and triangle) to quickly find the part you need.
Then glue the stop blocks to the support rails. To do this, glue the triangles, alternating them into shorter pieces. Apply glue, and then glue the pieces in place, covering the laminated surfaces with tape. Now you can put the rod in place and check how it works.
In the photographs, look at the movements that each of the 7 long slats should make. They should begin with the stop of the locking block, and stop vertically against the edge of the triangle. Once the movement is perfect, you can deploy the hinge. Cut off the excess, and then use a ball-head hammer to smooth the end. Finish the surface with a grinder.
To hang up, you can use two invisible wall sockets.
- Mark the center on the side of the second and fourth support and drill holes.
- Take a drill for walls of the same size, and make two holes in the wall at a distance of 11.5 cm.
- Insert the plastic spring studs into the wall with a hammer, and then screw in the hexagonal rods.
- Finally, push the shelf onto the invisible wall sockets until they are fully inserted into the support rails.
You can use strong glue, such as epoxy, to make the fastener stronger, but if the holes are the right size, glue is not needed.
Materials:
- laminated plywood
- threaded rod
- 2 wall sockets
Tools:
- pencil and ruler
- jigsaw
- Sander
- drill
- clamps


https://i.expert-h.com/en/polki/knizhnaya-polka#sigFreeIdaba449941e
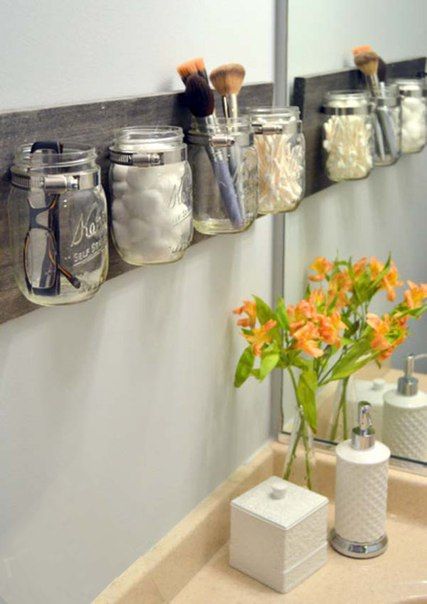
Wooden shelf for bathroom books
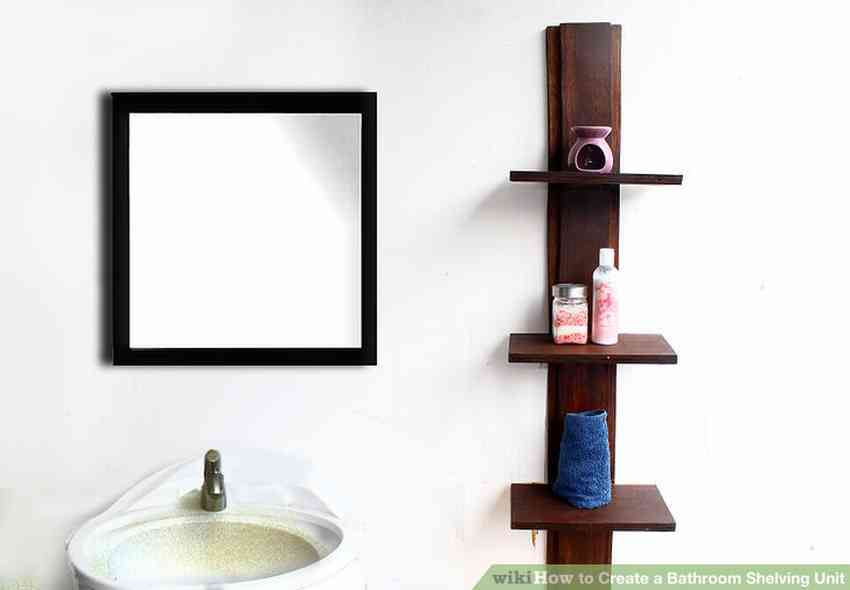 You can easily make this booked wooden shelf in the bathroom with your own hands. All you need is a tree and self-tapping screws. The shelf will perfectly fit into any interior of the bathroom.
Tips:
- To increase the shelf life in a humid room environment, we recommend covering the top surface of the boards with a self-adhesive film.
- Also, to increase the functionality of the shelf, the author of the photo advises attaching homemade hooks to the bottom of the shelf so that you can hang jewelry, manicure scissors, hair accessories and much more.


https://i.expert-h.com/en/polki/knizhnaya-polka#sigFreeIdbc0afb530c
Wooden corner shelf in a semicircle for books
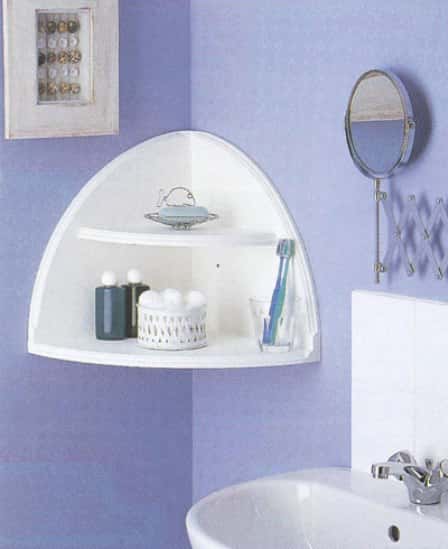
To make such a bookshelf a semicircle in a corner with your own hands, you need a milling machine and a piece of MDF.
To give aesthetic, we recommend that you stick special tape on the ends, this is done with an iron)))
Step-by-step photo of manufacture:


https://i.expert-h.com/en/polki/knizhnaya-polka#sigFreeId539f4e1fd3
See
68 drawings of book shelves
mounted made of wood and plywood for books, do it yourself


https://i.expert-h.com/en/polki/knizhnaya-polka#sigFreeId8067cde696
Shelves for books made of cardboard and newspapers
Shelf rack cardboard boxes do it yourself step by step
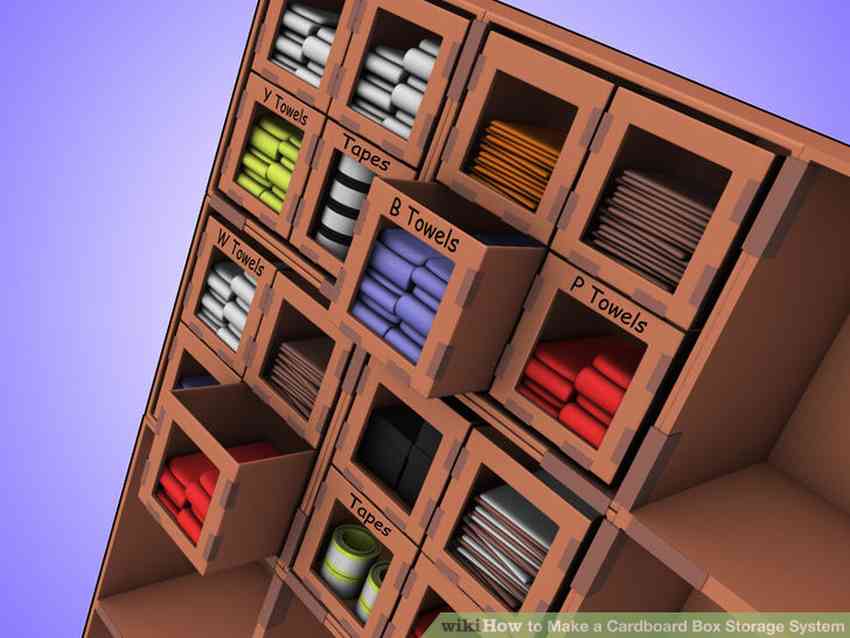 Look at the master class on how to make this bookcase on the photo above.
Minuses:
- not very reliable
- not tight
Pros:
- cheap
- simply
In this design, two types of boxes are used.
- these are the large shelves that are made
- it's narrow of which drawers are made
All boxes are fastened with ordinary tape.


https://i.expert-h.com/en/polki/knizhnaya-polka#sigFreeIdc3a36632e6
Tips:
- light items should be placed on the upper shelves, larger and heavier ones on the lower.
- when you cut large boxes, as shown in the pictures, then from these scraps you can make additional shelves for small items inside the shelves, for this you just need to make cuts in the trim and connect the trim with a grill.
- Also, these scraps can be used as additional supports inside the boxes, in problem areas.
Newspaper shelf
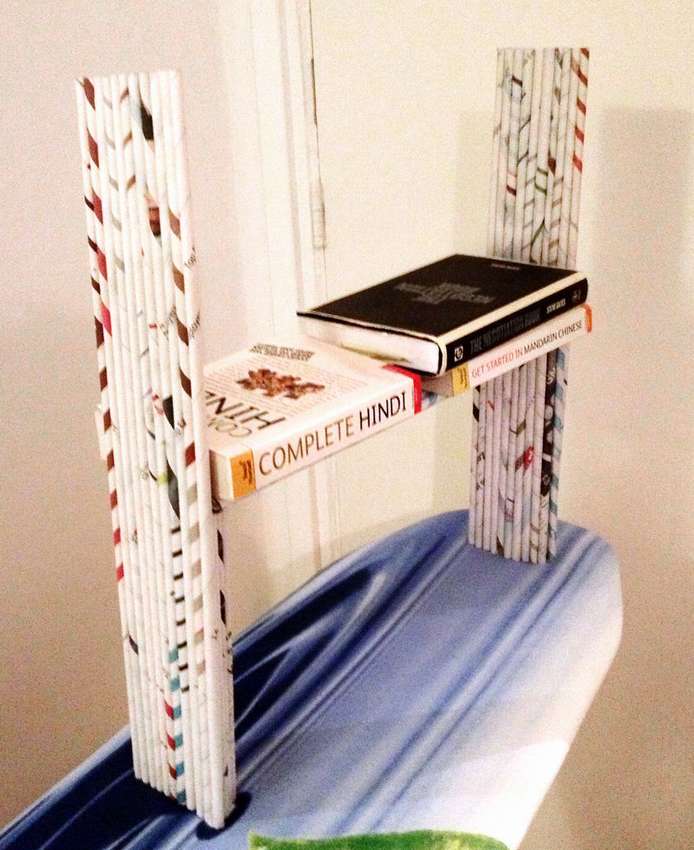 Very simple and at the same time strong shelf for books from newspapers. This shelf will appeal to people watching the environment, because here things that are out of use are reused, as well as this shelf is completely biodegradable.
The tubes rolled up from newspapers turn out to be strong enough to make FURNITURE from them !!!
In total, you will need approximately 60-70 sheets of newspapers or 60-70 tubes that can be made while watching a movie.
See the walkthrough for creating such a shelf below.


https://i.expert-h.com/en/polki/knizhnaya-polka#sigFreeId6e3cec0e8f
Shelves for books on belts
Bookshelf on belts do it yourself
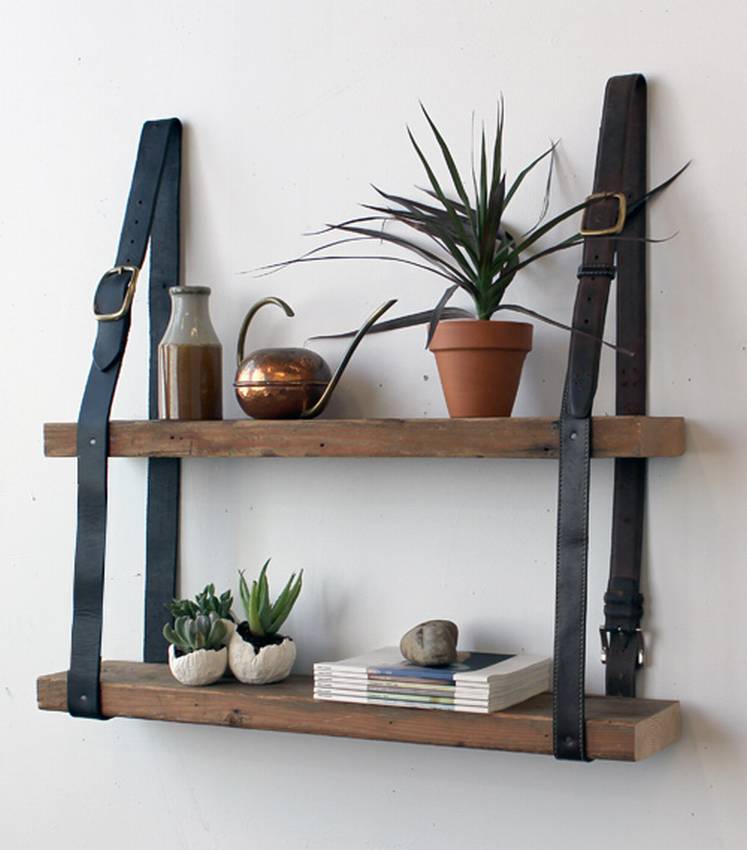
To make such a shelf you will need only TWO BOARDS AND TWO LEATHER BELTS !!!
The shelf fits perfectly into the "patsansky" room)))
The shelf is suitable for books, flowers, toys, all sorts of trinkets, for photographs and spices in the kitchen. It can be used as a bird feeder on the balcony. In general, the use of this shelf is limited only by your imagination.
See the step-by-step photo of the manufacture:


https://i.expert-h.com/en/polki/knizhnaya-polka#sigFreeId0c1d8152ce
Here another option hanging shelves on belts


https://i.expert-h.com/en/polki/knizhnaya-polka#sigFreeIdef688b99c5
Pendant bookshelf
To make this shelf from the bars you need, as you probably guessed, the bars and just two ordinary wall mounts. The bars strung on a rope resemble a suspension bridge.
What's the point of this? The practical benefits, of course, are not very many, but First of all, books do not fall, but Secondlyjust cool. How to do it, shown in step-by-step photos


https://i.expert-h.com/en/polki/knizhnaya-polka#sigFreeId9e0b19634c
Secret door - cupboard and bookshelf
 Let's see how to make a secret door in an apartment, for example, in a closet, in the dressing room, in the wall.
If you want to make a secret room, or to hide some unsightly part of the apartment, in order to make a more aesthetic look, then follow the instructions below in step-by-step photos.
Do not use loops because your the design must withstand up to 450 kg! The author of the photo advises using bolts as pivot pins to be welded in the frame.
IMPORTANT fix the frame vertically, for this you should use a plumb line. First attach the top mount to the ceiling, and then plumb the bottom mount (see photo).
See the step-by-step photo of the manufacture:


https://i.expert-h.com/en/polki/knizhnaya-polka#sigFreeIdb8ae2548ea
Do not forget to install wooden stop above the door (see photo). Attach a magnet to this stop to keep the door pressed against the wall. Be careful when choosing a magnet, it should attract not too much and not too weak.
IMPORTANT!!!: according to fire safety rules: all entrances to rooms in which stoves or gas stoves and gas pipes are located should be clearly visible.
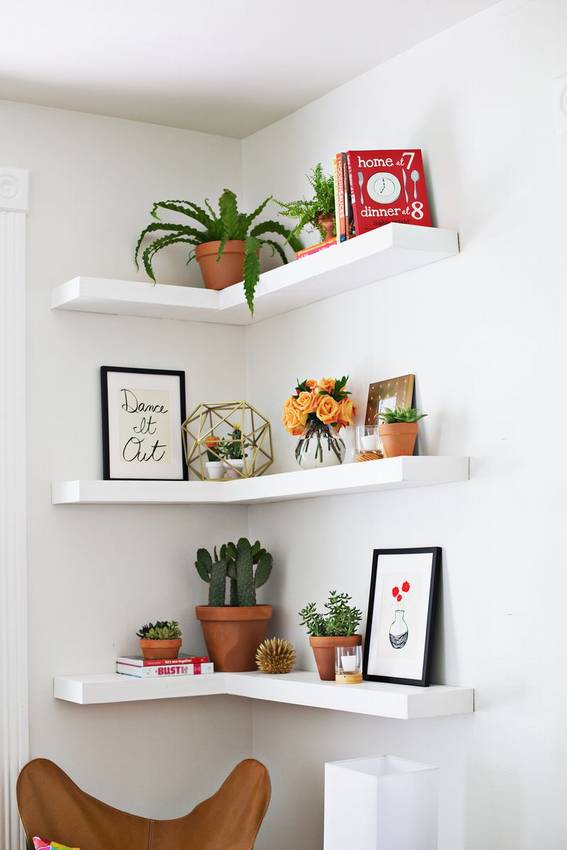 Corner soaring shelves for books on the wall
Look at an example of a simple bookcase hanging shelf at an angle (“floating” or “flying”, as they are called abroad), which you can do with your own hands.
"These shelves are called soaring because you can't see the mounts."
See below for step-by-step photos of the master class


https://i.expert-h.com/en/polki/knizhnaya-polka#sigFreeIddf8b5eaf65
DIY Corner Bookshelf
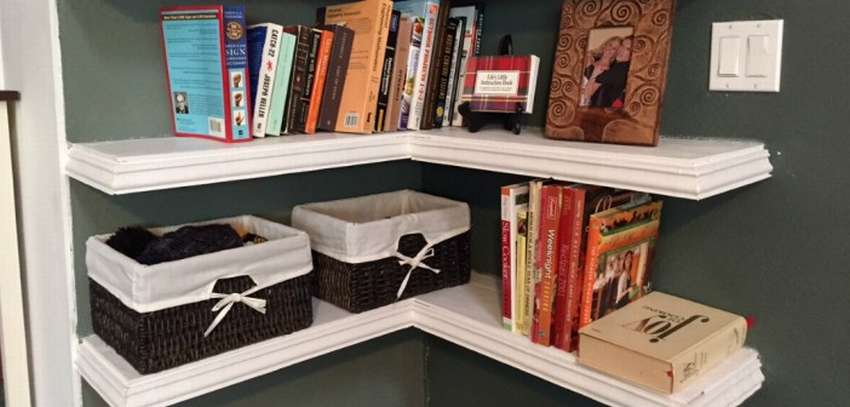 If you have a free corner in the living room or bedroom, you can fill it in, making a simple corner bookshelf your own handsand. Here is an example Soaring shelfwhen the mounts are completely hidden. There is nothing complicated here, but maximum accuracy is required when attaching. To adjust the height, the author used strips of cardboard. You can give any shape to the shelf, either as in the photo, with curly edges, if you prefer the modern style, you can make simple bevels, sand and paint. Look at the master class in step-by-step photos, the process is shown from scratch, starting with the manufacture of blanks.


https://i.expert-h.com/en/polki/knizhnaya-polka#sigFreeId6e83ac9ad3
 Soaring shelf on the wall
A great bookshelf for anyone looking for original design solutions. Production does not take much time, and it will cost inexpensively. The idea is to fix a wooden block with guides on which a plywood frame box is put on the wall. The most reliable way to fasten the support bar is to hammer the anchor into the wall, and then use threaded rods. To achieve greater accuracy, make a cardboard template, which will repeat the contour of the back of the shelf, then you definitely will not lose with the holes.


https://i.expert-h.com/en/polki/knizhnaya-polka#sigFreeIdf70f7969e1
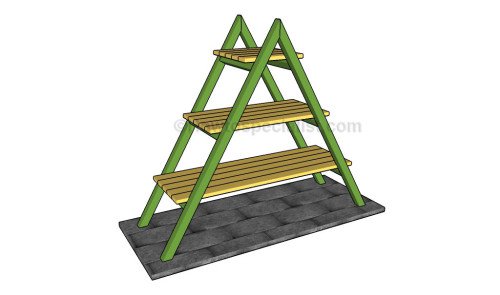
Original transformer bookshelf
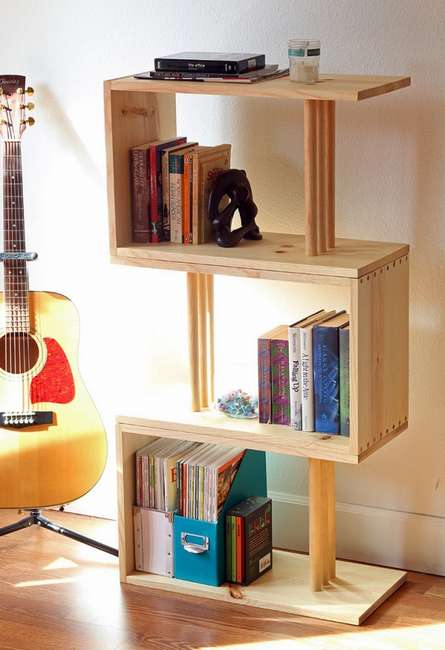
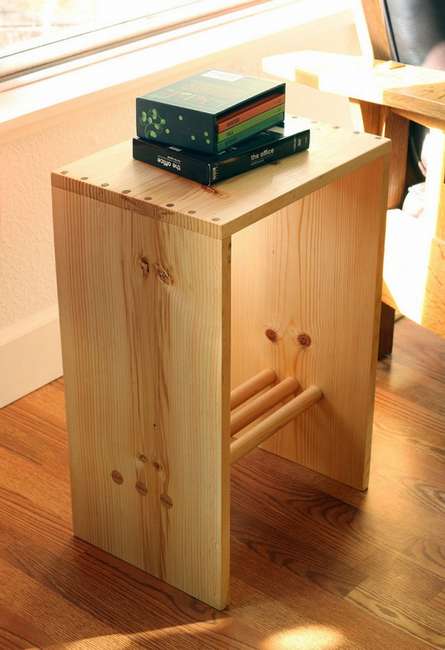
Why the original and why the transformer? Because this the floor bookshelf is not quite a shelf, it consists of three stools or, if you like, tables folded sideways on top of one another. Everything is simple and tasteful. In general, you need to make these three separate parts, of course, and more, you get a real bookcase. True, the construction is not very reliable, if there are children in the house, then you need to come up with a way how to fix this whole thing. In general, if you liked the idea, see the master class in step-by-step photos.


https://i.expert-h.com/en/polki/knizhnaya-polka#sigFreeIdf250dc7d38
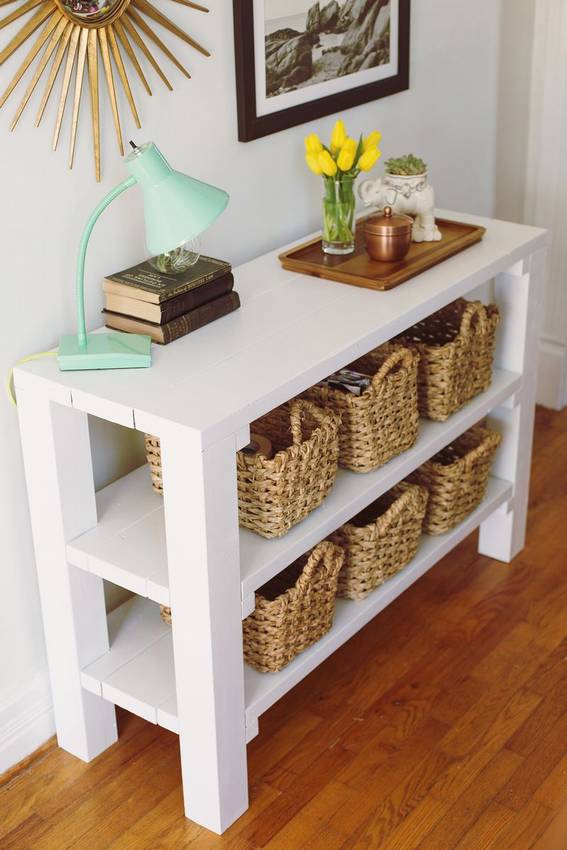 Floor shelf or table with shelves in the kitchen
Most likely this option relates more to tables than to shelves. But still, we placed this model here, because We hope that this option of personal organization will be interesting to you, and most importantly useful, because when arranging a home, one must keep in mind all the options !!!
See below for step-by-step photos of the master class


https://i.expert-h.com/en/polki/knizhnaya-polka#sigFreeId3b74b28411
Bookshelf CACHE
(with secret compartment)
Very Secret Bookshelf)))
The author of the photo jcapili bought a dressing table from Ikea decided to make it secret compartment hidden behind books.
He took a wooden box and attached to it from below the runners, so that the box could easily slide on the shelf
Then he attached books to the front of the drawer (see the photo below for the method of attachment).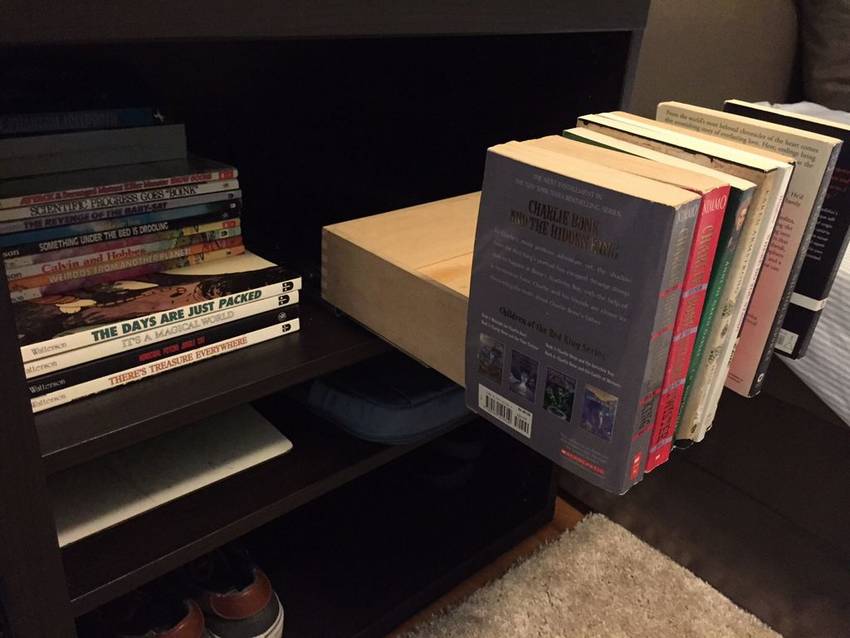
TIP: it is advisable to take for this boring books that no one would think to read;)
As you can see in 19 photos, the master cut out the core from books, this was done in order to facilitate the design, because According to jcapili, books coolly outweigh the drawer when pulled out.
This design can be converted to a shelf with a secret compartment for storing weapons.
ATTENTION!!! Use a sprayer, as when cutting and drilling books, an unusually large amount of fine paper dust is formed, which is very easy to inhale.
Also when drilling need to hold books tight, because if the sheets of the book are pressed against each other loosely, paper chips will accumulate from the drill between the sheets, which will significantly increase the volume of books.
See step-by-step photos of manufacturing
bookshelf with secret compartment drawer


https://i.expert-h.com/en/polki/knizhnaya-polka#sigFreeId2a36bc3982
Another option "How to make a cache from a book with your own hands"
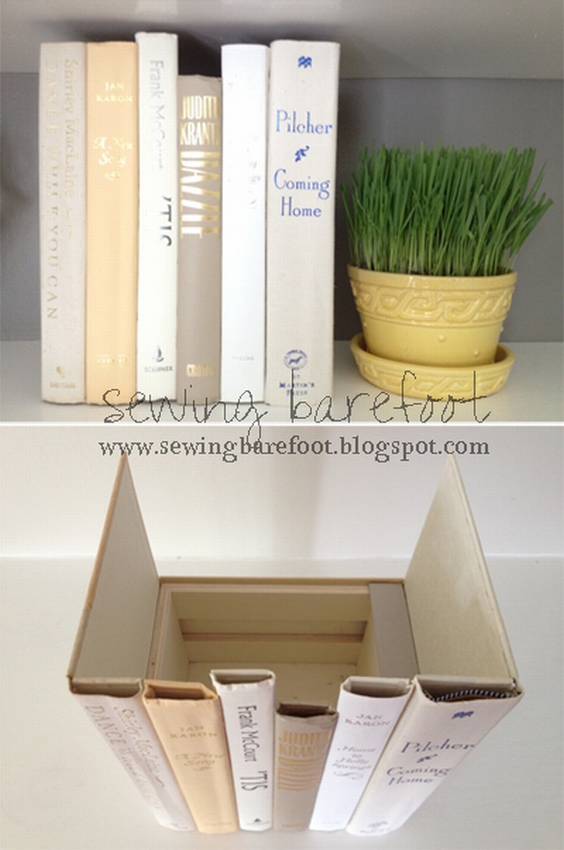


https://i.expert-h.com/en/polki/knizhnaya-polka#sigFreeIddacfbf9ff4
A few more photos of the options for such hiding places


https://i.expert-h.com/en/polki/knizhnaya-polka#sigFreeIdc3c9be7300
Corner bookshelf LED backlit
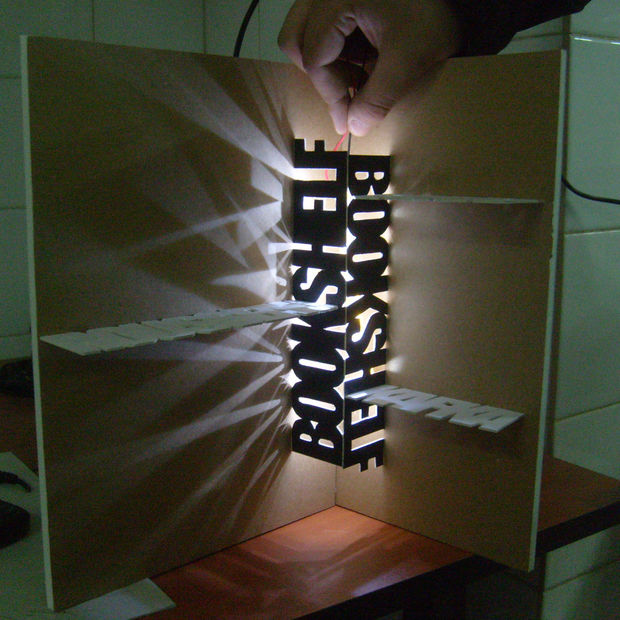 Such a shelf will create a cozy and welcoming atmosphere in your room.
You can cut the shelves yourself, or you can simply order at the nearest furniture factory. Just enter in the search the query "sawed chipboard by the size of the customer" and Yandex will give you those companies that are engaged in this. Just say what you want and they will cut everything for you in the best possible way, it will not cost much. Cheaper than your time for drinking!
BUT, we advise you to responsibly approach the choice of FONT, it should be so bold that the letters have as empty space as possible - so beautiful.
After you fasten the central boards perpendicularly, it will be possible to determine the markings for the LED strip so that the light is distributed evenly. This is nothing complicated, just do not miss this moment.
The central boards (angular) should be painted only on the outside, so that the inside retains its reflectivity.
Step-by-step photo of manufacture:


https://i.expert-h.com/en/polki/knizhnaya-polka#sigFreeIdb4ed0e4d23
Do-it-yourself invisible bookshelf (3 variants)
See below a step-by-step photo of the simplest invisible bookshelf (no comment)
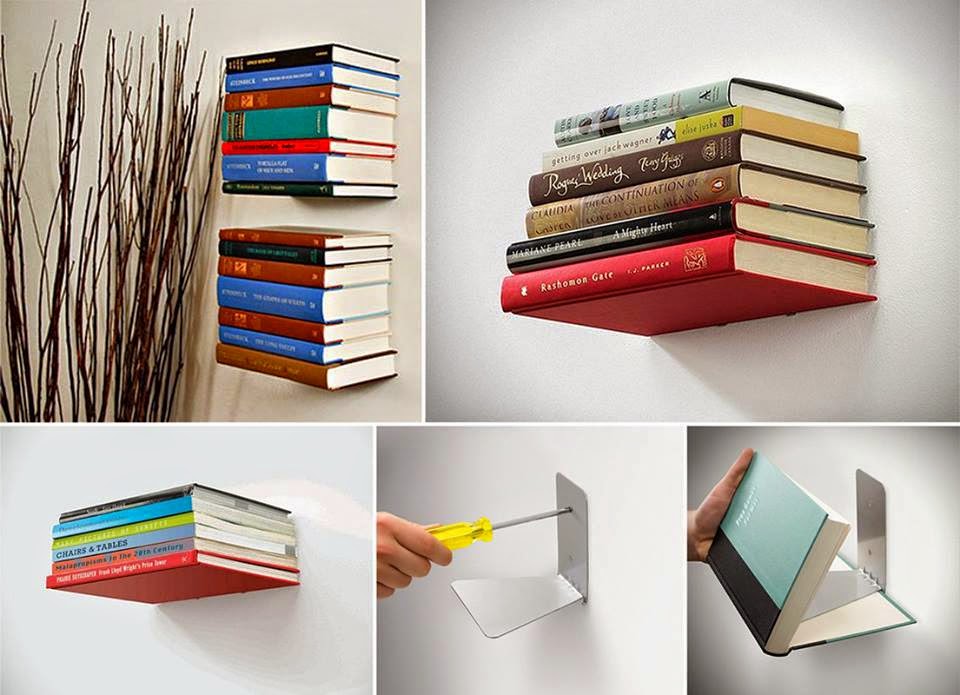
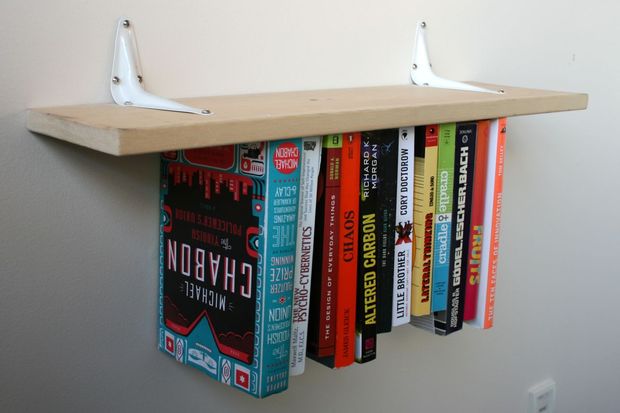
Invisible shelf on homemade brackets
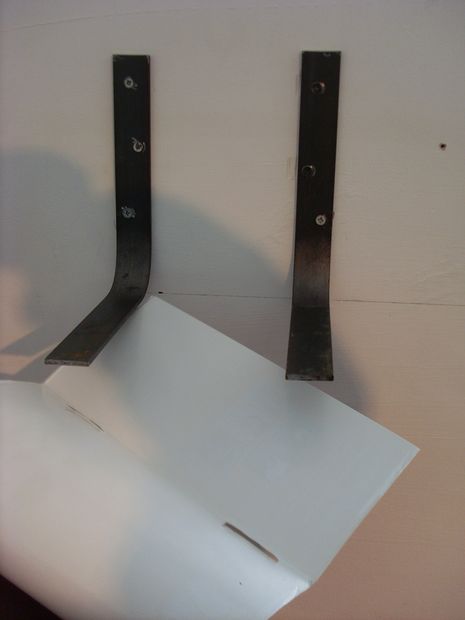
Brackets for an invisible shelf can be made with your own hands very simply. We take a strip of steel, which in strength does not bend under the weight of books. Bend the strip into the bracket, drill holesfor wall mounting. We cut our bracket and the brackets are ready)))
In the photo, the author used a large book with a dust jacket for foundation - this is a great idea!, which will help to dispense with the glue, which is usually necessary for fixing the bottom cover of the book.


https://i.expert-h.com/en/polki/knizhnaya-polka#sigFreeIdd7c9342c22
Invisible bookshelf option from purchased brackets
Unlike the previous version of the invisibility shelf, here we will use brackets that can be bought at almost any nearby hardware store. There is nothing complicated in the creation, just look at the step by step photos of the two options below.


https://i.expert-h.com/en/polki/knizhnaya-polka#sigFreeId284f83ef1f
Inverted bookshelf
(Inverted Bookshelf)
 The utility coefficient of this shelf is 2 times larger than a conventional shelf, because not only the top surface of the shelf is used, BUT AND THE BOTTOM side !!! We simply fasten the gum of a given length with a stapler and fix the books with these gum.


https://i.expert-h.com/en/polki/knizhnaya-polka#sigFreeId103fff7f94
Plywood book stand
For such a stand you will need many small pieces cut from thick plywood. You can use and prosperity, it does not matter, the main thing is the idea itself. Then just glue these sawn boards to the configuration we need. Dimensions and shape can be chosen arbitrarily, each has its own “desktop” books.


https://i.expert-h.com/en/polki/knizhnaya-polka#sigFreeId5706bfded8
Bookshelf made of branches and snags

All you need for this shelf is dry snag branches (the author of the photo found them on the beach), glass (on which books will stand) and twine (to fix the snags together). After fastening the driftwood, we recommend lacquering them. Making such a shelf is pretty budgetary and does not require you great physical strength. See the process of creation from step by step photos below.


https://i.expert-h.com/en/polki/knizhnaya-polka#sigFreeIdcb6155d70c
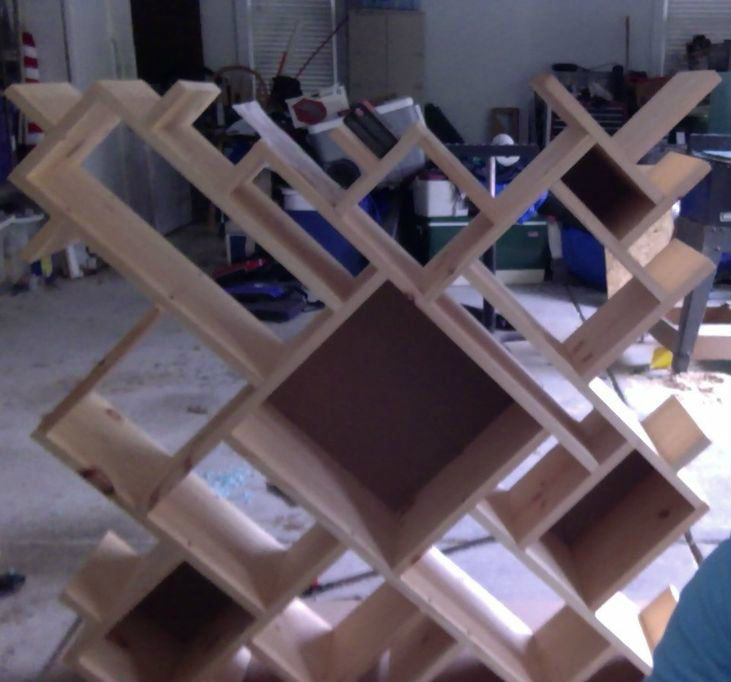
Art Nouveau shelf
The author calls his shelf ULTIMATE (Ultra Modern). The combination of right angles to irregularly applied symmetry makes this shelf truly Ultra Modern. Some side edges are painted black to give an accent.
Since the shelf is very simple, then, in principle, there is nothing more to be said about creating the shelf, what would you not be able to learn from the step-by-step photos of the master class located below in the gallery.
This shelf is perfect for books, CDs, etc.


https://i.expert-h.com/en/polki/knizhnaya-polka#sigFreeId91227e89d9
Shelves from boxes from the table or bedside table
drawer shelf
It so happened that the author’s neighbor decided to throw out some old furniture and asked the author if he needed anything. The author took only drawers from the curbstone, for a long time they gathered dust in the garage, until such a shelf was made of them. Just arrange the drawers as you like and fasten them with screws. Painting at will.
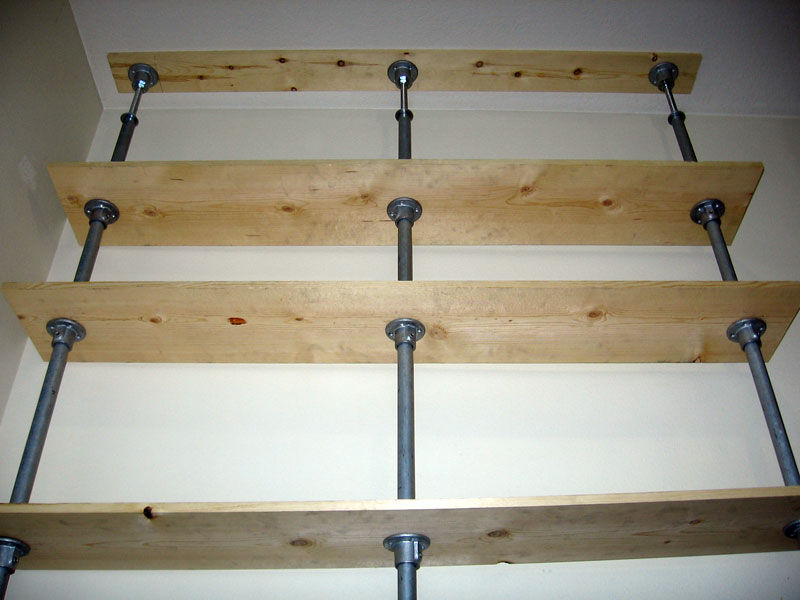
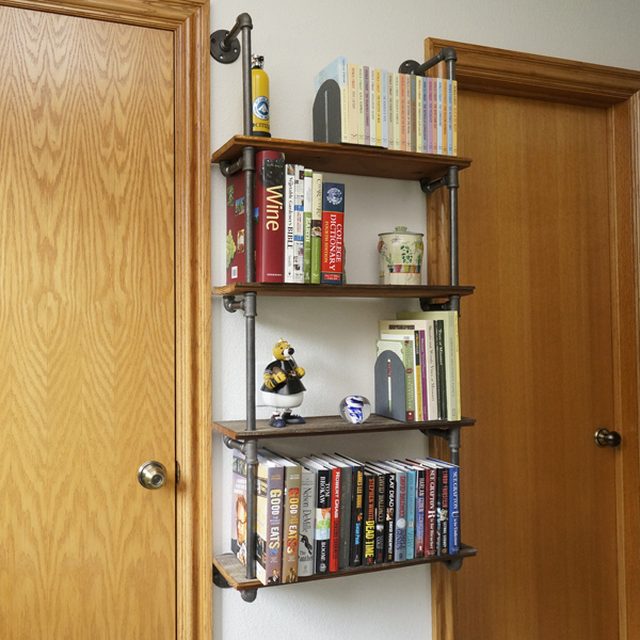
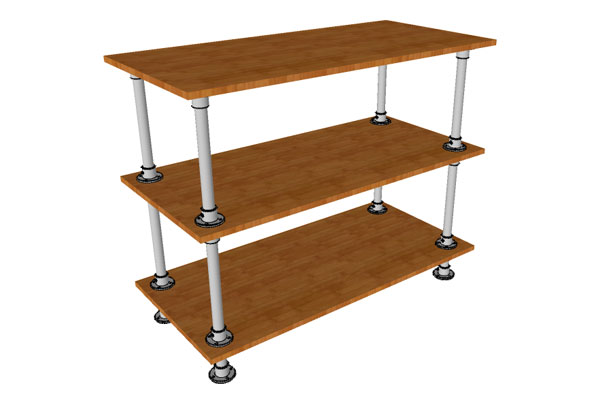
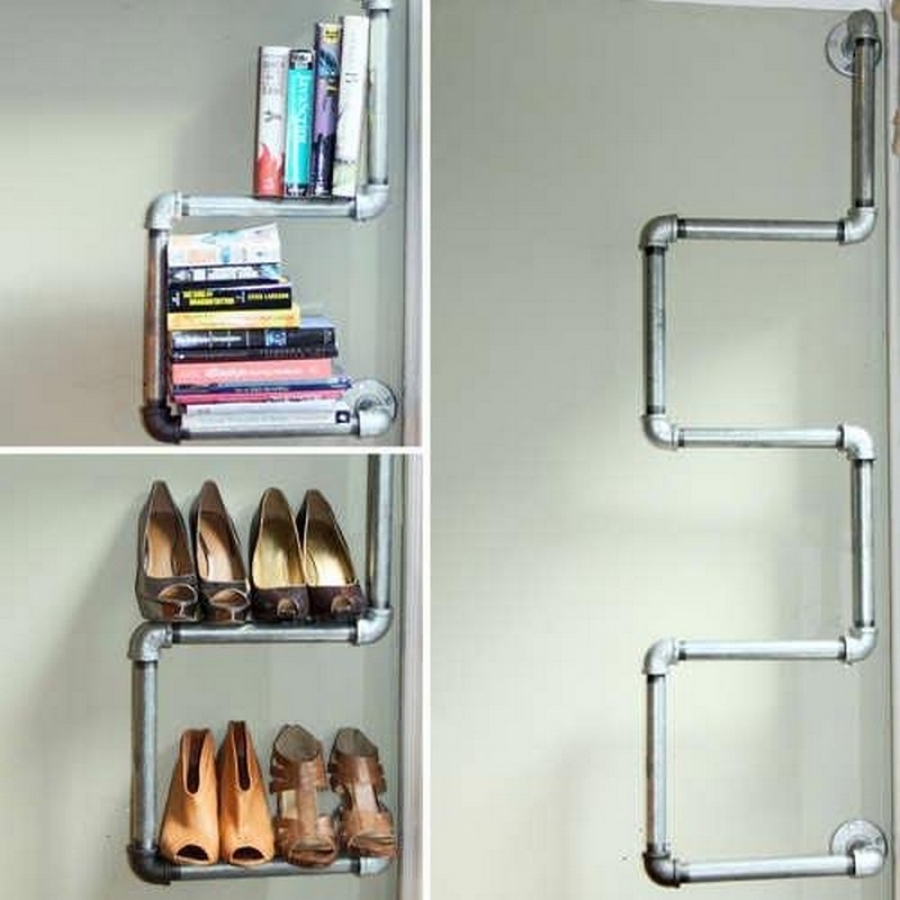
Bookshelves made of pipes.
Corner pipe bookshelf.
DIY master class
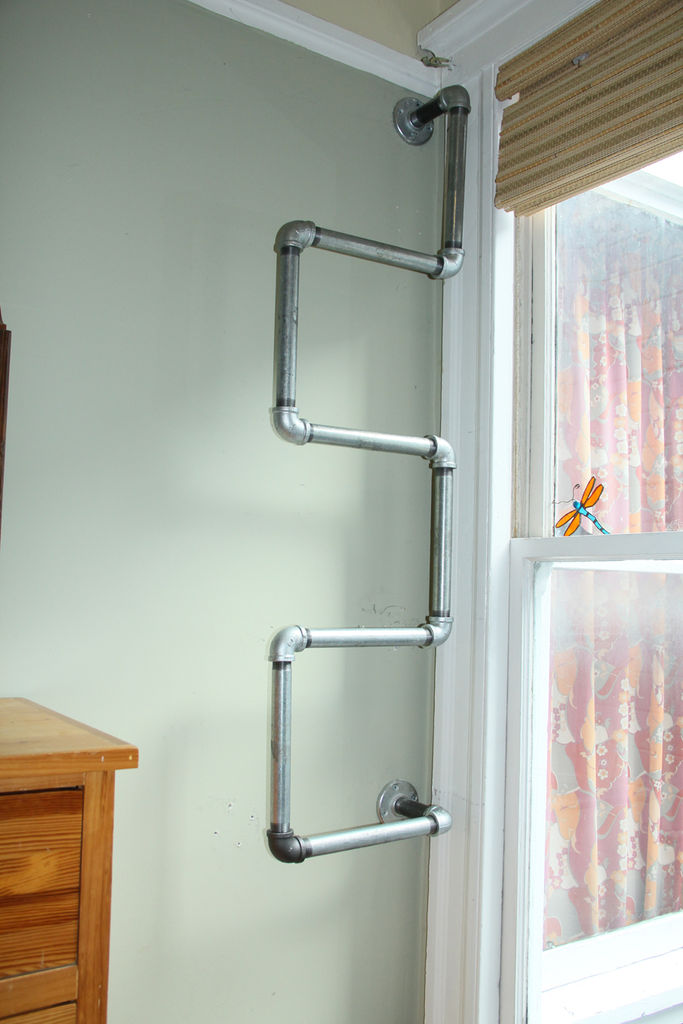
Let's look at the photo how to make such a shelf from metal water pipes with your own hands. See step-by-step photos in the photo gallery below.
This shelf will look great by the window, in the bathroom, hallway, living room or kitchen.
Step-by-step photos of the master class:


https://i.expert-h.com/en/polki/knizhnaya-polka#sigFreeIdb2e6d6ccec
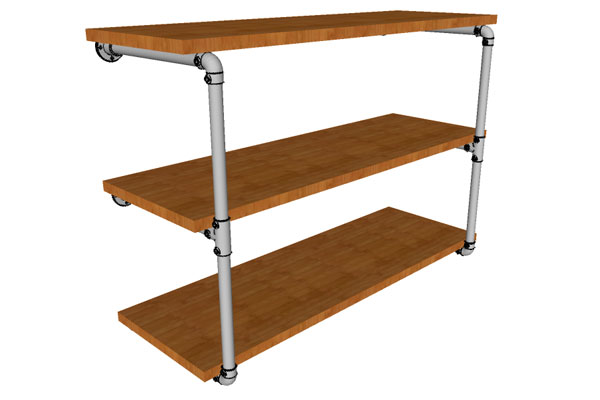
(Shelf) Bookcase from water pipes
do it yourself
When choosing which pipes to make the rack, the author of the photo had difficulties:
- PVC cheap, easy to process, but not elastic enough - will not withstand heavy loadswhich the rack suggests. PVC pipes are suitable for small shelves
- Galvanized steel pipes, more expensive than PVC, strong, durable, but harder to handle.
- Copper pipesare fairly easy to process, stronger than PVC and reasonably affordable.
Therefore, the author's choice fell on copper pipes ....
Attention in this design I am absent back diagonal beams, which usually give stability to wooden shelves, here they are replaced by horizontal supports, which are located under the massive shelves (see photo). The diagonal supports are removed for aesthetics to fully open the back wall. In this case, it is still worth attaching the rack to the wall, which will give additional stability.
This pipe rack can be used for books, flowers, toys, a children's room, perfect for tools in the garage, for shoes, as well as for garden tools in the country
See the rest in the visual step-by-step guide below, presented as a gallery.


https://i.expert-h.com/en/polki/knizhnaya-polka#sigFreeId70698a531d
Shelf shelf from floor to ceiling on struts

As you can see from the step-by-step photos below, the author of the photo made an interesting option of fastening shelves with compression systems. Unscrewing the bolts at the ends of the pipes, you can fixa shelf between the floor and the ceiling, so our shelf can do perfectly without a wall as a support, and can also be placed in any open place in the room.


https://i.expert-h.com/en/polki/knizhnaya-polka#sigFreeId0e00a35458
.... another option for such a shelf
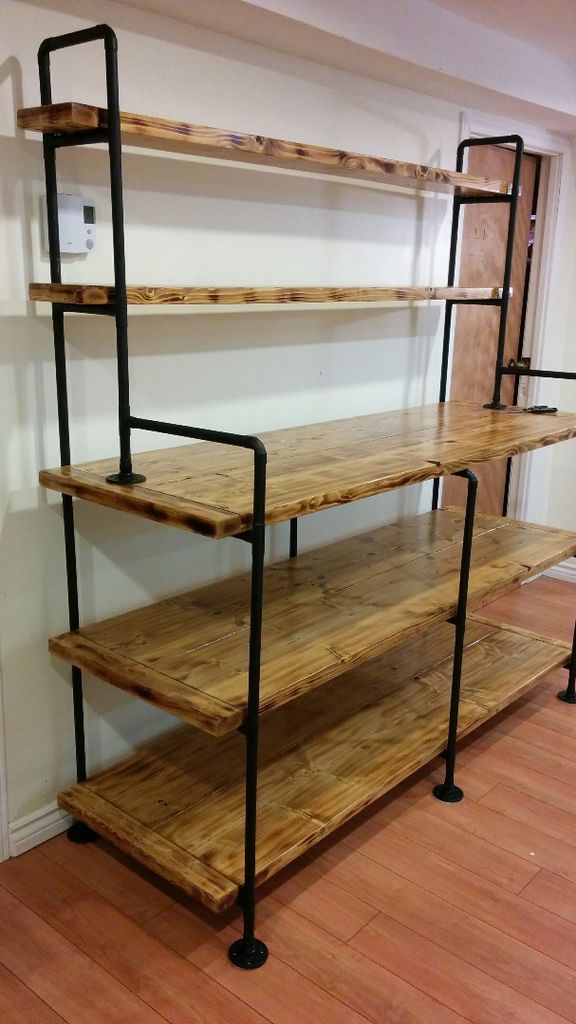
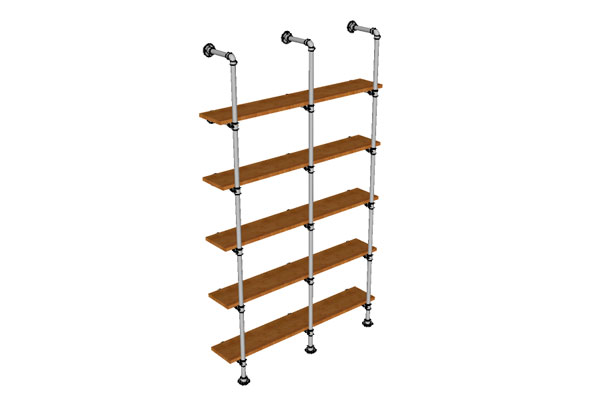
Rack of 3 pipes from floor to ceiling.
This shelf from galvanized pipes belongs to racks, her plus isthat she fixed in the apartment without a single hole !!! in a wall or ceiling, and can be located away from walls. The method of fastening our shelf is based on the clamps between the floor and the ceiling.  According to the author of the photo, making this shelf with your own hands is not at all difficult. So let's look at the features ...
For the rack, the author used flanges, which, unfortunately, had an inner lip. Therefore, the first thing the author had to remove this part of the flange so that the pipes would pass freely inside the flange (see photo 2-7).
Next, we cut the pipes necessary for us to be long. When measuring the length of pipes that we need, we must take into account the width of the clamp that will stand between the pipes. This clip should not be too short or too long !!!
 The author made a clamp between two pipes (short and long) at the top of the rack, under the stream. But later he came to the conclusion that a short pipe is not needed here, the clamp can be arranged in such a way that it will rest directly against the flange. The presence of a small pipe weakens the stability of the rack (see photo 11). Do not forget to rinse the pipes in soapy water before installation.
Next, cut holes in the shelves for pipes. The author advises putting all the shelves on top of each other, and on the marked upper shelf, as by patternDrill all three holes in all the shelves at once.
Mounting a shelf is not difficult, just collect the shelf from the bottom according to the step-by-step photos of the master class located below in the gallery.


https://i.expert-h.com/en/polki/knizhnaya-polka#sigFreeId1f64b3445f
Bookshelf made of pipes backlit.
Do it yourself. Master Class.
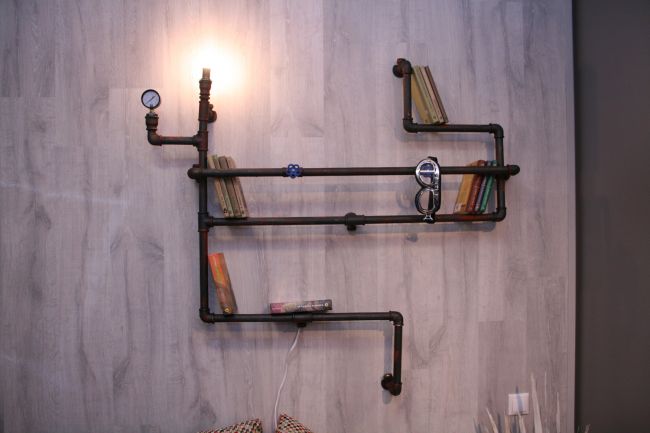 You can call this shelf POLKA-BRA, tk. a distinctive feature is the presence of a luminous element - light bulbs. This shelf will look great over the place where you like to read books, for example, over an armchair or bed. The manufacture of this shelf is not difficult, so you can learn everything from the step-by-step photos located below


https://i.expert-h.com/en/polki/knizhnaya-polka#sigFreeId61632cc0df
How to make a hanging shelf for books from pipes
See phased photos of the master class


https://i.expert-h.com/en/polki/knizhnaya-polka#sigFreeId96c75ad900
The 5 most popular pipe shelves and bookcases
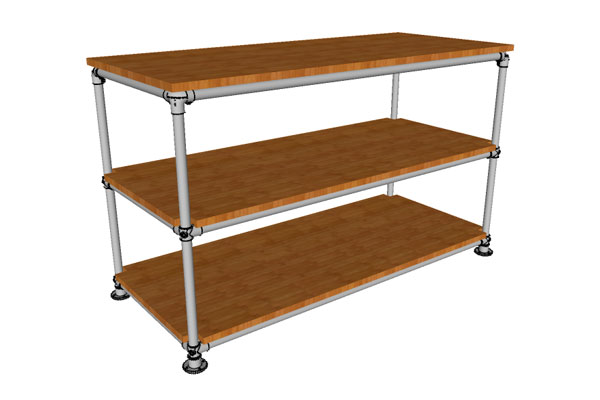
Do-it-yourself simple bookcase for pipes from pipes
 A simple rack that you can easily make if you have the appropriate material. The peculiarity is that shelves just lie on pipes without any cuts, unlike the following option. All spare parts can be bought in the store, so the size and shape of the rack completely depend on your desires. This rack from treb is perfect in the garage for tools, in the nursery for toys, in the bathroom, in the kitchen for kitchen utensils.


https://i.expert-h.com/en/polki/knizhnaya-polka#sigFreeId998d1397b6
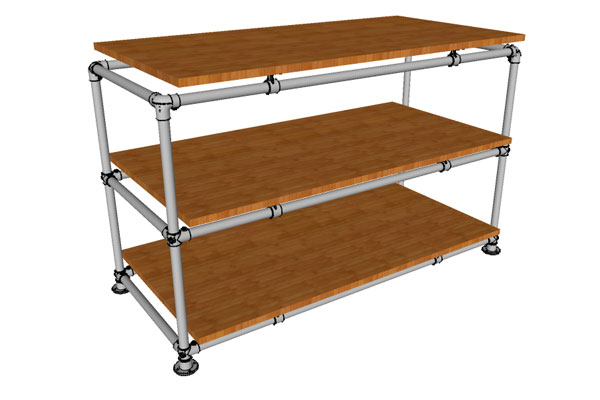
Thick bookshelf made of pipes
 The peculiarity of this shelf is that the pipes surround the shelves, as it were. In the shelves cuts are made in the cornersthrough which pipes pass. This type of shelf is suitable for places where you need to save space, for example, in the kitchen. Also, this option is perfectly converted into a shelf.


https://i.expert-h.com/en/polki/knizhnaya-polka#sigFreeIdbf106e2348
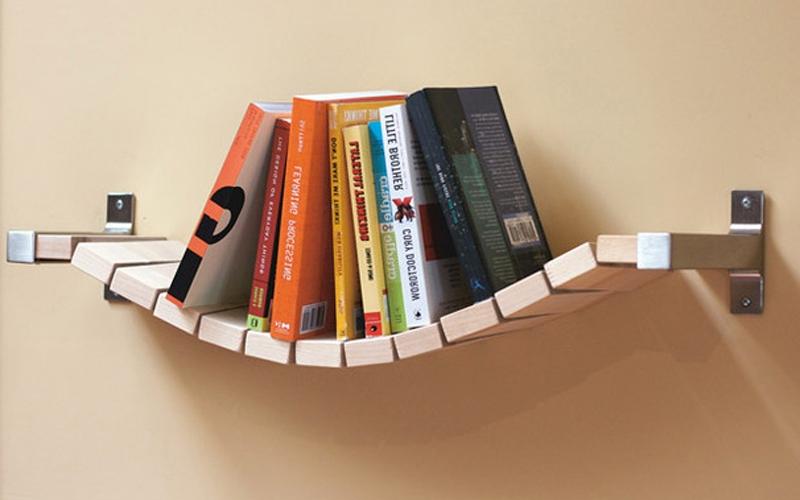
Shelf made of pipes with "flying" shelves
 Feature. This pipe shelf is that the shelves no longer lie on the pipes, but are mounted on props. The supports, in turn, are attached to the pipes, which in turn creates the appearance of levitation, shelves, as it were, hover over the structure. These shelves are suitable for "prominent" places in the house, for example, in the living room, common room, bring an aesthetic decorative effect.


https://i.expert-h.com/en/polki/knizhnaya-polka#sigFreeId65d1eea77c
Bookshelf "plug"
 The simplest shelf from this list is that it uses only two varieties of metal parts for the frame. This is a pipe and a flange (see photo). This shelf is usually free-standing.


https://i.expert-h.com/en/polki/knizhnaya-polka#sigFreeId186d7b5ca2
Wall shelf for books made of pipes
 This shelf attached to the wall. The design uses 4 varieties of metal parts (see photo). The assembly and installation of the shelf does not present anything difficult, see how this is done using the step-by-step photos below.


https://i.expert-h.com/en/polki/knizhnaya-polka#sigFreeIdc3c9ecd78b
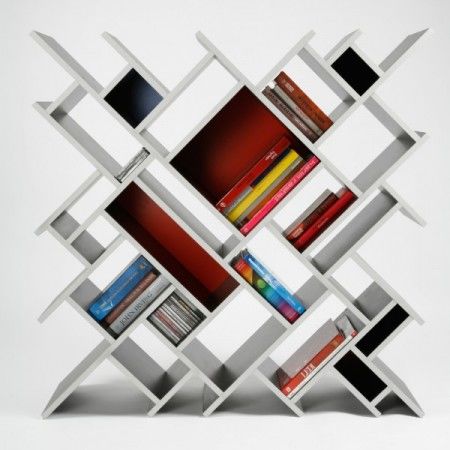
Do-it-yourself modern bookshelf
(Which in the store costs $ 2000)
Again this Art Nouveau shelf. A student from Server Carolina, not having enough special funds to buy, decided to make a shelf that, like a pedestal, would contain some of his things. He also wanted the regiment to look modern. After a long search, he found a prototype shelf, which was in store 2$ 000 So this one the student made a similar shelf for himself at a cost of $ 20. 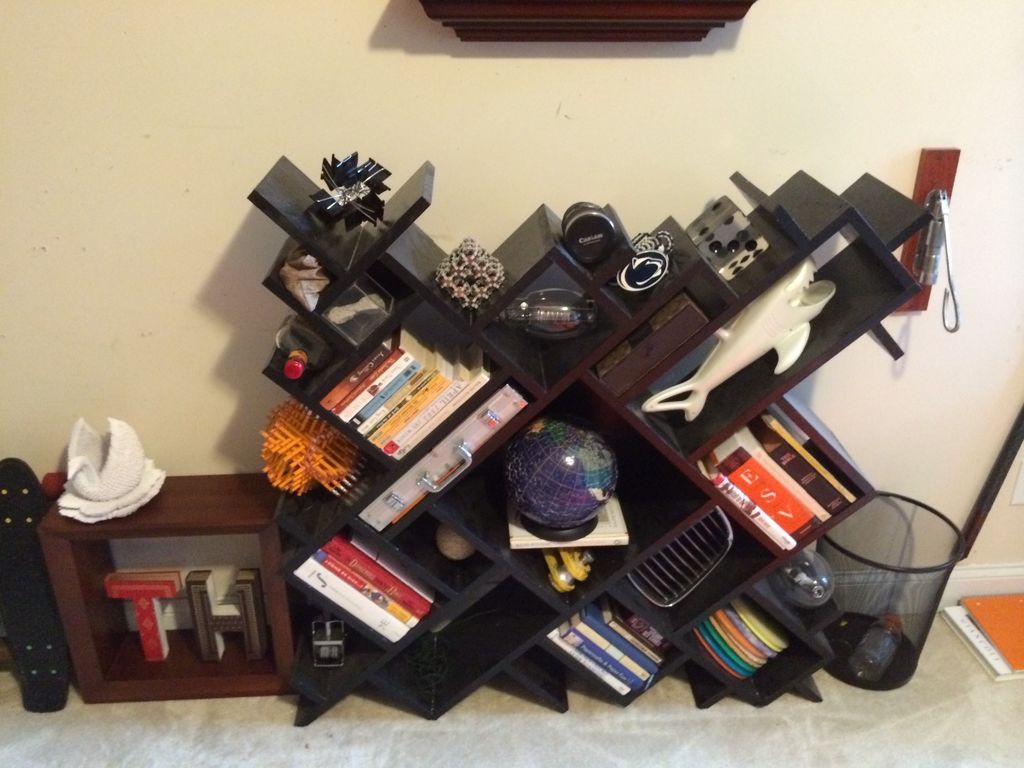 Of course, it didn’t work the first time, because due to the many shelves, I forgot to take into account the thickness of one of the boards. But in the end, after filling up the pits with the putty from the screws, and painting, a modern and presentable shelf was obtained.
 |
 |
All boards of the shelf are located at an angle of 90 degrees. to each other. The shelf itself is relative to the floor at an angle of 45 degrees.
Saw Shelf
No comments....


https://i.expert-h.com/en/polki/knizhnaya-polka#sigFreeId57c9434c33
Do-it-yourself bench bench for books or shoes
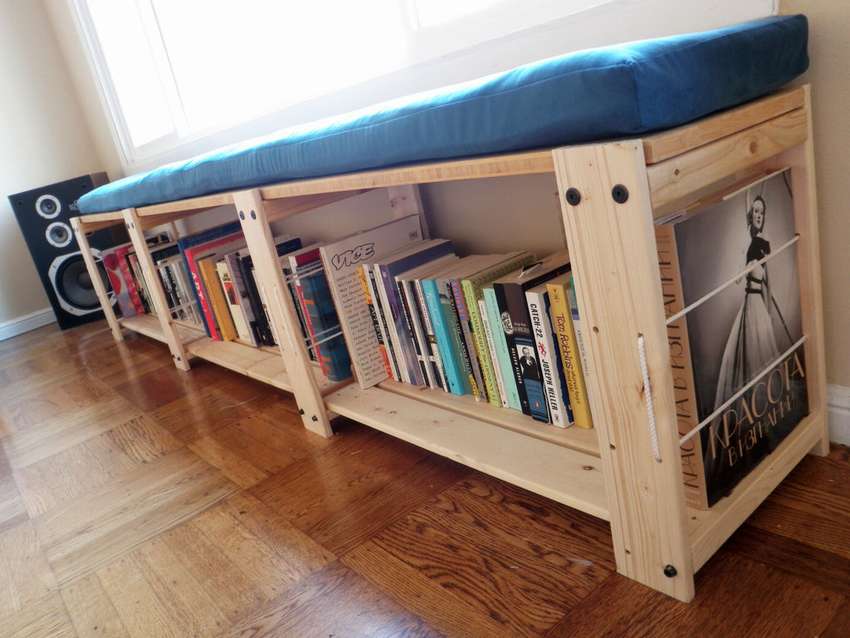 This shelf bench is also perfect for toys, for spare parts or tools in the garage.
In general, the author of the photo bought a rack in IKEA and something he did not like about this rack. As a result, he made a bench out of it.
We did not begin to lay out the whole process of alteration, because it is unlikely that you will buy a rack to make a bench out of it. Therefore, we have placed only the most necessary photos, so that you would simply familiarize yourself with this option. From the photo you can do the same just from the boards.


https://i.expert-h.com/en/polki/knizhnaya-polka#sigFreeId58bc279800
Beautifully thread threads for book support
Making a bookshelf under the ceiling
(storage of books under the ceiling)
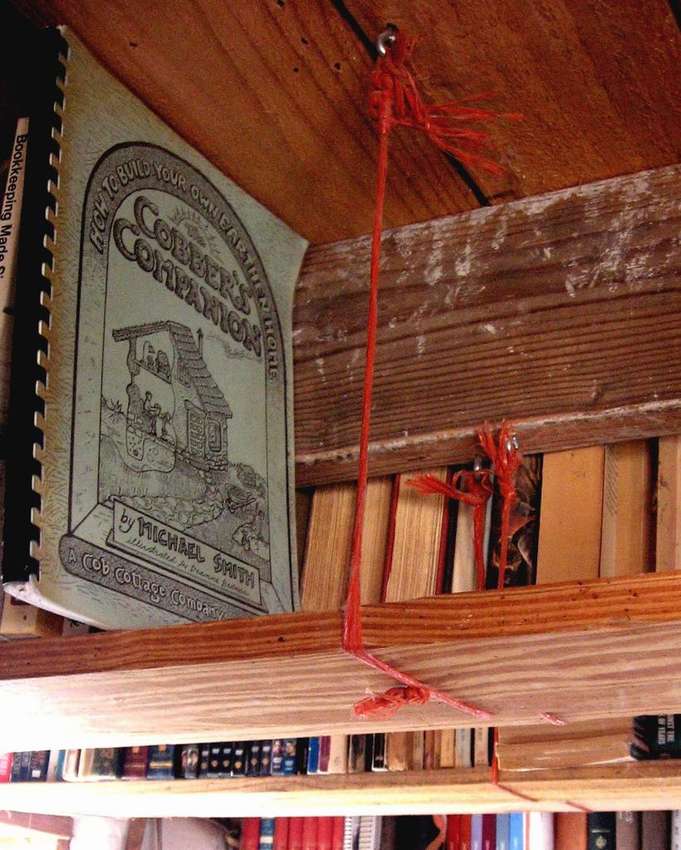 Our bookshelf will be under the ceiling, make this shelf do-it-yourself easy, so we did not even turn around with step-by-step photos - everything is already clear.
Just screw the screws with the loop into the ceiling, then tie the measured twine to them and lay the boards on the twine.
This shelf is useful for books in that the books on it are well ventilated. Also, the shelf perfectly saves space and can be used where the walls do not allow them to be attached. For example, the author of these photos had the same problem, because his house is made of clay with straw.
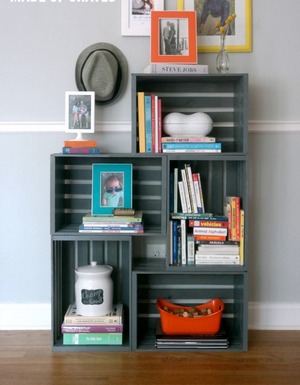
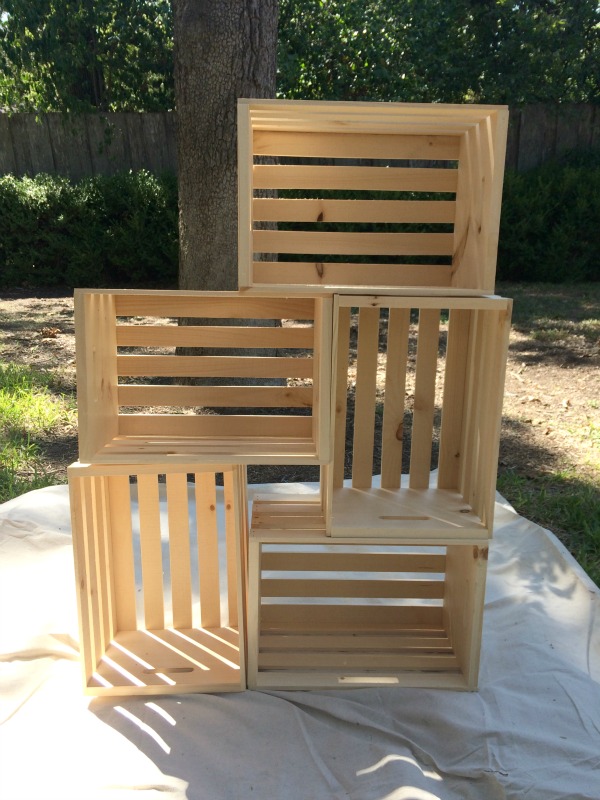
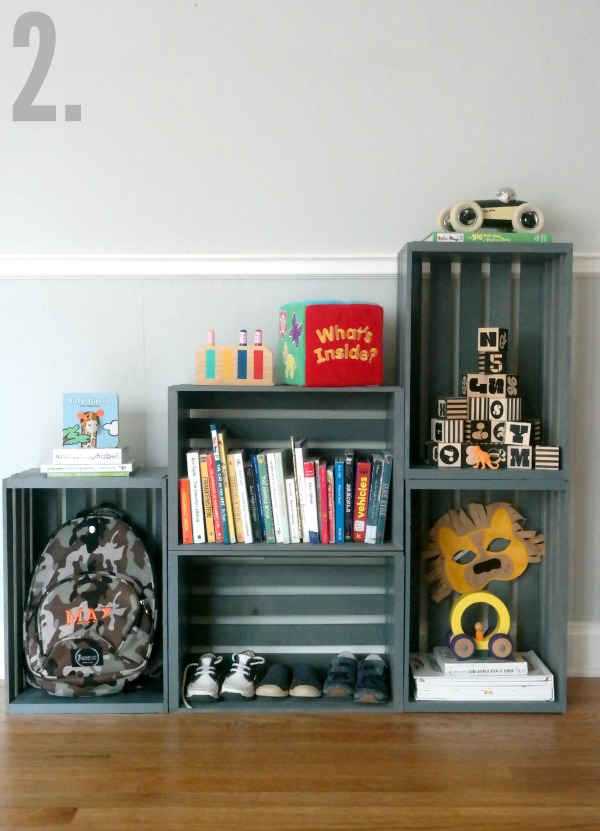
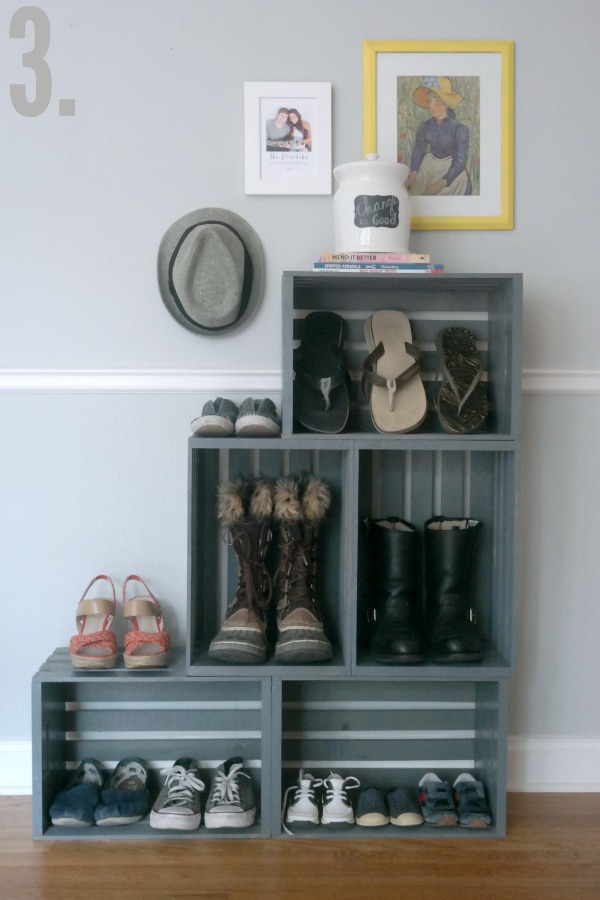
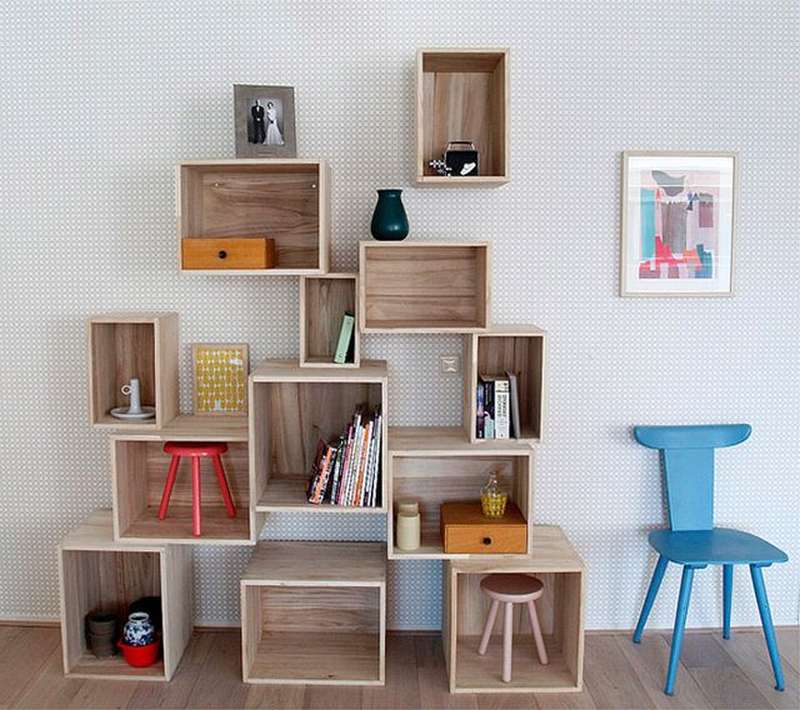
Bookshelves from drawers
Do-it-yourself bookshelf made of wooden boxes
 Another option for a shelf of wooden boxes, which you can do yourself.
This shelf is perfect for toys, tools in the garage, for shoes, flowers (if you knock the back wall of the boxes), as well as for other household items.
Below you can find a step-by-step masterclass for the manufacture of this shelf


https://i.expert-h.com/en/polki/knizhnaya-polka#sigFreeId14a8101047
How to make a shelf out of drawers - without nails
 Perhaps this will be the easiest shelf for bookshave you ever done. So, you need to find five boxes and a can of paint. Then take a brush and paint the container in the color that is best suited for your interior. When the paint dries, everything, the shelf is ready.
 You just have to decide how to stack them. If the house has small children, the structure, of course, must be connected with bolts or self-tapping screws, or better yet, attached to the wall, it will be more reliable and safer. But if there are no children, then there is no need to fasten, the boxes are strong enough. And the main advantage you can change the shape of the structure at least every day. Imagine every day you have a new shelf and no nails
So, for example, today you have a pyramid, and tomorrow a ladder, in the mood.

Folded into a sturdy construction, it is very convenient to store shoes. For a change, you can pick up one box and fold anything.

Well, how do you like the idea?
Corner Bookshelf for children.
Step-by-step photo of manufacture
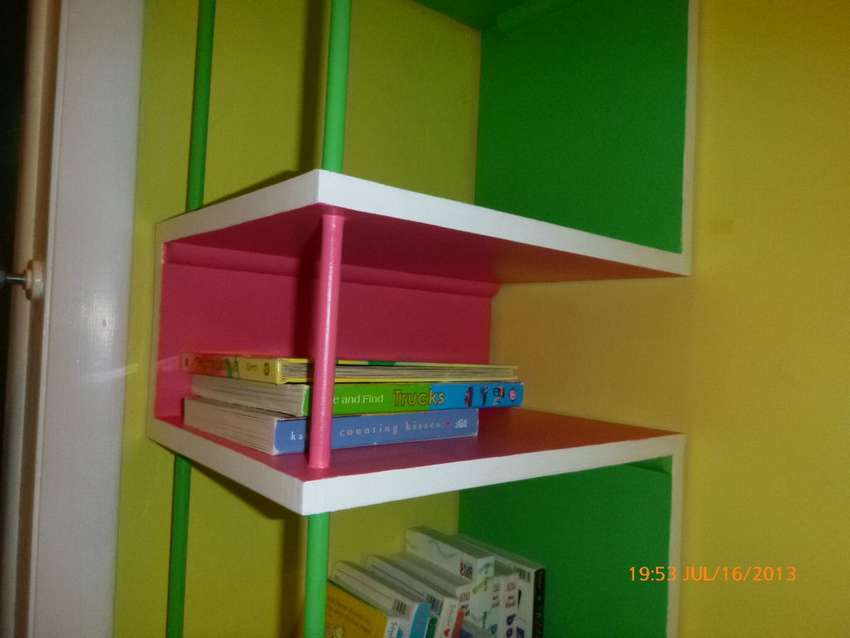 Let's look at how you can make such a corner bookshelf for your children’s room with your own hands. The author of the photo took 10 days to make this shelf. A day for each level, for sawing (he sawed everything at once), painting, installation. The levels are kept with glue, cox glue for 24 hours. Please note that when installing the shelf, the corner part of the plinth is removed so that the shelf fits snugly against the wall. The author also attached the top of the shelf to the wall for stability (this is not shown in the photo). See step-by-step photos of the master class below.


https://i.expert-h.com/en/polki/knizhnaya-polka#sigFreeId27e8c5d147
Bookshelf of stairs
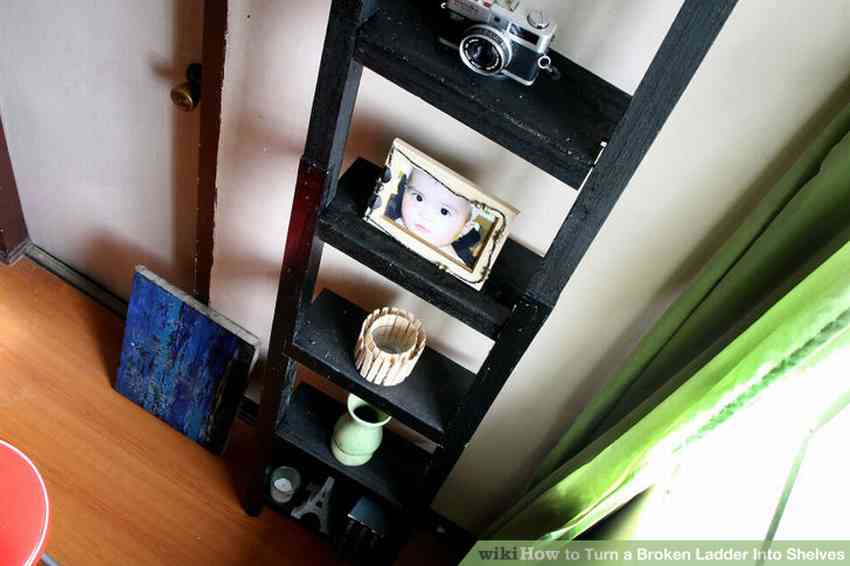 An old and broken ladder can easily become a functional shelving or shelf. It is worth sanding the stairs, pinning down the sawn boards in place of the shelves and fixing against the wall. This shelf-ladder will be a great design solution for your room


https://i.expert-h.com/en/polki/knizhnaya-polka#sigFreeIdd12c4cb402
From a wooden drive for books)))
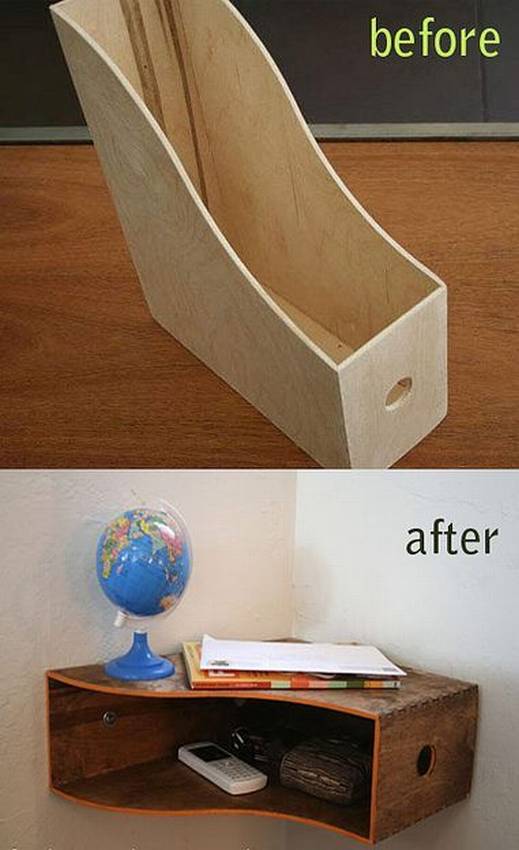
A very simple shelf, you only need the drive itself and a drill with dowels. Look at the options)))
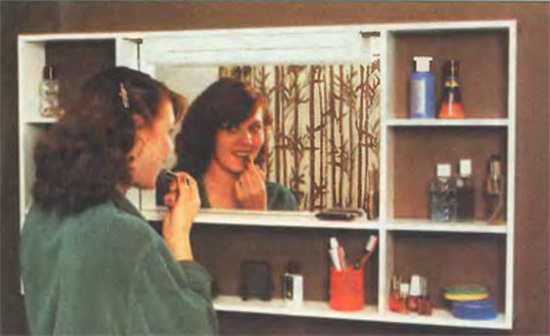
A simple chipboard shelf for books and cosmetics
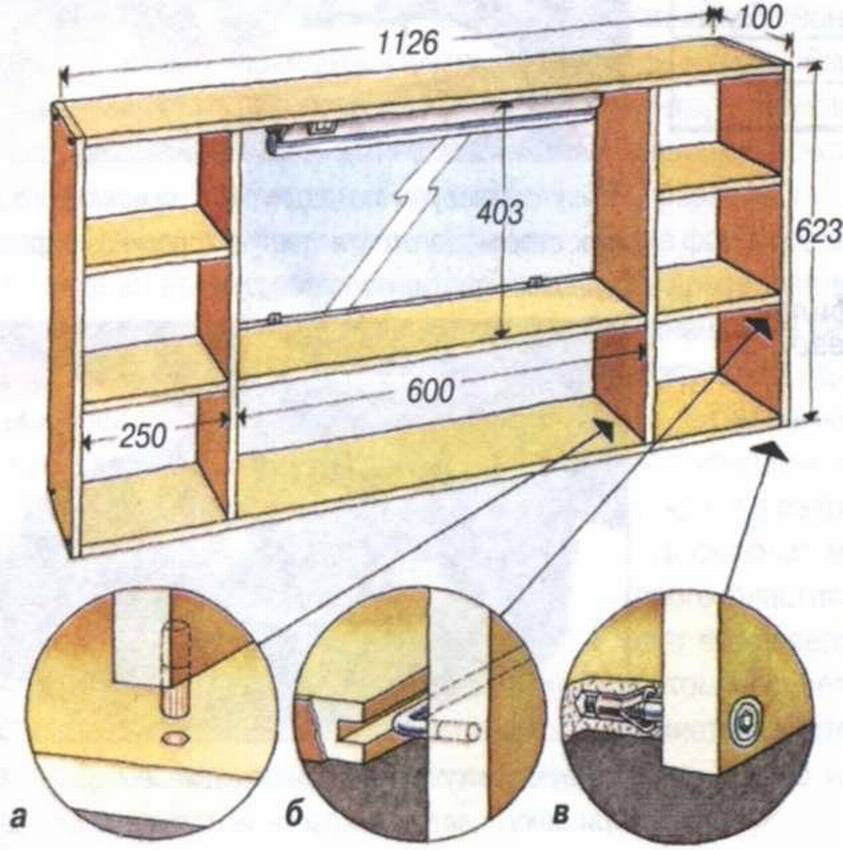 As you can see from the drawing of the shelf there is nothing complicated in it, everything can be done with your own hands.
It is possible to make a shelf from a chipboard coated with a film with a thickness of 13 mm or more.
After marking and sawing a chipboard sheet into parts, you need to choose one of the three ways to assemble the shelf frame shown in the figure. In the first case - using screw ties with wedged inserts, in the second - using pins with glue, and in third- using wire holders Ø4 mm.
 The outer edges of the frame and shelving boards paste over with a self-adhesive tape. It is smoothed through a paper pad with a hot iron. After the adhesive has set, excess tape is carefully removed along the length with a sharp knife or file.
You can attach a lamp to the top board of the shelf. Also, any of the shelves can be easily turned into a cabinet by hanging a door with a magnetic latch on furniture hinges.
Magazine "Sam" №11-2000g.
Cable channel shelf


https://i.expert-h.com/en/polki/knizhnaya-polka#sigFreeId18fd40208c
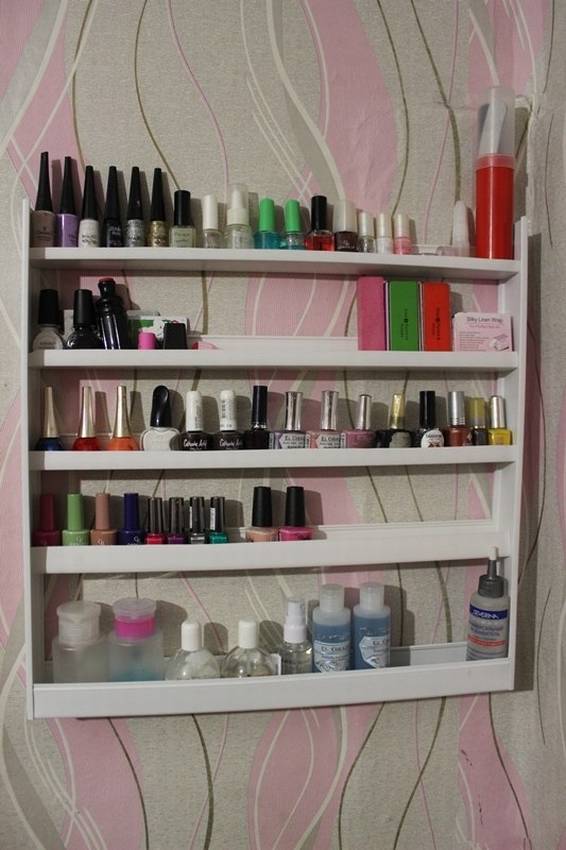
Hanging shelf
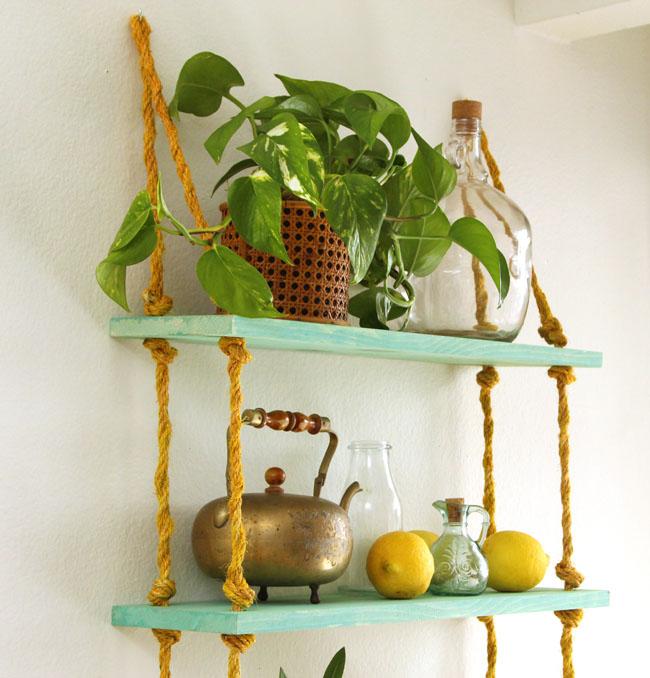
A shelf can be made of any size, not necessarily as large as the previous one. For example, for a kitchen or other small room, such a shelf-shelf is suitable, You can adjust and make as many shelves as you like. See the manufacturing process for step-by-step photographs.
The shelf is small, so The decor can be approached with imagination. Paint shelves in different colors, or paint only the ends. The rope can also be made multi-colored and fluff the tassels under the lower nodes.


https://i.expert-h.com/en/polki/knizhnaya-polka#sigFreeId0dfa2151ac
Bookshelves made of bricks and boards
Do it yourself
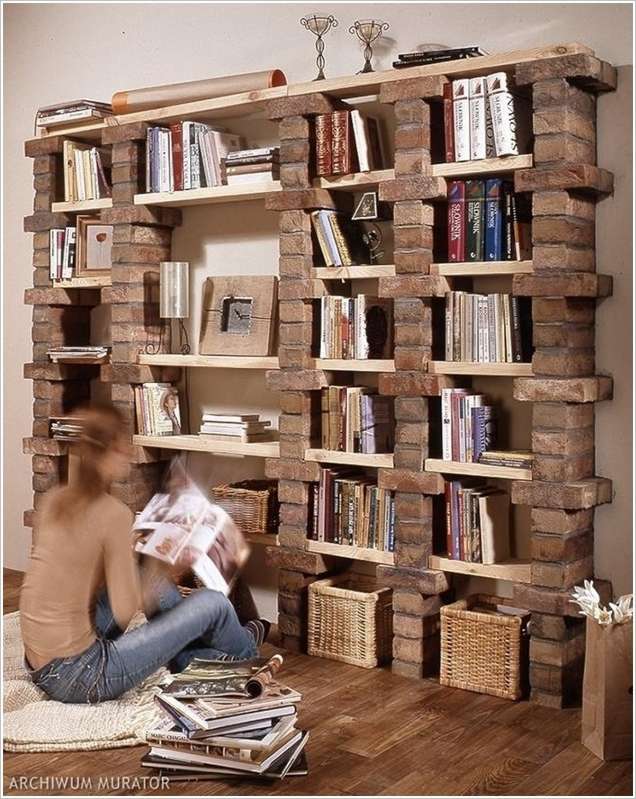 The advantage of this library is a very simple design that can be made
yourself near one of the walls of the apartment. The columns are made of high-strength (clinker) brick of manual molding of brown-olive color. They are kept on a clinker mortar and are additionally attached to the wall with steel anchors located in every fourth layer of the masonry. 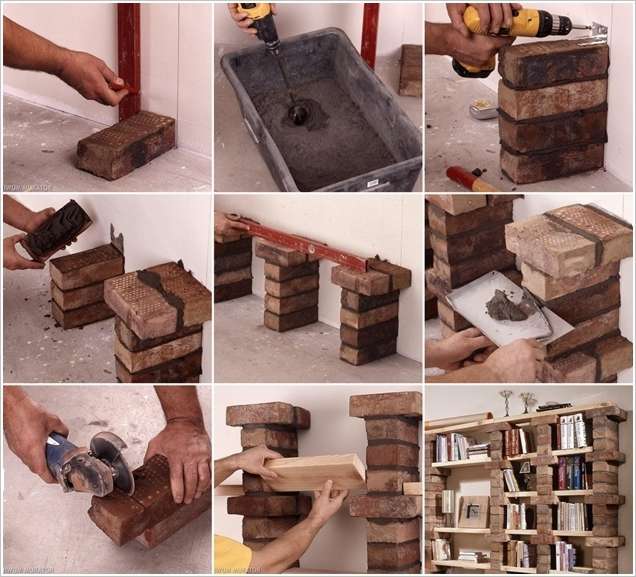 Wooden shelves are covered with a layer of colorless matte varnish. Thanks to this, they look natural and are protected from dirt.
Remove the flooring in the places where the posts will be installed so that it does not deform.
(See step-by-step photos with recommendations)


https://i.expert-h.com/en/polki/knizhnaya-polka#sigFreeIdca4448fab8
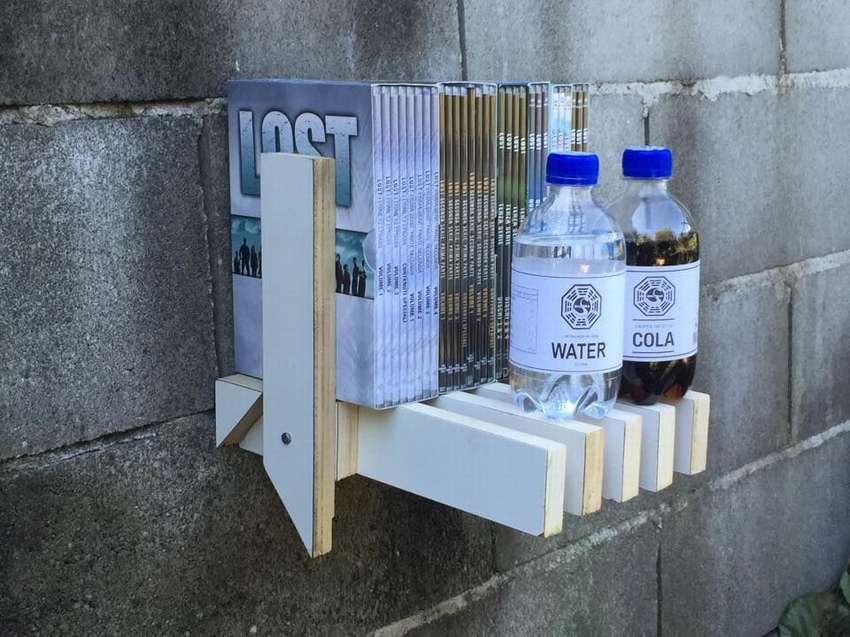
do-it-yourself beer
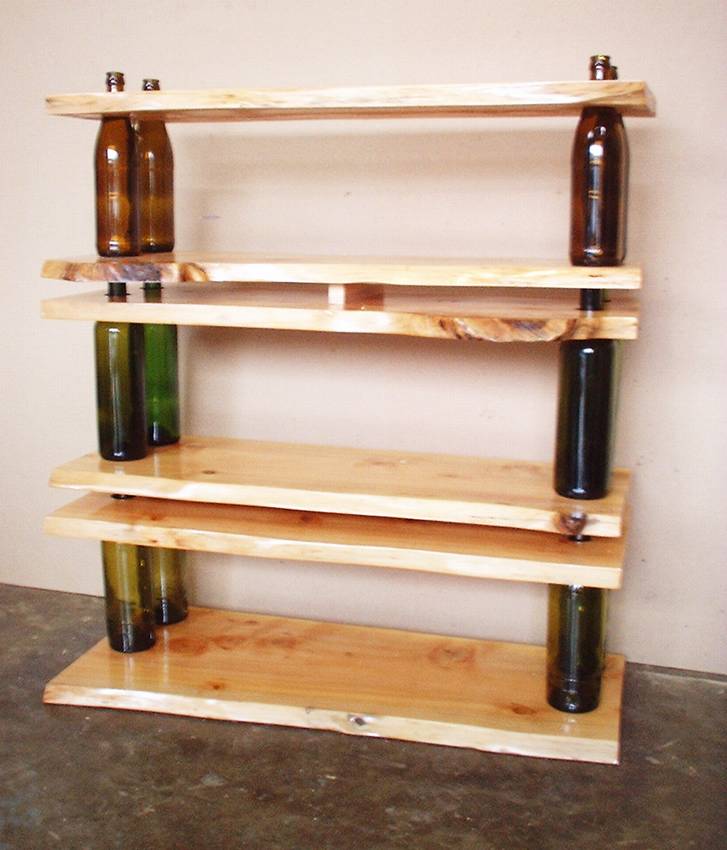 Let's look at how to make a shelf (rack) of beer glass bottles with your own hands. If you already have four beer bottles (or from champagne) and two boards, then consider that you have already done half the work. Of course, in addition to this, you still need inexpensive fasteners, which you can buy in almost any hardware store.
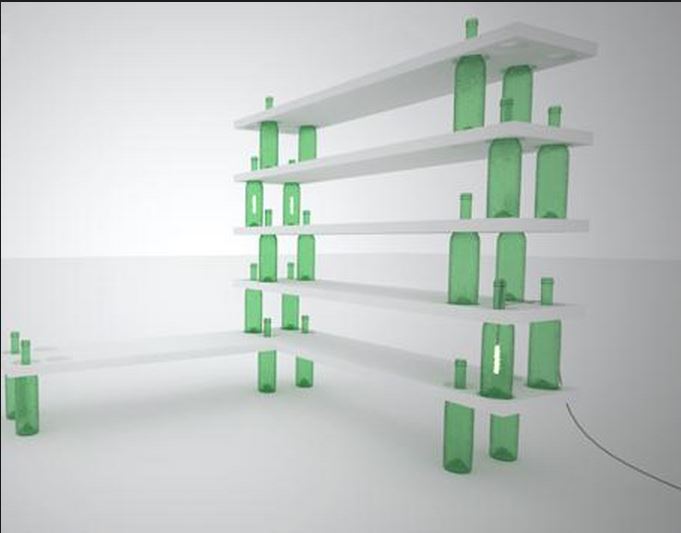 Choose long-necked beer bottles.
Shelf boards are sanded and dark lacquered.
Surprisingly, such shelves made of glass bottles are durable because they can support the weight of an adult.
Having put one such shelf on another you will receive a rack from glass bottles.
See step-by-step photos of the master class:


https://i.expert-h.com/en/polki/knizhnaya-polka#sigFreeIdd1157acba1
This gallery presents the whole world of bookshelves - wooden, metal, plastic, glass and such that it is not known what they are made of. Of course, not all of this is done with your own hands, but in principle, nothing is impossible, maybe some of the ideas you like. So watch 300 bookshelvescollected from all over the internet.


https://i.expert-h.com/en/polki/knizhnaya-polka#sigFreeIdca9b69b37e
= What can I make shelves of:
|
from wood
Example: DIY flower shelves 230 |
from metal pipes
Example: Do-it-yourself pipe shelves |
from PVC pipes |
|
from cardboard
Example: Cardboard box shelving unit |
from paper | plasterboard |
|
from glass
Example: Shelves in Art Nouveau style 180 photo do-it-yourself |
from old boxes
|
from pallets pallets |
| stainless steel | from glass | from old stairs |
| From bars |
from bottles
Example: Glass bottle shelves |
from snags and branches Example: Book shelf made of twigs and snags |
|
made of bricks
|
from newspapers
Example: Newspaper shelf |
From cans
Example: Do-it-yourself shelves in the kitchen: 456 photo drawings instructions |
= Methods of fastening shelves:
|
On the straps
Example: Shelves for books on belts |
On brackets
Example: Inverted bookshelf |
On hinges (hidden shelves) or articulated spiers
Example: Secret door - bookcase and shelfg |
| On the strings | On the ropes | On the pins |
|
On the clamps
Example: Rack of 3 pipes from floor to ceiling. |
On perforated rails | |
= What are the shelves:
|
Corner |
Wall mounted
Example: Wooden shelf for bathroomss |
Mounted
|
| Outboard |
Floor
Example: DIY shelf in 45 minutes |
Under the ceiling
|
|
Shelving
Example: Do-it-yourself pipe racks: 180 photos, instructions, diagrams |
Whatnot |
Shelf - Invisible
Example: Invisible bookshelf |