Do-it-yourself pipe shelves 210 photos: drawings, layouts, instructions
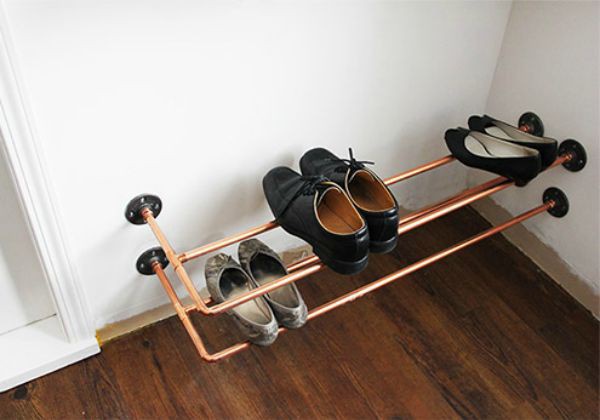
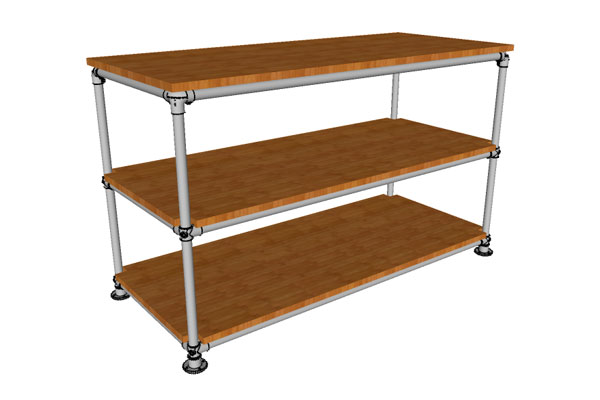
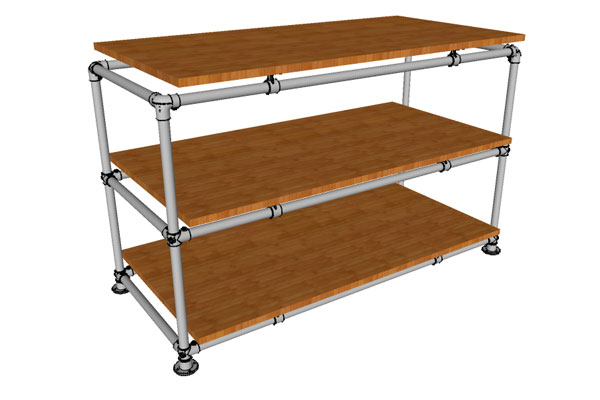
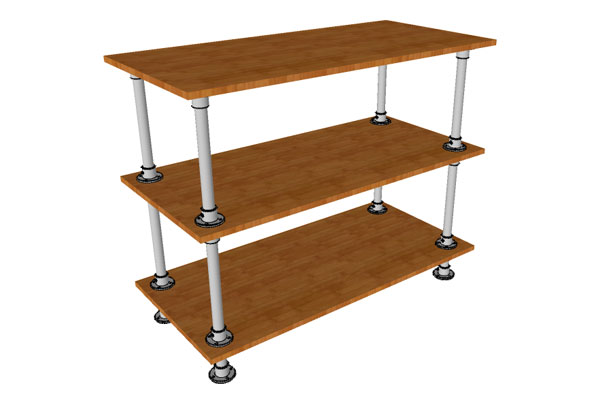
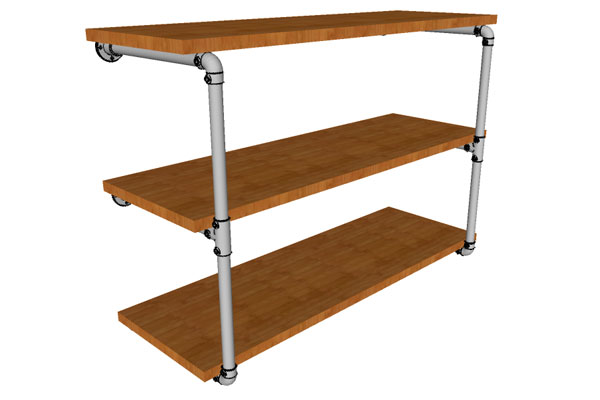
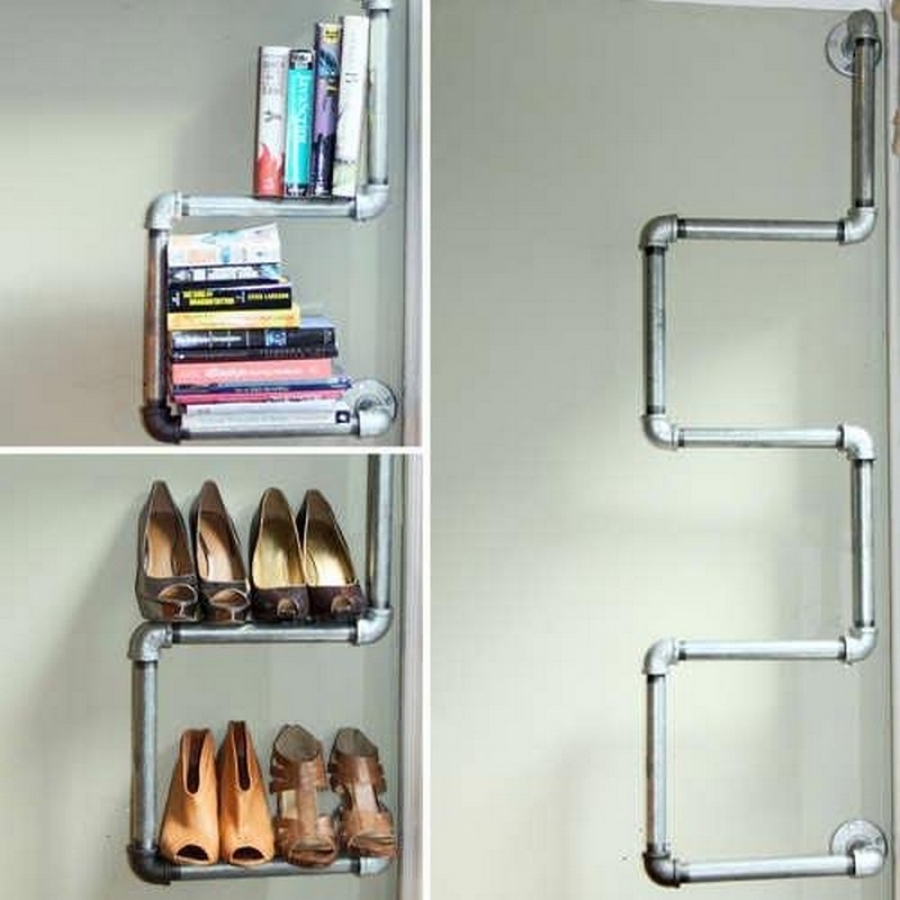 Pipe shelf
(Shelf) Bookcase from water pipes do it yourself
When choosing which pipes to make the rack, the author of the photo had difficulties:
- PVC cheap, easy to process, but not elastic enough - will not withstand heavy loadswhich the rack suggests. PVC pipes are suitable for small shelves
- Galvanized steel pipes, more expensive than PVC, strong, durable, but harder to handle.
- Copper pipesare fairly easy to process, stronger than PVC and reasonably affordable.
Therefore, the author's choice fell on copper pipes ....
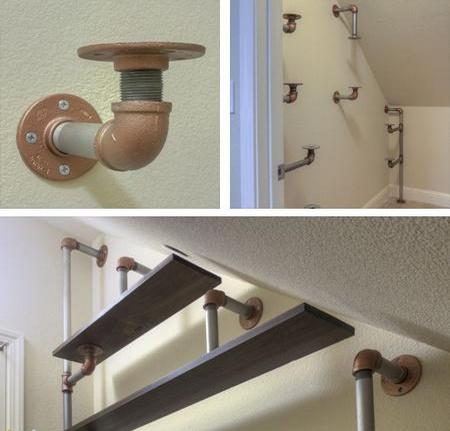
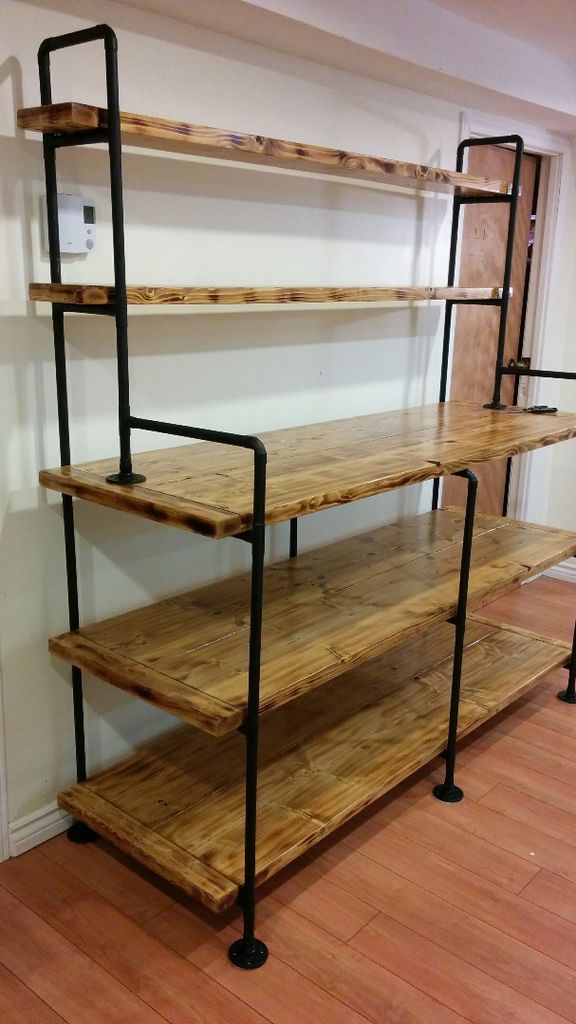 Attention in this design I am absent back diagonal beams, which usually give stability to wooden shelves, here they are replaced by horizontal supports, which are located under the massive shelves (see photo). The diagonal supports are removed for aesthetics to fully open the back wall. In this case, it is still worth attaching the rack to the wall, which will give additional stability.
This pipe rack can be used for books, flowers, toys, a children's room, perfect for tools in the garage, for shoes, as well as for garden tools in the country
See the rest in the visual step-by-step guide below, presented as a gallery.


https://i.expert-h.com/en/polki/polki-iz-trub-svoimi-rukami-210-foto-chertezhi-makety-instruktsii#sigFreeIdd756cd6bf9
Shelf shelf from floor to ceiling on struts

As you can see from the step-by-step photos below, the author of the photo made an interesting option of fastening shelves with compression systems. Unscrewing the bolts at the ends of the pipes, you can fix the shelf between the floor and the ceiling, thereby our shelf can do perfectly without the wall as a support, and can also be placed in any open place in the room.


https://i.expert-h.com/en/polki/polki-iz-trub-svoimi-rukami-210-foto-chertezhi-makety-instruktsii#sigFreeIdb92206243b
Shelf made of pipes for shoes or books.
DIY master class
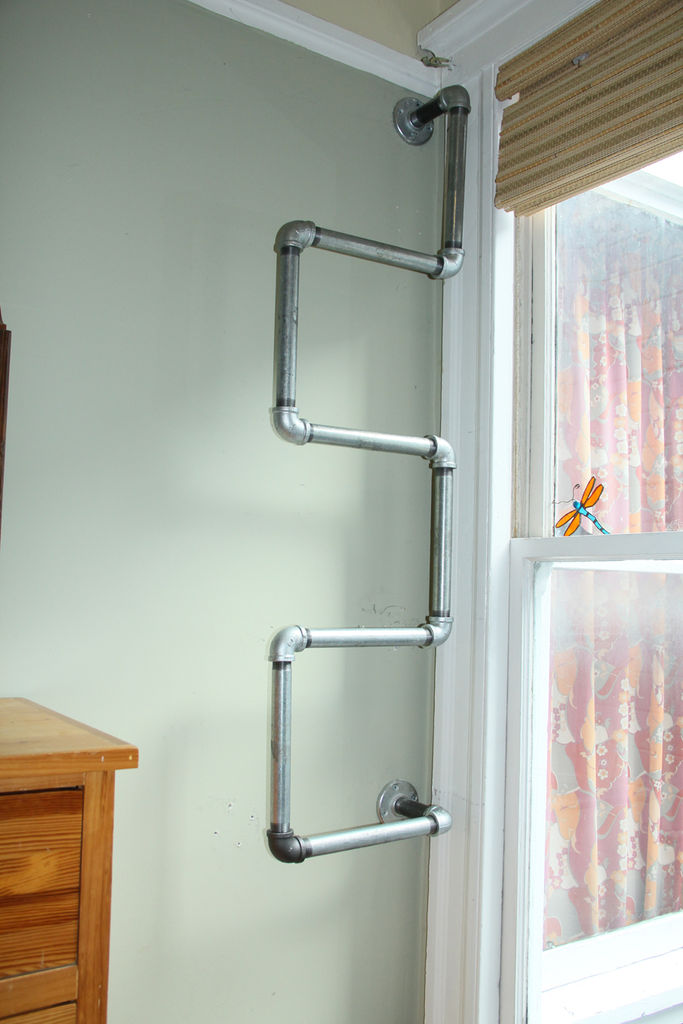
Let's look at the photo how to make such a shelf from metal water pipes with your own hands. See step-by-step photos in the photo gallery below.
This shelf will look great by the window, in the bathroom, hallway, living room or kitchen.
Step-by-step photos of the master class:


https://i.expert-h.com/en/polki/polki-iz-trub-svoimi-rukami-210-foto-chertezhi-makety-instruktsii#sigFreeIdd78aa72b40
Big do-it-yourself pipe rack
 Let's consider how to assemble such a large rack from metal pipes. This rack is perfect for a garage or pantry.
Our shelving is done from ordinary gas pipes.
Flushing: After purchasing the pipe, wash it with either soap and water or brake fluid. After the side racks are assembled, they should be painted with spray paint.
In the shelves we drill holes a little more than the diameter of the pipes, and before installing them on the pipes, we cover the boards with varnish.
The problem is to connect the hangers between the shelves (see photo 11), the fact is that here it is necessary to connect two shelves with a pipe, but when screwing in, one part is screwed in and the other screwed out, because no left thread. In general, if you decide to make the same suspension for the shoulders, then you have to break your brain.


https://i.expert-h.com/en/polki/polki-iz-trub-svoimi-rukami-210-foto-chertezhi-makety-instruktsii#sigFreeId58258e74ab
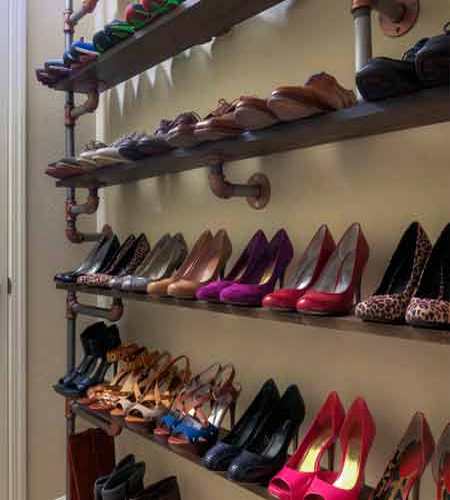
Shelves for shoes from pipes
Do-it-yourself pipe shelf for pipes
A very simple version of a shoe shelf made of pipes, the creation process is very simple, so we will not focus attention, you will understand everything from the photo
Unfortunately, the author of the photo could not be installed.
Large shoe shelf made of pipes under the stairs
 Another option is shelves for shoes, only larger. The place under the stairs is usually empty, unless various unnecessary things are put there. And you take and make such a shelf of pipes for shoes. You will need pipes, fittings, adapters and a complete set of plumber tools. But everything is reliable, thoroughly, in a true industrial style.
First make a drawing for a specific place, calculate the crossbars and other details, then select fittings and pipes. All this iron can be painted with metal paint, or you can leave it like that, it will look cooler.
Now we collect all the details according to the scheme, at the end we fix the boards.
It turns out here is such a multi-tiered shelf from pipes
White pipe shelf in pantry or kitchen
So let's make a shelf of metal gas or water pipes in the kitchen do it yourself over the sink or in the pantry or in the bathroom above the washing machine.
You will again have to go to the store for pipes and other fixtures. Pipes should be washed in soapy water or in brake fluid. Then the pipes should be painted with spray paint, it is better to paint the pipes after they assembled the "designer" of the side supports of the shelves.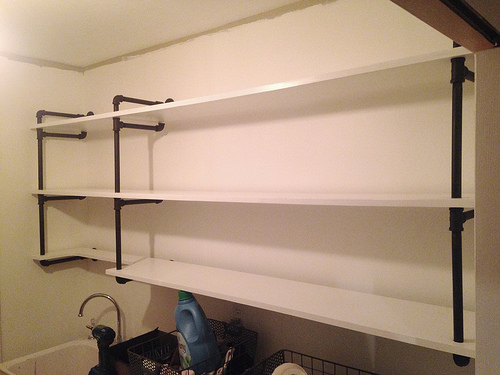
If you decide to cut holes above the sink in the first shelf, then to give a smooth shape, the author advises not to be wise, just circle any suitable sized rounded object on the board (see photos 8 and 9).
The author also advises to hang the first level from the pipes of our future shelf on the wall and put a board on this level (see photo 7), then, marking the places where the pipes will go through the boards, cut holes. And then, as by pattern, place all the other boards on our first finished shelf, mark the places of future holes and cut THESE "holes" (see photo 10).
Step by step photo master class manufacturing:


https://i.expert-h.com/en/polki/polki-iz-trub-svoimi-rukami-210-foto-chertezhi-makety-instruktsii#sigFreeId09e94df975
The author claims that at one time on the Internet I did not find a pipe shelf made in white, so I was very worried about being a pioneer. But as we see from the photo the shelf turned out for a feast for the eyes!!!
Rack of 3 pipes from floor to ceiling.
This shelf from galvanized pipes belongs to racks, her plus isthat she fixed in the apartment without a single hole !!! in a wall or ceiling, and can be located away from walls. The method of fastening our shelf is based on the clamps between the floor and the ceiling. 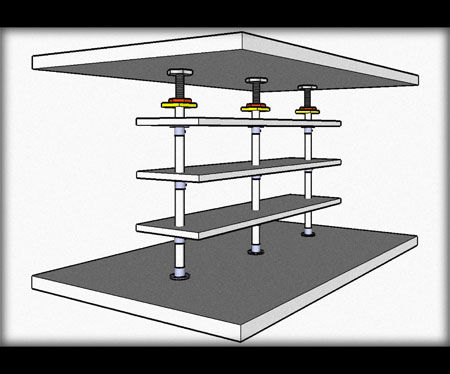 According to the author of the photo, making this shelf with your own hands is not at all difficult. So let's look at the features ...
For the rack, the author used flanges, which, unfortunately, had an inner lip. Therefore, the first thing the author had to remove this part of the flange so that the pipes would pass freely inside the flange (see photo 2 - 7).
Next, we cut the pipes necessary for us to be long. When measuring the length of pipes that we need, we must take into account the width of the clamp that will stand between the pipes. This clip should not be too short or too long !!!
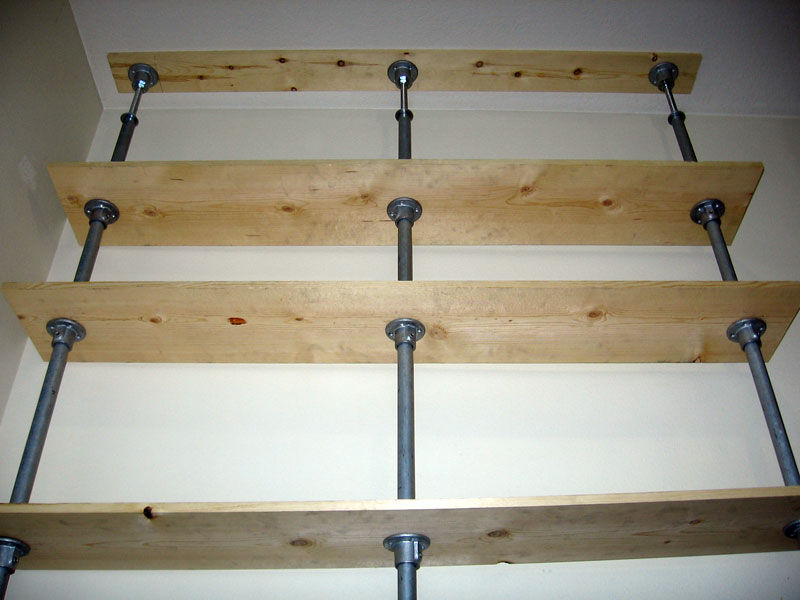 The author made a clamp between two pipes (short and long) at the top of the rack, under the stream. But later he came to the conclusion that a short pipe is not needed here, the clamp can be arranged in such a way that it will rest directly against the flange. The presence of a small pipe weakens the stability of the rack (see photo 11). Do not forget to rinse the pipes in soapy water before installation.
Next, cut holes in the shelves for pipes. The author advises putting all the shelves on top of each other, and on the marked upper shelf, as by patternDrill all three holes in all the shelves at once.
Mounting a shelf is not difficult, just collect the shelf from below according to the step-by-step photo of the master class located below in the gallery.


https://i.expert-h.com/en/polki/polki-iz-trub-svoimi-rukami-210-foto-chertezhi-makety-instruktsii#sigFreeId0ec82ba233
Bookshelf made of pipes backlit.
Do it yourself. Master Class.
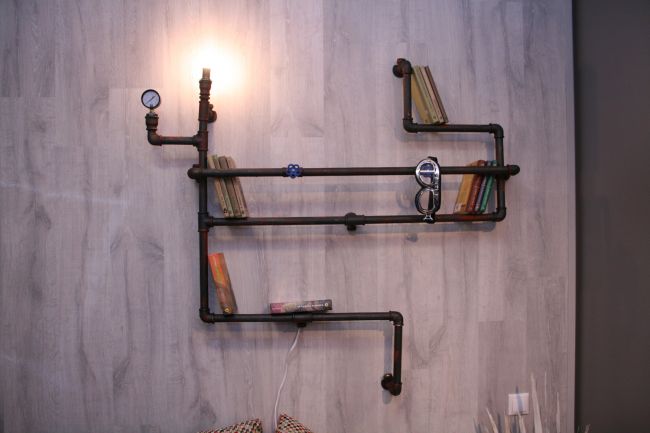 You can call this shelf POLKA-BRA, tk. a distinctive feature is the presence of a luminous element - light bulbs. This shelf will look great over the place where you like to read books, for example, over an armchair or bed. The manufacture of this shelf is not difficult, so you can learn everything from the step-by-step photos located below


https://i.expert-h.com/en/polki/polki-iz-trub-svoimi-rukami-210-foto-chertezhi-makety-instruktsii#sigFreeId56636c2e34
How to make a hanging shelf for books from pipes
See phased photos of the master class


https://i.expert-h.com/en/polki/polki-iz-trub-svoimi-rukami-210-foto-chertezhi-makety-instruktsii#sigFreeIdde1a95f296
5 most popular pipe shelves and racks
Do-it-yourself simple pipe rack
 A simple rack that you can easily make if you have the appropriate material. The peculiarity is that shelves just lie on pipes without any cuts, unlike the following option. All parts can be bought in the store, so the size and shape of the rack completely depend on your desires. This rack from treb is perfect in the garage for tools, in the nursery for toys, in the bathroom, in the kitchen for kitchen utensils.


https://i.expert-h.com/en/polki/polki-iz-trub-svoimi-rukami-210-foto-chertezhi-makety-instruktsii#sigFreeIdb93c5405fa
Tight pipe shelf
 The peculiarity of this shelf is that the pipes surround the shelves. In the shelves cuts are made in the cornersthrough which pipes pass. This type of shelf is suitable for places where you need to save space, for example, in the kitchen. Also, this option is perfectly converted into a shelf.


https://i.expert-h.com/en/polki/polki-iz-trub-svoimi-rukami-210-foto-chertezhi-makety-instruktsii#sigFreeIdb641a3369c
Shelf made of pipes with "flying" shelves
 Feature. This pipe shelf is that the shelves no longer lie on the pipes, but are mounted on props. The supports, in turn, are attached to the pipes, which in turn creates the appearance of levitation, shelves, as it were, hover over the structure. These shelves are suitable for "prominent" places in the house, for example, in the living room, common room, bring an aesthetic decorative effect.


https://i.expert-h.com/en/polki/polki-iz-trub-svoimi-rukami-210-foto-chertezhi-makety-instruktsii#sigFreeIdb8fbb716c5
Shelf "plug"
 The simplest shelf from this list is that it uses only two varieties of metal parts for the frame. This is a pipe and a flange (see photo). This shelf is usually free-standing.


https://i.expert-h.com/en/polki/polki-iz-trub-svoimi-rukami-210-foto-chertezhi-makety-instruktsii#sigFreeIda9f7577582
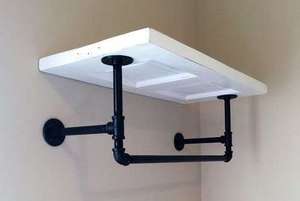
Pipe wall shelf
 This shelf attached to the wall. The design uses 4 varieties of metal parts (see photo). The assembly and installation of the shelf does not present anything difficult, see how this is done using the step-by-step photos below.


https://i.expert-h.com/en/polki/polki-iz-trub-svoimi-rukami-210-foto-chertezhi-makety-instruktsii#sigFreeIde916434464
Pipe and door shelf
 Nice combination water pipe shelf and door. All this can be found at home, so there’s practically nothing to buy, except fittings and tees. Here's how to do it:
- Step 1: Cut the door to size.
- Step 2: Wash with soap and water.
- Step 3: Sand the surface.
- Step 4: Paint color of your choice.
- Step 5: Cover with sealant. The author used a polyurethane spray. Follow the instructions for sanding between coats and drying time.
- Step 6: Plan the layout of the pipes and parts.
Below is a list of required materials..
- 4x ½ "flange fittings
- 2x ½ "pipe 2.50 m.
- 2x ½ "90 ° Turn Signals
- 2x ½ "Tee
- 2x ½ "12 cm ½ pipes (vertical brackets)
- 2x ½ "2.5cm fittings 1x pipe as long as you plan to make a shelf.
- Step 7: Paint the pipes and fittings. The author used glossy black paint. Also, the screw heads are sized to match the flanges.
- Step 8: Prepare the shelf. You can do as the author suggests, or use another way of attaching to the wall (“L” brackets, supports, etc.)
- Step 9: Assembly and installation. Connect the two parts and attach to the wall. Make sure you use good anchors.
- Step 10: Sit back, relax and enjoy your work.


https://i.expert-h.com/en/polki/polki-iz-trub-svoimi-rukami-210-foto-chertezhi-makety-instruktsii#sigFreeId4e8a8902aa
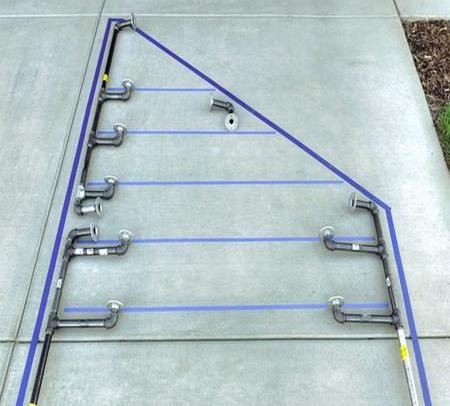
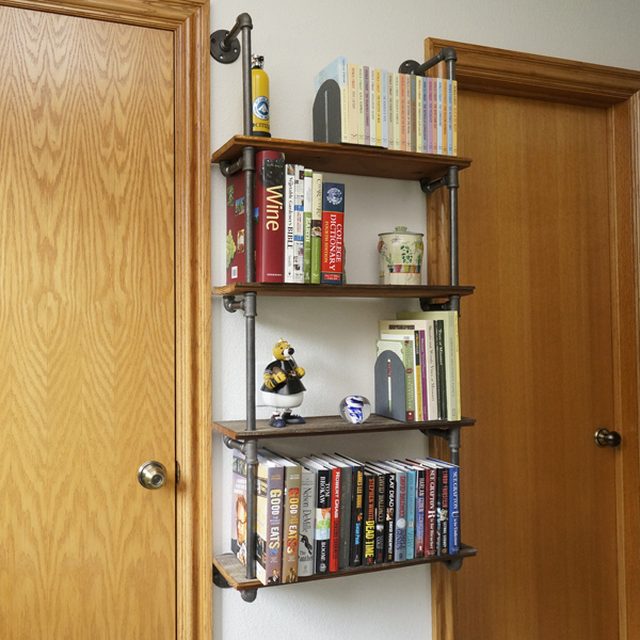
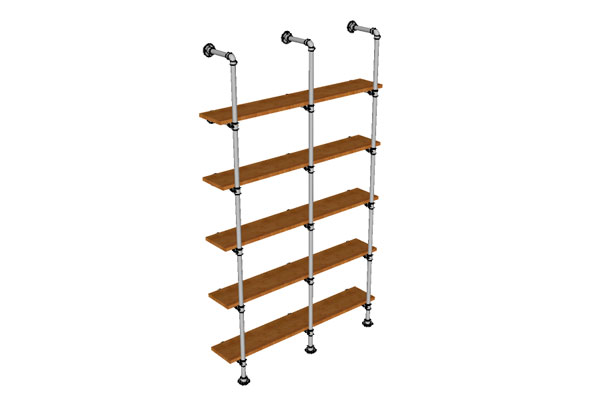
Three-tier pipe bookshelf
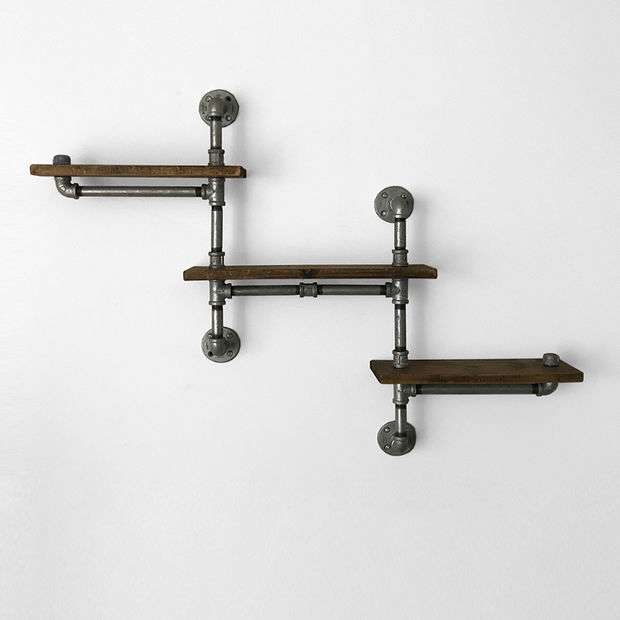 The shelf from pipes, it is fresh, stylish, original. You probably already saw a lot of pictures on the Internet, and if you were interested in the price, you probably imagine how much they cost. Maybe for someone it's not so expensive, but then again, why spend on simple shelf for books from pipes your money. Simple, not in terms of design, but in terms of manufacturing complexity. Such a shelf can be done with your own hands.
How, look at the step by step photos and read the instructions.
Materials:
Drywall Bolts
- 6 x 0 "(only connectors that pass through the tree)
- 4 x 1 "
- 4 x 3 "
- 2 x 4 "
- 2 x 7 "
- 2 x 12 "
Pipe fittings
- 4 x flange
- 6 x turn signals
- 4 x T fittings
- 5 x pipe connectors
Step 1: Cut the shelves, if you have a circular saw, then you can do it yourself, if not, order.
Step 2: Collect the pipes. The photo shows how to assemble all the parts. The author drew colored fragments in the picture and in the description below to help you chart and show how the parts fit together.
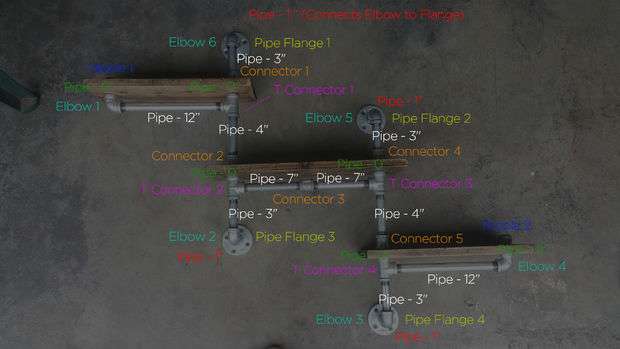
- 6 x 0 "(light green - you can see how they pass only through the wood - they no longer need)
- 4 x 1 "(red)
- 4 x 3 "(white)
- 2 x 4 "(white)
- 2 x 7 "(white)
- 2 x 12 "(white)
- Pipe connectors
- 4 x pipe flange (greenish yellow)
- 2 x End Caps (Blue)
- 6 x Turning 90 ° (blue)
- 4 x T fitting (pink)
- 5 x pipe connectors (orange)
Step 3: Pipe installation: You need to drill six holes with a diameter of 2.5 cm to connect everything. An easier way to do this is to collect the pipe cuttings and then use the exact dimensions to mark the locations of the holes. The photo shows the drilled holes for each section.
Step 4: Paint the wooden parts of the shelves with any color (s) you like
Step 7: Installing the pipes: Part 2. You can insert pipes through the holes without using glue or screws.
Step 8: Pipe Installation: Part 3. Complete Assembly. Take the assembled sections and inserted wooden shelves through the drilled holes.
Step 9: Fix the shelves to the wall.


https://i.expert-h.com/en/polki/polki-iz-trub-svoimi-rukami-210-foto-chertezhi-makety-instruktsii#sigFreeId64b4d5a788
 Shelf made of pipes and pallets
If you have never used these materials before, then shelf made of pipes and palletsmay be an interesting solution. At least in terms of savings, you will definitely win. Pallets come in different shapes and sizes, in this case they were used with a width of boards of 14 cm.
It will take a little to assemble materials:
- (2) 3/4 long water pipe 1.80 m.
- (2) 3/4 "Flanges
- (16) Screws and anchors
What you need to do to assemble a shelf from pipes and pallets:
- Disassemble the pallet
- Saw the side walls, cut through the middle support and cut the boards.
- Sand the boards.
- Mark the studs so that they are not accidentally screwed in.
- Make markings where the pipes will be attached.
- Use a straight edge to align both pipes.
- Align the upper pipes with a level.
- Drill through holes.
- Fix the anchors to the wall.
- Screw on the flange and screw in the pipe.
Install pallets boards.


https://i.expert-h.com/en/polki/polki-iz-trub-svoimi-rukami-210-foto-chertezhi-makety-instruktsii#sigFreeIdddee0e678b
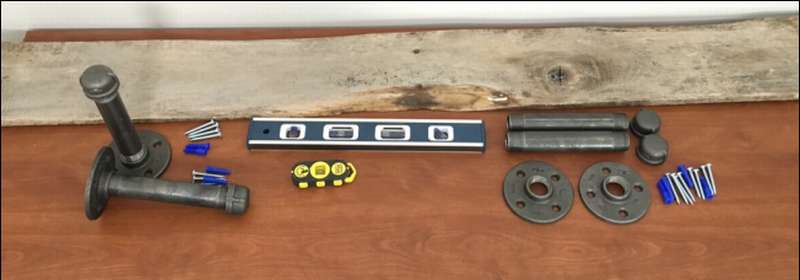
High shelf of water pipes
 Here you can find out how simple make a shelf of water pipes yourself for the kitchen, bedroom or any room in your home. A little hard work and this shelf will be completed in just one day.
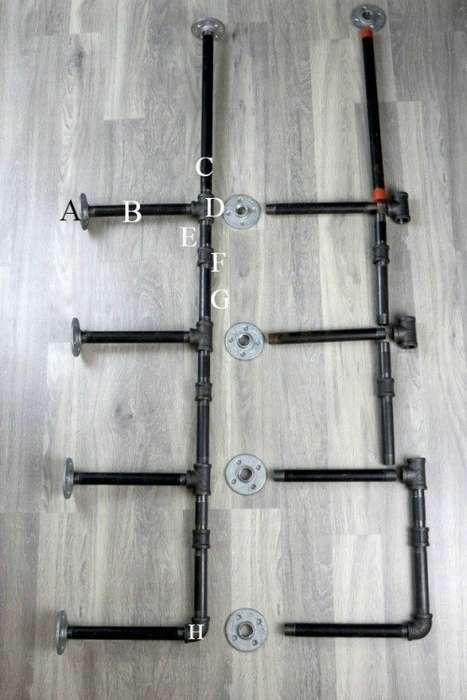 What you need, see the picture:
- 3/4 "flanges 10 pcs - 8 for wall, 2 for ceiling
- B - 3/4 "x 10" pipe (x 8)
- Pipe C - 3/4 "x 18" (x 2)
- D - 3/4 "Three Way Tee (x 6)
- E - 3/4 "x 3 1/2" pipe (x 6)
- F - 3/4 "connector (x 6)
- Pipe G - 3/4 "x 6" (x 6)
- H - 3/4 "90 ° Turn Signal (x 2)
- anchor bolts and screws (not shown)
- boards - 4 'x 10 "(x4)
- spray paint for metal
to simplify assembly, you can replace the materials E, F and G with 3/4 "x 10 tubes
Assembly order:
- Wipe the pipes to remove residual oil or grease
- If you want all the parts to be the same color, in the color of spray paint.
- Saw off boards for the shelf of the necessary size.
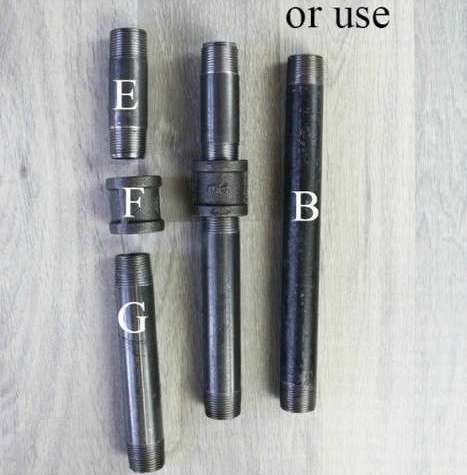 Assemble the vertical pipes using the 3/4 "socket (F) to connect the 3/4" x 3 1/2 "pipe (E) to the 3/4" x 6 "pipe (G).
- Repeat this step for all 6 vertical pipes. Note: if you want, you can skip this step and use a 3/4 "x 10" pipe.
- Use a 3/4 "three-way tee (D) to connect the assembled vertical pipes (E, F, G) and connect the horizontal pipe (B) as shown in the photo.
- Screw flange (A) to the open end of the horizontal pipe.
- For the lower flange, attach the vertical pipes (E, F, G) to the 90 ° turn signal (H).
- Attach the “horizontal” pipe (B) and flange (A).
- Attach the top vertical pipe (C) to the top of the tee (D) and screw flange (A) to open the end (C) of the pipe.
- For now, place the assembled unit against the wall and flush the ceiling. Use the level to make sure it is level and mark the places on the wall where the anchors will be mounted.
- After inserting the anchors, align the assembly and secure it.
Install the boards in the block, and that's it!


https://i.expert-h.com/en/polki/polki-iz-trub-svoimi-rukami-210-foto-chertezhi-makety-instruktsii#sigFreeId4fc5b7ba5c
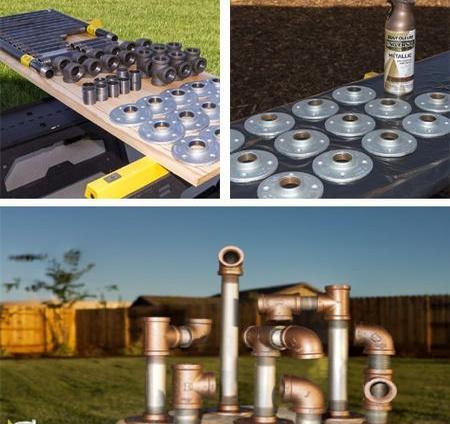
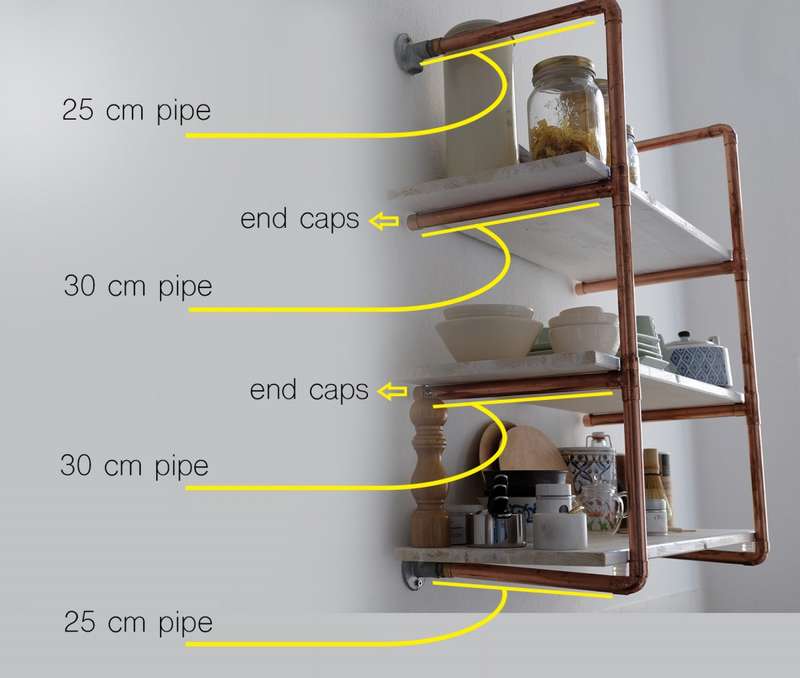
Copper tube kitchen shelf
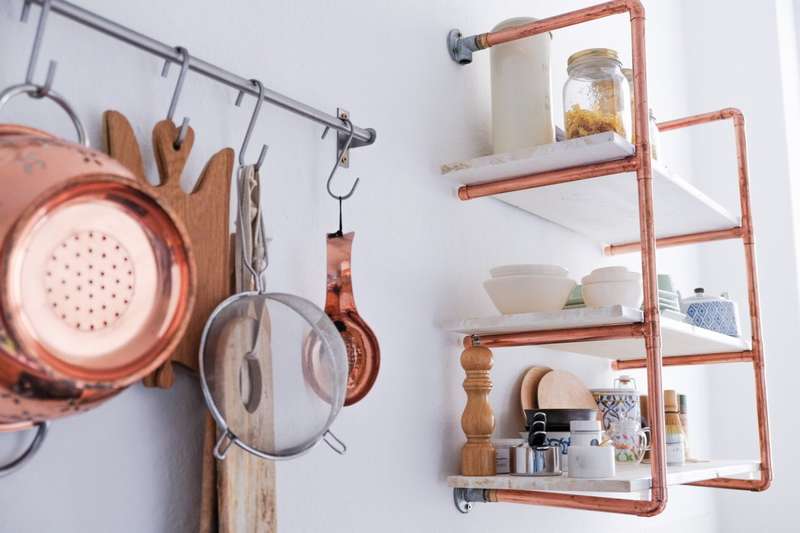 So stylish copper tube shelf can really become an adornment of your kitchen interior.The author also really likes his product, so he decided to share how to make such a kitchen shelf from copper pipes with his own hands. Below you can see the photos and read the brief instructions. True, the author did not take step-by-step photos, but on the other hand, the pictures with sizes and arrows indicated the main details that you need to pay attention to. The inscriptions are in English, but there are only a few words: pipe trumpet, connector connector, corner piece corner piece, end caps caps, flange flange, copper screw connector copper screw. More detailed information is on the website of the source, a link under the gallery.
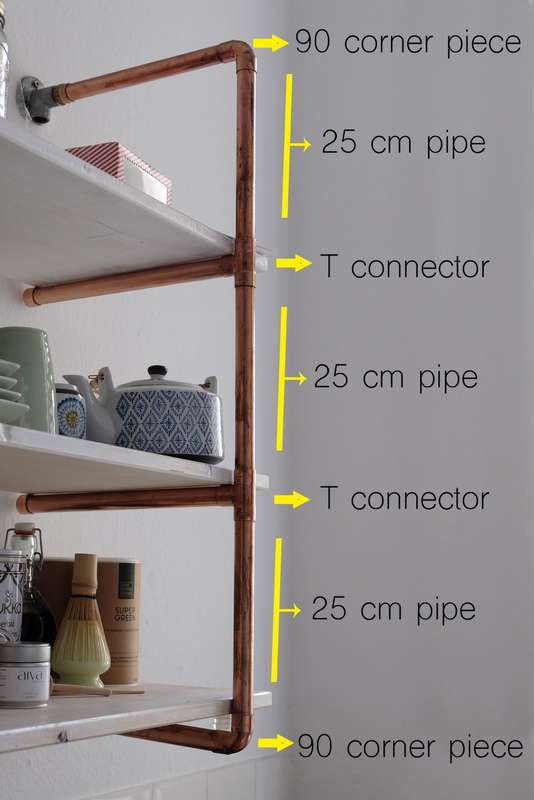 First, start with the parts you need:
- copper pipe (used tubes and fittings 1/2 inch)
- 4 x 90 ° turn signals
- 4 x T connectors
- 4 flanges for wall mounting
- 4 connectors for screwing the copper pipe onto the flanges
- 4 caps for tube boards of any width and length that suit you.
- super glue (the author used a quick-drying two-component epoxy resin)
- polishing paste
- White paint
- transparent coating for copper pipes
- For shelves, the author used three panels measuring 30 x 80 cm painted white.
Start by trimming the copper pipe to the desired size. In this case, it is 10 x 25 cm and 4 x 30 cm, of course you can make your own sizes, depending on the size of your kitchen.
Trimming, polishing and joining
 Using a pipe cutter is very simple. Tighten it and twist around the pipe, then again tighten and twist until you cut it. Just don't overdo itso that there is no dent or bend. The most difficult thing is to achieve accuracy and cut off all pipes of the same length.
Then connect the segments. Mix epoxy and apply to the inside of each fitting and the outside of the pipe. Twist to ensure even glue distribution. Assemble the two vertical front parts first. Make sure the connections are parallel. This is the most important part and the most difficult. If the connectors are not parallel, then when you connect the supports for the shelf, they will move in different directions. Therefore, it is better to check again. For now, leave to dry overnight.
The next day connect the remaining pipes. Screw the caps onto the four middle pipes, but leave the two upper and two lower pipes without connectors, this should be done later when you fasten the shelf to the wall. Paint the boards and varnish the copper pipes if you want them to remain shiny. Copper oxidizes rapidly.
When the paint is dry, assemble the shelf. First, screw the copper connectors into the flanges, and then fasten them to the shelf brackets. Mark the places where the holes will be. Then drill holes and screw on the flanges. Put epoxy on pipes and a copper screw and connect them. Hold for about 10 minutes to dry the glue and leave overnight. The next day, put the wooden boards in place!
The shelf is finished!


https://i.expert-h.com/en/polki/polki-iz-trub-svoimi-rukami-210-foto-chertezhi-makety-instruktsii#sigFreeId2b42191cc4
Shelf made of copper pipes and pallets
 You might like this option. shelves made of copper pipes and pallets. Super lightweight design with minimal material costs. All parts of the shelf used by the author are used. The only parts that I had to buy at the store were flanges and a copper cover.
That's what it took:
- 2 1/2 "flanges
- 2 1/2 "copper adapters
- 1/2 "copper pipe
- 2 1/2 "copper T-connectors
- 1 1/2 "copper cap
- Various copper parts for appearance
- 1 pallet
- Tools:
- Saw
- Drill
- Roulette
- Sandpaper
Operating procedure:
- Dismantle the pallet and cut the desired shelf size. Also make the crossbar from the parts of the pallet, as in the photo. You can paint or millet varnish, it’s your best for the interior.
- Measure the wall and draw a line where the shelf will be installed.
- Cut the copper pipes to the required length.
- The flanges will protrude 1.5 cm from the wall, and the bottom of the pan 12 cm from front to back
- Cut holes.
- For the front parts, cut 2 pipes of 10 cm
The great thing about this project is not necessarily accurate. Get creative, the latest photos show a few more possible configurations, so to speak, for inspiration.


https://i.expert-h.com/en/polki/polki-iz-trub-svoimi-rukami-210-foto-chertezhi-makety-instruktsii#sigFreeId72f712949c
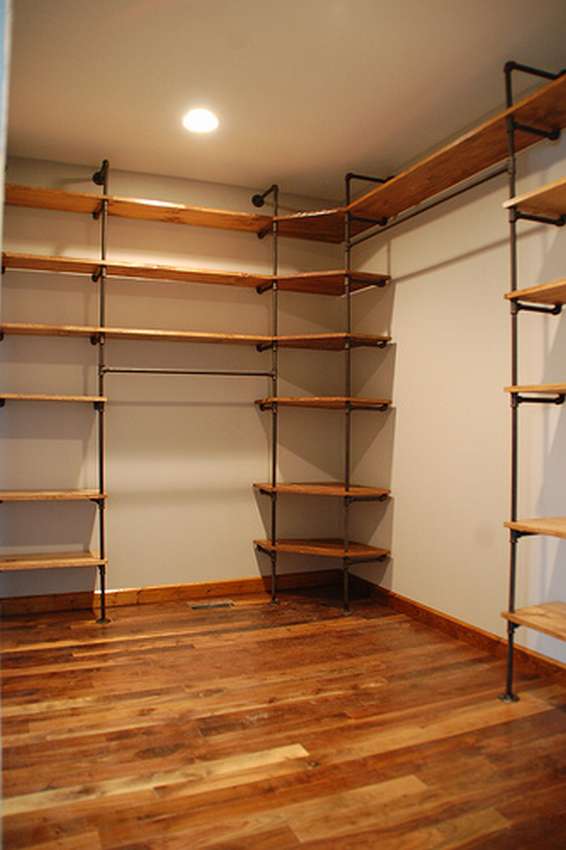
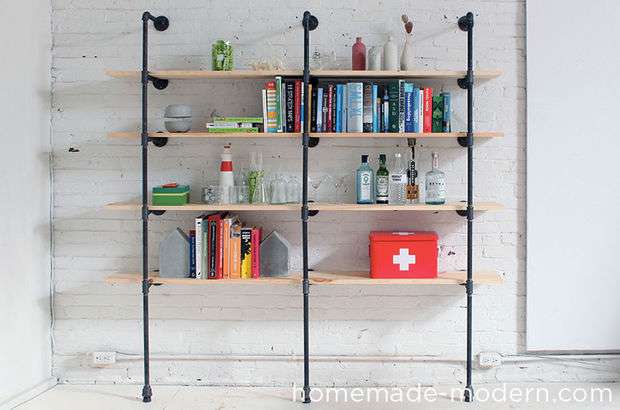
Floor pipe shelf
 There are many ways to use water pipes to make shelves. Of course pipes, the material is affordable, but if you make, say, a rack from them, then the option is not the cheapest. But this is a good investment, because pipe rack can be disassembled and adapted to almost any conditions. For example, if you rent an apartment or move often, this is a great alternative to giant bookcases or large shelves. Anyway, pipe shelf, the thing is convenient, both in terms of design, industrial style is now in fashion, as well as in terms of functionality - you can use it as a bookcase, a rack for dishes and accessories in the kitchen, or even as a wardrobe, if you upgrade a little.
Materials
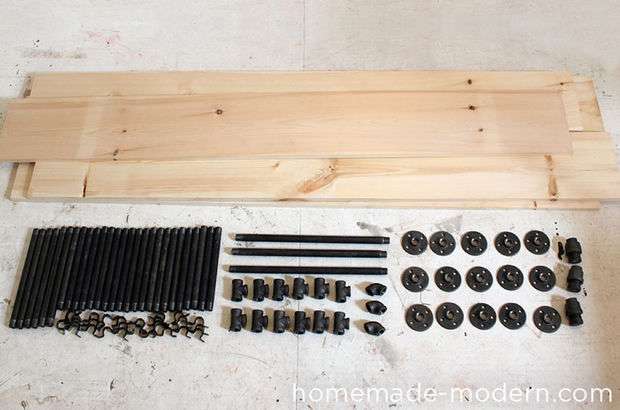 pine boards
The author used boards 25 cm wide and 1.80 m long. You can make shelves from wider or narrower boards, the main thing is that they correspond to the length of horizontal pipes.
1/2 "diameter black iron pipe + fittings
The author recommends using a vertical set of pipe supports about every 70 cm of shelf length. In this case, with a shelf length of 1.80 m, 3 supports are installed located at a distance of 75 cm from each other.
Pipe clamps
Clips are metal hinges with which you can connect pipes to boards. Use 2 clamps for horizontal support and fasten them with screws.
Three stubs
3/4 "plug allows you to easily adjust the level of the shelf, although this is not an essential detail.
 Step 1: Cut boards so that in length the ends protrude 10-15 cm beyond the pipes.
Step 2: Sand the boards with sandpaper and treat with wood oil or varnish on an acrylic basis.
Step 3: Twist the pipes manually, but not very much.
Step 4: Attach flanges to Wall. Use a level to make sure the pipes are vertical before screwing the flanges into the wall. If the walls are drywall, use special anchors.
Step 5: If you want the shiny collars to match the black iron pipes, cover the clips with matte black paint from spray can.
Step 6: Fasten the connections.


https://i.expert-h.com/en/polki/polki-iz-trub-svoimi-rukami-210-foto-chertezhi-makety-instruktsii#sigFreeId0e1d178361
 How to make an industrial-style pipe shelf
If you have a narrow and long room, then you need an appropriate interior. Therefore, you will probably be interested to know how to make an industrial style pipe shelf, which is ideal just for such a room. The industrial style is in fashion today, you can, for example, glue the walls with brick-like panels, hang a steampunk lamp, make chairs and a table from pipes, then the version of the home-made shelf offered here will be very useful. Think, you might actually try to change the environment.
To prevent the brick from looking like panels, fill the joints with wooden filler and sand well.
The author used 3/4 inch black iron pipes, although this is a matter of taste, you can buy galvanized pipes instead of black ones.
 Also, the author bought 5 cm thick boards for a shelf, but if you want, of course, you could save money by buying thinner boards. Grind them well before installation.
First, collect the bottom row of pipes, then temporarily put on the floor where the shelf will stand.
Screw the flanges to the floor. Use a 1 and 1/4 inch drill to drill holes.
The photo clearly shows how the first shelf was installed, so the same for each shelf.
Since the last pipe from above should reach the wall, use a 20 cm pipe. Attach a flange to it, and then screw it into the wall.
In the photo on the right, you see the dimensions of the pipes used in inches inch, this translates to inch, and inch, this is 2.54 cm.


https://i.expert-h.com/en/polki/polki-iz-trub-svoimi-rukami-210-foto-chertezhi-makety-instruktsii#sigFreeId6f595a6adb
18 diagrams and 82 photographs of pipe shelves


https://i.expert-h.com/en/polki/polki-iz-trub-svoimi-rukami-210-foto-chertezhi-makety-instruktsii#sigFreeId1f032b8f79
Actually water pipes - universal material. If you are attracted by the industrial style, then pipe shelves will appeal to you.There are many options that you can realize at home.


https://i.expert-h.com/en/polki/polki-iz-trub-svoimi-rukami-210-foto-chertezhi-makety-instruktsii#sigFreeId7a8673cd40
By the way, industrial style is very popular today.
Shelf in the bathroom from pipes
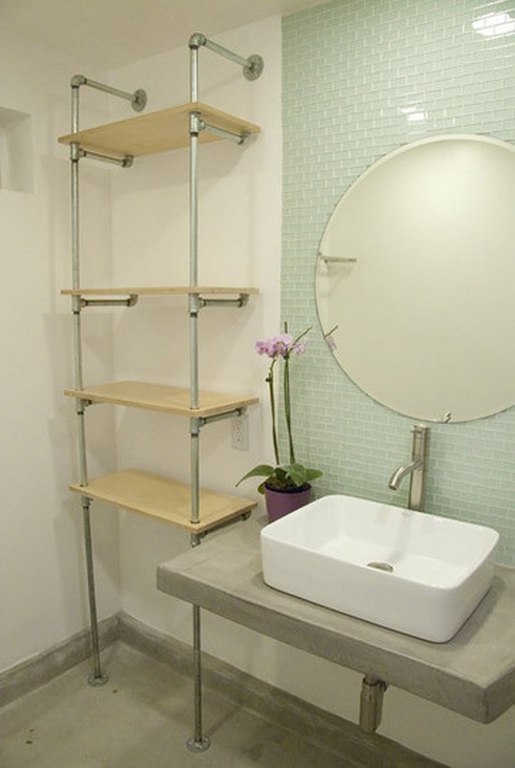 To make such a shelf out of pipes is not a difficult task, but you will have to work. The main task is to get the pipes. If you want to do everything yourself, you will need a grinder and a die and, accordingly, a complete set of locksmith tools. From materials, if you are going to make the same shelf in size as in the photograph, you will need to prepare:
- Two pieces of pipe 300, 260, 460 mm long
- 200 mm pipes for cross - 8 pieces
- 700 mm pipes - 2 pcs.
- Eight tees
- Ten knees
- 4 galvanized flanges
- Plywood 25 mm thick 600 by 300
First of all, we prepare all the details, cut the plywood according to the size of the shelves
- We drill holes in the shelves of 25 mm, grind, varnish or paint.
- We screw flanges on the lower ends of the pipes, tees on top, a horizontal pipe with tees at the end to the tees.
- We fix the next part of the pipe from above, and through the holes we “put on” the shelf.
- So gradually we collect the entire rack, at the upper ends we wind the flanges.
- Check the level, if necessary, adjust the shelves horizontally.


https://i.expert-h.com/en/polki/polki-iz-trub-svoimi-rukami-210-foto-chertezhi-makety-instruktsii#sigFreeId415c808dff
By the way, the flanges can not be screwed to the floor, but simply glued, unless you are going to store something very heavy on the shelves.
Photos by Michelle Chin, apartmenttherapy.com
Shelf for towel from pipes
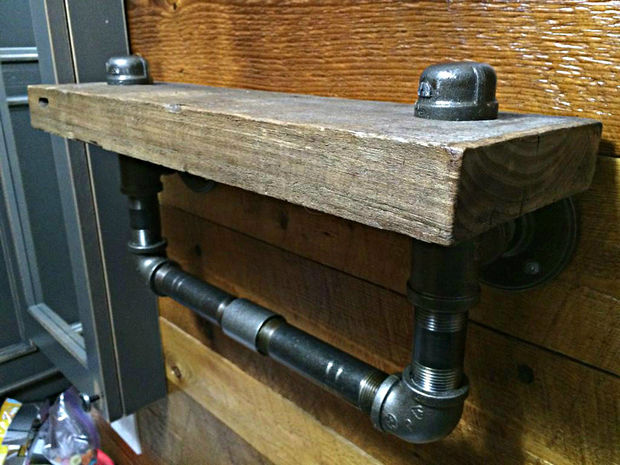 Why pay for pipe towel rack industrial style, if you can do it yourself. It shows how to make a water pipe and a small plank stylish bathroom shelf rooms with a crossbeam for canvas. You will need a thick board or bar, saw, drill, sandpaper, in general, everything you need is shown in the second picture. Steel water pipes and other parts can be bought at any hardware store without any problems. tools.
It is important to clean and degrease all parts. before assembly, because you have to varnish them to prevent rust. The best way, to buy a special spray like WEICON Surface Cleaner, there are many different types, ask in the store, they will tell you which is better to choose.
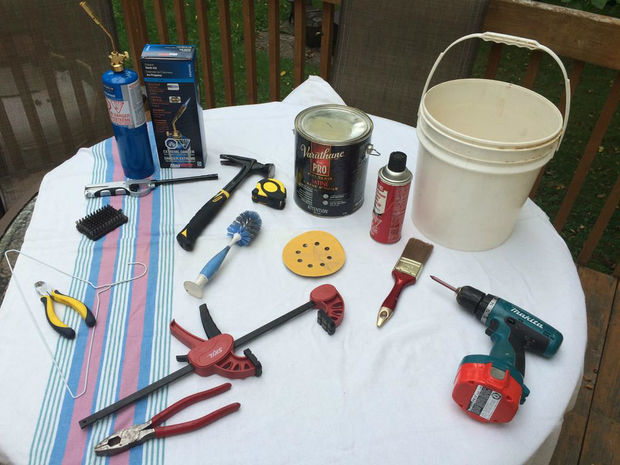 Spray on steel parts and brush with a wire brush. You can wash it with an ordinary detergent with water and dry it with a cloth. If you want your shelf to look beautiful, it is recommended to varnish steel parts. In addition, the bathroom has constant humidity, so protecting the pipes so that they do not rust will not hurt. The author used Veratane, because he did not want any shine.
Pipe assembly.
- Assemble the pipes and make sure that all parts are screwed to the same length.
- Saw a piece of the size you want from the board.
- To give the edges a stylish rustic look, tap them with a hammer, as shown in the photo.
- Then walk a little sandpaper to remove the roughness.
- Drill two holes.
- For a decorative look, you can scorch the board in an open flame and then remove the blackness with water and a wire brush.
- Be sure to varnish the inner walls of the holes, there will be constant contact with the metal and plus moisture will accumulate. Apply several coats to make sure that the dust does not stick to the wood.
It seems that everything remains to collect the shelf and hang on the wall


https://i.expert-h.com/en/polki/polki-iz-trub-svoimi-rukami-210-foto-chertezhi-makety-instruktsii#sigFreeId0915f184f6
Pipe toilet paper holder
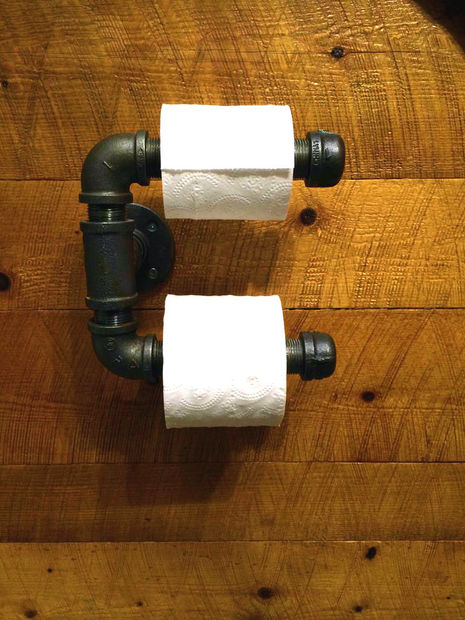 Do you like industrial style? Start with the design of the toilet room. If you are not a fan of all shiny, chrome or fake antiques DIY do-it-yourself toilet paper holderA good start to modernization. To get started, find or buy the parts you need. Inch pipes are ideal, well, if you use standard rolls. You will need:
- 1- T-fitting
- 1- wall mount
- 2-corner connections 90 °
- 1- long nipple
- 2- caps
Before assembly, it is important to clean and degrease all parts, because they will have to be varnished to prevent rust. The author for cleaning pipes from grease offers a proven way to buy any in the car shop engine cleaner. Pop on the pipe, after two minutes rinse with plain water, wipe with a rag and you're done. Make sure the surface is dry and can be varnished. Apply at least two coats. Make sure that there is no rust in the corners, moisture usually accumulates there. The author used Veratane varnish to not shine.
Whenthe varnish will dry, the only thing that remains is to collect the parts and fix it on the wall with screws. Make sure that the screw heads are large enough to withstand loading. Put toilet paper on each holder and tighten the caps. To replace the rolls, you just need to unscrew the caps.


https://i.expert-h.com/en/polki/polki-iz-trub-svoimi-rukami-210-foto-chertezhi-makety-instruktsii#sigFreeId2c9a57073d
This is just one example. toilet paper holder can be made in a variety of optionsthat’s enough for fantasy. Some ideas can be gleaned from the submitted photos in this gallery.


https://i.expert-h.com/en/polki/polki-iz-trub-svoimi-rukami-210-foto-chertezhi-makety-instruktsii#sigFreeIdd1ab8d0c09
= What can I make shelves of:
|
from wood
Example: DIY flower shelves 230 |
from metal pipes
Example: Do-it-yourself pipe shelves |
from PVC pipes |
|
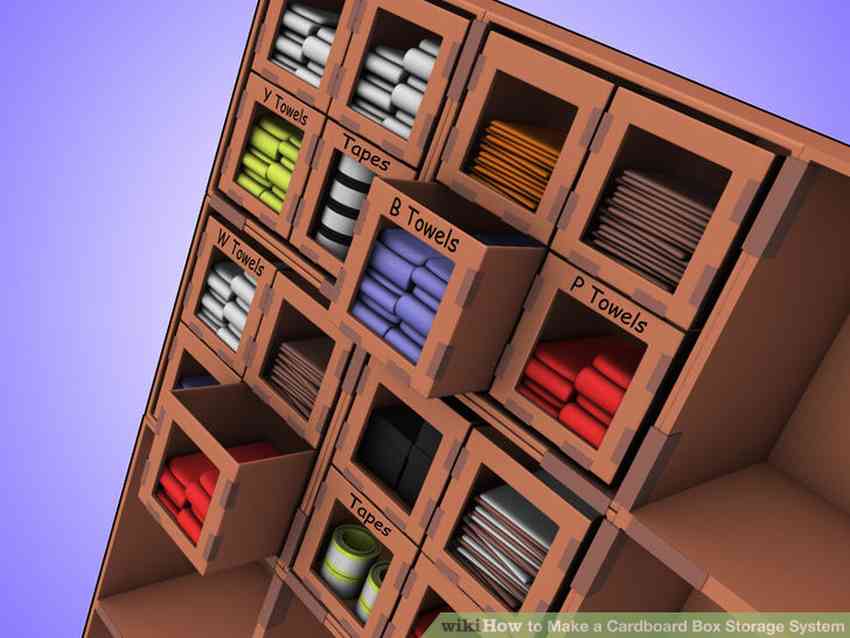
from cardboard
Example: Cardboard box shelving unit |
from paper | plasterboard |
|
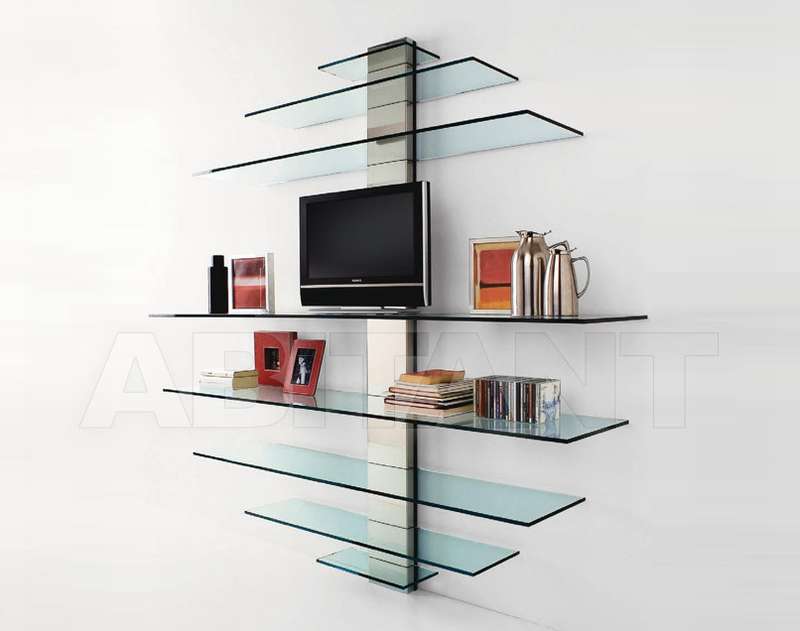
from glass
Example: Shelves in Art Nouveau style 180 photo do-it-yourself |
from old boxes
|
from pallets pallets |
| stainless steel | from glass | from old stairs |
| From bars |
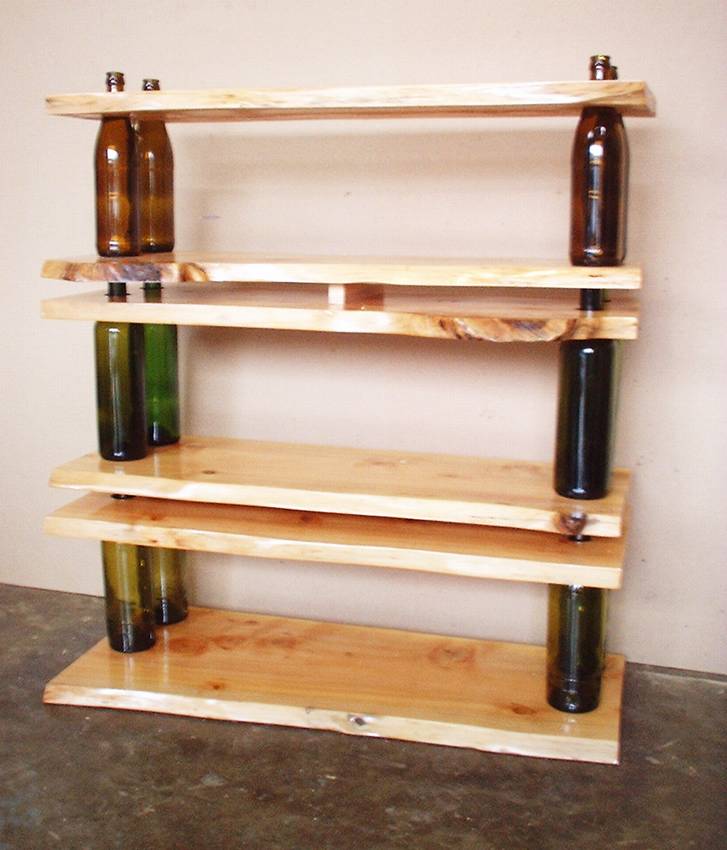
from bottles
Example: Glass bottle shelves |
from snags and branches Example: Book shelf made of twigs and snags |
|
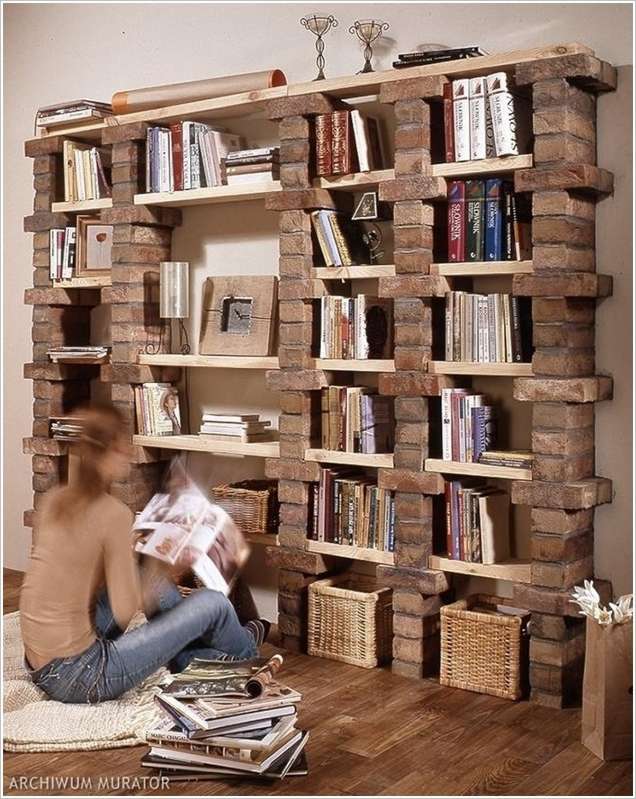
made of bricks
|
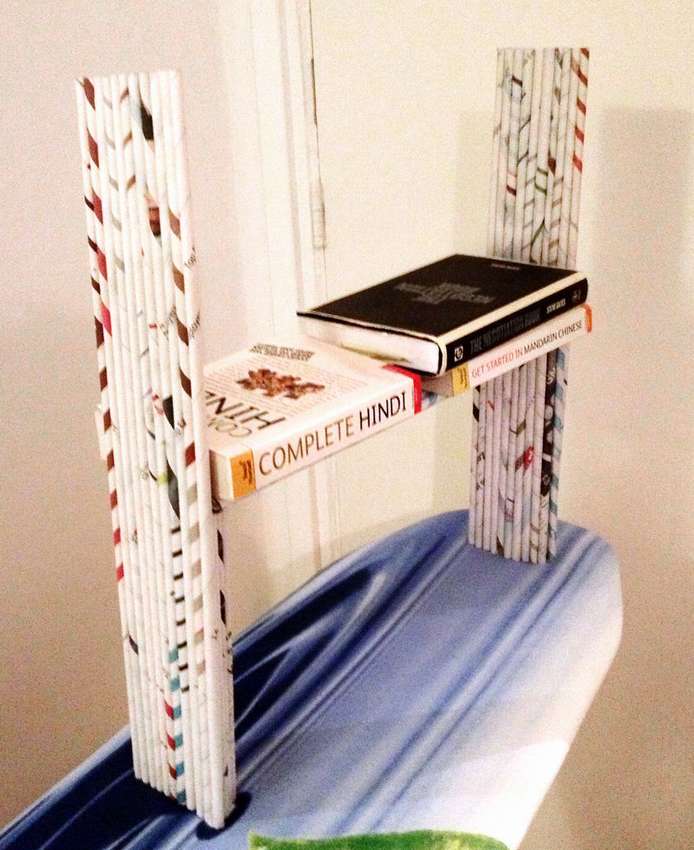
from newspapers
Example: Newspaper shelf |
From cans
Example: Do-it-yourself shelves in the kitchen: 456 photo drawings instructions |

= Methods of fastening shelves:
|
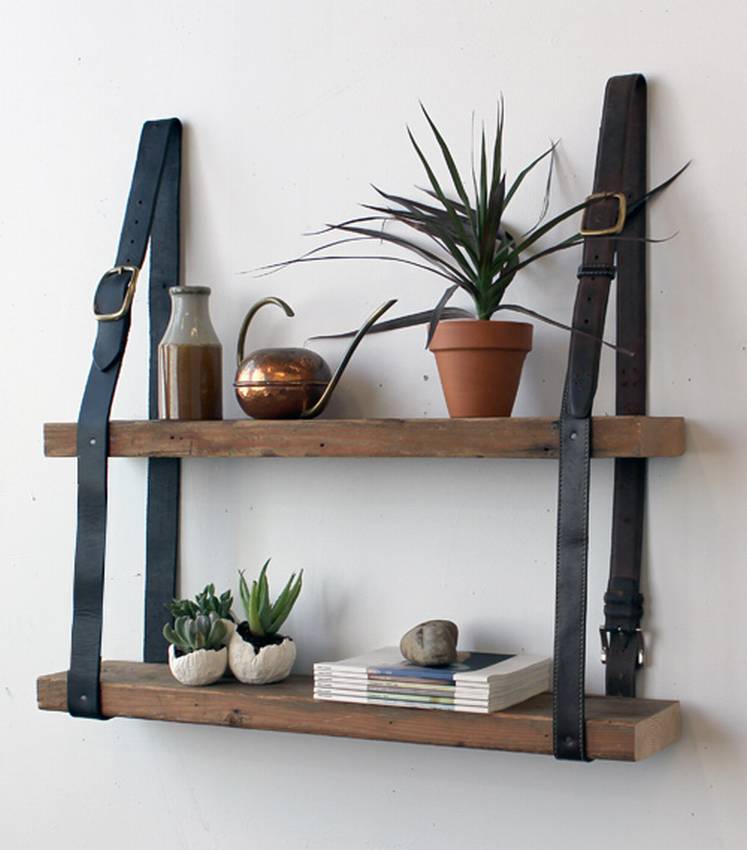
On the straps
Example: Shelves for books on belts |
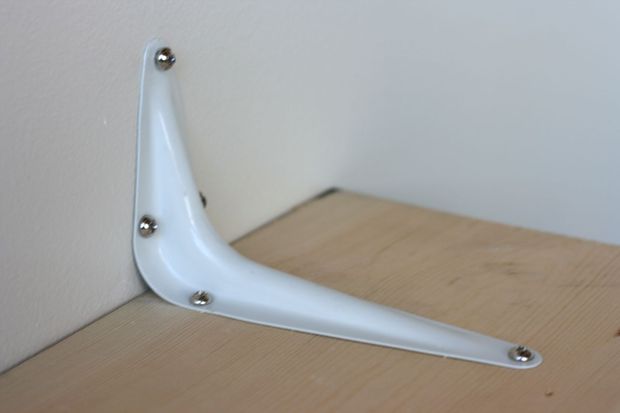
On brackets
Example: Inverted bookshelf |
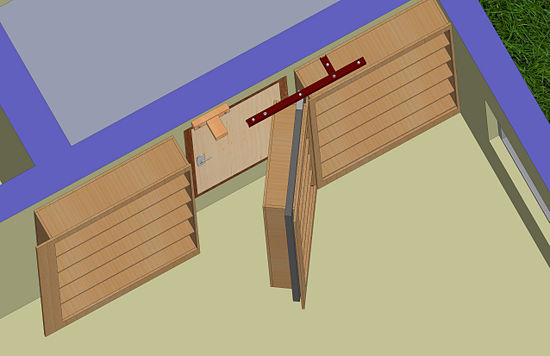
On hinges (hidden shelves) or articulated spiers
Example: Secret door - bookcase and shelfg |
| On the strings | On the ropes | On the pins |
|
On the clamps
Example: Rack of 3 pipes from floor to ceiling. |
On perforated rails | |
= What are the shelves:
|
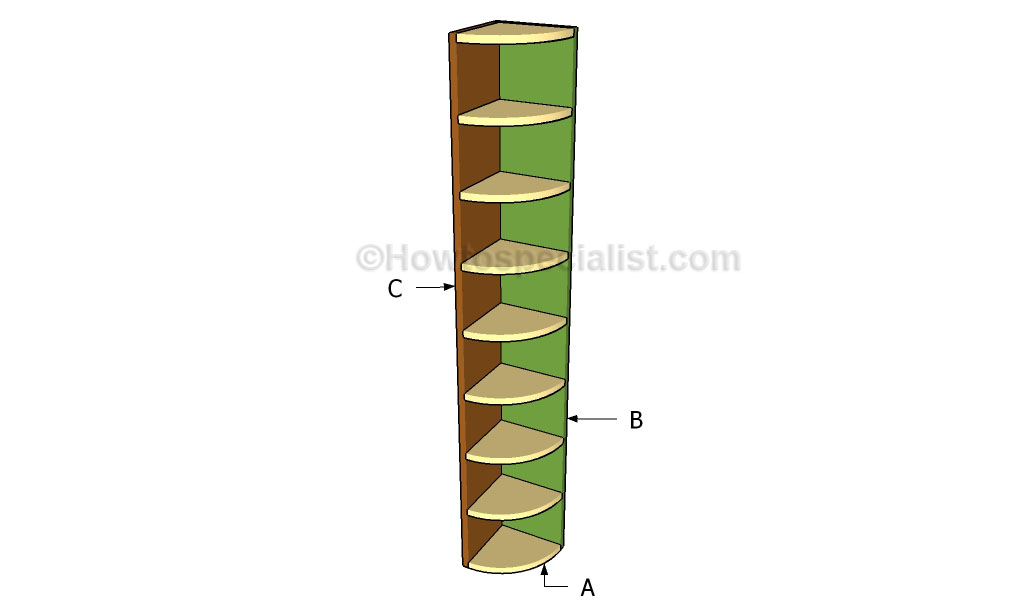
Corner |
Wall mounted
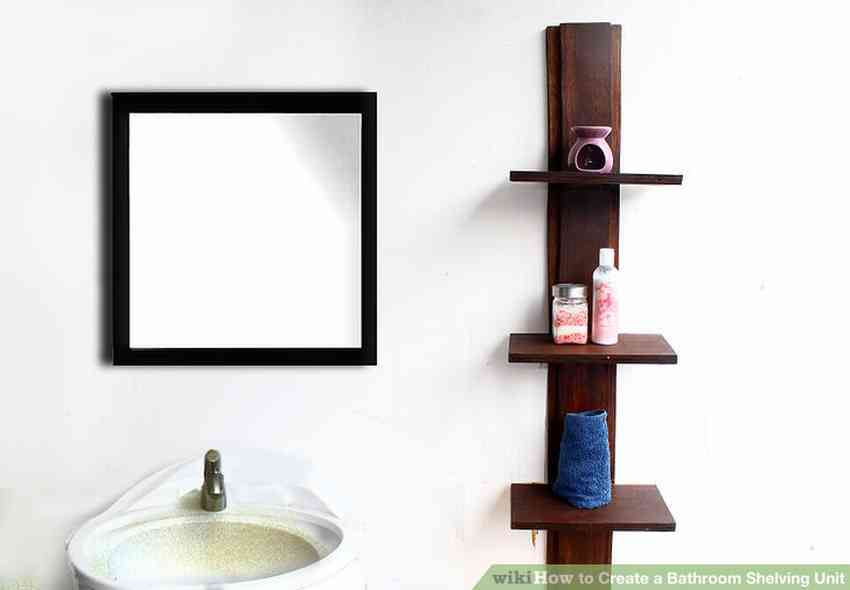
Example: Wooden shelf for bathroomss |
Mounted
|
| Outboard |
Floor
Example: DIY shelf in 45 minutes |
Under the ceiling
|
|
Shelving
Example: Do-it-yourself pipe racks: 180 photos, instructions, diagrams |
Whatnot |
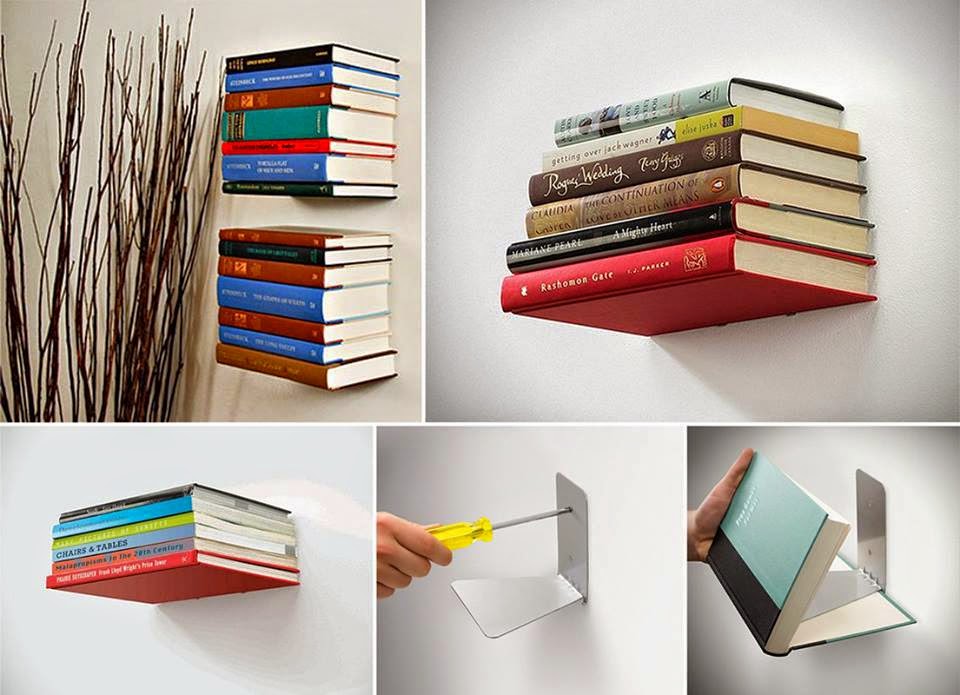
Shelf - Invisible
Example: Invisible bookshelf |
- Brick grill: 44 drawings, 18 projects + photos
- Collapsible barbecue: 50 drawings, 20 master classes +300 DIY photos
- ✿ Flowerbeds:> 34 turn-based master classes + photos (248 ideas) - do-it-yourself
- DIY sauna in the apartment: bathroom, balcony, storage room. Projects and photos
- Shelves in the bath with your own hands: +200 photo. Drawings of bench benches in the steam room