Do-it-yourself bathroom shelf 245 photos
 DIY bathroom shelf
Editor’s word:
Of course, various accessories can be viewed in any furniture catalog, but this collection contains photos of bathroom shelves, which do it yourself.
Article menu:
Wooden shelves for the bathroom
Layouts and drawings
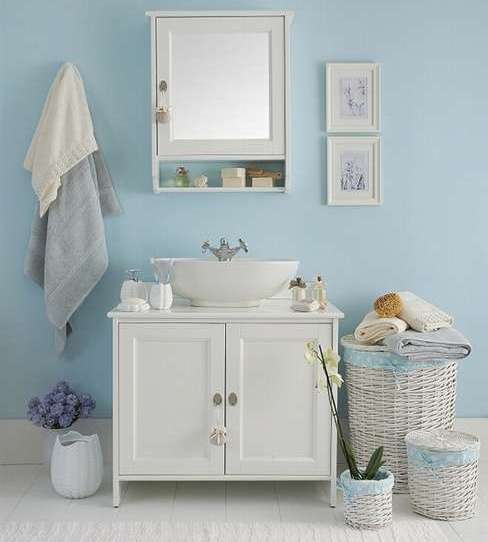
Wooden shelf for the bathroom
 You can easily make this wooden shelf in the bathroom with your own hands. All you need is a tree and self-tapping screws. The shelf will perfectly fit into any interior of the bathroom.
Tips:
- To increase the shelf life in a humid room environment, we recommend covering the top surface of the boards with a self-adhesive film.
- Also, to increase the functionality of the shelf, the author of the photo advises attaching homemade hooks to the bottom of the shelf so that you can hang jewelry, manicure scissors, hair accessories and much more.


https://i.expert-h.com/en/polki/915#sigFreeId0b2fd76a40
Wooden shelf in the bathroom with two shelves and two drawers
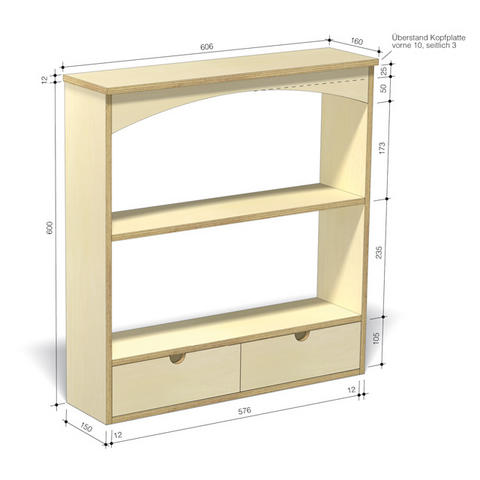
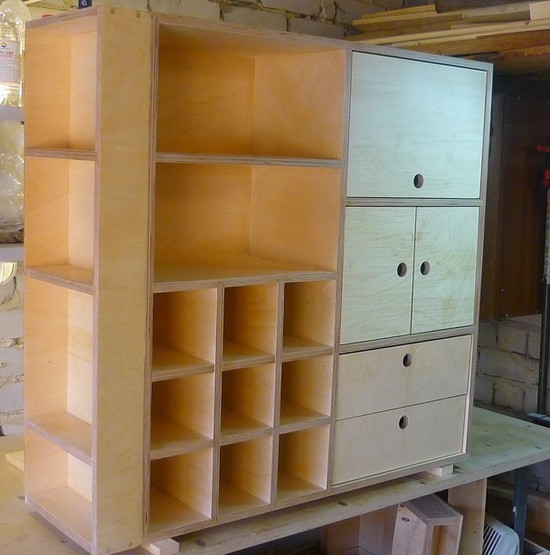
Shelf - a cabinet with two working shelves and two drawers. Shelf made of wood or plywood
Below you can see step-by-step photos of the master class on making such a wooden shelf for the kitchen with your own hands.


https://i.expert-h.com/en/polki/915#sigFreeId2ddfc29f67
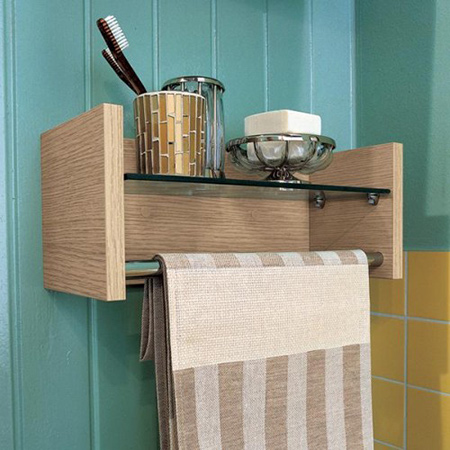 Wooden shelf in the bathroom with heated towel rail
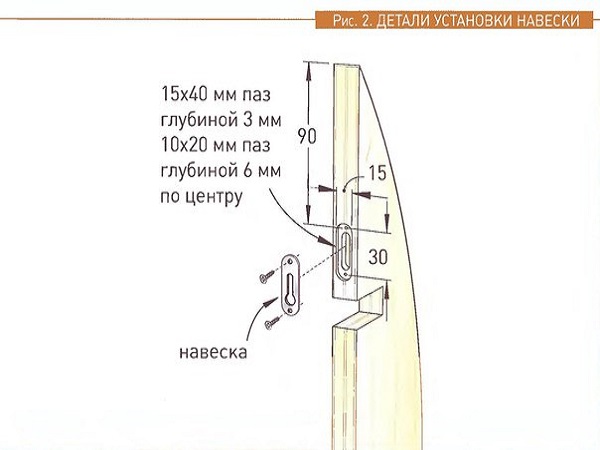
This practical wooden shelf in the bathroom using meranti, but you can replace pine or any other wood, the main thing is to match the interior of your bathroom. The main requirement for the material in rooms with high humidity is moisture resistance, with today's choice of paints and varnishes to solve this issue is not a problem. In order to fix the shelf to the wall, you can add key brackets on the rear panel, for this, mark the location of the brackets on the back side.


https://i.expert-h.com/en/polki/915#sigFreeId88e55299c4
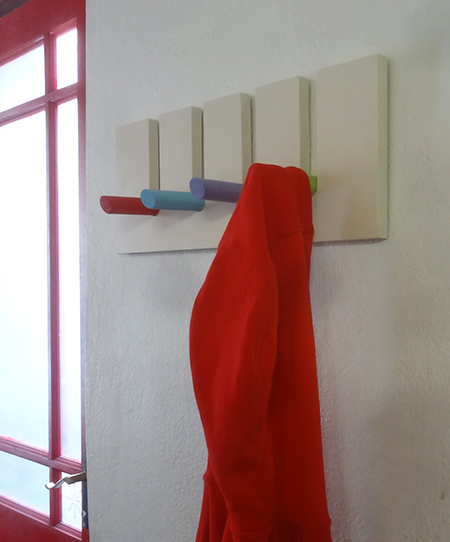 DIY towel bar
This rack is very convenient to use in the bathroom. She is simple, light and it’s not at all difficult to make such a towel hanger with your own hands. By the way, it can be used not only in the bathroom, if you slightly strengthen and increase the length of the board, then it is suitable for both the nursery and the hallway. When mounting, it is good to use Fisher dowels, they are great for attaching wall shelves and cabinets.


https://i.expert-h.com/en/polki/915#sigFreeIdd0fb6ff7c3
 DIY bathroom cabinet
With all the abundance, it is not so easy to choose the right furniture today, especially in such a purely individual place as the bathroom. Of course, furniture can be ordered, but if you are a millionaire, then you probably would not have been on this site. In general, let's look at how to make a locker in the bathroom do-it-yourself, the whole process is shown in step-by-step photos. It’s a pity, there is no final photograph of this product, but according to what it is, it is clear that the cabinet turned out to be nice and functional.
And with external decoration you can dream up.


https://i.expert-h.com/en/polki/915#sigFreeIdb68da6405b
Sliding bath rack


https://i.expert-h.com/en/polki/915#sigFreeIdde033a73a5
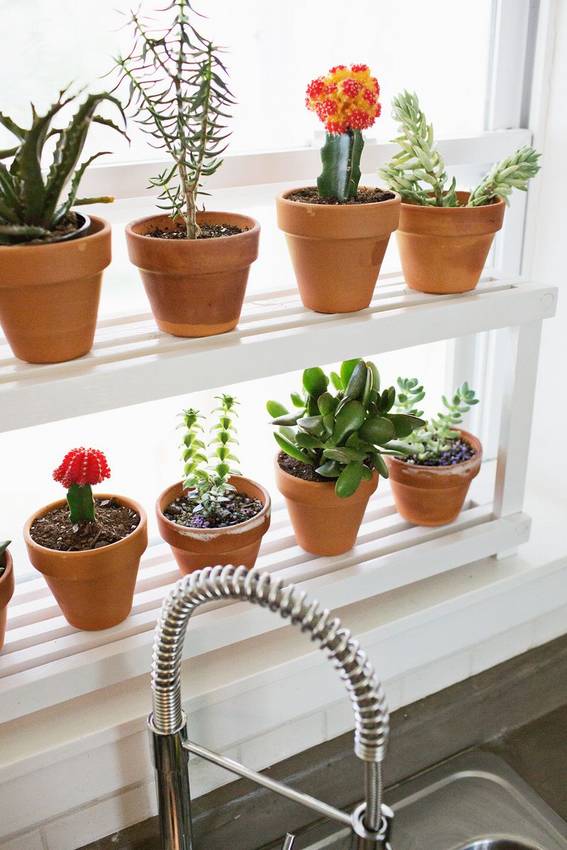
 Original flower shelf above the window
A shelf for flower pots can be placed above the window in the bathroom.
See the step-by-step photo of the manufacture:


https://i.expert-h.com/en/polki/915#sigFreeId348b3ed4fe
Shelf made of plywood (MDF) for accessories in the bathroom. Drawing scheme
 Shower or bathroom shelf made of MDF plywood, which you can easily do with your own hands according to the drawings indicated below.
1) We cut 5 blanks of the shelf from plywood (see drawing). To do this, it is convenient to make a template from hardboard or durable cardboard and circle it on plywood, and then cut out the details.
2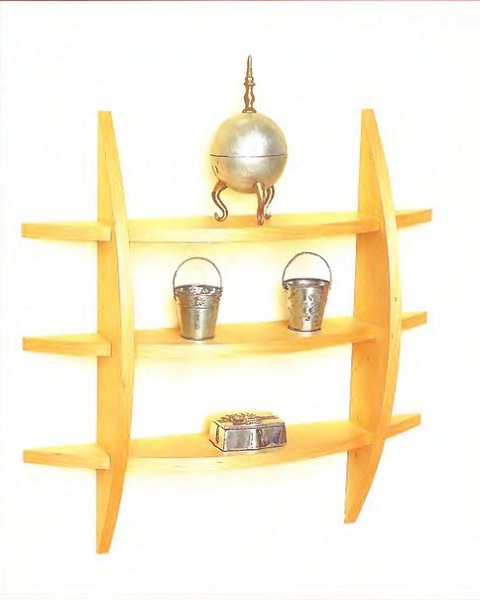 ) On the vertical racks at the back, we outline the location of the hinges and with a groove cutter (chisel, etc.), carefully cut out the grooves under them, all the while checking the accuracy of their location and the compliance with the metal hinges.
3) The outer ends of the plywood are glued with an edge band of veneer.
 4) We assemble the entire structure with PVA glue and self-tapping screws, first check to see if the angle is 90 degrees.
5) We cover our hinged shelves with stain or varnish and screw in the hinges.
This shelf will look great also from solid pine or other wood species. The main interest and desire.
Photo from Wood Magazine
Simple shelf in the bathroom chipboard
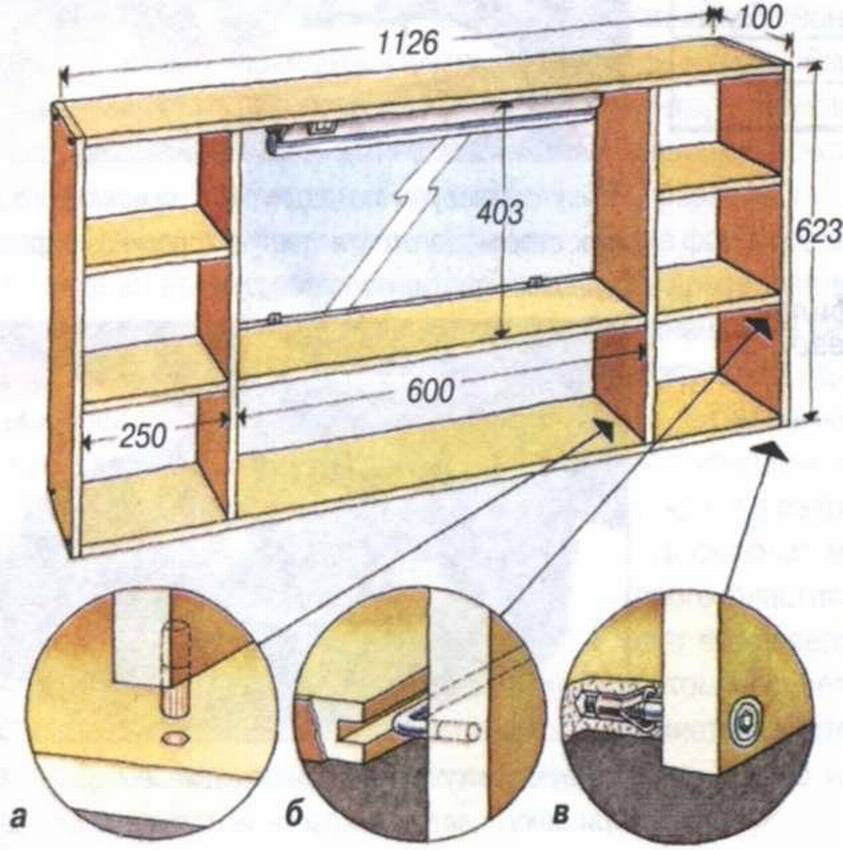 As you can see from the drawing of the shelf there is nothing complicated in it, everything can be done with your own hands.
It is possible to make a shelf from a chipboard coated with a moisture-resistant film with a thickness of 13 mm or more.
After marking and sawing a chipboard sheet into parts, you need to choose one of the three ways to assemble the shelf frame shown in the figure. In the first case - with the use of screw ties with wedged inserts, in the second - with the use of dowels with glue, and in the third - with the help of wire holders Ø4 mm.
 The outer edges of the frame and shelf boards are glued self adhesive tape. It is smoothed through a paper pad with a hot iron. After the adhesive has set, excess tape is carefully removed along the length with a sharp knife or file.
You can attach a lamp to the top board of the shelf. Also, any of the shelves can be easily turned into a cabinet by hanging a door with a magnetic latch on furniture hinges.
Magazine "Sam" №11-2000
Small rustic shelf in the bathroom
Drawing scheme


https://i.expert-h.com/en/polki/915#sigFreeId69b3834150
Shelf for flowers on the windowsill in the bathroom
Wooden shelf under the flower pots on the windowsill with your own hands. Step by step photos.


https://i.expert-h.com/en/polki/915#sigFreeId3756bfba93
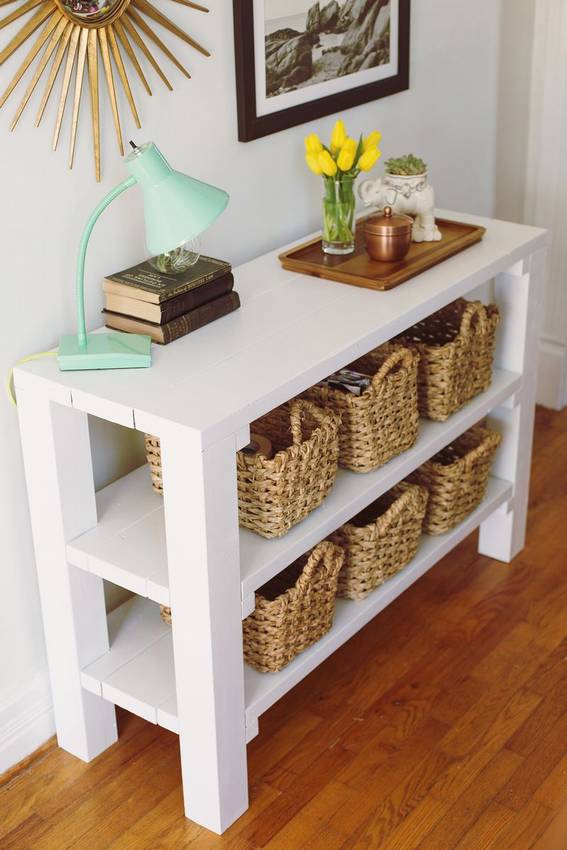 Floor shelf or table with shelves in the bathroom
Most likely this option relates more to tables than to shelves. But still, we placed this model here, because We hope that this option of personal organization will be interesting to you, and most importantly useful, because when arranging a home, one must keep in mind all the options !!!
See below for step-by-step photos of the master class


https://i.expert-h.com/en/polki/915#sigFreeIdb4247dbfc4
Floor shelf for a bathroom
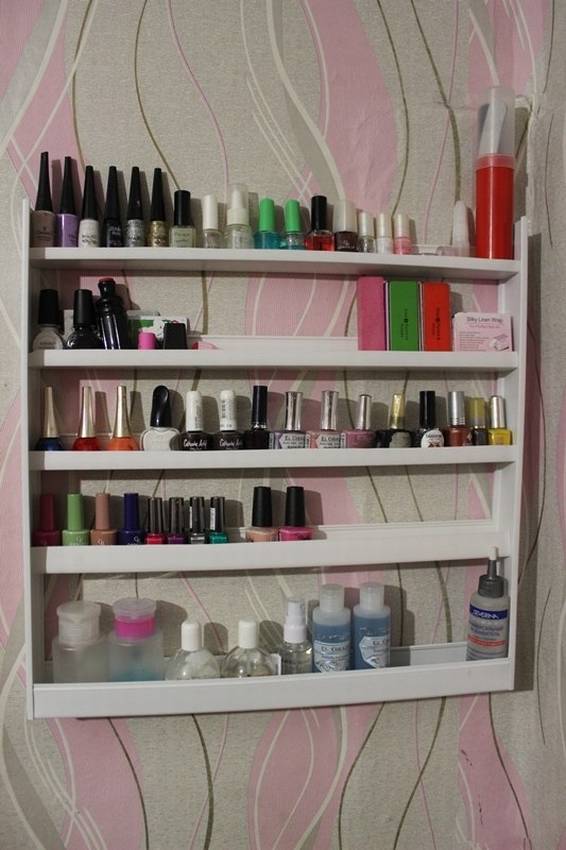
 Instead of storing towels and other bath items in the hall closet, keep them within reach of bathroom shelf. A similar design can be done in one day, an approximate time for a person with minimum skills of 6 hours.
The bathroom cabinet consists of five shelves with a lattice structure for ventilation with a gap between the planks of 1.2 cm. The lower shelf has a height of 18 cm to fold wet towels.
Below are the tools and materials needed to assemble the bathroom cabinet: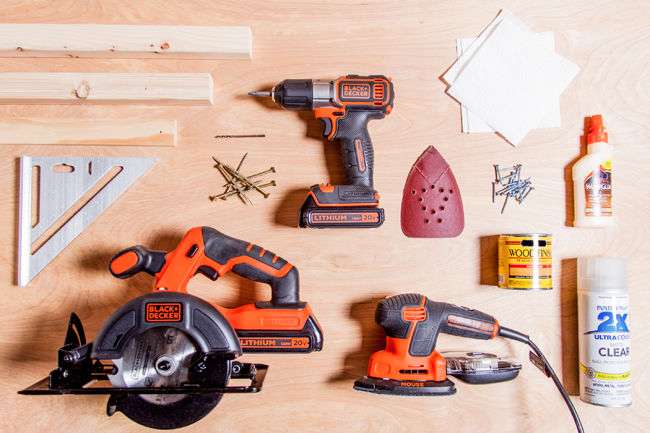
How to make a bathroom shelf
Saw workpieces in the following sizes:
- (4) bars of 1.80 m for legs
- (10) pieces of fronts to support a shelf 45 cm long
- (10) pieces of bars for attaching a shelf 25 cm long
- Also file strips for the grilles of the 35 cm shelf
Tip. Use S4S bars for planks if you cannot find lattice molding. S4S means that the board is sanded from all four sides.
Sand the parts with sandpaper at all corners and edges so that they are smooth and free of debris.
Drill two through holes at both ends of each rail.
Tip. The holes should be slightly smaller than the diameter of the screw to prevent splitting of the tree and small enough for a tight grip.
Assemble shelves
- Install two 45 cm shelves. Apply glue to the ends of the two 25 cm shelves and place them between the 45 cm supports in which to drill two through holes.
- Fasten the joints with screws to form a 35 x 45 cm rectangle.
- Repeat this process to collect the remaining four shelves.
Set the bars
- Apply glue to the ends of the two planks, covering an area of 2 cm. Sq. At both ends.
- Starting from the support frame, install the slats perpendicular to the sides of the frame.
- Install five more slats between the two outer rails; the distance between them is approximately 1.5 cm.
- Repeat the same process to complete the other five shelves.
Tip. Cut a 1.5 cm workpiece to fit between the rails for a convenient layout.
Determine the position of the shelf
- Place all four legs on a flat surface, parallel to each other and flush at the ends.
- Measure the upper end of one leg, mark every 40 cm with a total of four marks. Draw a line by connecting all the marks to indicate the centers of the shelves.
- Continue the line around each leg.
Tip . The upper shelf will be flush with the upper ends of the legs, so here you do not need tags.
Assemble a shelf and two legs
- Place two legs parallel to each other on a flat surface at a distance of 35 cm.
- Apply glue to the upper surfaces of the legs in one of the places on the shelf using lines.
Place the shelf on the legs
- The outer edges should be flush with the outer sides of the legs.
- Drill a hole through the support of 45 cm, turning it to the center of the leg.
- Attach the support to each leg with screws.
- Fasten the rest of the legs
- Repeat the process with the other two legs, that is, set on a flat surface and apply glue.
- Line the shelves.
- Drill guide holes and screw the shelves to the legs with screws.
Wood protection against moisture
- Apply the dye with a soft cloth and let it dry in accordance with the recommended drying time.
- Spray a light coat of spray varnish.
- When dry, sand manually with sandpaper and apply another coat of varnish


https://i.expert-h.com/en/polki/915#sigFreeId6b1dd8f347
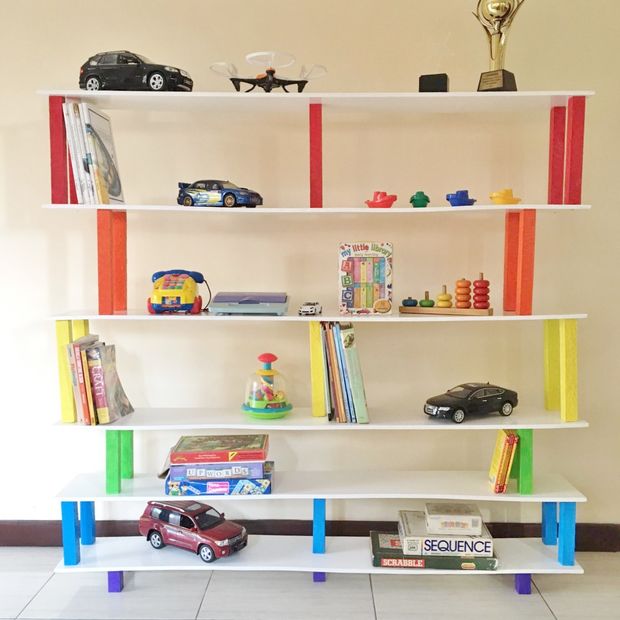
Bathroom rack
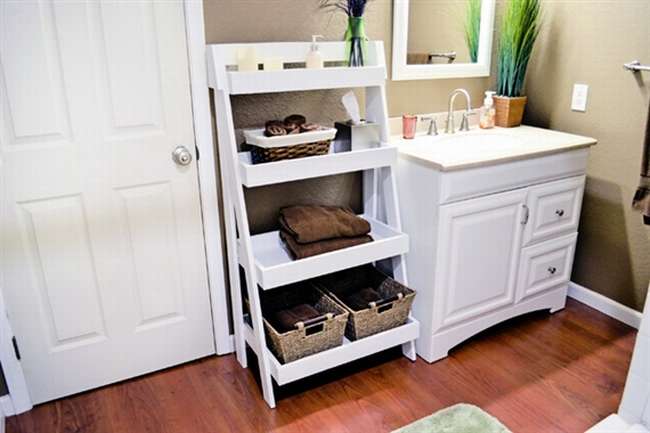 Layered racks for the bathroom Provide ample storage space, look stylish and without taking up too much space. This convenient shelving cabinet consists of four shelves with a width of 60 cm, a depth of 40 to 10 cm. The design is not complicated, if you have basic skills in carpentry, that is, you can use ordinary tools, then if you have all the materials, you can easily assemble the rack for 4 to 5 hours.
The picture below shows the tools and materials that you will need to work.
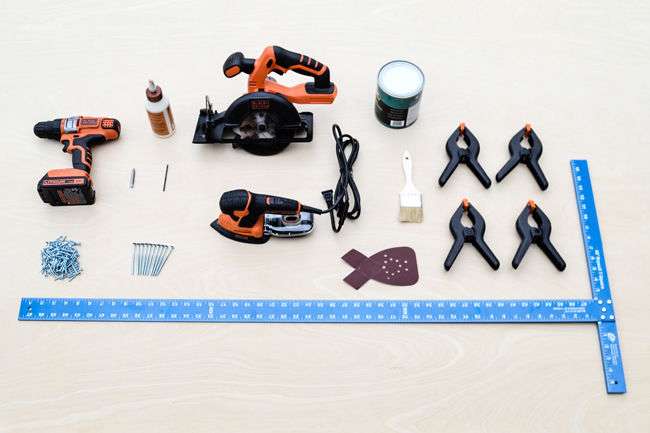 Instructions on how to make a do-it-yourself bathroom rack
1 Cut the bottoms of the shelves. Use a circular saw to cut a sheet of plywood. Use the resulting template 60 x 120 cm to saw the rest of the workpiece for the bottom of the shelves:
- 40 x 60 cm
- 30 x 60 cm
- 20 x 60 cm
- 10 x 60 cm
2 Cut the plywood into strips. Saw off six 8-centimeter wide strips from the remaining sheet of 120 x 180 cm plywood. This will be your stock for legs and shelves.
3 Cut legs.
- Cut out two front legs.
- Mark a 15 ° angle at both ends of each leg so that they are parallel to each other.
- At the upper end, from the corner, mark 2 cm along the upper edge.
- Then another one centimeter from the opposite corner.
- Connect the marks to create a line that grips one of the 15 ° angles.
- At the lower end of the leg, measure the angle and make a mark. Draw a line between the mark and the opposite corner.
- Cut the entire width of the sheet at the lower end.
Tip. Lower corners allow legs to stand on the floor. It is normal if these angles are not perfect. You can simply polish them, here a lot of precision is not needed.
4 Cut the shelves and the rear bar.
- 8 pieces of 65 cm for the front and rear
- 2 pieces of 40 cm for the bottom shelf
- 2 pieces of 30 cm for the second shelf
- 2 pieces 10 cm long for the third shelf
- 2 pieces 10 ms for the top shelf
- 1 pc 65 cm for the rear rail
5 Sand and assemble shelves.
- Sand the parts with sandpaper, rounding off all sharp edges.
- Apply glue to all four edges of the bottom of the first shelf and to the ends of the two side parts.
- Set the front, back and sides to the edges of the bottom, with the sides located front and rear.
- Drill additional holes from the lower edges of the front, back, and sides, positioning them 15 cm from the edges of the bottom.
- Repeat this step for each shelf.
You should also consider that the holes should be slightly smaller than the screws.The idea is that, on the one hand, the hole should be small enough so that the thread holds tight, but at the same time large enough so that the screw does not split the wood.
6 Cut your legs at an angle.
- Fold your legs in pairs.
- Place the hind leg over the corner foreleg so that the upper end of the front leg aligns and merges with the upper end of the hind leg.
- Use a pencil to draw a line where the parts overlap.
Tip. Cutting corners can lead to some errors. Therefore, install the shelves on the front and back legs, as if they were already attached to check how the legs connect from above. Cut the corner on the front foot accordingly. Do not worry if the corners do not turn out perfect. Most joints will be covered with veneered staples.
7 Align the legs together.
- Drill three evenly spaced through holes through the tapered top of the front legs to penetrate the hind legs.
- Apply glue to the rear edge of the front foot and fasten to the rear foot with screws.
- Repeat the same process to connect the second pair of legs.
- Let the glue dry.
8 Fasten the joints
- Saw two squares of plywood 15 cm each.
- Place them flush with the top of the joined pair of legs.
- Trace the outline of the two connected legs in a square, and then saw along the lines to make a bracket.
- Drill holes and screw each bracket to the outside of the legs with the screws in each leg.
9 The final stage.
- Pokraste regiment, although it is of course optional.
- But what is desirable to do is to varnish the surface to protect the shelving from moisture.
- Use a square and a pencil to mark the places on the shelves for the inner surfaces of both pairs of legs.
- Set the square at each mark flush with the rear edge of the hind leg so that it crosses the front leg at an angle.
- Draw the top of the square to represent the top of each shelf.
10 Assemble the block.
- Install the bracket between the pairs of legs so that it is flush with the tops and rear edges of the legs.
- Drill through holes through the brackets on the outside of the legs.
- At all ends, secure the brackets and legs to the rear rail with screws.
- Position all the shelves between the legs so that they are flush with the rear edges, and its upper edges are located on the location lines on the legs.
- Drill two through holes through all four legs and screw them into the shelves.
Tip. Assemble the rack by putting it on the back, so it is easier to fasten the shelves.


https://i.expert-h.com/en/polki/915#sigFreeId856e46076c
 DIY bathroom cabinet
This small wall cabinet - A useful item for the bathroom or kitchen, and a great project for a beginner carpenter to improve their skills. The main thing is that such a useful thing can be done at little cost. The whole case is made of one board 2.5 m long, though you still need additional material for shelving and towers. This design is made of pine, but it is not so important, chipboard and MDF are suitable, although MDF is perhaps better. Just be sure to apply several thin layers of polyurethane varnish, this is necessary for the wet environment of the bathroom. Here it is shown complete with a sink, but it's just, as an example, the cabinet is very beautiful to look separately.
How to make a bath cabinet
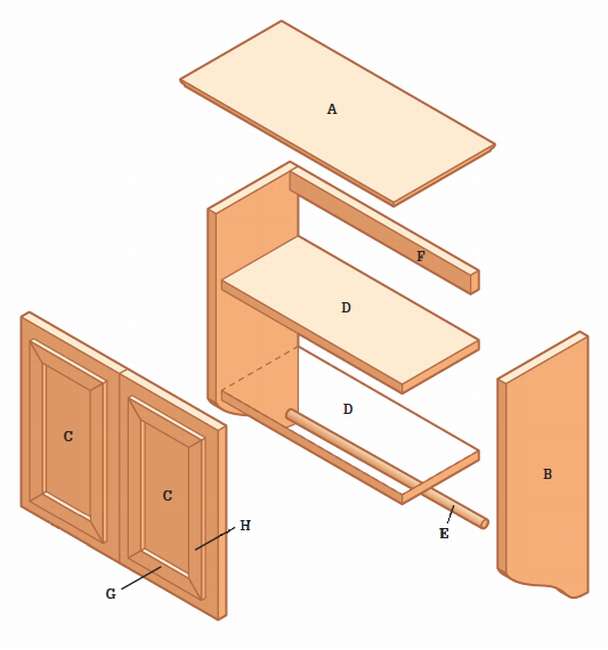 Cut off the top cover 48 cm.
- Saw out the doors and grind. The final width should be 23 cm. After the material has been prepared, cut the doors to length.
- Make a template. Cut the margin for the sides of the cabinet 18 cm wide or select a piece of 1 × 8 stem. Photocopy the drawing and use it to make a whiteboard template guide.
- Cut the profile. Fasten the two sides together so that the ends and edges are flush. Then use a jigsaw to cut the profile at the same time in both parts at the same time.
- Find the center point for the dowel hole. Drill a hole.
- Glue the ends of all three parts.To do this, lay the side boards on a flat surface lying in parallel and at the rear edges. Cut a 1 × 2 clip and 7-inch shelves 18 cm and 42 cm long. Then apply glue to the ends of all three parts and fix them between the sides of the cabinet.
- Strengthen bonded joints. Before applying glue, fasten hammer in nails on the sides and in each shelf.
- Insert the towel rail into the holes in the enclosures. Glue the ends of the towel bar into the holes in the sides of the cabinet, and then fasten them in place with a nail passing through the rear edge of each side.
- Corner mounts. Turn the fixing angles of the decorative frames to the door fronts.
- Painting. Paint the cabinet before you hang the doors and install the top of the cabinet.
- Install the cabinet doors. Be careful when installing the doors. Make the outer edges flush with the outer edges of the side panels. The vertices should be approximately 30 mm below the upper edges of the sides of the cabinet. Move the cabinet doors to chrome or nickel hinges.
- Attach the finished top of the cabinet. Attach the top by hammering a few nails into the upper edges of the sides of the cabinet.
- Install the cabinet on the wall. If possible, position the body so that it rests on two studs. Secure with screws through the wall stand.


https://i.expert-h.com/en/polki/915#sigFreeId6a0439fab2
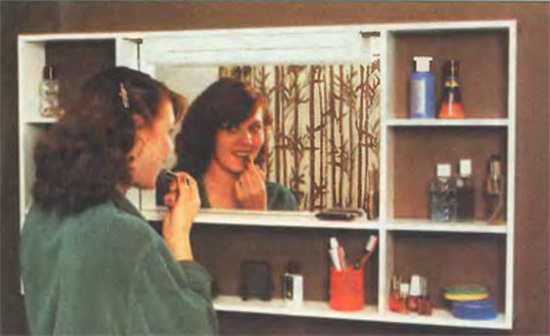
Bathroom cabinet with mirror
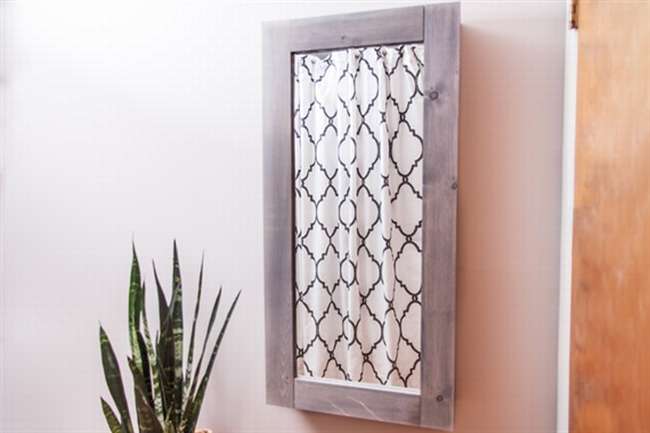 One more example, how to make a wall cabinet in the bathroom, just added a mirror. The cabinet has an internal depth of 14 cm, a width of 60 cm and 150 cm, with adjustable racks that are easily suitable for products of any height. Such a cabinet can be made by any novice master in one evening. I will not describe the assembly order, it is practically no different from the many numerical examples given in this article. Except that mirror installationbut nothing too complicated here.
Lay the door face up on a flat surface. Apply mirror glue to the plywood. Install the mirror in the hole. Place books or other heavy objects on top of the mirror so that the surfaces stick evenly. Let the glue dry and you're done. If you still need instructions, there is a link under the gallery, just copy and paste.


https://i.expert-h.com/en/polki/915#sigFreeId1ed2c594bd
Corner shelves in the bathroom (58 photos)
Glowing !!! wooden shelf
Author idea designer Matt Brown
 To make such a magical glowing shelf for a bath or shower with your own hands you will need embossed boards (with knots, notches, cracks of an unusual shape) and a mixture of polyester resins and fluorescent, luminescent pigments, you can buy on Ali.aliexpress.com/w/wholesale -pigment-resin.html
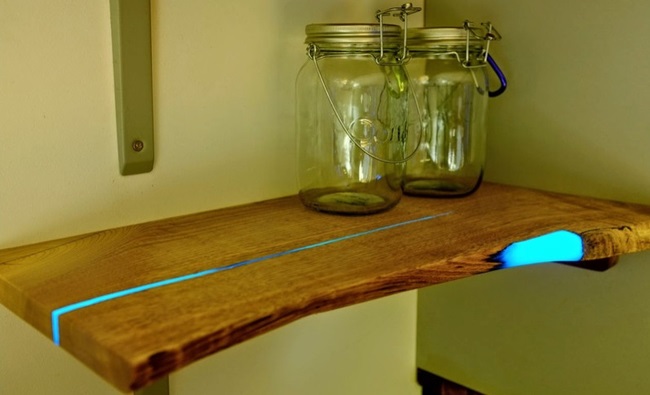 Pour the mixture into the cracks and seal the cracks with tape. When pouring, use the level so that the shelf is completely horizontal when pouring. Also, when pouring, make sure that the mixture does not spill over the edges of the cracks.
The next step is grinding. When everything dries, you can remove the tape and gently grind the surface.
Having finished grinding, cover the shelf with varnish-fixer in 8-9 layers
In the dark, the shelf will shine!


https://i.expert-h.com/en/polki/915#sigFreeId8c939e4263
If you distribute shelves with such luminous elements throughout the room, you get a beautiful planetarium.
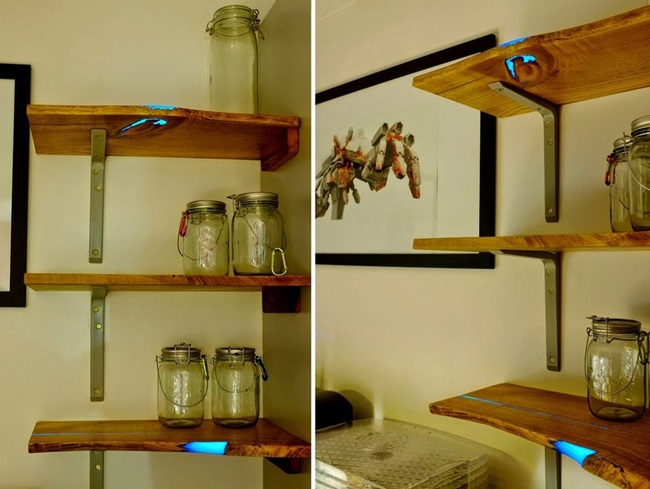
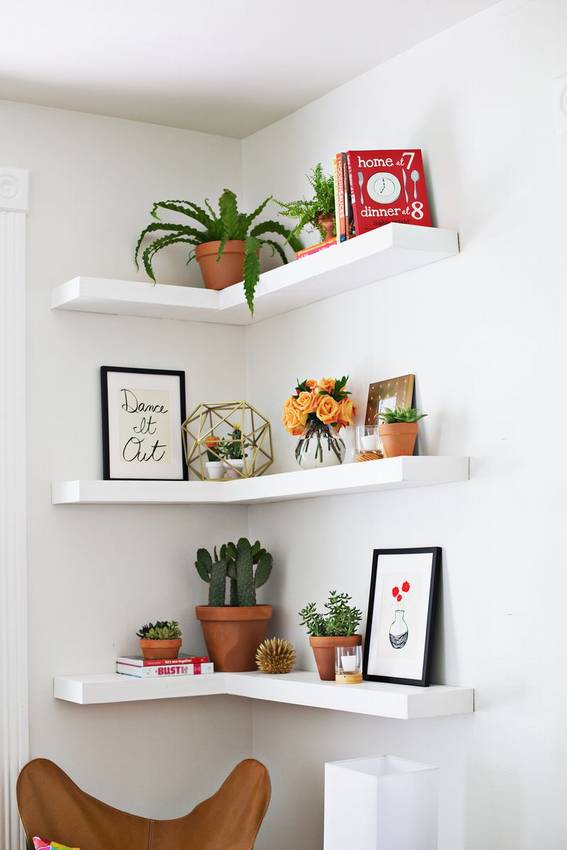 Corner soaring shelves on the wall
Look at an example of a simple hinged shelf at the corner to the bathroom (“floating” or “flying”, as they are called abroad), which you can do with your own hands.
"These shelves are called soaring because you can't see the mounts."
See below for step-by-step photos of the master class


https://i.expert-h.com/en/polki/915#sigFreeIdf46c4a2e70
Wooden corner shelf in a semicircle for a bathroom
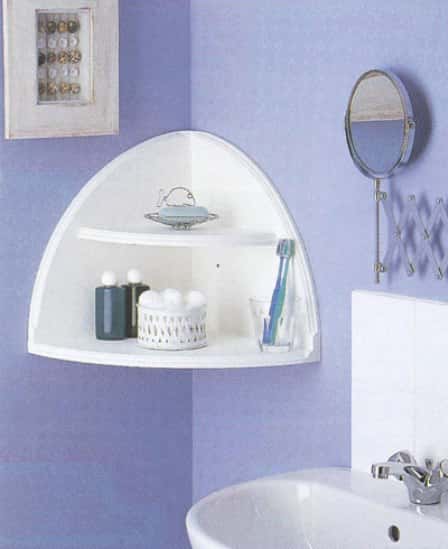
To make such a shelf for a bathroom or toilet with your own hands, you need a milling machine and a piece of MDF.
To give aesthetic, we recommend that you stick special tape on the ends, this is done with an iron)))
Step-by-step photo of manufacture:


https://i.expert-h.com/en/polki/915#sigFreeId87a088d18b
How to make a shelf in the bathroom with your own hands
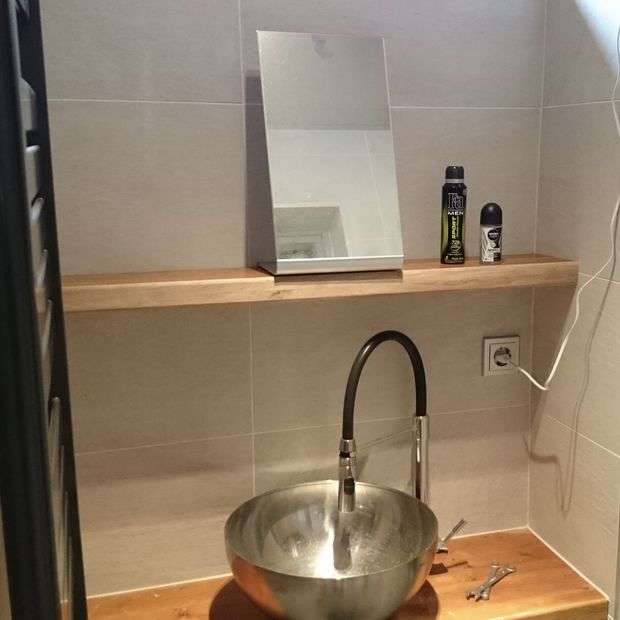 How do you like this option? Shelf in the bathroom without holes and glue. Great idea for a very small room if you do not want to drill holes in new tiles. In addition, not all supporters of the use of glue - it is aging, and over time, the shelf will lose its stability. If your bathroom is as small as the author of this project, you can take advantage of his experience. In this case, the small size of the room is an advantage, because you need two walls close to each other to fix the shelf between them.
You will need
- 15 x 15 mm aluminum L profile
- aluminum 15 x 15 x 15 mm U-profile
- milling cutter
- drill
- screwdriver
- 10 mm wrench (2x)
Step 1: Shelves
I will not talk about how to make shelves, you can make them as you wish.
Several things are important.:
- The length of the shelf should be only 2 mm shorter than the space between the walls.
- The shelf must be strong enough to hold the clamp. Both pushing power and clamp holding screws.
- Attach a bar to hide the clip.
Step 2: Prepare material for clamping
To make a clamp, you will need metal profiles that do not rust. In the bathroom this will be a problem.
- Measure the width of the shelf behind the bar.
- Cut two pieces of the L-profile and one of the U-profiles along the width of the shelf.
- Drill four holes on one side of the L-profile.
- Do the same with the other L profile.
- Fasten or lay one L-profile in the U-profile.
- Drill two holes with a diameter of 6 mm through the L-shaped profile and the U-shaped profile for M6 bolts.
Step 3: Fasten the rubber coating
For density we need to add some rubber. The author used rubber from an offset printer, but this is at your discretion, you can take from the internal bus.
- Measure the size of the profile.
- Cut the rubber to size.
- Glue the rubber to one L-profile. (on the outside where there are no holes)
- Glue another piece of rubber to the U-profile. (on the outside, opposite side with holes)


https://i.expert-h.com/en/polki/915#sigFreeId8dbd043ee2
Step 4: Mark and drill holes
Lay the L-profile on one edge of the shelf, with rubber on the outside.
- Mark the four holes with a drill that is smaller than the screws.
- Remove the L profile.
- Drill holes. Be sure not to drill through.
- Screw the L-profile into place.
- Insert the bolts through the holes with a diameter of 6 mm L-profile from the inside.
- Put the nuts on the bolts.
- Install the U-profile to the bolts.
- Fasten the two rubber profiles with bolts on the other side inside the shelf.
- Mark the screw holes with a small drill.
- Remove profiles.
- Drill screw holes.
- Screw the profile to the shelf.


https://i.expert-h.com/en/polki/915#sigFreeIdfaeaef0f3e
Step 5: Varnish and reinstall the shelf.
Tighten the nut with two wrenches.
Enjoy it!


https://i.expert-h.com/en/polki/915#sigFreeIdfaa1340554
... from unusual materials
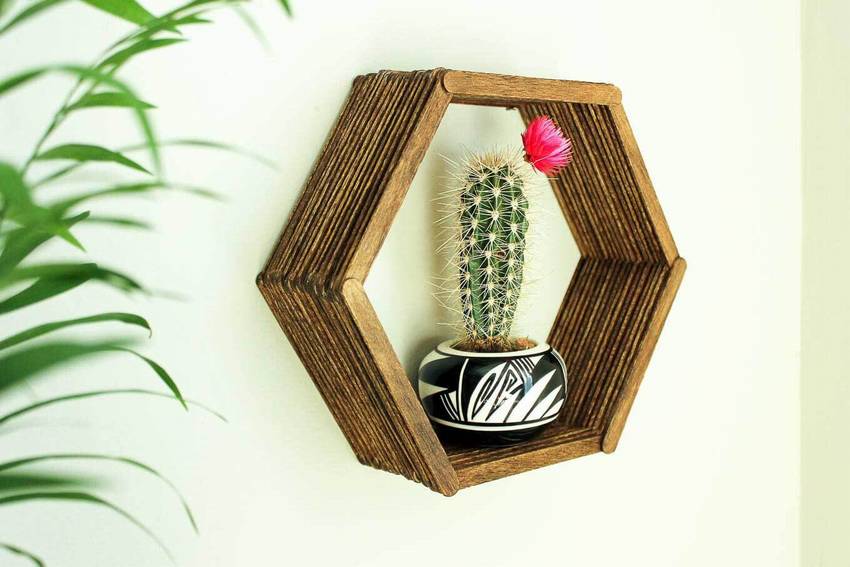
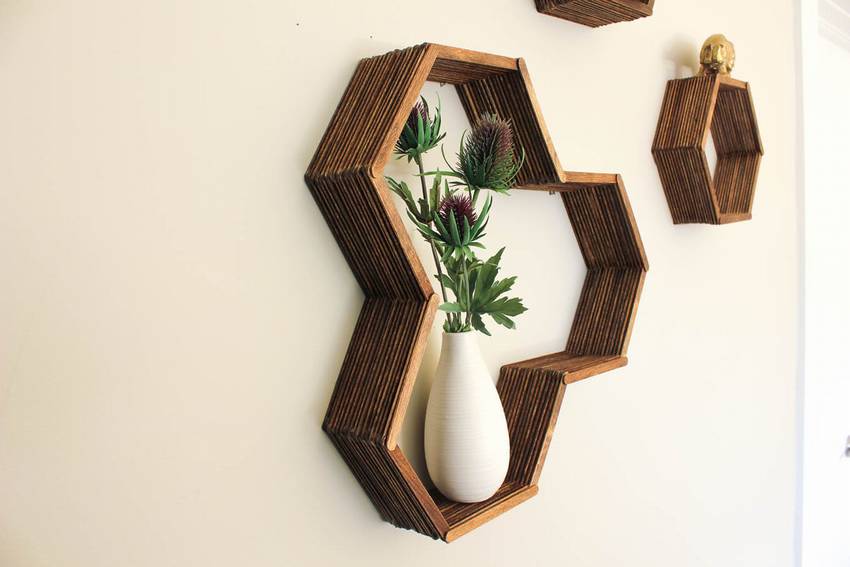
Simple shelf from ice cream sticks
Click on the photo to enlarge it.
 |
 |
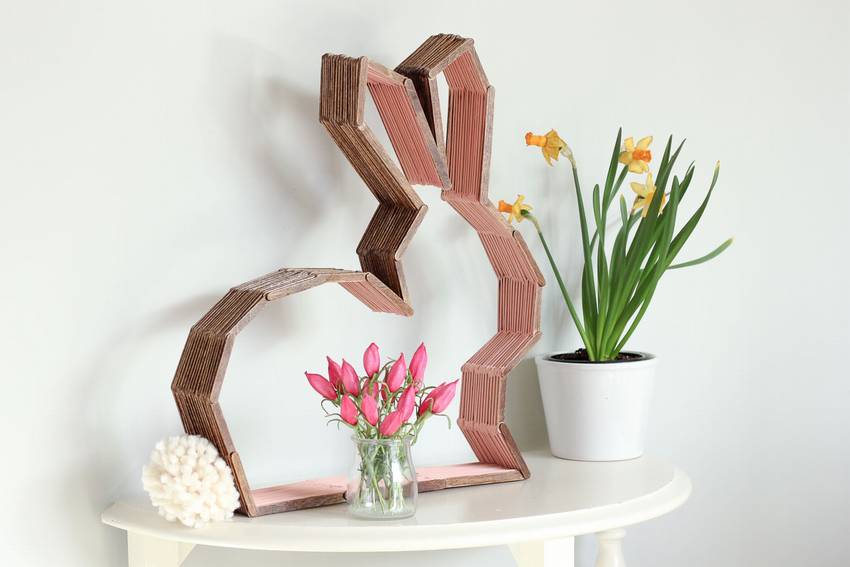 |
See step by step photos:


https://i.expert-h.com/en/polki/915#sigFreeIde248a18b86
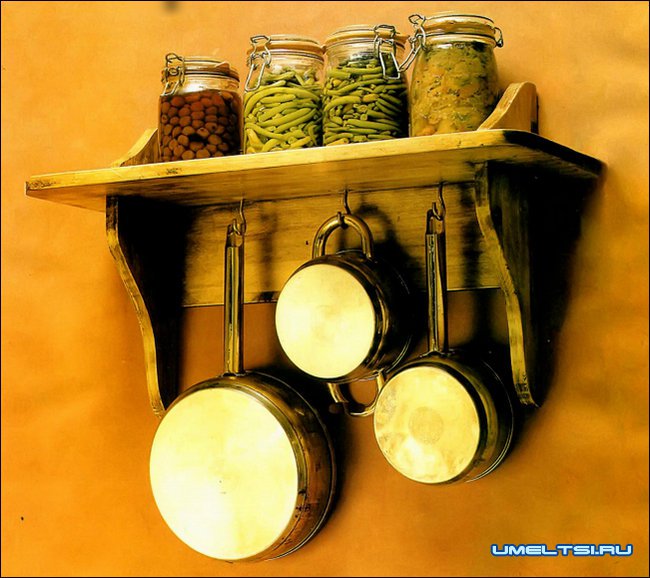
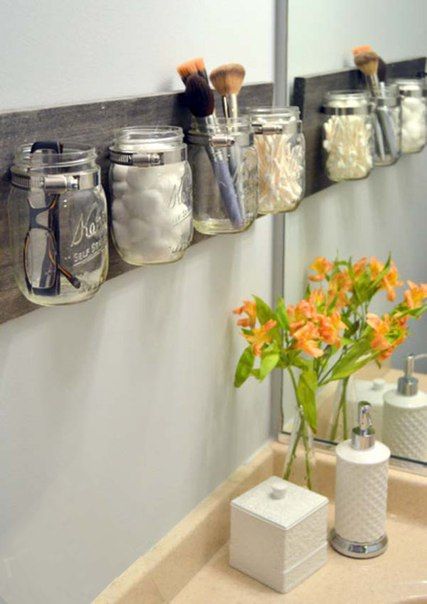 Can shelf
Also using clamps, you can make such an interesting shelf from cans. It would seem that the idea is not very original, but where have you seen similar products? The shelf is very simple and functional, suitable for flowers and not only. All you need, sturdy board, clamps and cans. Bring the board in the appropriate form, stain, varnish, and how to fix the jars, you can look at the step by step photos. The main tool that you will need an electric drill, because it will be necessary pre-make holes in the clamps and in the boardand then just tighten the jars with clamps and the shelf is ready. You can grow flowers and store every little thing.


https://i.expert-h.com/en/polki/915#sigFreeId73f4e58ef4
Cable channel shelf
If wooden shelves shrink, crack, rot when wet, then this shelf is okay, you can easily hang this shelf in the bathroom or in the kitchen or in any other wet place. Made of available material, the manufacturing method is simple.
See step by step photos below


https://i.expert-h.com/en/polki/915#sigFreeId90ef5c817c
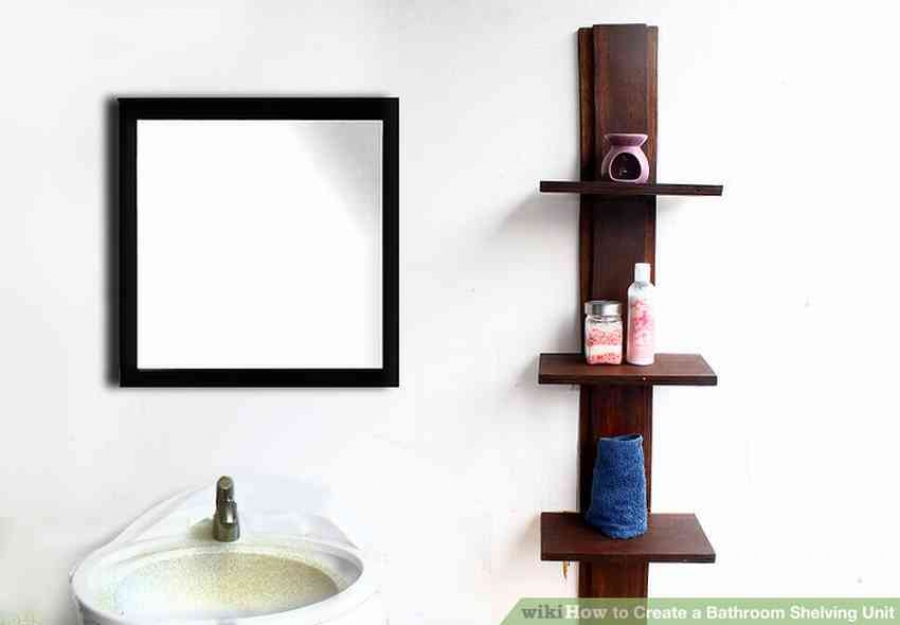
Shelf for bathroom
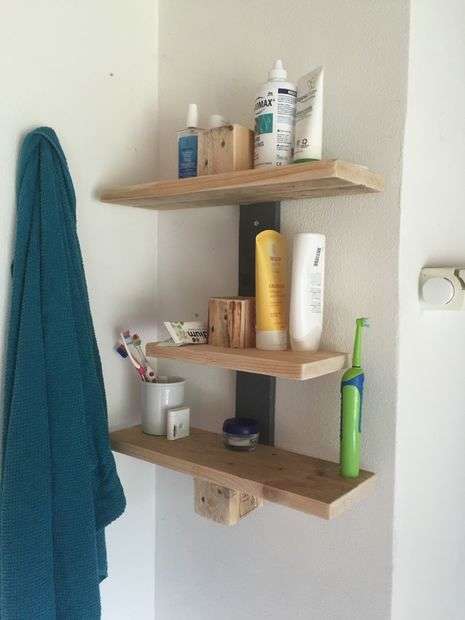 Here is an example how to make a bathroom shelf from a disassembled pallet. Classic box designs are a thing of the past, try something more interesting and bold. If you liked the design of the shelf, step-by-step photos are at your disposal.
- Disassemble the pallet
- Using a circular or hand saw, cut one of the uprights with thick wooden blocks at each end. You now have a plank on each end into which you can easily screw the shelves.
- Now cut out one of the remaining remaining blocks to use it to install the middle or third shelf.
- For shelving, the author used one board from a standard pallet, sawed it into two parts of 45 cm and used the remaining part for the shifted middle shelf.
- Install the shelves, see how it will look on the wall.
- After that, screw the shelves with 6 cm screws to the support block and align
- Pokraste regiment.
- Hang your wall and lay out the toiletries.
- For strength, you can use 3 or 4 large wall anchors, because wooden shelving is quite heavy.


https://i.expert-h.com/en/polki/915#sigFreeIdaa52705c26
In the corner of the bathroom From a wooden drive)))
A very simple shelf, you only need the drive itself and a drill with dowels. Look at the options)))
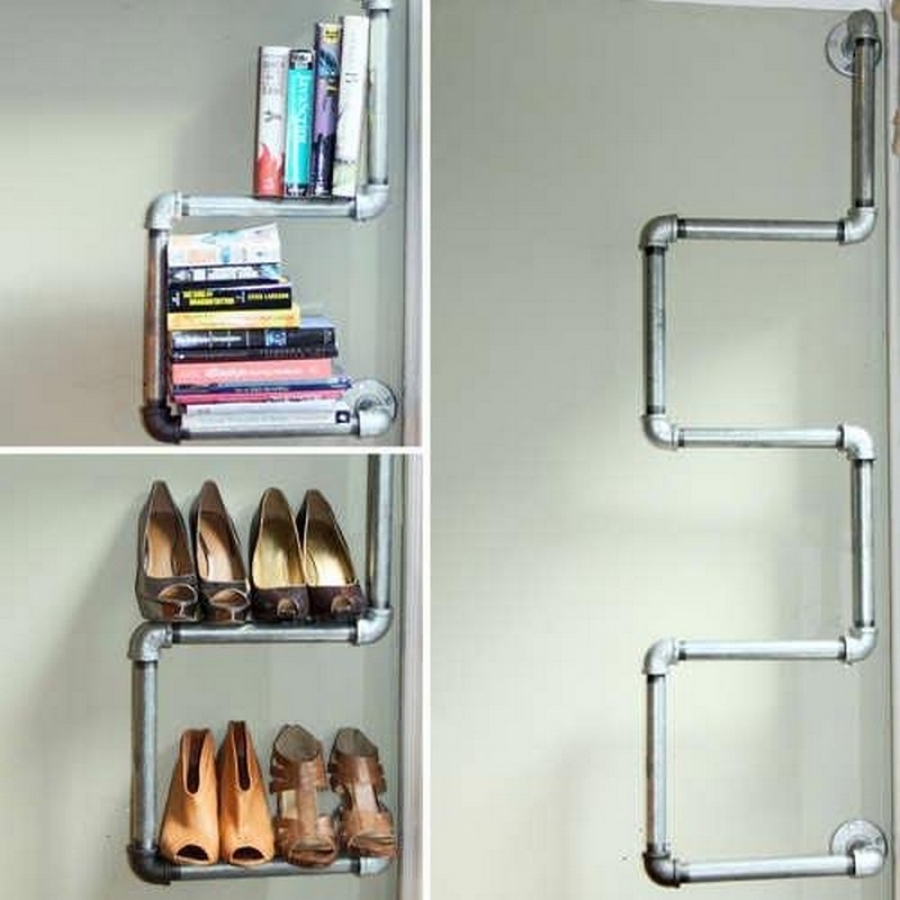
Shelves in the bathroom from pipes
Rack from pipes to the bathroom
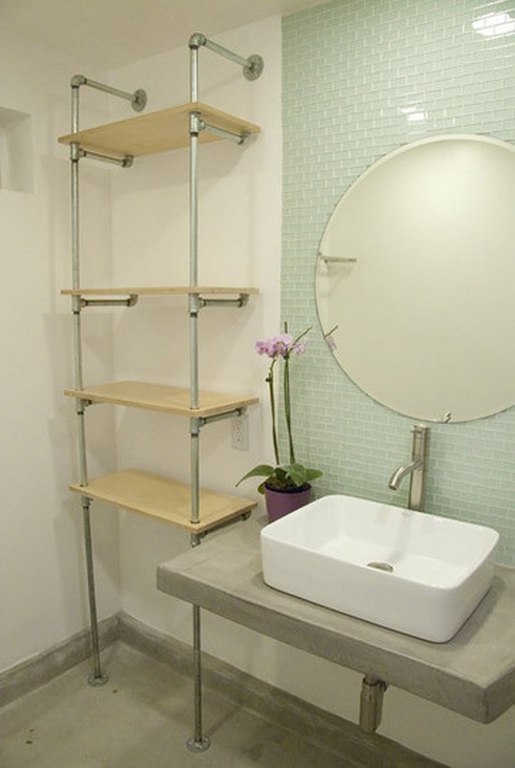 To make such a shelf out of pipes is not a difficult task, but you will have to work. The main task is to get the pipes. If you want to do everything yourself, you will need a grinder and a die and, accordingly, a complete set of locksmith tools. From materials, if you are going to make the same shelf in size as in the photograph, you will need to prepare:
- Two pieces of pipe 300, 260, 460 mm long
- 200 mm pipes for cross - 8 pieces
- 700 mm pipes - 2 pcs.
- Eight tees
- Ten knees
- 4 galvanized flanges
- Plywood 25 mm thick 600 by 300
First of all, we prepare all the details, cut the plywood according to the size of the shelves
- We drill holes in the shelves of 25 mm, grind, varnish or paint.
- We screw flanges on the lower ends of the pipes, tees on top, a horizontal pipe with tees at the end to the tees.
- We fix the next part of the pipe from above, and through the holes we “put on” the shelf.
- So gradually we collect the entire rack, at the upper ends we wind the flanges.
- Check the level, if necessary, adjust the shelves horizontally.


https://i.expert-h.com/en/polki/915#sigFreeIdb6cf37620d
By the way, the flanges can not be screwed to the floor, but simply glued, unless you are going to store something very heavy on the shelves.
Photos by Michelle Chin, apartmenttherapy.com
Shelf for bathroom made of PVC pipes
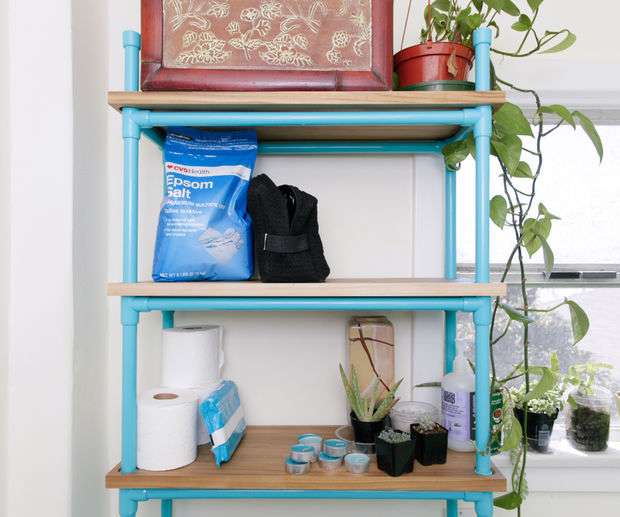 If you have a small bathroom, you have to somehow get out. The author of this project decided to approach the problem creatively and built an over-dressing a rack for a bathroom from plastic pipes.
Working with PVC is a pleasure, it looks like assembling a children's designer. PVC pipes are relatively cheap, so don't be afraid to experiment if anything happens. In this case, the top is separated from the base and can be used as a shelf for any labor room.
For this project, the author used the following:
 Pipe cutter
- PVC Chamfering Tool
- PVC primer and cement
- PVC pipes half a inch thick
- PVC furniture connectors
- PVC corner connectors and caps
- 3 wooden boards 23 x 60 2 cm thick
- Drill
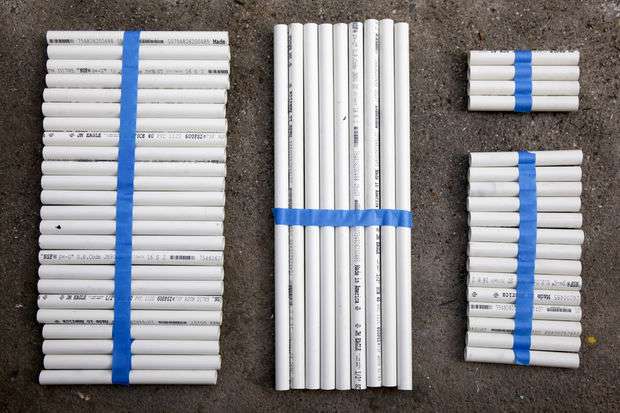
Step 2: Cut the pipes
You will need such sizes
- (4x) 15 m long for legs
- (9x) 53 cm for long horizontal support
- (14x) 6.25 cm long for side supports
- (20x) 27 cm long for vertical side gaskets
- (4x) 10 cm long for the top
Step 3: Assemble the Parts “Dry”
Step 4: Glue the base
Step 5: Install end caps
Working with PVC caps is a great way to make the structure beautiful :) In addition, this prevents water and dirt from entering the open pipe. By adding end caps to the top and bottom of the shelf, we create foot pads and completely seal the pipe against potential contamination.
Step 6: Glue the top shelves
Shelves should be cemented along all seams, except along the axis into which the set screw will be inserted. The top shelf has shorter racks with end caps.
Step 7: Shelf creation
Cut the boards to the desired size. Mark where the holes will be and drill. Clean the board with sandpaper and varnish.
Step 8: Set screws
If in the future you are going to disassemble the shelf or use in another configuration, then it is better not to abuse the glue. Therefore, the author decided not to glue many joints, but instead add a set of screws. Add set screws along the vertical axis of the joints by drilling a hole through the fitting and pipe.
Step 9: PV paintingX
For painting PVC pipes, spray paint is required, which is intended to be connected to plastic. Apply three coats, with a break of 20 minutes. To completely fix the paint, it is best to wait 48-72 hours, otherwise the base layer may crack.
Step 10: Reassembly
Reassembly occurs between levels. It is not long, but it will take a little effort to put the parts in place with a hammer. Insert the set screw and slide the shelves between the layers so that the shelf is placed on the pipe fitting.
Step 11: That's all.
The latest photos show how the shelf looks in the interior.


https://i.expert-h.com/en/polki/915#sigFreeId32892af28c
Plexiglass bathroom corner shelf
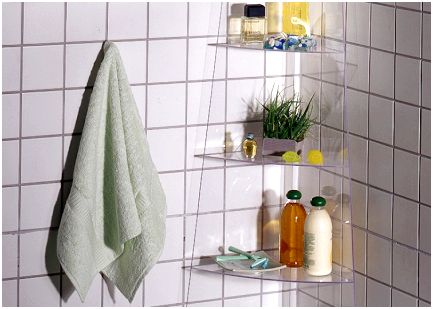
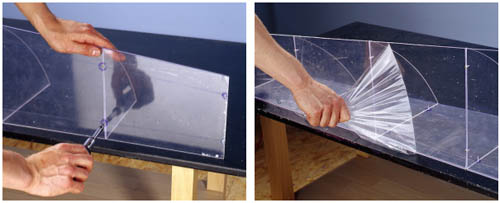
Constant humidity creates certain problems with the selection of furniture for the bathroom. One suitable option make a shelf for a bathroom from plexiglass, it is easy to process and most importantly, it is not afraid of moisture. Work will take several hours, but the shelf will last for years.
So, you need plexiglass, 2mm screws 24 pcs and a jigsaw. First, prepare the template and make markup on plexiglass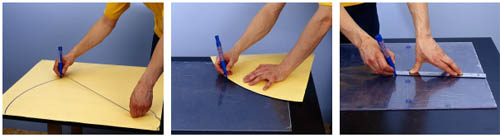
From plexiglass we cut out the shelves in size with a jigsaw and fasten to a plastic base.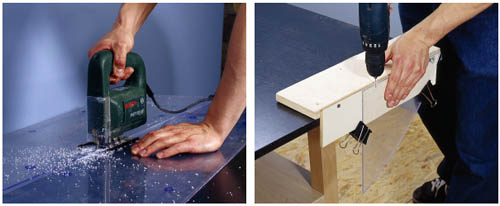
We fasten the structure and remove the protective film. The shelf is ready.
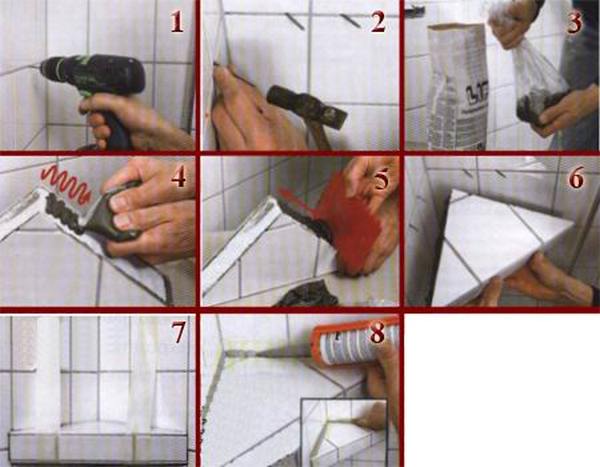
Corner shelf from building panel
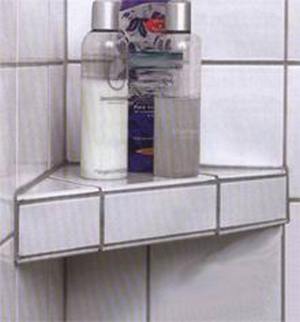
This corner shelf from the construction panel is best done during repair. For its manufacture, all that is needed is a couple of tiles, a section of a building panel and a mass for stitching. If you use the same material as for the wall, the shelf will look very harmonious.
Necessary measure the surface carefully, cut out the base and cut the tiles. Then we apply the solution and lay the tile.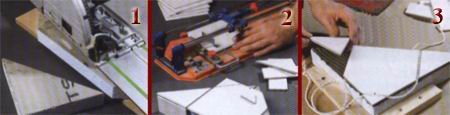 To secure the shelf, you must:
- hammer 4 nails
- drill 4 holes for dowels
- prepare a solution, it is convenient to do this in a plastic bag, there will be less dust;
- at nails we bite off the hats and drive into the dowel;
- apply a solution;
- we put the shelf on the nails;
- fasten with tape until the solution solidifies;
- we close the seams between the wall and the shelf with building silicone.
Shelf for washing machine
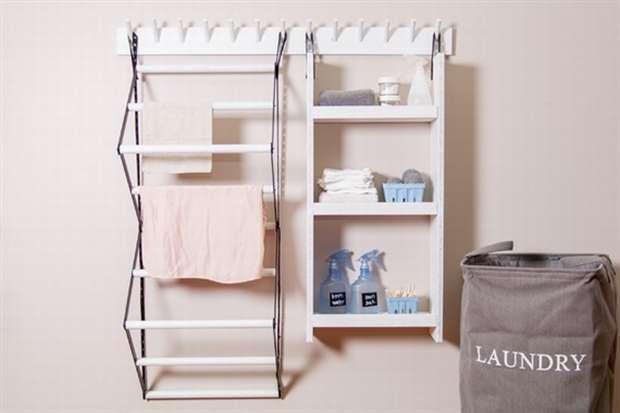 Make a convenient shelf to fold all the necessary laundry accessories. This shelf for washing machine includes a drying rack, shelves for accessories and additional hanging racks (pegs) for towels and other items. Pegs also allow you to rearrange the drying racks and shelves to where you need them to be more convenient to use. The design is not very complicated, it is somewhat problematic to make a dryer, but the assembly mechanism itself can be understood from the step-by-step photos.
The photo below shows what you need to work.
 Step-by-step photographs are not very detailed, but if you are interested, a link to the author’s site under the gallery, there is a detailed instruction with all the explanations.


https://i.expert-h.com/en/polki/915#sigFreeId6af08774db
48 schemes and drawings of shelves in the bathroom


https://i.expert-h.com/en/polki/915#sigFreeId5d64ca8888
do-it-yourself beer to the bathroom
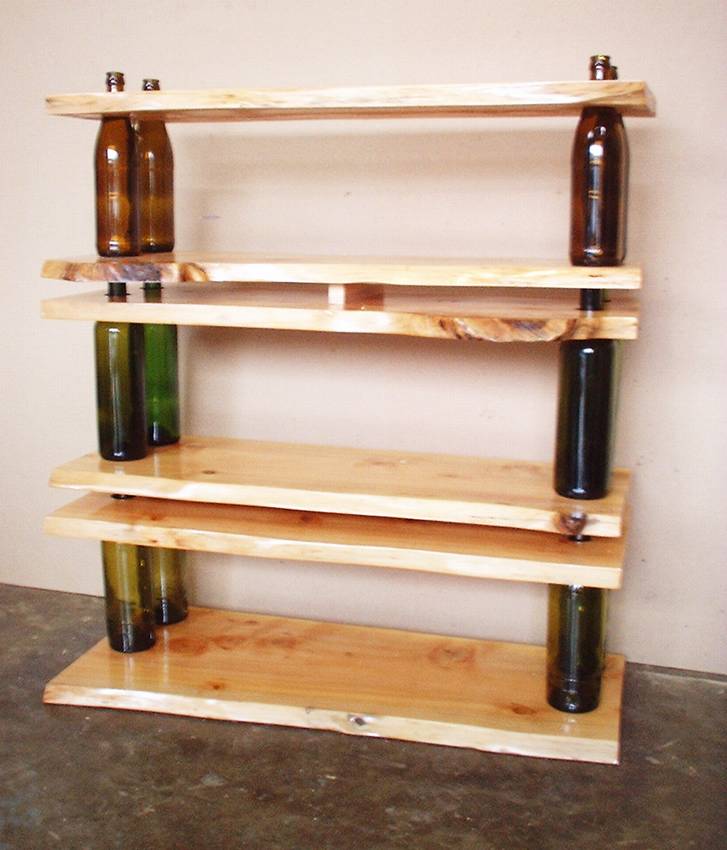 Let's look at how to make a shelf (rack) in the bathroom from beer glass bottles with your own hands. If you already have four beer bottles (or from champagne) and two boards, then consider that you have already done half the work. Of course, in addition to this, you still need inexpensive fasteners, which you can buy in almost any hardware store.
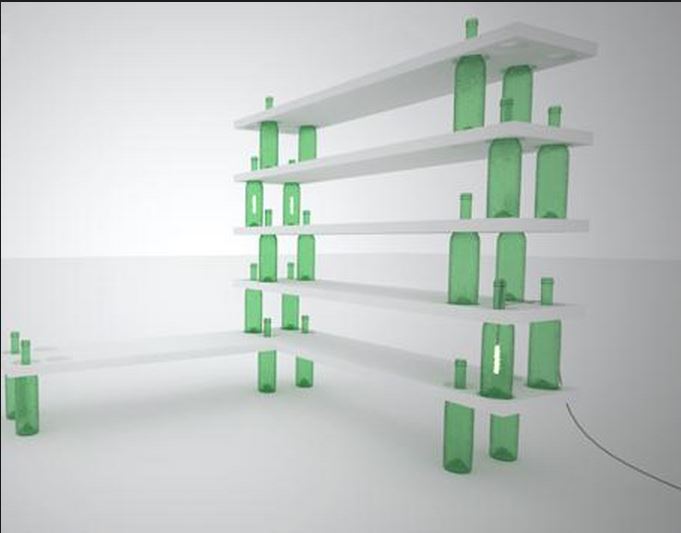 Choose long-necked beer bottles.
Shelf boards are sanded and dark lacquered.
Surprisingly, such shelves in the bathroom of glass bottles are distinguished by their strength, because they can withstand the weight of an adult.
Having put one such shelf on another you will receive a rack in a bathroom from glass bottles.
See step-by-step photos of the master class:


https://i.expert-h.com/en/polki/915#sigFreeIdee40b9fcb5
Shelves for the bathroom (large photo gallery 240 photos)
Of course, various accessories can be viewed in any furniture catalog, but this collection contains photos of bathroom shelves, which Rdo it yourself.


https://i.expert-h.com/en/polki/915#sigFreeId50726cbf99
= What can I make shelves of:
|
from wood
Example: DIY flower shelves 230 |
from metal pipes
Example: Do-it-yourself pipe shelves |
from PVC pipes |
|
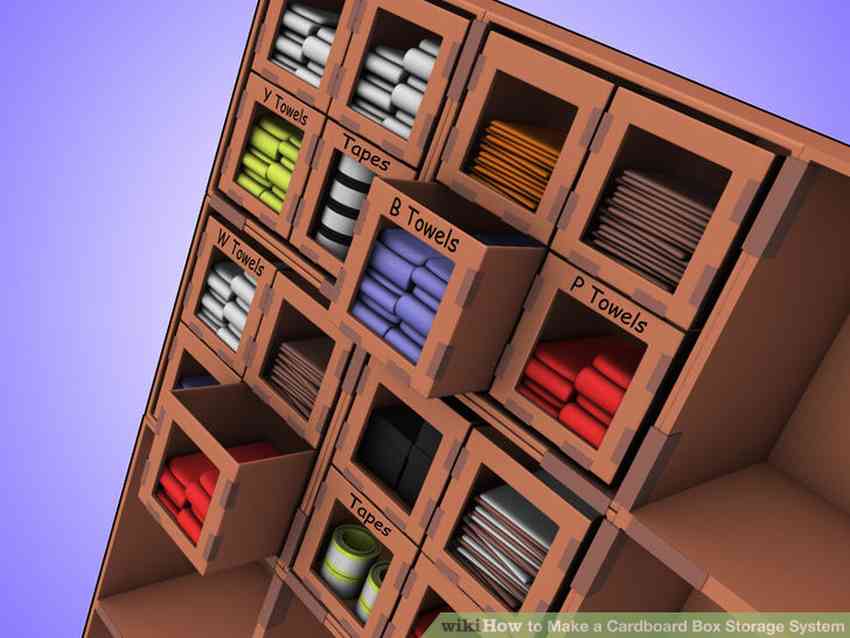
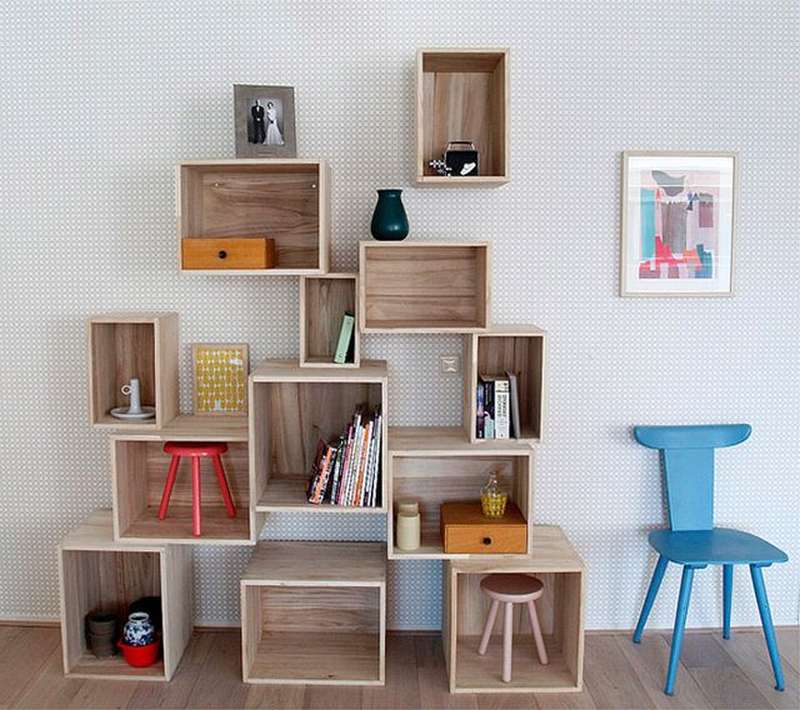
from cardboard
Example: Cardboard box shelving unit |
from paper | plasterboard |
|
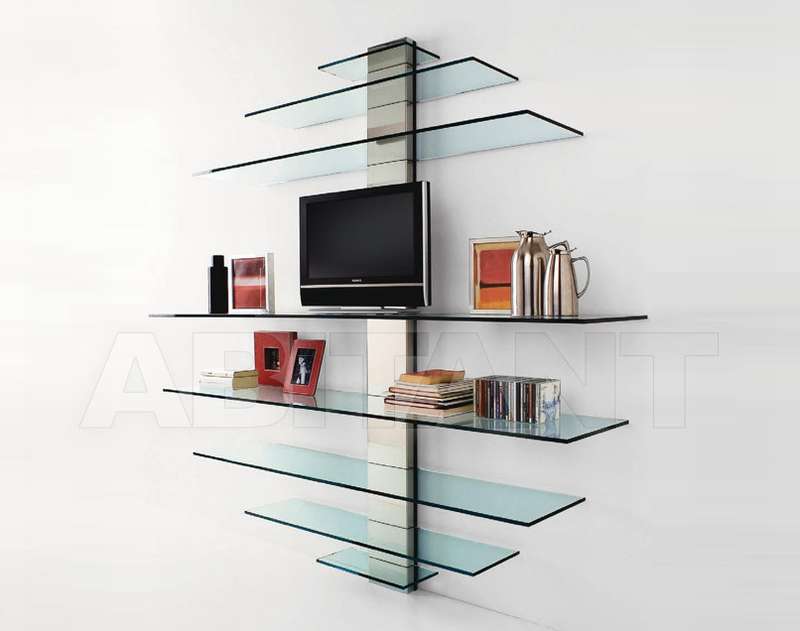
from glass
Example: Shelves in Art Nouveau style 180 photo do-it-yourself |
from old boxes
|
from pallets pallets |
| stainless steel | from glass | from old stairs |
| From bars |
from bottles
Example: Glass bottle shelves |
from snags and branches Example: Book shelf made of twigs and snags |
|
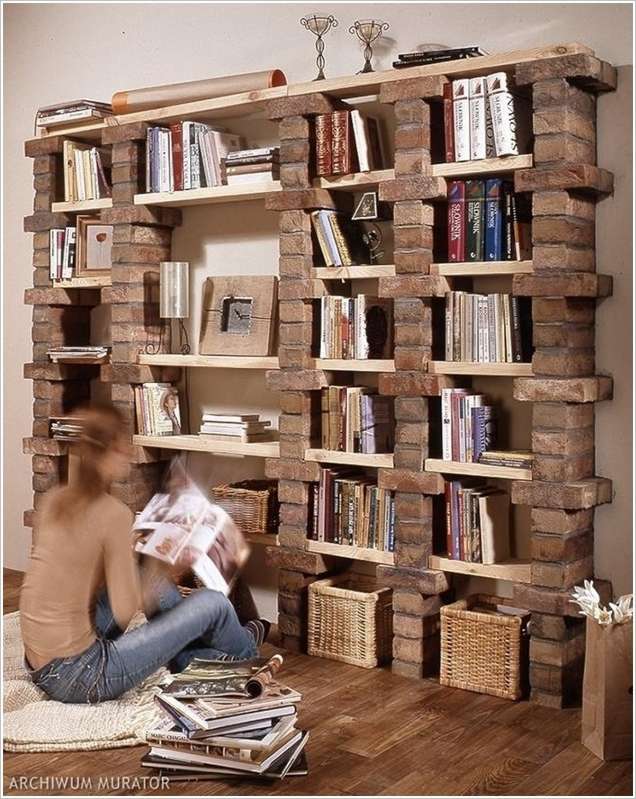
made of bricks
|
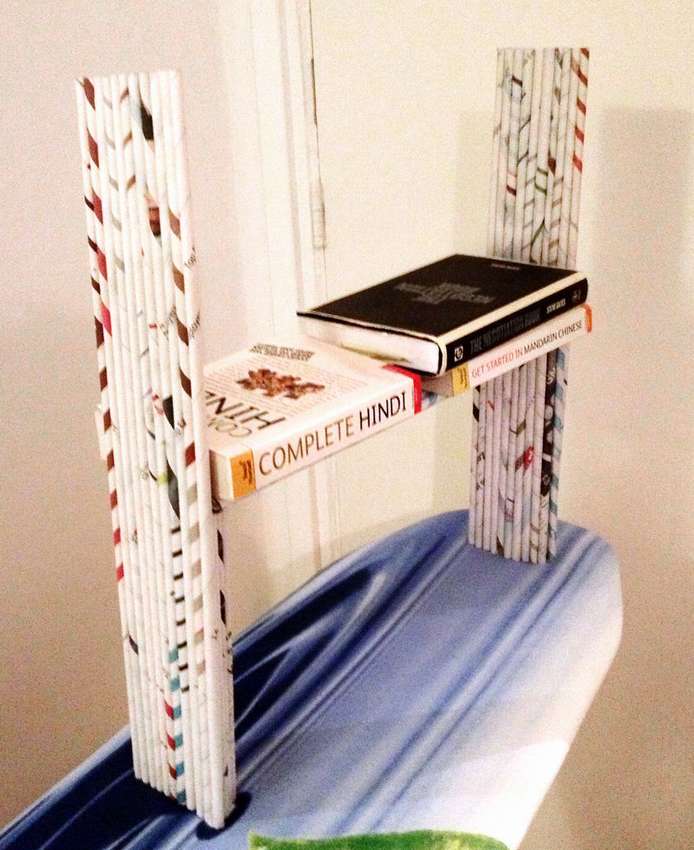
from newspapers
Example: Newspaper shelf |
From cans
Example: Do-it-yourself shelves in the kitchen: 456 photo drawings instructions |

= Methods of fastening shelves:
|
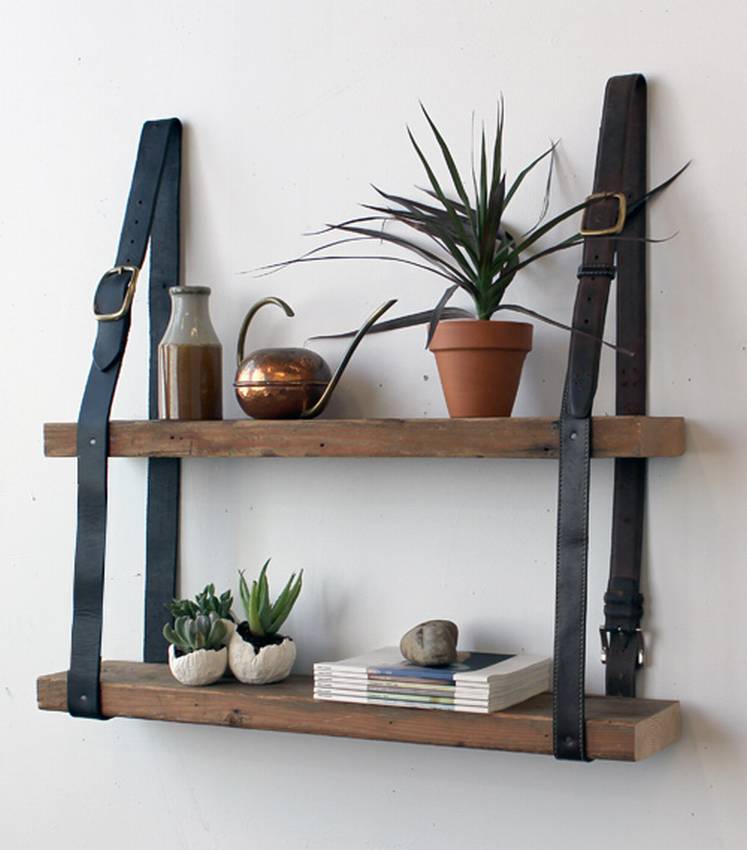
On the straps
Example: Shelves for books on belts |
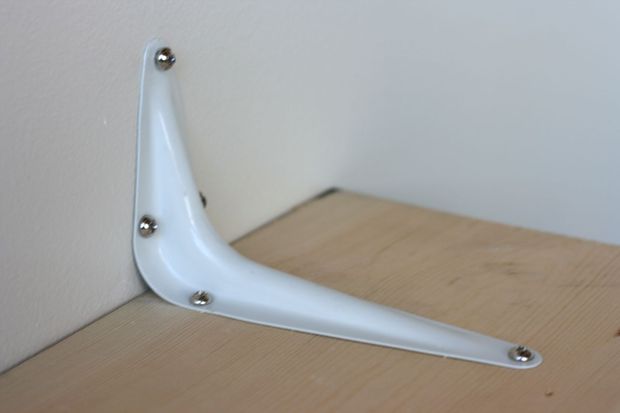
On brackets
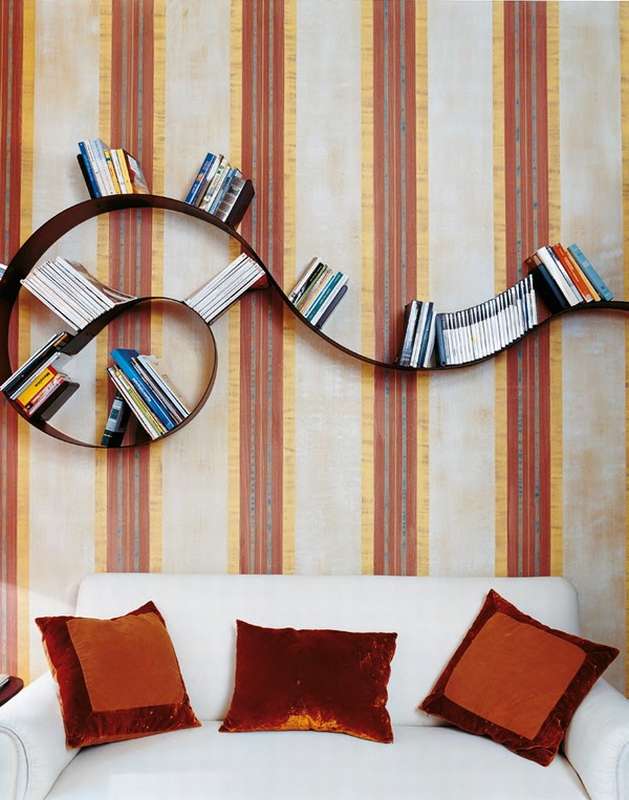
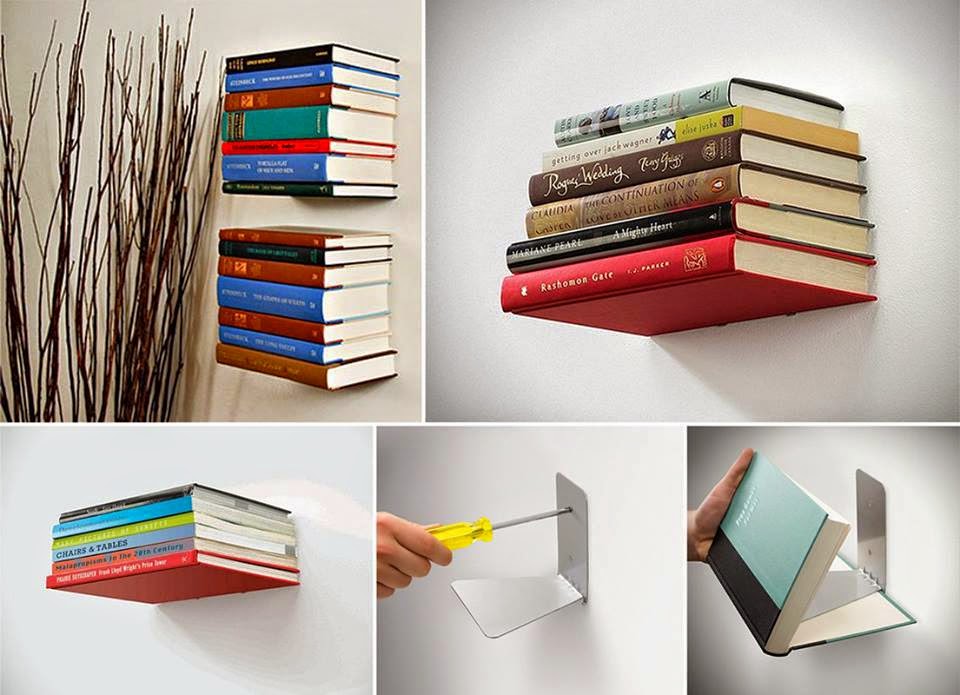
Example: Inverted bookshelf |
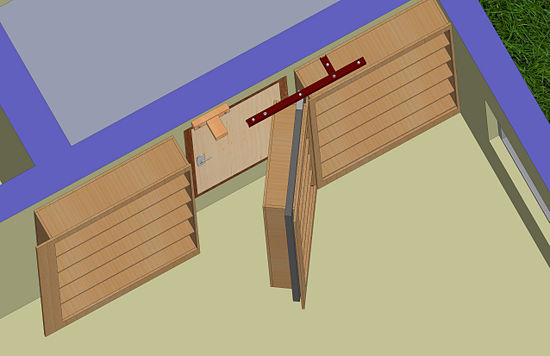
On hinges (hidden shelves) or articulated spiers
Example: Secret door - bookcase and shelfg |
| On the strings | On the ropes | On the pins |
|
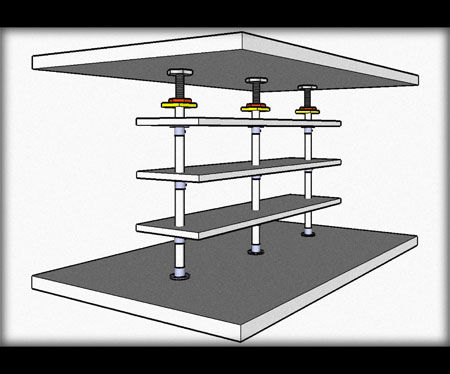
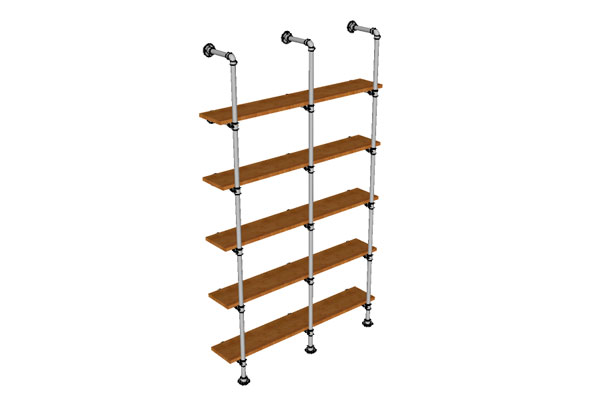
On the clamps
Example: Rack of 3 pipes from floor to ceiling. |
On perforated rails | |
= What are the shelves:
|
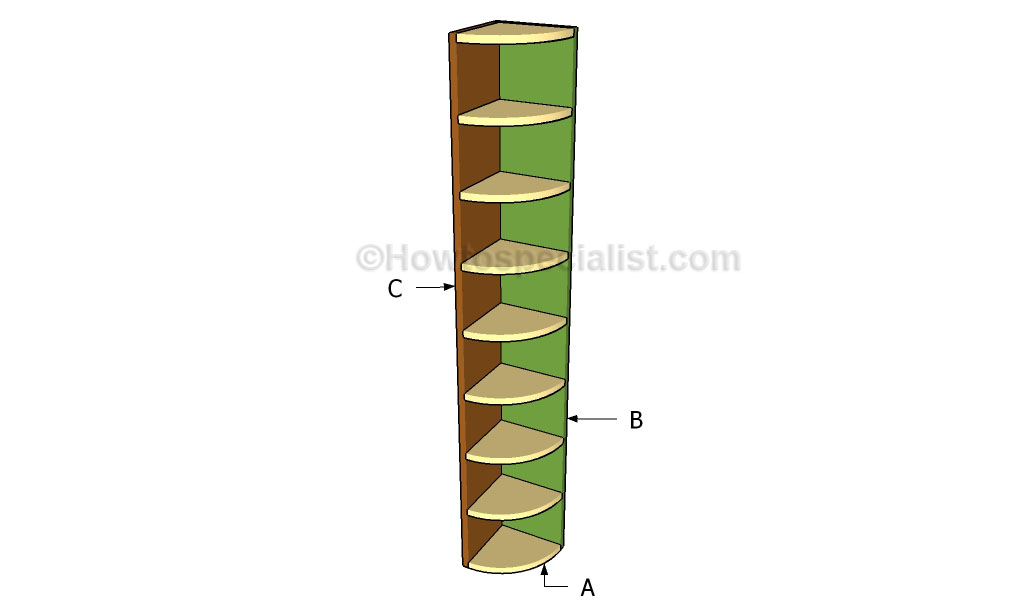
Corner |
Wall mounted
Example: Wooden shelf for bathroomss |
Mounted
|
| Outboard |
Floor
Example: DIY shelf in 45 minutes |
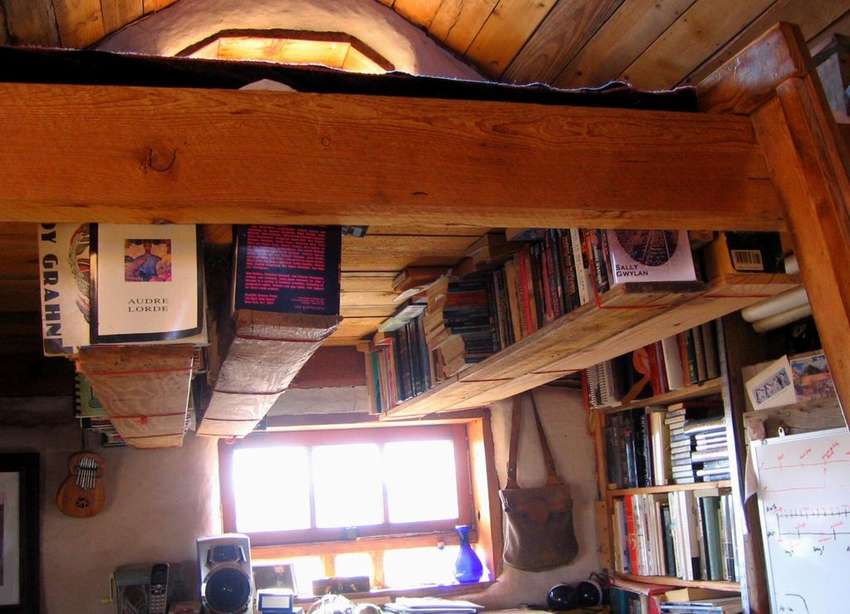
Under the ceiling
|
|
Shelving
Example: Do-it-yourself pipe racks: 180 photos, instructions, diagrams |
Whatnot |
Shelf - Invisible
Example: Invisible bookshelf |
- Brick grill: 44 drawings, 18 projects + photos
- Collapsible barbecue: 50 drawings, 20 master classes +300 DIY photos
- ✿ Flowerbeds:> 34 turn-based master classes + photos (248 ideas) - do-it-yourself
- DIY sauna in the apartment: bathroom, balcony, storage room. Projects and photos
- Shelves in the bath with your own hands: +200 photo. Drawings of bench benches in the steam room