Crafts from cones. Do it yourself. Master classes.
 beautiful crafts from cones
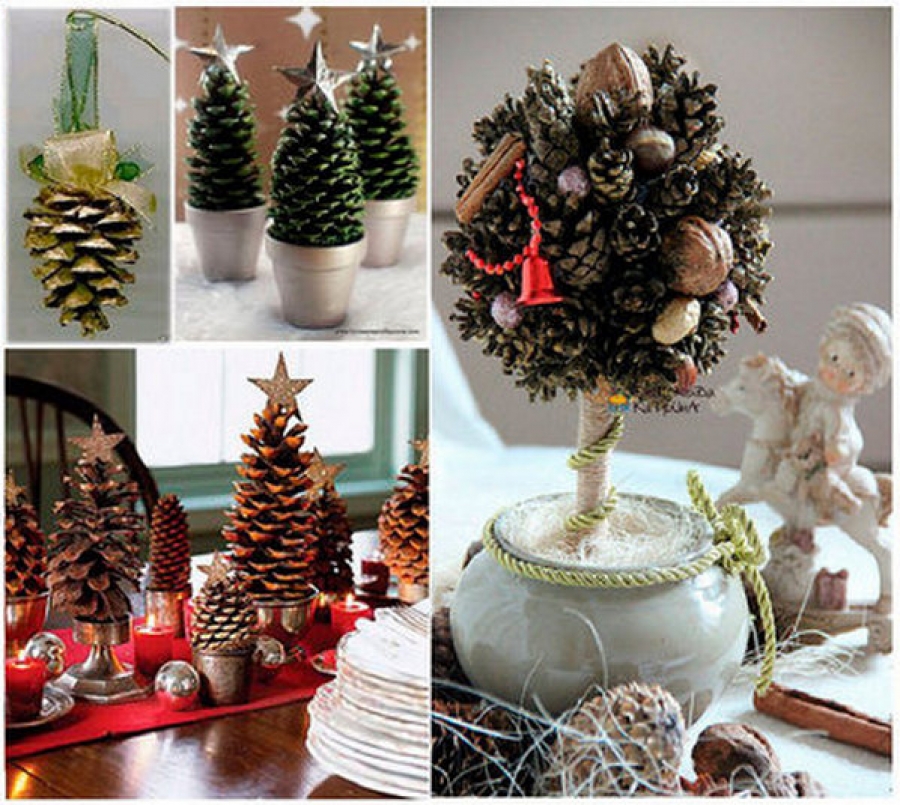
Interested in cone crafts? In this article you will find almost all the options that can be done DIY crafts from cones, according to one example, starting from children's crafts and including candlesticks, panels, wreaths, garlands and the most diverse New Year's decor.
Cones, like any natural material, are great for crafts. Nature transfers their strength to them, and man transfers the warmth of his hands. Crafts from conesamong other things, they have a specific coniferous aroma. On New Year's Day, Christmas, generally on winter holidays, you can’t imagine a better decoration. For each article in the article there is a master class with step-by-step photos, so that after reading the information, you will learn how to independently make the most different decorative things out of cones.
From this article you will learn:
Baby crafts from cones
Hedgehog + 10 more models of hedgehogs 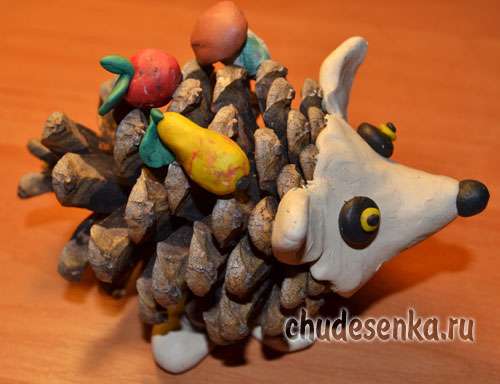
15 models Owls from cones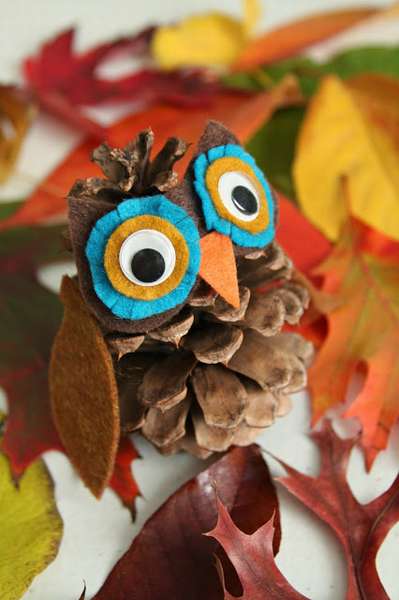
Pig step by step master class 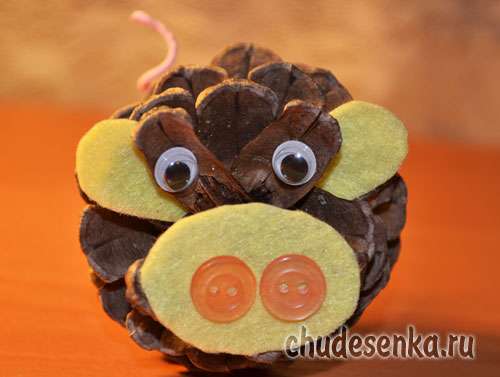
Bear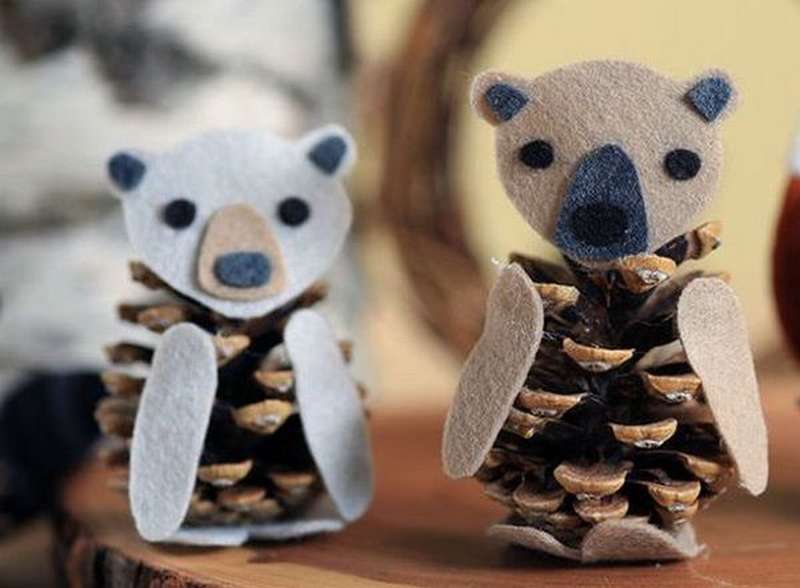
Deer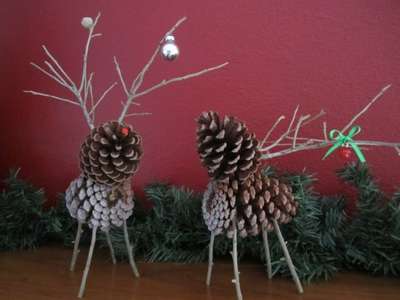
+ master classes::
- Swan
- Squirrel
- Raccoon
- Beaver
- ... and others
+ Step by step photos:
with the most detailed
instructions
Crafts from cones for INTERIOR.
Decorate your home !!!
Wreath in the store starts at $ 50
Topiary +30 models
Bouquet roses !!! from cones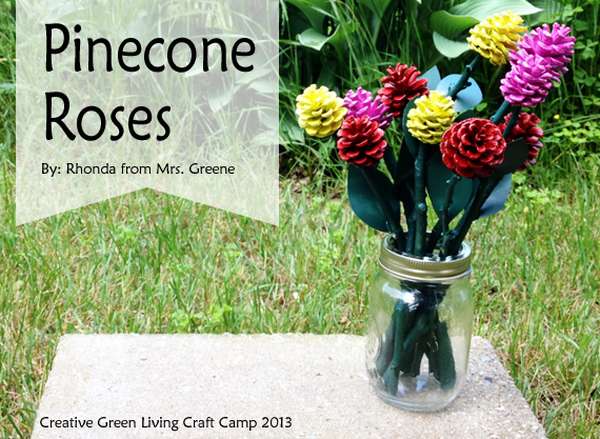
Winterdecor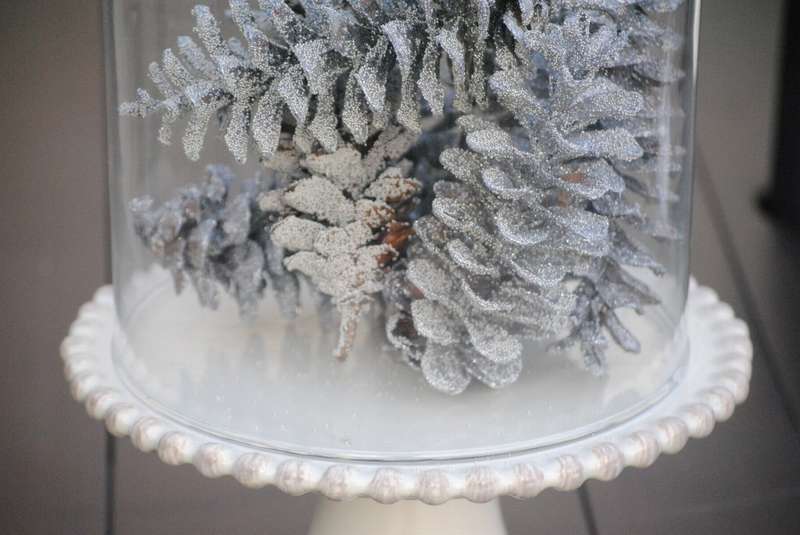
Ball
Panel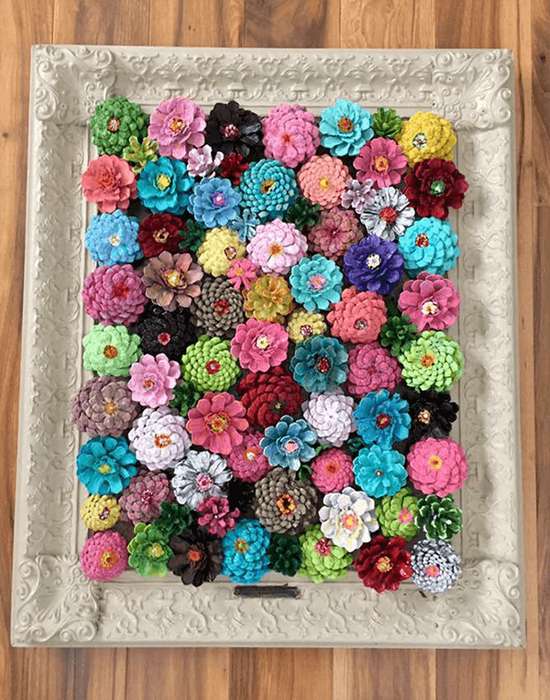
Crafts from cones for the NEW YEAR decor
Christmas tree
(step by step photos) 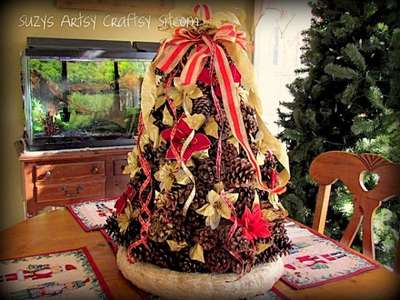
Toys
on the Christmas tree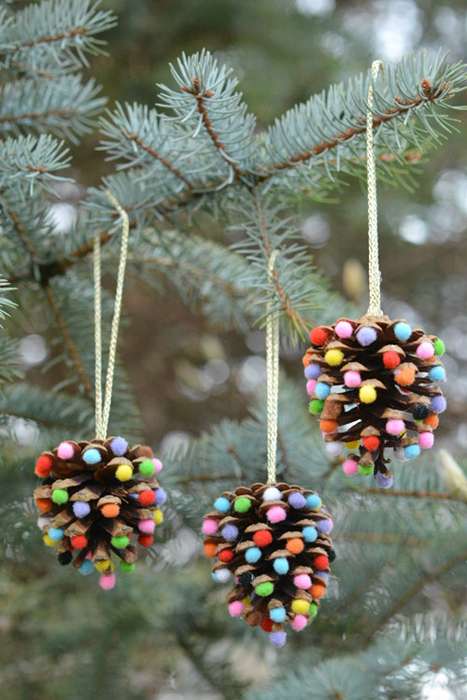
Santa Claus
favorite toy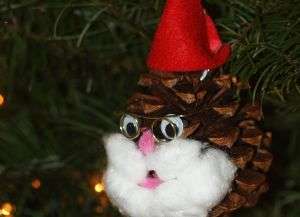
New Year's composition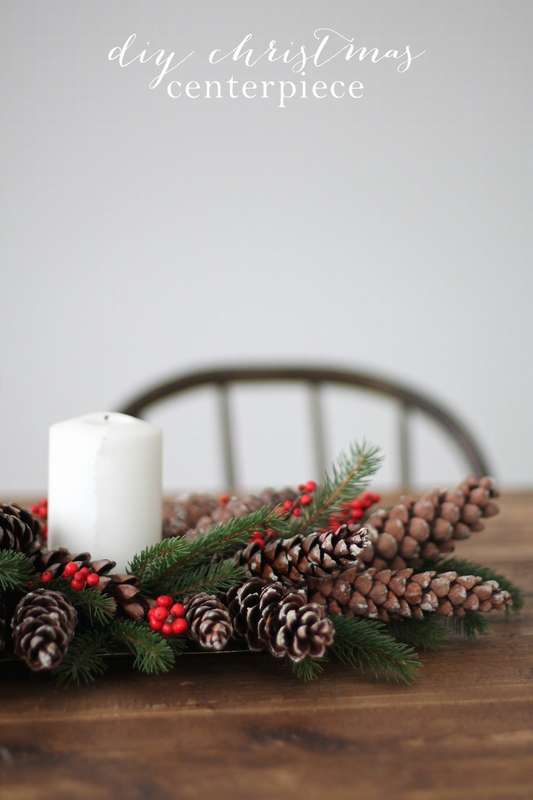
Candlestick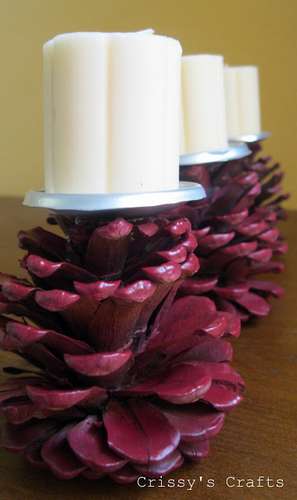
Snowflake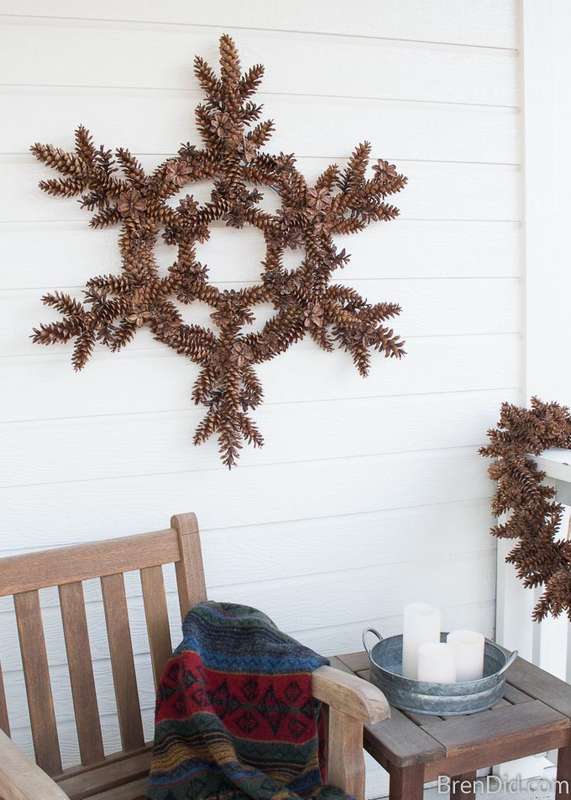
Crafts from cones for giving
Garlandto the fence.
(you can go to the apartment !!!)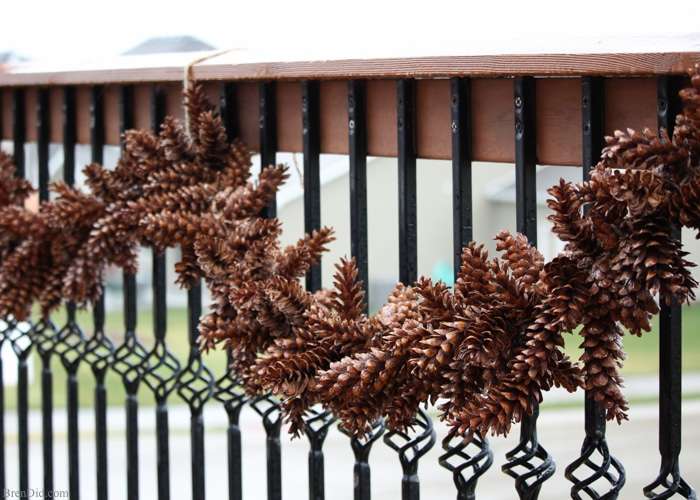
Flowers ZINII.
(+ reveal the secret !!!)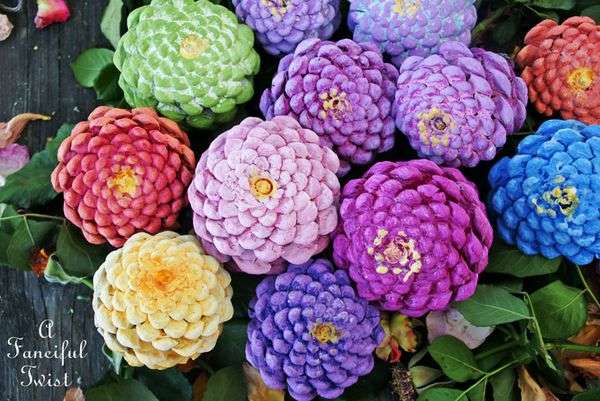
Basket from cones (decorative)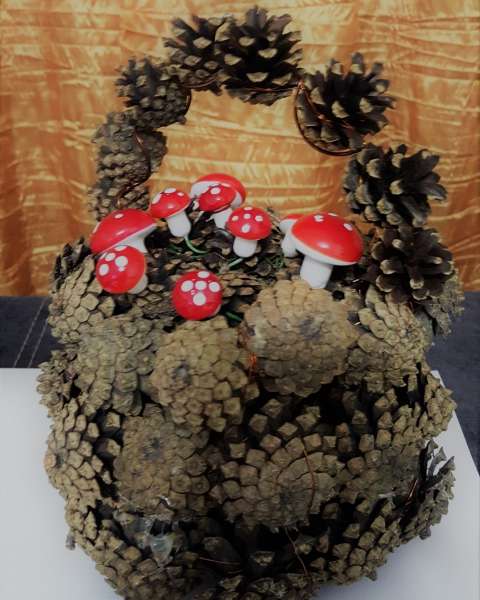
See all the master classes with step-by-step photo-making and instructions in the text below. Enjoy watching!!!
So let's go ....
Baby crafts from cones.
(Hedgehog, owl, deer and others ....)
DIY hedgehog made of cones
Classic crafts - cone hedgehog . It is very popular, since it is even the smallest craftsmen who can make crafts according to their strength. There are different options for using the material, the simplest way is shown here, how to make a hedgehog from cones and multi-colored plasticine. In general, the task of the child is simply to make a muzzle - nose, eyes, ears, for the stability of the craft, so that the hedgehog does not roll, add legs. And of course, you can stick a hedgehog prey - mushrooms, apples, something else, let the child show imagination.
Look at the step-by-step photo of making crafts a hedgehog from cones.


https://i.expert-h.com/en/iz-shishek/podelki-svoimi-rukami#sigFreeId295c7e6922
+38 Photo Hedgehogs from cones. A selection of crafts.
(To enlarge, just click on the photo)


https://i.expert-h.com/en/iz-shishek/podelki-svoimi-rukami#sigFreeId59a2fe08ed
Read also: + 40 more models of hedgehogs from cones
Owl from cones master class
You can search the entire Internet, you will not find a prettier owlet.
The craft is super easy to manufacture. To make an owl out of cones with your own hands, you will need pieces of felt in five different shades.
You can mix colors the way you want. The shapes don't have to be perfect, just grab the scissors and cut!
The most expressive part of an owl is the eyes., so make three circles of different colors and stick in three layers, as shown in the photo. Attach your eyes with hot glue.
TIP: Apply hot glue to the felt first, then attach eyes over the glue. The tip of the hot glue gun can melt the back and it will look ugly.
Then attach the beak and glue the wings.
A master class on how to make an owl out of cones, see step-by-step photos


https://i.expert-h.com/en/iz-shishek/podelki-svoimi-rukami#sigFreeId93b705e18b
Owl from cones +38 Photo. A selection of crafts.
(To enlarge, just click on the photo)


https://i.expert-h.com/en/iz-shishek/podelki-svoimi-rukami#sigFreeIdf2b1f383f9
Read also: +30 more master classes of owls from cones
Cone pig
Here is an example of how to make fun cone pig. The craft has its own characteristics, after all, mumps, this is not a hedgehog, so you need a patch and a twisted tail. Piglet and ears can be made from dense fabric, or feltas in this case. Sew two buttons to the patch, for greater credibility.Make a tail out of wire wrapped in pink paper. The technology of manufacturing a spiral tail is simple, wind the wire around the pencil and remove. After that, fix it on the pig, now it will be clear for sure what exactly little pig.


https://i.expert-h.com/en/iz-shishek/podelki-svoimi-rukami#sigFreeId3c27ab70b9
Pig made of cones. Another 10 photos. A selection of crafts.
(To enlarge, just click on the photo)


https://i.expert-h.com/en/iz-shishek/podelki-svoimi-rukami#sigFreeIdd47c8d5045
Cone animals
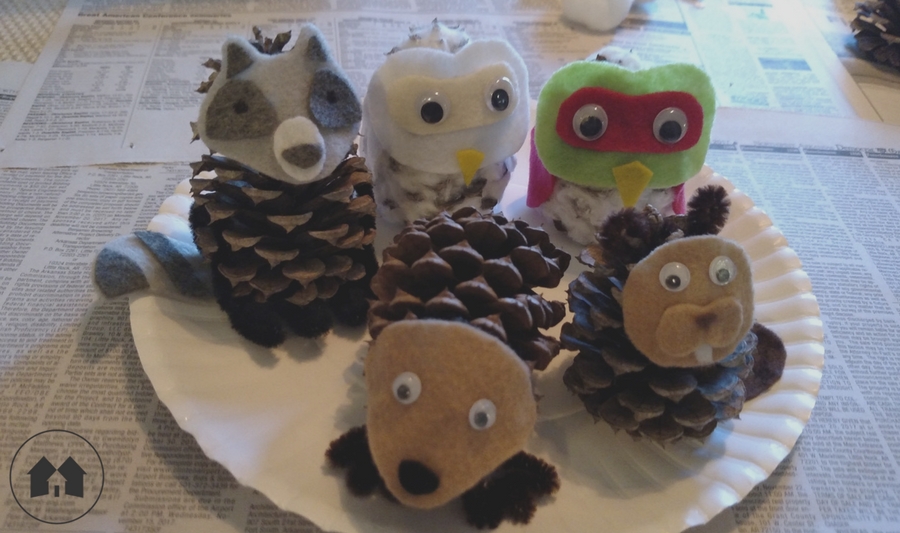 Autumn is coming, it's time to collect cones, for small collectors this is a fun activity. The collected treasures will be useful to you for home crafts. Cone animalsmade by children can decorate not only the nursery, you can put them on the fireplace or on the shelf in the living room. A great opportunity to show off to the guests the creativity of your kids.
So, it remains to organize a workshop.
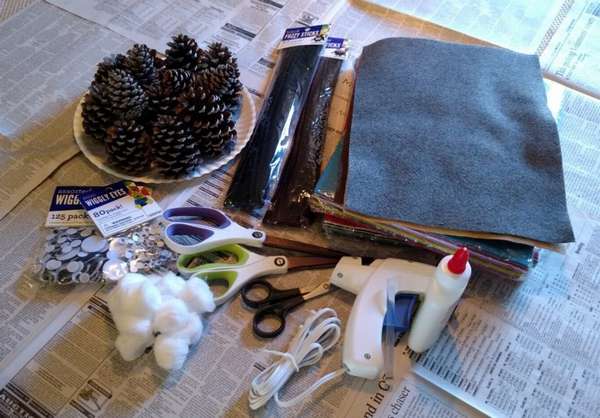 What you need to make a menagerie of cones with your own handsshown in the photo.
Sort the cones first. For raccoon, snowy owl and beaver, you will need stable samples that will stand upright. For a hedgehog, you need to choose bump with a flat sideso that the hedgehog does not roll. Or you will have to remove a few scales on one side, although for stability you can simply attach legs.
Basic moments, how to make little animals out of cones, you can look at step by step photos. If you are interested in details, read the detailed instructions about each animal on the author’s website, the link is under the gallery.


https://i.expert-h.com/en/iz-shishek/podelki-svoimi-rukami#sigFreeIdde628eeaa4
Deer of cones
See how cute these little ones look deer of cones! But all you need to do is pick up pine cones and small twigs for legs and horns. Combine all this with glue, add a red nose and a bell, which could be easier. Kids will love helping to search for the perfect pine cones and sticks., for crafts you will need different sizes. Compare the bumps, find a pair that will look best together so that the head is proportional to the body in size.
If you encounter difficulties with fastening the legs, horns and head, on the author’s website, the link to which is under the gallery, is detailed instructions and useful tipshow to make a deer from cones.
Master class look at step by step photos.


https://i.expert-h.com/en/iz-shishek/podelki-svoimi-rukami#sigFreeIda85df42647
Deer of cones. (38 Photo) A selection of crafts.
(To enlarge, just click on the photo)


https://i.expert-h.com/en/iz-shishek/podelki-svoimi-rukami#sigFreeId7471a8b93e
Squirrel from cones
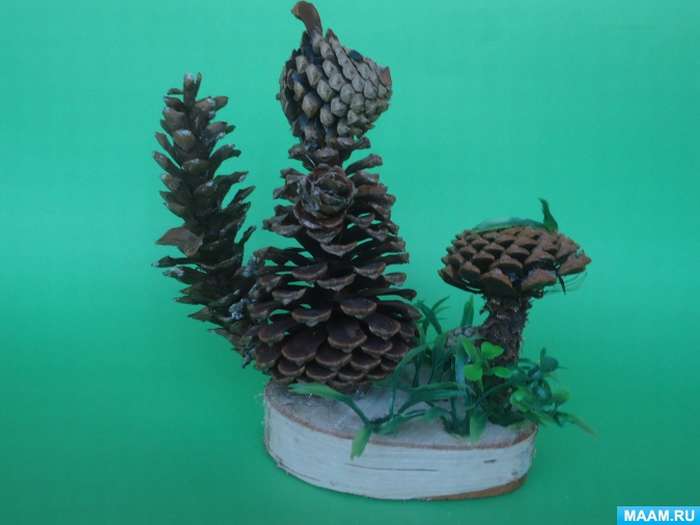 And here is an example crafts protein from cones. This is a whole composition, it will take 6-7 cones, sawed from a thick branch or log and a little decoration, moss or grass, although it is not necessary to collect real materials. Real grass will quickly dry and crumble, you can choose something from synthetics, most importantly, to look natural. Five cones are needed for making the squirrel itself - the trunk, head, fluffy tail and legs, and one more cone for the mushroom. All this sticks together, for reliability thin carnations or metal pins can be used. To make a mushroom, just cut off the top flakes, turn the cone over and fasten it with the cone down.


https://i.expert-h.com/en/iz-shishek/podelki-svoimi-rukami#sigFreeId71460985fd
24 Photo squirrels from cones. A selection of crafts.
(To enlarge, just click on the photo)


https://i.expert-h.com/en/iz-shishek/podelki-svoimi-rukami#sigFreeIdaf28c1679e
Craft Bear of Cones
Here is another one children's crafts bear from cones. Well, isn't he pretty? Look at their little noses! In addition, it only takes a few minutes to create, and you are guaranteed to get crafts that children will simply adore. To make you you only need bumps and felt. You need to draw a head and paws on paper, although you don’t even have to draw yourself, follow the link under the gallery there, on the site you can download the template. Then, using the template, cut out all the parts from the felt. Use hot glue to attach the ears, nose and eyes to the bear’s head. Then attach all the finished parts to the bump and teddy bear is ready.
See below for step-by-step photos..


https://i.expert-h.com/en/iz-shishek/podelki-svoimi-rukami#sigFreeId010b0f052e
Bear of cones. A selection of crafts: (28 photos)
(To enlarge, just click on the photo)


https://i.expert-h.com/en/iz-shishek/podelki-svoimi-rukami#sigFreeId1456373918
Cone swan
To make a swan from cones, you will need a pipe brush, pine cone, feathers, orange beak paper and a pair of eyes.
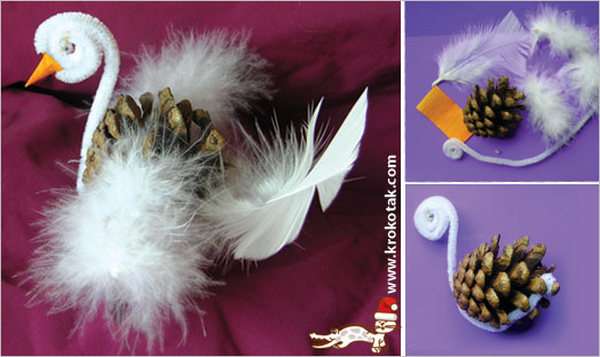 Twist the tip of the brush several times, to make a swan head. Attach the other end to the bump as shown in the photo. Glue the bottom of the neck to the base of the bump. Make small orange paper beak and stick to the head. Glue the eyes on both sides of the head. Finally, glue the feathers - one for the tail and one on each side of the cone, it will be wings. Everything, a beautiful swan from a cone is ready.
Swan made of cones. 24 Photos: nselection of crafts.
(To enlarge, just click on the photo)


https://i.expert-h.com/en/iz-shishek/podelki-svoimi-rukami#sigFreeIde058a904b0
Crafts from cones for the new year!
(Best ideas and master classes)
DIY Christmas tree made of cones
Do you have a ton of cones that need to be used? Then here is the instruction for you, how to make a chic Christmas tree from cones with backlight. By the way, this is a great idea for a gift for the New Year, and most importantly you will be worth a penny.
For crafts from cones need:
- One sheet of black thick paper or other material
- Tape
- Peeled hemp (about 40 different sizes)
- Hot glue
- One 15-inch straw wreath (for the base)
- Assortment of christmas decorations
- One chain of white LEDs with backlight (set of 20)
Detailed instructionshow to make this beautiful crafts out of cones, you can read on the site, the link is under the gallery.
See below for step-by-step photos, how to make a christmas tree from cones with your own handsperhaps this will be enough to understand the essence of the process.


https://i.expert-h.com/en/iz-shishek/podelki-svoimi-rukami#sigFreeIdddc8f014dd
Santa Claus from cones
On New Year's Eve, all the characters of any cartoons go by the wayside in children, and comes to the fore main winter characterthat everyone is looking forward to. Make your kids happy, do it with them Santa Claus from cones do it yourself, it will be their favorite toy for the New Year holidays. It is very simple to make the craft, in addition to the cone you will also need a piece of red cloth, a wire to make glasses, this is for solidity, and a little cotton. You can make your own eyes by drawing on paper or buy ready-made ones. To better hold on, use plasticine.
How to make Santa Claus from cones, look at step by step photos


https://i.expert-h.com/en/iz-shishek/podelki-svoimi-rukami#sigFreeId947a5a0e63
New Year's toys from cones
Excellent crafts from cones for children and adults, and look very beautiful! Such DIY Christmas toy from a cone surprisingly easy to do. They will look amazing on your Christmas tree!
Here is what you need:
- Pine cones
- Tiny pompons
- Tape
- Hot glue
These tiny pompoms can be bought at the store or, if you can, do it yourself. The work is a little painstaking, you need to apply glue to the open flakes, so you need to pick up “open” cones, with a large distance between the scales. But if it does, the process will go pretty quickly.
Then take about 30 cm of cord or tape and glue the ends to the bumps.
You can make them colorful, as in this case, or try use single colored pompons, to give a crafts from cones a more uniform look.


https://i.expert-h.com/en/iz-shishek/podelki-svoimi-rukami#sigFreeId12b78f6213
Crafts from cones for the New Year. (Best ideas !!!)
Snowflake made of cones
However, christmas wreath of cones may have any other form. Just the shape of a snowflake emphasizes the cold weather, creating at the same time a festive mood. You can use the wreath for the festive decor for Christmas, New Year and even Valentine's Day. Any winter holiday will do, February is also a snowy month. Cones can be picked up in a neighboring park, even in your own yard, where pine trees grow. The remaining materials are in every home.
Necessary materials:
- Cones;
- Wire;
- Wooden planks (9 pcs);
- Hot glue and glue gun;
- Aerosol white paint or artificial snow (optional).
How to make a snowflake out of cones:
- From the wire, make the base for the wreath, as in the photo.
- Fix 6 strips, cut the remaining 3 in half, lay over the previously fixed strips and fix with glue. Thus, the hexagonal shape of the future wreath is formed.
- Stick the cones on the strips and the wire base. Some of the remaining cones can be trimmed, the trimmed tops of the cones resemble flowers in shape. Fix them where the wire or tree shines through to eliminate such gaps. In addition to practical benefits, it is also beautiful.
- The final, although not mandatory, chord: sprinkle a ready-made wreath with a spray or cover with artificial snow.


https://i.expert-h.com/en/iz-shishek/podelki-svoimi-rukami#sigFreeIde8fe3c244b
Crafts from cones for giving and at home
Flowers from cones. (ZINII)
This beauty is called zinnia in the original. See how to make great do-it-yourself flowers from cones. Again, pine cones, multi-colored paints, and brushes will be needed. Bumps should be well driedopen. Craft chip in removing several flakes from the top. The remaining stem base can be painted in any color.
Having painted them first with white paint and letting it dry, you will get an even more colorful result.
Then these cones, pretending to be zinnias, can be put in a basket or bowl. It looks really nice interesting option for interior decoration.


https://i.expert-h.com/en/iz-shishek/podelki-svoimi-rukami#sigFreeId105f038848
Read also: 78 ways to make FLOWERS from cones !!!
Basket of cones
See an example how to make a decorative basket of cones. The task is not difficult, but 5 hours will be needed. The main thing is to stock up on a large amount of source material, that is, cones, and preferably the same size. The basket frame is going by wire, it is necessary to cook two types, thin and thicker. First, collect three hoops from wire and cones, set the size yourself, depending on which basket you want. Hoops are also fastened together with a wire.
Yes, before that you need to collect the bottom, and fit the outer hoops under it. It is done simply, around the central cone, fasten a few more in a circle to get a less dense surface. Cone basket handle, this is the same hoop, just attach the ends to the edges of the basket.
See the step-by-step photos with the assembly order of DIY crafts from cones below.


https://i.expert-h.com/en/iz-shishek/podelki-svoimi-rukami#sigFreeIdbb065323fe
Read also: +80 more models of BASKET from cones !!!
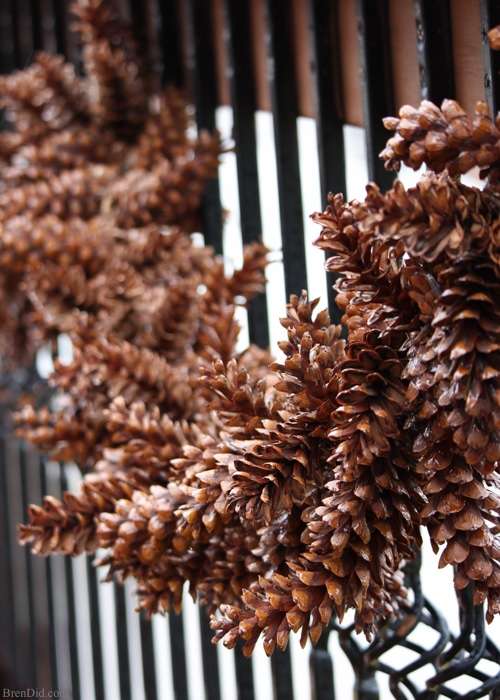
Cone garland
I must say that cone garlands - universal decoration, suitable for any holiday, especially winter. Traditionally used in the New Year, Christmas, decorate buildings inside and from the street.
Decorations look more relaxed, more comfortable than multi-colored constantly blinking lights, which is appropriate for home decor.
Make a garland of cones not difficult, most materials are always at hand, or, literally, underfoot.
 DIY materials:
- Prepared cones, the amount depends on the desired garland length;
- Ropes, better twine, what length you want;
- Aromatic oils of your choice, the most suitable are cinnamon and cloves.
How to make a DIY crafts out of cones step by step:
- Prepare the bumps.
- Tie loops at both ends of a thick sturdy rope.
- Tie small pieces (15 to 20 centimeters) of a thinner string around each bump.
- With the remaining free ends of the string, tie the cones to a rope stretched between two chairs.
- For a larger garland, tie the cones, directing the ends in different directions.
- Used cones and twine can be aromatized with cinnamon or clove oils.
- The finished garland remains to be hung in the right place and admire your work.
Garland of cones master class


https://i.expert-h.com/en/iz-shishek/podelki-svoimi-rukami#sigFreeId668d10f8c0
Cone Crafts - Ideas for interior.
Photo and master decor classes.
Bouquet of cones
You may notice that a bump, if you look at it from a certain angle, is very similar to a flower.
This is a direct tip. make roses out of cones, the perfect natural material. We pick up a few fallen cones, turn each into a flower, put them together, and we get such a bouquet of cones.
How to make a beautiful decorative ornament, look at the step by step photos, it is really very simple.


https://i.expert-h.com/en/iz-shishek/podelki-svoimi-rukami#sigFreeId2abf69bce0
Panel of cones
If you want to decorate a room in an unusual and stylish way, make do-it-yourself panel of cones. It is fresh and modern, suitable for any interior. Instructions can not be given, each picture is individual and is done to your taste, just see some examples in a small gallery.


https://i.expert-h.com/en/iz-shishek/podelki-svoimi-rukami#sigFreeIde2aeca5c84
Read also: +80 types of DECOR jewelry from cones !!!
Cone candle holder
As we see in the photo, candlesticks made of fir cones made easy: one bump - one candlestick. Of them, you can, if necessary, assemble a whole candelabrum. Suppose you need several separate candlesticks for single candles. It is better to pick up large cones of stable shape, with a flat end. It turns out, depending on the color, autumn or New Year's decor.
Necessary materials:
- Bumps:
- Spray paint;
- Glue gun;
- Scissors;
- The bottom of the aluminum can from the drink.
How to make a candlestick out of cones:
- Cover the fir cone (or cones) with spray paint and put on a newspaper until it dries.
- After drying, cut off its upper part so that the top of the cone becomes flat, and spray the paint again.
- From the aluminum can, cut the bottom and glue it to the flat top of the cone.
- Place a candle on an aluminum circle - the candlestick is ready!


https://i.expert-h.com/en/iz-shishek/podelki-svoimi-rukami#sigFreeIda4d5b98416
Do-it-yourself wreath of cones
It is very light and simple crafts of cones, and looks ... let's say not a million. But such things in online stores cost from $ 50, depending on size, but it will cost you almost free. The very presence of such a wreath of cones give the room a festive look. Although something may have to be bought, the price of the result cannot be compared with the factory version.
Such a miracle is done easily, and quickly enough, you can use different decorative elements and change them as desired.
The necessary materials for crafts from cones:
- Styrofoam ring;
- Cones;
- Brown spray paint;
- Glue gun;
- Wide fabric tape of any color and length.
How to make a wreath of cones:
- The foam circle should be slightly covered with brown paint, white color can shine from under the cones.
- Starting in the middle, glue the bumps until the whole circle is filled.
- It is better to glue the cones in a checkerboard pattern, so they will be more closely adjacent to each other and less risk that a circle will be noticeable - the base of the wreath. Between the cones, you can also add a little glue, the wreath will be more dense.
- Pass the ribbon through the finished wreath, tie the loose ends with a large beautiful knot.
Now a wreath of cones can be hung - on the mirror, as in the photo, or in any suitable place.


https://i.expert-h.com/en/iz-shishek/podelki-svoimi-rukami#sigFreeIdeda45ef856
DIY cone topiary
Decoration like cone topiaryYou can buy, it looks great. But much more interesting, and not just for the sake of economy, do it yourselfIt’s not at all difficult.
For this crafts from the cones will need:
- a plastic ball of the desired diameter;
- garbage bag and rope;
- Pine cones;
- hot glue;
- white spray paint;
- beautiful flower pot.
How to make topiary from cones:
- Put the ball in the trash bag, like in a bag. Pull the bag tightly over the ball and tie it with a rope. Cut the rest of the bag with scissors. Fill the tied end of the bag with hot glue.
- Cut the lower part of each cone; for the topiary, only the upper parts of the cones are used. The product will be symmetrical if all the cones are the same size.
- Glue the cones to a plastic ball wrapped in a garbage bag. Better to start from the top and continue until the whole ball is pasted over.
- Set the resulting work on a flower pot and sprinkle lightly with white spray paint from a spray can. Now this simple but effective decor will please the eye for a long time.
DIY crafts from cones on step by step photos


https://i.expert-h.com/en/iz-shishek/podelki-svoimi-rukami#sigFreeId55136579dc
Read also: +20 more master classes TOPIARIUS from cones
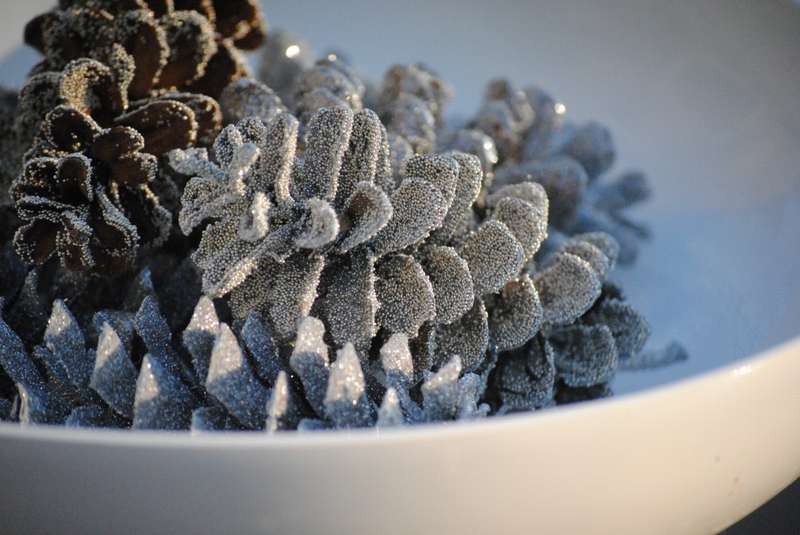
Cone decoration
 It’s worth immediately clarifying that Christmas decor from cones with sparkles only conditionally called "New Year", you can decorate any winter holiday. Such luxury is done very simply, but it looks simply gorgeous.
For crafts from cones you will need:
- Cones;
- Multi-colored sequins;
- Glue spray;
- Latex gloves;
- Cardboard box.
How to make shiny bumps:
 Fold the prepared cones in a box and process with glue. It should be sprayed onto the cones with aerosol glue from the spray can, then mix them by shaking the box well. Repeat the operation several times until all the bumps become sticky, and work better with gloves.
- Cones are placed in a bag with sequins and shake until the sequins cover the entire surface of the cones, penetrating all their cracks.
- For a change use several packages with sparkles of different colors. Adjust the number of sparkles as you wish. After all, let the cones dry by laying them neatly on a newspaper.
Finished shiny ornaments from cones can be laid out in bowls, vases, put on shelves, added to garlands and wreaths, decorate them with a Christmas tree.


https://i.expert-h.com/en/iz-shishek/podelki-svoimi-rukami#sigFreeId6d6ca8af9d
Cones tree
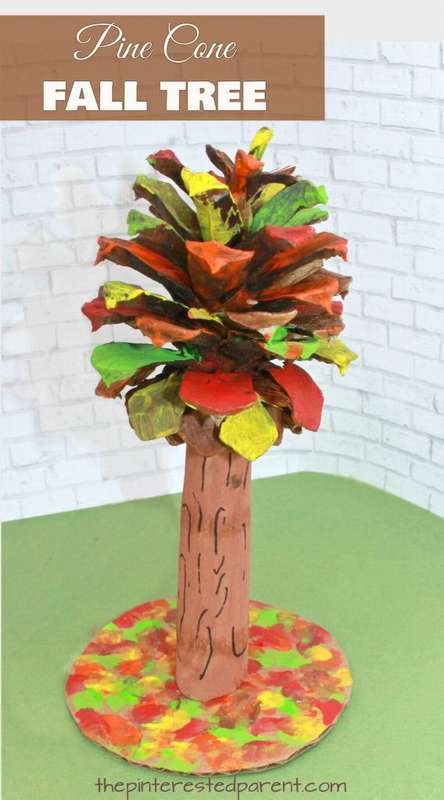 Decor from natural materials is always unusual and attractive. These autumn cone trees beautiful as autumn itself - eyes enchantment. Just the season of the fall of cones, you can collect them, prepare, there will be material for crafts. On winter holidays, cones are decorated with artificial snow, sparkles. In autumn, tones prevailing in nature in this season are used.
Materials:
- Cones;
- Acrylic colors of autumn colors;
- Cardboard tube;
- Hot glue;
- Black felt-tip pen;
- A piece of cardboard.
How to make a crafts from cones step by step:
- Color the bumps in autumn colors.
- Cut the cardboard tube in length, glue it so that one end becomes wider and the other narrower.
- Check if the lower end is even enough - the cone should be on a flat surface. Paint it brown when dry, with a black felt-tip pen, draw lines to create a likeness of the bark.
- Cut a circle out of cardboard and paint it as if it were land covered with fallen leaves.
- Glue the bump to the narrow end of the cone-trunk. Glue the tree to the circle with the wide end.
- Such trees can be made in any quantity, there would be cones.
See step-by-step photos on how to make a tree from cones.


https://i.expert-h.com/en/iz-shishek/podelki-svoimi-rukami#sigFreeId23b2262066
Ball of cones
This is a wonderful decorative decoration and not only for the New Year or Christmas, ball of conesDIY, will be a great addition to the interior at any time of the year.
Materials that will be needed to make a ball of cones:
- balls of polyurethane foam of various sizes (4 "balls with a diameter of 10 cm for large cones and 5 cm for small ones were used here)
- pine cones of various sizes, dry and open
- twine (optional)
- stapler (optional)
- hot glue gun and regular glue
How to make a ball of cones with your own hands
Collect pine cones of different sizes and dry. They are dry when open. If you plan to hang balls, fasten a loop of twine on a ball of foam until the next step. Use a hot gun to attach the base of each cone to a sphere, starting with the largest cones and adding smaller instances to fill in the gaps.
When the ball of cones dries, you can hang it somewhere or put it on a shelf, a bookcase or even on a coffee table. Look at the step-by-step photos on how to make a DIY craft out of cones


https://i.expert-h.com/en/iz-shishek/podelki-svoimi-rukami#sigFreeIda81d9a4a55
Cone vase
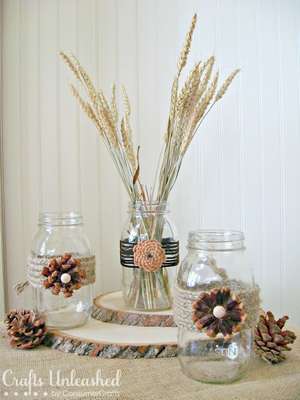 Flowers are able to decorate any thing. Even turn an ordinary glass jar into a beautiful vase. Let's take a closer look, as make a vase of cones, or rather, turn an ordinary jar into a chic flower vase.
Mason banks shown on the site can be replaced with any glass vessel. Or not even glass flowers from cones will turn any container into a decorative thing.
Necessary materials:
- 3 cans;
- Cones;
- Suede dressing for one of the cans;
- Double rope
- Wooden balls;
- Glue gun;
- Pliers;
- File on wood;
- Powerful strong scissors.
How to decorate cans with flowers from cones:
 All three cans should be wrapped: two with double twine, and 3rd with suede.
- Use a pair of pliers to remove the scales from the bump. Perhaps they will have to be cut off with scissors from the core of the cone.
- Saw akgently saw off the bottom of the bump. This will be the base of the flower.
- Using a glue gun, glue the flakes from the cones to the round base, row by row. Glue a wooden dummy ball in the center. Flowers can be made different, as in the photo, 3 different types, it looks very impressive.
- When the flowers have dried, glue them one at a time to each jar, to twine and suede.
After drying completely, you can put candles in such jars, or use them as vases.


https://i.expert-h.com/en/iz-shishek/podelki-svoimi-rukami#sigFreeId967e870b22
Picture of cones
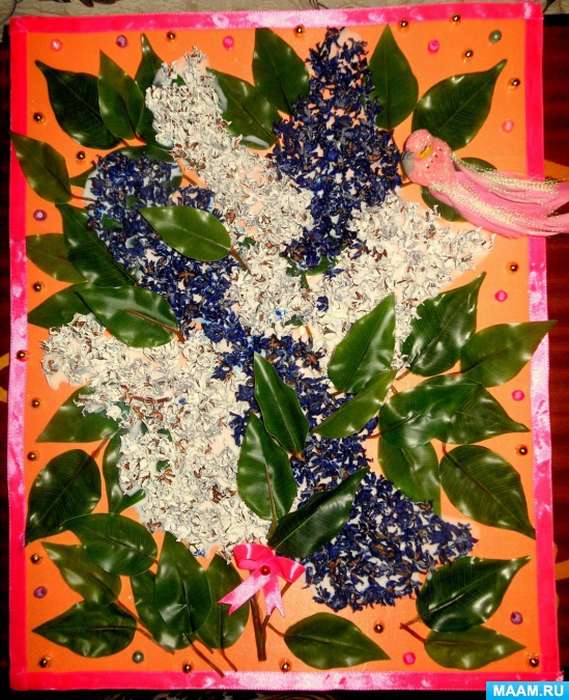 See an example how to make a beautiful picture of cones. This craft is called "Lilac Bouquet". For the manufacture of used thuja cone scales. It is necessary to collect more opened cones and prepare beautiful leaflets.
You can find out the details of the master class on the site, you will find the link under the gallery.
Although it’s not difficult to make a craft.
- It is necessary to take foam, this will be the basis of the picture.
- Collected cones to sort and sort.
- After that, paint with thick gouache.
- Then glue the leaves with hot glue.
- When dry, you can stick lilac flowers.
At the end add some more decor - a bird, bows, a beautiful ribbon, in general, that will tell your imagination.


https://i.expert-h.com/en/iz-shishek/podelki-svoimi-rukami#sigFreeId53e7c2497a
Hello, I am the author of this article, so I look forward to asking questions for this article in the comments below, I will answer all !!!
If you have questions on another topic, ask them on our forum, we will answer you
- Two baskets of paper in 5 minutes (Master class)
- How to make a simple and compact table for a milling cutter from plywood
- How to make a soft headboard tile (Instructions + step by step photos)
- Cinder block benches: a convenient bench in 55 minutes
- How to make a bed with a niche: saving space (Master class)