Topiary of cones. Master class + 300 photos
 cone topiary master class
Cones are a traditional decoration for the winter holidays. Here you will find out how to make topiary from cones, decorative tree from natural and other materials. The craftwork is ideal for decorating any interior, it is beautiful, stylish, and also has a lot of advantages. A topiary made of cones, like a flower in a pot, pleases the eye, but it does not require attention.
Today this stylish craft is very popular, for the New Year holidays, if you add a little colorful decor, it can replace the Christmas tree. The rest of the time it will delight you, creating a cozy atmosphere in the house, not for nothing that the topiary’s second name is “tree of happiness”. In general, here are 15 examples with step-by-step photos on how to make do-it-yourself topiary of cones, watch and be inspired.
DIY cone topiary
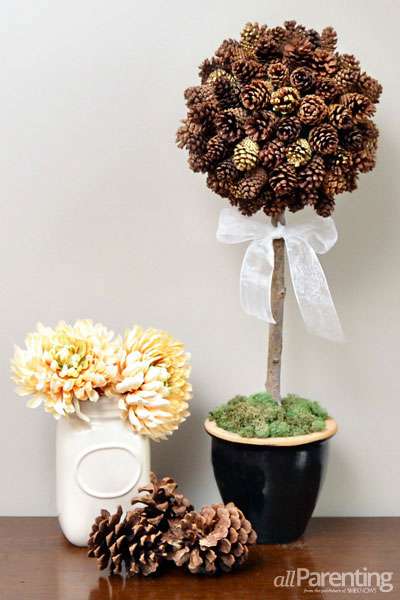
 This is a simple project, so if this is the first time you want to do this tree of happiness, you can use this example. To make a topiary from cones, you don’t need much, just a couple of branches of a thuja, a beautiful pot and something from the decor - ribbons, beads.
All that you need, as well as detailed instructions can be found on the author’s website, the link can be found under the gallery. Below, step-by-step photos show in detail the process, how to make topiary from cones with your own hands. By the way, if you don’t have a foam ball, you can easily replace a simple tightly folded newspaper.


https://i.expert-h.com/en/iz-shishek/topiarij-foto#sigFreeId7f30a3811f
How to make topiary from cones
 It is not necessary to decorate the house solely on holiday. You can admire, for example, jewelry such as cone topiary a little longer, all winter, and more. For the holidays, in particular, for the New Year and Christmas, it is customary to decorate the home in a special way. Holidays pass, beautiful winter decor is hidden until next year. But a cone topiary will decorate your interior year-round - watering is not necessary, just do not forget to clean it from dust.
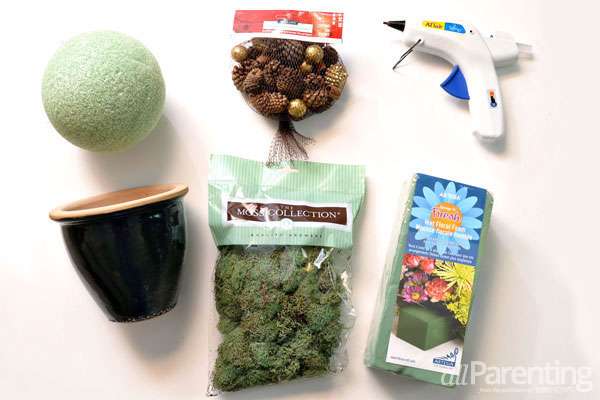
Necessary materials:
- Pine cones (preferably small, of the same size);
- Foam ball;
- Empty flower pot;
- Wooden stick;
- Moss:
- Hot glue;
- Floral foam;
- Floral pins;
- Colored ribbon (optional).
How to make a topiary of cones with your own hands, master class:
- Fill the pot with floral foam.
- Fix in the center of the pot a wooden stick 60 - 80 cm high.
 Place a foam ball on the upper free end of the stick.
- Glue a floral pin to each bump so that the tip remains free.
- Stick the tips of the studs into the foam ball, close to each other, to cover the entire ball with them.
- Cover the flower foam in the pot with moss, gluing this moss to the foam with hot glue.
- If you want, you can tie a ribbon with a beautiful bow around the stick under the ball of cones, this will give the topiary an even more festive look.


https://i.expert-h.com/en/iz-shishek/topiarij-foto#sigFreeIda2b8272c01
Topiary of cones step by step photos
 Today is fashionable decorate the interior with crafts made from natural materials. Look at the master class, how to make a topiary of cones with your own hands, this beautiful home-made tree will add a twist to the design of any room. It is not difficult to do, just need to prepare various natural materials for the decor. There may be many options, in this case you will need moss, dry acorns, juniper branches, open pine cones and rowan berries. A foam ball is usually used for the base, although you can simply twist the newspaper tightly and wrap it with tape or make a ball out of mounting foam.
See below step by step photos how to make a topiary from cones.


https://i.expert-h.com/en/iz-shishek/topiarij-foto#sigFreeId8a6134c8d2
Topiary tree of happiness
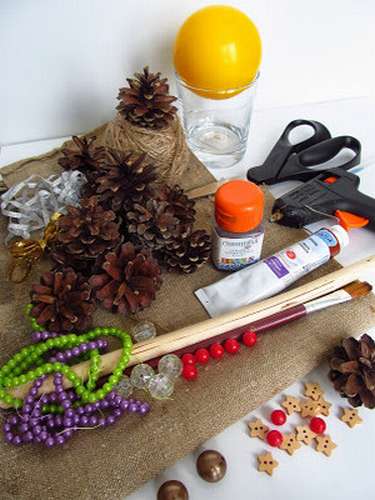 If you are looking for instructions on how to do do-it-yourself topiary of coneshere is a great example. On the right in the photo is what you need for work. it great decoration for the interior, which will delight you not only on holidays.
The process of making topiary from cones, see step by step photos.


https://i.expert-h.com/en/iz-shishek/topiarij-foto#sigFreeIda25ce4453f
Topiary of cones master class
 To make represented in the photo cone topiaryyou don’t have to buy anything, everything can be made from improvised materials. For example, a tree pot is made of a plastic bottle of milk and an old bamboo mat. You will also need a strip of burlap for decoration and a beautiful ribbon. The topiary itself is made of ordinary dry branches, a foam ball and cones. Will have to spend only on spray paint and glue. You can see step-by-step photos on how to make a topiary from cones below in a small photo gallery, the process is displayed in great detail and is accessible, so it shouldn't be difficult.


https://i.expert-h.com/en/iz-shishek/topiarij-foto#sigFreeId043ca365a0
DIY topiary made from natural materials
 This cone topiary created from natural materials and completely handmade from top to bottom! So you can use this tree for a sample.
Topiary made of flakes of cones. This, of course, takes some time, since the cone is 38 cm high and with a circumference of 58 cm.
In total, about 20 medium-sized cones went to the tree. If you want a uniform color, then it is better to collect cones from one tree.
The base can be made of polystyrene foam, but here a more original version is proposed - ordinary balloon
- Glue the ball in four layers with a brown-colored newspaper.
- Using pliers, carefully separate the scales from the bump and align the cutting edges with scissors.
- Then glue the ball around them, as shown in the photo.
- Prepare a flower pot by painting it white.
- Install the whitewashed ball and the topiary of cones is ready.
See below for step-by-step photos..


https://i.expert-h.com/en/iz-shishek/topiarij-foto#sigFreeIdb631293dac
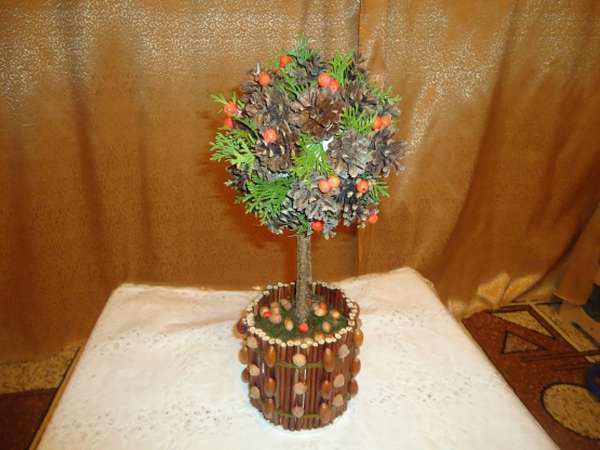
Topiary of cones and leaves
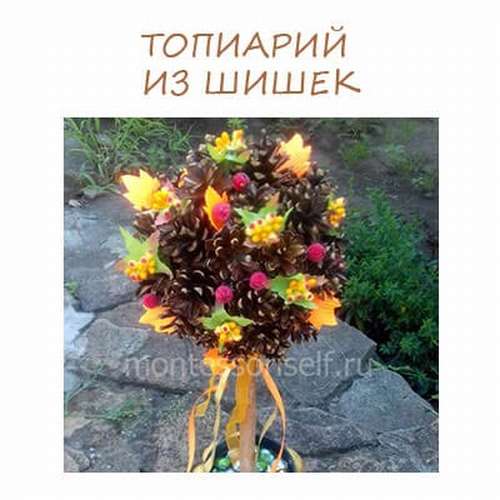 Topiary made of cones is a universal decoration, in the sense that you can make different decorative elements depending on the time of year or the upcoming holiday.
Happy new year decorate the crafts with garlands and snowflakes, there will be something like a decorative Christmas tree.
For valentines day attach a few hearts. Want to fall thememake a topiary of leaf cones, as shown in this example.
In general, approach the manufacture with imagination, if you are already collecting cones for the topiary, collect other natural materials. Acorns, beautiful pine branches, arborvitae, bright fallen leaves, rowan berries, moss - all this can be used to create a decor.


https://i.expert-h.com/en/iz-shishek/topiarij-foto#sigFreeId91682bda2a
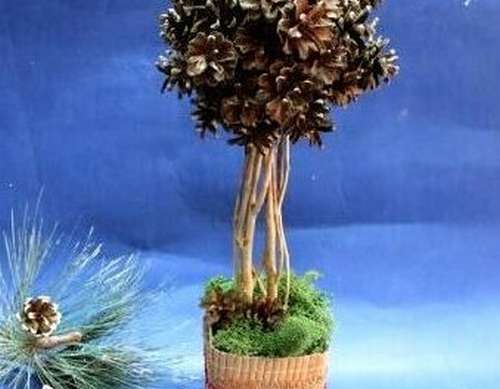
 Pine cone topiary
Here is another example for lovers of decorative crafts. Cone topiary, two trees in one pot.
Based on a ball of newspapers, a pot of gypsum and a double pine branch.
Perhaps you can’t stop at the process in detail, everything is very clearly shown in step-by-step photos.
Even a child can easily cope with such a task, so you can use the craft for school competition.
Below in the gallery see the master class on how to make a topiary of cones with your own hands.


https://i.expert-h.com/en/iz-shishek/topiarij-foto#sigFreeIdb79a93b3cf
DIY Christmas tree topiary
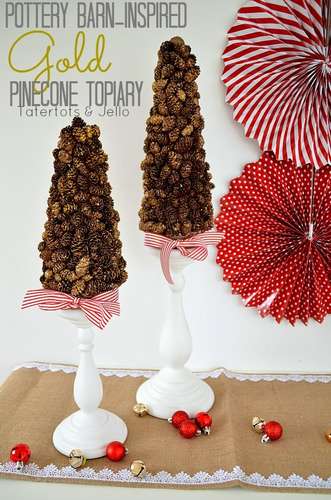 See an example of how to do cone topiary on a candlestick. Although you can use a clay pot for these purposes, this option is shown in the first photo in the gallery.
Consumables: pine cones, wooden form, hot glue, bronze and gold paint, metal ribbon (optional), decorative ribbon, candlesticks.
- Apply hot glue to the wooden blank. If you use tape, then leave some space below.
- Then start fastening the cones. You can do one five-centimeter section at a time.
- Once the entire form is covered with cones, apply bronze paint from a spray gun. The paint will cover the bumps, and fill the holes, covering the tree with an even shine of bronze color. Very beautiful!
- When the glue dries, tie a ribbon at the bottom and install on the candlestick. You can stick it to the candlestick if you want. Or just set on top, the shapes with bumps and hot glue are heavy enough, so that should hold on, of course, if you have a candlestick with a big enough top.
If you do not want to use a candlestick, you can take a small dowel and insert it inside a wooden blank, and then install it in a small container filled with floral foam.


https://i.expert-h.com/en/iz-shishek/topiarij-foto#sigFreeId641c1e8a58
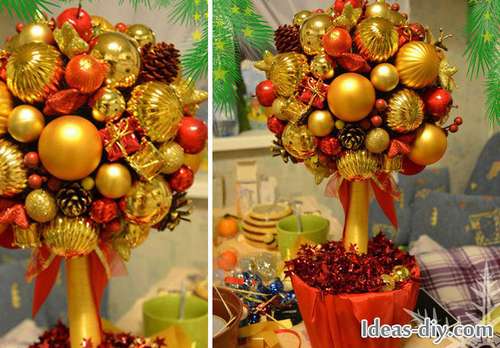
 Decorative topiary
This cone topiary intended for a gift. TechnoloThe manufacturing process differs from the above examples in that the ball is based on a regular balloon. Just apply glue on it and wrap the iris with threads, thus making several layers. Then cover with silver spray paint. For decor, beads can be glued between the cones.
For the base, find any pot, clay or plastic, install the topiary trunk in it, in this case it is an expressive snag of the original form. Do not completely fill the pot with alabaster; leave a place for decoration on top.
You can also glue it from below CD, this is not necessary, but it will be more reliable.
Below are a few step-by-step photos, how to make a topiary of cones with your own hands.


https://i.expert-h.com/en/iz-shishek/topiarij-foto#sigFreeId745e1c1d7a
New Year's cone from cones
 Autumn has come, it's time to prepare for the New Year. Why put off? It's too early to put a Christmas tree, but make topiary from cones It is possible already in September. It is beautiful, fashionable, unusual and wonderful decoration for any holiday. So prepare the basket and go to the forest for the cones. While collecting, while dry, you look, and already December 31.
I think there’s no sense in describing the entire manufacturing instruction, everything is shown in detail on step by step photos, but if something is not clear, there is a link under the gallery, everything is described in detail for each stage, you can read it.
To make such festive cone topiary it will take 5 to 6 hours. Nothing complicated, the manufacturing procedure is almost the same as in the other examples presented in this article. The main difference in decorating a pot for a tree. So do not be afraid and boldly get to work.
Turn it, this is one thing in the photo, and when the topiary of cones will be ready in your room, that's another, you will be delighted with your craft.


https://i.expert-h.com/en/iz-shishek/topiarij-foto#sigFreeIdf622984e31
Check out three more examples. how to make a topiary of cones for the New Year and Christmas holidays
Christmas Topiary
 See how to make this bright, colorful crafts out of cones. Imagine how New Year's Topiary will look great in your living room. Material requireds:
- Pine cones;
- paper towel and aluminum foil;
- flower pot;
- double sided tape;
- fabric decorations;
- foam ball flower;
- glue gun and sticks


https://i.expert-h.com/en/iz-shishek/topiarij-foto#sigFreeId44f47161c0
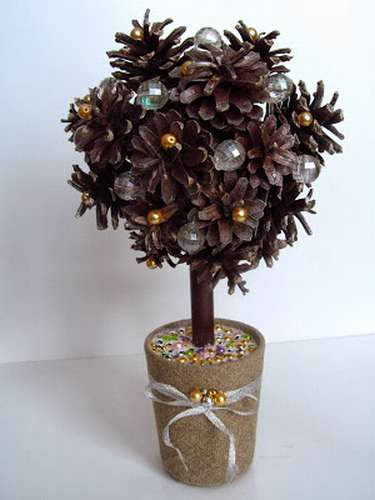
 Looking at this cone topiary, New Year mood comes up automatically.
For the manufacture of crafts you will need:
- Dry pine cones of medium size;
- Christmas toys that are suitable for your topiary;
- White gouache;
- Artificial branch;
- Multi-colored ribbons for braiding;
- Large beads;
- Gypsum;
- Small flower pot;
- Faux white fur;
- Thread with a needle, wire cutters, newspaper, glue.
Here master class how to make a topiary from cones - see step by step photos.


https://i.expert-h.com/en/iz-shishek/topiarij-foto#sigFreeIde3811effaa
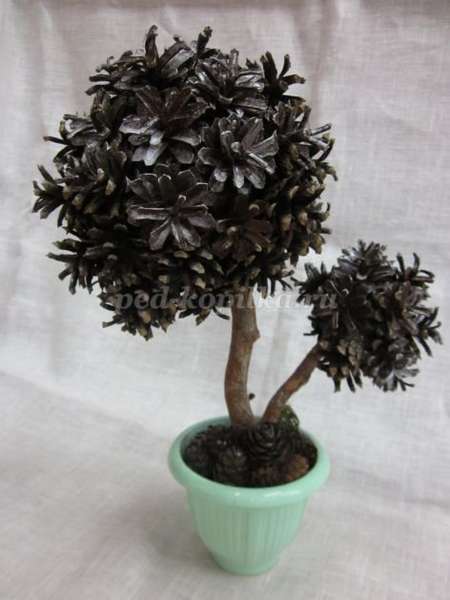
 Such a topiary ball will add a little festive christmas decor for your room.
A cone topiary in combination with a white clay flower pot looks modest and charming, adding to the interior a homely atmosphere and a festive mood. Pine cones really do not go out of fashion, regardless of the time of year.
The step by step photos show how to make topiary from cones. A little effort, and you will have a decorative tree - a wonderful decoration for the house all year round.


https://i.expert-h.com/en/iz-shishek/topiarij-foto#sigFreeIdc508246f8a
Here is another example New Year's Topiary with Christmas toys and a beautifully decorated pot of burlap material. Step by step photos, how to make topiary from cones look in the gallery.


https://i.expert-h.com/en/iz-shishek/topiarij-foto#sigFreeIdafdfc48ed5
These are just a few examples, actually options, how to make topiary from cones lots of. To facilitate your choice and give food for fantasies, below in the gallery there is a small selection that will help you with the idea for your own crafts.
Topiary of cones 300 photos


https://i.expert-h.com/en/iz-shishek/topiarij-foto#sigFreeIdd2f4d8a3ad
Hello, I am the author of this article, so I look forward to asking questions for this article in the comments below, I will answer all !!!
If you have questions on another topic, ask them on our forum, we will answer you