DIY crafts from cones with their own hands. Master classes + 300 photos
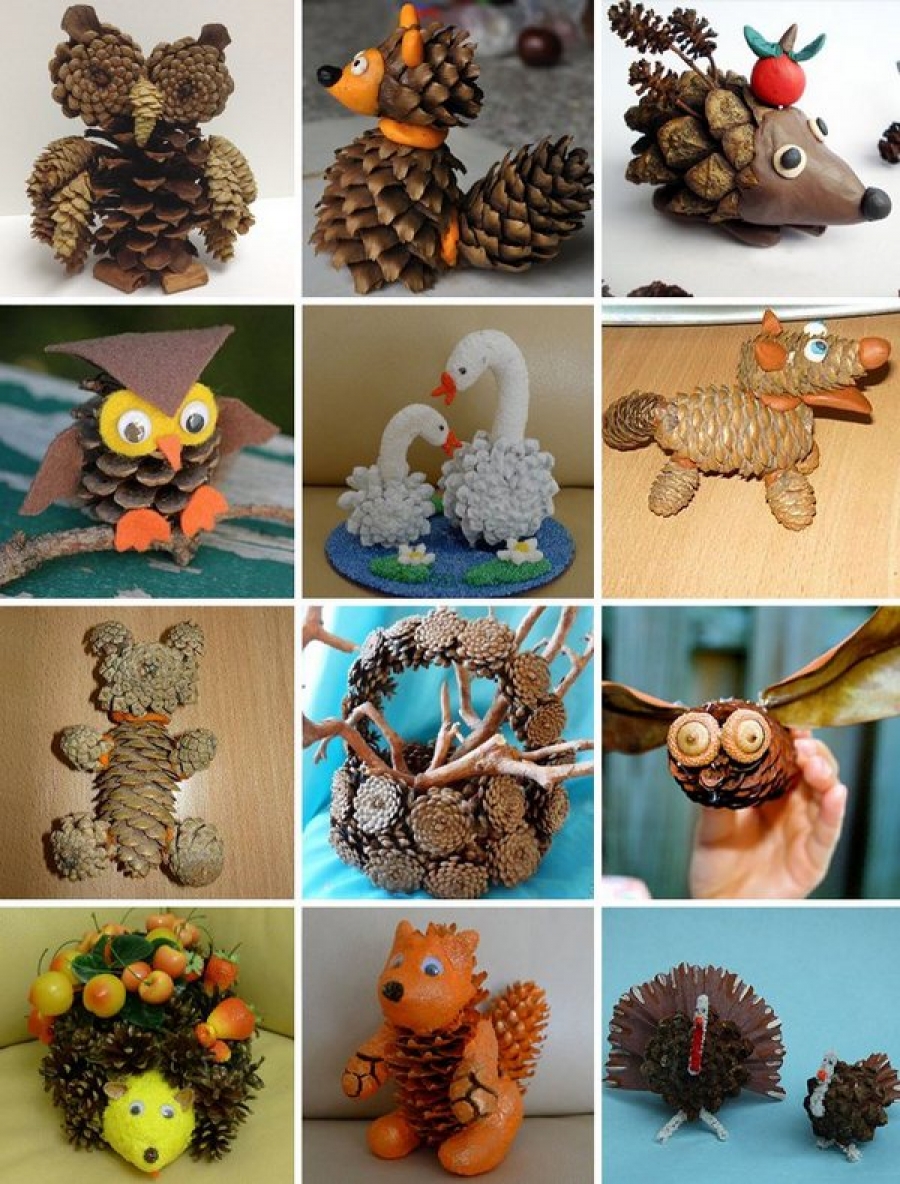 crafts from cones for children
Autumn is a time of bright colors and amazing transformations, when ordinary cones, acorns, dry leaves and much more that can be found in the forest, in children's hands miraculously turns into various crafts. This article presents ideas children's crafts from cones - 45 examples of various animals, birds, snakes, spiders, figures of gnomes and beautiful fairies.
Data master classes of children's crafts suggest the joint creativity of parents with children. The task of adults is to push the child to creative activity, suggest an algorithm of actions and teach how to use tools and accessories. The main thing is to let your children show their abilities.
Cone bears
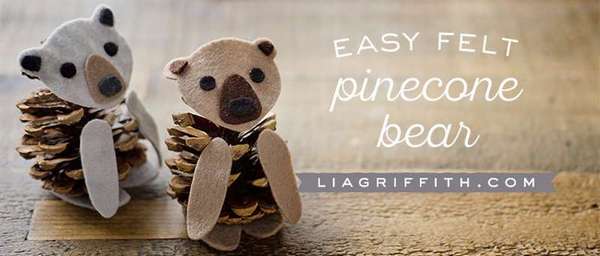 Can you do this! For crafts bears from cones it will take quite a bit of materials, and the result is a charming little character, a favorite of kids. It's wonderful crafts from cones for childrenwho learn to cut with scissors, as well as a useful project for developing attention.
Here's how to make a bear out of cones
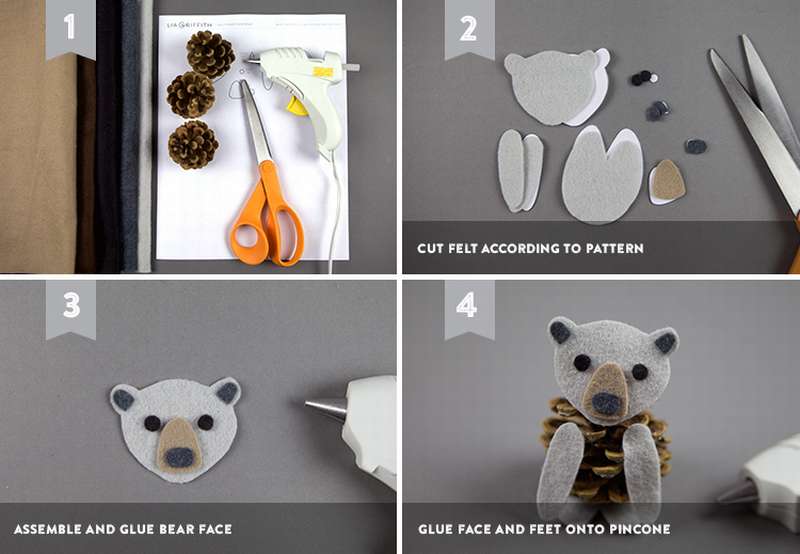 When you're done, you can make others the same way. little animals from cones and felt.


https://i.expert-h.com/en/iz-shishek/detskie-podelki#sigFreeId2ea2087908
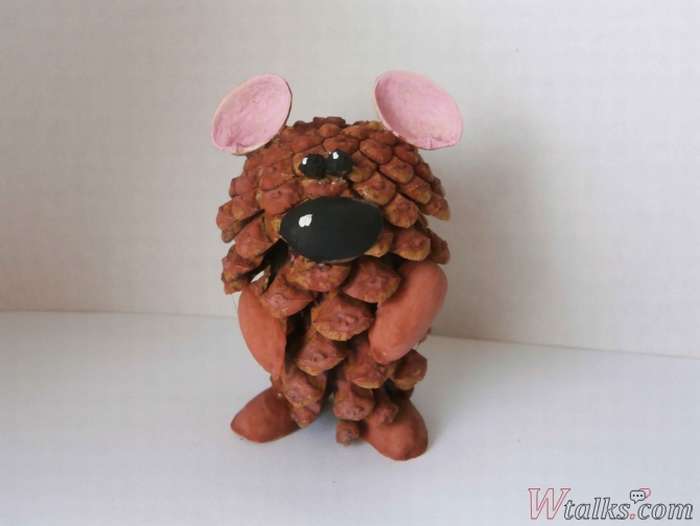 Here is another one master class how to make a cute bear out of cones.
For crafts, you can take any additional materialused in this case pistachio shell. Ears, nose and paws are made of it. If you don’t have pistachios on hand, flakes from a cone will do. In addition, prepare gouache, brushes and glue. And black pepper peas to make the eyes of the little bear.
How to make in stages DIY crafts from conesLook at the step by step photos.


https://i.expert-h.com/en/iz-shishek/detskie-podelki#sigFreeId41effbb170
Bear of cones 50 photos


https://i.expert-h.com/en/iz-shishek/detskie-podelki#sigFreeId3574036095
Craft Owl from Cones
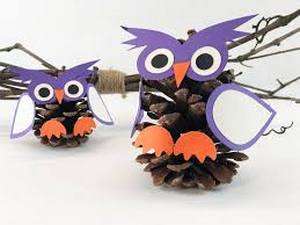 This craft is suitable for children aged 5 years and older, but still it will take a little supervision when using a glue gun and scissors. The project will take about 20 minutes, but this does not apply to drying time. To make an owl out of cones with your own hands, you can download free PDF-templates from the Internet, or draw on your own, for this you do not need to be a great artist. Decide which colors you like and choose cardboard in these colors. And then you just need to cut out the shapes and stick on the bump. That's the whole thing.
Use the craft as a home decor, and perhaps children will need it for competition in kindergarten or school.
Most importantly, home projects allow parents to spend time with their children. Enjoy while the children are still small enough and they have a desire to communicate with their parents!


https://i.expert-h.com/en/iz-shishek/detskie-podelki#sigFreeId817958727d
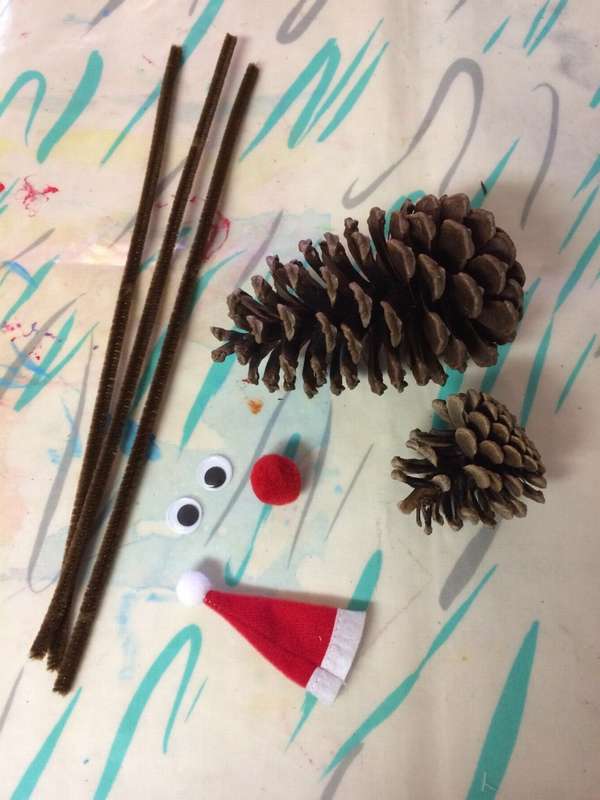
Deer of cones
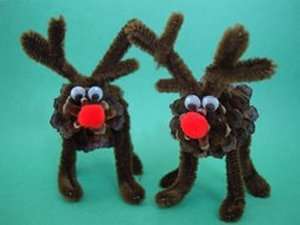 Do you like these crafts? See a master class on how to make these cute deer of cones. Craft will do for children from six years old and above. You will need small or medium sized cones, 4 pieces of chenille wire, eyes and a red pompon. First you need to make the legs of a reindeer. Make fluffy wire loops. Then connect in the center, bend and make the circle flat. Repeat twice to make a second set of deer and horns. You should have 3 lanes with a connection in the middle. The body of a deer is a pine cone. The narrow end is the face. Wrap one piece of fluffy wire around the front end of the cone and the other around the rear end of the brush. Bend the ends to make the legs. Make horns from the upper ends and move them apart a little. Attach the eyes and nose, and deer of cones completed!


https://i.expert-h.com/en/iz-shishek/detskie-podelki#sigFreeIda1e96ea479
 And this craft will serve as a beautiful toy for the Christmas tree.
To DIY do-it-yourself deer, you will need:
- Hanging tape or thread
- Clippings or felt for the ears
- Toy eyes
- Chenille wire
- Red nose pom poms
- Glue
- First of all, cut a little ribbon and glue it to the bottom of the cone to make a hoop for hanging the finished deer on the Christmas tree.
- Twist the fluffy wire in the shape of horns. You can make them big or small as you like.
- Cut pieces of fabric to make deer ears.
- Then glue along a flat edge and bend to give a more realistic shape.
- After that, glue the eyes and nose from the pompom.
See below for step-by-step photos. master class how to make little deer from cones


https://i.expert-h.com/en/iz-shishek/detskie-podelki#sigFreeId4c5ed84aa2
Craft from cones deer
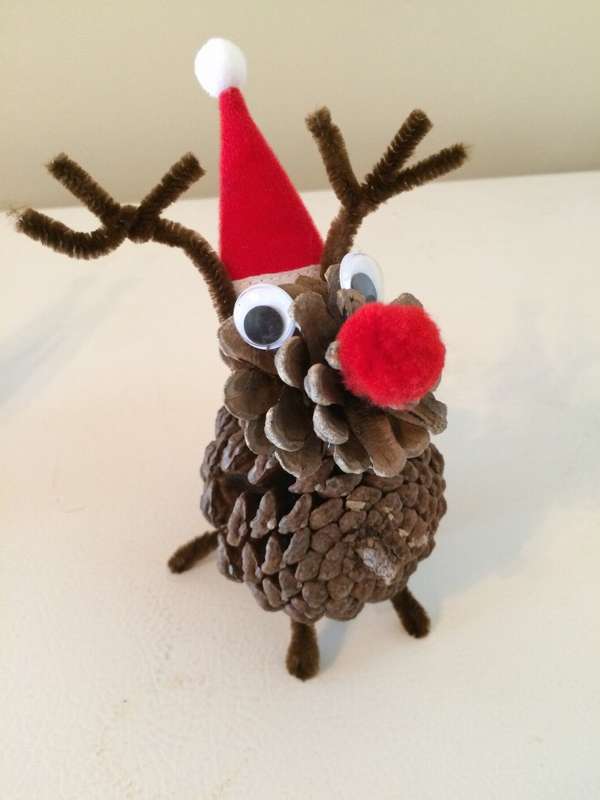
 Funny craft christmas deer made of coneswhich you can do with your own hands. In the photo on the right, what you need.
Below is a small photo master class. The first photo shows that the deer hat is purchased, not self-made. If you need instructions, a link to the site under the gallery.


https://i.expert-h.com/en/iz-shishek/detskie-podelki#sigFreeIdf0a7b46972
Craft deer 50 photos


https://i.expert-h.com/en/iz-shishek/detskie-podelki#sigFreeIdcc8fe212e4
Children's craft pig
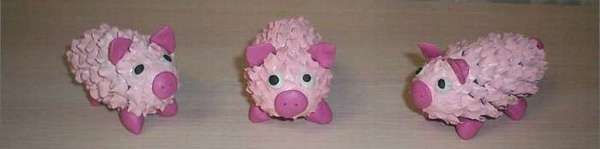 How to make three fun piglets from cones? Very simple. Find the three bumps, a little pink plasticine and see the master class below, how to make a children's crafts out of cones with your own hands.


https://i.expert-h.com/en/iz-shishek/detskie-podelki#sigFreeIddfcdab83bd
Craft pig 10 photos


https://i.expert-h.com/en/iz-shishek/detskie-podelki#sigFreeId75143f406d
Squirrel from cones
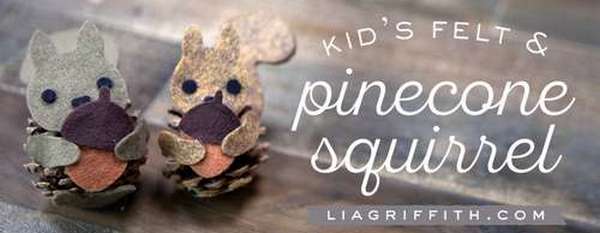 These cute squirrels are made of little cones pieces of felt and tail wire. Do not be afraid for your crafts from cones change colors and sizes, let your squirrels be original.


https://i.expert-h.com/en/iz-shishek/detskie-podelki#sigFreeId03f8b9bdfa
Craft Protein from Cones
 Recognize the hero of the movie "Ice Age", saber-toothed squirrelwho hunts for an acorn all the time? Yes, that's her. A ruffled bump perfectly conveys the character of a brave hunter. Children will surely like to make an entertaining character of the famous cartoon with their own hands. In addition, it is simple, fun and can serve as a great gift!
See below for step-by-step photos, how to make a squirrel from cones with your own hands. When manufacturing, it is necessary to take into account some nuances, so you can use the link under the gallery and visit the author’s website, where there is a list of necessary materials and detailed instructions.


https://i.expert-h.com/en/iz-shishek/detskie-podelki#sigFreeId79970305b0
Squirrel from cones 15 photos


https://i.expert-h.com/en/iz-shishek/detskie-podelki#sigFreeIdd958cb6a84
Cones swans
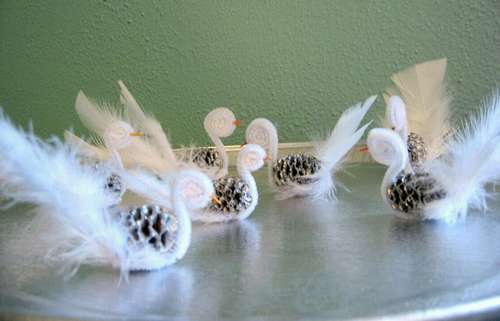 Beautiful crafts, seven white swans on the sparkling surface of the lake. You can do these too cones swans, this is not difficult. Only need chenille wire cones and feathers. Twist the fluffy wire, as shown in the photo, it will be a head with a neck and a base. Paint a small piece of toothpick and glue it on the brush, where you will have a head - the beak is ready. Before attaching the neck, glue a few feathers to the bump. Yeah don't forget yet paint the bump white. That's all, fasten the cone to the chenille wire and the children's crafts swan is ready, you can let it out to the lake. How to do do-it-yourself swan shown in step by step photos.


https://i.expert-h.com/en/iz-shishek/detskie-podelki#sigFreeId963299de1f
Swan made of cones and plasticine
 This is another way, simpler. For children's crafts swan You will need a bump, clay and cotton.
Main job is make the neck and head of a swan from plasticine, and stick a red beak and a black bridle, also from plasticine. Fill the top and back of the cone with cotton, leaving the sides free so that there is a similarity to the wings. That's all, a small child can easily do this job.
To complete the composition, find sheet of blue cardboard or paperit will be a lake. Or just roll out a small piece of blue plasticine.


https://i.expert-h.com/en/iz-shishek/detskie-podelki#sigFreeId9d7ceb92f2
Craft Swan from cones
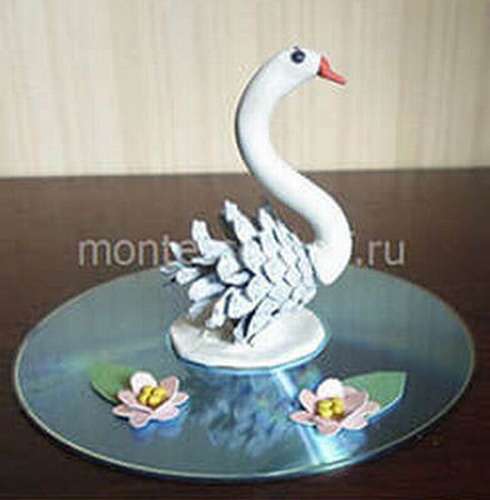 Here is also an interesting composition. The manufacturing technology is the same, only serves as a lake CD.
Cone swan fixed on a small piece of plasticine,pressed into the center of the compact disc, where is the hole. The sequence for making this beautiful craft is shown below. in step by step photos.
Plasticine water lilies are also part of the composition. Of course, you can show more imagination and blind, for example, reeds, or something else to come up with. There is a wide field for imagination.
Step by step photos of the master class, how to make a children's diy do it yourself Look at the step by step photos.


https://i.expert-h.com/en/iz-shishek/detskie-podelki#sigFreeIdab6fbc65d5
Swans from cones 20 photos


https://i.expert-h.com/en/iz-shishek/detskie-podelki#sigFreeId5edb0c9ad1
Cone hare
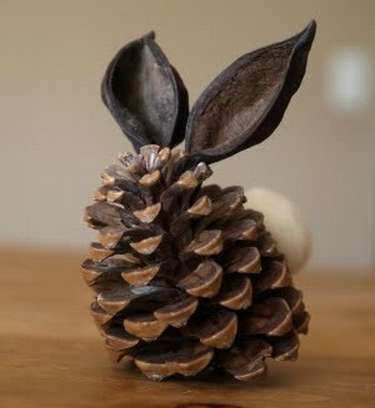 Children love hares, so it is not surprising that they are happy to take crafts to make their beloved animal. This cone hare made mainly from natural materials that you can collect while walking around the neighborhood.
A bump, a couple of pods and, of course, a little wool or a piece of cotton wool is the tail, this is the pride of every hare. Use the glue gun to stick the pods onto a bump that immediately looks like a cute little rabbit.
To complete the craft, just glue the white ponytail.


https://i.expert-h.com/en/iz-shishek/detskie-podelki#sigFreeId8dc1166109
Hare from cones and plasticine
 This crafts of a hare of cones even simpler, you only need a bump and plasticine.
The master class is taken from textbook for elementary school students, so if you are interested in instructions, with an introduction, recommendations, goals and objectives, in general, everything is as it should, you can use the link and visit site ped-kopilka, learn a lot of interesting things. And not only about rabbits from cones, but also the rules for working with plasticine and even how to clean up a workplace.
A how to do DIYSee below for step-by-step photos.


https://i.expert-h.com/en/iz-shishek/detskie-podelki#sigFreeIdfd0cbb6ee5
Hare from cones 30 photos


https://i.expert-h.com/en/iz-shishek/detskie-podelki#sigFreeId1452c6ebcf
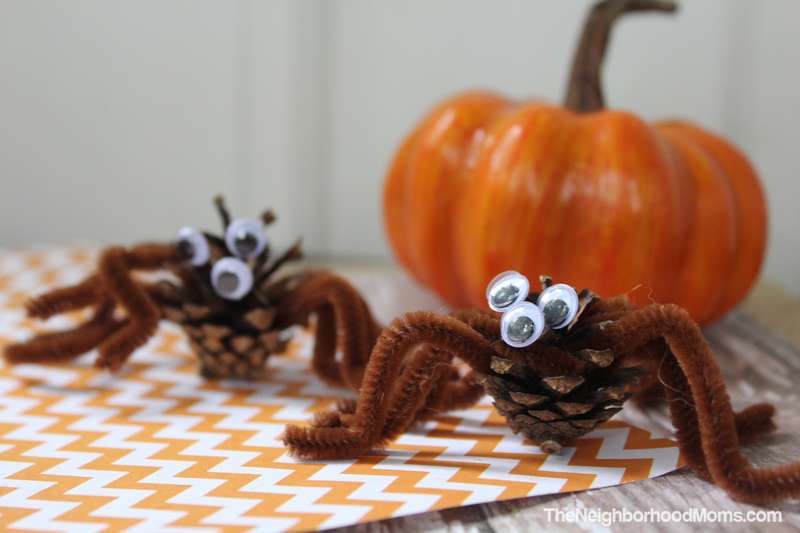
Cone spider
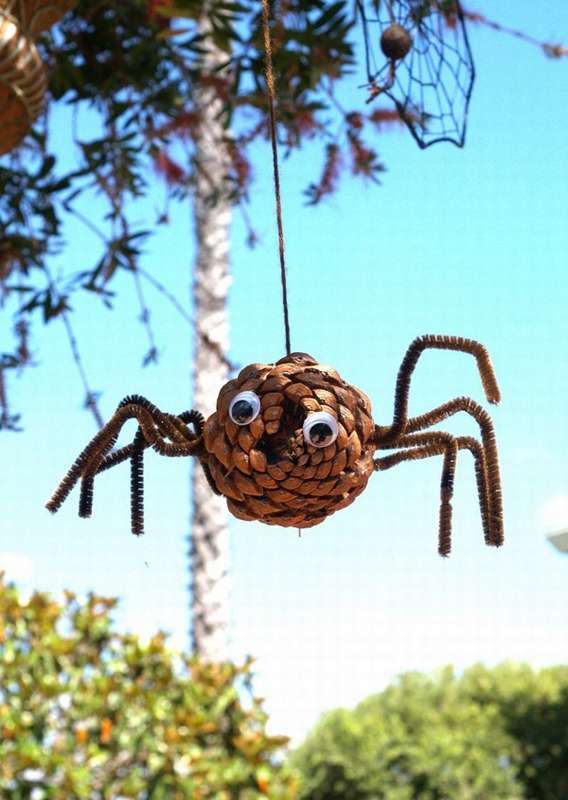 Make a spider out of cones You can on Halloween, or for April Fools ’pranks. You definitely can’t buy such a spider in the store, this is purely original product, with individual character. Perhaps they will be more accurate, but this one can successfully compete with them with its creepy appearance.
What will be needed for children's crafts:
- Pine cone;
- 4 pieces of chenille wire;
- Plastic eyes;
- Glue.
The cone needs to be allowed to dry a little, open up so that it really begins to resemble a spider with its dried-up scales.
Between these scales will pass 4 pieces of chenille wire, forming 8 spider legs. Then glue the plastic eyes, as in the photo, and creepy spider is ready.
You can tie a string to a tree branch in the garden, chic festive decor!


https://i.expert-h.com/en/iz-shishek/detskie-podelki#sigFreeIdc0f06635d6
 Here is another one children's crafts spider from cones, same scary, but somewhere pretty. For manufacturing you will need chenille wire, she seems to be invented to make paws for terrible spiders. So, prepare pine cones and buy plastic eyes. There is?
Start with 8 legs for each spider. They can be the same size, or you can change them. It is completely depends on the size of the craftwhich you conceived.
Bend the end of the wire to create “legs”.
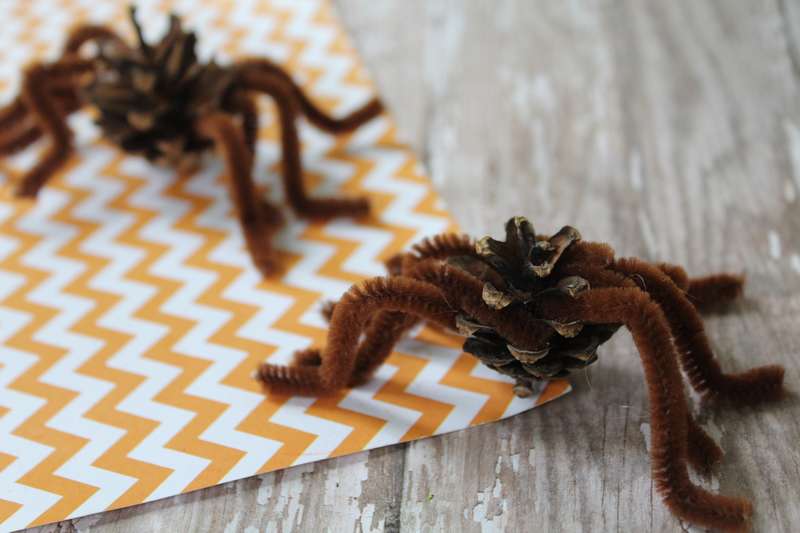
 Add glue to the opposite end of the chenille wire and insert into the side of the bump. Continue adding legs until you have 4 on each side.
Glue the eyes of the spider. Add a few because spiders usually have several eyes. In this case, there are only 3, but you can add as many as you want!
Just bend your legs from the wire so that the spider can stand. The cone spider is ready!
Crafts spider from cones 15 photos


https://i.expert-h.com/en/iz-shishek/detskie-podelki#sigFreeIddfb117d9bc
DIY dinosaur
 Today, dinosaurs are the favorite cartoon characters, so it is not surprising that children often choose them as characters in their crafts. So get acquainted big and scary shishkozaurthat your kids will surely enjoy.
This children's craft is made of fir cones, unlike pine cones, they are easier to glue, because they are softer.
What do you need for baby dinosaur crafts see pictured right.
The order of work is:
 First, trim the top cone of one of the cones, this will be the neck of the dinosaur. Glue a smaller bump to it, the body. For fixing the main parts use thin wire, so it will be more reliable.
- Glue four legs of very small cones and a tail to the body. Bump for the tail glue the flakes back.
- Then you need to make a comb on the back of the dinosaur. Perfect for this purpose. pumpkin seeds.
- Now you can make wings. Although it’s not a Gorynych snake, it’s more interesting with wings, it looks more like a dragon from the cartoon about Shrek. Wings can be made from lionfish (maple seeds). And if you trim the ends of the lionfish, then get excellent ears.
- Buy plastic eyes, make balls of plasticine and fix on the head.
Cone dinosaur ready. You do not have to adhere to this instruction exactly, let the children add some interesting new details, the process of making crafts should be creative.
Master Class, how to make a dinosaur from cones Look at the step by step photos.


https://i.expert-h.com/en/iz-shishek/detskie-podelki#sigFreeId7d989134bb
Dinosaurs from cones 20 photos


https://i.expert-h.com/en/iz-shishek/detskie-podelki#sigFreeId0e7802bce3
Cone bird
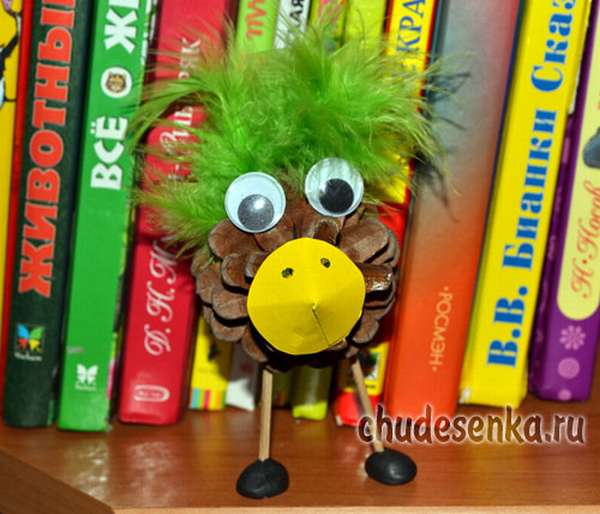 Simple and fun DIY bird from cones. If your children like to make applications, then making this craft with your own hands will not be difficult.
Prepare cardboard, feathers, some plasticine and plastic eyes. To make an even circle, still prepare a pair of compasses; if not, find some round object, a glass, for example, or something similar.
Master class on how to make a bird out of cones, look at the step by step photos, the first image in the gallery, this is what you need for crafts.


https://i.expert-h.com/en/iz-shishek/detskie-podelki#sigFreeId7e56d9e00e
Craft birdie for children
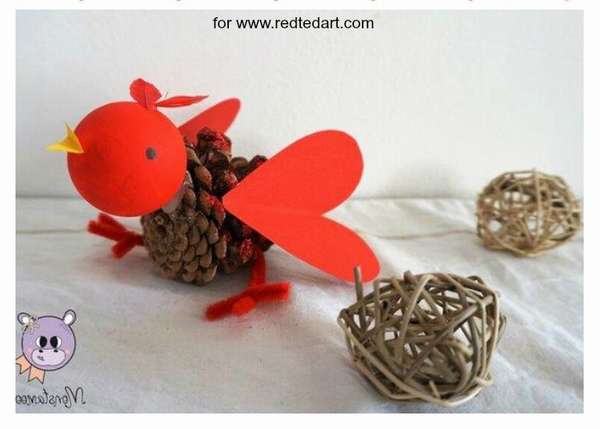 If you already have a stock of cones, then you can try to make this charming cone bird. Accessories that you need for crafts do not need a lot: red paper; pine chic; red acrylic paint; red chenille wire and black marker. To make a bird out of a coneLet the children carve two heart-shaped wing hearts. If they are still small, you can pre-cut the pieces or draw shapes on paper so that they can cut. Then apply a little glue to the bump and add the sparkle. Let it dry.
Bird head - ping pong ball. Paint it red acrylic and let dry. Draw the eyes and glue the wings, as well as the yellow beak. At the last stage, make 2 legs of chenille wire and glue with hot glue.
Your cone bird is ready to use and can serve either as a decoration or as a gift.


https://i.expert-h.com/en/iz-shishek/detskie-podelki#sigFreeId7449f72389
Crafts birds from cones 20 photos


https://i.expert-h.com/en/iz-shishek/detskie-podelki#sigFreeId41851704fe
Cone snake
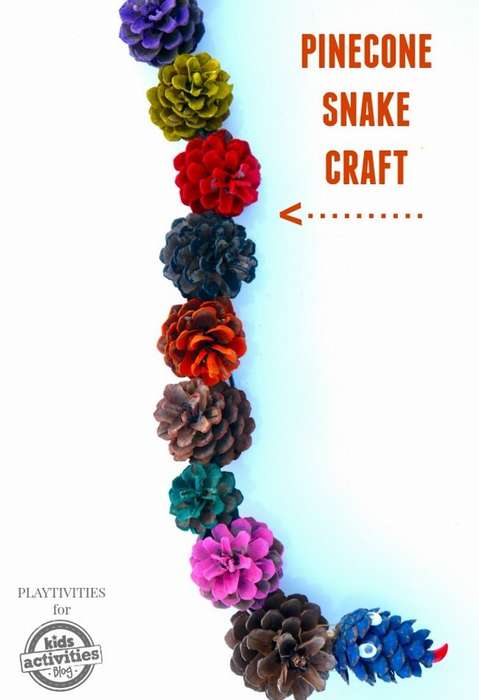 Children love to work with bumps. That is, they like to play with them, the size of the cone fits well in the children's palm, pleasant to the touch. It is interesting to do different crafts together with the children. This cone snake - a very simple craft. It can also serve as a decorative element for outdoor decoration.
Materials for making a cone snake:
- Pine cones;
- Multi-colored paints (preferably acrylic);
- Rope;
- Plastic eyes;
- Red tongue made of oilcloth, fabric or plastic.
Make a snake out of cones Simple. Paint all the bumps with multi-colored paints. When dry, tie one bump to the middle of the rope folded in half. The rest continue to tie in the same way so that the rope does not shine through. Glue eyes with a tongue to one of the extreme cones, as in the photo. Now you can play the resulting snake, forcing it to "crawl" through the garden. And if you want to make a wreath out of it, connecting the ends and removing the tongue with the eyes.
See below for step-by-step photos.


https://i.expert-h.com/en/iz-shishek/detskie-podelki#sigFreeId488e076574
Cone penguin
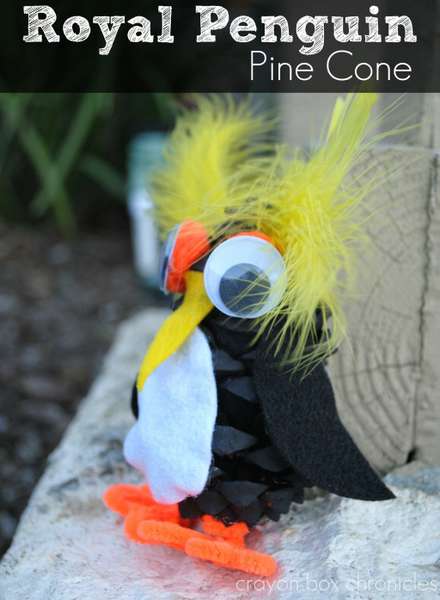 Get to know Mr. King Penguin. Pine cones are an excellent material for children's crafts. Many interesting things can be created from them; this is a fun activity for parents and children.
Interesting Facts:
King penguins - one of the species of crested group of penguins (genus Eudyptes), the so-called because of the yellow crest on their heads. They reach a height of up to 70 cm and weigh from 4 to 5.5 kg. King penguins can swim at speeds up to 30 km / h.
How to make a children's penguin crafts out of cones with your own hands
- Dry the cones for 45 minutes at 250 degrees on a baking sheet with foil.
- Once they are completely cooled, you can start work.
- Paint the bump black. There are several ways to do this: put in a bowl of paint, paint with a brush or spray. The latter option is a bit easier.
- If you have chosen the second option, use the brush to penetrate deeply into the crevices.between the scales. Then lay for several hours in the sun, let it dry.
 During this time, cut a triangular nose from the felt.
- Then cut the wings using a semi-oval shape.
- Then a white belly and legs (how to make legs out of brushes, see step-by-step photos)
- Now there are all the parts, and you can start collecting the penguin. Glue your eyes to the pompom first. Then glue the white belly. And at the end of the beak, wings, legs and feathers.
See below the master class on step by step photos..


https://i.expert-h.com/en/iz-shishek/detskie-podelki#sigFreeId41e032c9c1
Penguin from cones 30 photos


https://i.expert-h.com/en/iz-shishek/detskie-podelki#sigFreeId4de8288825
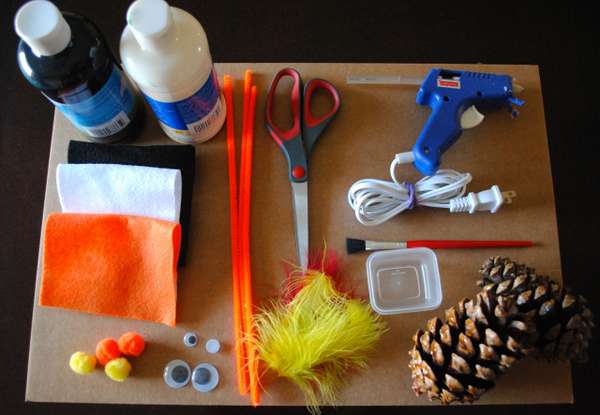
Peacock
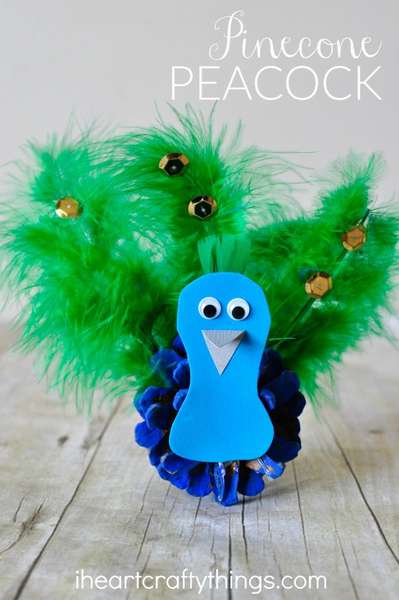 Your attention is invited children's crafts peacock. It will be especially interesting for children to engage in creativity after visiting a zoo, an aviary with real peacocks. What, in fact, is the most remarkable thing about a peacock? Tail, of course, make it out of feathers, decorate with sequins.
DIY materials:
- Pine cone;
- Blue foam sheet;
- Blue paint;
- Green feathers;
- Plastic eyes;
- Gold sparkles;
- Gray cardboard (quite a bit);
- Glue gun;
How to make a peacock out of a bump:
Paint the bump blue completely - with a brush or dipping it in a container of paint. Set aside and let it dry completely.
While the bump is drying, cut out the head and neck of the peacock from the blue foam. Glue the eyes, cut out of gray cardboard and glue the beak, green feather to the head, as in the photo.
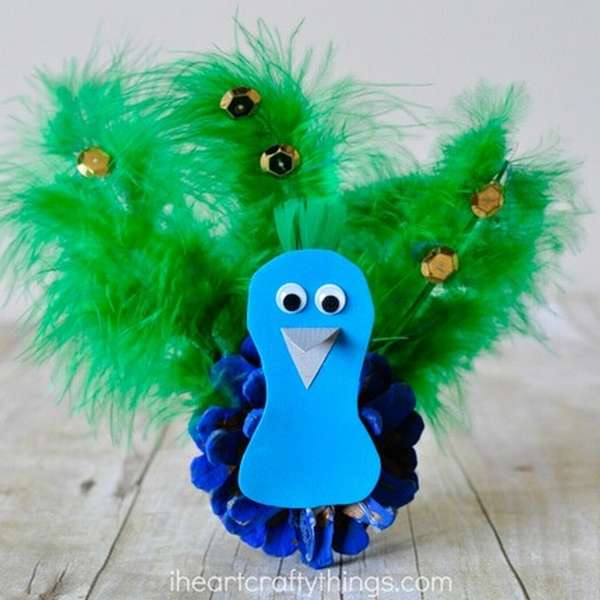
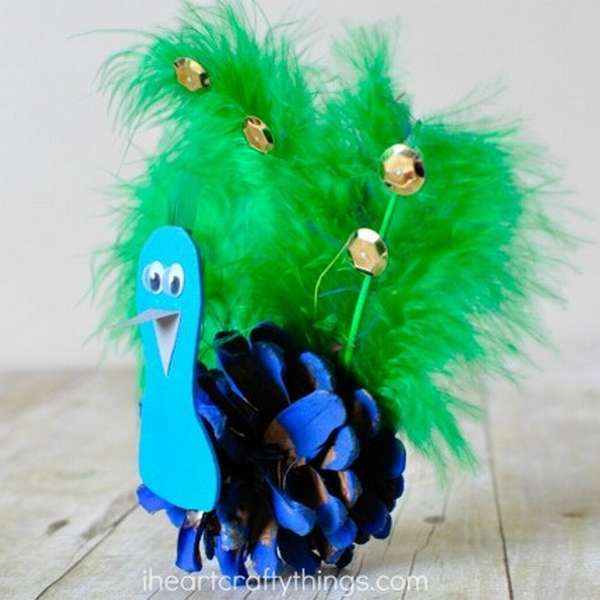 On some green feathers (3 - 5), attach the sparkles.
Stick and stick the feathers between the flakes of the wide end of the bump. Glue your head to the narrow end. The blue-green peacock is ready.
 One more example, how to make a peacock out of cones. But in this case, the main material is chenille wire, an excellent piece for crafts. In addition, you will need, of course, a pine cone, then natural feathers, plastic eyes and a drop of nail polish.
 How to make children's crafts, look at the step by step photos, it’s not difficult and turn it will be fun.


https://i.expert-h.com/en/iz-shishek/detskie-podelki#sigFreeIdc156835a1f
Photo of peacocks from cones


https://i.expert-h.com/en/iz-shishek/detskie-podelki#sigFreeId5b6a27b7f7
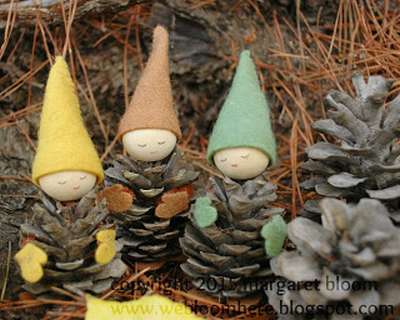
Gnomes from cones
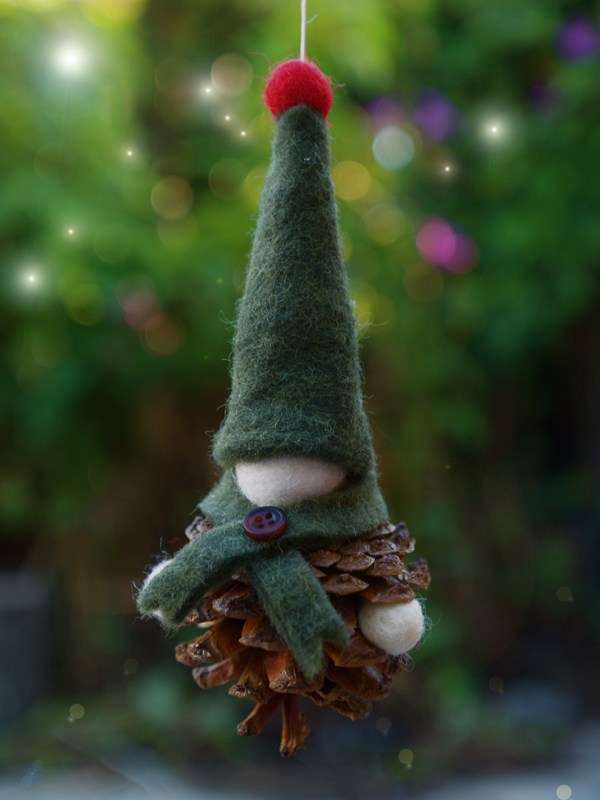 These gnomes from cones can be used in many ways. Like Christmas tree decorations, for example, or just interior decor. Crafts from natural materials together with children, contributes to development, while remaining an interesting and useful activity, this is a well-known method of Walvsdorf pedagogy, which showed amazing results, and is widely practiced today. From the cones, delicious decorations for the Christmas tree are obtained.
To make DIY crafts from cones, you will need:
- Cones (for the body);
- Balls (for heads, in the absence of, acorns will do);
- White wool (for a beard, yarn is suitable);
- Glue gun;
- Tape.
How to make a gnome from a bump:
- Drill a through hole in the ball and thread the tape through it.
- Glue the hair as in the photo.
- Glue the head and beard to the bump. Now you can hang the finished gnome in the right place.
You can make as many gnomes as you want with whole gnome families. Grandmothers and grandfathers from larger cones, grandchildren - smaller, most importantly - from cones!


https://i.expert-h.com/en/iz-shishek/detskie-podelki#sigFreeIdf03738aed4
 Here's another gnomes from conesThese are a little different. Their age, probably, does not allow them to have beards, but the principle is the same: cones and balls.
On the heads are paper pointed caps, you can make colored mittens, draw cute muzzles with colored pencils.
For resistance to cones, glue felt, you can do something heavy for balance, like coins.
A couple of these gnomes will help create a fabulous, magical atmosphere that children love so much.


https://i.expert-h.com/en/iz-shishek/detskie-podelki#sigFreeId678f419e06
DIY craft gnome
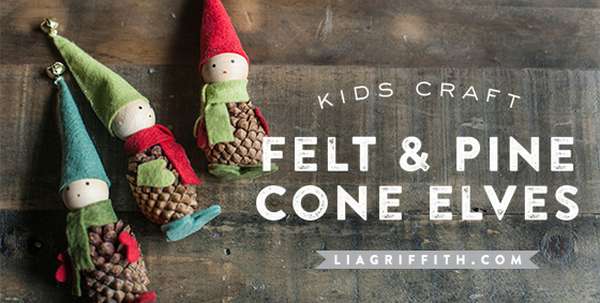 And the third example how to make a gnome from cones using felt.
Look at the master class on step by step photos.


https://i.expert-h.com/en/iz-shishek/detskie-podelki#sigFreeIdf201b9c3ff
Gnomes from cones 50 photos


https://i.expert-h.com/en/iz-shishek/detskie-podelki#sigFreeId181c892624
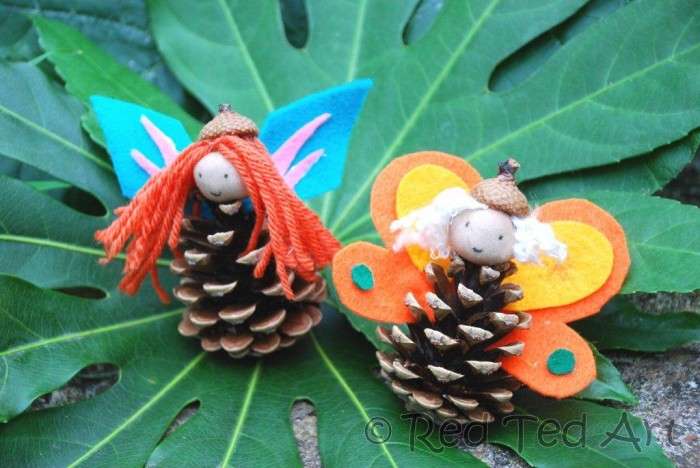
Craft Fairy
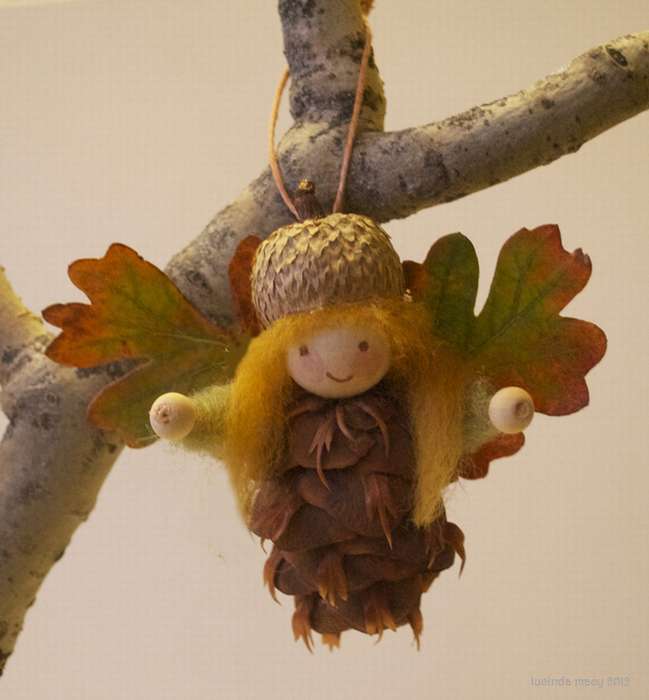 Step-by-step instructions on how to make a small fairy fairy from the bumps. You can use other pine cones of the appropriate size, and resize the wooden beads for the head.
Below in the photo materials used in the project. In addition to the cone, you will need an acorn hat, dried leaflets for wings, pieces of felt and wool, small wooden beads for hands, chenille wire and a wooden bead for the head.
Feel free to use different types of cones and hats. Wings can be made of paper, felt, mesh or many other things. You can also create many hair and clothing options.
Dried leaves become quite fragile over time, but this can be fixed if cover nemiddle and back surface with glue.
 Leaves vary, for example, white oak leaves are stronger than black oak. The sequence of these steps can be changed.You may find another way. If you do not want to use a cordless drill, you can make a hole with a hand tool, carefully so that the hat does not crack.
- Apply glue to the small stem at the top of the bump. If there is no stem on your bump, you can drill a small hole and insert a toothpick or twig. The shoulder size of this project is 20 mm.
- Place a wooden bead over the stem and place on glue. Hold a little until it dries.
- Next come the hair, hands and hat!
If you want to read the full instructions, how to make a fairy from cones, visit the site of the author of this craft, the link is under the gallery. The latest photos in the gallery show three more versions: a fairy with a basket, at the table and an elf with a cap and a beard.
See below for step-by-step photos.


https://i.expert-h.com/en/iz-shishek/detskie-podelki#sigFreeId092216db85
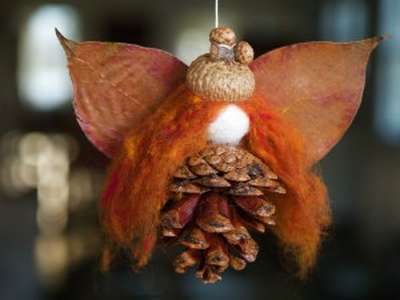 Here's another similar example, only the technology is a little different.
Make a fairy head by sticking red “hair” to the ball. Put on the top of the acorn cap by gluing it with a drop of glue.
Attach the ball-head to the narrow part of the bump.
Two large beautiful leaf glue to the back of the cone - the back of a fairy like wings.
Tie a string to the stalk on the acorn cap.
Children's crafts autumn fairy is ready!


https://i.expert-h.com/en/iz-shishek/detskie-podelki#sigFreeId9e9e61c6a2
 Third option crafts fairy from cones. Here you will need such materials: for the head - old tights, cotton wool and a small thread, hair wool, felt for wings, PVA glue.
Small heads look complicated, but they are not. And they have the advantage (over wooden beads) that you can easily stick them on a pine cone with PVA glue (and they are very light).
- Take two pieces of cotton wool and place in tights.
- Wrap the tights around to form a ball. Fasten and trim.
- Hair and hat: cut several threads of wool. Glue over a piece of hat with lots of PVA (maybe a little dirty).
- Add a lot of glue inside the beret from the acorn head and press over the top of the head.
- Decide on the shape of the wings, you can do as in this case - like a butterfly. Just glue on the back and slightly push the bumps between the scales with something sharp.
Craft is ready (when it dries).


https://i.expert-h.com/en/iz-shishek/detskie-podelki#sigFreeId76c03e4ce6
Photo fairies from cones


https://i.expert-h.com/en/iz-shishek/detskie-podelki#sigFreeId814ff2bb83
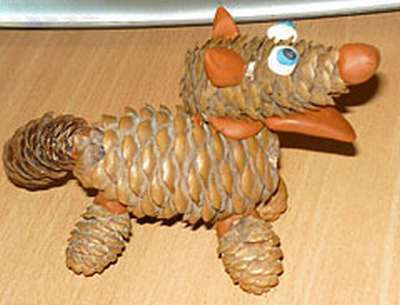
Fox
Example of children's crafts made of cones and felt
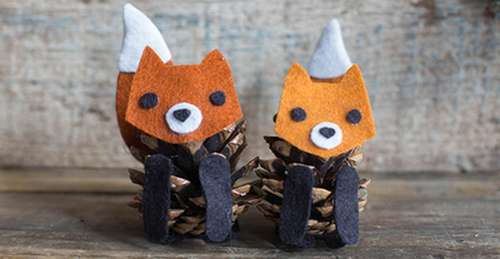 Look at the master class, how to make a fox out of cones with your own hands


https://i.expert-h.com/en/iz-shishek/detskie-podelki#sigFreeId00119d2c1e
 Children's craft fox
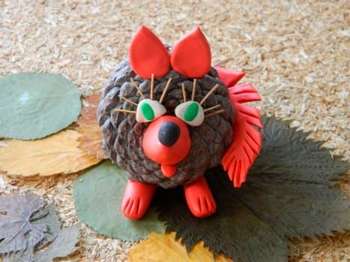
This is another example how to make a children's craft - a fox made of cones and plasticine.
The operation procedure is shown in step-by-step photos. If you can make the same eyes out of plasticine with charming matchstick cilia, then this craft will win any competition in kindergarten. Well, who might not like this cute fox.
Below, see the photo instructions and you will succeed.


https://i.expert-h.com/en/iz-shishek/detskie-podelki#sigFreeId9fb793b263
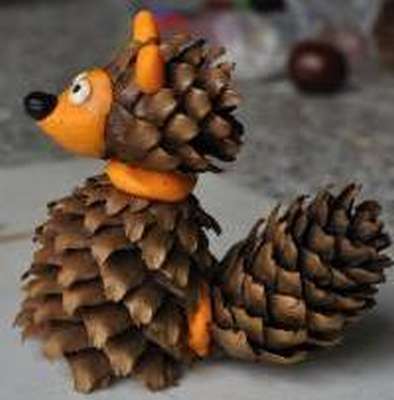 Here's another example, this too fox from cones and plasticineonly made of two parts.
- To make the craft, you need to prepare two cones, one cut into a third, and the second in half.
- From the sharp part we make a muzzle, that is, we sculpt nose, ears, eyes from plasticine.
- Then we sculpt the tail and attach to the cone's second half.
- At the end we make paws and the chanterelle is ready.
- If you have questions, a link to the author’s site under the gallery.
However, the whole process is looking at detailed step-by-step photos


https://i.expert-h.com/en/iz-shishek/detskie-podelki#sigFreeId778a85c5e1
 For this children's crafts "fox from cones"a whole set of fir cones of different sizes will be required. So collect more everything will come in handy.
Here the most important thing is to have a lot of source material on hand, you need to put aside a large bump for the trunk, a smaller one for the muzzle and tail, and four very tiny bumps for the legs. We fasten all this with plasticine.
The fox from the cones is almost ready. It remains to add ears, nose. Eyes can be bought and glued, or also made of plasticine.


https://i.expert-h.com/en/iz-shishek/detskie-podelki#sigFreeId72859e15da
Fox from cones 20 photos


https://i.expert-h.com/en/iz-shishek/detskie-podelki#sigFreeIdb2eb14ca68
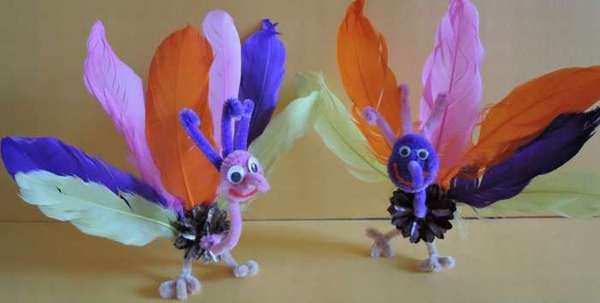
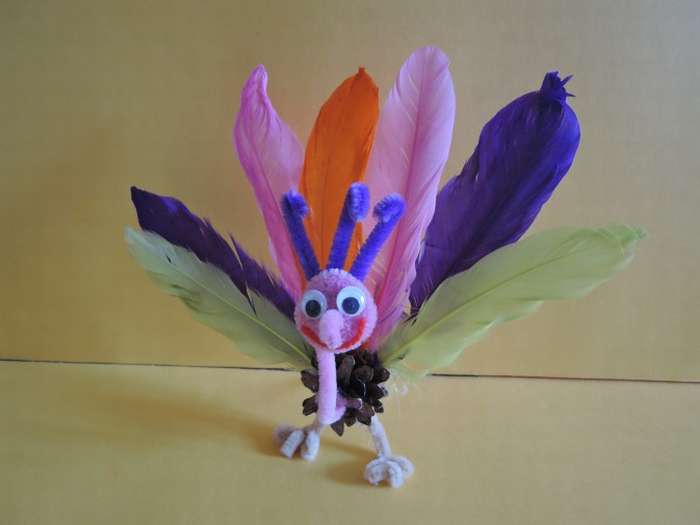
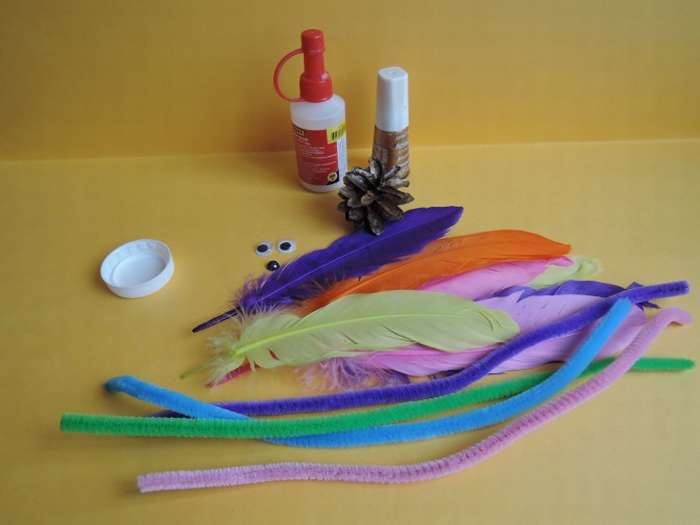
Turkey from cones master class
Shown here how to make turkey out of cones and felt.
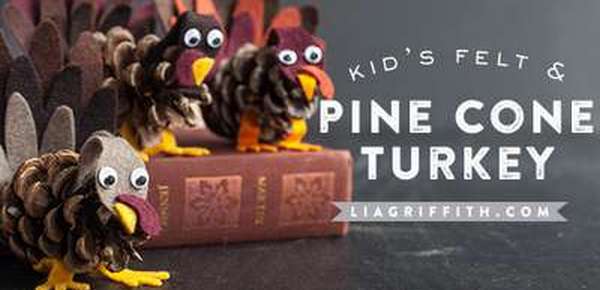 There are a lot of them in the photo, and each with its own unique character. Tools, materials and the manufacturing process are shown in step-by-step photos.


https://i.expert-h.com/en/iz-shishek/detskie-podelki#sigFreeIdfdfb2b8cc4
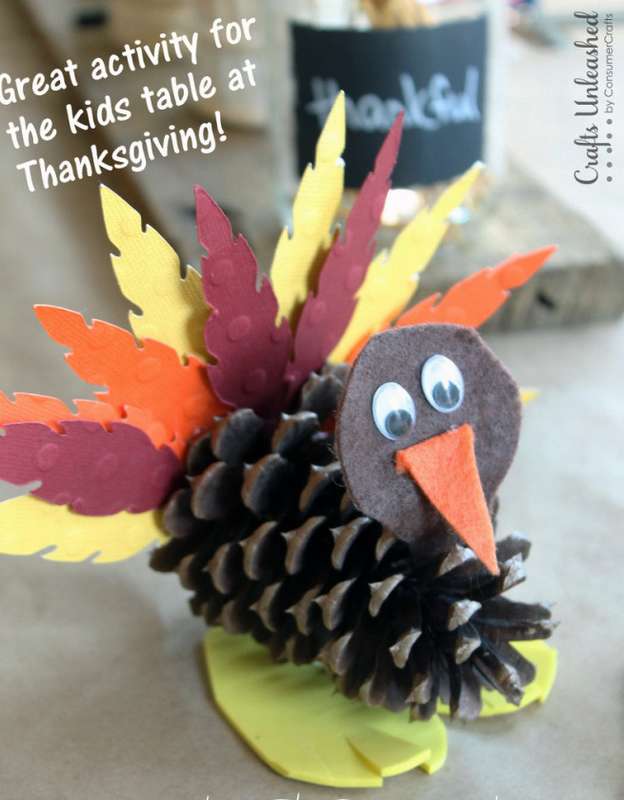 Here is another example how to make a turkey out of cones, only here you will need cardboard and thin plastic for the tail besides felt.
If step by step photos are not clear, then the procedure for making crafts such:
- In the back, wide, part of the cone, insert the cut feathers and glue them.
- From brown felt, cut your head out of orangeabout felt - beak.
- Glue beak and eyes to the head.
- Fix the head, as shown in the photo, add more glue to the back of the head so that it holds evenly.
- Cut the yellow sheet, as shown in the photo, it will serve as a stand for crafts.
Glue the bump on this leaf - the turkey is ready!


https://i.expert-h.com/en/iz-shishek/detskie-podelki#sigFreeId9864e6a59c
And here is an example how to make turkey out of cones and ice cream sticks.
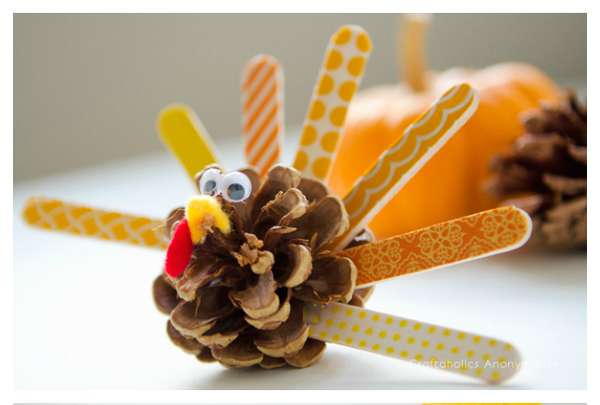
 What you need for crafts, in the photo on the right. How to make a turkeyLook at the step by step photos.


https://i.expert-h.com/en/iz-shishek/detskie-podelki#sigFreeId683be7c760
Turkey cones 50 photos


https://i.expert-h.com/en/iz-shishek/detskie-podelki#sigFreeIdfadf3ca52f
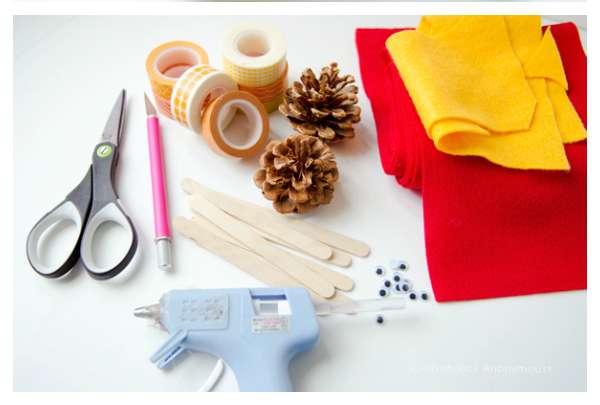
Children's crafts snowman
 See how to make a wonderful children's crafts, a snowman from cones skiing.
For this you need:
- Pine cone
- white, blue and black paint
- brown chenille wire and a piece of orange (2.5 cm)
- 2 medium light blue pompons
piece of 5 cm light blue felt - 30 cm of fabric, cut to a width of 3 cm
- 2 white pompon
- 2 toothpicks
- 2 sticks
How to make a snowman out of a bump with your own hands
- Paint the bump with white paint, preferably in two layers.
- Fasten a blue strip of fabric around the narrow part like a scarf. Cut the ends of the scarf by cutting thin strips with scissors.
- Glue the blue pompons to the ends of the felt tape.
- Assemble ski poles by gluing white pompons on the ends of two toothpicks.
- Cut the brown chenille wire by a third.
- Insert the part on the side of the hand cone and glue it. Repeat on the other side.
- Cut out of felt and attach earphones.
- Glue the bump to the skis.
- Glue the orange piece of chenille wire like a nose.
- Add a hanger by bending a piece of fluffy wire in half and gluing the open ends on the back.


https://i.expert-h.com/en/iz-shishek/detskie-podelki#sigFreeId611c960739
Snowman from cones photo


https://i.expert-h.com/en/iz-shishek/detskie-podelki#sigFreeIdea90f5c3c0
DIY do-it-yourself mouse
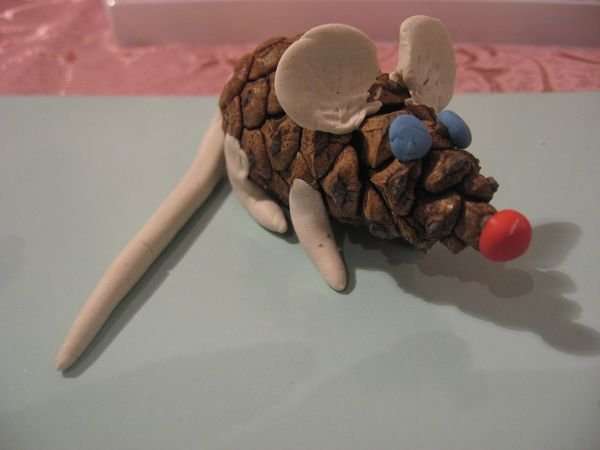
 The step-by-step photos show a master class, how to make children's crafts from cones and plasticine.


https://i.expert-h.com/en/iz-shishek/detskie-podelki#sigFreeId705ba94c9e
Children's crafts lamb from cones
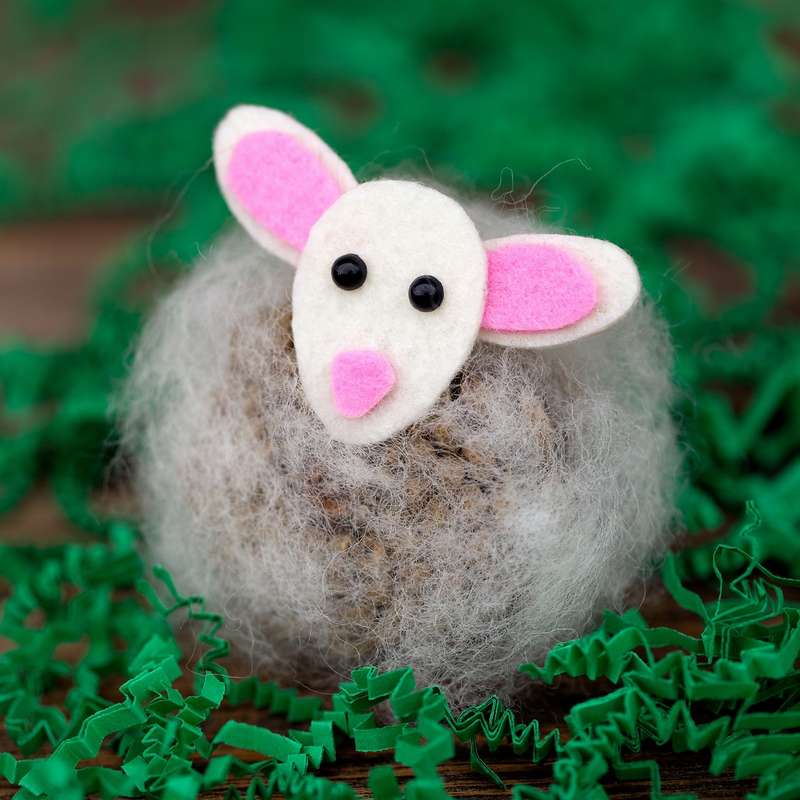 See how to make cute children's craft from simple materials.
To make a sheep out of cones with your own hands you will need:
- Pine cones
- cotton wool
- pink and cream felt
- 5 mm black beads for eyes
After collecting materials, ask the children draw a muzzle, nose and ears for a lamb.
- Then let them cut out all the details with scissors.
- Wrap small pieces of cotton wool around the bump.
- Glue the muzzle details - nose, ears, eyes.
- Glue the lamb's head to the bump, then gently wrap more cotton wool around the front and in open areas.
- Cut a small tube shape of cream felt and glue to the back of the bump to make a tail.
The lamb from the cones is ready.


https://i.expert-h.com/en/iz-shishek/detskie-podelki#sigFreeIdc866139fcf
Bumblebee
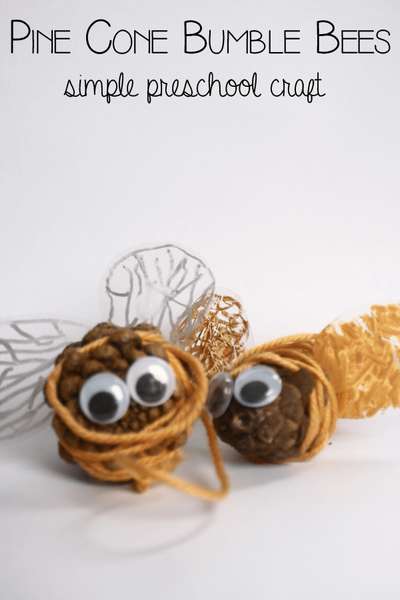 Cones are a great material for such a children's craft as a bumblebee.
What do you need:
- Pine cones
- Yellow and orange yarn
- Plastic eyes
- Pieces of plastic
How to make a children's DIY bumblebee diy
First of all, make sure that pine cones are driedTherefore, it is better to collect them on dry days, and then leave them on the windowsill in the sun for several days. Then they will open completely, and will be ideal for winding yarn.
Cut the yarn. Start by helping your child wrap the end around one of the bumps to secure. Then wrap the yarn around the bump to fill in the gaps. Alternate stripes with yellow and orange threads.
Glue the eyes.
Cut the two wing shapes out of plastic and then paint them to look like wings. Add some glue to the bottom of each wing. Bumblebee is ready.


https://i.expert-h.com/en/iz-shishek/detskie-podelki#sigFreeId699a815acc
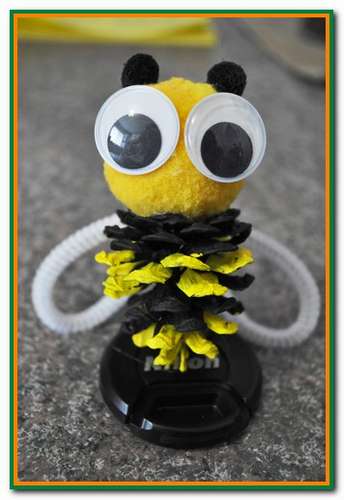 Craft for children - shaggy bumblebee
To get started, advice, if you collected fresh bumps, make sure that there no insects or worms.
- Take a bowl and fill it with water, add a glass of vinegar.
- Dip the pine cones in a bowl and rinse them for 20-30 minutes.
- Preheat the oven to 200 and put the pine cones on a baking sheet and heat for about 30 minutes.
- Then put it on a newspaper and put it in a dry place for another 2 - 3 days.
Now, how to make a craft. First, prepare black and yellow paint, two pompoms, black and yellow, a piece of white chenille wire and plastic eyes.
Then paint the bump with stripes, black and yellow. Make a head out of yellow blanket, that is, glue the eyes and the "antennae" of the black pompoms. From the fluffy wire, make wings and glue to the body. After that, glue the bee’s head on the flat end of the bump. Let it dry.
Now you have your own homemade bumblebee, which does not buzz and stings.


https://i.expert-h.com/en/iz-shishek/detskie-podelki#sigFreeIdf8f4f2665f
Children's crafts from cones 100 photos


https://i.expert-h.com/en/iz-shishek/detskie-podelki#sigFreeIdfd062a8435
Hello, I am the author of this article, so I look forward to asking questions for this article in the comments below, I will answer all !!!
If you have questions on another topic, ask them on our forum, we will answer you
- Two baskets ofpaper in 5 minutes (Master class)
- How to make a simple and compact table for a milling cutter from plywood
- How to make a soft headboard tile (Instructions + step by step photos)
- Cinder block benches: a convenient bench in 55 minutes
- How to make a bed with a niche: saving space (Master class)