DIY grill table 700 photos, step by step instructions
 grill table
Here you will find out what is needed to make the barbecue area comfortable. The article contains several options, how to make a do-it-yourself grill table. Each of them is functional and attractive, but has its own style. A grill table will help you better organize the process, very convenient when everything is at hand, especially if you are cooking outdoors. Now you can focus on the most important part - food.
From the article you will learn how to make a table with a built-in grill, auxiliary mobile trolley tables, a removable tabletop for the veranda, and also how to make useful barbecue accessories and other necessary things. I hope this information inspires you to create your own project.
BBQ table
 Philosophy of this barbecue tables lies in the fact that any participant in the picnic can cook whatever they want, and independently follow a dish prepared on charcoal, while not leaving the table. Although the design is quite convenient, at least you don’t have to worry that you will bury your feet in a red-hot box, but there are a lot of nuances to consider when making it. The main problems are overheating, weight and of course, external factors, that is, weather conditions, since it will be difficult to move the table constantly.
The size of the table is designed for 12 people, so for such a length (250 x 120 cm) a metal frame is required, which will help prevent various deformations due to excessive weight.
Metal frame
The metal frame is made of hollow square tubes 60 x 60 mm, length 220 cm and width 100 cm with four legs 73 cm in height. At the center point of the frame is a barbecue fixture. Then the entire top surface was lined with cement slab, mainly for fire safety. The surface of the countertops is lined with waterproof plywood. At a central point under the table is a wooden box that closes the barbecue.
B-B-Q
To clean, the barbecue can be removed and then returned to its place. The upper surface is made in the natural color of wood and varnished, and the rest is painted black. In addition, when the table is not used as a barbecue, a special cover is provided for the hole, so that the design looks like a regular table.
Testing
According to the author of the project, with a small amount of coal, you can cook for three hours or, possibly, longer. Thermal insulation works perfectly and safety measures are followed. The only problem is the smoke from the grill. Therefore, it is worth considering how to make a hood.


https://i.expert-h.com/en/barbekyu/stol-dlya-grilya-svoimi-rukami-700-foto-poshagovye-instruktsii#sigFreeId95b9211cc2
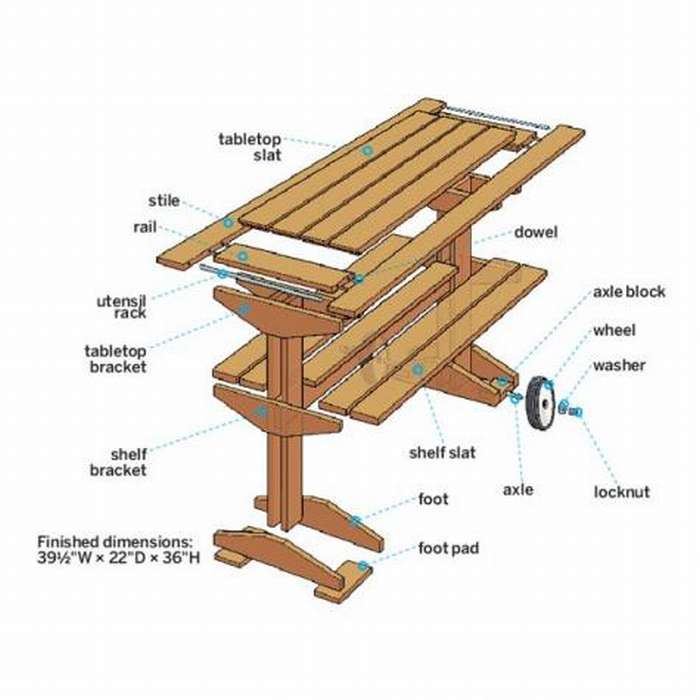
Grill table diagram
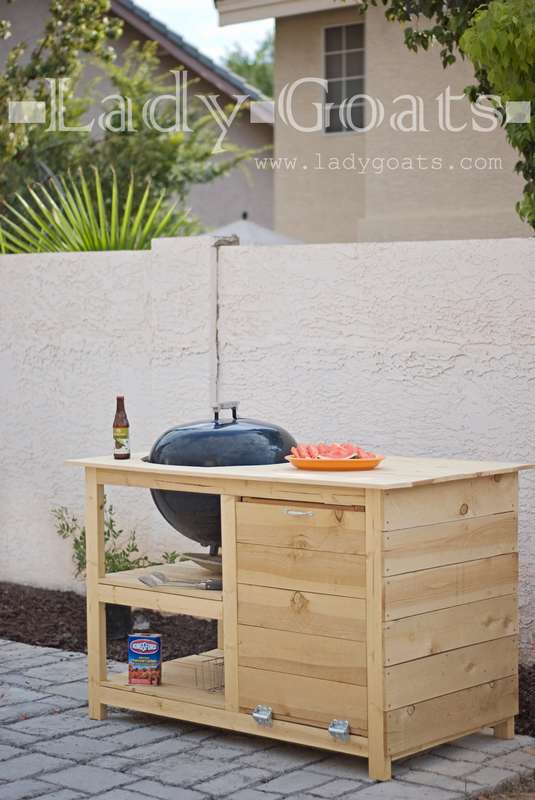 You probably saw this photo on Pinterest, if, of course, you were interested in this topic. Here are the plans by which you can do this do-it-yourself grill table. True, they do not contain instructions for the top of the table. The author planned to make a concrete worktop to insert the grate, but had to abandon these plans for technical reasons. Therefore, the table is made entirely of wood and perfectly performs its functions, one folding drawer is worth what. In addition, it is a robust design that is weather resistant and you must admit that it looks very attractive aesthetically! But if you liked the idea with a concrete worktop, you can finalize the project yourself by simply reinforcing the legs and frame.
Dimensions in inches, 1 "is one inch, translated 2.54 cm.
List of blanks:
Bars 2x3 (50 x 76 mm)
- 4 pieces 49 "long (stretchers)
- 4 pieces 32 "long (legs)
- 2 pcs 24 "long (shelves)
- 2 pieces 24 1/2 "long (partitions)
- 8 pieces 25 "long
Boards 1x6 (25 x 152)
- 15 pieces 28 "long (regiments and lateral levels)
- 7 pcs 22 "long (front and rear drawer)
- 6 pieces 21 "long (sides" drawer ")
- 3 pcs. 22 "long (bottom of drawer)
Boards 1x2 (25 x 50 mm)
- 2 pcs 24 "long (front drawer racks)
- 2 pcs 17 "long (drawer frame)
- 4 pieces 19 "long (directing frames of a box)
- 4 pieces 21 "long (drawer)
Dimensions:
Width 56 1/2 "(144 cm), Depth 30" (76 cm), Height 33 1/2 "(85 cm)
(dimensions are based on recommended countertop size, taking into account a height of 1 1/2 inches).
- Step 1: Start by making the main frame using glue and wood screws. Set the top shelf to the required height, making sure that it matches the front and rear frames.
- Step 2: Install the side rails as shown. What you need to pay special attention to are the lower and middle subframes.
- Step 3: Fasten the middle rails for the upper shelf.
- Step 4: Make a front drawer frame.
- Step 5: Make the back frame for the drawer.
- Step 6: Using the 21-inch crossbars, make a box as shown in the photo.
- Step 7: Complete the box by securing the side boards with screws on the front and back of the frames. Screw the screws from the inside of the box into the outer panels.
- Step 8: Cut Four Workpieces to Size. These will be the front and rear boards for the shelf. Reinstall the workpieces from the bottom shelf.
- Step 9: Insert the drawer using the 1/4 inch bottom gasket on the bottom. Attach the drawer hinges. If necessary, add a locking block to the inside of the frame.
- Step 10: Secure the side rails with glue and screws.
The table is ready! The choice for covering countertops is endless, choose any - tiles, boards, concrete! Recommended tabletop sizes - 30 "(76 cm) x 56 ½ (143 cm)


https://i.expert-h.com/en/barbekyu/stol-dlya-grilya-svoimi-rukami-700-foto-poshagovye-instruktsii#sigFreeId2e260d9bb3
BBQ picnic grill
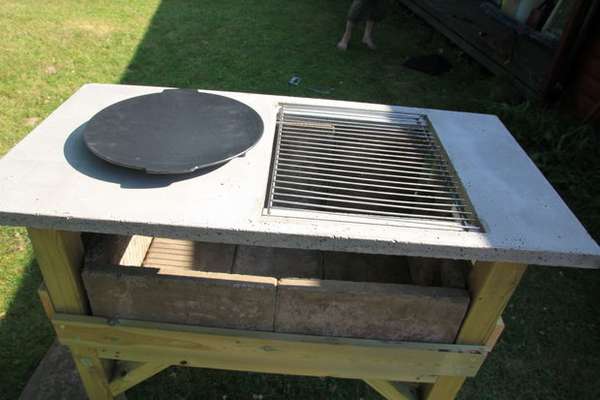 How to make mobile and not very complicated picnic grill with great opportunities for culinary experiments. The main feature of this barbecue table is the concrete countertop. You can install it in any corner of the garden or summer cottage and organize a wonderful American picnicby cooking juicy steaks and toasting sausages.
The table is very easy to manufacture, as you can see by looking at the step by step photos.
Training
- The first step is to make a base, which will determine the size of the grill and, most importantly, the concrete top.
- The frame is made of treated wood so that it can be used outdoors.
- Wooden boards and beams are cut to an appropriate length and assembled. The goal is to get four stable legs and a box in which the insulator will be installed. To do this, use standard concrete blocks. Be careful with size; cutting concrete blocks is a lot harder than wooden planks.
Creating a mold for concrete
The concrete top is made of die casting. Find a wooden board with a smooth surface. When you decide which grill you need and what size will fit the base, start making a mold.
The grill itself needs a round hole and a mesh. Saw the board onto a base sheet and several planks to use as an outer rim. To prevent concrete from seeping between the boards, fill all cracks with silicone.
Concrete worktop manufacturing
- First prepare the steel mesh reinforcement.
- Make a solution and fill in the prepared form.
- When half is flooded, install reinforcing mesh and pour out the rest of the mortar.
- When everything looks good, install the wooden part and make sure that the bolts stick to the concrete.
- Drive in the sides when filling the mold, and then remove it with air bubbles.
- As the solution begins to harden, water it several times a day. For high-quality solidification, approximately two days are necessary.
Assembly
- To remove the concrete worktop from the mold, unscrew the sides.
- Install concrete blocks in a wooden stand to make a hearth where the fire will be fired.
- Cut the grill net with a metal cutter.
- Set the cooktop.
- Place a baking sheet in an open cavity.


https://i.expert-h.com/en/barbekyu/stol-dlya-grilya-svoimi-rukami-700-foto-poshagovye-instruktsii#sigFreeIdf2097f3200
Grill and smokehouse table
 It is presented here how to make a do-it-yourself grill and smokehouse table. The fact that such a thing is necessary is known to everyone who organized a barbecue. But first of all, you need to imagine how it will look. The author of the project did not want the top rack to be high, so he used a drawing of a person to see things in scale and perspective.When you have your own drawings, you can start collecting tools and materials to start the project. You know the saying, cut seven times, once ... ... or is it the other way around? :)

 Tools and materials
Here is the list of wood used in this project.:
- Wooden beams 4x4, a total of went somewhere 5 m
- Worktop plate 150x80 cm
- Panel 10 cm wide x 1.5 cm thick.
- White plastic grill for front cover
Dimensions:
- 90 cm from the ground to the countertops
- 1.8 m from the ground to the upper strut
- 1.5 m from left to right
- 80 cm deep
Core tools:
Drill, level and most importantly, pencil
Look at the process step by step photos. Although they are not very detailed, you are not doing a synchrophasotron either. In short, the procedure is as follows:
- Size your legs and snap them into the frame.
- Then paint and let dry.
- Saw the top of the table from a standard chipboard.
- Depending on your design, holes can be drilled wherever you want.
- Make a hole in the shape of U enough to fit the grill and smokehouse.
- Then paint.
- After staining, allow to dry for several hours and start working with the parts that will be above the painted chipboard.
- As you can see in the photo, the author used pine wood planks to cover the painted top. For stability, add an extra leg.
- Remember to cover all lamellas with high-quality exterior paint so that rain, snow and the sun do not damage the product.
- Once this is completed, add a decorative grille to the front.


https://i.expert-h.com/en/barbekyu/stol-dlya-grilya-svoimi-rukami-700-foto-poshagovye-instruktsii#sigFreeId75d472a0fc
Side tables for grill
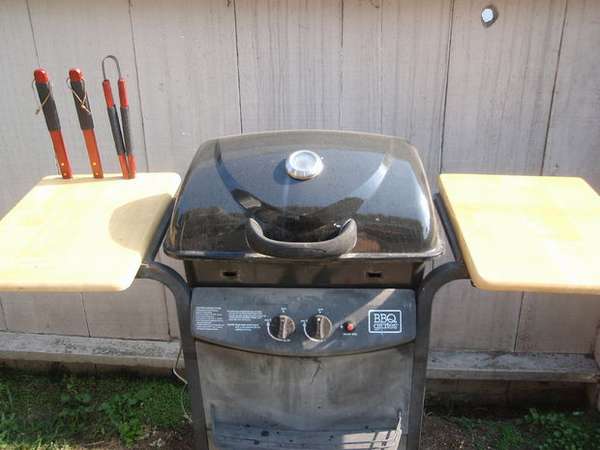 Here's how to make replaceable side barbecue tablesusing wooden TV stands!
In addition to two TV stands, you must prepare:
- drill
- saw;
- ordinary nippers
- screwdrivers
- glue
Remove excess debris, remove the screws and bolts that will need to be embedded in a wooden tray.
Mark where the tray will be attached to the grill, and where there will be slotted holes for kitchen utensils.
Drill holes marked with paint and make slots for accessories.
Place the coasters in the grill holes at all points and push the tables in.


https://i.expert-h.com/en/barbekyu/stol-dlya-grilya-svoimi-rukami-700-foto-poshagovye-instruktsii#sigFreeId7e29e20349
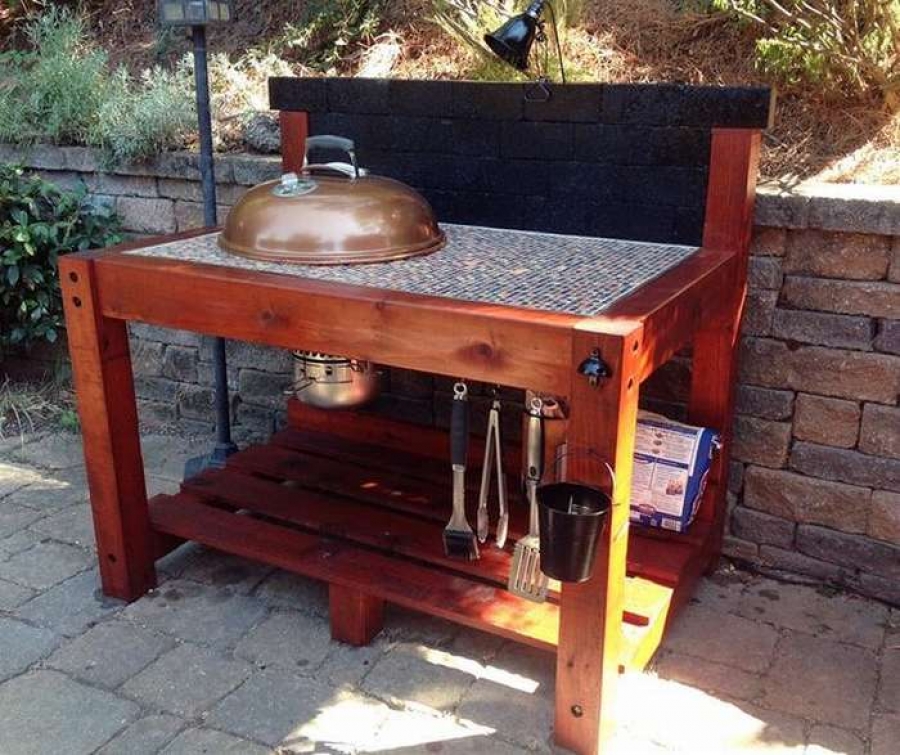
Weber Grill Table
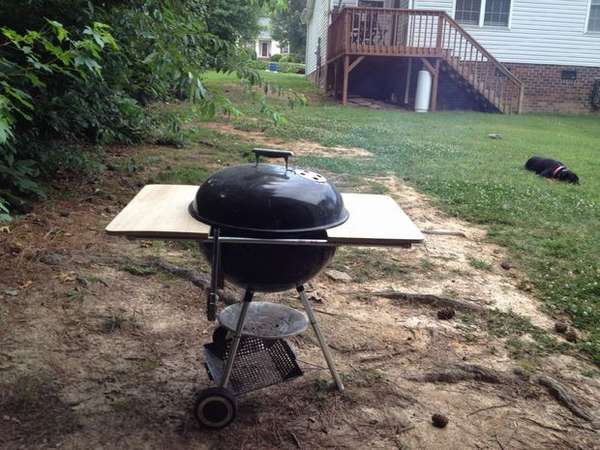 if you have Weber grill, then make a table for him is not at all difficult. You will need metal tubes, here we used tubes for cable, a sheet of plywood or a wood board, the size depends on the size of the grill, and on what table you want. You can use the board, just then there will be more work. Also buy mounts, such as shown in the photo.
Perhaps the procedure for making tables can not be described, photographs speak better than words.
It is clear that you can fix the halves in your own way, there is no complicated technology here.
Set one of the tables in the center of the grill handle, as shown in the photo. This is a snapshot from below.
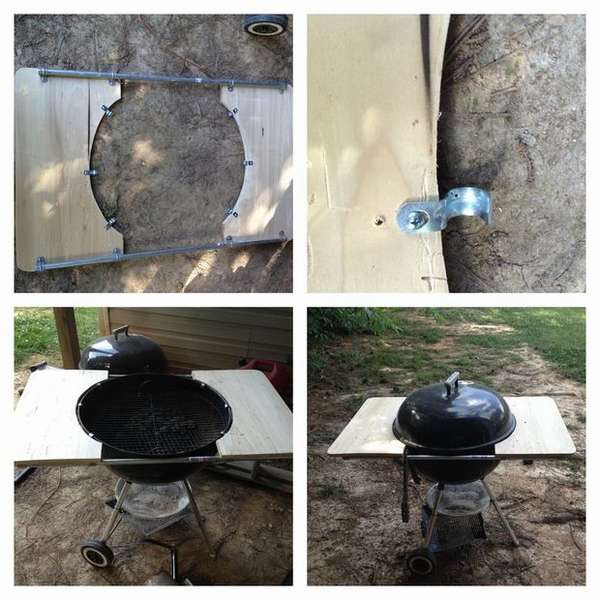 Adjust the countertop along the tube. You may need to trim the wood a bit so that the grill fits snugly in the groove.


https://i.expert-h.com/en/barbekyu/stol-dlya-grilya-svoimi-rukami-700-foto-poshagovye-instruktsii#sigFreeId4f952401a3
Picnic table
 If you don’t have your own grill, you can arrange barbecue on a regular picnic table. How? Just make a hearth for the fire in the countertop, cover with a grate, here the grill is ready. This is if simplified. Of course, making an ordinary picnic table is not a problem, you can see a lot of options for various designs here. But in order to build a hearth, you need to take into account many nuances, you can read more about fireplaces tables in this article. In general, everything can be done, although the presented table with a hearth cannot be called a full-fledged grill; for fire, bioethanol is used here for fireplaces. But anyway, better than nothing. How to make this table with your own hands, look at the step by step photos, you can read the instructions on the site.


https://i.expert-h.com/en/barbekyu/stol-dlya-grilya-svoimi-rukami-700-foto-poshagovye-instruktsii#sigFreeId4a819131f9
How to make a grill trolley
 Homemade grill trolley has a solid wooden base with a hole for the Weber round coal grill.To move, the design is equipped with wheels and a convenient handle, as well as devices for placing kitchen utensils. If you need a convenient table for cooking outdoors, then this homemade trolley for grill will perfectly perform all functions. It has a fairly large work surface for cutting food, hooks and a handle for kitchen utensils and moving trolleys. In general, this is an excellent mobile table, in addition, you can assemble it quite quickly, according to the author, in just a couple of hours.
- Prepare the grill. If you are installing an old grill, clean and wash, in general, put in order.
- Saw all the wooden parts in size.
- Locate the steel tube for the handle and connectors. Clean and color.
- Assemble the frame of the countertop, nail the boards. Then mark the hole for the grill.
- Screw the legs. Given the wheels, the two legs will be slightly shorter than the rest. Assemble the lower support frame and lower shelf.
- Drill very small holes in the steel bar where the wheels will be, and install cotter pins to secure. Then drill holes in the two short legs to insert the rod and secure it with the pins.
- From the marks, cut a hole for the grill.
- Sand the surface of the trolley
- Attach the handle.
This, of course, is not a detailed instruction, but rather work plan. If you are interested in more detailed information, a link to the author’s site is located under the gallery. By the way, to look at the final result and understand the assembly process much better, be sure to watch the video that is on the site!


https://i.expert-h.com/en/barbekyu/stol-dlya-grilya-svoimi-rukami-700-foto-poshagovye-instruktsii#sigFreeId2bad2aff33
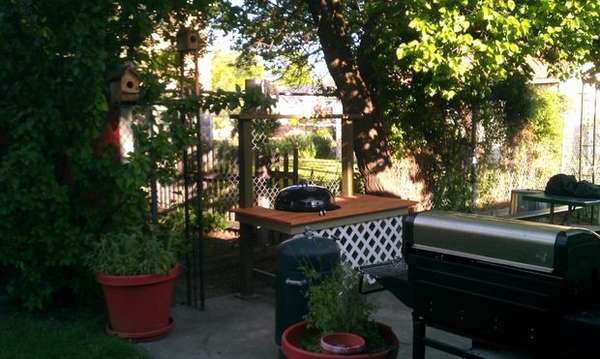
Mobile grill table
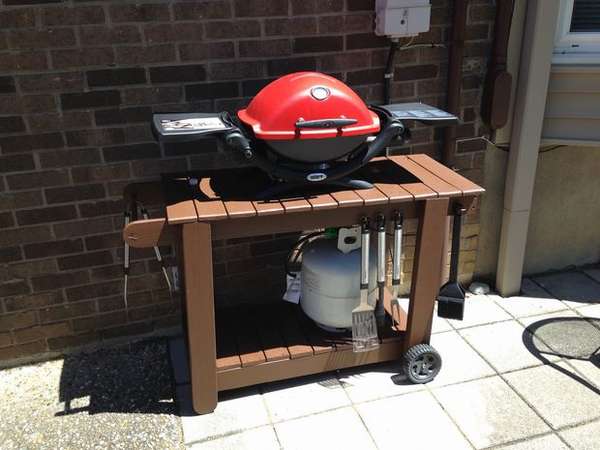 Here is another option grill table. Very compact and mobile, you can install it anywhere in your yard or plot in the country. The small size allows you to keep it in a garden shed for tools or any other place. The gas bottle fits comfortably on the bottom shelf. A metal bracket helps hold the top of the tank. To do this, eyebolts are installed on both sides. Brass hooks are made for kitchen utensils, you can attach them on the side that is more convenient for you. 99% of all the wood that was used to make the mobile barbecue table was obtained from disassembled pallets. Be sure to drill test holes before tightening the screws.


https://i.expert-h.com/en/barbekyu/stol-dlya-grilya-svoimi-rukami-700-foto-poshagovye-instruktsii#sigFreeId0d8e4fd10e
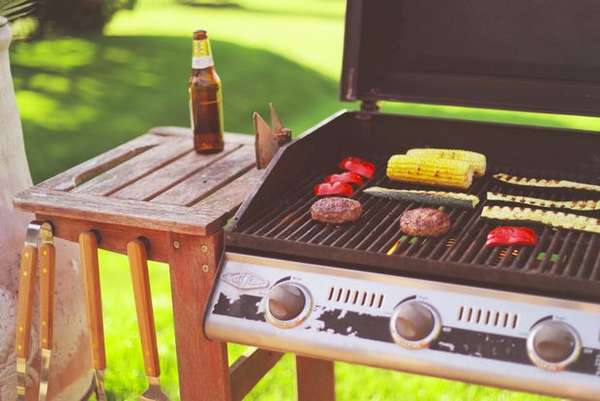
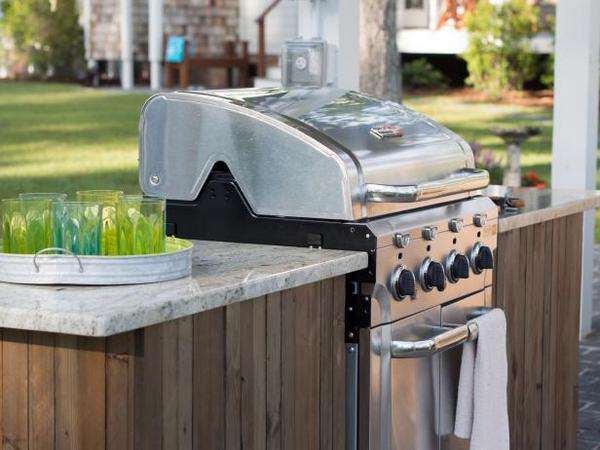
Grill table
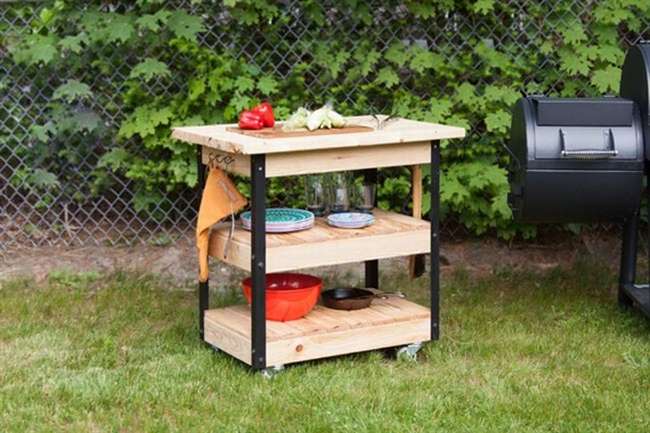 Great, if you have a grill, then it's time to think, how to make a do-it-yourself grill table. This article presents several options, although they differ somewhat in design, but the essence of the design is basically the same. Most garden tables for grilling are compact in size and equipped with wheels for moving. Here is a simple and functional option. Worktop for slicing food and preparing meat, two lower shelves for dishes and kitchen utensils, hooks for towels. Such a trolley will unload the dining table, will serve as a cutting board for cooking and a regular table for cocktails after a meal.
 Wooden table details are made of fir. You need to cut it.
- 4 pieces 92 cm long for the upper boards
- 6 pieces 76 cm long for frame supports
- 6 pieces 38 cm long for frame supports
- 16 pieces 46 cm long for the shelf
- 6 pieces 27 inches 68 cm long for clips
- 6 pieces 35 cm long
Step 1 Prepare the details
Round off all edges of the workpieces, then sand the surface with sandpaper. This will give the trolley a finished look and will be easier to assemble.
Step 2 Make shelves and upper support frames
- Place two 38 cm workpieces between two 76 cm long boards.
- Drill two through holes at both ends of each 76 cm part.
- Secure the frame with screws.
- In the same way, make two more frames.
Step 3 Drill holes
Depending on what type of screws you use, the holes should be slightly smaller than the screw. The idea is that the hole be large enough so that the screw passes without chopping the wood, but at the same time small enough so that the thread holds firmly.
Fasten the screws on the long sides of the frame, flush with the top. Drill about 10 cm apart and fasten them to the frames.
Step 4 Fasten the shelf and top boards
- Finish the top by flushing the four boards at the ends.
- Flip up on a flat surface with a clearance of 3 mm.
- Drill two holes evenly distributed between the short clips for both ends of the boards.
- Then drill another five holes along the side bars.
- Make shelves in the same way.
Step 5 Fasten your legs
- Measure and mark the position of the holes for attaching the pins to the top and the shelves on the aluminum corner legs. The upper ends of the legs should be pressed to the lower surfaces of the upper boards.
- The lower shelf is mounted flush with the lower ends of the legs. Middle shelf optional.
- Color the legs
Step 6 Complete the assembly of wooden parts
Apply a thin coat of varnish and leave to dry for the time specified in the manufacturer's instructions (this can be a few hours, but best at night). Manually sand the surface with sandpaper. Apply two or three more coats.
TIP. Varnish and other external coatings well protect the surface from weather conditions, but are not safe for food and should not be used on surfaces in contact with food. Wood surface conditioners contain mineral oil and beeswax and are safe for food. However, they are not very weather resistant. Therefore, it is recommended simply to use air conditioning more often.
Step 7 Make a table
- Assemble the trolley by screwing its feet to the corners of the shelf frames using bolts with a washer head.
- Make one side first, then flip and screw your legs on the other side. Gather the top in the same way.
Step 8 Fasten the hooks and rollers
- Mark the place for hooks and screw with screws.
- In each corner, drill a hole in the bottom shelf frame.
- Screw the locking rollers to one side or the end of the cart.


https://i.expert-h.com/en/barbekyu/stol-dlya-grilya-svoimi-rukami-700-foto-poshagovye-instruktsii#sigFreeId328d80fa82
Trolley for grill
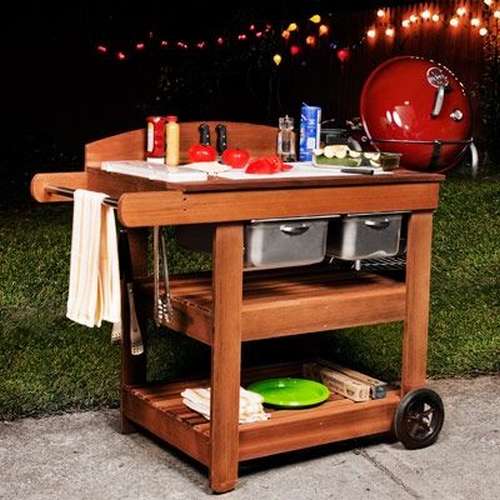 Practical barbecue table Add style and comfort to any summer kitchen. It is an ideal place to store and cook food. Cut vegetables or pieces of meat on a cutting cutting board, then dump the waste through an opening into a stainless steel sliding pan. The large grill moves easily to give access to meat, fish, vegetables or ice stored in containers.
Put the cookbooks on the back and seasonings on the tray on the left. After the feast, the retractable pots, cutting board and seasoning tray are easily removable so that you can wash and clean.
What do you need
The table is made of red cedarresistant to rotting wood, which is easy to work with. To make the same as in the photo, you will need a table saw. Ideally, it is best to use a portable planer and router to make a soft curve on each edge of the plate and around the hole in the cutting board.
This, of course, is a lot of equipment for such a small cart. If you do not have these tools, then use a circular saw and replace the dowels. To avoid unnecessary planing, make trims separately.
- Clamp and tighten. Fasten the parts together and drill holes for the screws. Apply waterproof glue and tighten the screws.
- Install the legs. Cross the two rear legs, apply waterproof glue to the joint and fasten with screws.
- Screw the shield from two pieces of acrylic plastic.
- Attach the wooden handle of the cart to the upper frame with glue and screws.
- Slotted slot for knives. To create the five sections where the knives will hang, drill six holes through the top frame and acrylic panels. Insert a dowel into each hole and cut.
- Bottom shelf. Knock down the slats and fix on the frame at a distance of 15 mm from each other.
- Assemble the top with the separation board and secure the assembly. Screw the wedges at the bottom.
- Screw on the rails that will support the two stainless steel tanks.
- Fasten the back.


https://i.expert-h.com/en/barbekyu/stol-dlya-grilya-svoimi-rukami-700-foto-poshagovye-instruktsii#sigFreeIda1e07cd6ba
How to make a patio grill table
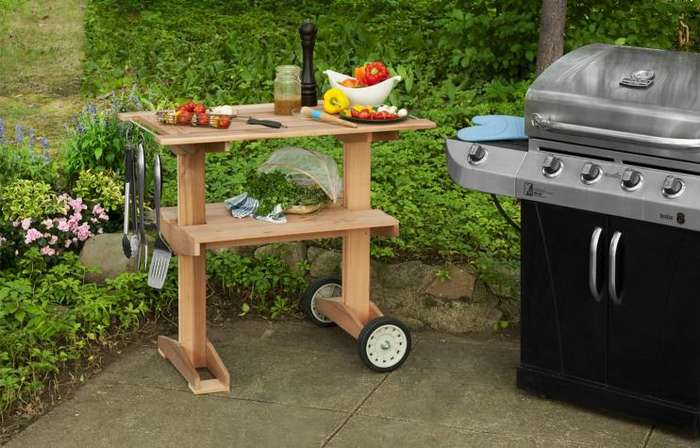 Another example of how to make a few cedar boards and wheels from a lawn mower portable grill trolley. This is a very convenient design, with a spacious worktop and a lower shelf for tray support, metal pins for hanging accessories and wheels that allow you to drive a cart with dishes directly to your guests. Naturally rot-resistant cedar is not only a beautiful material for work, but also safe for food processing. Follow the instructions, and in a few hours of not so hard work you will become the happy owner of a nice grill table.
 Materials:
Boards 1x4
- 2 pcs 100 cm
- 2 pcs 38 cm
- 8 pcs 76 cm
- 2 pcs 88 cm
- 2 pcs 80 cm
- 10 pcs 46 cm
- 4 pcs 8 cm
- 2 pcs 12 cm
- 1 pc 73 cm
- 1 pc 55 cm
And further:
- 2 thin galvanized rods with a diagonal of 43 cm
- 4 galvanized flat washers with a ½ inch diameter hole.
- 2 galvanized lock nuts ½ inch
- Plastic wheels for Maxpower 335080 lawn mowers
Grill table assembly procedure perfectly displayed in step-by-step photographs, if you are interested in instructions with a detailed description of each step, you can visit the site of the author of the project, you will find the link under the gallery.


https://i.expert-h.com/en/barbekyu/stol-dlya-grilya-svoimi-rukami-700-foto-poshagovye-instruktsii#sigFreeId2d4a2f3230
Barbecue Accessories on Magnets
 Here's an easy way to store grill accessories barbecue on magnets, within easy reach when needed. With Sugru + magnets, it is very easy to do! Who doesn’t know Sugra, this is self-hardening rubber with amazing properties, it can be used in any conditions, outdoors and indoors, in heat and frost, even at minus 50 °. Humidity does not matter, can be treated as plasticine. So you can use Sugru for almost everything - a wooden bench, a metal grill or a brick wall. Whether it’s a handle made of plastic, metal or wood, Sugru self-hardening rubber will stick to almost any surface!
Step 1: Share Sugru
First of all, open the package and divide Sugru into two parts. Approximately 60/40 for this project.
Step 2: Attach magnet
- Take most of the two pieces of Sugru.
- Pinch a small part the size of a pea and apply to the surface where you plan to stick on a magnet. This will help create a basic level.
- Attach the rest to the back of the magnet and press firmly onto the greased base layer.
- Smooth the edges with your finger.
Step 3 Creating a base layer
- Take the smaller of the two parts.
- Apply the correct amount of Sugru to the surface of the barbecue accessory again.
- Attach the rest to the base layer and shape into a dome.
- Smooth the edges.
Tip: For a good finish, dip your finger in soapy water.
Step 4: Install washer for magnetic contact
- Push the magnetic washer into Sugru
- Take away the excess that comes out through the middle.
Step 5: Time to use the grill!
After 24 hours, you can safely use the new mount.


https://i.expert-h.com/en/barbekyu/stol-dlya-grilya-svoimi-rukami-700-foto-poshagovye-instruktsii#sigFreeIdf855c35dc9
Barbecue tray
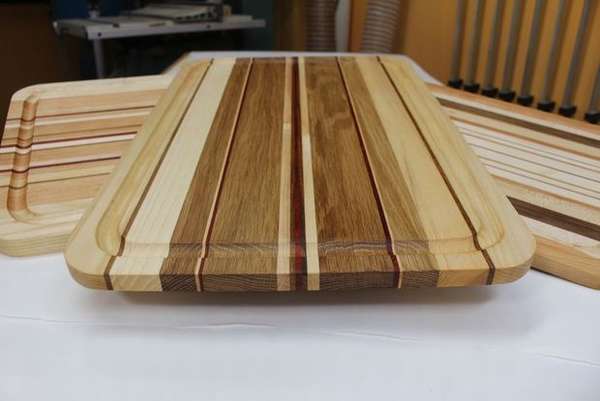 What is the difference between a barbecue tray and a cutting board? True, they look like cutting boards, but still there are two main differences. First of all, barbecue tray thinner to bring steak or sausages, you do not need a thick board. In this case, the thickness is approximately three centimeters. Secondly, special grooves for meat juices are provided in the tray. As you can see, the amendments are not big, but significant, make yourself such a barbecue tray and you will be able to appreciate its merits.
- The tray is assembled from scraps of wood. The author collected all the scraps that were, laid out and sorted by type, thickness and so on. Why put them together to get an aesthetically attractive look and glued them together. The tray turned out pretty thin, about 1.5 cm thick.
- Then the plates are cut to the required length. After trimming the corners, clean the corners on the grinder.
- An important point is making grooves for juice. For this, the author used a manual milling cutter.It is necessary to firmly hold the milling cutter and maintain pressure on the edge of the tray and very carefully and slowly turn the corners. Needless to say, this method will not work if you have 90-degree angles!
- A CNC machine is also a good option if you find a suitable spindle head. In general, there are many different ways, most importantly, the result.
- You can also make a shallow recess in one of the corners to drain the juice, if necessary.
I later added this to my own barbecue dish and found that it works
To cover the author used a mixture of beeswax and mineral oil Clapham's Salad Bowl. I don’t know, or we have such a thing.


https://i.expert-h.com/en/barbekyu/stol-dlya-grilya-svoimi-rukami-700-foto-poshagovye-instruktsii#sigFreeId213497301f
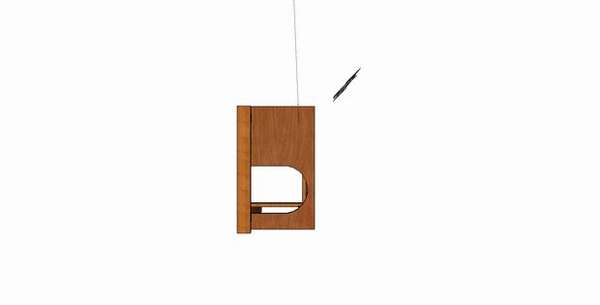
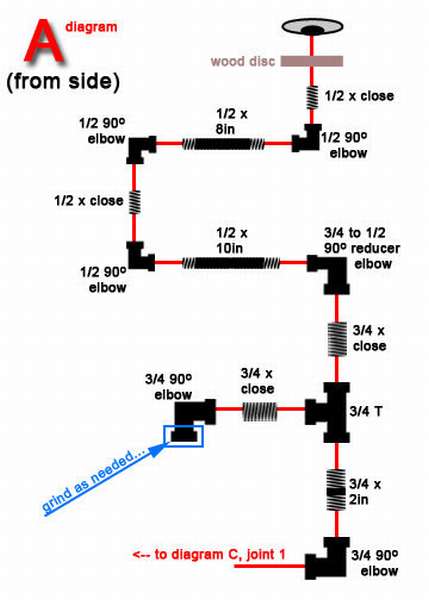
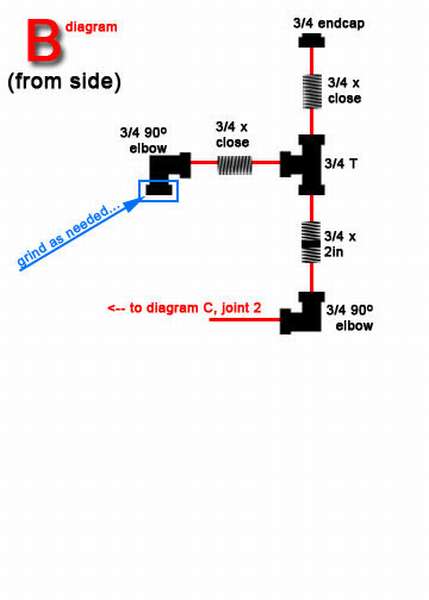
Removable grill worktop on the veranda
 Purpose of creating this small grill table: Create additional space for plates, pans and other kitchen utensils. The main idea is that the table is removable, and does not interfere on the veranda or terrace when it is not necessary.
The design consists of a wooden tabletop and a supporting frame, which holds the tabletop and has sufficient weight to remain in the working position on the railing. The author did not plan to take step-by-step photos, so they turned out to be somewhat spontaneous, but he provided several drawings. However, making a grill table is relatively easyjust read the instructions. If you make no mistakes, making a table will not take too much time, and step-by-step instructions will help you with this.
Tools
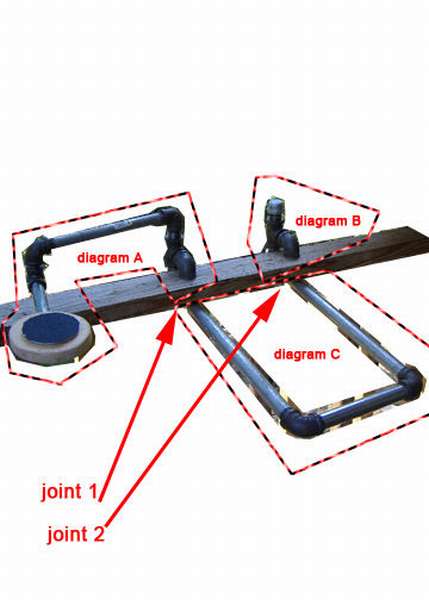 Two wrenches, it is advisable to prepare a piece of pipe to create a lever.
- File
- Circulation saw
- Drill
- Bulgarian
- A sander or just an emery cloth.
Trumpet:
- 2 1/2 inch pipes
flange - 3 turn signals 1/2 inch 90 °
- 2 tubes 20 and 25 cm
- Adapter 3/4 to ½ in at 90 °
- 4 tubes 3/4 inches
- 2 3/4 inch T-fittings
- 6 turn signals 3/4 inch 90 °
- end cover 3/4
- 3/4 pipe 46 cm long
- 3/4 pipe 20 cm long
Tree:
Any boards with a total length of approximately 2.5 m
Pipe Support Structure
The photo shows three drawings, which show how all the components of the pipes fit together to form different areas. In the image you can also see how they are all oriented.
 Operating procedure
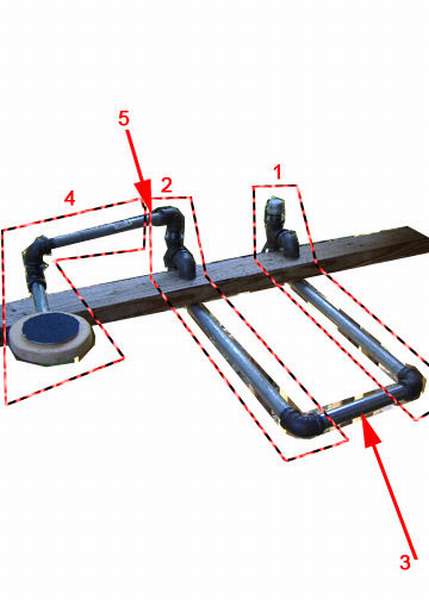 Assemble in the following sequence, it is slightly different from what is shown in the drawing. First, point 1 and 2, then connect to the 3/4 x 8 inch pipe at 3, because it is easier to combine these two connecting pipes after connecting all the parts in 1 and 2. Then make a lever and connect to the turn signal 5
Make sure all connections (anywhere in the pipe) are very tight. The only connections that do not need to be twisted strongly on the handle that make it movable.
Top counter top
For the countertop, the author used floorboards so that the table matches the flooring on the veranda. The working surface without spaces so that small objects do not fall out. For the lower part, it is necessary to pick up something heavy enough to act as a ballast and prevent it from tipping over if you put something heavy.
Assembly order:
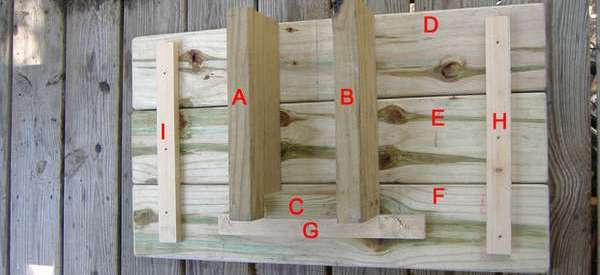
- measure and cut the two central bars (A and B)
- saw off the cross bar (C)
- assemble three parts together
- saw off and grind the upper boards (D, E, F)
- center board D into parts Abcopposite end C and attached to A and B;
- central panel E into parts Abcdsqueeze a vise D and Eand attach E to A and B;
- central board F into parts Abcdeclamp vise F and DE and attach to A and B;
- attach G to the bottom Fby placing Gdrill through holes through Fdelete Gcontinue the holes all the way through Fthen fasten them with screws, screwing into the countertop
- G serves as a shock absorber
- screw in the same way H and I
Completion
That's all. Both parts may seem heavy, but they are light enough to be easy to remove.


https://i.expert-h.com/en/barbekyu/stol-dlya-grilya-svoimi-rukami-700-foto-poshagovye-instruktsii#sigFreeIdc248154c5f
Table of drawers
 Highly simple grill table from ordinary wooden crates.
You will need 3 wooden boxes, several bars for the frame and a board, or plate, for the countertop. If you want a mobile option, then also the wheels.
If something is not clear with the assembly, there is a small step-by-step instruction on the site, but I think there are enough step-by-step photographs.


https://i.expert-h.com/en/barbekyu/stol-dlya-grilya-svoimi-rukami-700-foto-poshagovye-instruktsii#sigFreeIda39caf10d3
Waterproof coal storage box
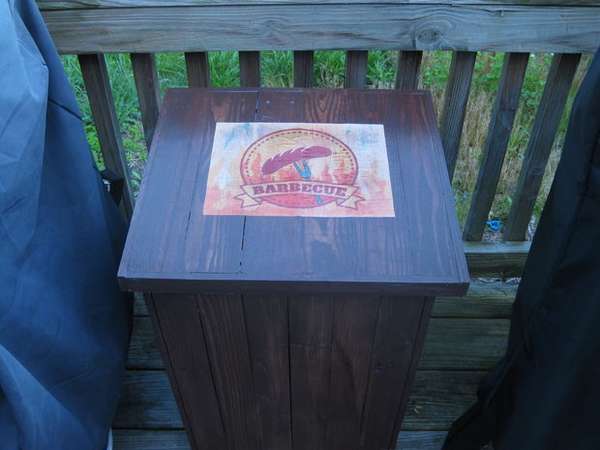 Hold charcoal for grilling or smokingFlax at home is not the best option, but what if there is no suitable dry room in the yard? The author solved this problem by making waterproof coal storage box and now stores fuel, judging by the photo, on the veranda. The photo gallery below shows how to use this power tool to make this simple but very useful thing. By the way, the box is made of old pallets, so the costs are minimal. The author calculated the sizes to hold two full bags of charcoal, of course, you can change them according to your needs.
Tools:
- a circular saw
- Miter saw
- mounting gun
- stapler
- Sander
- knife
Step 1: Dismantle the pallets, cut the boards to size and sand. Dimensions are in inches. 1 "is one inch and inch is 2.54 cm
The rest is pretty simple.
Drawer 16 "x15" 2 'tall
Sides (24) 2 1/2 "X 24"
Bottom (6) 2 1/2 "x14"
Side cover
(2) 1 1/2 "x16 3/4"
(6) 3 "x 15 3/4"
(2) 1 1/2 "X17"
- First make the sides without assembling the box. Then the top. The bottom is the last, leaving the bottom open, for air circulation.
- To make the drawer waterproof, fasten the resin paper to the inside and bottom of the top.
- Fasten the sides, then assemble the bottom.
- Primer and paint.


https://i.expert-h.com/en/barbekyu/stol-dlya-grilya-svoimi-rukami-700-foto-poshagovye-instruktsii#sigFreeId0ad086142c
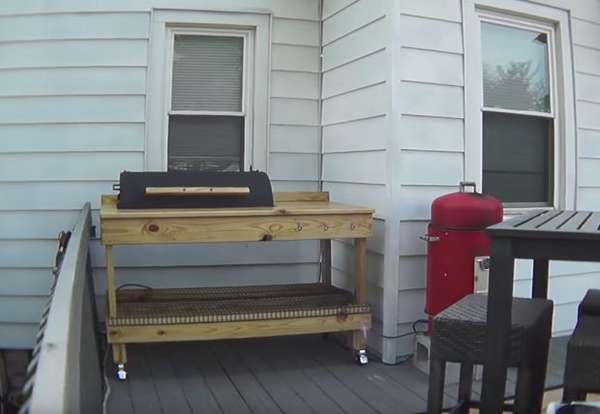
Grill improvement
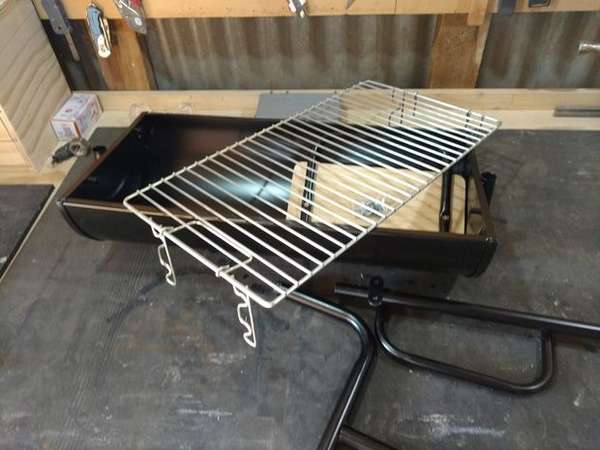 Grill upgrade or method upgrade gas grill. In general, how to make a gas grill in a homemade wooden table. A full-fledged barbecue, of course, does not work out, but maybe this information will be interesting to someone. In principle, nothing complicated or original. The main task is to attach the trellised drum to the frame. Note that the holes should be low, so the grill drum stays below the border, in the order that will be covered later. Use the legs that go with the grill to make pads. Well, making just a wooden picnic table is not a problem.


https://i.expert-h.com/en/barbekyu/stol-dlya-grilya-svoimi-rukami-700-foto-poshagovye-instruktsii#sigFreeIde55b26c085
Restoration of an old grill table
 This is in case you have an old grill, well, or someone is about to throw it away. Do not get lost, take it, but how to put it in order, you can look at these step-by-step photos. Perhaps all this will cost as much as buying a new shiny grill, but there are situations when this model is suitable for various reasons. You probably want to grill table fit into a specific space and had functions that are convenient for you personally.
Convenient in that the design and base are ready, and everything else can be done at your discretion.


https://i.expert-h.com/en/barbekyu/stol-dlya-grilya-svoimi-rukami-700-foto-poshagovye-instruktsii#sigFreeIdcb29954617
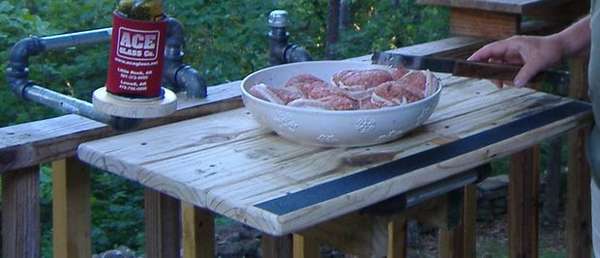
How to turn an empty terrace into a functional place for barbecue
 The step by step photos show how to make cute barbecue corner on the terrace. Unfortunately, the author did not provide instructions, but the idea and assembly sequence is displayed in the photographs in quite detail.


https://i.expert-h.com/en/barbekyu/stol-dlya-grilya-svoimi-rukami-700-foto-poshagovye-instruktsii#sigFreeIdcd2e4de02f
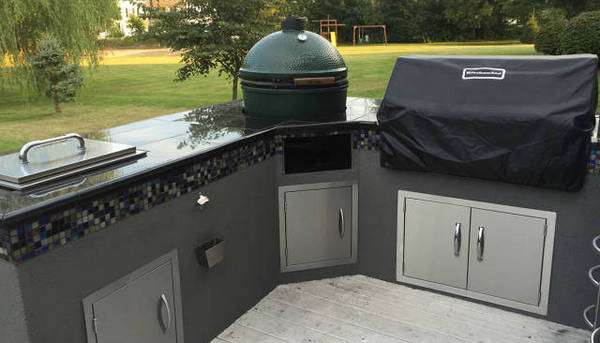
Grill island table
 Make an open kitchen by installing a gas grill in a specially made island table with a granite countertop. This is a great way to create a non-standard kitchen without special costs and special tools. Just take a standard ready-made grill and adapt to island life. You don’t need much to work, except for bars and boards, you will need to purchase bequelite plywood, or sea plywood, as it is usually called. This is a veneer material impregnated with formaldehyde adhesive. It is characterized by increased moisture resistance, and is much stronger than other types. The biggest cost is a granite slab, but it can be successfully replaced with a makeshift concrete slab.
- Base size. Measure the width and depth of the grill, making sure all objects protrude from the back. Add 15 mm to each measurement. This will be the size of the grill hole. Then measure the distance from the floor to the cover and subtract 10 cm. This will be the height of the countertop. Then determine the total width and depth of the island table. The starting point is the width of the grill multiplied by three. This will give an equal surface area on both sides of the grill. Take the depth of the grill and add 17 cm to determine the total depth.
- Make a frame. Form a U-shaped top and base for the table, using the general dimensions of the width, depth and holes for the grill.
- Create vertical corners by connecting two boards with screws. Subtract 10 cm plus the thickness of the countertops (usually 2.5 to 3.5 cm) from the total height of the countertops to determine the length of the uprights.
- Assembly of parts. Place the plywood on the base frame. Attach the base, uprights and top frame at each corner with screws. Rotate the completed frame and set the feet to align at each corner and center.
- Select countertop material. Consult your local worktop manufacturer to select a clean-up material that will resistelements. Once the material has been selected and the lead time has been set, ask the installer to focus the island frame by adding a 1-inch overhang around the perimeter. Be sure to consider the thickness of any shell in addition to the protrusion.
- Set the island frame to the end position and check the level. Adjust the legs and, if necessary, add a plastic gasket.
- Set the countertop.
- The outer part of the island table can be finished with any decorative materials at your discretion.
- Carefully reinstall the grill. Make sure that the front is flush with the surface of the island to allow air circulation.


https://i.expert-h.com/en/barbekyu/stol-dlya-grilya-svoimi-rukami-700-foto-poshagovye-instruktsii#sigFreeId3f848f607c
Grill table drawing


https://i.expert-h.com/en/barbekyu/stol-dlya-grilya-svoimi-rukami-700-foto-poshagovye-instruktsii#sigFreeId2e7ff3af6f
Grill table 100 photos


https://i.expert-h.com/en/barbekyu/stol-dlya-grilya-svoimi-rukami-700-foto-poshagovye-instruktsii#sigFreeId205c6f4e78
Hello, I am the author of this article, so I look forward to asking questions for this article in the comments below, I will answer all !!!
If you have questions on another topic, ask them on our forum, we will answer you
- Two baskets of paper in 5 minutes (Master class)
- How to make a simple and compact table for a milling cutter from plywood
- How to make a soft headboard tile (Instructions + step by step photos)
- Cinder block benches: a convenient bench in 55 minutes
- How to make a bed with a niche: saving space (Master class)