How to make a mini grill 500 photos, step by step instructions
 do-it-yourself mini grill
The creation of miniature table grills is a really interesting way to cook delicious dishes on an open fire, and for this it is not necessary to travel out of town. You can even fry several sausages or vegetables on the balcony. To make do-it-yourself mini grill it’s not at all difficult, for this we need simple materials that every housewife will probably find.
A small grill is a portable thing, ideal for travelers. Grilled sausages and steaks cooked on a mini grill are no worse than those cooked on large grills. It just needs a little practice, and you will cook as a professional. This article contains some of the simplest examples, I hope you have enough for inspiration to make your own mini grill.
Portable charcoal grill
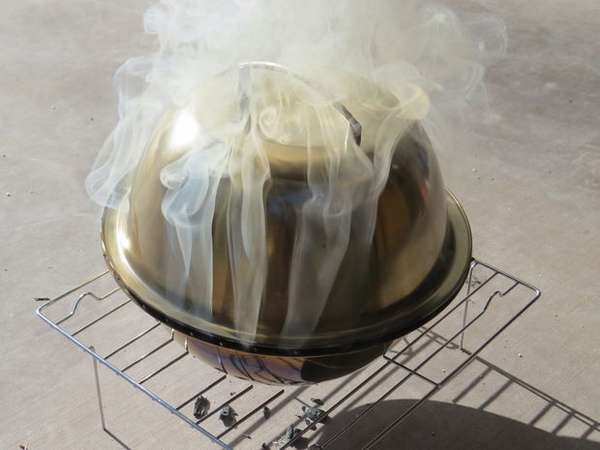
 If you travel by car, but do not want to eat in roadside cafes, do do-it-yourself portable charcoal grill and enjoy delicious home-cooked food. The wikihow website offers an excellent alternative to the stove, instructions for making a portable mini grill. the main thing do not forget about security measuresAlthough the grilled fire is easy to control, be careful and never disregard it. When filled with water, a cloud of steam with ash particles rises and covers the nearest area, including your clothes. You can do this from a distance using a hose, if any.
What do you need. Metal pan, pan, grate, chimney tank, coal and water, just in case.
- Prepare charcoal: lay the newspaper at the bottom of the chimney and fill the top with charcoal. Ignite the paper from below and place the chimney in the pan for 20-30 minutes.
- Wait for the coal to burn.
- Discard the burning charcoal into the pan. Place the grill in a skillet.
- Put food on the grill.
- When the food is cooked, remove on a plate.
Extinguish the fire with water. This will save unburned coal for the next time.


https://i.expert-h.com/en/barbekyu/kak-sdelat-mini-gril-500-foto-poshagovye-instruktsii#sigFreeIda7fb139353
Simple grill
 Situations are different, if you want to fry just one or a couple of sausages in nature, it makes no sense to drag a big grill with you. If you need a portable, compact, efficient grill, then the idea of the author of this project is to make simple grill from a can for coffee you will surely like it. Of course, it may look different; here is a sea of opportunities for improvisation. But according to the author, this version of the grill is very economical and it’s great to cook on it. So try it, you don’t lose anything, neither in time nor in cost.
Parts List:
- A can of coffee or any other
- Mesh (grill)
- 4 long bolts with nuts
- 4 short bolts with nuts
- A few centimeters of wire
Tools
- Dremel with cut-off discs to cut the jar and wire rack. If you don’t have this useful tool, then a fine-toothed hacksaw
- Screwdriver and pliers
- Clamp to hold halves when calibrating and cutting
- Sandpaper
Step 1: Cut the can in half
Step 2: Join the halves and cut the excess
When cut in half, insert one half into the other. Choose an arbitrary length for the grill by moving the halves along the length. Since they are the same size, the inner half will be slightly higher than the outer. Align the halves on one side. On the other hand, the inner half rises above the outer. Now fasten the halves together. Drill four holes at an equal distance from the center and fasten the halves with short bolts.
Step 3: Attach the legs
Calculate and mark the four positions for the bolts (legs). This will help mark the lower center at each end. Then select an offset (e.g. 40 mm) on either side of the center. Feet should not be too close to each other, otherwise the grill will swing. Drill holes for the four long bolts and fasten them.
Step 4: Cut and attach the grate
Install the rack over the grille, which should slightly overlap the grille on all sides.
Step 5: Cut the grate
Cut off part of the left rack (for coals). This will ensure air circulation.
Step 8: Test
Load the briquette grill. Make a fire and you can fry something.


https://i.expert-h.com/en/barbekyu/kak-sdelat-mini-gril-500-foto-poshagovye-instruktsii#sigFreeId16d16fa55c
Another option can grill, only the size is bigger.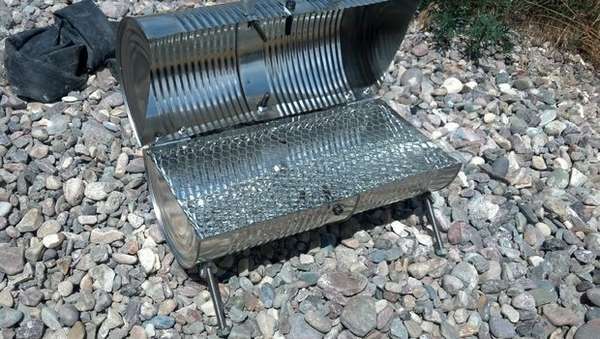 First you find two large cans, this, perhaps, will not be easy to do. Honestly, I don’t even know what can be a tin container of this size. In general, use the largest banks you will find.
- Cut the cans in half.
- Drill one hole in the bottom of both cans, as well as two holes in the upper part on both sides.
- Insert the bolts through the holes on the outside and secured them inside. This will hold the two halves together.
- Find three bolts with foot nuts for which to drill three holes, two in the front and one in the back.
- Find a thick wire mesh and bend it into three layers.
- Use two loops with eight nuts and bolts. Drill holes in the top and bottom, then attach the loops.
- Screw the handle.
Done.


https://i.expert-h.com/en/barbekyu/kak-sdelat-mini-gril-500-foto-poshagovye-instruktsii#sigFreeId10d00fa27c
Mini grill for home
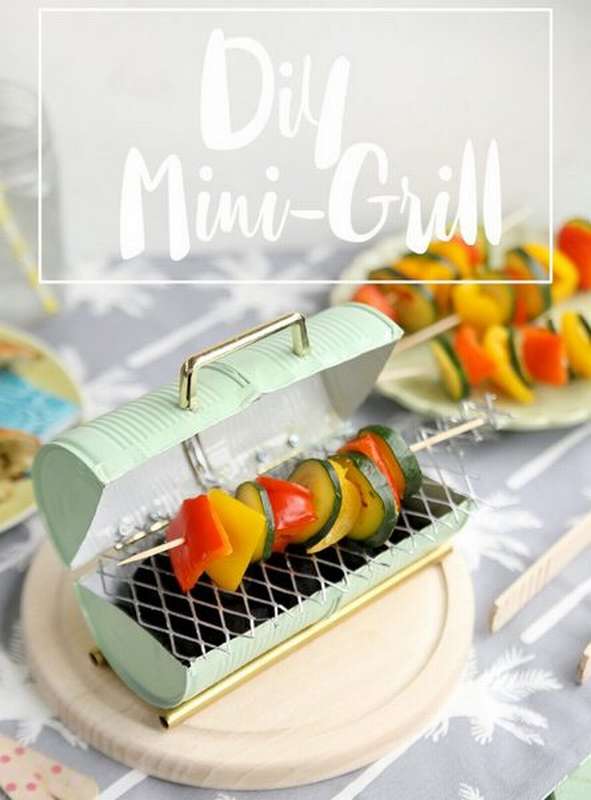 Is it possible to organize a barbecue on the balcony of my apartment and not quarrel with neighbors? The question is not simple, but quite solvable. The author of this project offers an interesting idea, how to make a mini grill for home and have a barbecue party without disturbing your neighbors. The grill is made of empty cans and is very small. In general, cans are a classic material for a mini grill, and most importantly, they are full in every kitchen, so you can experiment as much as you like until you reach perfection in this matter. By the way, you can cook on the grill not only meat, if you have your own mini grill, you will have the opportunity to try to cook a variety of products, so to rehearse before a big picnic in nature.
You will need:
- One large can or two small ones
- Two hinges corresponding to screws and nuts
- Small drawer handle
- Scissors
- Metal pipe
- Cordless drill
- Insulating tape
- Grill grate (metal mesh)
- Forceps
Operating procedure:
- First open the jars and eat the contents, then wash them and remove the label. If you will make of two cans: define the longitudinal center of the cans and cut them with scissors for metal. Solder the jars as shown in the photo.
- Mark the places for the loops and drill holes for fastening. Establish loops and tighten with nuts. Repeat all this on the “cover” and attach it to the hinge.
- Cut the pipe into two parts. They serve to stabilize the mini-grill on the bottom. Insert and screw to the bottom of the grill.
- Drill holes for the handle. Install the handle and tighten with screws. Cut the wire rack with pliers and you can start cooking!


https://i.expert-h.com/en/barbekyu/kak-sdelat-mini-gril-500-foto-poshagovye-instruktsii#sigFreeId5ffe3c44a2
Barbecue in the Bank
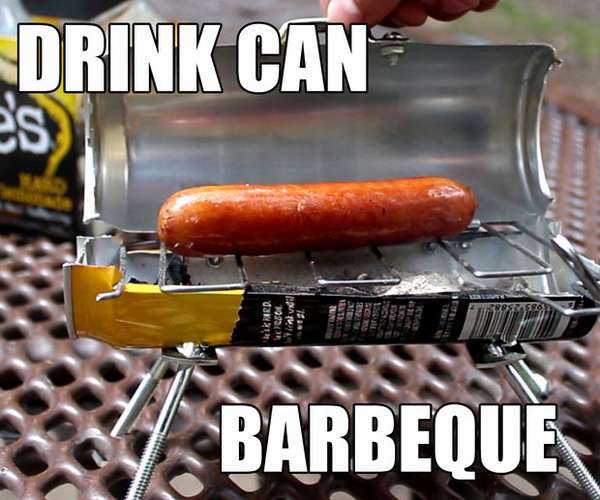 I really want to roasted sausages, but there is no grill? Here is one of the interesting projects, how to make barbecue in a jar from beer or any other drink. Having looked at step by step photos, you will understand how simple it is. But only observe safety measures, cutting produces very sharp edges, so use gloves. Hot coals also pose a number of risks. Never use homemade mini grill near flammable materials or on worktops that are sensitive to heat. Otherwise, no difficulties with the manufacture of the grill should arise. Of course, you can only cook one sausage at a time, but it's a grill made from a simple can! Read the instructions and you will learn how to turn empty cans of drinks into simple and functional miniature barbecue.
- To begin with, you will need to cut an empty jar in half, which can be done with scissors, or something else, it doesn’t matter. The goal is to divide the jar exactly into two parts.
- Make small angular cuts a centimeter from the edges, you can bend the aluminum, forming a small ledge.
- Make the other side exactly the same, and then cut off the narrow parts so that they are not so sharp.
- You need to find a thick wire and draw a pattern, as in the photo. If there is any coating on the wire, sand it with sandpaper. Bend the wire according to the pattern.
- Buy a pair of 4-inch bolts for the legs, as in the photo.Remove the metal plate, and use it as a template on the inside of the can. So, you will understand exactly where to make holes.
- Bend your two legs and see that the plate is fixed on the bank, holding it securely.
- Now do the same on the other side.
- Collect it all
- Fasten the hinges between the gaps on the grill and twist the round head screws to fasten them together. You can screw a miniature handle.
Time to cook!
Author Tip: it is better to heat the coals in another place, and when they can be cooked on them, transfer to a mini grill.
Another interesting feature is that the grill has a built-in loop for hanging tongs.
You can use several small cans as a base, and install a wire rail to make a temporary grill with half a can.


https://i.expert-h.com/en/barbekyu/kak-sdelat-mini-gril-500-foto-poshagovye-instruktsii#sigFreeId2bf25f5986
And if there’s absolutely no time, you can do this simple grill from a can in 10 minutes
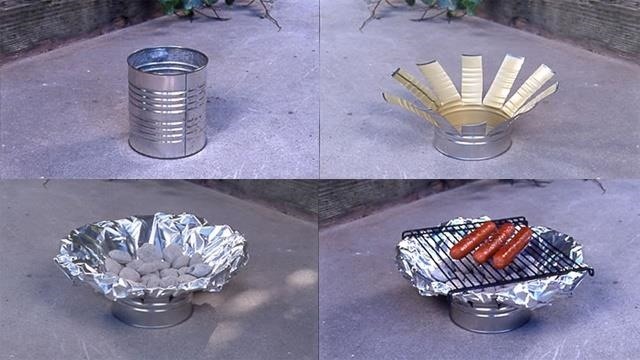
Table mini grill
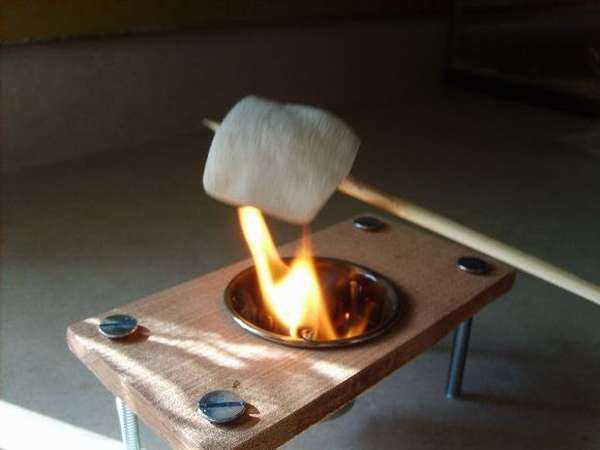 This table mini grill the author made for his little son so that he could fry marshmallows on a real fire. A commendable act, perhaps your child will be pleased if you organize a small picnic in the courtyard. Just don’t forget about control, be careful with fire. Follow the process and use the mini grill only outdoors. Make sure that you always have a container with enough water on hand or a fire extinguisher in case the fire spreads. Although the grill looks like a toy, the fire is real.
Details:
- Cedar plank
- 4 bolts - 1/4 inch and 2 1/2 inch high
- 4 nuts - 1/4 inch
- 4 washers for bolts
- Stainless steel cup
- Box of cheap toothpicks
- Box of matches
- Bamboo skewers
Tools:
- Drill with drill
- Wood hacksaw
Operating procedure
Drill a large hole (2 and 1/2 inches) in the center of the board approximately 1.5 cm from the outer edge.
- Do it the other way too
- Then drill four holes in the corners
- Insert a bolt into each hole and tighten it with a nut
- Place the cup in the hole
- Fill a cup with toothpicks, light and start toasting marshmallows
- When done with the mini-grill, fill the cup with water.


https://i.expert-h.com/en/barbekyu/kak-sdelat-mini-gril-500-foto-poshagovye-instruktsii#sigFreeId01c282a63a
Foil grill
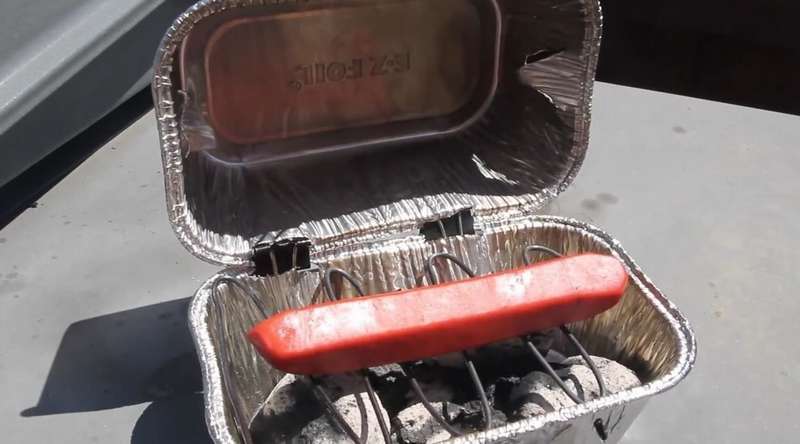 It shows how very fast make miniature grill foil and thick wireso that after half an hour enjoy the aromatic toasted sausage.
What do you need
- 2 deep foil plates
- 3 stationery clips (binders)
- Charcoal
- Pliers
- Knife
- Wire
How to do
- Take two foil containers and connect by turning the top bowl upside down.
- Cut two slots in the back and secure with clamps.
- Using a pair of pliers, make a zigzag out of wire.
- Make slots on the sides of the upper container and a few slots in the bottom, as in the photo.
- Place coal and a couple of chips to ignite the coal.
- Set the chips on fire, and while the coal is burning, install a wire grill.
- Put the sausage (sausage, sausage or whatever you will fry).
- Close the grill and wait about five minutes.
Done! Now you have the perfect little barbecue.


https://i.expert-h.com/en/barbekyu/kak-sdelat-mini-gril-500-foto-poshagovye-instruktsii#sigFreeId28a6c7288a
Mini barbecue
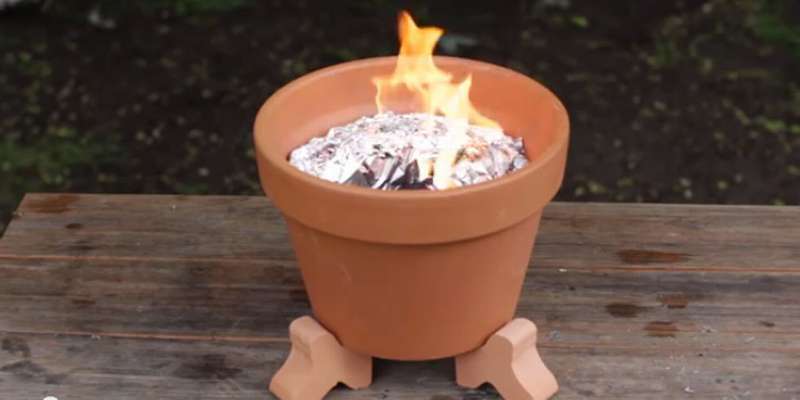 Here's how to turn an inexpensive mini barbecue terracotta pot in just six steps:
- Buy a regular terracotta pot.
- Find black steel mesh or custom chrome grille. Cut the grid in a circle, the size of a clay pot. Set aside for later.
- Prepare the inside of the pot with dry sand and foil, making sure that the hole is closed from the bottom.
- Put lump coal in the pot, filling it up to five centimeters from the base.
- Light charcoal and set the top of the grill. Heating will take about 10 minutes.
- It's time to cook!
Tip. To control the temperature, cover the pot with a lid, just remember to leave a place for air to escape.


https://i.expert-h.com/en/barbekyu/kak-sdelat-mini-gril-500-foto-poshagovye-instruktsii#sigFreeId4106e978eb
Fishing grill
 This small grill made for cooking fish. Everything is quite simple, and if you use old dishes, and not buy new ones, then almost for free.
A metal bowl or pan forms the main body of the grill, where the coals will be.Two lattices directed in different directions make up a shelf that holds everything that you cook, and the old candlestick plays the role of the base. The two grilles will ultimately be held together by wire, but you can simply tape them together before use.


https://i.expert-h.com/en/barbekyu/kak-sdelat-mini-gril-500-foto-poshagovye-instruktsii#sigFreeId5fd16f0682
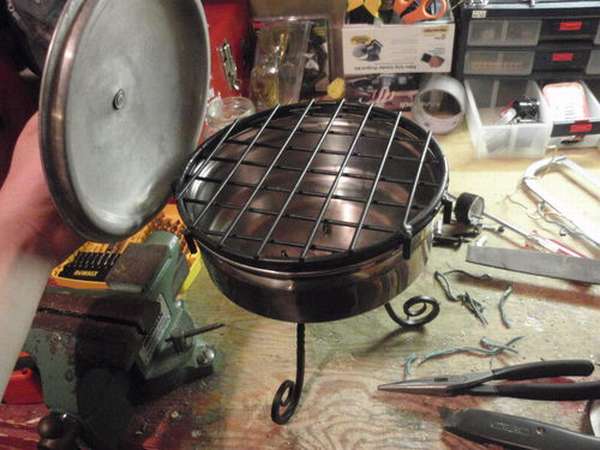
Camping grill
 To make this grill camping it took two bowls of stainless steel and two wire racks. After reading the short instructions below, you will understand that it is quite simple to make the camping grill shown in the photo. Actually a very convenient thing, not only easy to manufacture, but also easy to operate and transportation. You can grill with ordinary hand tools in just a couple of hours. For expenses, to buy two bowls of stainless steel, if you do not have old at home, is not burdensome.
- Step 1: Cut the inner grill
Start by creating an internal grill. Cut a circle with metal scissors. You just need to make sure that the circle you are cutting is large enough to circulate air when you place it in a bowl. - Step 2: Make Mounting Holes
To prevent the inner grill from moving, you must drill several holes in the bowl. These holes should correspond to four points on the grill. - Step 3: Ventilation
Use a hand drill to make ventilation holes in the bottom bowl. - Step 5: Attach the handle and top grill
You can use any pen, it doesn’t matter. The upper grill is held in place by drilled holes. - Step 6: make a stand
Just cut off part of the inner grill and bend the four rods at an angle of 90 degrees. - Step 7: Fire
You can use briquettes or wood, which is more convenient. Place chopped wood in a bowl and set fire. When the firewood burns well, put on the lid and let the fire go out. Now you have a bunch of charcoal to cook on.


https://i.expert-h.com/en/barbekyu/kak-sdelat-mini-gril-500-foto-poshagovye-instruktsii#sigFreeId0bef658a8f
Tin box grill
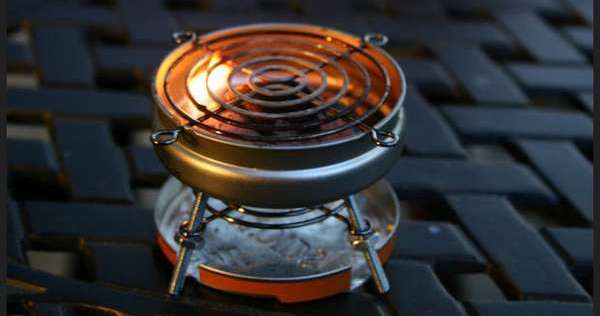
This unit is equipped with standard-sized briquetted charcoal and can easily fry sausages or toast bread. It gets hot after catching fire, so be careful and keep a large glass of water on hand.
Step 1: Materials
- 1 tin box for sweets
- 4 38 mm wide-head sheet metal screws
- 8 nuts
- 70 mm metal protective casing of the computer (similar to the one shown in the photo)
- 92 mm metal computer fan (as pictured)
- Dremel with cutting blade
- Drill
- Scissors for metal
- Pliers
- Screwdriver
- Safety glasses and gloves
Step 2: Remove the bottom box
- Take a 70 mm fan as a template, drill 4 holes in the box.
- After that, using the Dremel and the cutting wheel, cut out the central part, leaving 2-3 mm around the holes that have been drilled.
- Remove enough metal so that the “tabs” with 4 holes can easily bend outward without changing the shape of the box.
- Then bend the tabs slightly by approximately 15 °.
Step 3: Upper grilles
- Using scissors and a large fan grill as a template, cut out 4 small slots in the frame. They must be thin so that they capture the upper grill, but not so much that the grill is difficult to pull out.
- Then install the grill and make sure it goes in and out well.
Step 4: Feet and lower grill
- A small grill will hold the briquette. It should be approximately 6 mm below the bottom of the grill.
- First you need to connect the legs. Insert all 4 screws into the holes and fix with a nut, but do not tighten yet.
- Then place the grill on the leg and loosely screw another nut about halfway.
- On the remaining legs, you need to screw the nuts about halfway, align them with the holes in the grill, and then push them in, securing the end with a second nut.
- Finally, tighten the top nut on all screws to secure the legs.
Step 5: Alignment
A second nut on each leg aligns the lower leg.Tighten all nuts until the lower grill aligns approximately 6mm from the bottom. All 4 legs should be at the same distance from the center so that the grill is firmly and does not stagger.
Step 6: Cap
Using metal scissors and pliers, make 4 cutouts in the lid so that it can fit above the box when the top grill is installed. In practice, you can use the lid as an ash tray.
Step 7: Done!
The grill is complete! To remove the upper rack, install the briquette on the lower rack, install the upper and remove the briquette from below. All you can use.


https://i.expert-h.com/en/barbekyu/kak-sdelat-mini-gril-500-foto-poshagovye-instruktsii#sigFreeId9866d8807f
Pocket grill
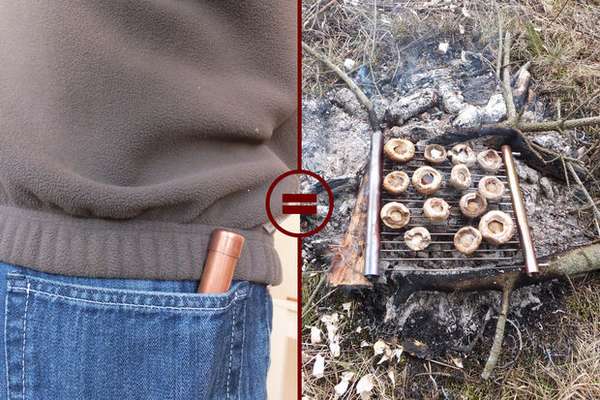 Here, the pocket grill. Ideal for camping, mountaineering or hiking.
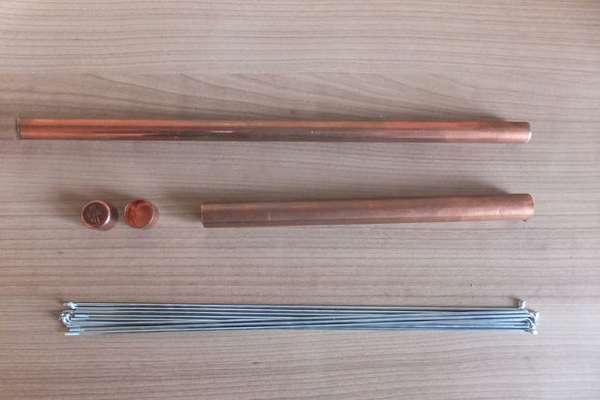
Below in the photo is everything you need.
 From materials:
- Basically, 2 tubes will be needed, while one should go into the other. It is possible to use, as in this case, copper tubes of 18 mm and 15 mm. In principle, any metal is suitable, but copper is better, because: relatively light weight, does not bend much under the influence of fire, has thin walls.
- 2 copper caps suitable for larger pipe diameters.
- Spokes for a bicycle wheel with a diameter of 2 mm. Be sure to use stainless steel knitting needles.
Tip. If there is a bicycle repair shop nearby, ask for broken needles, most likely they will give it for free.
Dimensions:
This is quite simple, as you need to cut out all of one size (you get a rectangular grill). The more you make the grill, the more knitting needles, just make sure that the number of knitting needles you fit fits into a smaller diameter tube. The presented grill is 20 cm wide (about 25 needles 2.2 mm are placed inside a tube with a diameter of 15 mm).
- Cut two tubes to an equal length and grind the rough edges.
- When the pipes are cut, it is necessary to mark and drill holes for the needles.
- Having decided on the number of knitting needles, just count the holes. The spokes should also be the same length with pointed ends.
- You will also need 2 knitting needles about 5 to 10 mm longer.
- Assemble the grill
To disassemble and pack the grill, simply unscrew the clips and it will fall apart. Packaging is also quite simple.


https://i.expert-h.com/en/barbekyu/kak-sdelat-mini-gril-500-foto-poshagovye-instruktsii#sigFreeId7ebafe5dfe
Simple wire grill
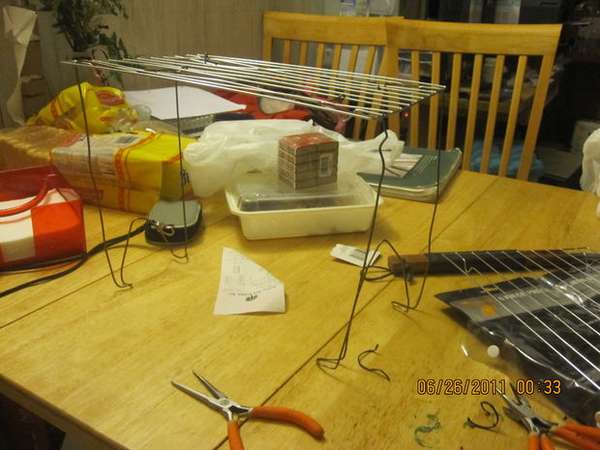 This grill can be used wherever there is fire. It is unlikely that you will find something lighter and simpler than this prototype tuscan grill, which can be moved using forceps, change the height and it will cost you almost nothing. After all, all you need is 2 wire hangers or just thick wire, mesh, rack, pliers. And then everything is simple.
- Take the hangers and straighten them.
- Align the ends and bend them in half.
- Take the curved end and bend in half.
- Then, using pliers, bend the long wire on one side in the shape of W, about 1/3, at an acute angle.
- Do this on the other hand W.
- Now bend the half of the “bent” part inward.
- Wrap the end of the hanger around the rack.
- Repeat these steps for all other legs.
- The legs will have different lengths, so bend them to the pointed parts of W.
Everything is ready!


https://i.expert-h.com/en/barbekyu/kak-sdelat-mini-gril-500-foto-poshagovye-instruktsii#sigFreeIdb0758b39fe
Campfire grill
 One of the greatest pleasures is cooking over an open fire. The simplest dish is to fry meat and sausages. There are many ways to do this, but one of the most popular is simple campfire grill. This is not at all difficult to do. The grill consists of two panels, which are connected by a hinge. The meat is located on one panel, and then the other panel closes like a book, clamping the meat. This allows you to make any adjustments to the heat by simply turning or moving the entire grill, rather than every single piece of meat.
This, of course, is not an original invention, you can easily buy such a thing in a store. But this article is for those who prefer to do things, rather than buying them. And if the materials are also free, then this is even better. For the manufacture you do not need welding or other expensive equipment. Of course, this design can be adapted as you wish.
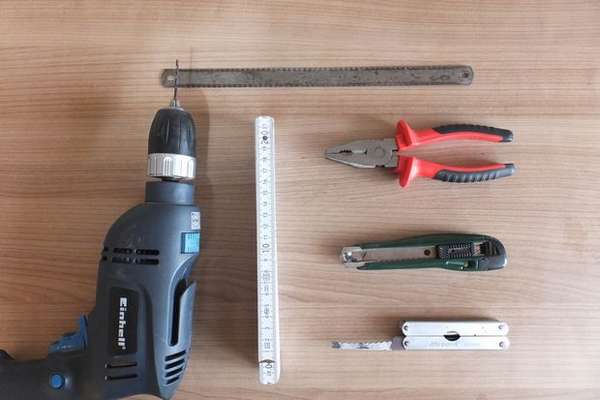
Step 1: What do you need
- The most important tool is a decent pair of pliers.
- Then you need to find two panels with the same size.
- Wire to tie construction.
- Heavy wire or rod for pens.
Step 2: Make pens
- Handles have two functions. Hold the meat in a clamped position and move to adjust the temperature.
- Ideally, the handle will have a length of at least 400 mm and a width of about 50 mm. Moreover, they are strong enough to rotate the grill with clamped meat.
- Bend the shaft as shown.
- Securely hold the handles. Look at the photo.
Step 3: Attach the handles to the panels and lock
- With loose wire rings at the edge, join together two panels opposite the handles. This creates a hinge that allows you to open and close the grill. Four rings will be enough.
- The lock is a simple wire loop that holds the handles together. With the grill in the closed position, wrap the handles with wire and twist the ends together. Cut excess.
- Make sure that the sharp ends of the wire do not stick out.
The grill is finished, you can cook.


https://i.expert-h.com/en/barbekyu/kak-sdelat-mini-gril-500-foto-poshagovye-instruktsii#sigFreeId5f234e1ee7
Grill Yakitori
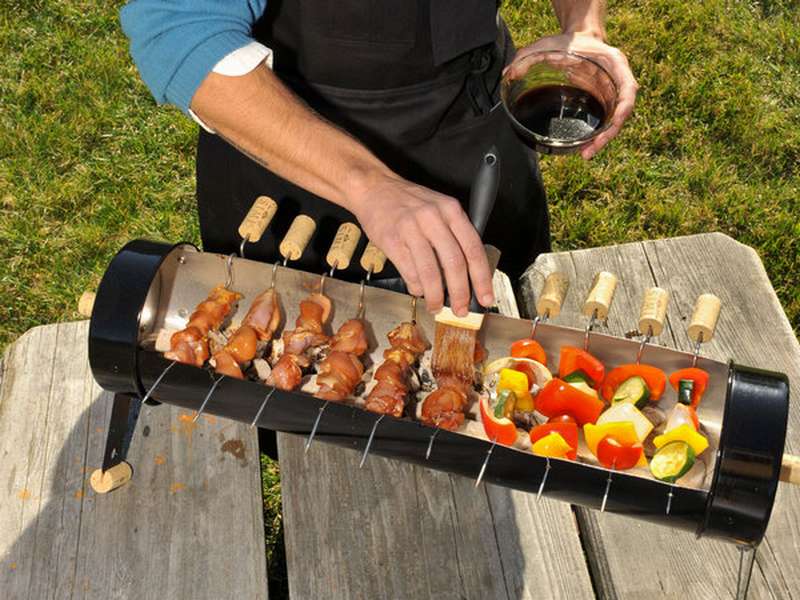 Unlike most grills that cook anything, from burgers to sausages and steaks, this special grill specifically designed for yakitori, Japanese chicken skewers. In principle, the word "yakitori" is translated, fried chicken. Short kebabs are placed over a narrow gutter with coals. Suspended products cook quickly, do not burn and do not stick to the grill or grill surface. If you want to try a dish of Japanese cuisine, the recipe is at the end of the article. It remains to make himself grill for yakitori. The author, after traveling to Japan, offers an easy-to-use grill design and specially designed double-hook skewers.
Step 1: Prepare a metal sheet.
A WARNING: Do not use galvanized steel for the grill housing. When heated, the surface releases vapors hazardous to the body.
- Mark the 4 mm holes that will serve as skew holders. Draw a ½ "line 60 cm below the edge of the aluminum sheet. Mark 10 holes 5 cm between the centers and drill.
- Then drill 5 holes along the short ends of the sheet. They are designed for fastening rivets to the frypot rims. Draw a line 25 mm from the edge, then measure, mark and punch holes of 15 cm on each side.
Step: Prepare the end cups.
Find and mark the center of the bowl. Draw a line from the center to the edge. Use this line to center the legs of the L-mount. Mark the location of the holes on the frypot.
Use a wooden block as a support inside the broiler. Use a rivet with washer on the inside to secure the L-shaped leg. Repeat this with another bowl.
Step 3: Test the details.
- Gently rotate the aluminum sheet 30 cm. Do not try to bend everything at a time, lean the sheet against the countertop. Fold the sheet slowly and gradually to bend the curve.
- Place the curved groove inside the end cups on a flat surface, making sure that all 120 cm are even.
- Hold the brackets against the curved edge of the sheet and mark the location of the holes on the inside of the caps.
- If you use the grill in places where there are strong winds, you can make the trough a little deeper or even make a lid.
- Use the holes already drilled in the gutter to mark the location of the corresponding holes in the bowls. Mark with a marker on the inner rim of each bowl.
- Then flip over and punch the marks on the other side to make indentations on the outside of the rim. This will facilitate drilling from the outside.
- Prepare a wooden block and drill holes in the rim with a diameter of 4 mm.
Step4: Collect and paint.
Align the holes and insert the rivets. Cover the inside with paper and tape. Paint the grill with heat-resistant paint, preferably in two layers. Let dry overnight.
Step 5: Make legs and arms.
Attach the corks to the legs, as shown in the photo.
Drill a 3 mm hole through the axis of the 2 plugs. Take a small flat head bolt to secure the plug on the end cap with the washer and nut on the inside.
Step 6: Make skewers.
- To make skewers with a double hook, cut the steel rods by about 35 cm and use a pair of pliers to make zigzag bends.
- Drill a hole in the center of the cork and a second, shallow one, between the center and the edge.
- Fasten the cork to the short end of the skewer.
- Use pliers to make a U-shaped bend at the end of the wire.
- Then slide the curved end into the second hole in the plug.
- You get an insulated handle that will not rotate.
- Make as many skewers as you want.
- If you do not want to make special skewers, you can use any.
How to cook
Place the grill on a fireproof surfacee from plants or buildings. Put crumpled paper and apply charcoal. Heat the coals and let them burn until they are evenly covered with white ash - about 30 minutes.
Yakitori Recipe (chicken on skewers)
Ingredients
- 500 g boneless chicken thighs, with or without skin
- ¾ cup mirin (sweet rice wine)
- ½ cup soy sauce
- ½ cup sake
- ¼ cup sugar
Combine mirin, soy sauce, sake and sugar in a small saucepan and simmer over medium heat.
Cut the chicken into bite-sized pieces. String the meat evenly on skewers. If using bamboo skewers, first rinse them with water so as not to catch fire. Brush the pieces with the sauce.
Spread the coals to create a uniform layer along the middle of the gutter. Insert the skewers into the holes. Turn the skewers every few minutes until the meat turns golden.


https://i.expert-h.com/en/barbekyu/kak-sdelat-mini-gril-500-foto-poshagovye-instruktsii#sigFreeIdae30103648
DIY mini grill 200 photos


https://i.expert-h.com/en/barbekyu/kak-sdelat-mini-gril-500-foto-poshagovye-instruktsii#sigFreeId55165a3592
Hello, I am the author of this article, so I look forward to asking questions for this article in the comments below, I will answer all !!!
If you have questions on another topic, ask them on our forum, we will answer you
- Two baskets of paper in 5 minutes (Master class)
- How to make a simple and compact table for a milling cutter from plywood
- How to make a soft headboard tile (Instructions + step by step photos)
- Cinder block benches: a convenient bench in 55 minutes
- How to make a bed with a niche: saving space (Master class)