DIY brick grill 300 photos step by step instructions
 brick barbecue grill
There is nothing better than enjoying good food, fresh air and a company of friends, and the best opportunity to combine these things, to fry something delicious on an open fire. You can buy a barbecue grill and install it almost anywhere, but it's much better to build your own do-it-yourself brick grill in the country or in the yard of a country house. There are two advantages: firstly, the material - bricks can be easily removed, and the grate is very simple to clean; secondly, you can choose the most perfect shape and size of the barbecue, depending on the free space.
Brick barbecue building is not at all difficult, as most people might think. For a good cook, a brick grill is great for outdoor parties with family and friends. Just keep in mind that this is a stationary structure, so be sure to think about convenience before starting construction. In general, look at the examples presented here and be inspired to build your own functional brick barbecue.
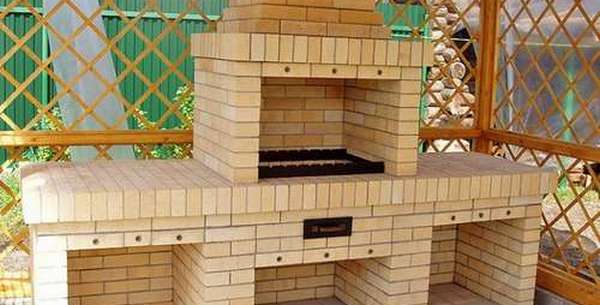
Brick BBQ Grill
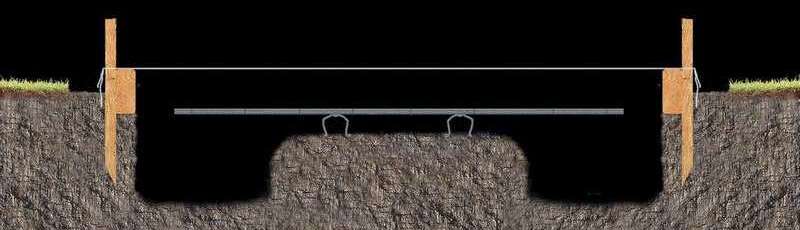
 The brick barbecue grill design presented here is built with a double inner wall made of heat-resistant refractory brick, which surrounds the cooking area, and the outer wall. This material has been selected primarily for reasons of economy. If you want to change the design, you can use a different material. A ten-centimeter space between the walls helps isolate the cooking zone. The walls are covered with thin tiles of cut stone. Refractory mortar is recommended for use in places of direct contact with fire. It is heat-resistant, and the connection will last a long time without cracks. The base combines a support of 30 cm supporting a reinforced slab. This structure, known as a floating base, is used when temperature changes cause the structure to move.
Barbecue area
- Lay out the pad 120 × 150 cm.
- Dig a continuous trench 30 × 25 cm around the perimeter of the area, leaving a rectangular mound in the center.
- Remove 10 cm of soil from the top of the embankment and round it around the edges.
- Set the shape around the site so that the top is 5 cm above the ground behind and 14 cm along. This slope is needed to drain water.
- Fix the support with five pieces of reinforcement of 130 cm each. Install the reinforcement on the support 10 ms from the front and back of the trench.
- Cover the molds with vegetable oil and pour concrete.
- After the base hardens in a week, mark the layout for the inner edge of the wall.
- Draw a line of 10 cm 4 from the front edge of the support and the center line perpendicular to the first line.
- Make a rectangle 60 × 80 cm.
Dry masonry
Install the first row of refractory bricks around the outside of the rectangle. Note: Proper placement of the internal walls is necessary so that they can reliably support the grill. Start with a 10 cm full brick to start the right and left walls. Complete the course with a carved brick in the middle of a short wall.
Exterior wall
Break the bricks into 1 cm construction joints. The back wall should be within 1 cm of the last refractory brick in the left inner wall. Finish the left wall with a carved brick in the middle of the wall. Mark the reference lines for the exterior wall.
Supports
- On one side, mark 8 rows of refractory bricks, leaving a 10 mm clearance gap and 3 mm gaps for the rest of the joints.
- The top of the last row should be 90 cm from the bottom edge.
- Lay out 11 rows of ordinary building bricks, evenly distribute them so that the last row is flush with the line.
- All horizontal gaps should be slightly less than 1.5 cm thick.
Inner wall bookmark
Lay a layer of mortar for the inner wall, and then lay the first row of refractory bricks.
Lay out the outer wall
Lay the first row of the outer wall.Use greased dowels to make holes behind the front bricks of the left and right walls.
The outer wall of the second row
Begin the second row of the outer wall.
Metal structures
Install metal connections between the corners of the inner and outer walls on the second, third, fifth and seventh rows.
Smooth the solution.
Smooth the joints of the solution. Check the joints in both walls after every few rows. Different solutions may need smoothing at different times.
Install the grill supports
- Add tees to support the fifth, sixth and seventh rows.
- Use 10 cm plates with flanges no more than 2 mm thick.
- Place the plates along the side refractory brick walls centered 8 cm, 30 cm, 45 cm and 68 cm from the back wall.
Set stone tiles
When both walls are completed, install stone tiles. Apply the mortar over the inner and outer walls. Lay the tiles. Make sure the bricks are flat and shape the joints when they are ready. Install the grilles.


https://i.expert-h.com/en/barbekyu/gril-iz-kirpicha#sigFreeId9d06eaf399
You can not resist the taste of fried meat cooked on a street grill? Do not rush to the store to buy an expensive barbecue - set aside just one day and you will have your own stylish brick grill. Here is another example, how to make a simple grill from carp.
You will need
- Bricks, nets, sand, cement
- Level, shovel, putty knife
- Paving slabs
- Hose
Operating procedure
- Lay out the first row of bricks using the cooking tray as a guide.
- Collect as many bricks as possible to cut less.
- Mix five parts of sand with one part of cement, adding enough water to get a viscous consistency.
- Using a spirit level, mark the outer edge of the barbecue. This provides a direct foundation for laying the first row of bricks. When you start laying the first row, again check the level that the corners are at right angles.
- Insert the metal screed into the mortar to connect the inner wall to the longer wall, which will add strength to the finished structure.
- Start laying the rest of the rows, starting from the corners.
- Use a spirit level to check every corner to ensure that the structure is square.
- When five rows are laid in each corner, check the level again.
- Spread walls up to seven rows. On the left and inner walls, turn the bricks to make a ledge. After three more rows, add another to support the grill.
- Place paving slabs over the walls as shown in the photo.


https://i.expert-h.com/en/barbekyu/gril-iz-kirpicha#sigFreeId6411ec8b92
Barbecue area
 Build Great barbecue area Outdoors, and have fun family outings with friends and relatives. This project assumes that you have basic knowledge of bricklaying and at least basic skills in carpentry. This design cannot be built in one weekend, so tune in to the fact that the construction may be delayed for several months. Although this is the most a cheap way to build a do-it-yourself brick BBQ grillbut you still need to rely on certain costs. But believe me, it will not be an extra investment, because having a summer kitchen will significantly increase the value of your home. Many parts of the project can be modified in different ways, so do not be afraid to deviate from the instructions presented here, this is not the only way to build a barbecue, although the final product turned out to be excellent.
Step 1: Prepare the site
- Dig and level the piece of land on which the barbecue will be installed.
- Before pouring concrete, make sure that the water supply, electrical cables and gas pipes are installed.
- Run all communications through the foundation and close.
- Then make the formwork, in this case, the size of the site is 90x335 cm.
- Prepare the solution according to the instructions on the package and fill. If you do not have your own concrete mixer, then you can rent it or ask your friends, otherwise you will have to interfere a lot.
Step 2: Lay the first row of stove blocks
The first thing to do is use cement epoxy to reliably install the reinforcement into the concrete foundation.
- Drill a hole and add resin.
- Then build a dry well to drain the water. If there is, the ability to connect to a home sink, then this is not necessary.
- Dig a deep hole that is slightly larger than the barrel you have, then drill many holes and install drain pipes through the lid.
- Place the barrel in the pit and pour gravel on the sides.
- Make a mortar and lay the first layer of bricks.
- Fill the drain pipes with cement so that they are not visible.
Step 4: Lay the following rows of blocks
Lay a few more rows, leaving the front door opening. Use a bracket to secure the middle brick over the door.


https://i.expert-h.com/en/barbekyu/gril-iz-kirpicha#sigFreeIdab90448b03
Step 5: Make concrete molds for countertops
Make a shape to fill the bottom surface of the countertop. Check that the molds are well fixed and will not bend under the weight of the concrete. Be sure to use enough fittings. The sticks sticking out of the blocks can be bent to fasten to the countertop.
Step 6: Make molds for the top countertops
Make a mold for the top countertops. Make 3 wooden braces, attach them to the side of the barbecue and fill first. Remember to add reinforcement to them before they dry.
Step 7: Fill in the shape of the countertop
- Prepare the solution and fill in the mold.
- Count so that it stands intact for several days.
- Make sure the surface is flat, air bubbles are not so important because they will be tiled.
- Then, using a drill and epoxy, fasten the rack to the cover.
Step 8: Plaster
Make a mixture of plaster and add any color you like. Rub the outside of the blocks without applying to the countertop.
Step 9: Tile
Choose the tile that you like. Then mix the tile adhesive and apply to the countertop in the front area between the top and bottom edges. First install the edge tiles, then around the perimeter from the top and center along the diagonal. Once all the tiles are in place, install the sink and side burner.


https://i.expert-h.com/en/barbekyu/gril-iz-kirpicha#sigFreeId44f03caa62
Step 10: Doors
For doors, take any available material. In this case, we used ordinary boards, though with antique hinges and handles for the effect.
Step 11 Roof
You can make a canopy that is best suited to your climate and weather conditions. The idea of a pergola, as in this case, for the southern regions is not bad, if it suits you, then you need to prepare 4x4 supports for a rack, 2x6 bars for sides and 2x2 for strips. Color the tree to match the rest of the barbecue. Fix all the electrical boxes on the pole and hang at least four lights to make it comfortable at night.
Step 12: Playground
The area around the barbecue can be laid with paving stones or paving slabs. In this project, this question is only in the process, so there are no step-by-step photos yet.
That's all, it remains to buy furniture for the patio and to make bar counters for a complete idyll.


https://i.expert-h.com/en/barbekyu/gril-iz-kirpicha#sigFreeId750e5689b5
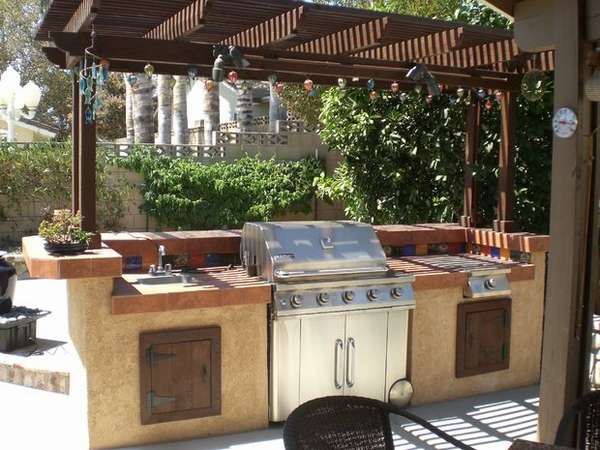
Brick BBQ Grill with Smokehouse
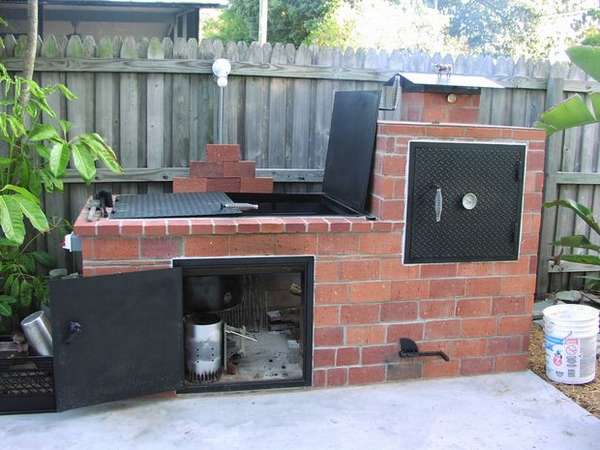 Even with little skills and a minimum of tools, everyone can build their own brick barbecue grill, there would only be a desire. If you are comfortable with the sizes suggested by the author, follow this instruction. The slab is about 115 cm long and 76 cm deep. Smokehouse 76 cm high, 71 cm wide and 76 cm deep. This is a gas grill, so you need to calculate the location for the cylinder. There are no special secrets or complex nuances in the construction of the grill; you can see the general order in step-by-step photographs. But if you're interested, the author wrote a rather detailed step-by-step instruction, you can read on the source site, the link is under the gallery.


https://i.expert-h.com/en/barbekyu/gril-iz-kirpicha#sigFreeIdf73906f152
BBQ with arch
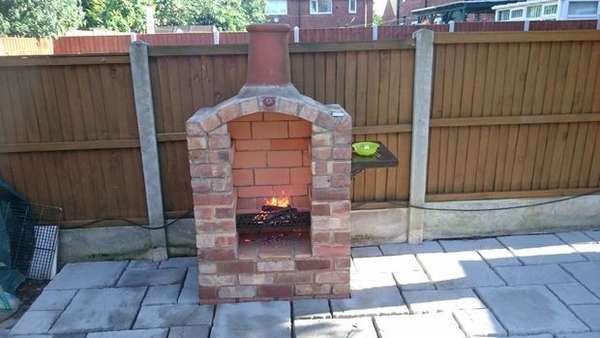 It’s not at all necessary to be a professional to lay down a nice arched brick barbecue. Material evidence is the photo you see. The author of this project, for the first time in his life, did brickwork and did a good job.
Tools that were used in construction:
- various trowels, most importantly a spatula
- hammer for bricks, chisel
- spirit level and diamond grinding belt grinder.
- hand saw.
- cordless drill.
- several buckets and an old plastic roofing sheet for kneading.
Step 1: Base and front rows
- Start with the first two rows of regular building bricks. As you can see in the first photo, you first need to lay out the refractory bricks, and then the building bricks, leaving a 10 mm gap between each brick.
- For foundation, remove the soil 150 mm wider and longer than the brush print.
- Then fill the area with mortar and wait a few days for the concrete to harden completely.
- After that, fill the area with crushed stone and add approximately 25 mm of solution.
- Then lay the tile, you can take any, the cheapest, just to look beautiful.
Step 2: Masonry walls
Lay out the oven box. How to do the laying, described in previous posts, everything is the same here.
Step 3: Arch
The minimum height of the arc must be at least 1/8 of the width (inner span), so here the inner diameter is 450 mm, which means the minimum lift that you can use. The author decided to make a rise of about 150 mm.
To build an arch, assemble a temporary supporting formwork, any material that you have at hand is suitable for this. The formwork should repeat the shape and dimensions of the inner plane of the arch. Leave a hole in the center of the chimney by inserting two halves of the brick. To install the castle stone, cut the cone from top to bottom with a grinder, put the brick in place and lay as much mortar in the gaps as it goes in.
Step 4: Bookmark
- Fill the back wall under the arch and start lining the inside with refractory bricks. Here you can saw bricks with a grinder, especially not caring about the appearance, they will still not be visible.
- To make stops for the grill grate, lay the refractory bricks on the edge and just rotate a few pieces to make a ledge.
Step 5: Chimney
Any chimney can be used for the chimney, the author often found it from an old fireplace. Just lay it in place, level and fix with a thick solution. In general, it’s easier to do than to tell.
Step 6: At the end
On the side you can make a wooden shelf a table.
Refractory bricks keep the temperature well, so to cook, get accessories - a poker, tongs to turn the meat, etc., otherwise when the grill is warm, it will be quite hot.


https://i.expert-h.com/en/barbekyu/gril-iz-kirpicha#sigFreeId11bf964828
Here is another one arched barbecue grill, but in this case, arches are made over each section. Here are just a few step-by-step photos, and in more detail you can find out on the site, the link is under the gallery.


https://i.expert-h.com/en/barbekyu/gril-iz-kirpicha#sigFreeId30371590be
Do-it-yourself grill stove in the country
 Practice shows that the most reliable stoves come out of brick, which can be called the ideal material. One condition: for such a grill stove a foundation is needed. Therefore, before you build do-it-yourself grill in the country, it is necessary to prepare the site. It consists in casting a reinforced concrete slab, which will serve as the foundation for the planned construction.
- When the concrete has solidified, consider that the foundation is ready, now it should be noted on it the outline of the future structure. To do this, you just need to lay out the bricks around the perimeter, without using the mortar so far. The most important thing at this stage is the exact designation of right angles so that they are really straight. Only after this, it is possible to start laying bricks on the mortar, using ordinary brick and a mixture of cement and sand. The wall thickness is half brick.
- High-quality protection of the structure from moisture is very important. The waterproofing layer will perfectly cope with this task, which the master will not forget to lay on top of the very bottom of the structure, its base. Now the bricks can be laid on the solution by inserting pre-prepared steel bars between them. These square bars are used continuously. After the laying of each row, they are removed and inserted then between the bricks of the next row.
- A similar operation is carried out to facilitate the activities of the master.So the bricks will be laid with equal gaps between them, and these gaps will not be more or less than the cross section of the rod. The cross section should be equal to one centimeter. It should be constantly monitored how smoothly the installation is carried out. Horizontal control is carried out using a level, vertically checked by a plumb line.
- Naturally, it makes sense ahead of time to prepare the tools. Already on the second row, bricks should be laid so that each overlaps a seam between the bricks of the previous row. Masonry is called spoon dressing and is performed to strengthen the structure. The next step is the formation of a support ledge - a pallet is installed on it.
- The pallet can be made later, later, and have any suitable shape. The only wish is a side in front so that the coals do not crumble. Having formed the protrusions on both sides of the wall, we continue the masonry, strengthening the staples between the bricks for the grill. They need to be firmly fixed at different heights for the next 5 to 7 rows of masonry.
- I want to say that the masonry of the grill stove is completed on this, but some more mandatory work remains. While the solution has not hardened, you need to embroider the seams by drawing along them with a joint. They will result in a neat rounded shape. And when the solution finally sets, you can start decorating. Firebreaking is permissible no earlier than a week after complete solidification of the solution.


https://i.expert-h.com/en/barbekyu/gril-iz-kirpicha#sigFreeIdec1f6223a0
Outdoor barbecue grill
 Usually outdoor barbecue grill they are laid out of bricks, and not so much material is needed, in this case about 130 pieces went. It should be noted that this should be a red solid brick. In addition, cement and sand, as well as crushed stone or rubble stone, reinforcement sections, will naturally be required. But the main material remains brick, the walls of the future barbecue grill are made of it, although its design differs in some features.
So, the very first thing that is necessary for any major (namely, this should be our barbecue grill) structure is the foundation. We prepare a trench for it, fill it with concrete and wait a few days, about a week, for the concrete to solidify. Only after this we proceed to the laying of the walls. Do not forget about waterproofing, which is suitable strip of roofing material.
- Masonry is carried out in half a brick, paying particular attention to how the corner bricks are located.
- They should form perfectly right angles, so the horizontal position of the masonry is constantly checked by the building level.
- The base of the hearth is laid out simultaneously with the walls, but without dressing with them in the first three rows.
- Dressing with walls begins with the fourth row, the walls are always laid out with dressing.
- Between the sixth and seventh rows, metal strips or corners are mounted in the masonry, which will serve as a support for the floor bricks.
- The wooden tabletop is screwed to the rods fixed in the tenth row of masonry.
- The grill or skewers will rely on the bricks of the ninth row.
- As usual, after the brickwork is completed, the joints are stitched.
Designs should be allowed to dry for at least a week. Only then can the fire in it be built without fear of cracking.


https://i.expert-h.com/en/barbekyu/gril-iz-kirpicha#sigFreeId740b8777f3
How to make a temporary brick grill
 Why buy a grill if you can do temporary brick grill. Fold this simple construction and you will have a great barbecue. Making a temporary grill is as simple as double two and does not require any tools at all! You just need to lay out the bricks in accordance with the size of the metal grid.You can also adjust the distance between coal and the metal grill by turning the brick.
What do you need:
- 20 pcs. non-chemically treated bricks
- cast iron grate
- Choose a location. Inspect your site and choose the perfect place to put your temporary grill. It is desirable that this be a flat, flat surface.
- Creating a base. Lay out 12 bricks in a rectangle. To circulate air, make a gap between the bricks of about half a centimeter.
- Lay the side bricks. Take another 8 bricks and place it on an edge around the sides of the base.
- Install a cast iron grate. Place the cast-iron grate on the side bricks. Find the correct position, then you can remove it to fill up firewood or coal.


https://i.expert-h.com/en/barbekyu/gril-iz-kirpicha#sigFreeId6bc4b12d98
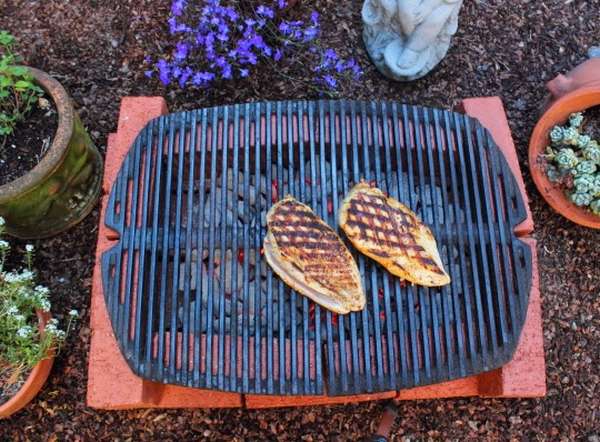
Simple brick grill
 Very simple indeed. Here is a charcoal grill design you can use to make brick barbecue.
Requirements:
- Cement board 71x 71 x 7 cm
- 40 standard red bricks
- Grill of your choice
- Cement 1.5 - 2 kg
Sequence:
- Find a good place to install the grill, far enough from the house and in general, any buildings.
- Level the platform and install a cement slab on it.
- Prepare a solution. Install the first row of bricks on a slab with a distance of 3.5 cm from each other.
- Continue laying to make three rows.
- Take the four remaining bricks and determine where to place them in the center of the grill. They will serve as supports supporting the grill.
- Mount the grill on the brick supports and enjoy your new grill.
I hope this helps someone at least :)


https://i.expert-h.com/en/barbekyu/gril-iz-kirpicha#sigFreeIdf2ad49b3d7
Hello, I am the author of this article, so I look forward to asking questions for this article in the comments below, I will answer all !!!
If you have questions on another topic, ask them on our forum, we will answer you
- Two baskets of paper in 5 minutes (Master class)
- How to make a simple and compact table for a milling cutter from plywood
- How to make a soft headboard tile (Instructions + step by step photos)
- Cinder block benches: a convenient bench in 55 minutes
- How to make a bed with a niche: saving space (Master class)