DIY barbecue grill 700 photos, step by step instructions
 DIY barbecue grill
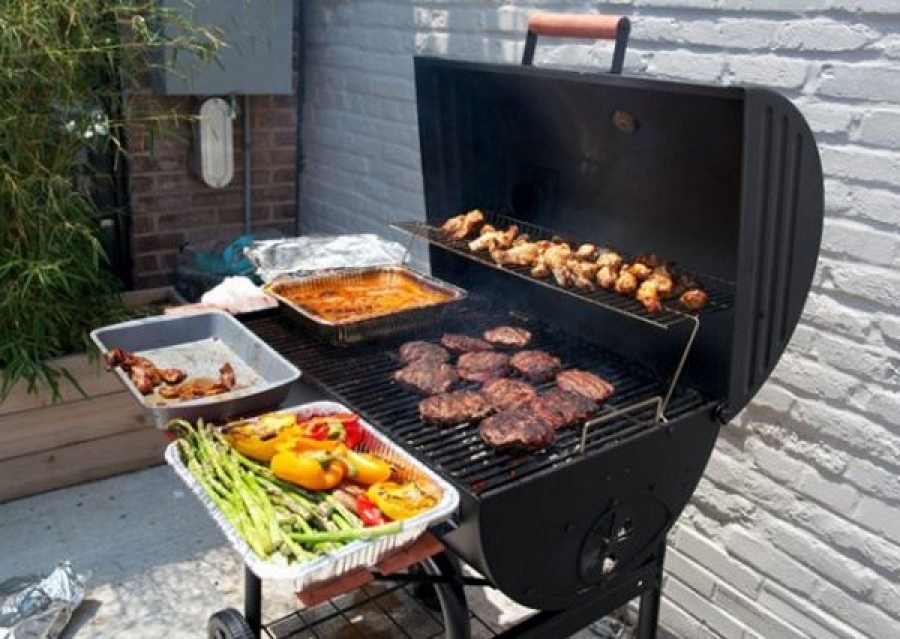
For many people, outdoor recreation is associated with various delicious things cooked on fire. For owners of cottages and suburban areas, this issue is especially relevant. Therefore, many will probably be interested to know how to make a barbecue do-it-yourself barbecueto enjoy all the delights of a summer vacation.
The number of options on the market to meet this need is simply overwhelming, but it’s much more interesting to do the grill yourself, not to mention the savings. This article presents homemade metal grills - wood, coal, gas, in combination with a smokehouse and in a ceramic container, in general, for every taste.
In the article you will find how to do it yourself:
- gas bottle grill;
- charcoal grill;
- barbecue grill;
- grill rocket
- smokehouse with grill;
- ceramic smokehouse grill;
- grill from a metal 200 liter barrel;
- wheel disc grill;
- grill from the drum of the washing machine;
- gas grill, etc.
DIY gas cylinder grill
 If you have an old gas cylinder that you no longer use, do not rush to turn it into scrap metal. Instead of a couple of earned cents, he will bring much more benefit in another capacity. Better use the advice of the author of this project, which offers here do the grill from a gas cylinder do it yourself without much effort and expense, but with welding.
Even no instructions are needed, everything is clear from the photographs.
- First make sure that the container is completely empty.
- Cut the cylinder with a grinder to the height that suits you.
- For ventilation, drill a hole in the bottom.
- Install the tray from the grill, which rests on the base and is held by the threaded rod. To fix the rod in the cylinder, weld a nut to the bottom and drill a hole.


https://i.expert-h.com/en/barbekyu/gril-barbekyu-svoimi-rukami-700-foto-poshagovye-instruktsii#sigFreeId01fa51e553
Charcoal grill for a summer residence
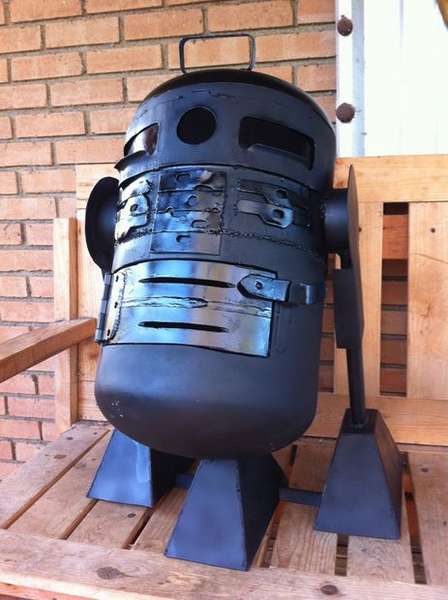 If you, as the author of this project, are a big fan of the movie "Star Wars", then the idea is to make do-it-yourself coal grill in the form of an R2D2 robot, you will surely like it. The grill, although it looks like a famous character, is made of ordinary propane cylinders. By the way, the author only learns to use welding, so she immediately apologizes that most of the welds you see are far from perfect.
Tools:
- welding
- hammer
- personal protective equipment: safety glasses, gloves, welding mask
Materials:
- two propane tanks
- steel plates
- lattice
- metal sheets
Step 1: R2D2 enclosure
- Find two propane tanks. Make sure they are empty.
- Drill through holes in the cylinders and leave in the sun to make sure that all expanding gas has disappeared. It may have been too much, but it’s better not to risk it. Or simply open the valve and fill it with water until the gas is completely displaced.
- Cut the bottom of one tank and then the top of another.
- Weld them together to make a long cylinder.
- Remove the paint.
Step 2: "Legs"
- The length of R2D2 was 92 cm.
- For the “feet” of the legs, you need to cut metal plates and weld into shapes, as shown in the photo.
- Make 3 “ties” by bending them and welding the corner plates.
- To support the legs, the author used the old rail and pipe cuts to connect the legs to the body.
- Weld everything together and strip out the ugly welds.
Step 3: Grill part
- Cut the top and door.
- Make holes in the door for air circulation, then add the latch and hinge.
- Attach another hinge to the cover and make a simple handle.
Step 4: Color and enjoy
Buy special refractory paint. The author painted his robot in matt black, highlighting some of the parts with gloss. But this is of course at your discretion, you can choose a color that is closer to the prototype.


https://i.expert-h.com/en/barbekyu/gril-barbekyu-svoimi-rukami-700-foto-poshagovye-instruktsii#sigFreeId576918ff5b
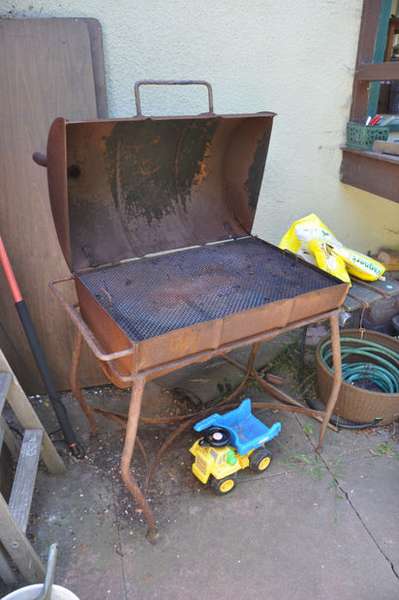
DIY barbecue grill
 The author made this grill specifically for barbecue, so it can be called a barbecue with a grid.
Materials:
- One section of a non-galvanized chimney.
- 2 pcs. aluminum strip
- Assortment of screws, nuts and bolts.
- Metal grid
Tools:
- Ruler or tape measure
- Hand drill
- Scissors for metal
- C-clamp, clamp
- Hammer
Bend the metal to form a verrotten part of the grill.
Make an air gap at the bottom of the grill. This will provide air circulation, which is necessary to support hot coals.
Make a foundation. The author used the shelf from the old table, so you can also come up with a design made of materials that you will find in the house or garage.


https://i.expert-h.com/en/barbekyu/gril-barbekyu-svoimi-rukami-700-foto-poshagovye-instruktsii#sigFreeIda57d6e15d5
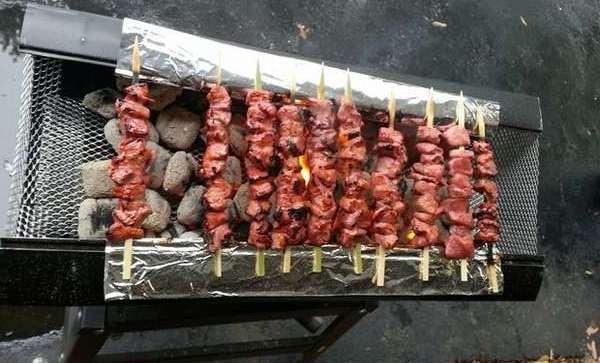
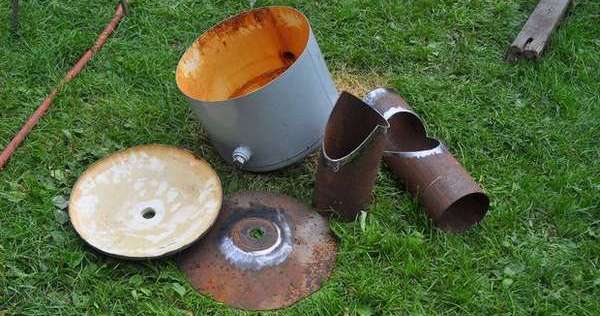
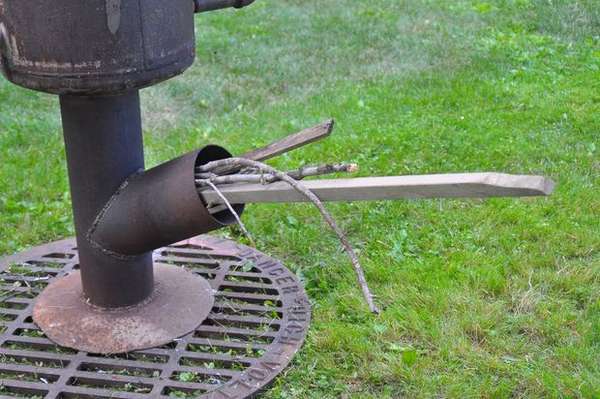
Grill rocket
 This is just one version of the "rocket furnace" - a simple technology for the clean combustion of biofuels. You can use twigs, wood waste, wood chips or almost anything that fits into the furnace. Air blowing ensures maximum combustion. If the grill works fine, there is practically no smoke, only heat, and this thing really buzzes like a rocket. By the way, you can use it not only for grilling, but also for boiling, baking, stewing and frying!
Most importantly, the simple and robust construction is almost maintenance-free. There is no piezoelectric starter in the grill or other “modern” technologies that tend to break constantly.
Despite the fact that the design looks a bit bulky, the grill is small and light enough for one adult to easily load it into the back of a pickup truck. The lid and side tables are also easy to disassemble and fold. Since the structure is closed, it is also suitable for use as a campfire in places where open fire cannot be built.
To do-it-yourself grill, need welding, without it anywhere. Although a lot of experience is not required, it was the first welding job for the author.
Tools:
- Bulgarian
- Grinding disc
- Cutting disc
- Welding
- Safety glasses, work gloves, welding gloves
- Drill
- Level
Materials:
This project is mainly done. from scrap metalbut a few other details will be required.
For the grill itself:
- Base. Something comfortable to stand firmly. The author used a heavy disk with a grill.
- Steel pipe - the diameter of your choice, but the size will affect fuel consumption. In this case, a pipe of 16.5 cm and a length of 91 cm was used.
- Steel water tank. This will be the “bowl” of the top of the grill.
- 4 steel pipes of small diameter, approximately 15 cm long.
- 2 elbows of the same diameter
- 2 flanges of the same diameter
- 2 pieces of flat tabletop material
- Small scraps of steel plate
Parts for grill cover:
- Wooden block of your choice for the lid handle.
- 2 bolts about 12 cm long with nuts and washers, it is possible from stainless steel or ordinary steel.
- 2 copper or steel pipes of slightly larger diameter and shorter than carriage bolts, for use as gaskets.
- Steel plate 15 by 30 cm.
Operating procedure
Step 1.First prepare the materials for the main part of the grill
- Base
- Large diameter pipe
- Water tank
The base should be large enough to keep the grill from tipping over. It also forms the end face of the grill, where hot coals will fall. In principle, any steel plate is suitable for this.
- A large diameter pipe must be cut into two parts. One approximately 30 cm, which will be located vertically, the other - 50 cm.
- In this case, a water tank with a diameter of 40 cm. The lower part is cut to a height of approximately 30 cm.
- The assembly of the base, the vertical pipe and the water tank section should be at a height convenient for you. The top of the water tank section is the height at which the grill will be installed.
- To mark a line on a cylindrical object, such as a pipe or water tank, wrap a straight section of sheet metal around it and secure it with duct tape. Mark it with a marker, then remove the sheet.
- Cut the pipes and the water tank in size, the cut part is just right for the lid.
- Cut off the top of the water tank.
- Fold the base, upright pipe, and section of the water tank to see how the grill will look. If you are working on a flat surface, such as a concrete floor, you can use a level to make sure that the vertical pipe is installed perpendicularly.
Step 2: Special cut
The main feature of this design is how the side pipe and the vertical pipe connect to each other.
Although the exact joint angle is not very important, it should be somewhere between 90 ° and 45 °. This angle facilitates the flow of fuel. If it turns out to be too steep, this will not allow to ensure the proper air flow.
Some difficulties may arise here. The grinder makes straight cuts, but both pipes are rounded. However, they must dock tight enough to get a good seam.
What needs to be done is to imagine how two straight cuts look projected onto two curved surfaces.
Most easy way – use laser levelable to project a straight line. A few centimeters from the end, point the laser on a vertical pipe, at an angle so that the side pipe fits. Then mark the laser line with a marker. Turn the laser 90 ° and mark the line again. On the side pipe, mark the two lines equally 90 ° apart.
Another way mark the same slices - use sheet metalwhich can be wrapped around pipes. You can make a projection of what the cuts should look like and cut it out of sheet metal. Then wrap sheet metal around the pipe and mark.
When you are finished, you will have an incision in the vertical pipe, and a bird's beak is cut in the side.
Connect the two pipes and see how tight they are. Use a file to better fit the edges.
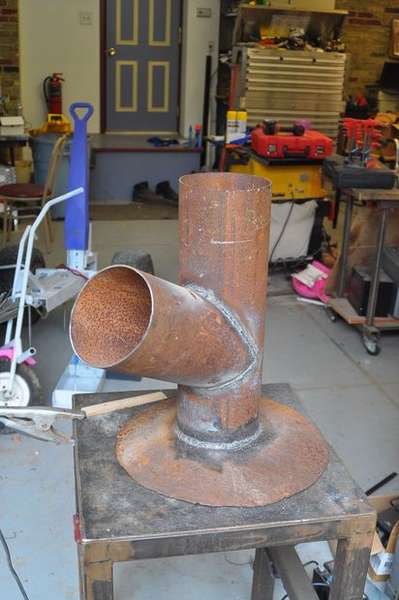 Step 3: Welding
- Weld vertical and side pipes.
- This is easiest to do when both pipes are on the floor.
- Weld one side, then flip and weld on the other side.
- Install the Y-shaped structure on top of the base.
- Using a level and plumb line, check that it is level.
- Weld the pipes to the base.
- In the lower part of the water tank, it is necessary to make holes of the same diameter as the vertical pipe.
- Place the grill upside down and attach the vertical tube to the section of the water tank.
- At this stage, the main grill is done, but you still need a lid and other details.
Step 4: Tfuel plate
A fuel plate is a special insert that holds the fuel in place and allows you to let enough air in for natural exhaust in the grill to create heat.
The plate must withstand high temperatures.
Take a steel plate and cut into a width slightly smaller than the diameter of the side pipe, and about the same length. The plate is inserted into the feed pipe and divides it into upper and lower regions.
Fuel is laid in the upper part, and air enters through the lower region.
At the far end, the plate has holes.
When the grill is ready, just insert the plate into the feed tube. Gravity and friction will hold it in place.
Step 5: Cover making
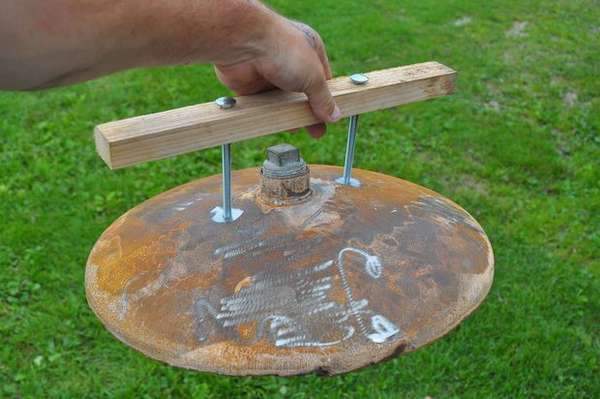 You should have left the top of the tank, which can now be used as a lid.
This is the same diameter as the top of the grill, so it should fit perfectly.
A pen:
the length and width of the handle are based on the size of the user's hand, preferably with enough space for the oven.
- Drill two holes in the bars and thread the carriage bolts.
- Mark where they will be mounted on the cover.
- Drill two holes in the cover.
- Cut two pipe sections slightly shorter than the length of the carriage bolts. These will be struts to keep the handle at the required distance from the cover.
- Slide the washer, and then the tube over the carriage bolts, and then secure the carriage into the holes in the cover. Attach washers and nuts to the underside of the cover and tighten.
The cover also needs an outlet for hot air. You can do ventilation grill or something like even a chimney right on the lid, but it's easier to just add small steel tabs. These liners separate the lid from the grill to allow airflow.
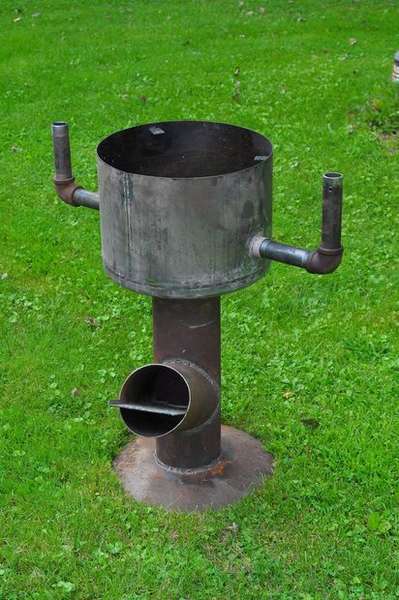 Step 6: Side tables
Each grill needs a table, the author offers this option.
In this case, the water tank included pipe connections on the sides, so the author cut the threads along the horizontal pipe to each side, and then 90 ° so that the vertical section of the pipe completed “L” on both sides of the grate.
Both side tables have pipe flanges. Thus, the side table tube sits inside the vertical tube. Drilled holes through both pipes allow small bolts to slide, preventing accidental rotation of the side table.
You can make tabletops for your discretion, depending on the material you find.
Step 7: In conclusion, a few details
Heat diffuser:
One of the drawbacks of this design is that it becomes very hot in the middle of the grill and much cooler in relation to the outer edge. This is bad for making hamburgers and sausages. Thus, a “heat dissipator" is installed in the grill. It is just a small steel plate that rests on a bracket.
Ash removal:
For now, the author simply turns the entire grill upside down to remove the ash. Of course, this is not the best way, but you can cut a corner on the lower back of the grill and then hang it so that you can block the flap valve to access and empty the ash.
Grill:
The grill is a standard round grill grill. This is an average size. It actually covers the top of the grill, making it easier to use the entire top.
Step 8: Fueling and burning
 The advantage of rocket grilling is how it is refueled.
You no longer need to buy coal and cook firewood. Due to the amount of air passing through the grill, almost any bio-fuel burns in it, that is, any waste wood can be used.
The effect of the chimney makes all the heat rise in a vertical pipe. No smoke or fire coming out of the supply pipe.
Rocket grill - This is a universal and efficient use of fuel, and as we have seen, the entire structure can be made of scrap metal.


https://i.expert-h.com/en/barbekyu/gril-barbekyu-svoimi-rukami-700-foto-poshagovye-instruktsii#sigFreeId44d1f7795b
DIY smokehouse with grill
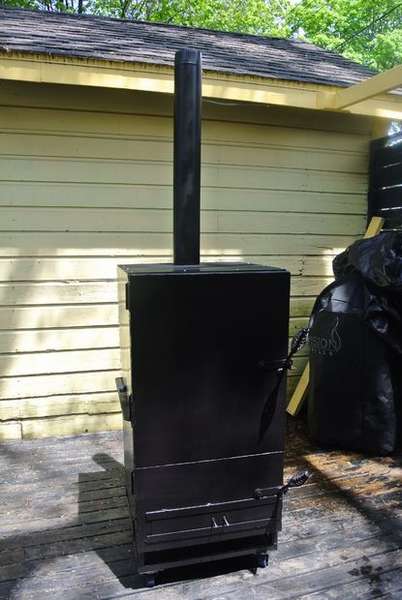 The author made this smokehouse grillinspired by japanese cookers Kamado. The advantages of kamado are that they are incredibly fuel efficient and can be cooked at extremely high temperatures, mainly because the body is made of ceramic. Ceramic construction - a good "insulator", this is the main advantage and uniqueness of the ancient Japanese invention. The stove can maintain a temperature of 150 ° for a long period of time with minimal fuel consumption. The disadvantage is the small surface of the cooking surface, an inconvenient way to load fuel. In addition, it takes a very long time to cool the stove to the desired temperature. In general, there are also enough shortcomings, so the author decided to take all the best and maximize his smokehouse with grill.
The criteria were such a design:
- Must have sufficient surface for cooking.
- Able to effectively retain heat.
- Economical fuel consumption
- The source of fuel will be charcoal.
- Different lattice levels
- Have an easy way to add charcoal even.
- To perform the functions of a grill and a smokehouse.
- The ability to cook pizza.
Step 1: Design
The design of the grill was based on those materials that the author had. The idea was to use sheet metal for a “shell”, insulated with clay or sand. For simplicity, the author made a vertical box, but unlike fragile shop smokehouses, it is made of thicker sheet metal.
Step 2: Metal and materials
Typical smokehouses and grills are made of thin metal 1.5 - 2 mm, so they quickly rust and do not hold heat well. The author recommends using sheets more than 2 mm thick.The frame is made of square pipe, and the sheet metal is welded to the pipe. Kitchen surfaces are foam metal and steel mesh.
Additional materials:
- Heavy rollers
- Various hinges
- Bolts and nuts
- Barbecue thermometer
- Barbecue felt pad material
Step 3: Tools
This assembly requires the use of welding. Everyone can learn to cook, and this is a great project for anyone who wants to solve a problem. According to the author, he is also not an excellent welder, but he was able to do it. But if you do not want to do welding, you can change the design, and make all the bolted connections.
Step 4: Frame creation
The frame is made of square pipes. This is a box 51 x 48 x 96 cm
You will need welding magnets to preserve the entire area of the square. Also make wood patternto weld the two sides equally. Before cooking, make sure that all angles are even. Ideally, a three-position clamp is best, but they are very expensive.
- Weld the rollers to the bottom.
- On the top of the frame, make some slots, they will be needed for insulation from clay.
Step 5: Interior walls and top
First, weld the right and left sides, then the back. Cook small sections while moving to different parts of the frame to minimize deformation. Ideally, two additional 2.5x2.5 cm tubes should be staggered vertically.
A metal corner was used for the ceiling.


https://i.expert-h.com/en/barbekyu/gril-barbekyu-svoimi-rukami-700-foto-poshagovye-instruktsii#sigFreeIdba6c51efd9
Step 6: Doors and air intake
- It should be: two doors for the stove, the top door for access to food and the bottom for the firebox.
- They are made of square pipes, like the frame, then coated with sheet steel. The locking mechanism is a tube welded in place in the doors.
- The air intake is a square hole in the bottom door.
- A welded steel sheet serves as a choke. Long bolts are mounted on sliding chokes as handles.
Step 7: Chimney
The chimney is a 10 cm air vent for a metal dryer. The hole should be smaller than the chimney at the top of the smokehouse. Weld a strip of metal on top of the stove to make a round ventilation flange.
Step 8: Exterior walls
The outer walls are made of sheet metal and just like the inner walls are welded in place.
The tube in the center of the inner wall is the hole for the grill.


https://i.expert-h.com/en/barbekyu/gril-barbekyu-svoimi-rukami-700-foto-poshagovye-instruktsii#sigFreeId707b940a06
Step 9: Door installation
The hinges are simply welded to the metal squares. The locking mechanism is an impact hammer welded to a piece of the barrel and locked with a door.
Step 10: Cooktops and charcoal basket
Kitchen grills are made of wire mesh with rods welded on the outside for support.
The coal basket is made of steel sheet and mesh. Two corners are attached to the bottom, on which the basket stands, this is to ensure normal circulation.
Step 11: Shelves for products
The rails to support the kitchen grills are welded at an angle at different heights.
Step 12: Removable top and wall filling
The top of the smokehouse is removable, so if it is necessary to remove the clay, this will not be difficult. Granules for cats are poured into the walls, for insulation.
Step 13: Side table
Folding table made of pine, painted and varnished. Fastens to the welded square and has a simple folding mechanism.
Step 14: Grinding and painting
- The entire smokehouse was machined with a grinding wheel and then polished with a hinged-lid disc.
- A thermometer has been installed in the door. Ideally, it is better to set a few, as the temperature fluctuates in different parts of the grill.
- The stove must be completely washed with soap to remove traces of welding and metal residues.
Step 15: The grill smokehouse is ready
The grill works great, maintains temperature without any problems. The air intake provides air flow. Like a smokehouse, holds a temperature of 120 °. Even bakes pizza!
This, of course, is an abridged version of the step-by-step instructions, where only the main points are described, you can find out in more detail on the site, the link to which is located under the gallery.


https://i.expert-h.com/en/barbekyu/gril-barbekyu-svoimi-rukami-700-foto-poshagovye-instruktsii#sigFreeId92080c394d
Grill smokehouse for summer cottage
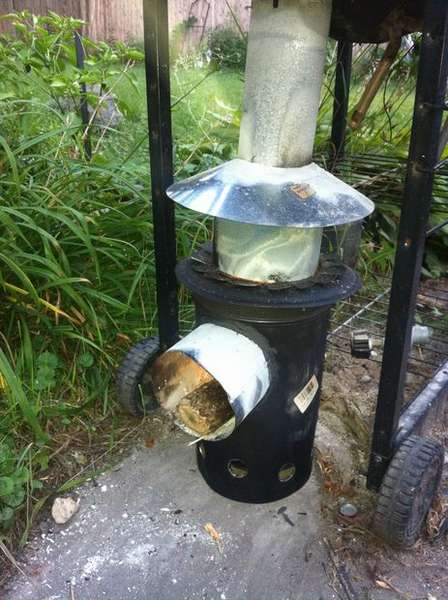 That's how you can turn an old gas grill into a functional smokehouse grill for a summer residence. It does not take much time, all the work can be done in one day. In addition, you do not need to buy special tools or expensive materials.
Materials.
- black pipes with a diameter of 200 and 150 mm, 1 pc.
- black pipe cover 150 mm
- pipe collar 150 mm 2 pcs
- rain hood 150 mm
- pipe 127 mm long 60 cm
- pipe 100 mm long 60 cm
Production of metal parts for the camera
You will need to drill a total of 24 holes of 20 - 25 mm. It doesn't really matter what size the holes are. On the outer shell (20 cm black pipe), you need to drill 8 holes from the side. This will be the bottom of the device. The inner shell needs to be drilled from above and from below. Put the cap on the side of the non-slip joint and make holes over the edge, this will be the bottom of the inner section.
Drilling Tips:
The location of the holes is easy to determine if one hole is drilled, the pipe is turned so that the hole is at the base, the other is drilled and turned again so that the holes are on the side and then drilled from above and below. Then simply determine half the distance between each of the 4 holes that you have already made.
- Cut a 12 cm pipe to fit the contour of the 15 cm pipe at one end and leave 25 to 30 cm of the total length.
- Make a damper for the feed hole from the end cap. To do this, cut the edges and bend them.
- You will need to cut a hole in the bottom of the grill with a size of 10 cm of the starting cuff.
- The rain cover should have a hole with a diameter of 10 cm. Measure the length from the rain cover to the bottom of the grill and add 15 to 20 mm. Make slots around one side of 15 - 20 mm.
Assembly
The combustion chamber:
- Attach a 15 cm cover to the side of the 15 cm pipe and seal with cement.
- Slide the collar at the end of the 15 cm pipe with the connection that you previously cut. The collar must rest on the protrusion of the joint.
- Bend the tabs down to hold them in place. Seal the bottom surface with cement.
- Insert the 12 cm feed pipe through the 20 cm pipe and into the 15 cm pipe. Fasten in gags to lock, they should fit snugly. Seal the outside with cement.
Grill mount:
- Insert a 10 cm pipe into the hole on the rain cover. Fold the tabs inside.
- Insert the starter clutch into the hole on the bottom of the grill.
- Fold tabs.
- Attach a 10 cm pipe (with rain cover below) to the starting collar.
- Attach to the grill.
Inside the grill:
Install a mesh in front of the combustion chamber to hold the coals from below. Look at the photos of the assembly.
Before use, it is necessary to burn all galvanization. To do this, melt the grill to maximum temperature.


https://i.expert-h.com/en/barbekyu/gril-barbekyu-svoimi-rukami-700-foto-poshagovye-instruktsii#sigFreeId8a7f73d4e9
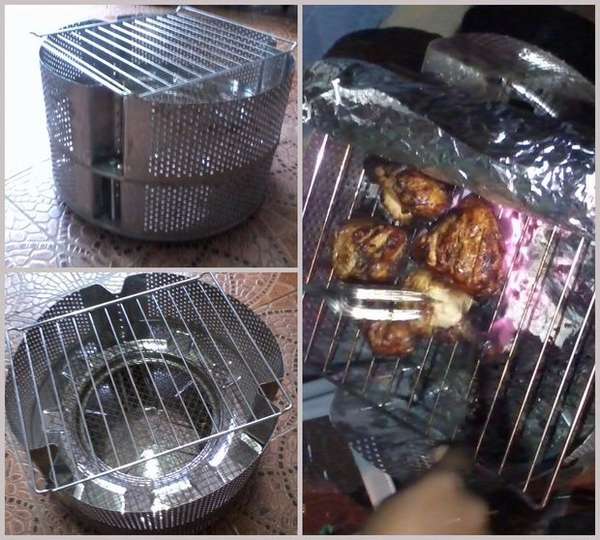
Ceramic Electric Grill
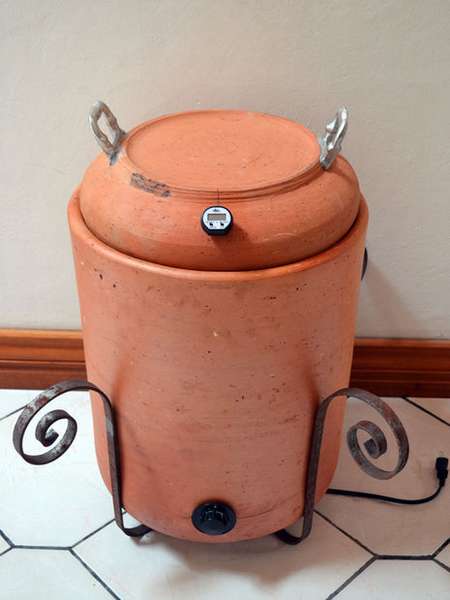
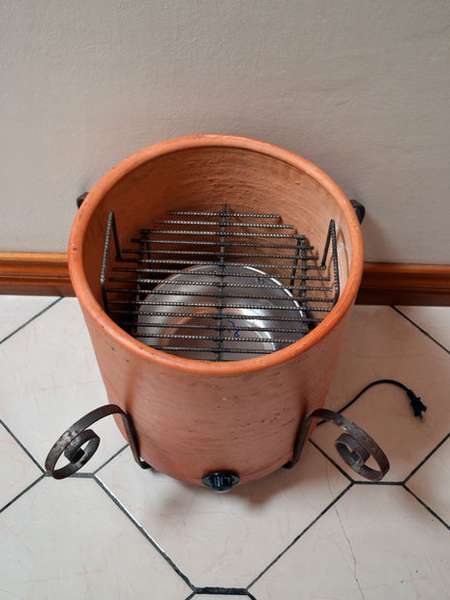 The instruction can be divided into three parts:
- First part - how to make a round grill. (Step 1 - 5)
- Second part consists in creating an extension for the handle of an electric burner. (Step 6 - 9)
- the last part unites everything. (Step 10 onwards).
All parts have their own level of difficulty, but if you have the right tools, making a smokehouse grill with your own hands is not so difficult.
Step 1: Idea
The idea was this - to make a round grill of a suitable size, with a diameter of about 32 cm for a smokehouse.
Step 2: Tools
- Hacksaw
- Roulette
- Welding machine
Step 3: Grill layout
To create the layout, the author used the newspaper, because it has the right size, and it is quite easy to work with it. Measure the diameter of the vessel at different points to see if it is really round. Then draw a circle in the center. To do this, put a mark in the middle and make a few marks around this point at a distance of half the diameter. Finally, cut it out.
Then, as shown in the photo, put the rods on the newspaper to determine what the gaps between them will be.
Step 4: Grill cutting and welding
As you can imagine, the farther the rod is from the center, the shorter it is. It is rather difficult to calculate mathematically, that's why the layout was made. The first thing to do is cut two rods of the size of the diameter, one will be the central rod of the grill, and the other will become the basis. Place the rod in the center of the guide using the first notch. Then put three pieces of the rod next to it, two of them indicate the size of the gap, and the last is the one that needs to be cut and installed in this place. To mark a rod, first align its end with the top edge of the guide. Using a vise, cut two rods to the marked length, one for each side of the central rod. To weld everything together, it is easier to hold the rods to make a clearance in the marking phase.
Step 5: Grill finish
Using a vise, bend the two rods to form a U-shape with a width and height that is convenient for you, equal to the width. Cook it straight to make pens. To facilitate welding, select a width that is the exact distance between the two rods. The forces between the rods and the handle will hold it in place, which will simplify welding.
Finally, weld 4 parts of the shaft to make legs. Make them long enough so that the handles reach the edge of the pot.


https://i.expert-h.com/en/barbekyu/gril-barbekyu-svoimi-rukami-700-foto-poshagovye-instruktsii#sigFreeIdd652f12a79
Step 6: Burner handle fixture
Many believe that for ceramic grill is better to use an electric burnerbecause then you can control the temperature. Only problem is that to change the settings you need to open the smokehouse, delete everything and adjust the handle.
Therefore, the author decided to make a small rod attachment with handle and install on the outside of the smokehouse, as well as make it more professional.
Step 7: Tools and materials
- Hacksaw
- Lathe
- Calipers
- Measuring tape
- Flat screwdriver
- Drills for metal
- Hand or vertical drill
- Sword
- A piece of metal for lengthening
Step 8: Dimensions
Determine the length. First of all, you need to measure the length. Start by placing the burner in the center of the pot, measure in all directions to make sure it is perfectly centered. Then measure the distance between the base of the handle and the inside of the vessel. Also measure the thickness of the pot and add to the first size. And finally, measure the depth of the hole in the new pen with a vernier and also add to the previous calculations. Better to make it a little longer, if anything, you can always cut it off.
Use a flathead screwdriver to remove the handles from the burner. As you can see in the photo, the shape of the rod is a circle with a straight cut. Same thing with the new pen. Measure the diameter of the circle and the distance between the flat surface and the end of the circle using a vernier caliper.
Step 9: Manufacturing fixtures
If you know how to use a lathe, then everything will be clear from photographs. And if not, then ask you to make this part.


https://i.expert-h.com/en/barbekyu/gril-barbekyu-svoimi-rukami-700-foto-poshagovye-instruktsii#sigFreeId481d7e29a3
Step 10: Making a smokehouse
Step 11: Tools and materials
- Hand drill
- Welding machine
- Steel nail
- Hammer
- Steel rod
- Steel figured ornaments
- Large ceramic pot
- Ceramic pot lid
- Electric burner
- Heavy pan
- Round grill
- Handle extension
- Grill thermometer
- Epoxy adhesive
Step 12: Smokehouse stand
If you do not know how to make forged forms, then it is easier to buy and then just weld them, as in the photo. To make sure the dimensions are correct, lay the pot upside down and place the decorative parts in place. Then weld it all together, nothing complicated.
Step 13: Hole for handle and electric cable
To install the handle in a new place, first determine the distance from the top of the pot to the center of the rod in the burner and transfer this size to the outside of the pot. Using a nail and a hammer, make a small mark in the vessel. Make a hole with a chisel.
If there is not a single drain hole in the pot for cable passage, make it. In this case, there was one at the bottom, large enough to skip the plug.
Step 14: Set the pan by removing the handles. Use a drill to remove the rivets that hold the handles.Save the handles, later they can be attached to the lid.
Step 15: Cap
Two things need to be done here. Drill a small hole for the thermometer and attach the handles, for this you can use epoxy glue. Make sure the epoxy is designed for high temperatures.
Step 16: Complete assembly
The first thing you need to do is install the pot on top of the ceramic grill rack. Just insert it and align the hole you made so that the handle is in the center between your legs. Then install the burner in the lower part of the tank. Just before that, run the electric cable through the hole. The next thing you need to do is attach the extension cord to the shaft in the burner. First align the rod to the hole you made, insert the extension cord into the hole in the pot and into the rod. Tighten the extension screw to the flat surface of the burner shaft. Then install a new handle. After that, put the frying pan, wire rack and lid in place, in that order. Now everything, you can start cooking.


https://i.expert-h.com/en/barbekyu/gril-barbekyu-svoimi-rukami-700-foto-poshagovye-instruktsii#sigFreeId7f3d89ebf1
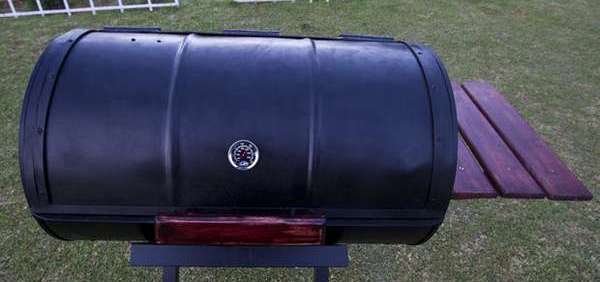
DIY Barrel Grill
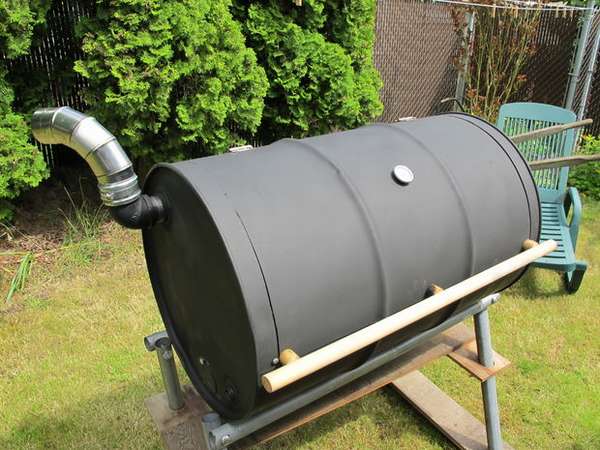 Here are some examples how to make a barbecue grill from a regular 200 liter barrel. Instead of shopping at a local garden center and parting with your money, which you probably are not superfluous, to buy a ready-made grill, approach the solution of the problem creatively. Finding a two-hundred-liter barrel is not a big problem, you can go to a food warehouse, maybe they will give it to you even for free. You can, of course, use containers containing oil or fuel, but in this case you will have to seriously clean it, so it’s not worth it.
So, The first example of how to make a grill from a barrel.
- Firstly, whatever it is stored in, you need to thoroughly clean the inside. Then cut a hole.
- Now you need to create a base. The author used old steel fence racks and plywood, which he found in the basement. I cut 6 pillars of different lengths - 2 for the barrel body and 4 for the legs. The author wanted the grill to be portable, so he decided to make the barrel simply lie on the racks. Two racks held the barrel, and 4 legs were fastened with carriage bolts at both ends. To firmly fix the legs, secure them with pieces of plywood.
- Then install the brackets that will hold the grilles, as well as the lower rack for coal and air circulation.
- Brackets and hinges must be made of stainless steel.
- Light a fire to burn paint or coating, or who knows what's in this barrel.
The last steps in making a grill were to screw the handle (simple wooden dowel from the store), make vents and install temperature sensor. Buy heat-resistant grill paint and paint the barrel. In addition to the aesthetic point, the paint helps prevent rust. That's all, it remains only to check the grill in action.


https://i.expert-h.com/en/barbekyu/gril-barbekyu-svoimi-rukami-700-foto-poshagovye-instruktsii#sigFreeIdac2ee3fc7f
Second example how to make a grill from a barrel with your own hands.

Find a 200 liter barrel. Try to avoid containers containing toxic chemicals, but if you are not sure, bake the barrel thoroughly on fire.
- Instead of cutting the barrel in half, make a “quarter” sink. Pre-mark the location of the cuts.
- The next step is to use a solid tool to cut along the marks. The cut area will be a barbecue lid. When you cut a quarter section, start a big fire inside the barrel to completely burn any harmful substances. Then, as soon as the container has cooled, remove the ash and rinse.
- Then weld a corner in the middle of the drum, these will be the supports for the grill.
- Find a good mesh that can be used as a grill surface. It is preferable to choose a heavy calibration metal. Weld metal rods around the edges and add a few transverse ones.
- After you get the desired shape, weld the cuts. This will create a solid base to which you will attach your legs.
- Attach the hinges to the body and cover and secure from the inside with steel plates.
- Determine the desired height and cut the legs out of the square tube. Cut relief marks about 15 cm so you can bend your legs outward for more stability. Now weld your legs, and you have your own, cheap and efficient barbecue grill.
Of course, you will need to add handles, a pair of ventilation holes, a hole in the bottom for the capAnia. If you have come this far, then you can handle it already.


https://i.expert-h.com/en/barbekyu/gril-barbekyu-svoimi-rukami-700-foto-poshagovye-instruktsii#sigFreeId37c386b10c
And such an option, step-by-step instructions on how to make a barbecue grill from a 200 liter barrel In one hour

- Clean the barrel
- Cut a 135º segment and wrap the edges. Using a marker, mark where you are going to cut and bend.
- You need to drill a sufficiently large hole on both sides of the barrel.
- The cutting edges will be sharp, so be careful until the edges are bent. This is easy to do with ordinary pliers: working along the fold line, bend the metal to 90º.
- Drill holes in the drum and secure the supports to hold the grill.
- One thing that is not described in detail here is the drain on which the barrel will stand. But this does not matter - a pile of bricks or openwork forged legs - this does not affect the quality of the grill.
- Make a fire to burn off the remaining oil, and then put some old bricks in the middle. This will protect the barrel metal from direct contact with fire, so it will last longer.
Enjoy your meal!


https://i.expert-h.com/en/barbekyu/gril-barbekyu-svoimi-rukami-700-foto-poshagovye-instruktsii#sigFreeId0cbc5ad0ae
Barrel Barbecue Grill
 Here is a detailed description of how to make a barbecue grill from a metal barrel. The manufacturing procedure is not much different from the above options, so we can do without written instructions. If something is not clear from the step-by-step photos, you can read the details on the site, the link is under the gallery.


https://i.expert-h.com/en/barbekyu/gril-barbekyu-svoimi-rukami-700-foto-poshagovye-instruktsii#sigFreeId6466c31b8e
Keg barbecue
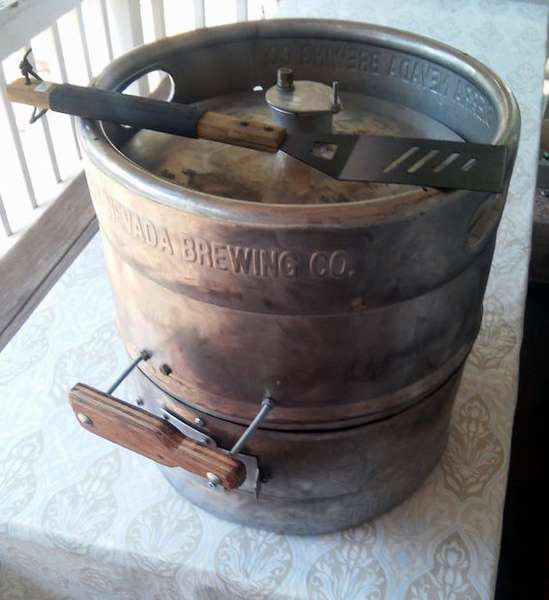 If you are lucky, you have access to beer kegs that are no longer suitable for commercial use, then you can take this opportunity and make an excellent grill yourself. To make this barbecue, you will need standard tools with which you can work on metal and skills, so as not to be crippled. Of course, you can use other methods to make keg grill, but according to the author of the project, this is the easiest way. You may need to buy some parts, because the author used what he found in the workshop, however, probably you also have your own scrap metal reserves.
There are some points that could have been done differently, but the author is quite pleased with what happened. Let's start!
Step 1: Materials and Tools
Materials used by the author of the project:
- Keg
- Heavy steel door hinge
- Aluminum plate
- Various small bolts and washers
- Lattice
Tools:
- Bulgarian
- Drill with drills of different diameters
- Welding
- Saw
- Welding magnets
- Forceps
Step 2: Cut keg
- It is necessary to make two cuts along the barrel diameter.
- Make sure that the keg is depressurized and drill a tiny hole in the part that will be cut to make sure that the barrel is empty.
- Make sure the keg is firmly fixed, or the grinding wheel may catch in the cut if the keg moves during cutting.
- To remove the central tube, make several cuts through the upper ring. When access opens, you can pull out the central tube with a screwdriver.
- Once the barrel is cut, remove all burrs. Cutting edges may not match. Take a pair of embossed pliers and bend the edges slightly until the upper part fits snugly against the lower part.
Step 3: Welding
- Cut the plate and connect as a hinge. The author used a steel 4 cm strip 5 mm thick. The longer center panel is 10 cm long and the other two are 4 cm long.
- To hold the metal during welding, use a magnet as shown in the photo.
- Fasten the mountings on the side rim in the position shown. Align them with handles to make them look beautiful. Make sure they are even!
- Attach the swivel supports to the barrel as shown. This is a little tricky because the keg is made of thin stainless steel and the hinge mount is thicker.
- After you assemble the fasteners, connect the two halves of the barrel together and raise the fasteners. Attach the hinge as shown.
Step 4: Top hole
To adjust the air flow through the barbecue, ventilation holes are required. There is already a large hole from the tap at the top of the keg, which can be used for the top hole.
- Take a sheet of metal and cut as shown in the photo to make a ventilation cover.
- Drill two holes, one for turning, one for the handle.
- Cut off the head from the 4 cm bolt and weld the threaded rod on the inner rim of the outlet hole as shownabout in the photo.
- Add a bolt to the vent cover. Put the washer and two nuts so that it all holds. Tighten the nuts.
Step 5: Bottom hole
To ensure normal circulation, it is still necessary to make a hole in the bottom. Cut a rectangle from a sheet of metal and bend it as shown in the photo. To make it easier to cut, the author used aluminum. The size of the hole can be made as you wish, but the author recommends making a larger volume than in the photo.
- Mark and cut the pattern in the lower half of the barrel.
- Cut out the area marked in red and drill holes on the red dots.
- The remaining marked lines simply show where the lid will be when it is opened and closed.
- Cut two thin metal strips as shown in the photo and drill holes in them.
- Screw these plates to the keg.
- This hole is only about 5 cm high and 3 wide, so it does not give a lot of air flow. You can make a bigger hole.
Step 6: Grill mounts
The grill mounts are very simple. Take three long bolts and install around the upper edge of the bottom of the grill, which will simply rest on them. Look at the photo.
Step 7: A pen
To make a pen, grab a piece of thick plywood and cut out the desired shape. Two holes, two long bolts and several nuts will allow you to install it on the upper half of the grill.
A few tips:
Before using the grill, heat the barrel well. This will remove the remaining oil or coating on the metal and create a protective layer of soot on the inside of the barbecue.
During cooking, the keg is very hot, so in order not to spoil the expensive pieces of meat, first practice a little.


https://i.expert-h.com/en/barbekyu/gril-barbekyu-svoimi-rukami-700-foto-poshagovye-instruktsii#sigFreeId257cc6c9a6
100 photos of barbecue grills


https://i.expert-h.com/en/barbekyu/gril-barbekyu-svoimi-rukami-700-foto-poshagovye-instruktsii#sigFreeId72551bd41d
How to convert a wood grill into a gas grill
 Which grill is better, coal or gas, is a moot point. But if you already have a coal grill, and you have changed your preferences, then you can convert from coal to gas. Like, read this article.
This guidance material is for informational purposes only. It is not intended for training materials and security. Using this material as a guide for diagnosing or attempting to troubleshoot gas problems is not recommended under any circumstances. This site does not bear any responsibility, as it is intended for educational and informational purposes only.
Necessary Details
For natural gas:
- 3/8 NG hose and needle valve to adjust flame size. It uses a 45deg brass fitting for hose ends.
- Gas-burner. If you have welding, you can make a torch yourself. It should be 1/2 to 1/3 of the size less than the diameter of the barbecue container. Stainless steel will extend its life, especially in winter, when you forget to close your grill.
- Grill fittings: 1/2 NPT brass fittings and lock nut, or 1/2 steel sleeve, brass gearbox, 45 ° slide valve for hose attachment (not used in this assembly), 1/2 NPT brass nipple to attach the burner to the connector welded to the container (not used in this assembly).
- Fittings for the home: all brass; from 3/4 to 3/8, 3/8 st. 90, nipple 3/8, ball valve 3/8, torch from 3/8 to 45 degrees for attaching the hose to the barbecue.
For propane:
1-30 PSI regulator and needle valve for flame adjustment. In this case, a 45deg brass fitting for attaching the ends of the hose to a barbecue.
Make a hole
Locate and mark the hole for the fittings. Make a hole 1 1/8.
Install plumbing
You can see the installation instructions here, which describes the connection of a gas burner to an outdoor fireplace. All actions are identical.


https://i.expert-h.com/en/barbekyu/gril-barbekyu-svoimi-rukami-700-foto-poshagovye-instruktsii#sigFreeId9992b0b331
DIY gas barbecue grill
 Unfortunately, the author did not provide written instructions, but he took several step-by-step photos on how to make a gas barbecue grill with your own hands. As you see in the photo, you just need to find the old boiler and the stand from the TV. Still need parts from a gas boiler, tubes from a vacuum cleaner and welding, although there is not much welding work. If there is no gas burner, you can do it yourself, the instructions are in the previous block. Yes, you still need to find a large grill ...


https://i.expert-h.com/en/barbekyu/gril-barbekyu-svoimi-rukami-700-foto-poshagovye-instruktsii#sigFreeId8d38e42cb2
Disc Grill
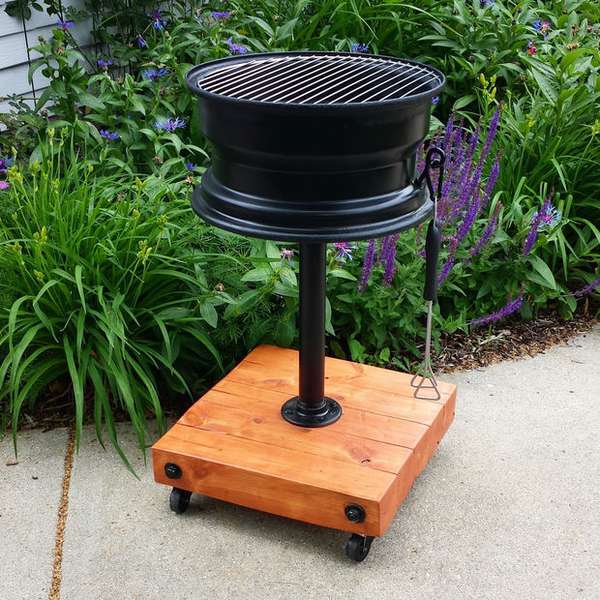 To make it simple and functional do-it-yourself grill, a lot is not necessary. It is enough to find the old rim, and in this embodiment, even welding is not needed. Various tools and materials are used here, but this project is easy to redo according to your own preference. Base can be mademade from pallets or other lumber, or if there is no basis, it can be attached to concrete, and the height can be adjusted by adding a longer piece of pipe, etc. In general, be creative and take the idea of the author of this project as the basis.
Tools:
- grinder
- saw
- electric drill
Parts:
- Tires
- High temperature paint - 2 cans
- Bolts - 4
- Wheels - 4
- Log bolts - 4
- Steel black pipe 50 cm
- Threaded rods - 2
- Grill grill - Various sizes, 1 or 2
- Lumber
Disassemble the wheel
Details and design
The pipe flange, which will be installed on a wooden base, does not need additional attention, since it will be bolted. It must have holes so that bolts with a wide head pass.
Next is painting. Use a special paint for grills, apply two layers.
Base
- Tire wheels are quite heavy, so the base must be massive.
- Drill holes through the ends using the guide hole.
- Then install the bolts and washers on the threaded rods, remove the excess part of the threaded rod.
- I drilled holes to install bolts on top and wheels on the bottom.
- Apply a primer and varnish.
Pipe rim
To fasten the flange of the steel pipe to the rim, use the upper bolts (with the largest possible heads). Simply insert the bolts into the flange, making sure that the protrusion of the bolts is in maximum contact with the edge of the center hole of the rim.
The pipe is screwed into the rim flange at one end and the base flange at the other. The base flange is secured with bolts and washers.
Finishing touches
- Insert the wheels into the holes on the underside of the base to facilitate movement.
- Use the hole in the valve stem to attach the hook. It’s so convenient to hold all the grilling tools (tongs, brush, spatula).
- Finding the right grid size is difficult, but real. It will take 2 pieces, one for coal, and one on top to hold food. In principle, one grate is enough, you can throw the coals directly onto the disk, nothing bad will happen.
Conclusion
Good disk grill, both in appearance and in functionality. If you remove the wheels, and the grill is turned upside down, you get a pretty stylish table.


https://i.expert-h.com/en/barbekyu/gril-barbekyu-svoimi-rukami-700-foto-poshagovye-instruktsii#sigFreeId41246654f3
Fish grill
 This is another example of how you can use an old car drive to make fish grill. Why fish and why drive? Good question. Rybny, because the author of this project planned to cook fish on this grill, and the disc, because:
It is cheap. A good factory grill, and not even a very good one, is expensive. Although this grill cannot compete with store models in design and functionality, but it competes very well in cost.
It's simple. Easy to do, easy to transport, easy to use.
This is a reason for pride. When you go fishing with friends, you can proudly say, "I did it myself." By the way, a good reason to talk on vacation.
What is needed
For making fish grill you'll need:
- Armature (3 pcs.)
- Any scrap metal, the author used an old metal frame from a chair.
- Welding
Make calculations
The size of the grill will naturally depend on the size of the disk, in this case the rim is 40 cm. The author chose a square design for ease of use, but a round grill will be more effective in terms of saving materials. For a square lattice, each part of the reinforcement was 40 cm. You will need 5 to make a frame, and then about 13 to make it look like the presented version, or only 25.
Make the grill
Put the first five rods and cook. Keep in mind, if you cook sausages, they can fall through a wide grill.
Test
Take a few test runs to burn epoxy, grease, or any other pollutants you don’t want to eat. Testing will also show you any problems that may occur during operation.
Use and care of the grill
When the grill is relatively clean, apply a coat of vegetable oil or olive oil. Like cast iron, this will create a rust-resistant coating that will last long enough.


https://i.expert-h.com/en/barbekyu/gril-barbekyu-svoimi-rukami-700-foto-poshagovye-instruktsii#sigFreeId6c017ab06c
Washing machine drum grill
 Are you planning a party and urgently need a grill? There are many ways to come up with something, one of them, make a grill from the drum of a washing machine. If everything is okay with your washer, you can go to the washing machine repair shop and ask for it. In principle, nothing else is needed, only a small grill. Prepare the grinder, pliers, sandpaper and you can get to work.
 Cut the drum in half and grind the sharp edges with an emery cloth.
- Remove the legs from the drum.
- Then fasten the two parts one on top of the other, with a mesh between the compartments. Coals will be on the grid, and the ashes will fall into the lower compartment.
- Using 3 long bolts, fixed the two parts of the drum together. You can fix the bolts to the wooden blocks, which will serve as the legs for the grill.
- Barbecue grill was ready !!!
To improve barbecue grill performance, You can wrap aluminum foil around the drum. Then air from the bottom, which is not covered with aluminum foil, will flow directly to the coals, raising the temperaturegrilled ur.


https://i.expert-h.com/en/barbekyu/gril-barbekyu-svoimi-rukami-700-foto-poshagovye-instruktsii#sigFreeId8da8f6ac9e
How to make a stone grill
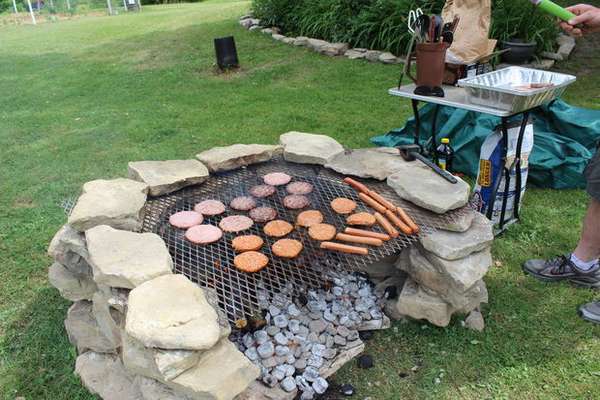 Instead of buying a cheap grill that will fall apart in two years, do do-it-yourself simple stone grillusing auxiliary materials that can be found in each suburban area. You don’t need much for this - a metal grate, 40 stones, charcoal or wood and a chisel for forming stones. Building time will take four hours, unless of course there is something to build from.
Firstly, you will need large flat stones to build a campfire.
- Start by laying stones in the shape of U, about 60 cm high. You need about 40 stones.
- After the sides are firmly fixed, place several stones in the base of the hearth to stack firewood or coal.
Grill installation
- With a grinder, cut the grate of the desired size.
- To keep the grate, place a few flat stones on it.
In principle, everything is ready, load firewood and you can light it. If you have cast iron pots and a frying pan, then you can use the grill as a stove.


https://i.expert-h.com/en/barbekyu/gril-barbekyu-svoimi-rukami-700-foto-poshagovye-instruktsii#sigFreeIdc73e19a625
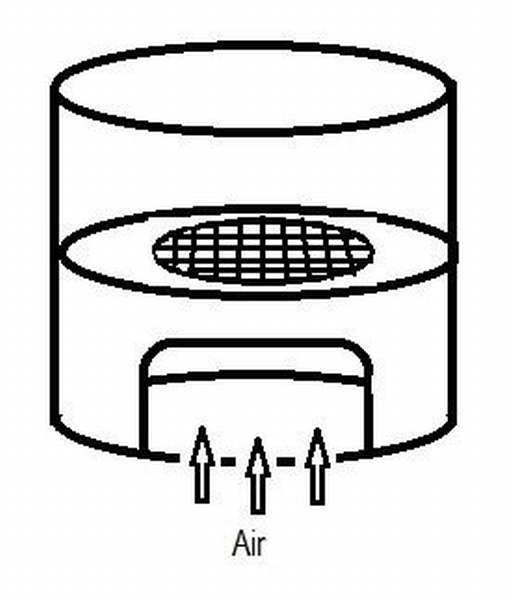
How to cook a grill
 If you are familiar with the basics of welding, then special difficulties, in fact, should not arise. In principle, you can learn everything, but this project is a good opportunity to hone your skills. So, how to cook a grill with minimal experience.
Step 1: Making a grill frame
Better use a ready-made grill. Use it to measure the frame and weld the four sides together.
Join the corners and weld across the joint on both sides of the frame.
Step 2: Reflector manufacturing
- The reflector is made of a simple sheet of steel. Find the right material and cut to size.
- Locate the pipe and use it as a shape to bend the sheet into a parabola shape, which is most suitable for maximum heat reflection.
- You can do it the other way, that is, just bend it until both sides fit on either side of the frame.
- Then weld the folded sheet.
- Right angle welding was much more difficult than butt joints, so be careful not to burn the plate.
Step 3: Square mesh welding
Insert a piece of steel square mesh at the end of the frame and weld so that the mesh covers the compartment for collecting ash and ash. Then cut off the overlap with a grinder, and all sharp edges were cleaned.
Step 5: Foot making
- To measure how long the legs are, set the grill at a convenient height and measure the diagonal distance to the floor. If all four legs are the same length, everything should be fine.
- To fix the legs to the frame, take a few M8 nuts, as they have large flanges and fit perfectly into the ends of the box section.
- Before marking the center point, set the legs and check the level so that the bolts hold two legs at the intersection.
- Then drill and insert the M8 bolts with washers.
Step 6: Set the grid for coal
Measure the length of the mesh and cut the grinder to the desired size, leaving the edge with which you can fix the mesh.
Step 7: Make a fire and enjoy
The shape of the grill perfectly reflects heat, quickly heating the coals.


https://i.expert-h.com/en/barbekyu/gril-barbekyu-svoimi-rukami-700-foto-poshagovye-instruktsii#sigFreeIdd980595a7f
Forest grill
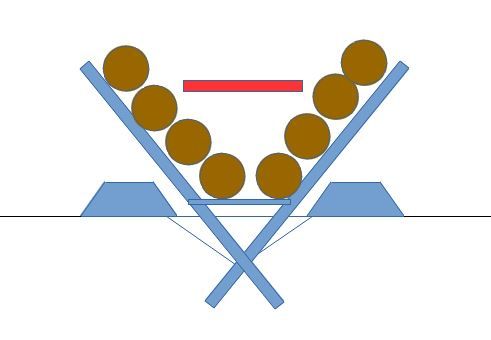 What you see in the picture can be called V-shaped fireplace or forest grill, in general, it does not matter what to call, most importantly, how such a method of making a fire and cooking works.
The idea to raise a place for a fire gives one very important result - better burning of firewood, which means more heat. All these photos show that the idea was worthy.
But there are, of course, pros and cons.
pros:
- Combustion is improved due to good air circulation, and therefore all wood turns to ash.
- The fireplace is well controlled and is in one place.
- Left and right loaded small logs press on the lower logs in the center of the fire and, waiting for their turn, heat up, therefore, lose moisture. Thus, dry and heated firewood already gets into the fire.
- There is almost no need to control, add firewood or move something for proper burning.
- In the central part, high temperature is maintained, and if you install the grill, you will have a perfect barbecue or grill ...
- Environmentally friendly, because all fuel is burned without the slightest impact on the earth.
Minuses:
- All firewood should be the same in length. 2 cm above each side and a diameter of about 4-7 cm.
- If there is wind, fire tends to burn toward V shape
- Rocky soil problem: it is difficult to find a suitable place to install.
Well, that is what experience says. Now let's move on and explore a little more.

Grill
Take aluminum rods 20 x 3 mm, cut them into 6 parts 60 cm long and drill holes.
- For assembly, you need 15 bolts and nuts.
- Heat comes from both open flame and coal.
- For cooking, you definitely need to make an aluminum reflector.
- The temperature in the middle of the holder exceeds 700 C.
You can see all the details in the photo in the gallery. So this V-shaped design can be used as a classic charcoal grill, which serves as the basis for pots and pans; boil water, cook food. Or bake a pie. Or make coffee.


https://i.expert-h.com/en/barbekyu/gril-barbekyu-svoimi-rukami-700-foto-poshagovye-instruktsii#sigFreeIda4b8b53778
Campfire barbecue stand
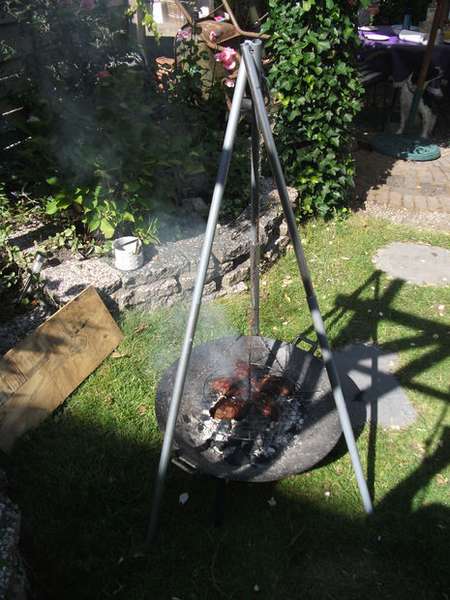 Tripods are perhaps the simplest and most reliable structures, which is why they are so popular among tourists. Making a tripod is easy, here’s one ofexamples. What is needed for this? Little.
- Six tubes from 60 to 80 cm long.
- Old barbecue.
- Hanging baskets.
- Aluminum tape so that the tubes fit snugly against each other.
- Hacksaw.
- Marker.
Make holes in the upper part of the pipes, which will then need to be fastened with wire.
Use a hacksaw to cut the pipes to the same length.
That's basically all set. At the top, attach a chain on which you can hang anything from a cauldron to a grill.


https://i.expert-h.com/en/barbekyu/gril-barbekyu-svoimi-rukami-700-foto-poshagovye-instruktsii#sigFreeIdb4b23977ca
Grill examples on a tripod


https://i.expert-h.com/en/barbekyu/gril-barbekyu-svoimi-rukami-700-foto-poshagovye-instruktsii#sigFreeId56efdb297e
How to replace a charcoal pan in a grill
 Everyone loves grilled food, so they take this opportunity at every opportunity. A common problem is that the gratings themselves can last a long time, but charcoal trays rust in a couple of years ... and trying to find a replacement at a reasonable price is not so simple. To buy or if you had it homemade, making a new grill is not the best option. Therefore, the author offers a way how to replace the charcoal tray in the grill, making it yourself. The tray example shown here was made and installed in place of the old one within an hour, so the offer is beneficial in every way.
Materials:
- 60 x 60 cm screen with metal mesh
- corners 15 mm
- washers
- steel rivets
Measure the old tray
First, first remove the old tray and measure it. You may not be able to accurately duplicate the size, but try to make it as close as possible to the original. In this case, the old tray is 34 cm long and 68 cm wide.
Spare metal mesh tray
A screen with a metal mesh can be bought at the store, it will not cost very much.
Before making any measurements or cutting, you need to determine which grid will be the most reliable for your grill. That is, you need to calculate the deflection points, and this depends on the holes and the method of fastening. (See photo)
Measuring and cutting a new tray
- The critical step in this part is to make sure you lay out the grid in the direction that you defined in the previous step.
- For long sides that need to be bent for support, you need to make sure that there is a free area to accommodate the washers and rivets that you will use to attach the corner supports. This will be approximately 2.5 to 3 cm or about half of the open mesh. Therefore, make marks according to the size of the holes in the grid.
- Then measure approximately 34 cm deep into the tray and cut to the mark you made.
- You can use any tool for cutting, the author used the Harbor Freight edge milling cutter to cut the mesh, but it is also possible with a grinder.
Long edge bend
Set the grid between the two bars and clamp. Then bend the metal with a hammer at an angle of 90 °.
At this point, the tray really takes shape, but the photo shows that there are still many deflections that need to be fixed.
Corner Mount
As you can see in the photo, you need to smooth one side of the washer so that it matches the inner corner. Install one washer on the outside, one on the inside and use a rivet for protection.
The new tray has been completed!
Installation and launch of the grill!
The only drawback of this entire project was that the height adjustments did not match the original - but this is not a big problem.
The main test when loading coal in the middle of the tray. This is the maximum weight that the tray will usually support, so make sure that there is no tilt in any direction.


https://i.expert-h.com/en/barbekyu/gril-barbekyu-svoimi-rukami-700-foto-poshagovye-instruktsii#sigFreeId31bdc28725
Homemade Grill Drawing


https://i.expert-h.com/en/barbekyu/gril-barbekyu-svoimi-rukami-700-foto-poshagovye-instruktsii#sigFreeId39285c6b31
DIY metal grill 200 photos


https://i.expert-h.com/en/barbekyu/gril-barbekyu-svoimi-rukami-700-foto-poshagovye-instruktsii#sigFreeIdae974d113b
Hello, I am the author of this article, so I look forward to asking questions for this article in the comments below, I will answer all !!!
If you have questions on another topic, ask them on our forum, we will answer you
- Two baskets of paper in 5 minutes (Master class)
- How to make a simple and compact table for a milling cutter from plywood
- How to make a soft headboard tile (Instructions + step by step photos)
- Cinder block benches: a convenient bench in 55 minutes
- How to make a bed with a niche: saving space (Master class)