Do-it-yourself children's bed made of wood. 1000 photos, drawings, step-by-step instructions
 how to make a baby bed do it yourself
Not surprisingly, children spend a lot of time in their bedroom. Therefore know how to do-it-yourself baby bed very important. For children, this is also a place for sleeping, playing and useful activities, such as reading. It follows that the space of the child should be a reflection of his small personality.
Children's furniture should be stylish and practical, and the child in his crib will have fun, cozy and comfortable. Just find the finished one baby bed for baby can be quite difficult, especially on a budgetary basis. So sometimes it's easier to do do-it-yourself baby bed made of wood. Of course, this is not a simple task for all parents, but it is quite feasible. Here are some really good suggestions for do-it-yourself home projects.
Make a baby bed from scratch - This is not exactly a walk in the park, but not so difficult. In the article you will find how to do:
- DIY baby bed made of wood
- DIY children's bed drawings
- Children's beds with storage drawers
- Cots with a berth for the child
- Children's bed the carriage for the girl
- Children's bed in the form of a ship
- Pirate ship bed
- The limiter a side for a children's bed
As well as interesting examples with step by step photos, how to make original children's beds from logs, in the form of a ring, an asymmetric form and other home-made models for a children's bedroom.
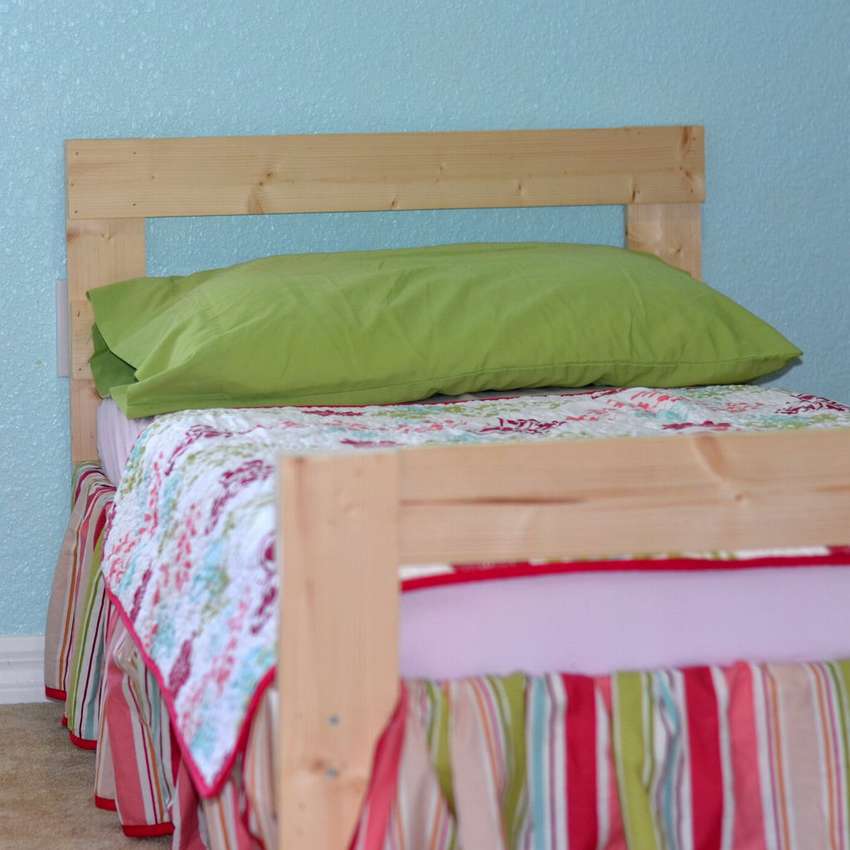
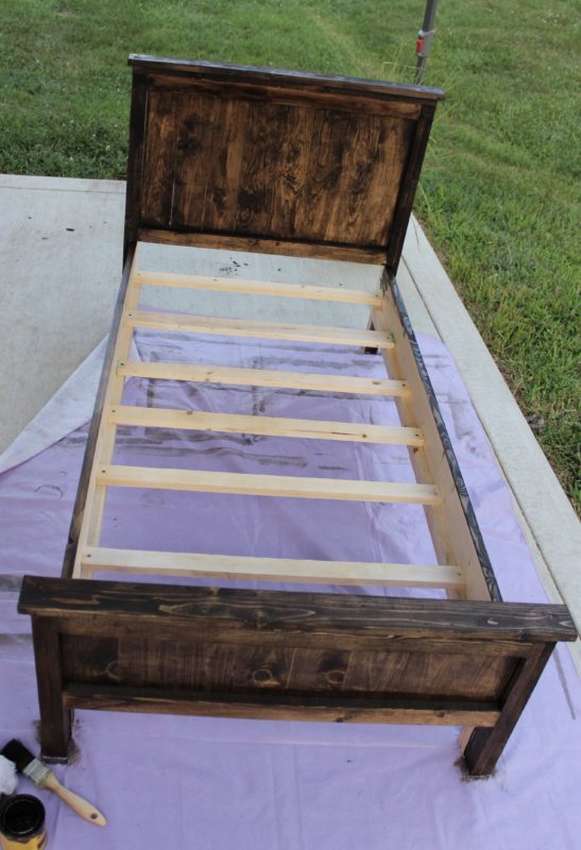
How to make a baby bed with your own hands made of wood
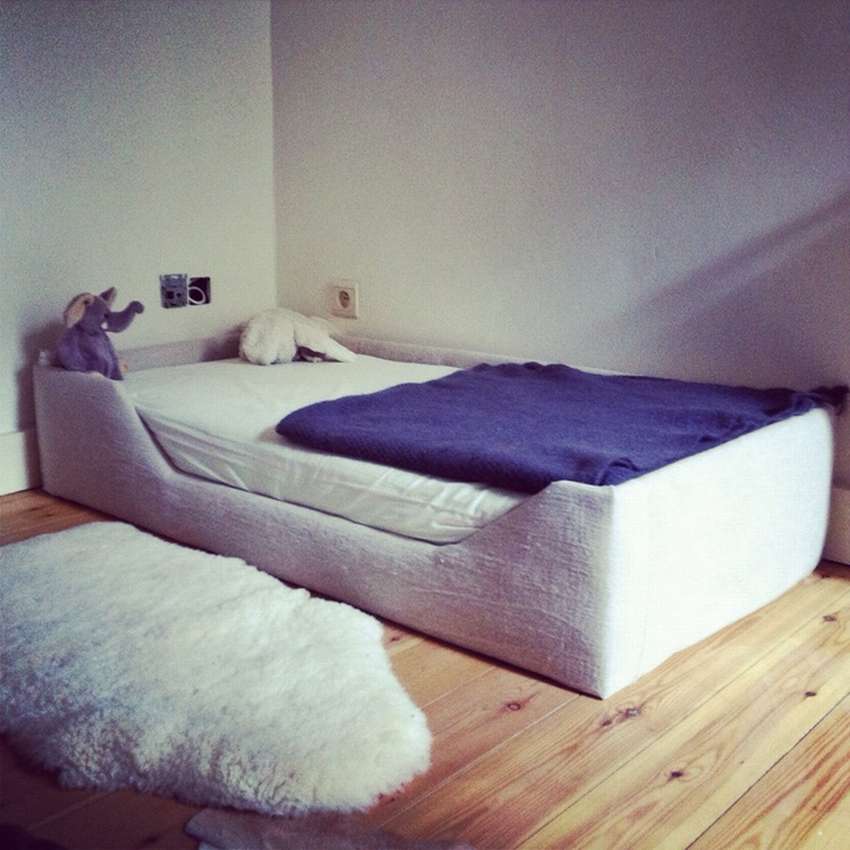 Shown here how to make a baby bed out of wood without legs. Safe option for young children, as the bed frame lies on the floor. Proceed from your existing mattress and rack base. In this case, it is 120cm x 60cm. Take a board width depending on the thickness of the mattress, and a few slats 1x1. Screw on the outside, just make sure that the screws are flush. Draw a cutout to the side. Drill holes at an angleto make a smooth transition. Then connect all 4 sides together. Start filling the frame, securing it with a stapler. Cover the upholstery with a cloth. Here the remains of the curtains were used. That's all, look at the master class step by step photos.


https://i.expert-h.com/en/krovat/1129#sigFreeId134af4b25d
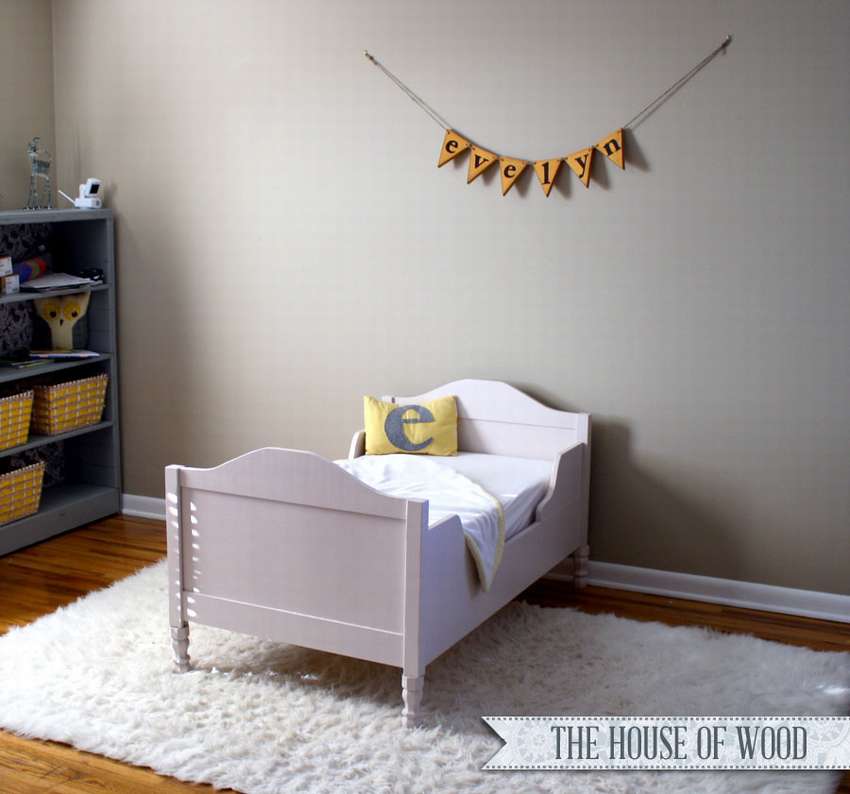
Children's bed made of wood with sides
 Children like beds in which you can not only sleep, but also play. Many of the “cool” models in the store are most common beds with painted cartoon characters on the sides, or closed forts, extremely uncomfortable for parents. There are some really neat custom models, but to do this do-it-yourself baby bedYou must have serious skills.
This project, imitating a baby bed on a tree, should satisfy the needs of children and adults. The bed is designed to look more like a treehouse than a piece of furniture.
 To achieve this, the design is assembled using materials and technologies that are used for building terraces and real tree houses. You can make a bed with simple tools, although if you have a milling table, it will be easier for you, but this is not necessary. Below in the gallery you can see diagrams with dimensions of parts and individual photo assemblies.


https://i.expert-h.com/en/krovat/1129#sigFreeIdfbdace3643
Beautiful baby bed for a girl
 In the catalog of the furniture salon you can find very beautiful models of beds, wonderful in every way, except for the price. It's just a pity to pay so much, because children grow up so fast. This crib for girls made by hand, although the design is also taken from the catalog. The most interesting thing in independent furniture manufacturing is that you can satisfy any needs, of course, if you have tools and a set of skills. Can do toas strong as you want! For example, you can lengthen your legs by 15 cm or install close to the base of the bed and attach with metal brackets.
 Another option that might be interesting is these are wheels. You will also need to determine the method of attaching the upper side rails to the heads. You can make a pocket hole, but it will be noticeable. Better to use small countersunk screwneatly twisted outside. Glue and finishing nails will also work, and it will be easier to hide. It is recommended to fix mattress slats as close to each other as possible, at least 2 cm. You can also use 3/4 ”plywood as a basis.
Sawing and assembly order read on the site, below the gallery step by step photos with drawings.


https://i.expert-h.com/en/krovat/1129#sigFreeId6991eca2b4
And here is the crib made by this project.


https://i.expert-h.com/en/krovat/1129#sigFreeId866b4f49e9
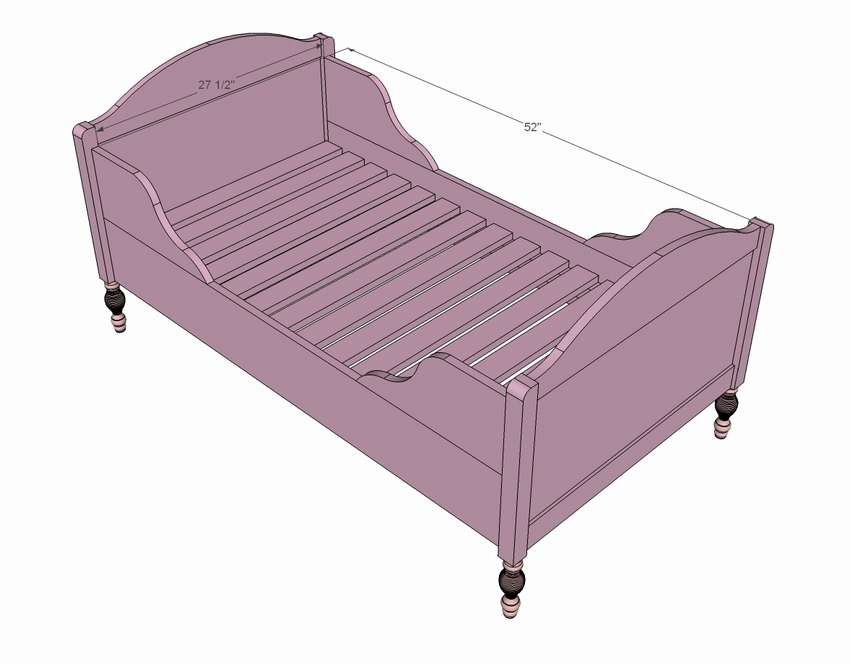
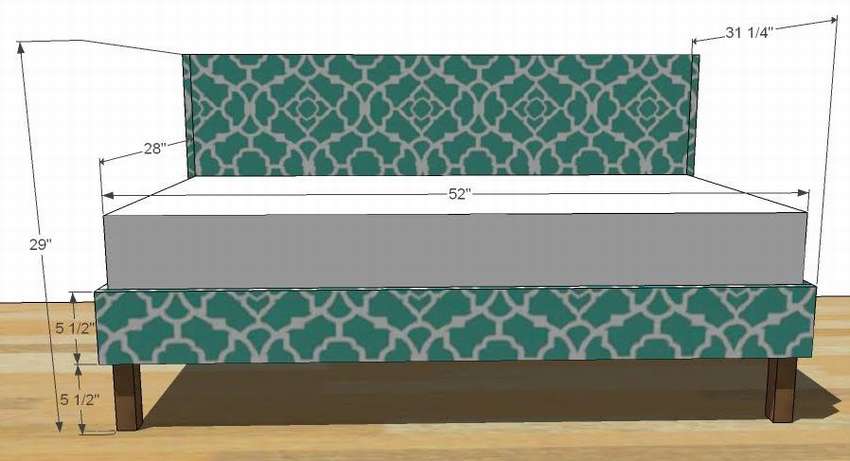
 Here is another similar drawing of a children's bed with decorative elements. The assembly sequence is shown in the diagrams in the gallery. On the site you can read the instructions. Tip: It’s important to drill pocket holes on the internal surfaces of the components to hide screw heads. Make sure all connections are at right angles before tightening the screws.
Part Dimensions:
 A - 4 bars 2 × 2 22 1/2 ”(57 cm) feet long
B - 2 boards 1 × 6 52 inches (132 cm) long sides
C - 6 boards 1 × 6 28 ”(71 cm) long
D - 2 bars 2 × 2 length 52 inches (132 cm), 11 boards 1 × 4 length 28 inches (71 cm)
E - 4 sheets of plywood 3/4 ″ size 9 1/2 ″ x11 ″ (24 cm x 28 cm)) decorative elements


https://i.expert-h.com/en/krovat/1129#sigFreeIdefb54281a3
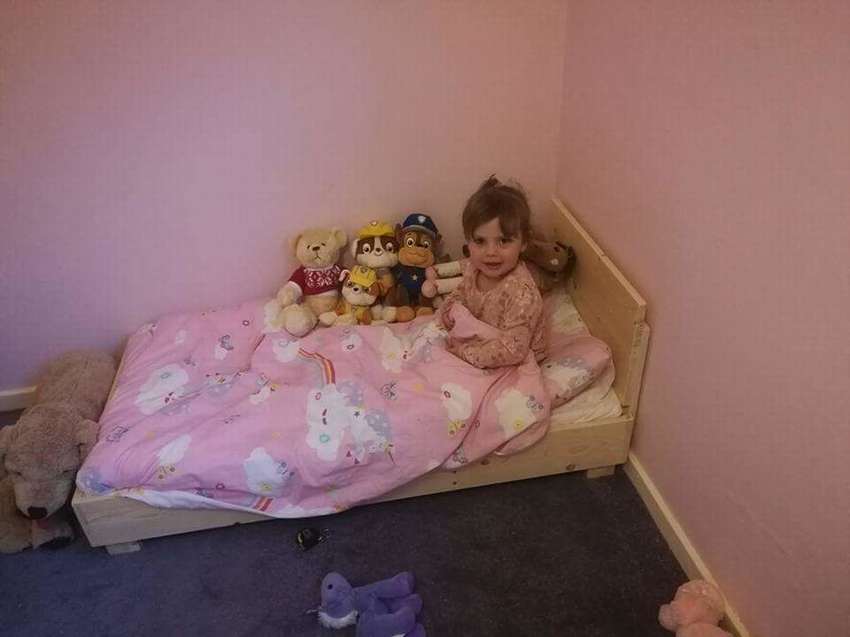
Simple do-it-yourself baby bed
 Look how to make a simple and stylish baby bed for only $ 40. Before deciding that this is too complex a project for you, keep in mind that anyone can make such a bed, even with minimal experience. From tools enough hand saws and drills. If you've never done something like this before, this is the perfect opportunity to start acquiring your first experience! Here are all the materials you need.:
- 1x4 board 3 meters long,
- three boards 1 x 4
- 5 slats 1 x 2 2.5 meters long.
The instructions on the author’s website describe the assembly process in great detail, link under the gallery with step by step phabout.


https://i.expert-h.com/en/krovat/1129#sigFreeId9321a46f52
DIY plywood crib
 This is a really simple design, for the manufacture of which only simple tools will be required (although power tools will speed up the process). A baby bed made of plywood and pine boards, so it can be painted, varnished or left unprocessed. Unfortunately, the author did not make normal step-by-step photos, but he wrote very detailed instructionswhich you can read on the site. Although everything is simple here, the frame is shown in the photo. The headboard is designed using cutouts, and does not require any additional incisions. Just lay the two boards horizontally on top of each other, and then set the other two recesses at both ends vertically so that there is at least 40 mm overlap. Screw the boards and then attach to one end of the frame.


https://i.expert-h.com/en/krovat/1129#sigFreeIdc41cecda26
Children's bed for preschooler
 Simple example cots for preschoolers. Not a complicated design, even a beginner can do it. Use the link under the gallery and read the author’s article, where you will find a lot of useful information: how to make a baby bed do it yourself, decoration ideas, how to choose the right materials for children's furniture, what are the advantages of home-made designs and much more. Below in the gallery see the master class, several step-by-step photos, how to assemble a wooden bed for a preschooler with your own hands.


https://i.expert-h.com/en/krovat/1129#sigFreeIdc4ad199b07
Large crib for girls
 This large crib the author did for his daughter. The full-size bed dimensions are 190 x 137 cm. In this case, boards 245 cm long were bought, you need to saw them into the following parts:
- Three bars 2x4 long (245 - 192) = 53 cm (for legs)
- Two 2x4 bars 108 cm long (also for legs)
- Eight boards 1x3 108 cm long (for the headboard)
You will need 8 legs, assemble them by connecting the wooden planks of 5 cm and 16 cm in size, as shown in the photo. Glue the pieces and screw them together. Full instructions can be read on the website, link under the gallery.


https://i.expert-h.com/en/krovat/1129#sigFreeIddf8bcadb4d
How to make a bed for kids
 Two beds for babies were made by parents for their twins, who came to get out of their cots.
Everything was ready in about 2 hours, including cutting the whole tree. Even someone who knows little about woodwork and has no skills can do this do-it-yourself crib. Just keep in mind that here the dimensions for the mattress are 132 cm long, 70 cm wide and 15 cm thick. Your the mattress may be a different size, and you will need to change the drawing to fit your mattress.
Of the materials you need Boards 2.5 meters long: 8 pcs. 1 × 2, 3 pcs. 1 × 4, 2 pcs 1 × 6 and one board 1 × 3. Also screws, nails, sandpaper and glue for wood. The design is not complicated, but if you need instructions, go to the author’s site, the link is under the gallery. See the master class and drawings below for step-by-step photos..


https://i.expert-h.com/en/krovat/1129#sigFreeIdddb95703f4
DIY bed made of wood drawings
You will be surprised how simple and inexpensive it is to make such do-it-yourself baby bed.
 The gallery below shows the assembly order in diagrams and drawings with dimensions, however, in inches. It's very easy to translate 1 inch - 2.54 cm, just multiply the indicators and get the dimensions in centimeters. Below are the photo schemes of baby beds made according to these drawings.


https://i.expert-h.com/en/krovat/1129#sigFreeIdec8b39b313
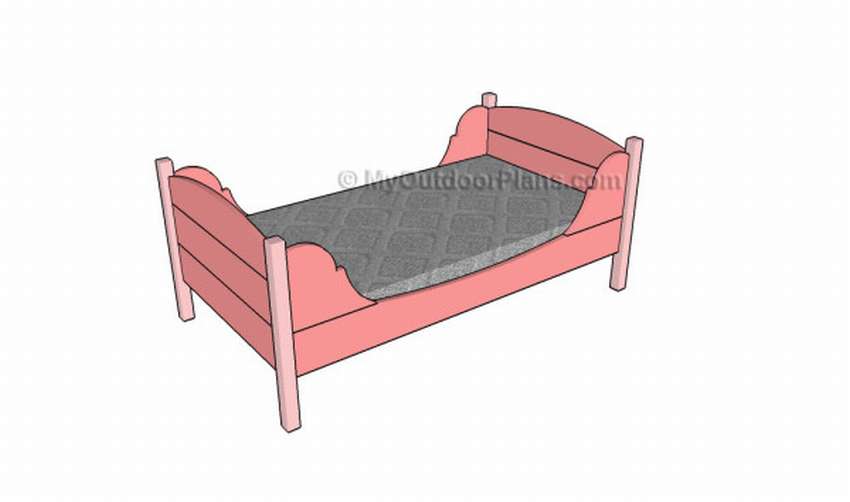
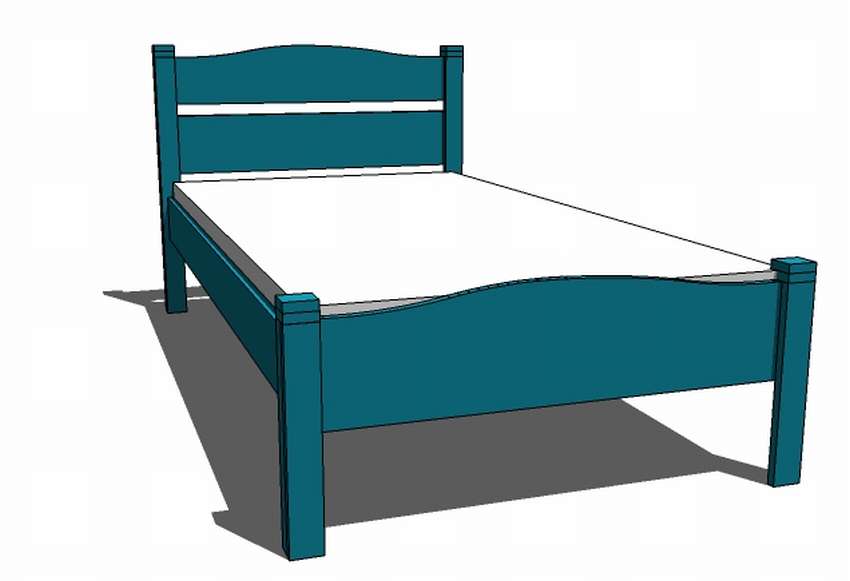
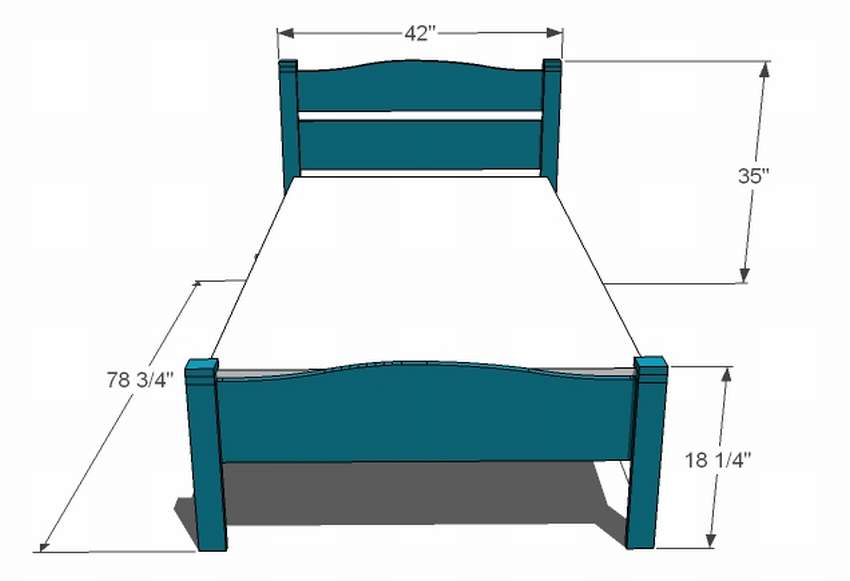
Classic bed for children
 This simple wooden bed in a classic style will look great in the interior of any children's bedroom.
Using standard inexpensive boards, you can make do-it-yourself baby bed for about $ 35 - and it's real hard wood! Use the provided drawings and save a significant amount.
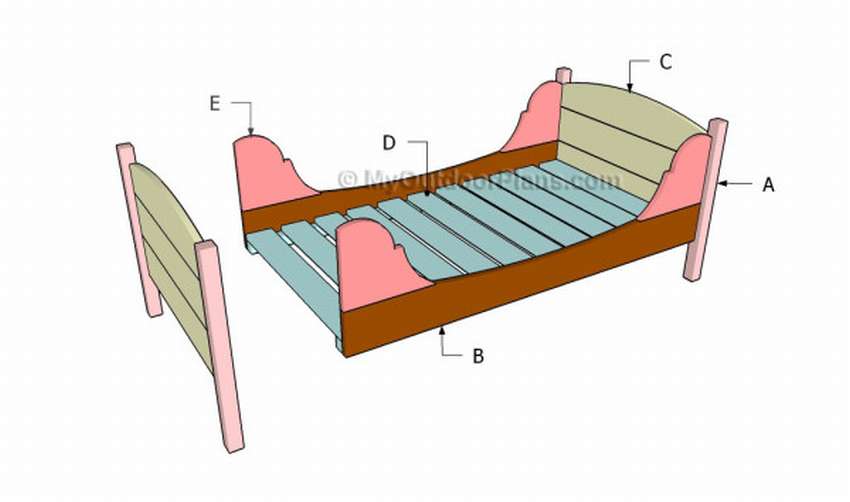
 The most difficult part in this project is the decorative part, rounded headboard.
 Cut the shape of the head of the head a little smaller so that the edges are not visible in front. Fix with finish nails and add wood glue. Detailed instructions how to make a baby bed made of wood with your own hands read on the site. Below in the gallery, in addition to the drawings, 12 examples of classic-style cots made according to this manual are presented.


https://i.expert-h.com/en/krovat/1129#sigFreeIde070cd5bed
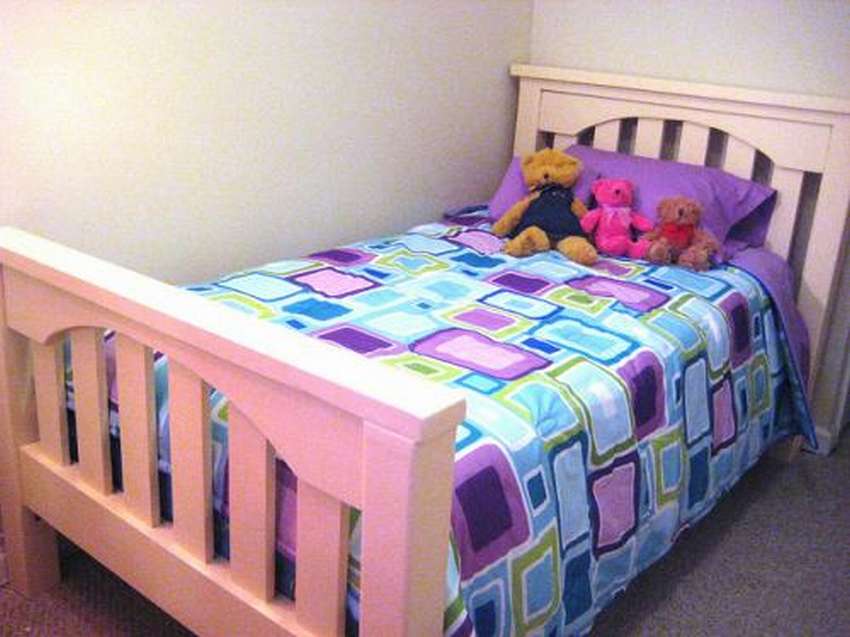
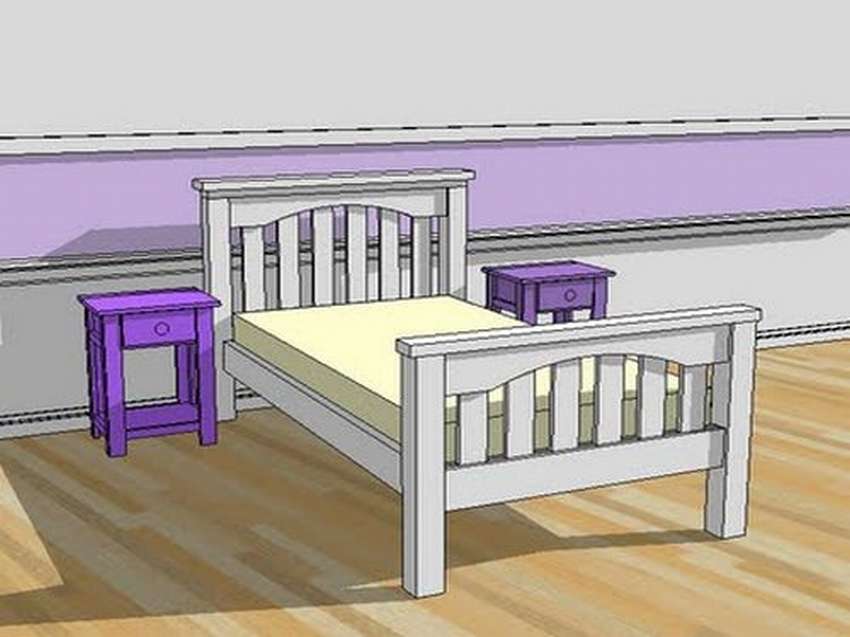
Classic baby bed
There was a time when all the beds were simple. You like simple crib in classic style? Here is a simple example of how to make such a model with your own hands.
 The simpler the design, the easier the assembly. Necessary materials, tools, sawing with dimensions and step-by-step instructions - all this is on the site, a link under the gallery. Drawings and schemes look at step by step photos.


https://i.expert-h.com/en/krovat/1129#sigFreeId9ad10931d9
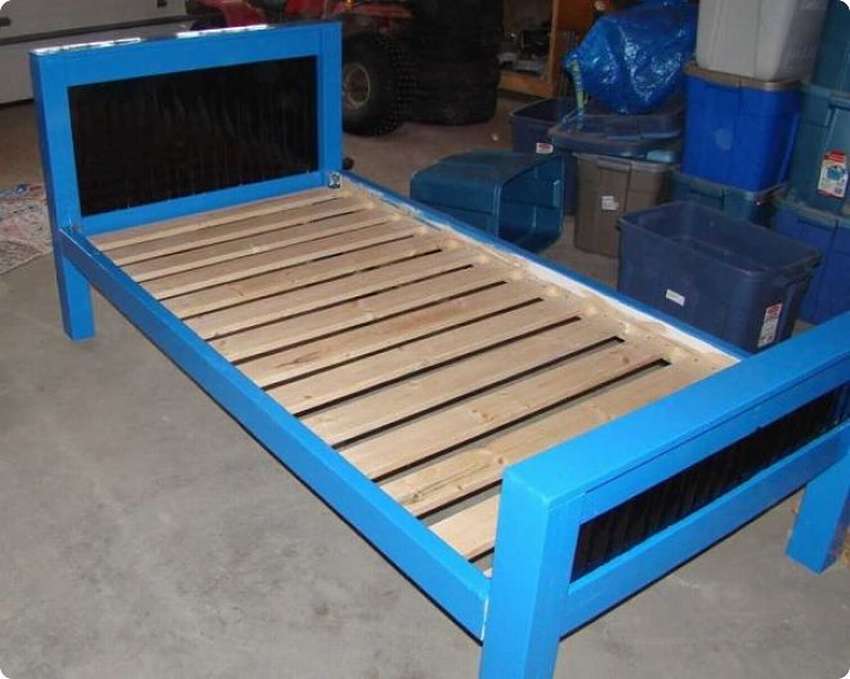
DIY bed made of timber
 If you want to do good children's bed made of timber 2 × 4, then the drawings presented here and step-by-step instructions on the site will be useful to you. Despite the fact that you can choose from a variety of designs, in this article you will find everything you need to know about manufacturing classic children's bed made of ordinary materials. The first step is to assemble the footrests for the bed. Then adjust the trims, you must install 2 × 4 bars on the top of the footboard. Next is necessary to collect the head just like the bandwagon, the difference is only in the size of the components. To make the upholstery fit the headboard, install a 2 × 4 pad at the top of the headboard and secure it with screws by drilling several guide holes. After assembling the steps and the headboard, it is necessary to connect them by installing side strips on the bed frame. Then install 1 × 1 brackets on both sides of the bed frame. Secure the support strips and side rails.
 Dimensional sawing pattern
A - 2 bars 2 × 4 25 ”(63.5 cm) long, 2 parts - 37" (94 cm) legs
B - 4 bars 2 × 4 39 inches (99 cm) long
C - 7 blocks 2 × 4 6 inches (15 cm) long, 7 pieces - 18 inches (46 cm) long.
D - 2 bars 2 × 4 - strips 75 1/2 ”long (192 cm)
E - 2 bars 1 × 1 length 75 1/2 inches (192 cm)
F - 17 boards 1 × 4 - 39 ”(99 cm)
F - 2 bars 2 × 4 long 48 "(122 cm)


https://i.expert-h.com/en/krovat/1129#sigFreeId7ac0858cde
Drawing of a crib with a limiter
 From these drawings you can make simple do-it-yourself crib bed. The instructions can be read on the website. Single moments: do leg recesses and drill pocket holes at both ends of the bottom element. In addition, drill guide holes at both ends of the legs. And further, add waterproof glue to the joints and do not forget to remove residues with a damp cloth.
 A - 2 bars 2 × 2 26 inches (66 cm) long, 2 pcs. 9 inches (23 cm) long
B - 2 boards 1 × 6 52 inches (132 cm) long, 1 pc. 27 1/2 inches (70 cm) long, 1 2 × 6 board - 27 1/2 inches (70 cm) long
C - 8 boards 1 × 6 panel 17 ″ (43 cm) long
D - 2 boards 1 × 6 27 1/2 ″ long (70 cm)
E - 2 bars 2 × 2, 52 inches (132 cm) long, 11 pieces 27 1/2 inches (70 cm) long


https://i.expert-h.com/en/krovat/1129#sigFreeId1d7267afce
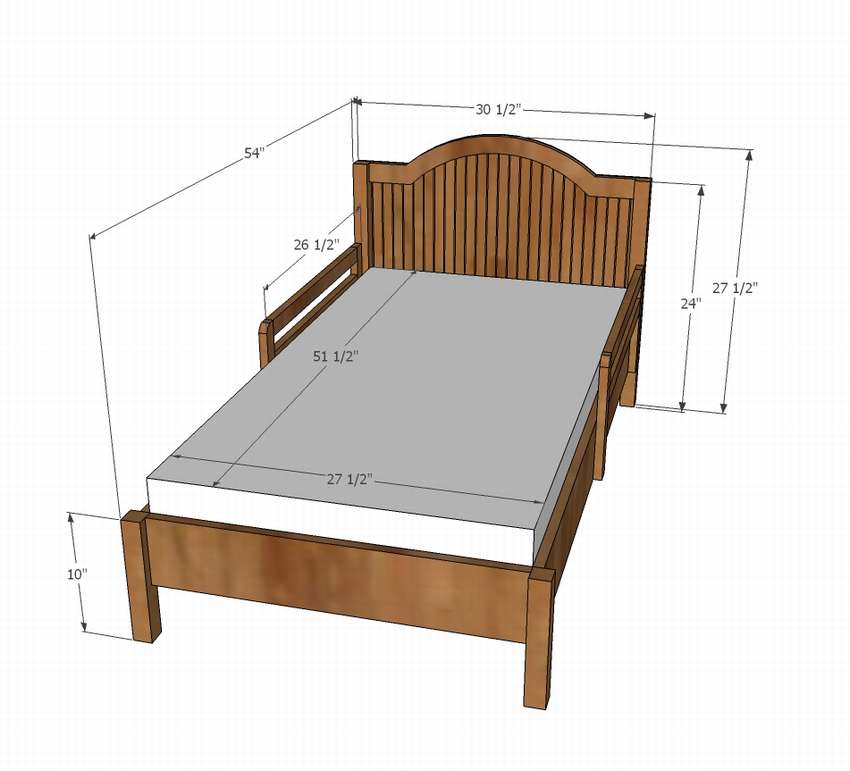
Children's bed with a canopy
 Here are instructions and drawings on how to make a pretty canopy bed for babies.
For those who have little space or the child may want something more attractive, do not despair. This design can be easily modified. Just trim your legs and make the headboard symmetrical to the footboard. The dimensions are shown in the drawing in inches, multiply them by 2.54 and get the result in centimeters. Be sure to measure your mattress correctly (the bed is designed for mattress size 71 x 132 cm), and also consider the height of the canopy. You can do higher if you want.
Sawing:
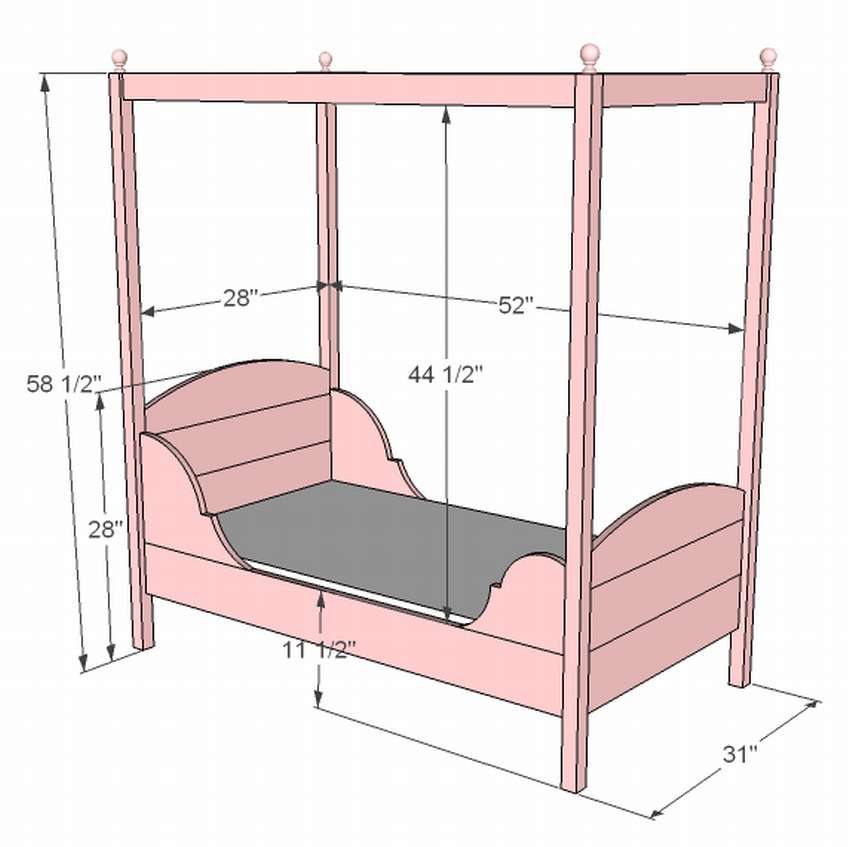 7 boards 1 × 6 length 28 ″ (71 cm) boards for backrest and footboard
- 4 bars 2 × 2 length 58 1/2 ″ (149 cm) legs
- 2 bars 1 × 3 length 28 ″ (71 cm) canopy top / bottom
- 2 boards 1 × 6 length 52 ″ (132 cm) side rails
- 2 bars 1 × 3 length 52 ″ (132 cm) canopy sides
- 2 bars 2 × 2 length 52 ″ (132 cm)
- 2 boards 1 × 12 length 15 ″ (38 cm) decorative side, top
- 2 boards 1 × 12 length 8 1/2 ″ (22 cm) decorative side bottom
- 12 pieces 1 × 3 length 28 ″ or plywood 1/2 ″ 28 ″ x 52 ″ (71 x 132 cm) bottom mattress


https://i.expert-h.com/en/krovat/1129#sigFreeId6cba019849
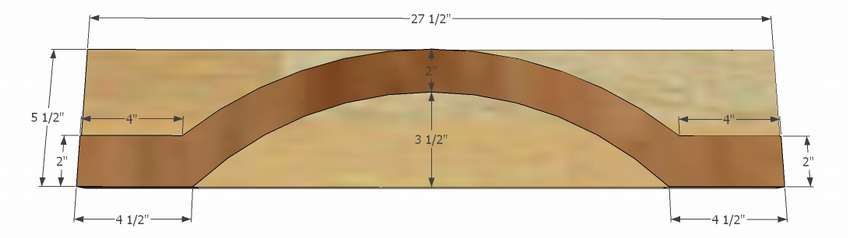
Children's bed with an arch
Simple baby bed with the addition of a decorative element in the form of an arch at the head and foot of the bed.
 How to make a bed with your own hands Look at the diagrams in the gallery. Instructions on the site.


https://i.expert-h.com/en/krovat/1129#sigFreeId17af543934
DIY children's bed drawings


https://i.expert-h.com/en/krovat/1129 # sigFreeId1df59bc2ff
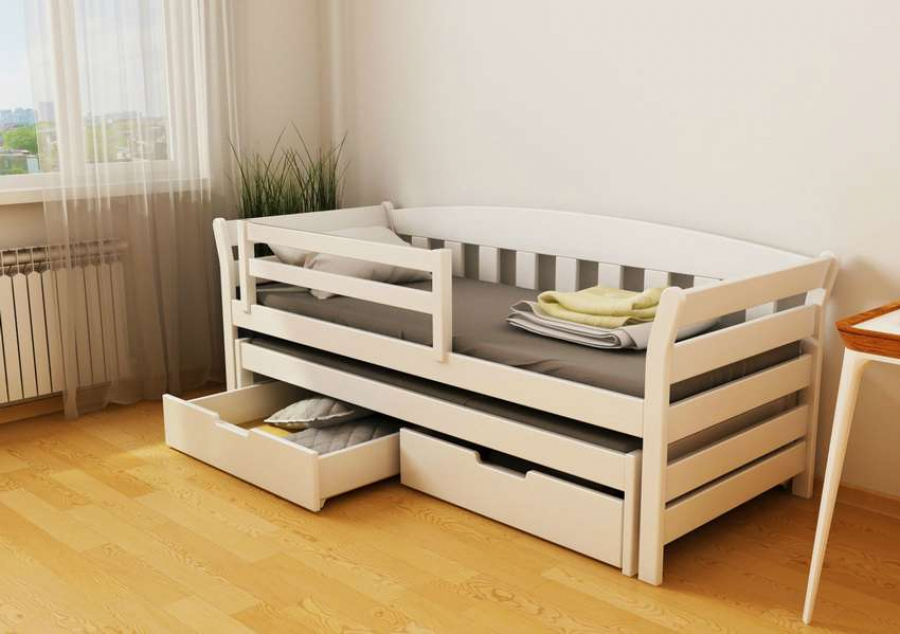
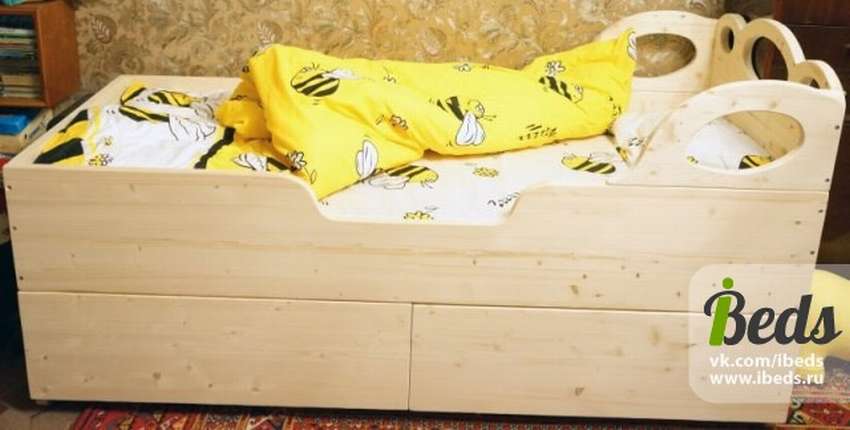
Children's bed with do-it-yourself drawers
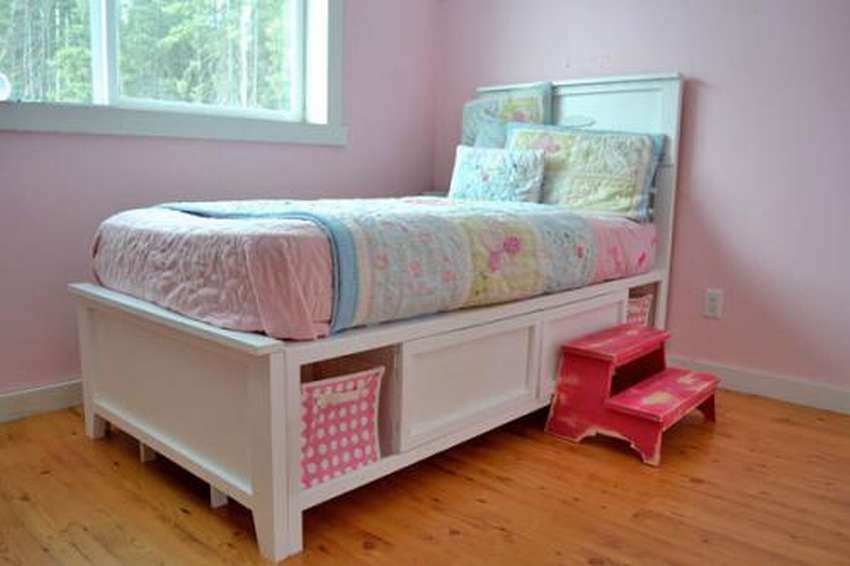 Convenient option children's bed with drawers. You can’t even imagine how many things can be stored in these seemingly small lockers. If you want to make an enclosed space (although the drawers at the ends are perfect for curtains made of fabric), easy to make ordinary doors. Measure the opening so that the doors begin in the center of the bed and cover the external partitions. Make a frame, fasten the plywood at the back with finishing nails and glue, and fasten it with a loop and fasteners.
Sawing parts
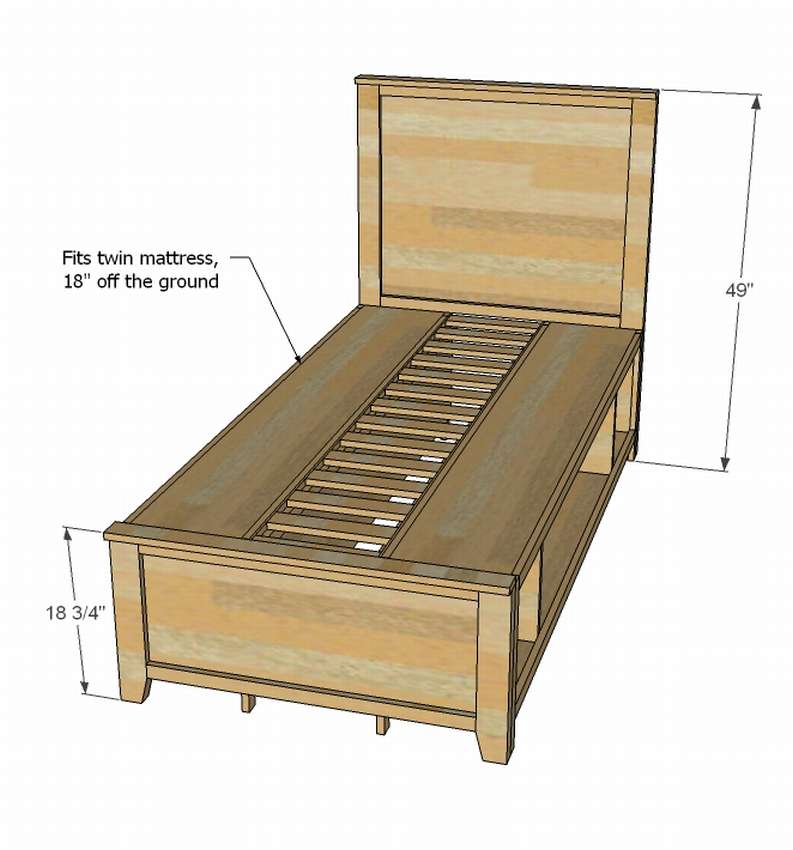 4 boards 1x12 at 75 "(190 cm) top / bottom
- 5 boards 1x12 at 13 1/2 "(35 cm) dividers
- 8 1x2 bars 18 "(46 cm) long
- 8 bars 1x2 72 "long (190 cm) top / bottom
- 2 sheets of plywood 15 "x 75" (38 x 190 cm) back
- 1 sheet of chipboard 33 "x 30 1/4" (84 x 77 cm) in size
- 1 sheet of chipboard 33 "x 15" (84 x 38 cm)
- 2 bars 1x3 length 39 "(99 cm) headers
- 4 bars 1x2 length 33 "(84 cm) panel
- 14 planks 1x3 13 "(33 cm) approximately
- 2 2x4 bars 3 "(76 mm) wide at 18" (46 cm)
- 2 2x4 bars Torn to a width of 3 "(76 mm) at 48 1/4" (122.5 cm) of the head of the head
- 2 bars 1x2 length 75 "(190 cm)


https://i.expert-h.com/en/krovat/1129#sigFreeId6b025b3fcb
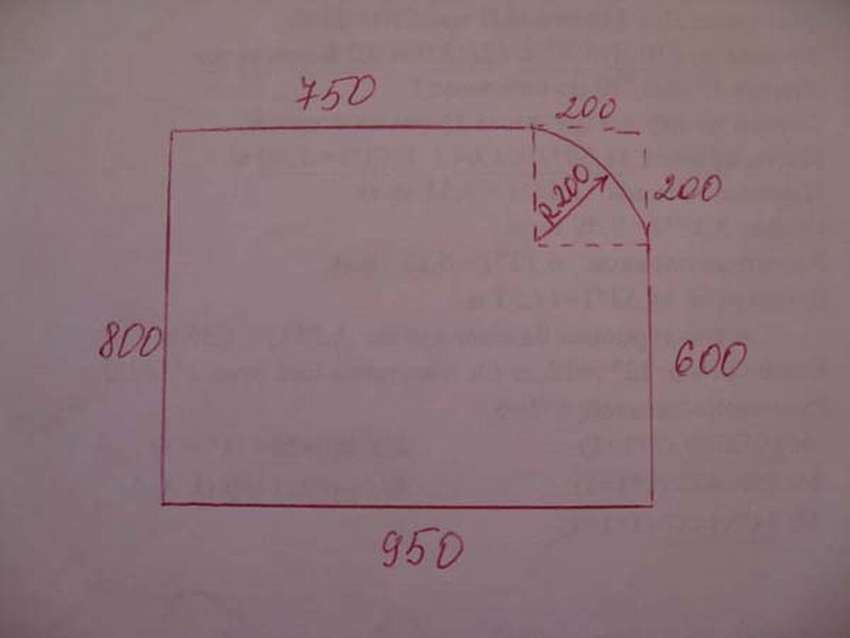
Children's bed with drawers and a shelf
Example, how to make a crib with lower drawers and a shelf at the foot of your own hands.
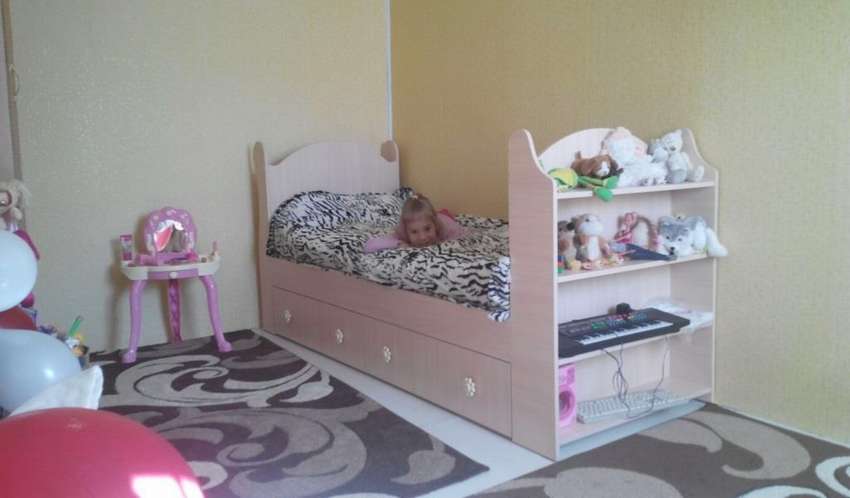
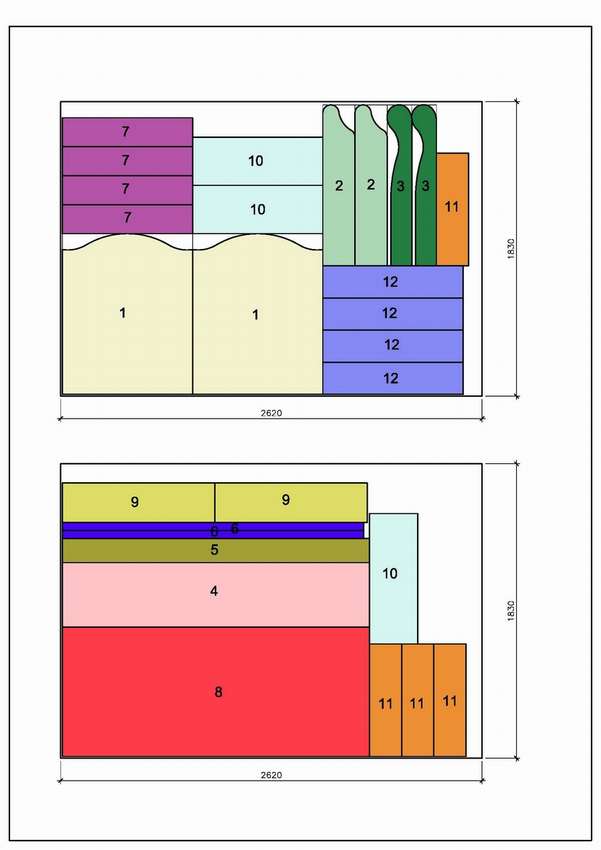
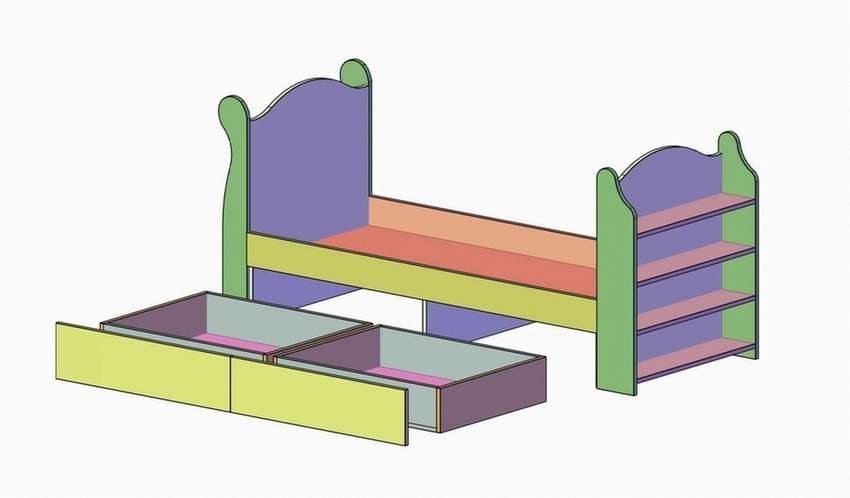 The bed is made with "reserve" under the mattress 800 x 1900 mm from chipboard. Below is a drawing of a design with drawers and a scheme for cutting chipboard.
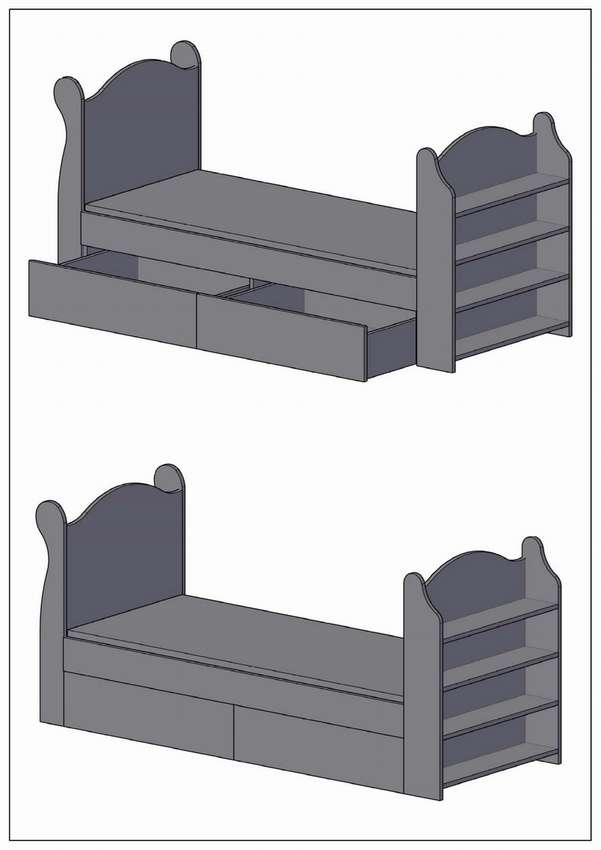
 The manufacturing procedure in the instructions on the site. Master Class, how to assemble a baby bed with your own hands look below at step by step photos.


https://i.expert-h.com/en/krovat/1129#sigFreeIdf9be2eff70
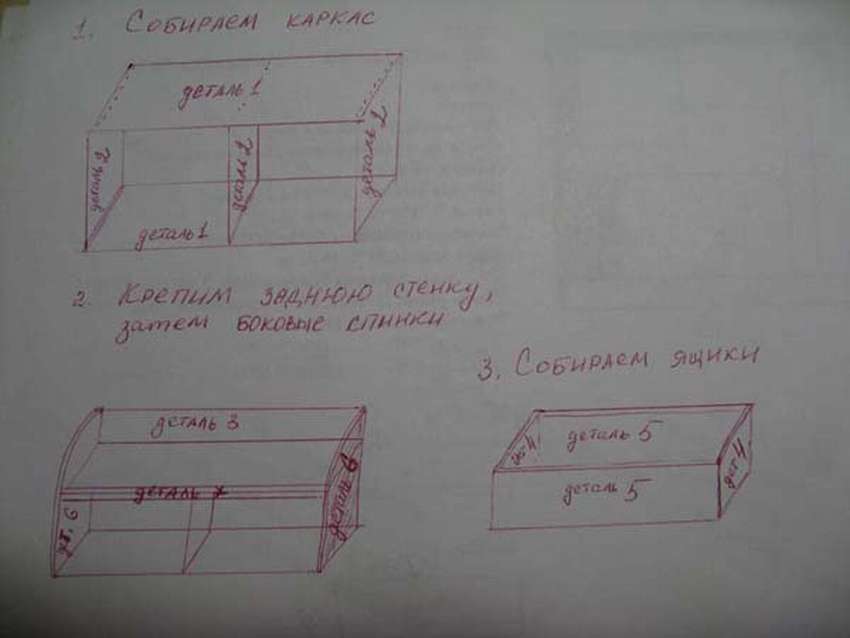
DIY bed with drawers
This step-by-step guide will show you how to make crib with drawers.
 All assembly steps, as well as useful tips and tricks, read on the author’s website, link under the gallery. The master class is shown in detail in step-by-step photos..


https://i.expert-h.com/en/krovat/1129#sigFreeId519d0028a0
How to make a bed for a teenager
Here is an example how to make a bed with lower drawers for a teenager.
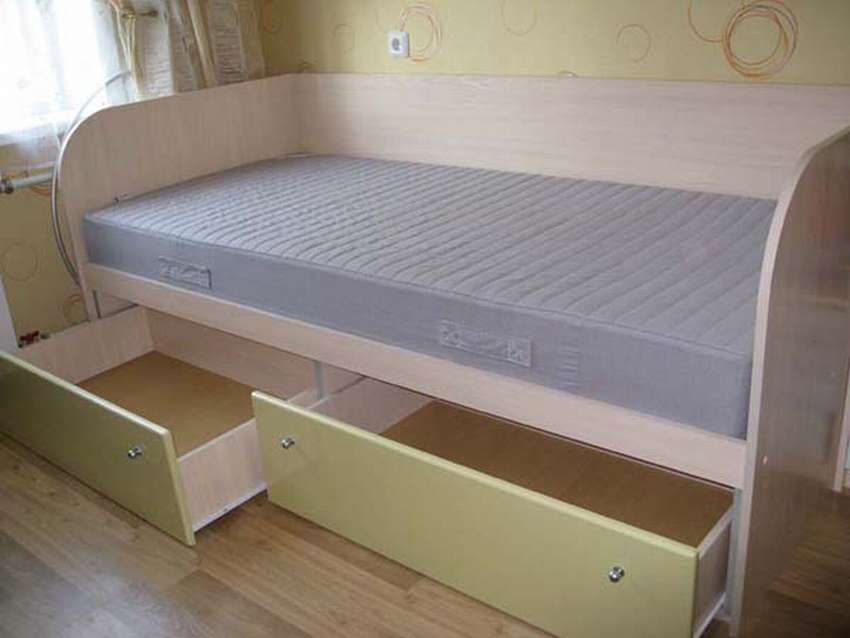 The bed is made mainly of chipboard, it is not very expensive. On the author’s site there are prices for all materialsTrue for 2009. The link is below.
 True, you still have to spend money on fittings, and this: 3-4 eccentrics, 4 handles, screws, guides. Although, given the self-assembly, the project can be called a budget.
Drawings of a children's bed with drawers


https://i.expert-h.com/en/krovat/1129#sigFreeId4e95e30954
Children's bed with drawers 100 photos


https://i.expert-h.com/en/krovat/1129#sigFreeId656e593eef
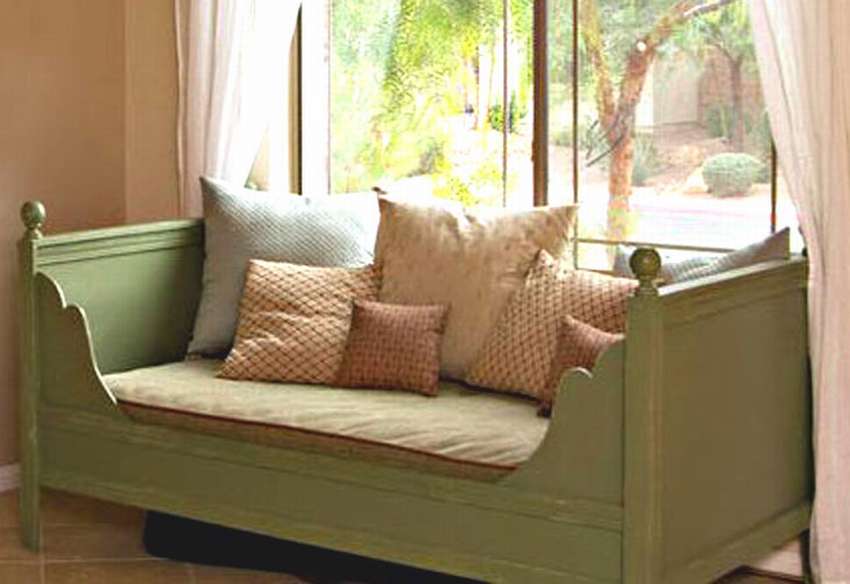
DIY daybed
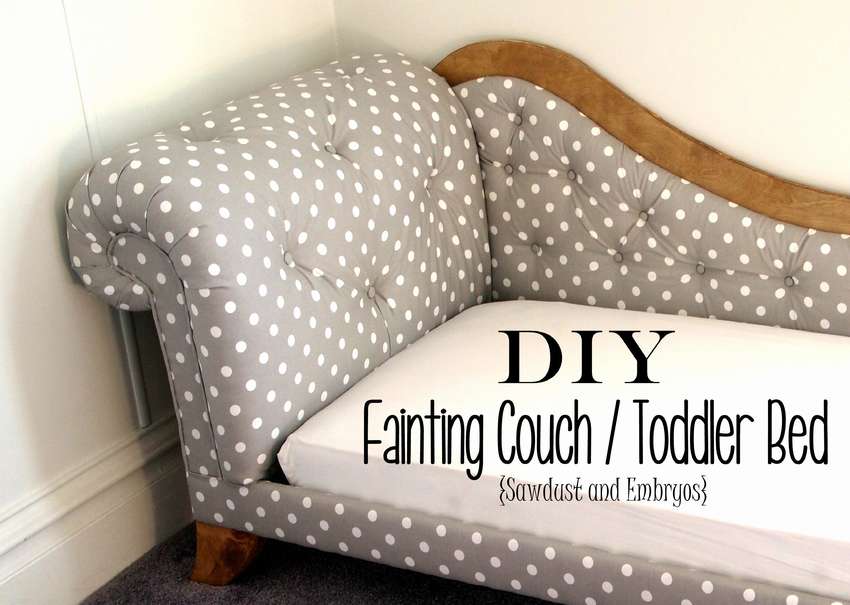 Want to make baby cots unique and charming? Here is something you will surely enjoy. This is an example of how to make soft do-it-yourself couch for children. Perhaps it was possible to choose a more practical and cheaper option, after all, children will only use these beds for a couple of years, but you must admit, this is a very nice couch. If you also liked it, you can read the instructions on the site. See detailed step-by-step photos in the gallery below..


https://i.expert-h.com/en/krovat/1129#sigFreeIddf8b0066f4
The second part shows how to make soft upholstery for a baby couch.


https://i.expert-h.com/en/krovat/1129#sigFreeId1a33370d38
Simple couch
 This simple sturdy daybed can provide a sleeping place for children or in your guest room. The design with classic design is very durable and suitable for a double mattress. Make a nursery do-it-yourself couch it’s not at all difficult, instructions on the process can be found on the website.
Below the gallery presents several drawings and three couches collected for this project.


https://i.expert-h.com/en/krovat/1129#sigFreeIde61bc09f99
Children's bed sofa do it yourself
A nice, simple design that uses a standard crib mattress to make sofa bed to the nursery. You can sit and sleep, very comfortable.
 Such the couch is very easy to doand quite inexpensive.
 Below in the gallery on step-by-step photos the assembly order is schematically shown. Instructions with a list of materials and sizes of parts can be read on the website. Also in the gallery see some examples of sofa bedsmade by this manual.


https://i.expert-h.com/en/krovat/1129#sigFreeId0f5f22a86b
DIY daybed
 This beautiful children's couch will surprise you with its simplicity of design. Design features: serrated edges, moldings inside and out, beautiful lining. If necessary, dimensions are easily changed. Make such do-it-yourself couch easier than you think. If you know how to handle a jigsaw, then you will not have any special problems with making a couch. The assembly sequence is described in detail in the instructions on the site, there you will find dimensions of partsto be cut and a list of necessary materials. In the gallery after the drawings, several examples of children's couches made according to this instruction are presented.


https://i.expert-h.com/en/krovat/1129#sigFreeIdc60d0c7a15
Couch in the nursery
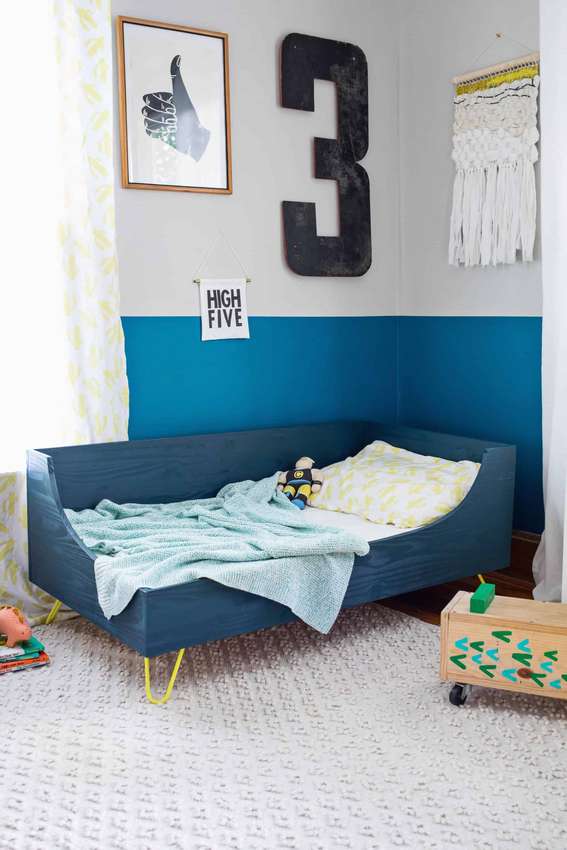 In the life of every mother, the day comes when the baby can no longer sleep in his crib, and you need to choose a new bed. Sometimes it becomesa problem, and so that the child does not act up, you need to come up with something that he likes. If for you to do do-it-yourself children's couch, this is the best option, why not make a model that fits well with your dreams about mid-century scandinavian design. On the Internet you can find many good beds for babies, for example, what you see in the photo, the author found Pinterest. He liked it, and he decided to try his hand at creating something with a similar silhouette at the top, but with metal studs for legs instead of conical wooden with an original design. When a child is growing up, you can use the same stilettos for legs to make a double bed for him.
For the couch you will need saw boards into such parts:
- saw a 1 x 16 board 245 cm long to make one part 27.5 ″ 70 cm long and one part 53.5 ″ 136 cm long. You still have some margin left;
- saw a 2 x 6 board 245 cm long to make two pieces of 70 cm each;
- cut a 2 x 2 bar 245 cm long in half;
- saw four 1 x 3 boards 245 cm long into 70 cm pieces so that you get a total of 12 pieces.
This the bed frame fits a standard crib mattress. Instructions on how to make a couch with your own hands and a list of materials read on the site. Below in the gallery step-by-step photo assemblies.


https://i.expert-h.com/en/krovat/1129#sigFreeIdfe96522ecb
Children's daybed drawings


https://i.expert-h.com/en/krovat/1129#sigFreeId4e5b5dc81c
Children's daybed 100 photos


https://i.expert-h.com/en/krovat/1129#sigFreeId10d7b48c63
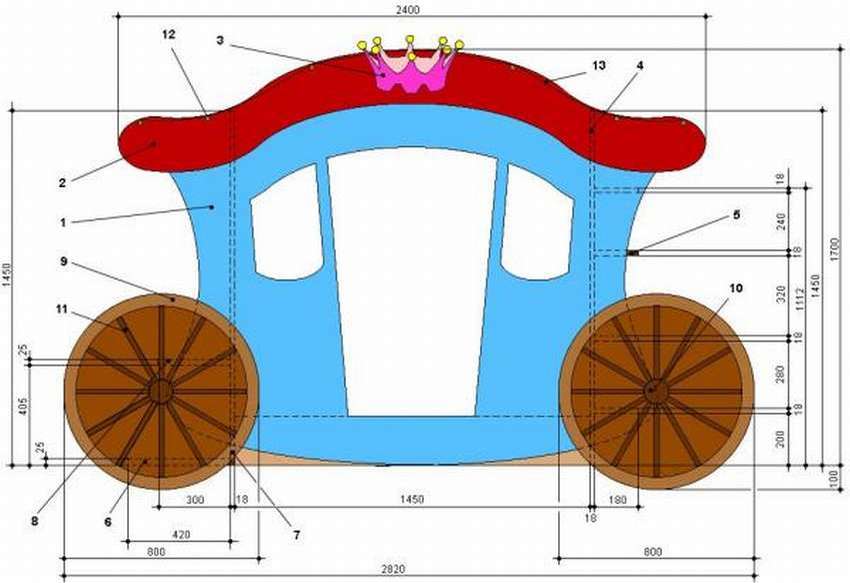
Children's bed in the form of a carriage
Of course it’s a great idea to do bed for a girl in the form of a princess carriage.
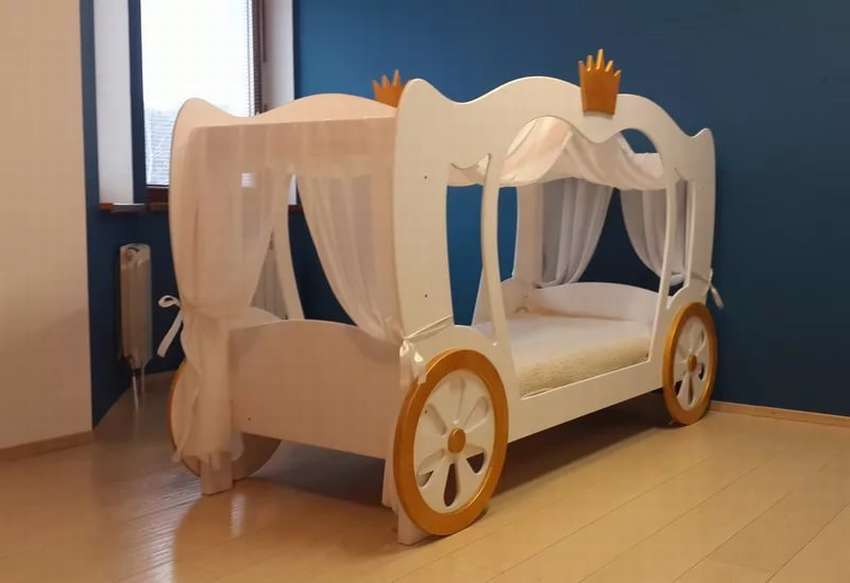
 There is no need to discuss the natural connection between girls and princesses, especially Cinderella. Generations of children were fascinated by the incredible life of this charming princess.
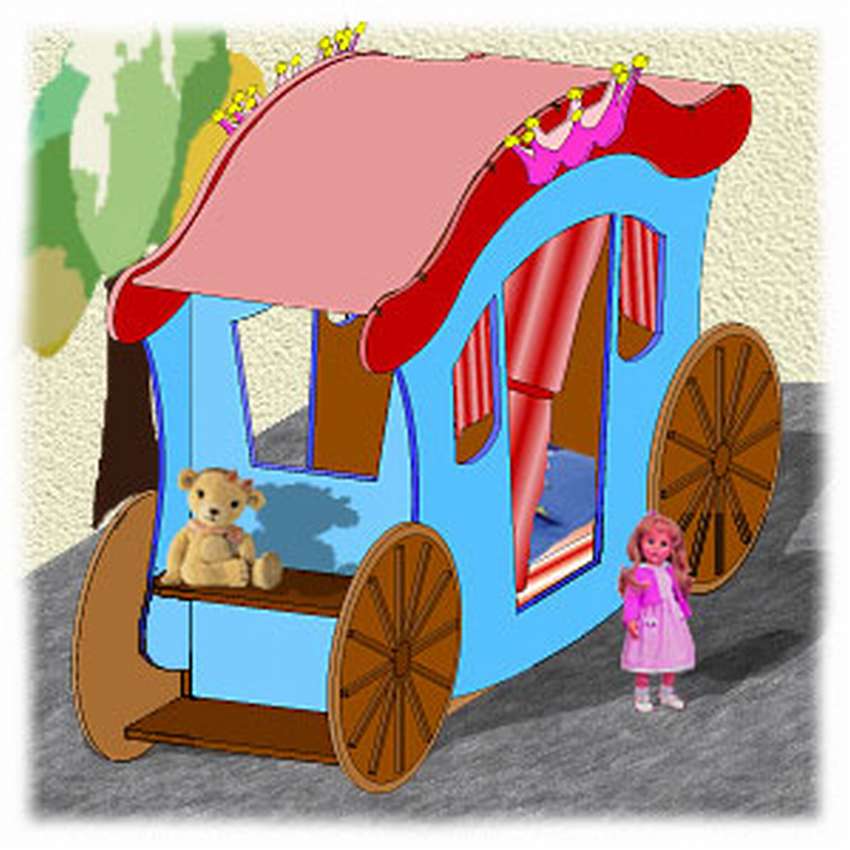 Thanks to cutting-edge design, you now have the chance to motivate your daughter’s imagination and make her dream come true. Carriage bed, this is the dream of every little girl, because everyone wants to feel like a princess. Therefore, the best gift is wonderful carriage bedwhich you can do with your own hands. To read the instructions, use the link under the gallery, where you will find a detailed description, how to make a do-it-yourself carriage bed and a list of required materials with dimensions.
Below in the gallery are presented several drawings with design diagrams.


https://i.expert-h.com/en/krovat/1129#sigFreeId0fc9666685
Check out 100 more photo examples cots for girls made in the form of a beautiful carriage.


https://i.expert-h.com/en/krovat/1129#sigFreeId2c66d5ba75
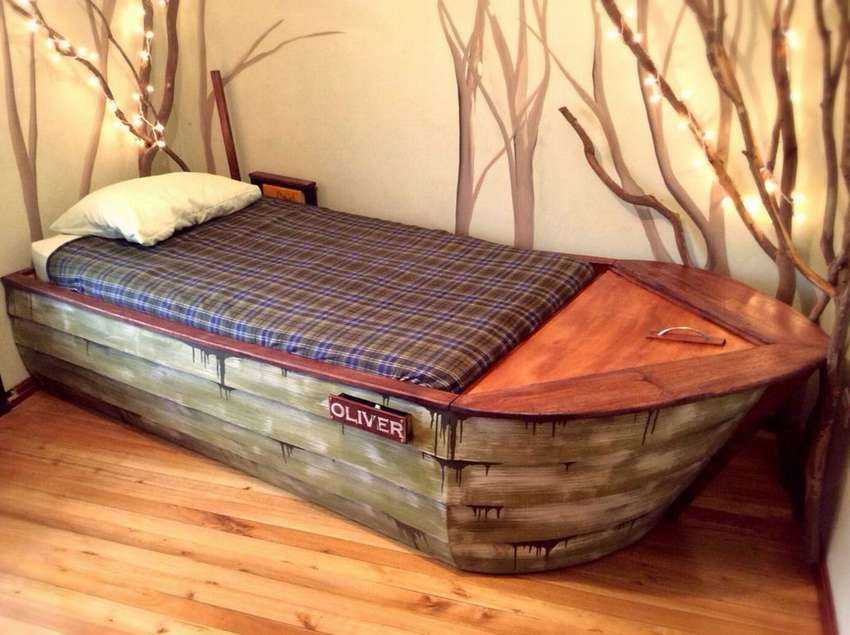
Baby bed ship
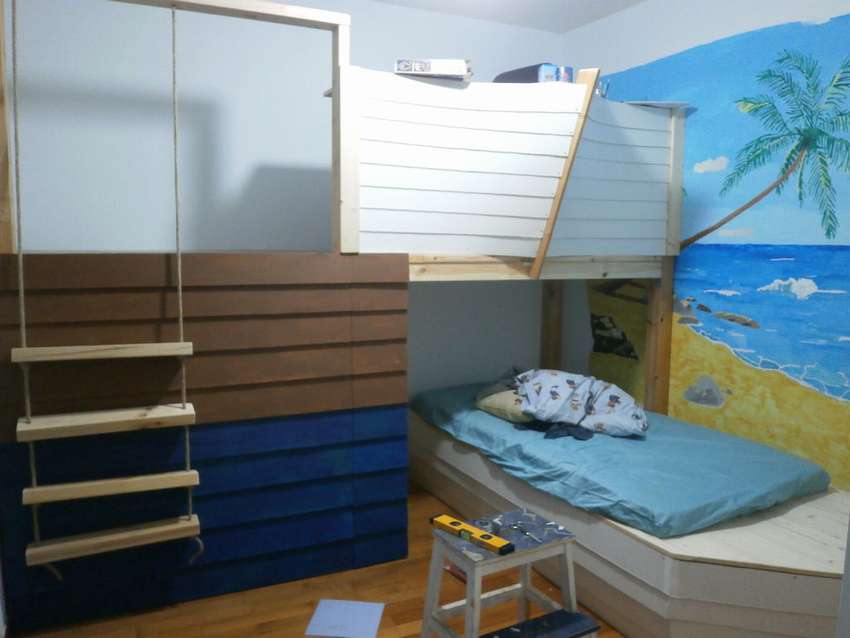 Children like the marine theme and if your child dreams of sleeping on the high seas, do it for him ship bed. In general, you can design the entire bedroom in a marine style. The instructions below apply only to the bed and not to the rest of the structure (table and warehouse). Start collecting the front of the ship with middle keel supportand not from the sides. To support the bed trims, screw the side blocks 200 x 4.5 x 4.5 (2 pcs.) Tip: Start from the bottom of the nose and, when rising, carefully measure each part for an exact length that fits the keel (you can draw a line to see where each part should be). To make an exact shape, place a large sheet of paper on top and draw lines. Then use the drawing as a stencil. Do not forget about the keel hole. If you want, add metal loops and make on the deck secret locker.


https://i.expert-h.com/en/krovat/1129#sigFreeId4f9eb5600f
Children's bed ship 100 photos


https://i.expert-h.com/en/krovat/1129#sigFreeIdc54fff30d7
Children's bed pirate ship
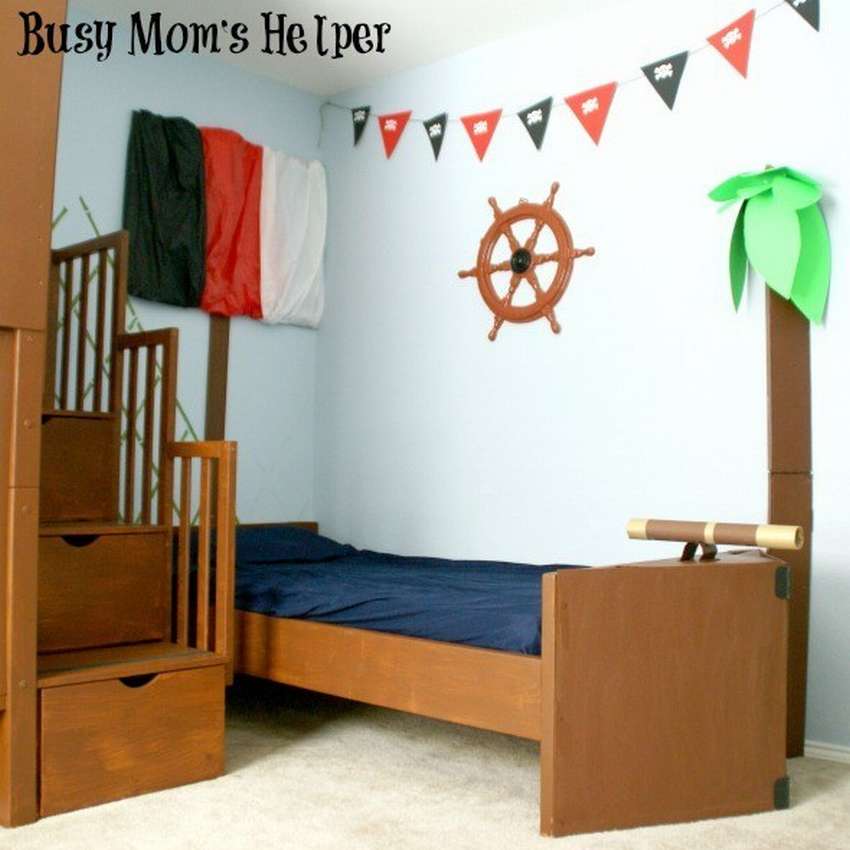 It may look a bit off-standard, but this one baby bed real pirate ship. Very durable and safe. Well, unless the child drops the spyglass a couple of times, this is not a problem, the main thing is that the children like it. Read the instructions on the author’s website, and you will also learn how to turn a simple double bed into a fun one pirate ship bed. Of course, your bed may vary in height and the like, so be sure to measure everything well. In addition to the wooden parts, you will need a lot of tape and cardboard. For the front of the bed, use screws to attach two square boards to the end of the bed pillar. Screw the hinges to connect the boards together at the end. To close the gaping hole between the bed leg and the tip, just glue a few sheets of cardboard. Add more decor.: the captain’s steering wheel is mandatory, this is a mandatory attribute of any ship, palm trees, yards, pennants - this is already possible.


https://i.expert-h.com/en/krovat/1129#sigFreeId14e49c8fc3
Pirate boat bed with secret box
 Probably, hidden doors and secret compartments are laid in us by nature. We all want to have a bookcase with a secret door. Or a secret candlestick, which turns the fireplace and opens the passage to the secret laboratory. However, about the beds. This pirate boat bed has three ... maybe four secret compartments. One thing is pretty obvious. Bow hatch The boat opens to store blankets and other large items. On the starboard side there is a small box in which you can hide the goodies. And on the side there is a flagpole, clicking on which opens secret panel. That's cool. In addition, you can remove the mattress and store things under the bed itself ... In general, if you want to do something like that, the instructions on the site. And if this is not your first project, you’ll understand, nhaving examinedstep by step photos.


https://i.expert-h.com/en/krovat/1129#sigFreeIdf612319ed6
Of course, the pirate theme provides the most fantastic solutions, but, unfortunately, the possibilities for most people are limited. At least look at the beautiful pictures that can be made beds pirate shipsmaybe some ideas come in handy.


https://i.expert-h.com/en/krovat/1129#sigFreeIde3fa514096
Bed house for a child from 3 years old do it yourself
 An excellent safe option for an older baby to facilitate the transition from a crib. The photo on the right shows materials and toolsthat you will need to do do-it-yourself wooden crib. note: The boards will depend on the exact size of the mattress and the height of your ceilings. Cut the 2x2 bars to make a frame around the bed attached to the uprights at the corners. Pre-drill the holes slightly less than the screws so that they do not touch the place of their intersection. This is an important point for stabilizing angular supports.. Attach the steel corner brackets. Cut 2x2 bars for the upper rungs (the same length as the lower rungs). Fasten to these corners metal staples.
 Attach the bars to form a 90 degree angle for each end of the house. Mark where they are coincide with the outer edges of the house. Cut the edge along these marks and attach the roof parts, after pre-drilling the holes for the screws. Set one 2x2 crossbeam between 2 peaks and the house is finished. Cut the bars for stability. 1x3 at the bottom, evenly distributed between them by about 5 cm. A good glue for wood should be applied to all joints! And steel corner brackets should be installed on all 90 degree joints. Sand and apply a non-toxic, clear, water-based coating.


https://i.expert-h.com/en/krovat/1129#sigFreeIdcacff943a4
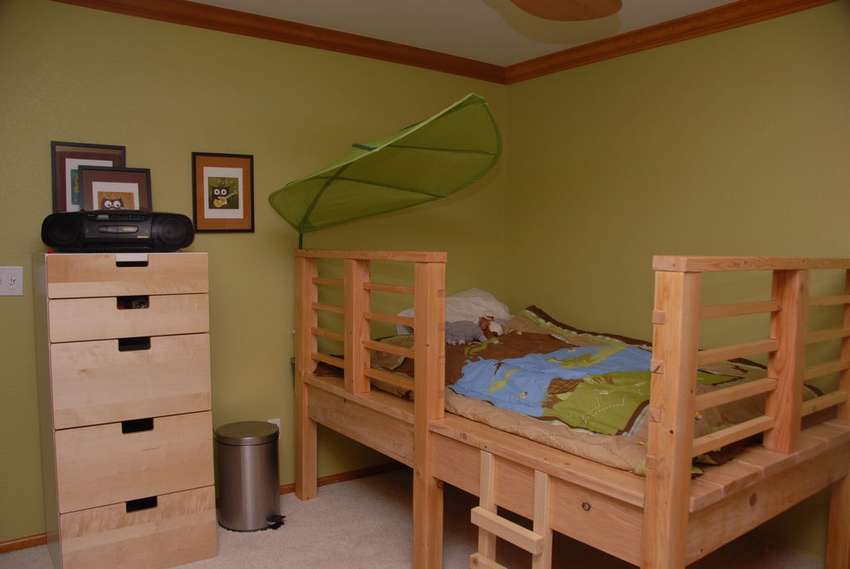
Children's bed loft with a bed below
 Here is an example how to make a baby loft bed. Many eventually come to the conclusion that it is better to make furniture for children with their own hands. Either design and do, or wait for someone else to do it for you. Is it not so with everything in life? Cost, time and quality ... you can always have two at the expense of the third. If you can’t do it cheaper, you can do it better using proven materials. Most of the items purchased at the store, even Ikea, are made of chipboard (MDF) covered with thin wood veneer. It sags under the weight, swells from moisture, the veneer can peel off, and the screws will not hold, so you need fasteners for a quarter of a turn, which they all use. Try rearranging the bed after assembly, and you will see how stress destroys the structure. Generally don't be afraid to take on even complex projectsanyway, something will work out, and it will work out well, because you worry about your children.


https://i.expert-h.com/en/krovat/1129#sigFreeId2969fa4ce0
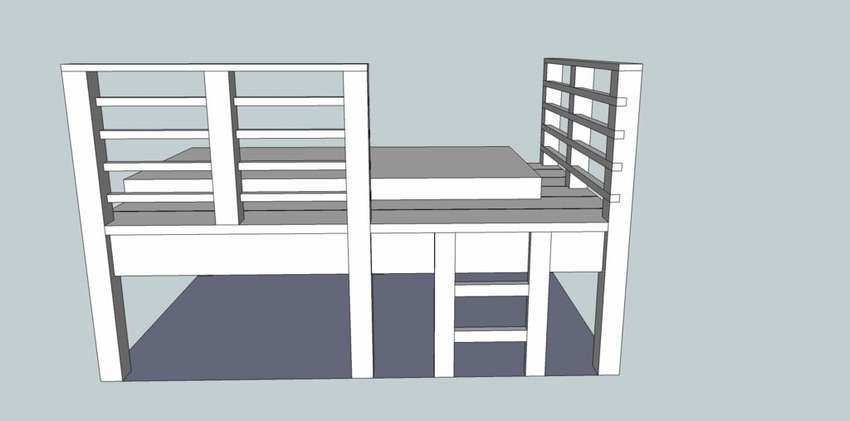
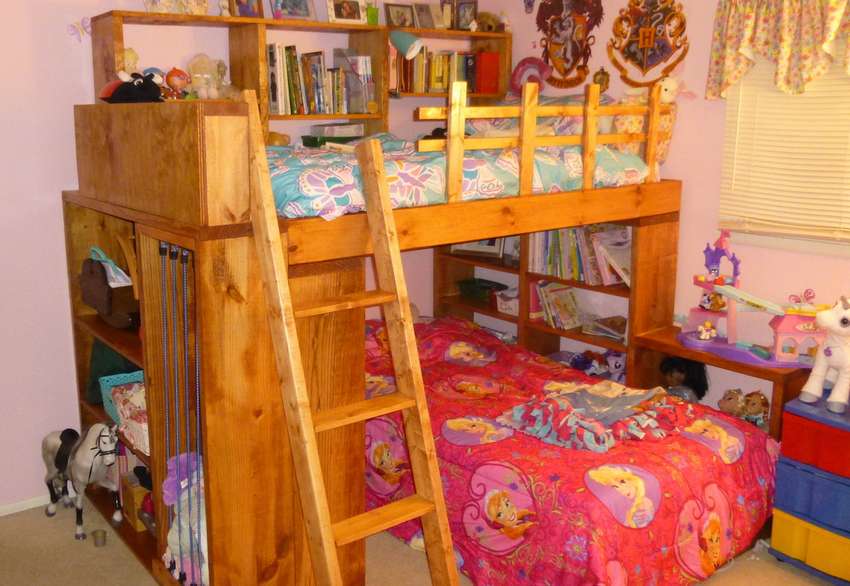
Built-in bunk bed for children
 Children's bunk beds are a great solution for a small room. And if you are lucky, as in this case, when there is a small room just right for the size of the bed, then you can allocate much more space in the children's room for games and other activities. Look at this example, how to make a built-in bunk bed do-it-yourself. Unlike a freestanding bed, this design has its own characteristics. In this case:
- Both platforms measure 207 x 102 cm (to accommodate a double XL mattress measuring 203 x 96 cm)
- Lower bed: The top of the platform is 25 cm from the floor, leaving the mattress at a height of 17 inches and a ceiling height of 34.5 inches.
- Upper berth: the upper part of the platform is 56 ″ from the ground, resulting in a mattress at a height of 43 cm from the ground and a ceiling height of 83 cm.
- The stair rails have a width of 46 cm, which makes a complete staircase 53 cm wide from edge to edge. The steps are located at a distance of 30 cm from each other.
- Top rail 18 cm above the top of the mattress (12 cm required) with an 8 cm gap between the two slats
How to make a bunk bed do-it-yourself shown in great detail in the master class on step by step photos.


https://i.expert-h.com/en/krovat/1129#sigFreeId84920bc835
DIY wooden bed
 If you like rustic design, here is an example, how to make a children's wooden bed from logs, simple and original. This is a project that most people can implement even with little experience and using ordinary tools. if you have dry logs with peeled bark, you can immediately get to work. If not, you will have to wait until they dry. You can read the instructions on how to make a children's bed on the site, it is very long and detailed, but according to the author, you spend less time making the bed than reading the instructions. The master spent most of Saturday, as well as several hours in the evening, grinding, painting and assembling the bed. Most of the time was spent making spindles to try to grind them to the right size. The bed is really comfortable, but for the child the main thing is that there is something fabulous in it.


https://i.expert-h.com/en/krovat/1129#sigFreeId0e994518e8
Children's bed out of doors
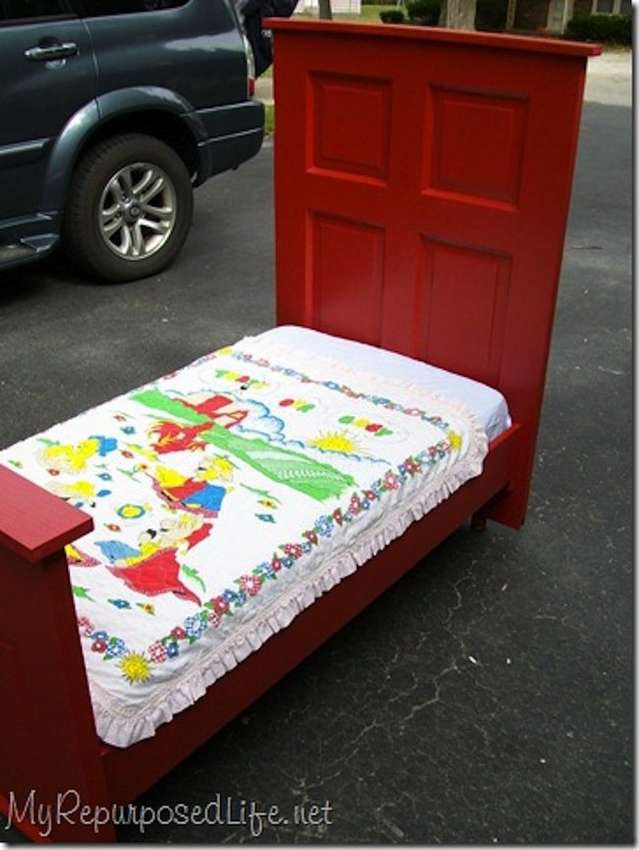 Here is an example of how to make an original crib from old doors. The author of the project is not new to the fantastic redesign projects. But do not worry, this is one of the furniture projects that you can do with your own hands. So all you need is find the old door and follow this walkthrough. First you need to cut the door into two parts. To get a straight line, attach the board to the door so that it serves as a guide for the saw, and use a jigsaw. Then drill holes in the bottom. Make side rails. To give them extra strengthmake a clip for the headboard and footboard. Glue them with wood glue, and then screw them into place. To attach the side rails to the headboard and footboard, you can use multiple brackets. Insert all the screws into the side guide, but use only two screws for the headboard and footboard. it to easily make out the bedwhen it will be necessary to bring it into the house, then it will be possible to add additional screws for strength.


https://i.expert-h.com/en/krovat/1129#sigFreeId04d191afb8
Original baby bed in the form of a ring
 The boys like the original furniture - cars, steam locomotives, ships. And if the child dreams about fighting ring beds, also not a problem, according to this instruction you can realize such a desire of a little dreamer. This ring is made of the frame of the old bed, corner posts made of PVC pipes, painted black and closed on top with plastic plugs. You also need to cut off the additional supports from the 2x2 bars. From the 2 x 8 boards, make support strips under the mattress. Cut the boards and screw them between the base of the front and rear legs. This step is necessary to stabilize the rackssince the headboard support has now disappeared to prevent the bending of the pillars when donning ropes. The rope is threaded through rings fixed on supports eye bolts. Cover the corner springs with insulation to prevent pinching. Cut the excess rope and wrap all the ropes with electrical tape. This step makes the ropes less flexible. Add stunning graphics to the wall! Put a metal trash can (perfect place for toys!). A small black commentary table (for homework), steps and a small staircase.


https://i.expert-h.com/en/krovat/1129#sigFreeId746d10b4f3
Asymmetric bed
 Asymmetric robotic bed for children from 2 sheets of plywood. The headboard has an accessible shelf for water bottles, books and game items. The kit includes custom made pillows that look like robot eyes, flexible led reading lightsimilar to an atmospheric sensor. This bed has not yet been fully designed, so you can paint the details or make applications to create a real look for the robot. Project Materials: 2 sheets of plywood 3/4 ", three bars 2 x 4, 26 threaded inserts, nuts, screws. All parts of the robot bed, cut from two sheets of plywood in the attached drawings in the gallery - a plate for the head, a shelf for the cavity, hands, plate for legs, feet, folds.Also shown in the gallery assembly of a bed from plywood on step-by-step photos.


https://i.expert-h.com/en/krovat/1129#sigFreeId241480cba5
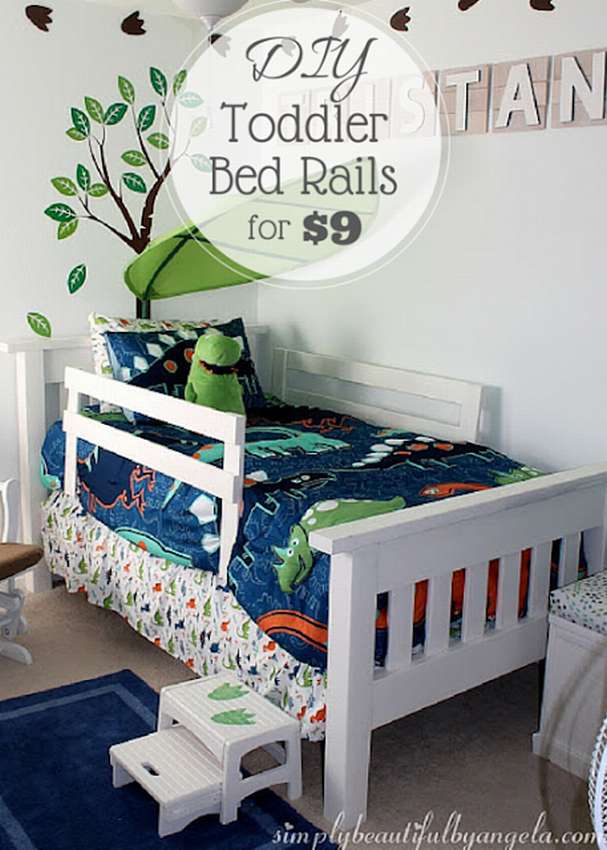
Drop limiter for crib
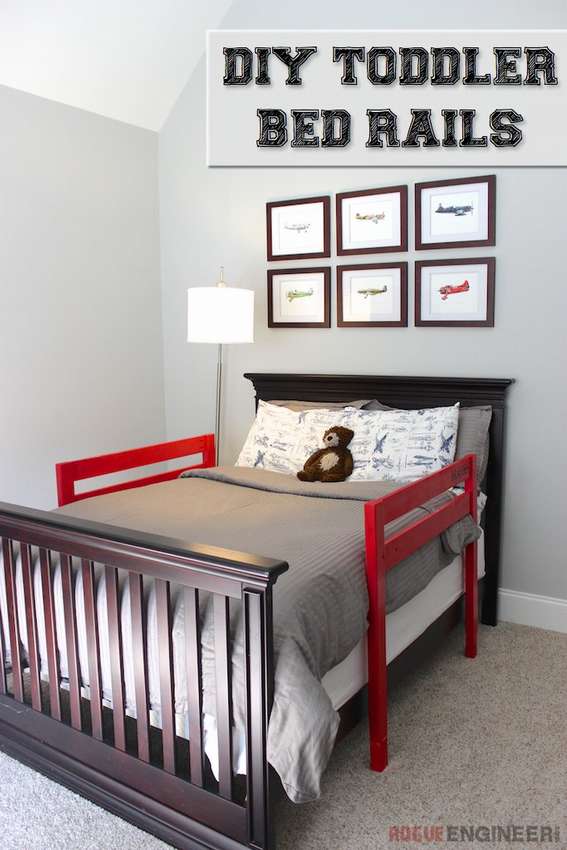 When your baby moves into a large bed, you will need limiters to prevent the child from falling. This is not a complex element of the bed, which you can easily make yourself.
The home-made handrails presented here are not only durable, but also a good wooden alternative to the cheap plastic handrails that are sold everywhere today. For work you will need a miter saw and a drill.
Materials for one crossbar:
- 1 block 2 x 4 96 ″ (244 cm) long
- 2 boards 1 x 4 72 ″ (183 cm) long
- 1-1 / 4 ″ pocket screws
As a spacer here, 1 × 3 boards were used
It’s not difficult to do, several diagrams and step-by-step photos below in the gallery.


https://i.expert-h.com/en/krovat/1129#sigFreeId1449b2a4b4
DIY bed restraint
 Baby bed railing should serve two purposes. Obviously, the first is safety, and the second is a sense of security for the child so that he can move normally and feel more comfortable. You will need only 10 wooden pieces.
- 4 50 cm long (vertical racks - the height of this mattress is 23 cm)
- 4 122 cm long (crossbars)
- 2 102 cm long (connectors under the mattress)
To make baby bed restraints safeattach the L-shaped brackets. Note: just make sure you have big, strong L-shaped brackets! After that, connect the two U-shaped shapes by attaching the 122 cm crossbars to the racks spaced 8 cm apart and fill with wood putty. After that, grind to get rid of any irregularities. Then apply one coat of primer, two coats of paint and a coat of polycryl. The length of 122 cm is ideal because it leaves only a small space, but enough for the child to rise.


https://i.expert-h.com/en/krovat/1129#sigFreeId582909095c
DIY bed 200 photos


https://i.expert-h.com/en/krovat/1129#sigFreeIdc4093414e4
Hello, I am the author of this article, so I look forward to asking questions for this article in the comments below, I will answer all !!!
If you have questions on another topic, ask them on our forum, we will answer you
- Two baskets of paper in 5 minutes (Master class)
- How to make a simple and compact table for a milling cutter from plywood
- How to make a soft headboard tile (Instructions + step by step photos)
- Cinder block benches: a convenient bench in 55 minutes
- How to make a bed with a niche: saving space (Master class)