Do-it-yourself fire hearth made of metal 300 photos step by step tools
 hearth for a bonfire in a country house made of metal
It is wonderful when the summer cottage has its own hearth for a bonfire, where you can sit in your free time, enjoying nature with friends and family. There are many different ways to equip a campfire place in the country, usually these are stationary structures made of bricks or concrete blocks. But this is not always convenient, sometimes it’s more advisable to make portable metal fire pitto organize a picnic in the yard, grill something tasty and just sit by the fire.
Metal foci, which is good, are that they can be stored in the utility room and taken out only when necessary. Not everyone has a large yard, or simply the design of the site does not provide for the installation of a stationary fireplace. Here are a few examples. how to make a simple hearth for a fire from metal.
The hearth for a bonfire in the country of metal
 If you have a couple of metal sheets lying around in your garage, find them worthy of use. The authors of this project just found the right material when they were cleaning the garage. Since it was autumn and the evenings were already quite cold, the idea came make a fireplace for metal.
For this project you will need:
- steel plates about 5 mm thick
- angle grinder with grinding wheel and cutting discs for steel
- welding machine
- something for measuring angles
- pencil
- clamps

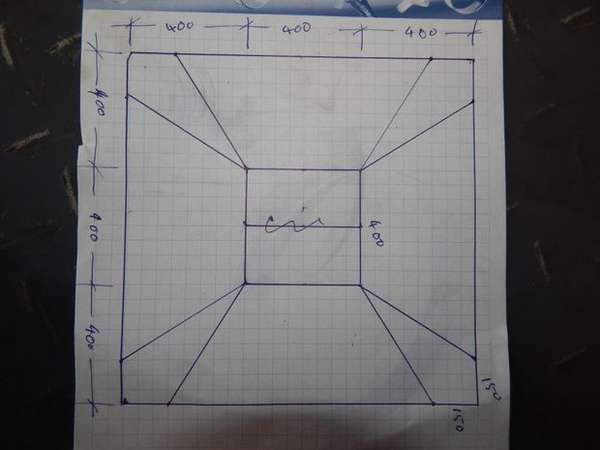
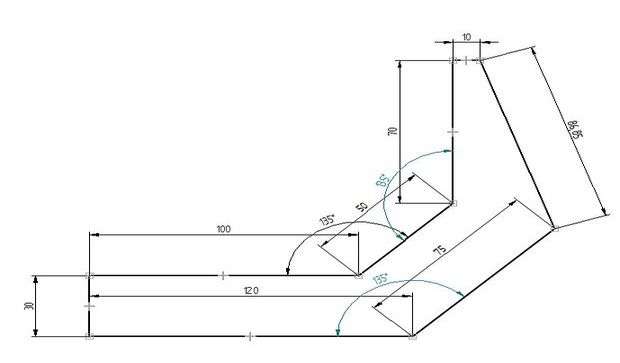 It is necessary to cut one bottom plate and five walls, in general, as shown in these drawings.
- Cut out the parts and clean the edges if they are sharp.
- Then assemble the frame. Weld sides at an angle of 108 °. To do this, at this angle, cut the trim boards to use them as a stencil.
- When done with the frame, set the bottom. Before welding it, check if it fits perfectly. If this is not the case, clean until it fits flat on the frame.
- Weld the bottom from all sides, as in the picture.
- Mark the middle of the bottom and draw three lines for the legs with an offset of 120 °. Weld them and paint if you want.


https://i.expert-h.com/en/kostry/ochag-dlya-kostra-iz-metalla-svoimi-rukami-300-foto-poshagovye-instrunktsii#sigFreeId0cd9600910
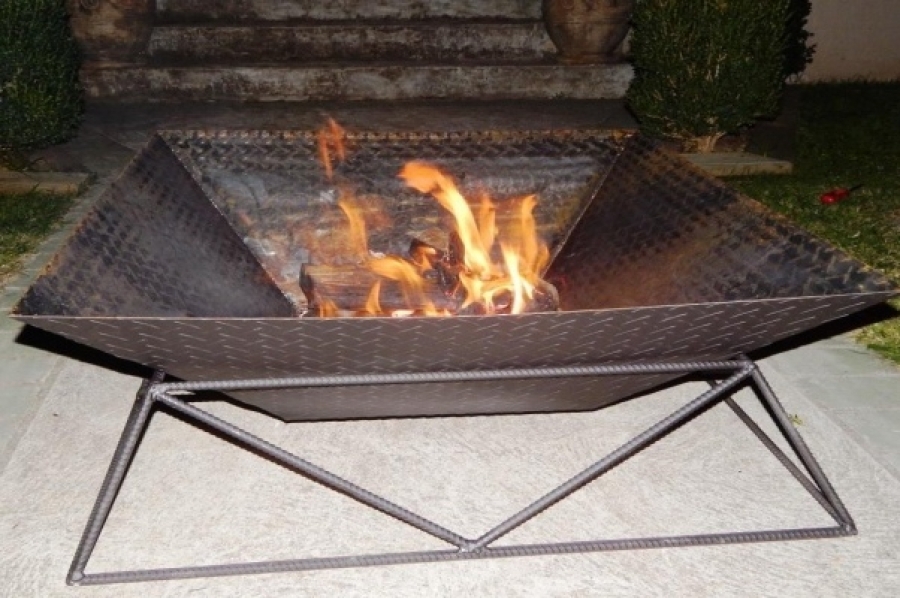
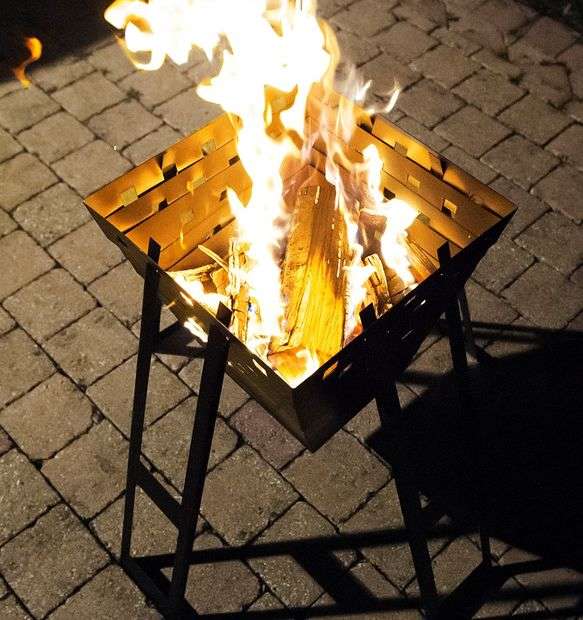
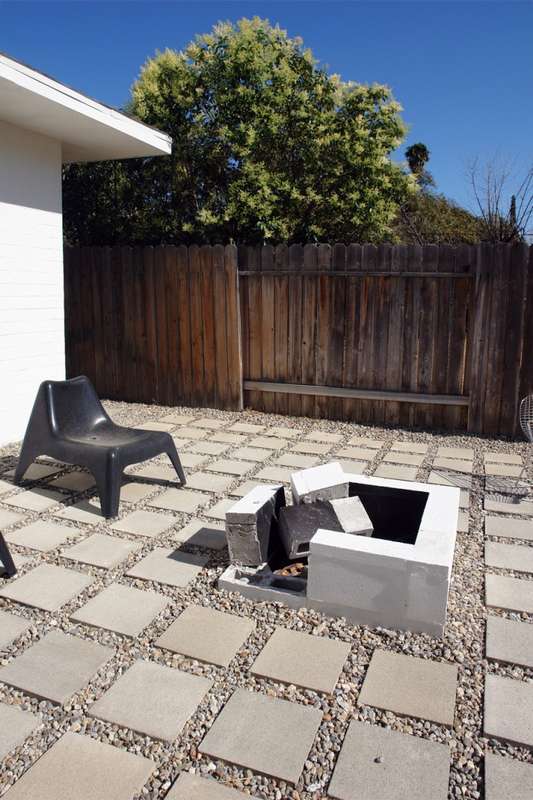
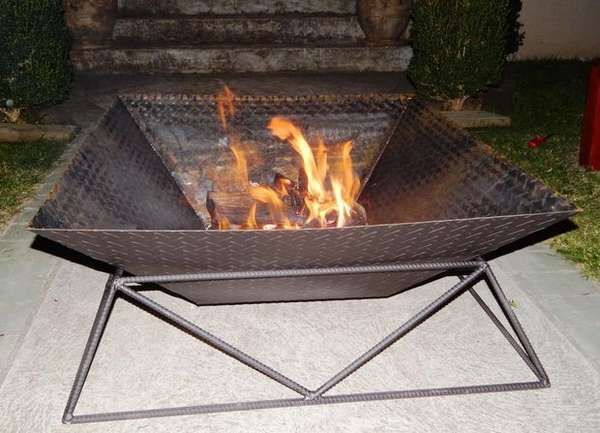 Another similar option metal fire, only square and framed. The design is very simple and should not be too difficult for those who have basic welding skills and experience in plumbing. You will notice in the photographs, and the author himself claims that he is an absolute lover, so I hope that this fact will inspire other lovers to implement this and other projects. In this case, the author used only simple metric measurements, without computer programs and complex drawings.
To make part of the bowl, you will need a piece of steel plate 1200 mm x 1200 mm. This is half the standard sheet, so only one cut is needed to make the initial square. To make a stand, you will need about 11 m of 12 mm reinforcement or a steel bar.
 Step 1: Cut the plates for the bowl
- Take a tape measure and mark the steel plate as shown in the sketch.
- Use the cutting blade to cut the corner parts as shown.
- Lightly sketch the fold lines in the center square. This will help to gently bend the plate.
Step 2: Bowl formation
- Now bend along the edges of the central square until the corners intersect.
- Smooth the corners slightly to hold the shape.
- At this point, you may need a hammer to connect the edges.
- Weld the edges together.
Step 3: Making a stand
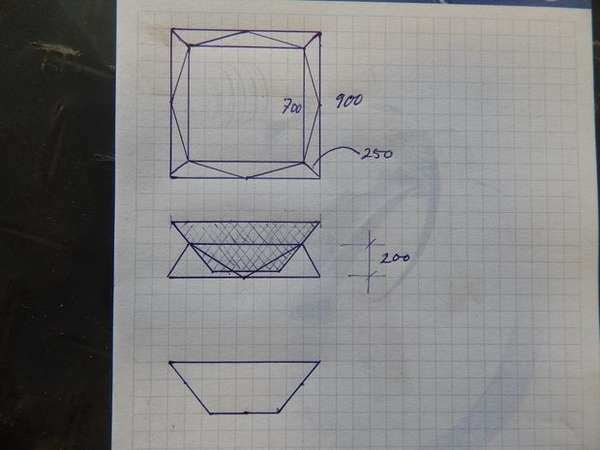 The idea of the stand is to safely raise the campfire site above ground level. A stand or frame consists of two squares; one is 700 mm x 700 mm to hold part of the hearth, and the base is 900 mm x 900 mm. Between these squares there is a very simple lattice that gives the structure the necessary rigidity.
First cut the bar between the squares: 4 x 900 mm and 4 x 700 mm.
- Set the squares, making sure to get even angles. Tip: Before welding, measure the diagonals of the squares to make sure they are even.
- Once the smaller square is in the desired position, measure and cut the rod, which will be between the corners.
- Carefully install them and grab them by welding.
- When all four supports are on a meta, you can get rid of temporary supports.
- Make sure the structure looks even and square. If looksawkwardly, don't be afraid to hammer.
- Now measure and trim the bar to go from the centers of each edge of the larger square to the upper corners. If it’s not clear, just look at the photo.
- If necessary, align the seams with a grinder.
Step 4: Conclusion
Install the armature rack to the ground. Lower part of the hearth into the stand. Stand back and admire what it looks like.


https://i.expert-h.com/en/kostry/ochag-dlya-kostra-iz-metalla-svoimi-rukami-300-foto-poshagovye-instrunktsii#sigFreeIdfaa40aff1a
Fire hearth
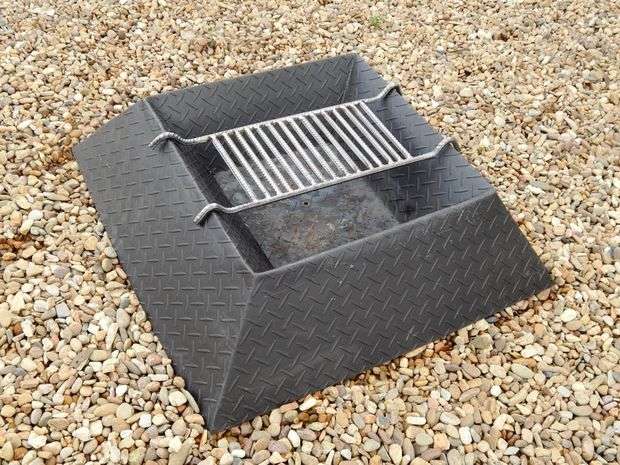
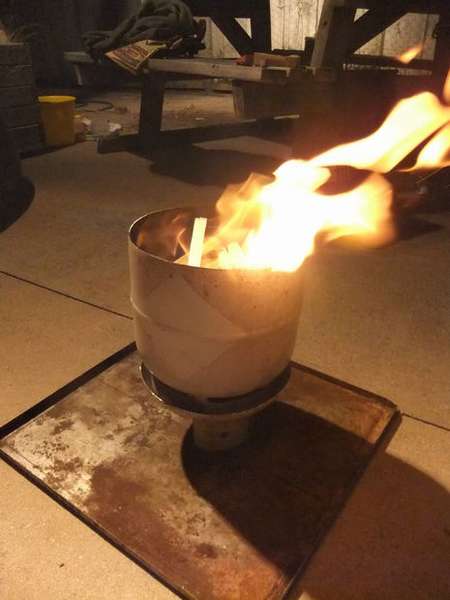
 How to make a simple and compact hearth for a fire from a sheet of steel.
You will need half the standard sheet 2.1 mm thick. In the sense, this is not a prerequisite, any steel plate is suitable, just so that it is not too thin. The overall dimensions of the sheet required for this design are 1200 mm x 1200 mm.
Of course, you can customize the design according to the materials that you have. There is no need for a separate stand for this outbreak, this is all one thing.
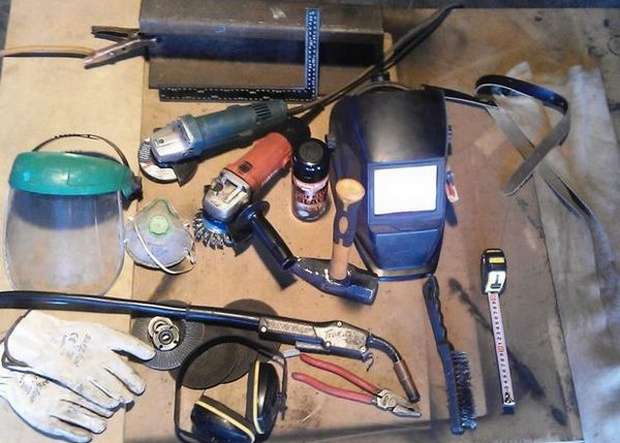
Everything you need for work is shown in the photo below.
 Paper layout and drawing
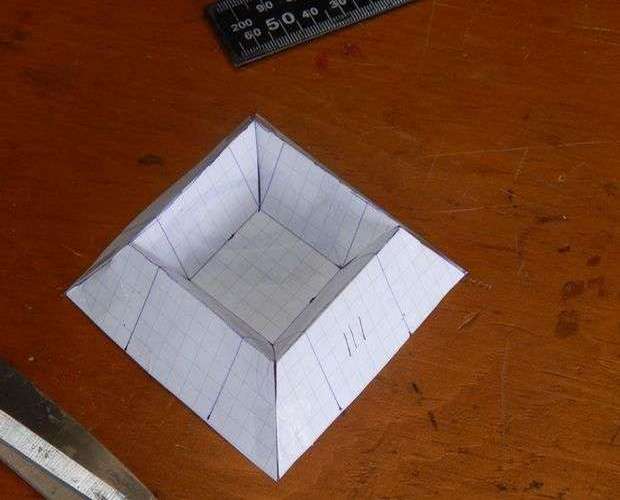
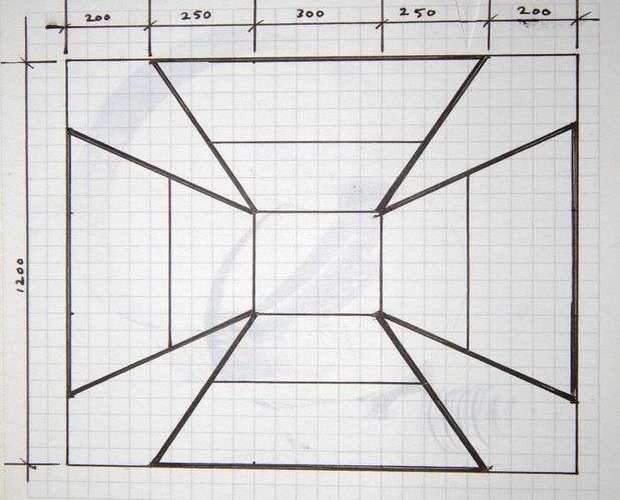 The author wanted to make a compact hearth so that it could be installed even in a small yard. From here the idea arose that it was possible to create a hearth from one sheet of steel, but for this it was necessary to make simple models on graphic paper and compare the results. You can use the same technique to create your own design. From the figures you can see that it was a very simple process of transferring dimensions from graphic paper to a steel plate. The heavy lines in the sketch are cuts, and the light ones are folds. Mark all this on the smooth side of the steel plate as shown.
- Cut corners. This step is very simple - but noisy.
- Grinder cut four "V" from the corners.
- Where there are marks, make light incisions to make it easier to bend. The author used a piece of rail to bend.
- Sand the edges of the “V” cuts, it’s more convenient to do it now.
- The first; bend the outer piece with the smooth side up. Do not try to reach the final position.
- Then bend the inner folds to the other side. Try to make the seams meet in the folded corner.
- Fold the corners to create a beautiful line. When all four corners converge, tap with a hammer so that the seams intersect with weld them. Try to make the welds neat.
- Bend the outside so that it joins the corners. Weld the edges from the inside.
The fire is ready and looks good, but a few more touches will make it even better.
- Drill holes for a stack of water, one in each corner and one hole in the center.
- Pokraste heat-resistant paint.


https://i.expert-h.com/en/kostry/ochag-dlya-kostra-iz-metalla-svoimi-rukami-300-foto-poshagovye-instrunktsii#sigFreeIdb5be783432
 And here is shown how to make a simple grill for your metal fire. This is a very simple design, designed to adapt to any campfire site. This design is suitable for stationary structures made of bricks and concrete slabs, and for portable metal products, which are presented in this article. Even if you have a regular grill, you can use this simple and convenient grill. You just need to resize a little.
Materials:
About 4 m of reinforcement 12 mm (or any other material that you can get).
Tools and equipment:
- Gloves of good quality.
- Protective glasses.
- Hacksaw or any other tool to saw the armature.
It will be necessary to bend the reinforcement. If you have a rebar, then of course there are no problems, but few people have such an expensive thing. This is not scary, there are so many ways to bend the fittings, from the method of heating to the use of various kinds of stops. There are hundreds of articles on this subject, you can look on the Internet.
And of course you need welding.
Make a grill
This grill consists of two beams with hooks at each end to hang on the edges of the hearth. Between the two rungs, the rods that make up the grill are welded.
- First of all, measure the hearth for the fire to determine the length of the two crossbars.
- Cut them to length. A shaft with a length of 500 mm with an additional 80 mm at each end for hooks.
In turn, heat the ends of the beams and bend the shape of the hook, as in the figures. These hooks can be made larger or smaller depending on how close the grill is to the fire. - Now you have two crossbars. Set them on the campfire site and find out what the distance between them should be. In this case, it is 200 mm.
- Saw the required number of short rods for the grill, at the rate of 10 mm between each.
- After making sure that the long rails are correctly oriented with hooks at the right angle, weld the rods between the beams.
- When all this is welded, take the wire brush disc on the angle grinder and remove the rust.
Testing
Make a fire and lay a couple of large logs that will burn to good hard coals.
When the flame becomes low and the coals glow, cook something on the grill. The photo shows how the steak is fried. A good option for an American picnic if you can cook it.


https://i.expert-h.com/en/kostry/ochag-dlya-kostra-iz-metalla-svoimi-rukami-300-foto-poshagovye-instrunktsii#sigFreeId2b39b9a846
Campfire stand
 Can, campfire stand, sounds a little strange, but in essence this is the stand. Well, you can also call portable portable fireplace, although this is very original. A convenient thing, you can use it in the yard or take on a picnic. If necessary, decomposes, and you can make a fire and when folded. True, the author admits that he did not do this thing himself, since there are no welding skills and necessary equipment, but the main thing is the idea, and the real master will always come up with how to do it.
Although the author is not friends with welding, but with the computer you are. When developing this project, he used FreeCAD Editor. In general, there are many similar editors, but FreeCAD is good in that it is completely open, installed and immediately used, pay for nothing, all functions are immediately available. Compared with similar programs, the size of the distribution is relative, but this does not affect the capabilities. However, we will not go into details, if you are familiar with the editor, then so in the know. Just in step-by-step photos for clarity, Cad files are included.
So what you need:
A steel sheet 2 mm thick (stainless or normal, if you are not going to paint, use a stainless steel), although this design is made of 1 mm thick sheet, but the author claims that this was a bad decision.
- Angle grinder (grinder)
- Welding equipment (or someone who has welding and knows how to cook)
- Heat resistant paint if you will not use stainless steel.
The author did not provide instructions for manufacturing, since all the details according to his drawings were made in the workshop. If you have the appropriate equipment or at least a part, then of course, all this can be done with your own hands.
For example, if there is welding, then this part of the work is not a particular problem. You just need to close each square by welding the corners.
The decision with painting is completely up to you; if you used stainless steel, you do not need paint! If you like a rusty look, paint is also not needed!
In general, see the photo, if you liked the idea of a portable campfire stand, I think you will find a way to make it.


https://i.expert-h.com/en/kostry/ochag-dlya-kostra-iz-metalla-svoimi-rukami-300-foto-poshagovye-instrunktsii#sigFreeId0e85bdd1a4
 By the way, for a portable stand for a campfire, you can lay out just such a small concrete block site. You can do this in a few hours and for a minimum amount, depending on the type of material selected.Of course, a lot depends on the size of the site, the amount of material depends on this, and hence the total cost. The author of the project did not have a special saw to saw the blocks, so in his calculations he proceeded from the block sizes of 15 x 15 and 15 x 23 cm. The result was a platform of 90 x 90 cm. One difficult task was to determine the block pattern you want to use, for which you will need a sample.
To get started, choose a nice flat place away from home and neighbors. Choose with good sense and arrangement, because it is permanent.
In addition to blocks, you will need drainage gravel and sand.
Material List:
- 16 blocks 15 x 23 cm
- 12 blocks 15 x 15 cm
- 5 bags of crushed stone (approximate)
- 3 bags of sand
Tools:
- Paint (not necessary, just easier to make markup)
- Shovel
- Roulette
- Four long-sized planks
- Gloves
- Level
Step 1: Preparation
- Spray the contour on the ground and remove the turf.
- Make the square a little smaller so that you can fit the blocks tightly.
- If anything, you can always still remove the soil later, if necessary.
- Given the thickness of the layer of crushed stone, sand and blocks, the soil should be removed by approximately 15 cm.
- Try not to overdo it with depth, it's just the extra expense of sand and gravel.
- Tamp the site.
Step 2: Fill the area with drainage gravel and tamp.
Step 3: Fill the sand and level with the board trim and level. Now place the blocks on the sand, use a hammer and level. Align and stagger each block, if necessary, tap with a hammer so that they fit tightly.
Step 4: Check again how the blocks are. Pour a little water, and try to fit the blocks even denser. Lay some ground along the outer edge of the site.
Step 5: Now you can install your campfire stand on the platform and admire how it looks when the bonfire burns.


https://i.expert-h.com/en/kostry/ochag-dlya-kostra-iz-metalla-svoimi-rukami-300-foto-poshagovye-instrunktsii#sigFreeId5409472af8
 Metal fire pit
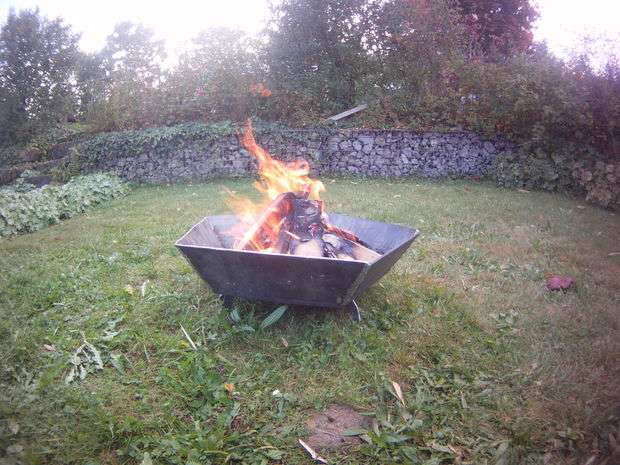
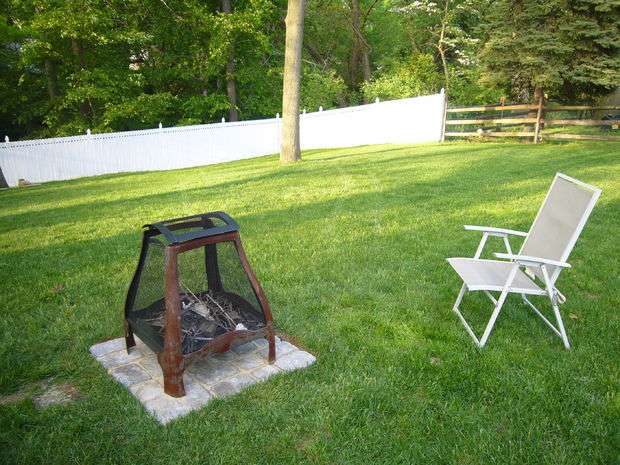
It is shown here not how to make, but how to repair the old hearth for the fire. However, it turned out to be an almost new design, so if you plan to make a new one metal fireplace, these guidelines come in handy.
For this, you need to buy four steel sheets 100 x 50 cm. Use magnets to weld at 90 °, their efforts are enough so that the walls do not lead during welding. It is very simple to do it yourself and costs almost nothing, but it significantly increases the speed and accuracy of welding at an angle.
The hearth of the bonfire will be recessed into the ground with the help of eight steel rod supports to keep squared and strength.
Add foot steel rods to the corners and in the middle of each panel. They are not very pretty, but since they are installed underground, it does not matter.
There are no more special nuances in the manufacture of this metal hearth for a bonfire, everything is perfectly shown in step-by-step photos.


https://i.expert-h.com/en/kostry/ochag-dlya-kostra-iz-metalla-svoimi-rukami-300-foto-poshagovye-instrunktsii#sigFreeId6d25fcd2a8
How to make a square hearth for a bonfire
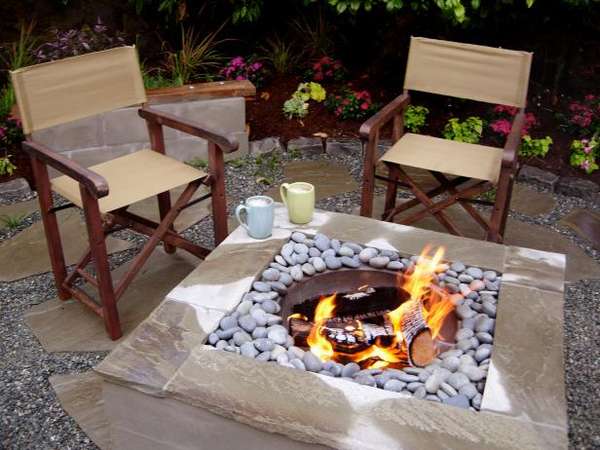 The author had an old metal bowl, which they were going to send to a landfill. But instead of throwing away, the idea came up to reuse the bowl as hearth for a fire. What came of this, you can see in the photo. A square concrete frame was built, filled with stone, and in the center there was a metal bowl lined with decorative stone, which completely hide the outer walls. From above, tiles or slate stone are laid on the walls of the concrete base. It turned out beautifully.
To make such a design is not difficult, just view the step by step photos.
- Assemble the outer formwork first.
- Then the inner formwork, repeating the same steps, but reducing the size of 20 - 25 cm
- Add 50 cm pieces of reinforcement in the corners of the formwork, as well as along each leg inside the frame.
- Make sure that the fittings are firmly fixed in the ground and below the edge of the frame.
- Pass 10 cm pieces of reinforcement horizontally between the vertical reinforcement.
- Tie with steel metal wire. Cut the wire with wire cutters.
- For additional reinforcement add a wire mesh. Cut the pieces to fit inside the mold. Tie a wire to the reinforcement grille.
- Pour concrete into the frame. Fix the concrete so that all holes are filled; you do not need spaces inside the form. Smooth the top with a spatula. Set the molds while the concrete is still wet. Leave to dry overnight.
- After the concrete is dry, carefully remove the molds.
- Add a thin layer of mortar on the outside so that the walls are even.
- If desired, pieces of slate can be cut to fit the top of the frame.
- Fill the space approximately three quarters with gravel so that the top of the hearth is flush with the top of the concrete frame.
- Replace the bowl.
- Add large stones along the outside of the bowl until only the top edge is visible.


https://i.expert-h.com/en/kostry/ochag-dlya-kostra-iz-metalla-svoimi-rukami-300-foto-poshagovye-instrunktsii#sigFreeId3638c292ad
Campfire site from an old gas cylinder
 Shown here how to make a hearth for a fire, or barbecue, or maybe a grill from an old gas cylinder. Great for an evening out with the whole family under the open sky, frying marshmallows or barbecue!
Step 1: Prepare a gas bottle
First, make sure there is no gas in the cylinder. In an open space (not indoors), open the valve until all gas has been vented. Make sure there is no open flame or other ignition source nearby. Remove the valve with a wrench and fill the cylinder with water to displace any gas from the tank. Mark the cut line around the top of the vertical side of the container.
Step 2: Cut off the top of the cylinder
Fix the cylinder in a vice. Wear gloves, a long sleeve shirt and trousers, as well as safety glasses. Gently wipe the bottle near the top. Water inside will help cool the cut. Grinder make a straight cut along the entire circumference of the container. Stop 2 or 3 times to turn the cylinder in a vice. After the upper part is cut off, install a grinding disc in the grinder and grind all the rough edges.
Step 3: Drill air holes
Fix the balloon upside down. Mark where the holes will be. The author needed about 80 holes with a diameter of 10 mm for normal combustion. Cool the metal with engine oil or something similar.
Step 4: Make a fire
Put the charcoal grill on the bottom of the cylinder. You can use a cheap folding colander.
Identify a bonfire site that is well cleared of anything that could catch fire. Place the bottle on a metal pallet or concrete base.
Now you can light a fire.


https://i.expert-h.com/en/kostry/ochag-dlya-kostra-iz-metalla-svoimi-rukami-300-foto-poshagovye-instrunktsii#sigFreeId73ac2046c0
Cast iron bonfire bowl
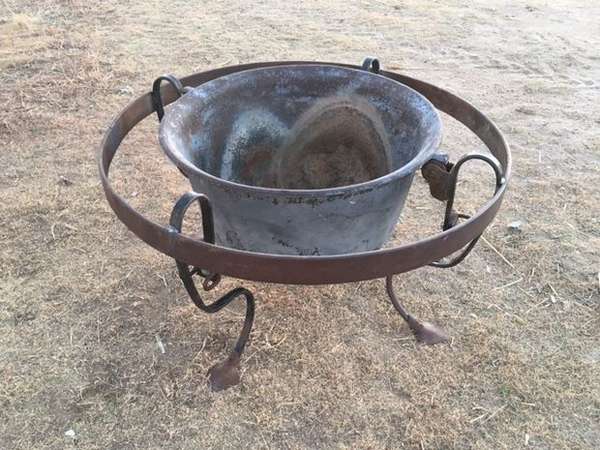 If you get creative, you can create pretty unusual things. Like this vintage campfire the author made of old scrap metal. Of course, the basis is a cast-iron tank, perhaps not everyone in the barn had such a thing, but this is just an example. If you wish, you can always find something suitable. For such a project, you really need a lot of equipment. Unfortunately, simple hand tools such as hammers, wrenches and hand saws will not help. The tools that the author used for this project ...
- Acetylene cutter
- Any welding, electric cheaper
- angle grinder
- Electric drill
- Adjustable wrench
- Clamps
- Roulette
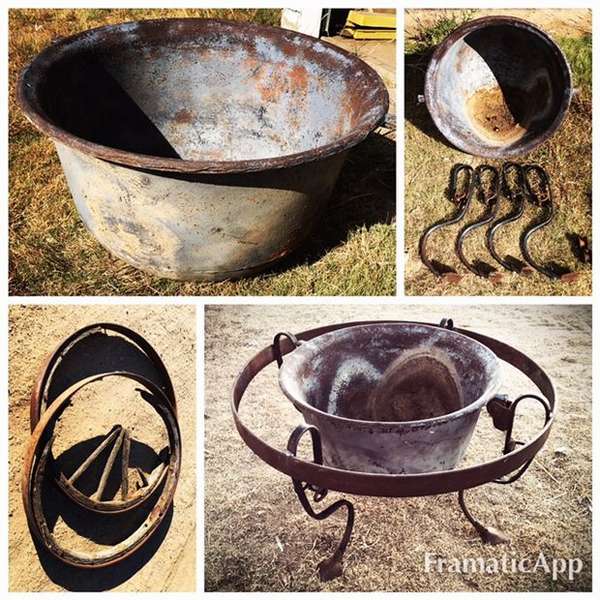 Of course, it is unlikely that you will collect exactly the same source materials, but as an example, it may come in handy. If you are interested in detailed instructions for making a hearth for a fire, you can visit the site of the author of this project, everything is painted in detail there. Link to the source under the gallery.


https://i.expert-h.com/en/kostry/ochag-dlya-kostra-iz-metalla-svoimi-rukami-300-foto-poshagovye-instrunktsii#sigFreeIde74e09c8f6
DIY gas fireplace
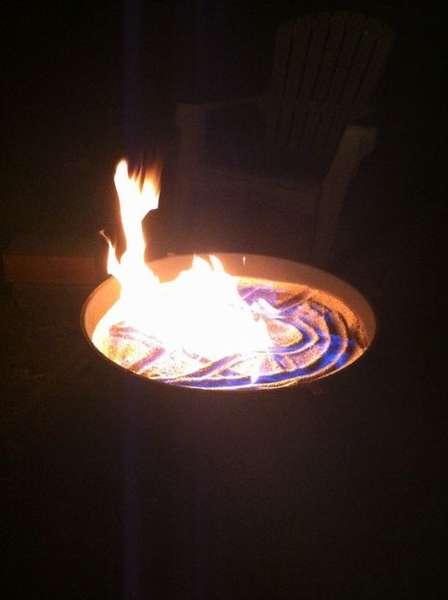
 A simple modification that the author used to remake the old hearth for the fire in a beautiful bowl of fire. It is pleasant to sit by the fire without smoke on frosty days, and most importantly, do not do any manipulations with firewood.
Step 1: Burner
- The burner is made of copper pipe and 1/2 "fittings.
- The author used 5 corner fittings and one 1/2 inch to connect to a quick-connect brass air coupling.
- All fittings are soldered with standard flux and solder for water pipes
- Make a hole in the bottom of the hearth and install a burner through it, aluminum foil can be used for sealing.
- Then add some sand and lava stones to the bottom.
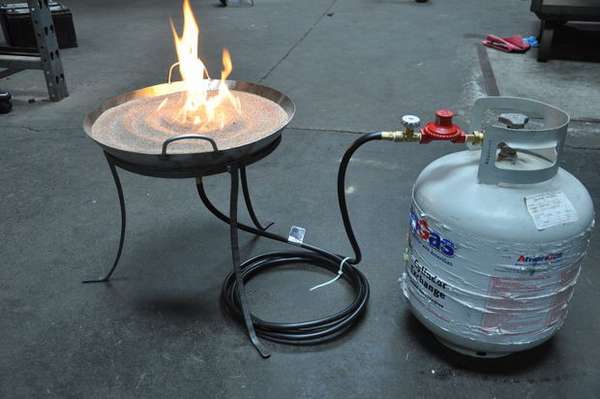
Step 2: Gas pipe
- The author wanted to make a portable fireside, so I used couplings and flexible tubes.
- The burner is held onto the hearth frame with a hose clamp.
- Take the propane regulator and add a quick coupler to it.
- The author used an old garden hose with a reel so that the gas bottle could be put in a hidden place.
To light the hearth:
- With the tap closed, pour a little light liquid over the burner and up the edge of the hearth and set it on fire.
- Slowly open the valve and make sure that the gas starts to burn.
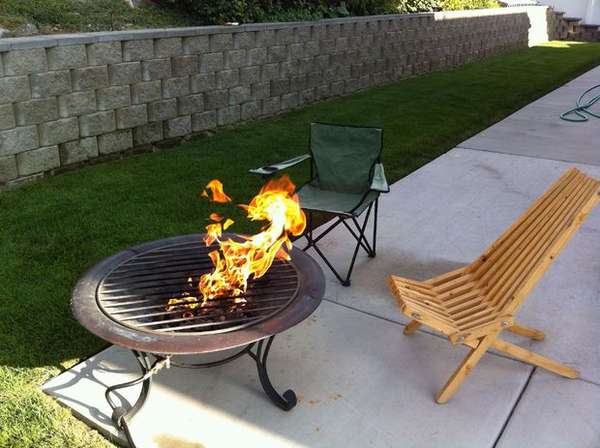
The latest photos show where you can use this beautiful fireplace for a bonfire. So observe safety measures and enjoy.


https://i.expert-h.com/en/kostry/ochag-dlya-kostra-iz-metalla-svoimi-rukami-300-foto-poshagovye-instrunktsii#sigFreeId25bdbd8dbb
Bottled gas fireplace
 Today, a street gas gas fireplace installed in the garden or in the courtyard of a country house is very popular. Naturally, many people prefer natural fire on wood, but you must admit that this is not always convenient. Using a gas bottle may not be so romantic, but much more comfortable and safer. In addition, smoke from a wood fire, flying sparks and other side effects are not always liked by neighbors, and with a gas cylinder you do not create any inconvenience to anyone.
Step 1: Burner Parts
You will need
- Regulator / hose 30 PSI or 2.1 bar (not BBQ regulator) and needle valve to adjust flame size. The author used a brass fitting for hose ends and fasteners in a bowl.
- Burner. This is a distribution system that is below the level of sand. If you have the opportunity to weld and make rings, you can make a torch with your own hands, using a weldable (not cast iron) connector in the center, a 5/8 thin-walled tube with holes.
Stainless steel will extend the life of the ring, especially in the fall and winter, when you forget to close the hole after the first rain. - Fitting. 1/2 NPT connector (in our opinion, with tapered thread), brass 1/2 to 3/8 45 degrees, 1/2 NPT brass, NPT locknut. This NPT standard is used in American-made plumbing. In principle, today in specialized stores you can find various types of adapters and adapters with conical and cylindrical threads, which makes it possible to use pipes with fittings of the American standard.
If it’s not entirely clear, look at the photo.


https://i.expert-h.com/en/kostry/ochag-dlya-kostra-iz-metalla-svoimi-rukami-300-foto-poshagovye-instrunktsii#sigFreeId2a3648ca84
Step 2: Hearth Container
To make a street gas fireplace, you will need a container that can withstand high temperatures and can be completely closed from the bottom (leaks or drain holes will also allow gas and fire to escape if you do not want to). You can use the bottom of 200 liters of metal barrels. Stay away from painted steel, aluminum, and galvanized steel, as this will result in fumes or melting.
Step 3: Drill Tube Holes
Stainless steel is very tough and requires strong pressure to make a hole. Steel drills are a great way to make round holes in thin materials. Conventional drills tend to make oblong holes in thin materials, and a large hole is not really recommended for standard drills.
Step 4: Install the tubes
In this case, the author used brass 1/2 NPT x 3/8 45-degree fitting with a brass nut 1/2 NPT. It fits snugly to the hole and does not need additional sealant or welding.
Alternative methods:
- Flange bolt - Great for thick material. Be sure to use heat-resistant silicone sealant to make sure there is no leakage.
- Welded r-pair is the best solution, but you must have welding.
Now attach the hose using the 45-degree flare fitting at the end of the hose.
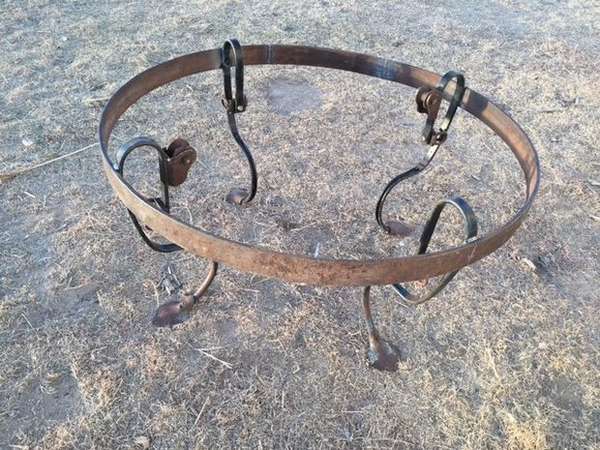
Step 5: make a stand
There are a lot of options, from a garden table to a concrete structure. If there is welding, you can make a tripod stand or any other option, which is enough for imagination and abilities. See the examples in the latest photos in the gallery, in these chalices of fire the same basic gas supply system is used.
Step 6: Fill Sand
Install a fireplace, connect the regulator to the tank and add sand 8 to 12 cm above the ring.
Light the torch, then turn onFlame gas over the sand. It will take a few seconds for the sand to fill with gas and rise up. Use a needle valve to adjust the flame. Tuning is best done after dark.
Notes:
- Never touch the sand with your hands or any other part of your body! Be careful, common sense and remember that the fire is hot!
- Don't worry about the gas moving up the hose, but make sure the fittings are tight (a good way to check is soapy water).
- Keep the bottle as far as possible from the burning bowl.
This guidance material:
- intended for informational purposes only;
- not intended for training materials;
- should not be a guide to security matters;
- not intended to provide security.
This site does not bear any responsibility, as it is intended only for educational and informational purposes. The content and images within this guidance material are not intended to be guidelines, but rather as an exhibition.


https://i.expert-h.com/en/kostry/ochag-dlya-kostra-iz-metalla-svoimi-rukami-300-foto-poshagovye-instrunktsii#sigFreeId5b178a9ee0
Gas fireplace for a summer residence
 To make outdoor gas fireplace for gardenFirst of all you need a container. This should be a tank of a suitable size, which, among other functions, will serve as a radiator. This will allow you to accumulate heat from the fire and keep the fireplace hot longer. An ideal container made of metal with thick walls is ideal for this purpose. The author was lucky; he had an old cast-iron boiler, which he sometimes used as a center for burning wood. Thick walls and solid weight are ideal for a garden gas fireplace.
So, let's begin!
The first step is to cut a metal lid from a 200 liter barrelso that it fits inside the boiler. The lid must be thick enough to withstand and fit snugly against the edges of the boiler.
After that, you need to drill a hole in the center for the fitting, which will hold the burner.
Tube installation
Then you need to drill a hole in the boiler itself. In all instructions, it is recommended to use a rigid pipe inside the receptor, but in this case it is impossible to do this, since the sides of the boiler are bent and the bottom is too close to the ground. Thus, the hole was made at an angle and a flexible hose was inserted.
Burner assembly
- To install the burner fitting on the modified barrel cover, use a large washer and then screw the torch.
- Carefully lower the assembled burner into the boiler.
- Fill in any gaps that might allow gas to leak. Use heat-resistant high-temperature sealant to completely seal the rim of the cover. Be patient and let the sealant dry for 24 hours.
Add sand
Fill the container with sand. Connect the hose to the septum fittings and to the gas tank.
Now everything is ready!
Do not forget make a cover for the hearth. This is a closed container, and any water that gets inside will simply stand there. The author used another cover that allows you to close the hearth immediately after turning off the gas, you do not need to wait until it cools down.
Be careful, adjust the fire as desired. Follow safety precautions and keep a fire extinguisher handy. Keep in mind this post is purely informational, not a step-by-step instruction. Oh, and don't forget to use nylon tape on all fittings.


https://i.expert-h.com/en/kostry/ochag-dlya-kostra-iz-metalla-svoimi-rukami-300-foto-poshagovye-instrunktsii#sigFreeId59eabee612
Hearth from the drum of the washing machine
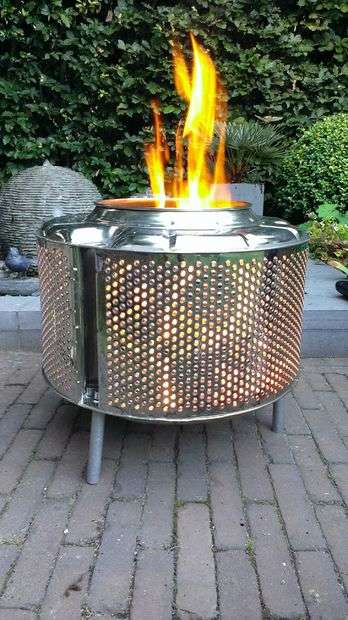 Theme of use drum from the washing machine as a fireplace very popular, just look at the number of photos on the Internet. This block presents only a few of the many existing methods. It’s easy to do, because the drum itself from the washing machine can already be said campfire ready, you just have to come up with a way how it is convenient to use. For example, the author of the project took only half an hour to make this design, which you see in the photo.
In order to make a hearth from the drum of the washing machine a lot is not necessary. The main part is the drum, if you do not have one, you can contact any workshop for repair of washing machines and purchase this part for mere pennies, or maybe give it for free.
For supporting legs you can use a conventional galvanized steel tube that fits well into the holes that are already in the drum (some connecting holes connecting the drum to the motor shaft ...)
Then you need to perform a few simple steps.
First, make the legs. To do this, a grinder (or a hacksaw, if patience is enough), saw off the galvanized steel pipes in half. Then insert the legs into the drum. You may need to work a little round file to increase the openingtiya in the drum. Grind until you can screw in the legs, but do not remove a lot.
That's all, your hearth for the fire is ready, load firewood and enjoy.
If you want to see how the bonfire burns beautifully, the author shot a video.
Link: youtu.be/jmQa2BAdMN0


https://i.expert-h.com/en/kostry/ochag-dlya-kostra-iz-metalla-svoimi-rukami-300-foto-poshagovye-instrunktsii#sigFreeId69f3ebbfc6
Here second option, how to make a hearth from the drum of a washing machine. To begin with, this project took about 5 hours, and it took half an hour to remove the drum.
- When the drum is released using a grinder and sandpaper, clean the surface inside and out.
- The author made the legs from the frame of the old bed.
- Using welding, weld your feet to the bottom.
- Then weld the rods as stiffeners.
- Turn the drum over and see how it stands. If it sways, sand or weld the legs.
- Work the edges to make them even and smooth, you can add some decorative detail. As you can see in the photo, the author fixed the pin with letters. Then the rest of the rod was used as a fastener, and welded it to the shaft in the middle of the drum.
- Paint the hearth. Apply at least 2 coats of heat resistant paint for approximately 1200 °


https://i.expert-h.com/en/kostry/ochag-dlya-kostra-iz-metalla-svoimi-rukami-300-foto-poshagovye-instrunktsii#sigFreeId8a911f6e63
Third option. Its peculiarity is that there is practically no need for additional materials; the author used a flywheel as legs. The washing drum is usually driven by the engine at the bottom of the machine using a drive belt. And if you look, then flywheel for the drum - an ideal stand for the center. Although, if you also want a grill, you will need to find a suitable grill, but this is probably not a problem.


https://i.expert-h.com/en/kostry/ochag-dlya-kostra-iz-metalla-svoimi-rukami-300-foto-poshagovye-instrunktsii#sigFreeId170594923f
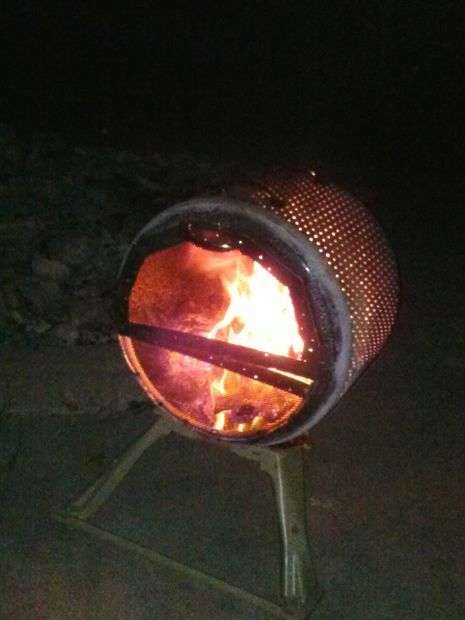 And one more option, only with a horizontal arrangement of the drum.
You will need to determine which parts to keep. They may differ from what the author of the project offers, however, here is an idea that you can adapt to your situation.
What is needed
- drum, in principle, from any washing machine
- screws
- nuts and bolts
- metal sheet with holes
- metal strip
Tools
- drill
- hammer
- pliers
- grinding machine
- welding
Step 1: Prepare the source material
Gather materials, parts and tools. The author took several hours, including disassembling the old washing machine.
Step 2: Prepare the drum
If the drum has a protrusion in the center, remove it by drilling holes. Make a bottom from a metal sheet, as in the photo.
Step 3: Attach the bottom sheet
Attach the bottom sheet with screws. If you do not want sharp tips sticking out, then drill holes and fasten the sheet with bolts.
Step 4: Upper removable plate
The author wanted the fire to be completely closed, so he developed the upper removable sheet to be installed on the edge of the drum. Start by marking the sheet so that it matches the diameter of the outer edge and is cut with scissors. Repeat the previous method of fastening the strip. For the frame around the arc, make straight cuts so that it stands firmly on the edge, holding it in place. Attach the frame with self-tapping screws and attach a handle for convenience.
Step 5: Legs
You can make legs in different ways, this does not matter much, the main thing is that the drum holds firmly. In this case, the author did not do them on his own, but found just such a tripod. The step-by-step photos show how he attached it. So look, maybe you will also find something suitable.


https://i.expert-h.com/en/kostry/ochag-dlya-kostra-iz-metalla-svoimi-rukami-300-foto-poshagovye-instrunktsii#sigFreeIdccbfb62cd9
100 photos of the fires from the drum of a washing machine


https://i.expert-h.com/en/kostry/ochag-dlya-kostra-iz-metalla-svoimi-rukami-300-foto-poshagovye-instrunktsii#sigFreeId7502088691
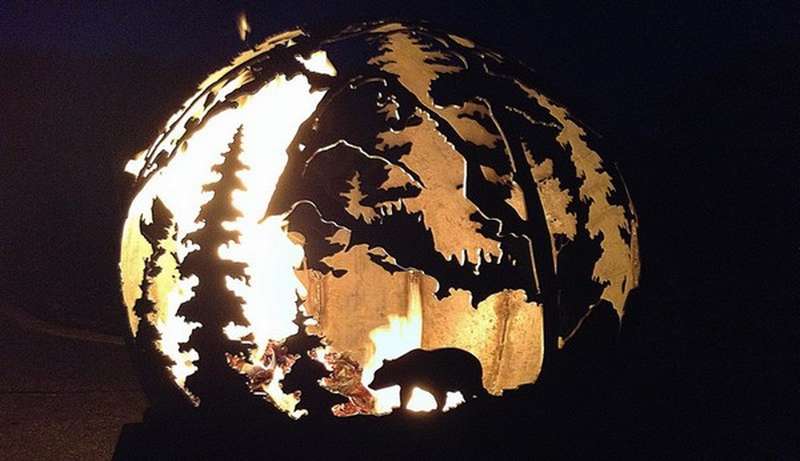
Decorative campfire bowl
Idea to create original campfire bowls arose in 2010, the authors of this direction, which they called The fire pit gallery, spouses Crisp - Melissa and Jason from Ohio. Perhaps this kind of creativity was done before, but it was their passion for creating fireballs that became widely known, mainly thanks to the Internet. Soon, the couple’s amazing hobby turned into a lucrative business that became popular far beyond America. However, no secret and sophisticated technology is required to create a fireball, everyone can use the idea of Jason and Melissa and make their own fireball bonfire. You can depict an ornament, patterns, amazing castles, a forest, but anything that is enough for your abilities. The most amazing thing is that for this you do not need to have any special artistic abilities, in the flame of a fire your work will take on a completely different look and meaning.
 Here is a simple example of how to make a bowl for a bonfire with your own hands, although without details, the authors have their own secrets, but the general steps in the photo are shown.
Cut out the picture, collect the details and grab the points with each other. ThenCustomize all this, sawing off and grinding the edges. In conclusion, weld all the parts together.


https://i.expert-h.com/en/kostry/ochag-dlya-kostra-iz-metalla-svoimi-rukami-300-foto-poshagovye-instrunktsii#sigFreeId363eb333e6
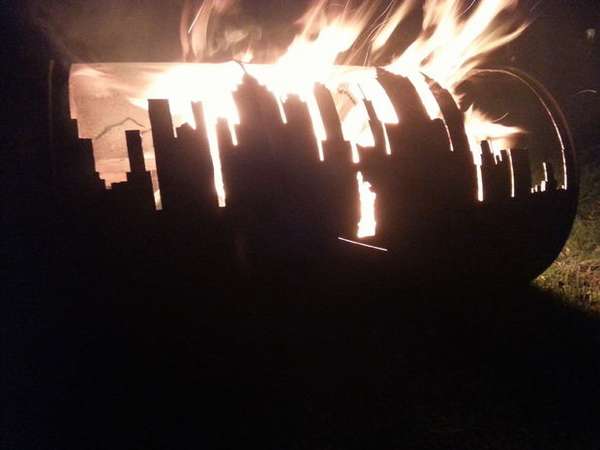 Of course, it is only in photographs that everything looks very simple. In fact, to make a metal ball, if you do not have your own workshop, the necessary equipment, in particular welding and metal skills, is almost impossible. But don't be upset decorative a campfire can also be made from an ordinary two-liter metal barrel, it is much simpler and you can do without a welding machine. It doesn’t matter in what condition the barrel is, in its size it is ideal for a street hearth. The main thing is to observe safety measures, wear safety glasses and clothing that completely covers the body. Will have to work with a grinder, and this thing, although useful, but not safe.
It all starts with design. Since the author of this project is American, he wanted something instantly recognizable and settled on the silhouette of the New York skyline with a statue of liberty. Buildings also helped streamline the work, because they require straight cuts to create them. Mountains are carved on the other hand, as this contrasted with the theme of the city. Against the bonfire it really looks very beautiful.
Drawing on the horizon
To create a picture of the city, first determine the area where it will be located and draw a grid. Keep all lines parallel and straight, do not forget to leave some of the tallest buildings connected to the top in order to try to minimize any deformation from the heat.
City relief
First make a grinder all vertical cuts with a thin disc. Then mark the points and drill holes where the transverse cuts will take place. Make the holes large enough to use the jigsaw for metal. Also, when marking the picture, consider that you will need to install the grid inside the barrel, on which firewood will burn.
The mountains
Everything is similar here, just the lines will be different. Use a drill and jigsaw again.
Drainage
Drill holes in the bottom of the barrel so that water drains from the bottom. No need to fantasize, just make sure that you drill them below, where water will accumulate.
Barrel Place
Dig a rectangular pit about 10 cm deep and 15 cm across. Then just set up the barrel and position it as planned. The pit will not allow the barrel to swing. Of course, if you want, you can make a stand. It is also advisable to pour a layer of gravel around the bonfire site.
Now you can light a fire, get comfortable and enjoy watching.


https://i.expert-h.com/en/kostry/ochag-dlya-kostra-iz-metalla-svoimi-rukami-300-foto-poshagovye-instrunktsii#sigFreeId875c8f5464
Decorative campfire bowls
Here is a small gallery of decorative art examples - creative campfire bowls


https://i.expert-h.com/en/kostry/ochag-dlya-kostra-iz-metalla-svoimi-rukami-300-foto-poshagovye-instrunktsii#sigFreeId28edb6a3a2
The hearth for a fire from metal 200 photos


https://i.expert-h.com/en/kostry/ochag-dlya-kostra-iz-metalla-svoimi-rukami-300-foto-poshagovye-instrunktsii#sigFreeId54b9929f43
Hello, I am the author of this article, so I look forward to asking questions for this article in the comments below, I will answer all !!!
If you have questions on another topic, ask them on our forum, we will answer you
- Two baskets of paper in 5 minutes (Master class)
- How to make a simple and compact table for a milling cutter from plywood
- How to make a soft headboard tile (Instructions + step by step photos)
- Cinder block benches: a convenient bench in 55 minutes
- How to make a bed with a niche: saving space (Master class)