Do it yourself stool made of wood. + Drawings +800 photos
Round folding stool + Drawing
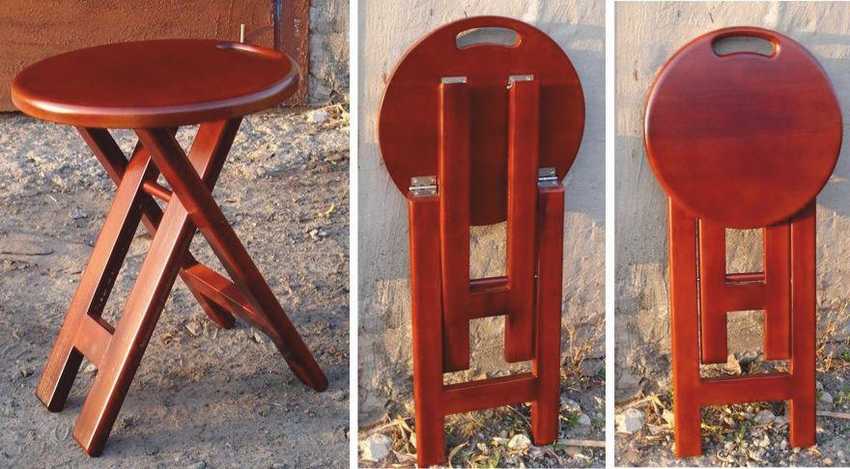 Below we have given you step-by-step photos of a master class for making such a wonderful stool with a round seat. The stool easily folds and unfolds literally without unnecessary effort, i.e. all sorts of latches and jumpers, everything is simple here. Pay attention, as the author (who is unknown to us), in order to close the metal stud between the legs, wooden tubes were turned.


https://i.expert-h.com/en/stul/taburet-iz-dereva-svoimi-rukami-chertezhi-foto#sigFreeId009b9d91f6
A stool-chair in the nursery in the form of puzzles.
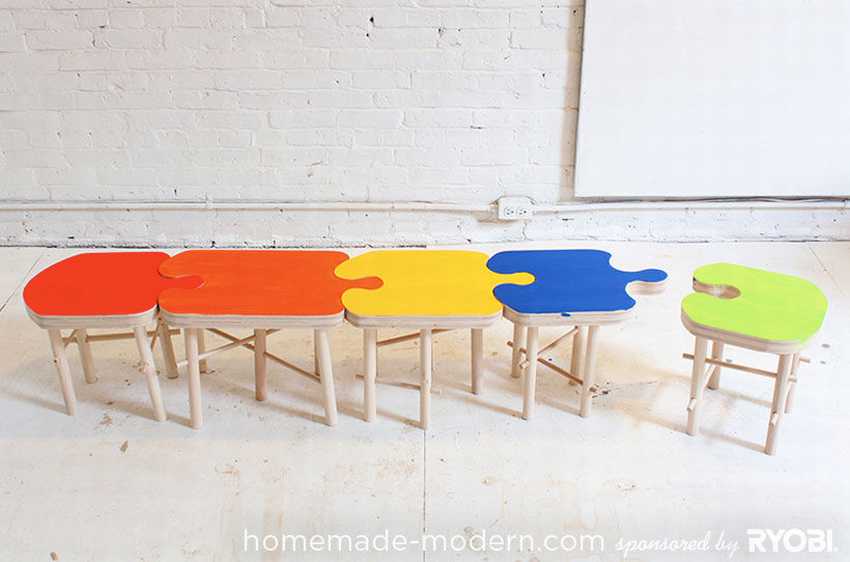 These chairs are great for children and can go to the playroom or nursery, and so will be a great solution for kindergarten. The seats of the chairs are made in the shape of puzzles, and therefore, if necessary, these chairs can be combined into a single benchthat in certain cases can be very convenient. You can learn how to make such chairs with your own hands from the step-by-step photos located below.


https://i.expert-h.com/en/stul/taburet-iz-dereva-svoimi-rukami-chertezhi-foto#sigFreeId75b6596a83
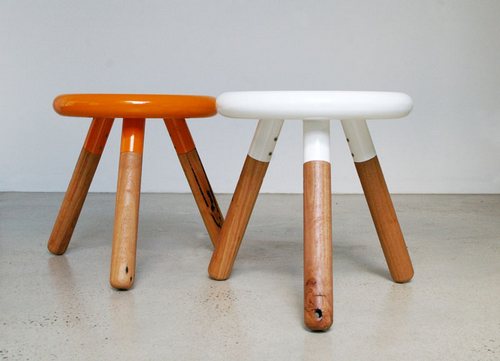 How to make a stool on three legs
Do you know that a stool on three legs is much more stable than four? There is no secret, for a design of four supports you need a flat surface, and if there is only three emphasis, then they themselves “look for” where to lean. How to make a stool on three legs with your own hands? Watch the master class. Saw round with a jigsaw seatthen legs. Make holes in the seat: using a compass, draw a circle on the bottom of the seat, divide it into three equal parts and determine the points for the holes. The hardest part drill holes at an angle, accuracy is needed here. Alternatively, you can use a bar. Drill holes one by one, resting the seat on the bar, then there will be the same angle, the main thing is to precisely direct the drill vertically. Then insert the legs and sand the surface. The stool is ready.


https://i.expert-h.com/en/stul/taburet-iz-dereva-svoimi-rukami-chertezhi-foto#sigFreeId910e0f1663
Simple round stool
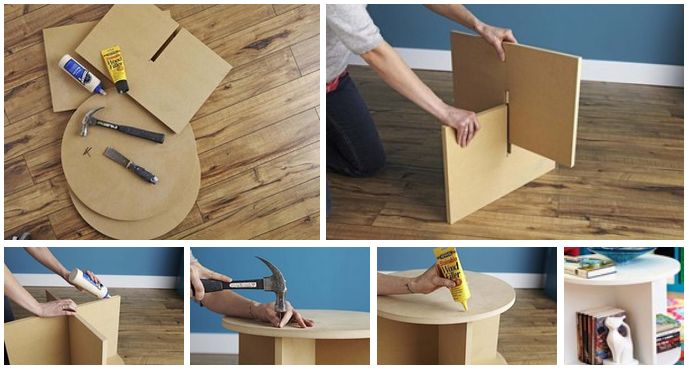
Magnetic three-board stool (collapsible)
 You can easily disassemble such a stool and put it with you in a hiking backpack or car, and this will not take up much space. Even a 2-3 year old child will be able to disassemble and assemble such a stool.
The photo below illustrates all the steps of making this model. Note. that the seat of the stool is supported by magnets, which makes disassembling the chair very quick and easy. Magnet, in turn, adhere to the glue.


https://i.expert-h.com/en/stul/taburet-iz-dereva-svoimi-rukami-chertezhi-foto#sigFreeId8526a0c34a
Round cardboard stool
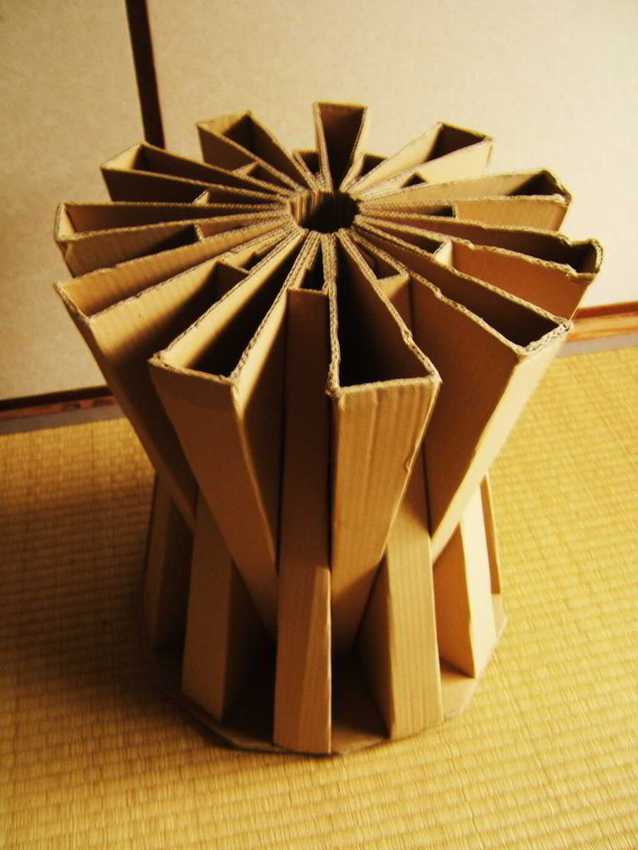 This the stool is made of 22 trapezoidal shapes from 3 mm corrugated cardboard, the forms are glued together with PVA glue. Below you can see the drawings of this cardboard chair.
Note: pictured is a chair that has been in use for 5 months every day by a person weighing 80 kg., which already speaks of its reliability and durability.


https://i.expert-h.com/en/stul/taburet-iz-dereva-svoimi-rukami-chertezhi-foto#sigFreeIdd195c63ba3
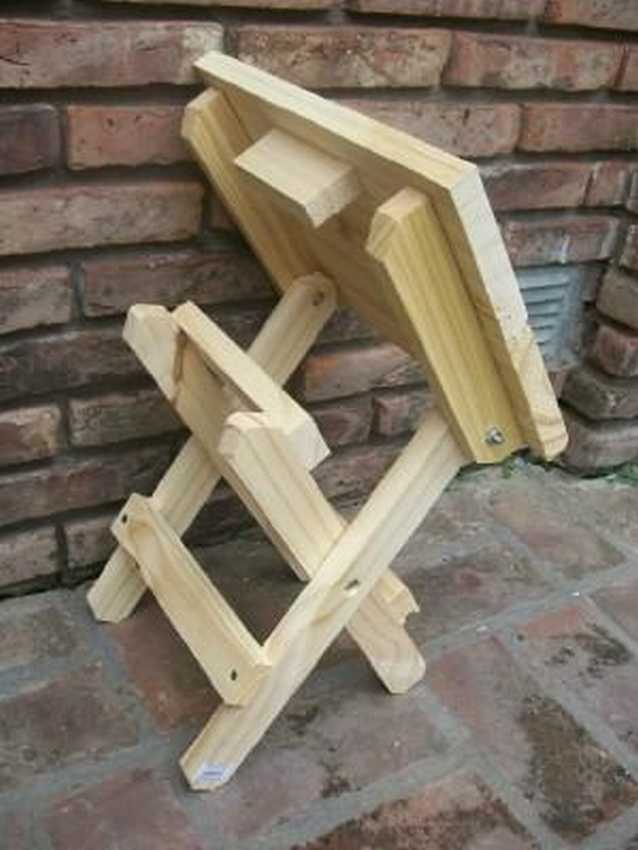
Folding portable stool
A wonderful and compact stool made of wood is obtained as in these photos. Unfortunately, we could not find step-by-step photos, but from photos taken from all angles and presented below, and so everything is clear, an experienced master should not have a question here.


https://i.expert-h.com/en/stul/taburet-iz-dereva-svoimi-rukami-chertezhi-foto#sigFreeIdfe6a39af83
One piece plywood stool
 This stool is assembled from parts, sawn from a single piece of plywood.
Blueprints You can view and copy below. You can cut it on an CNC machine (for example, by ordering it in a neighboring furniture factory) or by yourself using an electric jigsaw in uncomfortable places and circular straight lines. You can print the part templates on a piece of paper, and then, by applying a stencil to a sheet of plywood, outline all the necessary details.
This stool belongs to collapsible models, because it can be transported in a disassembled and compact form to its destination and is already assembled there.


https://i.expert-h.com/en/stul/taburet-iz-dereva-svoimi-rukami-chertezhi-foto#sigFreeIde45fb6558e
Drawing. Semi-assembled plywood stool

Chair + stepladder + ironing board.
Three in one!!!
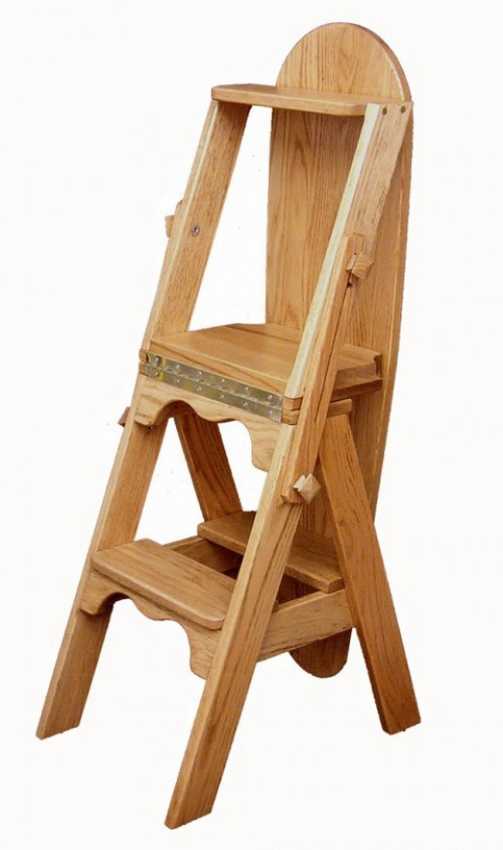
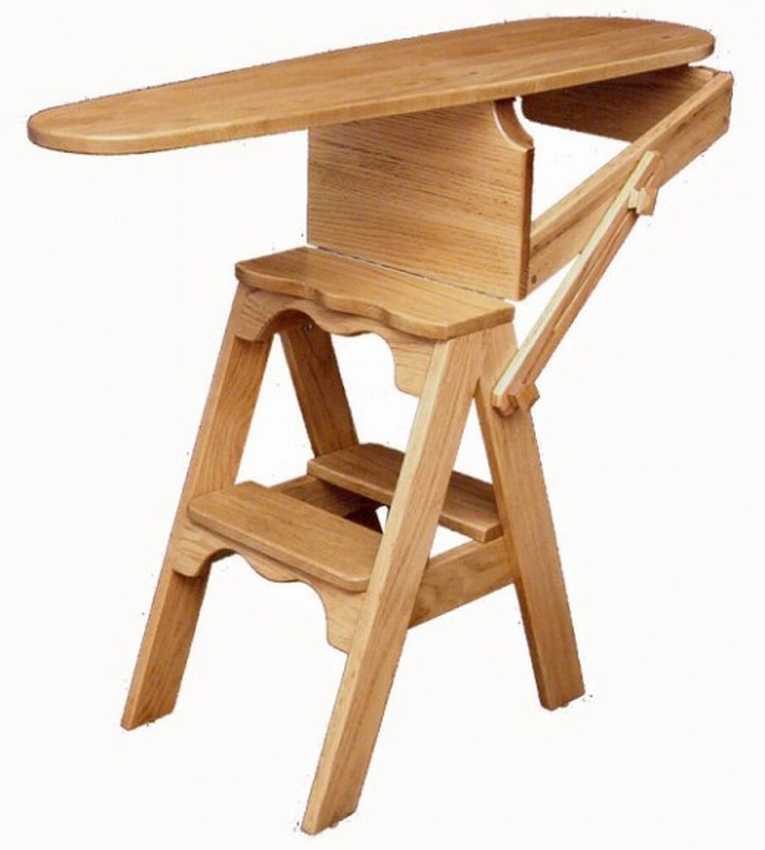
An unusual addition to a transformer chair, which can be either a stool or a staircase, was invented recently.The back of the transformer stool was replaced with an ironing board and this type of furniture has acquired yet another remarkable quality.
I wonder what else would come up with the masters to complement this chair ???


https://i.expert-h.com/en/stul/taburet-iz-dereva-svoimi-rukami-chertezhi-foto#sigFreeId57c67a66ec
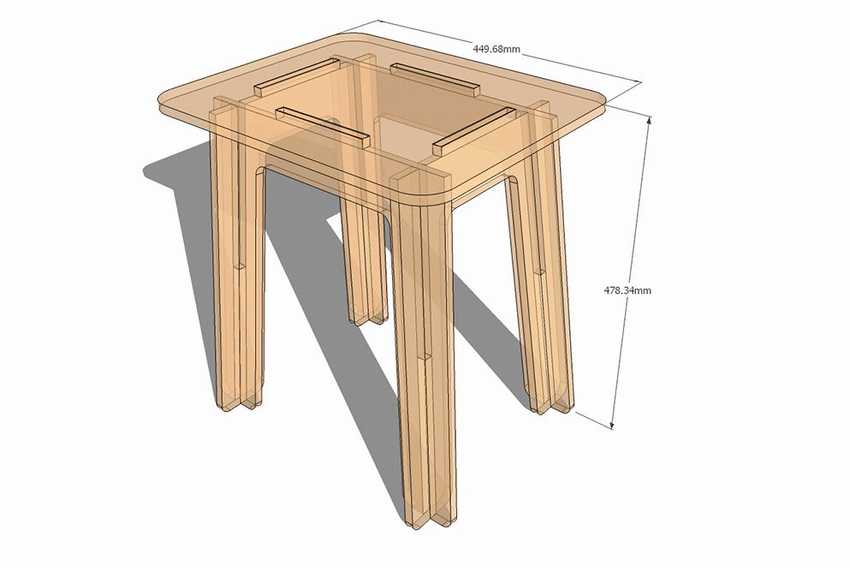
Drawing. Folding stool
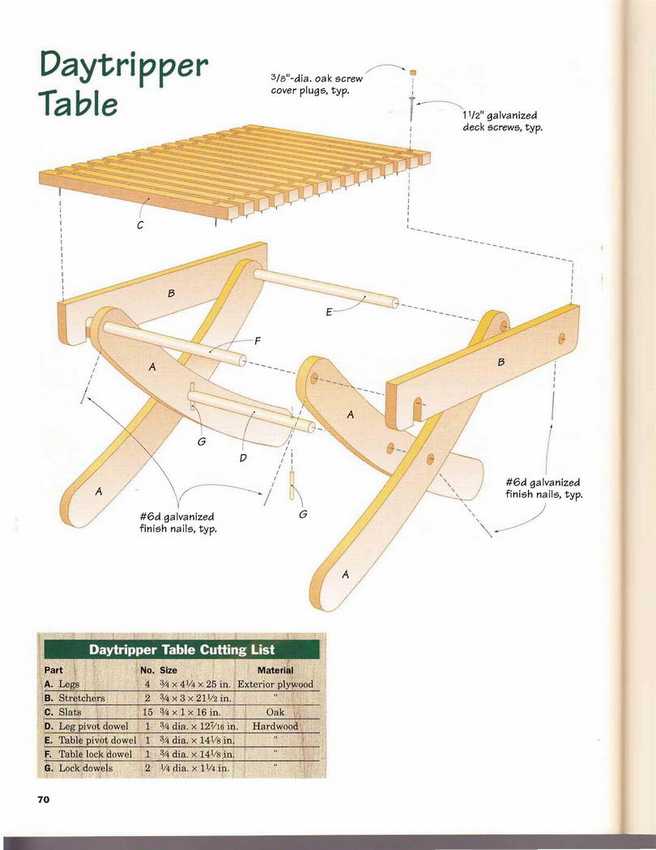
DIY folding stool made of wood
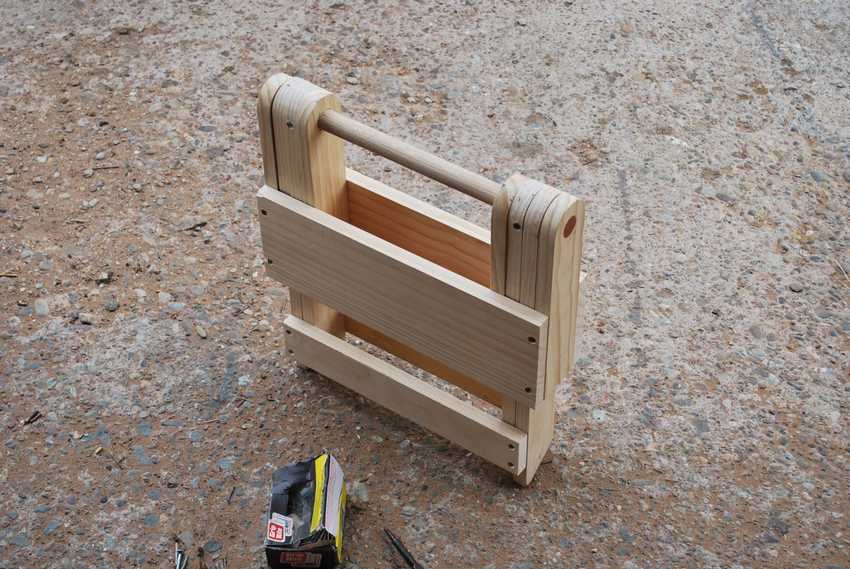
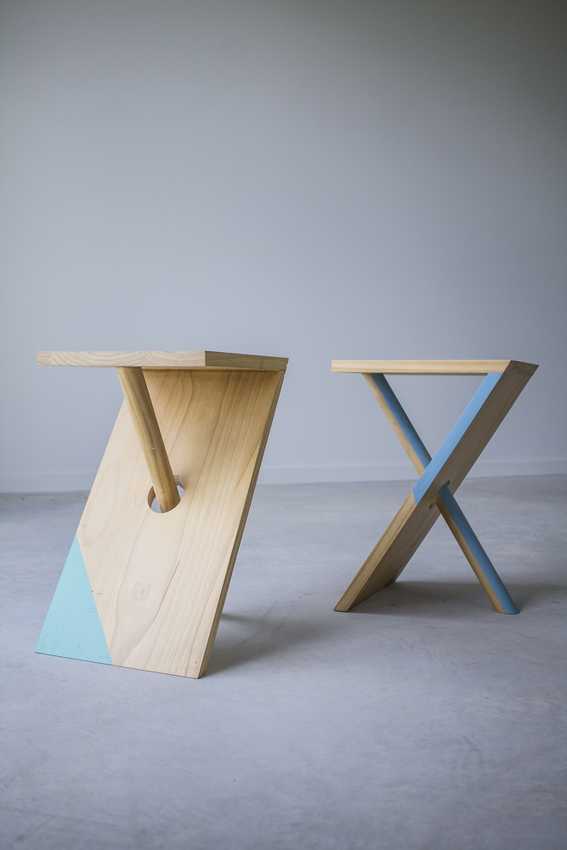
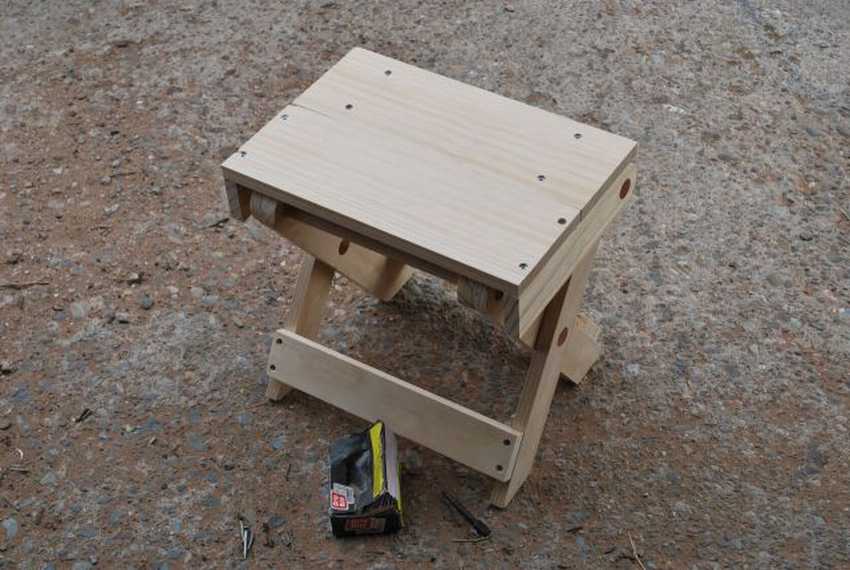 Look at what an amazing folding stool can be made of wood, this model folds perfectly and has excellent strength indicators, which was proved by the auto photo in the last photos, where he made a folding table in the likeness of this stool (just increasing the size of the parts) and stood on it with all his weight.
Here is a video on YouTube where you can watch the assembly and transformation process https://www.youtube.com/watch?v=JiQPUKHo9Xo


https://i.expert-h.com/en/stul/taburet-iz-dereva-svoimi-rukami-chertezhi-foto#sigFreeIdb291ff95cf
 Art Nouveau stool.
This easy-made stool can be used as a bedside stand for a telephone or remote control, for flowers, or as a mobile mini coffee table. Despite the apparent illusory nature of the shakiness of the pillar leg, in fact this chair is a very stable example of fashionable and simple wooden furniture.
DIY folding stool
Folding stool assembly procedure:
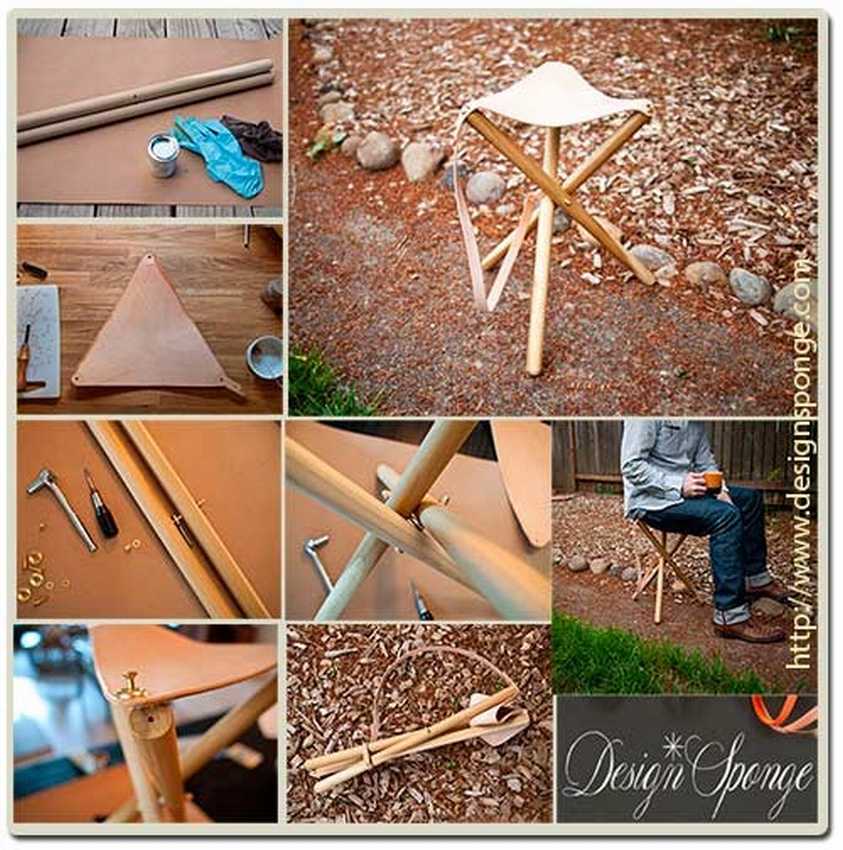
Drawing: DIY folding tripod stool

Folding stool (or table) design
Here is such a folding chair (or table: depends on the sizes in which you will make this model) you can do it yourself according to the model shown in the photo collage below

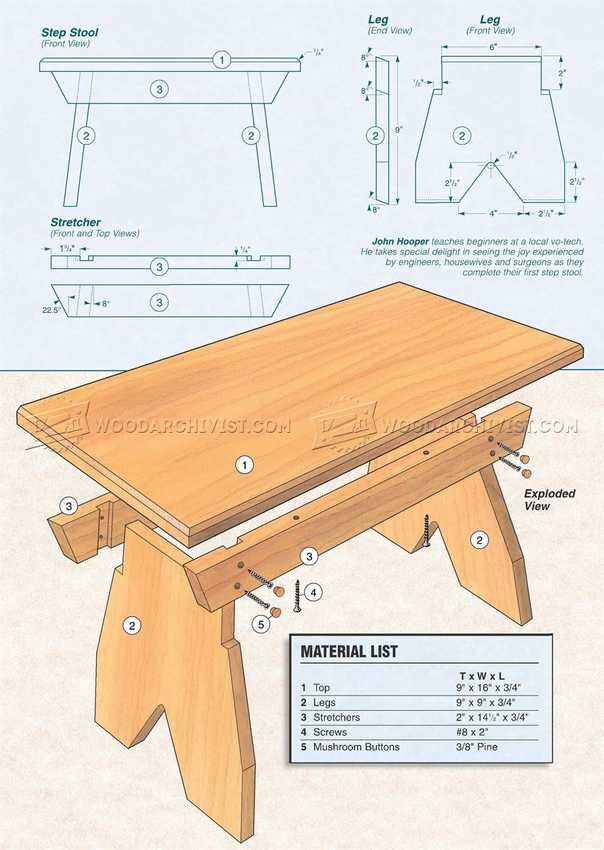
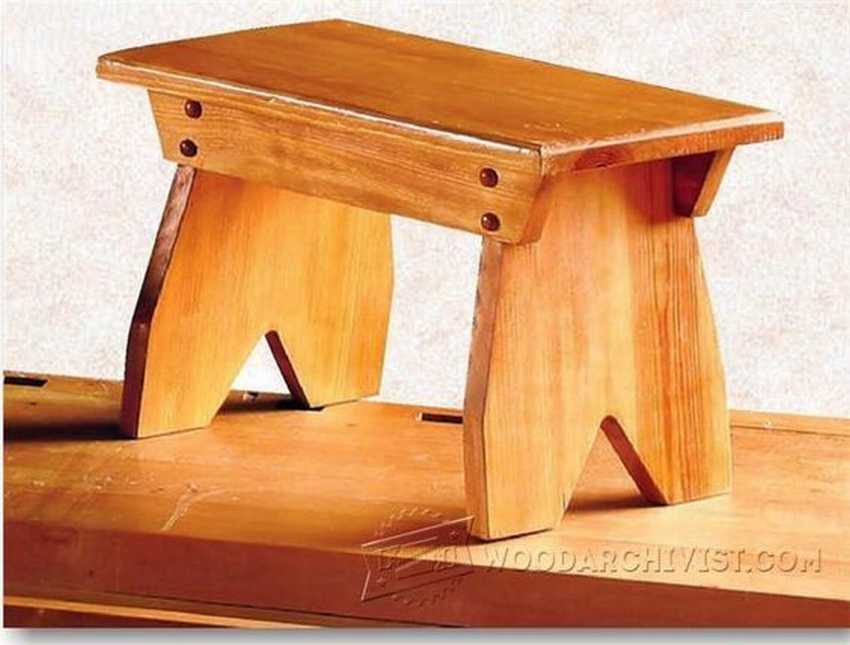 Simple portable bench + Drawing
Such a stool is made very simply and quickly, look at the drawings in the photo. It is possible to make both from boards and from plywood and chipboard.
 Solid stool
Simplicity and minimalism. This stool will immediately attract attention. Make it not at all difficult. As you can see, it consists of 4 parts: two bars and two legs. This stool can serve as a stand for flowers or be a mini table for coffee.
Carved stool
 The stool, of course, is ordinary, the whole chip in a beautiful thread on the cover. To get the same beautiful, you need to get a CNC machine. Although, if you have patience, you can do it manually. Below are step-by-step photos that show how to make a complete stool, not just a saddle. By the way, the design is very reliable, but the picture? You can cut out any drawing, if there is no special tool, make a stencil and tinker a bit with a bit.


https://i.expert-h.com/en/stul/taburet-iz-dereva-svoimi-rukami-chertezhi-foto#sigFreeId8e2700f7c3
High stool
 Tall stool for the kitchen
What is the advantage of stools? They take up little space, are more functional than chairs, suitable for almost any interior. And one more advantage, they are easy to make on their own. Here is a master class on how to make a high stool for your own kitchen. The main part is legs, to make such a beautiful carved product yourself, you need a woodworking machine. Although there are ways to make legs for a stool without a lathe, but this is if you make one stool, and if the whole set is in the kitchen, then, of course, it is better to order in the workshop. The author of this master class did just that, and step-by-step photos show how to make a seat and assemble the whole structure.


https://i.expert-h.com/en/stul/taburet-iz-dereva-svoimi-rukami-chertezhi-foto#sigFreeId779035c060
 Bar stools for the kitchen
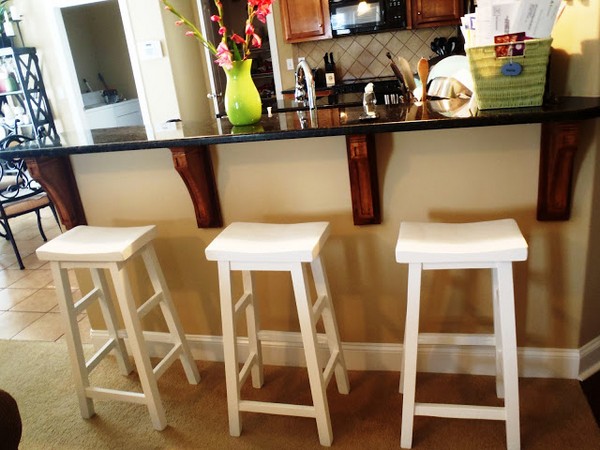
Today it is very fashionable to have a small bar counter in the kitchen. Well and accordingly, you will need bar stools for the kitchen. There are very stylish options in catalogs on the Internet, but these are just stools that are easy to make with your own hands. For example, such as in the photo. For comfort, you can still seat upholstery, but this can be done at any time.
Also, if you don’t want to bother, the seat can be made straight rather than concave.


https://i.expert-h.com/en/stul/taburet-iz-dereva-svoimi-rukami-chertezhi-foto#sigFreeId622f6cdac2
 Tall wooden stool
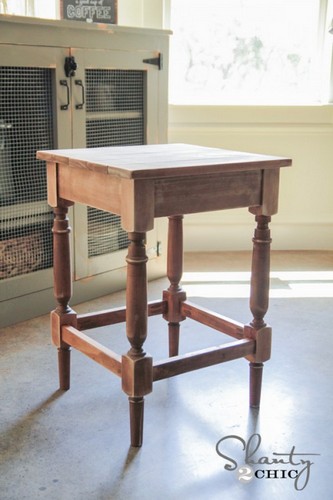
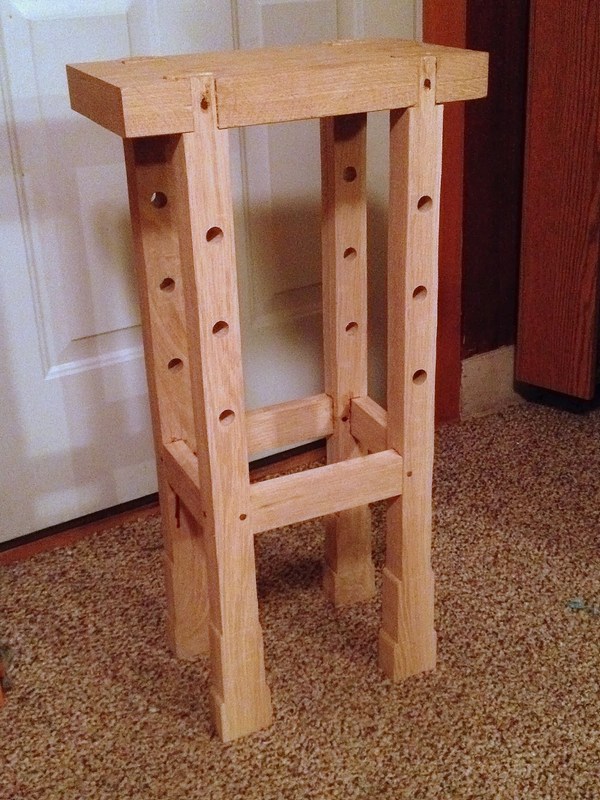
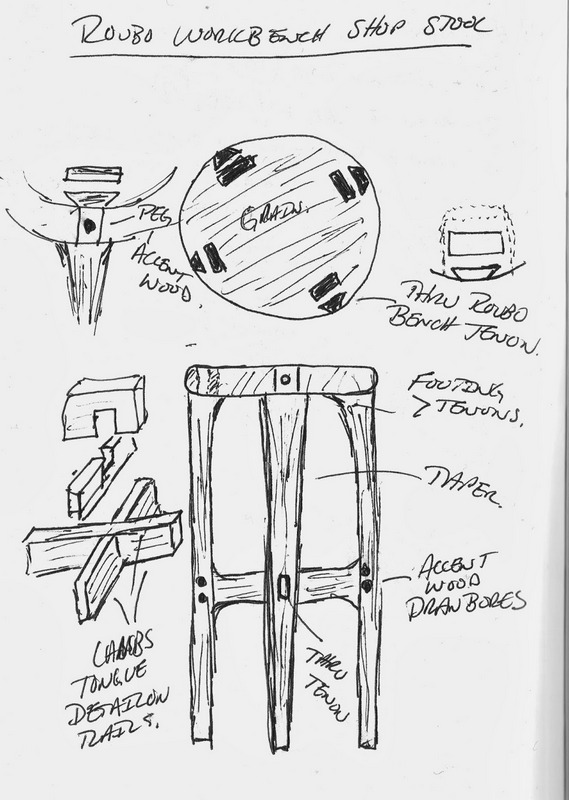
Stools are made of different materials, particleboard, plywood, but of course, completely wooden is more reliable, although making them a little more difficult. But the stool from the array will last a long time, and of course it looks more solid. From the materials we need bars, slats for tsarg, seat board. To make the construction look neat, the boards must be carefully sanded. From below, markings are made for fastenings and, most importantly, carefully monitor that all legs are the same length. You can use different methods for connecting, for example, furniture screws, but as you can see in the step-by-step photos, the author used spikes, not the easiest method, but the main result is. The finished structure must be sanded and decorated. For a tree, it is most logical to cover the surface with tinted varnish to emphasize the texture. Here are the drawings, as the author presented his stool before assembly.
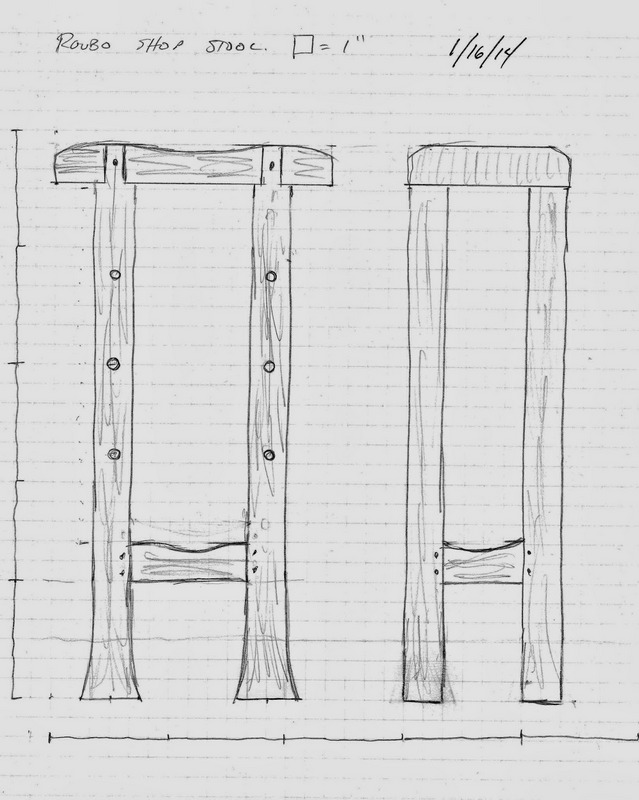
The author claims to have made this stool for one dayprobably it was a difficult day :)
Maybe you can do it, but you won’t know if you don’t try.


https://i.expert-h.com/en/stul/taburet-iz-dereva-svoimi-rukami-chertezhi-foto#sigFreeId751df68a2c
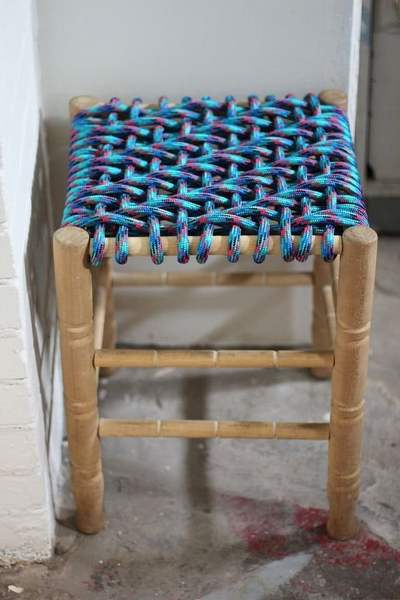 DIY wicker stool
Basically, stools are decorated with beautiful carved legs, but for the seat you can come up with something original. Here is an example - do-it-yourself wicker stool, cheap and stylish. A simple diagonal weaving method has been used here. All you need is a cord, best parachute, nails and a hammer. The stool itself can be made on its own, in this article many options are shown, or you can use an old stool and possibly redo the drawers.


https://i.expert-h.com/en/stul/taburet-iz-dereva-svoimi-rukami-chertezhi-foto#sigFreeId3608b4f4d4
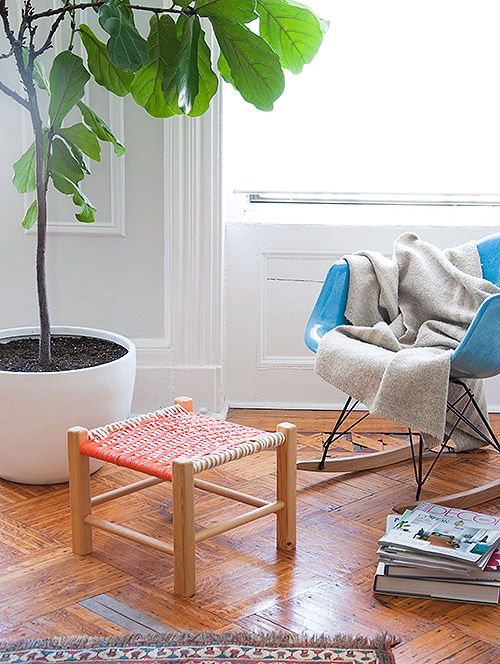
Another version of a stool with a wicker seat, only here a pattern is used, such as "chevron".
Rope will fit almost any, preferably stronger. Only about 25 meters. The process, in principle, is well shown in step-by-step photos of the master class. To begin, fasten the end of the rope, then you start to reel, for better fixing the drawers can be spread with glue. When the base layer is ready, an extra cord can be woven. Every few rows fasten it with a stapler or nails. To get a chevron pattern, you need to move the additional rope one step back in the middle of the winding.


https://i.expert-h.com/en/stul/taburet-iz-dereva-svoimi-rukami-chertezhi-foto#sigFreeIdf06c244e1d
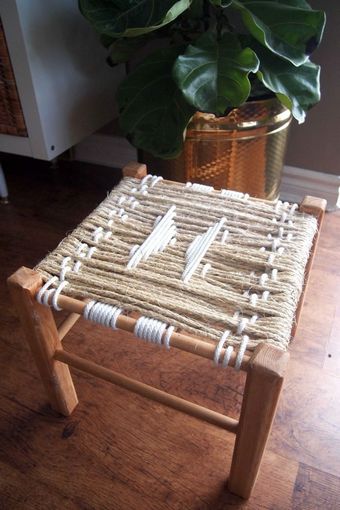
You can also use such decorative weaving.
True, such a design will not withstand heavy weight, because the entire load will go only to the main weaving, but a small child will do, or, as an option, can be used as a footrest. The weaving process is the same as in previous cases, just the pattern can be done without additional fastening.


https://i.expert-h.com/en/stul/taburet-iz-dereva-svoimi-rukami-chertezhi-foto#sigFreeId3c29eadea6
Drawings of wooden stools


https://i.expert-h.com/en/stul/taburet-iz-dereva-svoimi-rukami-chertezhi-foto#sigFreeIda987d91188
Wooden stools 300 photos


https://i.expert-h.com/en/stul/taburet-iz-dereva-svoimi-rukami-chertezhi-foto#sigFreeIdb3022e15cc
- Brick grill: 44 drawings, 18 projects + photos
- Collapsible barbecue: 50 drawings, 20 master classes +300 DIY photos
- ✿ Flowerbeds:> 34 turn-based master classes + photos (248 ideas) - do-it-yourself
- DIY sauna in the apartment: bathroom, balcony, storage room. Projects and photos
- Shelves in the bath with your own hands: +200 photo. Drawings of bench benches in the steam room