Bench in the hallway. DIY, photos, step by step instructions
 do-it-yourself bench in the hallway
Axiom: shoes should be kept in order and put on better when sitting. Conclusion: do a bench for shoes in the hallway do it yourself. This article presents 30 examples, something that even a novice master can do. From simple benches in the hallway, before bench for shoes with a hanger for clothes, padded seat and other amenities.
There can be many options, depending on the size of the hallway and the number of shoes. But do not get hung up on sizes, the main thing is to choose a model benches in the hallway, and already relying on the submitted drawings and step-by-step photographs, you can easily change the design for your needs.
In the article you will find:
- Bench for shoes in the hallway
- Soft bench in the hallway
- Entrance hall bench with backrest
- Entrance bench with stand
- Bench with a hanger
- Bench locker
- Benches from old furniture
- Benches in the hallway from pallets
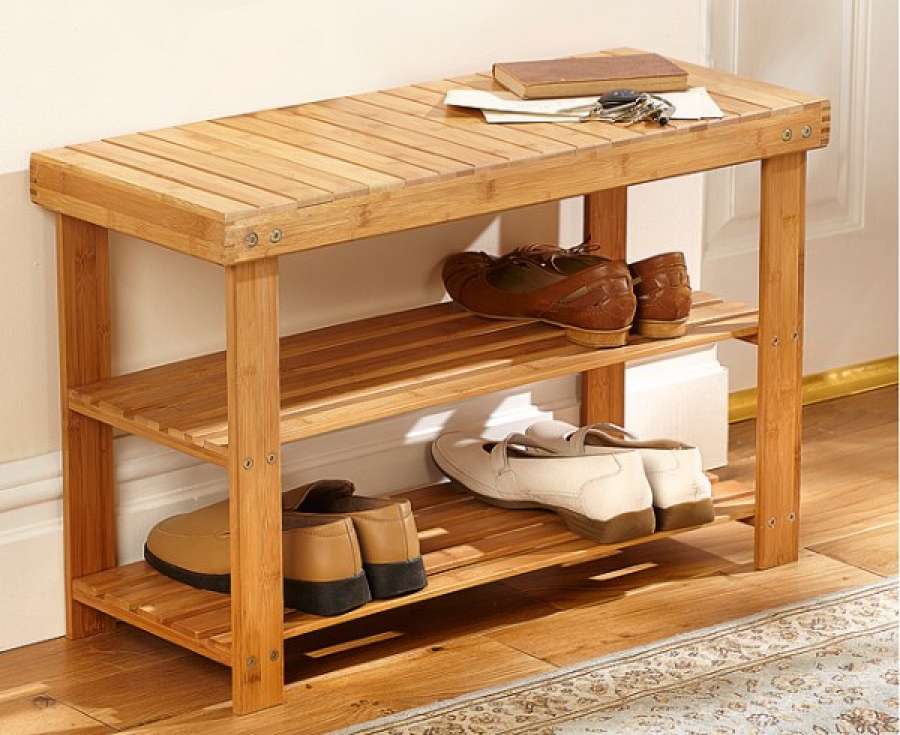
Entrance bench with shoe rack
 Very simple hallway bench in the style of minimalism.
Make two sets of side frames by attaching high legs and small parts of the frame to them using the clamping holes and glue.
Cut and add long frames to the side frames. Use a spacer to get an even distance from the bottom and top.
Add long frames and attach shelves.
 Make two sets by attaching screws for pocket holes. You can not use glue here, as this will expand the tree.
Be sure to follow the diagram to find the right hole for your pocket.. You will also need to add holes to secure the shelf to the frame of the shoe bench.
Attach a rack
After painting, attach the shelves to the finished rack frame with screws with holes for the pocket.


https://i.expert-h.com/en/lavki/skamejka-v-prihozhuy#sigFreeIdc4c380032a
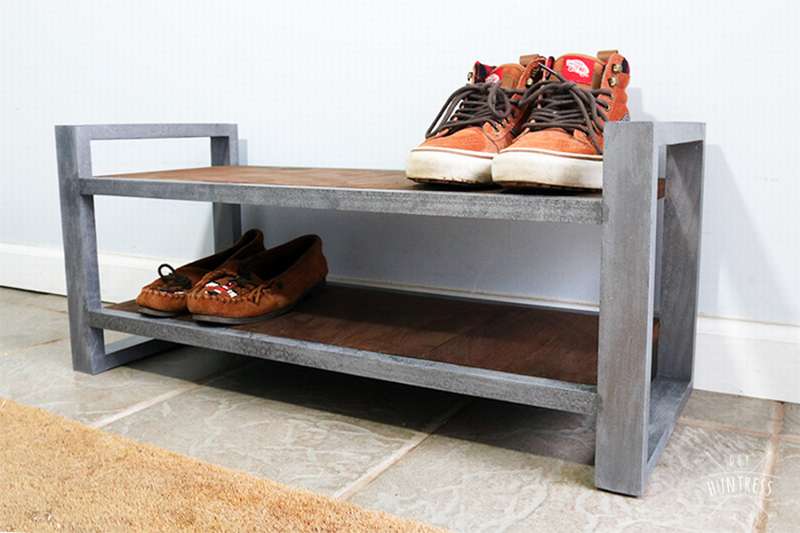
DIY bench in the hallway
 See how to make it stylish. a bench in the hallway with a simple walkthrough. This is an amazingly cheap project, with a simple design and assembly, and even a beginner can afford it. The minimalist look of the bench fits perfectly into the interior of any hallway.
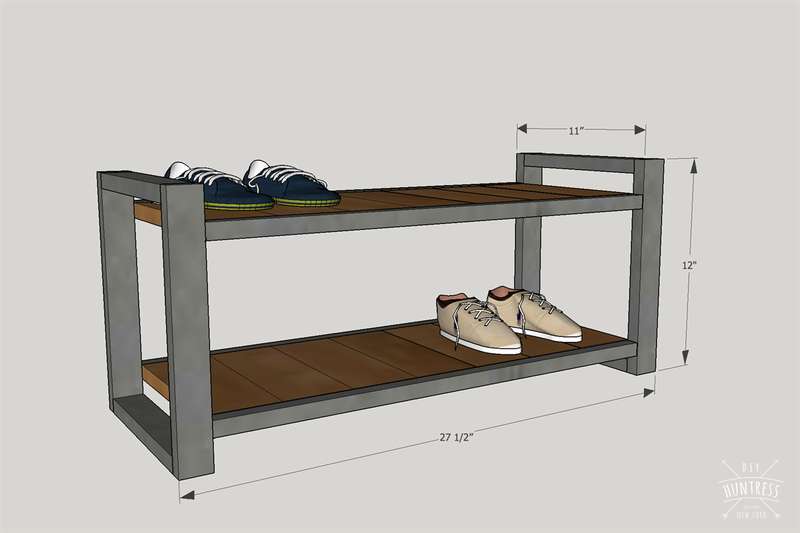
Step 1: Cut the tree to the specified dimensions. This bench is 152 cm long and about 50 cm high, which allows you to use only two 2 × 12 boards. Another 1 × 4 board will be the supporting beam from below.
Step 2: Sand the wood
Step 3: Drill holes in the Kreg Jig pocket to attach the boards.
Step 4: Attach the boards with glue and pocket screws. Use 5 cm pocket screws to attach the sides to the top of the bench.
Step 5: After the sides are attached, secure the support bar. A total of 6 pocket screws will be needed: 2 for the sides and 2 for the seat.
Step 6: Paint the hallway bench of your choice, and enjoy!


https://i.expert-h.com/en/lavki/skamejka-v-prihozhuy#sigFreeId435f4250bd
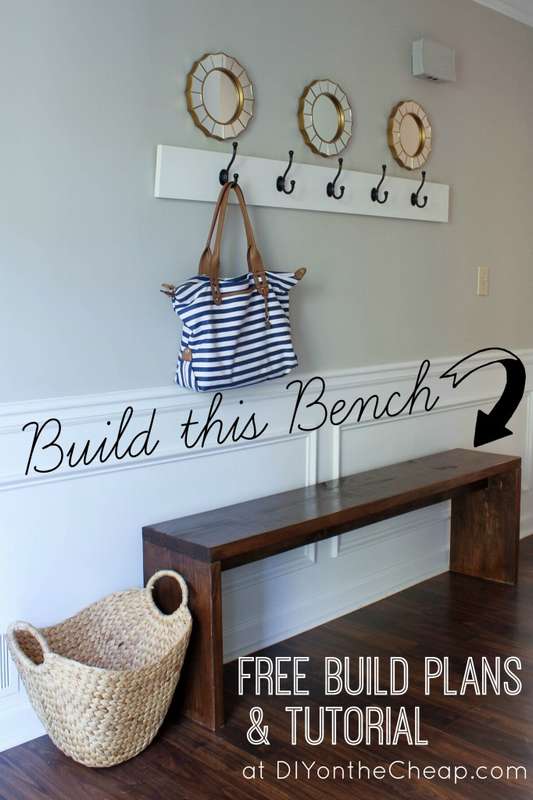
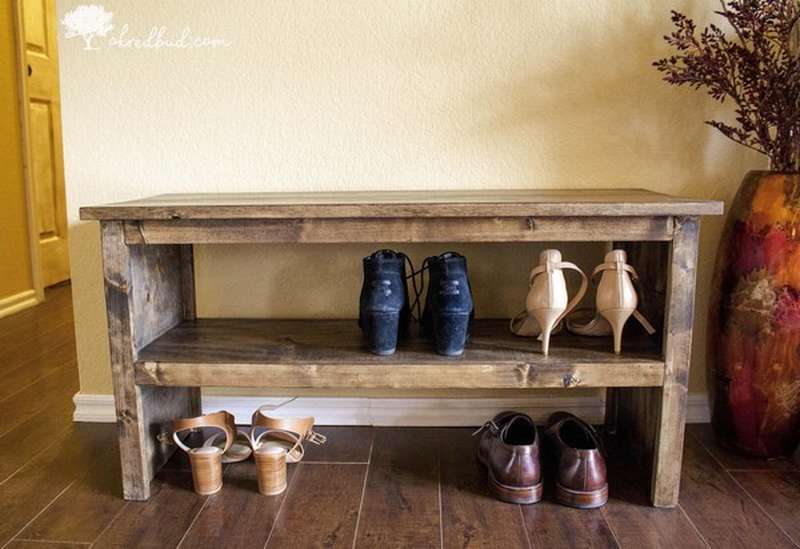
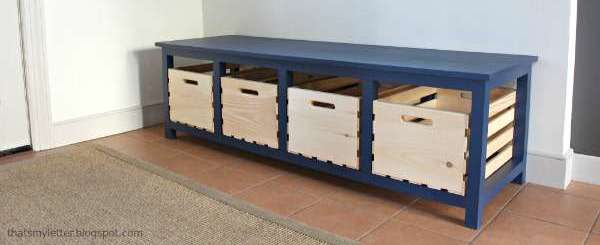
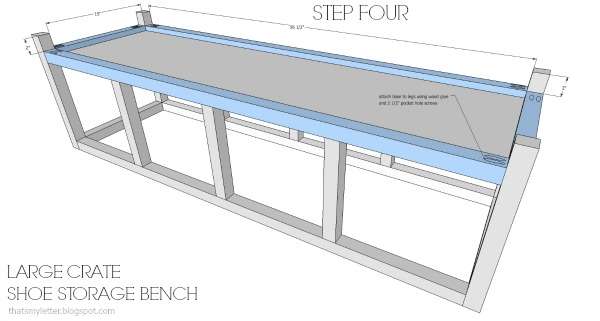
 Here is another example, a surprisingly simple bench. Just a couple of 2 × 8 boards: 2.5 m and 1.8 m long and in the end it turns out surprisingly strong and beautiful bench for anteroom. In addition, you will need mounting screws, a credit jig, a circular saw, a power drill, an orbital sander and wood impregnation of your choice. The baskets and drawers on the floor under the bench add an original touch. One basket on the floor is usually not used to store things, but the basket on the floor under the bench is another thing, it looks nice. This project is so easy that we can say with confidence: it is within the power of everyone. So, get the power tools and get started. The instructions can be read on the website.


https://i.expert-h.com/en/lavki/skamejka-v-prihozhuy # sigFreeIdaa9e2800a0
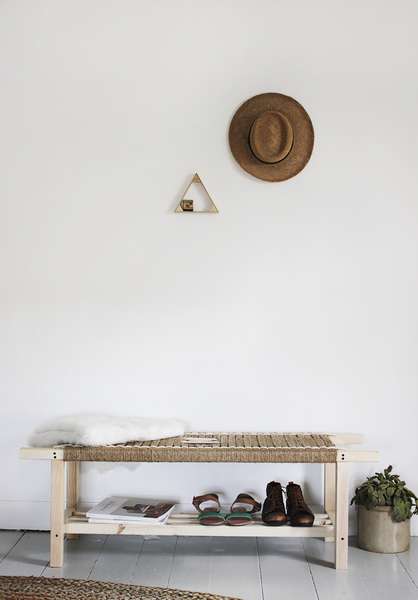
Bench for shoes in the hallway
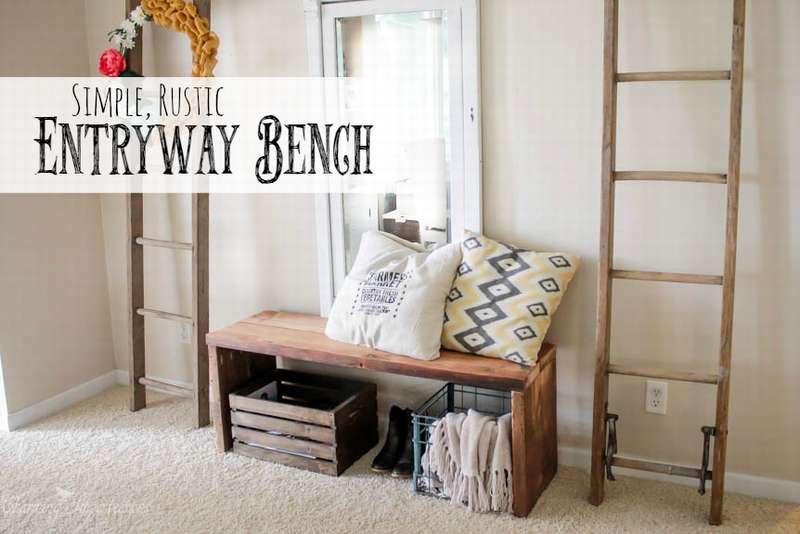
 Want to clean up the hall? Bench for shoes in the hallway - A great way to organize the storage of shoes, plus a place to rest and shoes are more comfortable to wear! What else can be said specifically about this bench - universal, can be used not only as a bench for shoes, thanks to practicality and style, you can put it anywhere. This simple project can be completed within hours or over the weekend. Detailed instructions, lists of materials and tools, all this you will find on the websiteif you use the link under the gallery.
Note. If you do not have a pocket fixture, then it’s better to buy, a jig will come in handy for you in many projects. However, you can use a drill and ordinary screws or brackets instead of pocket holes.


https://i.expert-h.com/en/lavki/skamejka-v-prihozhuy#sigFreeIdf597c3f301
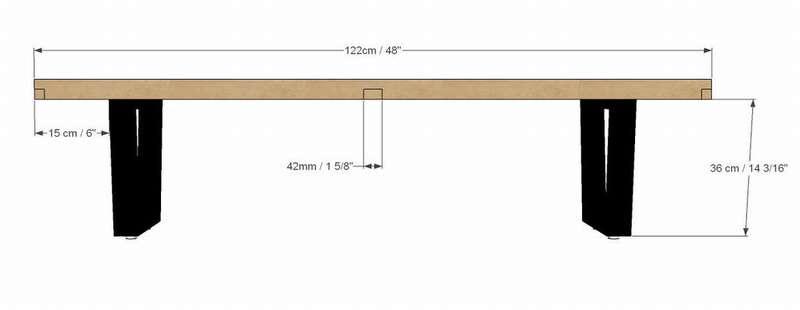
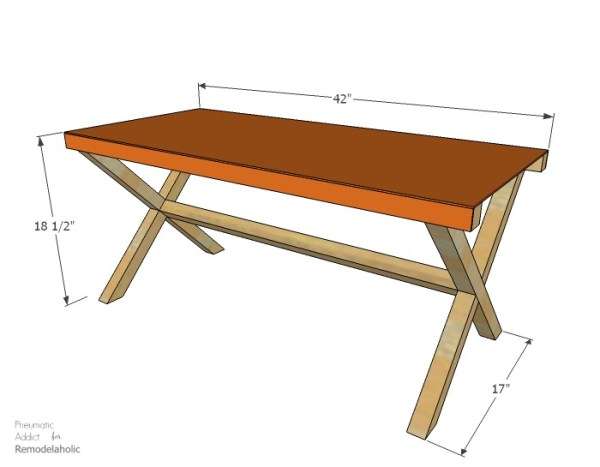
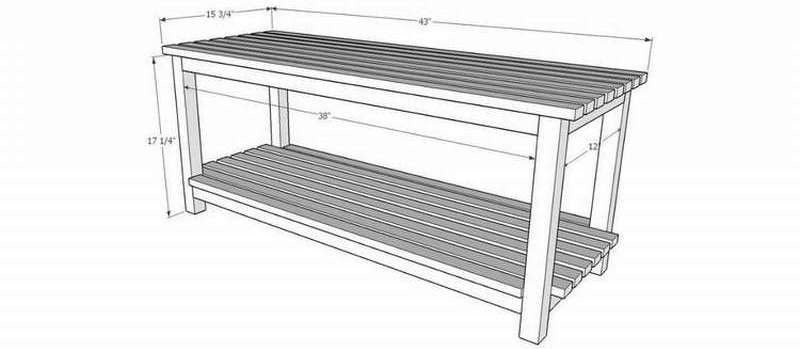
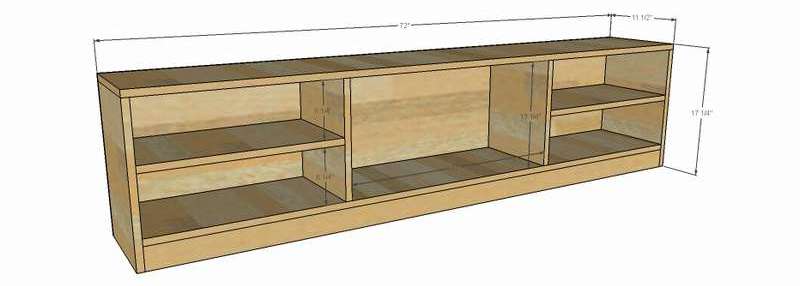
Bench in the hall "antique"
 Of course, this is a matter of taste, but if you like this style, here you will find step-by-step photos and drawings, how to make a bench in the hallway with your own hands.
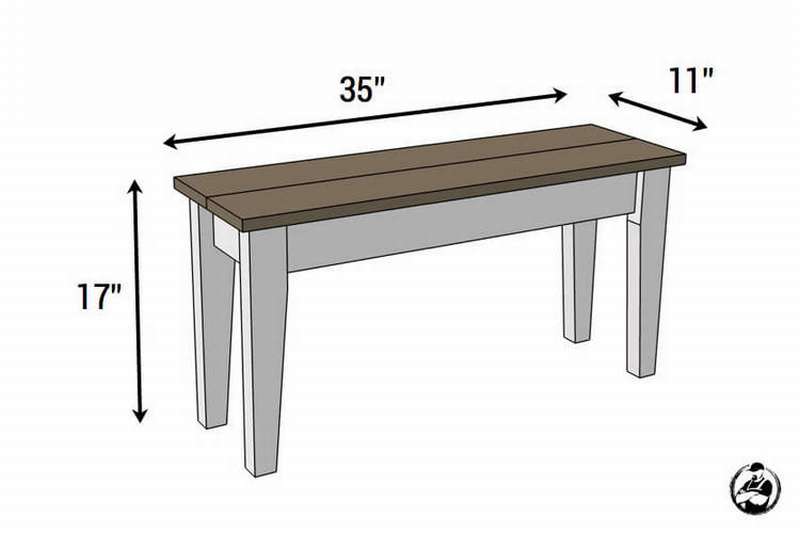
Below is a diagram of the necessary boards and the dimensions of the parts that you need to cut.
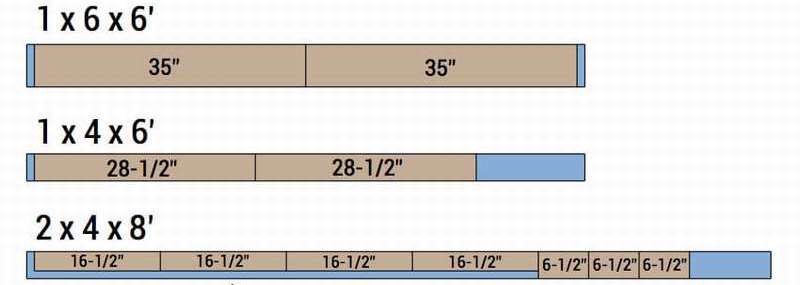 Dimensions in inches, multiply by 2.54, these will be the dimensions in centimeters.


https://i.expert-h.com/en/lavki/skamejka-v-prihozhuy#sigFreeId90621c55ab
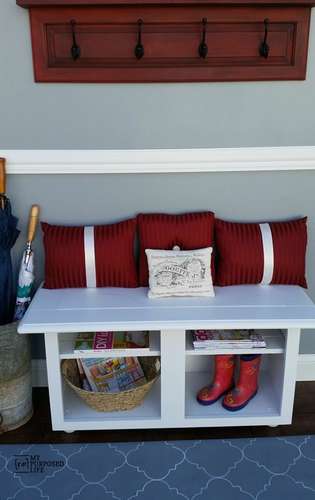
Bench for an entrance hall with a soft seat
 Treat yourself to a comfortable place to sit when you come home after a long tiring day - make it cozy bench with soft seat do it yourself, put pillows.
And this is not just a convenient bench, but also a great place to store shoes, which has a large space to accommodate three drawers - ideal for holding casual shoes that you may need. Agree, this is much better than folding shoes on the doorstep.


https://i.expert-h.com/en/lavki/skamejka-v-prihozhuy#sigFreeIdac640f4d67
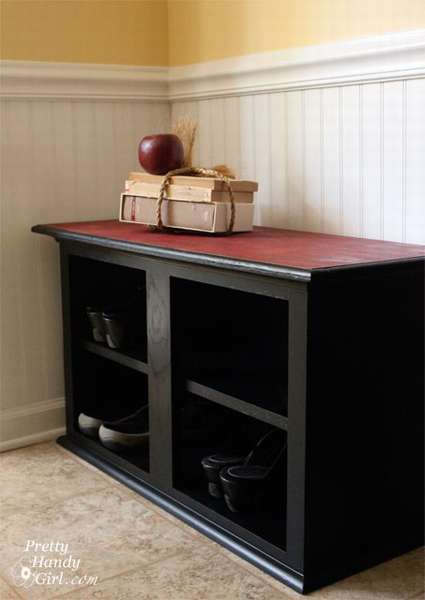
Bench with locker
 How do you like this option benches in the hallway? The depth of the cabinet allows you to keep on the shelves two rows of different shoes, according to the author, up to 30 pairs of boots fit in the cabinet. Impressive? See how to make such a bench with your own hands. Step-by-step photos are not very, but on the site the author of the project painted everything in great detail. So you can use the link and read.


https://i.expert-h.com/en/lavki/skamejka-v-prihozhuy#sigFreeIdbcabd4535f
Bench with a back in the hallway
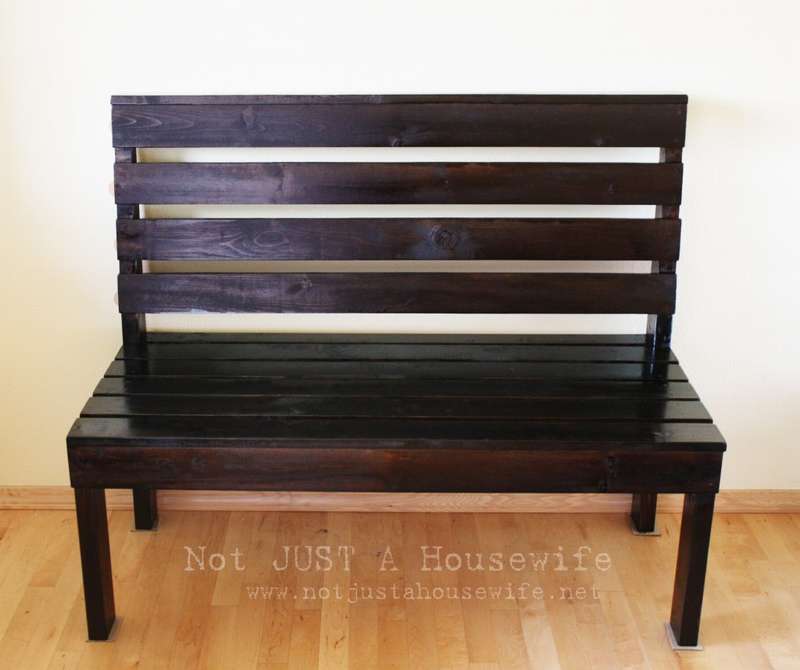 An interesting example how to make a bench with a back in the hallway do it yourself. One of the main reasons why we make furniture is that we need something specific to fit a specific space. Therefore, when you look at step-by-step photos or read instructions, it is necessary to separate the sizes of each individual part that you are sawing.
The purpose of the instruction is to show you AS to do. Then you can change everything as you wish, the main thing is that the bench in the hallway, or other furniture, match your size of the space.
The dimensions of the benches presented here are 120 cm long, 56 cm deep and 100 cm high.


https://i.expert-h.com/en/lavki/skamejka-v-prihozhuy#sigFreeIdba76b41227
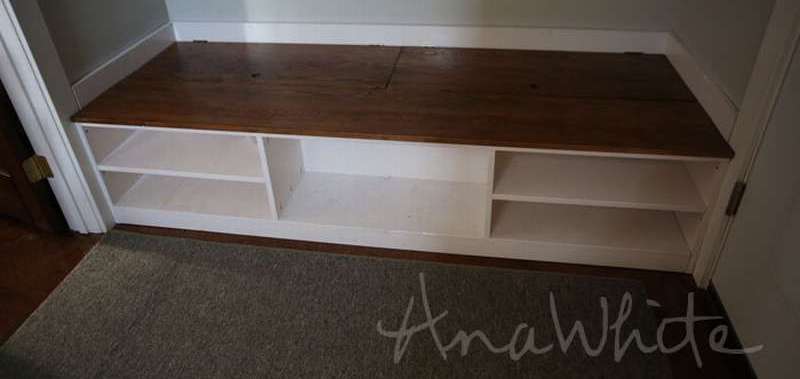
Bench in the hallway from the catalog
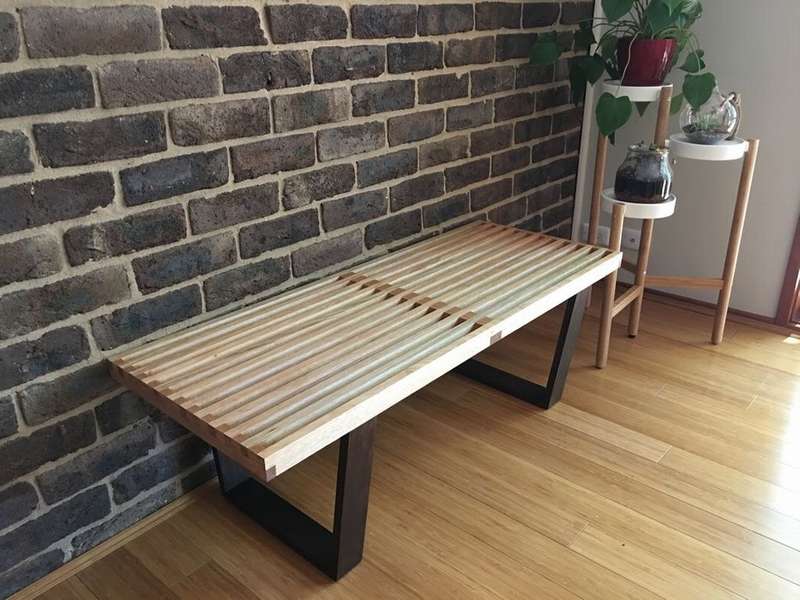 This photo can be seen in many interior design magazines, the Internet is full of very expensive versions of this bench. (retail at a ridiculous price - from $ 500 and up). However, you can easily do this. do-it-yourself bench in the hallway for about a fifth of the price of even the cheapest online offer and almost certainly from the best quality materials.
Even if you have to buy all the materials from scratch, let's call it maybe no more than $ 140. And even if you need to buy some tools (a great excuse), you will still potentially come forward.
 For information, the bench design developed George Nelson in 1946, and was first released by Herman Miller.
The bench is not only functional (it can be used, for example, as a low coffee table), but some believe that this is one of the most iconic modern pieces of furniture in the 20th century. The most amazing thing is that although the design is about 70 years old, it is not outdated and will look great in any modern house.
Thus, the bench has two main parts:
- two trapezoidal legs;
- the top of the plate, made with interchangeable semi-wheeled joints.
 Theoretically, if you are well versed with hand tools, this assembly could be done using a hand saw, chisel, etc. But ... if you are only interested in the end result, then why strain again if there are power tools. Of the consumables, you will need 16 wood screws, glue,walnut feed, sandpaper, polyurethane.
The process is shown in detailed step-by-step photos, and you can find out all the details of the assembly on the site using the link under the gallery.


https://i.expert-h.com/en/lavki/skamejka-v-prihozhuy#sigFreeId300146da67
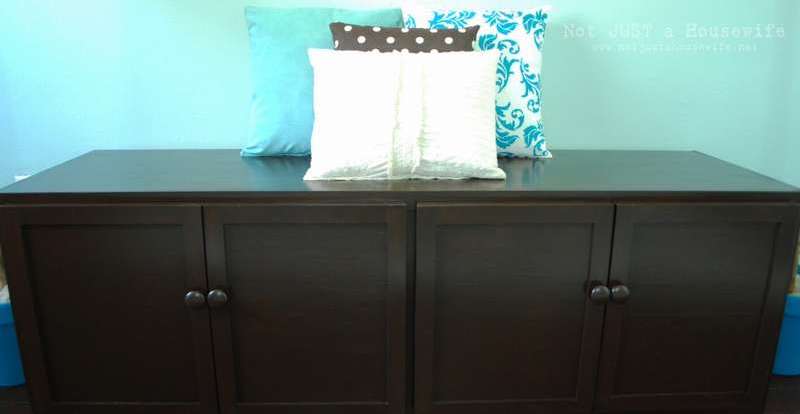
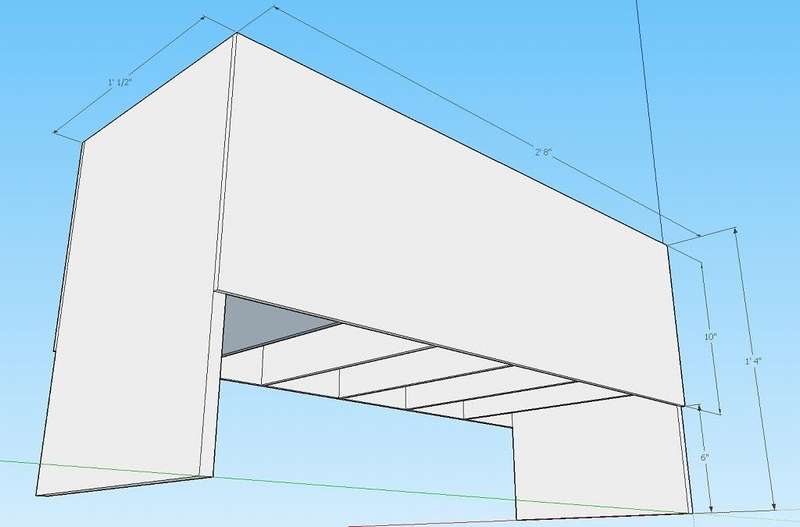
Bench in the hallway with a drawer
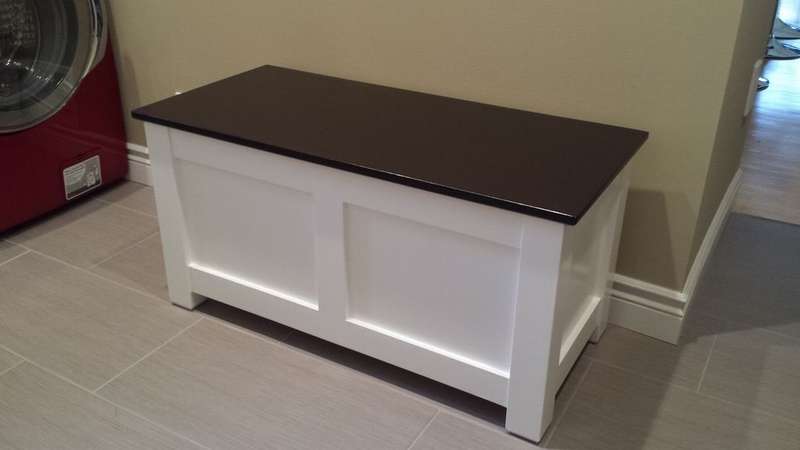 If you need hallway benchso that it was comfortable to sit on, putting on shoes, as well as a place to store backpacks and other things, then this is the right option for you. The goal is to maximize the space in the hallway and at the same time create a decorative interior. The bench will be a simple box with a lid, and the top of the lid is a rest area. The box is located at a height of only 5 cm from the floor. Finishing height 46 cm (45 cm is the standard height of a bench or chair).
 The main box is made of hardwood plywood. First cut to size. To simplify the process, the plywood was cut into 14 strips with a width of 3/4 inch (375 mm), and then cut in length - 4 pieces. 33 33/8 "and 2 13 3/8" long (339 mm).
note: used plywood 18 mm, less than 3/4 "of thickness, using the metric measurement system for the last two short pieces, it is easier to calculate everything to ensure the correct fit for the box. Please check the thickness of the plywood and make the right fit. Also, other the calculations are based on the space that is in this case, it may be too large or small for your hallway. The most important factor is the height of the finish 45 cm.
Legs in a three-piece construction - a two-piece L-shape and a square bottom. You need to cut out 5 cm of the square and stick them to the L-shape. Cut a few chamfers at the end to get a finished look.
 Apply glue to the edge of the plywoodto connect the two panels. (this ensures that they do not budgewhen you clamp)
The top of the bench is the last piece of plywood that has not been used, with solid oak trim. Note: if you use ordinary hinges, you need to make a pair of recesses on both boxes and at the top, so that the hinges work with a minimum clearance between the box and the top.


https://i.expert-h.com/en/lavki/skamejka-v-prihozhuy#sigFreeId5ca62009ba
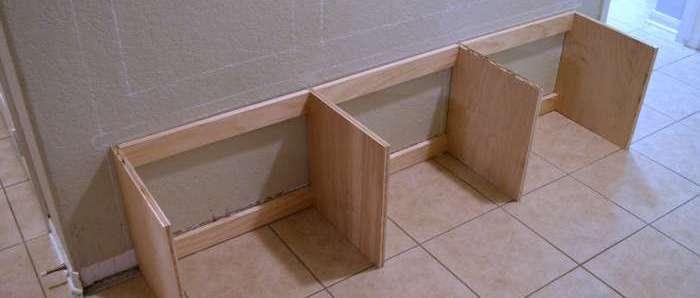
 Here is another example of a closed benches in the hallway with a shoe box. To assemble the box, glue and finishing nails were used here. After installation, secure the partitions in the same way. In this case, 5 partitions are installed, that is, 6 niches are made. Of course, you can do as many departments as you need. The cover consists of four parts of plywood, fabric and a common board.
The board has a cone and shape to fit the top of the box. Cut a soft pad, stick it on plywood and wrap it with a cloth. The general board is screwed onto the plywood covered with fabric.


https://i.expert-h.com/en/lavki/skamejka-v-prihozhuy#sigFreeIdab39e65311
Wooden bench in the hallway
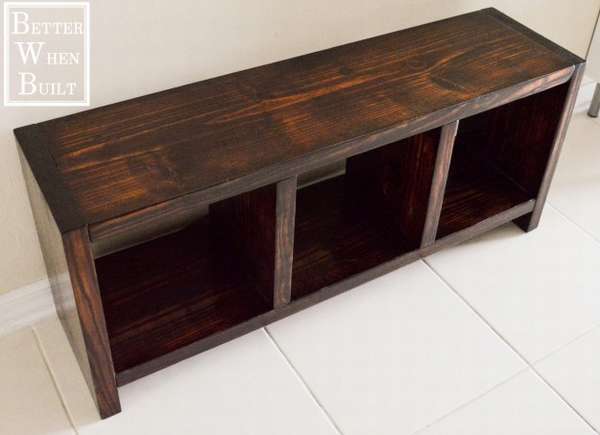 See how to make it very simple and convenient. bench in the hallway made of wood do it yourself and you will get a truly functional shop where you can put bags, store shoes, etc. Simple and elegant design provides a whole world of possibilities, it is so simple that the design can be easily adapted. For example, add more boxes or make from other material if 2x12s boards are not the best option for you. For example, a similar bench in the hallway can be made of 1x12s boards or using plywood (just make a frame of 1x2s).


https://i.expert-h.com/en/lavki/skamejka-v-prihozhuy#sigFreeId50d036f202
Foot bench
 Skill level: middle. Approximate time: 3 hours
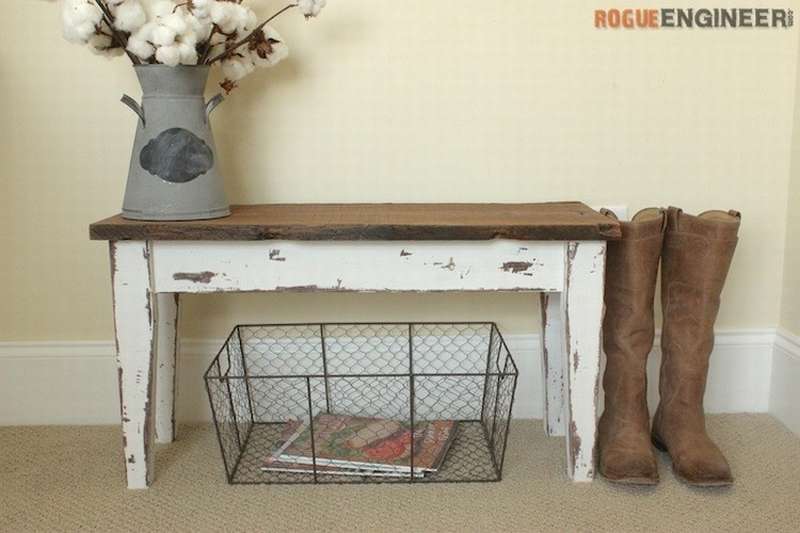
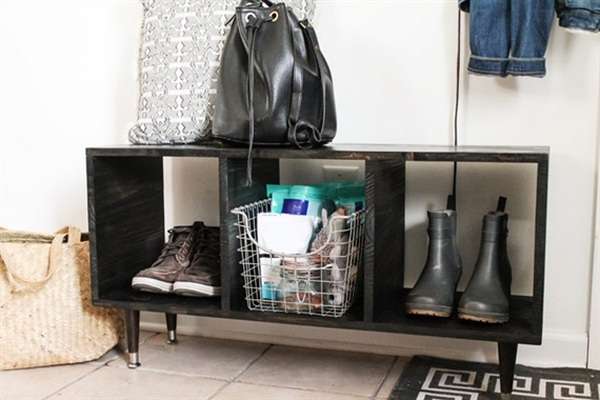
Do stylish bench for anteroomto fold bags and store shoes. In addition to a very simple assembly, the design of this bench will add style and functionality to the interior of your hallway. You can store items in attractive wire baskets placed on a shelf.
See the master class on making shoes for shoes in the mini gallery for step-by-step photos


https://i.expert-h.com/en/lavki/skamejka-v-prihozhuy#sigFreeId3811bd2687
Bench in the hallway with drawers
 Here's how to make a long a bench in the hallway with drawers for shoesdesigned for 4 drawers for storing shoes. For the manufacture you need bars for legs and beams and plywood for the walls. You will find a link to the site for step-by-step instructions, including consumables and a list of parts, under the gallery.
 When using power tools, observe all safety precautions.


https://i.expert-h.com/en/lavki/skamejka-v-prihozhuy#sigFreeId23da5d7bdd
 Leather bench
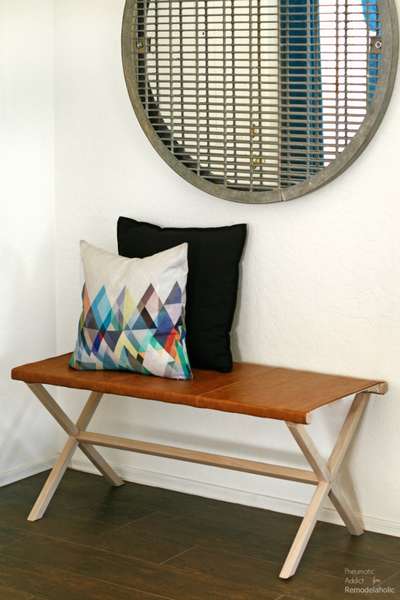
If you need a lightweight portable a bench in the hallway with a leather seatthen this is a great option. The wooden frame is very easy to install, with the exception of one pair of half joints.
- Start by cutting four cross-shaped pieces 65 cm long, square at both ends. Measure 30 cm from each end, cross section in the middle 3 cm.
- Measure half the depth of the board and mark the sides. You can remove the middle part in several ways - a saw, milling cutter or even a chisel.
- Apply glue to all three sides of the cuts and join the two ends together. Repeat with the remaining two crosses, creating two X.
- Firmly fix the boards and let the glue dry completely.
- Once the parts are dry, you can connect them with a long central guide.
- Pre-drill two holes in the center of each X and at the end of the center rail. Apply a small amount of glue to the screw holes.
- Center the upper guide on the sides of the frame, creating a 5 cm overhang at each end. Pre-drill two holes through the crossbars. Apply glue and fasten with fixing screws. If you want to paint, then do it at this stage.
 After the glue has completely dried, the frame is finished. The skin itself is not strong enough to hold a lot of weight. Creating a sublayer of cotton will give the necessary support for the seat.
- Use a webbing to pull the leather over the bench seat and fasten it on the inside. Use sharp scissors to cut notches in the skin around the legs.
- Before wrapping “artificial leather” around the frame, add decorative insert. This is necessary not only for decorative purposes, the insert adds tensile strength.


https://i.expert-h.com/en/lavki/skamejka-v-prihozhuy#sigFreeId803bfc98c9
Entrance hall bench with wicker seat
 This a bench in the hallway make it easier than it seems at first glance. You will need three 2x2x8 crates, four legs, several rolls of jute thread and a cotton cord. Another drill and upholstery nails. The idea, I think, is clear.
- It is necessary to make a frame for the top of the bench.
- Then use the upholstery nails to attach the jute to the inside and wrap tightly around the entire bench until you reach the other end.
- Fix the upholstery with nails where they will not be visible. It will take a few rolls of jute.
- When you reach the end of one roll, tie the end to the beginning of the next and continue wrapping - the knot should be on the bottom of the bench.
- Repeat these steps with a cord of cotton, weave it between the jute to create any pattern you want!
- To attach the legs, drill two holes through the top so that the screws go down into the legs.
- Make a stand below.


https://i.expert-h.com/en/lavki/skamejka-v-prihozhuy#sigFreeId106ce83d74
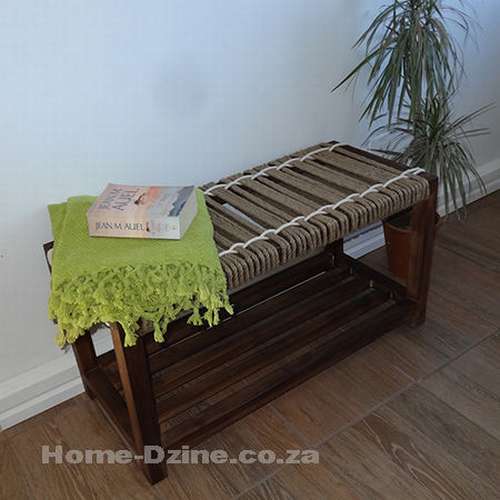 Here is another example of a "jute" bench.
The design is very simple to manufacture and strong enough for two people.
The principle of manufacturing and weaving the seat is almost the same as in the previous version.
Can use this wicker bench as a decorative accessory for decorating the interior of the hallway. Or put in the bathroom, on the shelf under the seat you can fold towels. And you can put it in the bedroom, at the foot of the bed, it will also look good. In general, anywhere, there would be a bench, but you can imagine where to attach it.
See the master class with step by step photos


https://i.expert-h.com/en/lavki/skamejka-v-prihozhuy#sigFreeIda577bc0e2b
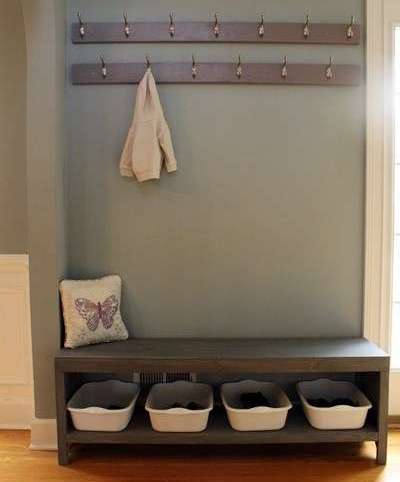
 Bench with a hanger
Here you can find out how to make a bench in the hallway with a clothes hanger and a place to store shoes.It looks gorgeous, but at the same time it is a very simple design, although grinding is really a bit tiring with all these shades. The best part is that this is an inexpensive project. You just need to buy 4 2x3s boards and several 1x2s boards, you have a beautiful bench for shoes, and even with a hanger.
A ready-made bench complements the appearance of the hallway and serves as an ideal place where you can put on shoes, store things or just sit.
First assemble the frame and sand it with sandpaper.
Place the bars of the 2 × 2 supports evenly, securing with wooden glue and pocket screws.
 Sand the 1 × 2 strips and evenly the space above and below the bench, creating protrusions in front and back. The plates should be spaced about 15 mm apart.
Cover the bench with three layers of polycryl.


https://i.expert-h.com/en/lavki/skamejka-v-prihozhuy#sigFreeId13d15f7ad0
Hanger for the bench. Below are presented drawings, as well as a list of materials needed for this project. True, the list and sizes are in English, but it's simple, 1 inch, which is designated as 1 ", it’s 2.54 cm. The inscriptions are also elementary, long - long, wood screws - wood screws, pocket - pocket, washers - washers, nuts - bolts.


https://i.expert-h.com/en/lavki/skamejka-v-prihozhuy#sigFreeIdaa7c965848
 Start by assembling the legs and base. The base parts are centered under the feet, so there is a margin of approximately 6 mm on each side. Put it all together with pocket screws.
- Use the 4 "x 1/4" (10 x 0.65 cm) bolts to secure the top of the support 45 degrees. Keep in mind that 1/4 "is the width of the threaded portion of the bolt, not the head.
- If you like the original design of the shelf with curved supports, then you need to saw off the supports to the desired length, then determine where the curve should begin. Draw a curve with a pencil and saw it out with a jigsaw. Use the first part as a template.
- If this step slightly exceeds your knowledge, you can simply leave the supports with a right angle of 90 degrees, or cut a chamfer in them to bring down the lower corner and give it a more rounded appearance.
- Fasten the shelves in place and performed the same steps for the armrests with an angle of 45 degrees. Two bolts go to each support.
- After the shelf, attach the 1 × 2 strips. First, beat the grate to the edge of the shelf to make sure that all the protrusions are lined up and then evenly separate them.
- Followed the same steps on the second shelf. For the slats that extend between the legs, drill holes at the ends and aligned with other slats.
- Fill all openings with wooden filler and let dry, then sand all surfaces so that the structure is ready for painting.
- When painting the shelf, fasten the hooks for the hanger at 25 cm intervals.


https://i.expert-h.com/en/lavki/skamejka-v-prihozhuy#sigFreeIdd27e19b58b
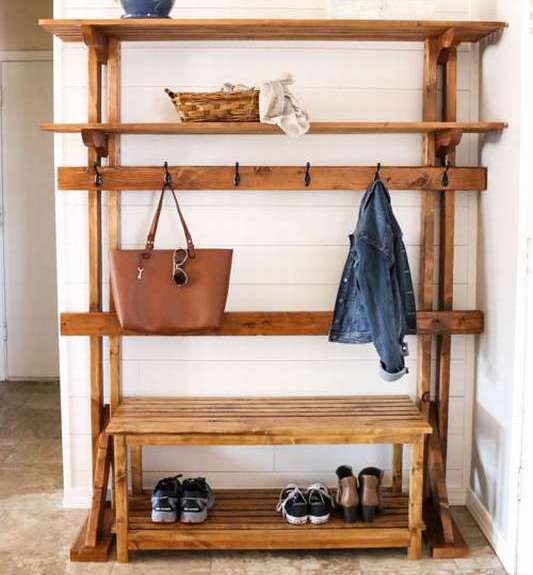
Shoe bench with a hanger
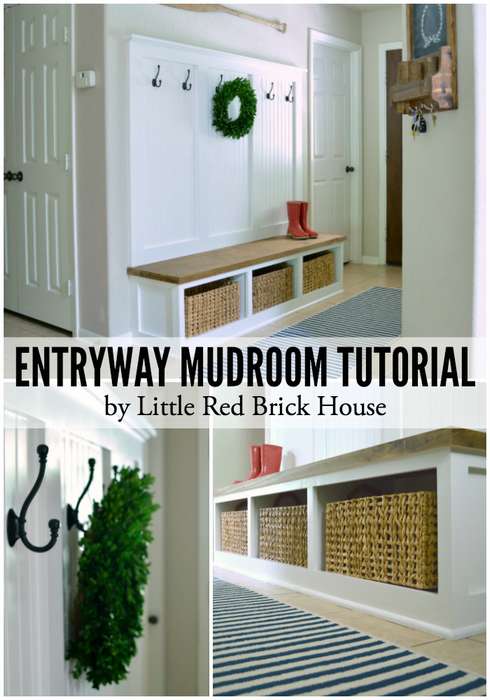 Make great entrance bench with integrated panelso that all your hats, coats, bags and scarves are in order at the right place. In this case, you will have enough space to store a number of pairs of shoes on the lower shelf. On the bench it will be very convenient to tie shoelaces or just use it as a chair. Stylish design will perfectly decorate the interior of your hallway.
- First, assemble the frame, after removing the baseboards where the bench will be.
- Before attaching the base to the wall, we need to add shelves.
- Then rotate the base vertically and add bench support. If you want, you can use a full sheet of plywood.
- To hide the open area below the cubic shelves, sheathe the base with 1 × 4 boards.
The bench is attached to the wall with long screws, about 10 cmIn general, they should be long enough to get through the spike, drywall and into the studs. Then the bench will not go anywhere!
For the upper stand, a plywood sheet was used, secured from the lower support of the seat.
 To cover the upper part, 1 × 3 boards were used. The board bends about 20 mm inches on each side. After installing the top board, the height of the structure was approximately 178 cm.
If you want to read the entire manual in full, a link to the author’s site is located under the gallery.


https://i.expert-h.com/en/lavki/skamejka-v-prihozhuy#sigFreeId6d22c4b73d
Bench with a hanger in the hallway
 Good example, how to make a bench in the hallway with a clothes hanger. A simple but stylish rectangular design, in which there is a place for several baskets to store your shoes, is installed on the floor. The doors are fixed on the walle elegant wooden boards for clothes. In addition to wooden boards of various sizes, you will need nails, glue, sandpaper, a circular saw, a jigsaw, clamps, a powerful grinder, a hammer and a drill.
This project is quite simple.
It should be mentioned that sanding is best done before the bench is fully assembled. After joining the boards, hard angles are unattainable for a grinding machine. Therefore, after assembly, you will have to spend much more time grinding.
You can read the detailed instructions for making this bench with a hanger on the website.


https://i.expert-h.com/en/lavki/skamejka-v-prihozhuy#sigFreeId6de0c40448
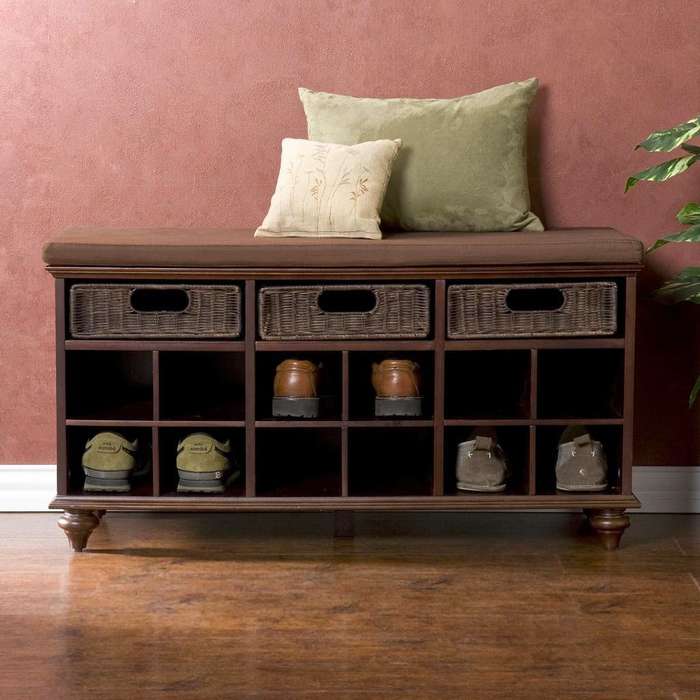
Entrance bench with shoe rack
 See how to do do-it-yourself wide bench for shoes in the hallway. Below is a drawing.
 You will find instructions for manufacturing, as well as a list of necessary materials and tools for this project on the website. Link under the gallery.


https://i.expert-h.com/en/lavki/skamejka-v-prihozhuy#sigFreeId3eeb63347c
A few examples of how to make a shoe bench in the hallway from old furniture
Bench in the hallway from the kitchen cabinet
 The submitted project is hallway bench remodeled from old kitchen cabinet. The back panel of the case is sheathed with a sheet of thin plywood. To raise the bench a little, the author used several parts from the bunk bed.
How to attach legs
- Mark the installation area bench below
- Drill holes
- For extra strength, apply glue
- Clamp your leg to get a snug fit
- Screw the screws from the inside of the cabinet through the bottom into the legs
Attached the old countertop, twisting the inside of the cabinet (top) into the countertop.
After that, paint the bench. First apply several coats as a primer using semi-gloss paint for the top coat. Start from the bottom.
You can read the full instructions on how to make a bench on the website using the link under the gallery. I hope you enjoyed the project. This small converted bench will serve perfectly as a shoe shelf, but with the same success it can be used on the street, for example, on the porch.


https://i.expert-h.com/en/lavki/skamejka-v-prihozhuy#sigFreeIdfb90476de5
 Here is another example how to remodel an old closet into a great shoe bench. Wall cabinets are great for this project. Ideally, the cabinet will have a height of 45 cm (standard seat height). If it is shorter, you can make a base for your bench to raise it a little.
It is more than likely that if you use an old kitchen cabinet, it will be covered in grease. But do not be afraid, there is an excellent cleaner for removing fat. Hot water and ammonia! You must work in a well-ventilated area when working with ammonia. Put the sponge in a mixture of ammonia and hot water and wait about 10 minutes. Wipe off the cabinet and repeat until thoroughly cleaned.
Remove all equipment and doors. Pull out all the nails. Cut three size boards to make a seat on top of the cabinet and use to support the bench. Use building glue for fixing boards. (Glue that has the consistency of toothpaste.) Measure the sides of the cabinet and the front panel. Cut a round shape (convex shape) to base and form a recess (concave shape) for the top of the cabinet. Glue a thin plywood strip.
Fasten the L-shaped brackets inside the cabinet to hold the shelf. Fortunately, the shoes are not very heavy, so you can use finish nails. Paint the cupboard, shelf and bench. Cover the surface with several layers of polyurethane, and you're done!


https://i.expert-h.com/en/lavki/skamejka-v-prihozhuy#sigFreeIdabfae72086
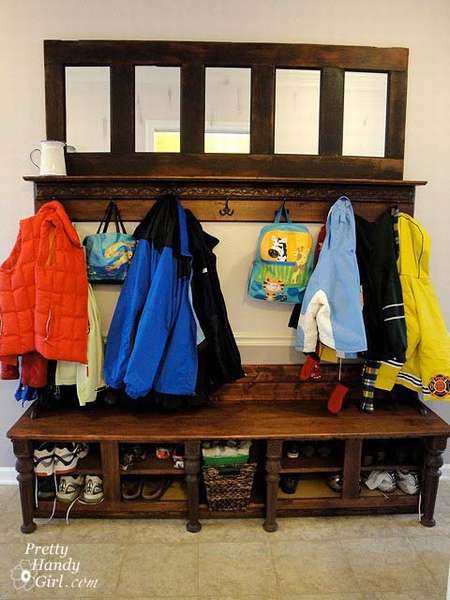 To make this design, a whole set of old furniture was needed. Bench made of inexpensive kitchen wall cabinets, an old door with recessed panels, four decorative old coffee tables that have served their shelves, and several second-hand boards. The result was a gorgeous bench in the hallway with shelves for storing shoes and a convenient clothes hanger.
Unfortunately, the author did not take step-by-step photos, but you can visit the site, which describes all the stages of bench assembly. In short, this was the case.
First you need to make the base frame. Add new 1 × 4 boards to hide old ones, i.e. for decoration.
There is also added a thick pine board, cut to size, it hides the base frame. Below are two coffee tables. Brackets for the shelf were used to secure the back to the seat.
Inside the cabinets, L-shaped brackets are fixed to support the shelves. Basically everything, but if you have a bunch of old furniture, it’s better to look at the video that is on the author’s site, maybe you also want to do something similar.


https://i.expert-h.com/en/lavki/skamejka-v-prihozhuy # sigFreeId56da094a97
Shoe bench from the old head of the bed
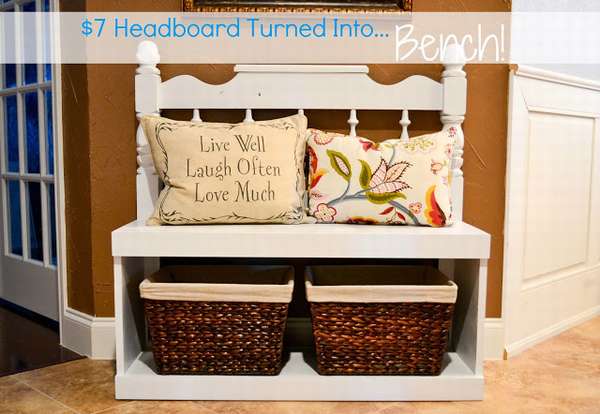 Who said that the headboard should only be the headboard, not a great bench? Just attach a regular wooden bench to the double headboard, paint, put a few pillows on top, and under the seat a couple of baskets, you will have a fashionable and unconventional bench for the hallway.
Shoes can be stored in baskets, and it is convenient to tie shoelaces on a bench. See step-by-step photos on how easy it is.


https://i.expert-h.com/en/lavki/skamejka-v-prihozhuy#sigFreeId7c3564c01b
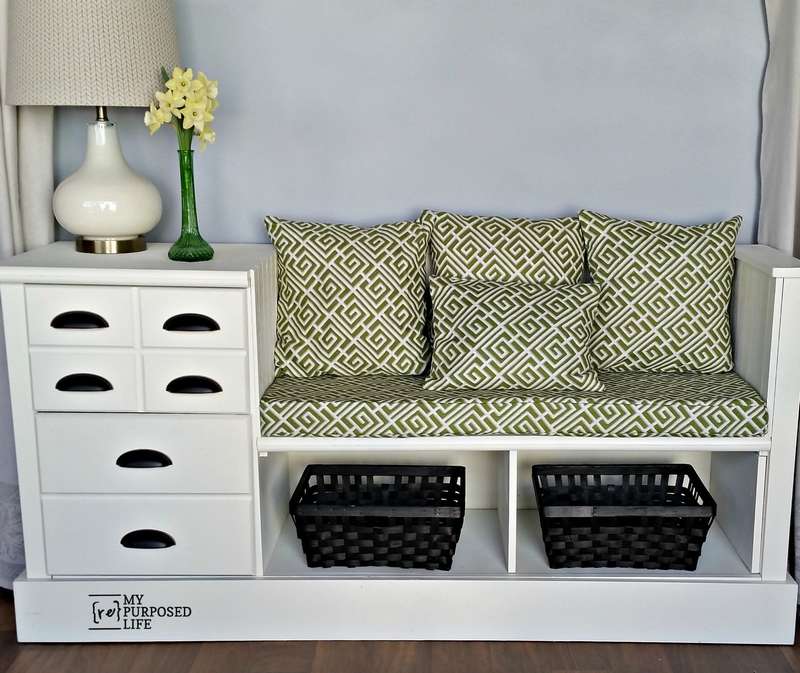 Wardrobes and beds are good, but if you have old chest of drawers, then you can do this elegant bench for the hallway. Yes, there’s a hallway, such a chic sofa can even decorate a living room, it will look very harmonious in a bedroom, in general, in any corner of your house. True, for this you need a special chest of drawers - big or much longer than usual.
Removing a chest of drawers into a bench is not difficult, but there is many different nuances, step by step photos are not shown. Therefore, it is advisable to visit the author’s site, he was too lazy to photograph, but he did not regret the instructions, everything is described in great detail there. Use the link under the gallery and good luck to you.


https://i.expert-h.com/en/lavki/skamejka-v-prihozhuy#sigFreeId20c4d801fb
Wheel Bench
 Do do-it-yourself mobile home bench. Easy to assemble, convenient to operate, inexpensive and durable, in every home there is a place for its use. Below are drawings with dimensions and a sequential diagram of the assembly of the bench.


https://i.expert-h.com/en/lavki/skamejka-v-prihozhuy#sigFreeId55213d15dd
Bench in the hallway to the wall
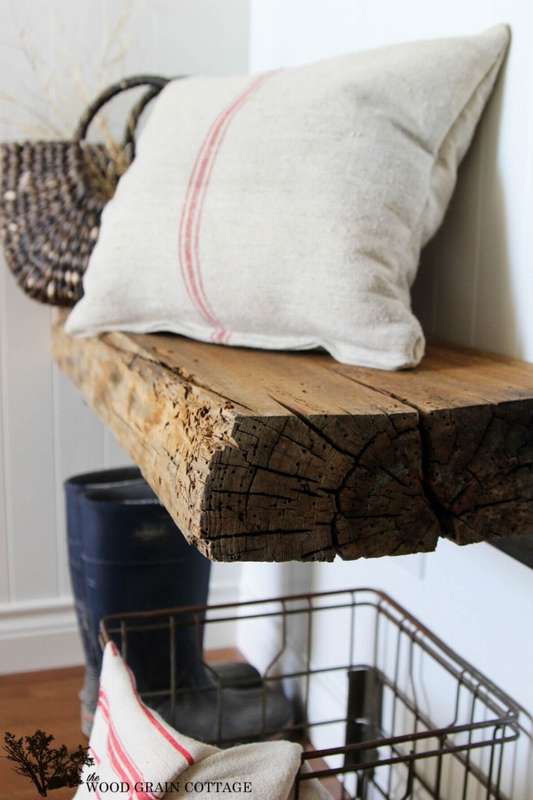 A very comfortable bench if there is not enough space in your hallway. But the main feature of this project is not functionality, the author wanted something unusual in the "antique" style. At first glance, the board that you see in the photo is in terrible condition, in fact, it took more time to search for this option than to make the bench itself. Well, everyone has their own quirks. If you are also a fan of this style, then this project is for you.
If you want the exact same bench, then there is one drawback, this beam is very heavy, so the author needed welding for fastening. The board is mounted on a metal platform welded to the bracket. Also, for wall mounting, you will need plastic anchors for additional support.
For coating used natural hemp oilthat helps restore wood ... But this method is good, if you do not want to grind and paint woody, and save, so to speak, in its original form.
Using a brush, apply a copious layer to the top and sides. Wood quickly absorbs oil, so apply another coat at the end. Oil does not change texture, but only enhances what is. So if you save the tree "with history", this is a good way.


https://i.expert-h.com/en/lavki/skamejka-v-prihozhuy#sigFreeIdb4d14ec1fc
Hallway drawer bench
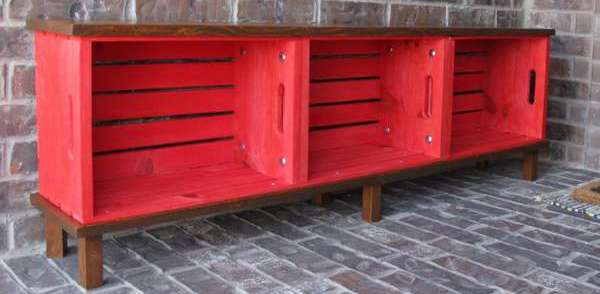 We collect several wooden boxes of bright color, and then connect them - this is the key to making beautiful hallway benches, with a spacious place to store shoes. You will need 3 wooden boxes, a board measuring 2.5 x 30 x 30 cm, bolts, nuts, washers, several wood screws, beautiful impregnation or paint, as well as wooden legs. See how to make a bench in the hallway with a few simple steps.
Below is a simple drawing, you can also sketch for your future bench.
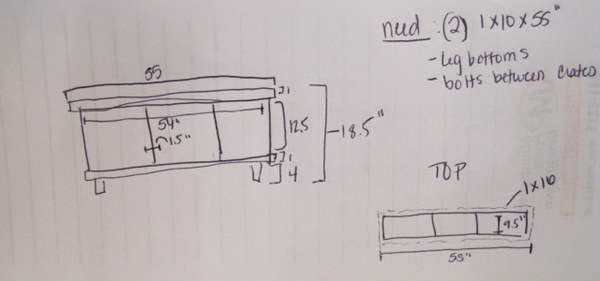 As you can see, everything is very simple.


https://i.expert-h.com/en/lavki/skamejka-v-prihozhuy#sigFreeId611b6e4011
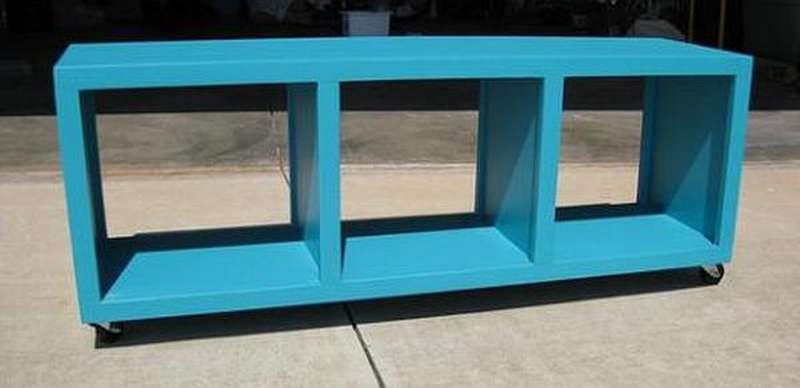
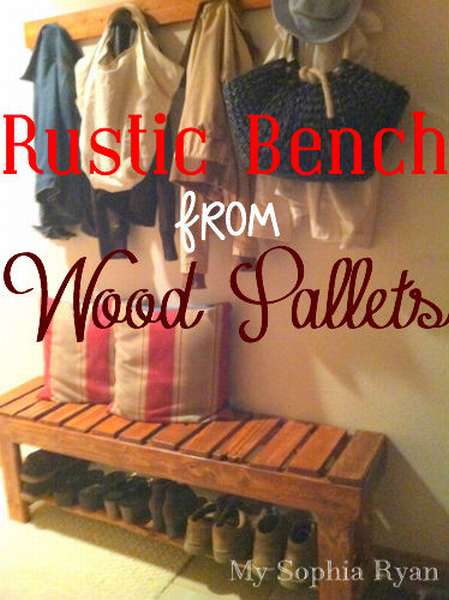
Bench for shoes from pallets
 Looking for a hallway bench to organize your everyday shoe storage? If you need a budget option so that everything is cheap and beautiful, then this is a good example. You can do modern bench for shoes from pallets in just a few hours, without spending a ton of money.
The design provides for many sections, as well as castorsso that you can easily move the bench without involving helpers. Grind well, paint it in a beautiful color and you still have to convince your friends that this bench is made of pallets, and not bought in an Italian furniture store.
Making a bench is not at all difficult, just look at the step-by-step photos, and everything will become clear. If you need any additional information, a link to the author’s site under the gallery.


https://i.expert-h.com/en/lavki/skamejka-v-prihozhuy#sigFreeId59ba919466
 Here is another example. This bench for shoes in the hallway also made entirely of pallets. It is a good material for furniture, although it requires significant processing. But it all depends on the condition of the pallets.
- First you need to disassemble the pallets on the boards.
- Build a bench from the top, that is, the seat.
- He filled wide open spaces with wooden pieces of the same size, leaving small holes between each rail.
- Measure 45 cm for the legs and cut.
- Using wood screws, attach the legs to the inside of the seat.
- Make a shelf.
- Grinding will go most of the time. The wood of the pallets is rather rough, so careful grinding is necessary.imo to smooth out the roughness.
- Apply two coats of brown soak. Then cover with transparent glossy varnish.
A bench will look better with a pillow, but it's a matter of taste.


https://i.expert-h.com/en/lavki/skamejka-v-prihozhuy#sigFreeIdff721c521b
Bench for an entrance hall 100 photos


https://i.expert-h.com/en/lavki/skamejka-v-prihozhuy#sigFreeId3045297950
Hello, I am the author of this article, so I look forward to asking questions for this article in the comments below, I will answer all !!!
If you have questions on another topic, ask them on our forum, we will answer you
- Two baskets of paper in 5 minutes (Master class)
- How to make a simple and compact table for a milling cutter from plywood
- How to make a soft headboard tile (Instructions + step by step photos)
- Cinder block benches: a convenient bench in 55 minutes
- How to make a bed with a niche: saving space (Master class)