DIY coffee table 800 photos, drawings, step-by-step instructions
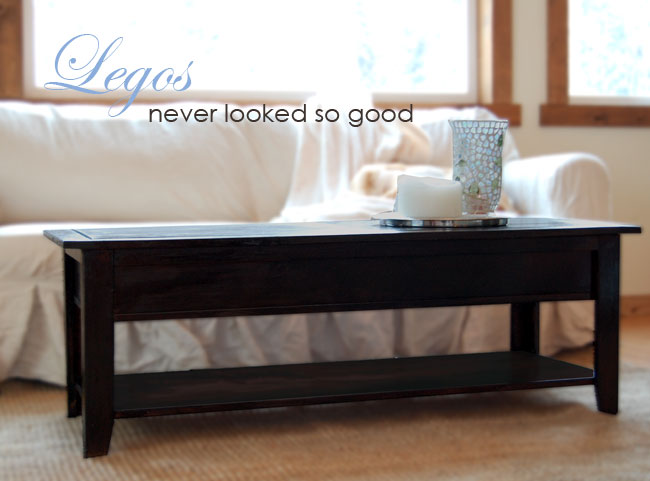
 wooden coffee table
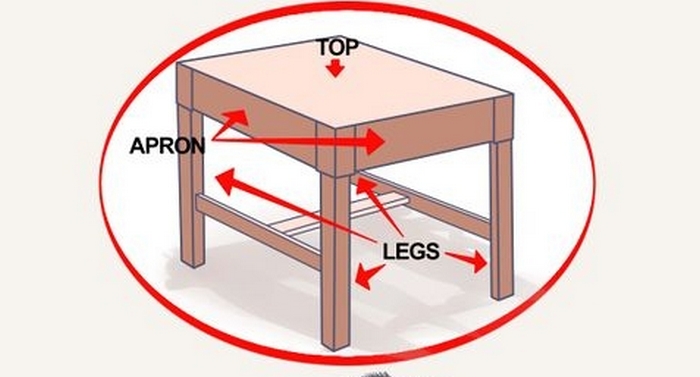
There is furniture in which there seems to be no urgent need, but without it, the interior looks somehow incomplete. To add comfort, do-it-yourself coffee table, this will be the highlight that will make the living room cozy at home. You can buy it, but this article is not for buyers, but for those who want to do something themselves.
There are a huge number of different models of coffee tables, hundreds of sites will not be enough to represent at least a part. Therefore, here are selected options that even a novice master can do with his own hands. If there are problems with materials, there are many stores where you can buy individual parts for tables, you only need to assemble them, it turns out much cheaper than in stores and most importantly you can come up with your own design!
How to make a coffee table with your own hands
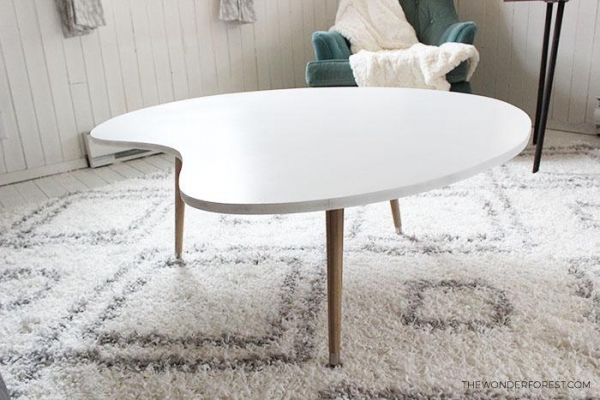 Such a cute table will decorate any living room, stylishly and without complaints. A great option for a beginner joiner, you do not need any drawings, no diagrams, and most importantly, minimum costs. To make a similar coffee table with your own handsneed hardboard sheet and three or four legsthat can be bought at a furniture store.
Use a centimeter on the sheet to find the center point. It's simple, draw two diagonals and mark the intersection point.  Then drive a carnation and fasten a thread or a thin rope to it, a pencil on the other end. Thus, you define countertop shape. If you want to make a table with a round lid, then the layout is ready. If you want to make an original shape, part of the circle can be cut to form a figure that looks like a bean. Then simply cut out the countertop, peel, paint, and finally fasten the legs. You can choose places for them at your discretion, the main thing is that the table does not stagger.


https://i.expert-h.com/en/stol/923#sigFreeId603b6ecb94
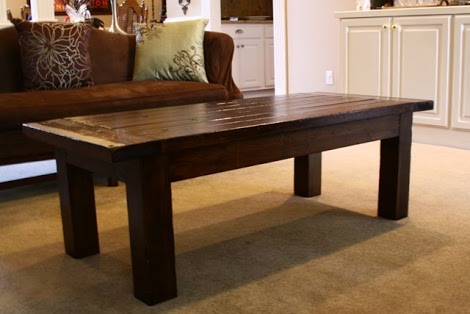
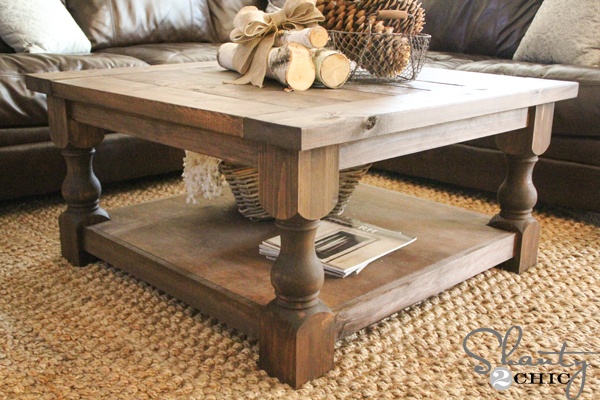
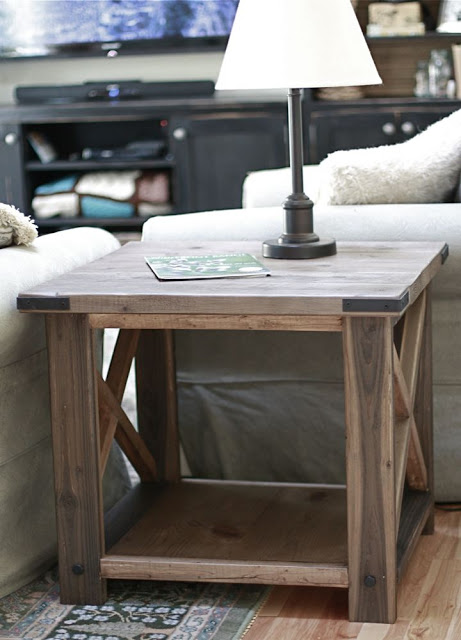
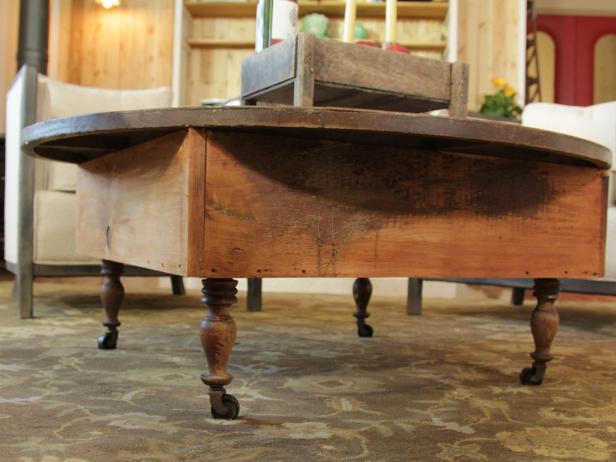
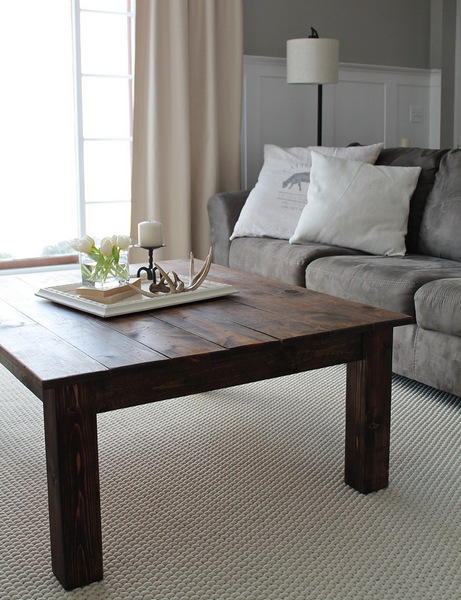 Country wooden coffee table
If you like a simple, rustic style, then this table is for you. It looks a bit massive, but this matter of taste, in principle, can be corrected. For making a coffee table with your own hands will need Craig Jig, an extremely handy piece for carpentryIf you decide to start manufacturing wooden furniture, you can’t imagine the best device for joining wooden parts at an angle. Further assembly order, see the step by step photos.


https://i.expert-h.com/en/stol/923#sigFreeId61015564c8
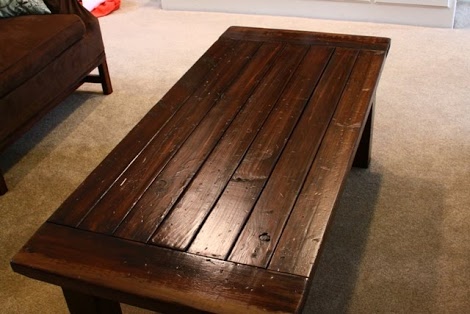
The same option, only a rectangular shape


https://i.expert-h.com/en/stol/923#sigFreeIdebf61e4fda
Schemes how to make a coffee table with your own hands
 If you decide to make a wooden coffee table in this style, you can use these schemes in step-by-step pictures. Fundamental rules: measure seven timesWell, then you know; do mounting holesto prevent wood from splitting; allow the connection to dry properly during few hours.


https://i.expert-h.com/en/stol/923#sigFreeId77fde17d1f
 Super simple do-it-yourself coffee table
Even if you’ve never done furniture before, just cope with such a project. It is necessary to cut a plywood sheet to the size, then four legs from the bars, make a bevel on the end of each leg with a face saw.
Then make holes at the ends of all four parts, as shown. Similar details should be made differently depending on where they are located, as in this case with legs for a coffee table. To avoid confusion, arrange the parts as they are oriented and mark with a pencil.


https://i.expert-h.com/en/stol/923#sigFreeIdbbd5a03ab9
 There are many things you can do with your own hands. If you have no experience, but have a desire, start with something simple, for example, to start, you can make a coffee table. Of course, they are also different, these step-by-step photos show the standard version, the main thing is to start, and there you will surely succeed.
It all depends on what you can do and what tools you have. So, we need to make a countertop, say 60 by 40 cm and four legs per meter. From wood is better to choose birch or pine, it’s easier to work with them. Then: we cut the workpiece, with the milling cutter we make holes and spikes. We connect the legs first without glue, we look how accurately the parts are fitted, if necessary, we correct. Then we put the compound on the glue. We cut out the plywood countertop. Glue the edges wooden plywood tape. It is made of veneer or polyester.sharp knife and steam iron. The lid is attached using special hooks, they can be bought at a furniture store. We fix them to the bottom of the countertop with screws. That's all, it remains to grind, varnish or paint


https://i.expert-h.com/en/stol/923#sigFreeId44146a9d86
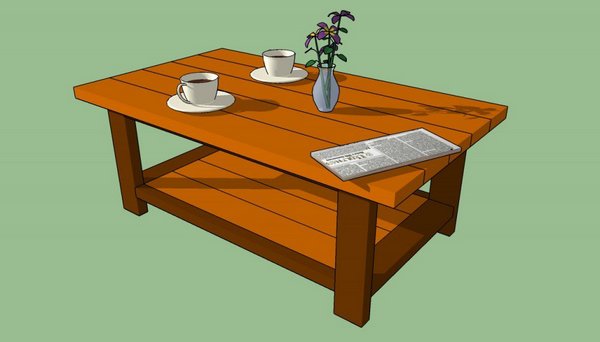
 Square coffee table
Solid design for classic furniture lovers. Natural boards will cost a lot, but the tabletop and the shelf can be made of glued plywood, and legs can be bought or ordered separately. The photo shows only the diagrams and sizes, the material can be selected independently, even bought in parts will cost much cheaper.


https://i.expert-h.com/en/stol/923#sigFreeId30fb54c7fe
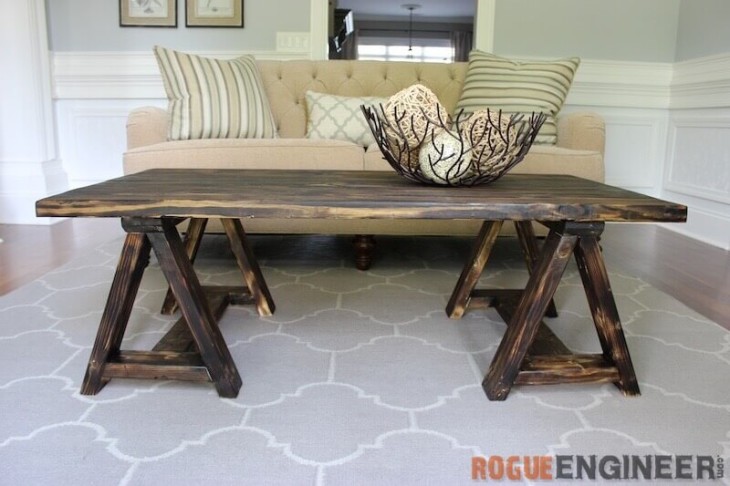
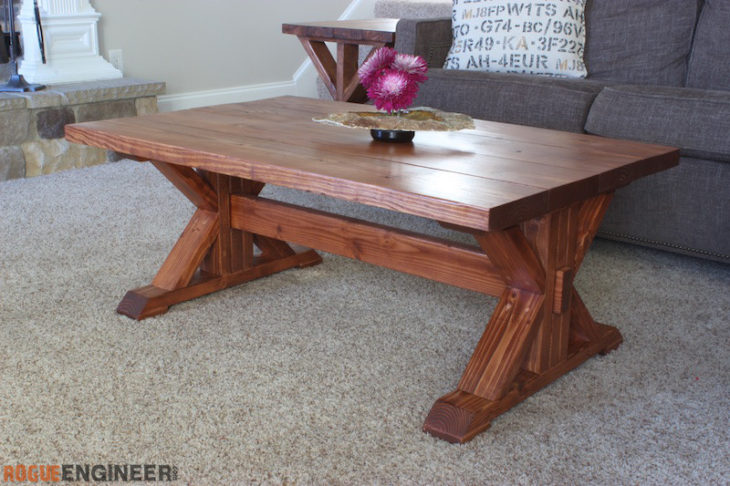
 Rustic high table
A good thing, for an amateur, of course. It looks especially original in a modern interior, in contrast with expensive furniture. The step-by-step photos show how to assemble such a design, almost the same as a stool, with only some design features. Don’t be afraid of the cross sides, it’s just a decorative element, they do not hold anything, so that they can even be put on glue, well, and fix a couple of cloves.


https://i.expert-h.com/en/stol/923#sigFreeId25cfc1cf76
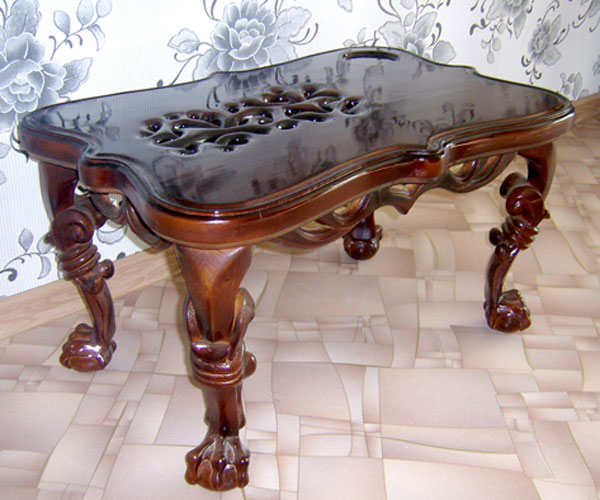 DIY carved coffee table
No, this is not an exhibit from the furniture museum of the last century, this chic coffee table made by yourself. Further on the step-by-step photo shows how it is done, all the stages, from curly legs to a countertop with beautiful weaving for ventilation. By the way, the decorative relief on the legs was made with an ordinary knife, which indicates the undoubted talent of the author.
Do you think this will not work? If you don’t try, then you won’t know.


https://i.expert-h.com/en/stol/923#sigFreeIdef190839fc
 Goat Coffee Table
This kind of legs for coffee tables are usually not used, but your room will look more original. A sort of Mediterranean style will add color to any living room. According to the presented schemes and step-by-step photographs, it is clear that it is not so difficult to assemble such a coffee table, and most importantly, you can use improvised materials, so You can also saveb.


https://i.expert-h.com/en/stol/923#sigFreeIdc365b857fb
 Rustic coffee table
Reminds the previous version of the table on the gantry rustic style, only performed in a more classic version. This material is taken from the same English site, probably some inscriptions will not be clear, but the photos are good.
If you decide to implement this project, step-by-step photographs show in detail all the stages.


https://i.expert-h.com/en/stol/923#sigFreeIdcfd89fc1f1
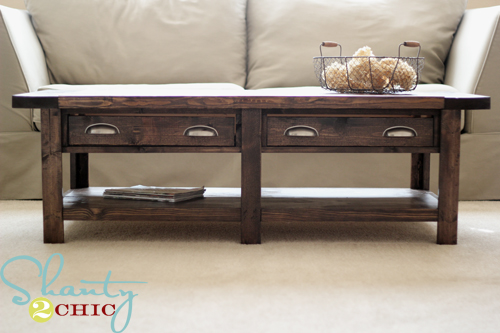 Classic coffee table with drawers
This model of a classic coffee table with drawers is taken from the Pottery Barn catalog. Agree, the stylish thing, the main thing is the external design, that is, it will be necessary to work well with the coating for a stylish look of "antique". Is the construction itself quite simple? Unless they may arise problems with drawersThis is if there is no experience. Therefore, the advice:
- make sure all parts are straight;
- first make one box, if it suits, do the second for the same size, do not rely only on the drawing;
- and as a consolation prize, remember, there are no ideal boxes if it slides a little crookedly, only you will know about it.
View the embedded image gallery online at:
https://i.expert-h.com/en/stol/923#sigFreeIde5481f7b65 -


Step-by-step assembly schemes for a classic coffee table


https://i.expert-h.com/en/stol/923#sigFreeId530ac56ed0
Source woodshop-plans.com/coffee-table-woodworking-plans-6/
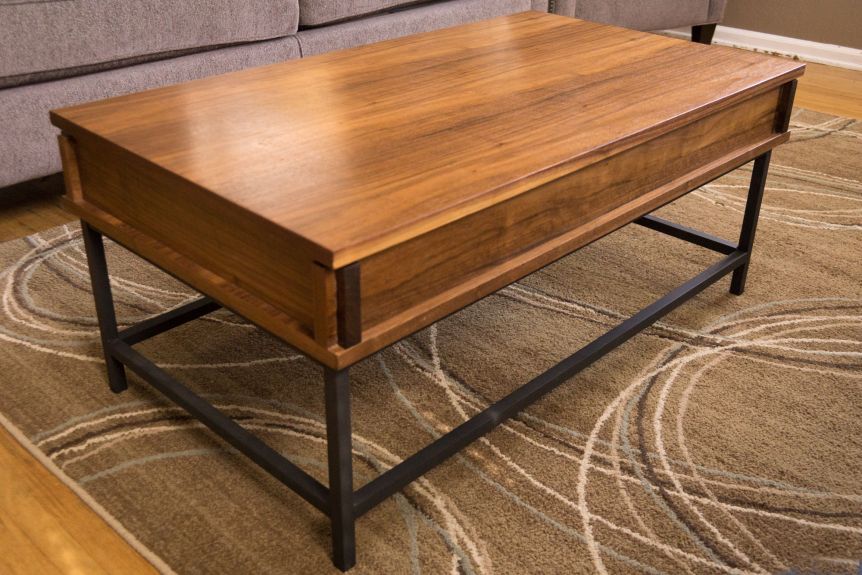
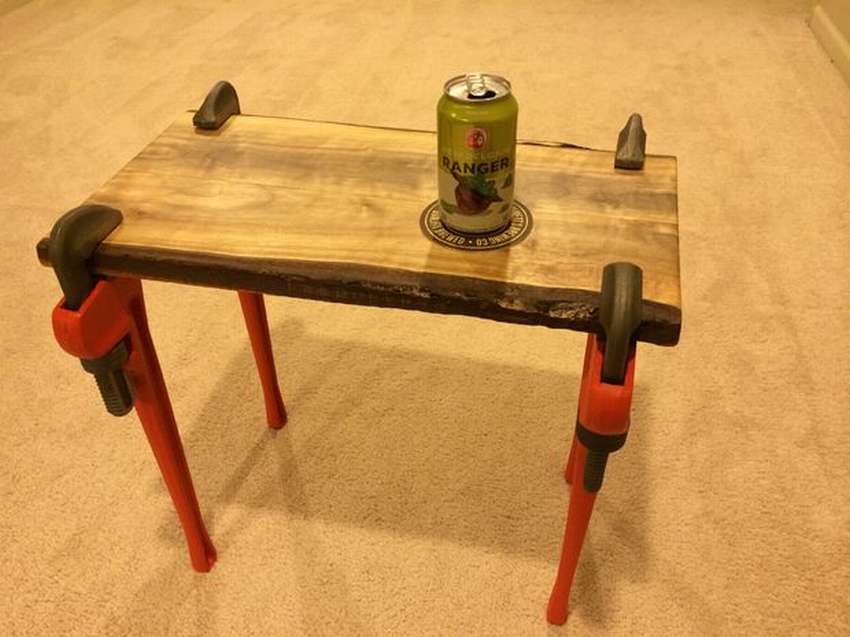
Coffee table with metal legs
In this project, birch boards were used, a layer of birch from 6/4 mm x 1220 mm 21 mm, walnut bars (~ 50x50x1000) and four hairpins 40 cm long
- The first step is to cut the boards into strips.
- Place them close to get the cutting edges facing one way.
- Spread the glue evenly, making sure everything is smeared to the brim.
- Clamp the structure with clamps, and carefully remove excess glue.
- Trim the ends with a saw using a cross slide.
- Saw the boards to a depth of 20 mm, leaving 10 mm at the top and bottom.
- Cut the foam 20 mm long, 30 mm wide.
- Using a table saw, chamfer 45 ° to the four lower edges at about half the height of the table.
- Grind the table.
Screw the legs and the thing is done.


https://i.expert-h.com/en/stol/923#sigFreeIdc3787cd113
 Coffee table with shelves
Beautiful coffee table with shelves, simple and functional. The stiletto heels give it lightness, and the convenient shelf adds solidity. But most importantly, it’s easy to make it yourand hands, and if you still know how to handle a drill, then this is generally a couple of nonsense.
The assembly itself will take two hours, just before that you need to prepare materials, this will take most of the time.


https://i.expert-h.com/en/stol/923#sigFreeId9f7274eb33
 Large coffee table for the living room
A good option for a spacious coffee table for the living room. If you like, step-by-step photographs in diagrams with dimensions show the entire order of work.


https://i.expert-h.com/en/stol/923#sigFreeId5ff637abd6
 Do-it-yourself rectangular coffee table
Making a coffee table with your own hands, and any furniture is not a difficult and more economical way to furnish an apartment. When choosing a model, one must take into account the quadrature, as well as what functions it will perform. The example in the photo can be called classic, the model is taken from the catalog, but this table is completely made by yourself, detailed stages of work, see the photo.


https://i.expert-h.com/en/stol/923#sigFreeIde376bac488
 Round table coffee table
This coffee table is built from recycled and antique materials for the weekend between lunch and dinner. When using parts from old furniture, check the materials for cracks and any other structural damage. For this table of new materials, you need a sheet of plywood to attach four legs, you need to cut four triangles, you can from the remains of plywood. Choose your own finishing method, because it depends on the parts of the furniture that you will use.


https://i.expert-h.com/en/stol/923#sigFreeId553ff30572
Source www.diynetwork.com
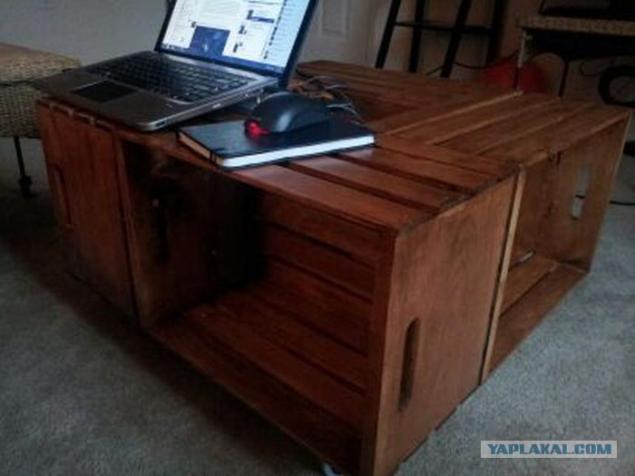
 DIY folding coffee table
Coffee tables in the interior play mainly a decorative role, as well as a stand for flowers, periodicals, well, or drink coffee there in front of the TV. But working with a laptop is not very convenient. To solve this problem I suggest variant of a folding table, this one, for example, is made of a regular tool box. The whole chip in a simple mechanism, in this case it is made of wooden blocks, you can use a metal corner or pipes. It is very convenient not only because it raises the countertop for comfortable work, even under the lid you can store various trinkets.
https://i.expert-h.com/en/stol/923#sigFreeId92224229f8
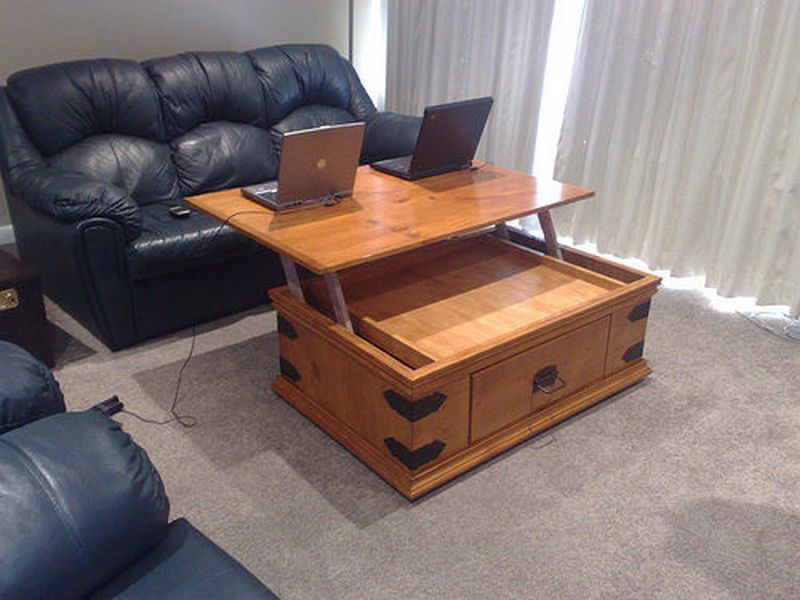
 Raised top coffee table
Rate the model upgraded coffee table with lifting top and legs in aluminum. The lifting mechanism allows you to raise the countertop to the ideal height for working with a laptop. Or if you want a snack in front of the TV. True, to make a hoist, you will need welding or have to order.


https://i.expert-h.com/en/stol/923#sigFreeIdfea58f298f
Coffee tables from pallets
 DIY pallets table
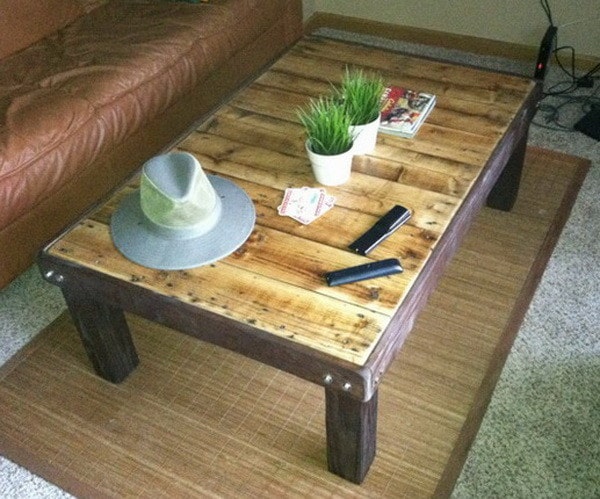
Starting to think about saving, immediately remember the pallets. To make such a coffee table, you will need a sheet of plywood, a wooden pallet in a more or less decent condition and a stain. The main costs are to order a metal frame with legs, although such a simple design can be made of wood.


https://i.expert-h.com/en/stol/923#sigFreeIdfa51c76acd
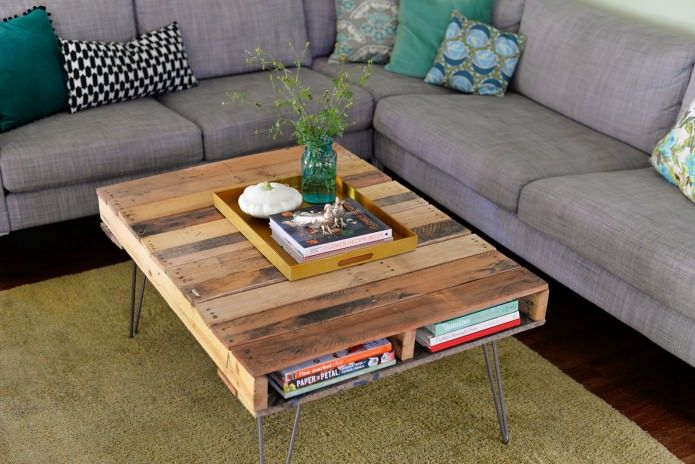 Coffee table from a pallet on metal legs
An exclusive coffee table made of pallets fits perfectly into the interior in eco-style. Make it easy, it does not take much time and does not require large expenses. In addition, it will save money and provide an opportunity to show your creative imagination. Most importantly, you can be sure that there is nothing like this in other apartments. You can put a table next to the sofa and store magazines, books, and a TV remote control on it.
Pallets are different. They differ not only in quality, but also in the distance between the boards.. For this option, the pallet must be disassembled, and then beat on a new one so that they fit snugly against each other. Or splurge on a sheet of plywood.


https://i.expert-h.com/en/stol/923#sigFreeId6281762c50
Source dizainall.com/sdelaj-sam/how-make-coffee-table-from-pallets-diy
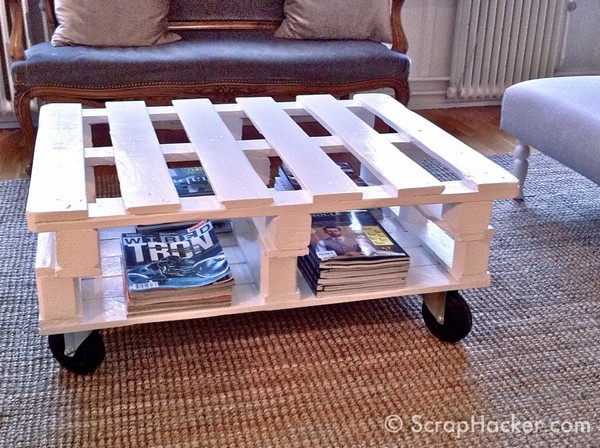 Coffee table with pallets on casters
With the manufacture of such a coffee table, you will definitely not have problems. In principle, step-by-step photographs are not needed here. Just take two pallets and modify them a bit. One part needs to be removed, from the remaining boards you make the bottom shelf solid, that's all. It remains to process, paint, screw the wheels.


https://i.expert-h.com/en/stol/923#sigFreeIdfcad3a5a57
Examples of coffee tables from pallets 100 photos


https://i.expert-h.com/en/stol/923#sigFreeIddbfdcb1678
 Wooden table coffee table
The most difficult part of making a coffee table from wooden drawers is finding wooden drawers. Sanding and varnishing, I think, is no problem for anyone. It remains to combine all this into one design and fix it to a fan sheetRy. Comfort lovers can still go broke and buy wheels in a furniture store.


https://i.expert-h.com/en/stol/923#sigFreeIdf236793160
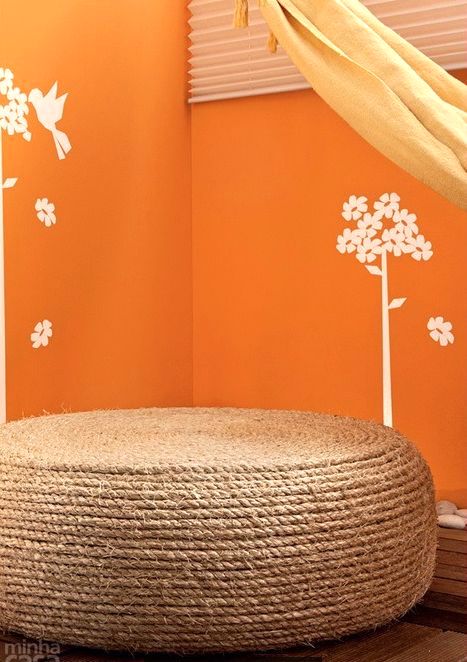 Do-it-yourself coffee table with tires
If we are talking about improvised materials, you can not help but remember the good old tires. Probably many people saw this photo on the Internet, from those who are interested in folk art. But just in case, recall how to make a coffee table from a tire do it yourself. In addition to the tire, you need a cord, plywood and wheels. In general, see the master class in step-by-step photos.


https://i.expert-h.com/en/stol/923#sigFreeIddf10eaa9ae
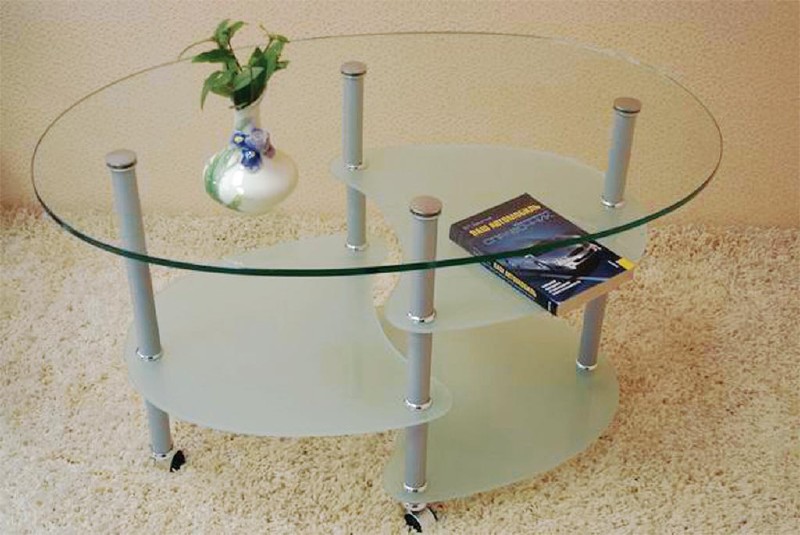 High-tech glass coffee table
You can make a glass coffee table with your own hands such as in the picture or any other form and with the number of shelves at your discretion. The main thing is the manufacturing principle itself. Start by choosing a glass; after all, this is a table, so any one will not do. It is better to take a triplex with a thickness of 10 - 12 mm.
Operating procedure:
- draw a drawing, make markup, for convenience, you can make a piece of cardboard;
- cut the countertop to size;
- we grind the edges, for which you can use sandpaper glued to a double-sided tape;
- if you use a drill for grinding, try not to overheat the glass, the speed of revolutions should be set to a minimum;
- the scheme for installing countertops on metal legs is shown in the penultimate photo.
View the embedded image gallery online at:
https://i.expert-h.com/en/stol/923#sigFreeId9495954af5 -


Glass coffee tables
Glass coffee tables elegantly fit into the modern interior of hi-tech style and minimalism. Of course, most of them you can’t do with your own hands, unless the simplest designs, can appreciate the interesting decisions of designersmaybe some creative ideas will come up.


https://i.expert-h.com/en/stol/923#sigFreeId9b667c242d
Some photos were taken from www.3d-madonnari.com/the-most-unusual-coffee-tables/
Interesting ideas for coffee tables
 Unusual do-it-yourself coffee table
Really unusual. If you can argue about functionality, then you definitely can’t take originality from it. There is another plus, making such an unusual coffee table with your own hands is not at all difficult. Do you want yourself like that too? In step-by-step photos there are diagrams with dimensions and assembly order.


https://i.expert-h.com/en/stol/923#sigFreeIdde8669fab2
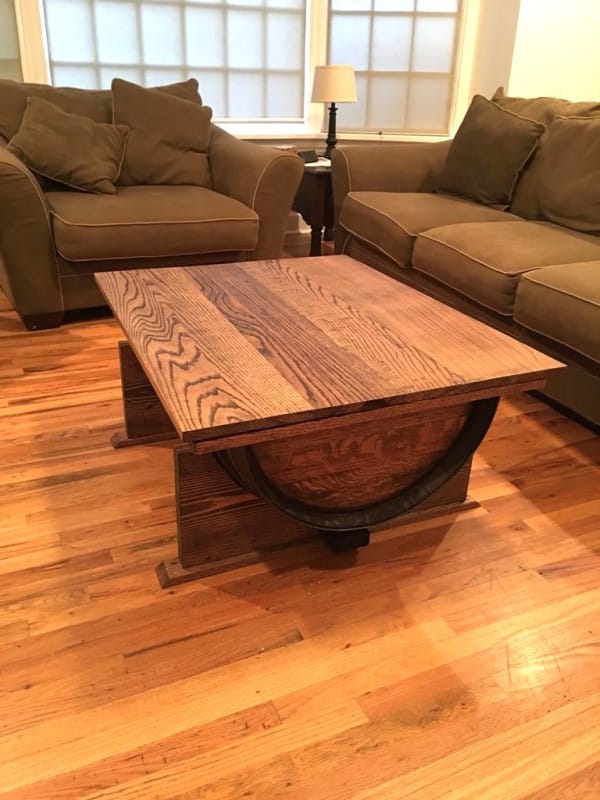 Wooden barrel coffee table
So, we continue to search for interesting ideas. Shown here how to make a coffee table from half a wooden barrel. The task is not simple, not in terms of technical solutions, but rather in terms of labor intensity. First, do not just split the barrel in half and save all the details. Then, you need to calculate the base for the table well, the easiest way is to make an opening tabletop.


https://i.expert-h.com/en/stol/923#sigFreeIddb2caf9e33
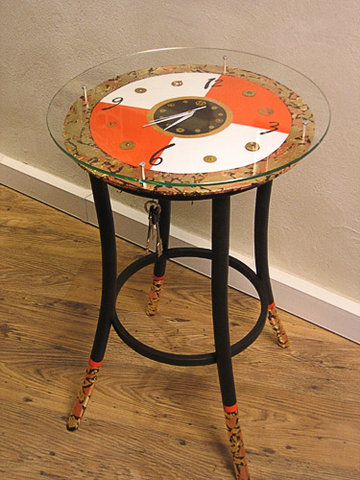 Coffee table clock
A bit away from the topic, this post is not about how to make a coffee table, but what can be done from a coffee table, just an idea is very interesting. The step-by-step photos show a master class on how to make a watch in a finished Viennese table, although you can do it yourself, in the sense of the table itself.


https://i.expert-h.com/en/stol/923#sigFreeId7aa3852896
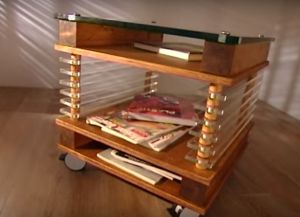 Do it yourself coffee table
Original mobile table on casters. It will take four thick 5x5 bars, 12 pieces of plexiglass 100x10 cm, a meter-long sheet of glass thicker, the same size three sheets of plywood, four metal rods, wheels and 28 small wooden cylinders. What to do with all this set, look at the step-by-step photos, there are already 57 of them, so you can make out everything in detail.


https://i.expert-h.com/en/stol/923#sigFreeId8ae7223973
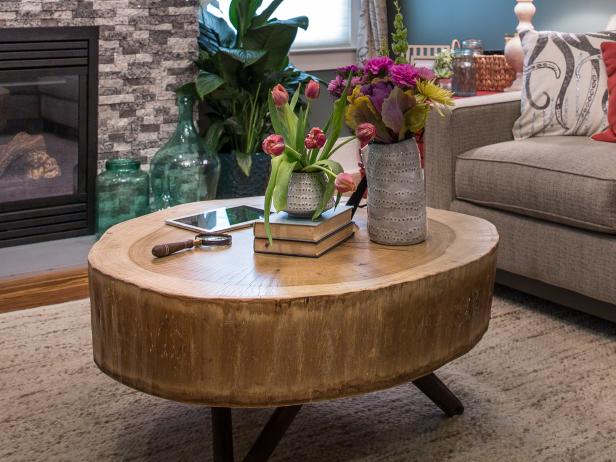 Kruglyash coffee table
This coffee table very easy to do, most importantly, find the right material. But easy doesn’t mean fast. If you use a freshly sawn round log, you need to put it in a warm place and wait, at least two weeks, until it dries. There is no need to rush the process, the faster it dries, the more cracks will form on the surface. Then there will be tedious work on thorough surface treatment, but in principle this is all, varnishing and attaching legs is no longer a problem.


https://i.expert-h.com/en/stol/923#sigFreeId45fccbc6e2
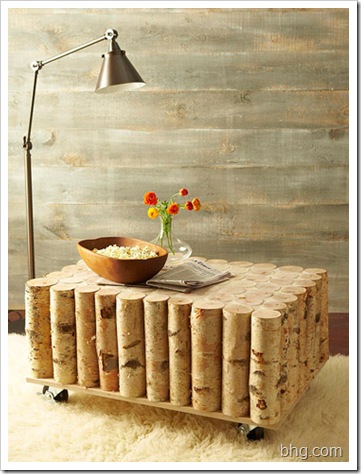 Birch log coffee table
Birch is an excellent material and can become the main element of any interior design. It radiates warmth and lightness, and can serve for various purposes: you can make beautiful candlesticks, use branches to create a natural organic wall background or, in this case, make a beautiful simple coffee table that is perfect for your home. This project took 34 birch logs with a diameter of about 10 centimeters. The result in the photo is a clean, neat rustic but elegant coffee table. You can look at the master class in step-by-step photos.
One caveat to fill the empty spaces that remained between the logs, add grout over the entire surface and rub the surface. Use a spatula to remove excessgrout from the coffee table and let it dry well before continuing to work.


https://i.expert-h.com/en/stol/923#sigFreeIda25c9a0ad5
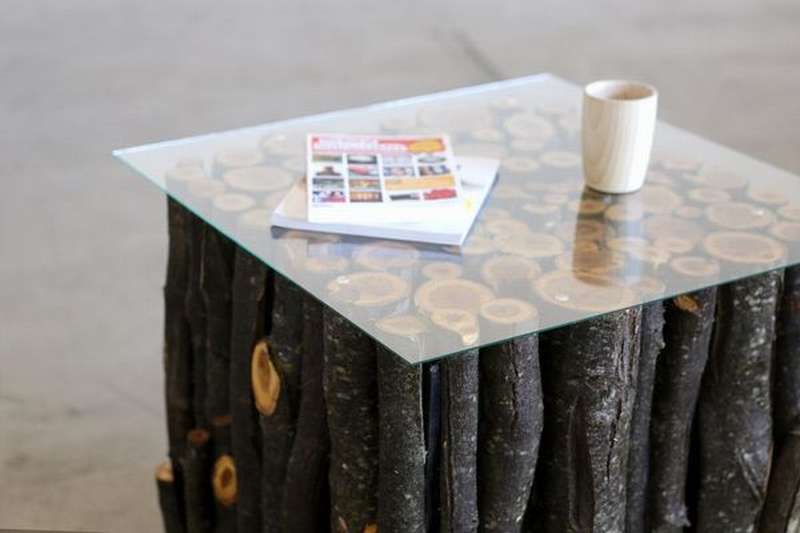 Similar coffee table made of logs and branchespurely visual, of course. In fact, the manufacturing technology is the same as the previous version of the birch log table. That is, a plywood box is made and beautifully decorated with logs and branches, and a glass tabletop adds style to a modern design. The manufacturing procedure is shown in step-by-step photos, as you see, there are no special secrets. First you need to make a box of plywood and paint it in a dark color so that light colors do not shine through the decorative finish. You can glue and fasten with nails, as the author suggests, or in any other way. Then cover the box with logs and branches, fix it with screws and fix it with carpentry glue. Then cut a sheet of thick glass for the countertop, stick transparent rubberized pads and set on a carefully leveled surface. If your legs are not provided, the lower part of the table can be upholstered with felt.


https://i.expert-h.com/en/stol/923#sigFreeIddbbe6584a1
Coffee table made of willow branches
 Such a table is a dream for fans of eco-style. This is no longer an imitation, as in the previous versions, but real furniture from branches. In the photo in the second gallery you can see other types of furniture made from willow branches, so if everything works out with the table, you can completely update the interior in a new style. In a city apartment, it will look super original. But if you are not so extreme, then giving is definitely a great option. This small table can be used as a night stand, a stand for a lamp or home plants. It is strong enough to support a person’s weight, and you can use it as a chair if you add large diagonal braces.
Such a table will not cost you anything, you just need to cut good willow branches. Willow grows wherever there is water, and is not yet listed in the Red Book.
For this small table, you need 12 large branches with a thickness of the thumb, and a bunch of branches with the thickness of the little finger.
Tools:
- Drill, preferably cordless, with a remote chuck.
- Roulette
- Edged saw
- Secateurs
- Good sharp knife
- Self-tapping screws, nails of different sizes.
Assemble the table by making two flat frames from the legs and sides.
Things to remember when working with willow:
It is necessary to pre-drill a hole, no matter how small. The author used 3 mm bits for screws and 1 mm for small nails. The reason you have to drill holes is that the cut willow is raw and will dry after assembly. We know that wood shrinks when it dries, as it shrinks, it presses on the screw and cracks.
- Start with the holes at the ends of all side branches.
- Drill holes in the legs.
- The illustration shows the nails in the screw holes, this is just so you can see where the holes are.
- Turn the legs to the sides.
- Remember: the top is 30 cm long and the bottom is 35 cm, so when done, it will not be square. Do not worry about the corners, just bend and hold the branches until it looks right.
- Once you're done with the two frames, add the remaining four side elements.
- Drill holes at right angles to ready-made holes.
- Screw the legs into the sides.
- Do the same with the second frame.
- Now you have something resembling a table. Set it on a flat surface and, if necessary, correct it to be stable. You may need to twist some screws and work with a knife.
- Then cut pieces of willow about 15 - 20 cm in size. Cut the ends at an angle of 45 ° so that they become diagonal braces. A strong structure must have diagonal brackets in order to be stable.
- Take all the branches that you cut, and put it on the bench.
- Starting in the middle, lay them on top to form the surface of the table.
The author used 7 branches for the upper part and another 7 went to the lower shelf.


https://i.expert-h.com/en/stol/923#sigFreeIdc2b2a5a5a2
You can use this technique to create all kinds of willow furniture.


https://i.expert-h.com/en/stol/923#sigFreeIdc4a9544576
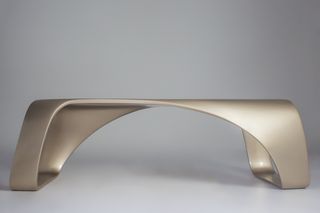 Contemporary coffee table
This is not even hi-tech, but some kind of cosmic style. Do you think such tables are produced at the factory? Maybe they release it, but in fact, this modern coffee table can be made by yourself, as the author of this model proved. You can take advantage of his experience, this is a truly unique design, although you cannot call it particularly functional. It can be used as an original small bench or table, painted in the color of copper, silver or metallic, or just black or white.
The author developed the concept of this model personally.experimenting with a regular piece of paper until he found an asymmetric but balanced shape.


https://i.expert-h.com/en/stol/923#sigFreeIdd4792538bd
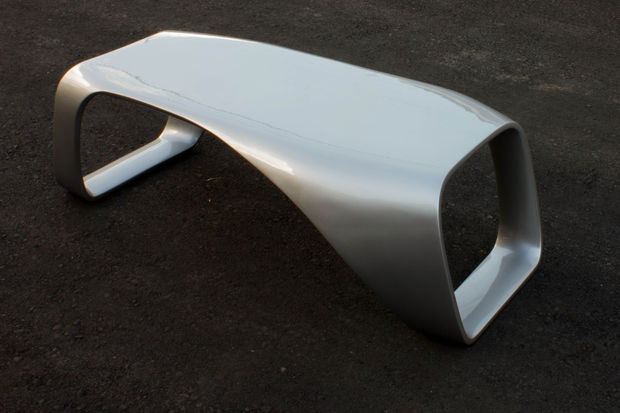 Now from concept to reality. The first task is to develop a structure that can be coated with fiberglass and formed into the desired shape. To obtain the initial structure, the author developed a metal structure, mainly due to the low cost, ease of processing and quality of structural properties. The mock-up of the form is transferred with chalk to a metal sheet, then cut using tongs. Table shape
 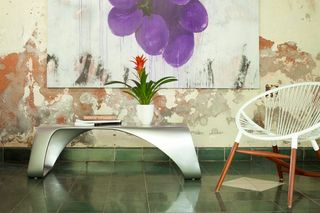 ready but not strong enough to pullreap the weight of a person. Strengthen it with fiberglass and resin. To do this, cover with 4 layers of fiberglass at the top, and 14 layers at the bottom, for a total of about 7 kg of fiberglass and about 25 liters of resin. The wall thickness is 1.5 cm at the widest point and 0.5 cm at the thinnest. If cut across, it looks like an airplane wing. The next step is the molding of parts using car putty and finally painting and finishing.


https://i.expert-h.com/en/stol/923#sigFreeId05a6bc5a01
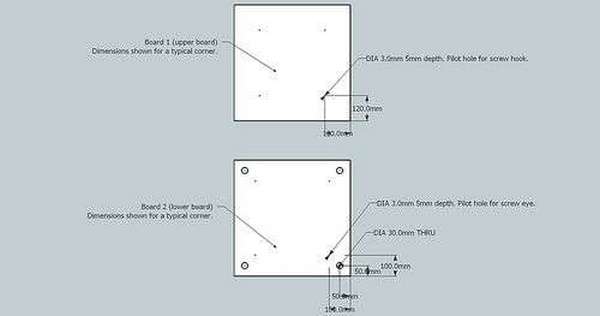
Glass Bottle Coffee Table
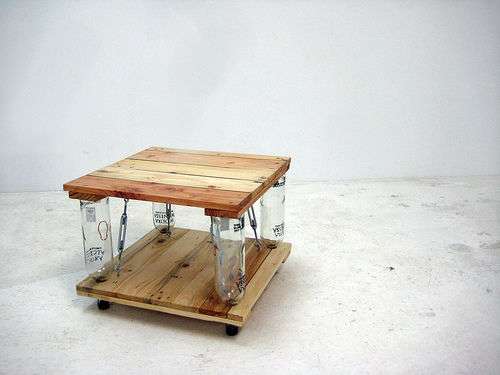 This article tells you how to make a coffee table from glass bottles. You can use any four bottles of the same height and any wood found, adapting the sizes to the tree you work with.
Step 1: Materials
For one table you will need:
Four screws and four hooks for screw, caliber to match the lanyards. Depending on the height of the bottles, a few more hooks may be needed. This is to create a mesh structure between the upper and lower hooks.
Two boards with a thickness of at least 25 mm, pallets are perfect. Make sure the wood does not contain rot. Cut the plate square and grind it to a smooth surface. For stability, it is better that the screeds be inclined.
 Step 2: Take the Bottles
You need four bottles. Wash them thoroughly in hot water.
Step 3: Install the base
Start with the top board, that is, the one where there are no holes drilled. Place this upside down on a clean, hard surface with the screw holes facing up.
Step 4: Install the bottles and the second board
Place one bottle in each corner of the board. Then carefully lower the top shelf from above so that the neck of the bottle passes through the 30 mm holes in the top board. The plate should rest on the neck of the bottle. Then manually adjust the bottoms of the bottles so that they sit flush with the bottom shelf.
Step 5: Install the suspenders and tighten
Adjust the bottoms of the bottles so that they are flush with the first board. Attach the shrink disk between the screw and the screw hook. The design of these screeds may vary, so you will have to experiment to find out which method is suitable for the buckle. When you turn the center of the lanyard, the ends should converge gradually, squeezing the bottles. Repeat for all bottles. Ties are designed to be installed on a slope to increase torsional strength.


https://i.expert-h.com/en/stol/923#sigFreeId9b4bd519a1
In these photos you can see some more examples. glass bottle tables.


https://i.expert-h.com/en/stol/923#sigFreeId0511a2a20c
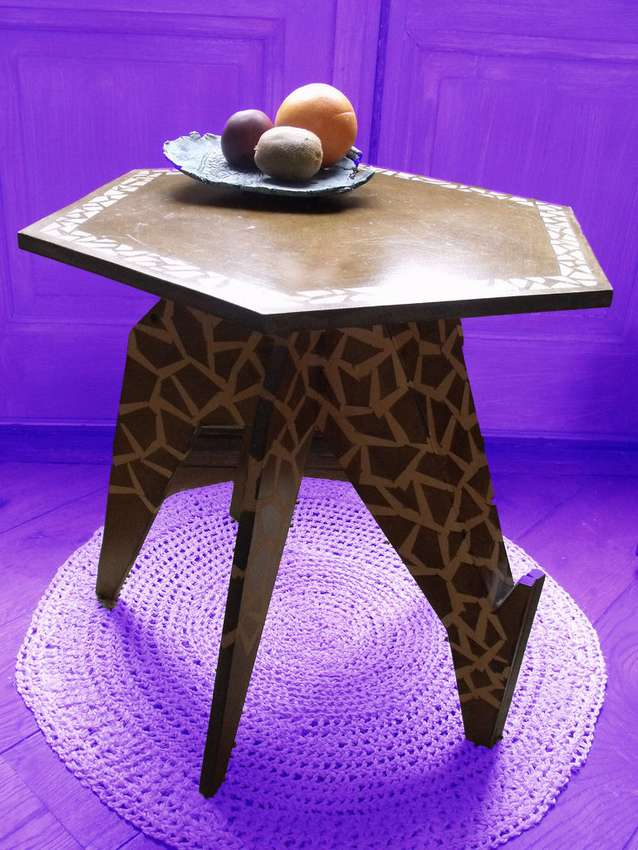 Homemade Giraffe Coffee Table
Making such coffee table in the form of a giraffe It seems expensive and complicated, but it is only at first glance. In fact, you do not need a lot of experience and special knowledge in the carpentry. If you can handle an electric jigsaw, you can easily make a similar coffee table with your own hands. It will look great in a room where the design is made in an African style or a children's room with a jungle theme. If you succeed, then be sure to be inspired by other options with animals, although the wide legs and pose of the drinking giraffe are very inspiring.
Materials: MDF 15 mm approx. 122x110 cm MDFA 3 mm 12x36 cm 12 screws 35 mm 4 screws 25 mm 8 small nails 20 mm
Tools: pencil, jigsaw, screwdriver, drill, drill 2 mm, sandpaper, stain.
Step 1: Body Shape. Draw all the details except the neck on the 15 mm MDF board. The neck should be 3 mm thick. (MDF or plywood) Saw all parts with a jigsaw. Sand the edges. Make eye holes only a few mm deep. The upper side of the tail (16 cm) should be at an angle of 45 °. Attach the feet with screws. Make sure body parts are at 90 °. Insert the tail on the other side and fasten with screws.
Step 2: Prepare the remaining parts. Part of the neck is attached with glue and 4 small nails on both sides. Fasten the parts in the center on the underside of the table. If measured correctly, this part should correspond to the hole in the upper body of the giraffe. Now you should understand why the tail is at an angle.
Step 4: Installation of the structure. Turn the table upside down. Fasten the body parts to the countertop with 4 screws.
Step 5: Painting. Cut 5 cm pieces of duct tape. Stick them on the body of a giraffe in the form of squares, triangles and pentagons. Leave your nose, ears, and lower legs free. Draw a bezel on the countertop. Fill the rim with a mosaic of small pieces of masking tape. Use triangles, quadrangle and pentagon. Coat all with two layers of clear wood varnish in a dark tone. The author used a dark oak. If the color is suitable, remove the adhesive tape.


https://i.expert-h.com/en/stol/923#sigFreeIdb9fb73e35c
Tetraherd coffee table
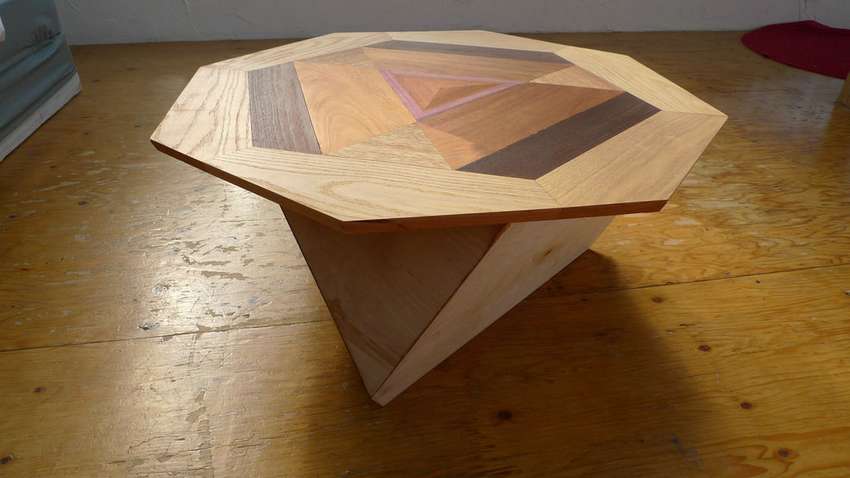 The concept of this table came from the construction of the floor for the geodesic dome. The author wanted to make a geometric transition from a triangle in the middle to an octagon on the outside. The geometry is designed by hand, so some errors are possible. But you must admit, the original design, so it's worth a try make a tetraherd coffee table, so to speak, add a twist to the interior.
Below the author presented plans and drawings.


https://i.expert-h.com/en/stol/923#sigFreeId11f18b0ff2
Perhaps the overall design is not stable enough, but you can always make minor adjustments. The essence of the process is well shown in step-by-step photos, if you are interested in the details of each step, instructions can be read on the website, the link is under the gallery.


https://i.expert-h.com/en/stol/923#sigFreeId4a7fe2ff20
Coffee table andfrom covers
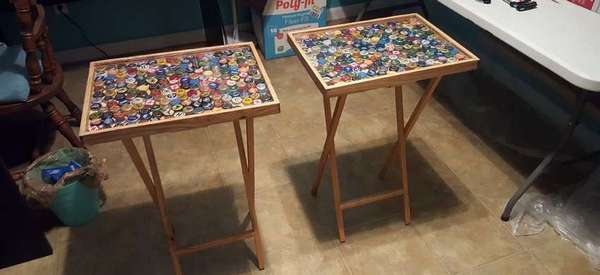 In search of creativity, a variety of ideas arise. I want it to turn out cheaply and cheerfully, here’s the idea for you - coffee table with bottle caps.
You will need:
- pallets
- acrylic sheet
- aluminum bindings
- nylon washers
- bottle caps
- linseed oil and wax
- wood glue.
Step 1: Gluing
For the countertop, the author used pine planks.
- Find the bars.
- Cut one end of each rail on the end saw so that it is square.
- Glue your shapes so that one end is perfectly aligned to cut the countertop to its final size.
- When the glue dries, cross the square sides. After that, trim the top to its final size.
Step 2: table frame
- Cut a few strips
- Measure the distance between the countertop and the plexiglass figure so that it sits on top of the plexiglass cover.
- Cut the frame parts to the desired length on the end saw. Cut two along the length of one side of the table. Cut the other two parts along the length of the other side of the countertop plus the thickness of the other parts of the frame.
- Two parts, which are the length of the upper part of the table plus the thickness of the other two parts, must finally have an insert to stand flush with the semicircular joint.
- Glue the 3 sides of the frame to the countertop so that the plexiglass and caps can be inserted before the last piece of the frame is glued.
Step 3: Feet
- Since the legs were made of hardwood, they are relatively thin but strong. The main part, make a convenient folding mechanism.
- The two outer legs are single legs connected directly to the countertop.
- The two inner legs are connected together as one frame.
- A dowel connects them from above, so the whole system can open and close.
- The spider is immersed in the frame closer to the bottom of the legs.
- In the middle of the frame is the fulcrum, which connects the inner frame of the leg with the external single legs.
Step 4: Attaching the legs to the table
There are 4 slats at the bottom of the table. Two short ones that hold the transverse shaft and prevent the structure from opening too far. There are two longer parts perpendicular to smaller bars on either side of the bottom, which have a hole in one side where the legs are connected by a pivot point.
Step 5: Assemble the Top of the Table
After the mechanics are assembled and function normally, you can complete the top.
- Cut the plexiglass to the desired size so that it fits into the slots of the table frame. The author used plexiglass with a thickness of 5 mm, but it can be thinner.
- Lubricate everything with linseed oil, including the inside of the countertop, but not the parts that will be glued
- Take the bottle caps and place them in the area of the countertop.
- Insert the plexiglass into the slot and glue it at the ends of the table frame.
Step 6: Crossroads
The crossbar runs under the countertop and prevents the leg assembly from being tightened. It is stretched into two smaller parts, which are mounted on the underside of the table. Therefore:
- Cut the bar to the desired length.
- Torch Steel
- Clean the clogged ends with a grinder
- Drill a test hole at both ends for connection. Use oil or other grease when drilling through steel
- Use holes drilled in steel to mark and drill control holes at the bottom of the table
- Use the screws to hold the bar in place.
Step 7: Final Assembly
- Connect the individual legs to the table with an aluminum stand. To help with friction, place a nylon washer between all wooden parts.
- Then connect the inner frame of the leg to the outer legs, tie rods, and nylon washers between them.
- After the legs are attached, simply connect the cross-member with screws - the table should fold easily.
- To seal Plexiglass slots, simply put on blue masking tape around the edges and pour silicone into the extra space in the slot.


https://i.expert-h.com/en/stol/923#sigFreeId9c4a384636
Original coffee table with gas keys
 If you like original ideas, then this coffee table with legs made of gas keys, will surely take one of the first places in the ranking of originality. Put it in the most visible place, and you and your guests will have a long topic for communication. At first glance, it is very simple to make such a design, but in order to get a normal, reliable table from all this, you need to take into account some nuances. Sixty step-by-step photos that the author of this work of art laid out, I think, will help you.
Well, a few more comments. Although the author used many tools for this project, if necessary, you can significantly reduce their number.
You will need: a croaker with a thickness of 2 cm for the countertop, although not necessary. You can use something ready-made. Any boards made of maple, oak, birch, pine, or even multi-layer plywood. In this case, the countertop is approximately 30 cm wide and 50 cm long. You will also need 4 gas keys 60 cm (there may be options). Joiner glue, 4 rods, sandpaper, screws.
Tools: a circular saw, if you yourself cut a board for a countertop. Jigsaw, clamp and 6 screws. Also welding to weld a metal flat bar or epoxy if welding is a problem. And of course a drill, screwdriver, grinder.
- The main problem is that the gas key and the delicate surface of the countertops are not completely compatible, so you can’t tighten them tightly. Thus, we need to make a bracket that will allow a safe connection between the legs and the tabletop. The author did it this way - cut out and welded a flat strip in the lower part of the spanners. Instead of welding, you can try epoxy glue. If you thoroughly clean the metal and use acetone to remove the remaining oil, it should work.
- The next step to fix the brackets to the legs (keys) is to use a hammer and a clove to shake out the pin that holds the lower lip of the key. Use pliers to completely pull the pin out of the key. Note: do not discard any parts, they will all be needed when reassembling. Use magnets to hold the bracket in place.
- Weld the brackets to all the keys.
- Use acetone to clean oil residues.
- To ensure that the keys on the feet do not rust over time, carefully spray paint over the surface.
- Attach the feet carefully so as not to scratchloafer! With a hammer, adjust each bracket as necessary.
- Please note that you cannot make the mount very tight. Be careful that the key does not stagger too much, as this may damage the finish. From the bottom, tighten two screws to attach the leg to the countertop. After installing each leg, make sure that they are attached to the appropriate distance from all edges of the table.


https://i.expert-h.com/en/stol/923#sigFreeId9af97c3e5d
Corner table in the hallway
 If, in your opinion, the corner in the hallway seems too empty, I suggest making this a table in the hallway. In principle, this table is not unusual, except that there are six baskets on the shelves. That’s the whole thing, I think you haven’t seen a little table with baskets in few places. Well and conveniently, you can store scarves, gloves, but you never know what else. How to make such a table. First, buy beautiful and comfortable baskets; in the store you can find very nice patterns. The size can be chosen approximately, as the author has - width 35 cm, height 15 cm, depth 25 cm. Before buying, measure your space in the corner to get an idea of how much it will take up space. In general, the author made a table for the size of baskets, if you do not have a table or baskets, you also have to go this way. Then nothing complicated, you need to determine the size, prepare the bars, and build just such a whatnot. You see the manufacturing order in step-by-step photos.


https://i.expert-h.com/en/stol/923#sigFreeId6e59828cbb
50 photos of original coffee tables


https://i.expert-h.com/en/stol/923#sigFreeId0b093a4207
Do-it-yourself coffee table restoration
If your coffee table has lost its former freshness and novelty, do not rush to throw itToday there is a huge set of tools and opportunities for the restoration of any furniture. Even you have no experience make a decoupage table is not difficult. This is done in many ways, from art painting to gluing decorative elements. In addition, there are many effects that are used in decoupage, these are:
- tinting;
- shading of shades;
- potal - contouring with silver or gold paint;
- patting, that is, dimming the surface;
- craquelure, antique imitation.
In the photo below are materials that are often used for decoupage.


https://i.expert-h.com/en/stol/923#sigFreeIdc1755fbccf
Dressing table top coffee table
Here is a concrete example. coffee table top decoration. Before starting the restoration, we disassemble the table, not completely, the frame can not be touched. Replace the inserts at the top and bottom of the countertop. Then we prime the lid and let it dry. During this time, it is necessary to prepare decorative parts from vinyl.
Then we apply a layer with a spray gun, remove the vinyl and finally varnish. A brand new table!


https://i.expert-h.com/en/stol/923#sigFreeIdeed614d65e
Here are a few examples that are result of restoration. So I advise you to study this matter in more detail, seriously, decoupage - an exciting lesson, and save a ton of money.


https://i.expert-h.com/en/stol/923#sigFreeIdea8af35f57
Singer sewing machine coffee table
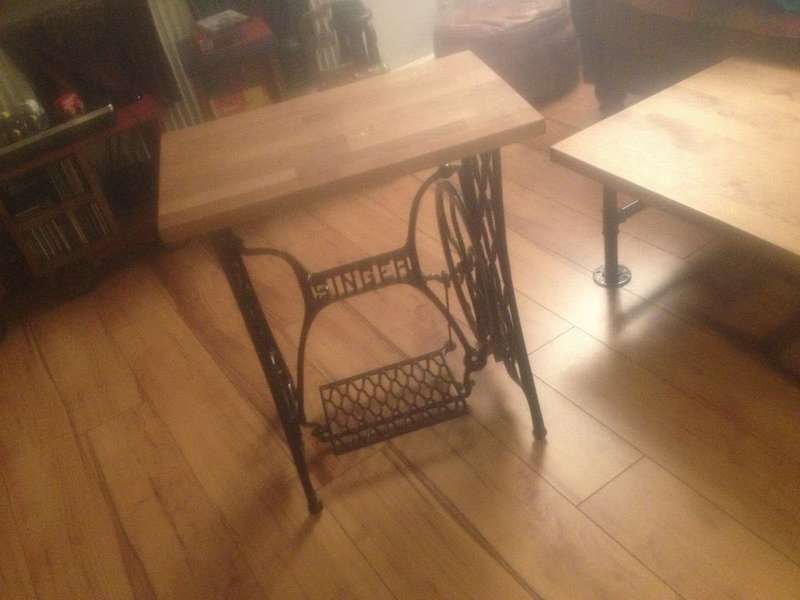 if you have old frame from a Singer sewing machine, in no case do not throw it away, because in fact a ready-made coffee table. And quite original, various vintage things are in fashion today. Do not be alarmed if the frame is too rusty. Of course, you have to tinker, but patience and sandpaper work wonders. That is, the first stage, disassemble the frame for parts, clean and degrease, in principle, this is the main part of the work. Then coat with a primer and paint. Now you find the material for the countertops. There are many options, the author, for example, the author found an unprocessed wide oak board and he had to spend several hours processing it to get smooth with rounded edges. After that, it remains to paint and attach it to the frame. All this is shown in step-by-step photos, although I think I can make such a table without prompts.


https://i.expert-h.com/en/stol/923#sigFreeId956aba3017
Schemes and drawings of coffee tables 100 photos


https://i.expert-h.com/en/stol/923#sigFreeId184554228c
Coffee tables 300 photos


https://i.expert-h.com/en/stol/923#sigFreeIdf195c9b7f4
Hello, I am the author of this article, so I look forward to asking questions for this article in the comments below, I will answer all !!!
If you have questions on another topic, ask them on our forum, we will answer you
- Two baskets of paper in 5 minutes (Master class)
- How to make a simple and compact table for a milling cutter from plywood
- How to make a soft headboard tile (Instructions + step by step photos)
- Cinder block benches: a convenient bench in 55 minutes
- How to make a bed with a niche: saving space (Master class)