Do-it-yourself polycarbonate greenhouse. 800 photos, drawings, step-by-step instructions
 how to make a greenhouse do-it-yourself polycarbonate
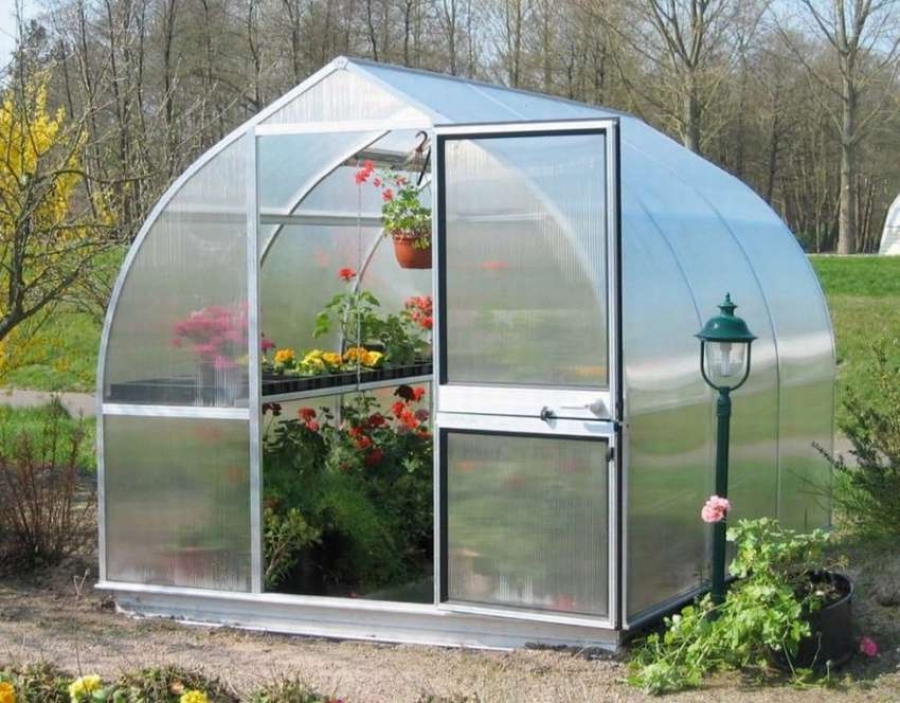
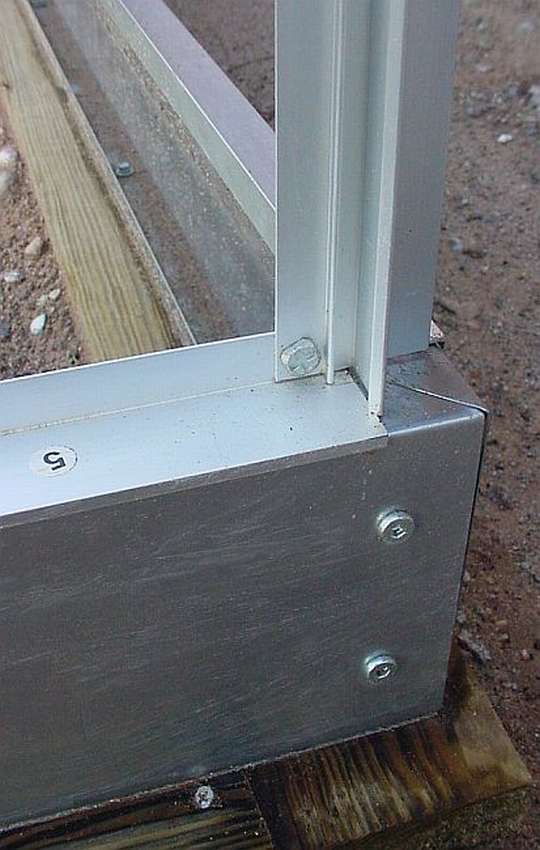
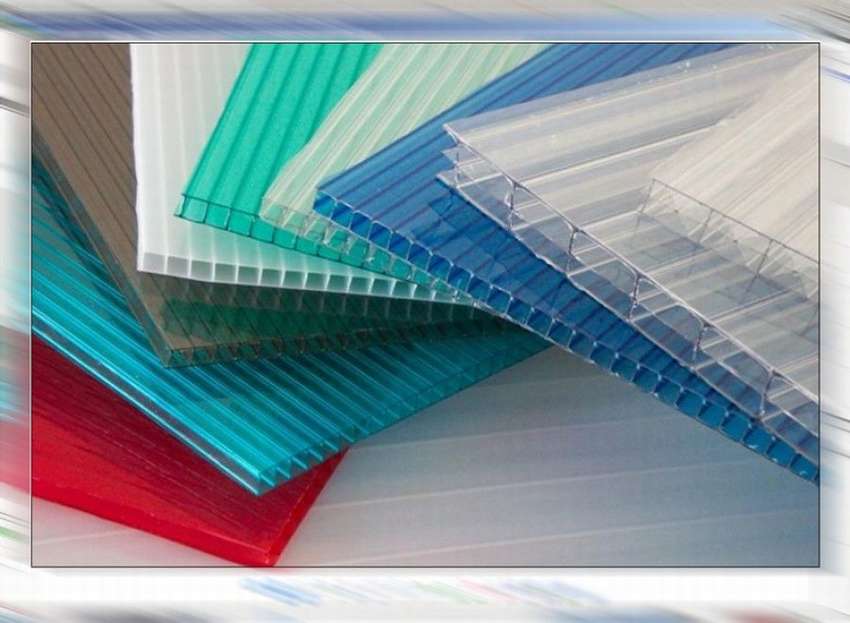
Due to the competitive advantages that polycarbonate has, polycarbonate greenhouses became very popular. This material provides all the qualities necessary in a greenhouse, such as transparency, durability, strength and a long service life. What else is important make a polycarbonate greenhouse with your own hands much simpler, this material is lightweight, so it is easy to carry, transport and install.
Ease of carrying helps to easily fix sheets that facilitates and accelerates installation. In addition, you do not need special tools for cutting these sheets. They can be easily cut with sharp scissors or circular saws. In general, the benefits are many. This article provides some examples. how to make a polycarbonate greenhouse, prepare the foundation, lay the panels, make the doors in the polycarbonate greenhouse. All examples with step-by-step photos, there are drawings, diagrams and tips for choosing a place and safety measures.
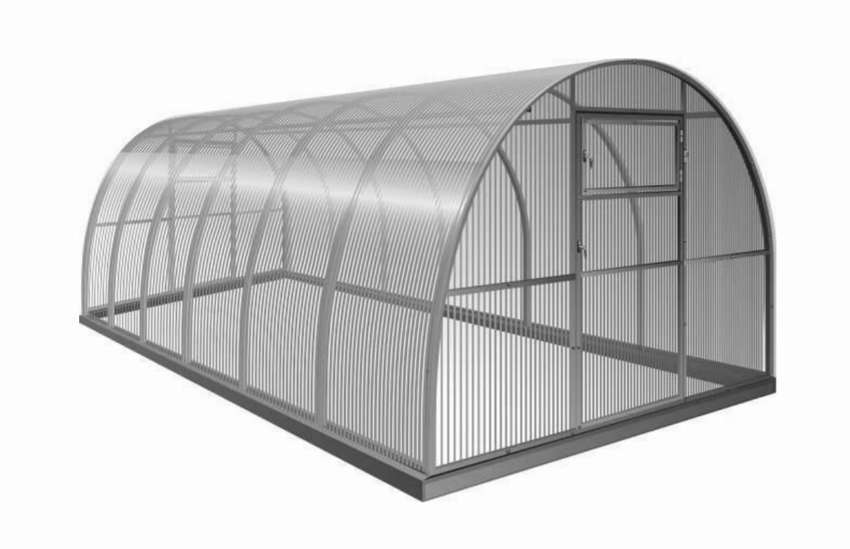
How to build a polycarbonate greenhouse
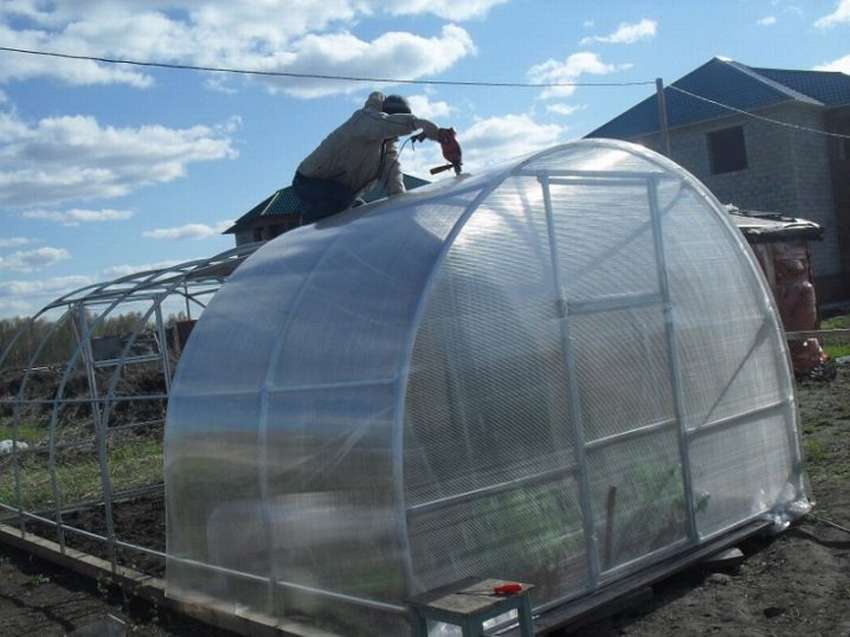
 In recent years polycarbonate greenhouses are becoming more popular and, apparently, are overtaking glass as the main material, which used to be a priority for this type of structure. Polycarbonate is cheaper and has amazing thermal insulation quality.due to which the heating costs are minimal, because there is no need to install any traditional cooling device that consumes a lot of energy. This walkthrough will show you how to build a polycarbonate greenhouse with your own hands with a broken line or as the roof is called
Materials:
 3 10x4 (348 cm) 2x4 bars for rear wall
- 5 2x4 bars 12 feet (365 cm) long for sides
- 32 bars 2x4 8 feet long (244 cm)
- 11 - 12 ft (335 - 365 cm) long and 26 "(65 cm) wide standard corrugated polycarbonate greenhouse panels
- 1 - 8 ft (30 - 245 cm) long, 26 "(65 cm) wide polycarbonate for doors
- 3 to 12 foot (90 to 365 cm) tin panels (side and back use)
- 1 - 8 foot (30 - 245 cm) tin panel (front use)
- Tin screws
- 28 - 4 '(122 cm) long ribbed stripes
To read the instructions, go to the site by the link under the gallery, where you will find a list of materials and tools, written instructions and videos. Below see the master class on step-by-step photos that include drawings of a polycarbonate greenhouse, diagrams with dimensions and photos of the main stages of assembly of the structure.


https://i.expert-h.com/en/parniki-teplitsy/1118#sigFreeId5ef4367424
The second part of the step by step shows how to make doors for a greenhouse.


https://i.expert-h.com/en/parniki-teplitsy/1118#sigFreeIdf0590062b9
How to make a greenhouse door
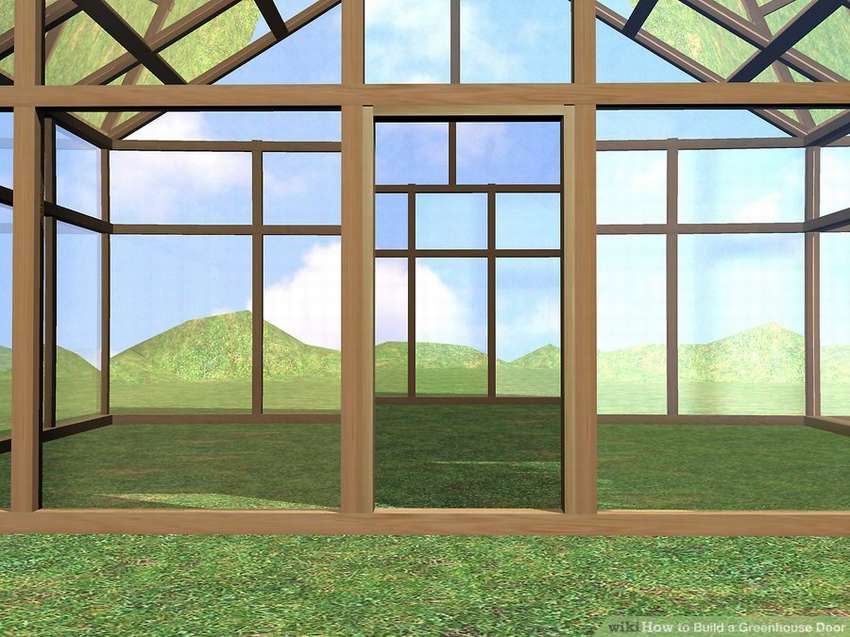 Finding a greenhouse door that matches your design can be difficult. If you have the tools and basic knowledge of woodworking, you can do do-it-yourself greenhouse doorsas described in this walkthrough. You can read about the steps of making a door on the site, the link can be found under the gallery.
See below master class in pictures on step by step photographs, everything is drawn very beautifully and in some detail.


https://i.expert-h.com/en/parniki-teplitsy/1118#sigFreeId3b01550d03
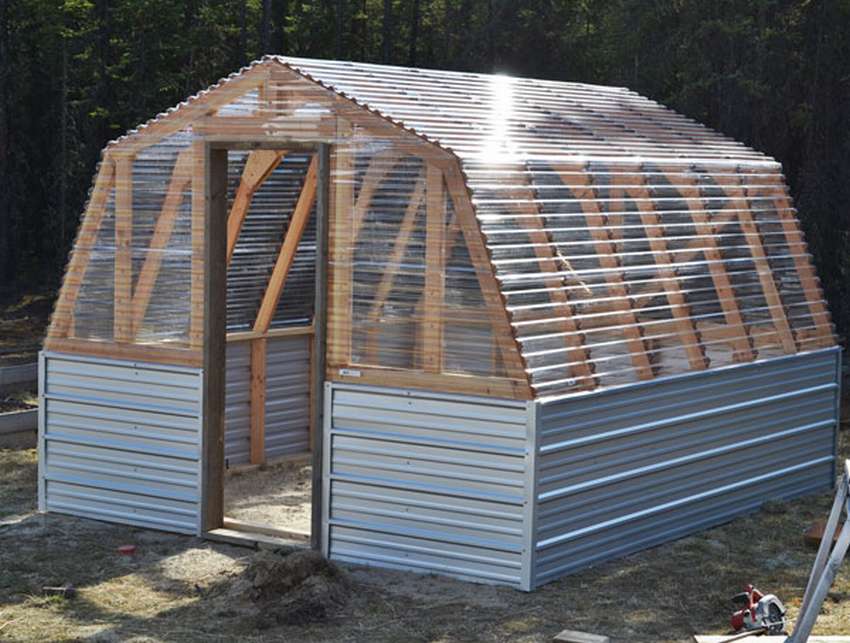
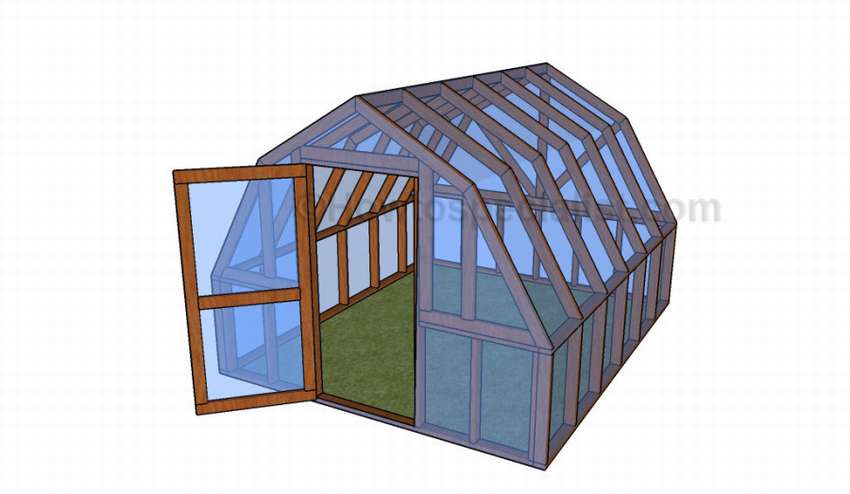
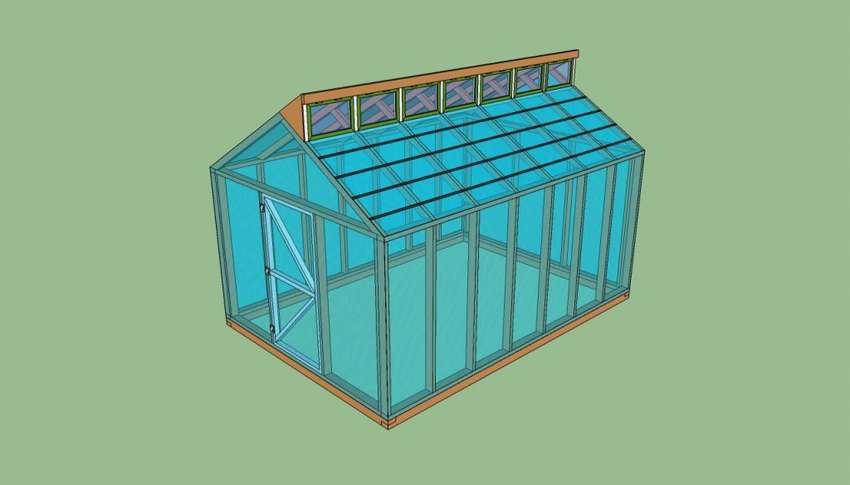
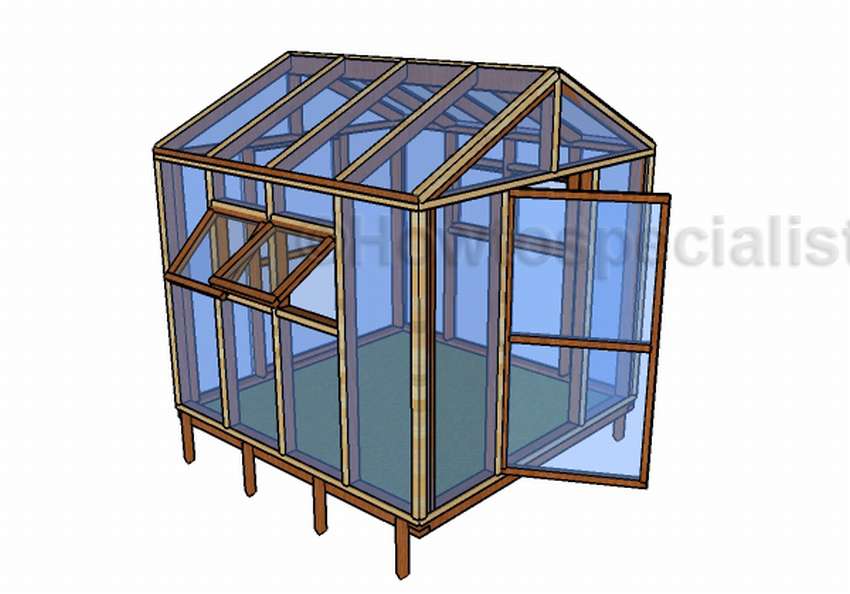
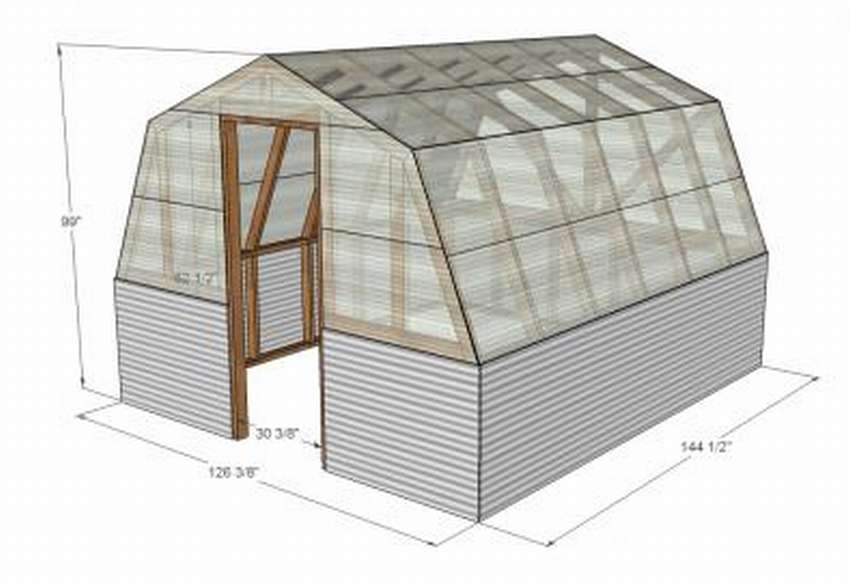
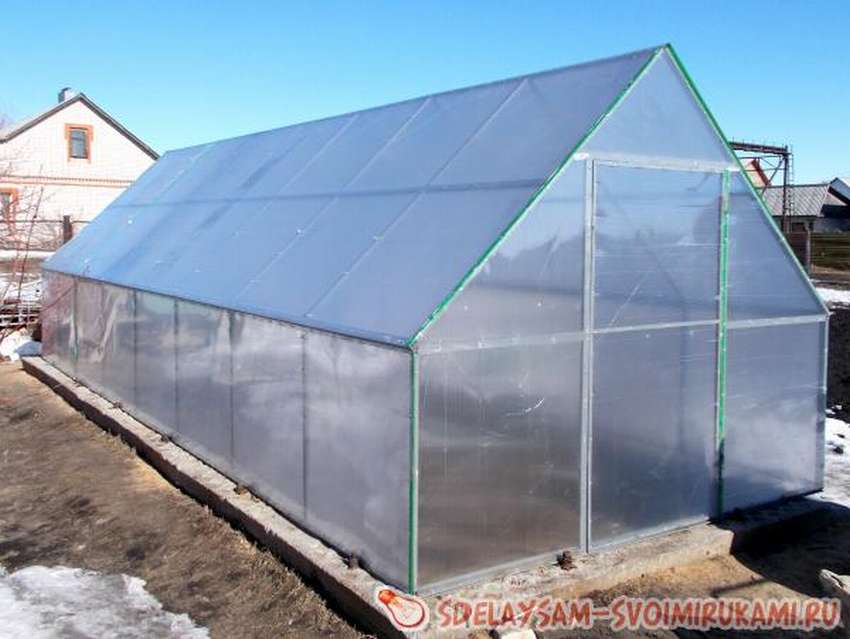
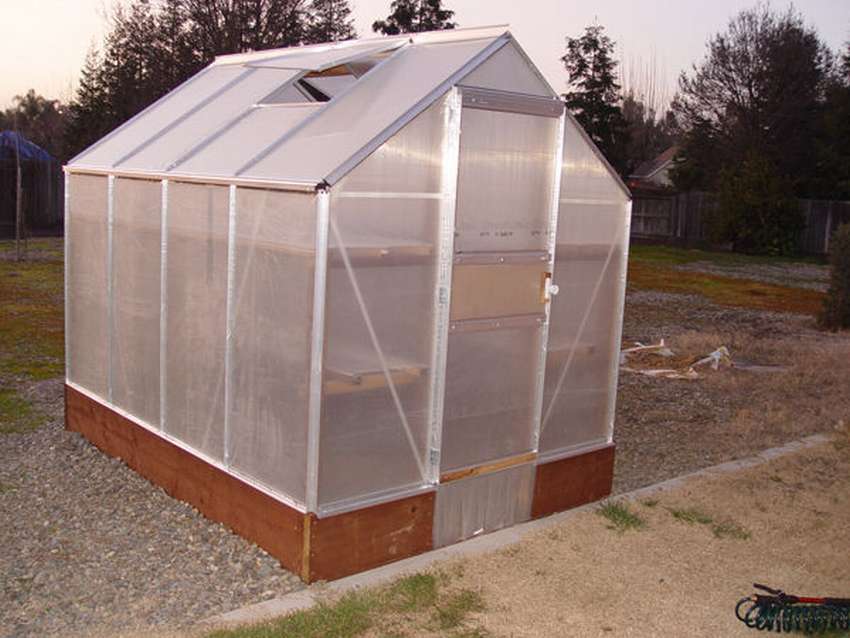
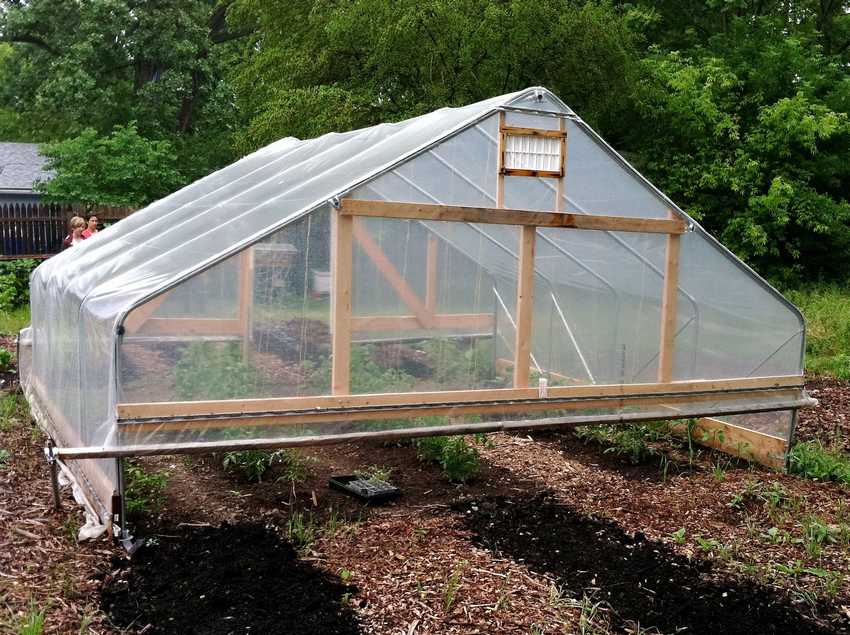
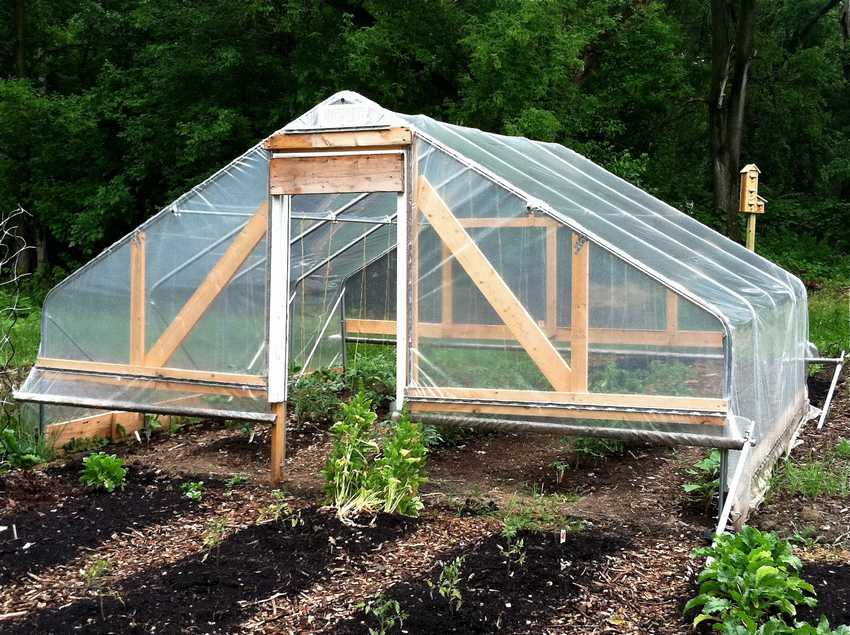
DIY polycarbonate 3 to 3.5 m greenhouse
What do you need to do-it-yourself polycarbonate greenhousedepends on the specific design.
 If you, as in this case, use Google sketchup, then you can resize and get a specific and accurate list of exactly how many materials, wood and polycarbonate you will need.
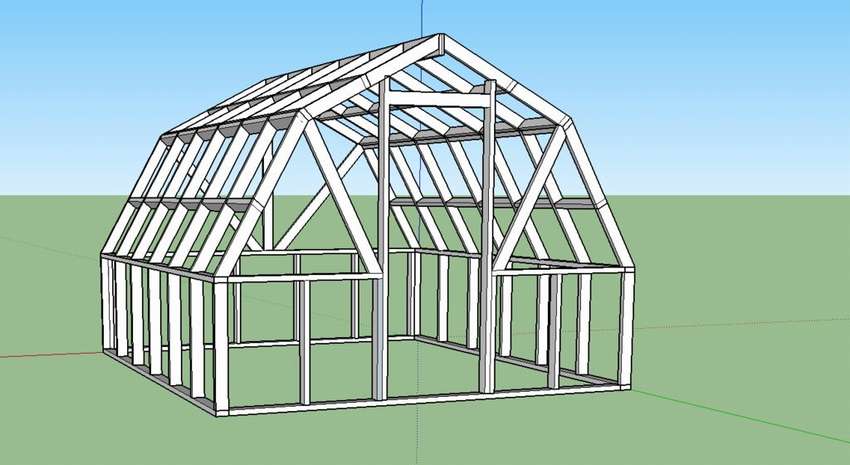 Otherwise you can use the design presented here. Under the gallery there is a link to the source site, use it and find out what you need for this design. The polycarbonate greenhouse is 10 feet (348 cm) wide and 12 feet (365 cm) long with a gumbrel-style roof.Be sure to watch the video of this project - this is a great video that will help to better explain some of the steps. do-it-yourself polycarbonate greenhouse assemblies. Below are step-by-step photos.


https://i.expert-h.com/en/parniki-teplitsy/1118#sigFreeId20862eac1a
Wooden polycarbonate greenhouse
Here's an example of how to build a pretty house - do-it-yourself wooden polycarbonate greenhouse.
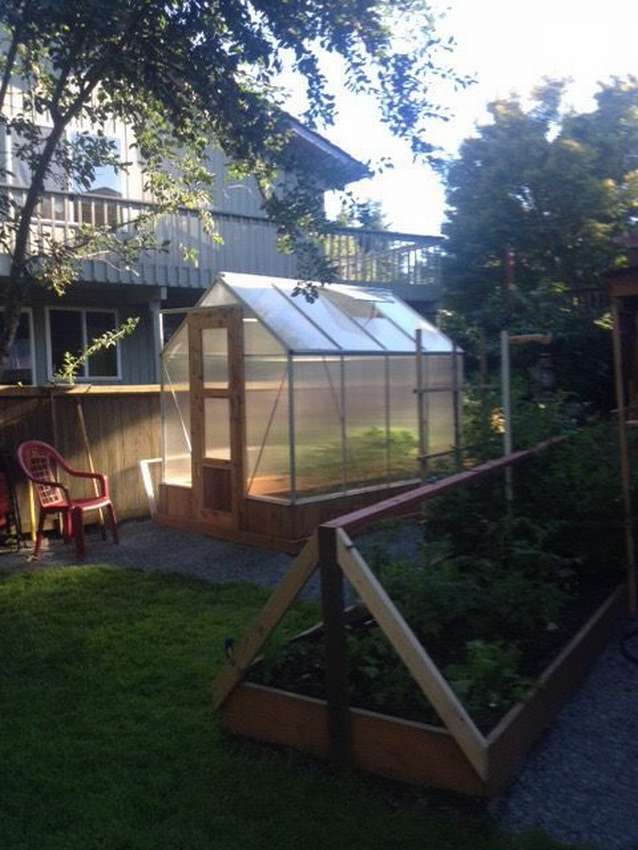
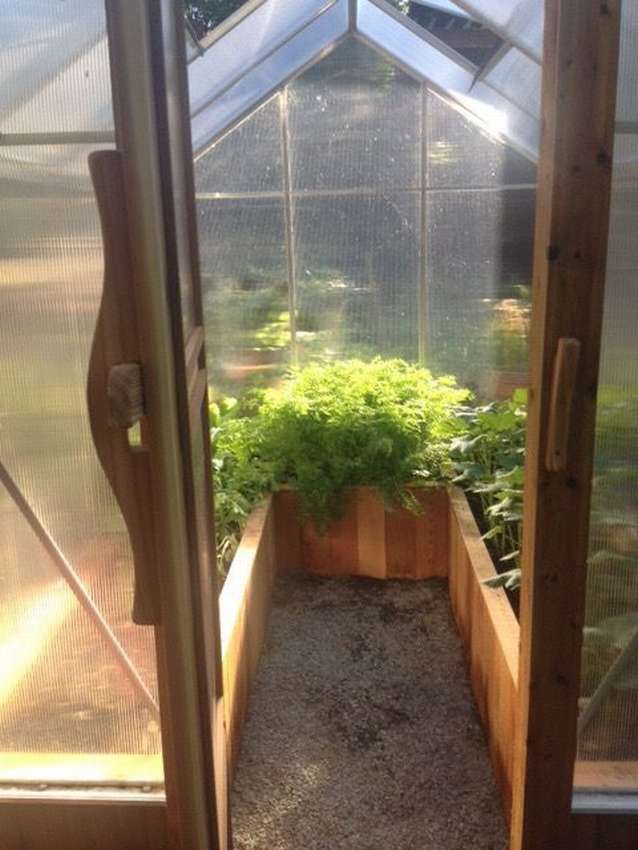 In the gallery below, step-by-step photos show the main stages of the greenhouse assembly and equipment. It’s hard to understand the nuances of construction, but you can use the link and read on the site detailed instructions, with a description of not only the manufacture of a polycarbonate greenhouse, but also a few tips for arranging the site.


https://i.expert-h.com/en/parniki-teplitsy/1118#sigFreeIdf892bc8fe7
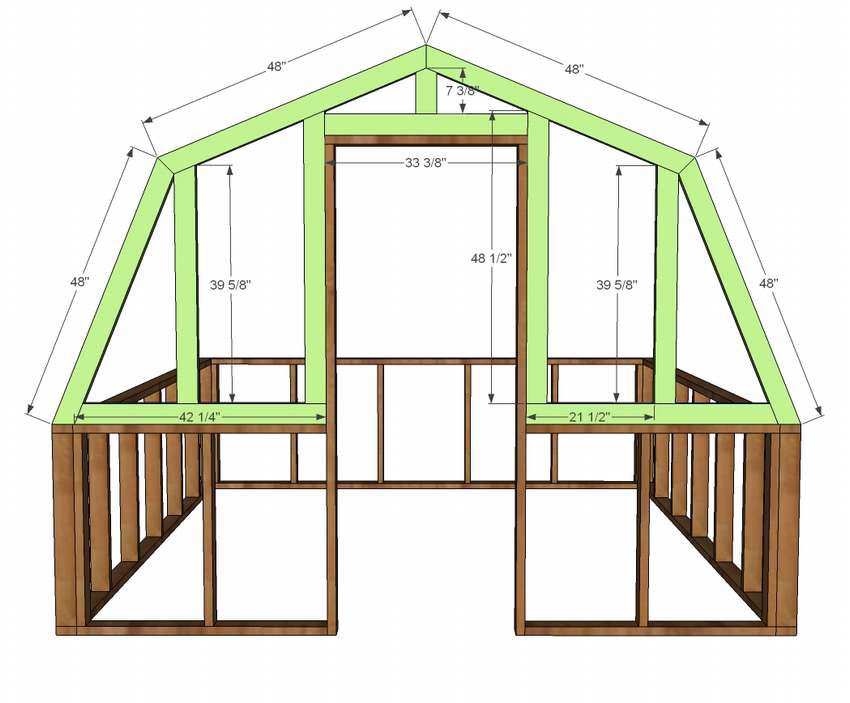
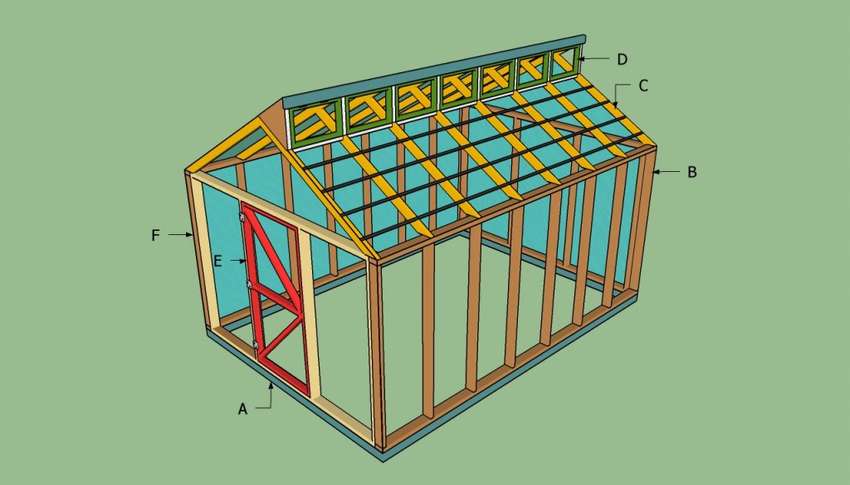
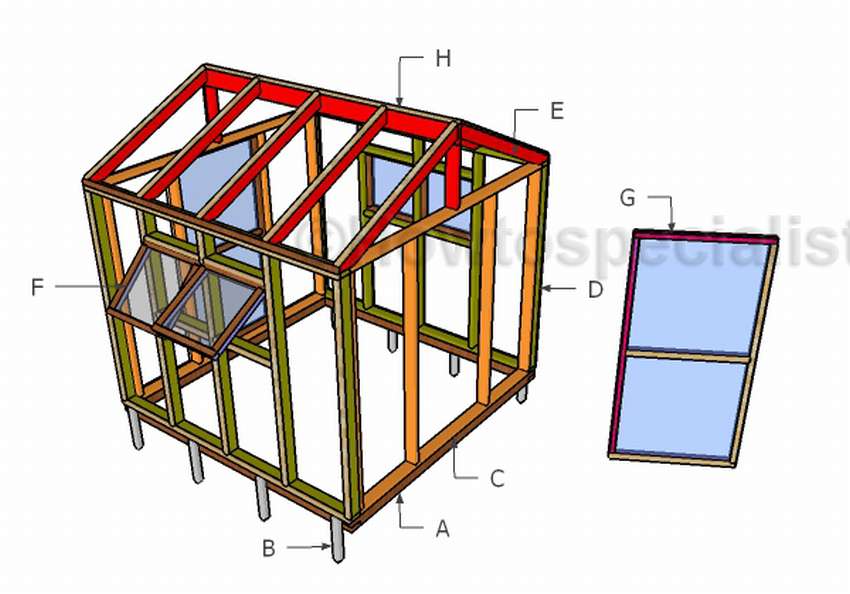
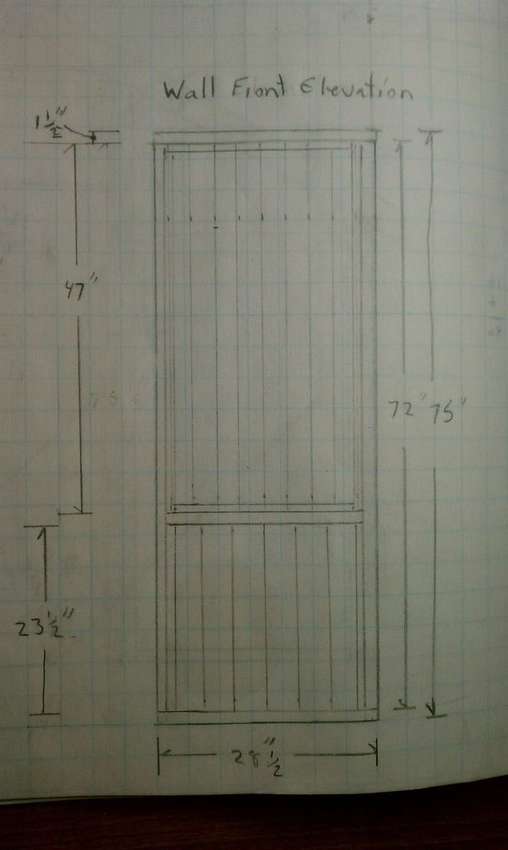
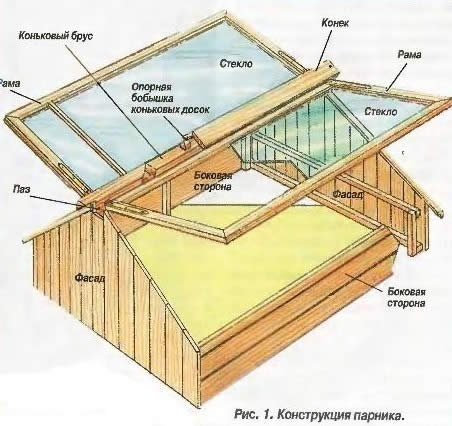
Dimensional drawing of a polycarbonate greenhouse
 Here, the drawings and diagrams show how to assemble a polycarbonate greenhouse with a broken mansard roof. If you want to learn more about building a beautiful and small greenhouse, visit the source site and read the detailed instructions. Follow the instructions and pay attention to the schemeswith which you can build a greenhouse, even if you are new to carpentry. Choose a place carefully, as the greenhouse should receive at least 8 hours of light every day.
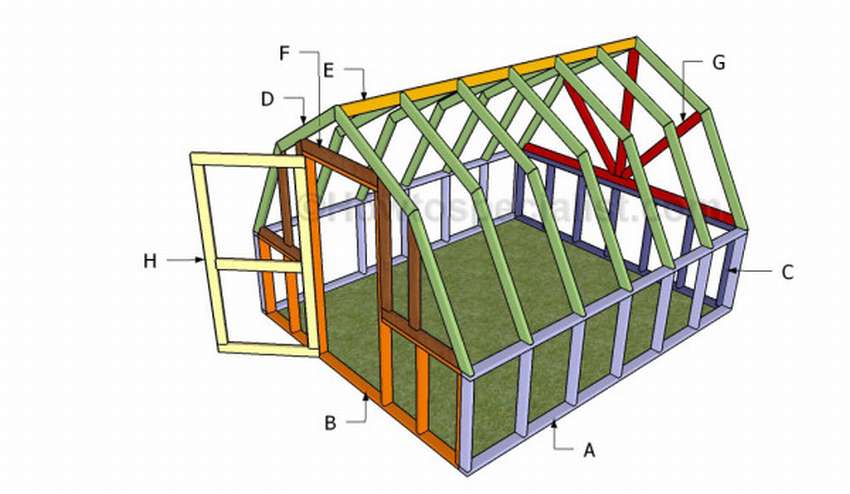 A - 2 bars 2 × 4 144 ″ long (368 cm), 7 pieces - 33 ″ long (84 cm)
B - 1 board 2 × 4 - 113 ″ (338 cm) long, 4 pcs. - 33 ″ (84 cm) long, 2 pcs. - length 36 1/2 ″ (91 cm), 2 pcs. - length 76 1/4 ″ (194 cm), 1 pc. - 40 ″ (102 cm) long front wall
C - 2 boards 2 × 4 - 113 ″ (338 cm) long, 7 pieces - 33 ″ (84 cm) long
D - 14 boards 2 × 4 48 ″ (122 cm) long, 4 pieces 41 1/2 ″ (106 cm) long, 10 pieces 40 3/4 ″ (102 cm) long
E - 1 PC. 2 × 4 - 141 ″ long (358 cm)
F - 1 board 2 × 4 - 36 ″ (91 cm) long, 2 parts 35 1/2 ″ (90 cm), 2 parts 43 1/2 ″ (110 cm)
G - 2 boards 2 × 4 with a length of 117 "(297 cm), 2 pcs. - 120" (305 cm), 4 pcs. - 39 3/4 "(101 cm)
H - 2 boards 2 × 4 - 37 ″ (94 cm) long, 2 pieces 69 1/4 ″ (176 cm) long, 1 pc. 30 ″ (76 cm) long Doors


https://i.expert-h.com/en/parniki-teplitsy/1118#sigFreeId4bb1762073
Scheme drawing of the greenhouse Mitlider
 If you want to build Mitlider polycarbonate greenhouseIn order to preserve plants in cold winters and for growing vegetables, it is important to consider all the nuances before starting construction. The greenhouse should be located so that most of the day getting more sunlight. This design was developed by Jacob Mitlider, an American expert on agriculture. Presented here greenhouse drawing, which we also call "American."
 A - 4 bars 4 × 4, two 120 inches (305 cm) long and two 168 inches (427 cm)
B - 4 boards 2 × 4, two 113 inches (287 cm) long and two 168 inches (427 cm)
B - 24 boards 2 × 4 72 inches long (183 cm)
FROM - 8 boards 2 × 4 with a length of 87 1/2 ”(222 cm) and 8 with a length of 6” (15 cm)
D - 28 2 × 2 bars, of which 14 are 14 ”(35 cm) long and 14 are 22” (56 cm) long
E - 2 bars 2 × 3 36 ”(91 cm) long, 2 bars 2 × 4 69” (175 cm) long, 1 pc. 33 ”(84 cm) long F - 500 sq. ft (150sqm) FOIL polycarbonate sheets
500 pieces 2 1/2 ″ (6.5 cm) screws


https://i.expert-h.com/en/parniki-teplitsy/1118#sigFreeId3cbcf992c9
Greenhouse under polycarbonate drawing
 To grow your own vegetables, take a look polycarbonate greenhouse drawing do it yourself. This design is large enough for a small family, especially if you grow vegetables as a hobby. There are two large doors and four ventilation holes. Be sure to choose the right place for the greenhousesince plants should receive a lot of natural light, even on winter days. Stakes hold the frame of the greenhouse if you live in an area with strong winds.
Sawing parts with dimensions
 A - 4 bars 4 × 4 - base length 96 ″ (244 cm)
B - 8 bars 2 × 2 16 ″ long (41 cm)
C - 2 bars 2 × 4 89 ″ long (226 cm), 4 bars 72 ″ long (183 cm)
D - 2 bars 2 × 4 96 ″ (244 cm) long, 5 pieces - 72 ″ (183 cm) long, 4 pieces - 22 1/2 ″ (57 cm) long E - 2 bars 2 × 4 18 "(46 cm) long, 10 pieces - 53 3/4" (136 cm), 1 part 2 × 6 length 96 "(244 cm) long rafters
F - 2 bars 2 × 2 - 22 1/2 ″ long (57 cm), 2 pcs. - length 19 1/2 ″ (50 cm), 2 bars 1 × 2 - length 22 1/2 ″ (57 cm), 2 pcs. - 19 1/2 ″ (50 cm)
G - 2 bars 2 × 2 36 ″ long (91 cm), 2 pcs. 69 ″ (175 cm) long, 1 pc. - 33 ″ long (84 cm), 2 bars 1 × 2 - 36 ″ long (91 cm), 2 pcs. 69 ″ (175 cm) long, 1 pc. - 33 ″ (84 cm) 2x door
H - 18 pcs. 1 × 2 length 72 ″ (182 cm), 9 pieces 96 ″ (244 cm), 10 pieces 52 1/4 ″ (132 cm)


https://i.expert-h.com/en/parniki-teplitsy/1118#sigFreeIddc3da49ffd
The following are the drawings, how to make a roof for a polycarbonate greenhouse, vents and door plans.
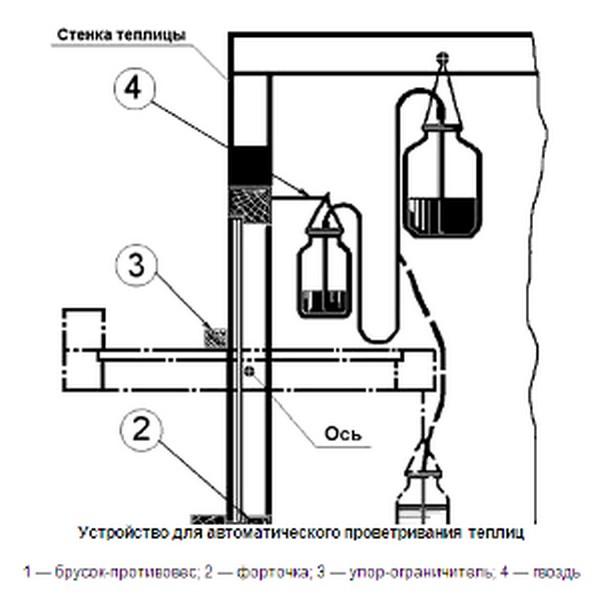
Smart tip: You can install automatic ventilation openers.


https://i.expert-h.com/en/parniki-teplitsy/1118#sigFreeId3692c53d3b
Here's another polycarbonate greenhouse drawing 8'x8 ′ (244 x 244 cm)
 If you ever thought about building a greenhouse, but realized that you might need help, then these polycarbonate greenhouse drawings just for you. You can read the step-by-step instructions on the site and view the drawings with sizes and diagrams in the photos in the gallery.


https://i.expert-h.com/en/parniki-teplitsy/1118#sigFreeIdd5eb16b65a
Polycarbonate Greenhouse Drawings


https://i.expert-h.com/en/parniki-teplitsy/1118#sigFreeId18b85e1795
How to build a polycarbonate greenhouse
 Do you want to make serious investments in your garden, that is, to grow vegetables professionally? Here is a good example how to build a polycarbonate greenhouse. It is a reliable and durable design that will last you for many years. Of course, not cheap - but doable. Projects always cost twice as much, look twice as cheap and take twice as much time as you expect. There are not many step-by-step photos on how to make this greenhouse, but you can use the link under the gallery and visit the website of the author of this project, where the instructions describe everything in great detail.
 The project used:
- 4 concrete blocks
- 2 boards 2x4 3.5 m long
- 4 boards 2x4 5 meters long
- 16 boards 2x4 2.5 meters long
- 21 sheet 365 cm polycarbonate greenhouse panels
- 4 sheets of 250 cm polycarbonate greenhouse panels


https://i.expert-h.com/en/parniki-teplitsy/1118#sigFreeIdc63e2509de
Large polycarbonate greenhouse
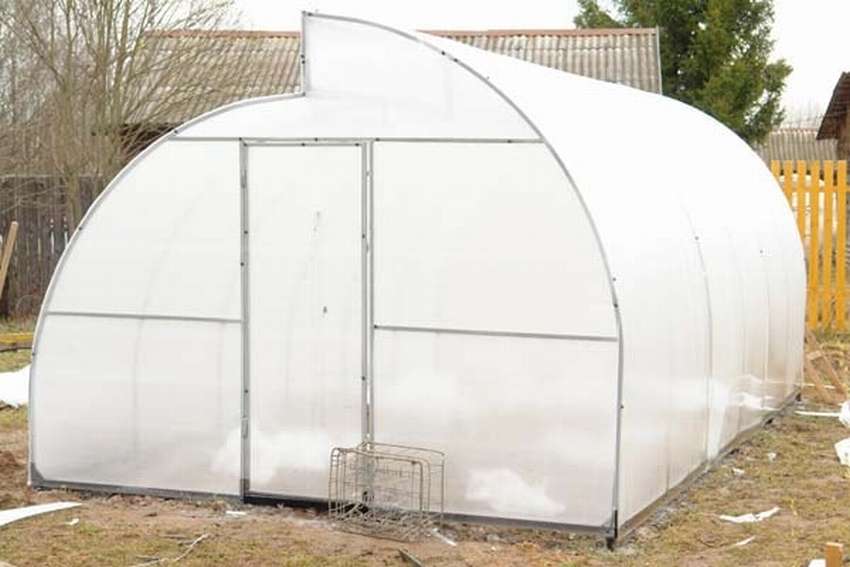
 This is a large polycarbonate greenhouse, mainly for growing seedlings for spring planting. See an example of how fast you can build an English style greenhouse. The fundamental element is the most important, do it right, and everything else will go easy. For this design no need for concrete or level ground. The greenhouse will be 3.5 m wide and 9.6 m long with a central walkway and long beds on the sides. You will need polycarbonate 37 sheets of 10 mm double wall. How was this greenhouse assembled? see below for detailed step-by-step photos.


https://i.expert-h.com/en/parniki-teplitsy/1118#sigFreeId37da089195
Mini polycarbonate greenhouse
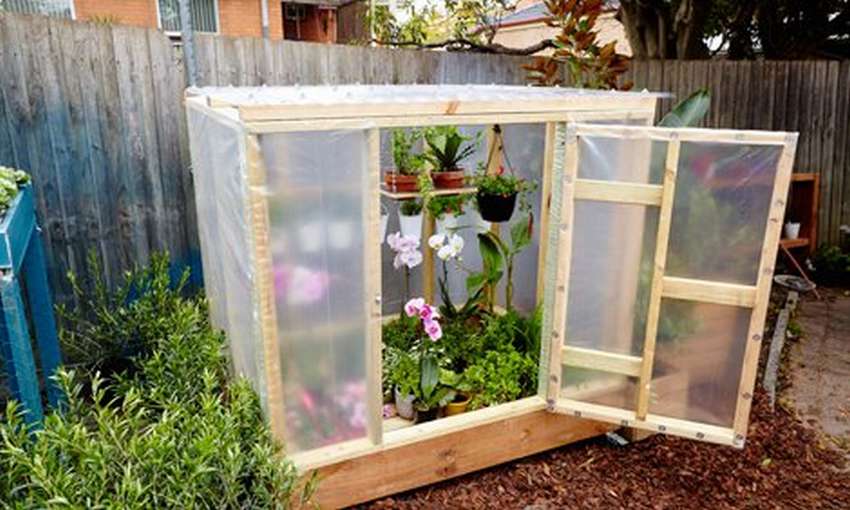 Make do-it-yourself little polycarbonate greenhouse - A great idea for enthusiastic gardeners or growers. This gives your plants every chance of prosperity, allowing you to monitor the sun and avoid harsh weather and insects that can affect their growth.
Below see step by step photosshowing how easy it is to do.


https://i.expert-h.com/en/parniki-teplitsy/1118#sigFreeId89ff7e1024
DIY greenhouse for the garden
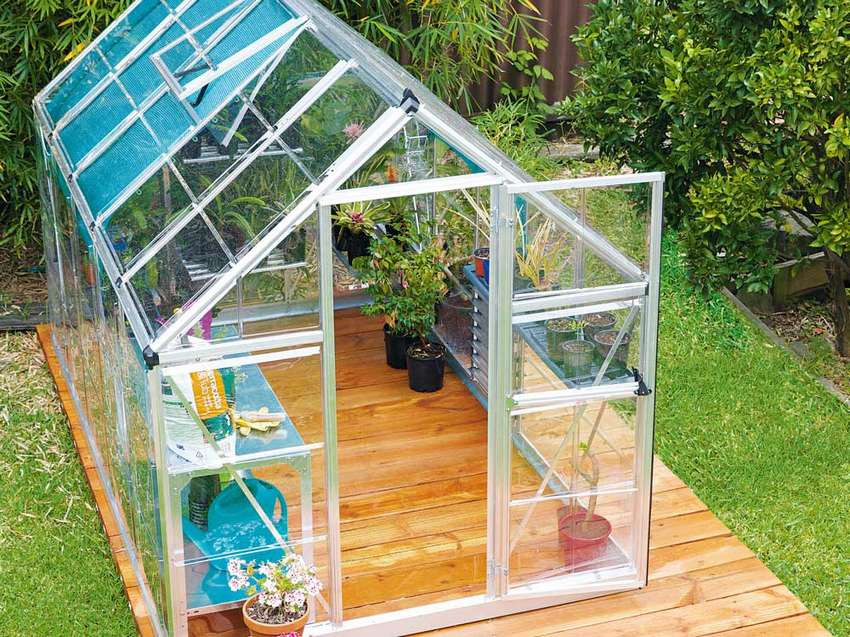 Build a polycarbonate greenhouse at the best site of your garden. Ideal orientation from north to south, so one side receives the morning sun, and the other - the midday sun. Thanks to strong but lightweight aluminum frames and transparent, virtually indestructible polycarbonate panels they can now be packaged in sets. The greenhouse has a ventilation hole on the roof, but to increase airflow, the wall panel can be replaced with a window blinds. To reduce the light intensity, part of the roof is desirable to screen. Put a bench with a lower shelf for storing tools and equipment, very convenient. Set shelves to arrange small pots and seedling trays.


https://i.expert-h.com/en/parniki-teplitsy/1118#sigFreeId2721609fb2
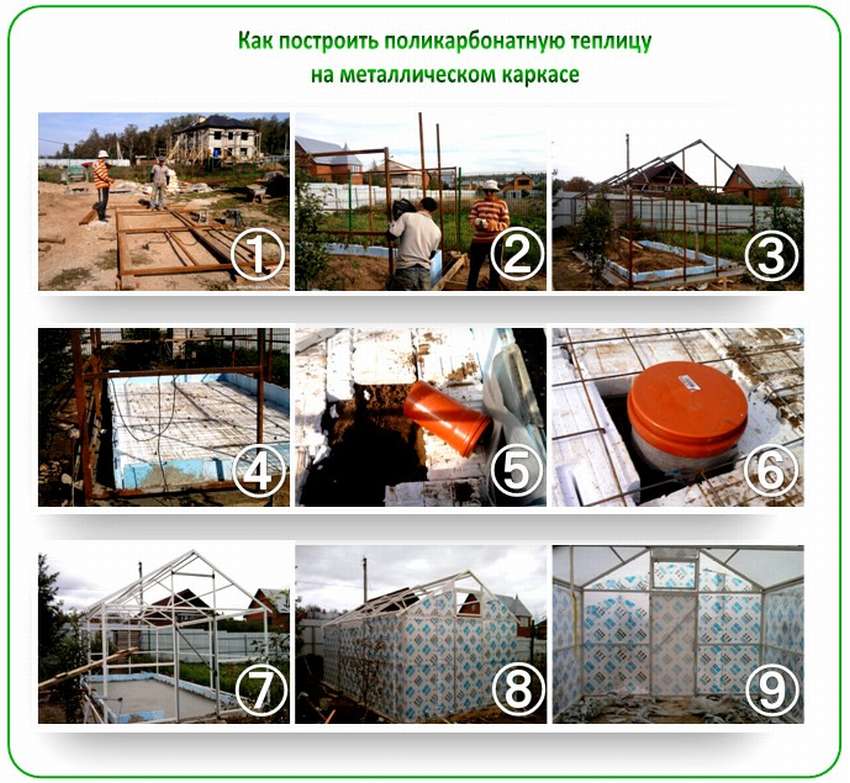
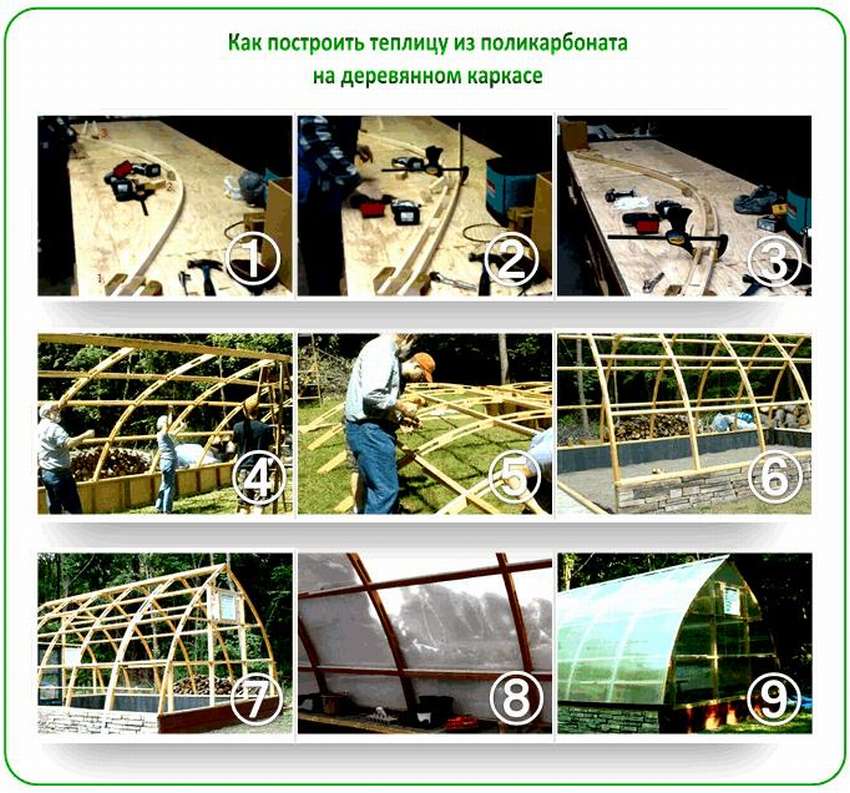
Polycarbonate Greenhouse Projects
Check out three more projects how to make a polycarbonate greenhouse with your own hands. These are just collages where the assembly process is graphically shown.
How to build a polycarbonate greenhouse with a pitched roof
 How to build a polycarbonate greenhouse on a metal frame
 How to build a polycarbonate greenhouse on a wooden frame
 You can read the text description of the process on the site, the link below.
Do-it-yourself polycarbonate greenhouse assembly
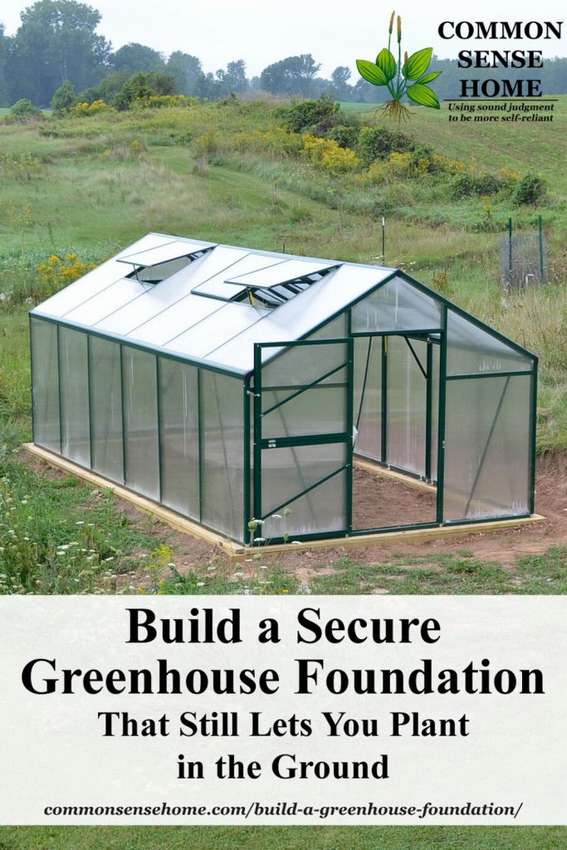
 Independently assemble a polycarbonate greenhouse, the task is not simple, although it is quite possible to do without professional specialists. Here is an instruction that will help you in this difficult task. Use the link under the gallery and visit the site, you will learn a lot of useful things, not only how to assemble a polycarbonate greenhouse with your own hands, but also read valuable tips. how choose a greenhouse, prepare a place and do the right thing foundation for the greenhouse. Also on the site there is a great video.


https://i.expert-h.com/en/parniki-teplitsy/1118#sigFreeIde3d1cd177f
Greenhouse from a profile pipe under polycarbonate
 I must admit that not always purchased greenhouses meet all the requirements. So the author of this project did not like what was offered in the store, and he decided make a frame for a polycarbonate greenhouse on your own from a profile pipe and a corner. Dimensions of the designed greenhouse 8 meters length, 3 width. As you can see, the design turned out no worse than the factory. Comfortable, durable, the right size and with minimum number of joints. So if you plan to independently make a frame for your greenhouse, visit the author’s site, get a lot of useful information.


https://i.expert-h.com/en/parniki-teplitsy/1118#sigFreeId49aef0218a
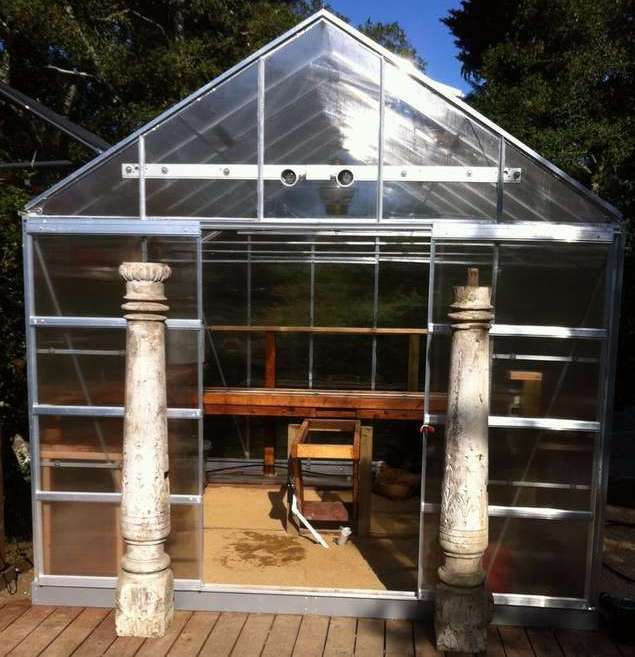
Do-it-yourself polycarbonate greenhouse
 Some people think that the frame of the greenhouse is quite rigid, and the usual wooden frame on the ground is enough for the foundation (most greenhouse sets recommend either railway sleepers or a concrete foundation). Unfortunately, this does not always work. Given the size of the greenhouse, no matter how carefully you try to align the frame, it is very difficult to make it completely square along its entire length. Greenhouse foundation construction, which was developed by the author of this project, is similar to the base of the terrace, protected from freezing.
There are six concrete pipes with a 20 cm base (one in each corner and one in the middle of each of the 60 meter sides). They are connected together by 5 x 25 cm boards 6 meters long (stringers), bolted through each concrete pipe, and 60 cm 3 m (10) long boards screwed into 6 m long boards. Fill the drawer frame with earth to rule out any gap through which animals can enter and support uniform distribution of temperature and moisture around the wood. Finally, the frame of the box is closed with 50 x 250 mm boards, and the greenhouse is protected with 30 cm wide boards.


https://i.expert-h.com/en/parniki-teplitsy/1118#sigFreeIdd305e67cff
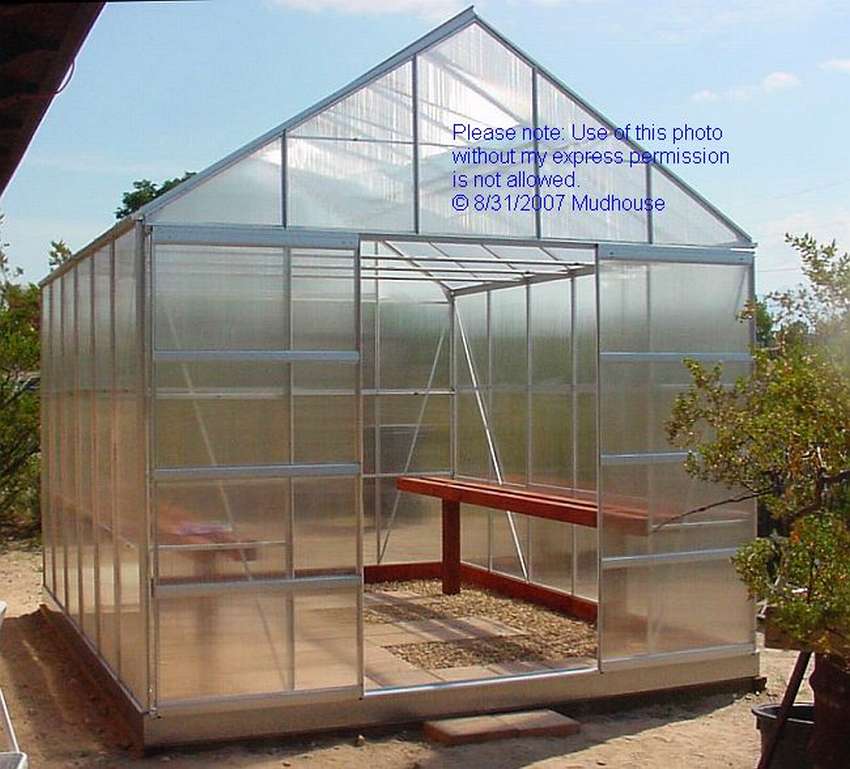
How to assemble a polycarbonate greenhouse from a kit
 The greenhouse is a great addition to any garden. To save money, consider collecting your purchase. DIY polycarbonate greenhouse kit. Start by preparing. Install the greenhouse so that its long side faces south and at least six hours of sunlight fall on it. Dig a trench of the same size as the perimeter of the greenhouse with a depth of 15 cm to fit blocks of 10 by 15 cm in size. Fill the trench with crushed limestone and compact it. Trim the bars in length and lay them on the top around the perimeter of the base. Align the beams along the edges, measuring the angle to the corner, and then fasten using reinforcement. Pre-drill holes at the ends of the bars and fix with 30 cm spikes. This is just the beginning, complete instructions on how to assemble a polycarbonate greenhouse with your own hands, read on the site and look at the step by step photos.


https://i.expert-h.com/en/parniki-teplitsy/1118#sigFreeIdf7f40b291d
 Here is another example, how from a ready-made kit to build a polycarbonate greenhouse with your own hands. This is a very detailed instruction, which includes:
Foundation construction. Although this kit does not provide foundations, most people believe that this greenhouse needs much better fixing, and would not like to bury the steel structure in moist soil. A popular solution is is to build a wooden foundation, somehow fix it on the ground and set the steel base on top. Tip: Lay the steel parts of the base on the ground and measure them before assembling the wooden base. The measurements listed in the manual relate to the gutter in the ground, and not to the actual size of the steel base.
 Polycarbonate Greenhouse Wall Assembly. It's easy to get confused about how to orient the four corner posts. Each pillar has two holes drilled at one end and four holes at the other end. The end with two holes goes down, and the end with four holes goes up. Each pillar is oriented so that two flat flanges were directed towards the greenhouse , and two flanges with curved edges are directed away from the greenhouse.
Assembling roof, windows and doors.
Modification of the frame for strength. Here you need to strengthen the back wall by screwing one or more pieces of solid material along the entire wall. Some creative people have linked this durable fastener to the design of the benches. Prevent bending of C-shaped steel base. This can be done by attaching small plates to the upper and lower edges of the base at regular intervals, or by covering the inside of the base with a whole tree, which is also attached to the upper and lower edges of the base. Of course everyHe decides which modifications he considers most important, and then finds his own ways to complete them using the tools and materials he prefers.
 Panel Installation. The panels are made of polycarbonate with a thickness of 2 mm and 10.5 cm. Close the ends of each panel aluminum tapeto prevent dirt, condensation and insects from entering the channels. Buy one roll of tape 4 cm wide (not duct tape), and cut into three parts, so that only a small bezel with tape will be visible on the panels. The panels have transparent plastic on both sides, which you remove before installation. If you remove the plastic, also remove the stickers with the part number, so just bend the plastic a few centimetersto seal the edges. Gluing the edges of the panel is not difficult, but it is a rather tedious process.
Installation of benches, shelves, sinks, floors and other necessary things. Be sure to visit the site, a link under the gallery, there you will find a lot of interesting and useful information.


https://i.expert-h.com/en/parniki-teplitsy/1118#sigFreeIdd32ca02682
How to upgrade a polycarbonate greenhouse
 A greenhouse kit can be a bargain, but it’s not always possible to assemble them perfectly, there is a marriage and other things, which entails some problems. You can read about the most characteristic shortcomings on the website, a link under the gallery. The article describes the procedure assembly of the factory greenhouse kit from polycarbonate, as well as how to eliminate frequently occurring problems and slightly modernize the greenhouse. You can see the main points in step-by-step photos. Of course, you may have a different model, but basically the designs are not fundamentally different, so the information can be useful.


https://i.expert-h.com/en/parniki-teplitsy/1118#sigFreeId0a83cc0b73
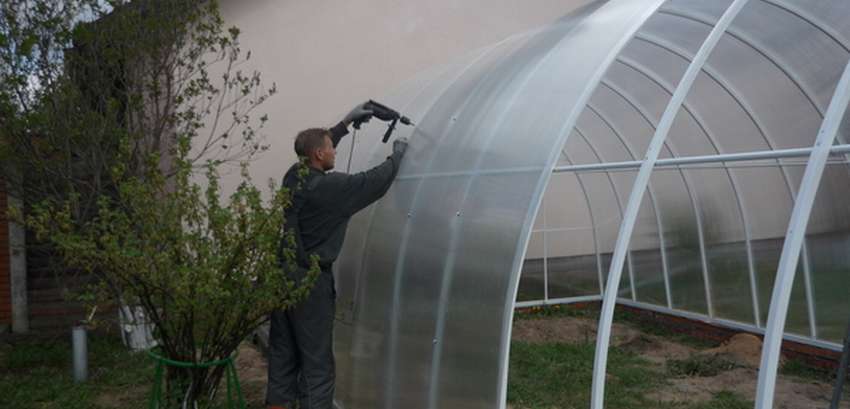
How to cover a greenhouse with polycarbonate
Ready greenhouses, not a cheap pleasure. But costs can be reduced slightly if independently cover the greenhouse with polycarbonate or mount the purchased kit yourself.
 Polycarbonate panels are used in two ways: as a roof and as walls.
 Polycarbonate Roofing Sheets Available in different sizes, colors and profiles. The price depends on the type of profile selected. The most popular and frequently used type of profile is the corrugated polycarbonate panel. Polycarbonate Panel Life depends on their quality. A roofing sheet can last from several weeks to several months or even a lifetime. Research from leading manufacturers, highly recommended and positively rated panels should be able to help you find strong and durable roofing sheets.
 First things first: make sure you have all the necessary equipment for security. If you work high, it is best to have a harness and fishing line. Always exercise extreme caution when walking on the roof; matching shoes are also needed. Never walk or apply your weight directly to the sheet.
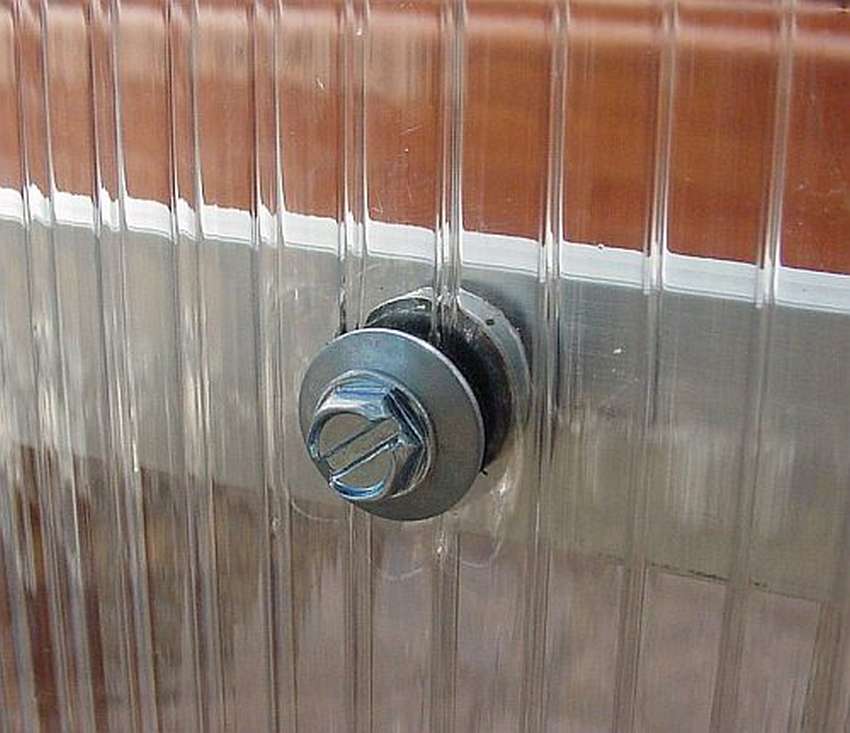
Polycarbonate corrugated sheets require minimal 5 degree tiltthat provides a drain of water. The run interval for corrugated sheets is 800 mm for final spans, and for medium - 1000. For Greca sheets, 900 mm for final spans and 1200 mm for medium spans are required. When installing under the gutter, use a return duct with profiled filling strips.
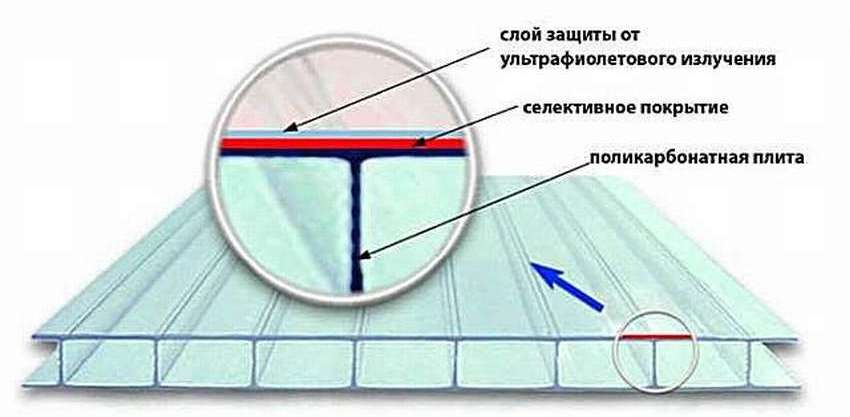 When you start installing sheets, the first thing you need to do is find stickershowing which side of the sheet is facing the sun. This is required since only one side of the sheet UV protected. The life of the sheet can be shortened and discoloration may occur if the exposed side is exposed to the sun.
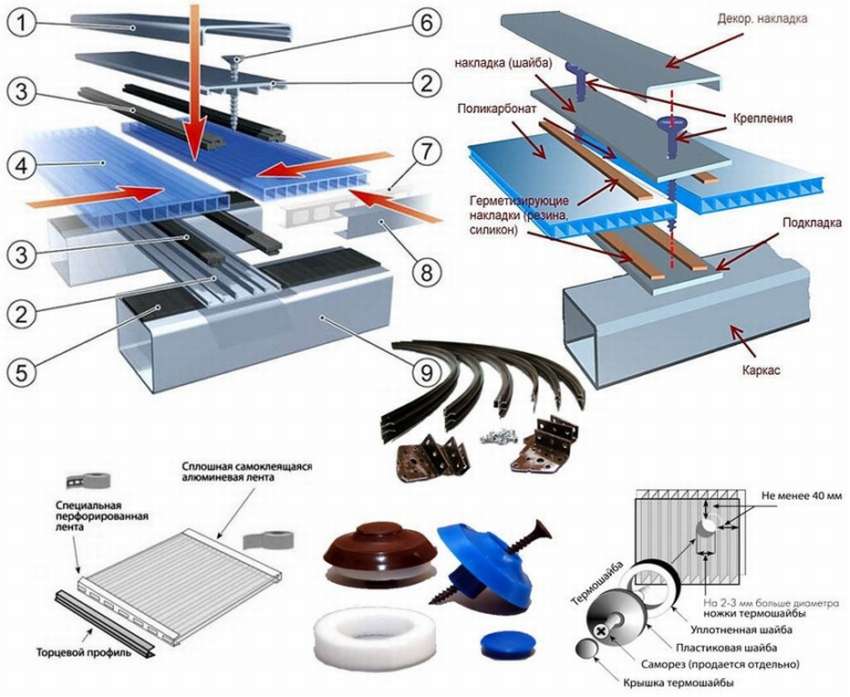 To begin installation, first lay out the bending tape over the rafters, to prevent extensions. Then cut the sheets to fit. Polycarbonate sheets can be easily cut with scissors, a thin gear saw or circular saw with a cutting blade suitable for plastic.
Polycarbonate sheets naturally move with temperature, so you need the right mounts to make this happen without a problem. Polycarbonate screws previously make the hole wide enough for such an extension. This prevents bending of sheets. The large rubber on the screw also seals the sheet and prevents water from entering the roof. It is important that your fasteners go through the corrugation. You must use a hex drill.
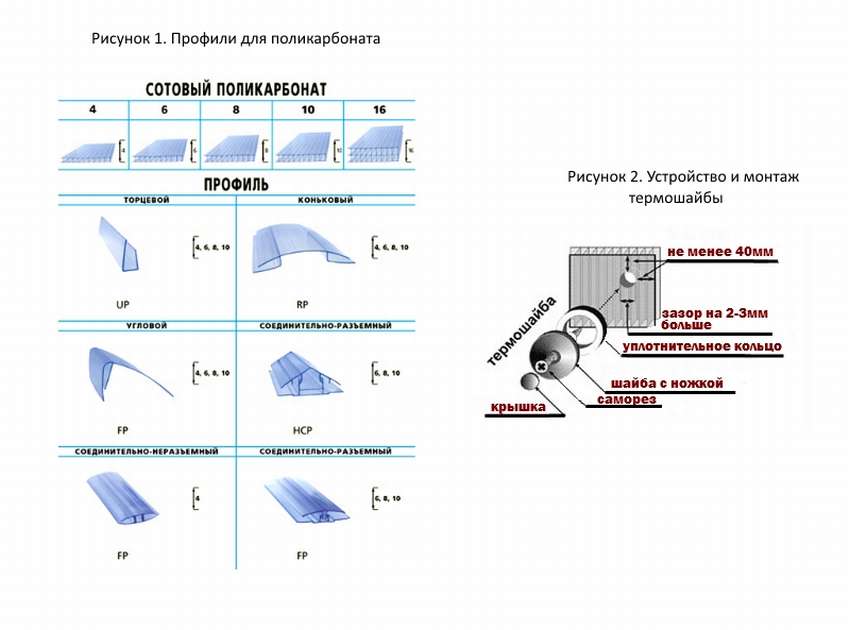 The best thing tighten fasteners tight enoughso as not to rattle. But you should be aware that overtightening can lead to distortion and excessive tension, which can lead to breakage of sheets. Also use only branded mountsrecommended by the manufacturer, as they are compatible with the polycarbonate roof of this brand.
The gallery presents short instructions collageswhere you can floorto learn a lot of useful information, from the structural specifics of polycarbonate to the use of docking one-piece profiles. Everything is clear and intelligible.


https://i.expert-h.com/en/parniki-teplitsy/1118#sigFreeId0ace084a5d
Polycarbonate greenhouse with automatic ventilation
 Here you will learn, not only how to assemble a polycarbonate greenhouse with your own hands, but also how to install the system automatic ventilation. Simple concept, the solar panels are directly connected to the fan, the sun goes out, the fan turns on. The author installed 2 sets of solar panels (shown in the photo), directly connected to a 12-volt fan for air circulation in the middle of the room. The fan is mounted above the box, which is embedded in the floor of the 2x12 board, open from the outside. It is fixed with two bolts to a 4x4 bar 3.5 meters long to the retaining wall next to the greenhouse and solar panels attached to it.
In general, if you want to know the details, a link to the site of the author of this project is under the gallery. By the way, there are some more useful tips. hydroponics.


https://i.expert-h.com/en/parniki-teplitsy/1118#sigFreeIdb65a02bc16
DIY greenhouse
 Example, how to make a polycarbonate greenhouse with your own hands, from automatic support for optimal air temperature. This is achieved through the installation of simple equipment, which includes thermal drives. The principle is simplewhen the temperature rises in the greenhouse, expansion of the fluid occurs in the thermal actuator and the retractable rod opens the window. You just have to follow the process, check that the mechanism works. How to make such automation, read the instructions on the author’s website, see step by step photos below.


https://i.expert-h.com/en/parniki-teplitsy/1118#sigFreeIdbfeb295649
Octagonal greenhouse
If gardening is your hobby and you want to build something beautiful for the garden, then here is a great example, how to make a beautiful polycarbonate greenhouse, which will surely become a landmark of your garden or summer cottage.
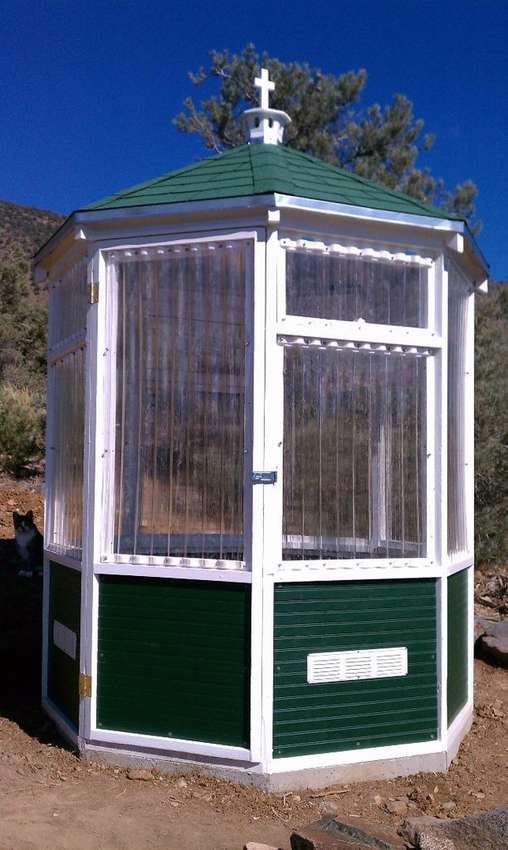
 It was just an experiment, so the author wanted to minimize costs, since gardening is his favorite pastime. If you liked it, detailed instructions on the site, see step by step photos below, the author was not too lazy and tried to display each stage in great detail.


https://i.expert-h.com/en/parniki-teplitsy/1118#sigFreeId89f94c6c52
DIY polycarbonate greenhouses 200 photos


https://i.expert-h.com/en/parniki-teplitsy/1118#sigFreeIda401d10169
50+ greenhouse pics
Below you can view the gallery of greenhouses with an opening lid, which you can do yourself. We collected photos from all over the Internet, below we indicated the sources from which we could determine the authorship.
-

-
-
-
-
-
-
-
-
-
-
-
-
-
-
-
-
-
-
-
-
-
-
-
-
-
-
-
-
-
-
-
-
-
-
-
-
-
-
-
-
-
-
-
-
-
-
-
-
-
-
-
-
-
View the embedded image gallery online at:
https://i.expert-h.com/en/parniki-teplitsy/1118#sigFreeIdc5beefab98
https://i.expert-h.com/en/parniki-teplitsy/1118#sigFreeIdc5beefab98
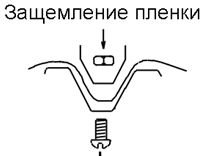
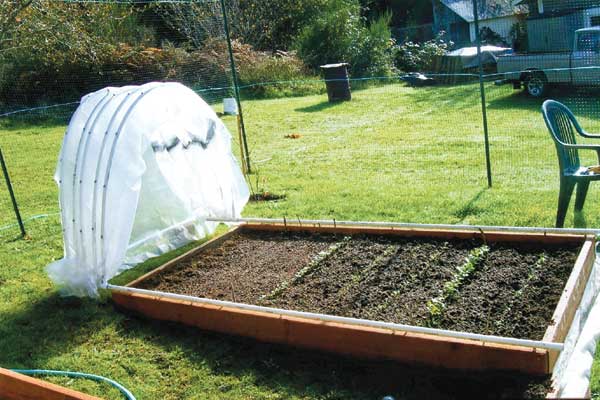
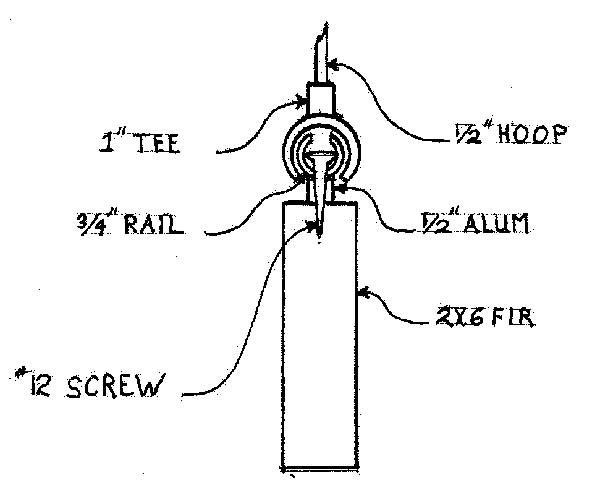
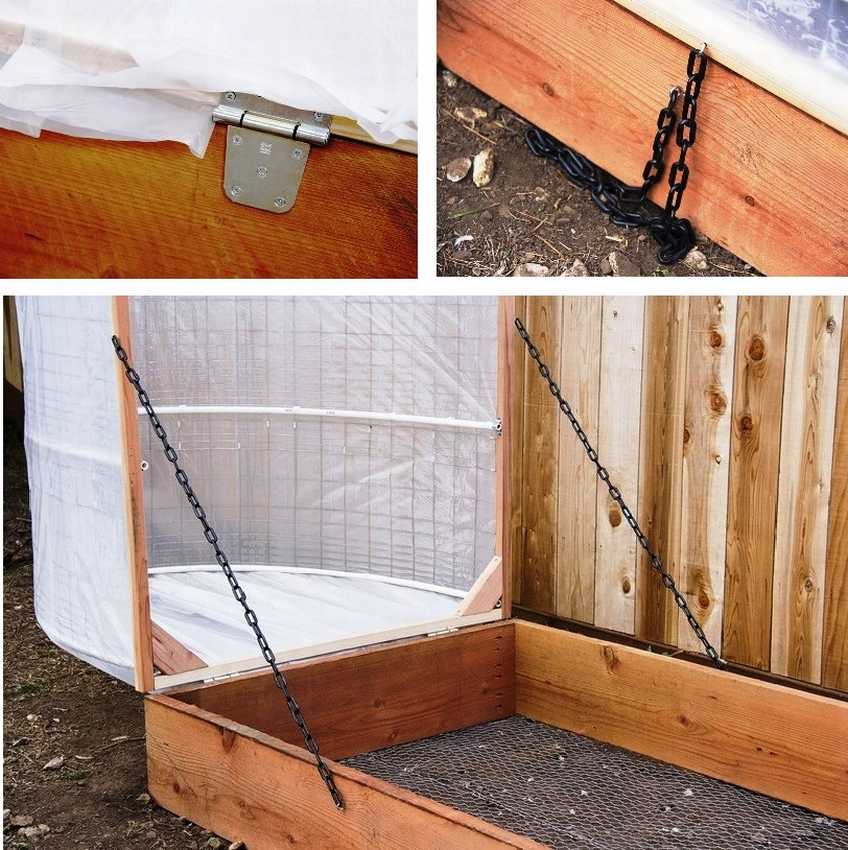
Mounting Methods
How to fix the opening greenhouse cover
|
Here is one reliable way.
|
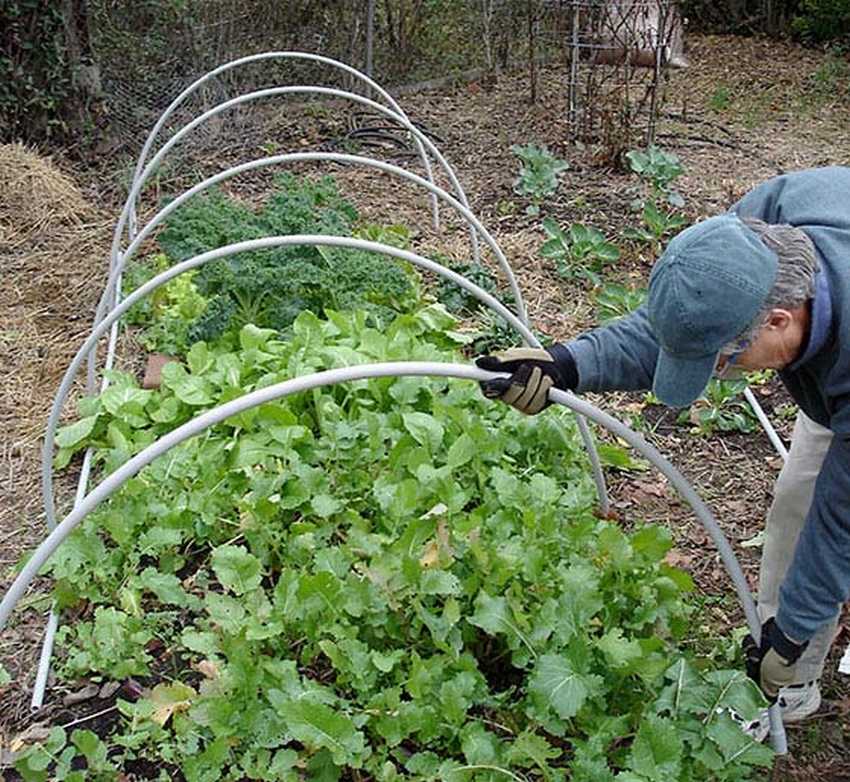
How to fix arches or PVC pipes of a greenhouse under a film
|
Clamps |
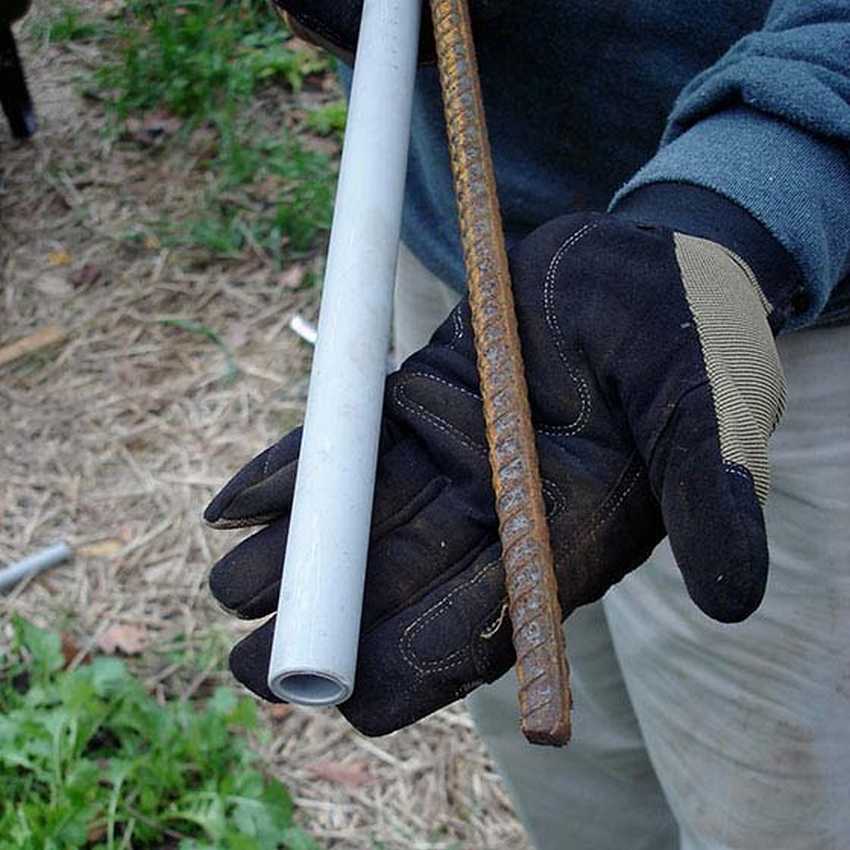
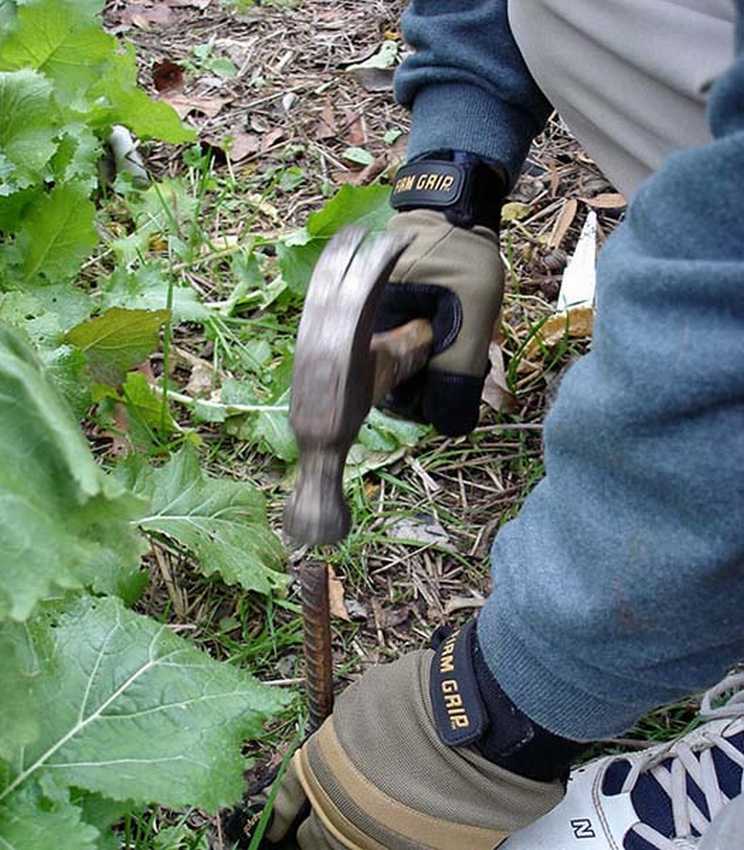
Insert into the ground The method consists in the fact that we are installing PVC pipes on fittings driven into the ground. Instead of reinforcement, wooden rods can come off (enough for a season) Click on the photo to enlarge
|
How to fix a film in a greenhouse
|
Hose lengths
|
 |

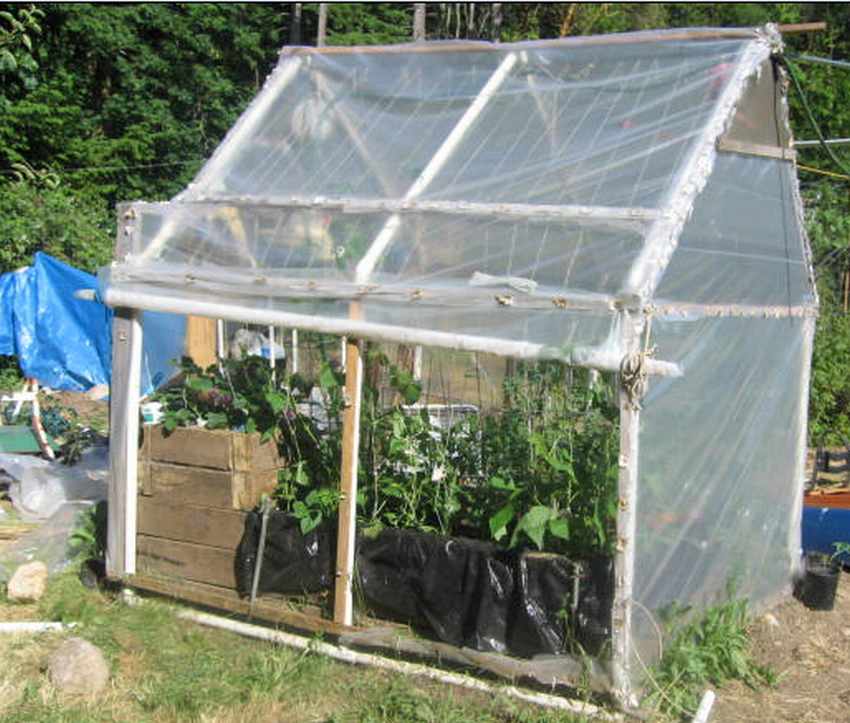
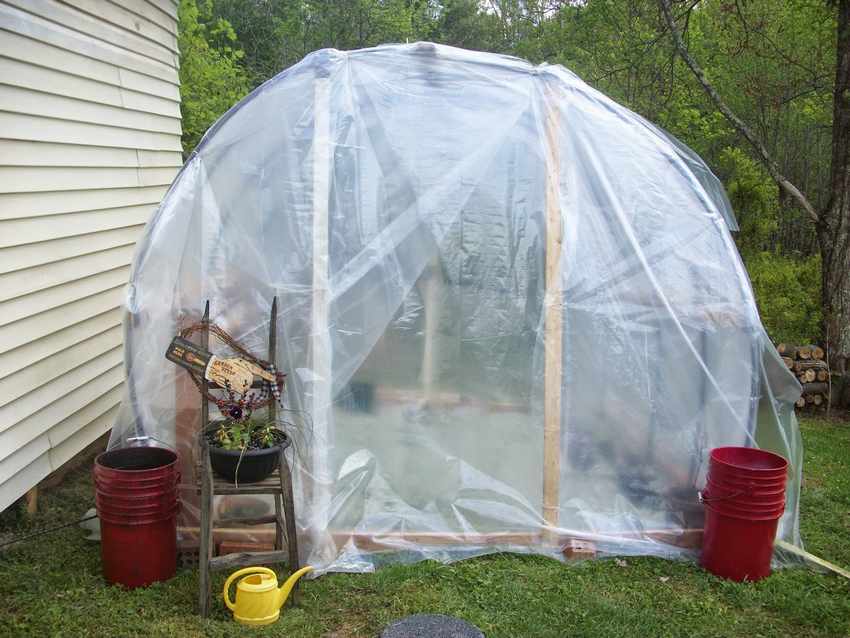
The easiest PVC pipe greenhouse

Very simple greenhouse design. Easy to assemble, and just as easy to disassemble. It can be moved, increased, reduced.
It is cheap and easy to manufacture..
ADVISE this greenhouse
Step by step photos. Click on them

https://i.expert-h.com/en/parniki-teplitsy/1118#sigFreeIdfca49e1727
How to make a greenhouse from willow or cedar branches.
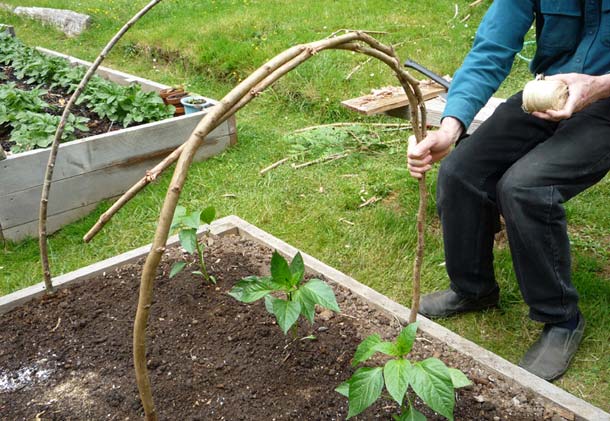
Such a greenhouse is suitable for those who did not expect sudden frosts.
This mini greenhouse can be done in 45 minutesaccording to the author of the photo. 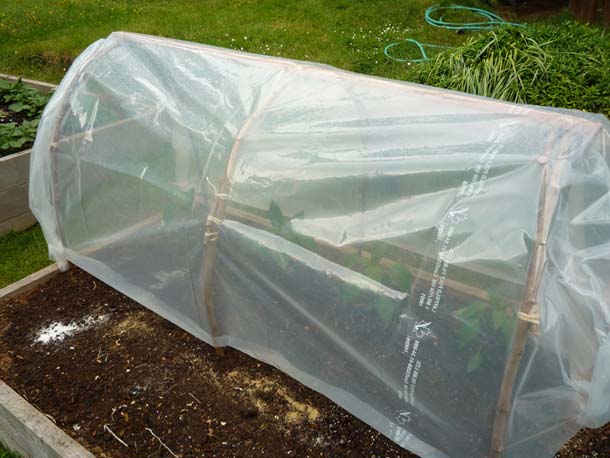
For the manufacture of arcs, not PVC pipes were used, but cedar branches, but I think that willow branches will come down in our conditions. The branches are interconnected by a nylon thread (not fundamentally what) to give an arcuate shape. When arcs from branches are stuck in the ground, a bar is attached over them, to give one damage, which is also attached to each arc.
In order to transfer such a greenhouse to another place, the author advises putting two long bars along the base of the arcs, then link each arc to these bars. As a result, we get something like a stretcher. Taking such stretchers from both ends, it is quite easy to pull our greenhouse out of the ground and move it to another place.
Below you can see step-by-step photos, to enlarge, just click on them.
-
-
-
-
-
-
-
-
View the embedded image gallery online at:
https://i.expert-h.com/en/parniki-teplitsy/1118#sigFreeIdfec62abad9


https://i.expert-h.com/en/parniki-teplitsy/1118#sigFreeIdfec62abad9
Telescopic greenhouse or greenhouse
And here is a very interesting variation of a telescopic greenhouse or greenhouse. I moved the arcs and nothing interferes, below you can see the mounting mechanism, click on it to enlarge.
DIY Convertible Hotbed
See step-by-step photos of making such a greenhouse. De firstwe bury the soil tray, then we make a frame on which we will fix the arcs, and which will recline. Then we fasten this frame to the pallet on the hinges and cover with a film.
Step-by-step photo of manufacture.
Click on the gallery to enlarge
-
-
-
-
-
-
-
View the embedded image gallery online at:
https://i.expert-h.com/en/parniki-teplitsy/1118#sigFreeId967c9b6600


https://i.expert-h.com/en/parniki-teplitsy/1118#sigFreeId967c9b6600
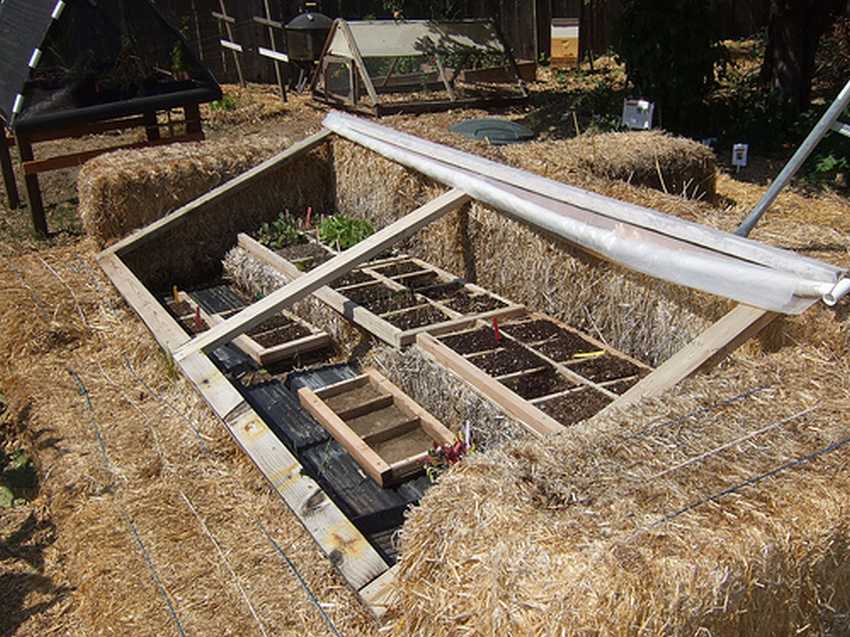
A greenhouse made of straw or hay.
As we see in the photo there is a greenhouse whose walls are made of briquettes (or bales) of straw (hay). A frame with an opening top is simply piled on the walls of straw. The film rolls onto a bar. These greenhouses are usually directed south. Such a design helps well when the slope of the soil in your area is directed to the north side, in such cases the sun weakly heats the earth. Such a greenhouse will help you out in this situation..
Greenhouse to collect water
(Roots Up Dew Collector Greenhouse System)
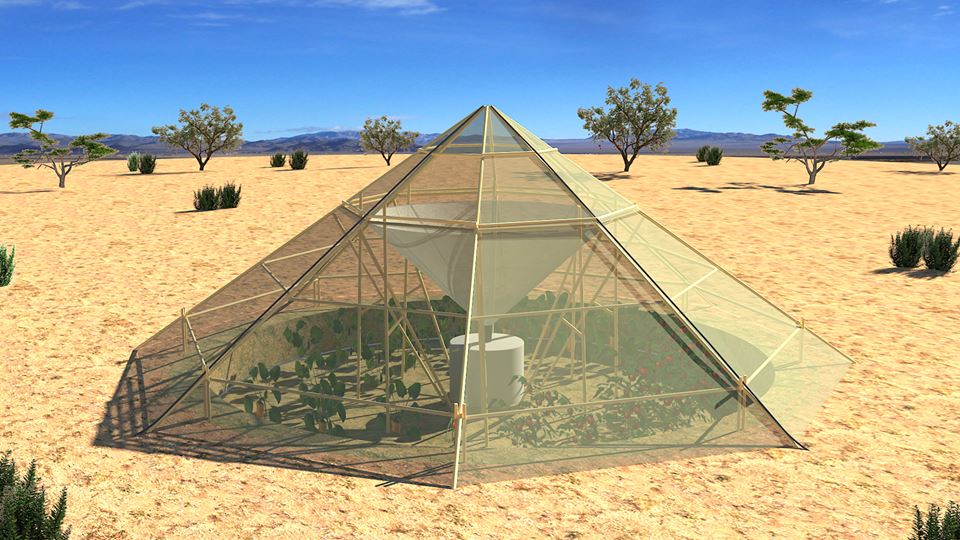 In a day, the greenhouse condenses to 80 liters of water !!!
Thanks to such greenhouses, Ethiopia will soon flood the world with food. The greenhouse was created for arid countries to solve the problem of drought.
In the afternoon, steam accumulates in the upper part of the greenhouse. When night falls, special valves are opened for intake of cold air, thanks to which water vapor is cooled and condensed, after which the liquid enters a special storage tank.
Excess water left after watering can be used for drinking.
-
-
-
-
-
-
-
View the embedded image gallery online at:
https://i.expert-h.com/en/parniki-teplitsy/1118#sigFreeId5e342fb7f8


https://i.expert-h.com/en/parniki-teplitsy/1118#sigFreeId5e342fb7f8
Portable greenhouse (greenhouse) from a barrel
Easy and simple to make (45 minutes)
This portable greenhouse is suitable for growing seedlings, or plants such as parsley, cilantro, etc.
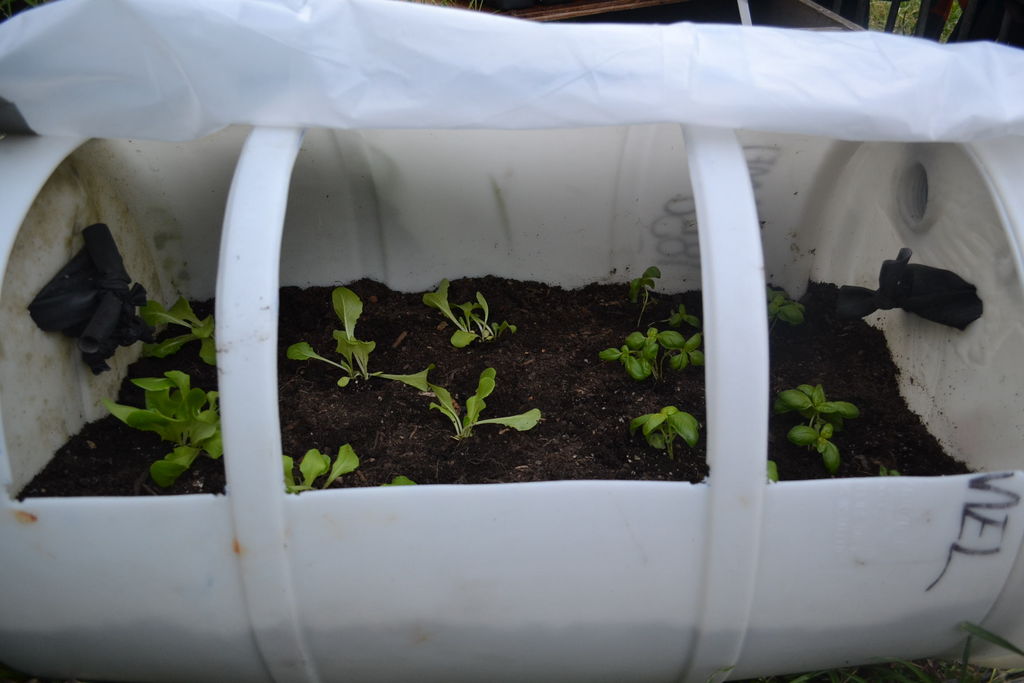
- 2 photos - cut square holes with a jigsaw in 1 quarter of the circumference of the barrel.
- 3 photos - a hole with a drill so that a jigsaw could be inserted.
- 4 photos - holes in the bottom to drain water from the drainage.
- 5-6 photos - attach the handles on the sides for transfer.
- 7-12 photos fasten the film.
- 14 photos - drainage.
The greenhouse can be painted green to blend in with the landscape of the cottage
-
-
-
-
-
-
-
-
-
-
-
-
-
-
-
-
View the embedded image gallery online at:
https://i.expert-h.com/en/parniki-teplitsy/1118#sigFreeId588bd29eff


https://i.expert-h.com/en/parniki-teplitsy/1118#sigFreeId588bd29eff
Portable film greenhouse
As you can see from the photo, the greenhouse has a lightweight version. It does not have a massive base; it is attached to the ground by reinforcement fixed on the base. It is transported as on a stretcher with the help of two long boards pinned to the base. A gardener will come in handy when it becomes necessary to close some weak plants at the time of cooling.
Greenhouse butterfly
How to do automatic opening window leaves in a greenhouse?
Very interesting and simple design to automatically open the window, depending on weather conditions. The principle is as follows. A tube in the form of a communicating vessel passes between the large (3l) and small (0.5l) cans. A large jar is suspended from the base of the greenhouse, and a small one from the window. Moreover, the small one must be balanced with the window in such a way that, with a minimum amount of water in it, the window must be closed. In a hermetically sealed large jar with increasing temperature in the greenhouse. water due to atmospheric pressure moves into a small can, opening the window
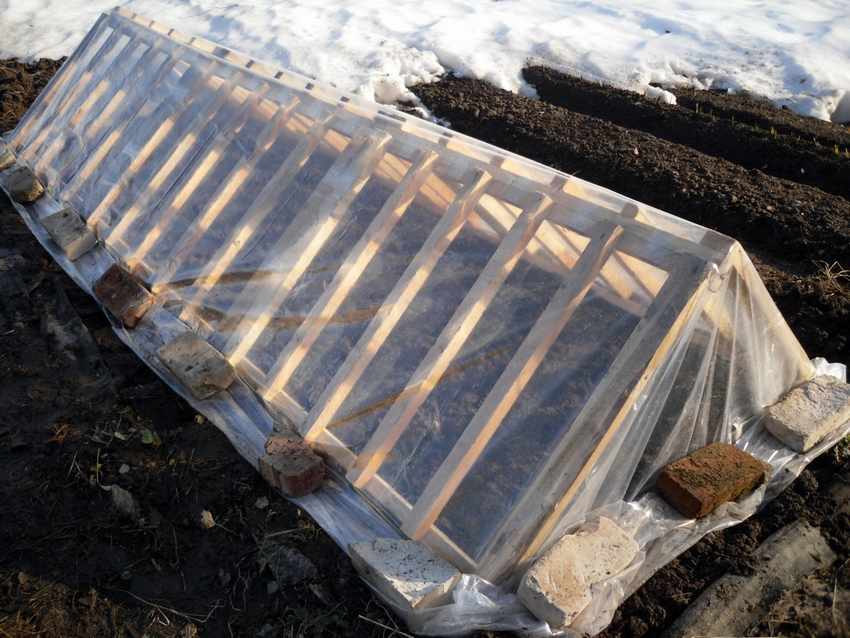
A simple version of the greenhouse side opening.
As you can see, a very simple design of the film greenhouse. Such a greenhouse can be easily moved and put into a new place.
Dome greenhouse from scraps of pipes
it's ugly but it works
 The authors of the blog booth555.com moved to a new home, and they had to independently sew themselves. As a result, they left a lot of pipe scraps, and they were used by an enterprising young family to create this greenhouse. The advantages of these pipes are that they are easy to bend and at the same time they are stable and easy to pin.
See step-by-step photos of creating a greenhouse.
-
-
-
-
-
-
-
-
-
View the embedded image gallery online at:
https://i.expert-h.com/en/parniki-teplitsy/1118#sigFreeId2d1e4b1eb3


https://i.expert-h.com/en/parniki-teplitsy/1118#sigFreeId2d1e4b1eb3
As I understood from the translation of the article from English, the pipes are attached to the wooden cross-pieces using tape. I didn’t really understand about the film, somehow the film scraps were fastened together, the cord was most likely threaded into the holes, and there is also a hint for 6 photos.
The film below is pressed to the ground by bricks, this makes it possible to pull the film up on hot days.
I could not translate the purpose of the star (in 4 photos), but suggested that it was attached to the dome to make the structure more stable.
Write your star assignment options in the comments.
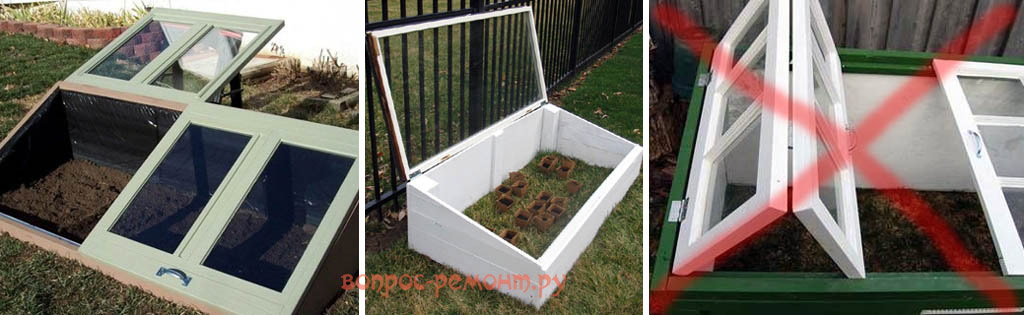
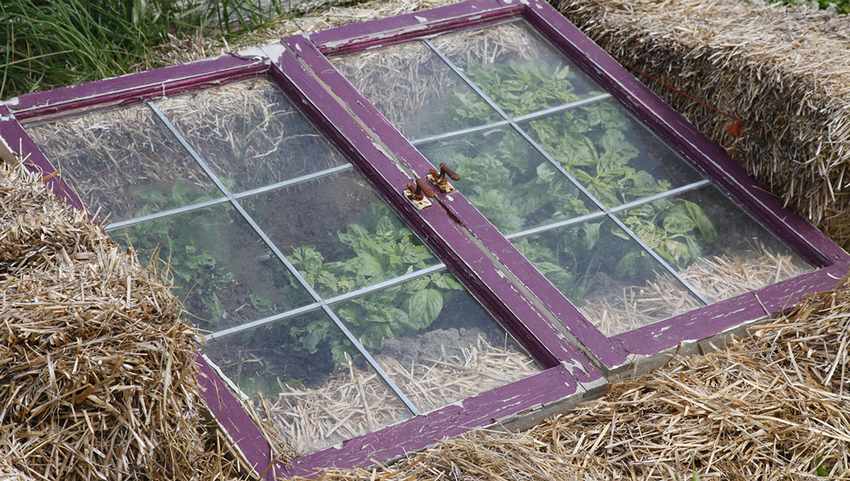
Greenhouse from a double-glazed window or frames
The author of the doorgarden.com blog made here such a recumbent greenhouse from a glass door (double-glazed window), into which a stone from a lawn mower accidentally fell.
According to the author, such a hotbed allows him to collect greens for salads in January, well, America, I can’t say exactly what kind of staff it is.
See the drawing of this greenhouse. Everything is very simple. As we see from the photo, the double-glazed window is not attached to any hinges, it just lies, resting against the side board from slipping.
The double-glazed window can be replaced with any large glass or window frame.
-
-
-
-
-
-
View the embedded image gallery online at:
https://i.expert-h.com/en/parniki-teplitsy/1118#sigFreeIdd949a42e36


https://i.expert-h.com/en/parniki-teplitsy/1118#sigFreeIdd949a42e36
In summer, in hot weather, when there is no need for such a greenhouse, it can be thrown on strawberries to protect the berries from birds.
Attention!!! An important point about greenhouses from window frames
Whatever frames you have at your disposal, you need to make the transparent roof folding (lifting up), and not hinged or folding, as on the right in Fig. Through any vertical gap, all the warm air will instantly disappear and the plants will hitby the boat, and the horizontal can be adjusted with supports according to the weather and local conditions.
What should be the inclination of the greenhouse cover ???
Note: the optimal slope of the roof slope of a single-pitch greenhouse from the vertical (90 degrees) –φ, where φ is the geographical latitude of the place; and (90 degrees) –φ is the angular height of the Sun at noon of the spring / autumn equinox. See below for a greenhouse with a heat accumulator.
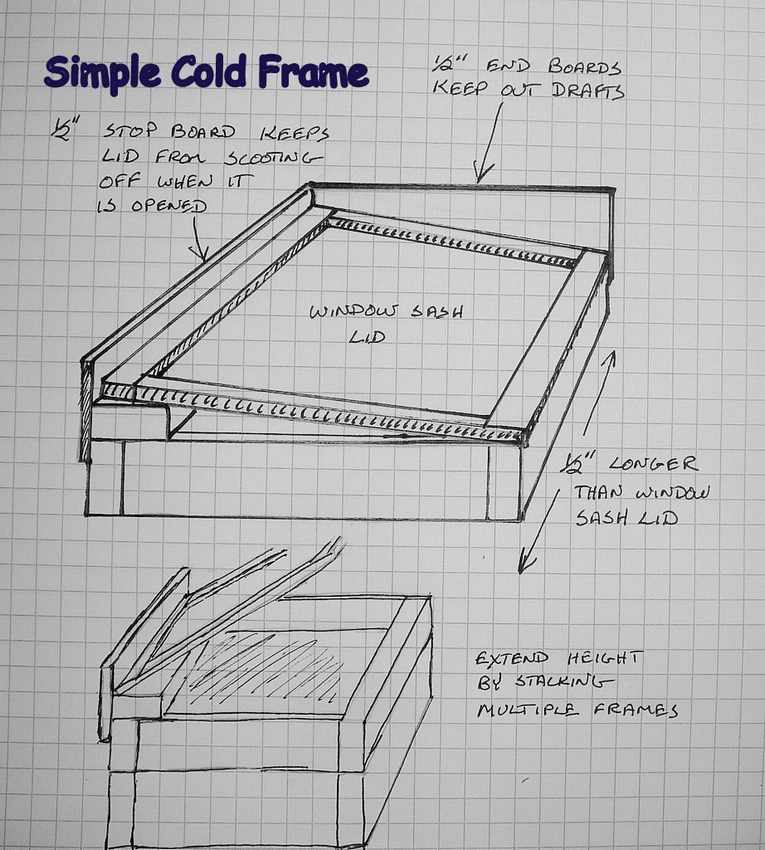
Cold greenhouse. (drawing diagram)
Do it yourself
The greenhouse consists of a wooden frame and a glass lid. The glass of the lid should always be inclined to catch as many rays of the weak winter sun as possible.
The author claims that even in winter in sunny weather, this greenhouse can heat up to very high temperatures, so the lid must be able to open upward. In order to regulate the temperature, a thermometer must be placed in the greenhouse (see photo 5), and it should also be a mechanism for fixing the open cover at different angles was made (see photo 4).
Vegetables that can be grown in the early winter in a cold greenhouse
BUT, nevertheless, the main secret of such a greenhouse is not in its arrangement, but in the plants grown in it. These should be plants that easily tolerate cold. According to the author's research, five crops: spinach, green onions, mache, claytonia, and carrots can be successfully grown in the northern states of the USA. As well as arugula, Escarole, Mizuna, parsley, sorrel, European salad, mustard, spinach and turnips.
The author sows vegetables usually from mid-August to mid-September.
-
-
-
-
-
-
View the embedded image gallery online at:
https://i.expert-h.com/en/parniki-teplitsy/1118#sigFreeIdc6a1d9f617


https://i.expert-h.com/en/parniki-teplitsy/1118#sigFreeIdc6a1d9f617
My advice: make a cardboard sheet glued on one side with foil. At night, you can cover the greenhouse with this foil, which will reflect the heat coming from the earth back into the greenhouse.
Window frame and hay greenhouse
Greenhouse (greenhouse) IN plastic bottle
or "How to grow seedlings if the apartment is cold"
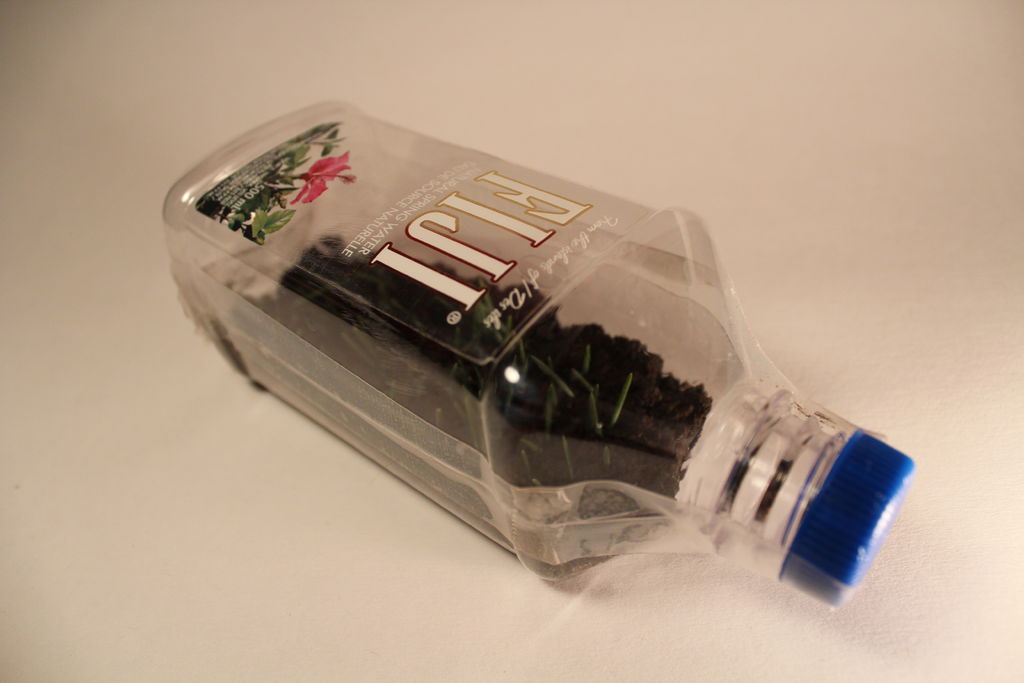 It often happens in our domestic apartments that for growing seedlings the room is not warm enough. Such a greenhouse in a plastic bottle can serve as a way out of this situation.
When sunlight enters such a greenhouse, the air in the greenhouse begins to heat up and remains warm for a very long time, even after sunset.
An important plus will be high humidity inside the bottleand, which will be created by heating pre-moistened soil. Such humidity significantly accelerates the process of seedling maturation.
The manufacturing process is simple.: Cut the bottle, rinse, place the soil with the seeds inside and seal it tightly with tape.
-
-
-
-
-
-
-
-
-
-
-
-
View the embedded image gallery online at:
https://i.expert-h.com/en/parniki-teplitsy/1118#sigFreeId2ec7d391ec


https://i.expert-h.com/en/parniki-teplitsy/1118#sigFreeId2ec7d391ec
How to do quick DIY greenhouse
Greenhouse made of wooden trellises
Advantages of such a greenhouse:
- - quickly build
- - is steady
- - easy to manufacture
Minuses:
- not suitable for tall plants, you can use for growing early greens and seedlings.
Russian in-depth greenhouse on biofuel
About Russian pits
The simplest greenhouse is a single-pitch greenhouse, recessed into the ground, with biological heating. For its construction choose a dry, well-lit and sheltered from the winds place. It is desirable that this was a low slope with a direction to the south. To protect the greenhouse from the wind, green spaces, fences or special reflective screens that are arranged on the north side can serve. Particularly convenient are swivel flat screens painted with white paint, which allow maximum use of solar energy. Illumination with reflected light increases the temperature in the beds by 2-3 °, which is equivalent to transferring your site, for example, from the Moscow region to the black earth regions of the country: Lipetsk or Voronezh.
Note: you can use any flat panels glued with aluminum foil for baking.
Construction begins with a strapping device around the perimeter of the greenhouse of four sanded logs with a diameter of 10-14 cm. The north side of the strapping should be slightly higher than the south. On the south side in the harness, a groove (quarter) is selected to support the frames.
At one time, the Russian greenhouse was a revelation to European farmers. It was from the “Russian pits” that the nobility of the time received in the winter a green onion, lettuce, dill, parsley, radish, and strawberry.
The foundation pit is dug to a depth of 70 cm. In cross section, it has the shape of a trapezoid. In dense soils, the walls can not be fastened, and in loose and floating soils, fastening with horizontal boards is used. To ensure that the greenhouse is not washed away by rain, a drainage groove is arranged around it, which can be closed with wooden shields that facilitate approaches.
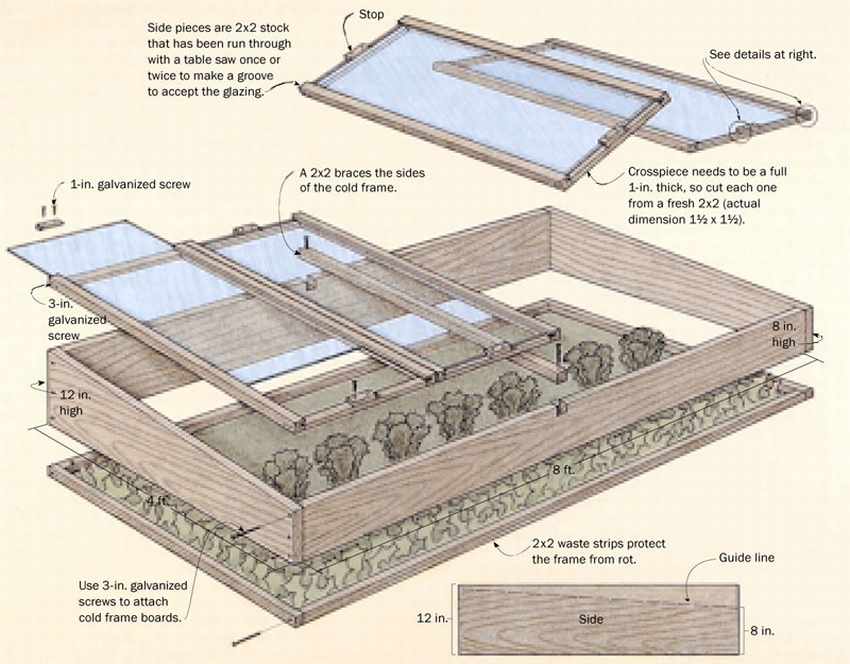
Frames for the greenhouse are most convenient in the size of 160x105 cm. They are made of 6x6cm bars, joined for strength with wooden studs, and then properly stained with weather-resistant varnish PF-166 ("6 = s"). Glass reinforced with putty or glazing bead. To drain rainwater in the lower bindings, grooves are cut.
Biofuel in greenhouses is horse or cow dung.. Horse is considered the best, it gives more heat. Harvest it in the fall. Manure is collected in piles and carefully insulated on all sides with straw, sawdust, peat and covered so that the manure does not freeze. In the spring, before stuffing the greenhouse, it is transferred to another, more loose pile and warmed up. To do this, make several holes in it and pour a bucket of hot water into each, after which the stack is covered with burlap or matting. In two to four days, when the manure warms up to a temperature of 50-60 °, they fill a greenhouse. It is laid colder at the bottom, and hot from above and from the sides. After precipitation, after two to three days, a new portion is added. The manure must lie loose, and only at the walls it is necessary to slightly compact it so that voids do not form.
Greenhouses - pits were usually made 3-4, which ensured year-round use: while 1 pit was heated after refueling, the rest gave production. An indispensable condition for the successful operation of the Russian greenhouse is the stroke of the entire complex with a clay castle with a drainage ditch, otherwise the biofuel will become acidic.
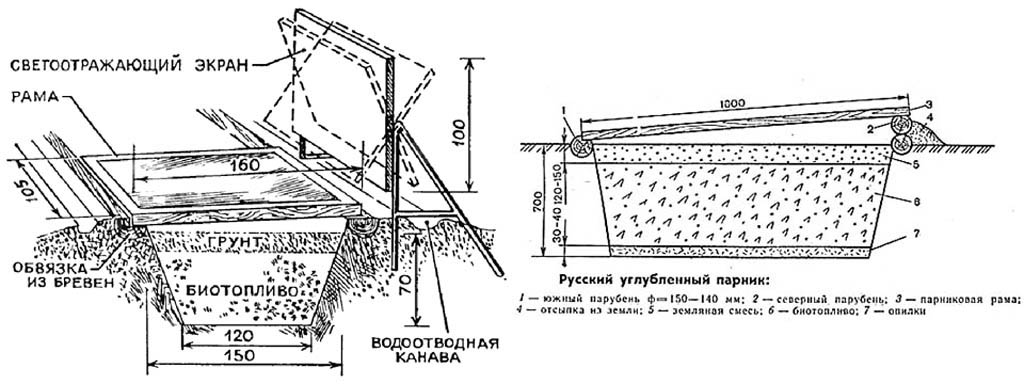
Click on it to enlarge it.
After stuffing the greenhouse pThey are covered with frames and mats made of matting, straw or burlap. From above, on heated manure, soil is poured - garden or sod soil, compost or fertilized peat. An average of 0.2 cc per frame. m of land. Exceeding this amount is not recommended, since under the weight of the earth manure is compacted, air flow is hindered to it, and it ceases to burn. For the same reason, do not over-moisten the soil.
A greenhouse of even such a simple design will make it possible to grow vegetables much earlier than expected.
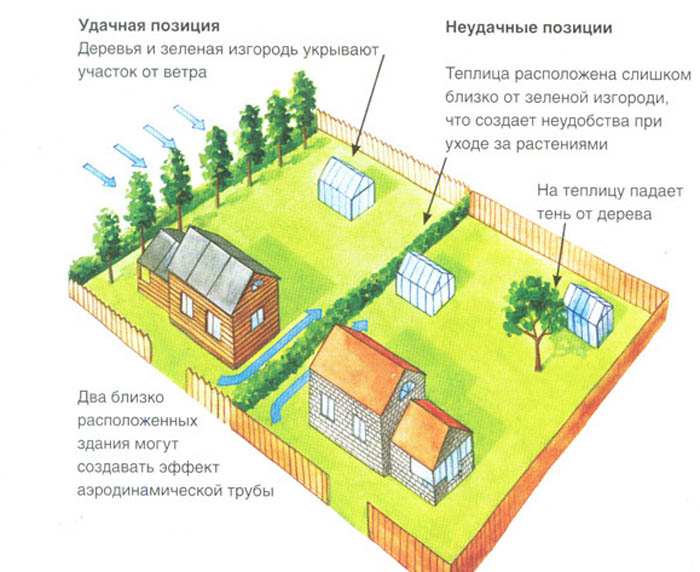
Greenhouse layout
where it is better to put a greenhouse on the site
Hello, I am the author of this article, so I look forward to asking questions for this article in the comments below, I will answer all !!!
If you have questions on another topic, ask them on our forum, we will answer you
- Two baskets of paper in 5 minutes (Master class)
- How to make a simple and compact table for a milling cutter from plywood
- How to make a soft headboard tile (Instructions + step by step photos)
- Cinder block benches: a convenient bench in 55 minutes
- How to make a bed with a niche: saving space (Master class)