Birdhouse ideas for birds. Do it yourself. Drawings + Dimensions
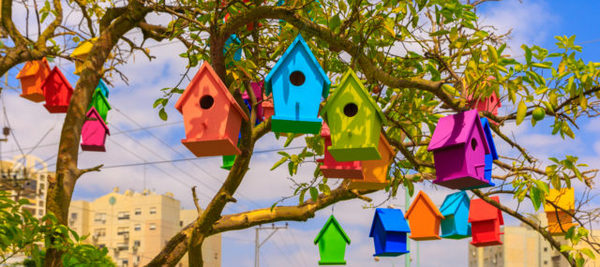
 ideas for birdhouses
The world of birdhouses is divided into two parts: cute, decorative, often bizarre creations that people like. Such birdhouse for school competition will be perfect. And the second part is functional nest boxes that the birds will actually use. Therefore, birdhouses are compared depending on how well they will serve as a house for most of the small birds that live in our gardens.
Below are presented birdhouse ideas for birds with drawings and sizes, as well as safety tips on where and how to install a birdhouse and some examples with step-by-step photos on making the most popular types of bird houses.
Original Birdhouse Ideas
Unusual birdhouse do it yourself
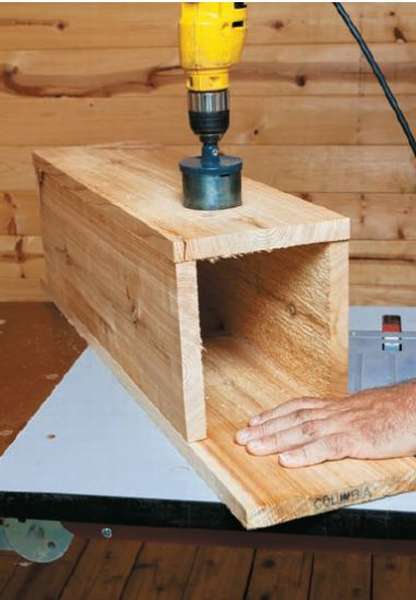
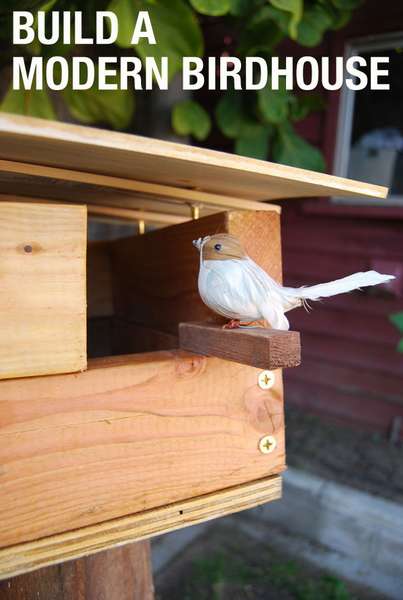 This is a project for those who are looking for interesting solutions and unusual birdhouse ideas. What is most attractive in this design, that you will probably find all the materials in your home workshop, well, unless you need to add a couple of details so that the birdhouse acquires a modern style. Do not be afraid to remake this design as you would like, just stick to the dimensions so that the residents of this house are comfortable.
Materials:
- 8 bars 2 × 4 25 cm each
- 1 sheet of plywood or board 45 × 50 cm for the roof
- 1 sheet of plywood 30 x 30 cm for the base
- 30 screws
- 1 small hinge
Tools:
- drill
- wood glue
- roulette
- sealant or paint
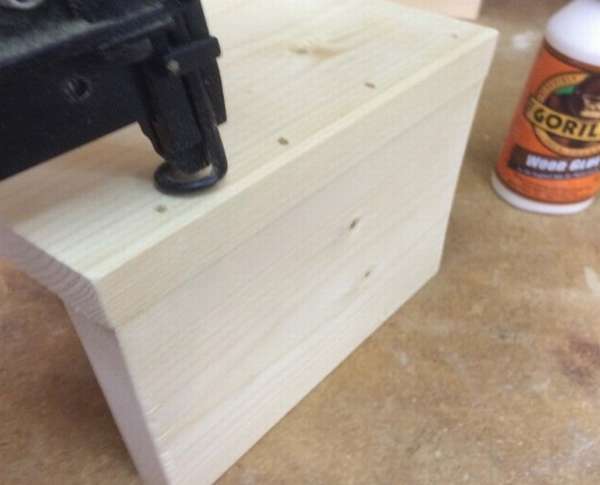
How to assemble this stylish house, look at the step by step photos.
Some comments:
- You can make two or three levels of bars, it depends on the type of birds that you are going to attract, and of course on the size of the source material.
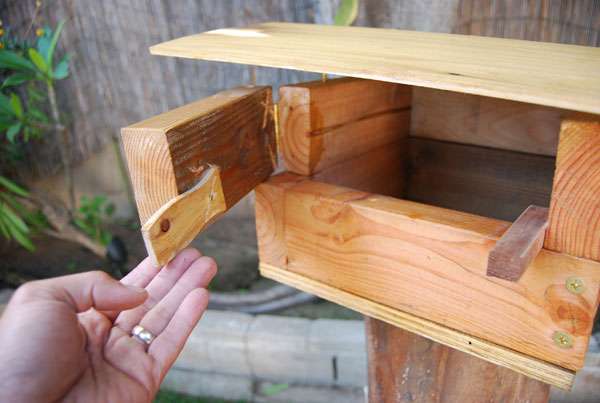 Make sure that the roof completely covers the edges of the birdhouse. In this case, I had to fix two pieces of wood, but it is better that the roof was solid. Install the roof at an angle so that it not only looks beautiful, but also provides a drain of water.
- Attach the base to the sides with glue and screws from below.
- To conveniently open the door, do not forget to make a wooden shutter, as shown in the photo
- Use waterproofing sealant or paint the birdhouse, then it will last more than one year.


https://i.expert-h.com/en/skvorechnik/1030#sigFreeId9e3837f111
An interesting idea for a birdhouse
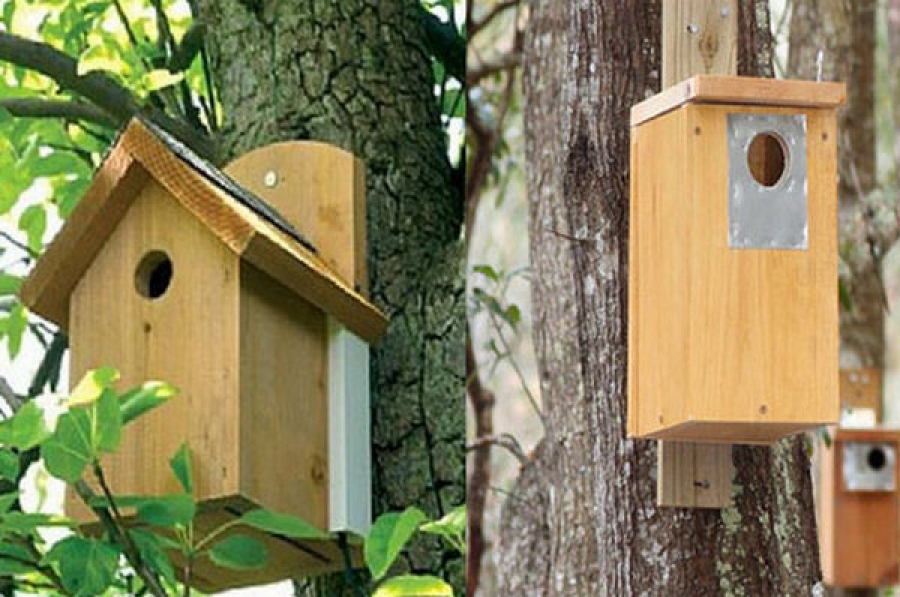
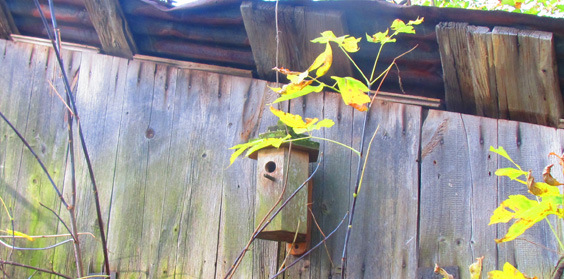
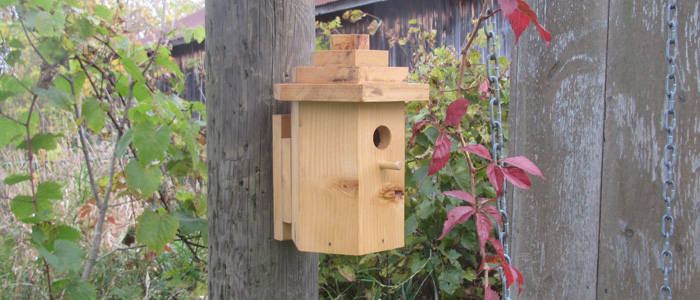
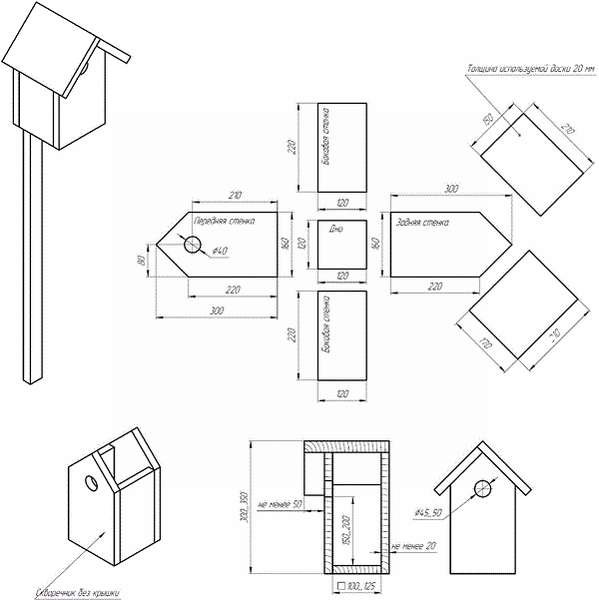
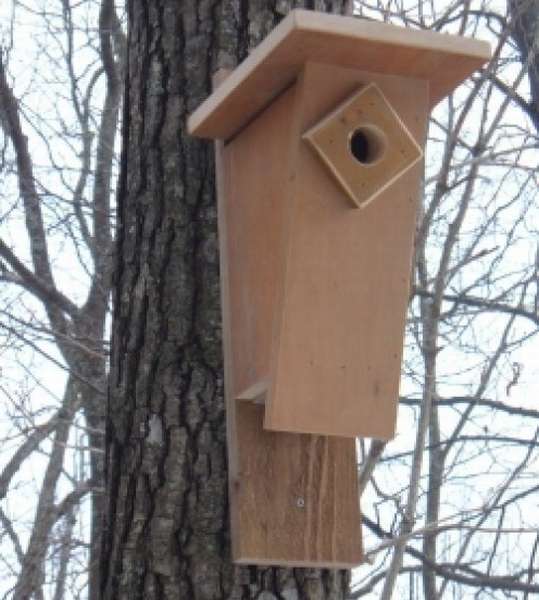 In this case the front front wall is tilted, which, by the way, is very correct. So the bird is much more convenient to climb to the exit. A large roof creates protrusions along the front and sides to protect the birdhouse from rain. One of the most important elements is the size of the inlet. If the size of the hole is too large, the birds can be replaced by more aggressive relatives.
How to assemble such a birdhouse, shown in the diagrams.
Short instruction.
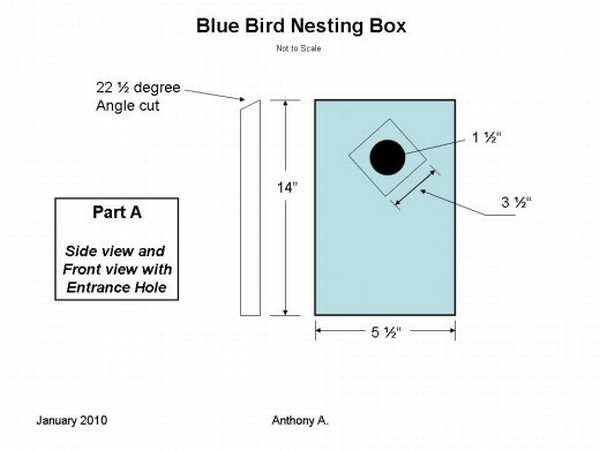
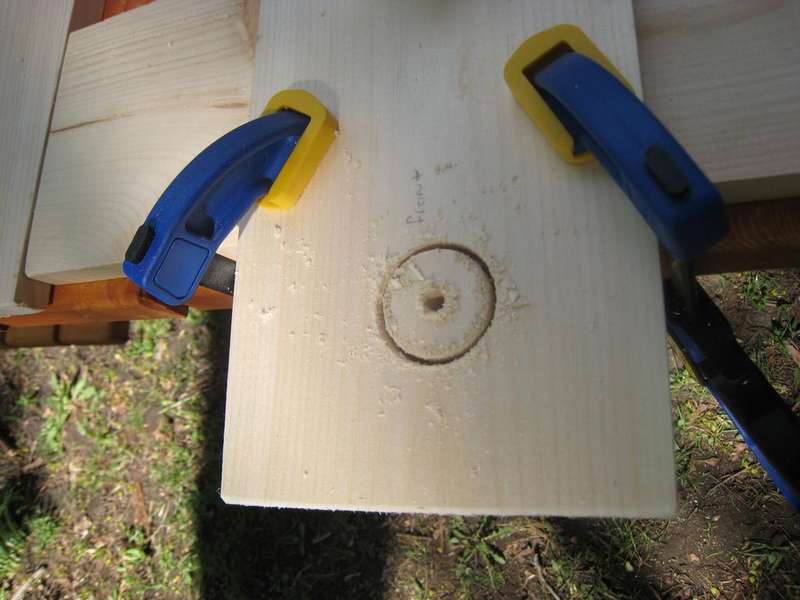
Cut a 22-degree bevel at the top, it will set the angle of inclination of the birdhouse and correspond to the angular section for the side parts.
Measure 28 cm from the bottom edge, centering the inlet to the width of the front section.
Lay out the angle of the side parts.
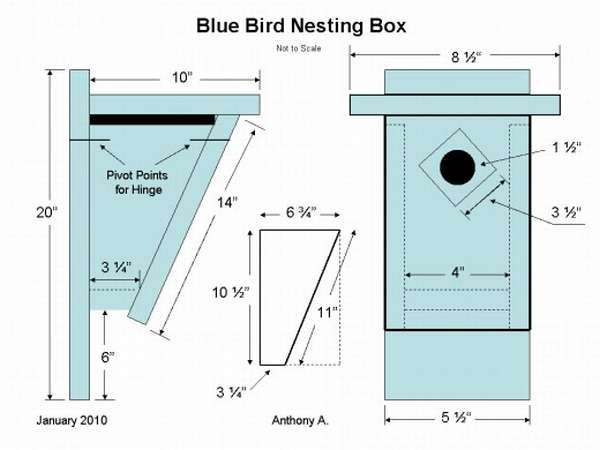
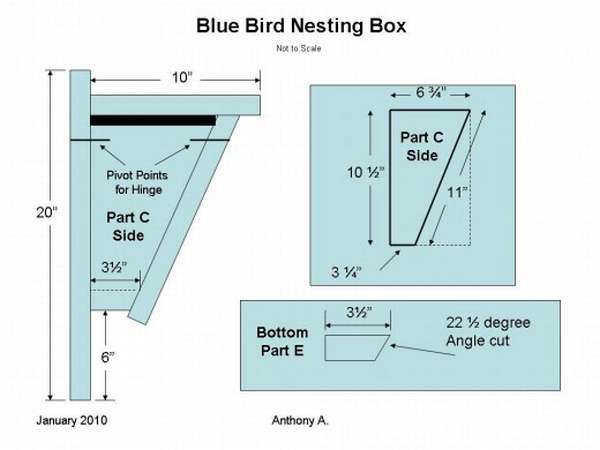
Form the bottom from a small piece of the stem, sawing a 22 ° bevel on one edge. Measure out 7.5 cm of the top edge of the bevel and cut off the bottom. Drill a few holes in the bottom to allow drainage.
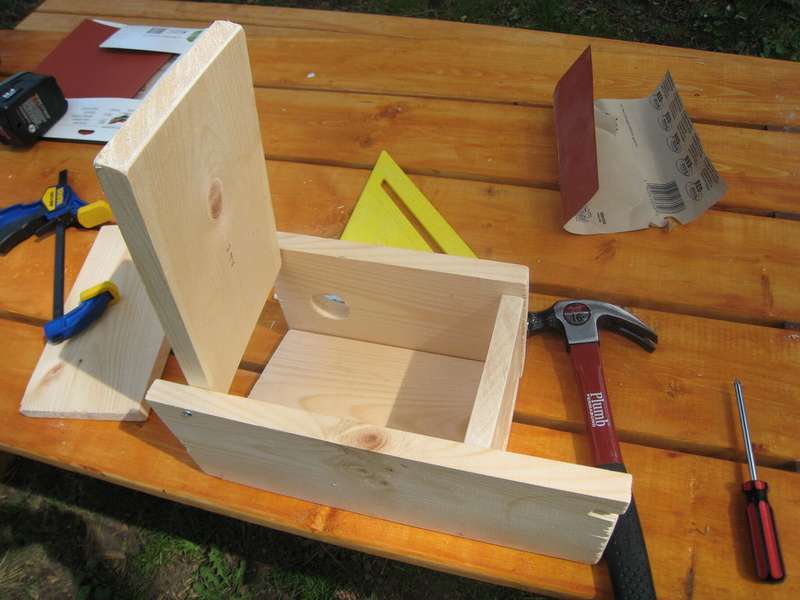
 Begin assembly by attaching the bottom to one of the side parts. Align the bevel of the lower part to the corner edge of the sidewall and secure with screws. This is the fixed side, while the other is hinged to provide access to the socket.
Align the second side from the opposite side, then tighten the screw in the center of the lower edge. This single short screw holds the side surface that forms the birdhouse door.
Assemble the sides so that the front protrudes 6 mm above the sides, creating space for air circulation. Drive a nail through the rear wall on the side of the door.
Place the hinge screws in the front and rear sections opposite each other so that the door opens easily. (see drawing)
Attach the oversized roof to the back and front.
 Install a birdhouse.You can read more detailed instructions on the website, the link below.
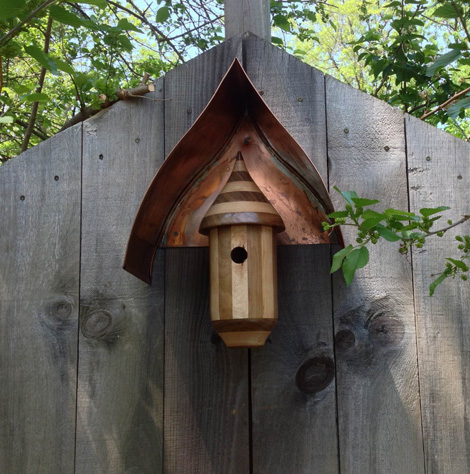
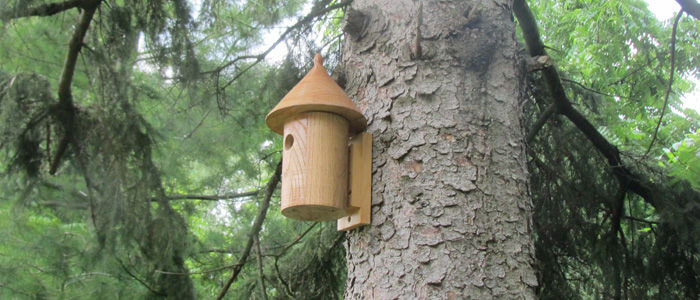
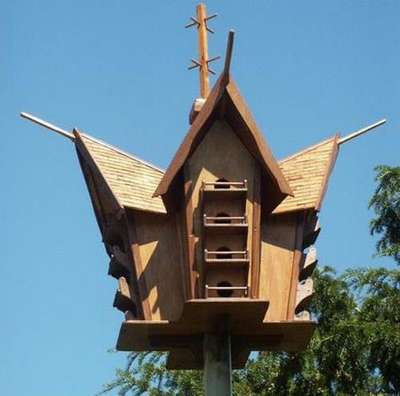
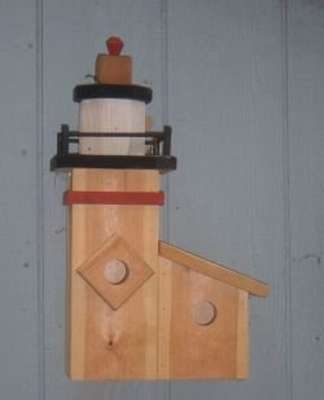 Here is another one interesting idea - birdhouse lighthouse. Making birdhouses is a pleasant activity that does not require much time, experience or expensive tools. Functional birdhouses can be ordinary boxes with an inlet or carefully designed to resemble a Victorian house or that will tell your imagination.
Regardless of whether a simple birdhouse or a decorative, functional birdhouse should meet the basic requirements. The size and depth of the nest box are important both to protect the chicks from predators, and to give them enough room for growth until they are ready to leave the nest.
If you are looking birdhouse decorative design, then maybe this project will interest you. The design looks complicated, but actually making such a birdhouse is quite simple: the house consists of three separate subsections, a tower, the main building of the lighthouse and a small box with a canopy. These parts are each made separately, and then assembled into one structure.
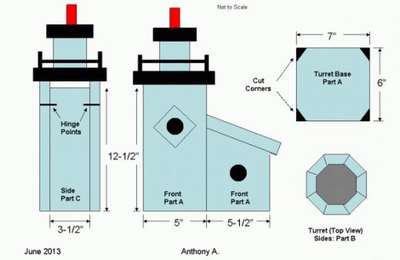 The author did not provide step-by-step photos, the gallery just photographs of individual parts, but the site has detailed instructions. If you want to make such a birdhouse a lighthouse, the link under the photos is at your disposal.


https://i.expert-h.com/en/skvorechnik/1030#sigFreeIdf38f99888c
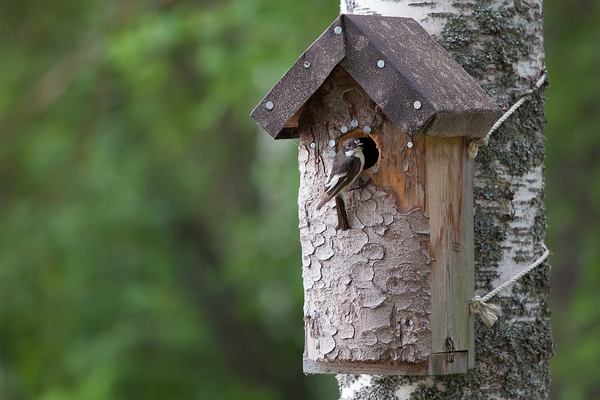
Creative birdhouse in the style of driftwood art
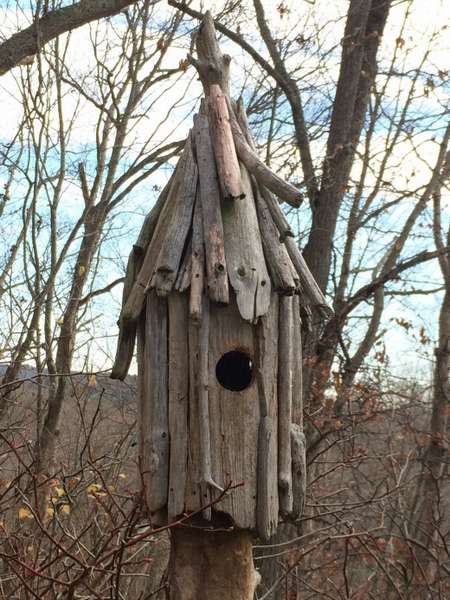 From English, Driftwood translates as driftwood, fin, that is, pieces of wood, branches, driftwood that are thrown by the waves onto the shore. Crafts from this material are called Driftwood art, it’s like the sculptors, when the artist in stone already sees the future sculpture. Driftwood art is a very extensive topic, if you are interested, you can type in Google and look at the work of masters of Driftwood Art.
In general, a rather fascinating activity, it seems to create a puzzle from pieces of wood of an unusual shape. This is when you have an idea of what you want to do and how it should look, but you are not sure what will come of it.
As for this project, then in fact it is an ordinary birdhouse. At first, a box is made that must meet all the necessary requirements of a functional birdhouse, but decor, this is your creativity.
I think that birds should like Driftwood Art style. Of course, exactly the same birdhouse as in the photo you can’t put together, all the driftwoods are unique, but you can try to do something like this, there is a detailed instruction on the site of the author of the project, a link under the step by step photos.


https://i.expert-h.com/en/skvorechnik/1030#sigFreeIde9bfead886
Quite unusual ideas for a birdhouse
Round birdhouse
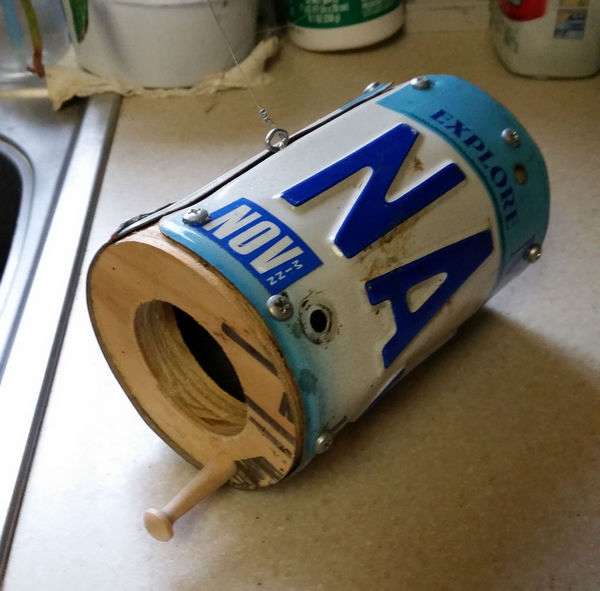 How do you like this birdhouse idea?
- Take an old car number or just a metal plate of the same size and drill holes every 5 cm along the edge of the hole.
- Saw two circles from a sheet of plywood 1.5 cm thick and make holes 3-4 cm in one hole for entry, and just drill a couple of holes in the other for ventilation.
- Wrap the license plate around two wooden circles and secure with screws.
- There will be a small space in the middle, so you need to find a small bar, and fix it at the junction of the ends of the number plate, it will also be needed to fix the hook for hanging the birdhouse.
- If you wish, you can still make a perch.
It was an interesting 30-minute project.
Watch Birdhouse
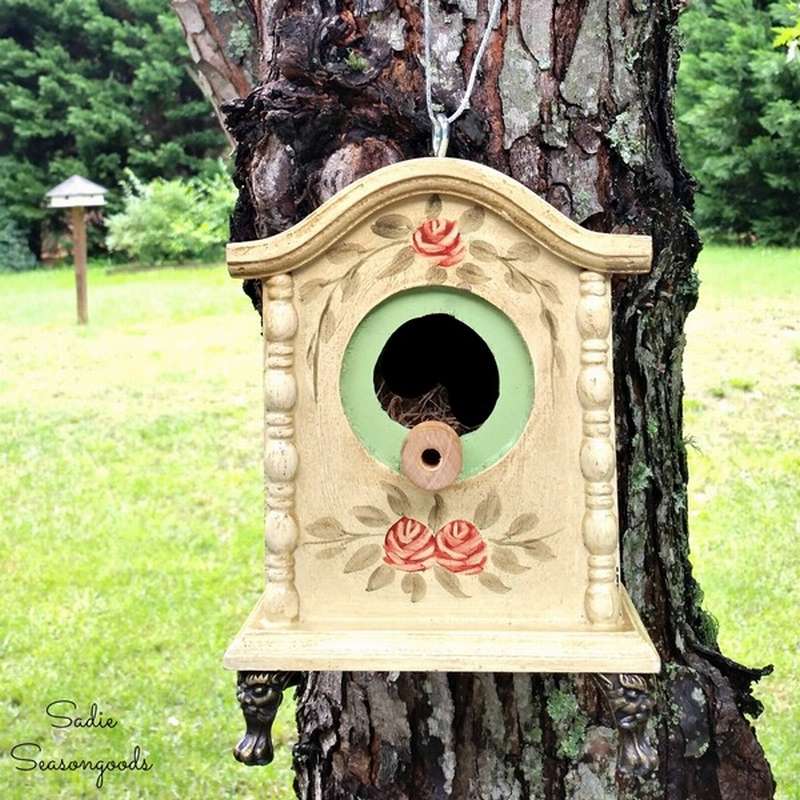 Birds do not need time to know, they determine it by the sun, but the clock can come in handy. How do you idea to make a birdhouse out of hours, more precisely from the box in which the desk clock used to be. Of course, if they fit. If you have such a watch, you can try. The main task is to reduce entry. To do this, just take a piece of plywood and cut a hole of the required diameter in it, then glue it to the front wall. Then screw on the hook screw and nut on top to hang the birdhouse on a tree. The author also put wine corks in the middle, I don’t know why, he probably believes that it will be more comfortable for the birds. It may not be worse.
People make birdhouses from a variety of things: old leather boots, ceramic teapots, bottles and boxes. On this background creative birdhouse of watchesperhaps it will not look bad. Let's hope the birds think that too!


https://i.expert-h.com/en/skvorechnik/1030#sigFreeId3e9400d6c6
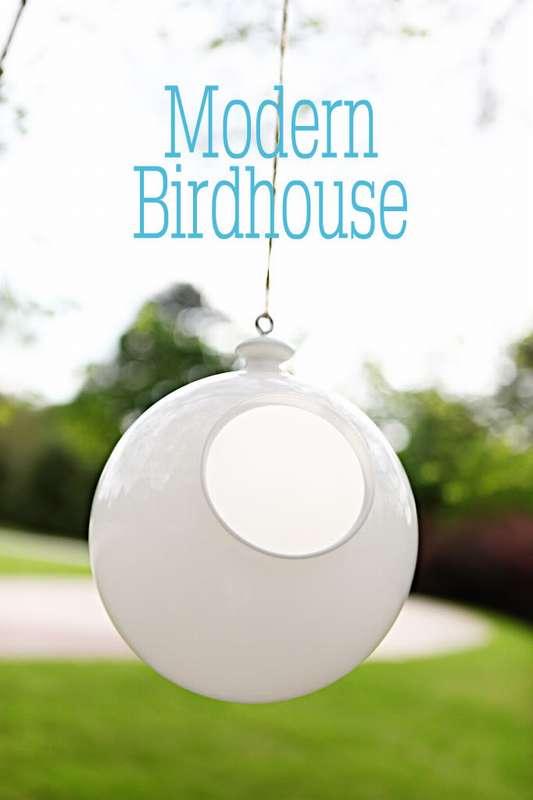 If you are too lazy to make a birdhouse, and you want to help the birds, you can just buy a glass lampshade. I don’t know if the birds will want to live in such a house, but since the article is called “Birdhouse Ideas for Birds”, and make a birdhouse out of a lampshade, this is undoubtedly an idea, well, since someone posted it on the Internet, I consider it my duty to present it to you.
Generally, your main task will be to fasten the handle with a hookto hang a lampshade. The author used epoxy glue, although it would be more reliable to tie with belts or make a mesh.
Of course, such a birdhouse is hardly functional, the holes are very large and there will be problems with ventilation, but it looks beautiful in the photo.
It is possible that birds will settle in it, but it will be very modern and advanced birds :)
And when they fly south in winter, you can put candles there. And at night, there will be luminous balls in your garden.
But in general bird feeders this lampshade will turn out pretty good.


https://i.expert-h.com/en/skvorechnik/1030#sigFreeId240d434bf8
How to set a birdhouse
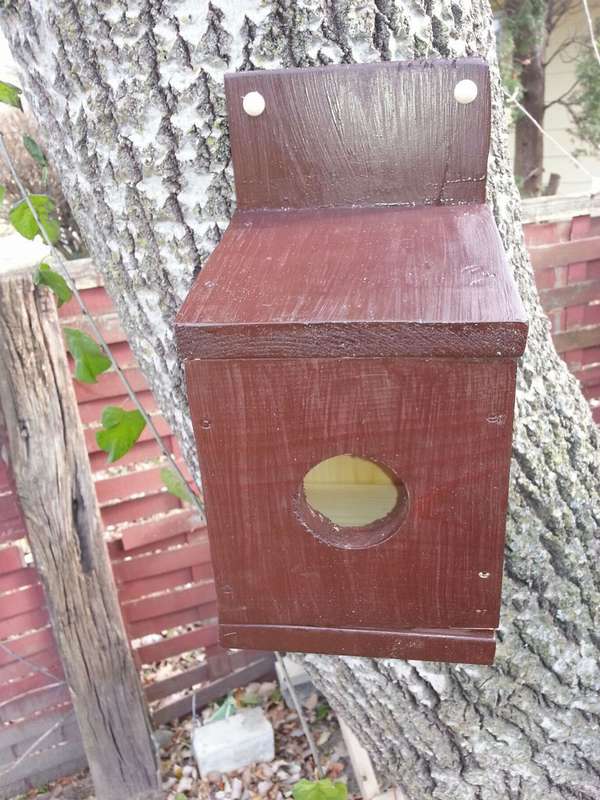
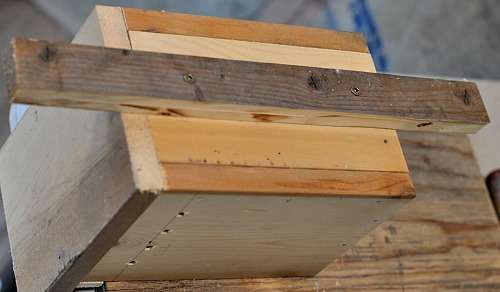
In the manufacture of birdhouses, special attention is usually paid to the correct size, but the question is, how to mount a birdhouse, fading into the background. In most cases, they make an expanded back wall, which acts as a mounting mechanism, allowing you to screw the birdhouse to the right place. This is not very convenient when there is a need to remove the birdhouse for maintenance.
But you can make like this birdhouse mounting bracketas shown in the photo on the right.
 The presence of this device makes it easy to remove the birdhouse as necessary and put in place. For the initial installation of the bracket, a screwdriver or drill is required, but then the whole operation goes without any tools. It is very convenient if you have not one, but several birdhouses and all should be checked or cleaned during the season.
But I want to draw attention to the fact that it is extremely undesirable to attach a bracket or birdhouse directly to a tree trunk, as you can harm the plant.
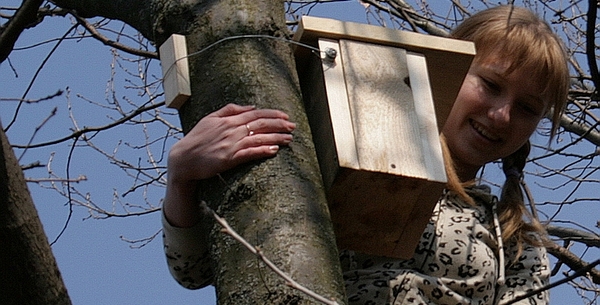
How to attach a birdhouse to a tree
The best way to hang a birdhouse on a tree is to use straps or rope..
 A great option is a flat nylon webbing, but if necessary, you can improvise and use almost any wire or strong fabric. You can stick or sew Velcro to the strap, which will allow you to fasten the birdhouse directly to the tree without the use of any fasteners.
Mount
 Set the birdhouse on the tree and tighten the belts until the house is firmly fixed. There is no exact instruction here, you just have to be sure that the birdhouse will not fall to the ground with the bird family, but it is advisable not to overdo it so as not to injure the tree.
There is no need to tighten strongly, the straps should support just the weight of a wooden box and a few birds, and not a family of hippos. Most songbirds weigh less than one hundred grams, so given the total weight, including eggs laid, it is a maximum of a kilogram.
To make sure of the margin of safety, hang on a thread standard red brick weighing about 2 kg through the top of the birdhouse. If it holds, then everything is in order.
But installing a birdhouse, this is not the end, you need to monitor the house and periodically loosen the belts in order to take into account the growth of the tree. And it’s best to make it a rule to remove belts every year and reinstall the birdhouse. At the same time, clean up to keep the birdhouse clean for residents of the next season.
Of course, you can do it easier screw the hooks into the birdhouse and hang them on a strong tree branch. This is also an option, but many birds do not like birdhouse swaying in the wind.
Installation of birdhouses, a good help to nature, but in order for the birds to have a normal environment, our trees must be healthy.
Birdhouses can be set in various ways..
 Birds tend to choose the places that are most convenient for them, so if the current location is not popular with birds, it may be time to find a new place.
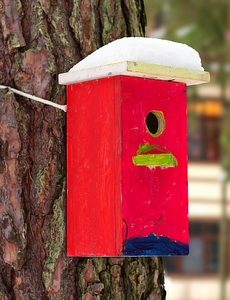
 Birdhouses need to be installed there, where there are fewer predators, well, preferably not in a crowded place. Unfortunately, in most cases, these recommendations are very difficult to implement. Therefore, you need to look at the situation. For example, birdhouses located under the eaves or roofs will last much longer, since they will get less moisture. In addition, it is rather difficult for predators to get to such places. Installing a birdhouse under a roof canopy will extend its life with minimal maintenance.
You can use this option, as in the photo on the right. Here birdhouse protected by a decorative metal roof.
It is better to place the bird house in sheltered from the prevailing spring winds and be located at a sufficient distance from the ground. And another very important point: birdhouses should be at a great distance from bird feedersas they attract predators who may be interested in a nest in a birdhouse.
How to mount a birdhouse
Shown here 6 ways to fix birdhousesto. Each of these is explained in detail below.
- Metal pole (the most suitable option)
- Slippery building facade
- Brick building facade
- Wood wall
- Wooden fence
- Tree trunk
Birdhouses it is advisable not to suspendbirds prefer houses that do not swing in the wind.
 A birdhouse mounted on a metal pole is less vulnerable to predators.. However, the pillar must be stable and not sway from the wind. For fastening in a column, you can drill holes or use stainless steel hose clamps. In order to make predators even more difficult to get to the birdhouse, you can install on a pillar partition or inverted pot.
The slippery facade of the building provides the same protectionlike a metal pole, but mounting difficulties may occur. It is only necessary to take into account that the dark wall heats up strongly in the summer, so do not mount the birdhouse on the south or west side.
 Mounting birdhouses on a brick wall also makes predators difficult to penetrate. Some bricks have a smooth finish that provides even better protection. Unfortunately, exposed brick can generate a significant amount of heat and become too hot. therefore choose east and north side for fastening.
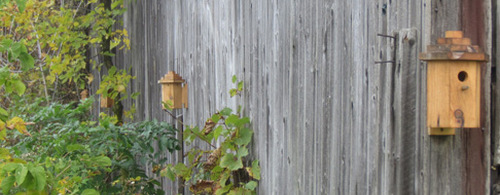
A good option wooden wall of an old barn under a canopy, for birds it is a more natural environment and cats usually do not climb on the wall. And most importantly, the wooden surface does not heat up more than the tree in the summer months.
Wooden post to some extent can provide security if provide protection against predators. You can mount a birdhouse, in which inlet less than 3 cm and there is a large overhang on the roof.
 Although many birds make nests in tree cavities, experts say that birdhouse mounted on a tree, this is the most unfortunate decision. The reason is clear, a tree for predators is the easiest way to get to a bird house. If there are no other places where you can install a birdhouse, this is still an alternative that provides more protection than a natural cavity. A bird house with a small hole will keep predators better than any hollow.
At what height do you hang a birdhouse
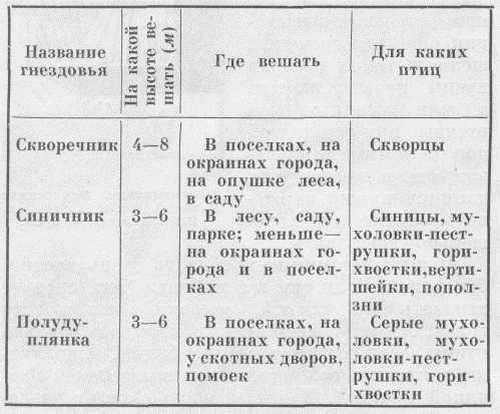
 Depending on the type of bird, it is advisable to hang a birdhouse within a certain range of height. Although birds often nest outside these ranges, especially if there are no other nests in the area.
At what distance from each other should birdhouses be installed
Some species prefer to nest very far from other relatives of the same species, while other species may be in close proximity 5 meters from another bird house.
Generally, too many birdhouses in one area may cause some birds to not nest.
 Therefore, the distance between birdhouses must be observed within such limits:
- tits 50-60 m
- gray wagtail 30-50 m
- pits 100 m
- Redstart 70-80 m
- woodpecker 160-200 m
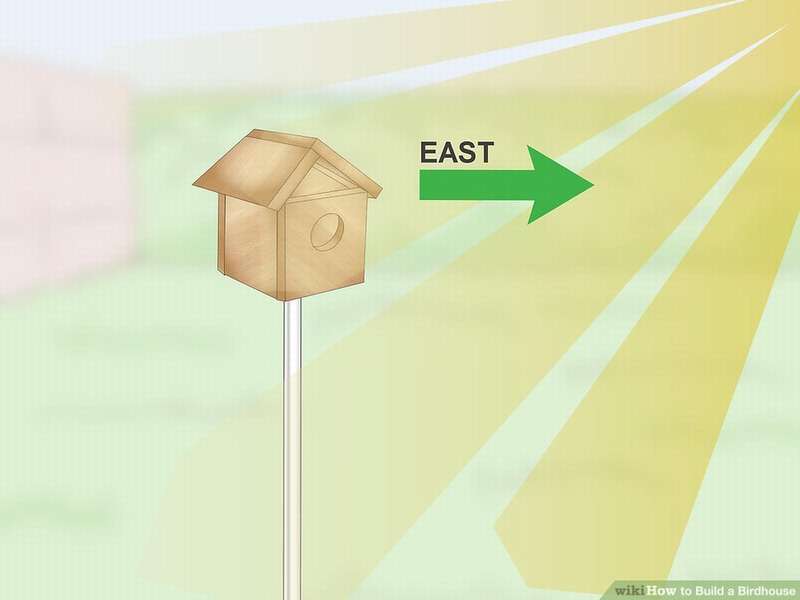
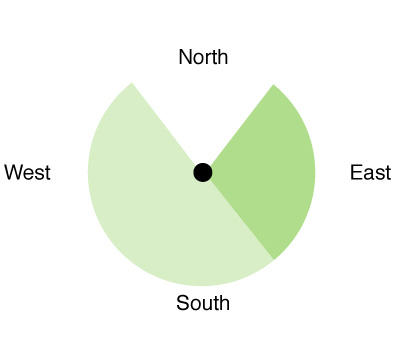 Set Birdhouses Entrance to the East
If your climate zone has relatively hot summers to avoid overheating the box in the afternoon set the birdhouse with the inlet to the East. Birds will receive the early morning sun when the birdhouse is still cold from night.
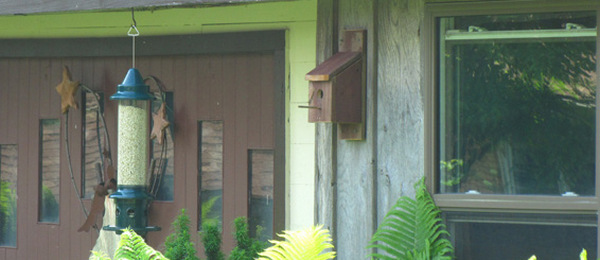
Also, the entrance of the bird's house should be away from bird feeders, or else the inhabitants of the birdhouse will be very nervous when predators visit the feeder.
Bird feeders
The birds are different, some may be territorial competitors of the residents of your bird house or predators, therefore do not forget to place birdhouses at least 5 m from bird feeders.
 If your yard is small and the distance between the birdhouse and the bird feeder is not perfect, try use food that attracts only certain types of birds and does not attract predators.
Birdhouse safety
You may be tempted to make or buy a beautiful bright birdhouse of an original shape, but experts warn that attractive and complex designs are not necessarily safe or effective for nesting birds. Therefore, follow these guidelines:
 Birdhouse should be well insulated.
- Do not make a birdhouse out of dense materials such as metal or ceramic, because in the middle of the house it will be too hot or too cold for the chicks. Boxes with metal roofs store too much heat, which can have fatal consequences for chicks on warm sunny days. Metal and plastic boxes also suffer from condensation, which is not good for young offspring.
- To ensure insulation and durability, the walls of birdhouses should be at least 15 mm thick. Outside, the surface should be treated with a non-toxic preservative based on water.
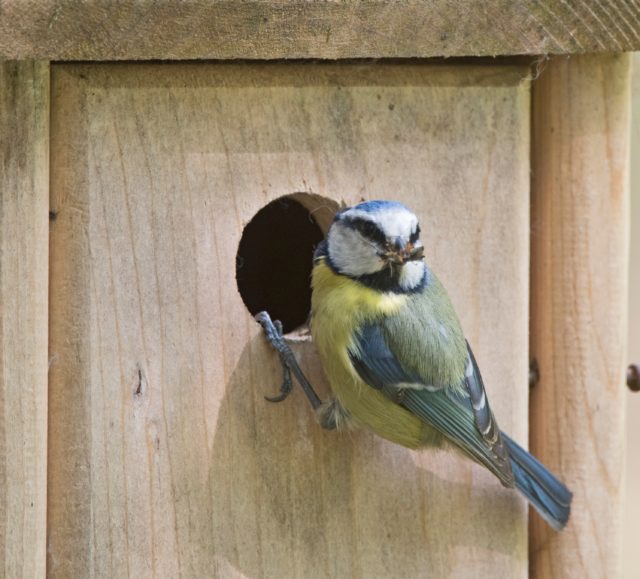
- The inlet should be approximately 32 mm, which is ideal for all small nesting birds.
- Do not make poles under the summer, this is an excellent springboard for predators.
- A good birdhouse should have easy access for observation and cleaning.
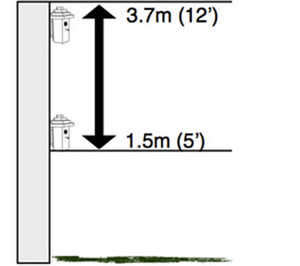
- The ideal height for a birdhouse with a small hole is from 1 m to 5 m above the ground with a clear flight path.
- Do not make bright birdhouses, the more they are invisible, the better.
 10. Do not make the birdhouse too small so that the chicks do not fall out of the nest, but also too deep is bad when the chicks grow up, it will be difficult for them to get out.
The following are some examples of popular birdhouse designs.
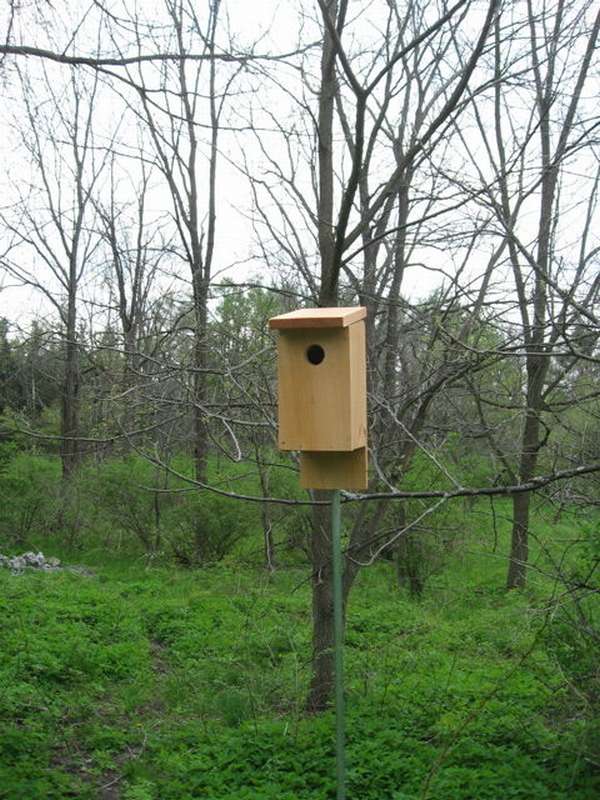
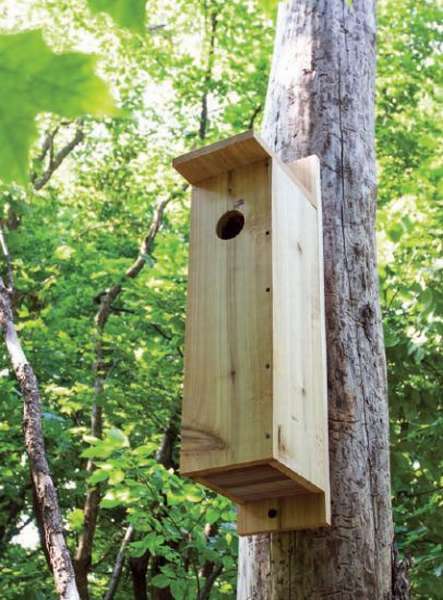
Shed roof birdhouse drawing
 Rectangular Birdhouse
This type of birdhouse made of wood is the easiest to manufacture. You will need one board, a saw, a drill and nails.
Prepare a board. For the base unit, one board with a thickness of 2.5 cm, a width of 15 cm is enough. The length is approximately 1.2 meters.
Any type of tree will do.. However, hardwoods such as oak and beech will last longer.
Do not use wood less than 2 cm thick.. It can be deformed and will not provide good insulation.
Mark and saw the details as shown in the photo.
- Drill a hole for entry.
- Drill drainage holes in the bottom.
- Make one or two holes in the back for mounting.
- Attach the bottom to the back
- Attach the base so that it is perpendicular to the back wall. Drive nails into the base through each wall.
- Install the front part, it should be attached to the walls and base. The edges of the front should be flush with the bottom of the base and the outer walls.
- Attach the top with a hinge that should be waterproof.You can use a waterproof brass hinge or just use a piece of tubing.
Add dry moss or grass to make it more comfortable for birds to build a nest. - Find a good place and set the birdhouse at a height of at least 4.5 m above the ground.
- Be sure to mount away from the branches of a tree or anything else that will allow the cat or other predator to easily get to the nest.


https://i.expert-h.com/en/skvorechnik/1030#sigFreeId5d76c965d5
How to make a simple birdhouse
 This birdhouse was made of 15 cm board with a thickness of 2.5 cm. There will be six parts in total - two sides, front, back, upper and lower parts. The sides will have an angle, but this is easy to do. It is also necessary to make holes for the screws in order to attach the birdhouse to the tree. Screws are carefully screwed into the bark so as not to damage the inner layer. At the front you need to drill a hole for the entrance of the tap hole. You can assemble a bird housewithout even having any experience.
Tools and Supplies
- hand saw
- pencil
- hammer
- drill
- primer
- sandpaper
How to assemble a birdhouse, there are many instructions, even in this article. This is a standard design, so no special secrets. If you want to know some nuances, a description of the assembly steps is on the author’s website, use the link under the gallery.


https://i.expert-h.com/en/skvorechnik/1030#sigFreeId66dbab7bd8
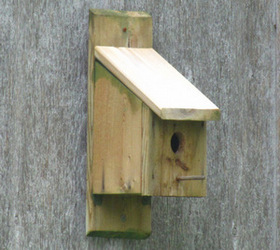
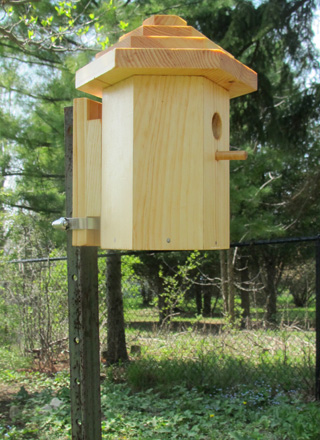
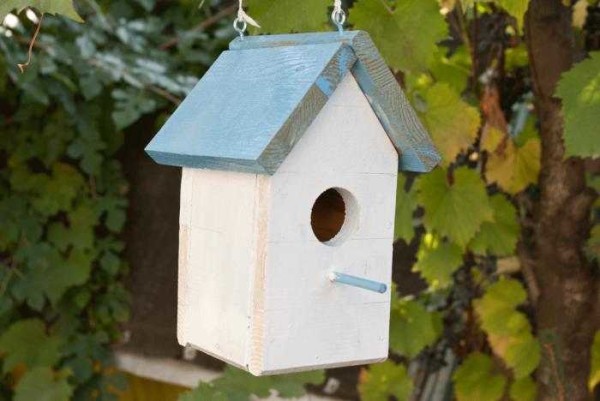
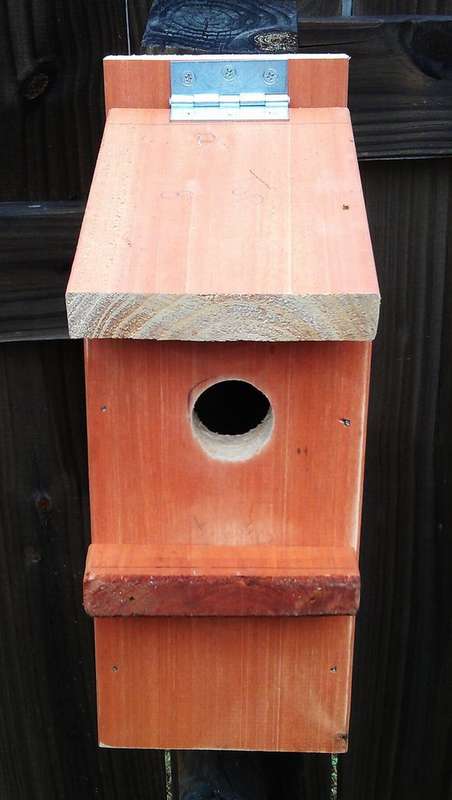 Here is another classic birdhouseonly with a hinged roof. Simple and functional, easy: assemble, install, clean.
Of the materials you need
- one 1.5 m board,
- hinge,
- nails or screws.
And standard tools:
- drill,
- hammer,
- saw.
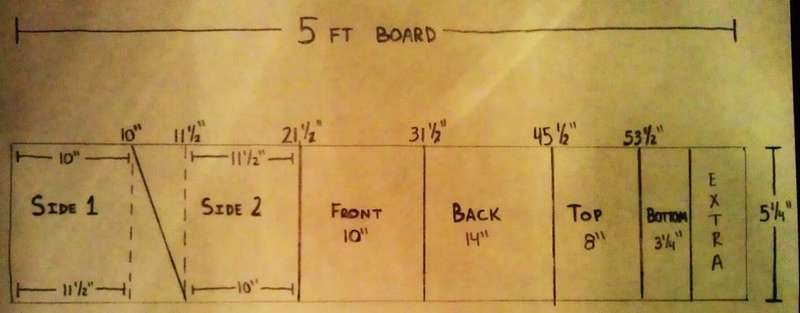
Use the provided below size chart and mark the board (you just need to lay the tape measure along the board and mark the top row, it's easy).
Saw off the parts (the first cut should be at an angle of 15 °, the rest straight).
Assemble as shown in the photo (you can use nails instead of screws).
Do not forget the bottom, front and side drill vents.


https://i.expert-h.com/en/skvorechnik/1030#sigFreeId787f439925
DIY birdhouse in the garden
 Bird houses, in most cases, are simple and interesting projects that can be done using conventional hand tools. Most often, except for a saw, a hammer and a screwdriver, nothing more is needed. In this example, the calculation of materials goes to two birdhouses, because two houses are preferable, more likely that the birds will settle in at least one of them.
Materials:
- 2 1 x 6 boards 1.80 m long
- 23 - 30 pcs of 4 cm nails
- Wood screws
- Metal pipe and clamps
Tools:
- Roulette
- Hacksaw
- Screwdriver
- Clamps
- Cordless drill
- Stepladder and Sledgehammer
Step 1: Measurement and marking
Each birdhouse has six parts that you will need to cut out. (from smaller to larger):
- Bottom (10 ")
- Front side (24 ")
- Left side (angled)
- Right side (at an angle)
- Roof (25-35 cm)
- The back side (36-38 cm)
Step 2: Saw the details
Step 3: Prepare Cut Details
Sand all edges with sandpaper. On the front wall, make the entrance of the tap hole, then drill drainage holes in the bottom, three will be enough.
Step 5: Assembly, part 1
 It may look a little complicated, but a good grip will work like a second pair of hands.
- First, install the back on a flat surface, then the bottom and two sides. Leave a small gap of 5 mm between the upper part of the back wall and the beginning of the side parts, for ventilation.
- Then take the front part (the one with the hole), and install on top of the other parts. Align and mark the places for nails on the right side and from the bottom - the left side will become a hinged door, so it does not need to be hammered!
- After the front edge is fixed, turn the structure over and fasten it on one side and bottom from the back.
Step 6: Assembly, part 2
 Now you need to make the hinged door from the left side.
- Pre-drill a small hole in the front and insert a nail to hold the bottom of the hinge side in place.
- Once this is done, nail the top to the tops front and back.
Step 7: Painting
Now it's time to paint the birdhouses. If you use strong wood, such as cedar or mahogany, then painting is probably not necessary. Better soak in wood oilThis will help extend the life of the birdhouse and make it better.
Make sure that paint, impregnation or varnish did not get inside the birdhouse.
Step 8: Mounting
Choose a suitable place to install a birdhouse. This is a serious question, so it’s better to look on the Internet for which birds, where and how best to install a bird house.
Then take the stepladder and sledgehammer and carefully hammer the pipe deep into the ground. The entrance must be somewhere in the distance 1,5 - 2 m from the earththerefore the pipe must be of appropriate length. Be careful not to fall off the stairs, and in general, it is better to ask someone to help. When the pipe is installed, attach the birdhouse with clamps.
Step 9: Wait for the tenants!


https://i.expert-h.com/en/skvorechnik/1030#sigFreeId8d3bc1420e
 Garden birdhouse
The bird house is a basic box, with a wall that can be removed for cleaning, and a tap hole. There are many different ways to make a birdhouse. If you like screws, not nails, you can use them. In general, a list of tools, these are recommendations, use those that are easier for you to work with.
Necessary materials:
Each birdhouse needs a board measuring 2.5 x 15 x 120 cm. The actual dimensions of a standard 2.5 x 15 cm bar are 2 x 13 cm.
Check the dimensions before proceeding with manufacturing. One birdhouse should come from one board.
Necessary tools
- Hammer
- Table saw
- A circular saw
- Portable drill
- 1/4 "drill
- Bit 1 1/2 "
- Template
You can read the detailed instructions for making a birdhouse on the author’s website, the link is under the gallery with step-by-step photographs. To cut the parts of the birdhouse, use the presented diagram.
 Who is not good at English, then everything is simple:
Side - side
Roof - Roof
back- back side
front - front side
floor - floor
support - support
With the dimensions, too, nothing complicated, 4 "is the size in inches, one inch is 2.54 cm, and 4 'in feet, foot, it is 30.48 cm.
Some more comments
Mounting method in the photo
 To ensure drainage, trim the corners of the floor.
- The birdhouse should not be too hot, so you need to drill 4 small holes in the side walls for ventilation.
- The front should be removable so that you can clean the birdhouse every year. It will be supported at the back by two strips located on the side walls of the house.
- Ahead, a strip on the roof line will keep the door in place. To do this, install a nail aligned with a groove in the front of the floor.


https://i.expert-h.com/en/skvorechnik/1030#sigFreeId16bba5d400
This is the second type of classic birdhouse - "house"with a gable roof. It is less convenient in terms of cleaning and more difficult to manufacture, but nevertheless has its own advantages and is no less popular than a nesting box with a shed roof.
 Birdhouse lodge
Instructions and step-by-step photos in pictures from the site wikihow, as assemble and install a gabled birdhouse.
Part 1
Find a rough board 2.5 cm × 20.3 cm 240 cm long. Better birch or oak, do not rot and last longer than other species.
Buy galvanized screws. If you use nails, the structure is very loose.
Buy C-clamps, they will be needed when gluing parts and drilling holes for screws.
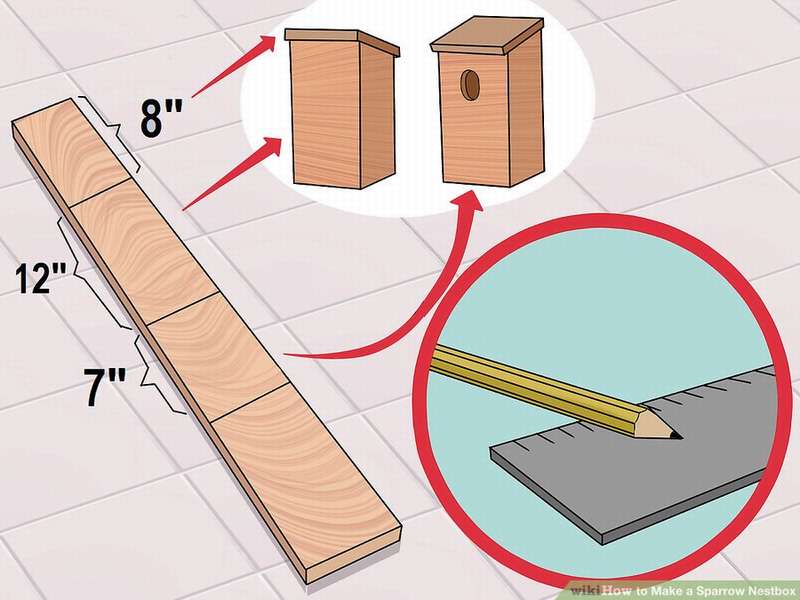
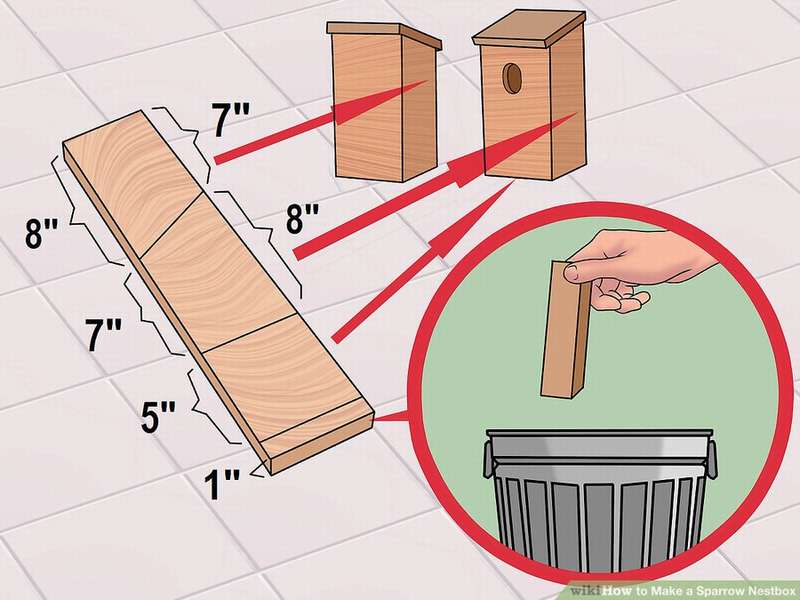
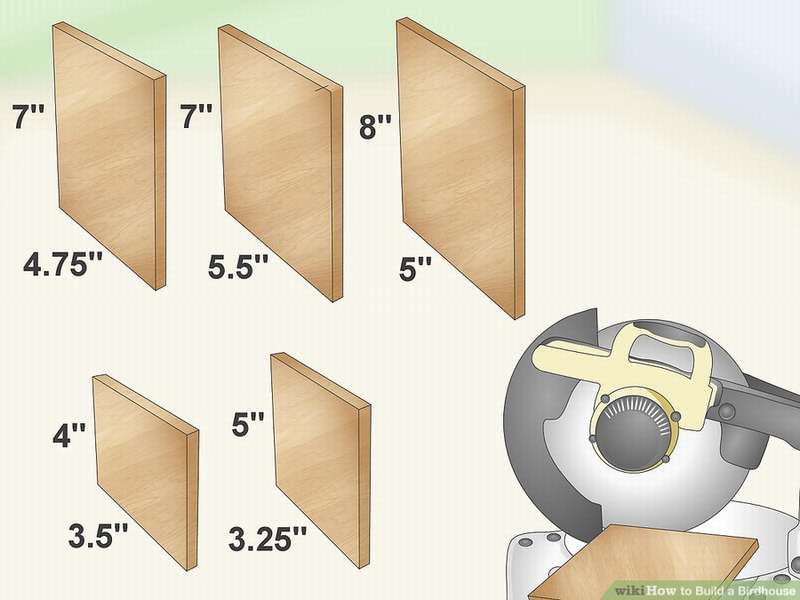 Saw the board in size as shown in the photo. Dimensions are in inches, so I’ll translate.
- Two side walls measuring 4 by 3.5 inches (10.2 by 8.9 cm).
- The only part that is 5 by 3.25 inches (12.7 by 8.3 cm) for the floor.
- One piece is 4.75 by 7 inches (12.1 by 17.8 cm) for the right side of the roof.
- A piece of 5.5 by 7 inches (14 by 18 cm) for the left side of the roof.
- Two separate pieces measuring 5 to 8 inches (13 by 20 cm) for the front and back walls.
- Drill a hole with a diameter of 1 to 3 inches (2.5-7.6 cm) around the circumference.
- Sand the edges of the hole.
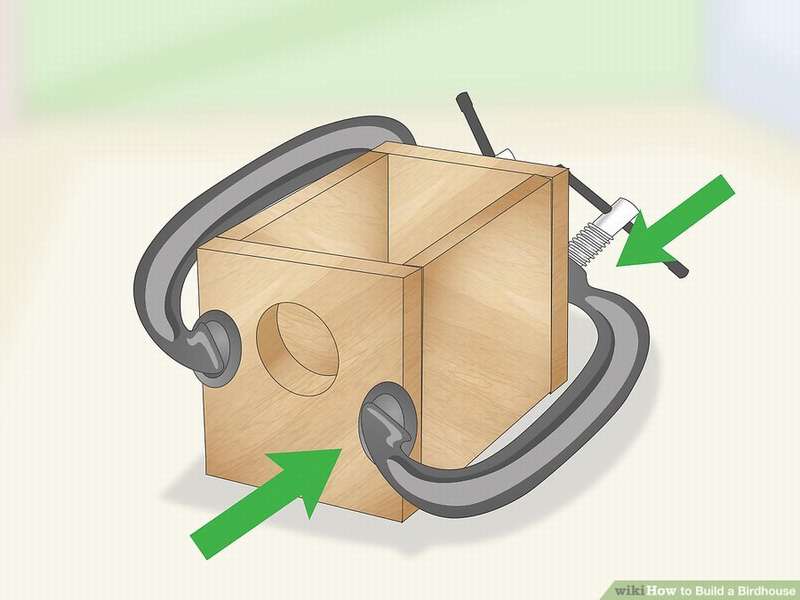
Part 2 Assembly
 Before collecting, color the tree. Choose colors with neutral and natural tones.Do not paint the inside of the birdhouse.
- Lay the future floor on a flat surface.
- Apply glue to the edges of the walls of the birdhouse and connect them. Move in order until you glue all four walls of the birdhouse.
- Fix the four walls of the birdhouse with clamps and leave to dry for at least 30 minutes.
- Fasten the floors with screws to the walls.
- Glue the roof parts to the walls at an angle of 90 degrees. Roof panels should overlap and the left side (the longer part) should protrude above the right. The angle of the roof will prevent the accumulation of water or snow on top of the birdhouse.
- Screw the roof panels into the walls.
Part 3 Choosing a place for a birdhouse
 Mount a birdhouse on a pillar or wall of a building. The best option is to use a metal pole to prevent predators from reaching the birdhouse.
- Set the birdhouse with the inlet to the east. Although not necessary, birds are more attracted to birdhouses, where there is natural sunlight in the morning.
- Mount the birdhouse at least 5 feet (1.5 m) from the ground. Firstly, this will facilitate cleaning if necessary, and secondly, it will protect the nest from most predators. In general, it depends on the species of birds that live in your area, so the birds, therefore, if necessary, you can make adjustments.
- Hang or install a birdhouse under a canopy, overhang or eaves. So it will last longer and the birds will be more comfortable. If you are installing on a pole, it is desirable that the pole is under some kind of canopy.


https://i.expert-h.com/en/skvorechnik/1030#sigFreeId7fe2cce143
Birdhouse of pallets
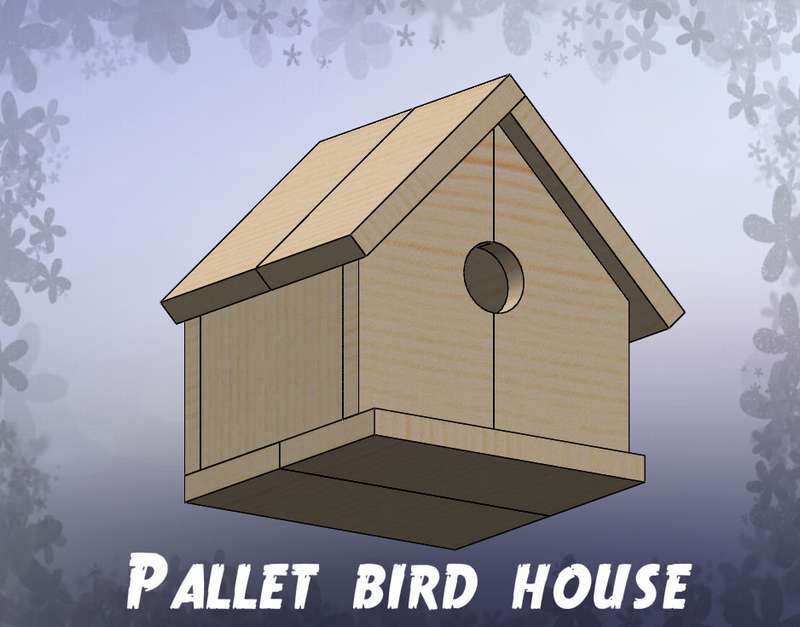 A simple and cheap project for beginners. Suitable for those who have two cute wooden planks and basic tools. This poultry house Ideal for teaching children how to use standard tools for making interesting things from wood!
Tools:
- saw
- hammer and screwdriver
- pencil or marker
- drill
Materials:
- a few 1.6 mm x 40 mm nails (it is better to use screws, but they are more expensive).
- two boards from the pallet (120 cm X 9 cm X 1.5 cm)
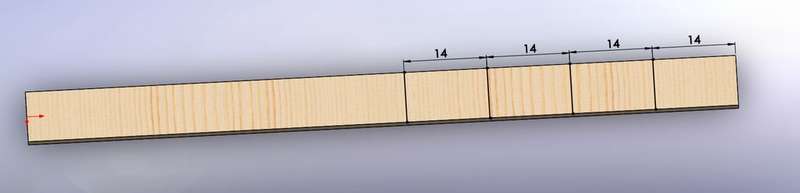
Step 1: Mark and cut
If the board is about 9 cm wide, cut it as shown in the photo.
 If it’s wider, you can still use the dimensions presented, but the finished product will be wider.
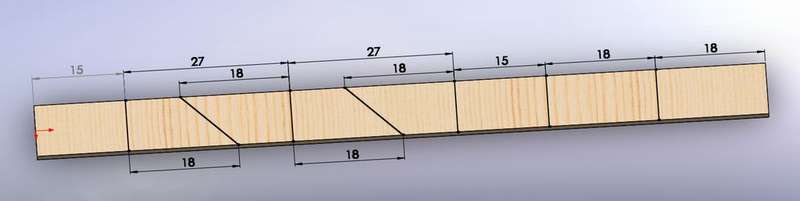 You need to cut out such parts:
- 2 pcs. Length 18 cm
- 4 things. 18 cm on one side and 9 cm on the other
- 4 things. Length 14 cm
- 2 pcs. Length 15 cm
Step 2: Connect the details
 Fix it all together with nails, screws or even wood glue. True, for bonding you will need additional clamps and a little patience, since wood glue dries quite slowly.
Step 3: Drill hole
- Drill a hole between the two front parts.
- Pay attention to the size of the hole. The most common sizes are from 2.5 cm to 5 cm in diameter.
- Do not be afraid to experiment, large holes will be suitable for large birds, although small ones in such birdhouses will not be very comfortable, there is a threat of penetration by predators or large birds. If you don’t have a drill, you can make a notch in two parts with an ordinary knife, residents will not mind if the entrance is not perfectly round. It just needs to be big enough.
Step 4: Improvise
- At your discretion, install a perch, mounting brackets, etc. The birdhouse can be painted and mounted on a tree.
- Be careful with the poles, they help predators get to the nest inside the birdhouse.
Painting Tips: - Do not paint or varnish the interior of the house, which is likely to be toxic to residents.
- For exterior coloring, choose natural colors that mix with the environment.


https://i.expert-h.com/en/skvorechnik/1030#sigFreeId09021a07d6
Or you can make it like this birdhouse of pallets. This is a very simple assembly from one wooden pallet, the author took 4 hours to make it, but he did not have instructions, and this was his first project.


https://i.expert-h.com/en/skvorechnik/1030#sigFreeIde068d6302c
How to set a pole for a birdhouse
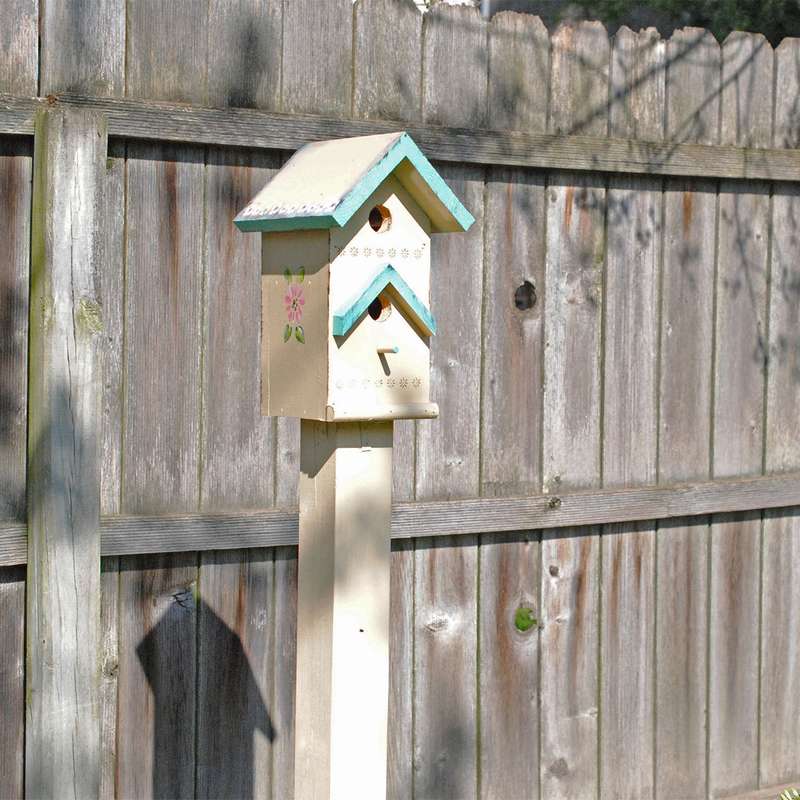 If you don't have feathered friends in your yard, a wooden birdhouse can solve this problem. Of course, you can hang it on a tree, but that is if you have a tree. And if not, then you need set a pole for a birdhouse, and how, read and see step by step photos. You can install a metal pole, or wooden, as in this case.
Choose a workpiece that will be well balanced with the proportions of the birdhouse.See to be able to set the brackets.
If you follow the instructions, all the work can be done over the weekend.
Tools and materials
- Wooden birdhouse
- Big bucket
- 10 kg of cement
- Cardboard form
- Sharp knife
- Level
- Electric drill
- Protective glasses
- Pencil
- Screwdriver
- Paint
- 4 small mounting brackets and screws
 Step 1: Dig a hole
Color the birdhouse and pillar. While drying, dig a hole 5 cm wider than the column. The pit should be about 35 cm deep. Insert a cardboard cylinder into the hole and cut 25-30 cm above the ground.
Step 2: Attach brackets
On each side of the column, mark with a pencil the attachment points for the metal brackets. Drill holes and screw the brackets. If desired, paint the brackets according to the column and birdhouse.
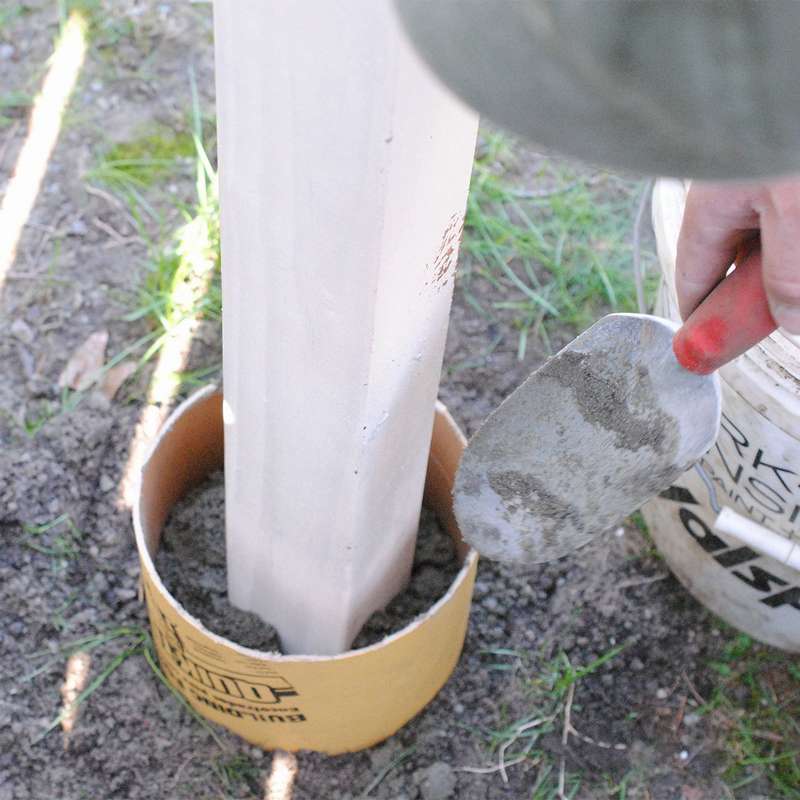
Step 3: Prepare a solution
Pour dry cement into a bucket, add water and mix to the desired consistency. (read the instructions on the package).
Pour about a third of the solution into the hole and install the pole. Level, if necessary, support it with something. Leave to harden for 24-48 hours.
Step 4: Drill holes in the birdhouse
Set the birdhouse on the post and use a pencil to mark the holes in the brackets. Drill holes and fasten the birdhouse.
Step 5: Trim the shape
Cut the portion of the cardboard form that protrudes above the cement. Fill with sand and cover with turf.
Everything is ready.


https://i.expert-h.com/en/skvorechnik/1030#sigFreeIdbdf3b95e04
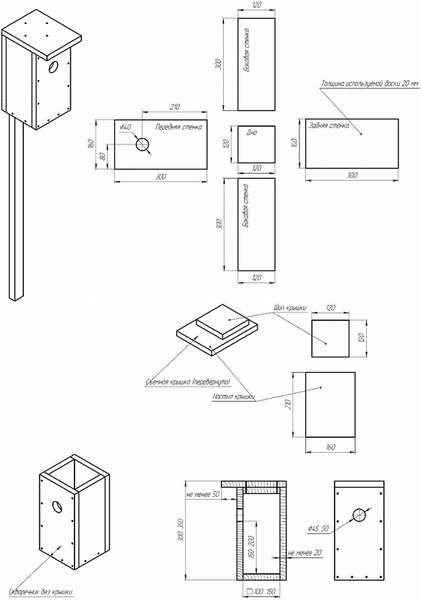
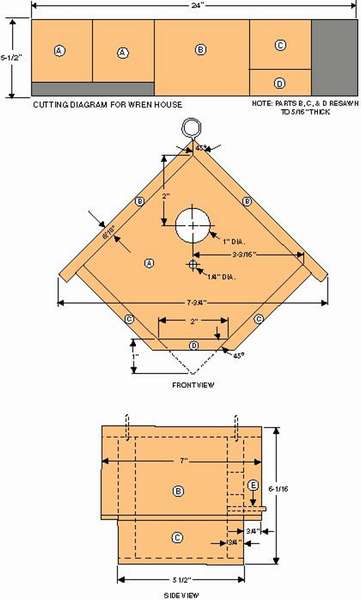
This type of birdhouse - diamond-shaped, uses less often, although it looks very pretty. The main disadvantage low inlet. If we take into account that the components of the nest that the birds will populate will fill the birdhouse halfway, that is, almost to the level of the hole of the notch, then it is clear that the chicks will be in great danger. Both from predators who will not be hard to reach the inhabitants of the nest, and the possibility of the loss of chicks from the house. Nevertheless, if you make the birdhouse a little deeper, then the birds will like it. Here in this drawing, the hole is located at a less acceptable distance from the floor. Although it can be done higher.
Here drawing of this type of birdhouse
How to make a birdhouse
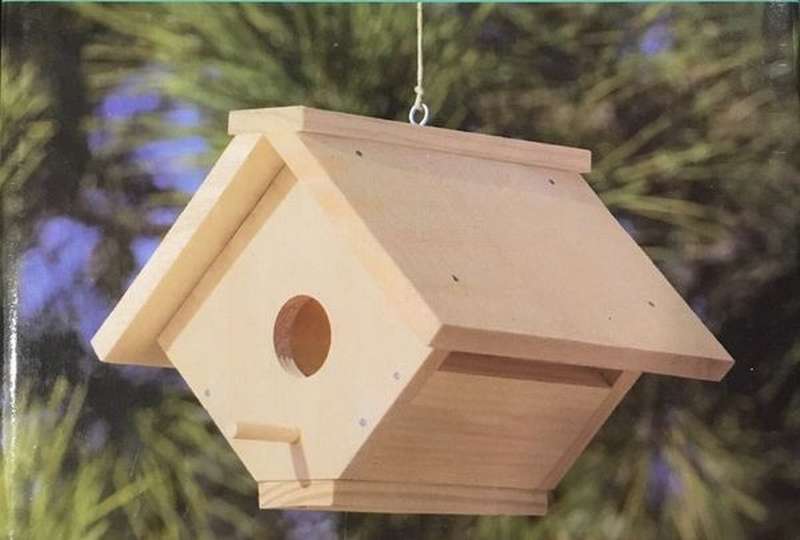 This project is suitable for children aged 8 years and older. Highly recommended adult control for safety when working with woodworking tools. Are you looking for an entry-level project that does not require expensive power tools? Then making it small bird house - great choice! Sometimes the instructions are quite vague and confusing, turning even simple projects into a much more complex task than it really is. But the step-by-step photographs and instructions presented here are very simple and understandable, with additional notation for each detail, so it is guaranteed to have fun by successfully building a neat birdhouse.
Tools and materials:
- Hammer
- Sandpaper
- Wood glue
- Paint and brush
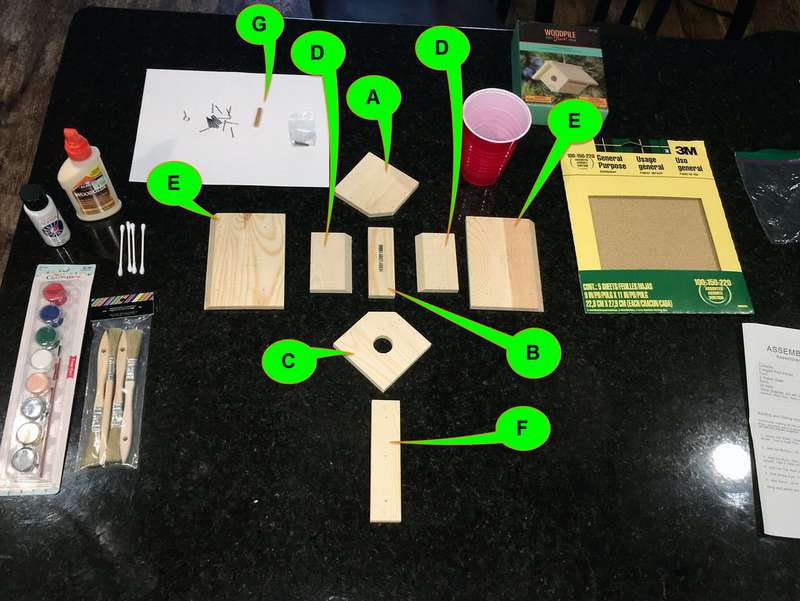 Birdhouse Kit Contents:
Wooden crafts:
- A. 1 back wall
- B. 1 Narrow lower part
- C. 1 Front (with wooden neckline and perforation hole)
- D. 2 small lateral parts (with angled ends)
- E. 2 large parts of the roof (with corner ends)
- F. 1 Narrow top
- G.1 Wooden pole
Equipment:
- Hook screw for hanging
- 24 nails (only 20 nails are used)
Step 2: Assembly of a bird house
Now that you have prepared the materials, we will begin to assemble the birdhouse. Some tips in the photo below
When attaching two sections of wood, it is important to maintain the correct angle where the two parts join.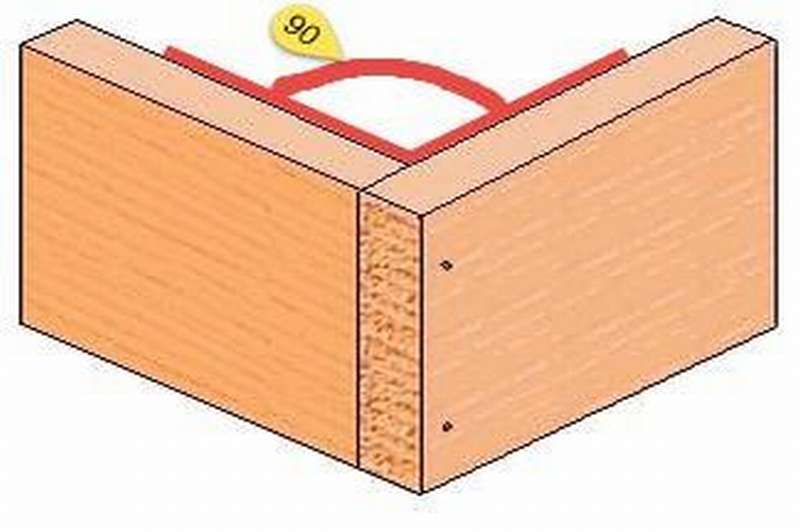
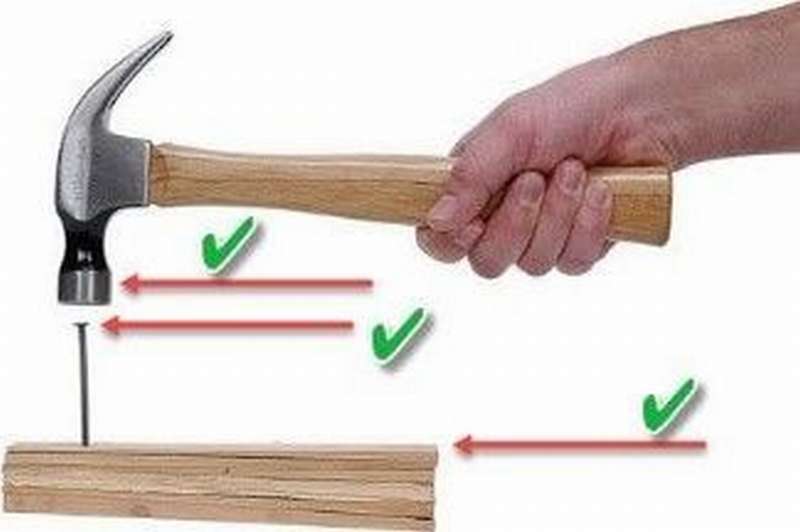 Make sure that the hammer head, the nail head and the surface of the workpiece are parallel to each other.
You can also strengthen the strength of each compound using wood glue. This is not a requirement, but only an option, if you consider it necessary.
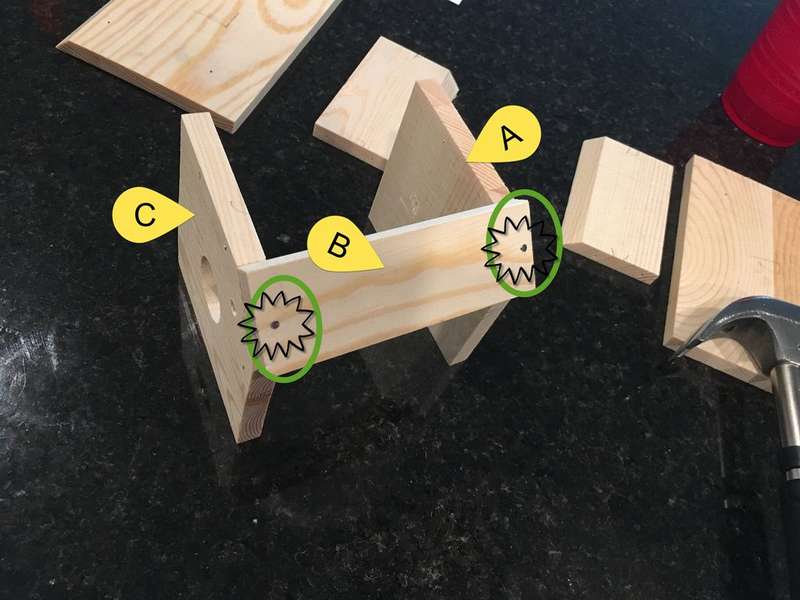 Step 3: Front and bottom mounting
- Nail part C to B using one nail on the bottom of surface B.
- Make sure that the small perforation hole on part C faces in the opposite direction from part B.
- Attach Part A to B using one nail on the bottom surface of B.
- The front and back are now attached to the bottom. You can proceed to the next step.
Step 4: Fastening small side parts
- Install one of the small side parts between the front and back, then secure the connection with two nails hammered in front.
- Once the front of the sidewall is assembled, secure the connection with two nails hammered in the back.
 Step 5: Roof mount
Fix both large parts of the roof on the left and right sides of the birdhouse with four nails on each side.
Make sure the corner is facing up, so when two large parts of the roof are installed, you have a flat surface on top for the narrow part of the roof.
Step 6: Attach a narrow top
Align the narrow top so that there is emphasis on the two previously installed large roof panels.
Apply glue to this area before fastening with nails to ensure a good bond. (Not necessary).
Step 7: Set the hook and perch
Attach a metal screw with a hook to the top of the birdhouse.
Install the perch. Apply a small portion of wood glue inside the hole so that it does not fall out.
Step 8: Finishing touches
Sand the surface of the birdhouse with sandpaper, at the beginning of a large, then smaller.
Paint the birdhouse at your discretion, in two or three colors. Rinse the brush thoroughly before changing colors so that the paints do not mix. After painting, rinse thoroughly with a brush and allow to dry before cleaning for future use. Make sure the paint cans are sealed so that they can be used again for future projects.


https://i.expert-h.com/en/skvorechnik/1030#sigFreeIda23258dd5e
DIY birdhouse
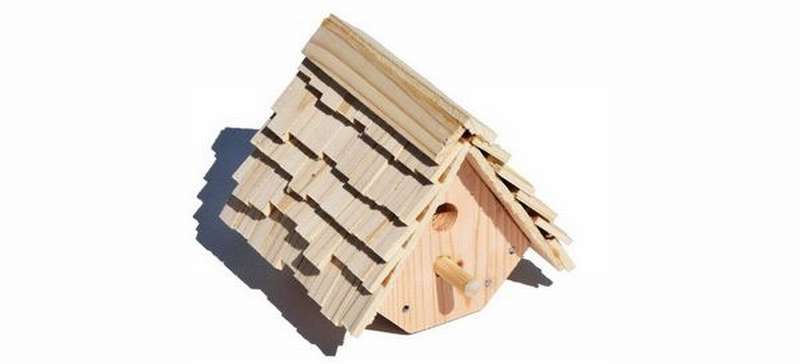 If you are a carpenter or just keen on wood crafts, you probably have lumber waste that takes up space in a workshop or garage. Use this potential trash and turn it into something useful! From this manual you will learn how to cut wood make a beautiful birdhouse - simple and functional.
- Saw a short piece of 2x4 board in length and plane to get a thickness of 12 mm.
- Fold the two boards together and design the front and back of the birdhouse.
- Cut a short length from the remaining boards. Align the sides in front. Mark the corners to cut the sides. Cut the middle squares so that both sides coincide. Use glue and nails to assemble parts of the birdhouse.
- Drill a notch inlet and one more below for a perch. Put glue on the perch and insert into the bottom hole.
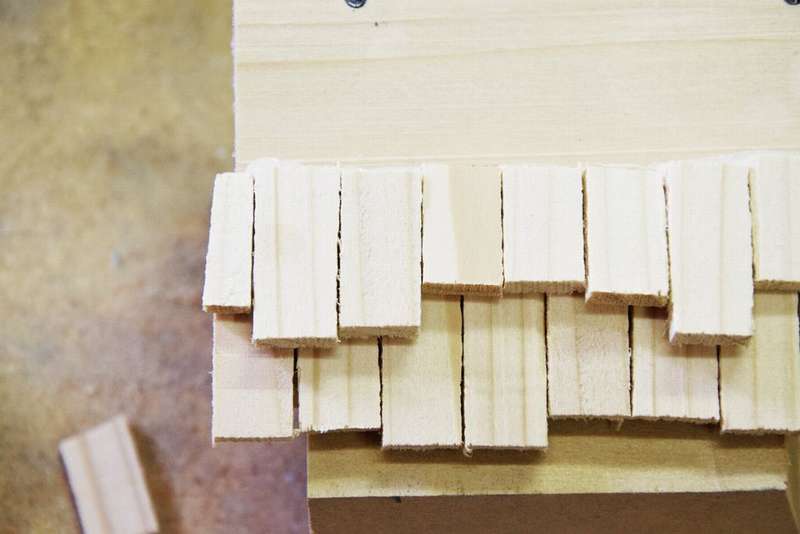 Make a roof. Cut a 3 mm veneer from a 2x4 bar. Cut to size, secure with glue and nails.
- The creation of tiles. Using the remaining veneer, copy strips of 1.5 cm. “Tiles” make different lengths, from 17 to 14 mm.
- Attach the shingles. Glue the row in a line, starting from the bottom of the roof, and so stick the rows to the top. Make sure that the bottom of the next row covers the top edge of the previous row of tiles. Once one side of the roof is finished, let it dry before starting the other. Once both sides are finished, glue the veneer 2 cm wide on each side using adhesive tape to hold it in place.


https://i.expert-h.com/en/skvorechnik/1030#sigFreeId0bbfcd309f
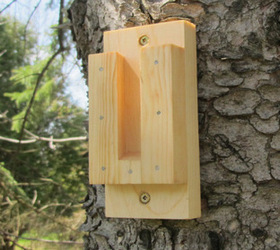
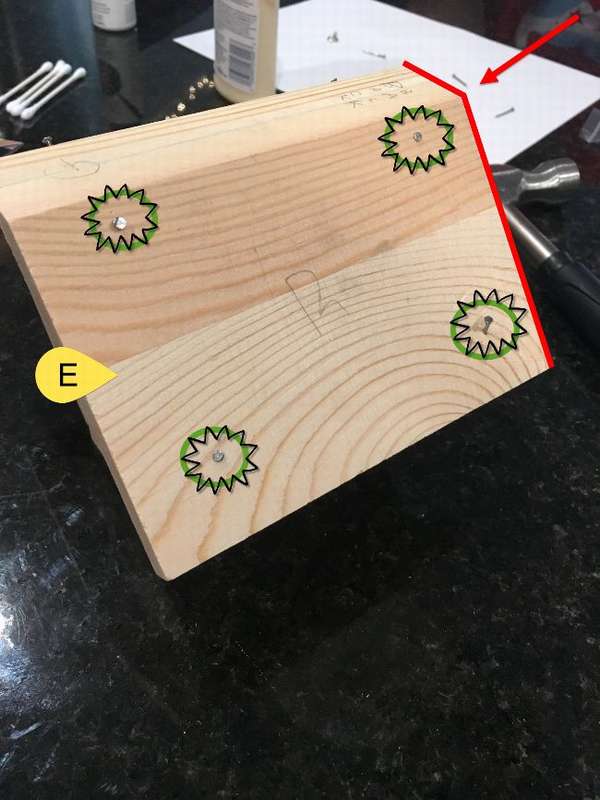
Birdhouse for woodpecker
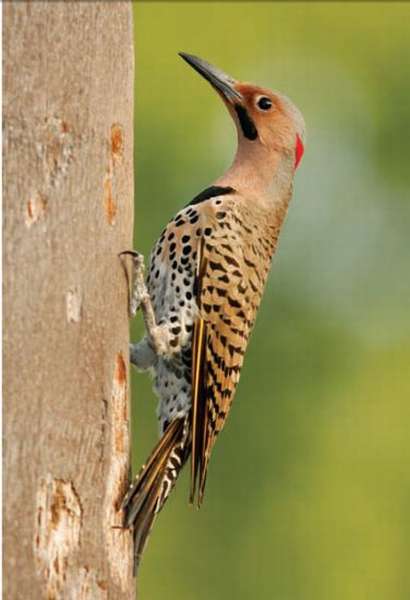 Such a birdhouse is very simple to make. In fact, the biggest problem will be to come up with how to fix a house at a height of 3 - 5 meters, it is at this altitude that these birds prefer to settle. And one feature - tin around the holeso that the woodpecker does not gouge the birdhouse.
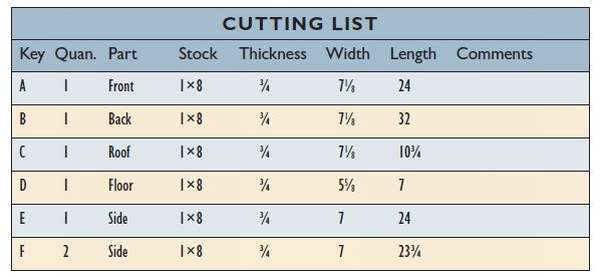
What you need (dimensions in inches, 1 inch - 2.54 cm)
 Six easy steps to build a birdhouse
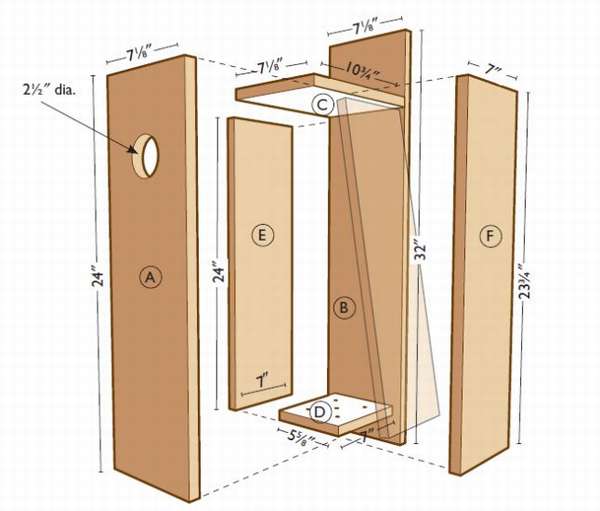 Saw all the parts according to the dimensions indicated in the list.
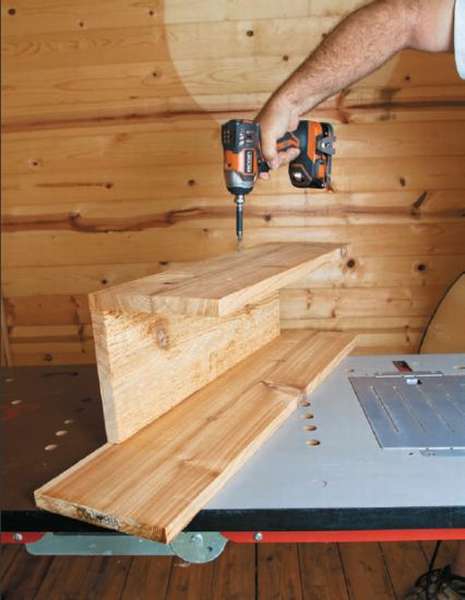
- Use glue and screws to attach the long side (E) to the back (B); then attach the front part (A) to the side (E).
After attaching the long side to the back, use glue and screws to attach the front to the side. - Install the shorter flip side (F) so that it is flush with the bottom of the front (A); then put on two 2-inch annular shanks, one on each side, they will serve as reference points near the top of the flip side (F).
- Attach the cable edge to the side edge of the front of the base, which will serve as a latch to keep the flap closed.
- Saw the inlet at the front (A) 45 cm from the bottom edge.
Due to the larger inlet, it will be easier for you to use a wired electric drill rather than a cordless one to make a hole, since the core drill has more torque and can handle a larger hole better. - Finally, drill four drainage holes in the floor (D) and glue and screw it into the 6.6.7 place; then attach the roof (C).
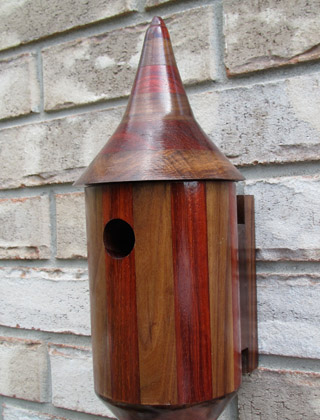
Modern birdhouse
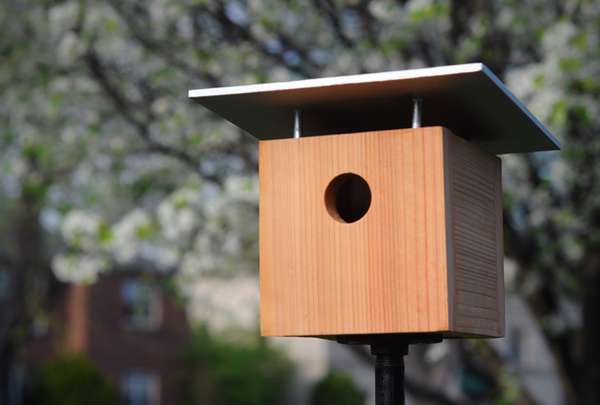 Not everyone has expensive tools and extensive experience in carpentry. But is it possible to come up with modern birdhousethat does not require sophisticated power tools and professional knowledge? Of course you can, he is in front of you. So, here is a stylish birdhouse, for the manufacture of which you will need only an electric drill and several household tools. All this can be done in just an hour or two..
Materials and Tools:
- board 1x6, cut to size:
- (2) 5 1/2 "15 cm long
- (2) 4 "long 10 cm
- wood dowel
- oil paint and brushes
- electric drill
- pliers
- wood glue
- sandpaper
- clamps
- boiled linseed oil
It is really not difficult to assemble such a design, you can read the manufacturing instructions on the author's website.


https://i.expert-h.com/en/skvorechnik/1030#sigFreeIde372c350ca
Large birdhouse for swallows
 Swallows, birds are independent, but willingly settle next to a person. Probably many saw their neat nests at the junction of a roof or a barn. According to legend, the swallow’s nest brings good luck and prosperity to the house. However, in this case we will talk about purple martin, a genus of Progne swallows living in North America. I don’t know, or our swallows settle in such houses, as shown in the photo, but very beautiful designs. Idea to build such multiroom birdhouse for swallows owned by a Canadian ornithologist with a complex name Percy Algernon Taverner. A self-taught naturalist, he was the first ornithologist at the National Museum of Canada, now the Canadian Museum of Nature, from 1912 to 1942. He helped create Point Pelee National Park and a number of bird kennels throughout Canada, including Bonaventure Island. He is the original designer and engineer of the so-called Taverner Violet Martin House, which is made of both wood and aluminum to meet today's standards.
Since he was an excellent architect, as well as an ornithologist, he certainly knew what was best for purple martin. His design ideas were ahead of their time; he was a true master of his craft. Today there are many similar projects, you can see them below in the gallery. It’s more complicated with the instructions; step by step photos are presented here, how to make birdhouse for swallows Taverner, however, without a description of the process. But something is better than nothing. If you really want to do something like this, then at least you will have a general idea.


https://i.expert-h.com/en/skvorechnik/1030#sigFreeId160b53eed0
Here's how to do Taverner Birdhouse Winch System.
 You can make the system very robust and allow quickly lower only one or all the houses if necessary. It also allows you to install only one section at the beginning of spring, before the swallows arrive to settle. This type works quite well, provided that you do not use raw wood. And if you still use it, then they should shrink. When the wood dries and shrinks, the holes for the rollers become closer to each other, which prevents them from rotating freely. In some cases, even the weight of the block is not enough to overcome the friction, and then the house may need to be removed with a rope. If this happens, the holes will need to be enlarged.
The houses are centimeter apart from each other to reduce the load of the wind during storms. It also allows you to improve the air flow on the rear sides of the houses, where 3 additional ventilation holes have been made. They are drilled at an angle of 45º, so thatWater didn’t get inside.


https://i.expert-h.com/en/skvorechnik/1030#sigFreeId352637a347
Option metal lifts


https://i.expert-h.com/en/skvorechnik/1030#sigFreeIdf87144f427
Below are a few drawings and photos of large houses for a swallowtodesigned by Percy Taverner.


https://i.expert-h.com/en/skvorechnik/1030#sigFreeId630d568f62
Beautiful, is not it!
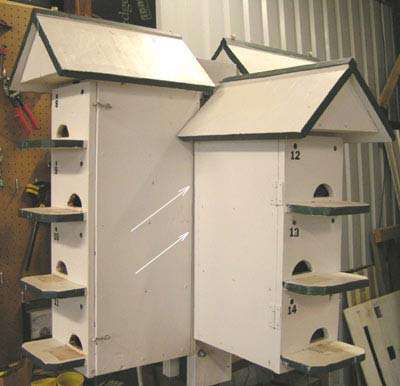
Multi-family birdhouse
 Of course, it’s unlikely that anyone will undertake to implement such a complex project as the Taverner’s house in an ordinary summer house, but make a small multi-family birdhouse under the power of everyone. This is a great project to use trimmed boards and other lumber residues. If you liked this multi-family birdhouse, you will find step-by-step instructions on the author’s website. Or maybe you can do it yourself, several step-by-step photos in the gallery give a clear idea of how to assemble a house for several bird families.
Tools used in this project:
- Wood screws
- Drill
- Countersink
- Band Saw (or Jigsaw)
- Construction glue
- Grinding machine


https://i.expert-h.com/en/skvorechnik/1030#sigFreeIdc387f63e35
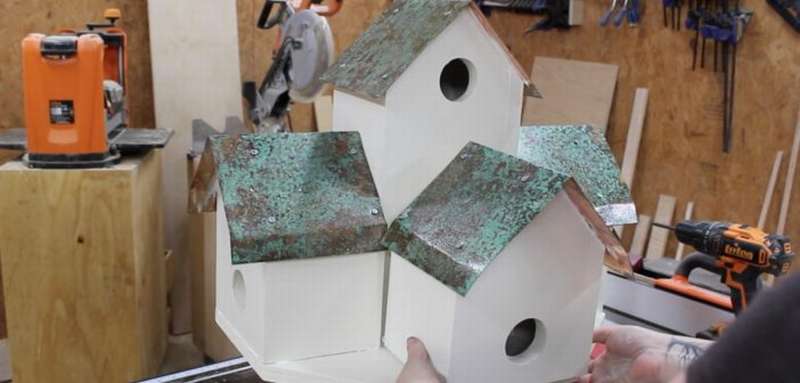
Or another such birdhouse option, three in one.
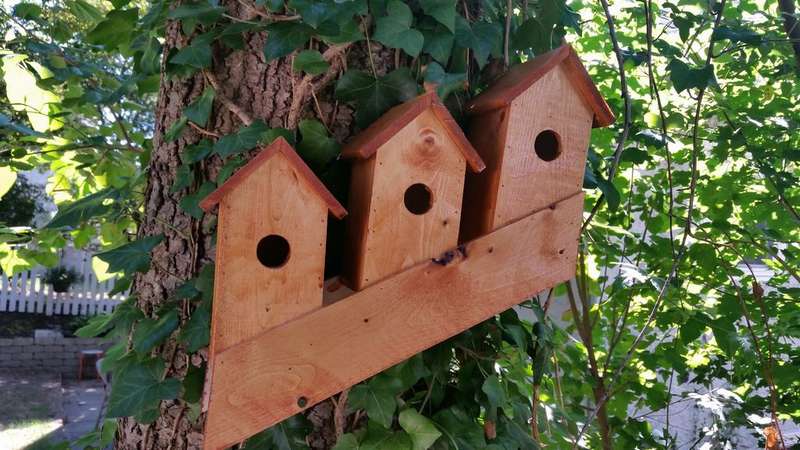 The advantage is that although the birdhouse is multi-unit, it can be made from just one board.
What you need:
- Roulette
- Pencil
- 2x4 board 2.5 m long
- A circular saw
- Hammer, nails.
One of the first cuts you need to make is a bevel 45 degrees in length. In fact, you will not need to saw all 2.5 m.
- Make twelve pieces.
- The front and sides will be slightly longer than necessary, but you will cut them later.
- Each birdhouse has four sides, three of them are tr, so you need twelve pieces. All this should come from one 2.5m board.
- How to install cross-section guides, see step-by-step photos.
- Perhaps some parts will be better combined with each other, experiment with the details of the three houses until you find the desired combination, and then connect the four walls together.
- If the halves of the roof do not stack in a line, you can trim them as you cut the bottom of the houses.
- Finish the last stage, polish and paint, it is possible in different colors, it will be more beautiful.
- Attach a birdhouse to a tree through one of the doors.
You can read the detailed instructions on the website of the author of the project, a link under the gallery.


https://i.expert-h.com/en/skvorechnik/1030#sigFreeId48e4a1d199
Check out a few more examples of multi-family birdhouses


https://i.expert-h.com/en/skvorechnik/1030#sigFreeId0e1150e630
Hello, I am the author of this article, so I look forward to asking questions for this article in the comments below, I will answer all !!!
If you have questions on another topic, ask them on our forum, we will answer you
- Two baskets of paper in 5 minutes (Master class)
- How to make a simple and compact table for a milling cutter from plywood
- How to make a soft headboard tile (Instructions + step by step photos)
- Cinder block benches: a convenient bench in 55 minutes
- How to make a bed with a niche: saving space (Master class)