Unusual birdhouses for birds. 395 Photos of original and beautiful ideas
 Star Wars R2-D2 Birdhouse !!!
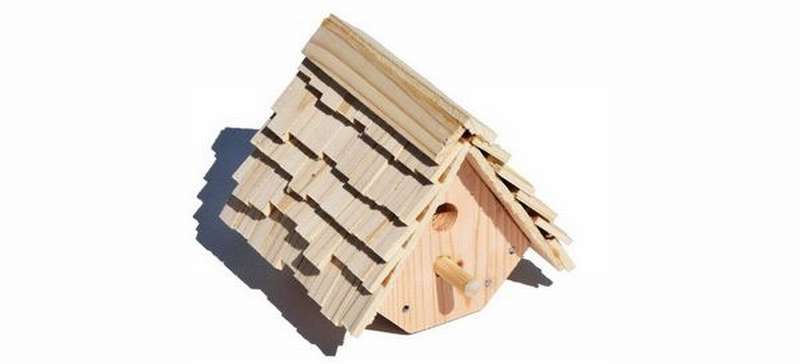
Round birdhouse
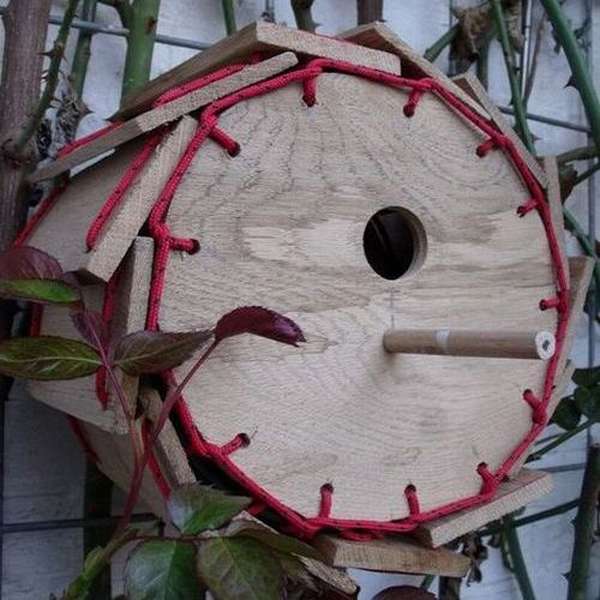 By chance, the author of this project had many oak planks left after installing the parquet floor. All are the same size 7 x 13 cm. It took a while to figure out what to do about it. But the idea was not long in coming, so it appeared several round birdhouses of original design. If you liked it, then making such a birdhouse with your own hands is not at all difficult.


https://i.expert-h.com/en/skvorechnik/neobychnyi-dlya-ptits#sigFreeId304cc362e6
Quite unusual ideas for a birdhouse
Round birdhouse
 How do you like this birdhouse idea?
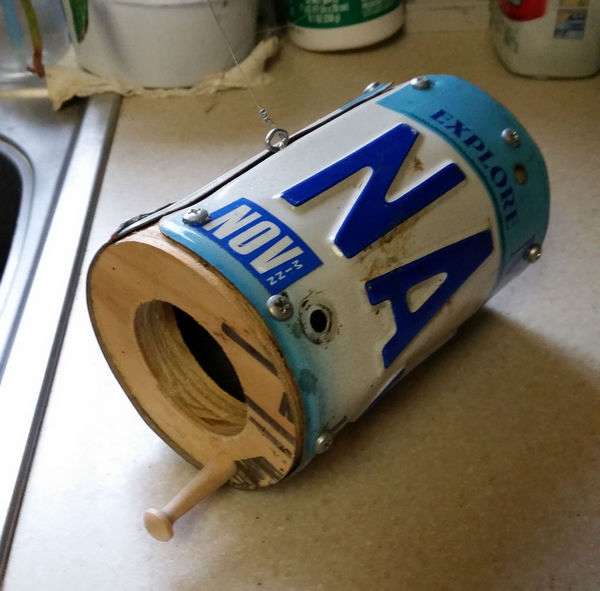
- Take an old car number or just a metal plate of the same size and drill holes every 5 cm along the edge of the hole.
- Saw two circles from a sheet of plywood 1.5 cm thick and make holes 3-4 cm in one hole for entry, and just drill a couple of holes in the other for ventilation.
- Wrap the license plate around two wooden circles and secure with screws.
- There will be a small space in the middle, so you need to find a small bar, and fix it at the junction of the ends of the number plate, it will also be needed to fix the hook for hanging the birdhouse.
- If you wish, you can still make a perch.
It was an interesting 30-minute project.
Birdhouse - Cracked Egg
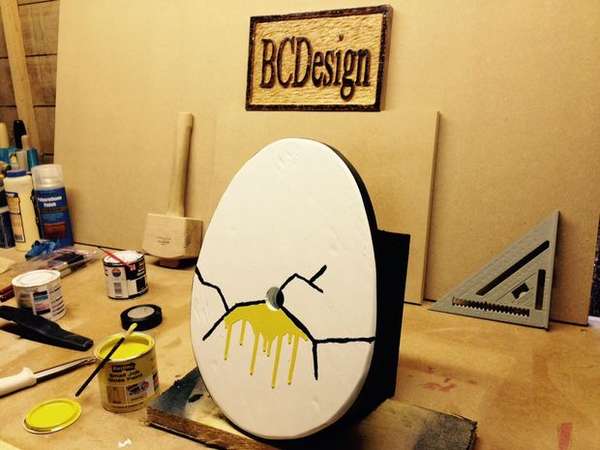 The feature of this project is that !!!that the bird seems to hatch from the egg every time it comes out of the hole of the notch. Construction -wooden birdhouse square, with an egg-shaped front wall. You just have to be creative and believably color the front part.
From 5 wooden parts you make a simple open box, this is the main body of the birdhouse. Then you need to cut the facade in the shape of an egg and make a hole in the notch.
The author secured the back of the box with 4 screws without glue, so that the back could be easily removed and, if necessary, clean the inside of the birdhouse.
To fix the facade, apply glue to the edges of the box. Press it to the back of the egg and pinch. When the glue dries, you can proceed to the artistic part. Simple, cheap and fun!


https://i.expert-h.com/en/skvorechnik/neobychnyi-dlya-ptits#sigFreeId6cab8c3cda
Unusual birdhouse in the shape of a teapot
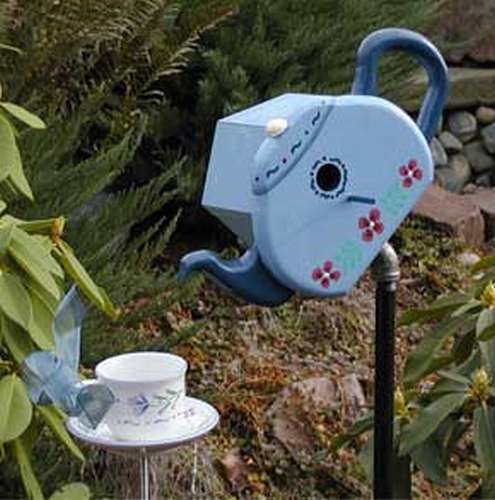 Spring is the time to think about birds. They will look for a good place to create a nest, here our help would be very helpful. Here is a construction project original birdhouse in the form of a teapot and a feeder, naturally in the form of a cup and saucer.
I hope you enjoyed this project.


https://i.expert-h.com/en/skvorechnik/neobychnyi-dlya-ptits#sigFreeId2ff53dc93b
Birdhouse from flexible plywood !!!
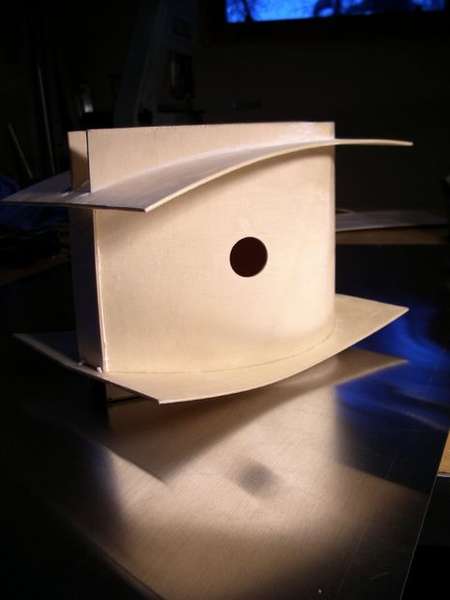 This is an original solution in birdhouse design different from usually boring birdhouses of the same type !!!, and includes fun building technologies unusual for this type of project. In the process of using flexible italian plywood from poplar, which can be bought at most specialized stores. It is a composite epoxy structure, lightweight, waterproof and elegant.
Note. You can change the design so that you can open one of the small end panels to clean the birdhouse between seasons.


https://i.expert-h.com/en/skvorechnik/neobychnyi-dlya-ptits#sigFreeId517ee06f1e
Another such option is a birdhouse made of flexible plywood 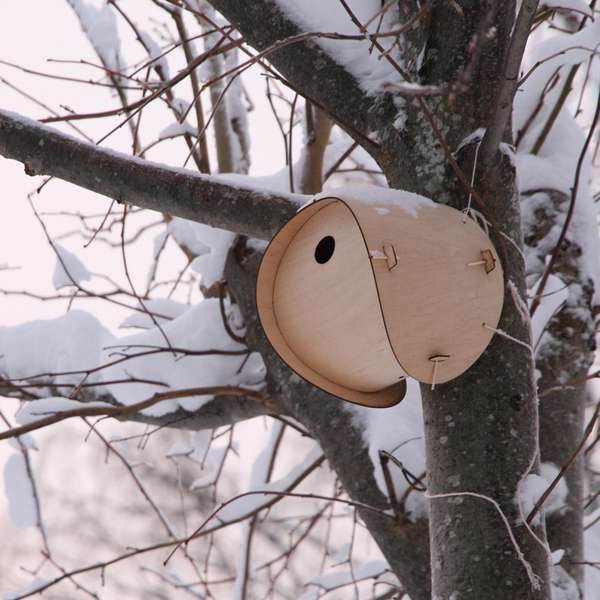
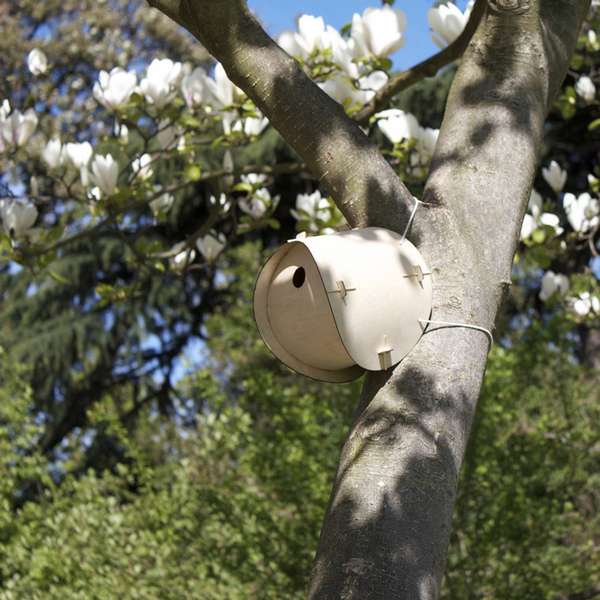 A folding house consists of two 1.5 mm plywood parts that require assembly with little creativity. Parts are made using laser cutting.
 The birdhouse is designed without a pole, with a hole diameter of 28 mm, and is intended for small birds of the passerine order. More information can be found on the website.
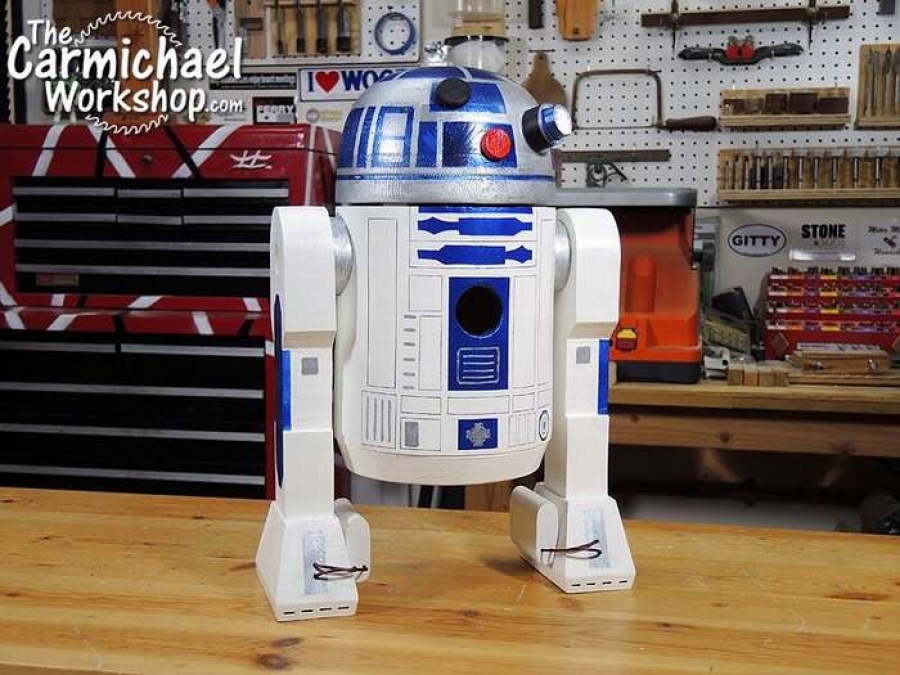
Original birdhouse R2-D2
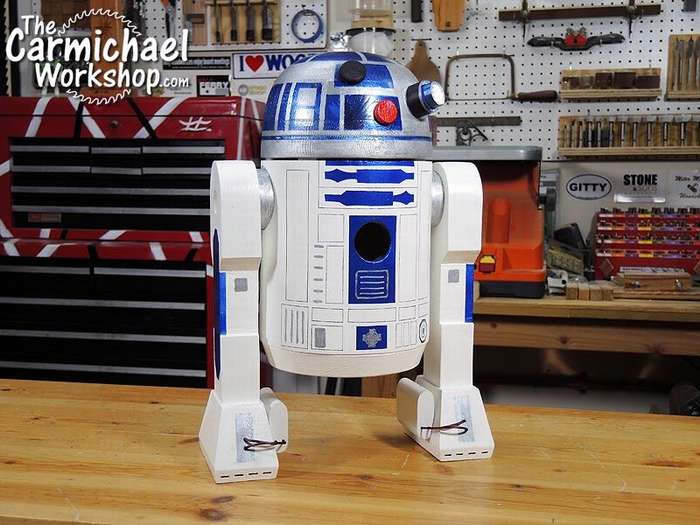 Project for fans Star Wars !!!
Of course, making an original birdhouse in the shape of a robot is not easy, you need a home carpentry workshop and a set of necessary tools, but for real Jedi, nothing is impossible !!!
Would Anakin Skywalker be stopped by any difficulties? And here is just a birdhouse.
So if you liked this idea, the step-by-step photos presented below will help to realize it.
You can read the detailed instructions on the website of the author, a true fan of Star Wars.
May the force come with you!


https://i.expert-h.com/en/skvorechnik/neobychnyi-dlya-ptits#sigFreeId79c528830a
Birdhouse with stone decor
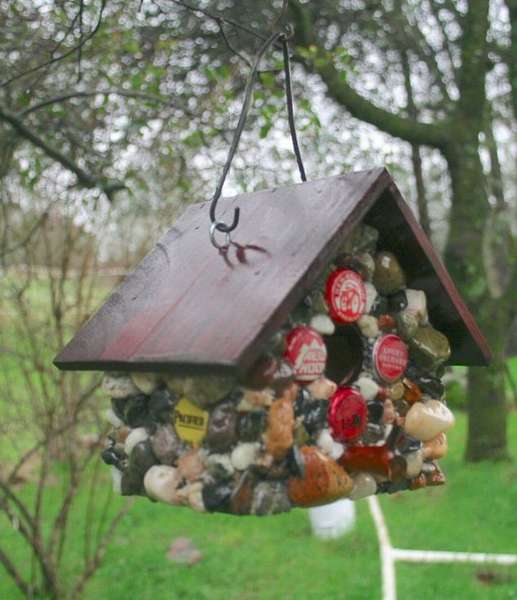 See how you can decorate a birdhouse pebbles and corks from bottles. You will need a solid base, in this case the house is made of plywood. Pay attention to the small pieces of wood attached inside. How to make a birdhouse, I won’t tell, we will focus on the decor.
- Paint the roof first.
- Remember to apply a primer around the inlet and under the eaves of the roof. Make sure that all places where you will not fasten the stones are painted.
- Gather the materials. Beautiful pebbles, a twig for perch, a few bottle caps. Go to the hardware store and buy a can of polyurethane.
- Paste all prepared materials on the birdhouse in any way that suits you.
- Set strong hooks and lead the birdhouse.


https://i.expert-h.com/en/skvorechnik/neobychnyi-dlya-ptits#sigFreeId02128d522f
Creative birdhouse in the style of driftwood art
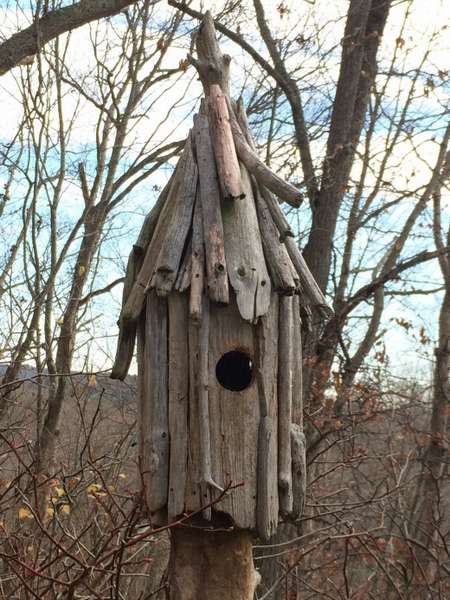 From English, Driftwood translates as driftwood, fin, that is, pieces of wood, branches, driftwood that are thrown by the waves onto the shore. Crafts from this material are called Driftwood art, it’s like the sculptors, when the artist in stone already sees the future sculpture. Driftwood art is a very extensive topic, if you are interested, you can type in Google and look at the work of masters of Driftwood Art.
As for this project, then in fact it is an ordinary birdhouse. At first, a box is made that must meet all the necessary requirements of a functional birdhouse, but decor, this is your creativity.
Detailed instructions are on the site of the author of the project, a link under step by step photos.


https://i.expert-h.com/en/skvorechnik/neobychnyi-dlya-ptits#sigFreeIdf931425f2f
Diamond-shaped do-it-yourself birdhouse
 This project is suitable for children aged 8 years and older. Highly recommended adult control for safety when working with woodworking tools. Are you looking for an entry-level project that does not require expensive power tools? Then making it a small diamond-shaped birdhouse - great choice!


https://i.expert-h.com/en/skvorechnik/neobychnyi-dlya-ptits#sigFreeIdd17df1a786
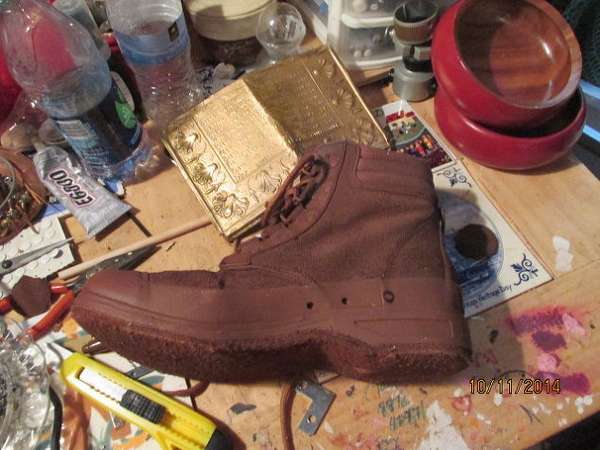
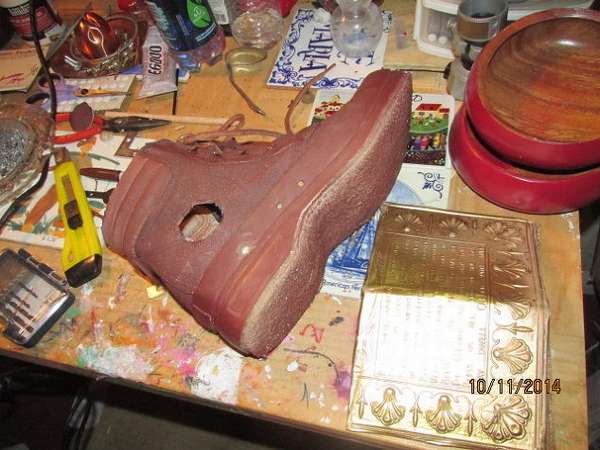
Birdhouse Birdhouse
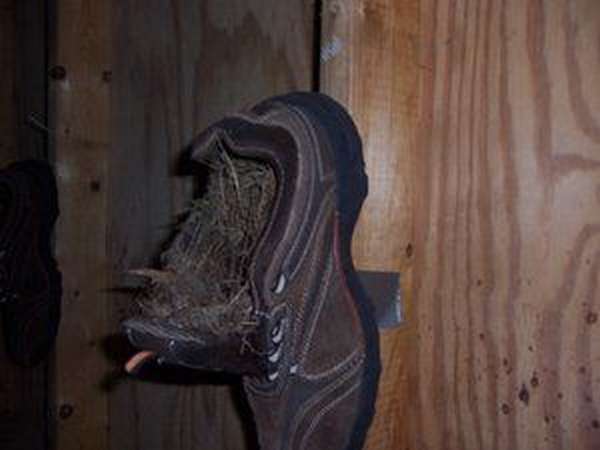
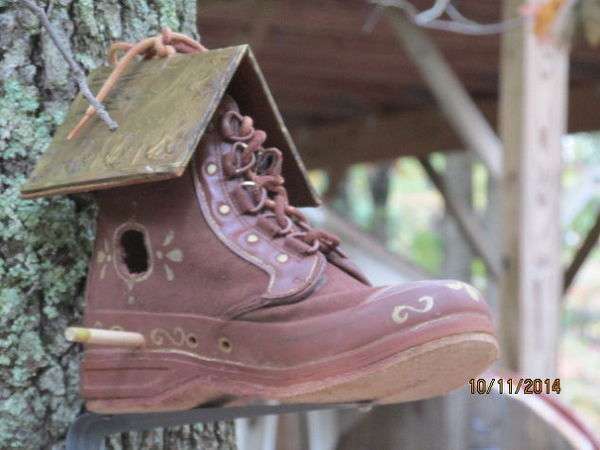 Do you have old shoes? Do you like birds? If you answered yes to both questions, read on, this information is for you. As you see in the photo, from old shoes turns out to be a good birdhouse.
You just need to make two holes, for the entrance and for the perch. Find a metal plate, cut to the desired size and bend in half. That is, make a roof. In principle, this can be done from any material - plastic, wood, the main thing is not to leak. Then glue it to the top of the boot.
That's basically it. Establish a perch and nail or tie to a tree, a fence, a pole.
Old sneakers come in handy too. Your old, worn, unusable, or simply uncomfortable boots can come in handy for birds.
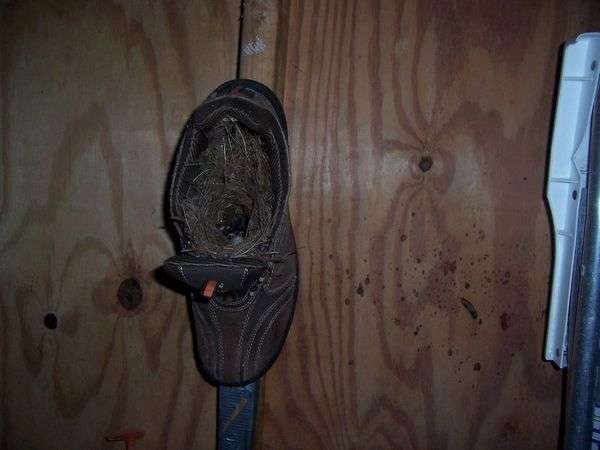 How to make this shoe nesting boxperhaps the instruction is not needed. Just grab your shoes and nail them to the tree. Put in the middle, sawdust, moss, although if the birds have a desire to settle in your shoes, they can do it without you. I hope the birds make a nest out of your old shoes.
And if you have old high bots, birdhouse can be improved a bit.
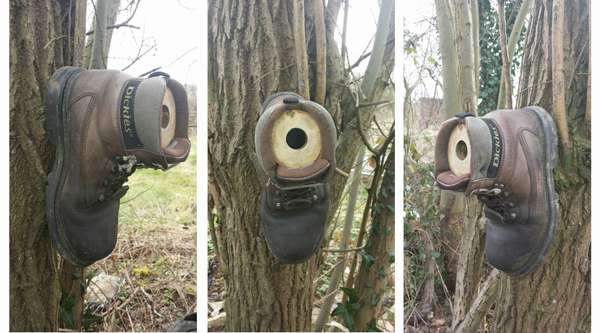 You just need to cut a circle out of plywood to fit the boot, drill a hole for the tap hole in it and fix it, as shown in the photo.
Birdhouse from the boot
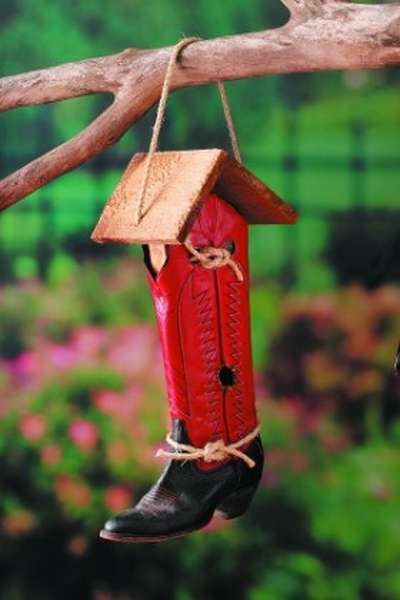
A
why
and
no?
If you can make a birdhouse out of a boot, then a boot is also suitable.
Read the detailed manufacturing instructions on our website at the link
https://i.expert-h.com/en/skvorechnik/podrucznyh-materialov
Decorate as you like. Hang the boot on a tree or other support approximately 2.5 to 3 m above the ground.


https://i.expert-h.com/en/skvorechnik/neobychnyi-dlya-ptits#sigFreeIdc425d341fd
 Here is another example from wikihow in pictures.
- Find an old boot and wash it with warm water and soap.
- Fill the sock inside with a clean rag.
- Glue the hook to the back of the boot, it will be needed for attaching to a tree.
- Drive in a small but sturdy U-shaped nail to support the weight of the boot and its occupants.
- Attach the boot to the side of the tree trunk.
- Put the hook on the U-shaped nail and make sure it sits firmly.
Depending on the weather, a birdhouse can last a season or two. If after the first season it remains in good condition, remove the boot from the hook and clean for the winter in the barn. It’s better to put it in a stocking to prevent the entry of insects, and in the spring hang it on a tree again.


https://i.expert-h.com/en/skvorechnik/neobychnyi-dlya-ptits#sigFreeId5ee8b7df5c
What else can be done shoe birdhousesSee this small selection of photos.


https://i.expert-h.com/en/skvorechnik/neobychnyi-dlya-ptits#sigFreeIdf1cc750a60
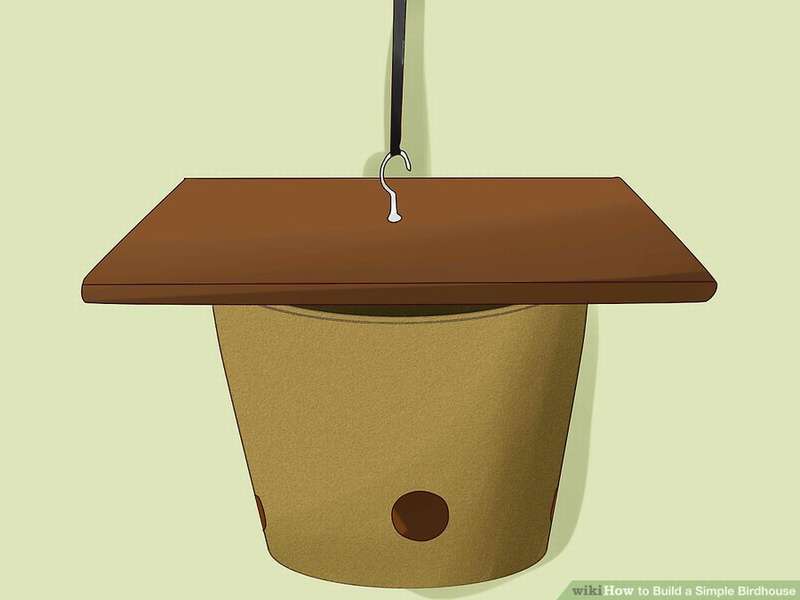
Flower pot birdhouse
Since this bird house is small, it is ideal for installation in dense vegetation. The only difficult part of this project is to make an inlet in a flower pot. The hole should be 26 mm in diameter. Drilling best with a special drill for ceramic tiles is not expensive. But it is also possible with an ordinary drill, just stick a piece of adhesive tape with a hole, make a small recess with something sharp and drill without pressure, at low speeds, blowing off crumbs and pouring with some water.
True, if the pot is covered with glaze, then you need to be especially careful, but if not in a hurry, then everything will be fine.
Instruction manual:
Define place to enter and drill a hole with the largest drill.
Then increase it to the desired size with a round file and an emery cloth. This may take up to 30 minutes. Perhaps you know another way, but be careful, patience is indispensable here. Once the entrance is large enough, the most difficult part of the work is completed. But be careful ... it’s not the right time to accidentally drop a flower pot!
Make plywood floor. Only from plywood, do not use chipboardthat absorbs water like a sponge. Cut the round base with a saber saw or hacksaw 5 mm more than measured. In the center of the plywood base, drill a hole large enough for the eye bolt to pass through.
Set the flower pot upside down on top of the plywood base.
Put the washer on the eyebolt and pass it through the drain hole and the plywood base.
Install another washer at the end of the eyebolt and secure with a nut. (Be careful not to overtighten the nut - you may break the pot.)
You can hang a birdhouse. Using a hook or chain, hang the house 2.5 - 3 m above the ground and wait for the arrival of feathered residents!
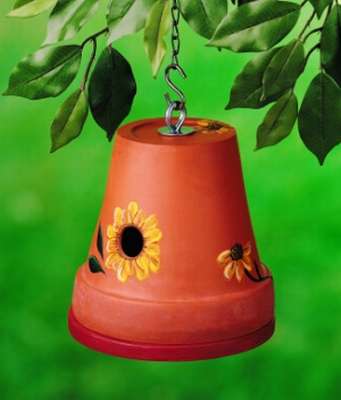
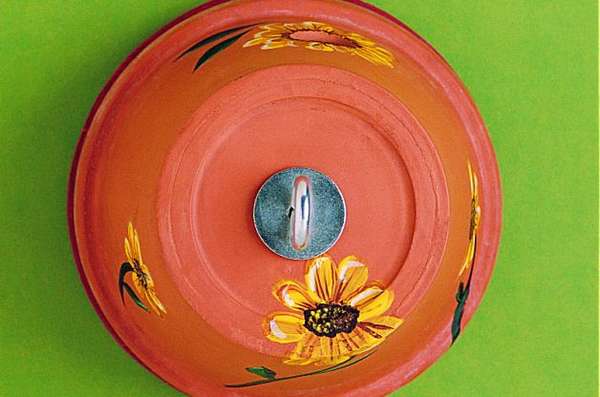
 Here is another example birdhouse terracotta potonly with a roof.


https://i.expert-h.com/en/skvorechnik/neobychnyi-dlya-ptits#sigFreeId0dcf777a44
 And so it is possible make a birdhouse out of a flower potwithout making a side hole, but by making a special insert from wood or plywood.
Necessary materials:
- Terracotta pot
- A small sheet of plywood or a piece of board.
- Cardboard for the template.
- Jigsaw
- Large Countersink Drill
- Big screws
Manufacturing procedure
- The first step is to make a template and fit it so that it fits perfectly into the pot.
- Paint the pot of your choice.
- While the paint is drying using a cardboard template, use a jigsaw to cut a circle out of plywood.
- Countersink a hole for the tap hole, anywhere, only no less than 5 cm from the edge.
- Now check how tightly the circle cut from plywood enters the pot.
- Screw the screws into the pole and secure the birdhouse.


https://i.expert-h.com/en/skvorechnik/neobychnyi-dlya-ptits#sigFreeId6405979fd1
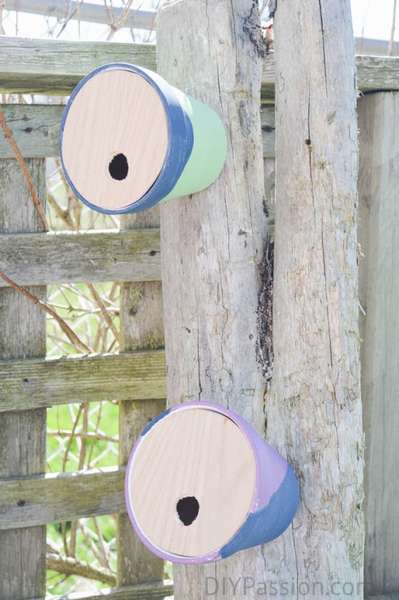
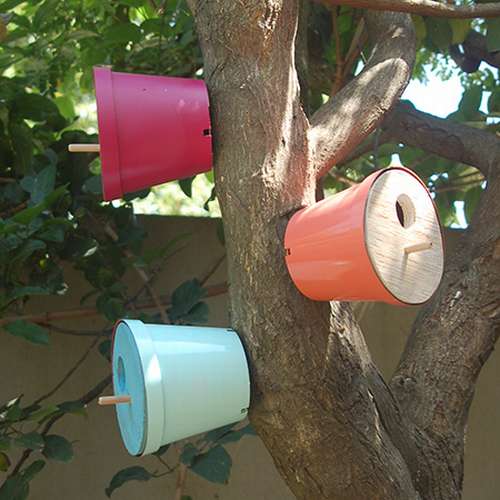 If you don’t have pottery, it’s even easier make a birdhouse out of a plastic pot. They are cheaper and you can very easily make several colorful bird houses for the garden.
Will need to prepare:
- Plastic flower pots 3 pcs.
- Rust-Oleum 2X slate paint of your choice
- Primer Rust-Oleum 2 X
- Plywood or board
- 8mm dowels 3 pcs.
- Newspaper or some fabric
The manufacturing procedure of the birdhouse is the same as in the previous example, so I will not repeat it. One difference, here is added a perch, but this is at your discretion, most masters recommend doing without this detail.


https://i.expert-h.com/en/skvorechnik/neobychnyi-dlya-ptits#sigFreeIde2c52b595d
- Brick grill: 44 drawings, 18 projects + photos
- Collapsible barbecue: 50 drawings, 20 master classes +300 DIY photos
- ✿ Flowerbeds:> 34 turn-based master classes + photos (248 ideas) - do-it-yourself
- DIY sauna in the apartment: bathroom, balcony, storage room. Projects and photos
- Shelves in the bath with your own hands: +200 photo. Drawings of bench benches in the steam room