Do-it-yourself bar counter. 700 photos, drawings, step-by-step instructions
 bar counter for home
Treating guests is not the only advantage of their own home bar - It is also convenience, style and privacy. Regardless of whether you want a glass of wine after work or brandy after dinner, nothing beats comfort when you can completely relax and enjoy the moment. For many, the idea make a home bar It reminds you of a dream, but it is much easier to realize it than you think.
Of all the furniture you can make do-it-yourself bar counter not the hardest task. If you are confident in yourself and have already been doing home projects, then you will surely cope with this task yourself. So, if imbued with an idea make a home bar do it yourself, we present 35 examples with drawings and step-by-step photos.
Content:
- Home Bar
- Do-it-yourself bar counter in the kitchen
- Bar counter drawings
- DIY kegerator
- Original bar counters
- Garden bar
- Bar counter for the veranda
- Bar counter of pallets
- DIY tiki bar
- Mobile bar counter
How to make a bar counter with your own hands
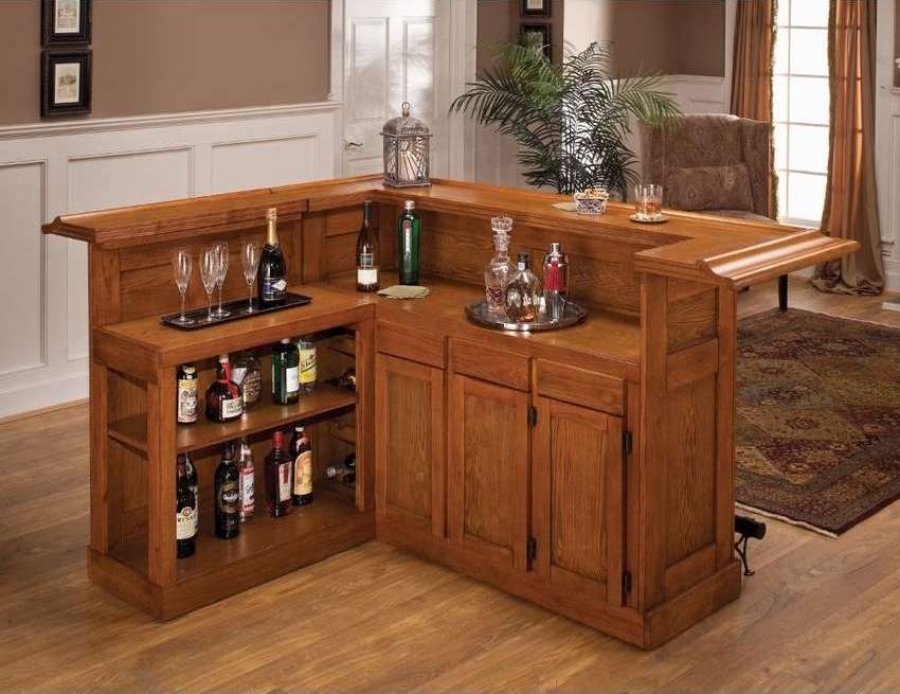
 Want to know how to make this do-it-yourself home bar? Unfortunately, to say that this is a very simple project will not be true. Working with oversized parts and cutting at an angle can upset a beginner. If a bar counter assembly idea evokes pleasant and fuzzy memories of how you were taught to use a hammer in school, this is not enough, this experience will not help much.
 it complex piece of furnitureAs you can see in the photographs, the bar counter is made of finished panels, durable oak timber, and the supports are reinforced with stainless steel parts.
But, nothing is impossible. For this it is written a guide with step-by-step photos on how to make a home-made bar yourself. Use the link under the gallery, on the author’s website you can read the complete instructions with a step-by-step description of each step, get acquainted with the list of materials and tools, and also browse detailed video. Presented here drawing and step by step photos help you implement this project over the weekend, it would be a desire. Good luck


https://i.expert-h.com/en/shkaf/barnaya-stojka-svoimi-rukami#sigFreeIda2613a3766
How to make a bar in the kitchen
 On the Internet you can meet many projects, how to make a bar counter with your own hands, from absolutely fantastic to quite respectable. This option can be attributed to the latter, made in strict English pub style of the beginning of the last century. Size can be changed, such a bar can be built even in a medium-sized kitchen. True, you will need to get rid of some furniture and change the design, but who will be interested in the interior, if you have own bar. In general, the choice of location is not limited, it can be not only the kitchen, but also the attic, basement, garage.
Below is a drawing, but you will need to make your own, given the size of the room.
The standard beam height is 105 cm from the floor and the depth is 60 cm. The shape and size options are practically unlimited, but it’s important to maintain standardized height and depth. The peninsula style is chosen here, where the bar extends perpendicular to the adjacent wall.
 Toolswhich you will need: table, circular and miter saws; shock gun; drill and glue gun.
Materials : 3 sheets ¾ ”plywood; 2 kg of drywall screws; building glue of your choice.
Step-by-step instructions on how to make a bar counter read on the site, link under the gallery. See the master class in step-by-step photos below.


https://i.expert-h.com/en/shkaf/barnaya-stojka-svoimi-rukami#sigFreeIda112135753
DIY bar counter for the kitchen
 You can dream about your own for years home barbut it’s better to pack up and do it yourself in a few days. Here is a good example, simple classic stand, ideal for the kitchen, does not take up much space, convenient and functional. It may look too modest, but you can refine the design as you like. Instructions with a phased description of the process, lists of tools and materials are on the site. How to make such a home bar with your own hands, see below for step-by-step photos.


https://i.expert-h.com/en/shkaf/barnaya-stojka-svoimi-rukami#sigFreeId394762cb60
Home bar for drinks
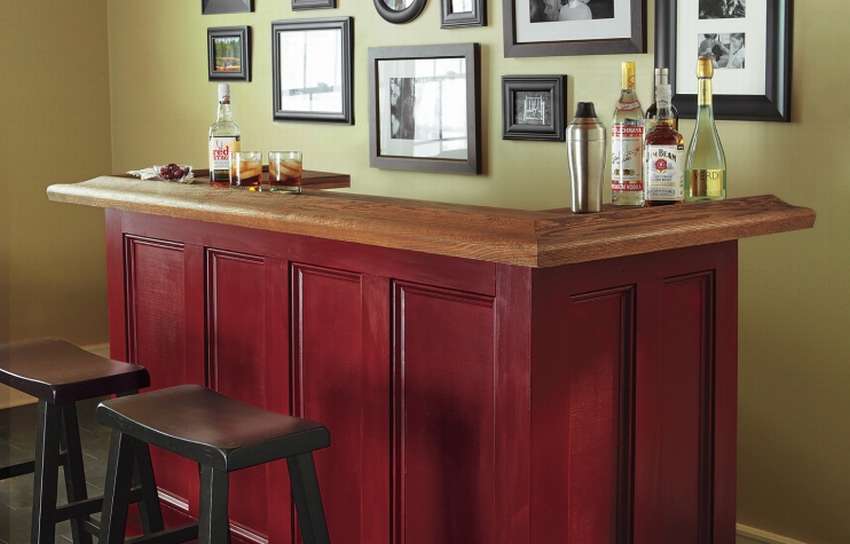
 Instruction how to make a real bar at home, with shelves, wine cabinets, counter - in general, everything is as it should be. You can read the full guide on the site, step by step and very detailed, a link to the source under the gallery. But I want to note some nuances. In the upper part of the frame you will install a board of a certain size (probably 3/4 inch), and then you will need to install the upper bar above the one that closesframe and extends 20 - 25 cm further so that the knees do not abut. Thus, you need to plan the frame based on the actual width of the shaft top, as well as the final height.
 Ultimately, the height should be approximately a meter. If you plan L-shaped panel, as in this case, you can make two sections completely separately, and then at the very end squeeze them together and “snap”. Usually, some precast bars are arranged in furniture stores.
Here the upper part is joined at an angle of 45 degrees, therefore the frame is not divided. This means that this bar cannot simply be disassembled and rearranged to another place.
Many people first make the bar itself, and then additional cabinets in the form of a separate box, which is located behind the bar. Here is the idea of the design, to make the frame in the cabinet area directly under the rack in order to rationally use the space, therefore frame a little deeperthan in similar projects.
Read all this in the detailed instructions on the site, and below you can see the master class, how to make a home bar do it yourself on step by step photos.


https://i.expert-h.com/en/shkaf/barnaya-stojka-svoimi-rukami#sigFreeIdad37bdfe70
Home bar
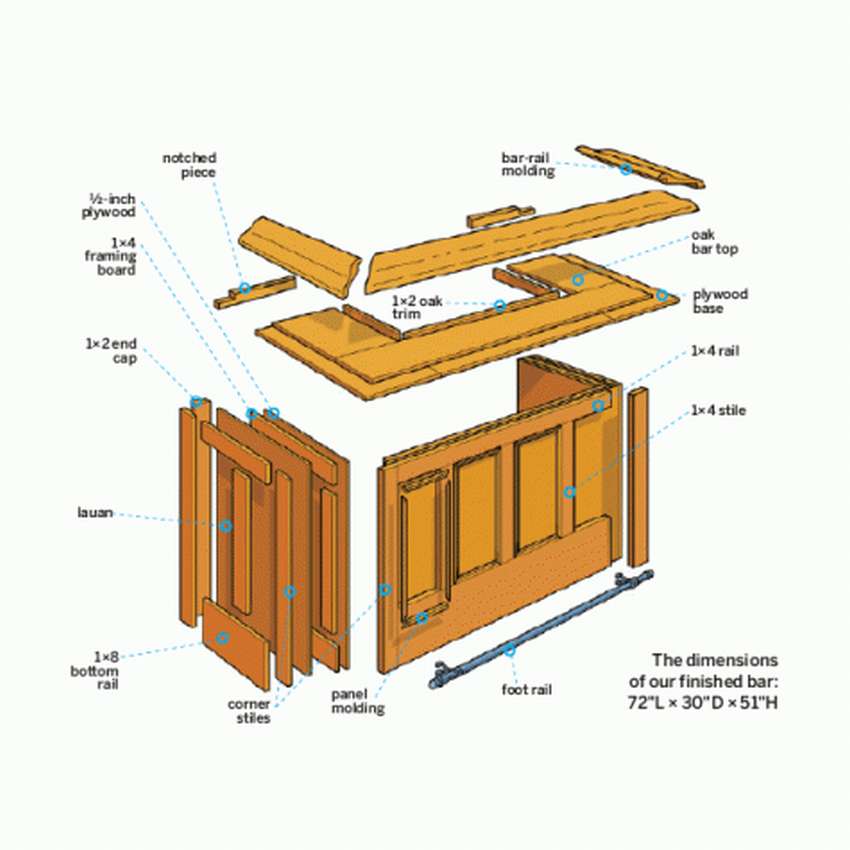
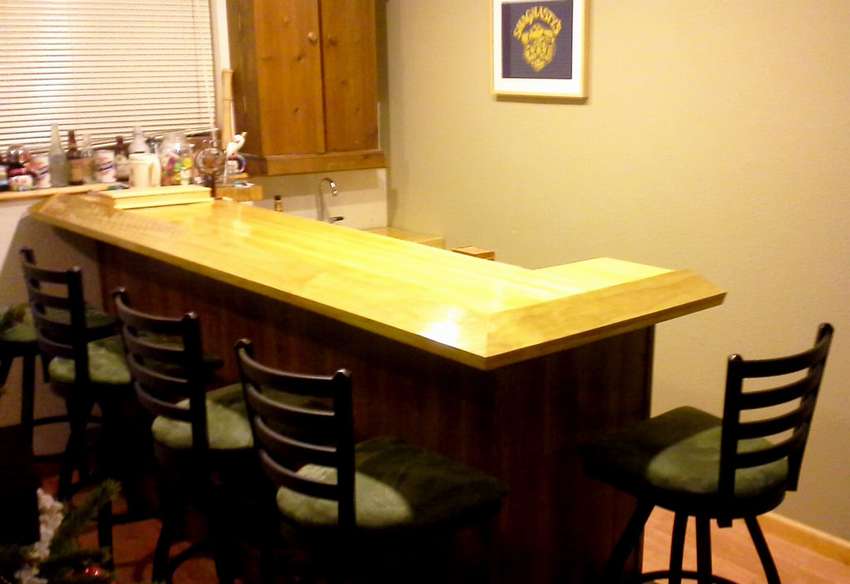
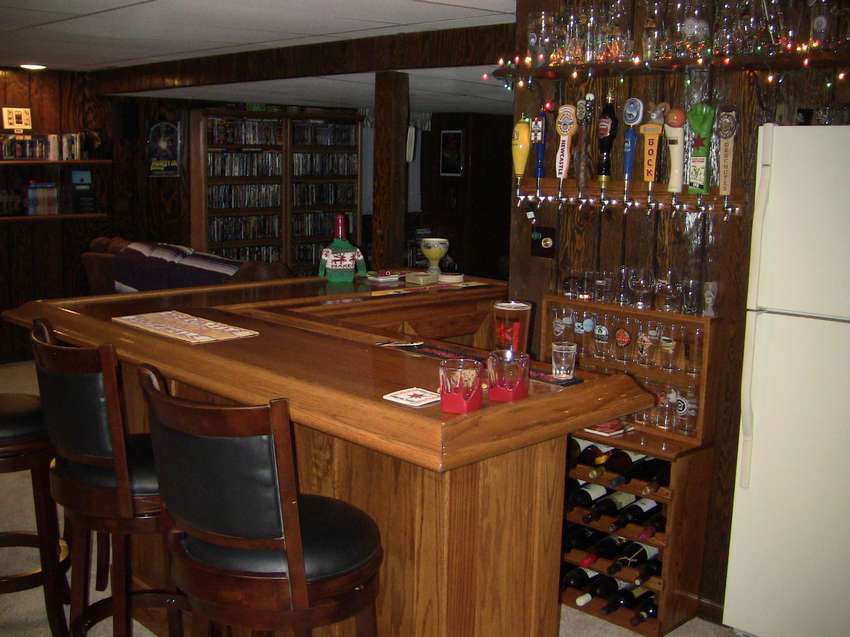
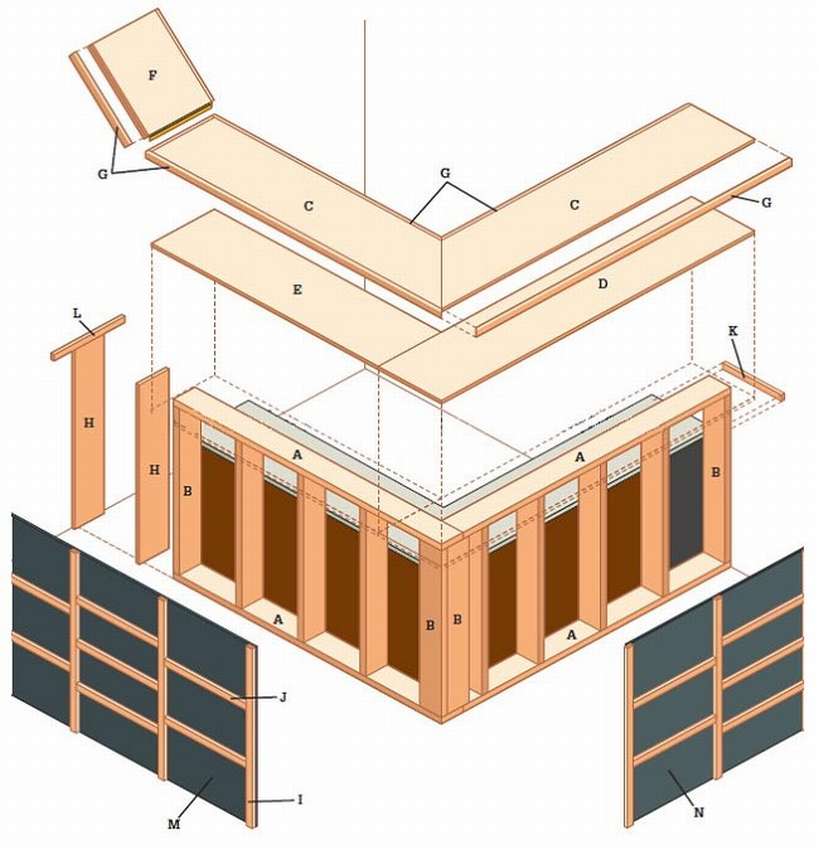
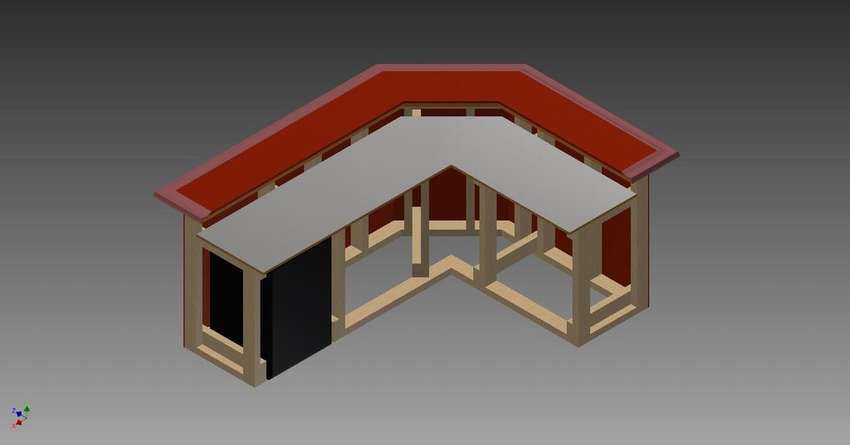
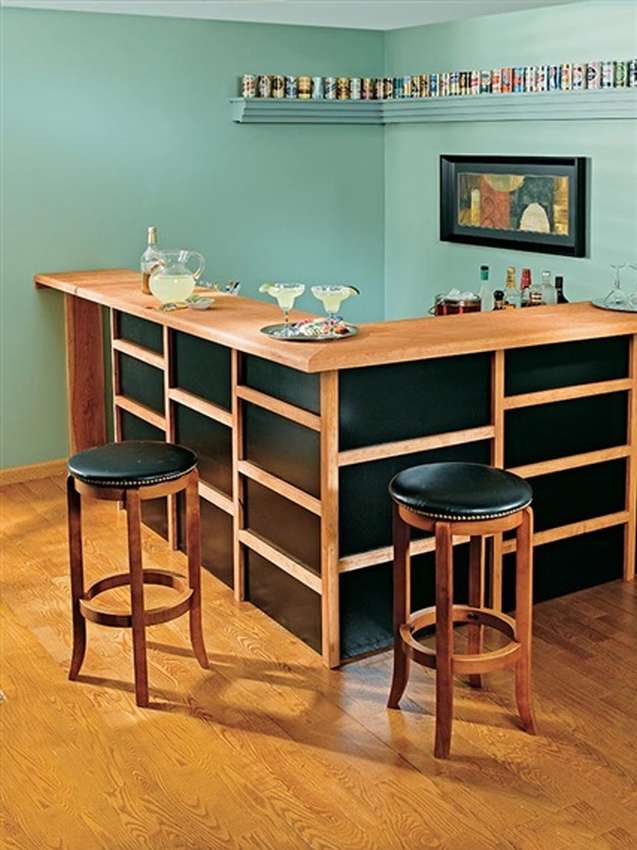 Presented here home bar made in an elegant style and thought out for the effective work of the bartender. A small refrigerator provides access to cold drinks and ice, and convenient cabinets make it possible to conveniently place all kinds of drinks. Although this is a “dry bar" (without plumbing), design can be changedThere are many ways to do this. If you want to make a stationary structure, water is not a problem. This compact corner bar It has glossy black MDF aprons with decorative applications that form a horizontal mesh pattern on the panels. The cherry plywood worktop is located on the L-shaped knee septum, which creates a comfortable place for the bartender to work. Hinged baffles in the bar at one end provide easy access to the work area. Key components - cabinets, laminated countertops, fridge and Asian-style finishes - create the basis of the home bar.
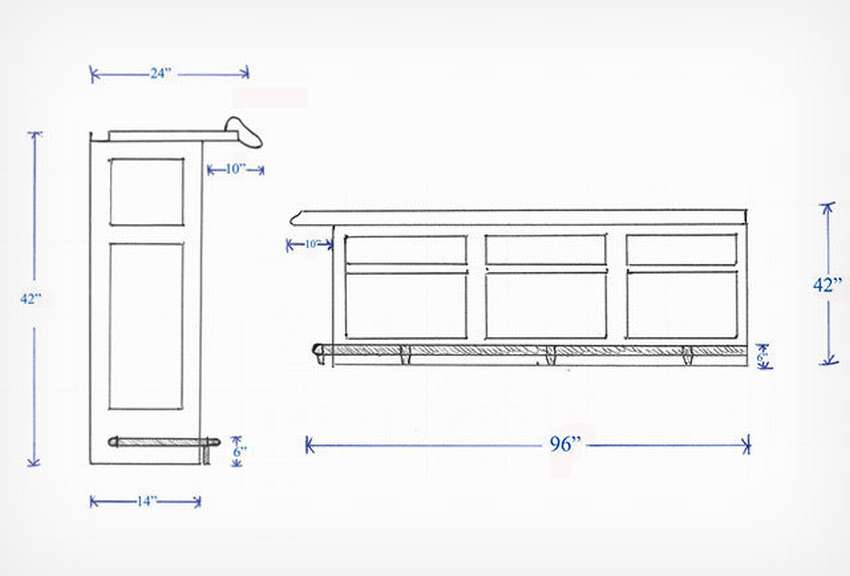
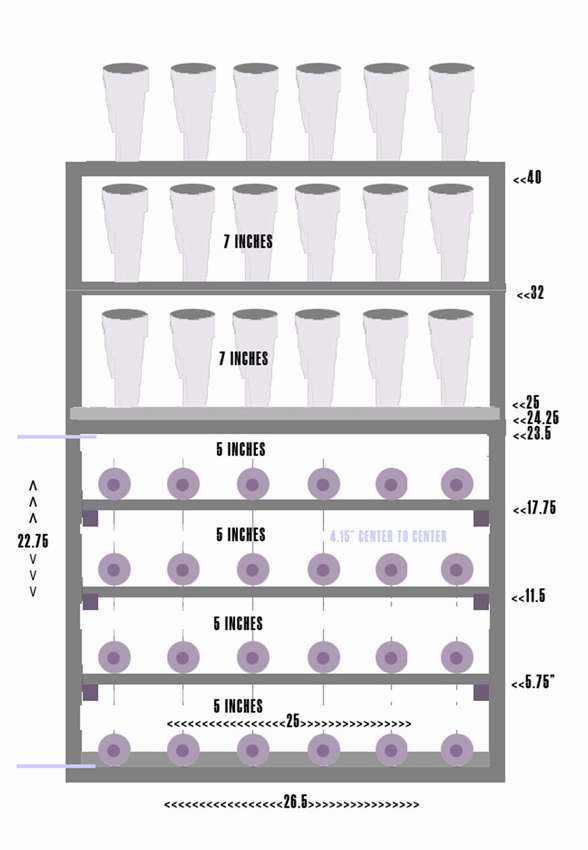
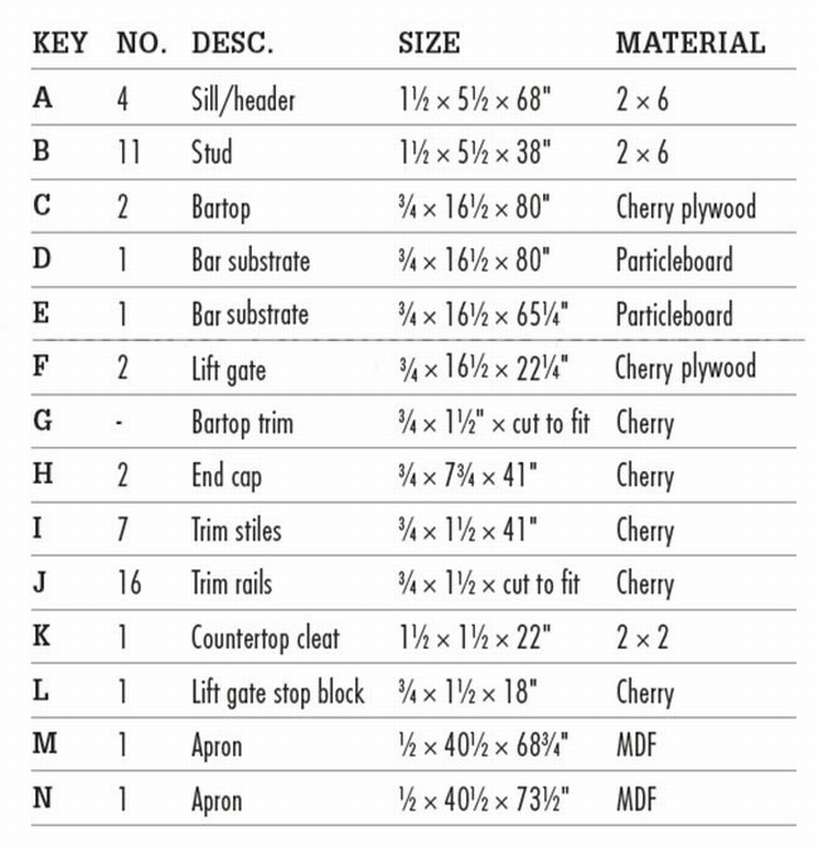
Below you see drawing and parts list with dimensions in inches. Multiply the values by 2.54 to convert the figures to centimeters.
 How to assemble a bar at home Look at the master class for step-by-step photos.


https://i.expert-h.com/en/shkaf/barnaya-stojka-svoimi-rukami#sigFreeId900c21097b
Wooden bar counter for home
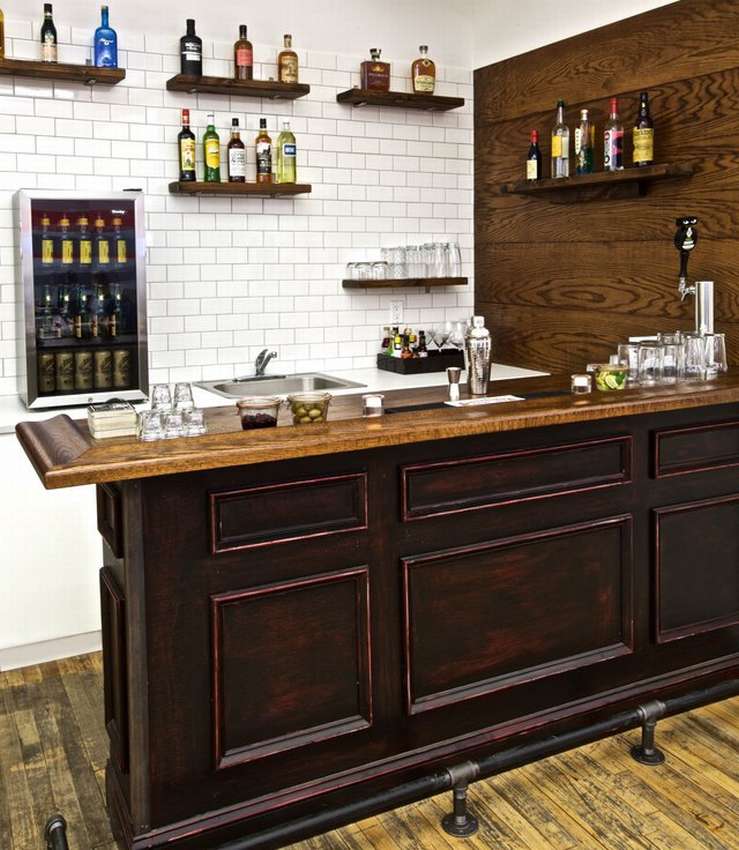
 Most of us want his home to be special. Some people like game rooms equipped with the latest technology, others devote their free time to create a solid office with a real library, and someone else wants their own movie theater. If you have free space and want to build something interesting and original, you need to make a choice. There are many ideas, but let's look at what can fit in any home, does not take up much space and is suitable for both single and family men. Bar. Or, to be more specific, bar counteraround which all activity revolves, and what makes the greatest impression on your guests. Here you will find a concrete example with step-by-step photographs, how to make a wooden bar counter for a home do-it-yourself. The instruction is on the site, the link is under the photo gallery.


https://i.expert-h.com/en/shkaf/barnaya-stojka-svoimi-rukami#sigFreeId945ded306f
Home Bar
 By following these step-by-step instructions, you will learn how to make a classic home barthat will satisfy your needs. Having a bar in the basement or other living space is important for meetings, whether with friends or just spending an evening with your family. Here you can have lunch, watch football, play cards or just relax with a beer on the weekend. Basic woodworking skills are needed, and don't be alarmed if you think your knowledge is not enough. Ask a friend or relative who is a little versed in woodworking and this will be a great collaborative project. Assembly instructions for this bar counter are on the site, the link can be found under gallery with step by step photos.


https://i.expert-h.com/en/shkaf/barnaya-stojka-svoimi-rukami#sigFreeId7a326d7d64
How to make a bar at home
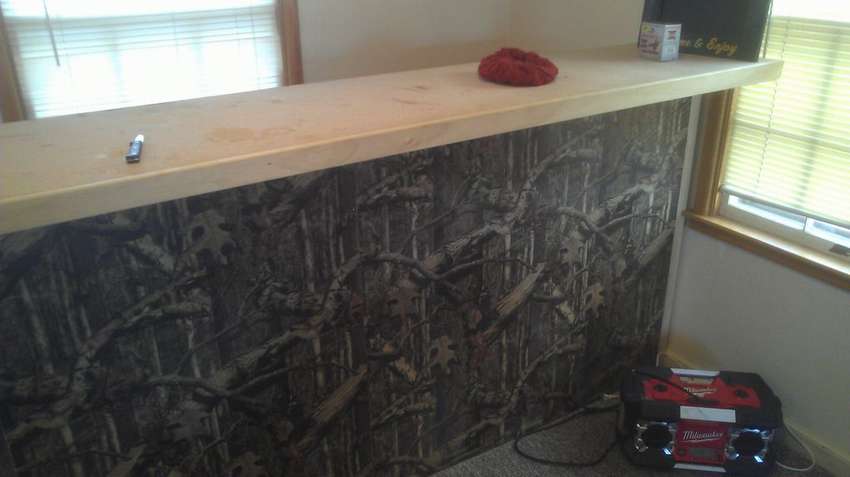
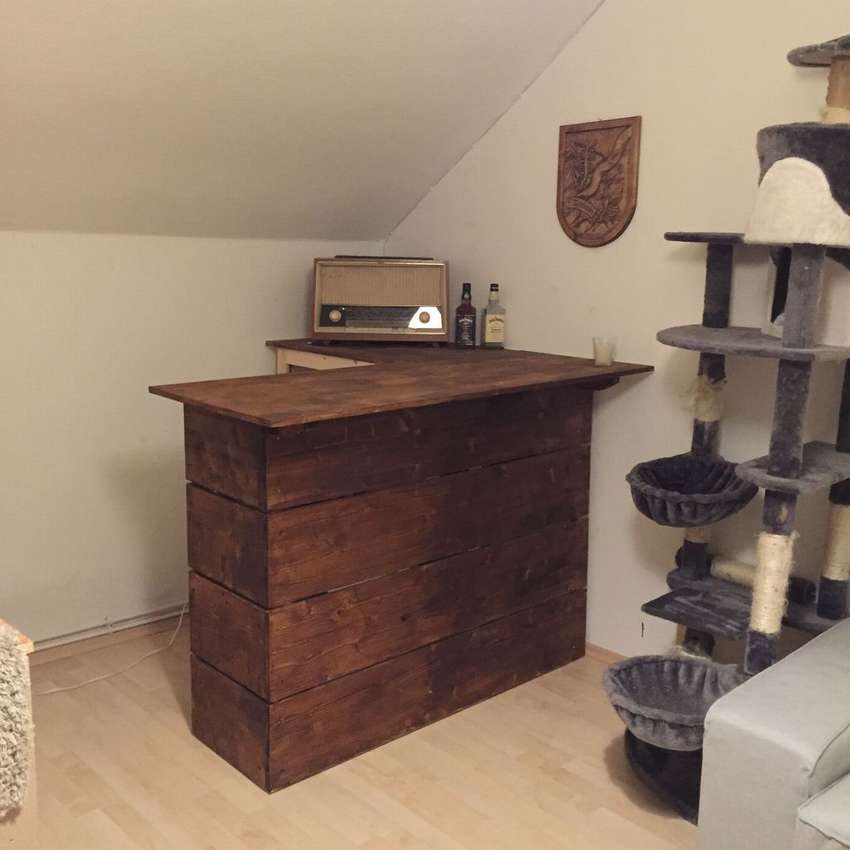 Shown here how to make a simple bar counter for a home do-it-yourself. For the frame you will need 5 three-meter bars 4 x 6 cm. The surface is made of glued wood 18 mm thick and 60 cm deep, and the skin is made of the same wood, but with a depth of 25 cm. You also need brackets where the rods and several screws intersect . For coating, varnish with walnut optics was used.
For work you will need circular saw, cordless and wire drill, jigsaw and brush.
To assemble the frame, connect the horizontal and vertical rods to the brackets on the bottom and one tilt screw on top. Then connect them to the remaining horizontal stripes.
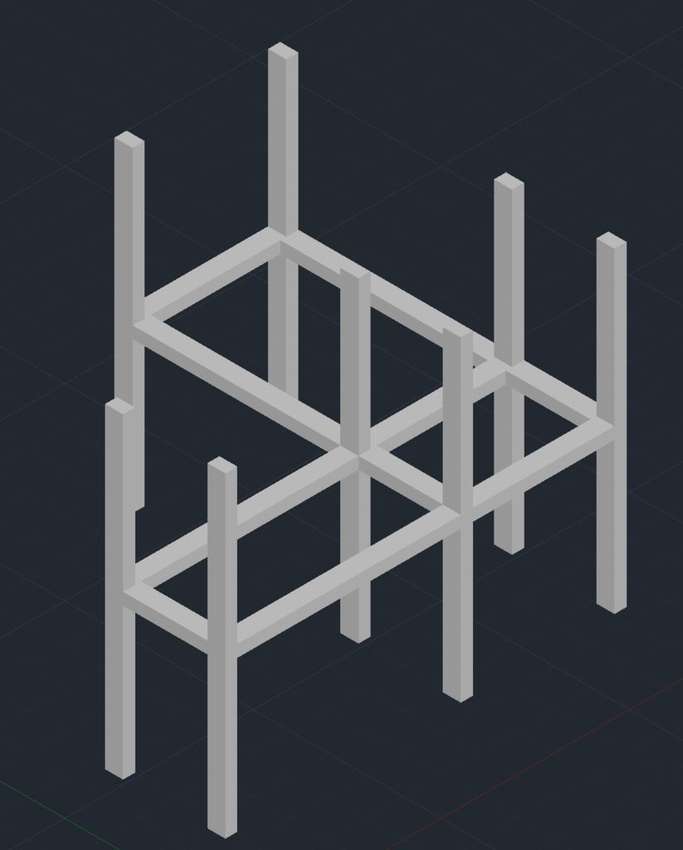 While the structure is not very strong, install a countertop to strengthen the frame.
- After that, fill the holes with wooden filler to get a flat surface without visible screw heads.
- Maybe 18 millimetersThe board is not strong enough for the 20-cm protrusion that is in front. Therefore, it can be strengthened by screwing the beam with long screws to the vertical supports.
- Then attach the casing and varnish. All boards are mounted at a distance of 1 cm and are held by two screws at each end.
- Finally, secure the shelves to the horizontal beams inside the rack for glasses and more.
In the future, you can make lighting, for example, fix led strip.
Step by step photos, how to make a barcan be viewed below in the gallery. Although there are not many, so if you want more information, use the link. To visit the site of the author of this project.


https://i.expert-h.com/en/shkaf/barnaya-stojka-svoimi-rukami#sigFreeId3fb85b6675
Oak bar counter
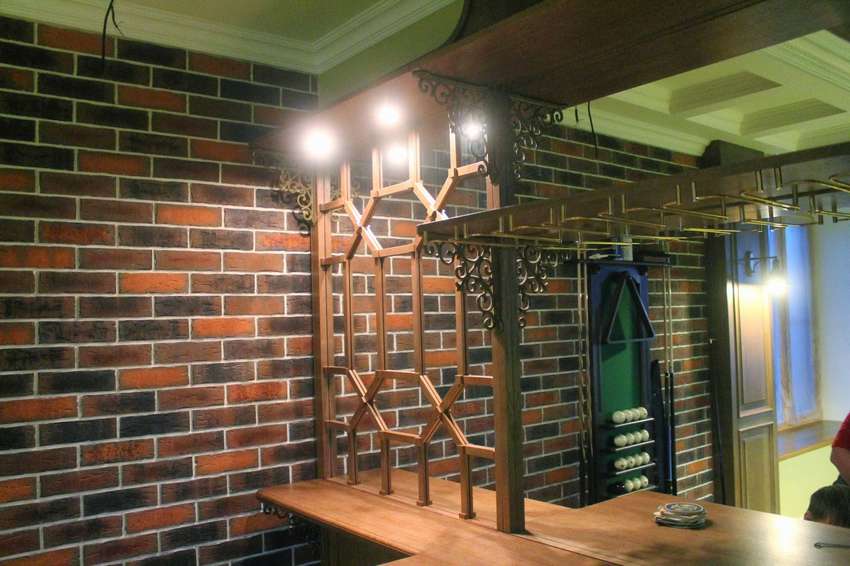
Winter holidays are coming. They will be much more fun if you have your own home bar. At least like this one, the photo is a bit dark, but the bar counter is visible on the right.
 The bar counter is made according to this scheme.. The tools and skills necessary for this, of course, are needed, but if you know how to use a hammer, drill, level, milling cutter and saw, then everything is in order!
 The most difficult thing is to make the correct angles of 45 degrees, but if you plan a different design, you can change it. You will find detailed instructions on the website, a link under the gallery. See below drawings and master class on step by step photos.


https://i.expert-h.com/en/shkaf/barnaya-stojka-svoimi-rukami#sigFreeId0b4f38df49
How to make a home bar
Many of us cluttered or underused the space in the garage or in the yard. But what prevents them from being turned into a wonderful vacation spot, for example, make a home bar do it yourself. Bar counters are often found in the interior of a kitchen, living room or, if possible, in the courtyard of a country house.
 If you want to create a vacation spot in the garage, a full tropical pool bar or a simple bar for family outings and cocktail parties, then this instruction may come in handy.


https://i.expert-h.com/en/shkaf/barnaya-stojka-svoimi-rukami#sigFreeId29d4e65a1c
DIY bar counter drawings
Below are a few bar counter drawingsthat will help you do your own home bar yourself.
Here is the first example. Drawing of a folding Cheesapic bar modeled on Pottery Barn's famous brand.
 The open bar has a hinged top and opening side walls. Schemes, instructions and a list of materials and tools will help you at every stage of manufacturing this bar in the open air.
 This street bar will surely be the theme of your next backyard party!


https://i.expert-h.com/en/shkaf/barnaya-stojka-svoimi-rukami#sigFreeIdba2c164b9d
Bar counter in the garden
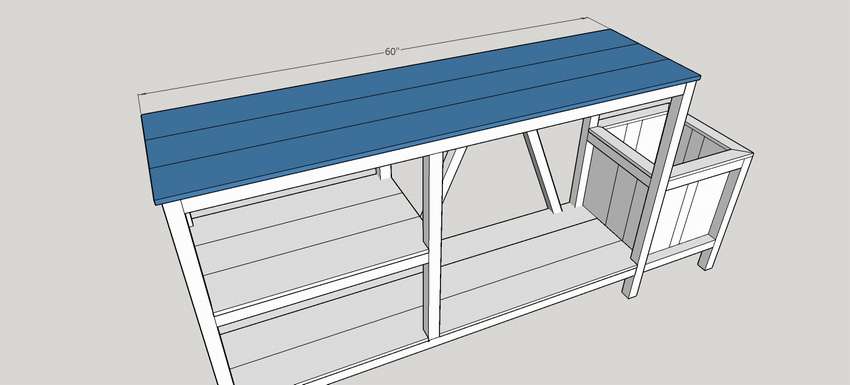
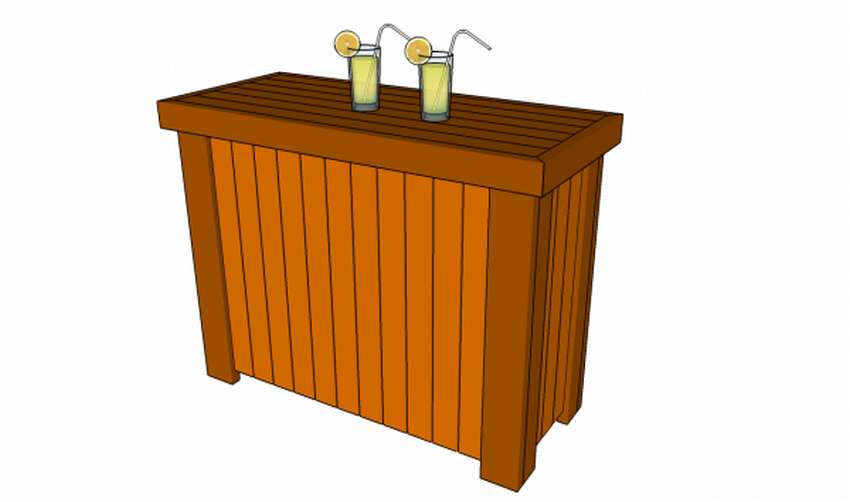 Second example garden bar drawing. Use high-quality materials, make sure that they are weather resistant (cedar, mahogany, pine), especially if you are going to install outdoor garden bar. As you can see, this is not a complicated and not expensive project, any person with basic skills in working with wood can do the job in just a few hours, if you use the right materials and tools.
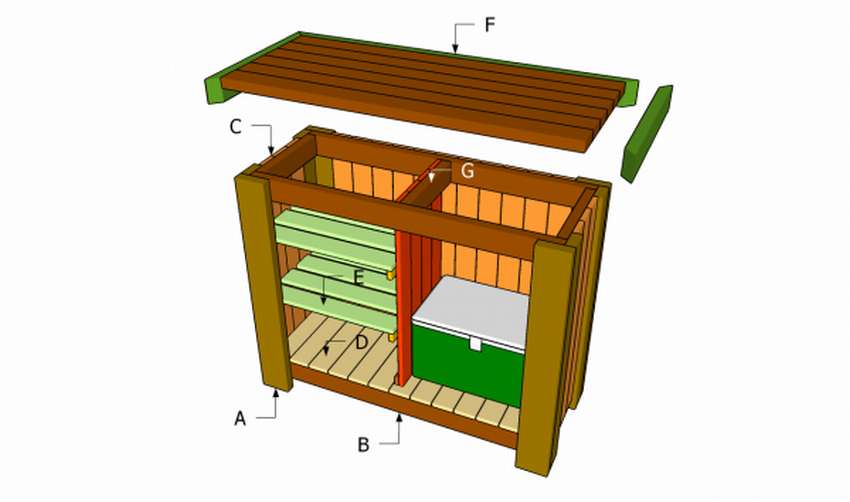 A - 4 bars 2 × 4 and 4 boards 2 × 6 meter long
B - 4 bars 2 × 4 38 cm long and 4 bars 2 × 4 122 cm long
C - 17 boards 1 × 4 - side strips 96 cm long
D - 13 boards 1 × 4 46 cm long
E - 5 pieces. slats 1 × 2 - 46 cm long, 8 pcs. 1 × 4 59 cm long
F - 2 bars 2 × 4 61 cm long, 2 pcs. - 137 cm, 6 pcs. - 129 cm
G - 4 boards 1 × 4 86 cm long, 1 block 2 × 4 38 cm long


https://i.expert-h.com/en/shkaf/barnaya-stojka-svoimi-rukami#sigFreeId45c79d0584
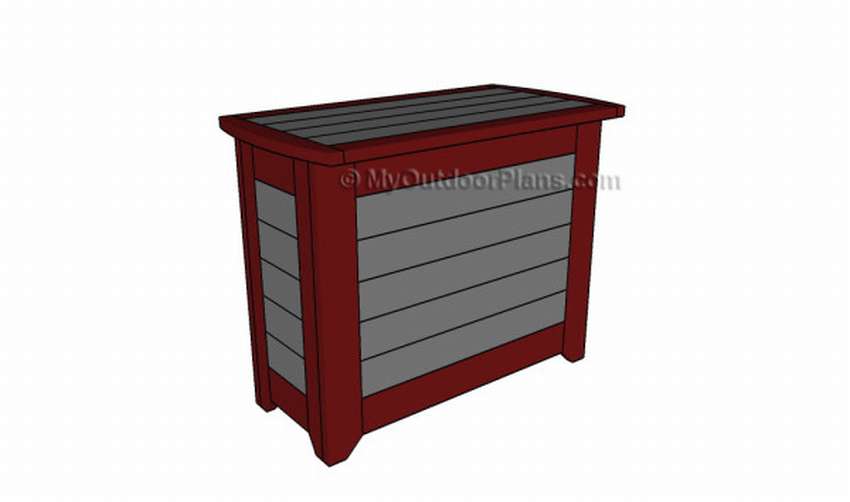 Bar counter drawing
Also very simple bar counter design.
The diagram shows the dimensions of the parts in inches. Here in brackets in centimeters. In the remaining drawings, to convert the figures to centimeters, simply multiply by 2.54. Instruction how to make a bar counter with your own hands, you can read on the site, the link is under the gallery.
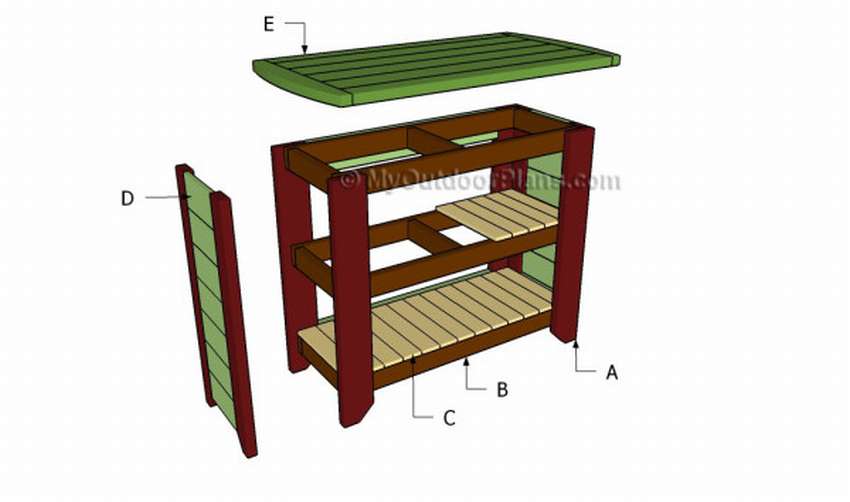 A - 4 bars 2 × 4 - 42 inches long (107 cm), 4 boards 2 × 6 - 42 inches long (107 cm)
B - 9 bars 2 × 4 15 "(38 cm) long, 6 pcs - 48" (122 cm)
C - 26 boards 1 × 4 18 ″ long (46 cm)
D - 14 boards 1 × 6 - 11 inches long (28 cm), 9 pieces - panels 40 inches (102 cm) long
E - 4 boards 2 × 6 - 48 inches (122 cm) long, 2 bars 2 × 4 - 48 inches (122 cm), 2 pieces - 29 inches (74 cm) long


https://i.expert-h.com/en/shkaf/barnaya-stojka-svoimi-rukami#sigFreeIdc58baff9ad
Bar counter drawing with shelves
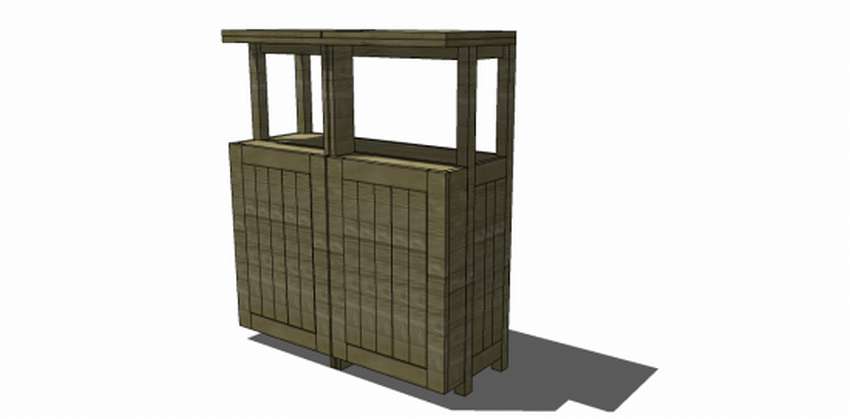
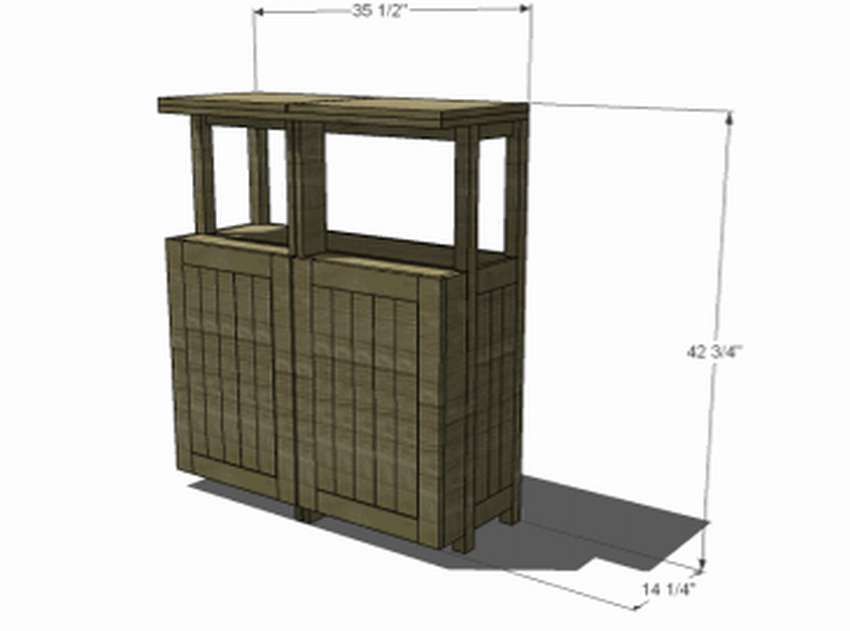
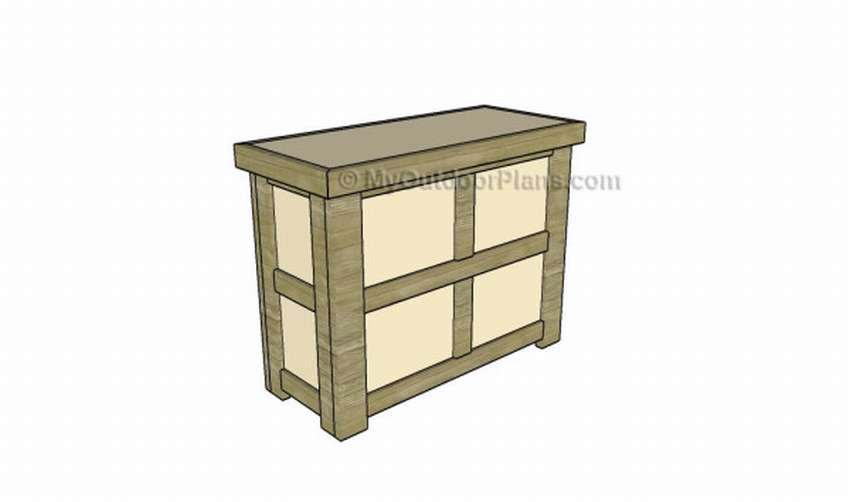
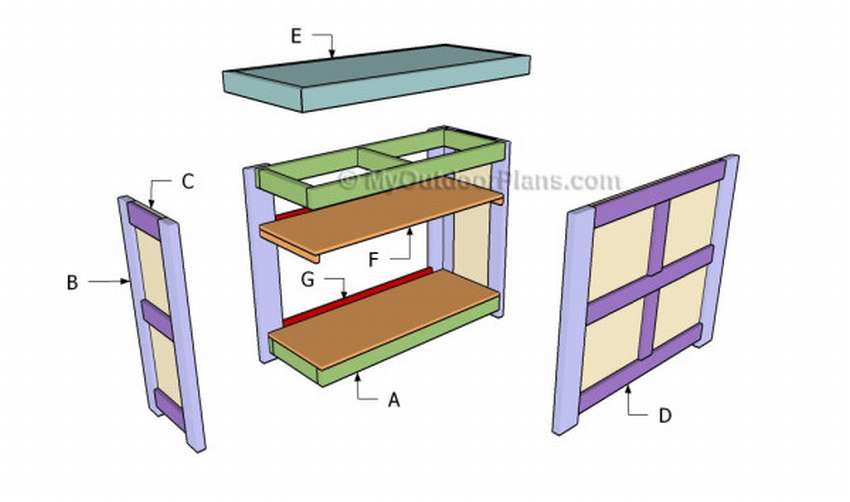
 This design bar counter differs in both the structure of the shelves and the fastening of the countertops. Making a tabletop panel is a simple process since you need to glue two sheets of 3/4 ″ plywood. Use several clamps to hold the pieces of plywood together. Tip: Center the countertop against the frame of the wooden beam and secure it in place with a few galvanized screws. Add glue to increase the rigidity of the frame and let dry for several hours. To improve the appearance, attach 1 x 2 strips to the outside countertop panels. Trim the ends of the strips at an angle of 45 degrees and fasten to the countertop using finishing nails and waterproof glue. Do not leave gaps between the components.
 A - 2 boards 1 × 3 - 56 inches (142 cm) long, 5pieces for the frame length 17 1/4 inches (44 cm)
B - 1 sheet of plywood 3/4 - base 56 "x18 3/4" (142 x 48 cm)
C - 2 boards 1 × 4 length 57 1/2 ″ (146 cm), 2 pcs. 10 1/4 ″ (26 cm) long
D - 4 sheets of plywood 3/4 ″ side 16 ″ x34 1/2 ″ (40.5 x 88 cm)
E - 1 sheet of plywood 3/4 "- 54" x34 1/2 "(137 x 88 cm)
F - 2 sheets of plywood 3/4 - x16 "(41 cm), 2 sheets 16" x19 "(41 x 48 cm)
G - 1 board 1 × 3 - 54 inches (137 cm) long, 4 planks 1 × 2 - 32 inches (81 cm) long, 4 pieces - 14 1/2 inches (37 cm) long, 3 pieces - 19 inches long ( 48 cm)
H - 2 sheets of plywood 3/4 ″ - length "x", 2 strips 1 × 2.


https://i.expert-h.com/en/shkaf/barnaya-stojka-svoimi-rukami#sigFreeId7ed7994e55
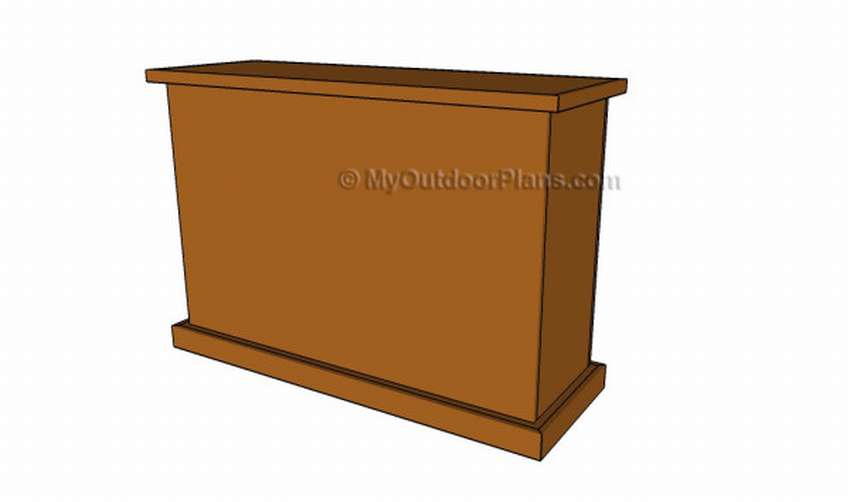
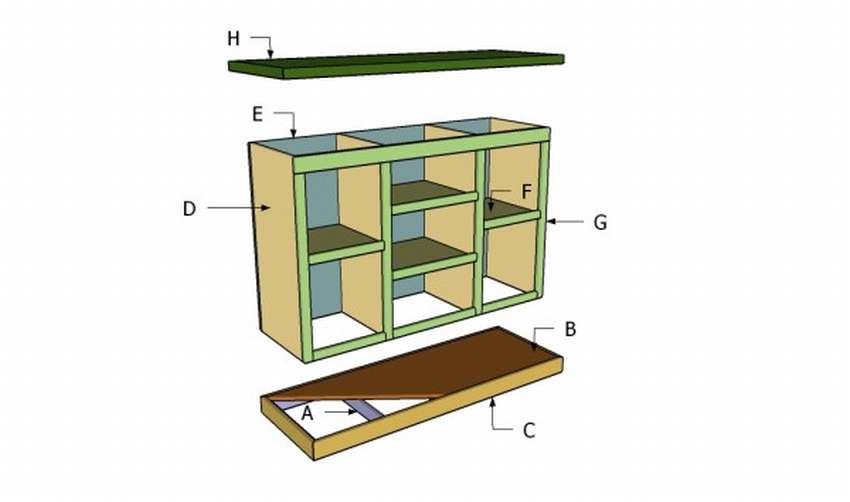
 Simple home barwhich is easy to do with your own hands. Functional design, which, if necessary, can serve as a conventional cabinet. The simplest part is to assemble the frame. Attach the 1 × 3 components as shown. Drill holes at both ends of the horizontal part and fasten on the vertical parts. Add glue to increase the rigidity of the structure. Drill through holes and insert the screws through the legs on the sides of the bar. The harder part, uhthen make doors. Assemble the frame of the doors from the boards 1 × 3, and the panels from plywood 1/2 ″. Drill holes at both ends of the horizontal components and fasten on the vertical parts. Cut 1/2 ″ plywood and secure to frame. Drill pocket holes along the edges of the plywood sheet and secure with screws. Add glue around the edges and remove excess.
 A - 4 boards 1 × 3 33 1/4 "long (84.5 cm) legs
B - 2 sheets of plywood 3/4 size 12 "x29 1/4" (30.5 cm x 74 cm) panels
FROM - 1 board 1 × 3 33 1/4 "long (84.5 cm), 1 pc. - 40" (102 cm)
D - 1 sheet of plywood 3/4 ″ - front part 45 ″ x33 1/4 ″ (114 x 84.5 cm)
E - 3 sheets of plywood 3/4 "- 17" x 43 1/2 "(43 x 111 cm)
F - 1 sheet of plywood 3/4 ″ - 17 3/4 ″ x45 ″ (45 x 114 cm)


https://i.expert-h.com/en/shkaf/barnaya-stojka-svoimi-rukami#sigFreeIdcb78400355
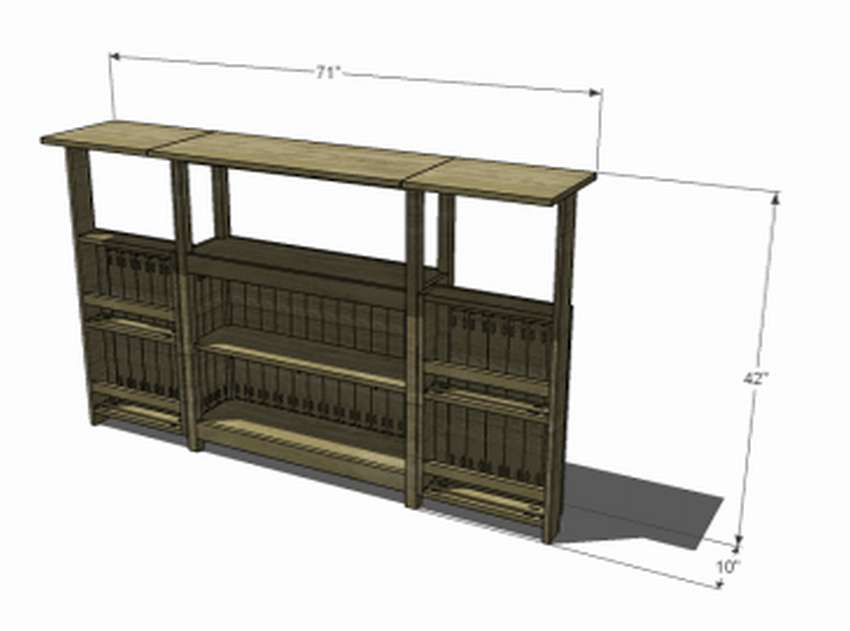
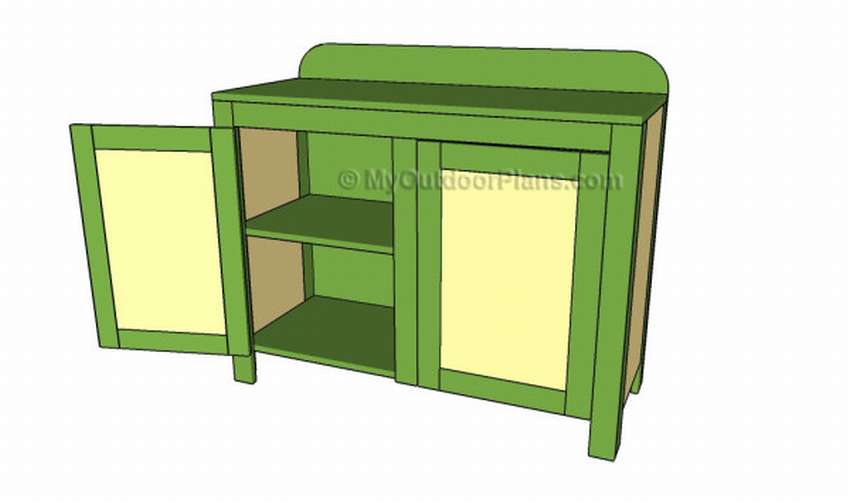
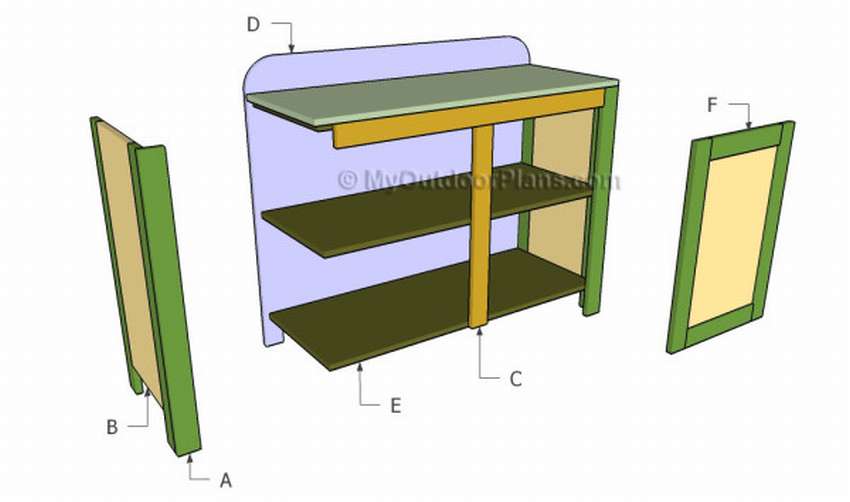
 Step-by-step schemes to help you do do-it-yourself home bar. A simple design will fit into the interior of any kitchen or living room. To make it beautiful, attach decorative lining to the side panels. Assemble the strips from 1 × 4 boards and fix them to the panels using finishing nails and waterproof glue. Be sure to drill holes in the pockets at both ends of the pads and secure them to the legs with screws. It is also necessary to attach decorative pads to the back of the home bar. Therefore recommended the upper trim is made of 1 × 2 planks and the lower is made of 1 × 6 planks.
 A - 2 bars 2 × 4 - 48 inches (122 cm) long, 3 pcs. 15 inches (38 cm) long
B - 4 bars 2 × 4 40 "(102 cm) long, 4 boards 2 × 6 40" (102 cm) long
C - 6 boards 1 × 4 11 inches long (28 cm), 6 pieces 41 inches long (104 cm). 2 pieces - 13 3/4 ″ (35 cm)
D - 2 sheets of plywood 3/4 "- 11" x38 (28 x 96.5 cm)
E - 2 sheets of plywood 3/4 ″ - length 51 ″ x21 ″ (129.5 x 53 cm), 2 bars 2 × 4 - length 54 ″ (137 cm), 2 pcs. length 24 ″ (61 cm)
F - 2 sheets of plywood 3/4 "- 18" x48 "(46 x 122 cm), 2 slats 1 × 2 18" long (46 cm)
G - 1 rail 1 × 2 - 54 inches (137 cm) long, 1 board 1 × 6 - 32 inches (81 cm) long


https://i.expert-h.com/en/shkaf/barnaya-stojka-svoimi-rukami#sigFreeId904dace8ee
Bar stool drawing
 If you will do home barthen bar stool not enough to do. Therefore, in order not to look for a long time, look at a couple of examples how to make simple do-it-yourself bar stool. There really is nothing complicated, the design is not much different from a conventional stool.
- After assembling the two sides of the chair, you need to tightly connect them by installing the remaining 2 × 2 supports.
- Make sure that the corners are at right angles and align the edges before tightening the screws.
- Use 1 x 4 rails for the seat.
- Cut four slats to a length of 14 ″ (35.5 cm) and secure with bolts. Drill a hole through the trims as shown in the diagram. Add glue to the joints and bond tightly. Make sure there are no gaps between the strips and the surface is flat.
- Center the frame towards the seat as shown in the diagram. Drill holes in the frame and insert a screw into the seat. Alternatively, you can drill through holes through supports.
 The design is very durable, so it can be used both at home and outdoors.
A - 4 bars 2 × 2 for legs 29 1/4 "long (74 cm)
B - 8 boards 1 × 4 10 inches (25 cm) long support
C - 4 boards 1 × 4 length 14 ″ (35.5 cm)


https://i.expert-h.com/en/shkaf/barnaya-stojka-svoimi-rukami#sigFreeIdade2b255fe
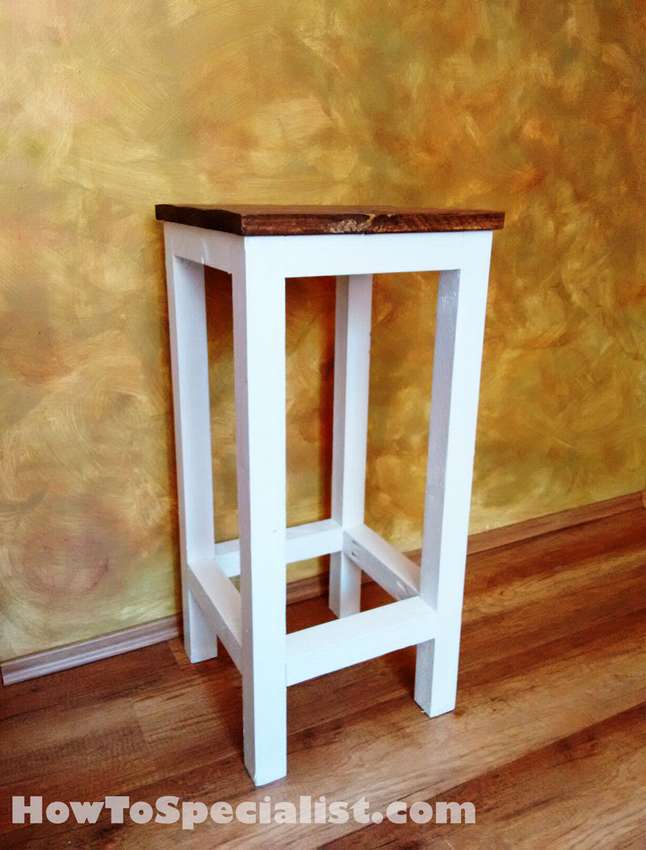
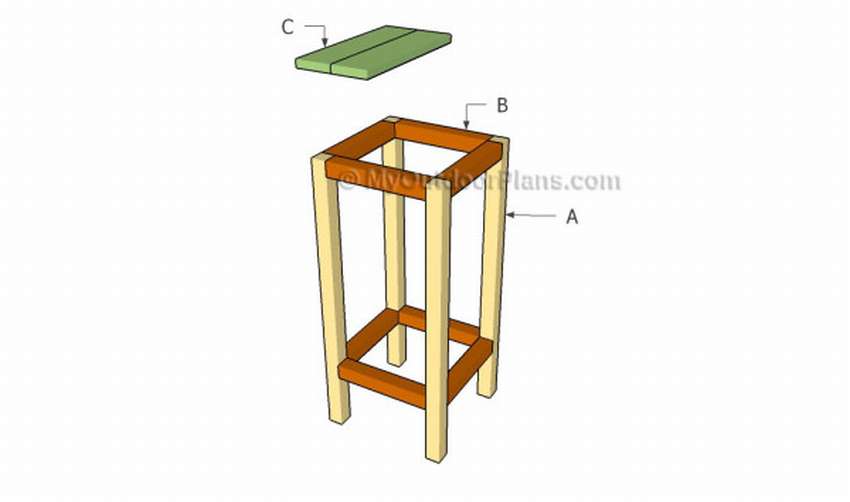
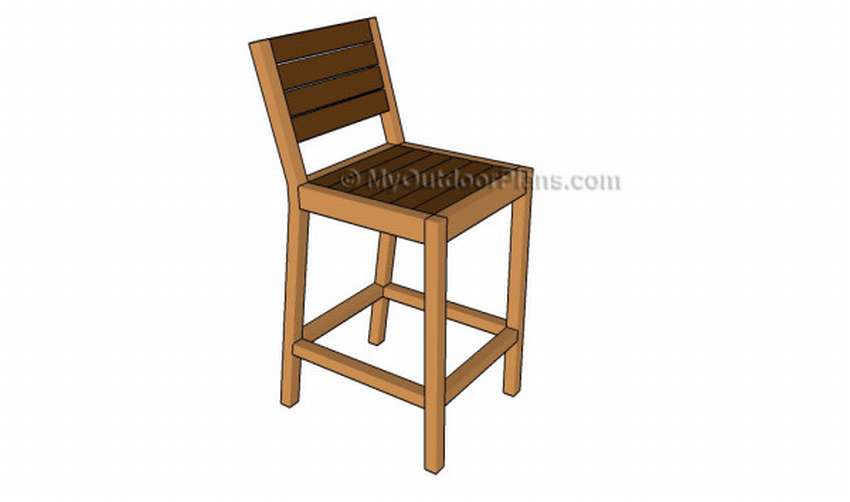 One more example, a drawing of a high bar stool with a back.
To make the frame strong, make the front legs of 2 × 2 bars, and the frame elements of 2 × 3 bars. Drill holes on both ends of the aprons and fix on the legs with 7 cm galvanized screws. Add glue into the joints and make sure that the corners are at right angles. Also, cut one end of the side brackets by 81.5 degrees and reinstall in place with great accuracy.
 A - 2 bars 2 × 2, length 29 1/2 "(75 cm), 2 boards 2 × 6, length 44" (112 cm) legs
B - 4 bars 2 × 3 16 inches long (41 cm) frame
C - 2 bars 2 × 2 - 16 inches long (41 cm), 2 pieces - 18 3/4 inches long (47.5 cm)
D - 3 slats 1 × 1 16 inches long (41 cm)
E - 10 slats 1 × 3 16 ″ long (41 cm)


https://i.expert-h.com/en/shkaf/barnaya-stojka-svoimi-rukami#sigFreeIda87ef371eb
Bar counter drawings


https://i.expert-h.com/en/shkaf/barnaya-stojka-svoimi-rukami# sigFreeId0bc23cf8f8
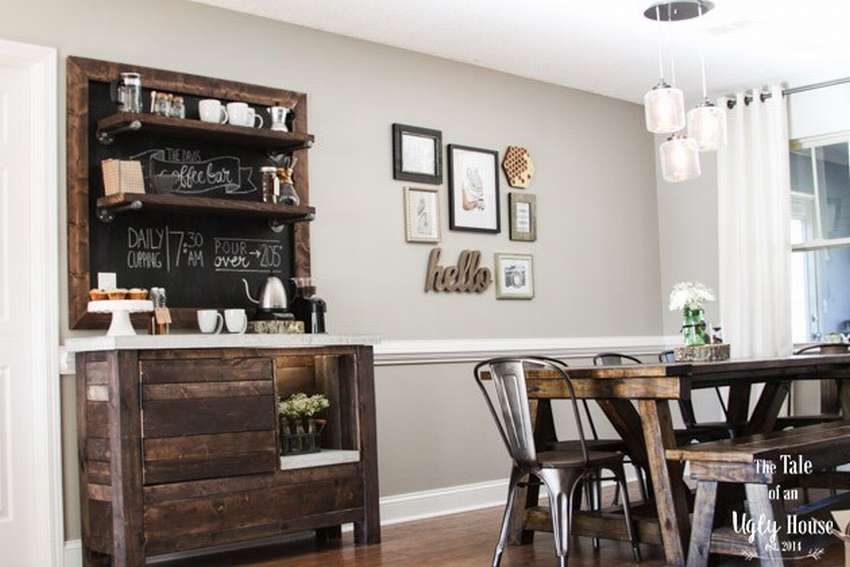
Bar under the stairs
Shown here how to make a bar for drinks from the cabinet under the stairs with your own hands.
 In this case, free space was found under the stairs between the living room and the kitchen. As it turned out, it was the perfect place to create a drink bar from an old cupboard. On the author’s website you can read detailed instructions about all stages of work.


https://i.expert-h.com/en/shkaf/barnaya-stojka-svoimi-rukami#sigFreeId34364b7c34
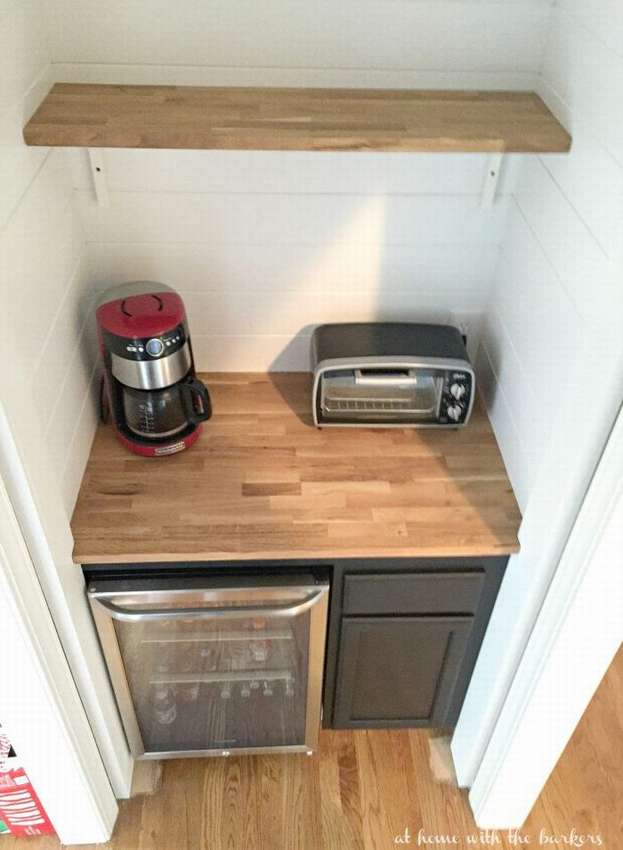
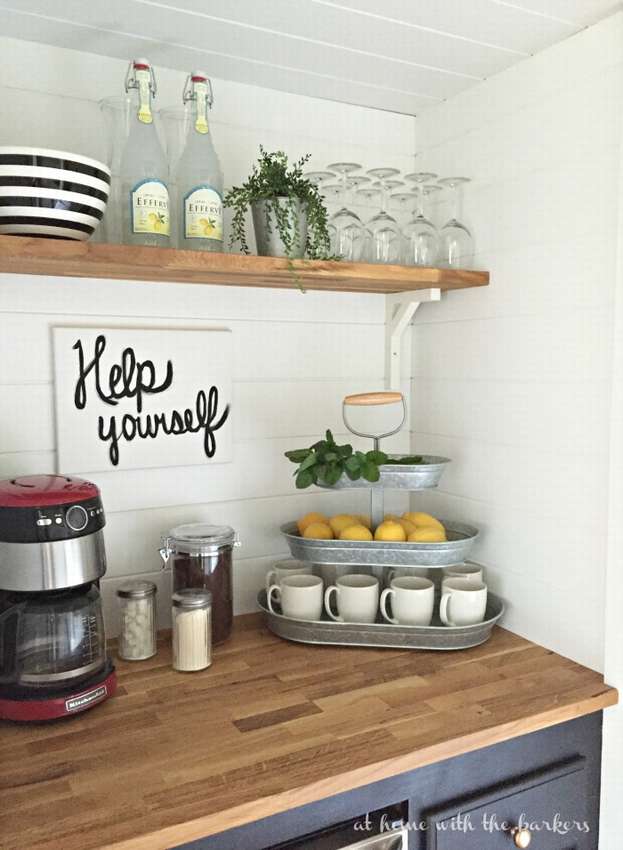
Coffee cupboard
 If you are not a fan of bars, but you like their classic style and a certain charm that they add to the house, you can do this coffee cupboard bar, which will be a nice addition to any interior. If you are serious about coffee and a decent design, this is certainly not an ideal option. If you decide to make the design smaller, keep in mind that this will reduce the number of boards you need. On the site you can familiarize yourself with the instructions, which include sawing parts, a list of materials, a description of the stages of manufacture and several step by step photoswhich you can see below in the gallery below.


https://i.expert-h.com/en/shkaf/barnaya-stojka-svoimi-rukami#sigFreeIdb13077b9df
Bar counter in the interior window
Interior window with a bar gives the house a more spacious look and provides two additional places for eating a large family.
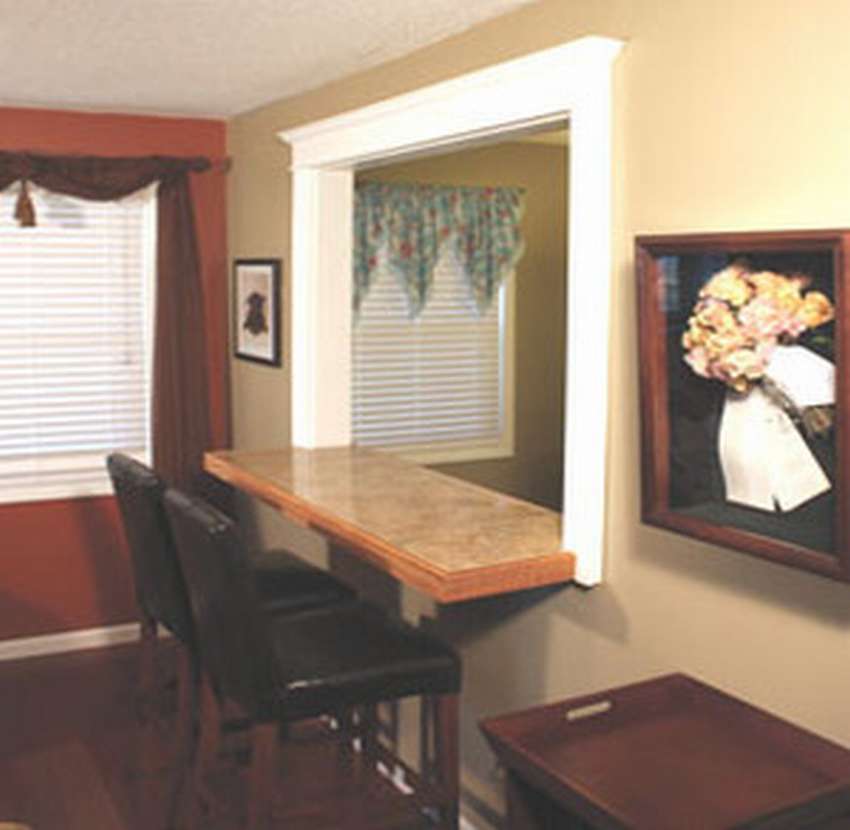
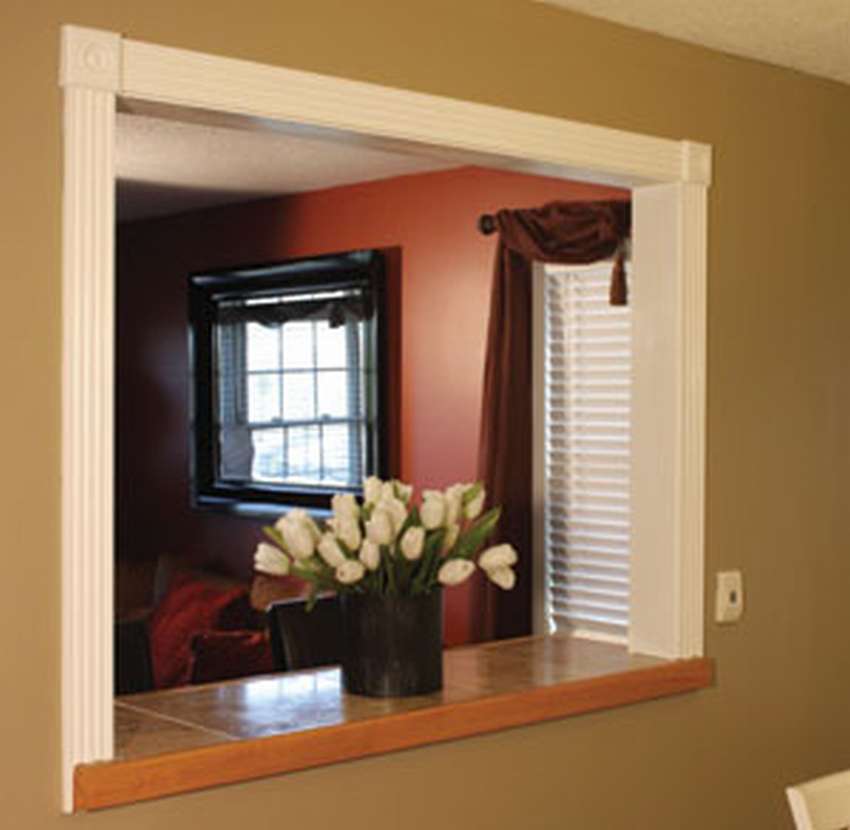 If your house has such an opportunity, then it is very difficult to make an interior window and install a bar counter in it. An example of how to do this, see below for step-by-step photos.


https://i.expert-h.com/en/shkaf/barnaya-stojka-svoimi-rukami#sigFreeId8ba493db86
DIY kegerator
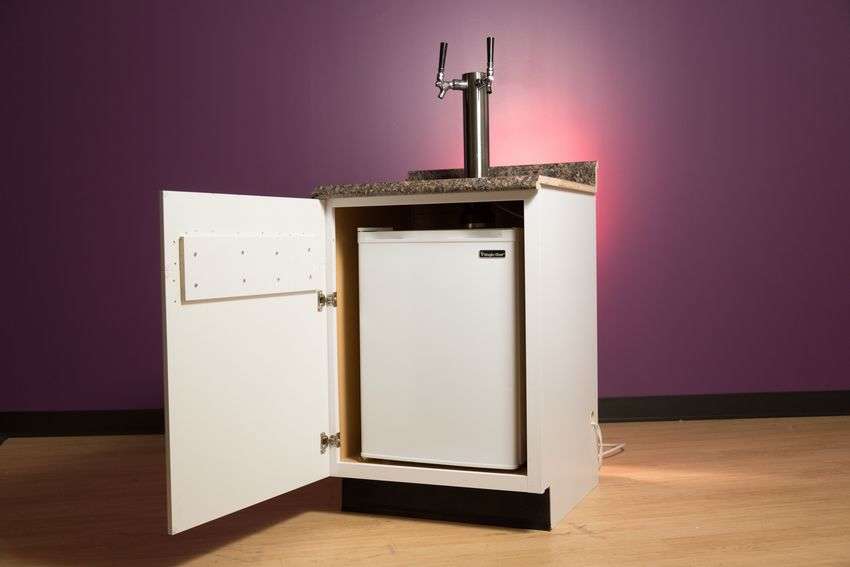 Since we are looking at home bar variations, see an example, how to make your own kegerator and install on the countertop. Now you can pour beer at home without paying a fortune. If you like beer, the benefits of a home kegerator are obvious. Unfortunately, the disadvantages of buying a commercial kegerator, a modified refrigerator and beer system, are enormous. Quality kegerators are expensive, you may not have enough space for a large, industrial looking unit in your home. Therefore, this instruction, which you can read on the site, may interest you.


https://i.expert-h.com/en/shkaf/barnaya-stojka-svoimi-rukami#sigFreeId9c3488aaac
How to assemble a home bar Kallax from Ikea
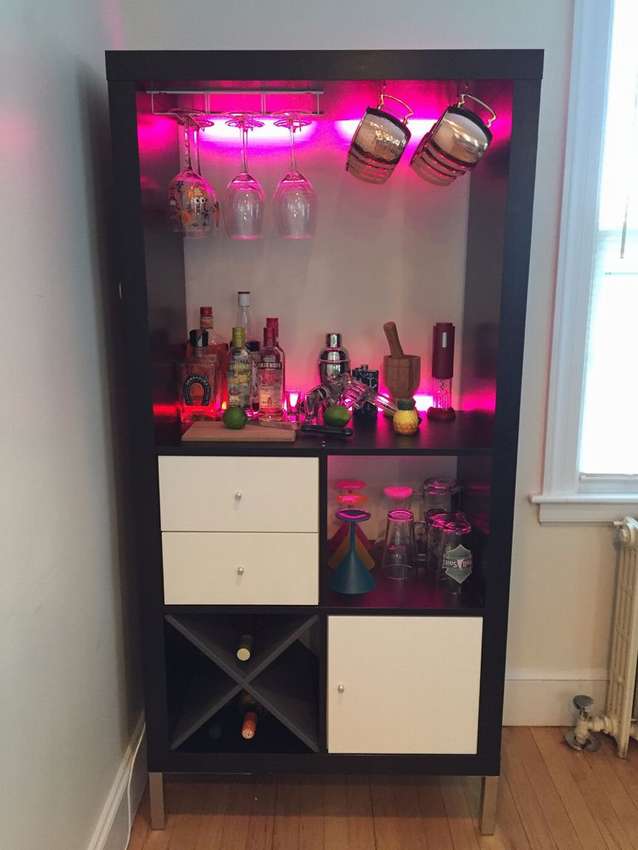 Shown here how to put together a nice home bar from the shelves Kallax from Ikea. In principle, if you buy the products of this famous Swedish brand, you will receive instructions. But here the main thing is not how to assemble a cabinet, anyone will cope with this task, although there are some difficulties. The main thing is how beautiful equip a home bar, or you can call a wine rack. This includes a bottle rack, LED indicator, tray for dishes, special hooks for mugs.
You need to assemble the shelves in accordance with the instructions, but not including 1 long inner shelf and 2 short ones, as shown in the photo. You will now have several dowels sticking out of the top of the bar - just cut them with a saw. Install wine racks and hooks while the cabinet is still lying on its side.
To make a highlight, just set the clips for the two LED strips on the back and top of the box, as in the photo. Drill a hole so that the unit can be stored in a drawer. Use double-sided tape to attach to the back of the drawer.
After assembly, put in the cupboard different types of mugs, a cocktail shaker, a knife with a cutting board, decorative openers, a corkscrew, napkins, an ice bucket. Now you can host guests to showcase the new wine cabinet.


https://i.expert-h.com/en/shkaf/barnaya-stojka-svoimi-rukami#sigFreeId1a1c7b60a7
Piano bar
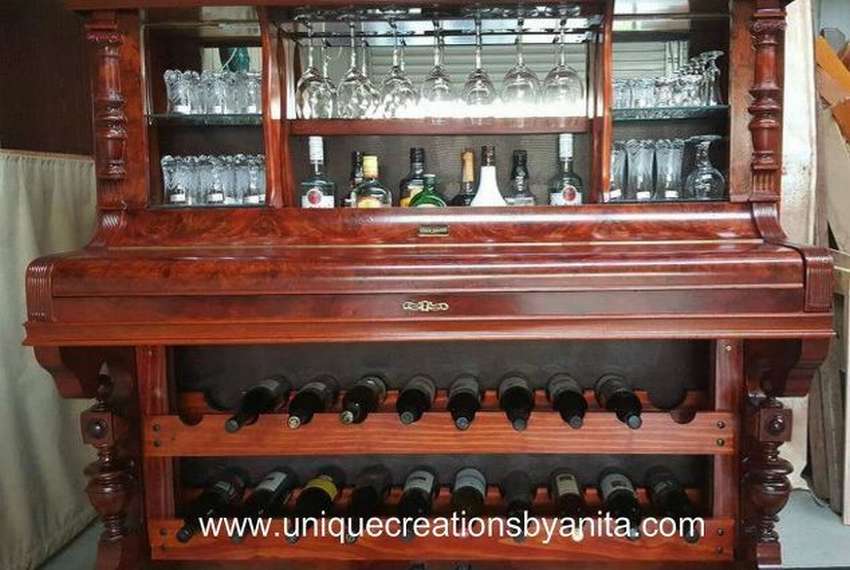 If you like to repurpose and restore old furniture and implement interesting wood projects, then this piano bar may interest you. Although it should be said that this bar wine cabinet is not for those who are looking for easy and simple solutions to do what you see in the photo, the author took several months of hard work. Just disassembling the instrument is worth what, if you ever shot the strings in a piano, then you understand what it is about. But, the result is certainly stunning. Read the instructions on how to make such a bar yourself on the site.


https://i.expert-h.com/en/shkaf/barnaya-stojka-svoimi-rukami#sigFreeId6b43abc0e5
Original bar counters 50 photos
A piano is not the only way to make an original bar. Parts of cars, wooden and metal barrels, old suitcases, cabinets and chests of drawers - all this can serve as excellent material for making a home bar, for creative people there is no limit to imagination. Check out a small selection of interesting ideas for amazing do-it-yourself bar counters.


https://i.expert-h.com/en/shkaf/barnaya-stojka-svoimi-rukami#sigFreeId70f69b8c16
Bar counter on the veranda
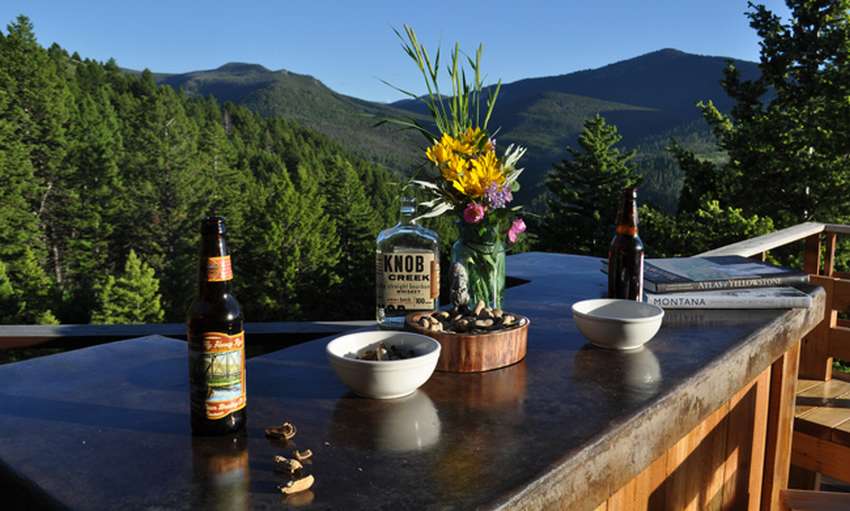 Here is an example how to make a bar counter on a veranda with a concrete worktop and LED backlight.
You can read about all the stages of construction on the website of the author of this project, if you use the link under the gallery.
A master class on how to make a bar counter with your own hands, see below in the gallery for step-by-step photos.


https://i.expert-h.com/en/shkaf/barnaya-stojka-svoimi-rukami#sigFreeId0bbb15b5ad
Bar in the barn
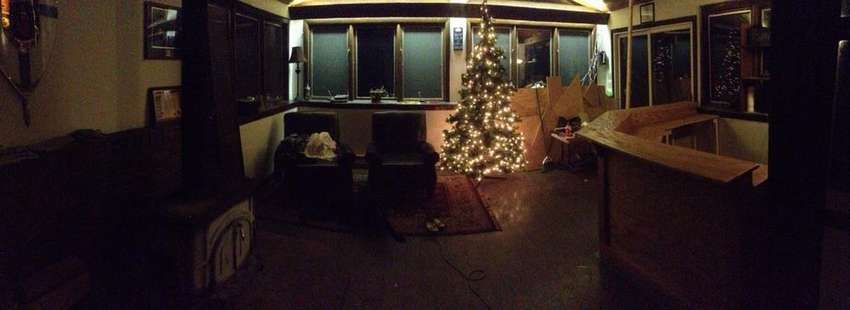
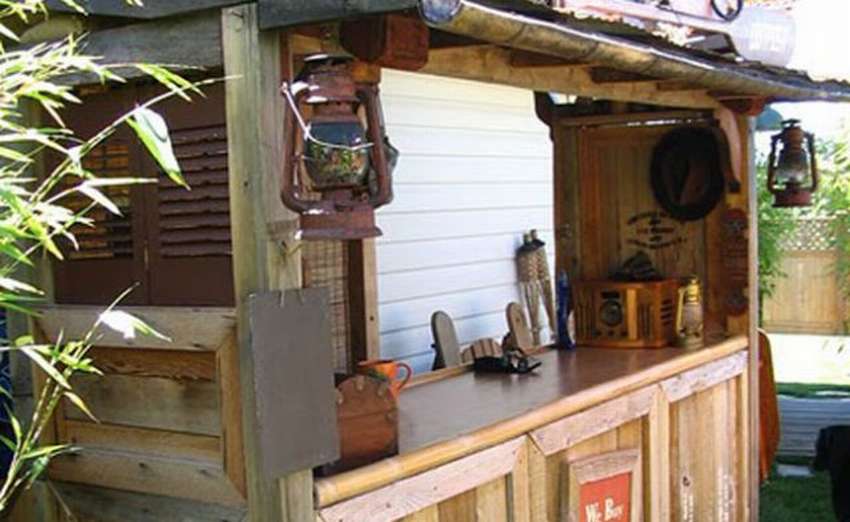
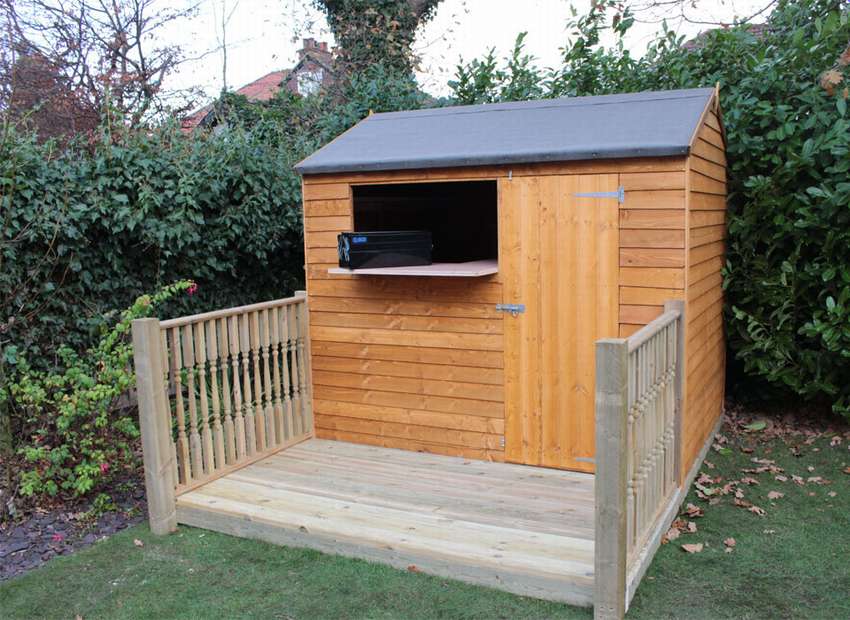 Stop sitting at home and watch TV shows, it's time to take your social life into your own hands and create something interesting and useful. Speech, of course, will be about building a home bara. Do you think this is too complicated? In fact, everyone can make such a garden bar. Do not believe? Use the link under the gallery and watch the video on the author’s websiteand this project. With a canopy, lumber and suitable tools, you can become the happy owner of a garden bar in about two days. Just keep in mind that this guide is intended to inspire you to create own home barbecause this special pub bar was created specifically for the place that the author had. Like this the garden bar in the barn looks inside.


https://i.expert-h.com/en/shkaf/barnaya-stojka-svoimi-rukami#sigFreeId1f8b9215bd
All in all, this example should give you lots of ideas and a good understanding of how to do:
- The frame on which the bar and flooring will be held.
- Shed to protect against the elements.
- Flooring to accommodate guests while they drink and chat.
- Railing is the necessary furniture for the home bar, which your guests can lean on if the party is very eventful.
- The bar counter is large enough and strong enough to withstand a blow with a glass of beer.
- A bar shelf for storing drinks and showing off your collection of bottles.
- Flap.
Detailed instructions how to make a bar for a garden with your own handscan be read on the website below see step by step photos.


https://i.expert-h.com/en/shkaf/barnaya-stojka-svoimi-rukami#sigFreeIdd6f2b2a726
DIY garden bar
 The great thing about this summer bar that you can use it as a bar or table for cooking. The design provides a lot of shelving, so you can put everything you need for a picnic or just relaxing in the garden.
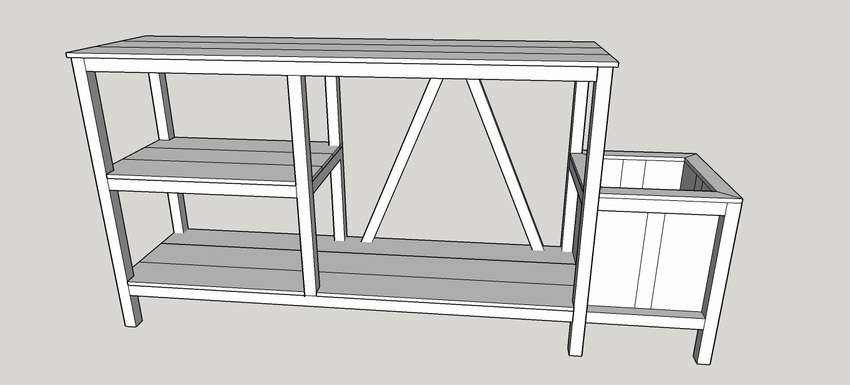 Use the link under the gallery to visit the site of the author of this project. There you will find a description of the assembly steps, lists of tools, materials, parts and cuts, as well as many drawings, diagrams and color photographs.
 Follow the step-by-step instructions below, and you will have no difficulty completing this interesting garden bar.


https://i.expert-h.com/en/shkaf/barnaya-stojka-svoimi-rukami#sigFreeId0df632cde2
Outdoor home bar 100 photos


https://i.expert-h.com/en/shkaf/barnaya-stojka-svoimi-rukami#sigFreeIde6bc7a6aa0
Do-it-yourself pallets bar counter
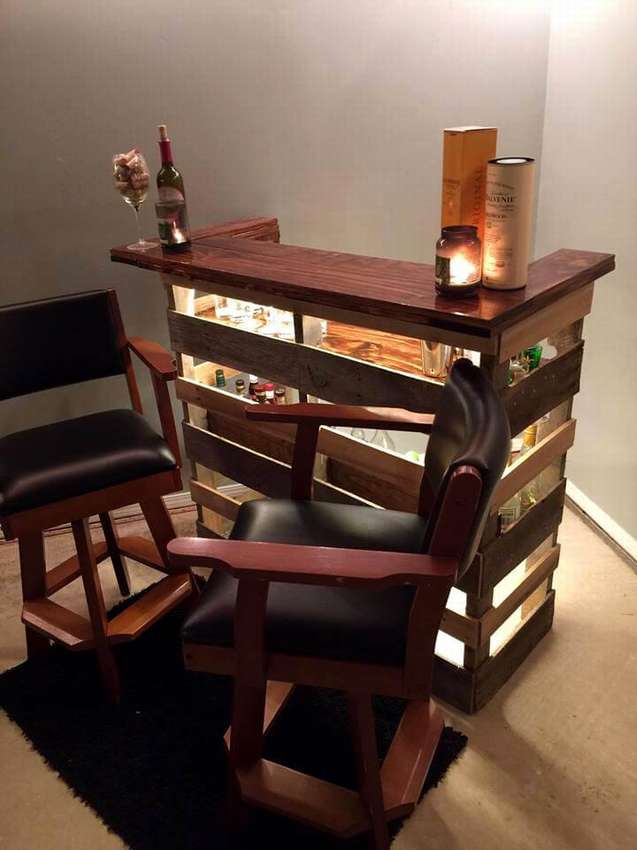 Here is an example how to make a bar counter from palletswhich you can install outdoors or indoors, in general, almost everywhere, because the design of this bar looks pretty stylish in any interior. The design includes two built-in shelves for storing bottles and a countertop for serving drinks. Surround the rack bar stools or stools and have a great time with your friends and girlfriends. Perfect design for any indoor bar! Another plus, you can add any number of built-in shelves and resize as you wish! As you can see, the whole structure is to integrate with single straight wooden pieces, so the very first step is to clean and dismantle the pallets using suitable tools! Assembling a rack is no more difficult than disassembling a pallet. See the assembly sequence for step-by-step photos.. Although there are no special nuances in the assembly of this design, but to get more information, you can visit the author’s website by clicking on the link under the gallery.


https://i.expert-h.com/en/shkaf/barnaya-stojka-svoimi-rukami#sigFreeIdd18b664eb4
Bar racks from pallets 100 photos


https://i.expert-h.com/en/shkaf/barnaya-stojka-svoimi-rukami#sigFreeId466022df15
Hawaiian tiki bar
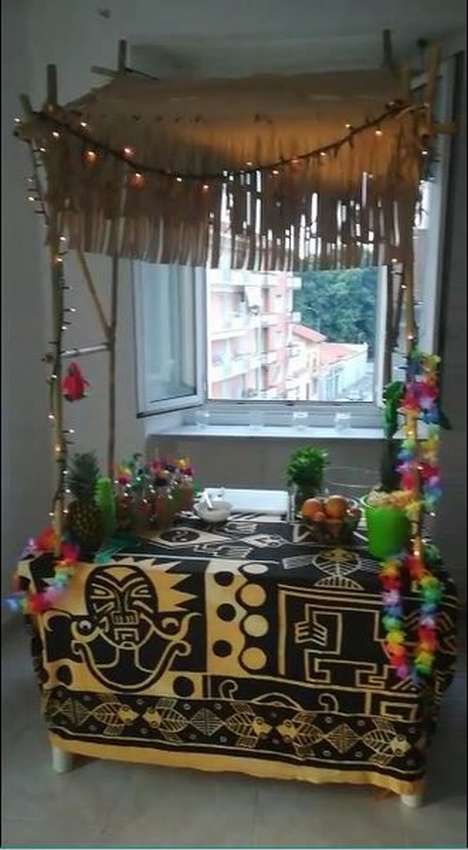 Need to prepare a fantastic Hawaiian party? Want to decorate your home with something unusual and exotic? So why not make beautiful hawaiian tiki bar! Simple steps, guaranteed success, all the necessary items are easy to find in the stationery store!
For this project you will need the following things:
- Bamboo sticks (at least 1.70 m long)
- Brown sheet of paper (length 1.00 m, width at least 0.50 m)
- Hacksaw
- Adhesive tape, tape, scissors, tape measure.
This Tiki Bar is designed to be placed on top of a table. Thus, the countertop will be a supporting structure on which you can prepare fantastic snacks and cocktails.
First of all, mark with a pencil the length on bamboo sticks. Then chop them with a knife. As a result, you will receive:
x2 1.70 m
x2 1.40 m
x2 1.20 m
x2 1.00 m
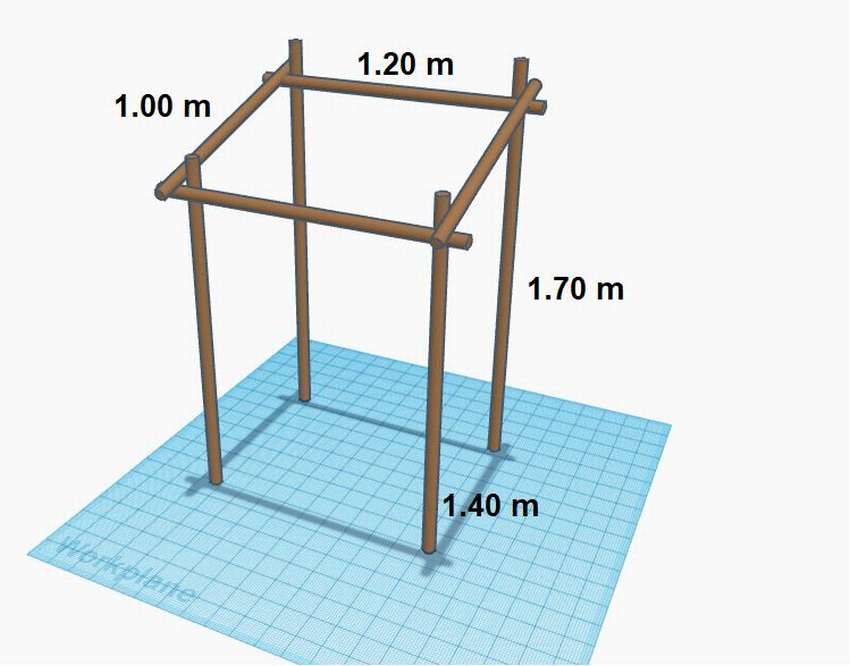 Then take bamboo sticks of 1.40 m for two columns and one of 1.20 m for the crossbar between them.
- Scissor cut the long part of the twine (50 cm long or more) and start tying two sticks: to facilitate the process, first make a simple knot with one of the two ends of the twine.
- Do the same for the other column. In the end you will have a U structure, this will be the facade of the Tiki bar.
- Do the same for the back panel. Here we use sticks of 1.70 for racks and 1.20 for the crossbar.
- Now connect the two shapes using bamboo sticks 1.00 m long.
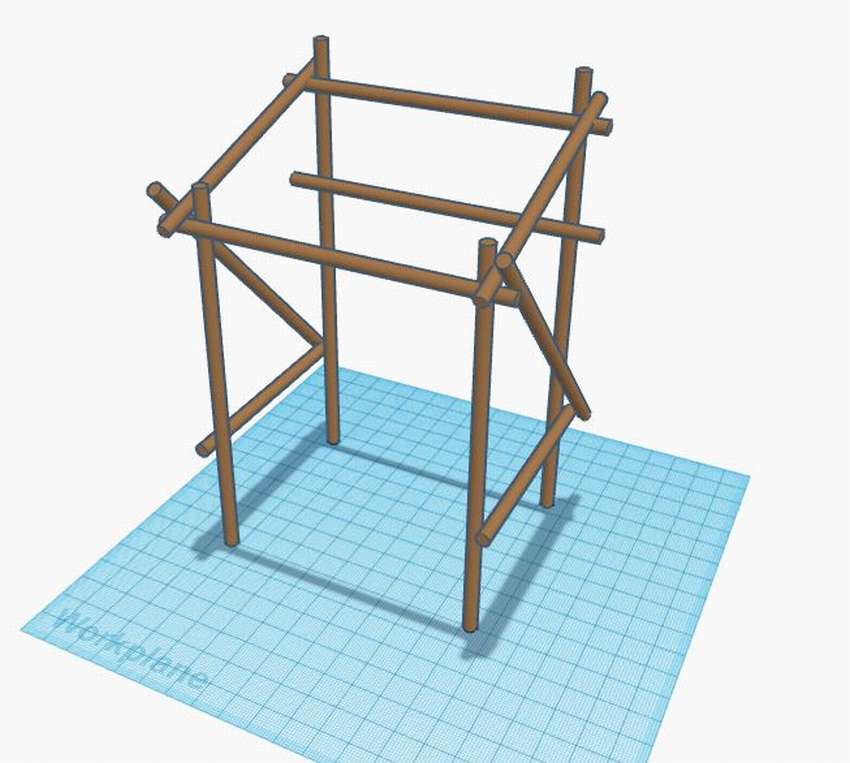 It is time to strengthen the structure! To do this, you need to add an extra bamboo stick to create the “Z” structure, as shown in the figures.
- On the back of the assembly, install an additional horizontal bar approximately 1.50 m from the ground. Then fasten the slanting sticks from one top to another.
- Do the same on both sides: set the horizontal bar at a distance of 40 cm from the ground, and then insert the incline stick.
- To make a typical Hawaiian roof, take a brown sheet of paper, fold and cut fringe strips of 20-30 cm, as shown in the photo.
That's all, cover the table with a bright blanket, hang a Hawaiian necklace, add something else exotic.


https://i.expert-h.com/en/shkaf/barnaya-stojka-svoimi-rukami#sigFreeId4e9590b78d
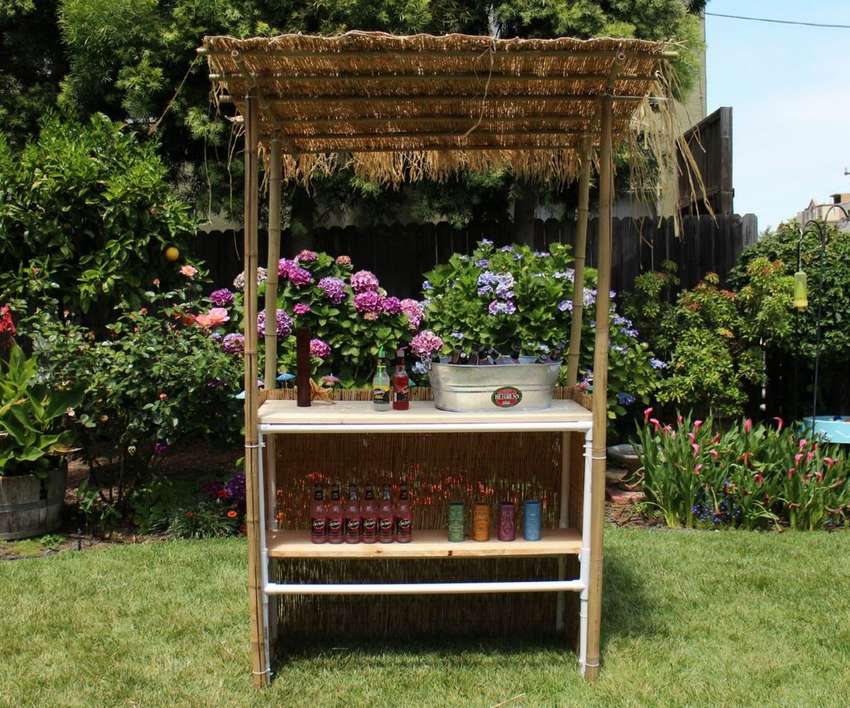
Tiki Bar is not difficult to do at all, look at another project, simple and tasteful.
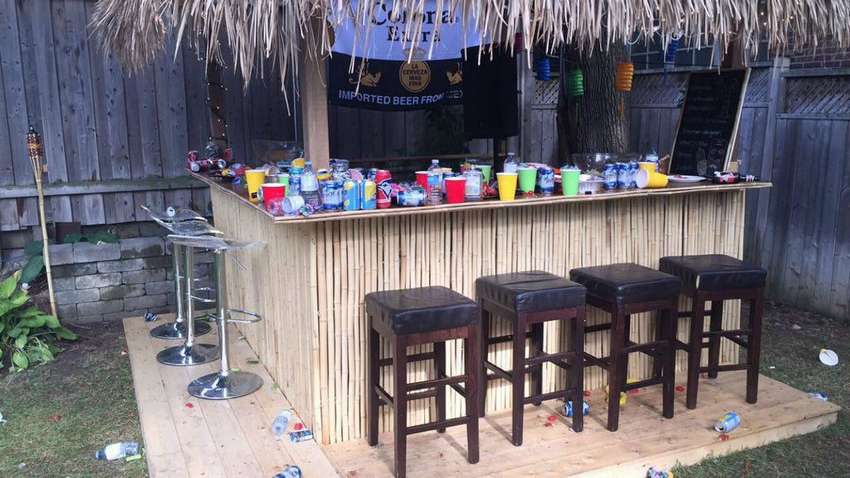 All that remains to be done is to decorate with Christmas lights, flags, signs and torches. If your budget allows, you can add refrigerator and a few cabinets below the rack.


https://i.expert-h.com/en/shkaf/barnaya-stojka-svoimi-rukami#sigFreeId675c3e1c2e
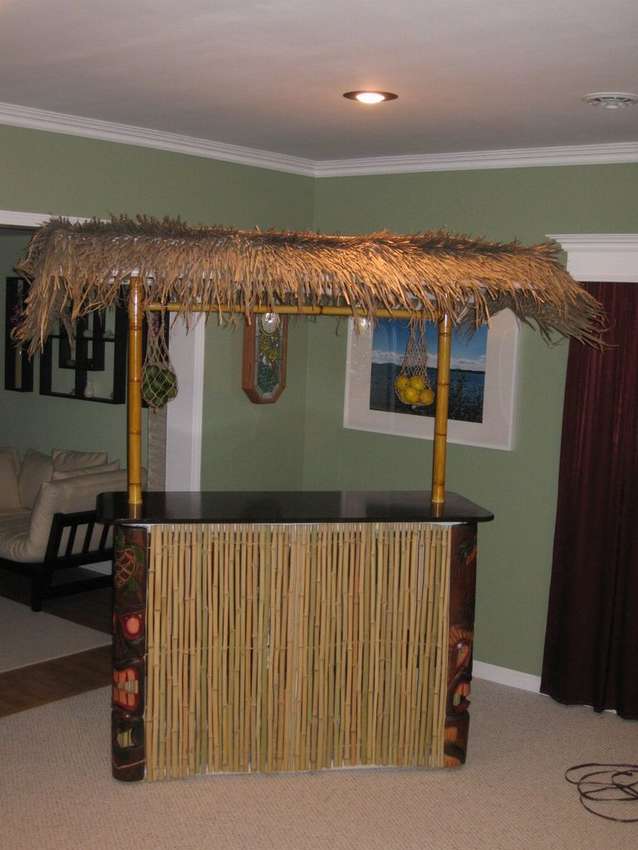
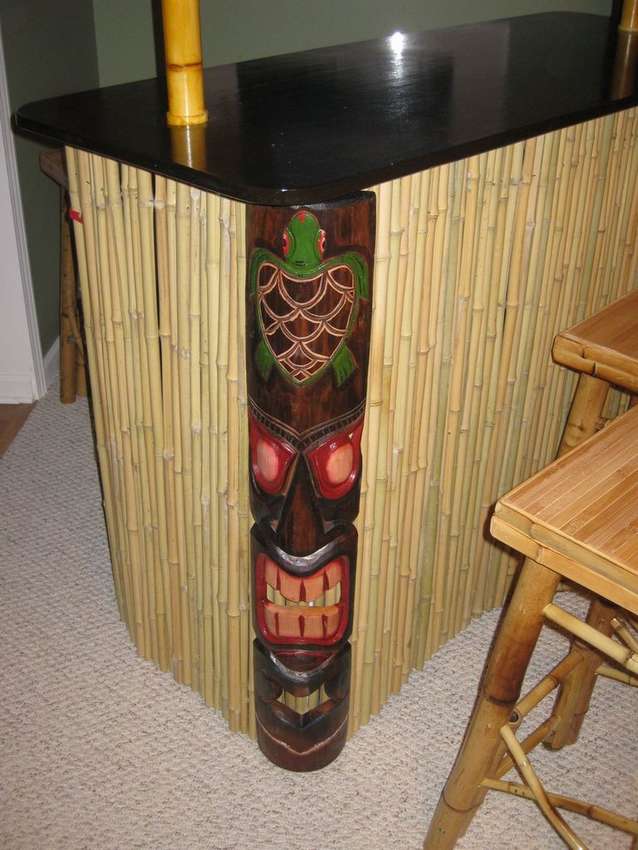
 And this is an example where it is shown how in 18 simple steps how build a tiki bar do it yourself with visual step-by-step photos andrizhemi. In the manufacture of something special from scratch, there is something special that allows you to see everything from beginning to end, as well as learn how to do it yourself or with friends. As you can see, making a tiki bar frame is quite simple, but this is not the most important thing. The main thing is decorate tiki bar. Draw a sign on the front cross bracket, hang the garlands, set the torches around (making sure they are at a safe distanceso that they couldn’t set fire to anything, especially the roof of the bar). Get creative and have fun. Now enjoy your full tiki bar!


https://i.expert-h.com/en/shkaf/barnaya-stojka-svoimi-rukami#sigFreeId4c04bce705
How to Build a Tiki Bar in the Yard
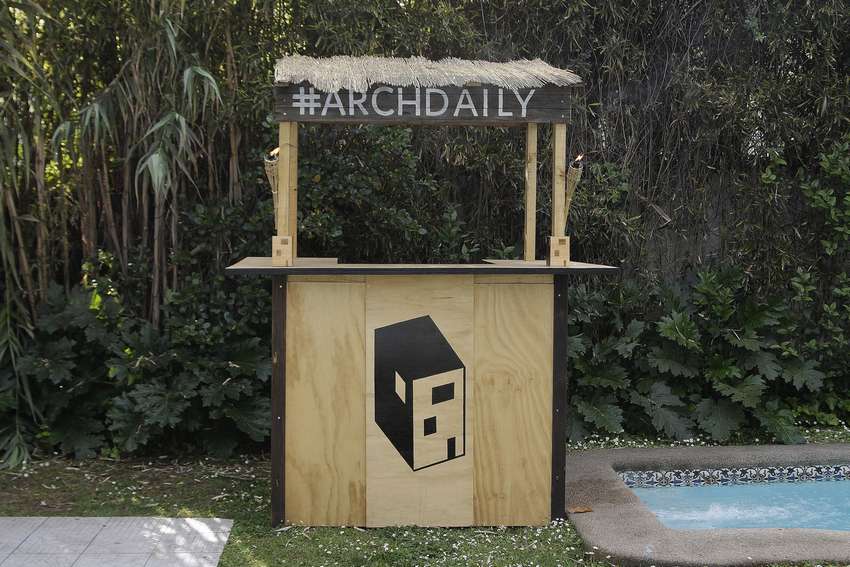
 You don’t need to live near the Pacific Islands to enjoy a coconut cocktail and relax with tropical music. Here are the main step-by-step plans for tiki bar - lanterns, fishing nets and other trinkets are not included. If you have a summer house or a country house, be sure to use this opportunity, especially since such a task is beyond the capabilities of even a novice master.


https://i.expert-h.com/en/shkaf/barnaya-stojka-svoimi-rukami#sigFreeIdaf4d66159f
Tiki PVC Pipe Bar
 There is nothing better than a tropical theme to set the tone for summer fun. Here is an example how to make a tiki bar from PVC pipes do it yourself. The scheme is very simple, such a design can be assembled very quickly. So if you plan to organize a Hawaiian outdoor party, this guide will come in handy. NOTE. To make all the cuts, in this case they used a cutting saw, but you can also use a hacksaw or ask them to cut pipes and boards in the workshop. This is a more expensive way, since they won’t do anything for free, but this is an option if you don’t have the necessary tools or don’t want to use up all your grease using a handsaw.
The site has an instruction in which you will find a complete list of materials and tools. How to assemble a tiki bar with your own hands, see below for step-by-step photos.


https://i.expert-h.com/en/shkaf/barnaya-stojka-svoimi-rukami#sigFreeId242218e4fa
Another simple example how to make a tiki bar for a house from plastic pipes. The project is actually very simple, the most difficult part is to make the PVC pipes look like bamboo and cut into sections to build the bar.
 How to do artificial bambooYou can read in this short instruction. Here are step-by-step photos, below them is a link to the site with instructions.


https://i.expert-h.com/en/shkaf/barnaya-stojka-svoimi-rukami#sigFreeId34eb6182d3
To assemble the frame and then fix the finished "bamboo" is not at all difficult. See the master class on step by step photos.


https://i.expert-h.com/en/shkaf/barnaya-stojka-svoimi-rukami#sigFreeId509cd0eaf0
DIY tiki bar 100 photos


https://i.expert-h.com/en/shkaf/barnaya-stojka-svoimi-rukami#sigFreeId91f488ffd8
Bar trolley
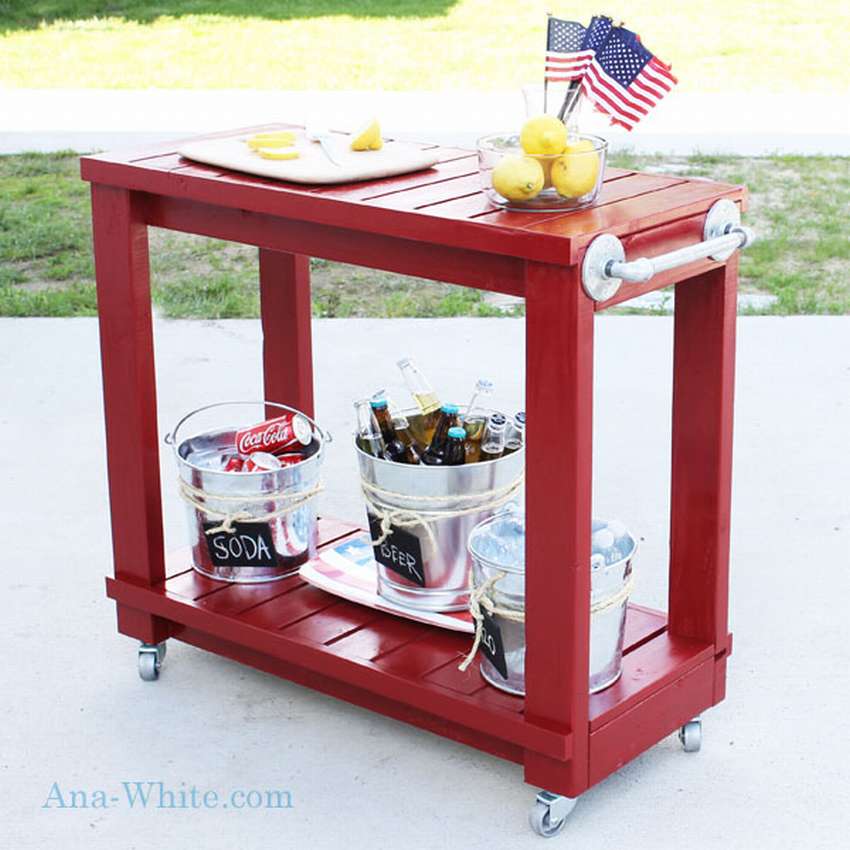 Cast iron bar trolley - An excellent alternative to the standard home bar, can be used both inside the house and in the yard. The design is equipped with a towel dryer and wheels, you can paint it in any color you want.
In this guide, in addition to step-by-step photographs are included drawings and diagrams with dimensions, and in the instructions on the site, in addition to the description of the manufacturing process, you will find a complete list of materials and tools.
Dimensions in the drawings are in inches, you will need to convert them to centimeters, multiplying by 2.54.
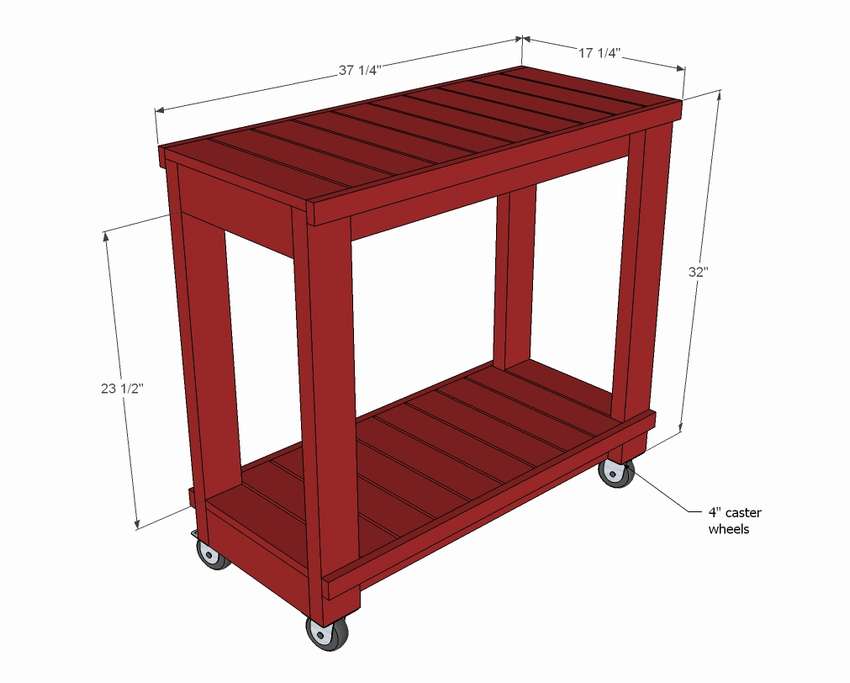
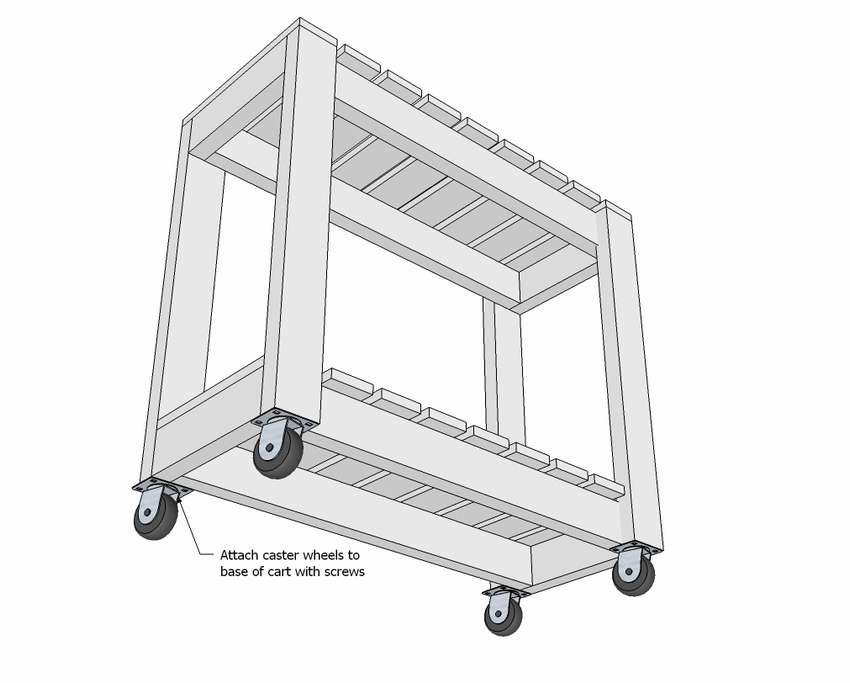 Master class on how to make a bar cart with your own hands, see below in the gallery.


https://i.expert-h.com/en/shkaf/barnaya-stojka-svoimi-rukami#sigFreeId5bec04bbcb
Mobile bar - BaR2D2
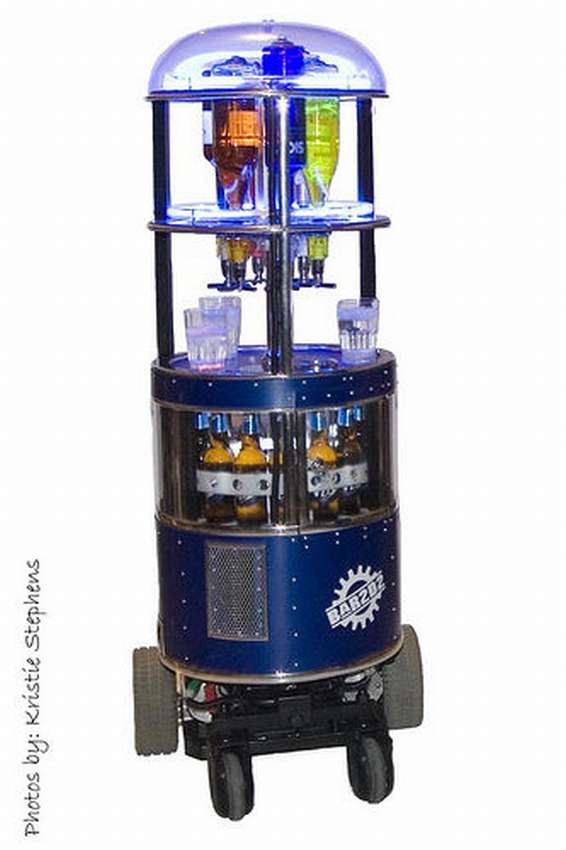 There is no limit to fantasy if you are a fan or even an admirer of the movie "Star Wars", this project will certainly interest you. BaR2D2 is a radio-controlled mobile bar with automatic beer elevator, motorized ice box, mixer, dispenser for bottles for six bottles and neon lighting with activated sound. A controlled robot was created in the garage of the author of this project using standard hand and power tools from easily accessible parts and materials. BaR2D2 Concept born when the author saw a real radio-controlled cooler. To take the idea to a new level, it was decided to create something more perfect. Of course, this is not the easiest project, you need knowledge of mechanics, woodworking, a bit of electronics - in principle, the usual set for a man who likes to do something with his own hands. The author claims that he is not a professional in any of the areas listed, and that he gained most of his skills from various hobbies and projects he implemented. So if you have basic knowledge of woodworking and working with low voltage, then you can make such a mobile bar do it yourself! You can find very detailed instructions on the author’s website. And of course, look through step by step photos, a lot step by step photos.


https://i.expert-h.com/en/shkaf/barnaya-stojka-svoimi-rukami#sigFreeId6bb987feb3
Bar counter for home 200 photos


https://i.expert-h.com/en/shkaf/barnaya-stojka-svoimi-rukami#sigFreeIdb9511aaf9c
Hello, I am the author of this article, so I look forward to asking questions for this article in the comments below, I will answer all !!!
If you have questions on another topic, ask them on our forum, we will answer you
- Two baskets of paper in 5 minutes (Master class)
- How to make a simple and compact table for a milling cutter from plywood
- How to make a soft headboard tile (Instructions + step by step photos)
- Cinder block benches: a convenient bench in 55 minutes
- How to make a bed with a niche: saving space (Master class)