Cupboard in the bathroom. Do it yourself. 800 photos, drawings, step-by-step instructions
 how to make a bathroom cabinet
If you are looking for information how to do do-it-yourself closet to the bathroom, then one of the first things you come across is that you have many options. However, the search process may be delayed. To make it easier for you, here are 30 examples with step-by-step photos, drawings, links to primary sources, plus 5 large galleries of various models cabinets for the bathroom.
In this article you will find how to do it yourself.:
- Wall cabinets for the bathroom.
- Cabinets under the sink for the bathroom.
- Fitted wardrobes in the bathroom.
- Modular cabinets.
- Case a case for a bathroom
How to make a wall cabinet for a bathroom
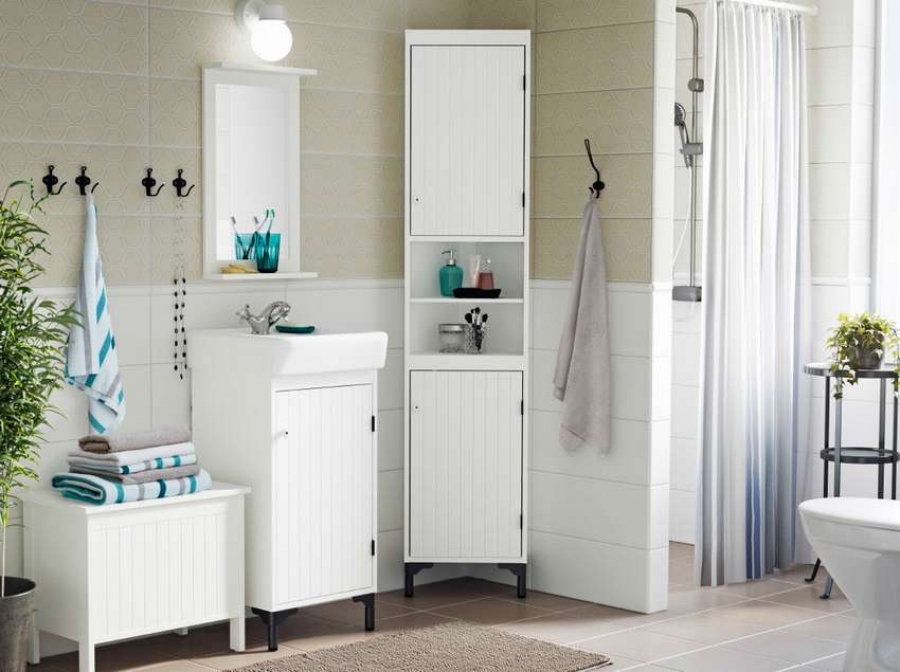
 Need more space in the bathroom? Try this simple project, make a cabinet for the bathroom it’s not at all difficult, just spend a couple of hours, but you will have a neat cabinet with a mirror where you can put toiletries and cosmetics.
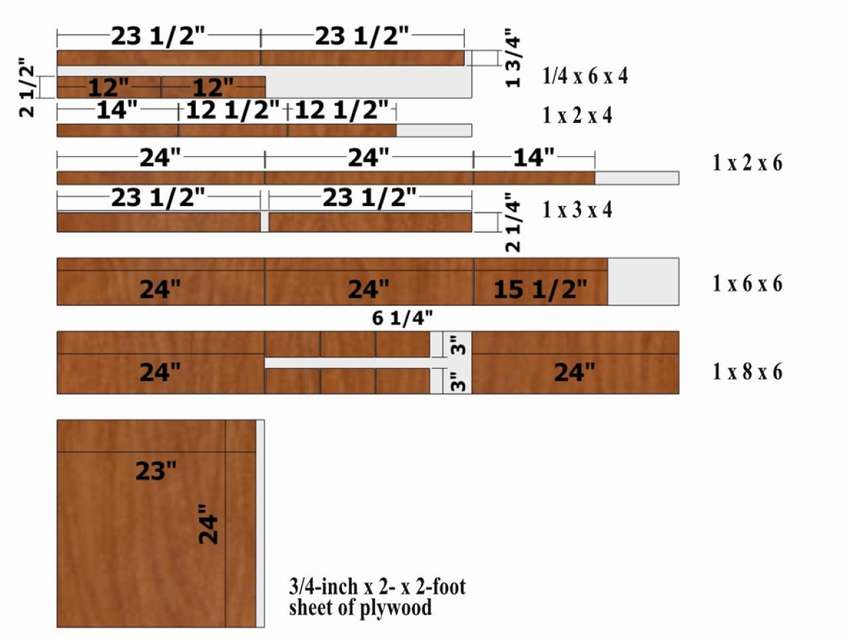
You will need 1x2, 1x6 and 1x8 boards 185 cm long.
The photo below shows sawing parts, inch sizes. Convert to centimeters is very simple, multiply by 2.54 and that's it. For example, 23-1 / 2 inches, this multiplied by 2.54 will be 59.95 cm, a total of 60 cm.
 How to make a bathroom cabinet with your own handssee below for step by step photos.


https://i.expert-h.com/en/shkaf/1107#sigFreeId9b6c7a9208
Wall cabinet for bathroom with mirror
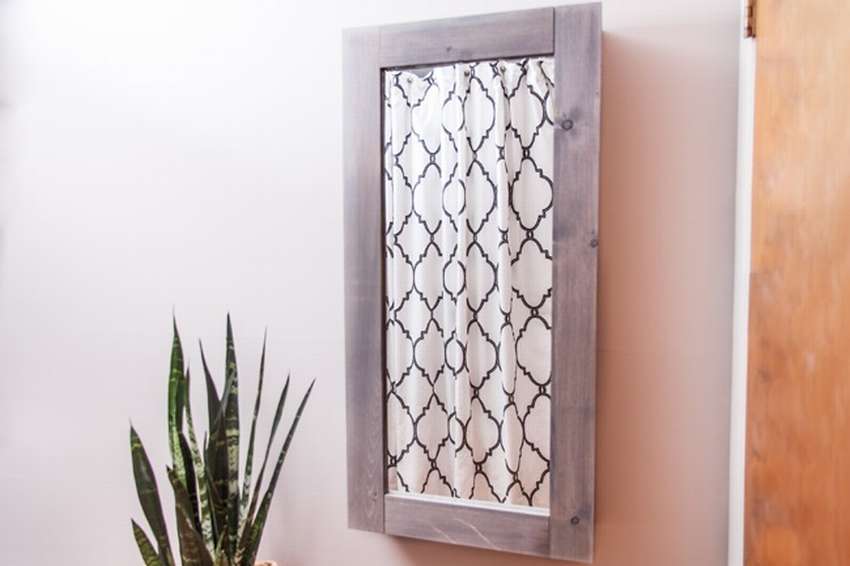 Make full use of the space by making hinged bathroom cabinet with a do-it-yourself mirror, which visually enlarges the room as a full-size mirror.
The cabinet has an internal depth of 14 cm, a width of 61 cm and a height of 152 cm, with adjustable racks that are easily suitable for products of any height. You can assemble such a design for one dayIt’s not at all difficult.
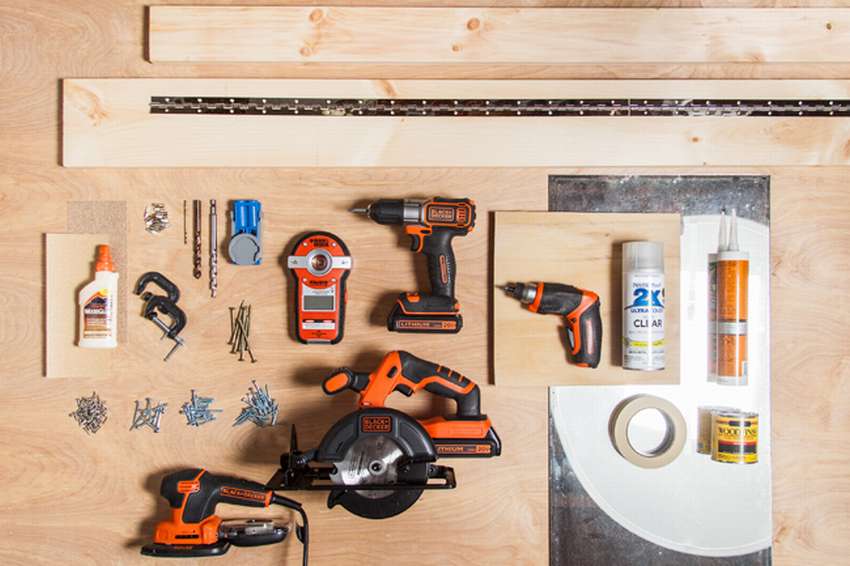 On the right in the photo are presented tools and materialsthat you will need to make a bathroom cabinet with a mirror. Detailed instructions can be found on the website, the link can be found under the gallery. TIP. Depending on what type of screws you use, the holes should be slightly smaller. The idea is that the hole be large enough so that the screw enters without splitting the tree, but at the same time, so that the thread holds firmly. See the wizard below for step-by-step photos..


https://i.expert-h.com/en/shkaf/1107#sigFreeIdefc92ca28d
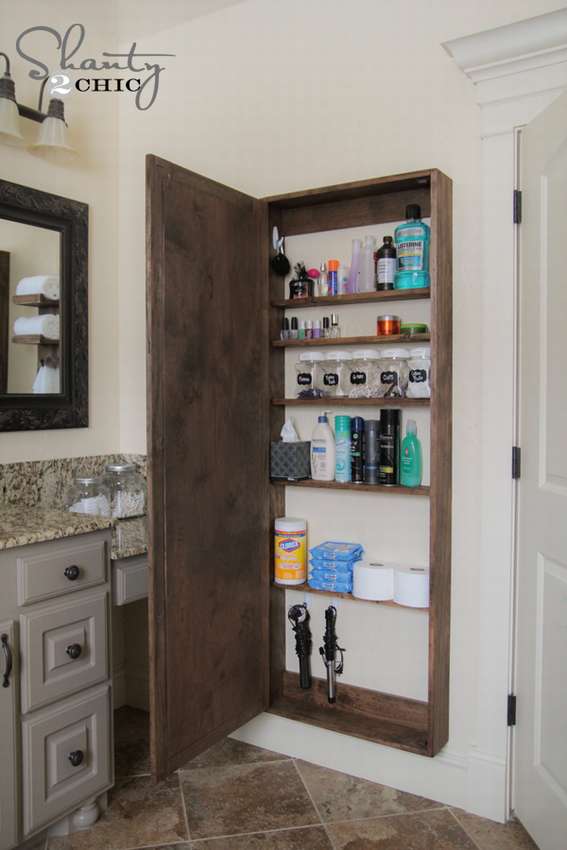
Wall mounted bathroom mirror cabinet
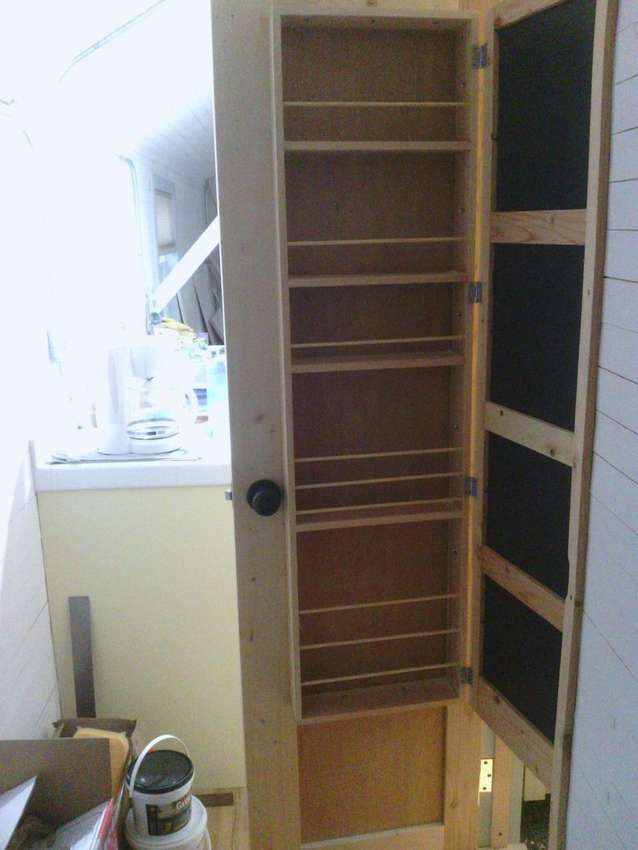
 Want to make beautiful cabinet with a mirror for the bathroom on the whole door? Then this wall cabinet with a sliding mirror is the perfect solution! It takes up little space, holds a lot of useful things when it comes to cosmetics and toiletries, and in front of a high mirror you can admire yourself in full growth. Moreover, this project will cost you very cheaply, the biggest expenses are drawers.
There are no step-by-step photos, but the cabinet assembly process shown in diagrams and drawings, you can see them below in a small photo gallery. If you are interested in this project, use the link and go to the site where there is a complete instruction, lists of materials and sizes of parts for sawing.


https://i.expert-h.com/en/shkaf/1107#sigFreeId1f3a78a8b3
Illuminated bathroom mirror cabinet
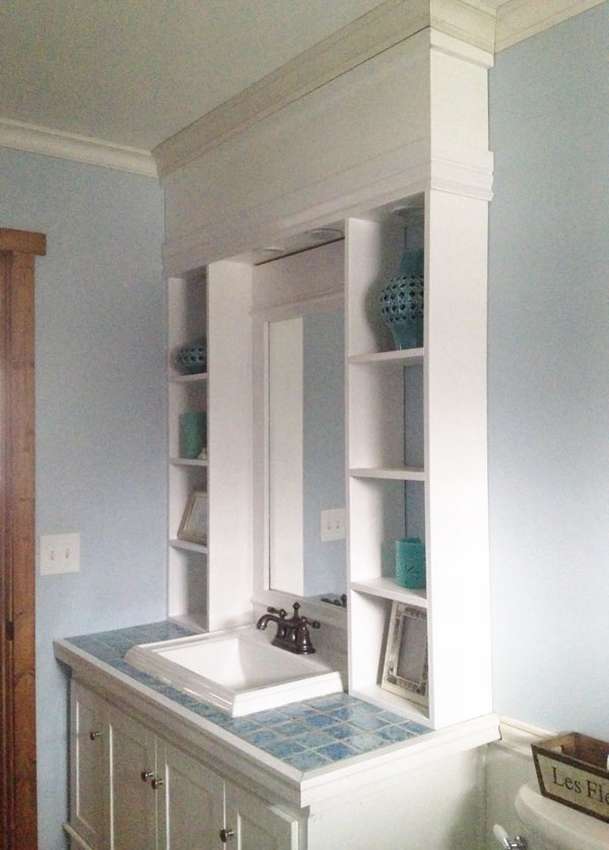 Example, how to make a cabinet for the bathroom above the sink with lighting. Below in the gallery you will find drawings, the dimensions are calculated for the cabinet with a width of 122 cm and a hole for the sink 61 cm. The ceiling in this bathroom is 245 cm and the height of the cabinet is 92 cm. Therefore, you need to measure the dimensions of your room to make a cabinet that will fit the room.
For the project you will need:
- 6 boards 1x8 245 cm long (can be used primed MDF boards)
- 1 board 1x10 183 cm long
- 1 board 1x3 183 cm long
- 4 recessed downlights
- First assemble the two side cabinet racks.
- After that, fix the upper crossbar for the fixtures, that is, simply nail it to the vertical side racks. Tip: First install the fixtures and connect the wires, then fasten the upper crossbar.
- Then put the frame back in place, you can attach the brackets or add staples to the lower shelf. It’s better to assemble the box on the floor, and then just reinstall it and nail it to the bottom board for fastening.
NOTE. Depending on the height of your ceiling and the location of the wall mounted bath cabinet, you can use 1x8 or 1x12 boards on top. Just leave enough space so you can install the box without damaging the ceiling.


https://i.expert-h.com/en/shkaf/1107#sigFreeId3d3f4ee78f
Mirrored wall mounted bathroom cabinet
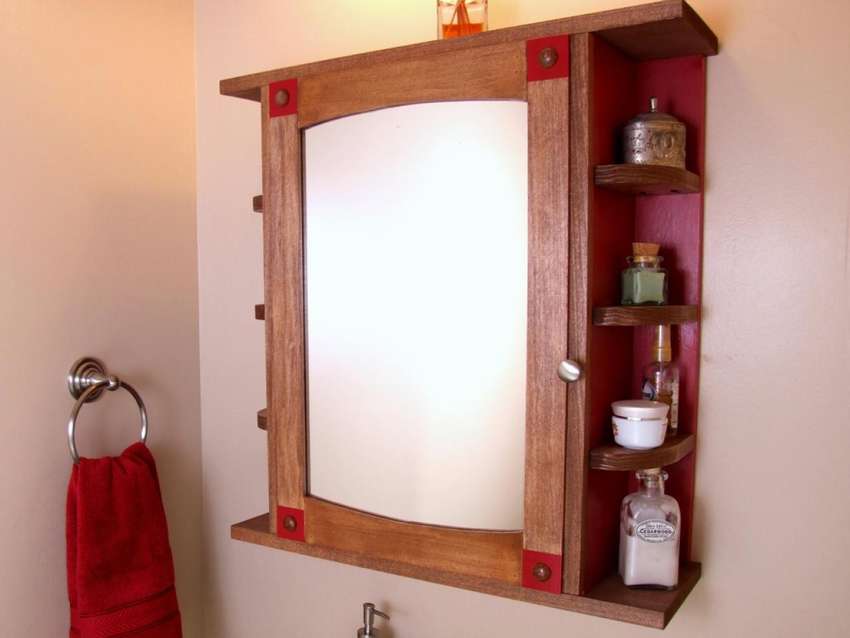
 Mirrored cabinets are a practical and universal solution for organizing storage in yourMy room. They free up valuable space, which is very important if the room is small. In this cabinet you can store toiletries, towels, hygiene products, accessories and more. The example presented here bathroom cabinet may not be very sophisticated, but simple and functional, beautifully designed and perfectly complement the interior of even the most modern bathroom.
They never go out of style. Mirrors reflect the light that improves the appearance of the room. In addition, mirrors can complement showers, plumbing equipment and accessories for plumbing. Consider installing a stylish mirror to turn your bathroom into a wonderful relaxation area when doing daily water treatments.
How to make this bathroom cabinet with mirror See below for step-by-step photos. It shows not only the sequence of the process, but also the dimensions of the parts in inches. To convert to centimeters, just multiply by 2.54.


https://i.expert-h.com/en/shkaf/1107#sigFreeIdcaed4fdcb1
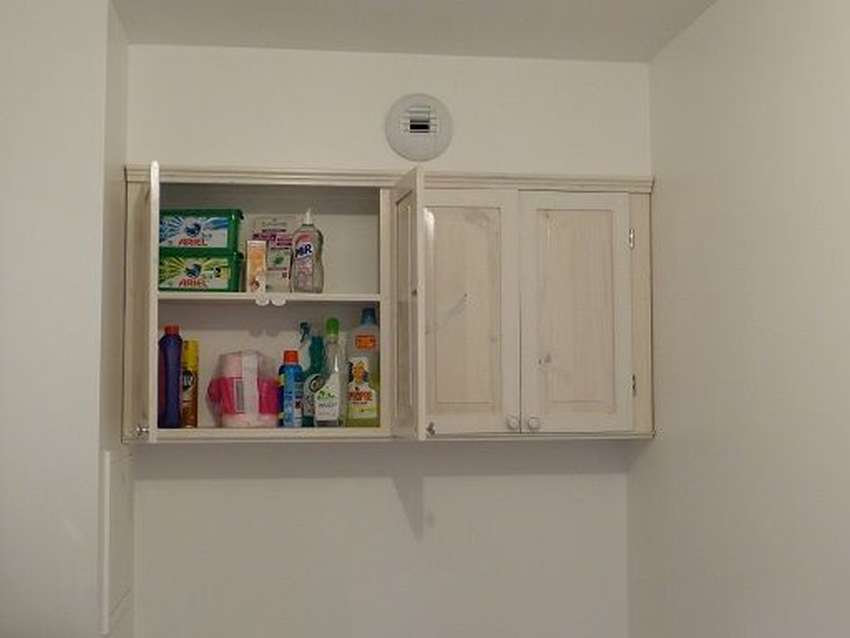
Wall cabinet with doors to the bathroom
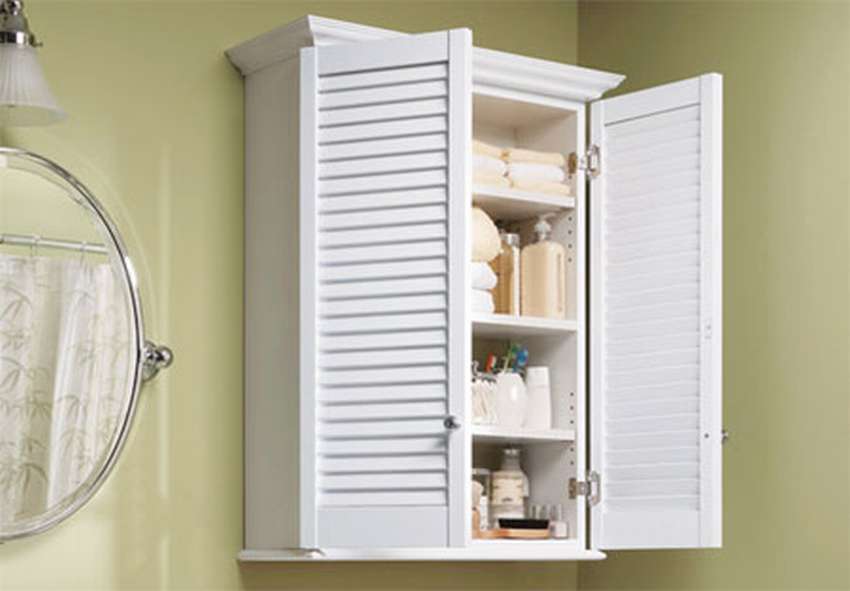 If you need a place to store toiletries, this wall cabinet for bathroom will be the perfect solution for any design.
This is also a great project for beginners thanks to the simple design and the finished door with shutters, which you can buy separately, or, if you do not find it, you can replace it with panel doors. Left on the photo is a diagram of the cabinet.
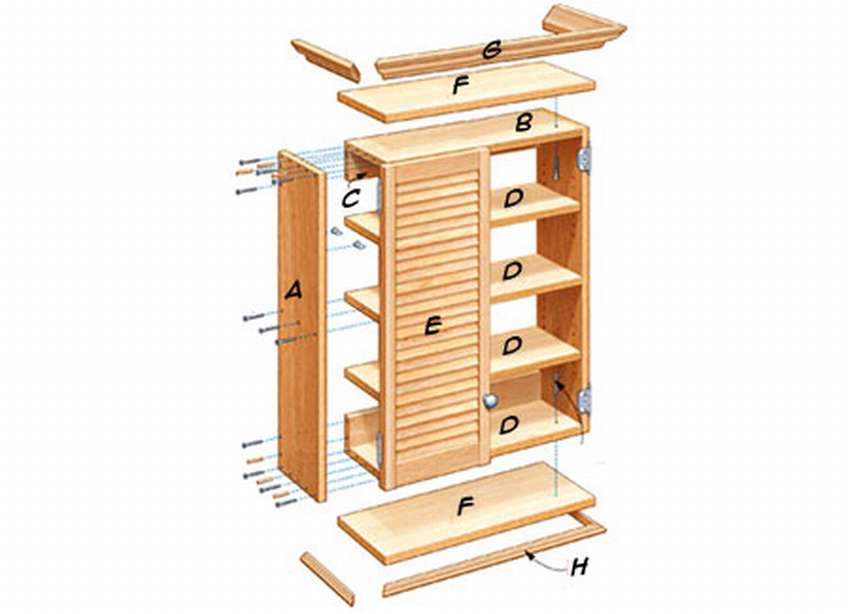 Assemble the frame with glue, screws and wall plugs. Drill 3 mm holes, use 8 mm wood bit for dowels. Holes must have same diameter as shelf pins - usually 6 mm, and should be installed at a distance of about 40 mm from the front and rear edges of the sides.
Detailed instructions on the site, the link is under the gallery. How to make this simple hanging bathroom cabinet see below for step by step photos.


https://i.expert-h.com/en/shkaf/1107#sigFreeIdb7c305eeee
DIY bathroom cabinet
See an example how to make a simple hanging cabinet DIY bathroom.
 The list of materials includes 2x4 boards, screws, nails, glue and small loops. From tools miter saw, table with router and grinder. A master class on how to make a cabinet for a bath with your own hands, see below for step-by-step photos.


https://i.expert-h.com/en/shkaf/1107#sigFreeIdbbab63865b
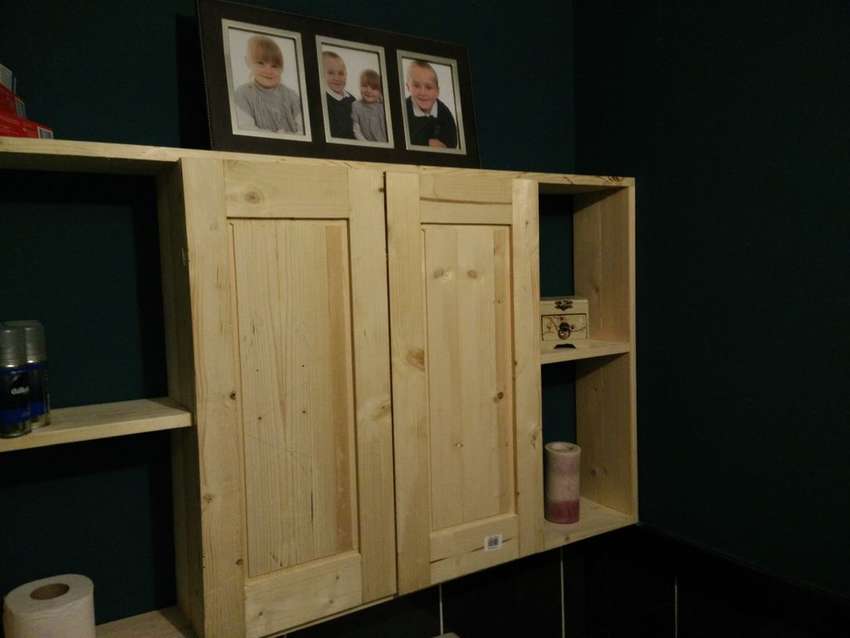
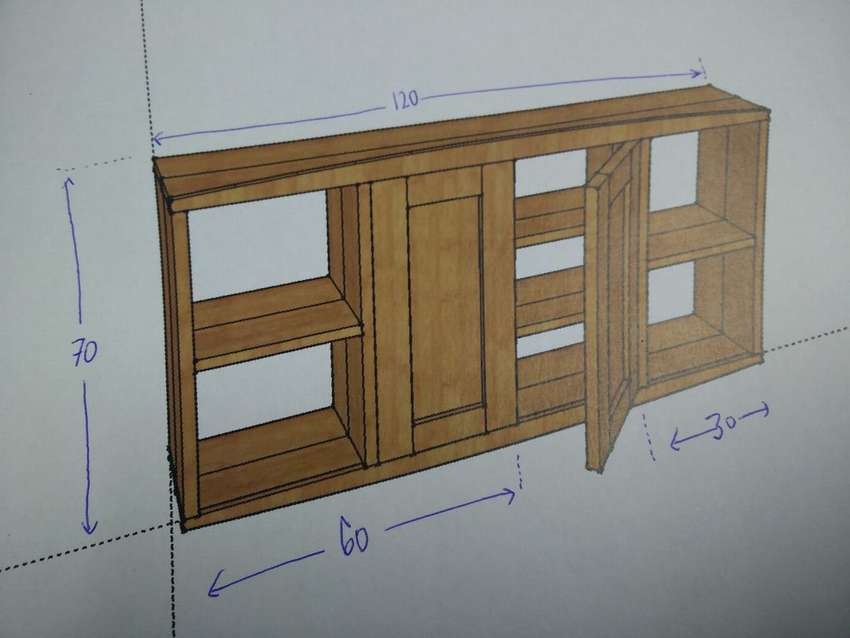
Wall-mounted bathroom cabinet
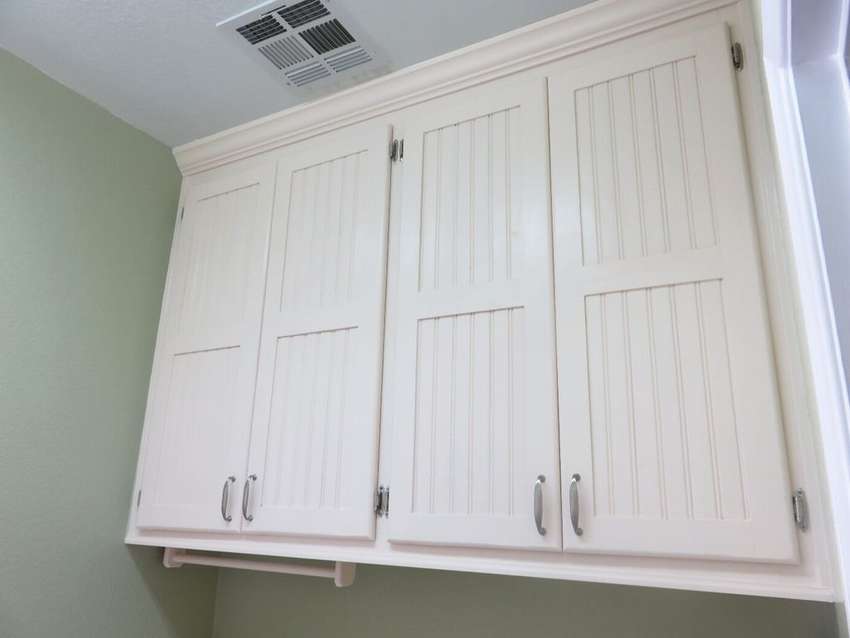
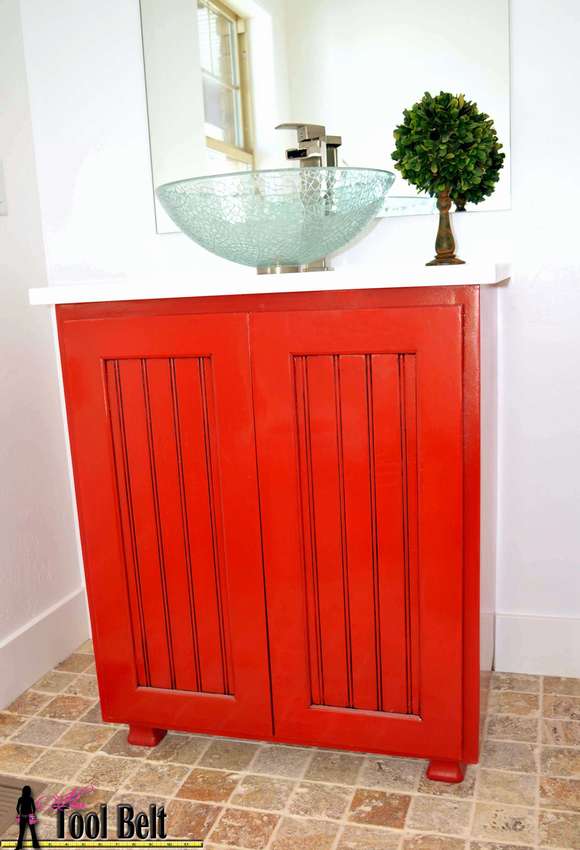
 A very simple and cheap project. To make a wall cabinet for the bathroom You can use any kind of tree you want. These are just 2 shelves with 4 doors and a top trim for beauty. Most of the time will take to do 4 panels in the middle of the doors, but it all depends on whether you have all the necessary tools. Then things will go faster.
If you are interested, there are two videos on the author’s website, if this is not all clear after viewing step-by-step photos.


https://i.expert-h.com/en/shkaf/1107#sigFreeId7ce86bf68f
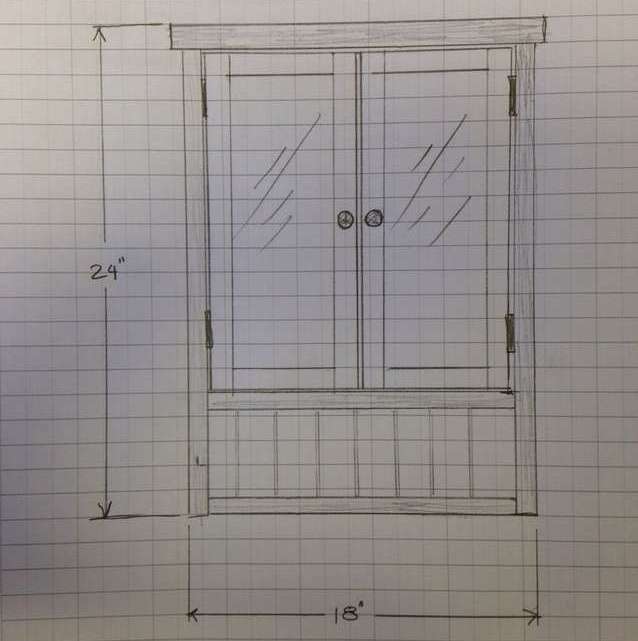
Simple wall cabinet
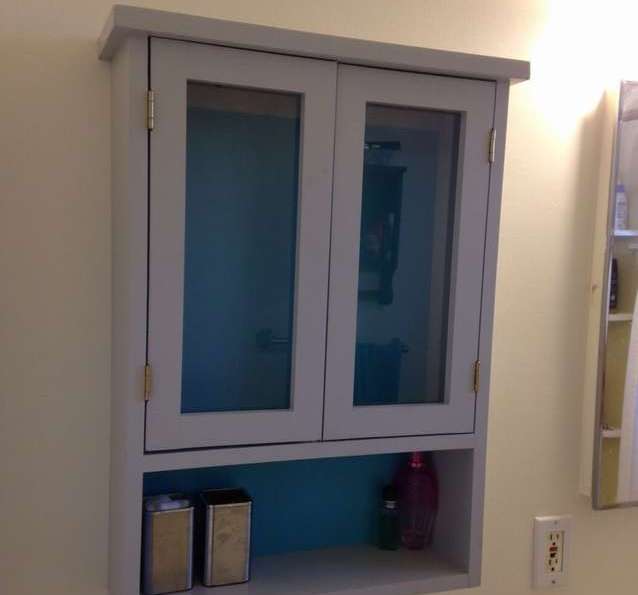 See an example of how to do simple wall mounted bathroom cabinet do it yourself.
You will need two boards 1x2 and one 1x6 2.5 m long. Saw them to the required size and assemble the frame. Ideally, the top should be solid, but if that doesn't work, sanding and paint will hide all the joints. After assembly, cut out the tablet with the milling cutter so that the base plate sits flush. Fill all openings with wood filler. To make doors, cut the boards 1x1.5. For holes in this case, we used craig jig, which greatly simplifies the assembly.
 You can use glue, although it was not used in this project.
- Using the router, make grooves for the hinges.
- After assembly, cut out the glass cover on the inside of the milling cutters and sand it carefully.
- Then you need to cut glass, if there is no experience in this matter, you can watch videos on YouTube, there are a lot of examples. In extreme cases, you can make just wooden doors, also very beautiful.
- Primer and paint as desired.
- After that, install the back panel and beat to the cabinet.
- Drill holes for handles and fasten to the door.
- Finally, install the adjustable shelf inside the cabinet and add magnets to the doors to close well.


https://i.expert-h.com/en/shkaf/1107#sigFreeIdba83a6debd
Original bathroom cabinet
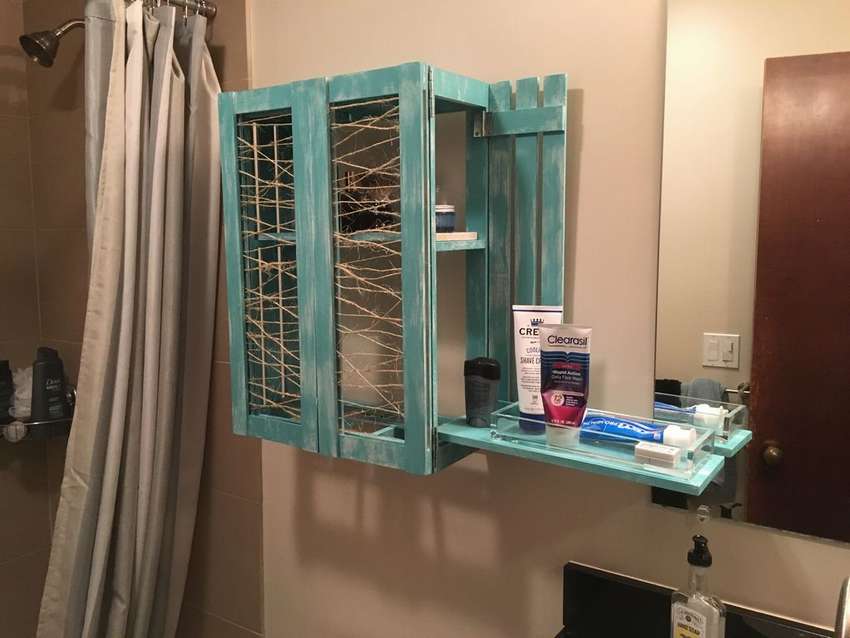 The basic concept is an ordinary wall-mounted small cabinet, but with extendable bottom shelf. And of course, the original design, hence the look of the cabinet, which resembles a box from a greengrocer, twine instead of glass, matte paint. Such a design in a modern bathroom is undoubtedly impressive. How to make a locker in the bathroom, can be read in a very detailed instruction on the author’s website, there you will also find lists of necessary materials and tools. Although the step-by-step photos show the process in sufficient detail. The hardest part is the doors. They are made of the same boards as the side panels, in this case 0.25 "x 1.5" x 24 "in size. For each door, use 4 full-size boards and 2 cutslightly less than half the width of the cabinet (the width of one door). Shorter boards are sandwiched between the long ones and make up the upper and lower parts of the door, and two long boards form the side of the door.


https://i.expert-h.com/en/shkaf/1107#sigFreeId09c3b53425
Wall cabinet for bathroom
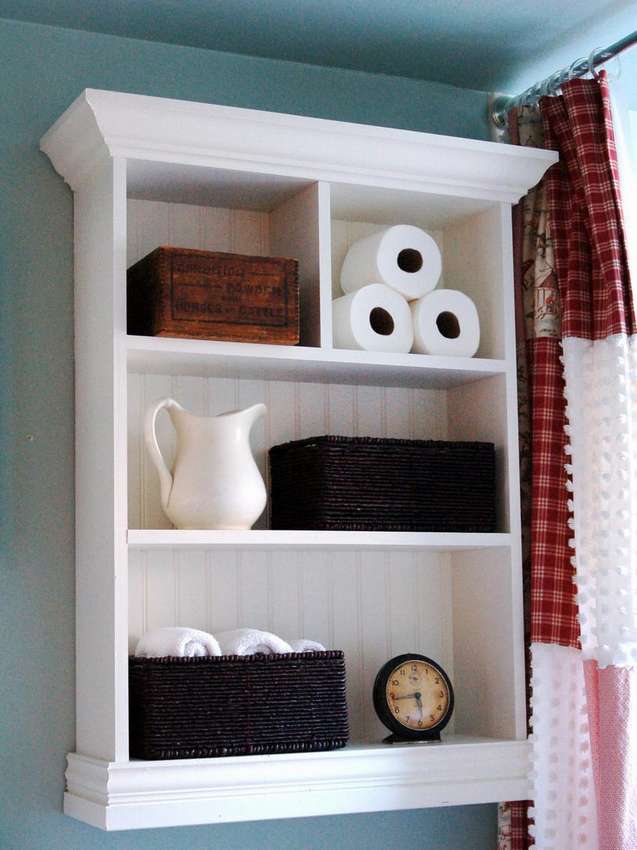 This built-in shelving - An ideal way to make unused wall space functional.
In fact, this is a simple shelf on the wall, decorated with moldings. A suitable project for a novice master.
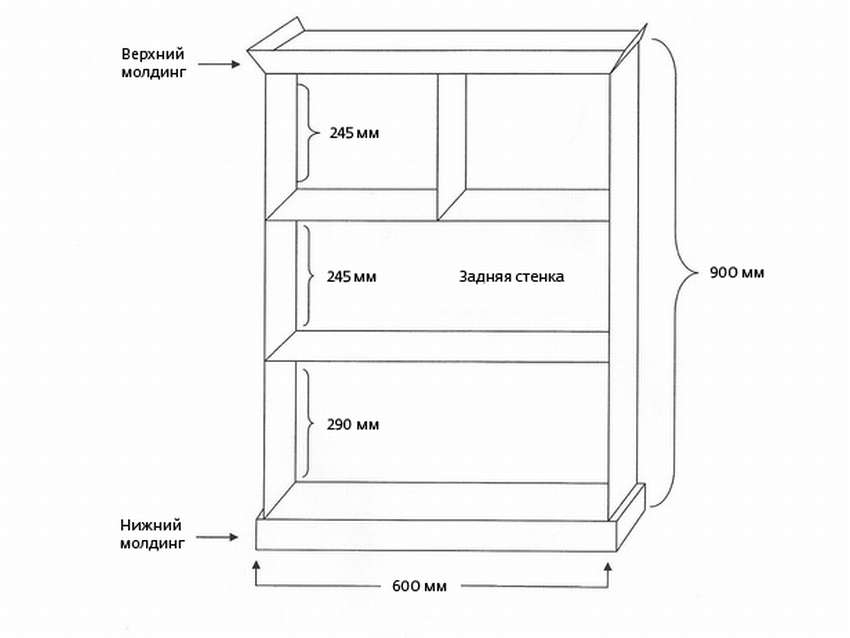 How to assemble the structure, look master class on step by step photos.


https://i.expert-h.com/en/shkaf/1107#sigFreeIdbc5c95b7ea
DIY bathroom shelf
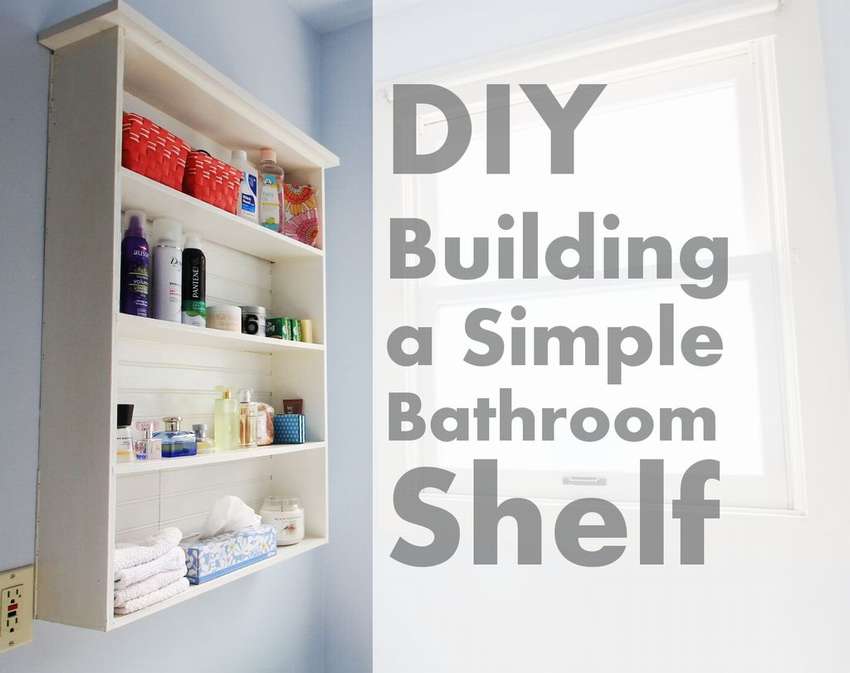 If you need a simple and practical bathroom shelf (or somewhere else!), this simple design will be a great choice. The presented shelf is made of plywood and is quite simple to manufacture and does not require complex tools. Using cheap furniture plywood - A great option, especially when you paint it. Here the shelves are made with a height of 23 cm, it is well suited for toiletries, but you can certainly resize, not a problem at all. Cabinet size: 91 cm high, 61 cm wide, 15 cm deep
How to make a shelf with your own handssee below for step by step photos.


https://i.expert-h.com/en/shkaf/1107#sigFreeIdf3a25305bb
Laundry Cabinets
 Look how to make a do-it-yourself laundry cabinet. It is easier than you think. Cabinets are installed wall to wall, so you can use every inch of space. Also provided additional shelf above washing machines and a horizontal bar for towels. Cabinets are made of plywood, which is usually used for flooring. It is not very beautiful, but cheap.
How to make do-it-yourself laundry cabinets, see below in the gallery with step-by-step photos.


https://i.expert-h.com/en/shkaf/1107#sigFreeId3a2593ab8a
Wall cabinet for the bathroom 100 photos


https://i.expert-h.com/en/shkaf/1107#sigFreeIdc592c76a70
DIY cupboard under the sink in the bathroom
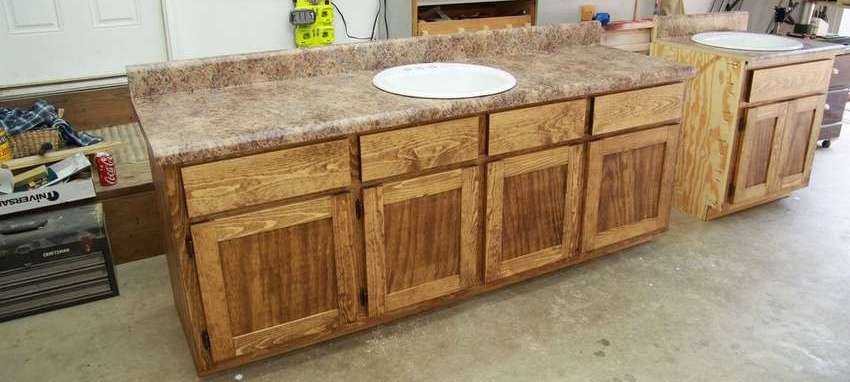 The cabinets that are presented here are the design washbasin cabinets in the bathroom. The same methods can be used for kitchen cabinets, since the difference between the cabinets under the bathroom sink and the kitchen cabinets is the height and depth. The design is a very conservative straight line style. Nothing fantastic. No rib parts. The drawer fronts are just a piece of 1x6 board, and the doors are a simple design with tongues and grooves with plywood panels.
 Material Lists for cabinets may vary depending on size and style, but for a general list you will need the following:
- Plywood for side panels, bottom and any other structural part that will not be visible.
- Plywood or solid wood panel for door panels.
- Hardwood boards for the front frame, door frame and front drawer.
- Slides for drawers.
- Hinges of the cabinet door for a door of any style, overhead door hinges were used here.
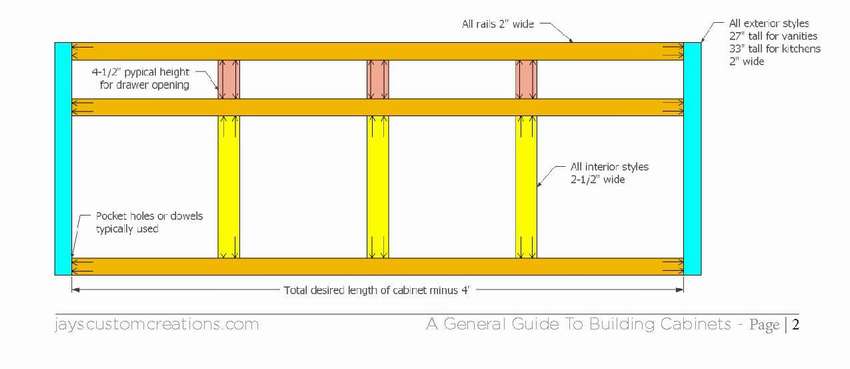
The following shows the assembly order of the cabinet in the bathroom on the diagrams.


https://i.expert-h.com/en/shkaf/1107#sigFreeIdf89aaba22b
How to assemble a cabinet under the bathroom sink See below for step-by-step photos. If you want to get more detailed instructions with dimensions, use the link to the site under the gallery.


https://i.expert-h.com/en/shkaf/1107#sigFreeIda6445cc2f7
Washbasin cabinet in the bathroom
 If you are not happy with the prices in the store, here is an example, how to make a cabinet under the sink for a bathroom do-it-yourself. Perhaps the amount of work may seem intimidating, but if you can put together a wooden box yourself, then you can make such a cabinet. This is actually an easy assembly, just read the instructions on the website, the link under the gallery and follow the steps shown in the step-by-step photos.
The first step is to cut the round edges of the 2 × 4 boards and make them 8 cm wide. This is not necessary, but then you will have to resize. In general, making a frame and paneling from plywood is not a problem. Doors can be bought separately or made independently from battens and plywood.
Step by step photo not very much, so it’s better to use the link, go to the site and see the video, everything is shown there in great detail.


https://i.expert-h.com/en/shkaf/1107#sigFreeId1377c706d1
For the manufacture of cabinet under the sink can use these drawingsThese models are very similar.


https://i.expert-h.com/en/shkaf/1107#sigFreeId03a2894a50
How to make a washbasin for a bathroom
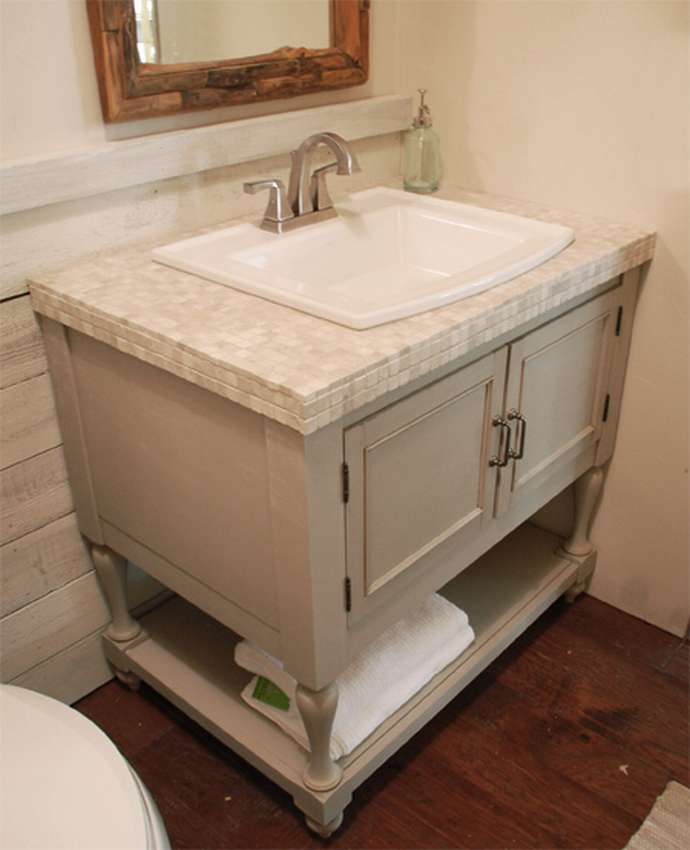
Style cabinet under the sinkpresented in this photo is more common in America and is very popular with British designers.
 If you like this design, the gallery below 105 step by step photoshow to assemble cabinet for a bathroom sink.


https://i.expert-h.com/en/shkaf/1107#sigFreeId66de3dbab2
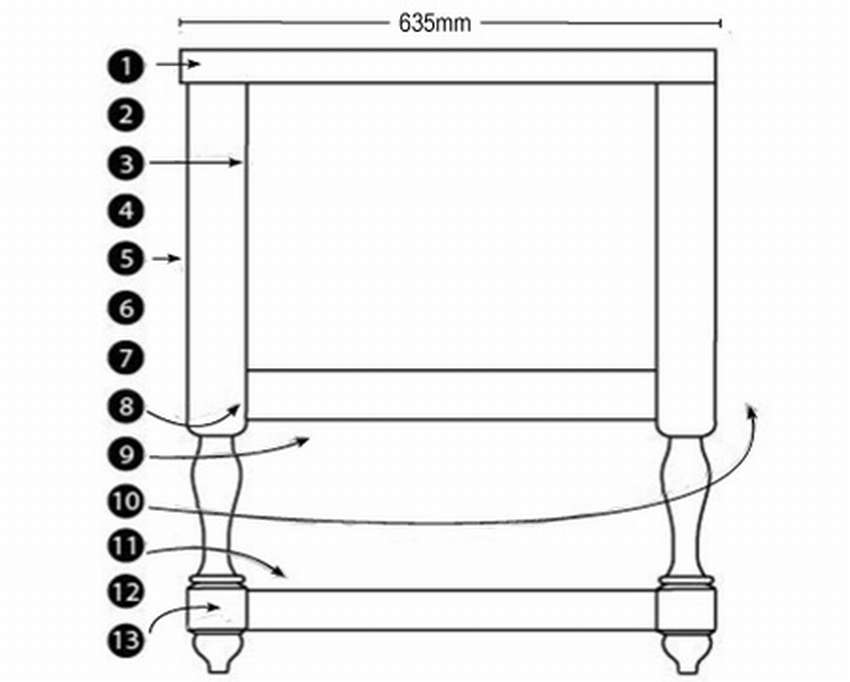
Cabinet under the sink drawing
 This simple washbasin cabinet with doors Add an interesting design to your bathroom interior. For the project used boards from poplar and cheap polished plywood. If you do not want to use poplar, you can takepine boards, although they also have their drawbacks - compaction around the knots, moreover, pine discolors the paint. Cabinet doors are designed for hinged hinges, and the dimensions of the structure for open racks. If you don’t want to buy legs, cut the bars to make the cabinet comfortable for you. A few notes for assembly. Before applying glue, do dry fit enclosures to make sure everything is in place. Make adjustments if necessary. If you are painting, skip the vultures. Apply glue to all joints and assemble the cabinet. Use the hidden foot at the top of the back of the cabinetto maintain the desired distance. Use clampsto secure all parts while the structure dries. Remove excess glue.
The assembly process is shown in the drawings in the gallery.


https://i.expert-h.com/en/shkaf/1107#sigFreeIdf91120c86b
Vintage bathroom cabinet
 Choosing your own style for the bathroom that you like is a difficult task. Most closets of toilet rooms are blocks with doors and have no style.
Cabinet under the sink for the bathroomDIY makes it possible to create unique design in the bathroom, and another plus, you will spend significantly less money on materials to make a cabinet than buying a finished product in a store.
You might think that this bathroom cabinet is too complicated for you, but if you have at least minimal skills, then the main thing is to start, and soon you will realize that everything is not so scary.
This is what this one looks like cabinet on the drawing.
If necessary, detailed instructions are on the site, and below are step-by-step photos.

 Note : For extra protection, apply two coats of clear polyurethane inside on unpainted sections. This increases protection and reduces the risk of swelling.


https://i.expert-h.com/en/shkaf/1107#sigFreeId412cf6b13e
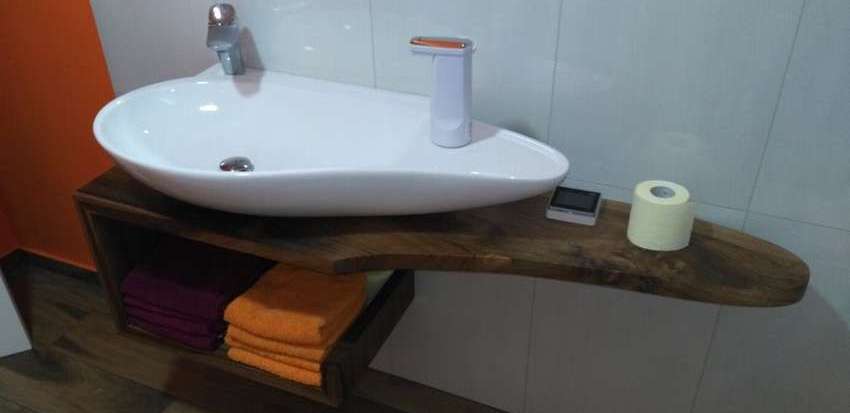
Wooden washbasin cabinet
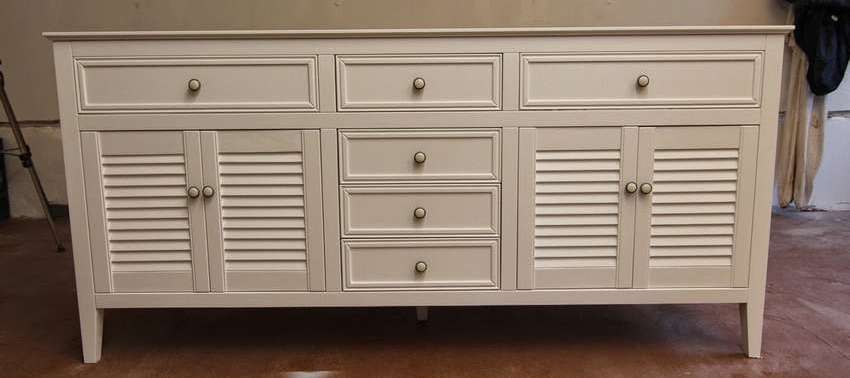
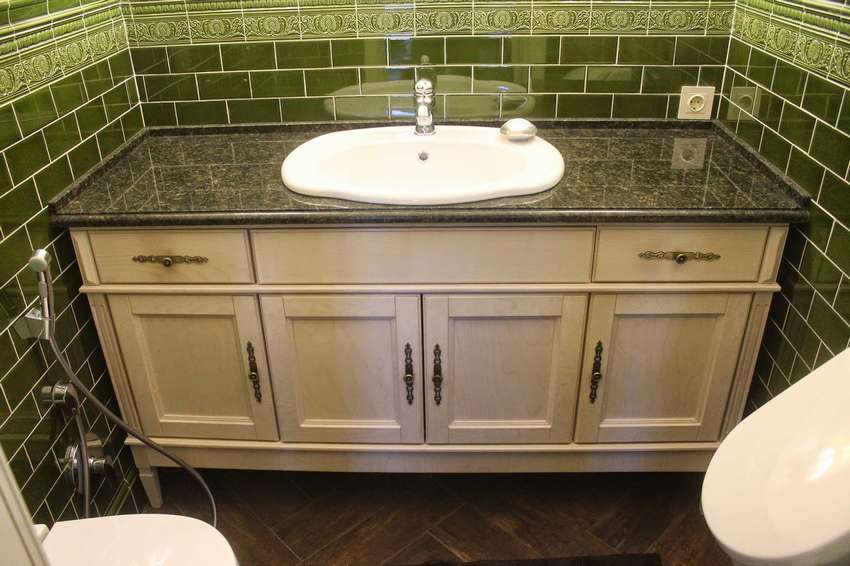 Cabinet under the bathroom sink must be not only functional, but also aesthetically pleasing to fit interior design premises. You will need to find a style that can accommodate the number of sinks you want. Of course, many would prefer double shells. Unfortunately, space limitations often exist. Size less than 150 cm usually allows you to install only one sink, it can be in the center, right or left. Also in the cabinet for the sink can be drawers or standard doors. Here is a custom example at Marko Studio. If you prefer to make furniture with your own hands, 30 photos of the master class at your disposal.


https://i.expert-h.com/en/shkaf/1107#sigFreeId1eeff17154
Stylish bathroom cabinet
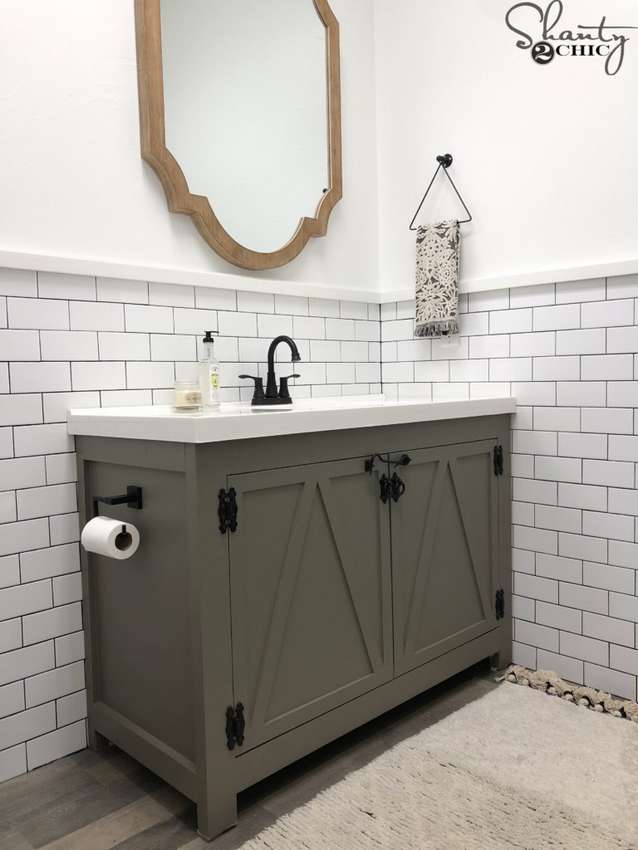
 Great example of how to do in bathroom cabinet under the sink in the English style. This design requires careful planning and attention to detail. There are many decisions to make, from layout and style to the types of sinks and countertops. This project also developed by Marko Studio and made by professional craftsmen, but if you have the necessary tools and a great desire to make a cabinet with your own hands, detailed master class is shown below on 100 step by step photos.


https://i.expert-h.com/en/shkaf/1107#sigFreeIdc1952ad10a
Hanging cabinet under the sink in the bathroom
This is part of the bathroom design, cabinet under the sink in the style of minimalism.
 Master class on manufacturing, see below on step by step photos.


https://i.expert-h.com/en/shkaf/1107#sigFreeId760183e672
Bathroom cabinet with sink Ikea
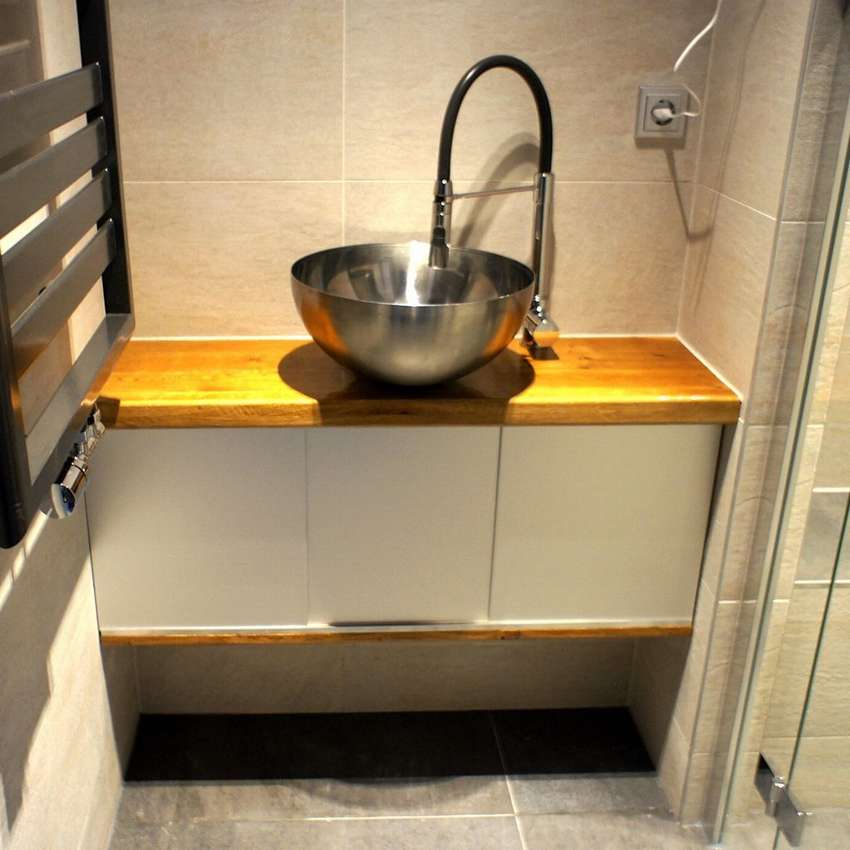 Interesting project for a small bathroom. First you need to make shelves, in this case, the upper part of the cabinet is 96 cm x 30 cm. The author used three boards from oak flooring. To make a bowl in bathroom cabinet sink, you need a hole that is suitable for a standard drain. To prepare the wooden parts, drill two holes in the upper part of the cabinet in the middle near the edge, so that the bowl protruded over the edge. Aluminum doors will slide along the F-profiles. But aluminum does not glide well on aluminum, so you can use brass rod 4x4 mm in the lower F-profile. All doors should be slightly wider than the cabinet. In this case, the frame is 96 cm. Thus, 96/3 - 32. In general, there are many different nuances, all of which you can read in the detailed instructions on the website of the author of this project, and see below master class on step by step photos.


https://i.expert-h.com/en/shkaf/1107#sigFreeId5e1a278aa7
Round cabinet under the sink
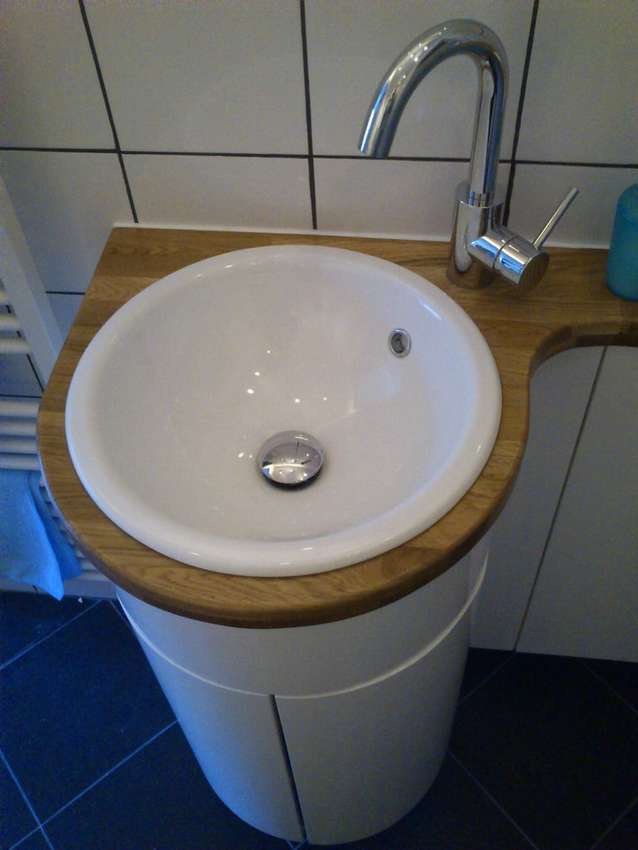 A good solution if, due to the layout of the bathroom where the washbasin is located, you need round cabinet under the sink. In the store you are unlikely to find such a design. The option is to make a cabinet for the bathroom with your own hands. The instructions presented here do not include complete assembly information, only the part with rounded doors, as this is the most difficult part. To make curved doors, start by making two identical shapes from an 18 mm MDF board. True, this step is not on the step-by-step photos, but the process is quite simple, read the instructions on the site, there are only 7 points.
Note: forms can be reused later for the upper and lower parts (or the inner shelf). Thus, the time required to make these two identical shapes is not only to create a one-time mold, but also to make other parts of the cabinet.


https://i.expert-h.com/en/shkaf/1107#sigFreeIda339a0ee88
Cabinet under the sink in the bathroom 100 photos


https://i.expert-h.com/en/shkaf/1107#sigFreeId7f041dad6c
DIY built-in bath cabinet
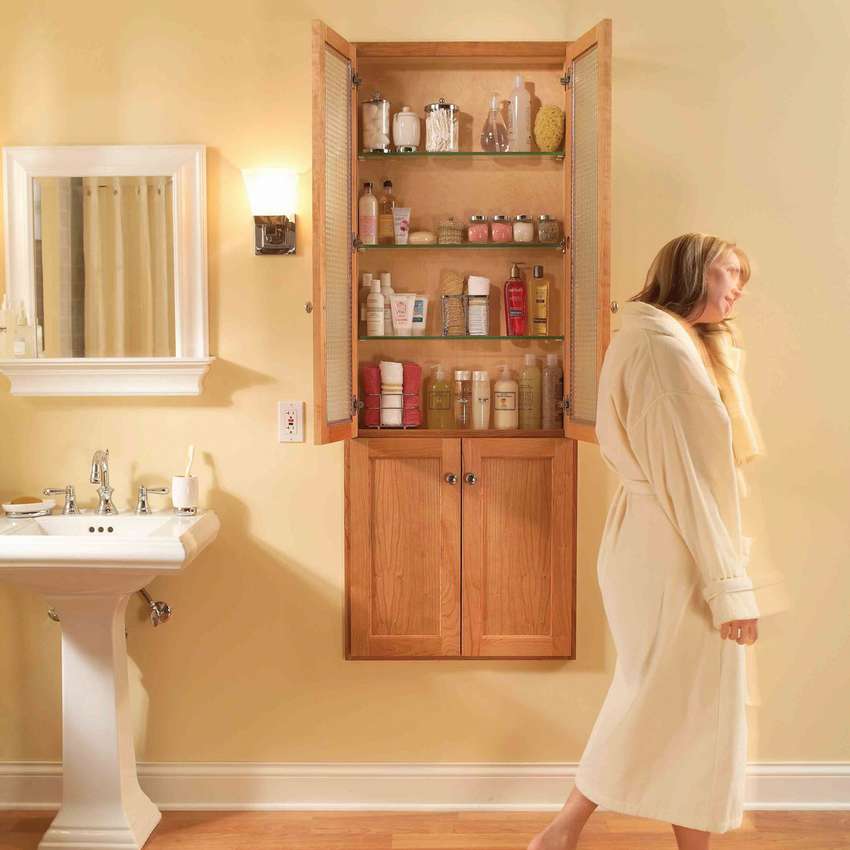 If there is not enough storage space in the bathroom, this built-in wardrobe may be a good option to resolve this issue. The design is large and spacious, and the small depth of the shelves makes it easy to reach any thing in the closet. No more digging in drawers or in dark corners to find what you need. And since it is recessed into the wall, you will not lose valuable area.
This project is an excellent introduction to the basic skills of making simple DIY bathroom cabinet. This is a simple box with a front frame attached to the front. You just buy the doors in the style that best suits your design in the bathroom and mounts them on the front frame.
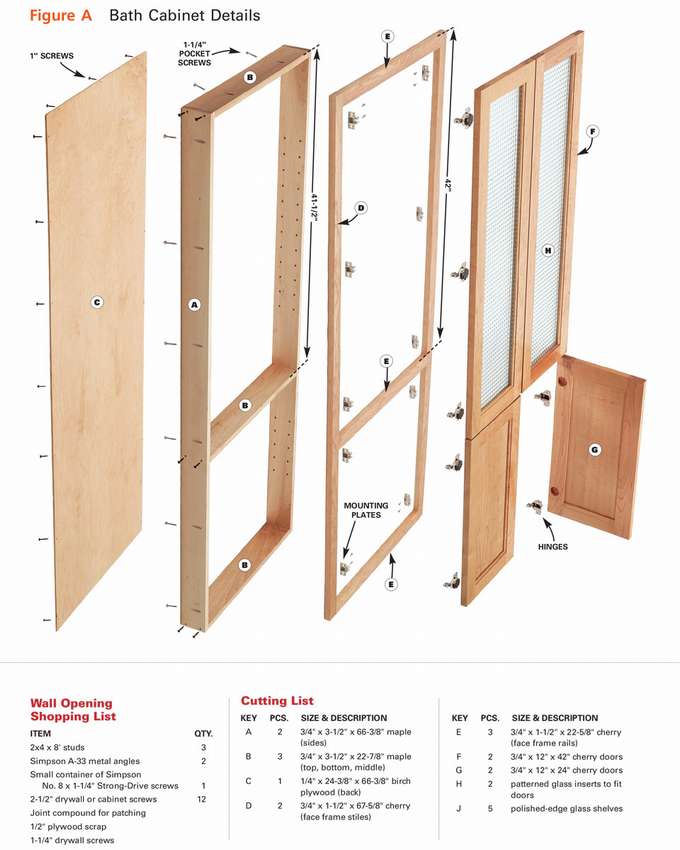 In this case, we ordered doors complete with 35 mm holes to install hidden euro-style hinges. These hinges are great for beginners because they allow you to customize the doors for a perfect fit.
This step-by-step photo shows the entire assembly process for the bathroom cabinet. If you want more information, link to the site under the gallery. There you can read how to cut a hole in the wall and safely remove the stud to create a recess for the cabinet.
Even with a little experience with wood, you can finish wardrobe in one day. Finishing and installing the cabinet will take another five or six hours.


https://i.expert-h.com/en/shkaf/1107#sigFreeId22bc717317
MDF bathroom cabinet
 it bathroom cabinet made from MDF scraps. If you need something simple in your bathroom to hang towels and lay out various necessary little things, then this is a great option. There is no detailed guide or detailed step-by-step photos, cut MDF board on the details of the required dimensions, and then simply sticking it all together is not difficult. When finished, sand and paint well. If there is no circular saw, that's okay. Author, for example, for making this bathroom cabinet used a jigsaw, a hand saw and a regular screwdriver. Difficulties may arise with doors, but the advantage of a home-made cabinet with custom-made doors is that you can choose any style of door that you want to fit your design. The terminology of door styles can be a little confusing, so it’s best to choose the style you like in the drawings or illustrations provided by the door manufacturer.


https://i.expert-h.com/en/shkaf/1107#sigFreeId585fe10d95
Modular bathroom cabinet
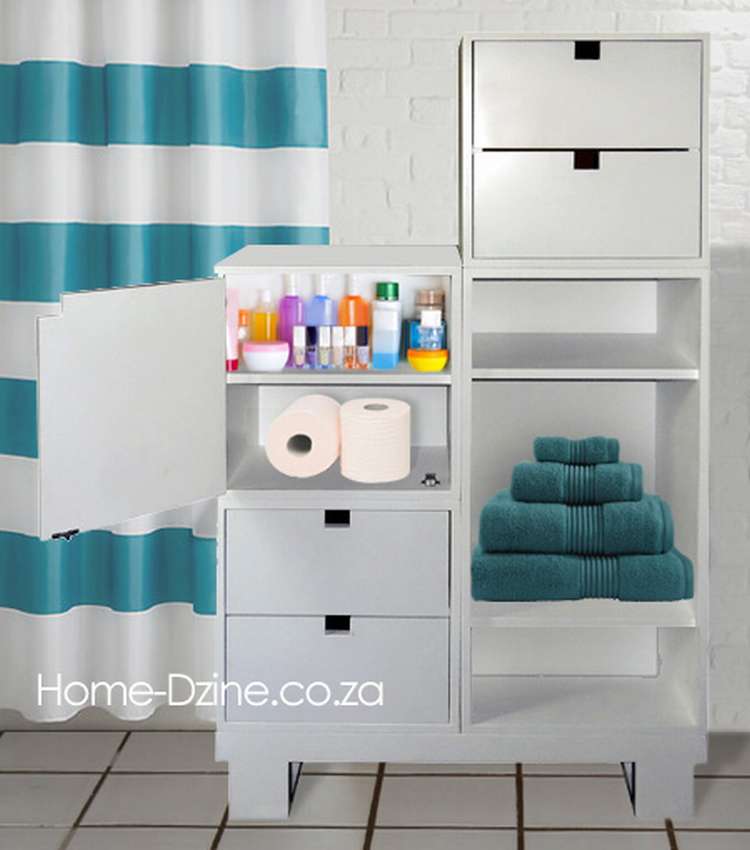 This modular bathroom cabinet consists of individual cubes that can be added to create the perfect storage space.
On a basic basis, you can add cubes with drawers, cubes for a shelf or cubes with doors for a cabinet, creating any configuration. The boxes are sized perfectly inside the cube, and the separator drawer makes it easy to open and close drawers. In the photo you see the base model, this is only one of the options, which includes a rectangular shelf and a 2-cell cube.
Drawings and step by step photoshow to do do-it-yourself modular cabinet You can see below in a small photo gallery.


https://i.expert-h.com/en/shkaf/1107#sigFreeId3be5698a4b
Swivel cabinet rack
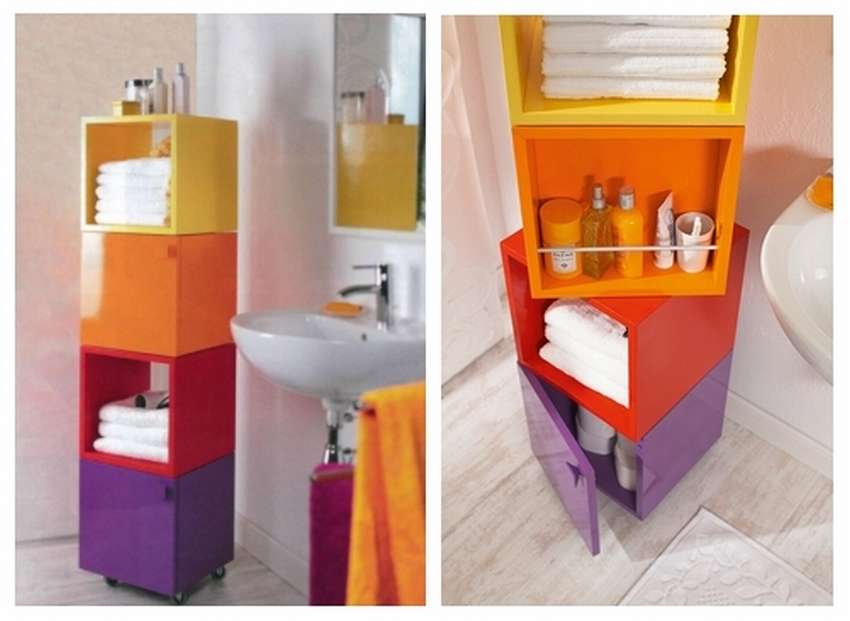
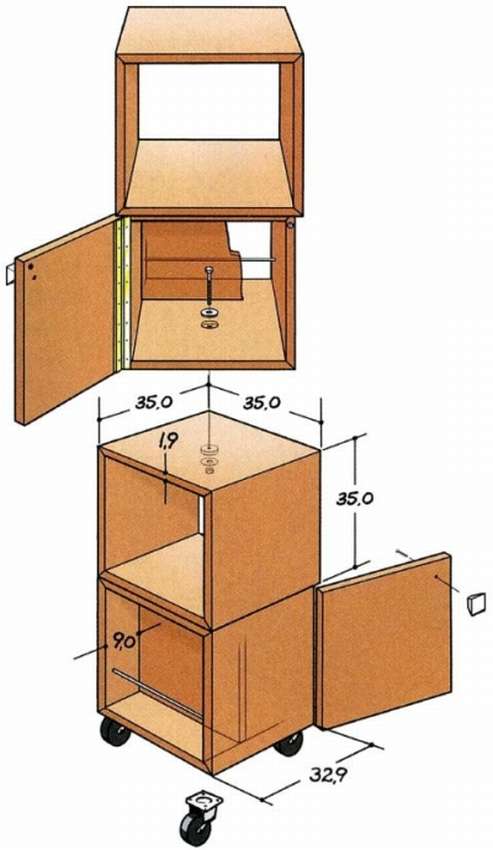 Want to make for your bathroom mobile cabinet on casters in the form of a rack of cubes, which can not only be moved to any place, but also rotated shelves, how convenient? These cubes are folded so that they occupy minimal space. Two of them remain open, while the other two are equipped with doors. You can make a modular cabinet yourselfIt’s not so difficult. Of course, this is not the simplest design, there are many technical details, so use the link and read the detailed instructions on the website, everything is simple and clear. Master class on how to make a mobile bath cabinet see below for step by step photos.


https://i.expert-h.com/en/shkaf/1107#sigFreeId7354de4026
Wardrobe with mirrored doors to the bathroom
 This is the door that the author designed and made for his camper, but it can be applied to any interior door, including for making a cabinet for the bathroom. A very successful project to save space in a small room.
The door frame is quite simple to make using the necessary tools. it cheap project, because the only material was ordinary 2x4 and 2x6s boards. Usually the panel door is made of 2 or more boards for strength and decor, but for this assembly the author decided to use one solid panel to make the cabinet section interior more economical.
If you look at the photo, you will see that the groove on the edge is offset. This is done intentionally to create more free space in the middle of the cabinet.
After the grooves are made, you can cut 2 vertical boards in length. If you are still reading, you probably have experience with wood, and now you can glue and fasten everything together. We will not describe the whole process, you can read the detailed information on the site if you use the link. Just see the step by step photosperhaps this will be enough.


https://i.expert-h.com/en/shkaf/1107#sigFreeIdb966e4ac7c
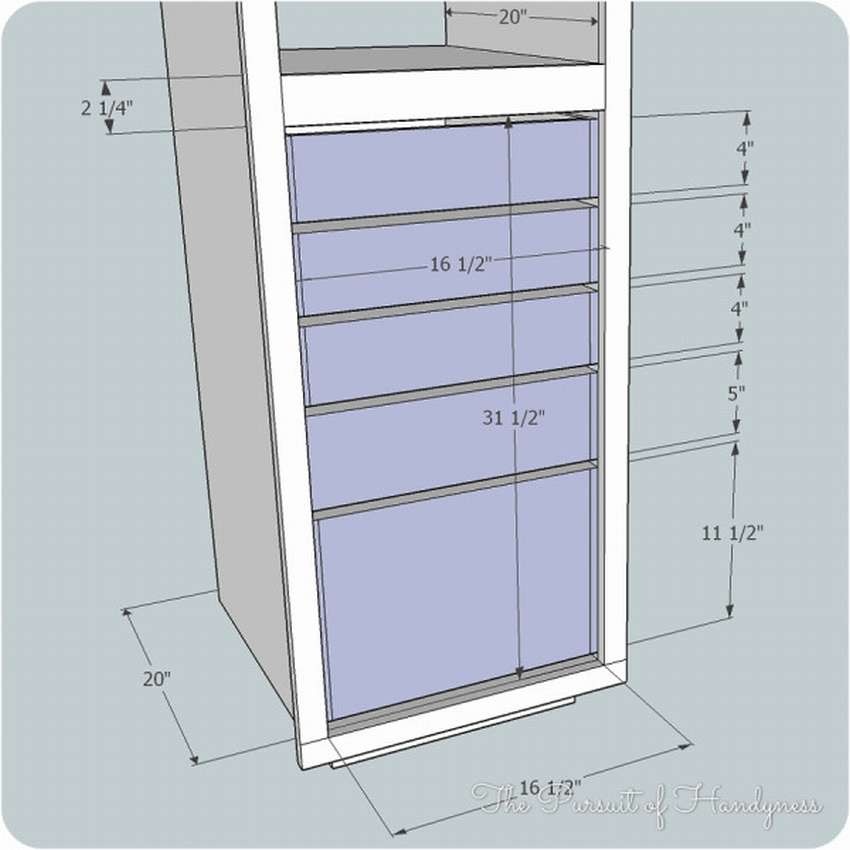
How to make bathroom shelves next to a shower
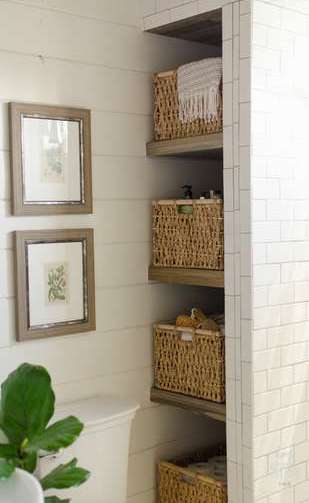 See instructions on how to make simple and inexpensive bathroom shelvesthat are perfect for this uncomfortable space between the shower and the wall.
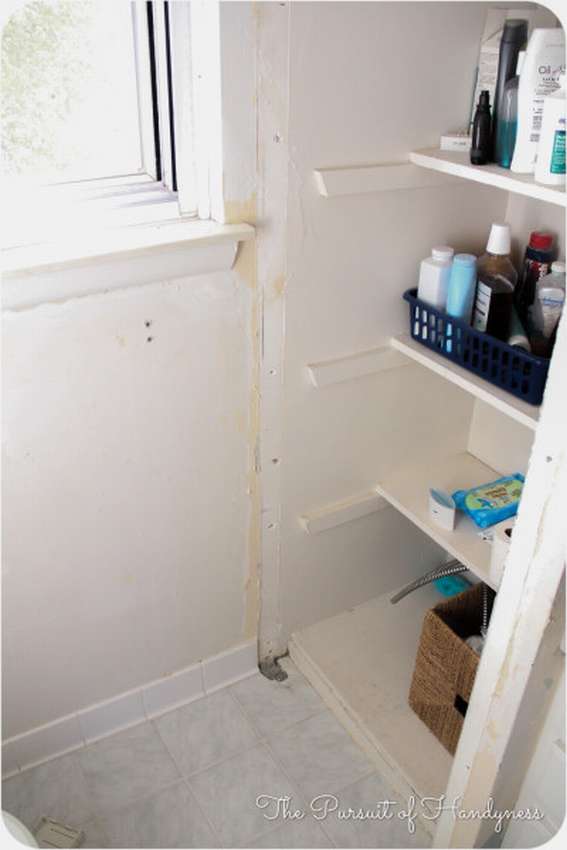
This “cabinet” is 2 meters high from floor to ceiling and approximately 45 cm wide. Buy plywood sheet and 1x2 board, then saw into the required dimensions. If you buy inexpensive plywood, you will spend a lot of time grinding! Cheap plywood is coarse and fragmented, but with grease, you can easily make a smooth surface. Don’t spend money on grinding machines that only vibrate back and forth, just take the rough sand paperand then with fine grain, spend some time grinding and you will have a great, even surface. When sanding, paint the shelves.
To determine,where to fix the bars 1 × 2, measure the height of the space between the walls and divide by the number of holes in the shelf. Here the space was 2 meters, so it took four niches and three shelves. You will need to do your calculations, but this will give you an idea of what to calculate. Use levelto make sure that the shelves are level. Then glue the plywood to the bars. Cut the front slats and fasten to the shelves. Reinstall the shelves.


https://i.expert-h.com/en/shkaf/1107#sigFreeIdc05f3f68ab
Narrow cupboard case in the bathroom
 And here is an example of how to niche install a built-in closet.
 As you can see, this is a very simple design.
See assembly procedure below for step-by-step photos..


https://i.expert-h.com/en/shkaf/1107#sigFreeId722fac0857
Narrow cupboard in the bathroom
Here is another example how to make a narrow cabinet for bathroomss.
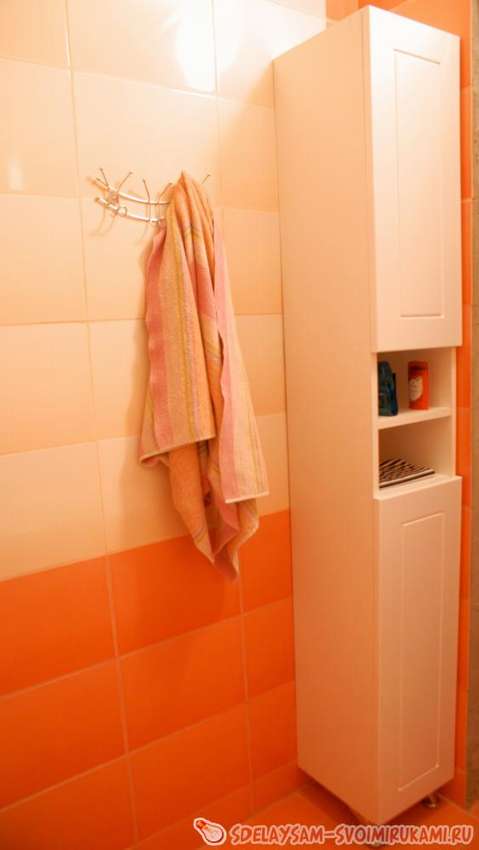
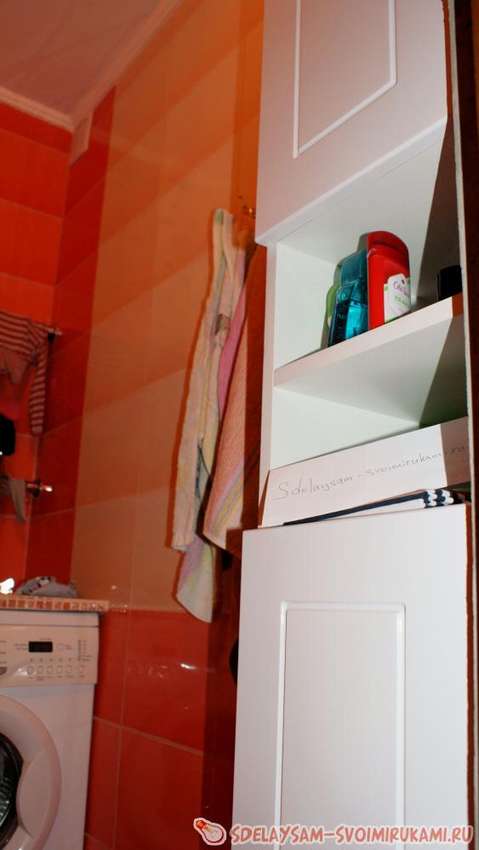 Below is a master class on step by step photos.


https://i.expert-h.com/en/shkaf/1107#sigFreeId9a61ea9097
Cupboard in the bathroom drawing


https://i.expert-h.com/en/shkaf/1107#sigFreeId4e769cfd6c
Sketches of bathroom furniture


https://i.expert-h.com/en/shkaf/1107#sigFreeIde1f999ef1e
Bathroom cabinet 100 photos


https://i.expert-h.com/en/shkaf/1107#sigFreeId318c7fb189
Hello, I am the author of this article, so I look forward to asking questions for this article in the comments below, I will answer all !!!
If you have questions on another topic, ask them on our forum, we will answer you
- Two baskets of paper in 5 minutes (Master class)
- How to make a simple and compact table for a milling cutter from plywood
- How to make a soft headboard tile (Instructions + step by step photos)
- Cinder block benches: a convenient bench in 55 minutes
- How to make a bed with a niche: saving space (Master class)