Do-it-yourself sandbox from Anastasia
 Do-it-yourself sandbox
In this article, we have prepared for you the most interesting and creative options for making children's sandboxes with your own hands. With the help of simple and accessible instructions even for a beginner, you can make a sandbox for a kindergarten, a sandbox near a house or for a playground from various materials, both traditional and modern.
Making a children's sandbox with your own hands step by step
The sandbox is one of the most important elements of the playground. Most children can sit out for hours with molds and sculpt muffins and build sand castles. That is why the sandbox should be built in accordance with all the rules and created taking into account all children's needs. Through this simple step by step guide You can make your child very comfortable and beautiful sandboxwhere he will spend time comfortably.
 First of all, it is necessary correctly choose a place for the sandbox. It should be in sight so that you can always keep your children in sight. It is also important to consider the location of the sun - the sandbox should not be located in the shade, but also not under constant scorching rays. Ideally, part of the sandbox in the sun, part in a shady place, for example, near a garden tree.
- Next, you need to determine the size of your sandbox. For several kids, a sandbox 1.7 * 1.7 is perfect. First you need to protect the place for the sandbox and mark it with a peg and rope. The place for the sandbox after marking needs to be plowed to a depth of about 25 centimeters.
- Then you need to think about the basis for the sandbox. You can leave just an earthen cover, however, when replacing sand in a sandbox, this may not be too convenient. Therefore, it is best to use geotextiles or agrofibre. You can also use a sheet of plywood or a film, but in this case you need to take care of the drainage so that excess moisture leaves.
- Now let's get ready for our sandbox. To do this, you will need 4 bars measuring 45 * 5 * 5. Each bar needs to be driven into the ground to a depth of about 15 centimeters. Important: the part of the bar that will be in the ground must be treated with an antiseptic.
- Then we beat boards with a size of 150 * 30 * 2.5 to the bars. If you do not have the necessary boards, you can choose the material from the existing one. Planks can be laid on top to make comfortable seating.
- The main thing is that all the lumber for the sandbox is perfectly smooth - for this, the boards need to be processed with a planer and sandpaper. And at the end of the manufacture of our sandbox, it is necessary to treat it with an antiseptic and cover it with varnish or bright oil paint.
Next, fill the sandbox with any sand - river or quartz sand is most often used for these purposes. That's it, the sandbox is ready!


https://i.expert-h.com/en/pesochnitsy/956#sigFreeId45619f8e93
: landscape-project.com
Making a sandbox for a summer house with your own hands in stages
For the suburban area can be done simple and convenient sandbox, so that children are busy playing. The sandbox for the summer cottage can be done independently, and for this you do not need to be a master of carpentry. It is enough to prepare the necessary material and show imagination!
 First, choose a place - a sunny area with a slight shade, for example, a tree, is perfect. Then in hot weather the children will not suffer from the scorching rays of the sun, and after the rain the sandbox will dry out quickly.
For a 1.7 * 1.7 sandbox you will need following materials:
- Boards 4 pcs 170 * 30 * 2.5
- Bars 4 pcs 5 * 5 * 40
- Boards for the top of the sandbox 4 pcs 200 * 40 * 2.5
- Antiseptic
- Bolts
- Wood paint
- Wood screws
- A piece of plastic film 1.7 * 1.7
- Fine sand
Through simple and convenient instructions make our sandbox, and do not forget to pre-treat all the lumber with an antiseptic.
After assembly, install the sandbox on a preselected place and fill it with sand.Optionally, you can install a parasol over the sandbox.


https://i.expert-h.com/en/pesochnitsy/956#sigFreeIdc3f2b4f89d
Do-it-yourself plywood sandbox
Sandboxes for children come in various shapes, and boys especially like machine-shaped designs. Do-it-yourself sandbox in the form of a truck can be done easily and simply. The author of this project did drawing for making plywood sandbox - such a place for playing with sand will be appreciated by any child. In addition, the design is lightweight and easy to carry.
 Do-it-yourself sandbox made of plywood is very simple. For this product you will need:
- 18 mm plywood sheets
- Corners
- Self-tapping screws 4 * 30
- Coupling bolts with a diameter of 8 mm
This version of the sandbox does not require much time - it is enough to cut out all the details and combine them with the order as indicated in the drawing. After the assembly of all parts is completed, the finished structure must be treated with a protective coating - varnish or antiseptic. After that, the sandbox in the form of a machine can be painted with bright paint. Then the sandbox made of plywood can be installed on the prepared place and put sand in the body.


https://i.expert-h.com/en/pesochnitsy/956#sigFreeIdf1aa235e00
How to choose the right place for the sandbox
Of course, do-it-yourself sandbox It does not require special skills in the carpentry, however, when building a corner for children, you need to know a few rules. First of all, it’s important choose the right place for a children's sandbox for a summer residence or on the playground. The sandbox for children needs to be located in the most suitable corner of the site, because here children will spend a lot of time. And kids often neglect safety rules and don’t wear hats. So, so that the sandbox becomes a comfortable place for children for a variety of games, it is important to be guided by these rules
- Sandbox space must be open and level.
- The sandbox should be in full view of the parents all the time (if it is a summer house or a house, the windows of the kitchen or living room should go to the sandbox)
- There should not be bushes with thorns or thickets of weeds near the sandbox.
- The place should be protected from passers-by and the street.
It is also important to consider summer scorching sun rays. Therefore, the place for the future sandbox is better to choose a shady, but not too gloomy. Ideally, there is a small fruit tree near the sandbox. However, it should be noted that it is better not to equip the place for children’s games near old trees - the trunk may collapse.
How to make a simple sandbox for children with their own hands
 But parents do not always have the opportunity to build large and interesting sandboxes for children. Then you can resort to a simpler and more compact version. In this workshop you will learn how to make a simple sandbox with your own hands for giving in an hour. You can connect children to this fascinating event - they will become excellent helpers. So, to build the simplest sandbox, we need very little material:
- 4 bars of required length (better 1.7 * 1.7)
- sand
- wood screws
- sandbox base material
Assembling this design will take very little time, which can be spent with the whole family. It should be noted that the base of the sandbox must be tight - it is best to use polyethylene or special agrofibre.
After completion, the sandbox made of wood can be painted with antiseptic and bright oil paint.


https://i.expert-h.com/en/pesochnitsy/956#sigFreeIdc2a74608bd
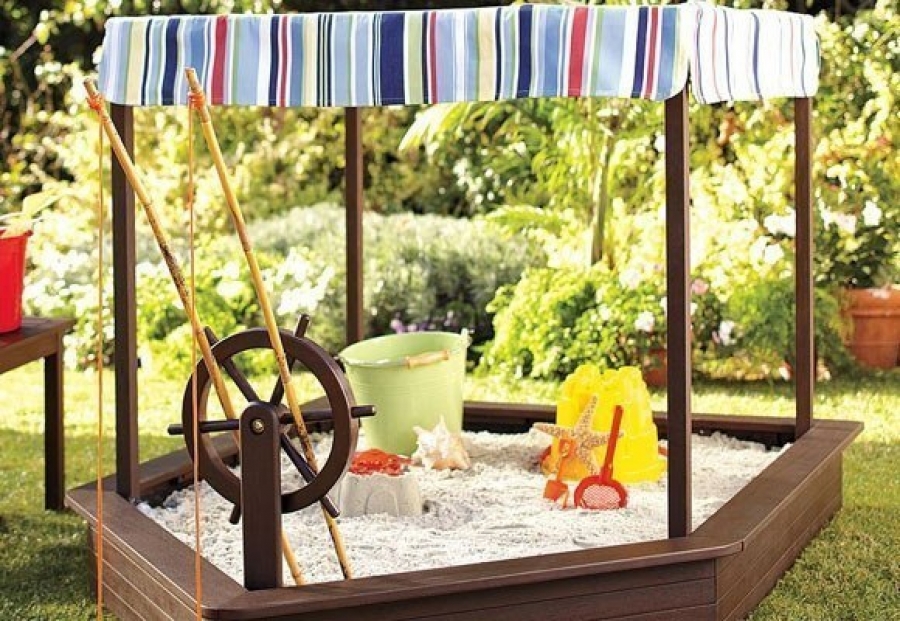
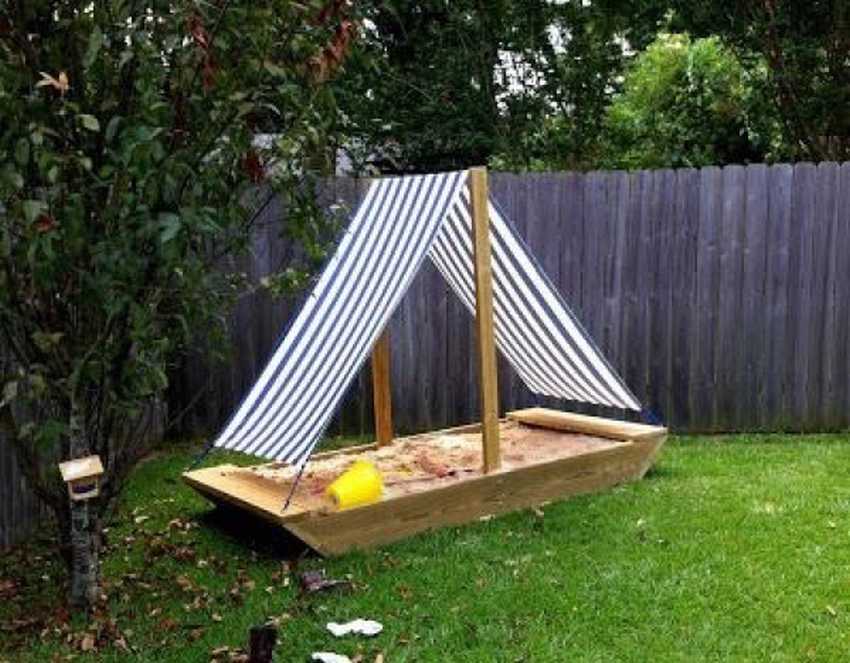
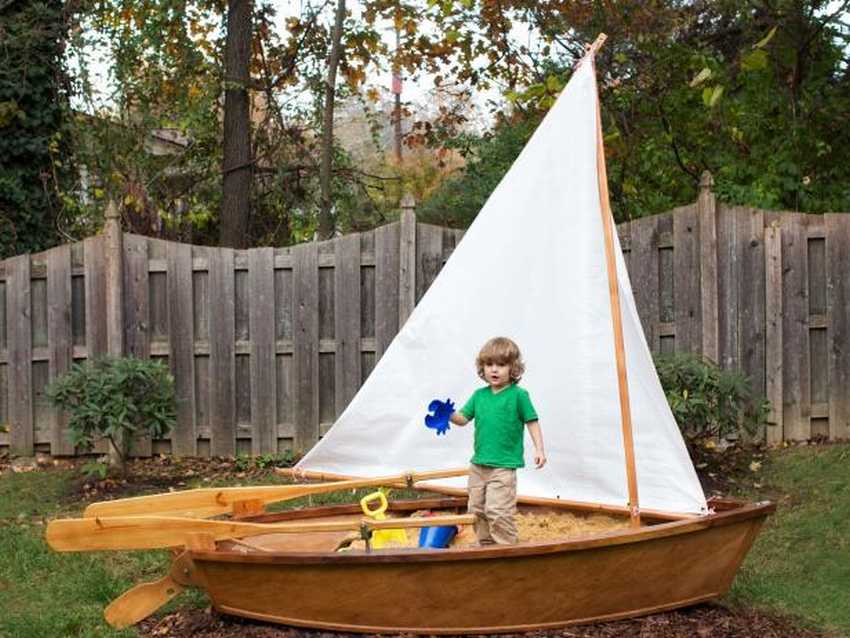
Sandbox "Ship" do-it-yourself step-by-step instructions + photos
Children are very fond of fantasizing and imagining, so for young adventurers it is better to make a sandbox of an unusual shape. Great for interesting games. sandbox "Ship"which will be appreciated by a child of any age. Your baby will definitely not stay away from the developing sail and the sea of sand! In addition, in such a sandbox, children are perfectly protected from sunlight by a canopy in the form of a sail. Of course, you have to tinker with such a sandbox, but is it really impossible for a loving dad to do this?
 For a sandbox with your own hands in the form of a sailing boat, you need a lot of different lumber:
- 2 boards 30 * 245
- 4 boards 15 * 115
- 2 boards 10 * 115
- 2 masts 10 * 180
- 2 boards (seats) 15 * 125
- In addition, to create this amazing sailing ship you need:
- fabric 2.75 * 1.2 m
- bolts with nuts
- round rail 125 cm long
- drill
- synthetic cord
- loop eye screws
- wood screws
Using very detailed instructions, we collect our Sailboat. All details must be treated with an antiseptic primer and painted - there is scope for your imagination! After the carpentry work is completed, we attach a sail sewn in advance on a sewing machine. If desired, you can decorate the sandbox with other ship paraphernalia - install a helm wheel, attach an anchor or a spyglass. That's all, the ship sandbox is ready for sailing on sandy seas!


https://i.expert-h.com/en/pesochnitsy/956#sigFreeId58660020dd
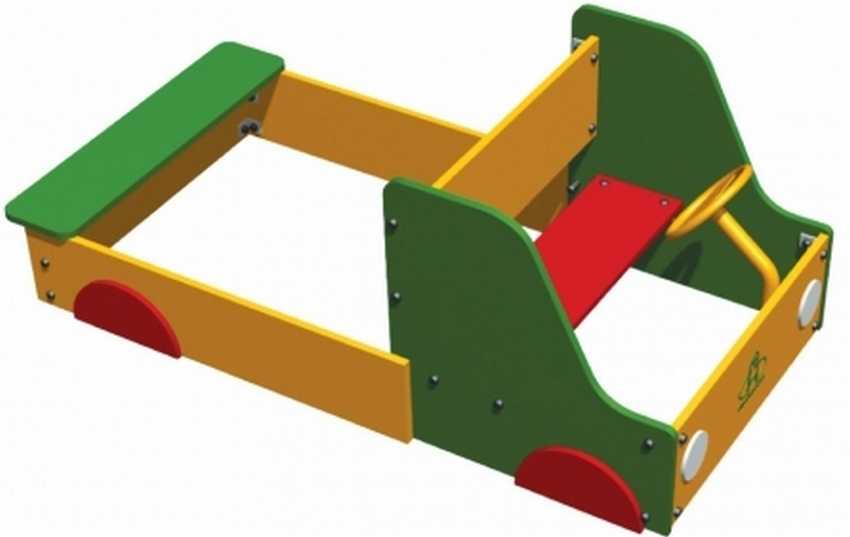
Do-it-yourself sandbox machine step by step with photo
Many dads love to do things “forever” - this is the unique sandbox in the form of a car. This copy will fit perfectly into any playground and give children a lot of joyful emotions during the game. After all, this is not just a box of wood with sand - it is a real work of art.
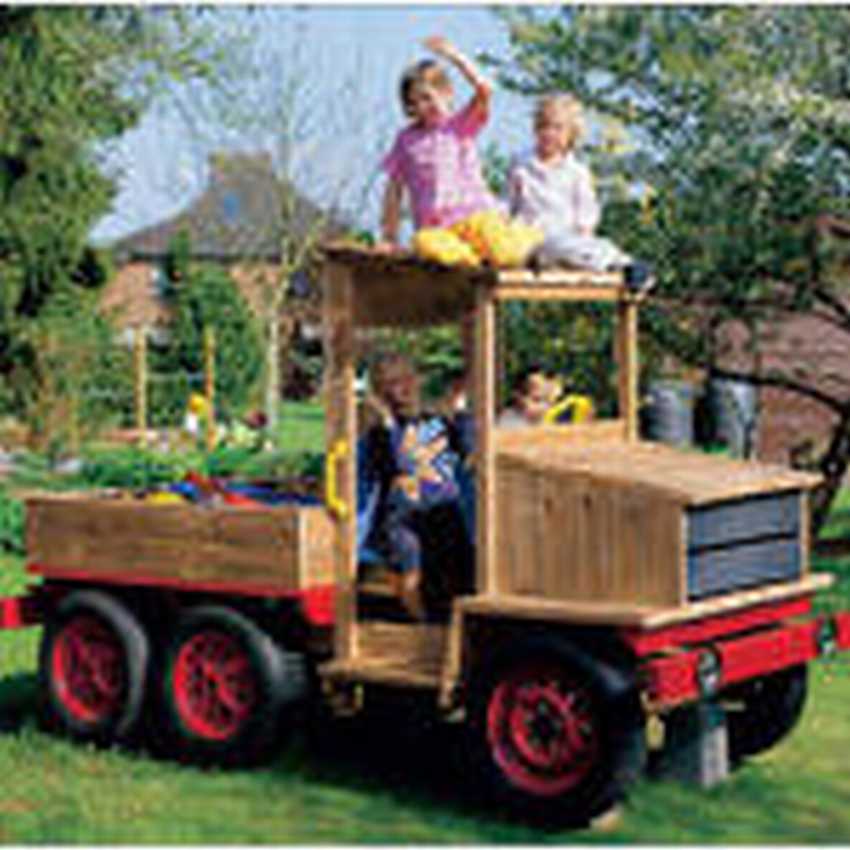 This sandbox machine is made of pine boards and mounted on concrete blocks - it is not afraid of frost, rain or heat! Of course, you will have to tinker with such a painstaking craft, but the result will fully justify itself. Such a sandbox will become the dream of any boy, and girls too. Using simple and clear instructions you can make sandbox car for the playground easily and without nerves. However, when installing this sandbox, you should remember some rules:
- The sandbox pad should be flat and stable
- All parts before assembling the sandbox should be perfectly machined by a grinder and have no sharp corners
- All parts are best fastened with steel corners.
- Sandbox parts must be treated with an antiseptic
In addition, after installing this sandbox, you occasionally need to check the status of the connecting nodes. This will help prevent drying out and damage to this amazing machine. A self-made sandbox truck will delight any child and will serve as a place for a wide variety of games for a long time - from modeling Easter cakes to an imaginary journey to distant lands.


https://i.expert-h.com/en/pesochnitsy/956#sigFreeId0671c4476e
The basis for the sandbox, how to choose
Experienced builders know that it’s not enough just to choose a place for the sandbox and install the frame. Between the soil layer and sand you need to lay the foundation. Of course, you can do without it, but then the soil when replacing the sand will mix with the sand, and after rain in the sandbox may form "porridge". Let's see, why is a foundation needed and how to choose it correctly.
Sandbox Base it is necessary so that between the ground and sand there is a barrier that will not allow them to mix. But at the same time, the base must let water through, otherwise the sand will turn into mud after rain. Now there are many materials suitable for this. The most popular types of sandbox bases are the following materials:
- Geotextile
- Agrofibre
- Polyethylene
- Plywood
It is worth noting that the first two options are ideal in all respects, but everyone always has the opportunity to purchase modern materials for the children's sandbox. therefore, many line the bottom of the sandbox with plywood or polyethylene, but for this you need to make a hole in the side so that excess water flows into the ground.
Do-it-yourself sandbox from an old boat
 A very simple and interesting option to create do-it-yourself children's sandbox - make it from an old and unnecessary boat. The attics and basements are fraught with many unnecessary things, perhaps someone inherited from the grandfather of the fisherman and left a wooden boat. It is perfect for a children's sandbox, at least for a personal plot, at least for a playground near an apartment building. And children will appreciate this unusual sandbox, which walked along the waves and fit for sand games. In addition, it will not be difficult for parents to transform the boat into a convenient place for children's games. Do-it-yourself sandbox boat with step-by-step instructions will please your yard with its unique look.
So, in order to breathe a second life into the old boat, we need:
- weightspruce boat
- two pressed boards
- sand
- tape measure
- antiseptic
- sackcloth
- wood screws
With a simple step-by-step instruction, the old boat turns into an interesting sandbox! The most important thing in this matter is to correctly install the boat on a wooden frame so that none of the sides of the structure outweighs. And the bottom of the boat must be treated with an antiseptic, so that moisture does not damage the product. Such a sandbox from a boat will appeal to any dreamer!


https://i.expert-h.com/en/pesochnitsy/956#sigFreeId1eed70ea23
Sandbox do-it-yourself sandbox step by step
One of the easiest and less expensive ways to make a sandbox with your own hands for a summer residence - from a car tire. This unnecessary spare part can serve as a good service for your baby as a very convenient mini sandbox. In addition, it can be done very quickly and easily, just an hour of free time is enough. Through detailed step by step instructions a sandbox from the tire on the site can be made even with children. Special talents are not needed here - just free time and good mood!
 For a sandbox from the tire
- old car tire
- paint
- plywood
- sand
For convenience, you can make a plywood cover on top of the sandbox so that rain and debris do not get inside.


https://i.expert-h.com/en/pesochnitsy/956#sigFreeId68be63cd36
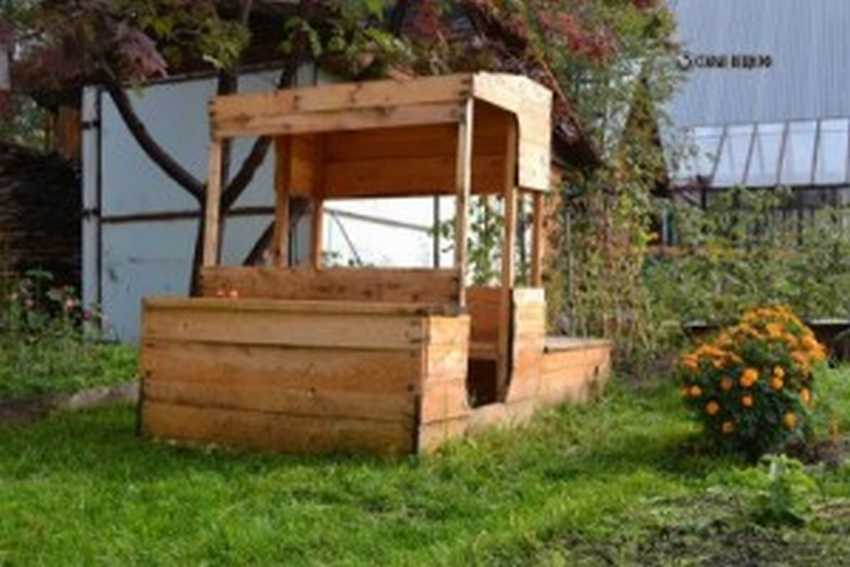
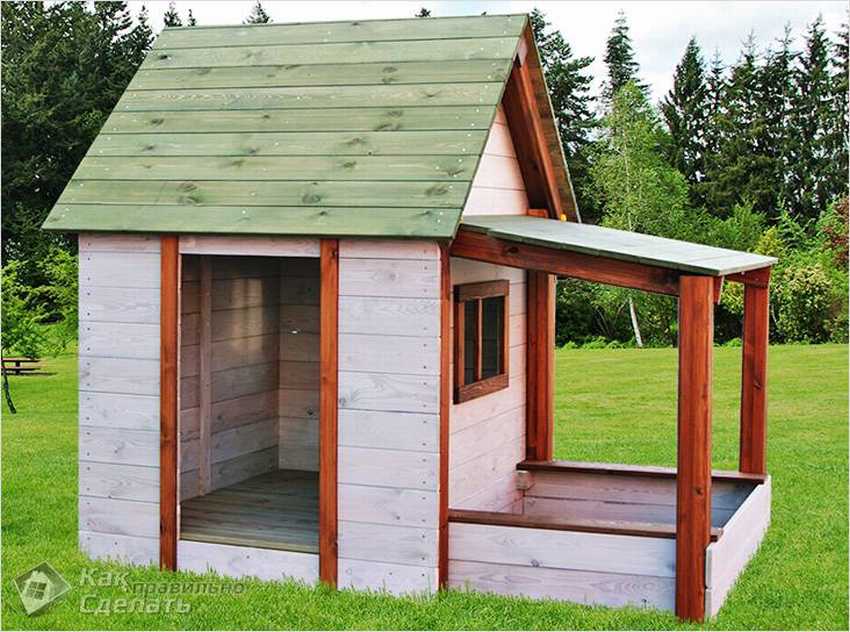
Do-it-yourself sandbox with a roof photo step by step
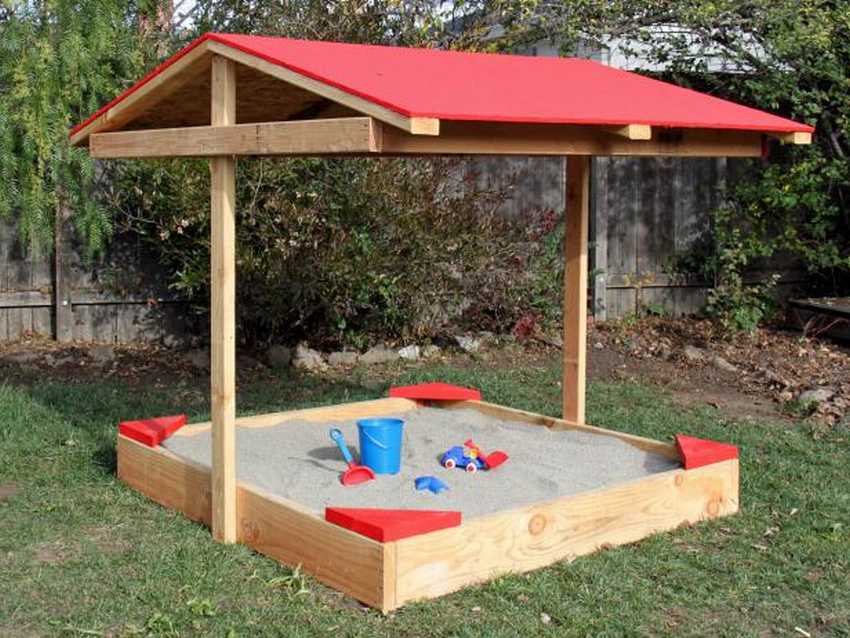 Another convenient option for giving and at home - gazebo with roof. Such a design will provide children with a comfortable game even under the hottest rays of the sun, because the roof visor will carefully protect them from harmful effects. And parents will not need to worry if the children took off their hats or caps. Any dad can make such a sandbox, especially with this detailed instructions with step by step photos. Such a convenient sandbox protects the sand from debris and leaves, as well as from rain. In addition, this design is very spacious, and both children and adults can have a good time in it. To create this model of a children's sandbox, the following materials will be required:
- Pine boards
- 2 sheets of pressed plywood
- agrofibre
- wood screws
- small bag
- facade paint of any color
- a circular saw
- furniture stapler with galvanized staples
- screwdriver
- brush and roller
It will take about a day to create such a sandbox, but an excellent play area will appear in your yard! With such a sandbox with a covered roof, neither rain nor heat are scary!


https://i.expert-h.com/en/pesochnitsy/956#sigFreeIdeb1caf2dbf
What material is better to make a sandbox
Before the construction of the sandbox, any parent asks the question - what can this convenient corner for children be made of? Sandbox Materials the most diverse are used, let's try to figure out which ones are better and safer for children.
- The most popular material is wood. Moreover, the tree for the sandbox can be used in different variations - logs, boards, hemp, pegs, blocks. This material is universally recognized as the safest, most durable and easy to use. In addition, anything can be made of wood, most importantly, to show imagination!
- Another material in demand is plastic. Its only drawback is that you cannot make such a sandbox yourself, you can only buy it. In addition, usually plastic sandboxes are not very voluminous, and are designed for one or two children, so this option is suitable for suburban and household plots.
- Sandboxes are also made from improvised materials - car tires, plastic bottles, old wooden boats and even beds.
- Plywood sandboxes are also popular, but many do not really like this material because of the short life and harmful fumes.
With such an extensive selection of material for creating a sandbox, any novice builder will choose for himself the best option for every taste and budget!
Do-it-yourself sandbox from logs step by step instructions with photos
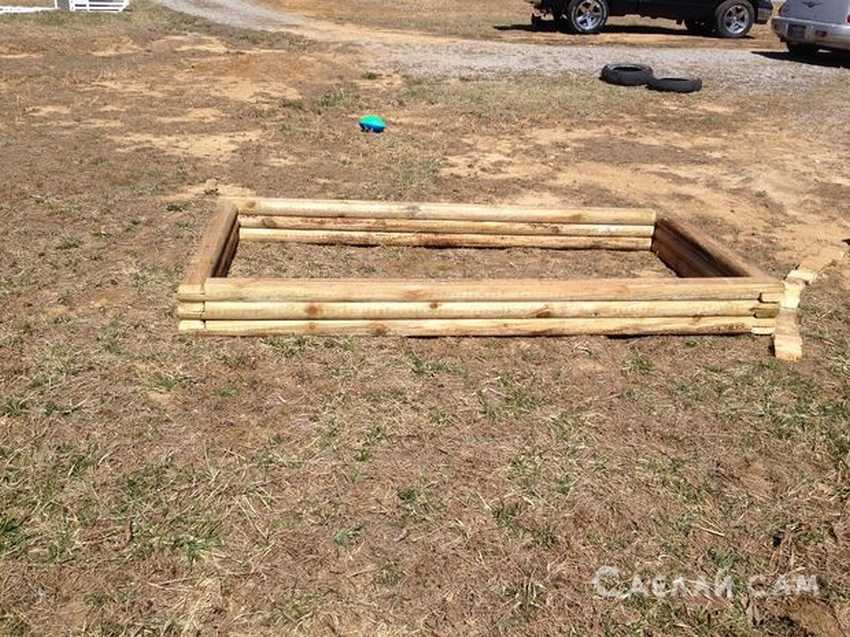 Another practical and durable version of the sandbox for children with their own hands is to make it out of logs. Such a design will last a very long time; moreover, it does not require much time for assembly. Build children's sandbox made of logs with step by step photos even a beginner builder with no experience or just a loving dad can. And it will be great pleasure for children to play in such a beautiful sandbox!
To build do-it-yourself sandbox made of logsvery little material is required:
- logs (4 * 6)
- chainsaw
- meter
- drill
- antiseptic
Using a simple and understandable step-by-step instruction, we collect ourdo sandbox do it yourself. Before assembly, it is important to treat the wood material with an antiseptic. Upon completion of the assembly and after installing the sandbox, the resulting design can be painted with varnish "wood" or any paint.


https://i.expert-h.com/en/pesochnitsy/956#sigFreeId9794fb3091
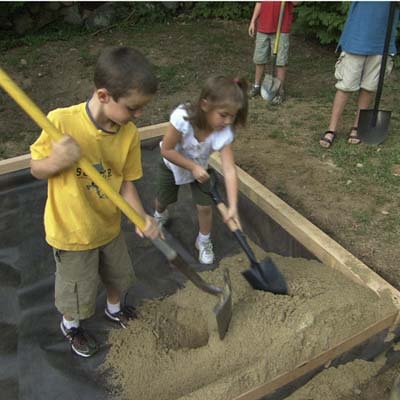
How to make a sandbox to the cottage with your own hands + photo in stages
This option sandboxes made of wood DIY is very popular with those dads who are far from construction. This sandbox from the boards can be made quickly and easily in a few hours. The obvious advantages of this sandbox are build speed, convenience, interesting design and roominess. For a comfortable game of two or three children, sandboxes of 2000 * 2000 centimeters in size are enough.
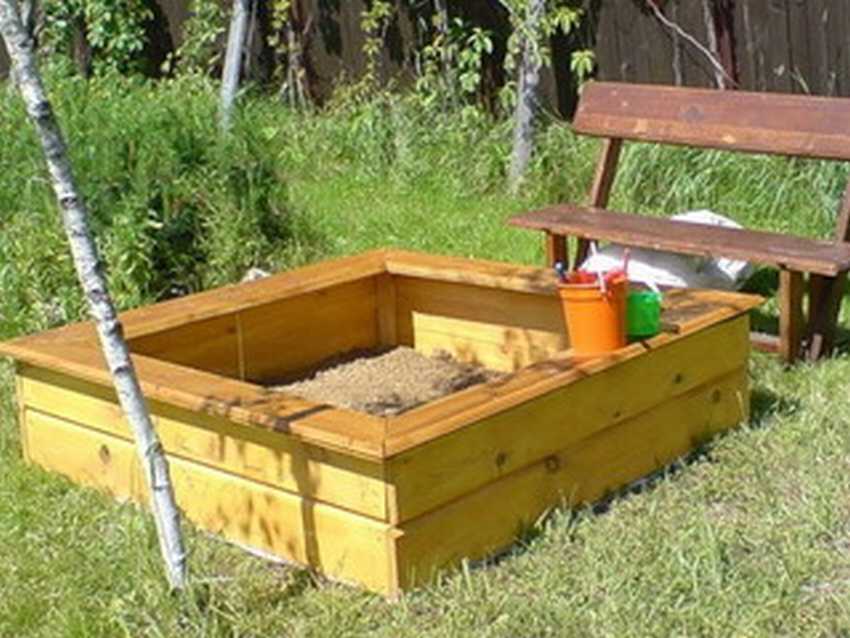 The necessary parts for assembling this sandbox from the boards with your own hands:
- Bar 100 * 100
- Edged board 22 mm thick
- nails (wood screws)
After assembling the entire structure, it is desirable to treat it with an antiseptic and coat with varnish or paint. In addition, the disadvantage of this model is the lack of a cover, but this is easy to fix - the cover can be put together from existing material or just use a piece of canvas.


https://i.expert-h.com/en/pesochnitsy/956#sigFreeIdc48d084537
THIS IS INTERESTING: how are sand games useful?
The sandbox is an indispensable attribute of any playground, and now few people wonder why sand is so important. and meanwhile, this malleable bulk material plays a huge role in the development of the child and even heals. No wonder in the 20th century, psychotherapists began to use sand for various relaxation techniques. So, what do games with sand develop?
- Fine motor skills of hands and fingers
- Creativity and fantasy in the baby
- Speech
- Social and communication skills
Games with sand activate nerve endings that are located at the fingertips, which has a beneficial effect on the nervous system as a whole. Therefore, psychologists from around the world are advised to engage sand therapy not only for children but also for adults. In addition, it is believed that this natural material takes away negative energy and charges positive energy to everyone who touches it.
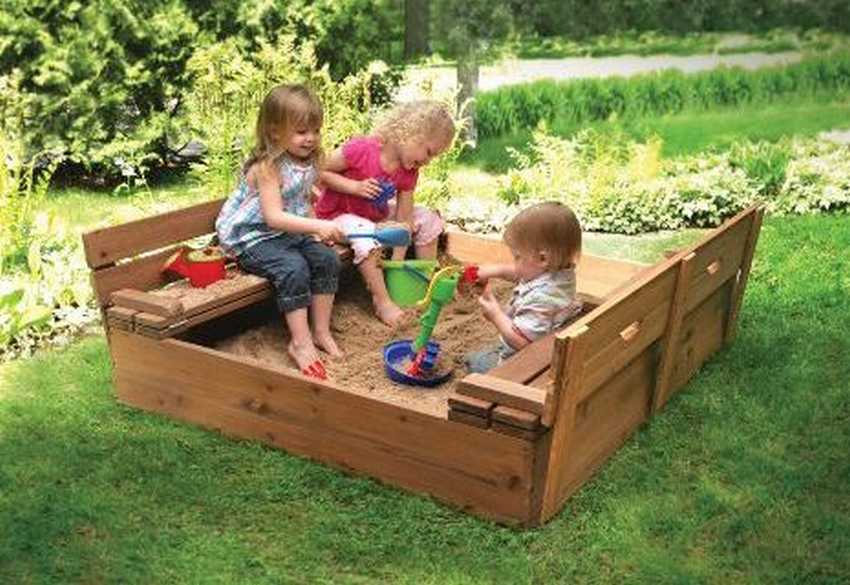
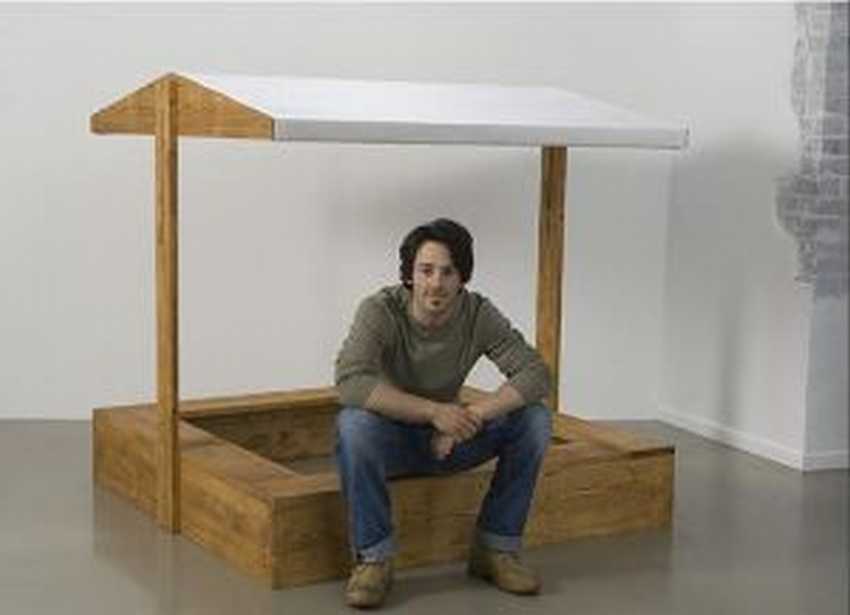
Children's sandbox with a do-it-yourself bench
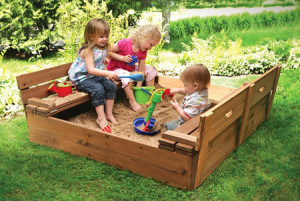 Children’s are very popular wooden sandboxes with transformer cover. With a flick of the wrist, such a 3-in-1 lid turns into a convenient bench on which children can sit or use it as a surface for sculpting Easter cakes. This model has a lot of advantages - firstly, it is protected from rain and debris. Secondly, the lid transforms into a bench or table, which is very convenient. And with such a simple and clear step-by-step instruction, anyone can handle the construction of a sandbox with a lid!
To create this sandboxes with transformer cover just follow the step-by-step instructions clearly and do everything as in the photo. During the construction of this sandbox, the author resorted to a little trick that will help you avoid unnecessary trouble. It is better to attach agrofibre or geotextiles to the base of the sandbox immediately to the bottom using a furniture stapler. Also, the author of this master class advises sticking a window seal between the boards so that then the sand does not spill out into the cracked cracks. Such a sandbox will appeal to any kid!


https://i.expert-h.com/en/pesochnitsy/956#sigFreeId408aacd0ed
Sandbox made of stones master class + photo
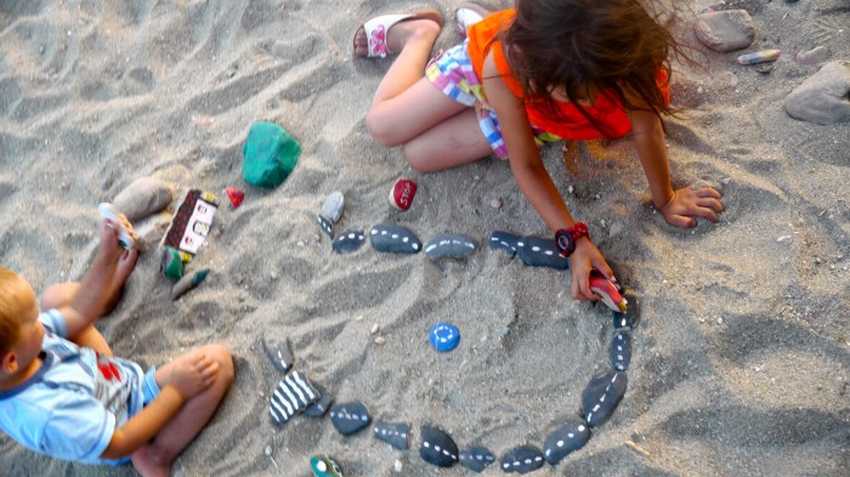 A very simple and compact option for those who do not want to "bother" with complex structures and wooden boards - do sandbox made of stones. This interesting and unusual sandbox will become the main decoration of your playground, and the attention of children to it is definitely provided. In addition, to create this masterpiece, you can connect children, and together you will do something unique!
To create a sandbox from stones, it is enough to paint them with oil or acrylic paints in the form of roads and cars. If you wish, you can fix the stones in the sand or just let the children play with them. This creative idea do-it-yourself children's sandbox made of stones creative people who don’t like the standard options will like it!


https://i.expert-h.com/en/pesochnitsy/956#sigFreeId1a7b9c0385
Sandbox from pallets do it yourself instructions with photos
 Sandboxes are made not only from expensive material, but also from simple and improvised things. In this master class, these things were ordinary wooden pallets, which are in large numbers in stores, even for free. The author of this project made a real work of art from a pallet - sandbox in the form of a truck. And he needed quite a bit of material for this, and the costs are even less.
- First you need to cook a large number of pallets, the more the better.
- Using 2 three-meter boards and pallets we assemble the frame for the sandbox
- We sort pallets on boardsand drive them around the truck
- We paint our comfortable sandbox with a place for the gazebo with colorless varnish or impregnation.
The author also advises making pallets a lid on the body of the sandbox so that debris and leaves do not fall on the sand.


https://i.expert-h.com/en/pesochnitsy/956#sigFreeId468efcedfe
How to choose sand for a children's sandbox?
An important factor for the sandbox is to choose the right sand for filling. It turns out that there are also a lot of subtleties in this matter, and now we will tell you how to choose the best sand.
What types of sand are there?
The most popular type of filler for the sandbox is river sand. It is small (up to 2 mm), medium (from 2 to 2.8 mm) and large (from 2.9 to 5 mm). For a sandbox, it is better to choose sand with sizes of grains of sand up to 2 mm, then it will be convenient for playing and will not get into your eyes.
Another option is quartz sand. However, there is a big minus - the price. Quartz sand is several times more expensive than river sand, so it is not very popular.
Also in fashion colored sand. You can ask for such a novelty at a hardware store, but at a price it will also be quite expensive, because on average about 4 cubic meters of sand is required in a sandbox.
When buying sand at a store, be sure to ask certificateto be sure of the quality of the material.
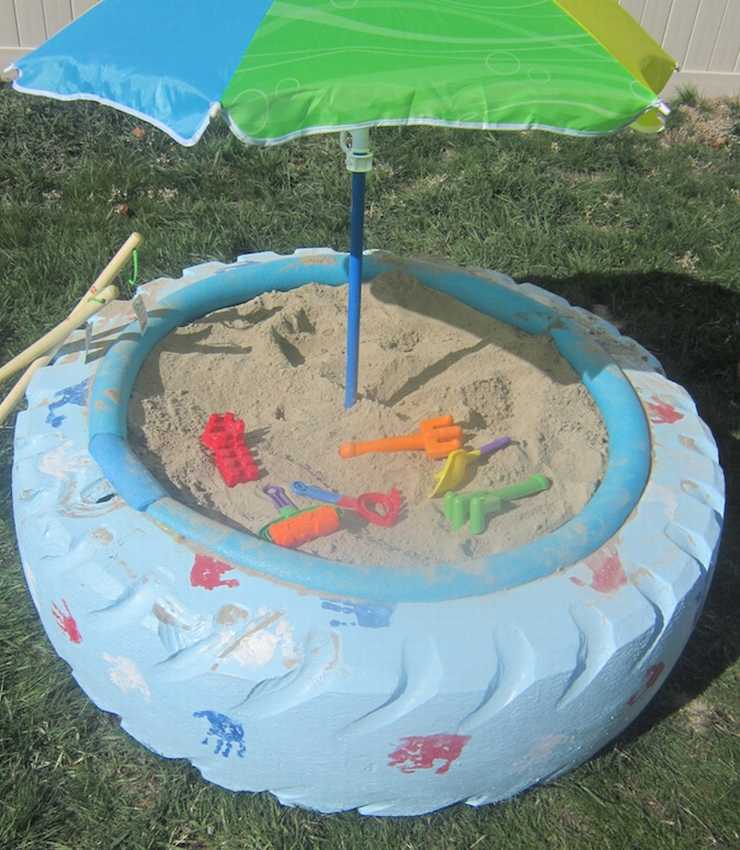
Do-it-yourself sandbox from a car tire
 Do-it-yourself sandbox from a car tire - The most popular form of parental creativity in the playground. Such a sandbox is done very quickly, and lasts a long time. In addition, there is a lot of room for imagination - a car tire can be turned into anything. This mom made a bright and beautiful sandbox out of the tire with her own hands very easily and simply! And to create this masterpiece, she needed only a car tire, paint and a piece of bright polyethylene.
Tip: From the top of the tire you can make a convenient cover that protects your sandbox from leaves, debris, branches and rain.


https://i.expert-h.com/en/pesochnitsy/956#sigFreeId88a996f601
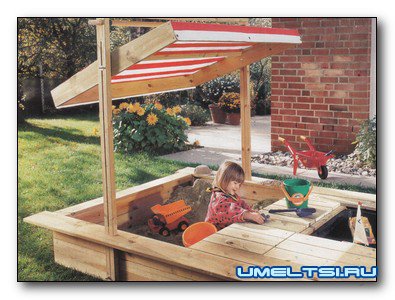
Sandbox do it yourself with a canopy photo step by step
 Before building a children's sandbox, it is important to consider many factors, first of all, whether you need a canopy or not. Covered sandboxes are convenient in that they protect children from direct sunlight and allow you to play in it from morning to evening. You can’t sit in a sandbox WITHOUT a canopy for a long time in the heat above 30 degrees. Therefore, one of the most popular models recognized do-it-yourself sandbox with a roof. Parents love this sandbox option for comfort and safety.
To make sandbox with a roof, you will need all the same materials as for the usual + piece of awning.
As can be seen in the last photo, the tent is fixed on the sides of the gables on the roof with a furniture stapler.
Such a sandbox will serve for a long time and will decorate any playground!


https://i.expert-h.com/en/pesochnitsy/956#sigFreeIdf3ab7c8fd1
Sandbox do-it-yourself drawings and diagrams + instructions
 Depending on the complexity of building a sandbox with their own hands, masters prefer to use different instructions. For some models, step-by-step photos and job descriptions are not enough, but a drawing is needed. This mainly applies to complex models such as sandbox with a house or roof.
We have collected for you the most detailed and accurate drawings and diagrams for creating various options for sandboxes with your own hands. In this album you will find DIY drawings and charts for sandboxes. Using these drawings, you can make any sandbox to your taste, and a detailed diagram will help calculate the material and plan of action.


https://i.expert-h.com/en/pesochnitsy/956#sigFreeId7f8a262f74
Sandbox with a lid-seat do it yourself step-by-step workshop
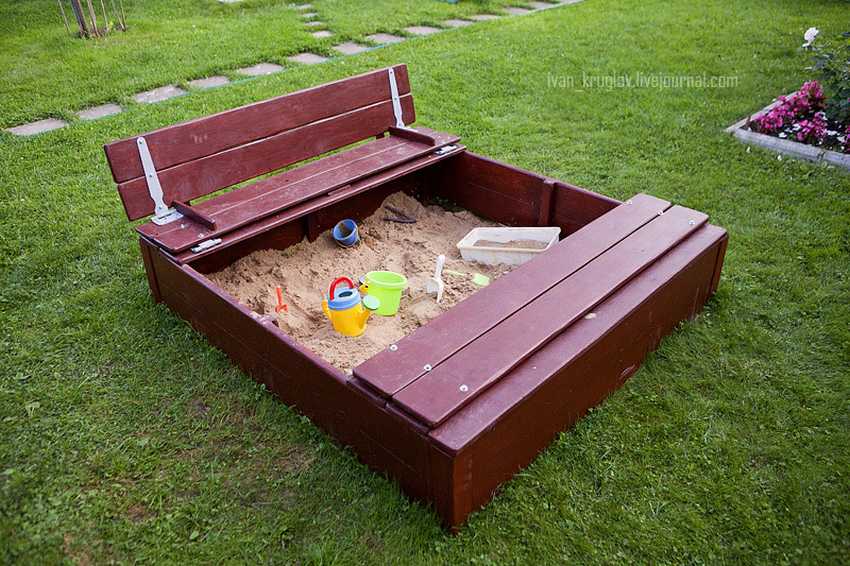 This project was developed and implemented by blogger Ivan Kruglov. He made a detailed do-it-yourself step-by-step instructions for a sandbox with a bench cover. Of all the options for children's sandboxes, the author considers this the most functional and easiest to assemble. Indeed, his sandbox turned out to be wonderful, and even a daughter was involved in the construction process! Ivan noted several subtleties in his blog:
- Sandbox legs need to be treated with machine oil
- The edges of the boards on the sandbox cover should be treated with a grinder for a more beautiful look.
- The hinges on the seat cover must be painted with paint to prevent rust
Such do-it-yourself sandbox with a lid-seat a child of any age will like it, and dad will not have much difficulty creating this masterpiece!


https://i.expert-h.com/en/pesochnitsy/956#sigFreeId4fa9939c4e
Paint the sandbox: which paint is safer for children?
Moms tend to worry about the health of their children, and therefore paint for painting a children's sandbox selected with particular care. It is no secret that most paints are toxic and dry for a long time. How to choose the right paint for these purposes?
- Antiseptic and various impregnations for wood are absolutely non-toxic and dry quickly.
- Eco-paint based on natural resins is recognized as the safest paint.
- More toxic, but quick-drying - enamel, nitro enamel, facade paint and other outdoor paintsworks. They are well resistant to frost, rain and temperature changes, but are not very safe for children.
- Oil and acrylic paints are great for sandbox decor. With their help, you can paint the sandbox with funny drawings and inscriptions.
It is worth noting that all painting work is best done during the week before the child plays for the first time in this sandbox. Then the paint or varnish will dry out well, and the smell will disappear.
Do-it-yourself sandbox maze of posts
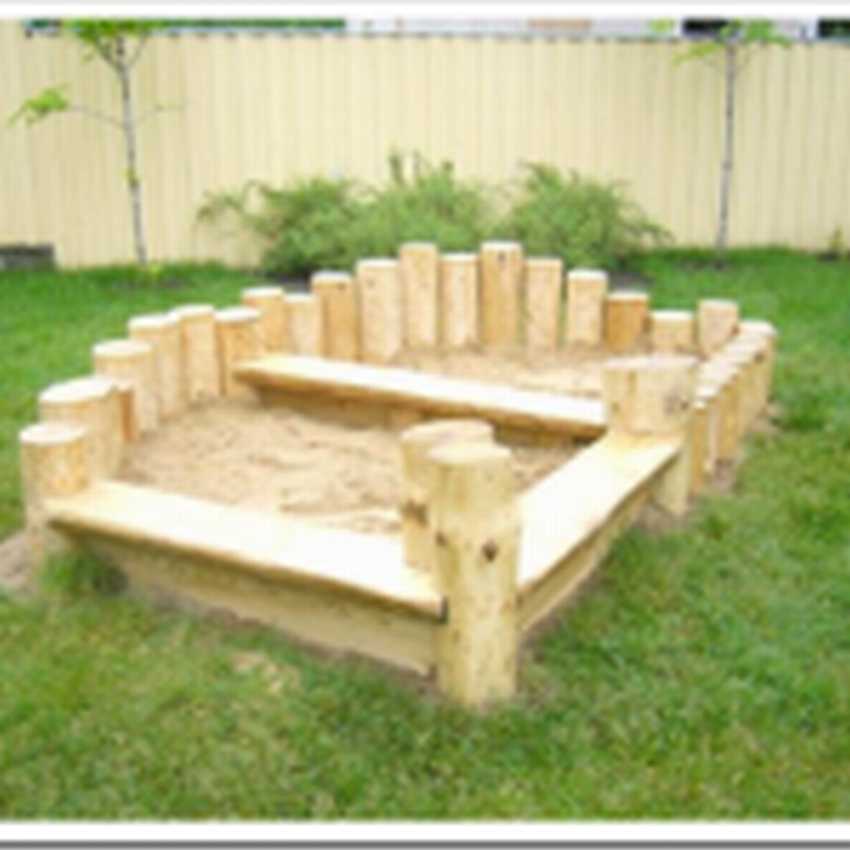 An interesting sandbox with your own hands can be made from ordinary columns. The most creative parents even make whole labyrinths of sand, columns and stones in this way! Such a sandbox will definitely appeal to any child, because how many games you can come up with here! A drawing of such a "maze" can be invented independently, or taken on the Internet.
We have prepared a step-by-step instruction for you, which simply and clearly shows how to make this creative sandbox. But the fantasy is not limited to this - we present you some more popular options do-it-yourself sandboxes!


https://i.expert-h.com/en/pesochnitsy/956#sigFreeId533907c242
Simple sandbox do-it-yourself photo step by step
 And this is another detailed master class on manufacturing simple sandbox with seats do it yourself. The author of this project recorded in detail each stage of this painstaking process, so that even the most inexperienced master could repeat this design. Well, the sandbox really was a success, dad tried for his children in vain!
The main advantage of this sandbox is that it is very roomy and suitable for playing two or three kids at once. unlike purchased sandboxes that are designed for one child. This sandbox will last a long time - the design is thought out to the smallest detail and made very thoroughly. Simple do-it-yourself sandbox made of wood decorate any yard!


https://i.expert-h.com/en/pesochnitsy/956#sigFreeId30f6d8f50b
Do-it-yourself sandbox with a tank for water from a tree photo
 Another creative sandbox model is a multifunctional design, thought out to the smallest detail. This sandbox has everything - a water tank, a bridge, hiding places, a convenient awning, which also serves as a lid for sand, and of course, a spacious container for sand. The author created this unusual model for his children, taking into account their interests and needs. The result was a real carpentry masterpiece, in which children of different ages play with great pleasure!
Such a sandbox will become a real highlight of any personal plot!


https://i.expert-h.com/en/pesochnitsy/956#sigFreeId9baa311a0a
How to care for the sandbox?
That's all, our article about sandboxes has almost come to an end, now the main question remains - how take care of the sandbox?
There are several hygiene rules of this children's corner that you need to adhere to. After all, children spend almost the entire summer in the sandbox, and spend days on end fumbling in the sand, making Easter cakes. How to protect children from germs and other threats that stale sand is fraught with?
- Sand in the sandbox must be changed at least twice a year. In addition, before buying, you must definitely check the certificate for the goods at the store.
- After the game, you need to cover the sandbox with tarpaulin or an awning so that garbage does not get there and pets do not mess up.
- The area near the sandbox should be landscaped, so that the sun does not interfere with the child and the sand gets into the eyes less.
Compliance with these sanitary standards will help you keep your sandbox clean!
DIY sandbox ship photo step by step
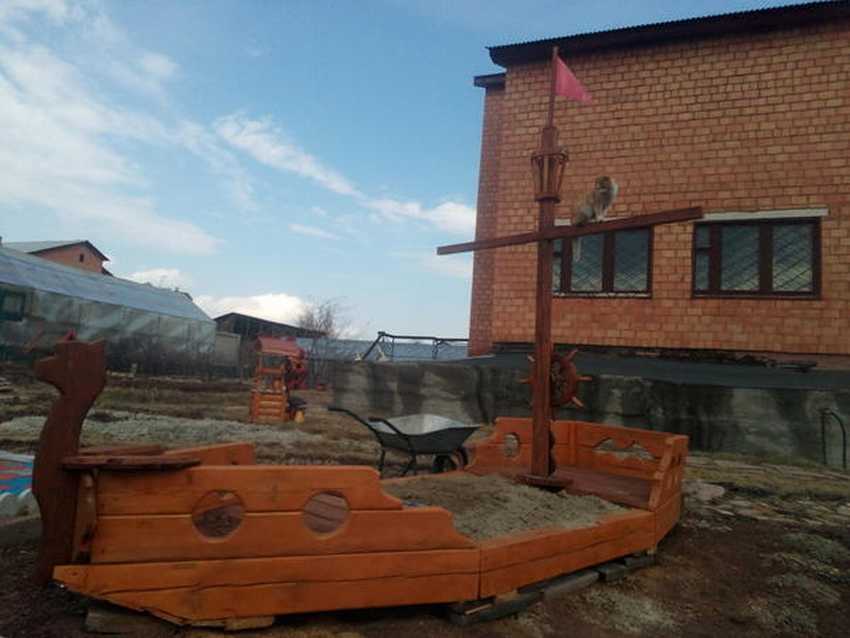 Well, the real cherry on our cake is amazing ship sandbox, as if descended from a picture of an adventure novel. Grandfather made such a masterpiece to please his grandchildren - everyone would have such a grandfather! This carpentry work of art will decorate any playground and ensure the interest of all the neighboring children.
In addition, grandfather Leonid from Bratsk shared his skills and published detailed step-by-step instructions for creating this sandbox. Now anyone can do it, the main thing is to make an effort and dream up. Do-it-yourself sandbox + detailed step-by-step master class will make even a "teapot" a joiner!


https://i.expert-h.com/en/pesochnitsy/956#sigFreeId5b346670af
Sandbox do-it-yourself drawings + schemes 40 photos


https://i.expert-h.com/en/pesochnitsy/956#sigFreeId8da957f130
Ideas for a children's sandbox 250+ photos
In this article, you have unleashed everything you need to create the most convenient and unusual sandbox for your summer house, home, and playground. We told you how to choose the right base for the sandbox, sand, what paint to paint the sandbox and how to care for it.
Here you will find more than 20 detailed workshops on creating different types of sandboxes. now you just have to choose which one you like! We present you 250+ photos of the most interesting sandboxes from around the world!


https://i.expert-h.com/en/pesochnitsy/956#sigFreeId8aaff3dbaa
150+ photos of sandboxes with your own hands


https://i.expert-h.com/en/pesochnitsy/956#sigFreeId6465e7d0e7