DIY stone garden paths: step-by-step photos, master classes + 500 photos
 DIY garden paths made of stone
Garden paths made of natural stone - one of the most popular destinations landscape design. With the help of a beautiful path, you can completely change the appearance of your site, create a convenient network of movement between significant objects and save you from the hassle for many years. After all natural stone - one of the most durable and multifunctional materials, ideal for many construction works both in the garden and at home. In our article you will find a lot of interesting step-by-step master classes on creating garden paths from natural stone with drawings and diagrams and a huge gallery of options in which you can choose the one suitable for yourself.
DIY garden path made of gravel master class
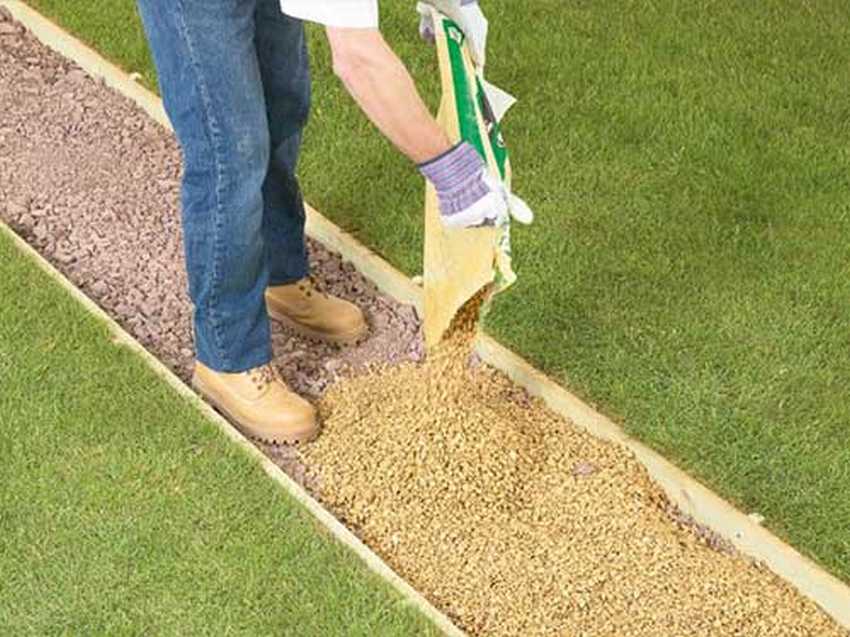
 One of the easiest and fastest ways to create a garden path made of natural stone is to make it out of gravel. This method does not require special design or construction skills, but you will still have to try its best. The most important condition for creating a garden path with your own hands from gravel is that you will have to dig a lot, a lot.
- To get started, draw a diagram on a piece of paper what your path will be. Then we mark the territory according to the scheme, and free it from obstacles - stumps, trees, bushes and stones. And along the marked territory, we begin to dig soil on a bayonet shovel in depth of 20-25 centimeters throughout the entire future path.
- The edges of the pit are carefully aligned and poured on the bottom of the pit of large gravel by 5 centimeters.
- Next, we prepare the formwork - we process 25-centimeter boards by impregnation (even better with bitumen) + through each meter we make spacers.
- Then you need to make the transverse partitions, then the path will be divided into sections.
- The areas near the partitions are covered with any material - sand, pebbles or small gravel.
- Now you can begin the final stage - we fill in the rubble in the section and compact it. The stone should be about 4-5 centimeters higher than the side, taking into account the subsequent shrinkage. The track covered with gravel of different colors will look even more interesting - they will protect the partitions from mixing.
Such a path will serve you well for many years and become a real decoration of your garden.


https://i.expert-h.com/en/dorozhki/sadovye-dorozhki-iz-kamnya-svoimi-rukami-poshagovye-foto-master-klassy-500-foto#sigFreeId0cf084f9d5
Garden path made of pebbles with DIY patterns step by step
One of the most creative and possibly painstaking ways to do DIY stone walkway - This is to lay it out of river pebbles. This material is available to almost everyone - the shore of any reservoir is strewn with pebbles of various sizes and colors. Such a path will become a real decoration of any site and will delight all neighbors.
 DIY pebble track It is done quite simply, but painstakingly. Before you start the process itself, you need to fantasize a bit and prepare a drawing of the track. And depending on your drawing, you need to pick up pebbles - they can be of different colors and sizes, combined in a florid pattern or a strict geometric pattern. To create such a masterpiece, you will need the following materials:
- pebbles
- plywood
- fine river sand
- cement (M300)
- level
- hard brush
- gravel crumb
Before starting work on the marked territory for the track, you need to dig a trench. Then pour a mixture of cement, sand and gravel on the bottom, and you can lay out pebbles in accordance with your drawing.
At the end of work, in the gap between the stones, pour a mixture of cement with a dog and pour it from a tamping hose. For a day, it is better to close the composition with plastic wrap.
Important: the resulting track will dry for several weeks, so it is better not to walk on it at this time, so that the result has time to consolidate.


https://i.expert-h.com/en/dorozhki/sadovye-dorozhki-iz-kamnya-svoimi-rukami-poshagovye-foto-master-klassy-500-foto#sigFreeIda679523851
Choice of material: which stone to choose for a garden path?
The very first question the owner of the site is about to make stone garden pathis it which stone to choose? In nature, there are many natural materials, and an inexperienced gardener immediately looks up at the sight of this assortment. So, DIY garden paths made of these types of stone:
- Sandstone and flagstone
- Gravel
- Granite
- Paving stones
- Colorful pebbles
Also, the stone is divided into two types - natural and artificial. Most often, masters give preference, of course, to natural stone, because it is brighter, more diverse, more unique. Natural stone, in turn, is divided into several subspecies that are most often used for paving paths:
- Slate
- Granite
- Shungite
- Sandstone
- Quartzite
Natural natural stone is much better than artificial stone, but it costs several times more. But the indisputable advantages of natural stone are its strength, environmental friendliness, wear resistance and infinitely beautiful appearance.
Do-it-yourself garden path made of limestone photo + workshop
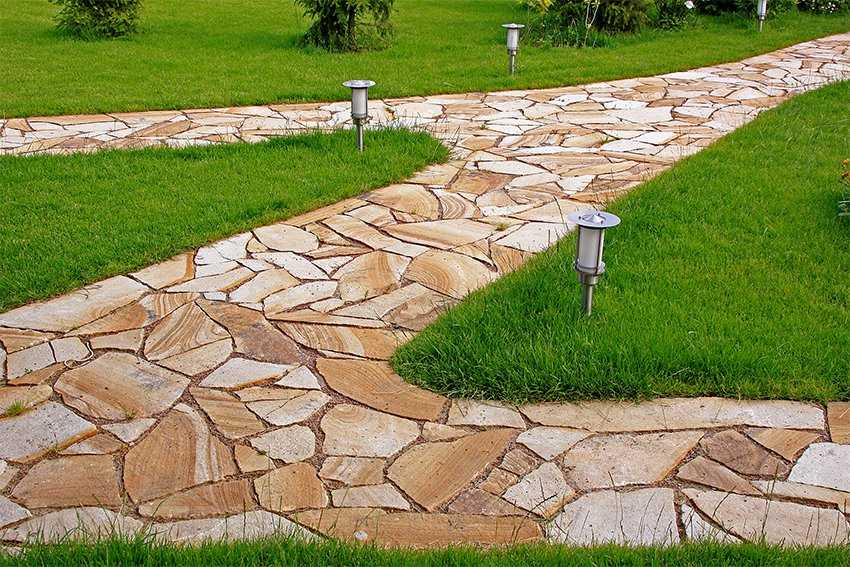
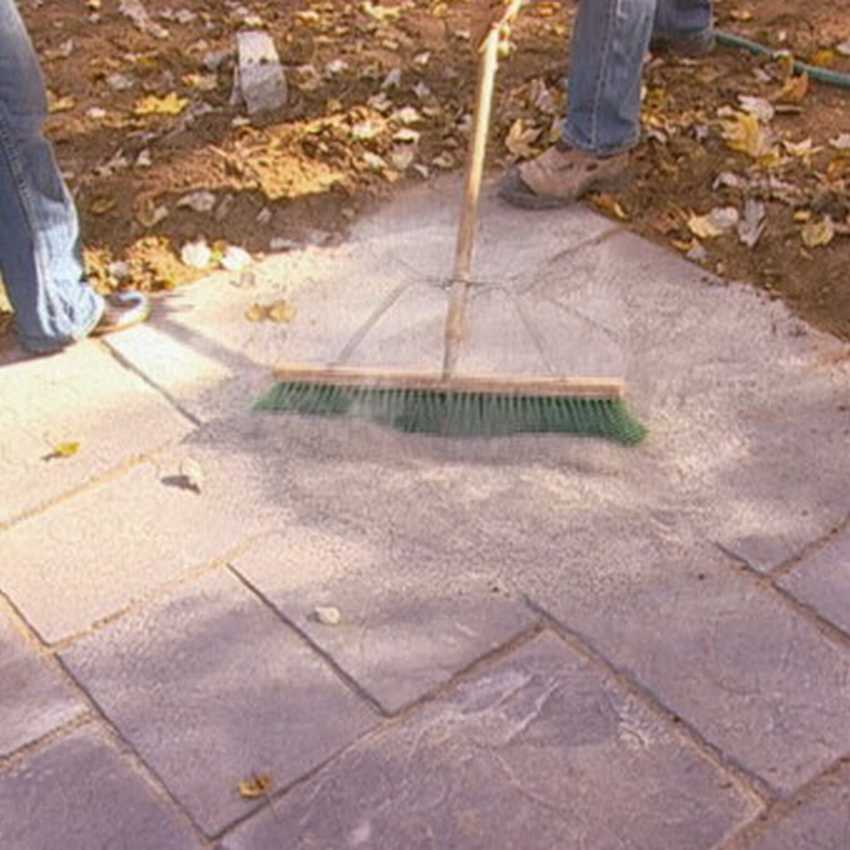
 Very comfortable and inexpensive natural stone path can be made from limestone. This natural material is the most affordable and often used to create simple and uncomplicated tracks. This flagstone path is made in just a few hours - this option is great for summer cottages and suburban areas.
The limestone garden path is made on a sand and gravel basis. First you need to mark out where the stone slabs will lie and there to dig the recesses, depending on the thickness of the stone. The author advises against making a sandy base if the slab is very thick.
Such a path can be made independently easily and quickly, and it will serve you for many years!


https://i.expert-h.com/en/dorozhki/sadovye-dorozhki-iz-kamnya-svoimi-rukami-poshagovye-foto-master-klassy-500-foto#sigFreeIdd9fad58280
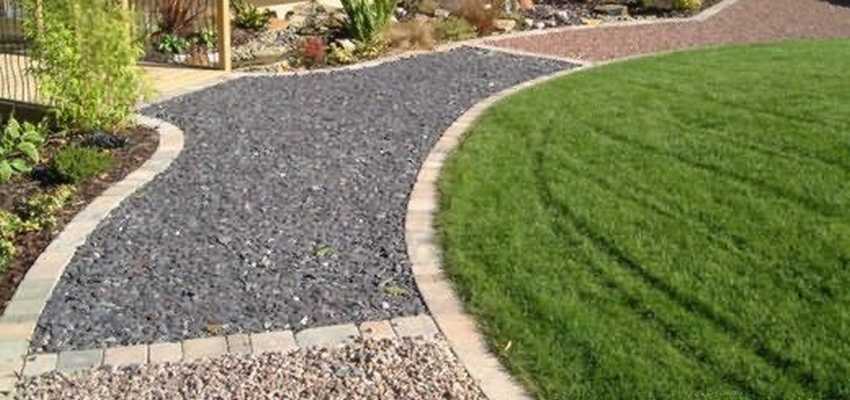
DIY do-it-yourself garden path photo step by step
 Gravel paths They are very popular among site owners because of the ease of installation and easy maintenance. There are practically no problems with the gravel path, so there are a great many workshops with different laying techniques. For example, this track, unlike the previous step-by-step master class, is laid with agrofibre or geotextiles. Such a coating will provide a long-lasting path, and the owner will cause less trouble with the care and weeds.
DIY gravel track can be done very simply - the main thing is not lazy and dig a trench about 20 centimeters deep. This gravel path is made using a wooden border, but the author notes that it can be anything - plastic, made of bricks, metal.
It is very simple to take care of such a garden path - geotextiles will not allow weeds to germinate, and gravel will reliably hold the border.


https://i.expert-h.com/en/dorozhki/sadovye-dorozhki-iz-kamnya-svoimi-rukami-poshagovye-foto-master-klassy-500-foto#sigFreeId8903833273
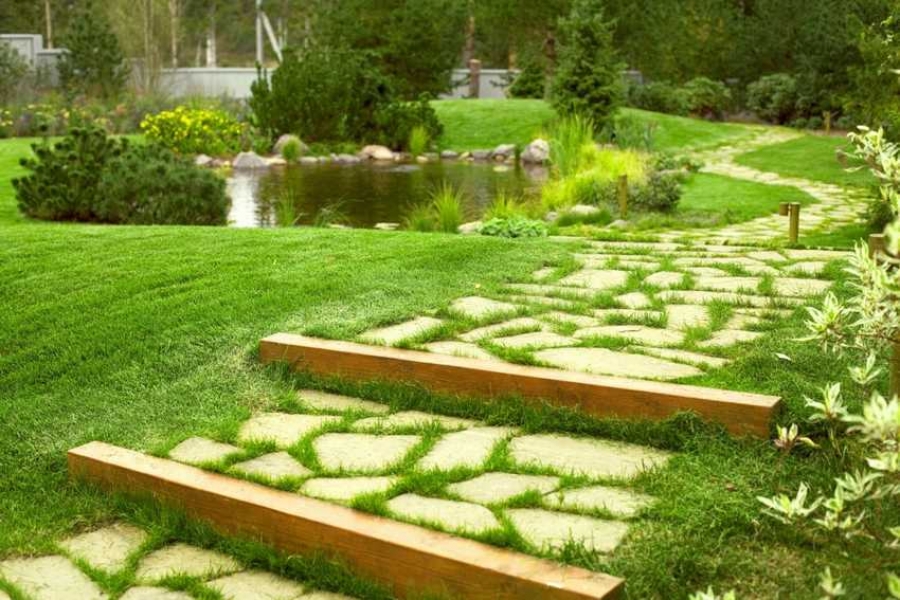
Do-it-yourself garden stone walkway step by step
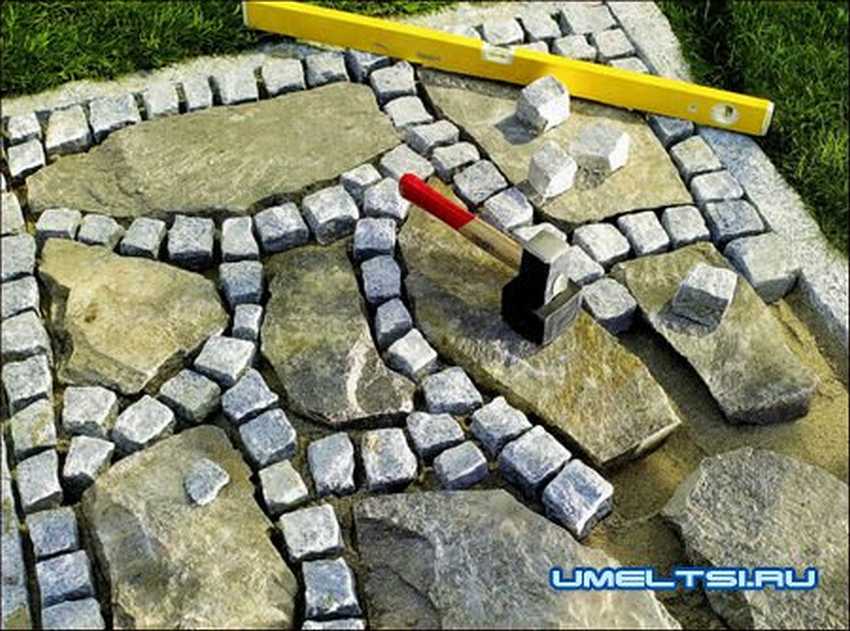 This interesting version of the garden path with your own hands will not leave indifferent the valuable experiments and the non-standard approach. A path made of rubble and paving stone It will take some effort, but the result will pay off at 100%. Such a creative path will definitely not be in any of the neighbors.
- First you need to prepare a sandy base for the track.
- Then with the help of imagination and level we lay uneven rubble stone in the most convenient way. Between the stones we insert a granite cube, which will serve as a guide for further masonry.
- Next, we spread the paving (granite) stone and fill the cracks with sand, crumbs or sprout the lawn.
Such a garden path will be a real "highlight" of the garden for many years!


https://i.expert-h.com/en/dorozhki/sadovye-dorozhki-iz-kamnya-svoimi-rukami-poshagovye-foto-master-klassy-500-foto#sigFreeIdd7fd22f9e0
The basis for the garden path: which one to choose?
In addition to the right stone for the garden path with your own hands, it is important to remember that the foundation is also of great importance. How to make your track durable and low-maintenance? To do this, you need to know a few simple rules:
- Place for track you need to carefully clear all sorts of obstacles - garbage, stumps, bushes, glands sticking out of the ground and other rubbish. The soil needs to be prepared and delineated where the path will take place.
- Then you need to dig a trench - it must be at least 15 centimeters long so that the track serves for many years and does not settle, freeze and crumble.
- Further, the most important thing is the foundation. Here, the opinions of experts differ, someone believes that garden paths should be on a concrete basis, someone believes that this is unnecessary. In this case, the master makes a sandy, sandy-gravel pillow or lining the bottom of the track with agrofibre (geotextile).
Experienced builders are advised to choose concrete basesince it will last longer and less prone to destruction.
Garden path made of artificial stone using the master class form
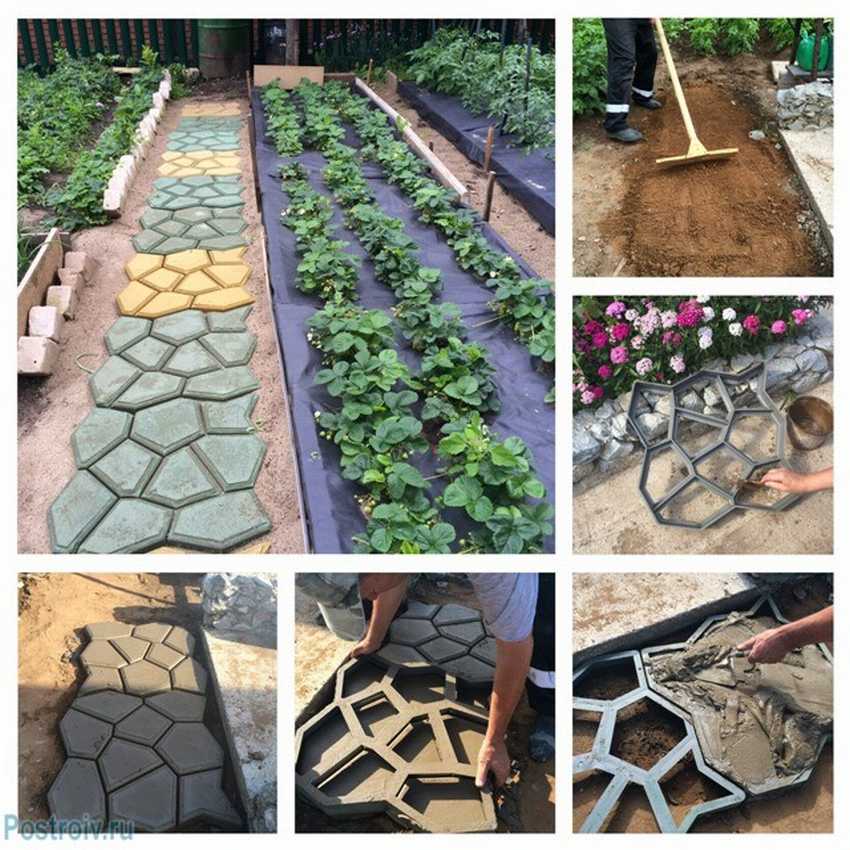 Many prefer natural stone, but at a cost it is very expensive. An excellent replacement for expensive natural material is to make stones yourself from concrete. Using a convenient plastic form, you can make stones of any shape and size, and with a simple master class this will be doubly easier!
The author of such a detailed instructions for creating do-it-yourself garden path made of artificial stone gave some important tips on creating this masterpiece:
- It is advisable to lubricate the form with a special tool - then you will not have to make efforts to remove it.
- In order to paint the stones in any color, you can use two ways. the first is to add paint to concrete in the final stages of mixing. The second is to color the resulting shape directly.
- However, the author advises to use the first option, because in the second case, the paint will be erased, and you will have to constantly tint the track.
With the help of different colors you can create a real work of art even from simple concrete!


https://i.expert-h.com/en/dorozhki/sadovye-dorozhki-iz-kamnya-svoimi-rukami-poshagovye-foto-master-klassy-500-foto#sigFreeId6da44d9730
DIY stone path step by step photos + workshop
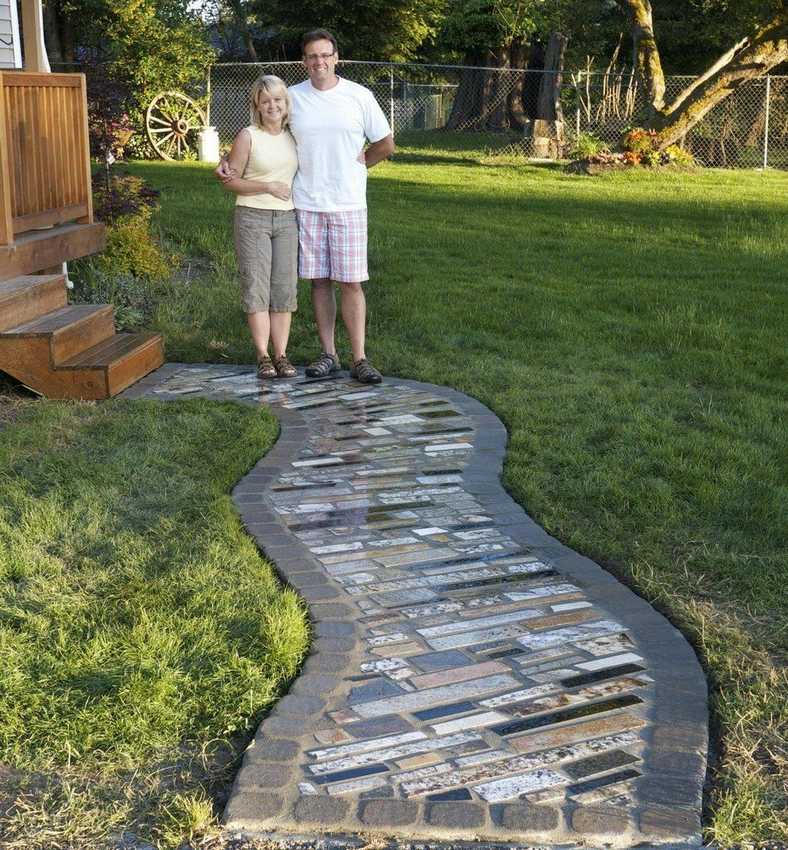 This amazing creation workshop DIY garden path made a married couple. After construction, they left many fragments of revealing stone, so they decided to use the “trash” in the business, and made them a very beautiful garden path. The couple participated in the construction together and recorded the whole process in the photo. It turned out an excellent master class, which they shared with everyone who wanted to make the same unusual and very original track with their own hands.
To create this building miracle, they needed the following materials:
- Facing stone
- Shards of stone from construction
- cement
- sand
- gravel
So easily and simply, using only available materials, the couple made an excellent garden path made of natural stone, perfectly fitting the debris of unnecessary garbage to good use.


https://i.expert-h.com/en/dorozhki/sadovye-dorozhki-iz-kamnya-svoimi-rukami-poshagovye-foto-master-klassy-500-foto#sigFreeId63a976f51d
Do-it-yourself garden path made of limestone on a concrete base
 Limestone Garden Paths are very popular with many owners of sites. The obvious advantages of this material are affordable price and durability. Paving limestone garden path It differs in the ways of laying the stone and the base under it. Three methods are most commonly used:
- Paving limestone on a sand and gravel pillow. We considered this method above.
- Paving flagstone on a sand-concrete pillow. Such a foundation will be much stronger and will last longer.
- Paving flagstone with a lawn base.
Of all these options, a flagstone track on a concrete base is the most durable and less costly to maintain. Experienced builders prefer this option when choosing a paving method.


https://i.expert-h.com/en/dorozhki/sadovye-dorozhki-iz-kamnya-svoimi-rukami-poshagovye-foto-master-klassy-500-foto#sigFreeIde9ca76a8be
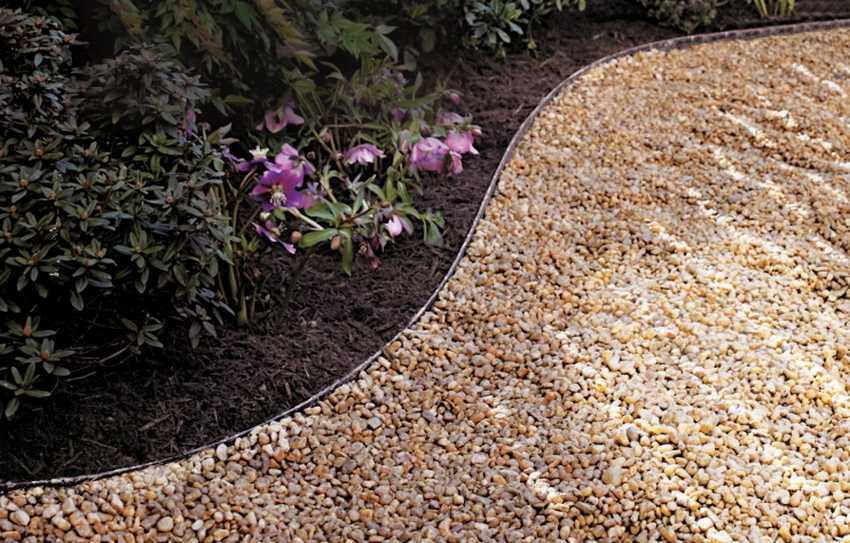
DIY garden track ideas with do-it-yourself gravel sprinkling
 A very interesting idea for landscape design is to make a gravel path. It doesn’t look as boring as a simple gravel path and adds a twist to any area. Gravel path can be made together with any material - brick, stone, wood, concrete blocks or other materials to your taste.
A path with a gravel fill is made in the same way as a simple gravel path, only another material is laid before filling the upper layer of gravel. Then empty places are covered with gravel and rammed.
We have compiled for you the most interesting combinations of garden paths with gravel filling!


https://i.expert-h.com/en/dorozhki/sadovye-dorozhki-iz-kamnya-svoimi-rukami-poshagovye-foto-master-klassy-500-foto#sigFreeId3cf50093f3
Garden path made of natural stone with cement do-it-yourself
 Do-it-yourself garden path made of natural stone with cement perfect for any site. Paving a stone in this way will not cause large monetary and time costs. But the track will turn out to be very strong and durable with proper care of it.
There are two ways to pave such a track. For starters, like other tracks, a base of 20 centimeters deep is dug. Then, the resulting depression is filled with drainage - gravel, fragments of rubble, pebbles or brick battle. After thoroughly tamping, sand is poured onto the drainage, which must be wetted and also tamped. Further, the stone can be laid in two ways:
- Just put the stone on the compacted sand, press it, and then fill the gaps between the paving stones with concrete mortar, using a cone like a candy store.
- In this embodiment, the stone is placed immediately on the concrete mortar. In this case, the stone will fit more tightly to the base.
Before choosing a method, it should be noted that in the first case the costs will be much less, but the second option is more durable and durable.


https://i.expert-h.com/en/dorozhki/sadovye-dorozhki-iz-kamnya-svoimi-rukami-poshagovye-foto-master-klassy-500-foto#sigFreeId3ac6ec87fe
How to prepare a solution for a garden path: make a concrete base
Often the owner of the site decides to make a concrete base for his path, and this is perhaps the best choice, because concrete will last much longer, and there will be many times less maintenance with such a base. In this case, it is important to properly prepare the solution, correctly observe all proportions and consistency. So what are the secrets of cooking concrete mortar for garden path?
Cement for the foundation is better to choose 300 or 400 brands. If you notice small lumps in it, it is better to sift the cement in order to avoid friction during mixing. But sand must be sifted necessarily, because most often for construction work not very high-quality career sand is used. And the third component of the solution is water. It should be at room temperature, too hot or cold can ruin the entire solution.
Next, knead the solution in such a proportion 1: 3 (1 part cement and 3 parts sand) until the consistency of thick sour cream. do not make too thin a solution, later it may crack.
Skilled builders advise adding modern components to the solution, for example, to give the desired consistency a plasticizer, and to obtain the desired color - colored granules or dye.
- Another secret of a good concrete mortar: it is better to lay sand and cement in layers, 1 thin layer of sand, 1 thin layer of cement. So it will be easier to interfere with the solution. Water should be added only after thoroughly mixing all the ingredients in a dry form.
With these simple secrets you will be able to make the right solution for the base of the garden path!
DIY pebble garden path "Mosaic" photo step by step
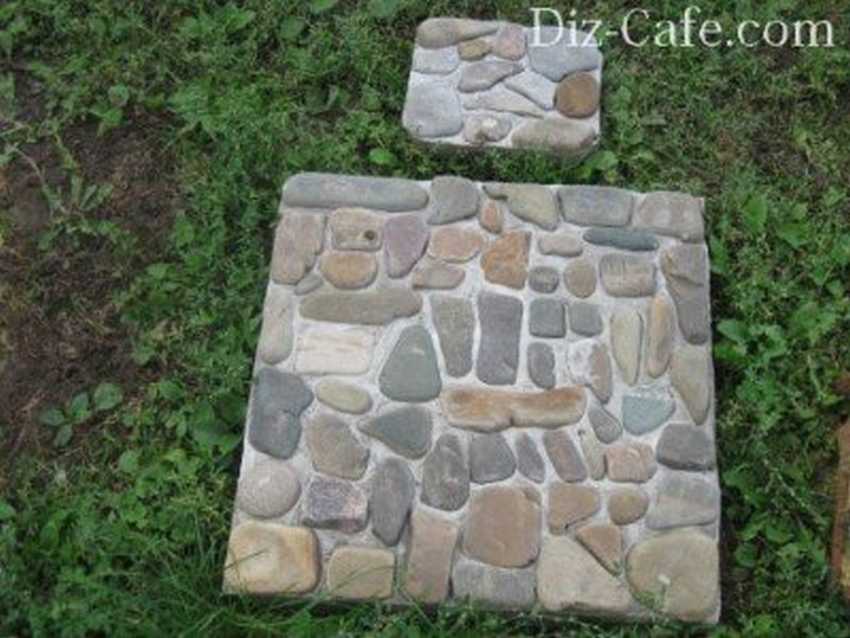 This option is for those who do not like standard solutions on their site! This garden path it imitates the masterpieces of Italian masters - of course, it cannot be compared with the original, but it will definitely give a “twist” to your site.This mosaic tile can be made easily and simply with the help of a very affordable step-by-step master class.
For pebble mosaic tiles you will need:
- cement
- sand
- pebbles of different sizes and colors
- wooden form
We mix the solution, fill it with forms and put pebbles in concrete. IMPORTANT: the wooden form must be covered with polyethylene and greased with machine or any other oil.
After laying out the pattern, the stones need to be pressed into the concrete at the same level so that the tile is even.
The tile must be left in the form until completely dry, it will take 3-4 days. Using the forms, you can make the right number of tiles of the required size to lay out garden path "Mosaic" made of natural stone.


https://i.expert-h.com/en/dorozhki/sadovye-dorozhki-iz-kamnya-svoimi-rukami-poshagovye-foto-master-klassy-500-foto#sigFreeId6a04570039
DIY garden path from stone slabs master class
 Very popular among owners of large personal plots concrete slab garden paths. This track looks very prestigious, easy to install and unpretentious in care. The only negative is that it takes quite a lot of time and effort to create the track. But the result will fully pay off!
For a stone slab track, the foundation is very important. It must be made very firmly so that the plates hold firmly and last a very long time. The instructions for creating this garden path are quite simple, but you should consider a few small nuances:
- The stones of the path should be above ground level so that water does not accumulate on it and flows down
- Not all stones are suitable for creating a taco track - for example, marble will make it very slippery
- The track should be fenced with a border so that over time it does not begin to crumble.
With the help of a simple master class, even the most inexperienced builder can make such a path!


https://i.expert-h.com/en/dorozhki/sadovye-dorozhki-iz-kamnya-svoimi-rukami-poshagovye-foto-master-klassy-500-foto#sigFreeId59188fccbb
Do-it-yourself gravel garden path with concrete leaves
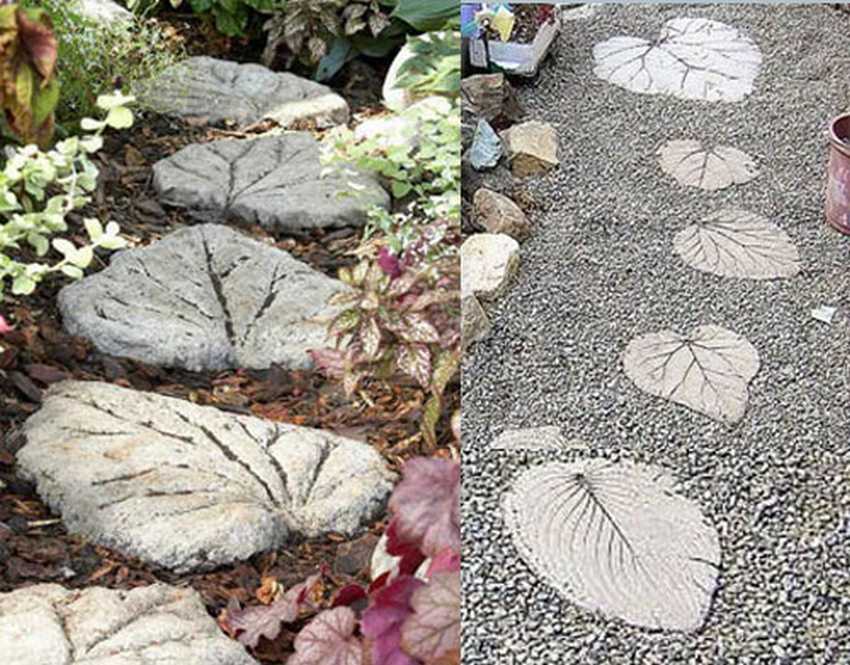 This DIY garden path will appeal to lovers of unity with nature and all that is natural. Gravel walkway with leaf concrete slabs Perfectly fits into any landscape design. Moreover, making this track is not as difficult as it seems at first glance - you just need to have a little patience.
- We already know how to make a gravel path, so we will only figure out how to make concrete sheets.
- For the solution we take sand and cement 1: 1 and mix thoroughly.
- On a sheet of burdock of a suitable shape and size, laid the convex part of the veins up (this is important!), Lay out the solution with a layer of 3-5 centimeters.
- And most importantly - you need to wait 3-4 days for the concrete to dry, then remove the sheet and set our tile aside for another 20 days.
After all the tiles have dried, we can make our path, having previously prepared the base for gravel and sheets. Such a path with your own hands will become a real pride of the master!


https://i.expert-h.com/en/dorozhki/sadovye-dorozhki-iz-kamnya-svoimi-rukami-poshagovye-foto-master-klassy-500-foto#sigFreeIdbe766987e3
DIY paving garden path photo step by step
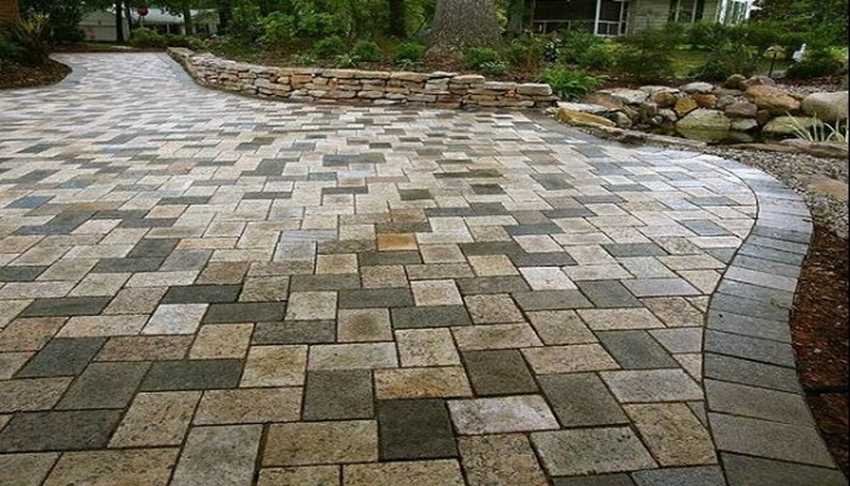
 Very convenient and easy to do. do-it-yourself path from paving stones. Such a project can be repeated even by a novice builder in almost one day!
This path made of pavers or bricks with your own hands will become reliable and durable, and will serve with benefit for many years. This path, like all the previous ones, is done on a sandy foundation. It is better to lay the stone with the help of a level and a rubber hammer, so that it turns out to be smooth and accurate.
Such a path can also be done on terrain with obstacles - with the help of cut stones you can go around any obstacle, whether it be a tree or the edge of a wall.
The author of this project advises making interesting "pockets" on the sides of the path - you can put flowers in pots, lanterns or garden figures in them.


https://i.expert-h.com/en/dorozhki/sadovye-dorozhki-iz-kamnya-svoimi-rukami-poshagovye-foto-master-klassy-500-foto#sigFreeIdce4243aa24
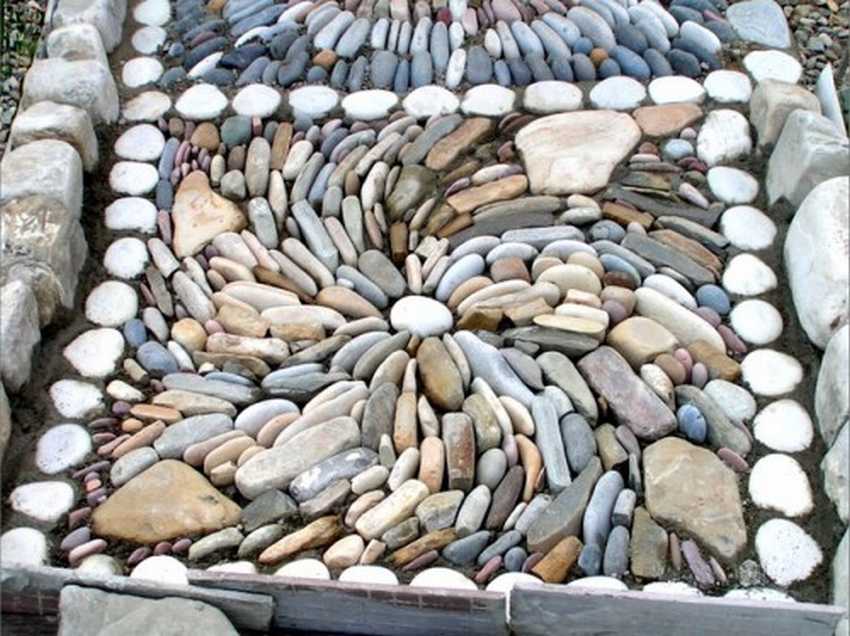
Garden path made of pebbles with do-it-yourself patterns photo
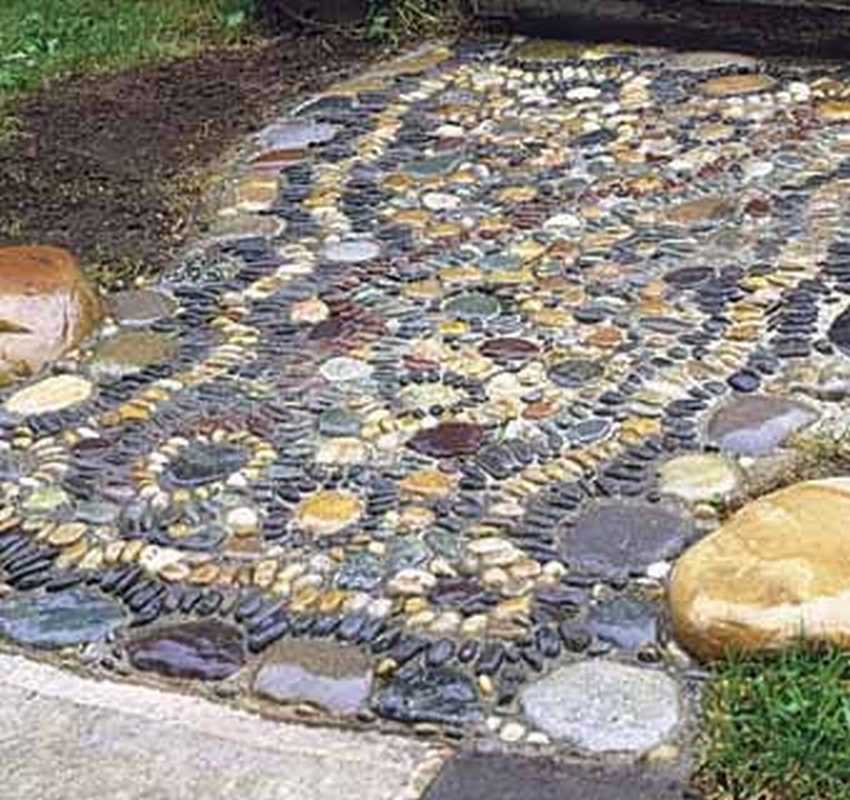 This path with your own hands was created thanks to painstaking and tedious work, but the result will more than cover all efforts! Using ordinary pebbles and a little imagination, you can lay out various patterns that will decorate any garden. Pebbles can lay a path in the garden, a terrace, a cozy corner for relaxation, or even the stairs.
The author of this project spent many hours to create a beautiful pebble garden pathbut its result cannot but delight!
The creator of this unique track gave some important tips:
- Stones must be wet before use.
- Stones with a flat surface are more suitable for mosaics.
- If cement mortar gets on the stones, wash it off with hydrochloric acid (be sure to use gloves)
With these tricks you can create a very beautiful pattern for the garden path, which will be the pearl of your garden!


https://i.expert-h.com/en/dorozhki/sadovye-dorozhki-iz-kamnya-svoimi-rukami-poshagovye-foto-master-klassy-500-foto#sigFreeIddba8149a55
Garden path curb: what material to make?
We already learned how to choose a stone, how to make a foundation, and how to prepare a solution. Now another important detail of the garden path is the curb. It must be done so that the track does not crumble, the stone does not collapse and retains its original appearance for as long as possible. Garden path border You can buy in the store, but you can do it yourself.
Most often, the following materials are used to create borders:
- wooden boards
- brick
- large stones
- sand-filled plastic bottles
- wooden log cuts
- stone blocks
With stones and bricks, everything is clear, but with the boards you have to tinker. The tree is not as strong as natural stone, therefore, before installing a wooden border, craftsmen advise soaking the boards with a special liquid. This will prevent destruction and make the tree more durable.
Any of these materials has proven itself as a border for a garden path, so you can choose any one to your taste!
DIY garden path made of glowing stones
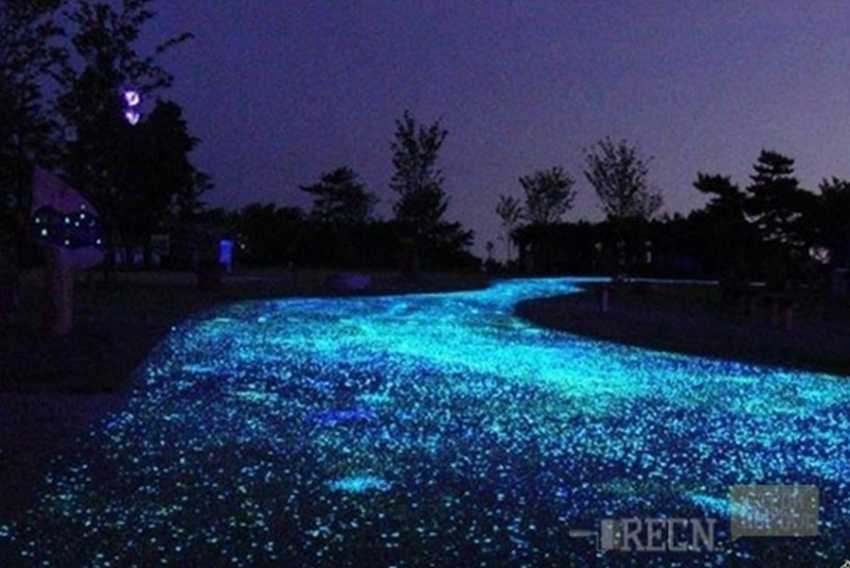 Another creative and newfangled version of the garden path is to make it out of luminous stones. This option will be unsightly during the day, but at night it will bloom with a riot of colors and give an unforgettable experience. Recently, such paths have been very popular because of their unusual appearance and additional lighting at night without batteries and electricity.
Glowing stones can be done in several ways:
- Polymer stones with LEDs. Short-lived and quickly fail.
- Plastic stone simulators with chemical catalysts. They accumulate sunlight all day, and then glow, but not more than 10 hours. Very durable and affordable.
- Stones painted with fluorescent paint. They can be painted right at home.
From these three options, you can choose any one that you like to create such an amazing garden path with your own hands. On long summer nights, this path will give positive emotions and decorate your garden!


https://i.expert-h.com/en/dorozhki/sadovye-dorozhki-iz-kamnya-svoimi-rukami-poshagovye-foto-master-klassy-500-foto#sigFreeId817169d0ce
DIY walkway combined with stone and gravel
 This gravel and natural stone combination path Great for a beginner builder. To create it will require very little time and effort, and the resulting result will delight even the most picky owner.
For the garden path from gravel and stone with your own hands, you need to make a foundation, as in previous master classes. The main difference of this path is that gravel is poured onto a sandy base, and stones are poured onto a concrete mortar.
This path is step-by-step, so the main reference point in planning will be a step. It’s not worth running along such a path or carrying something, it is designed for walking and unhurried walks. This is important to consider before choosing this workshop.
Also, the author of this step-by-step master class advises to trim the edges of natural stones before laying on the solution. This will provide them with a long service - sharp edges will break off and crumble.


https://i.expert-h.com/en/dorozhki/sadovye-dorozhki-iz-kamnya-svoimi-rukami-poshagovye-foto-master-klassy-500-foto#sigFreeId1f3b4e9773
Garden path made of gravel and pebbles with your own hands a simple master class
 This gravel and pebble garden path made using special forms for landscape design. Interesting "medallions" of river pebbles can be made easily and simply, most importantly, arm yourself with patience and fantasize. You can lay out any patterns to your taste - pebbles of different sizes and colors will allow you to create real masterpieces!
- The base for the track with “medallions” of pebbles is made in the standard way. After gravel is strewn onto the track, you can begin to create a pattern.
- To do this, you will need forms for landscape design, which can be bought in a store or made independently from wood or metal. But in this master class, the author uses a ready-made set to create “medallions”.
- Using the step-by-step instructions, create a pattern and fix the shape.
- The author notes that after laying out the pattern, it must be carefully tamped with sand.
Such gravel and sand path decorate any garden!


https://i.expert-h.com/en/dorozhki/sadovye-dorozhki-iz-kamnya-svoimi-rukami-poshagovye-foto-master-klassy-500-foto # sigFreeId57e03fde93
Garden path made of natural stone and bark step-by-step master class
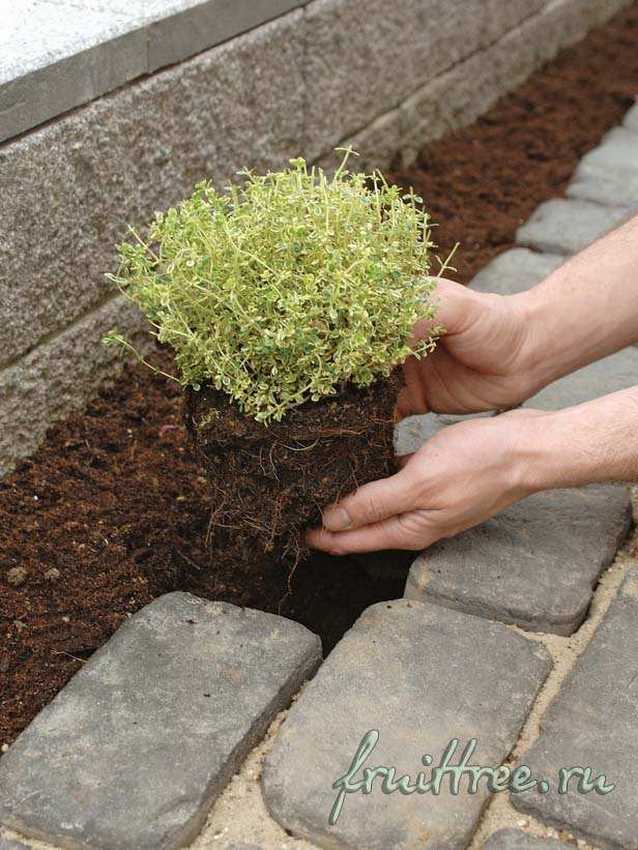
 And this mistress can make any mistress of a personal plot in a couple of hours! Comfortable walkway made of natural stone and mulch Suitable for both the cottage and the site around the house. This master class was created by a girl who faced the problem of improving her plot. And she managed to make such beauty in a couple of hours with the help of a layout and the necessary material!
We already know how to lay stones for the track with our own hands. Now the question is about mulch. As a mulch, you can use a lot of different material:
- tree bark
- sawdust
- shavings
- gravel
- pebbles
- brick chips
The author of this master class chose a tree bark, and she got an excellent DIY track!


https://i.expert-h.com/en/dorozhki/sadovye-dorozhki-iz-kamnya-svoimi-rukami-poshagovye-foto-master-klassy-500-foto#sigFreeIddd629ec982
Geotextiles for a garden path: why is it needed and how to choose?
Inexperienced builders often have a question - why is geotextile needed (agrofibre) to create a garden path. In fact, a lot depends on this, at first glance, excess material.
- Firstly, geotextile track strengthens and stabilizes the soil layers under the material of which the track is made.
- Geotextiles will serve as a reliable drain for water
- Geotextiles won't let weeds grow
- Geotextiles will not allow the soil to swell during severe frosts in winter
A track using geotextiles or agrofibre at the base will be very reliable and will last a long time. This material has established itself as an indispensable tool in any construction.
How to choose geotextiles?
Experienced craftsmen advise to buy geotextiles or agrofibre with a density of 150-250 g / m2 for garden paths.
The best material is polypropylene. It is recognized as the most durable in use and durable material.
Thanks to the use in the construction of agrofibre or geotextiles, your track will serve you many times longer!
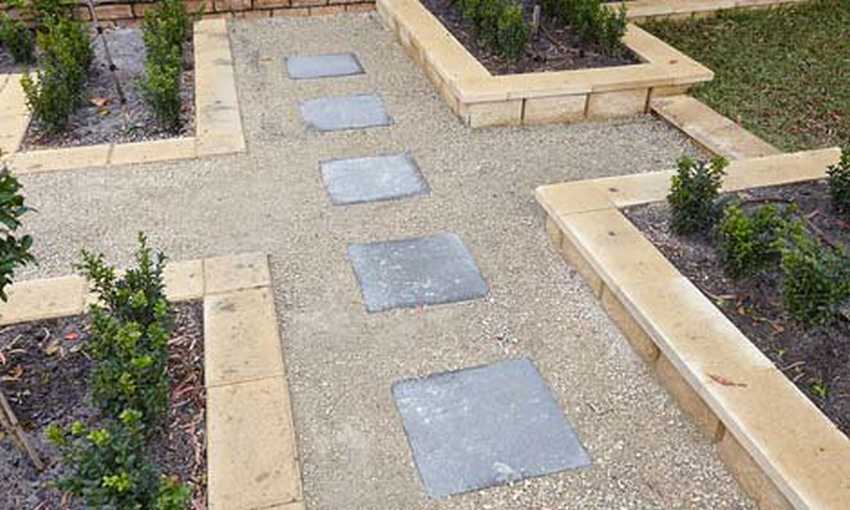
DIY garden path made of gravel step by step instructions
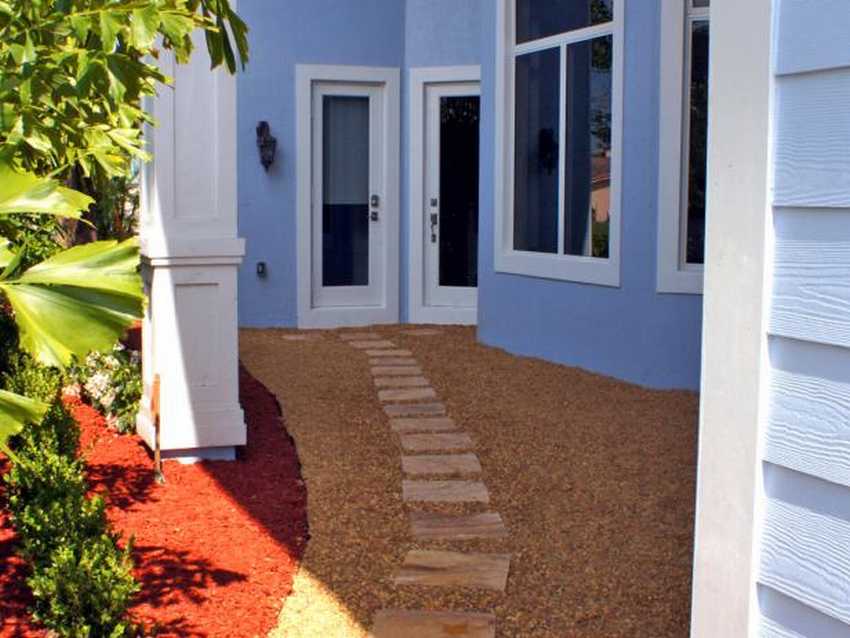 Often, the entrance to the house from the backyard also requires some kind of design move, and not just a trampled path. The owners of this house decided to make a path in the courtyard in the form of a convenient terrace with step-by-step slabs of natural stone. With the help of simple materials, they created an excellent example of landscape design and decorated their backyard with a non-standard path with their own hands.
The creators of this convenient step-by-step instruction gave the masters some tips:
- it is better to lay the space between the plates with geofibre, then gravel sprinkling can be changed as needed
- slabs made of natural stone are better not to choose a dark color - they will heat up in the sun and can burn your feet
- on the edge of the path it is better to make a border so that the gravel does not spill out, and the path has a well-groomed appearance
Thanks to these simple tips, you can create a very interesting and unusual DIY garden path!


https://i.expert-h.com/en/dorozhki/sadovye-dorozhki-iz-kamnya-svoimi-rukami-poshagovye-foto-master-klassy-500-foto#sigFreeIdc92d085224
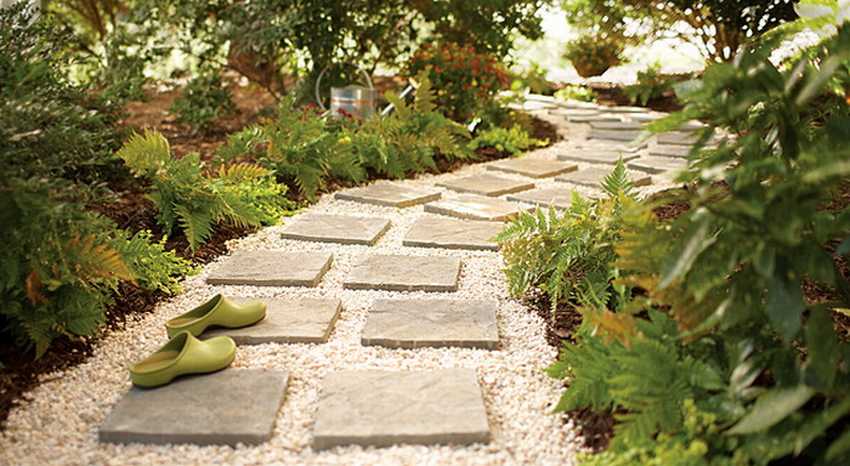
Do-it-yourself path for the garden from the flagstone step by step instructions with photos
 To lay a track out of limestone, you don't have to be an experienced builder! This multifunctional DIY track any friendly family can do in a couple of days - most importantly, free time and two pairs of hard-working hands. There is no need to adjust the tiles or measure pieces with a centimeter tape - your path can curl through the garden as you like!
This path is made of limestone, but in principle, you can choose a natural stone of any kind to your taste and purse. Limestone is laid on a sandy base and carefully rammed with a rubber mallet.
The authors of this project are a young family. To create a more organic look for the garden path, they advise the gaps between the slabs to fill the soil and plant native plants. If you don’t want to tinker with planting, you can fill the soil with seeds of lawn grass or just add mulch instead of soil - sawdust or tree bark.
Such flagstone path It will be a very long time to please the owners with its green look!


https://i.expert-h.com/en/dorozhki/sadovye-dorozhki-iz-kamnya-svoimi-rukami-poshagovye-foto-master-klassy-500-foto#sigFreeIdd43edeb580
It is interesting: a dry stream in the garden of natural stone photo
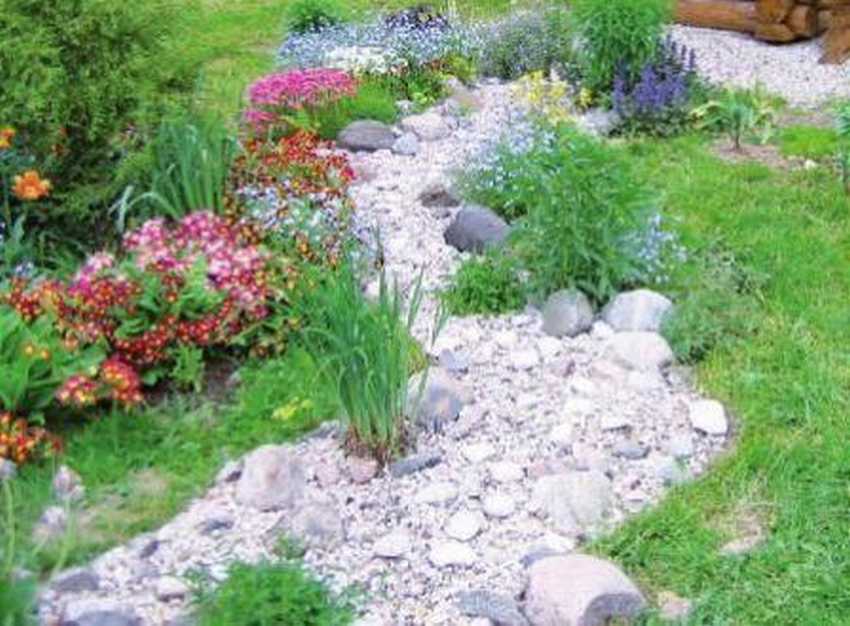 In landscape design, there are many varieties of the use of natural stone. The second most popular after garden paths is rightfully recognized as such an interesting view, as dry creek. Dry streams are often used as garden paths, and sometimes just as decoration of a garden.
Dry creek appeared for the first time in Japanese gardens - those who did not have the opportunity to have a real creek on the site made its imitation of stones.
With the return of fashion to all oriental cultures, the dry stream also returned - now many make such a design novelty on their own. Often the creek performs not only the function of decoration, but is also used as a track.
The dry stream will perfectly fit into any kindergarten and will become a "highlight" of any site. If you have not yet decided how to decorate your summer cottage or personal plot, be sure to consider this option!
15 + photos of dry streams


https://i.expert-h.com/en/dorozhki/sadovye-dorozhki-iz-kamnya-svoimi-rukami-poshagovye-foto-master-klassy-500-foto#sigFreeId39ef99b44b
DIY do-it-yourself gravel garden path
 This master class with step by step photos show how to quickly and easily make a great budget version of a garden path from gravel with your own hands. It is not always possible to create large-scale paths from expensive natural stone on a personal plot or cottage.
Then a simple and uncomplicated one will become a good option for landscape design. gravel or broken brick path.
To make such a path with your own hands, you do not need to be a builder with great experience - it is enough to be able to hold a shovel and have a strong back.
But the gravel path will serve you for a long time without any extra effort!


https://i.expert-h.com/en/dorozhki/sadovye-dorozhki-iz-kamnya-svoimi-rukami-poshagovye-foto-master-klassy-500-foto#sigFreeIdaf0463b666
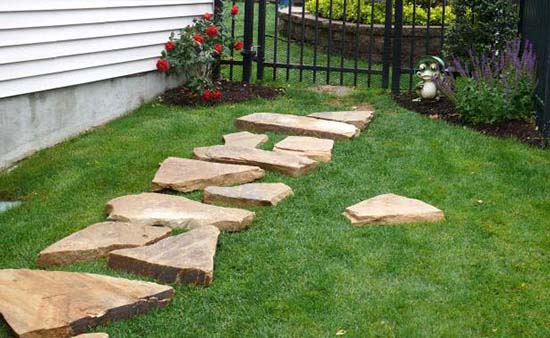
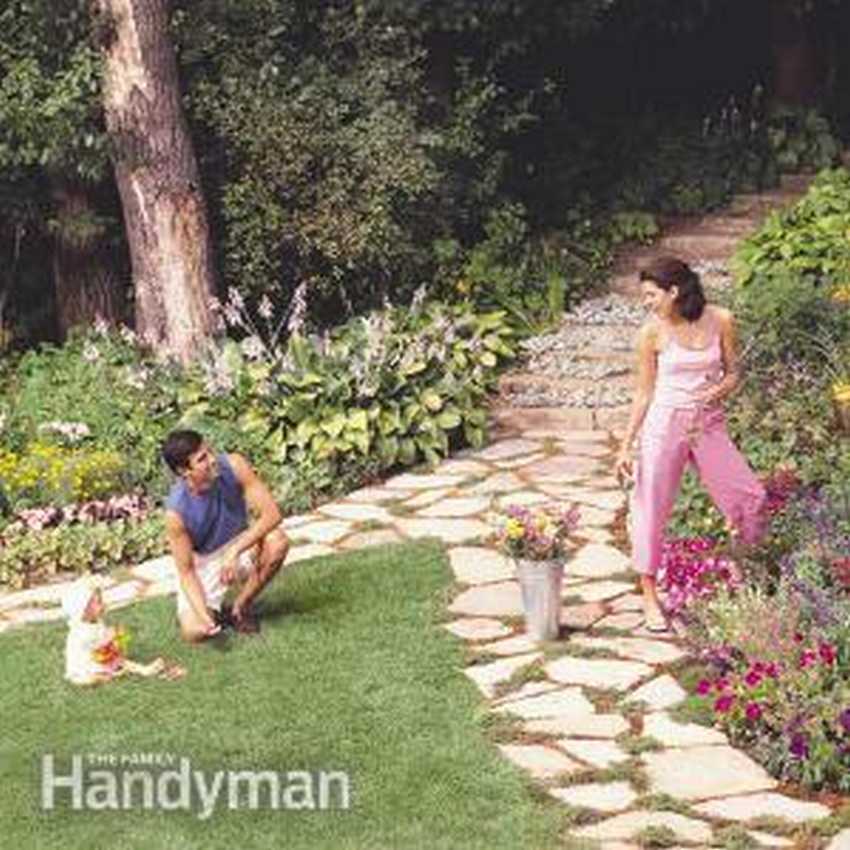
DIY walk-through garden path master class
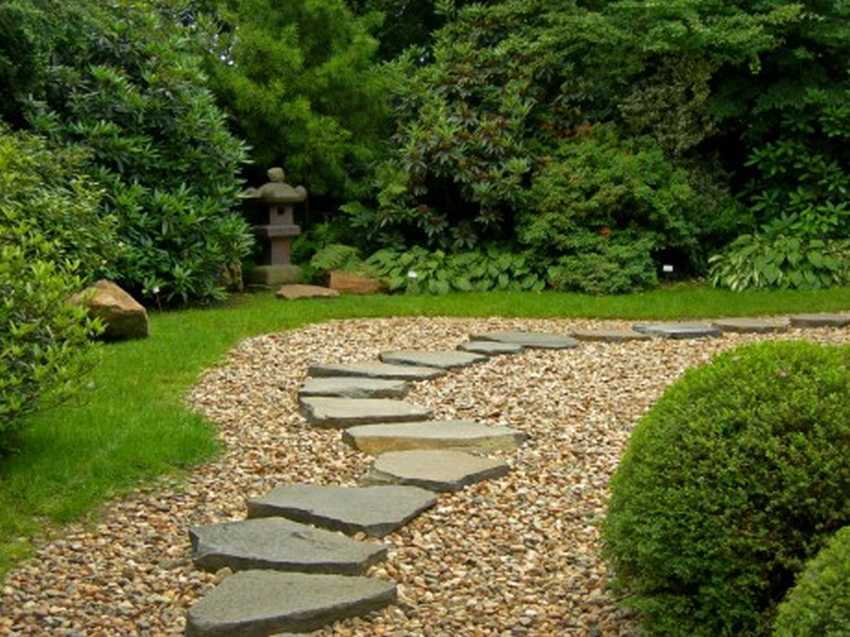
 If you do not want to spoil your lawn, a better choice than garden walkway, simply no! step-by-step paths are very popular, as they are very convenient in operation and maintenance. In addition, of all the options for garden paths, this is one of the simplest. And with this step-by-step master class, creating a garden path will even turn into an exciting weekend break!
The author of this project notes that before starting work, it is necessary to carefully note the location of the stone slabs on the future step-by-step path. This will help you make the track beautiful and even with your own hands.


https://i.expert-h.com/en/dorozhki/sadovye-dorozhki-iz-kamnya-svoimi-rukami-poshagovye-foto-master-klassy-500-foto#sigFreeIdc33d1d1533
Interesting: Pebble Garden Paths by Jeffrey Bale
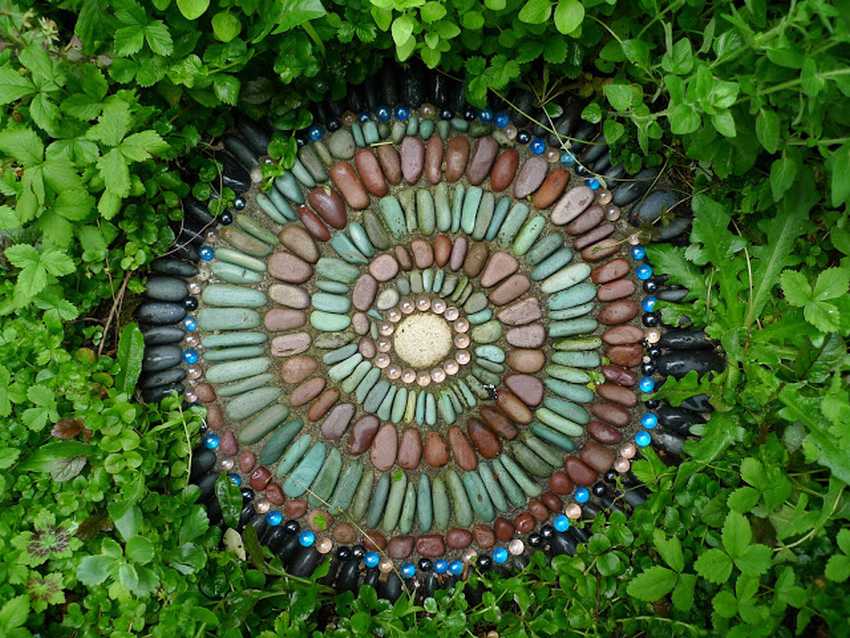 We saw a great many of the most beautiful pebble mosaics, but we did not know that the same person made all this beauty! This master’s name is Jeffrey Bale, and for many years he has been creating pebble mosaics around the world. The artist was born in Eugene, Oregon, but his name is busy in many parts of the world.
He loves to travel - he needs constant unity with nature. Over the past 33 years, Jeffrey traveled every winter, and many times visited Mexico, Southeast Asia, Thailand, India, Sri Lanka and other places. His work is directly related to his travels - Jeffrey is fueled by inspiration from nature itself.
Each Bale's work is something special, created specifically for the customer, taking into account his wishes and the surrounding nature.
Jeffrey Bale's works are scattered around the world - he inspired thousands of people to create such works of architectural art.


https://i.expert-h.com/en/dorozhki/sadovye-dorozhki-iz-kamnya-svoimi-rukami-poshagovye-foto-master-klassy-500-foto#sigFreeId9203a63ff6
Here you can see various drawings and diagrams for a garden path with your own hands


https://i.expert-h.com/en/dorozhki/sadovye-dorozhki-iz-kamnya-svoimi-rukami-poshagovye-foto-master-klassy-500-foto#sigFreeId76a233ab76
In this article we told you how to make DIY stone garden paths different ways. You can choose the option that is closer to your liking and pocket. And for inspiration, we have prepared for you a gallery of 500+ photos!


https://i.expert-h.com/en/dorozhki/sadovye-dorozhki-iz-kamnya-svoimi-rukami-poshagovye-foto-master-klassy-500-foto#sigFreeIdd848576a46