DIY concrete garden paths: step-by-step instructions, workshops, 500+ photos
 DIY concrete walkway
moj-ogrod.com.pl
DIY concrete walkway
moj-ogrod.com.pl
Any garden plot or garden cottage needs garden paths, so this category of landscape design is very popular. Often, land owners themselves want to cope with this task and do not resort to the help of professionals. And rightly so, because to do DIY garden path even the most inexperienced builder can do it! In addition, there are a great many step-by-step instructions and master classes with which you can quickly and easily create a path of any complexity.
Garden paths can be made from different materials, but practical owners often use a method that has been proven over the years. This article will focus on concrete garden paths - this material is recognized as the most popular among builders.
We will tell you about the simplest and most complex options for creating concrete garden paths with step-by-step photos and detailed instructions. With the help of this article you can easily and simply make a garden path of any complexity on your daughter or near the house!
DIY do-it-yourself concrete garden path
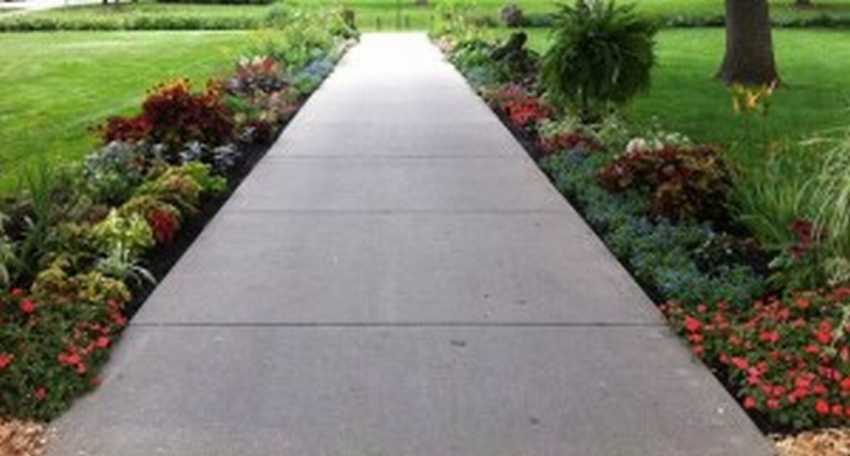
DIY concrete track - A great option for a country house or garden. Masters are very fond of concrete for the mass of its indisputable advantages, which include durability and affordable price. In addition, concrete gives great scope for imagination - from this material you can make anything, even an imitation of natural stone or colorful mosaics.
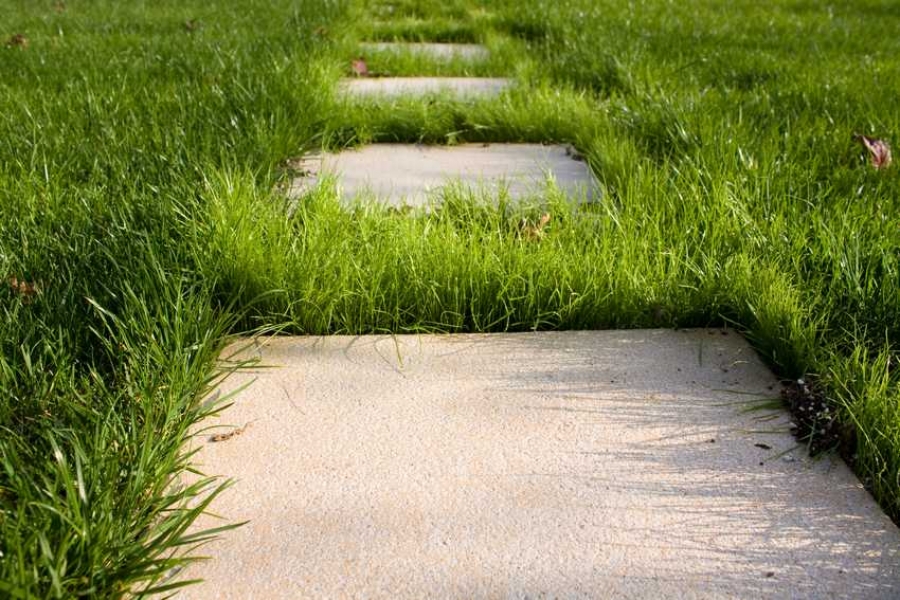
 DIY concrete walkway can be made in various variations, and for starters we will tell you how to fill a simple concrete path without any frills and complex shapes. Such paths are very popular in summer cottages, because you can run along them and carry a garden car. But complex paths with stones and mosaics can not boast of such strength.
The author of this master class did do-it-yourself simple concrete garden path quick and easy, but not without some of the intricacies of the workflow.
- First you need to prepare a place for a garden path - to determine where the trail will go, to clear this place of debris and obstructing obstacles - large stones, stumps and bushes.
- Then we prepare the base for the garden path - with a shovel we remove the sod to a depth of about 15 centimeters.
- Along the entire length of the track, formwork must be done - the author used 150 * 20 boards.
- Next, fill our base with a sand and gravel mixture, which we carefully ram and spill with water.
- After all the manipulations, you can start pouring concrete. The proportion of the solution depends on what functions the track will have.
- When the concrete is poured, it must be moistened to avoid cracks. The author advises watering the resulting track from a watering can for a couple of days so that the concrete dries more evenly.
- The "ripening" time of concrete depends on weather conditions, mortar density and track thickness. After drying, the formwork can be removed.
So, with the help of simple materials and a day of free time, you can make a simple concrete path with your own hands.


https://i.expert-h.com/en/dorozhki/sadovye-iz-betona#sigFreeId12c8a5853c
Garden path made of concrete do-it-yourself textured master class with photo
 Concrete is perfect for completely different ideas and techniques, because from it you can make anything. Concrete mortar can help translate into reality any idea, any whim. From concrete, you can make a perfectly flat surface that any perfectionist will appreciate, or you can make a diverse texture.Imprints of leaves on concrete are very popular - with the help of simple materials you can make a unique path in your garden.
This textured concrete garden path It is created using natural materials - maple, oak, birch leaves, burdock leaves, grass.
- DIY track made of concrete with prints It’s quite simple to do - it is poured in the same way as a simple concrete path.
- After pouring on concrete, imprints of leaves and other materials are made with bulk veins down - it is better to use larger leaves so that they are noticeable.
- As the concrete matures, the veins can be additionally drawn with a sharp object, so that the texture is clearer.
Such a path is perfect for eco-gardens, paths for the Japanese garden or even a summer cottage. Imprints on concrete will not take much time, but then for many years they will delight you with their interesting design.


https://i.expert-h.com/en/dorozhki/sadovye-iz-betona#sigFreeId0904baa286
Pros and Cons of a Concrete Garden Path
Of course, any master, before choosing this or that material, will carefully consider all the pros and cons. You can’t do without a garden path, because it will have to serve at least several years, and perfectly perform the necessary functions. That is why the owners of suburban and household plots should know all the pros and cons of the selected material.
This article will focus on concrete, so we will first consider it pros:
- Durability and durability. Concrete is recognized as one of the most durable materials in construction - its service life is tens of years, with proper pouring.
- Low cost and material availability. Unlike natural stone, which is very expensive, and it is not always possible to allocate such an amount to the country path, concrete is quite affordable. In addition, to create a concrete mortar, you will not need many ingredients - only water, cement and sand.
- A wide range of uses - concrete mortar will help to fulfill any idea.
Now let's move on to cons:
- Perhaps the only drawback of the concrete track is its complexity, because you need to knead a large volume of solution. however, in this case, the task will be greatly facilitated by the concrete mixer.
- Also, many are sure that it is difficult to pour the concrete path correctly so that it does not crack and does not begin to crumble over time. However, in terms of efforts and time costs, a concrete walkway is much simpler than, for example, a walkway with paving slabs or natural stone.
In general, concrete is a great choice to create. DIY garden path!
DIY do-it-yourself concrete garden path
 Beautiful paving slabs are always very popular in landscape design, however, the owner of the site does not always have the opportunity to pave real tiles or paving stones. For the price it will come out pretty impressive, and the expensive cost is not always suitable, for example, for a country path or a path between unimportant objects.
Then convenient comes to the rescue plastic mold to simulate pavers - with its help, you can make any pattern on ordinary concrete pouring. These are not the same forms as before - now you do not need to fill in the form one thing at a time and wait until the form is released after the tiles dry. Modern forms for concrete mortar are designed for continuous operation - they need to be cast directly on the site of the future track.
This is very convenient, because now you do not have to wait, and the process goes very quickly.
- To create a concrete garden path using a mold, you need the mold itself, cement, sand and water.
- As for an ordinary track, the first step is the foundation - the turf is removed, the sand is compacted.
- Further, the form is successively poured onto the base, the time of "setting" of one section is 10-15 minutes.
- Then the mold is removed and the next section is poured.
- Experienced builders advise lubricating the mold with some kind of oil to make the mold easier to take out.
Using the form, you can make a beautiful garden path that completely imitates expensive tiles or paving stones. Concrete paths from forms have recently been very popular, for their simplicity and reasonable price.


https://i.expert-h.com/en/dorozhki/sadovye-iz-betona#sigFreeId9832d1e1ed
DIY concrete garden path step-by-step workshop
 Often, a concrete path is designed not only for walking, but also for a larger load - a garden car, bicycle, motorcycle. Then it is better to make it more durable, and for this there are many ways. Often, builders use a simple and reliable way - they add something metallic to concrete.
The author of this step-by-step master class used for this purpose all the iron that he found on his site. The pipe heads, rods, metal staples and other rubbish were used.
- The main secret of this concrete path - the master used agrofibre as a layer between the ground and sand, and a film and between sand and concrete.
- Agrofibre between sand and soil will provide good water permeability and will not allow subsidence of a sand cushion.
- And the interlayer between sand and concrete will not allow "cement milk" to go into the sand, which provides the solution with quick hardening. A plastic film will not allow this important component to go into the ground and delay it.
Using these secrets concrete track will last for many years and withstand any load.


https://i.expert-h.com/en/dorozhki/sadovye-iz-betona#sigFreeIdf882b02e3a
Garden path made of concrete do-it-yourself with a chain link photo
 Another way to make the concrete track stronger is to fill the netting with concrete in the concrete. Concrete track reinforcement provide it with durability and better coverage. The author of this workshop used a building mesh with large meshes for a concrete path.
The mixture for such a track is made with crushed stone in the following proportions:
- 1 part cement
- 1 part crushed stone
- 3 parts of sand
The author advises using a vibrorail to level the concrete track. However, if such a device is not in use, you can make a flat board. It is set across the workpiece and slowly moved, making transverse movements. For an ideal result, about 3-4 passes are needed.
Using reinforcement concrete track It will become durable and will serve many times longer. It is especially important to add reinforcement if the path is used not only for walking.


https://i.expert-h.com/en/dorozhki/sadovye-iz-betona#sigFreeIda1dd4516c0
Concrete garden path materials: how to choose cement and sand
One of the main secrets of a good solution for a garden path is to choose the right materials for this. First of all, you need to buy high-quality cement, which is suitable for construction in all properties.
What are cement brands:
Alumina cement. It is heat resistant and waterproof, and is most often used in industrial construction.
Portland cement. It has several grades, with which you can determine the quality, strength and drying speed of cement.
- M500-M600 is the most durable cement
- M300-M-400 - cement, which is most often used in construction
- M200 and below is the lowest-quality cement; it is not worth using it for garden paths.
Also, cement has additional classifications that the seller in the store will definitely tell you. For example, B - quick-drying, PC DO - cement without additives.
Now let's move on to the sand. Preferably sand was river, clean and dry. In addition, experienced craftsmen advise choosing sand with medium grains, since too small ones will absorb water, and too large ones will roughen the solution.
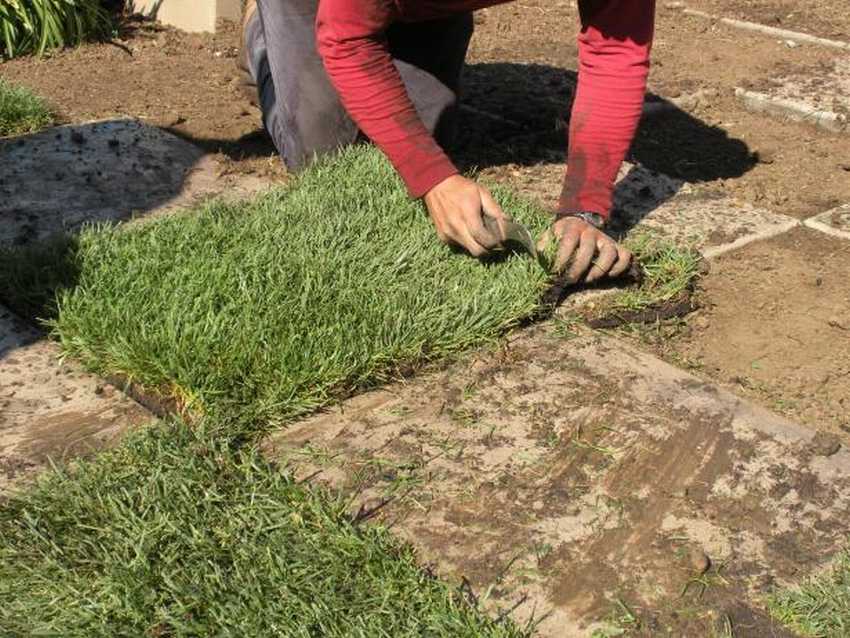
DIY garden path made of concrete blocks
 A very interesting and easy way to do DIY garden path - use lattice concrete blocks for this. The author of this workshop did not know where to adapt the concrete blocks remaining after construction and decided to make a garden path out of them.
As a result, he got a very creative and unusual garden path that fits perfectly into any design and will appeal to any homeowner.
The “recipe” for creating this track is extremely simple - you need to remove the sod, lay the lattice concrete blocks and fill the voids with sod.
Cells can be planted with lawn grass or beautiful ornamental plants.
Such an interesting path will be a great decoration for your garden!


https://i.expert-h.com/en/dorozhki/sadovye-iz-betona#sigFreeIdfd55416a4f
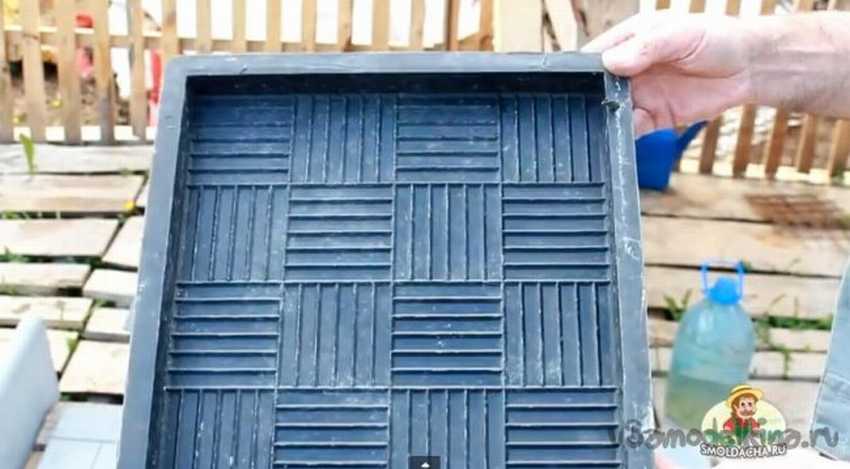
DIY concrete path in the form of paving slabs
 Many owners of a personal plot like paving slabs, but there is not always an opportunity to get a real paving stone. A concrete solution is used to help, which, with the help of a mold, turns into everything that the master wishes. Such a track will be slightly inferior in quality as a store tile, because vibration compression is used there. But for walkways in the garden, this option is great!
Form to create concrete walkway can be purchased at any store. It is worth noting that the form in this case should dry out, so it is better to purchase a large number of forms at once in order to improve performance.
The author advises that before filling the mold, grease it with oil and fill only half. Then put reinforcement in the concrete (piece of iron, rod or mesh) and add the rest of the solution.
It is better to remove the resulting plate from the mold only after 2-3 days. In general, concrete dries completely within 28 days.
Such an imitation of the sidewalk will appeal to everyone who does not like simple solutions in their area!


https://i.expert-h.com/en/dorozhki/sadovye-iz-betona#sigFreeIde50db4d7b9
DIY garden path from concrete slabs photo step by step
 Another very popular option of garden paths for summer residents and homeowners is made of concrete slabs. The author did itstep-by-step master class, when he faced the task of making tracks in the country with minimal loss to the budget. And he succeeded - the concrete path was made with scanty expenses!
The author of this detailed instruction used these materials:
- cement mortar
- used oil
- boards
The construction of such concrete track very simple - you just need to make forms for wood slabs and fill them with a solution.
The author advises to process wooden forms before pouring with used oil, so that cement lags behind the form more easily.
This great idea is suitable for all gardeners who want to make a budget version of a concrete slab garden path on their site. In addition, when creating such a track, time is significantly saved - on a medium-length path it will take only a day!


https://i.expert-h.com/en/dorozhki/sadovye-iz-betona#sigFreeId5eb3a0697f
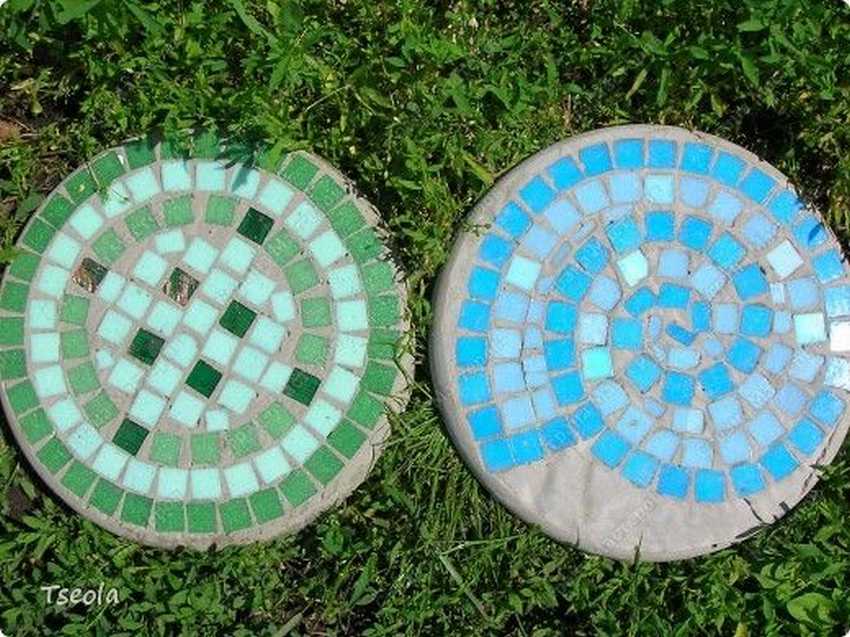
DIY do-it-yourself garden path: step by step mosaic
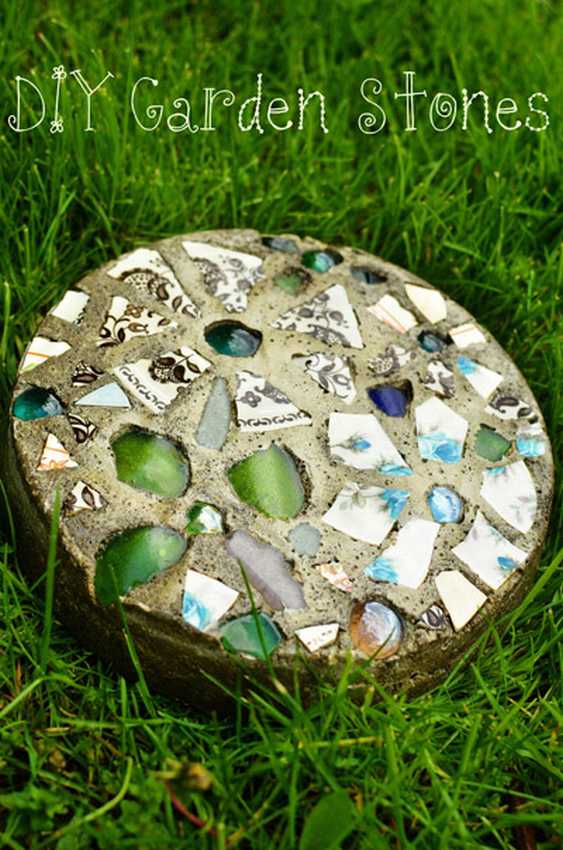 For those who do not like simple and boring options, we have prepared a terrific step-by-step master class on creating a unique and unique step-by-step path with our own hands! It is not difficult to make such beauty, but at the same time, no one in the area will definitely have such an amazing path. Such DIY turn-based concrete walkway made by a very skilled craftswoman and shared her project online. Now, thanks to her detailed instructions, anyone can create such a miracle! And most importantly, to make such a path, you do not need to interfere with concrete or make efforts all day. It’s enough to dream a little, and then you will get a unique masterpiece that will give odds to any store tile!
So, to create a concrete track with a mosaic she needed:
- non-stick baking tray (any shape, preferably round)
- petroleum jelly
- adhesive paper
- old plates
- pebbles and unnecessary jewelry
- glass
- concrete
- reinforcement mesh
The author described in step-by-step instructions all stages of the work. At the end of the work, the master advised to cover the finished parts with varnish. Then we lay the step-by-step plates as in the previous master classes.
Here is such an option concrete walkway will appeal to those who love a creative approach in everything!


https://i.expert-h.com/en/dorozhki/sadovye-iz-betona#sigFreeId9abf085ca6
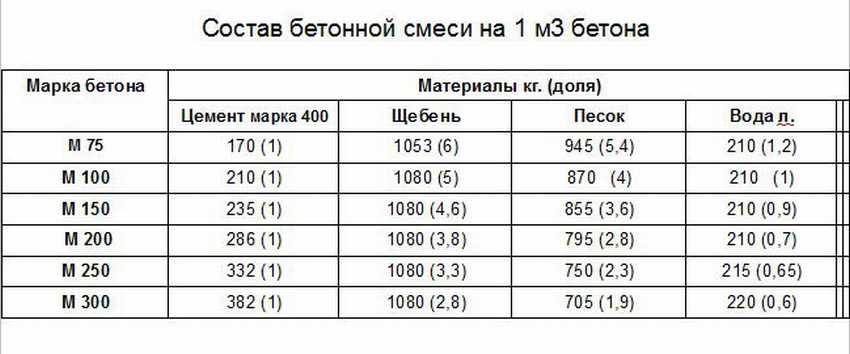
Concrete mortar for a garden path: proportions, how to make it right
Since concrete is the main ingredient in the tracks in this article, everything depends on the correct preparation. The solution for the concrete garden path must be of the right consistency and quality.
How to choose sand and cement, we have already learned. Now let's talk about recipes for the preparation of concrete mortar. The recipe, ingredients and consistency of the concrete mortar depends on the path you choose, usually the masters specify which mortar to mix. But still, there are several most commonly used recipes for the preparation of concrete mortar:
- 1 part cement + 3 parts sand + water to the desired consistency
- 1 part cement + 3 parts sand + 3 parts crushed stone + water
- 1 part cement + 2 parts sand + 2 parts crushed stone + water
You can also add dye to the solution per 25 kg of cement, 250 grams of dye or modern products such as plasticizer.
It is better to knead the concrete solution in a wide bowl, for lack of a concrete mixer. Experienced craftsmen advise to fill the ingredients in containers in thin layers alternately to make it easier to interfere.
That's all the secrets of preparing the right concrete mortar for garden paths!
Do-it-yourself paving slabs from concrete a master class
 Paving slabs are the most popular garden path option. However, paving slabs are not the cheapest pleasure, so many craftsmen prefer to find an alternative to an expensive option. The author of this workshop found this method and made paving tiles on his own.
To make such a tile, you do not need to be a builder with great experience. The author of this step-by-step instruction described all the stages of work in great detail, so there will be no problems with creating this track. So, to create paving slabs will be required:
- molds for tiles (30 * 30 * 3)
- cement M500
- sand
- gravel
- mold oil
Through detailed step by step instructions make filling forms and leave them to dry. The master, to improve the quality of the tiles, made a vibrating table with his own hands. Such devices are used in industrial production, and make the tile much stronger and stronger. In the same way as tiles, the author advises making borders, so that the look of your garden path is harmonious and complete.
With the help of simple devices and precise instructions, paving slabs from concrete are easy to make at home. After making the tile, it is laid according to the standard scheme, on a sand pillow.


https://i.expert-h.com/en/dorozhki/sadovye-iz-betona#sigFreeId838f92d673
DIY concrete walkway with stencil
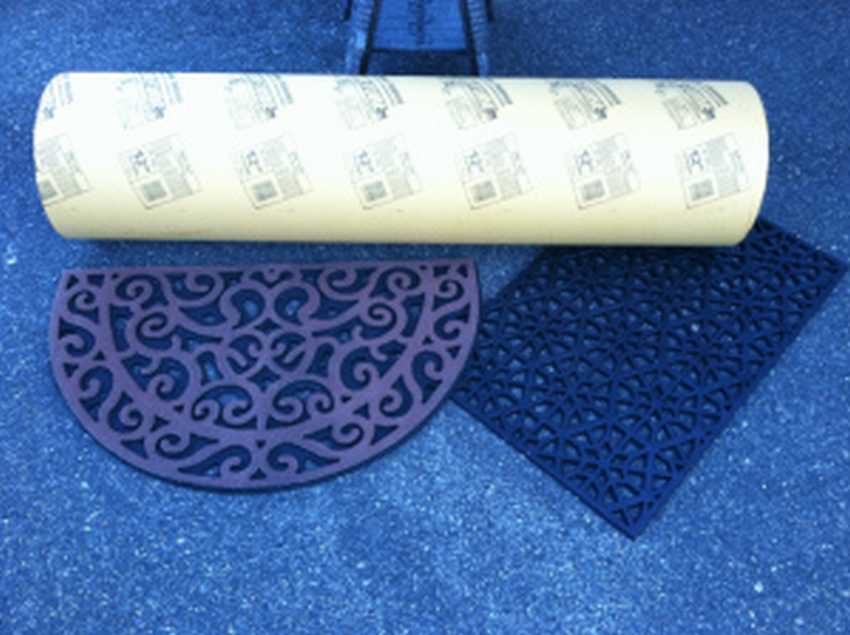 We already know how to perfectly make simple concrete tracks, now it’s time to talk about interesting landscape solutions. For example, DIY concrete track can be done using a stencil - then you will get an unusual step-by-step path.
The author of this creative master class used the following materials to create such a track:
- concrete mortar
- cardboard tube of the required diameter
- rubber mat with a pattern
- butter
- chalk pencil
- flat board covered with plastic wrap
When creating these concrete blocks, it should be borne in mind that the stencil must be laid on concrete 45 minutes after pouring. The oiled stencil should be gently pressed with a cloth so that it fits snugly against the concrete.
The author also advises not to remove the blocks from the mold for 48 hours to give concrete the opportunity to completely dry.
Such screen step walkway will become an adornment of any site!


https://i.expert-h.com/en/dorozhki/sadovye-iz-betona#sigFreeId532ed62183
DIY garden path made of lace concrete slabs
 Gray concrete slabs are boring! The author of this master class improved the usual material and created a unique track with her own hands using a lace napkin. Such a path will become the main highlight of your garden and will delight you with its gentle appearance. Looking at this track, you won’t say that it is made of ordinary concrete!
To create a unique concrete garden path would need:
- concrete slabs (you can buy in a store or do it yourself)
- lace doily (vinyl)
- spray
- piece of cardboard
- brush
The author advises not to use real lace napkins, but to buy vinyl or silicone in the store. Such napkins can be bought at any department store. In addition, the master prepared a surprise - she covered her concrete slabs with luminous paint, so with the onset of darkness they begin to glow! Such an idea will appeal to any owner of a suburban or personal plot!


https://i.expert-h.com/en/dorozhki/sadovye-iz-betona#sigFreeIdad79f5d6ab
Step-by-step garden path made of concrete "Leaves" workshop
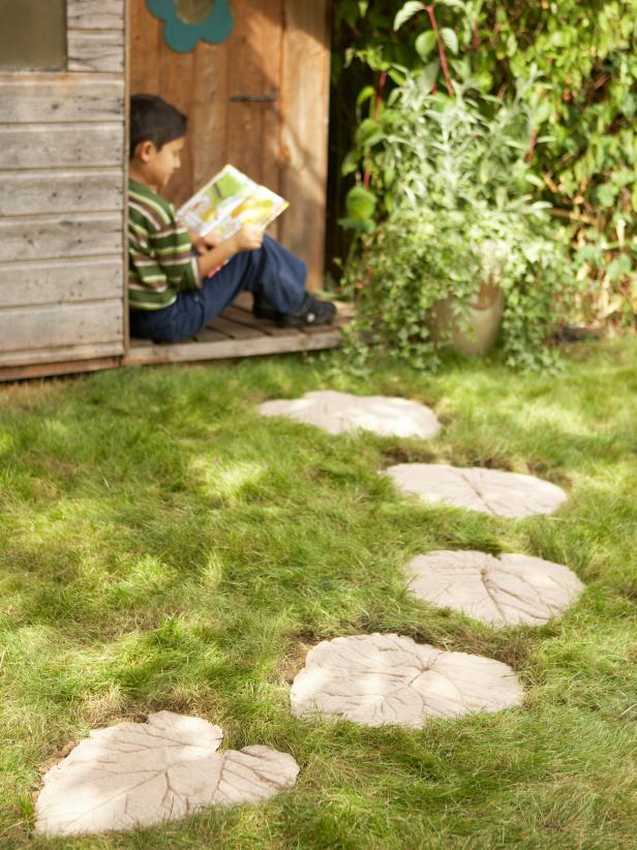 Especially popular concrete tracks in the form of leaves. It is easy to make such a step-by-step concrete path, and any, even the most boring, garden will decorate its unusual appearance.
Concrete walkway in the form of burdock leaves can be done in two ways. In principle, they are not very different from each other, the result is the same, and the process is approximately the same.
In the first way the concrete block itself is cast on a sheet, then the texture is printed with the smallest details. It is important to lay a burdock leaf with convex veins up.
After drying the concrete sheet, it is laid in the usual way, on a sand cushion.
In the second method concrete is immediately poured into the place of the track, then a sheet is printed on it, and the veins are worked out with a stick. To give greater texture, a piece of burlap can be printed on concrete.
As you can see, the materials and results of these workshops are almost the same, but the stages of work are slightly different. We advise you to choose the one that is more to your liking!
First way:


https://i.expert-h.com/en/dorozhki/sadovye-iz-betona#sigFreeId9c3ca14b6f
The second way:


https://i.expert-h.com/en/dorozhki/sadovye-iz-betona#sigFreeId64dc7427e7
Plasticizer in concrete: needed or not, how to do it yourself
In the modern world there is a huge variety of the latest materials for construction, which significantly improve quality and durability. These materials include plasticizers, which are often added to concrete mortar by experienced craftsmen. Why do we need a plasticizer, and is it possible to do it yourself?
Plasticizer - an additive to concrete, which improves its ductility, increases resistance to mechanical stress and temperature extremes. Plasticizer significantly improves the quality of concrete, so it is often used for internal work. There are different directions of plasticizers, for example, for preparing a non-freezing solution in winter or for pouring underfloor heating. And there are universal plasticizers, but they all differ in expensive price.
The chemical composition of the plasticizer is kept secret, but experienced craftsmen have found a more economical way out of this situation. As homemade plasticizers, these materials have long been used:
- Slaked lime. It is added to the solution 1: 8, which increases the alkalinity of the solution and makes the mass plastic. However, the strength when adding lime is slightly impaired.
- Detergent, laundry soap or laundry detergent.
- Liquid glass or silicate glue.
- PVA (polyvinyl acetate)
All these tools can significantly improve the ductility of concrete and increase its frost resistance when working in sub-zero temperatures. However, the masters note that the concrete strength is somewhat reduced.
Experienced builders are advised to add plasticizer only if necessary - for example, when working in winter or to create a textured plaster.
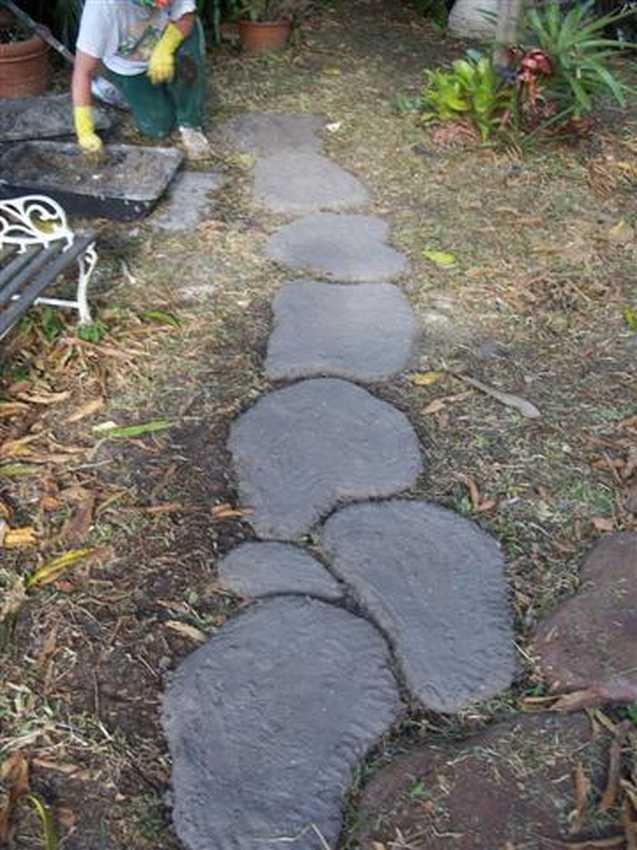
DIY concrete walkway in the form of steps
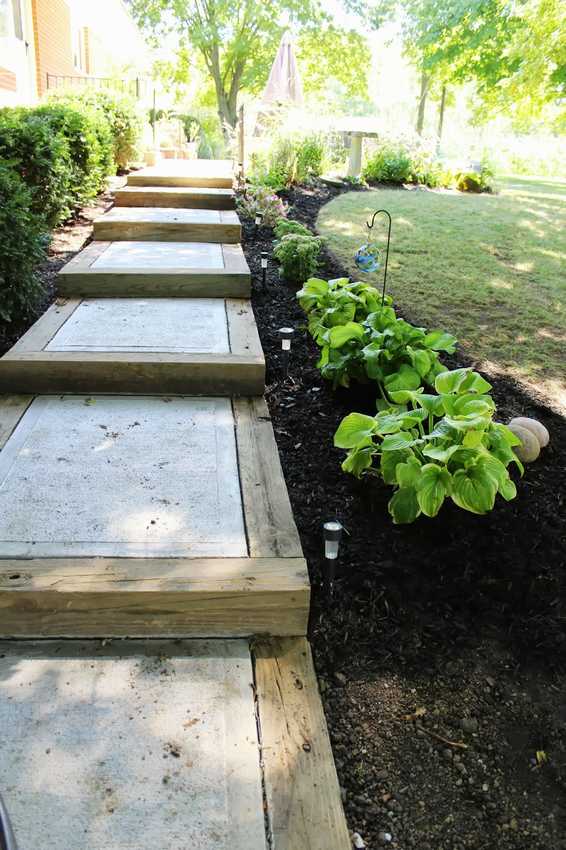 The terrain for the future path is not always flat - often there are lowlands and hills on the site, which greatly complicate the decisions for landscape design. Khoyaev of this house faced such a problem - the path to the garage on their site was located just on the slope. For several years they suffered, slipping in the mud, but then an ingenious decision came to their mind! They did do-it-yourself concrete and wood walkway.
In this detailed master class, they told how they did DIY concrete walkway to the house. It turned out to be quite simple, and to create the track it took only available materials and a little effort.
This path is perfect for anyone with a house located on a hilly area. This landscape course perfectly solves the problem of gentle slopes and sloping paths.
The author advises using metal brackets to connect wooden blocks, the more the better. This will provide a secure fit and improve track durability. In addition, it is better to drill holes in the tree and insert iron rods into them - such reinforcement will make your track very durable!


https://i.expert-h.com/en/dorozhki/sadovye-iz-betona#sigFreeId81a1622213
DIY do-it-yourself concrete garden path
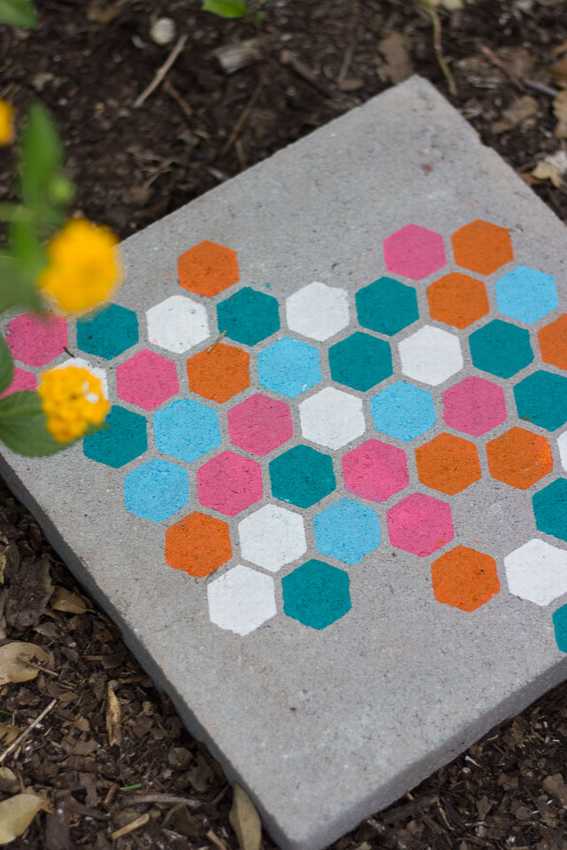 However, concrete slabs can be decorated not only with mosaics, but, for example, apply bright stencils on them. This method is perfect for walkways designed for rare use. You can also paint step-by-step paths - then they will be bright and colorful.
The author of this workshop was decorated with a stencil concrete slabs for your step track. is heand applied a bright pattern to the concrete using a pre-prepared stencil. With the help of such plates, she introduced a naughty particle into her landscape design and made it brighter and more colorful.
For creating painted concrete slabs she needed:
- stencil (the author chose "Honeycombs", but you can do any)
- weatherproof acrylic paints
- brush
- Scotch
- concrete blocks
With these simple materials, she turned her garden paths into a real work of art!


https://i.expert-h.com/en/dorozhki/sadovye-iz-betona#sigFreeId87fc1f1494
Step-by-step concrete garden path with shells workshop
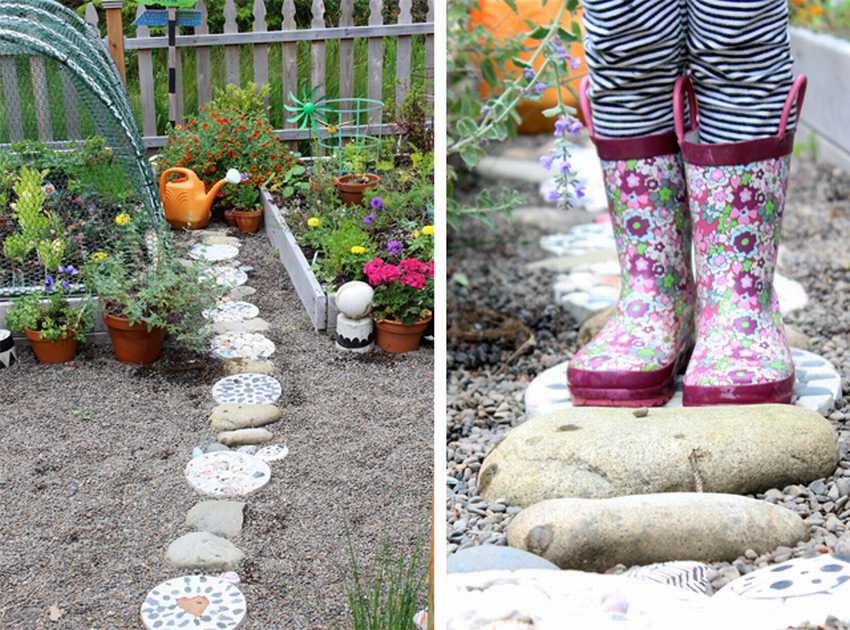 This workshop was created by Alice Burke with her daughter Andy. Mom and daughter decided to decorate their garden and created a very creative do-it-yourself step-by-step concrete path.
Girls used natural materials for this master class - shells, stones, pebbles. They collected material for garden paths with the whole family and as a result they got a unique instruction for a joint handmade with children.
Alice did all the stages of work with her daughter, so if you don’t know what to do with your child during the summer holidays, make such a beautiful garden path with your own hands with him!
Alice and her family took just a couple of hours to create such a fabulous garden path. and now anyone can repeat their interesting idea thanks to easy step by step instructions.


https://i.expert-h.com/en/dorozhki/sadovye-iz-betona#sigFreeId55b736d712
DIY stone and concrete garden path photo step by step
 It is very beautiful to combine concrete mortar with various natural materials, for example, with river pebbles. The author of this master class connected two components at once - pebbles and concrete. It turned out an excellent mosaic, which will decorate any site with its unusual appearance.
For creating concrete slabs with pebbles you will need the simplest materials:
- sand
- cement
- pebbles
- wooden boards
From the boards you need to make a form for the plates, in which pebbles will be laid out. Then all this is poured with concrete mortar and dried. to make the mold easier to take out, it is better to grease the boards with used oil.
In this way, you can make the right amount of slabs for your garden path.
After complete drying, the resulting boards can be laid in the usual way.
Such a beautiful path will delight you for many years, because concrete + pebbles will make the slabs very durable and wear-resistant.


https://i.expert-h.com/en/dorozhki/sadovye-iz-betona#sigFreeId5345293b4e
Painting a garden path: how to paint concrete
The inexpressive gray color of concrete is often not very popular with owners of suburban areas. Therefore, many masters paint concrete pavementto get the color you need for your garden path. There are several ways to paint concrete, and now we will tell you about them.
So, concrete can be painted by adding pigment to the solution at the kneading stage. This method is very popular because it has many advantages. The painted concrete mortar will not lose its color even after a long time, it will not be erased and will not fade in the sun. The only drawback of this coloring is that it will take a lot of pigment to get a deep and saturated color, and at a cost it will come out pretty well. This method is used in the manufacture of paving slabs, borders, monolithic blocks, which accordingly increases the price of the product, and improves quality and durability. For painting in this way on the construction market there is a wide range of pigment - in the form of powder, microcapsules, emulsions or pastes.
Another popular way is to paint an already finished concrete edition. Most often, a deep-penetrating compound with a pigment is used for painting concrete. Such coloring occurs as wood treatment with protective impregnations. The composition penetrates deeper into the concrete and the pigment is retained for longer and not erased. As the basis for the pigment, you can use a colorless base for facade paints, penetrating varnishes, etc.
You can also simply paint the concrete surface with nitro, alkyd or acrylic paint.
Masters do not recommend using oil paint when painting concrete, as it clogs pores, and concrete does not "breathe."
Having carefully studied all the ways of painting concrete with our own hands, we came to the conclusion that the first method is durable, but expensive, and the second is affordable, but will not last long.
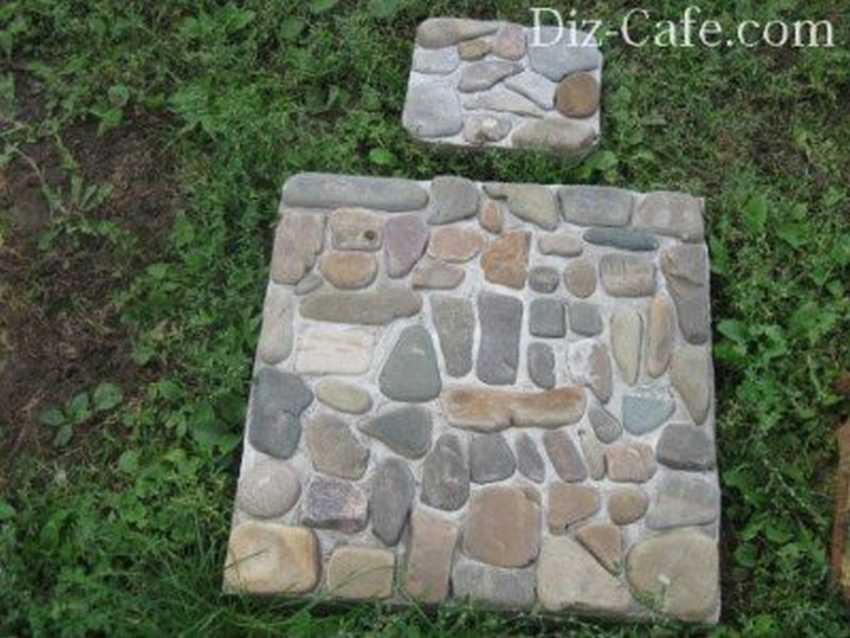
Garden path made of concrete do-it-yourself imitation of stones
 A path made of large stones looks very impressive, but natural stone is quite expensive, so many craftsmen prefer to find a cheaper replacement for it. And concrete mortar copes with this very well - with its help it turns out perfectly to imitate natural stone.
The author of this workshop also dreamed of a path made of natural stones, and found a great way out of this situation. He made a pretty concrete path and painted it like stone. This project was made in just a couple of days, besides, the author needed very few materials to create this track with his own hands - only cement, sand and paint.
Another plus do-it-yourself concrete track in the form of stones - concrete does not need a holeto lash or fill in forms. On the contrary, the uneven surface of concrete will just imitate natural stone.
The master simply made the foundation, laid out the concrete mortar and allowed it to dry thoroughly. Then, using several colors, he painted the resulting concrete stones as natural.
he turned out great DIY concrete path in the form of natural stone!


https://i.expert-h.com/en/dorozhki/sadovye-iz-betona#sigFreeId864f17a0af
DIY Chess Concrete Garden Path
 Surely each of us at least once in my life saw an interesting concrete and lawn chess and dreamed of the same in his infield. Now do not dream - with the help of this step-by-step master class, you can make such a path yourself without any extra effort.
Garden Path "Chess" can be done in any free space in different forms - both a large platform and a narrow path. To create a concrete chess track, you will need simple materials accessible to everyone - boards, concrete, sand, turf.
First you need to make a base for the track from the boards, as in the photo. Then, alternating, pour concrete and allow it to dry properly.
After that, we lay a lawn or fall asleep turf with seeds of lawn grass.
A chess track will become an adornment of any garden!


https://i.expert-h.com/en/dorozhki/sadovye-iz-betona#sigFreeId4652003382
DIY concrete walkway
 Another simple master class on creating a concrete track made this family. They wanted to build a comfortable walkway from the back entrance to the house so that it could withstand moderate loads and was not very bulky.
For such tasks, an ordinary concrete mortar track is perfect without any frills. It’s easiest to make such a track on your own in less than a day. In addition, it will fit perfectly into any landscape design, because its conciseness and simplicity will be harmoniously combined with anything.
With this step-by-step instruction, a concrete track is easy to make even for the most inexperienced master!


https://i.expert-h.com/en/dorozhki/sadovye-iz-betona#sigFreeId6604ae3cac
Concrete garden path with glass pattern master class
 Any owner of a suburban or personal plot wants to make it unusual, special. Garden paths play a large role in landscape design, because it was they who were the first to catch the eye.
The next master class is great for these purposes. It tells you how to make DIY garden path with glass pattern. You can use a variety of colors and shapes of glass parts, you can lay out an interesting pattern or drawing.
Using the instructions, we make blanks and fill them with concrete mortar. After complete drying, concrete blocks can be laid in any way on their site.
A concrete path with a mosaic will be the highlight of any garden, and will delight you with its unique look for many years!


https://i.expert-h.com/en/dorozhki/sadovye-iz-betona#sigFreeId5e7e2286de
DIY concrete track drawings


https://i.expert-h.com/en/dorozhki/sadovye-iz-betona#sigFreeId118666ca55
In this article, you learned almost all the options for concrete garden paths that are possible. Detailed workshops and instructions help you make your dream garden path in the shortest possible time and with a minimum of effort. A gallery with 500 photos paths will give you inspiration for future construction!
Gallery 500 photos


https://i.expert-h.com/en/dorozhki/sadovye-iz-betona#sigFreeIde830f81b13