Do-it-yourself firewood maker 300 photos, step by step instructions
 firewood for the fireplace photo
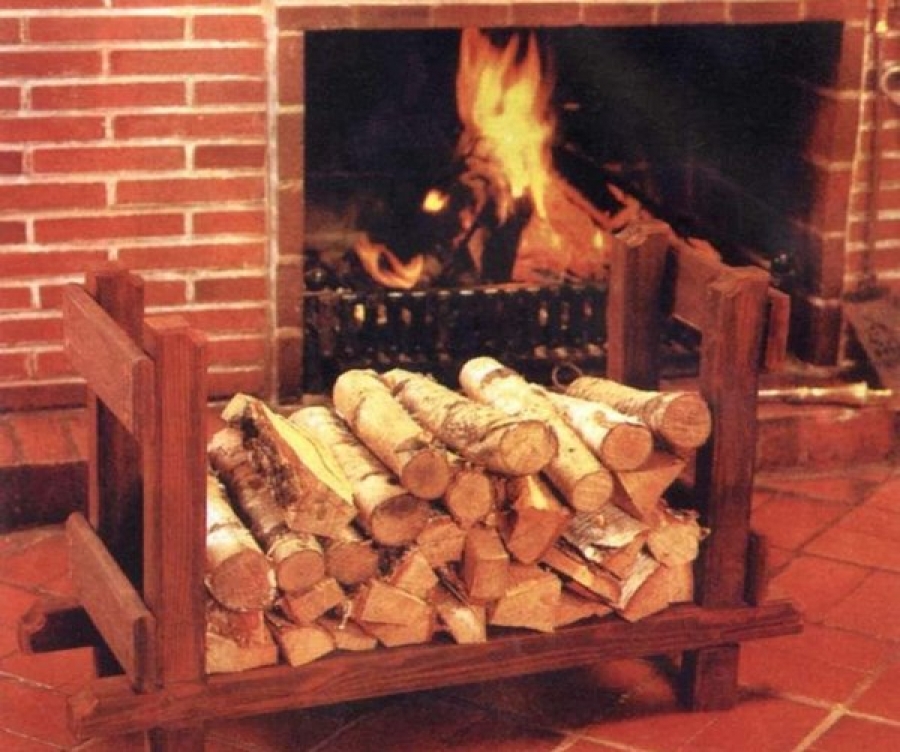
What could be better than spending a winter evening by the fireplace? The flame will warm with natural warmth, and the cozy crackling of logs will add comfort and create a unique atmosphere. The only problem is that at some point you will have to go outside for firewood. And most likely, they will need to be dried first, so it is much more convenient to have a supply of firewood on hand to last at least for the evening.
There is an exit - make a woodcutter for a fireplace with your own hands, It is not so difficult. Of course, there are two options: buy or do it yourself. You can see the prices of accessories for fireplaces in the catalogs of online stores, after which most likely stop at the second option. Now think about what you need - a stationary stand for firewood or a portable one, and, of course, how it will be combined with the overall design of the room. Here are homemade firewood for fireplaces and stoves. There are interesting ideas for racks from water pipes and simple wooden structures, and no complicated projects, everyone can do all of them with their own hands.
How to make a woodcutter for a fireplace
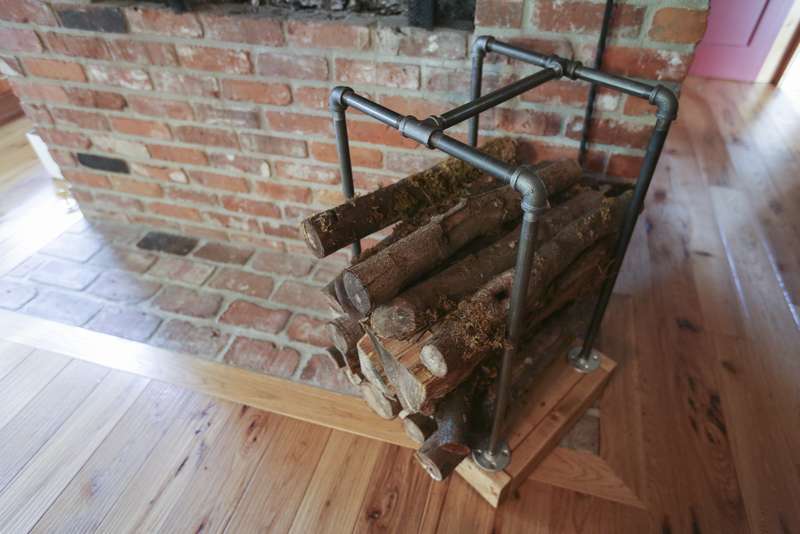
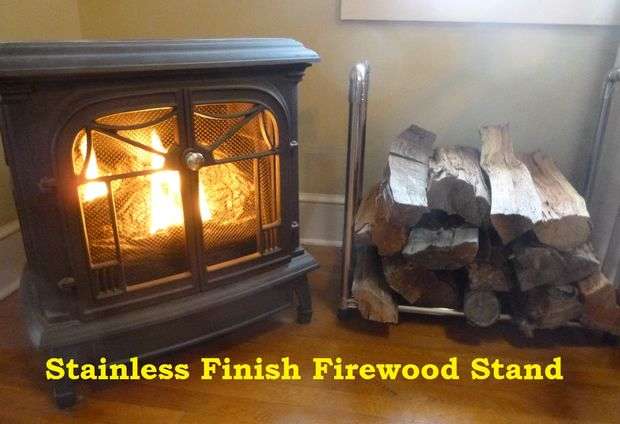 Home, comfort, relaxation, romance - usually all this people associate with a fireplace. True today this is not the most optimal way of heating, but no boiler can create a cozy atmosphere in the house. Accessories for the fireplace - firewood, poker, scoop, carrying for firewood - play an equally important aesthetic role. We’ll talk about them, in particular, how to make a woodcutter for a fireplace with your own hands. The metal structure presented here was made by the author in just half an hour. All you need to do is cut off the tube and secure a few fittings. therefore the only tool you need - 5 mm Allen key for fastening bolts at the joints.
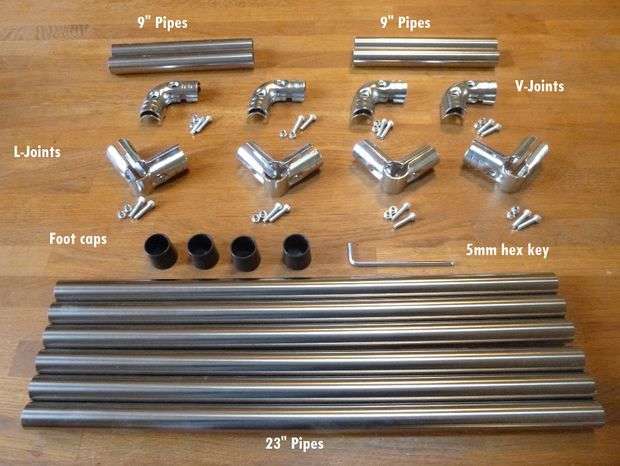 Parts List:
- 4 tubes of 23 cm; 6 tubes of 60 cm
- 4 V-shaped connectors
- 4 L-shaped connectors
- 4 leg joints
Assembly order
- Slide the foot caps and assemble the L-joints
- Caps for legs simply press on the pipes, so use four 60 cm pipes as vertical legs.
- Then assemble the L-connections with 25 mm bolts
- Mount L-joints on legs and assemble frame
- Then slide them down the legs until they hit the caps, and then connect the frame with two pipes of 23 cm and two of 60 cm.
- Make sure that the pipes are tightly clamped and tighten with a hex wrench.
- Establish V-shaped connections. To do this, attach the halves of the v-joints for all 4 joints and fix the 23 cm pipe to the frame. Tighten with a hex wrench. Assemble the stand.
Now you have a solid stand for firewood by the fireplace. I hope you enjoyed it!


https://i.expert-h.com/en/obustrojstvo/drovnitsa-dlya-kamina-svoimi-rukami#sigFreeId52d75571a8
Rack for firewood
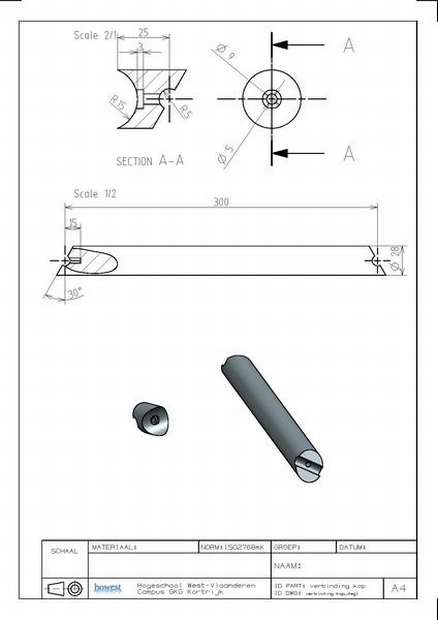
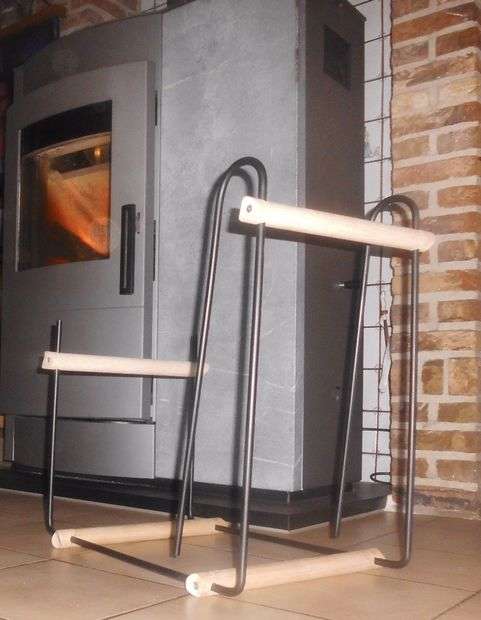 This stand for firewood Designed for indoor use. Small logs stacked on top of each other in a closed arc part of the rack. The big advantage is that the wood stand can be folded, for example, in the summer when it is not necessary. When folded, it takes up very little space, so it will not clutter up the garage or closet. The bolts can be easily unscrewed using an Allen key (8 hexagon head bolts M5 x 40 mm).
Manufacturing procedure.You need two metal rods 2 meters long (Ø 10 mm).
- 2 racks were bent using a bending machine, as shown in the figures. Cut off excess material with a saw.
- Punch holes on the tape with a punch, it is important that your drill does not slip when drilling holes.
- Drill 5.5 mm drill holes.
- Clean the metal parts and the color, the author used a black spray Ral 9005 Matte.
- Hang the grate on a rope or something else to make it easier to paint.
- Make 4 round wooden handles (Ø 25 mm) with a length of 35 cm. Use a rasp to round the ends of all parts.
- Now it's time to drill holes to install the racks. For this you need a drill Ø 11 mm.
- Drill holes for the bolts that will hold the parts together.To do this, use a Ø 4.5 mm drill so that you can then make a screw thread inside the holes.

 By connecting the parts together, you will notice that the holes are not as smooth as before because you removed the material. Make them round. Then sand the surface. If you want the bolts to be recessed, use a thick drill to drill 3 mm deep holes on the sides. To make wood carvings, use a screw head drill (M5) in the holes that you made on the sides. The holes were drilled with a smaller size (Ø 4.5 mm) so that the threads inside the hole could be cut.
Now you can use 8 bolts to connect all the parts. (8 recessed hex bolts M5 x 40 mm)


https://i.expert-h.com/en/obustrojstvo/drovnitsa-dlya-kamina-svoimi-rukami#sigFreeId3f76c25a1f
How to make a stand for firewood from water pipes
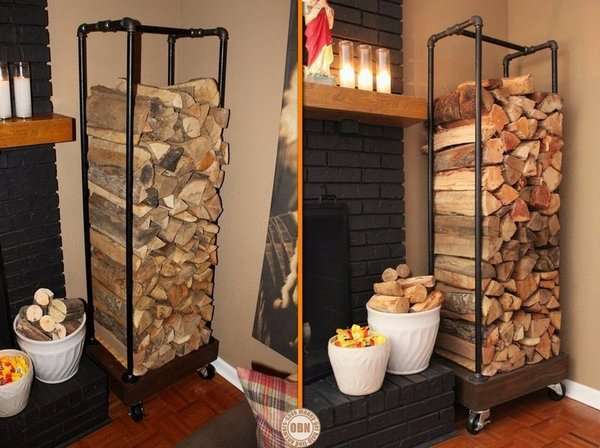 Want a beautiful firewood stand? You may like the design proposed by the author, which can be done in a couple of hours. The idea is taken from the catalog, of course, there is a large selection, but the price is not suitable for everyone. Why spend money when it's realmake a stand for firewood with your own hands, from materials that you might not even need to buy. you can use lumber residues and old water pipes, almost no costs, but look what happened beautiful fireplace rack, and even on wheels, very convenient.
Materials:
- wooden blocks;
- plywood
- nails
- reinforced wheels
- wood screws
- black paint
- spray
¾ "water pipes:
- 4pcs "150 cm long
- 4 pcs "12 cm long
- 1 pc length 45 cm
- 4 pcs turn signals 90 °
- 2 pcs T fitting,
- 4 pcs flange
Tools:
- Sander
- a circular saw
- hammer
- drill
How to make a stand for firewood from water pipesLook at the step by step photos.


https://i.expert-h.com/en/obustrojstvo/drovnitsa-dlya-kamina-svoimi-rukami#sigFreeId51891a9b31
Pipe fire stand
 Presented project - fireplace stand for fireplaceA perfect gift for those who like industrial decor. According to Kirsten Dunn, the author of this project, such a stand, if you have all the necessary materials, can be assembled in just 2 hours. And if you make a small roof using the upper crossbar, even just pulling a tarp, you get a good option outdoor firewood stands. The presence of wheels makes it possible to easily move the rack around the house and, if necessary, roll out onto the street, that is, you will mobile fireplace mantel.
Materials
- boards and bars
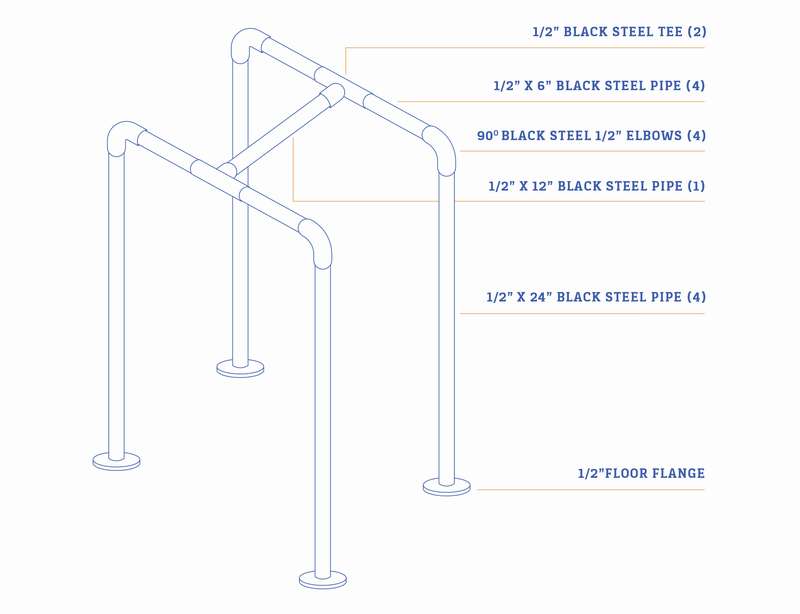
- 4 - ½ Black steel pipe 60 cm
- 1 - ½ Black steel pipe 30 cm
- 4 - ½ Black steel pipe 15 cm
- 4 - Turning 90 °
- 2 - ½ "black steel tee
- 4 - Floor flange
- 4 clips (optional)
Tools:
- saw
- roulette
- electric drill
- rags
- disposable gloves
Step 1: Saw wood parts
Cut seven pieces 36 cm long, two parts 51 cm long. And one part 44 cm long.
Step 2: Sand the surfaces of all parts
Step 3: Dry all the parts together, cut as needed to fit all the parts tightly. Here's how you should position the shapes together:
- A segment of 44 cm, this will be the lower support beam in the middle of the five upper parts of 36 cm.
- The four remaining parts (two pieces of 36 cm and two 51 cm) will hold the five upper parts.
Step 4. Using a straight edge, draw a line through the middle of the top five boards. This will be the mark for drilling. Make sure the bottom is under this line.
Step 5: Drill holes
- Begin pre-drilling along the line by making two holes in each board.
- Secure with 2½ in. Screws.
- Turn the boards upside down and place a frame around the middle boards.
- Pre-drill and secure the shorter sides of the frame with four 2½-inch screws.
- Install the longer parts of the frame by pre-drilling a total of nine screw holes in each: two ends of each perpendicular frame element and one in each in the middle of the board. This must be done so that the middle boards do not stagger.
Step 6: Coat with wood oil or varnish, which is more like it.
Step 7: Screw the wheels. This is not necessary if you are not going to move the stand for firewood, just for convenience. The wheels are mounted on the bottom of the rack to do this, turn the stand over, mark the holes for the screws with a pencil. Make sure the wheels are far enough from the sides so that they can rotate freely. Drill a holeTia and tighten the wheels with screws.
 Step 8: Prepare the pipes. Water or gas pipes are usually coated with grease, so wear disposable gloves. Remove the plastic caps and any stickers from the pipes. Wipe the pipes with a damp cloth and Barkeeper Friend. Wipe clean pipes with a fresh, damp cloth
.Step 9: Assemble the pipes. Simply connect all pipe parts to turn signals and T-fittings, as well as flanges separately from the wooden base. Scheme in the photo on the right.
Step 10: That's all. It remains to load the rack with firewood and enjoy the new woodcutter for the fireplace.


https://i.expert-h.com/en/obustrojstvo/drovnitsa-dlya-kamina-svoimi-rukami#sigFreeId634b19aca3
The cart for firewood
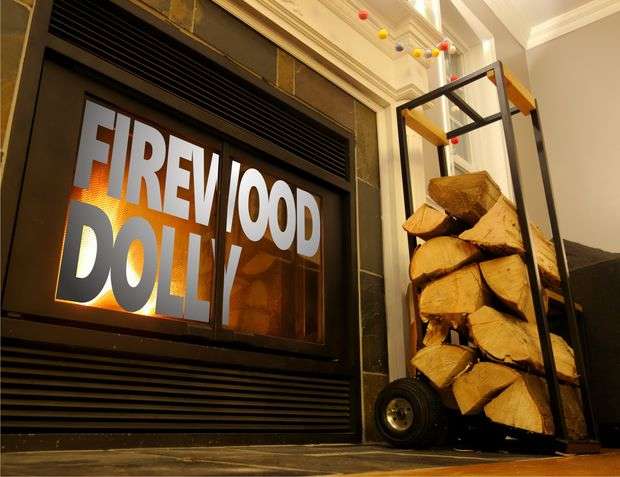 If you have a wood-burning fireplace, you are likely to perform several actions: pick up firewood in the yard, put it in a wheelbarrow, and drive it into the house. Transfer firewood from a wheelbarrow to an internal rack and already from them throw them into a fireplace. It is very inefficient and constantly annoying. Therefore, half the action can be reduced if you do home do-it-yourself firewood cart. The version of the wood-mounted rack on wheels presented here contains design elements, which makes it presentable enough to put in the living room; so the trolley is used to transport firewood and store them near the fireplace. The stand is made of a square profile and painted “wood-like”. It rolls perfectly and makes the fireplace insertion process much easier.
The design of the firewood cart will depend on the wheelsthat you plan to use. You will also need the following items:
- 5 x 3/4 inches square pipes of 1.2 m
- 1 x 1.2 m square pipe
- 1 x bar 5 x 5 cm long meter
- 4 x 10 cm nails and several five-centimeter
Tools:
- Hacksaw
- Welding machine
- Angle grinder
- Sandpaper
- Hand saw for wood
- Metal plate
- Drill
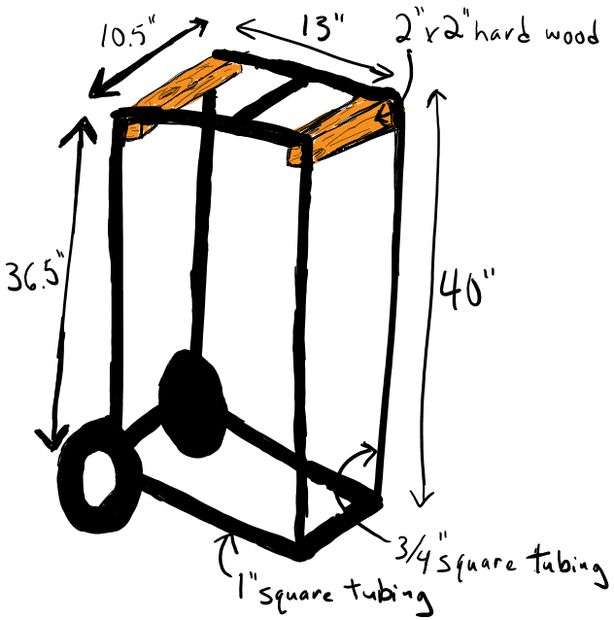 Step 1: Cut metal parts. In the manufacture of this design will have to do a lot of angular cuts. Most angles are 45 °, with the exception of the base of two arcs that attach to a rectangular frame. The author decided to first assemble the base rectangle and attach the wheels before trying to figure out what angles are needed for the racks. When deciding on the wheels, draw a diagram to determine the angles between the floor (horizontal, like the top of the arch) and the frame (on which the arches will be fastened). Then cut the metal parts according to the dimensions in your drawing.
Step 2: Welding and grinding
Weld four 10 cm nails in the corners of the arch that will hold the wooden handles, as well as two nails in a rectangle near the wheels.
Step 3: Attach wheels
Weld two nuts on each side. Before welding, tighten the bolt so that the holes match.
Step 4: Make wooden pens
Make several identical square pens. Their total length should match the width of the main rectangle (25 cm). Sand and varnish.
Step 5: Assembly
Assembly order is very important:
- Weld a rectangular frame;
- Weld arches and corner nails;
- Drive arches into the grooves at the same time and very carefully. Better ask someone to help to keep your feet on weight. Do not worry if the wooden squares are not completely pressed to the corners, this can be corrected later.
- Roll up the arches on the frame;
- Clamp the stand upside down in a vice to put the upper cross bar in place;
- Tighten the vise until the wooden rods are glued to the two arches, if the crossbeam is too long, loosen the vise, saw off and try again.
- Using a piece of wood and a hammer, gently tap so that the squares are pinched in the corners;
- Weld the cross member into place.
Step 7:Painting
Before starting to clean and paint metal parts, it is necessary to protect wooden surfaces. The author used the newspaper and masking tape to cover the tree, very carefully covering the gaps around the squares. Use thin sandpaper and then dust off with a damp cloth.Hang the frame to the ceiling, if you can, to get to all surfaces. For painting, the author used black matte paint to hide the welds.


https://i.expert-h.com/en/obustrojstvo/drovnitsa-dlya-kamina-svoimi-rukami#sigFreeId960c6a88ee
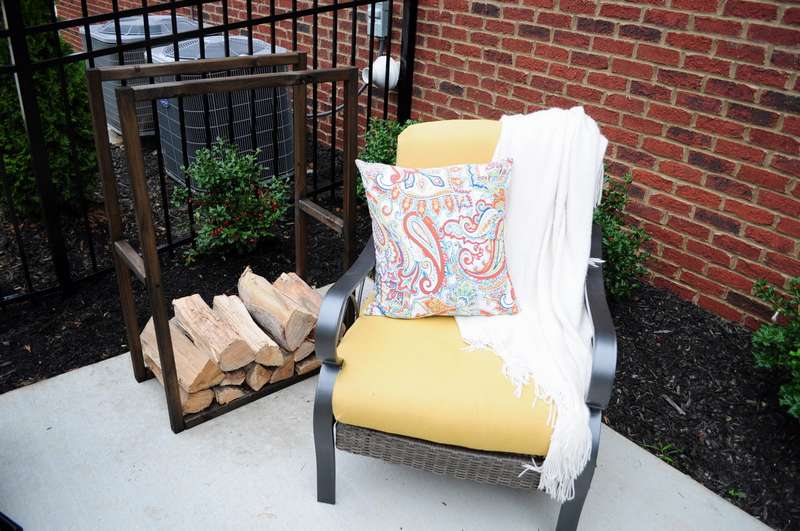
Fireplace stand by the fireplace
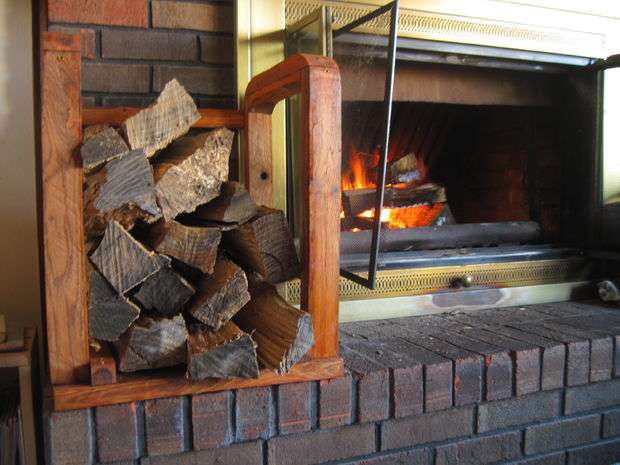 A great option made of wood stands for firewood by the fireplace. It can be easy to modify for various sizes and shapes of hearth. The author made this construction from raw firewood, as they say “from scratch”, but if you don’t have all the necessary tools, you can just buy the necessary size bars, I don’t think it will be very expensive.
I won’t rewrite the detailed instructions, step-by-step photographs are quite enough, but if you are interested, you can read it on the site, the link is under the gallery.
If briefly:
- First step, cut the necessary details.
- The second stage is long and tedious: grinding. After all the boards are cut off, it is necessary to sand them from all sides until they become smooth. This process, although long, is necessary. Despite the fact that the rack is designed for firewood, it is necessary that it looks and resembles furniture.
- Then saw two 30 cm boards at the top of the brackets, round the edges
- Assemble the frames. Apply glue, squeezing it on the board, then wipe it over the entire surface with your hand (the photo shows how to do this). After the bars are glued, you need to clamp them together. Then glue the two levers on both sides of the curved board, let it dry all night. When dry, smooth the corners. Then fasten with screws. It is advisable to drill the holes in advance so that the part does not suddenly crack.
- Assembly. Just twist the frames together. Connect the base plates (boards D and E). Again, the holes are best done in advance. Then screw the brackets onto the frames and install the back panel.
- Painting. To paint or varnish is up to you. High-quality paint with polyurethane will look good, but the glossy coating will quickly wear off from wood, so you can choose a simpler coating.
Now you have a wonderful stand for firewood by the fireplace, which, I hope, will serve you for many years.


https://i.expert-h.com/en/obustrojstvo/drovnitsa-dlya-kamina-svoimi-rukami#sigFreeId01c2573d67
Fireplace stand for fireplace
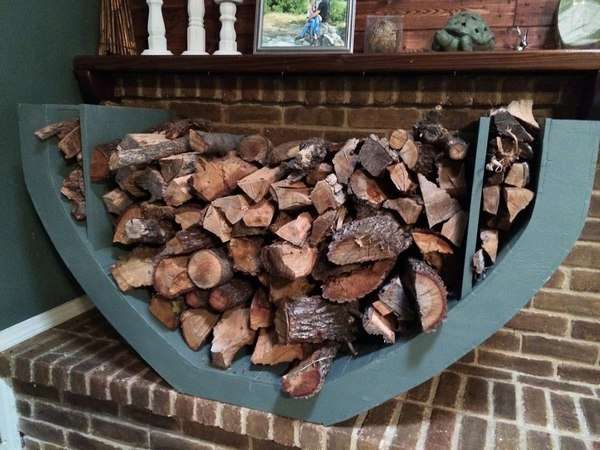 Such original stand for firewood on the mantelpiece in the shape of a bowl, with two partitions and side drawers. The author developed the stand design completely on his own, although there are similar designs on the Internet that are only made of forged parts. Of course, if you want to do the same do-it-yourself firewood stand, the dimensions will have to be adjusted. The author has a fireplace shelf with a width of 1.5 m and a height of 90 cm, so the stand is respectively 1.40 m wide, 76 cm high and 48 cm deep. Although, if you want to keep the dimensions, it is not necessary to put it on the shelf, there will probably be a place and by the fireplace. The manufacturing process is shown in step-by-step photos. The whole difficulty is to make the right measurements and cut the curved lines. I will not rewrite the instructions here, if you are interested in the idea, you can read it on the site, there is a video of the process. Link under the gallery.


https://i.expert-h.com/en/obustrojstvo/drovnitsa-dlya-kamina-svoimi-rukami#sigFreeId01e7074ea2
Wood fireplace
 If you need conventional wood standthen easier than represented in the photo, you won’t come up with anything. All you need is basic carpentry skills. The stand is lightweight, can be transported without problems, so it can be used both at home and on the street. Construction dimensions: height meter, width 70 cm, depth 35 cm. For firewood, just what you need. Assembly is very simple. Prepare the bars, drill holes for the screws. Then screw in the 2-inch screws that make up the frame shown in the illustration. Wipe all parts and allow to dry. Pokraste a rack for firewood.


https://i.expert-h.com/en/obustrojstvo/drovnitsa-dlya-kamina-svoimi-rukami#sigFreeIdceb7e408c6
DIY Firewood Carrier
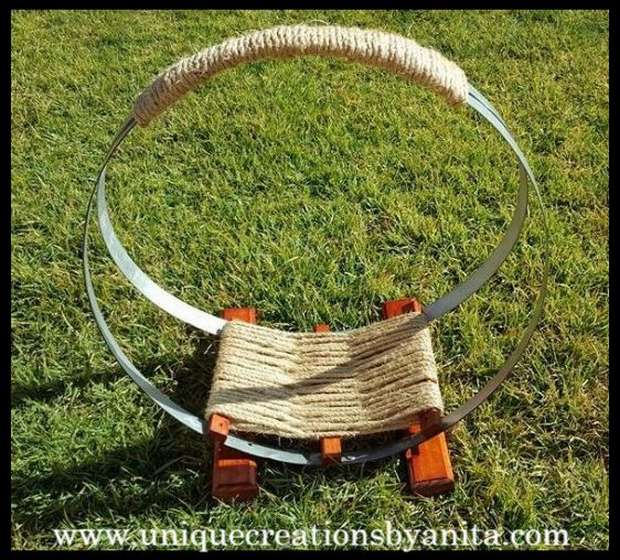 If you find several metal bands from wine barrels, you can easily remake them into carrying for firewood.
What do you need:
- 2 barrels
- 3 short bars
- 2 wooden legs
- 5 meter rope
- Wood varnish
- Big needle and fishing line
- clamp
- bit
Frame assembly.
- Sand the strip to remove the edges.
- Use a clip that will hold the stripes together.
- Saw wooden blocks, screw them to metal strips to support the logs.
- Use a chisel to remove the section so that the strips fit better. But keep in mind that ranges can be of different sizes, so you need to carefully measure everything.
- Color and polish all parts. Take a paint suitable for the metal and spray inside and outside the strips.
- Use a large needle and fishing line to secure the ends of the rope.
- Pull the rope around the three supports and secure with a fishing line.
Put down firewood and evaluate your work. Now you have a unique stand for firewood, which will look great next to your fireplace.


https://i.expert-h.com/en/obustrojstvo/drovnitsa-dlya-kamina-svoimi-rukami#sigFreeId5cd46a8d75
Willow Firewood Carrier
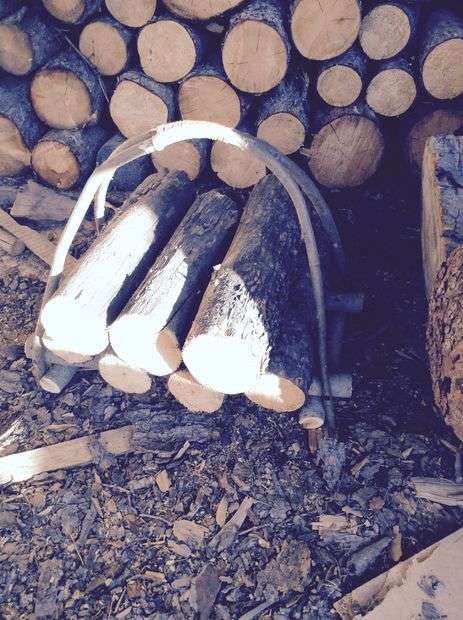 Carrying wood for the stove, one at a time, is a waste of time. Of course, a good option is to make a cart, but it is difficult, and you can not do without costs. The author offers a very simple device for carrying firewood from willow rods. Each literally can do such a piece in an hour, if there are materials. And they need a little, just a few green willow twigs of different sizes: two 1.20 m, two 60 cm and two 25 cm. Well, and another 2 - 3 meters of nylon rope.
- First, cut 2 green twigs of willow 1.2 and a thickness of ¾ inch at the thick end, and then a large two-meter rod thicker, about 2 centimeters in diameter.
- Cut it into 4 pieces, two of 25 cm and two of 60 cm.
- Gently bend and tighten 60 cm of the rods so that they form an arch with half a circle.
- Before assembling the main part, drill a 60 cm rod from both ends.
- Connect sections approximately 5 cm at both ends using drywall screws.
- To make an arch, simply gently bend the long parts into an arc. Insert the ends into the corners of the base. Then wrap the top with a rope, as shown in the photo, this will be the handle.


https://i.expert-h.com/en/obustrojstvo/drovnitsa-dlya-kamina-svoimi-rukami#sigFreeIdec845bb306
Bag for carrying firewood
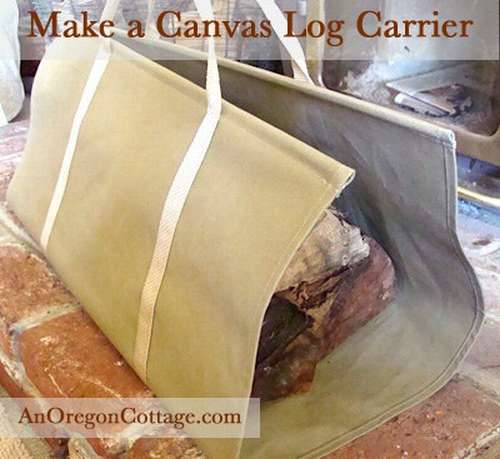 Here is another good option, firewood carrying bag. It is very convenient in the sense that, unlike the above devices, it practically does not take up space, the bag, it is the bag, can be put anywhere. Of course, it’s not enough for a long time, firewood is all the same, but stitching such a thing is not difficult, you can immediately dozens, in reserve.
How to sew a bag for firewoodshown in step-by-step photographs, and although there are sixteen of them, this does not mean that it is difficult to carry. For someone who knows how to use a sewing machine, an hour of work.
In general, buy 1.5 meters of dense material, a tarpaulin belt of 3 meters and two blanks for wooden handles.
- Cut the matter into two. You should get two pieces of 90 and 60 cm.
- Make pockets for pens by folding the long side and pressing with a hot iron, and then wrap another half centimeter to cover the raw edge. Sew closer to the inner edge of the hem, remembering to stick at the beginning and end to fix the stitch.
- Sew pockets for pens by wrapping blanks with fabric. Then remove the handle and secure the crease.
- Mark on the material where the belt will be located. Start from the middle, as shown in the figure, so that the seam is at the bottom of the bag. Leave about 15 cm from the top edge to the middle of the handle. If you need a long pen, add a few centimeters.
- Check that the straps on both sides are sewn evenly, otherwise the bag will be skewed.
- Sew the fabric starting from the upper side, and then sew the transverse jumper directly below it or over the upper edge seam (to leave the pocket free for the handle). Repeat this for the other side.
- Sew part of the handle, starting about 3 cm from where you sewed the handle on the bag, and fold the fabric in half inward.
- Last step, saw off the blanks for pens to the length so that they fit inside the pocket.
Do not worry, if the view is not very aesthetic, it should not be beautiful, but should be convenient! Insert the finished pens and you're done.


https://i.expert-h.com/en/obustrojstvo/drovnitsa-dlya-kamina-svoimi-rukami#sigFreeId8f5ebed230
Firewood carrying devices photo


https://i.expert-h.com/en/obustrojstvo/drovnitsa-dlya-kamina-svoimi-rukami#sigFreeId9cf07d8436
Firewood for the fireplace 100 photos


https://i.expert-h.com/en/obustrojstvo/drovnitsa-dlya-kamina-svoimi-rukami#sigFreeIdbf6ca3202c
Hello, I am the author of this article, so I look forward to asking questions for this article in the comments below, I will answer all !!!
If you have questions on another topic, ask them on our forum, we will answer you
- Two baskets of paper in 5 minutes (Master class)
- How to make a simple and compact table for a milling cutter from plywood
- How to make a soft headboard tile (Instructions + step by step photos)
- Cinder block benches: a convenient bench in 55 minutes
- How to make a bed with a niche: saving space (Master class)