Do-it-yourself drovnitsa for giving 500 photos, step-by-step instructions
 firewood for giving a photo
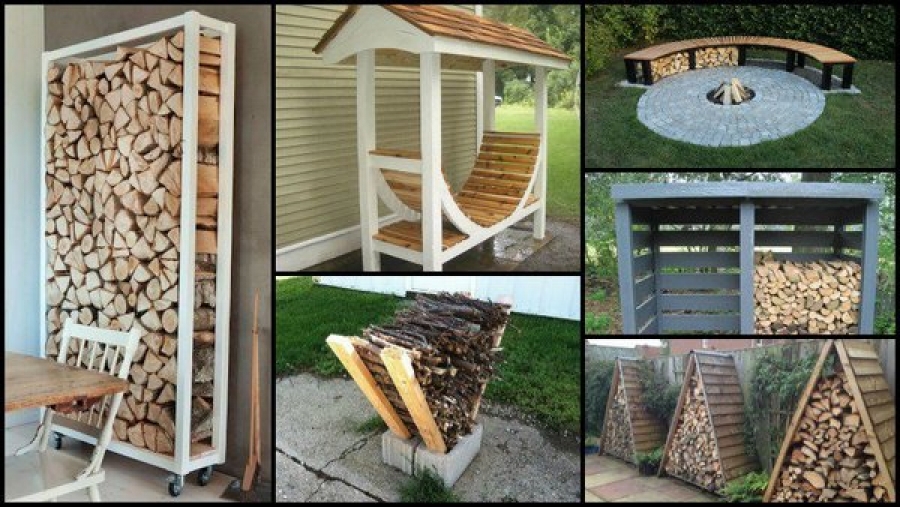
If you use a stove or fireplace in the country, you need to store firewood somewhere. In this article you can find out how to make a woodcutter for a summer residence with your own hands, get acquainted with the types of designs and manufacturing methods. There are two options: on the one hand, you can build a firewood shed that protects from rain and snow, but will require certain costs or use a simple alternative and make a wooden firewood rack.
Regardless of the choice, you will need to determine the size of the design according to your needs. From the options presented here, you can choose which is best for your site.
How to make a woodcutter in the country with your own hands
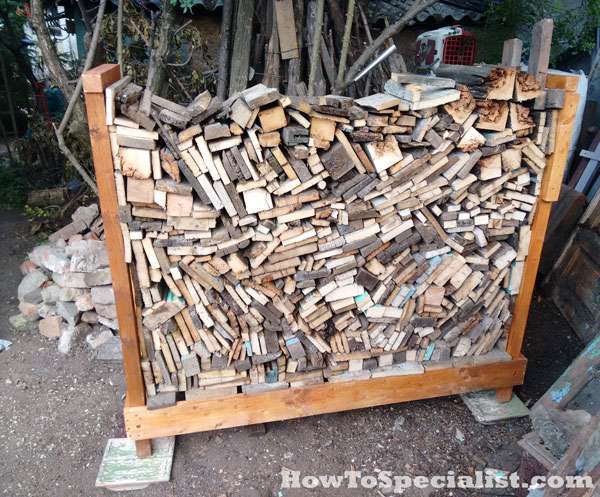
 If you do not know how to make a woodcutter in the country, then perhaps this option is just what you need. Functional and affordable rack for storing firewood - a great way to properly store firewood in the countryso that there was no need to constantly go to the barn for an armful of firewood. A properly designed firewood should be durable and ensure proper air circulation. If you have ordinary carpentry tools and several processed 2x4 boards, you can do this without any special expenses do-it-yourself woodcutter literally in an hour.
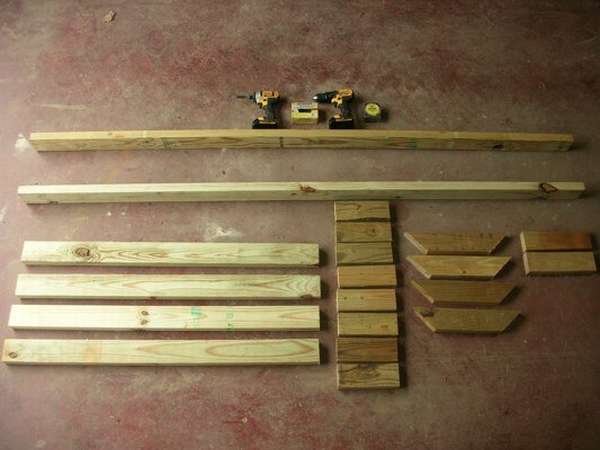 In the photo on the right, all the materials you need. Dimensions are not indicated, you yourself can determine them according to your needs. The assembly order is not complicated, everything is clearly visible in the photo. If you need more detailed instructions, a link to the source site is under the gallery. The stand is light enough, two people can effortlessly transfer it to any place, and a thoughtful design makes the structure very durable. Firewood makes it possible to store firewood near the house, saving time and energy.
I hope you enjoyed it.


https://i.expert-h.com/en/obustrojstvo/drovnitsa-dlya-dachi-svoimi-rukami-500-foto#sigFreeId69e06ad0aa
Here is another one simple stand for firewood with dimensions, only the frame mount is a little different.
 A few step-by-step photos on how to make it


https://i.expert-h.com/en/obustrojstvo/drovnitsa-dlya-dachi-svoimi-rukami-500-foto#sigFreeIddd2159fd19
How to make a simple stand for firewood
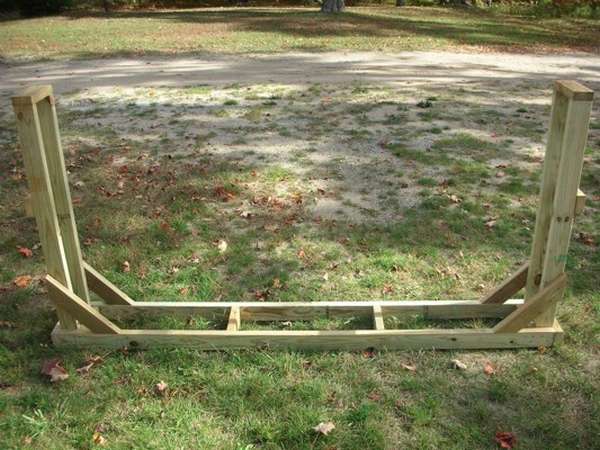
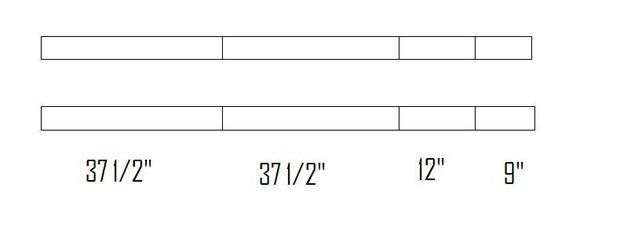
 If you need simple and cheap firewood in the country, then such a design, which can be assembled in a couple of hours, is probably suitable. To save time, it is better to calculate all sizes in advance, if the ones shown in the drawing are suitable, then, of course, it's easier. If this is your first project, ask someone to help you. Old boards are also suitable for this design, but still make sure they are in good condition, as the components will be exposed to bad weather, and you don’t want the rack to fall apart in one season, so be sure to process and paint the wood. If you want the construction to be solid, add waterproof glue in connection. You can adjust the size of the rack and add a few crosswise brackets if you will store a lot of firewood.
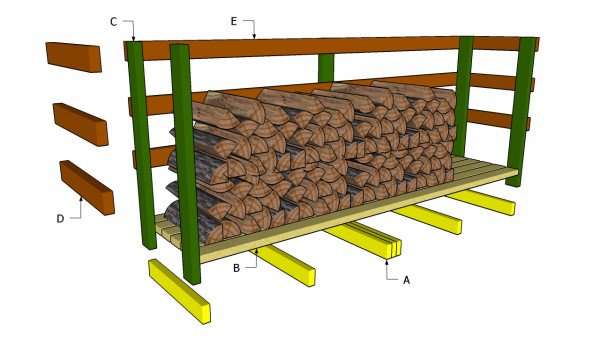
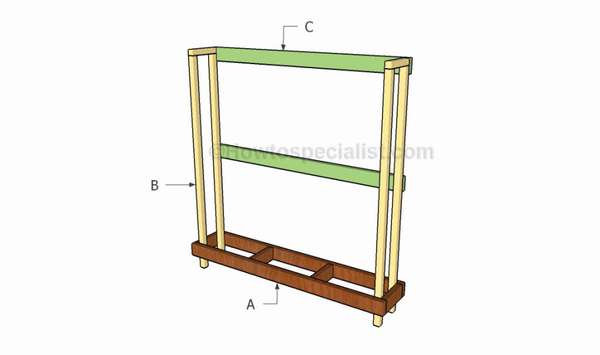 Materials for the rack on the diagram.
- A - 2 long boards of 150 cm and 4 short boards of 34 cm. For the lower frame
- B - 4 long bars of 150 cm and 2 short bars of 34 cm for side racks.
- C - 2 boards of 145 cm each.
Tools
- end saw
- jigsaw
- roulette,
- level,
- carpentry pencil
- drill and drill
First of all, you need to assemble the frame. Cut to the size of the board, drill through holes through the beams and tighten the screws into the middle supports. Saw off the bars of the required sizes, these will be the side racks. Attach them to the frame, drill through holes through the beams and screw them to the uprights. Fasten the upper crossbars in the same way. Then screw the bars to the back of the rack.


https://i.expert-h.com/en/obustrojstvo/drovnitsa-dlya-dachi-svoimi-rukami-500-foto#sigFreeIdfc9bab2e42
Metal firewood for cottages
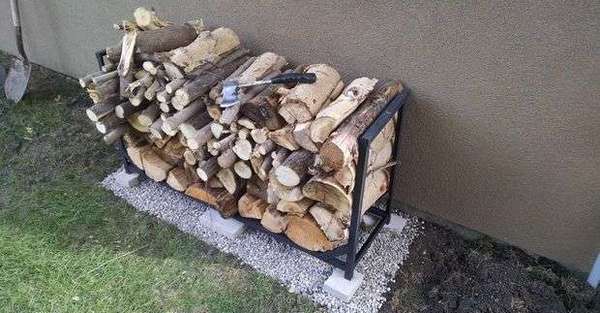 Here is an example how to make a woodcutter for a summer house from aluminum profiles. The assembly time of the structure is about 3 hours. Start by planning. The author wanted the rack to be unobtrusive, but strong, and fit nicely into the interior of the backyard. The aluminum part is 2.5 m long, therefore, the design of the firewood in the yard was developed with a view to minimizing material costs.
Material List:
(1) x 2.5 m aluminum profile
(2) x 2.5m aluminum bracket
(1) a small package of screws
(1) matte black paint
Tool list:
- angle grinder
- roulette
- level (optional)
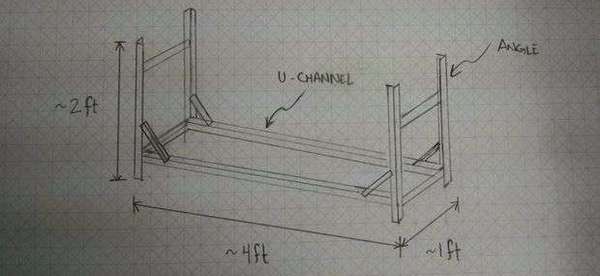
Step 1: Training. Cut the aluminum profile in half. Then cut one of the L-brackets into four sections of 60 cm. These will be the vertical posts. Cut the second L-bracket into four parts of 30 cm, four brackets of 15 cm and support legs of 5 cm.
Step 2: Assembly. Start assembling the side supports.
- The upper part of the horizontal L-shaped bracket will be 5 cm from the bottom of the vertical support. To fasten both parts with self-tapping screws, align them together and drill the first part.
- Make a mark on the bottom bar, and then drill a hole at that mark. Now you should have a hole in each part, aligned with each other, and you will not need to constantly change the drill.
- It is more convenient to work if you hold the lower part in a vice, then you will not need to hold the upper part.
- Once the side supports are assembled, connect them with pieces of aluminum profile.
- Attach the support legs.
- Finally, attach the support brackets at a 45-degree angle to the uprights.
- Paint the wood stand black matte paint.
- Prepare a stand area. Remove the sod and pour a pillow of gravel. Once the paint has dried, install a stand and stack the firewood.
Good luck :)


https://i.expert-h.com/en/obustrojstvo/drovnitsa-dlya-dachi-svoimi-rukami-500-foto#sigFreeId67ffd8a5b1
Wooden firewood for garden
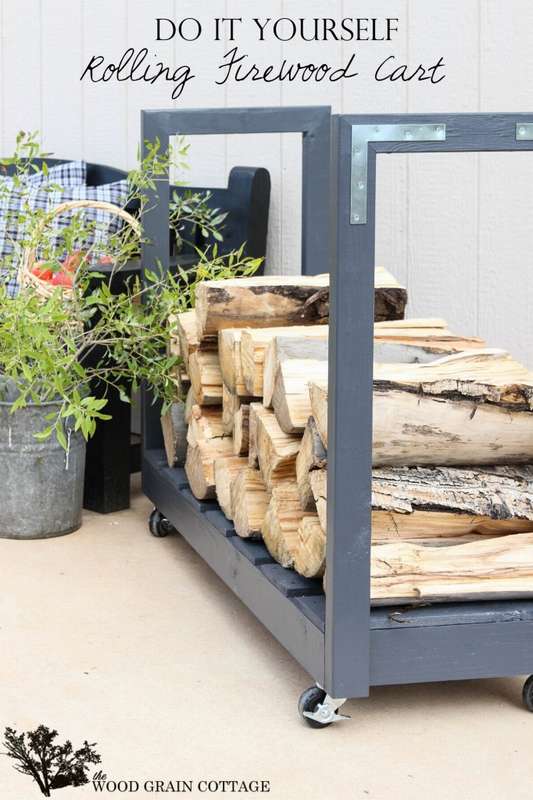 Mobile stand for firewood, it is very convenient. If you liked the author wooden firewood for garden, then do it yourself is not at all difficult. Firstly, it is necessary to determine the size of the base, in this example it is 120 x46cm. Clamps were used to assemble the base to hold the ends together. Then you need to add the block to which the wheels will be screwed. Then make side racks and attach them to the base. Install the slats on the bottom. Pokrasta firewood. Something like that, in short. However, you can read more detailed instructions on the website.
Consumables:
- Boards cut to size
- Rack bars
- Saw
- Countersink screwdriver
- Drill
- Screws
- Clamps
- 4 wheels
- Roulette
- Paint brush
- 4 corner brackets


https://i.expert-h.com/en/obustrojstvo/drovnitsa-dlya-dachi-svoimi-rukami-500-foto#sigFreeIde159d01b50
Street drovnitsa for summer cottage
 Storage of firewood in the winter will not be a problem if you make firewood correctly for giving. One of the conditions is that the wood does not come into contact with the ground, then it will be in good condition. To make a firewood do-it-yourself, presented in the diagram, it is not necessary to buy new boards, in order to save can use old pallets. To protect firewood from rain and snow, cover the rack with tarpaulin, the air will air the firewood and keep it in good condition.
You will need boards:
A - 7 pieces of 60 cm
B - 6 pieces of 245 cm
C - 5 pieces per meter
D - 6 pieces of 60 cm for the side walls
E - 3 x 245 cm for the rear wall
- The first step is to dol. As shown in the drawing, nail the boards at regular intervals and secure with galvanized screws. It is advisable to make holes in advance so as not to split the boards.
- Install the uprights, you just need to fasten the boards for the racks to the frame with screws. Check their level so that everything is smooth, then it will be difficult to fix.
- Side walls do not need to be sheathed with plywood, although it is more beautiful. There should be good air circulation, and for strength it’s enough to nail a few longitudinal boards support.
- Cut out gratings the correct size with a miter saw and pre-drill at both ends before tightening the galvanized screws.
- At installing side walls use a tape measure, it’s hard to make an even construction by eye.
- Sand the edges with sandpaper.
- At the end, install the rear trims.
Although the firewood dacha performs a purely functional role, it will not hurt to take care of the appearance. Do not be too lazy to sand, paint, in short give an aesthetic appearance. Also, cover firewood with tarpaulin before rain.


https://i.expert-h.com/en/obustrojstvo/drovnitsa-dlya-dachi-svoimi-rukami-500-foto#sigFreeIdbba5340044
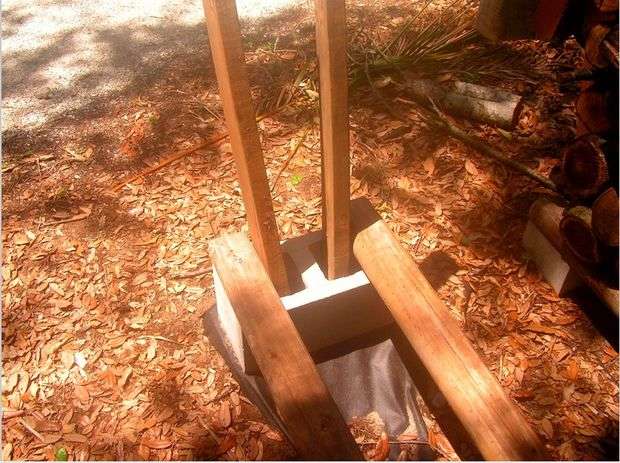 How to make a stand for firewood without tools
Everything ingenious is simple. You can use such a stand for many years, and nothing will happen to it for sure. Very strong, steady, easily dismantled design which can be assembled very quickly. The stand holds heavy, wet firewood without any problems.
What is necessary:
- 2 or 3 concrete blocks
- 2 thick bars
No special instructions are needed, the idea of the rack is clear, this can be seen in the photographs. Simply some tips from the author.
- install 2 concrete blocks on a flat surface, you can also 3 if you need support in the center;
- insert the racks from the bars into the holes in the blocks, after adding a little pebble there so that dirt does not accumulate;
- if the load on the racks is large, move them closer to each other;
- place the logs on the outer edges of the blocks.
The last photo shows double stand for firewoodwhere another block is added. In principle, you can put a lot more, judging by the comments, this is a very solid construction. Another advice from the author regarding storage. Cut a piece of tarpaulin 3 meters long to cover the logs, take a couple of bricks and tie a rope from one end to the other to keep the tarpaulin in the wind. The larger the firewood in the woodcutter, the stronger it is. The stand is high enough from the ground so that the leaves are blown away by the wind and do not accumulate under the wood. And most conveniently, the rack is very easy to rearrange.


https://i.expert-h.com/en/obustrojstvo/drovnitsa-dlya-dachi-svoimi-rukami-500-foto#sigFreeId607557cd47
Here is another similar version open rack for firewood. Everything here is also very simple.
- First you need to assemble the lower frame. Please note that both ends of the horizontal components must be cut at an angle of 75 °.
- Then drill through holes through the side boards and fasten them to the beam with screws.
- Assemble the side posts by trimming the lower edges at an angle of 75 °.
- Then drill through holes and fasten them on the sides with screws.
- Add glue to the seams and remove any residue from the surface with a damp cloth.
The last stage, the assembly of the rack for firewood. Leave a gap of 10 cm from the ground to the bottom frame. Drill through holes through the lower frame and tighten the screws. Check the level so that the bottom frame is horizontal. Install the legs of the rack on concrete slabs to protect them from moisture.


https://i.expert-h.com/en/obustrojstvo/drovnitsa-dlya-dachi-svoimi-rukami-500-foto#sigFreeId680014bc8c
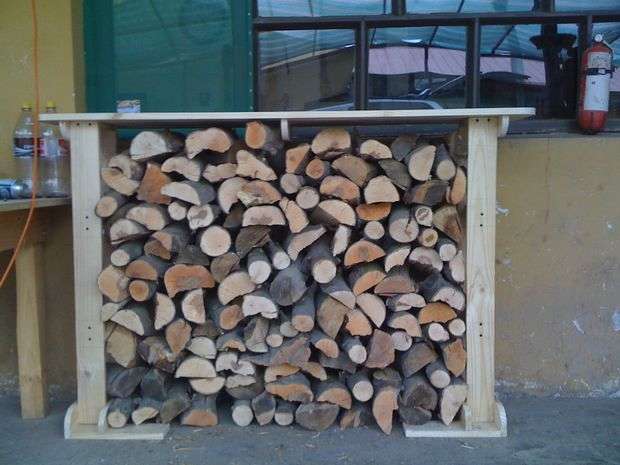 Drovnitsa do it yourself in the country
If your cottage has a stove or fireplace, then good wood stand always come in handy. The author offers a very simple design, which is easy to do with your own hands, without dimensions, so that you can make it according to your needs. How to assemble a rack, look at the step-by-step photos, I think there is no need for instructions here, so everything is clear. Just attach the legs to one of the largest rounded boards, then attach the second, narrowest part. You need to make two such racks. Connect the racks with the crossbars and screw the legs.


https://i.expert-h.com/en/obustrojstvo/drovnitsa-dlya-dachi-svoimi-rukami-500-foto#sigFreeIdc8539fbdc9
How to make a woodcutter in the country with your own hands
 Keep the wood dry. Here you can find out how to make a woodcutter in the country with your own hands from old pallets, boards and corrugated sheet for the roof. Pallets are used to base the structure so that the wood is not damp from the ground, remains dry and does not deteriorate. Before you start building, process the wood. The author proposes to do this in a natural way, using steel wool soaked in apple cider vinegar. A chemical reaction dissolves the steel coat, leaving a rich brown solution that perfectly impregnates woodwhen it dries. Please note that steel wool must be kept in solution for several weeks to achieve condition, so do this in advance. Use a sponge to apply the mixture to the wood.
- Construction begins with measurements and marking. Fencing must be cut into three parts to form the back and two side walls of the woods.
- To form two side walls, saw the top of the guard panel in half.
- The roof line on the side walls will be at an angle to ensure normal water flow.
- Measure 20 cm down from the top corners of the guard panel and make a mark on each side.
- Then measure 1.20 m inwards to mark the center point, and from this point, align a straight edge to connect the two points. Repeat the same on the other side.
- Then cut the fence along the marked lines. You must have one 2.50 x 1.80 m rectangle and two wall pieces.
- The design should "breathe", it is important for storing firewood in the open air. The clearance between the ground and the floor helps air circulation and keeps the wood dry. Pallets are ideally suited for this design, especially since getting them is not a problem.
- Place pallets near the place where your firewood boot is, because it will be heavy when you finish. For additional reinforcement, you can connect the two pallets together so that they sit on the same level and move as a unit.
- If you need to adjust the wall panels to fit the size of the pallet, cut the two high parts so that each side panel is as deep as the pallet. The three vertical guard panels will also be separated from the rear wall according to the width of the connected pallets.
- Define the rear wall so that the fencing plates are reinforced with a horizontal transverse bracket at one end. Muffle the loose ends flush with the board to provide additional support for the rear wall and roof.
- A simple structure with central brackets will be strong enough to support the weight of the corrugated roof. Make vertical supports for the roof line by measuring the distance from the top of the pallet to the top of the beam and secure with nails. Vertical supports will strengthen the structure and prevent the roof from bending under its own weight and snow.
- The board, previously installed on the upper part of the rear wall, serves as the third beam element that holds part of the weight of the roof. Although, in principle, the wall itself provides sufficient support.
- The cellulose fiber panels used by the author are sold in sheets of 1.20 x 2 m. Two sheets are enough to cover the width of the wood. The ridges should be located so that rainwater can easily drain down.
- Buy special roof fasteners with polycarbonate washers for installing corrugated roofs. Screw the screws on every second or third ridge span along each of the three ceiling beams.


https://i.expert-h.com/en/obustrojstvo/drovnitsa-dlya-dachi-svoimi-rukami-500-foto#sigFreeIddab6320a70
Do-it-yourself drovnitsa for summer cottage
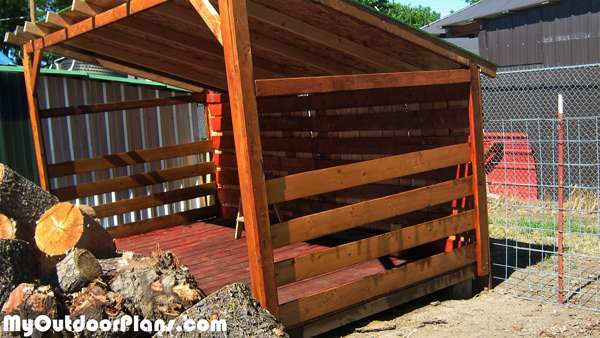
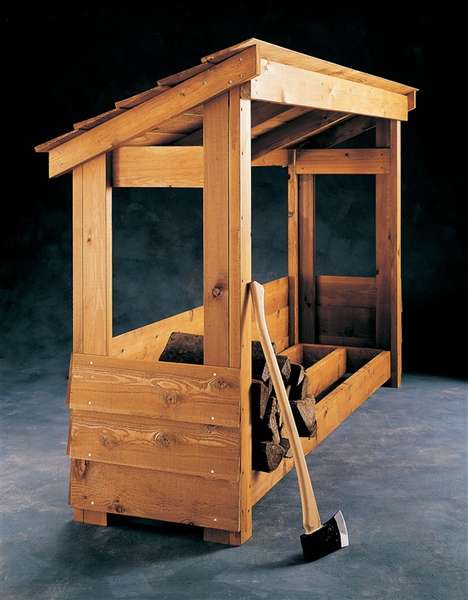 This one is beautiful firewood for cottages combines style and functionality. Sheathed on the sides and roof with beveled siding, the covered pillar has a neat appearance and solid structure. Because autonomous construction, it can be moved as needed. For the woodcutter does not need a foundation, when it is filled with firewood, it is very stable, even with a strong wind. The rack is quite spacious, height 1.20 m, width 2.50 m. Since the storage area is protected and raised, that is, there is no contact with the ground and good air circulation, firewood dries quickly and is ready to use when you need it.
Frame assembly
- Connect the edges of the front posts to form corner posts. Drill through holes with an interval of 20 cm. Drill holes and connect the pairs with screws. In the same way, connect the rear posts.
- Connect the two lower peadvertisements and two end guides in a rectangular frame. In the center, install the third perclin (see photo). Drill two screw holes at the ends of the crossbars. Attach the end bridges between the front and rear corners
 If the corner posts are strictly upright, install 5 cm gaskets next to each corner post to support the frame. Install the lower guide frame between the corner posts and attach the frame to the corner posts by screwing two screws through the corner posts and into the outer surfaces of the lower crossbars. Saw off the rear and front rails, roof supports, middle rack and middle supports. Roof supports and middle supports are compressed at the ends.
- To saw at an angle, mark a point 4 cm from each end along the edge of the board. Draw diagonal lines from each point to the opposite corner. Cut along the lines with a circular saw. Install the front rail on the roof supports.
- Drill through holes in the rear rail. Use the long screws to secure the rear rail to the back of the rear corner pins. Repeat the procedure to mount the bracket on the outside of the corner pins. Make sure that the top of the legs are flush with the top of the ends of the uprights. Install the front rung by tightening the screws through the external roof supports.
- Install the roof supports. The top of the crossbar must be flush with the top of the roofs. Attach the middle supports between the front rung and the rear rail, 75 cm from each end of the rung. Attach the roof covering to the supports starting at the rear edge. Make sure that the wide edge of the siding is facing down.


https://i.expert-h.com/en/obustrojstvo/drovnitsa-dlya-dachi-svoimi-rukami-500-foto#sigFreeId8667ab2b71
DIY firewood shed
 To do-it-yourself firewood shed enough average skills and very low costs. In principle, anyone can build such a structure using ordinary carpentry tools. Your task is to choose the most suitable design for your needs and determine the size so that the amount of firewood that you need fits in the barn. In addition, although such a structure is considered a utility room, use quality materials, unless of course you want to have a solid barn and use it for many years.
Materials and Tools:
You will need boards of different sizes, all this is shown in the drawings - height, width and thickness, only the dimensions in inches, that is, just multiply by 2.54, these will be the dimensions in centimeters.
In addition to lumber, you still need:
- 1 piece of plywood 3/4 "- 245 × 68 cm
- 7 - 2.5 sq. meters of roofing felt
- 8 - 2.5 sq. m tiles
- 1 piece 3/4 "plywood - 120x250 cm
- 200 pieces of screws 2.5 sq. m paper
- 100 pieces 1 5/8 "screws
 The first step is to assemble the floor frame. The picture shows that first you need to assemble the frame. Be sure to check to get even angles.
- Then, posts must be attached to the outside of the frame. Be sure to leave a few centimeters of space from the ground to the floor frame for marking. Before drilling through holes and tightening screws, use a level to check whether the floor is horizontal.
- To make the flooring, attach the slats to the floor frame, making sure that they are installed evenly. Drill through holes through the slats and tighten the galvanized screws into the frame.
- Saw the rafters at an angle of at least 15 ° and install them in place, as shown in the drawing. First of all, you need to attach the rafters of the rim to the racks, and then to the common rafters. Leave approximately 60 cm between the rafters to properly distribute the weight of the roof.
- Attach the roofing sheets, use a small sheet of plywood. Attach the plywood to the rafters and tighten every 15 cm with screws along the rafters.
- Cover the plywood sheet with roofing felt, making surethat the strips overlap by at least 5 cm. Then fix the tile, starting from the lower left edge of the roof.
- Screw the slats to the sides and to the back of the boards. For structural rigidity, leave a distance of 3-5 cm between the racks and fix them on the posts with screws.
- Attach the slats, just remember that the tile should hang about 5 cm from all sides of the barn.
And finally, process and paint the boards to protect them from moisture.


https://i.expert-h.com/en/obustrojstvo/drovnitsa-dlya-dachi-svoimi-rukami-500-foto#sigFreeId1a28f53c7c
Do-it-yourself canopy for firewood
 Building a canopy for firewood with your own hands is quite simple.
- First, make the floor, lay the transverse bars on a flat surface, nail the floor boards evenly.
- Then you need to assemble the side parts using vertical supports. Attach the rack to the vertical supports as shown. Sand the edges with sandpaper. Drill through holes at both ends of the strips and tighten with screws. Make a template from a piece of wood and insert between the planks to get even gaps.
- After collecting the sides, secure them to the canopy floor.
- Then attach the rear rails. Align them at the edges and fix with screws. Sand the edges with sandpaper.
- Saw the rafters, one end do 82 °
- Assemble the roof structure. Drill holes through the rafters of the rim and tighten the screws to the other rafters.
- Install the roof at the top of the canopy. Carefully align the edges and secure the rafters to the frame. Drill holes and secure with screws. Attach the upper trims.
- Cut the racks to size and fasten to the rafters with galvanized screws or nails. Make sure that the slats overlap by at least 2 cm.
Lay the firewood under the canopy to see how it will look.


https://i.expert-h.com/en/obustrojstvo/drovnitsa-dlya-dachi-svoimi-rukami-500-foto#sigFreeIdb32b9f90ce
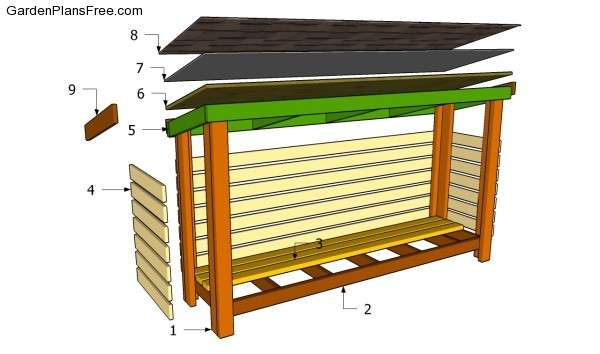
Shed for firewood in the country
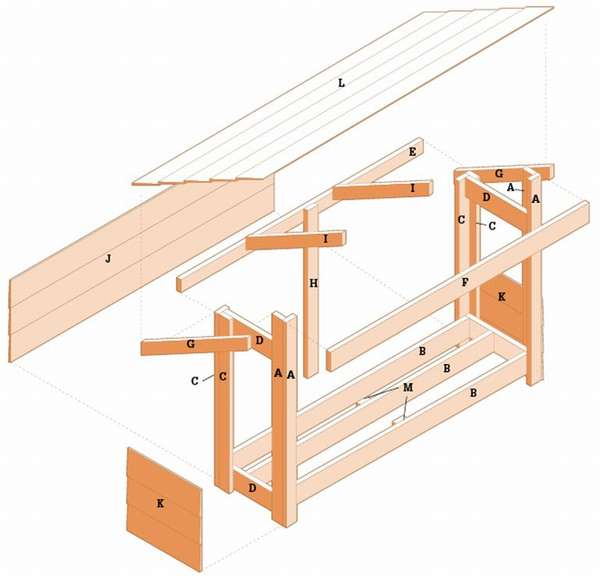
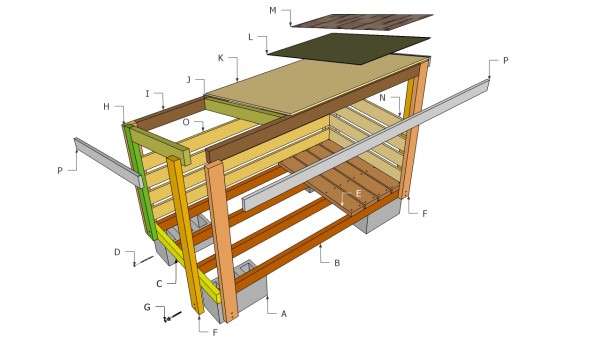
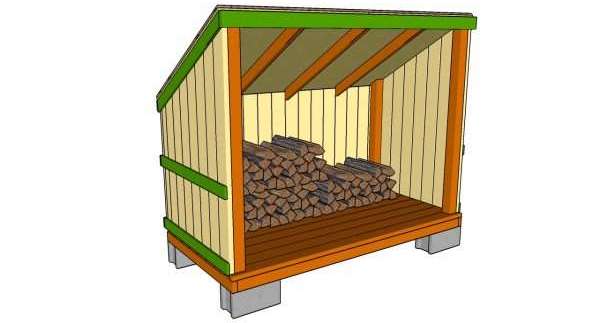 A firewood gardener can have many shapes and designs, so you must decide what you want from the very beginning. A good trade-off between costs and benefits would be to build a basic structure with low costs. Thus, using conventional materials, you can build a unique DIY firewood shed on his site. The back wall is not necessary, but its presence will certainly help, as this will protect the firewood from the rain. However, if you want to save money and time, you can build conventional wood stand and add sidebars.
materials
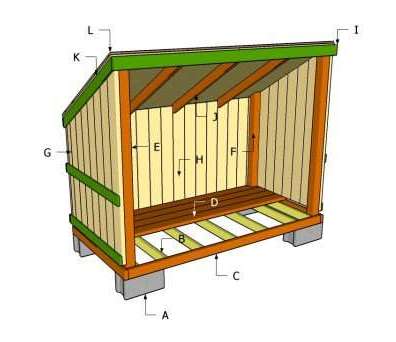 A - concrete blocks 4 pcs
B - boards of 115 cm 7 pieces
C - boards 240 cm 2 pcs and 122 cm also 2 pcs
D - 12 boards 244 cm
E - two bars 194 cm, one end is cut at an angle of 30º
F - two bars of 132 cm also with a cut end 30º
G - 16 pieces of boards 180 cm each 30º, 4 pieces 117 cm each on the side walls
H - 16 pieces of boards of 112 cm and 2 pieces of 247 cm
I - 2 boards 135 cm - ends at 30º, 2 boards 117 cm
J - 3 boards 132 cm, both ends are cut into 30º
K - 3.7 sq. m plywood for the roof
L - 3.7 sq. m roofing material and tiles.
Shed for firewood in the country - This is a good way to store firewood in the cold season. In addition, a properly designed barn will facilitate the drying process, as air will circulate and keep the wood in good condition.
Construction order
Recommendation. Install the boards on the beams with a spacing of about a centimeter. Trim the ends of the strips of the strips so that they stand right next to the corner posts.
- The first step is creating a floor frame. Put the beams on concrete blocks, as in the picture. Saw lumber in size and start assembling.
- Installation of rafters. Make sure that the corners of the frame are at right angles. Cut the corner posts to size, making sure the top is cut at an angle of 30 °. Fasten with screws after pre-drilling through holes. Check the level so that the columns are perpendicular.
- Attach the straps. Saw to the size of the board and fasten to the beam gratings. Do not forget to leave centimeter gaps.
- Mounting the side walls.As you see in the figure, you must first assemble the panels on the ground, then install them in place. When attaching, align them at both ends and screw them onto the posts.
- Rear wall mount. Installing the back wall is not difficult if you follow the instructions. Make sure that the panel is correctly aligned before screwing in the screws.
- Install the rafters of the rim, as well as the intermediate rafters. The picture shows that you need to install the rafters at equal distances in order to properly maintain the weight of the roof. Therefore, align the rafters at both ends and secure in place.
- Installation of roofing sheets. Take the plywood and fasten it to the rafters with 2-inch steel wire nails every 35 cm. The sheets should cover the slats.
- After installing the roofing sheets, it is necessary to cover the roof with roofing material, the strip overlay should be at least 5 cm. Customize the roofing sheets.


https://i.expert-h.com/en/obustrojstvo/drovnitsa-dlya-dachi-svoimi-rukami-500-foto#sigFreeIdccf0458f67
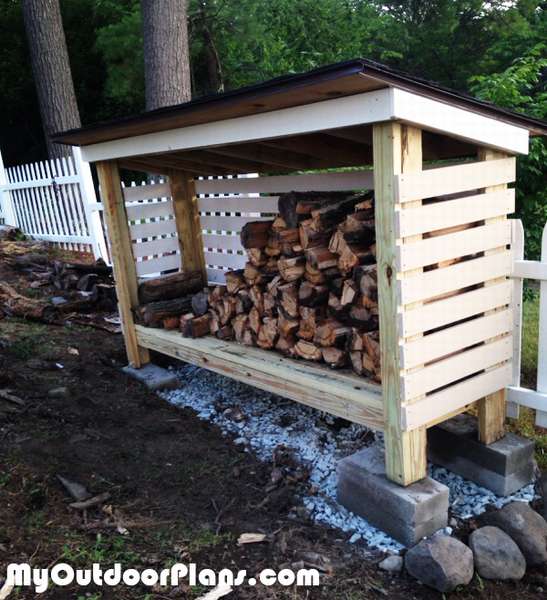
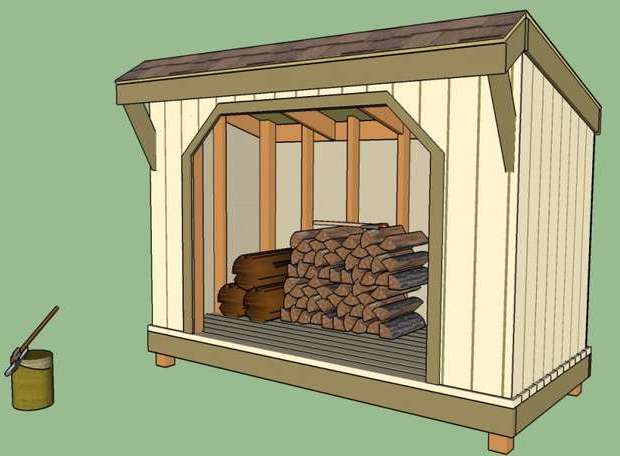 One more project of a small barn for storing firewood in the country. If you have fully wood-fired heating, then such a storage design can be more of an auxiliary one, since it is not designed for a large amount of firewood. However, compared to a large canopy you do not need to spend a lot of time or money to a firewood .. On the contrary, you could even save by building a firewood shed from pallets or scrap metal. You can install firewood on a concrete slab, fill the foundation or place on several concrete blocks.
I will not give here a list of materials and the order of construction, the process is essentially the same as in the previous examples, and the amount of materials will depend on the size of the structure, that is, on your needs. The only difference from the previous options, in this case added front panel and redesigned roof. The construction of a small front overhang will not only add style to the shed, but also protect the firewood from heavy rain or snow. The manufacturing procedure for the front wall is the same as the rest, just make sure you leave a large hole to access the wood. The assembly steps are shown in the drawings and I think everything is clear there, if you need detailed instructions, you will find the link under the gallery.


https://i.expert-h.com/en/obustrojstvo/drovnitsa-dlya-dachi-svoimi-rukami-500-foto#sigFreeIdbc20592ed8
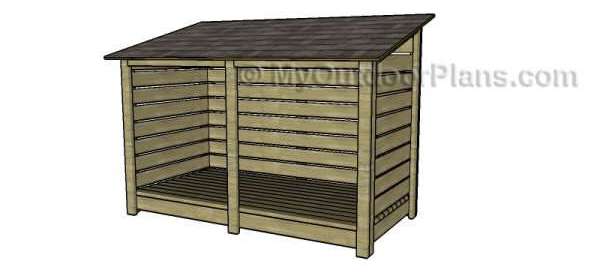 This option also practically does not differ from those presented above. The slope of the barn is oriented in front, so that water will drain from the wall of the house or garage. The assembly order is also not fundamentally different, maybe a few recommendations. When choosing lumber carefully inspect boardsmaking sure that they are direct and without visible defects. Buying weather-resistant lumber is a good decision, as it will pay off in the long run. At work use level, check before fixing the parts with screws, otherwise the building will not have a symmetrical appearance. If you have all the materials and tools necessary for the job, you you can build a firewood shed in about a dayb.


https://i.expert-h.com/en/obustrojstvo/drovnitsa-dlya-dachi-svoimi-rukami-500-foto#sigFreeId1452e76bb5
How to build a firewood shed
 A firewood shed is not the most difficult project. Difficulties will not arise if you know exactly what you want and you have a drawing. Compared to other complex structures, the construction of an indoor rack requires conventional tools that are likely to be found in every household. such as: a circular saw, a drill with a set of drills, a square frame and a tape measure. Shown here how to build a small firewood shed 6 × 3, of course, you can resize to fit your needs.
 A - 4 concrete blocks
B - 4 boards 175 cm
C - 2 boards 90 cm
D - 90 pieces of 8 cm galvanized screws
E - 18 pieces of boards 90 cm
F - 2 boards of 120 cm and two more of the same size sawn at an angle of 15 °
G-16 3-inch screws
H - 2 boards of 100 cm with a slice of 15 ° and two boards of 96 cm
I - 2 boards of 173 cm and 2 of 76 cm, cut at both ends at an angle of 30 °
J - 2 boards 94 cm cut at both ends at an angle of 30 °
K - 1 sheet of plywood 100 x 190 cm
L - 1.85 sq. m roofing material M - 1.85 sq. m of tiles
N - 12 boards 90 cm for side walls
O - 5 boards 1 × 6 178 cm long
P - 2 boards 1 × 3 193 cm long, 2 boards 100 cm cut at both ends at an angle of 30 °
First of all, you need prepare a place for a barn. To do this, you need to level the site and install four large concrete blocks at the corners of the barn. it cheap way to make a foundationbut you can fill the foundation with concrete. Adjust the blocks so that they are level. The assembly of a similar design has already been described above, there is no fundamental difference, except for the dimensions.
But in short:
- Make a frame of beams.
- Install flooring boards, leaving a small gap to allow airflow. To make the cracks even, insert a nail or a thin bar between the boards.
- Cut the top end of the side beams by 15º to get the correct tilt for the roof.
- Make rafters. Make 15 ° cuts at both ends of the rafters.
- How to install the corner beams, fasten the rafters of the perimeter.
- Set the rest of the rafters. First of all, place the rafters at an equal distance and before fastening them with screws, align them at both ends
- Attach the roofing sheets to be placed so that they cover the slats.
- Cover the entire surface of the roof with roofing material.
- Install and secure the tiles.
- Install the rear and side walls, leaving a distance of 2 - 3 cm between the rails.
If you want the barn to look aesthetically pleasing with a 1 × 3 wood finish. In addition, fill the holes with wood putty. After hardening, sand the surface with an emery cloth or grinder.


https://i.expert-h.com/en/obustrojstvo/drovnitsa-dlya-dachi-svoimi-rukami-500-foto#sigFreeId17e91d6b49
Below are presented photos of firewood for a summer house built according to these drawings.


https://i.expert-h.com/en/obustrojstvo/drovnitsa-dlya-dachi-svoimi-rukami-500-foto#sigFreeId8390b7788c
Firewood cover
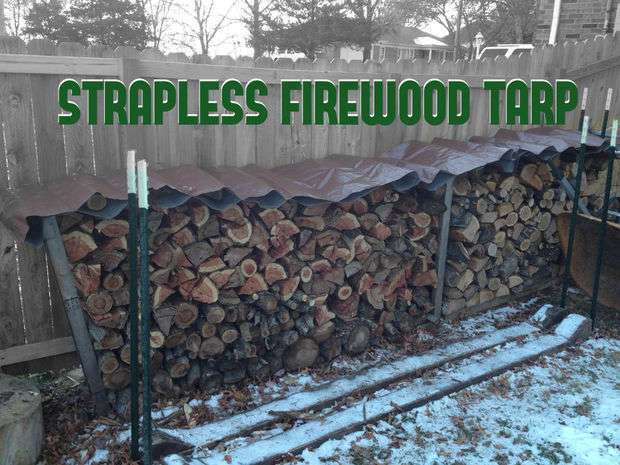 There are various ways to protect firewood from rain. Tarpaulins for firewood that are sold in stores are usually very light and fall apart after a few months. Therefore, the author offers his own way, how to make a cover for firewoodso that it reliably lasts you a long time. The idea, I think, is clear, firewood themselves will hold a tarp. Of course, you can’t do without the cost. It is necessary to purchase a heavy tarp, the author bought a 2.5x3.5 m canvas and nylon upholstery.
You will need a sewing machine and scissors.
- First you need to sew a few pockets. The tarp has gaskets at the edges that the author left. But if you want to remove the gaskets, simply remove the bushings with a small flat-head screwdriver. Make pockets 30 cm wide.
- Start by sewing a zigzag stitch along the short side of the tarp, then measure 30 cm and make another parallel seam. Repeat the entire length of the tarp.
- Note. If you are using dense upholstery, make some test stitches on some old material to adjust the correct tension and the length and length of the stitch. In addition, when tensioning the upper thread, make sure that the thread is installed between the tension discs, holding it near the spool and pulling the free end down of the needle (see photo).
- Once the pockets are sewn, fold one section in half. The fold will be the cut line.
- Then make a finish seam at the ends of each pocket to lock the pocket seams in place, as in the photo.
The tarp is ready, fill the pockets and cover the wooden handle.


https://i.expert-h.com/en/obustrojstvo/drovnitsa-dlya-dachi-svoimi-rukami-500-foto#sigFreeIda56b39a6aa
Firewood sleigh
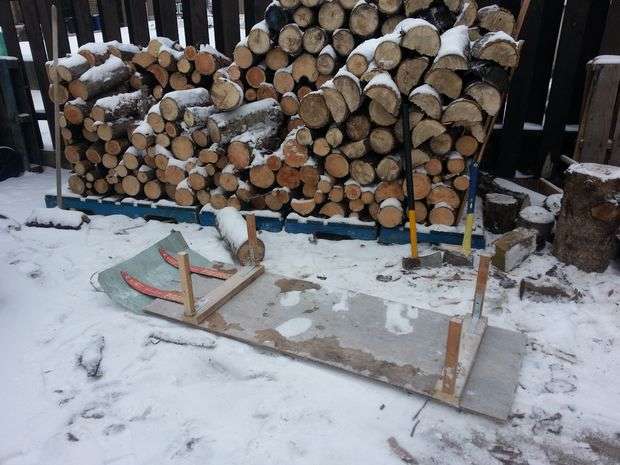 The basis of the sled for transporting firewood, galvanized corrugated sheet, good material for gliding in the snow.
Materials:
- Galvanized Corrugated Sheet
- plywood
- screws
- nuts and bolts, possibly several washers
- two small boards and two more
- old skis if you have
- rope
- flat metal corner brackets
- drill,
- hammer,
- saw
How to make a sleigh for firewood
- Cut the plywood. The sheet should be long or wide enough.
- Lay corrugated board on top to match dimensions.
- Cut a galvanized sheet. Leave a small supply just in case, never cut off for long.
- Screw a couple of bars to the plywood so that there is something to attach the corrugated sheet to.
- Set the skis by positioning the sheet so that it is flush with the rear and make a small ledge in front. Since the front will overlap the back, it will glide smoothly in the snow.
- Put the front panel. Install a bolt and washer on each side of both panels.
- Add corner supports to keep the firewood on the sleigh.
- PrikRepeat the rope, attach a pen and try the sled.
Of course, you can improve them as you wish, for example, add a box or install side walls.


https://i.expert-h.com/en/obustrojstvo/drovnitsa-dlya-dachi-svoimi-rukami-500-foto#sigFreeIdd9993a7982
How to chop wood ... with a knife
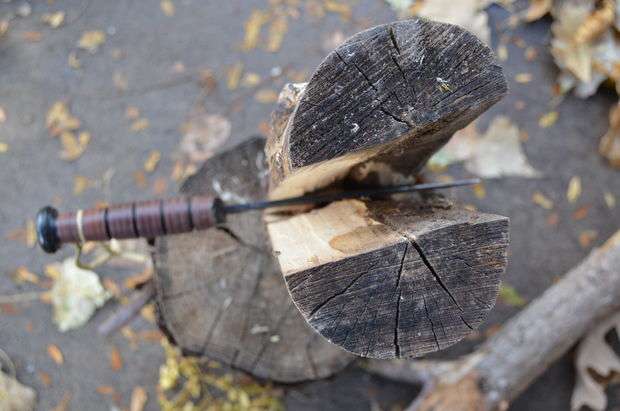 Since we have an article about firewood, I want to talk about an interesting way to chop wood. Of course, at home, where usually there are all the tools at hand - an ax, a saw, it is as if there is no need for it, except perhaps to make torches for kindling, in a new, cognitive way, it may be interesting. First of all, way to chop wood with a knife not an original idea. This method is known as Batoning, and it is most useful when splitting thin logs for kindling or when the surface you are chopping is uneven. And of course, in the forest, when there are no necessary tools at hand.
In principle, nothing complicated, the main thing is to comply with security measures. To work, you need some kind of hard surface, ideally a stump. Fixed blade knife. Do not use a kitchen knife or a folding knife, and one and the other is likely to break. Of course, folding knives are very durable, but they have moving parts, so the mechanism will undergo vibration during impacts, which can destroy the structure of the lock, and there it is not far from injury. And yet, the blade of the knife should be longer than the diameter of what you are going to chop.
Then you will need something that will serve as a hammer - a heavy log, log, or something like that. It is advisable that it be as thick as a brush and as long as your forearm. It should be easy to hold with one hand. With the process of how to chop a log, I think it’s clear, look at the photo.
Fix the blade on the object and gently tap the blade with an impromptu hammer until the log splits. But this is if it is thin enough.
Harder if the log is thick. There are three options.
- Chip small pieces from the log, that is, beat from the edge.
- You can only hammer the floor of the blade and hit the handle.
- Or you can try to split the log along. That is, make a split from the end, then put the log on its side and continue to split, shifting the blade and striking as it moves down. Then you can do the same on the other side of the log, and if the log is stubborn, hit them with something solid.


https://i.expert-h.com/en/obustrojstvo/drovnitsa-dlya-dachi-svoimi-rukami-500-foto#sigFreeId9d6d4c1ab0
Drovnitsa for giving drawings


https://i.expert-h.com/en/obustrojstvo/drovnitsa-dlya-dachi-svoimi-rukami-500-foto#sigFreeIdd22e68ef7a
Firewood for giving 100 photos


https://i.expert-h.com/en/obustrojstvo/drovnitsa-dlya-dachi-svoimi-rukami-500-foto#sigFreeIdcaeb24feb8
Hello, I am the author of this article, so I look forward to asking questions for this article in the comments below, I will answer all !!!
If you have questions on another topic, ask them on our forum, we will answer you
- Two baskets of paper in 5 minutes (Master class)
- How to make a simple and compact table for a milling cutter from plywood
- How to make a soft headboard tile (Instructions + step by step photos)
- Cinder block benches: a convenient bench in 55 minutes
- How to make a bed with a niche: saving space (Master class)