DIY campfire site 500 photos, step by step instructions
 hearth for a fire in the country
Fire is not just a chemical reaction; for a person, a bonfire is something from the realm of mysticism. Fascinating flame attracts an unknown mystery. As far as we know, fire is one of the most relaxing, therapeutic and enjoyable ways to relax. Therefore, probably everyone who has the opportunity, trying to get a fireplace.
But a fireplace in the country is an expensive pleasure, but to make do-it-yourself fire center everyone can. Today, for this purpose, you can buy a portable stainless steel construction, but they are short-lived and expensive, so it’s smarter and more economical to equip campfire place do it yourself. Below in the article you will find examples of fires made of stone, brick, concrete and other round and square materials.
The center for a fire in the country
How to arrange a cozy place to gather friends and family on cool nights? The answer to the photographs. And below you can read the instructions, how to fold the hearth for a fire with your own hands in just one or two days off.
How to stack a fire
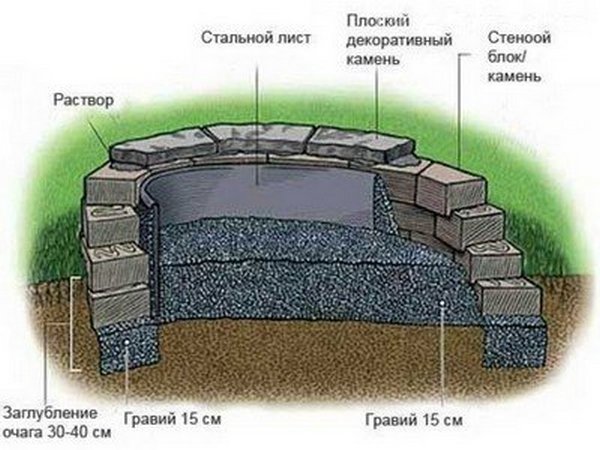
The center for a fire in the countryThis is a small pit with strong stone walls that help to light a fire and maintain fire safety. Thus, the first task in the construction of any hearth for a fire issecurity. The fireplace should be located far from overhanging trees, a house and any other flammable structure.
To simplify the installation of stone walls, you can use blocks of cast concrete. They are flat on top and bottom, so they fold neatly and can be glued for strength. Select a block with angled sides designed to form curves when they are pressed against each other. The optimal size for the focus is from 90 to 120 cm inside the diameter.
As an added precaution, campfire must be lined thick steel ringsimilar to those used for park fires. They protect concrete blocks from overheating, which can lead to their drying out and premature destruction.
For stability, the base of the wall should be deepened into the ground, the bottom is leveled and covered with gravel, which will provide drainage and protect from frost in the winter. Gravel also provides a basic foundation for stones to rely on. Most concrete blocks are about 10 cm high, so if the masonry is four blocks, one and a half rows should be in the ground and two and a half above the ground.
 Lay out blocks Lay the blocks in a circle on the ground around the future bonfire site. To adjust the size of the circle, you may need to crop the blocks. Hold the block over the gap that it will fill, then mark it on the underside with the appropriate width. If you have a stone-cutting saw, you can use it, but the author did it using a chisel and a hammer. Greater accuracy in this case is not needed, so these tools are quite enough.
- Make markup
Make sure that the gaps between the blocks are minimal and the leading and trailing edges are aligned. Using a shovel, mark a circle in the ground about 3 cm outside the perimeter of the ring.
Remember how many blocks a ring consists of, then remove them and set them aside. If some blocks with irregularities, remove the tabs on the bottom of the blocks of the first row with a hammer so that they lie exactly in the trench. - Dig a block groove
Dig a straight trench 30 cm deep and one block wide within the circle marked on the ground. Then make 15 cm indentations in the area surrounded by the trench.
Place the blocks in a trench in a ring to see if everything fits in a circle. If not, dig more to expand the trench. Remove the blocks. - Fill the trench
Fill the trench with drainage gravel and tamp.If necessary, add more gravel to maintain the level.
Make sure that the blocks lie close to each other, a difference of 2 cm in the diameter of the circle can create a 10 cm gap between the blocks. - Line the first row
Using the level, make sure the blocks are level. If necessary, trim with a rubber mallet or lay a little gravel. Before proceeding, make sure that the first row is perfectly flat and correctly located in the trench. - Lay out the wall
Apply glue in a zigzag fashion. Lay the block on top of the parts covered with glue, centering it along the seam. Make sure all parts on the blocks match. Continue until the completion of the second row. - Fill the pit with gravel
Fill a 15 cm pit with gravel to help support the first two rows. Glue and lay the third and fourth rows.
Insert the iron ring into the circle. Adjust it so that the top edge matches the top of the wall. Fill the space between the ring and the wall with gravel. - Cement blocks
If you use natural stone, then the top can be laid out from pieces, like a mosaic. Prepare a dry solution with an adhesive additive to make a mixture with the consistency of peanut butter. And if the blocks, stick the pieces over the wall.
Wait two days before making a fire.


https://i.expert-h.com/en/kostry/1009#sigFreeId98625b73a6
Round fireplace
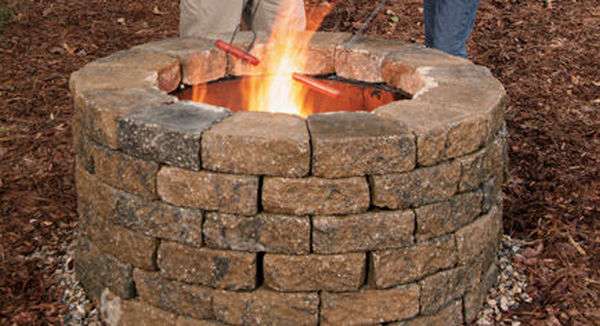 What could be more beautiful than the warm fires of a bonfire on a cool evening. An open hearth for a bonfire, and even with a grill, will make any country yard cozy where friends and family can gather, have dinner, talk or just relax by the fire. Build round fireplace quite simply and does not take much time, you can do it in one day. The costs are also not large, by the way, refractory bricks can be obtained and someone always changes and repairs something for free, and construction waste is usually thrown away.
Step 1: Training
- The stones. This hearth is built of stone blocks, you can use field stone or other materials. Do not use stones removed from a reservoir, they can crack from heat. Concrete blocks from heat are also destroyed, but they are easy to replace.
- Drainage. Dig a hole in the center of the pit and fill it with gravel, it will work like a sump, helping to drain rainwater.
- Glue. Dry masonry is a faster way to build a hearth for a bonfire. If you need to replace cracked or broken stones, dry masonry makes work easier. If you are cementing, put the cement only on the outside of the stones to protect the cement from overheating. Glues also have their drawbacks, it melts and gives off steam.
- Security. This hearth is built in a wooded area. Before starting a fire, soak the area around the pit with water. In general, when a fire is burning, it is advisable to keep buckets of water and shovels at hand.
What do you need:
- 98 wall blocks
- metal rim
- metal grill
- sand
- gravel
The blocks are different, in this case this product is 30 cm wide, 10 high and 20 deep.
Step 2: Dig a hole
- Dig a hole 60 cm wider than the hearth - about 215 cm across.
- Use a pin and a rope in the center to mark the circle.
- Remove approximately 30 cm of soil.
- Pour a 10 cm layer of gravel and the same layer of sand.
- Level and tamp lightly.
- Lay the bottom row of blocks.
- Fill the free space with gravel so that the blocks are almost completely hidden.
Step 3: Install the steel rim.
Lay the second row. Install the steel rim that will hold the grill. To keep the masonry even, pull the fishing line on top, and you will be oriented along it. The middle is 80 cm in diameter.
Step 4: Masonry
Brush the surface of the previous row. Lay the stones, leaving three or four random spaces in each row. Gaps will provide blowing.
Step 5: Steel rim
Before laying the last stone, install the steel ring in place. Then lay the last layer along the edge of the rim.In the original version, the author laid out 7 rows, but as a result of the experiments, one row was removed, it turned out that this way the fire burns better.


https://i.expert-h.com/en/kostry/1009#sigFreeIde810edfbab
Campfire place in the country
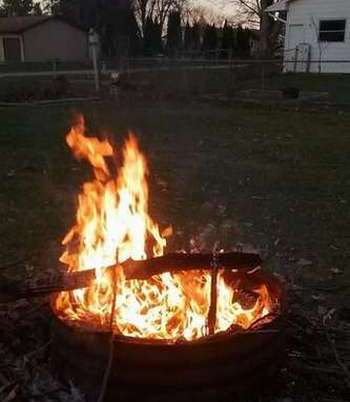 This is how you can simply equip a place for a fire with your own hands. The most important thing is safety:
- make sure that the campfire site, at least 3 m from any building or neighboring yard, is preferable to 8 to 10 m;
- do not equip a campfire place in the country under a covered porch or a tree with low branches;
- equip a fireplace on flammable surfaces such as blocks, slabs or concrete;
- It is not advisable to place a campfire right on the grass.
Tools and materials
- shovel
- galvanized ring
- small bricks
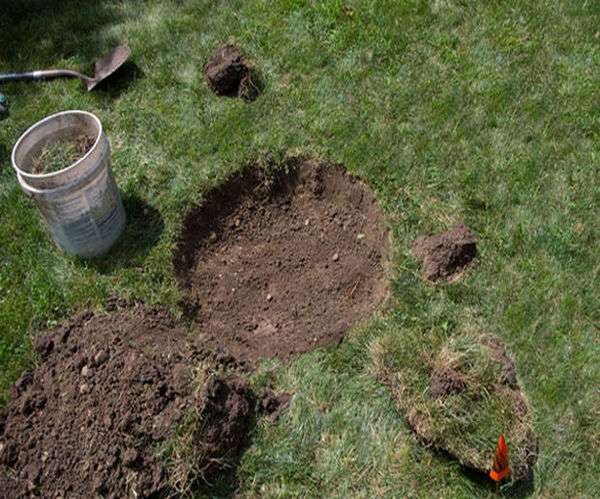
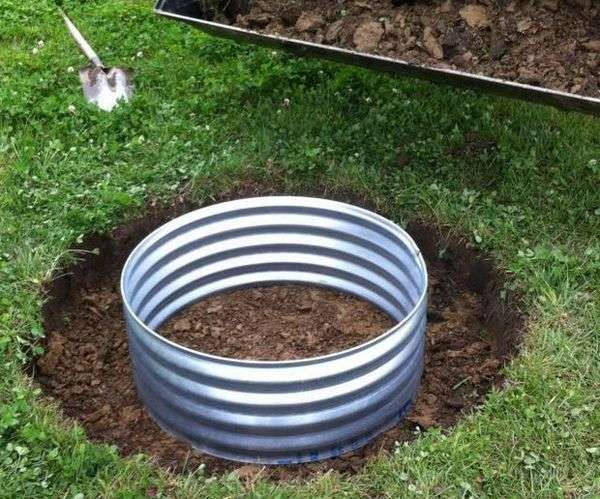
Set the ring where you will have a bonfire. The fire is usually made with a diameter of 90 to 120 cm.
- Dig a recess of 30 cm.
- Place the ring in the pit and see where you need to align.
- Place bricks under a galvanized ring on a flat surface for air circulation
- Download firewood and evaluate the result
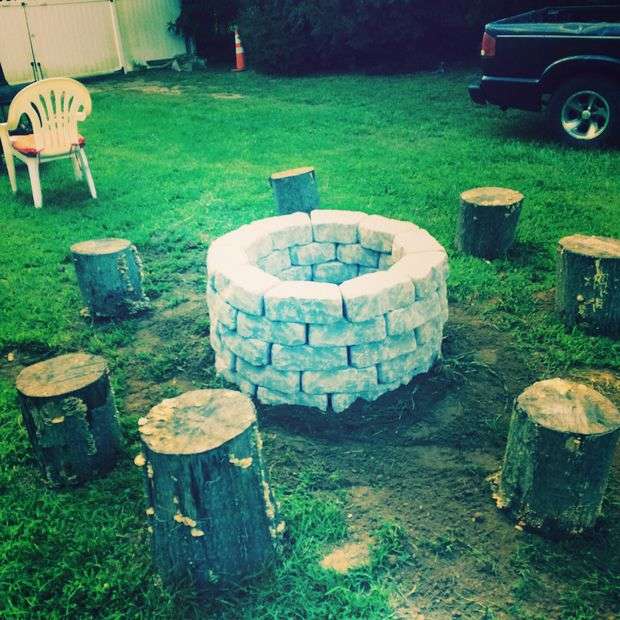
Campfire in landscaping
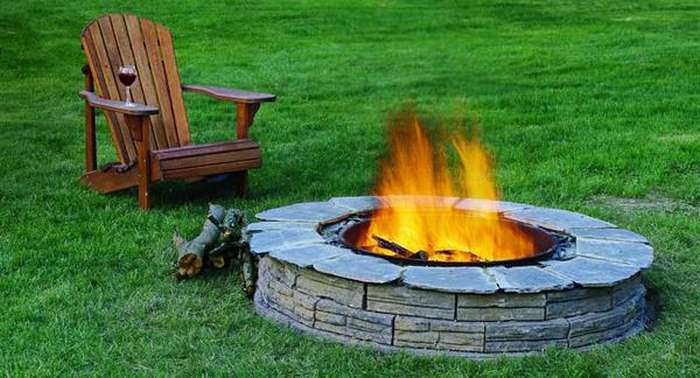
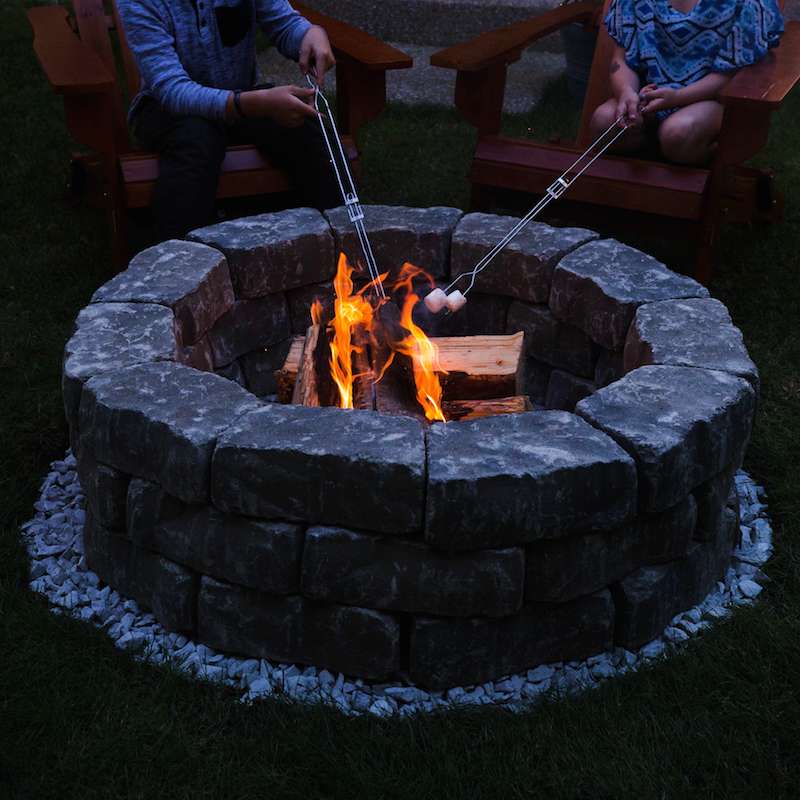
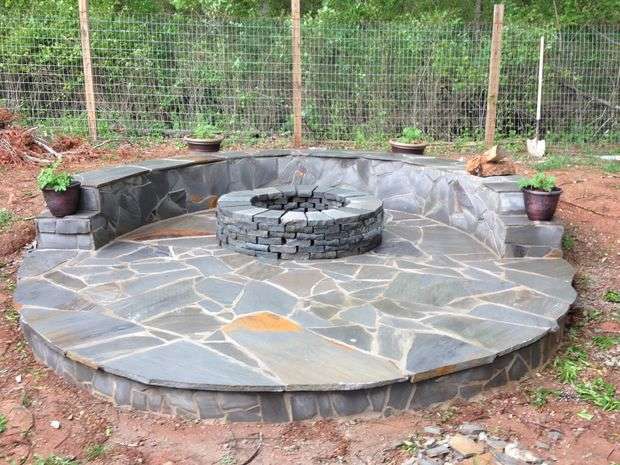
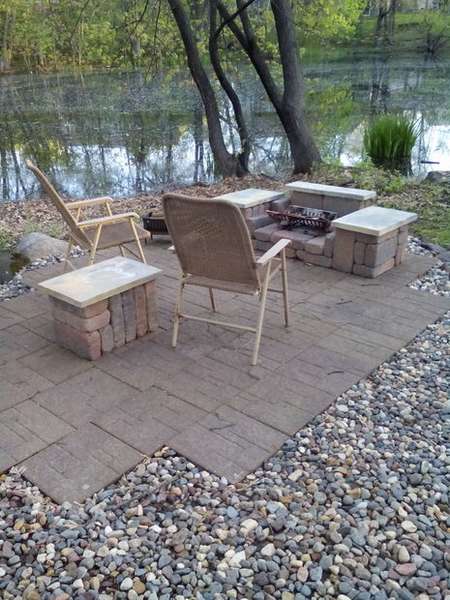
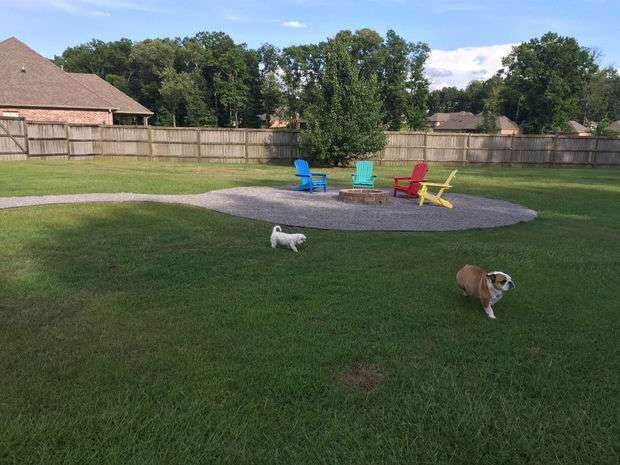 A hearth for a fire is not only a cozy place where you can spend time with your family, enjoying the crackling of firewood and the warmth of fire, but also part of the design of your site. In the photo, such a place looks very beautiful. therefore fireplace design in landscape designis an important process. Of course, it’s good if your site, such as that of the author of this project, is about 20 acres, but if it’s less, then it’s okay, you can always come up with something. The main thing is that the distance from the buildings should be at least 3 meters, in this case the author decided to play it safe and arranged a place for a fire 25 meters from the house.
Himself campfire design, of course, not very original, round in shape, laid out of pavers, but the place is beautifully decorated. The process of building a bonfire site is normal, as described in previous examples. Although there is nothing complicated, but on the site, (link under the gallery) there is a rather detailed instruction, with explanations and remarks in an art form.
How to arrange a place to relax is a personal matter. The author put 4 Adirondack chairs, conducted lighting, installed wireless speakers, you can see all this beauty in the last photo in the gallery.


https://i.expert-h.com/en/kostry/1009#sigFreeId9a73c82b0b
Garden fireplace
 To lay a high hearth for a bonfire, you will need 60 wall blocks, a bag of drainage gravel and a bag of stones of lava rocks.
- Then dig a hole about half the height of the blocks (approximately 5 cm).
- To get the correct circle, use the barrel, as in the photo.
- Add some gravel around the edges and lay out the first row of blocks around the barrel.
- Then dig a hole in the center of the site with a depth of 50 cm and fill it with drainage rocks.
- Then pour a layer of lava rocks because they retain heat.
- Lay the remaining blocks and you can make a fire.


https://i.expert-h.com/en/kostry/1009#sigFreeIda022b2296d
Another way how to make a hearth for a fire, only the technology is a little different.
 In this case, you will need a brick and natural stone. As well as:
- stands for support
- fabric wire
- sand
- cement mortar
Work on the ground
- Use something to make an outline, you can use an ordinary twine with a pin
- Install racks
- Fasten the wire around the racks.
- Pour sand in and around the circle.
The foundation
- Lay bricks or stones on a layer of sand.
- Cover the first row with cement mortar.
- Masonry from the rest of the blocks
- Use small stones with mortar to fill the gaps.
- Remove the racks when the wall is sufficiently even and stable.
- Do not leave a few gaps for air circulation.


https://i.expert-h.com/en/kostry/1009#sigFreeId0a9de68ef6
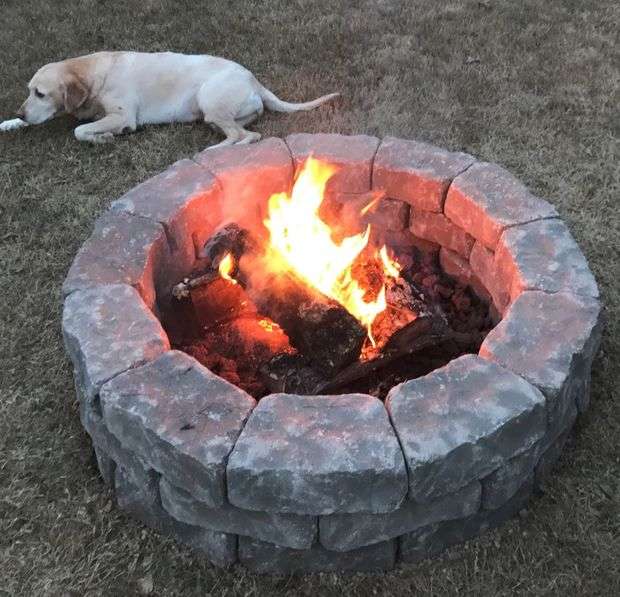
Round fire
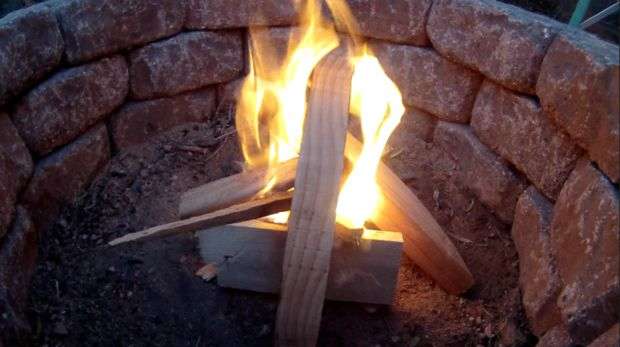 Shown here how to fold a round hearth for a fire from a landscape stone and construction glue. The minimum cost, half a day of work and a great place for a bonfire in the country is ready.
The author built this hearth for the fire from 30 stone slabs and 4 tubes of heavy-duty building glue. 30 stones are enough for 3 rings of 10 with an approximate inner diameter of about 76 cm. The size of the fireplace is completely up to you. Keep in mind that the more stones you add, the more building glue you may need. In addition to the slabs and building glue, the author also used a level, a pickaxe, a shovel, a rubber mallet, a small brush, and an assembly gun for the tube.
The procedure for the construction of the campfire is the same as in the previous examples, so in brief
- Choose a place and set stones.
- Mark the place of the fireplace and dig a recess, which should be several centimeters deeper than the height of one stone.
- Check the depth and diameter by laying the first row of stones, if it doesn’t work out smoothly, remove the stones and level the soil.
- Level the bottom row of stones because the level is the most important part of the assembly. Check each stone, always in front and from left to right, to make sure that it does not swing. Use a rubber mallet, and add bedding if necessary. Continue the process in a circle until you level each stone.
- Once the first row is flat, clean the surface to prepare for gluing.
- Apply a small amount of construction adhesive to the bottom of the block, rotate it and lay on top of the first row. Continue gluing and stacking the remaining stones on the second level. Glue and lay the third level in the same way. Check the top layer for rickety blocks. If you find, remove it and add the required amount of construction glue.
- When all the blocks are glued together, cover the edges of the fireplace with earth, which remained after digging the grooves and tamp.
For a day, wait for the glue to dry, after which you can make a fire.


https://i.expert-h.com/en/kostry/1009#sigFreeIdaeb1876862
The hearth under the fire with your own hands
 The campfire is a great addition to any yard and a good place to gather with family and friends. Today you can buy everything, however, it will cost a lot. In addition, if you buy an available separate version, the material may be of poor quality and begin to fall apart after a couple of years.
But you can easily build a campfire for a summer residence from bricks or pavers. Better to always plan ahead, especially for large projects. Do not try to plan every little thing, only as much as you can.
How to lay down the fire, read in other examples of this article, it is the same, and if you are interested in any nuances, a link to the author’s site is under step-by-step photos.


https://i.expert-h.com/en/kostry/1009#sigFreeId554c7343c6
 Do-it-yourself fireplace center made of bricks
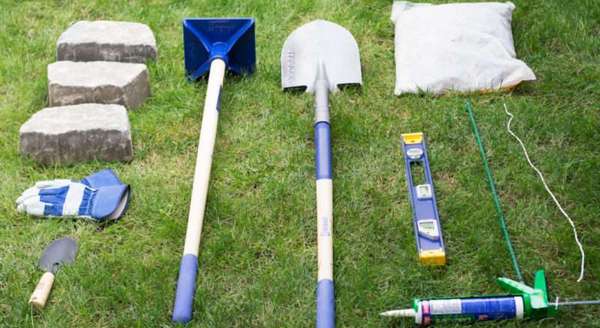
Make your site cozier by folding simple a fireplace for a camp in the country with your own hands in just a few hours. Before you begin construction, you need to prepare: bricks for the wall, gravel, tape measure, a large shovel, spatula and level. When buying bricks for the fire hearth wall, choose something reliable, for example, bricks for the walls. Use refractory bricks that have higher heat resistance.
Here is what you need
- Mark the circle with a pin and a rope ..
- Remove the sod inside the circle. For safety reasons, the recess should be between 15 and 30 cm in size.
- Use the level to level the ground where the bricks will be installed.
- Fill a layer of gravel and smooth.
- Arrange the bricks in a circle and increase the masonry until the wall is at least 30 cm high.
- For added security, you can install an inner row of refractory bricks. You can not use the mortar, but you can use an external fire-resistant mortar between the bricks for added stability.
Take a pair of Adirondack chairs, firewood, friends, and treats to make full use of your new campfire site.


https://i.expert-h.com/en/kostry/1009#sigFreeIdb3728d74bb
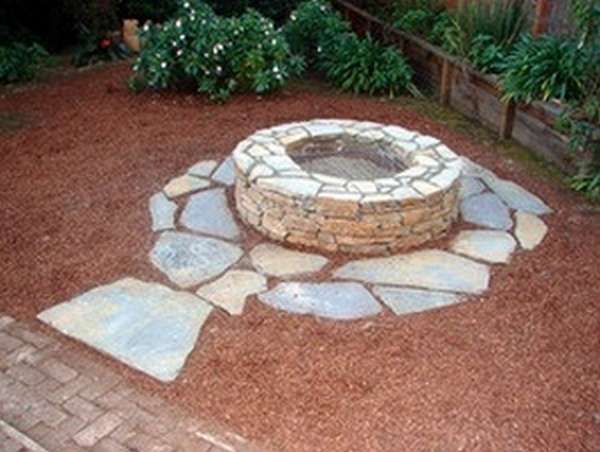
Brick fire pit
 Shown here how to fold a fireplace for a campfire made of brick with your own hands. Refractory bricks can be combined with natural field stone or other material to create a unique look for your summer cottage. Take a look at the step-by-step photos and read the instructions below.
A beautifully equipped campfire site is one of the most popular features of landscape design. Ideally, the campfire site is made of fireproof material on a flat platform, at least 7-8 meters from the house or trees.
The style and shape of the foci can vary both in size and in shape.
STEP 1
- To make a circle with a diameter of 150 cm, attach the thread to the pin, half the circumference and tie this end to the can of paint with spray guns. Further it is clear, pull the cord, and go around the pin spraying paint.
- Make a foundation. Mix the cement with water until it reaches the consistency of peanut butter. Lay the wet solution between two circles, flush with the ground.
- Insert reinforcement for reinforcement. Smooth the surface with a spatula and allow to dry for 24 hours.
- Dig a 15 cm recess. Then use the same method as above to mark the inner circle 30 cm from the outer circle. This will be the edge of the bonfire wall.
STEP 2
- If the foundation is ready, it's time to masonry. Mix the mortar and lay a 5 cm layer on a concrete base.
- When using natural stone, mix the sizes and colors of the stones and choose attractive stone faces that match the light curve of your contour. If necessary, use a hammer to form individual stones.
- As the first few levels of stones begin to form along the outer edge of the hearth, they begin to lay refractory bricks, forming the inner wall of the structure.
- Fold the outer wall.
STEP 3
- Fill the gaps between the bricks with a wet solution, scraping off the excess. It is imperative to regularly measure the internal and external edges of the wall in order to maintain the wall thickness and round shape.
- Continue to lift both bricks (against the inner circle) and stones (against the outer circle), filling the gaps between the stones with mortar.
- Continue laying the wall with alternating layers of external stone and refractory bricks until you reach the desired height. Fill all the gaps between the brick and the stone with mortar and waste stone.
- To finish the construction, install several flat stones on top of the wall. Add a layer of mortar of approximately 3 cm and lay selected stones on it, making sure that the vertices create a flat, even surface around the entire circumference. Add more mortar to fill the gaps between the top stones.
- Fold Inner Wall
- Level each brick, then fill in the gaps of the mortars with a grout and scraping off the excess.
- It is imperative to regularly measure the internal and external edges of the wall in order to maintain the wall thickness and circular shape.
STEP 4
- To make the inside look homogeneous, apply refractory paint to the bricks. Fill the campfire with a layer of river rocks.
- Dig around the area and cover with landscape cloth to prevent weeds from growing.
Finishing touches - Remove debris from the outside. Rinse off any remaining mortar with a garden hose.


https://i.expert-h.com/en/kostry/1009#sigFreeId00a5385d43
Another option how to equip a campfire place in the country with your own hands. The construction process is exactly the same as described above, only in this case a pre-sorted natural stone was used. . It is more expensive, but it will save time, because the stones are more uniform in size, shape and quality.


https://i.expert-h.com/en/kostry/1009#sigFreeId6ce3c0fcdf
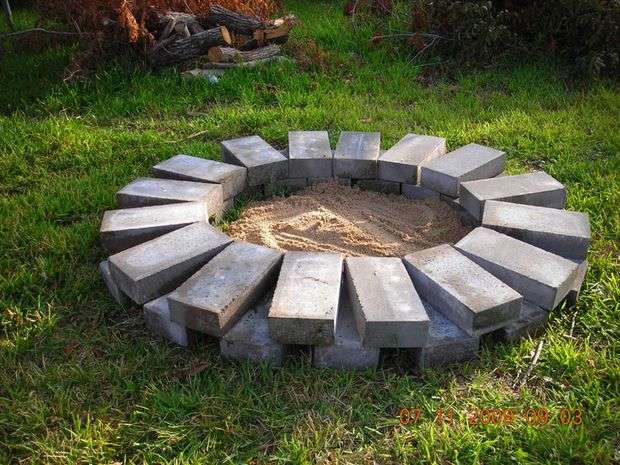 If you need a temporary hearth for a fire, can be laid out in this way. Just install blocks, bricks or stones in a circle, as shown in the photo, the height can be made in two or three rows. In total, the author used 32 bricks 10 x 25 cm in size. Pour a layer of sand in the middle of the circle. When the bonfire is not needed, just put the stones, blocks or bricks in the barn or under the canopy until the next season. The place after the fire can not be especially cleared, the grass will grow in the sand. A great way to recycle flammable items that cannot be composted.
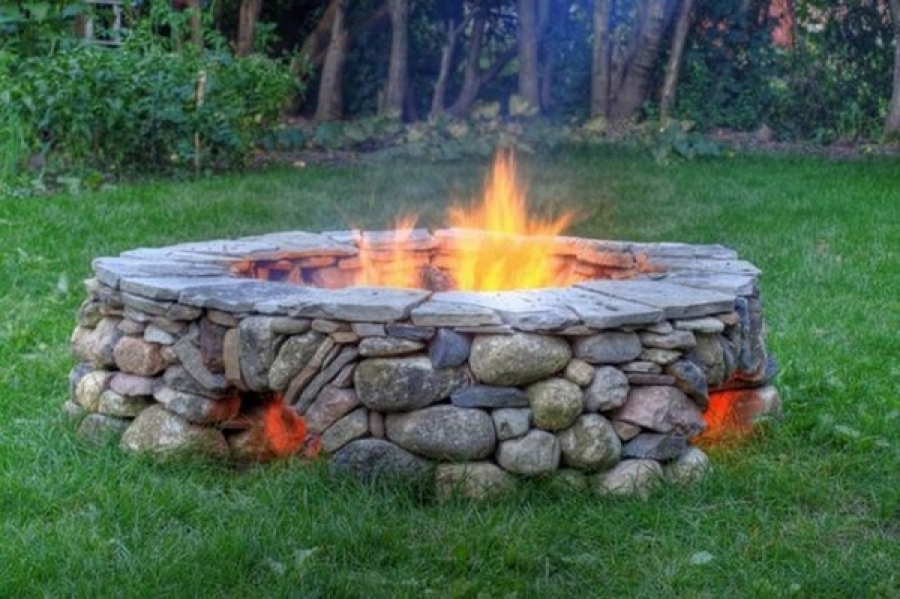
Fireplace in the country of stones
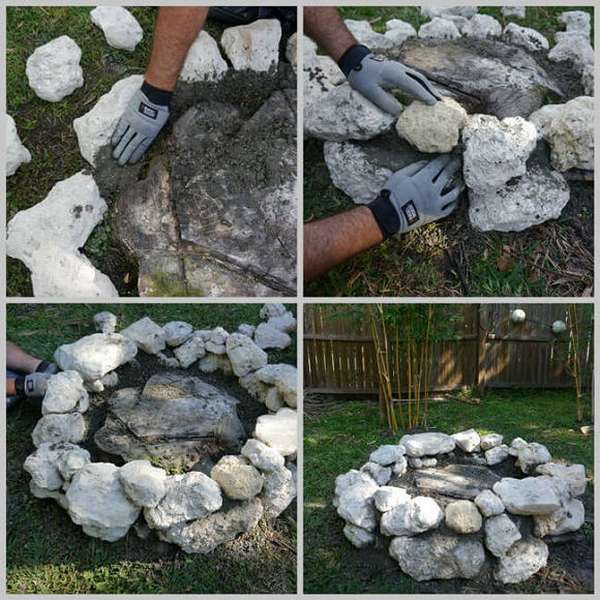
 In this article you have seen many examples of beautifully laid out fire pits, it depends on your tastes and preferences. Posted byoffers such a bonfire option in a cottage made of natural stone, which looks simple and natural. Such a fire can be folded in a couple of hours. Before you start working with the stone, make sure that you have an excellent pair of work gloves, this is an urgent advice of the author.
This project does not require a lot of materials and tools, but for work you definitely need a good pair of gloves.
- When you prepare the stone, you can begin construction. First lay out the fire dry. That is, just fold the stone wall in a circle without using mortar. This allows you to determine which stones are best suited.
- You can choose which stones are best suited for the base, which to fill the gaps are most visually attractive for installation in a prominent place, and which are for the top row.
- To make it faster, place the stones in concentric circles - the top row, the farthest, the second row one step from it, etc.
- Prepare a solution of a very thick consistency and separately an ordinary solution.
 Then set the stones in concrete using a standard concrete mixture with a small amount of gravel. Such a mixture is much stronger, but it is not easy for her to fill all the gaps.
Start masonry using the natural forms of stones. The bonfire structure for landscaping should look light and be durable. Then thicken all joints and gaps with a thick solution.


https://i.expert-h.com/en/kostry/1009#sigFreeIdd61c76ea8b
How to stack a campfire site made of concrete blocks
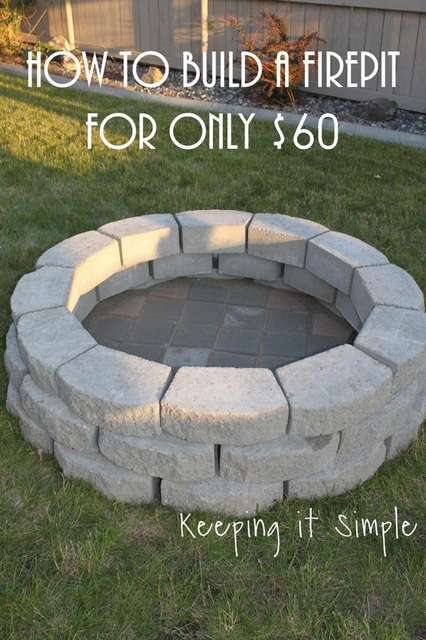 If needed campfire design, which would not be worth a fortune, you will certainly like this option. You will be surprised how easy and quick it was made. It took the author only morning to equip this simple and convenient place for a fire. This is much better than those that sell from the store, and much cheaper!
- Since the paving stones have a small protrusion, lay out the lower circle more (so that there are gaps between the paving stones).
- Then, when stacking the top row, the circles become smaller. Just first you need to install the blocks without spaces, and then offset by about 3-5 cm. The inner diameter is approximately a meter.
- Then put three levels of masonry. For additional support, you can use concrete in spaces. The inner diameter of the top layer is about 80 cm.
- The bottom of the fire is also laid out in square blocks.
- That's all. It is much better that the metal structures in the store.
Now, to create a real oasis at the hearth for the fire, make a nice sofa, as in the photo.


https://i.expert-h.com/en/kostry/1009#sigFreeIdd20c84dc5a
How to fold a fireplace for a bonfire with a grill
 Prepare a campfire site
Before you start digging, select campfire place, then define the center with a peg, rope and spray paint. In this case, the hearth for the fire will be 1.5 meters in diameter.
To determine the center, take a rope 75 cm long, tie it to a peg, go around in a circle, spraying paint. To determine the inside line of the circle, reduce the size of the rope by 35 cm and repeat the process. Once the marking is complete, you are ready to start digging. You should get a 20 cm wide strip between the inside and outside lines.
Concrete the strip between the lines
Make a cement slurry of a thick consistency and fill as shown in the photo. Strengthen the foundation with reinforcing bars.
Set stones
First sort the stones. Kapstons are finishing stones, their similarity to chipped stone gives them a unique old look. They will form the top of the outer wall. Mix the solution, add one shovel of lime, to increase strength. Add water and mix until a smooth consistency is achieved. Using a rope tied to a central peg, measure 80 cm and start laying perimeter stones.
Set the inner row
Use the rope again and measure the peg 35 cm from the outer circle to the inner circle. Find the highest point of the inner circle and set the first brick. Check the level, then use this height to level all the following bricks that you put around the inner circle. Remember to check that the inner circle is always 35 cm from the outer circle. Remember that for the inner part of the hearth for the bonfire, you use refractory bricks that are longer, thicker and wider than usual.
Fold base for grill
An easy way to lay down the grill base is to use a refractory brick. Just pusha couple of pieces to create emphasis.
Set the capstones
Use a level to set decorative stone. It is important that the masonry is very smooth. If you are making a grill, be sure to trim the inner hoods so that you can easily install and remove the grill. At the end, remove the remaining solution.
Finally, cover the area around the campfire with flat stones.


https://i.expert-h.com/en/kostry/1009#sigFreeIdb08b4079c7
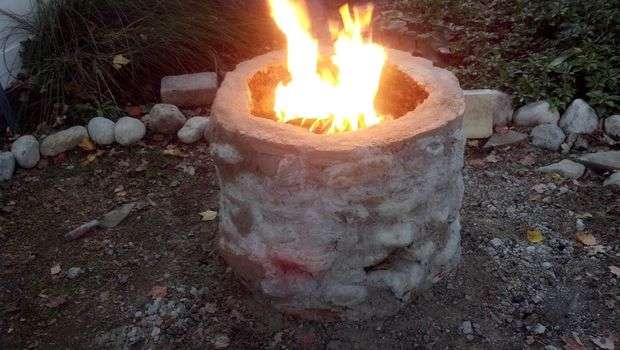
DIY bonfire bowl
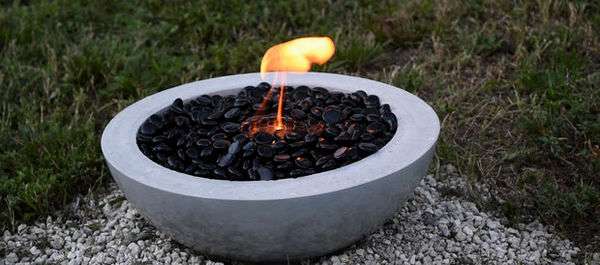 An interesting project for landscape design lovers. Although the author is not a professional, he decided to share his experience, how to make a campfire yourself. In step by step photos you can see all the stages of creating this amazing bowl of fire. You may not be able to find the bowls that the author used, he just stole them from his office after lunch. They are plastic kitchen bowls. Although this does not really matter, you can choose any suitable dish to your liking.
List of materials and tools that were used in this project.
- Gel biofuel for fireplace
- Pieces of marble or black glass (I don’t know what it is)
- High Density Concrete Mix
- 2 bowls of your choice (the bowls I used were 30 cm and 25 cm)
- Wire mesh construction
Tools
- Shovel
- Rubber mallet
- Palm Sander aka Sheet Sander
- Sandpaper
- Any oil (the author used engine oil)
- Heavy stone (hold the bowl in place)
- Pewter pins
Step 1. Prepare the solution
The author recommends using a separate mixing bowl.
- Add the concrete mix to the bowl and add water. Do not overdo it with water, the solution should be very thick.
- Then grease a large bowl.
- Add the solution to a large bowl. Place a smaller bowl in the pan and squeeze. This must be done so that they can see exactly how much is needed.
- Place a smaller bowl in the solution, put something heavy on top.
Step 2: Deleting a Form
After some time (the author waited three days), remove the concrete from the bowl.
Step 4: Grinding the Bowl
Sand the top edge of the bowl with sandpaper.
Step 5: Place the stones
To support the stones, the author used a structural wire mesh, which must be installed in the middle of the bowl. The net can be found at the hardware store. Just cut the required size with scissors for metal.
Step 6: Light the fire
- Remove the lid from the can and place in a bowl.
- Lay the grid
- Lay the stones, leaving the center open, the fire must breathe.
- Set fire to biofuel


https://i.expert-h.com/en/kostry/1009#sigFreeId858966f33c
Campfire place with playground
 When you turn on campfire place into your landscape, it’s important to think about where to install it and how it will be surrounded. A hearth for a bonfire is an element that stands on its own and creates an excellent concept for the patio. Regardless of whether you choose a modern gas model or a fire for a fireThe placement is critical to creating a space you will enjoy all year round. The author proposes a relatively simple project from concrete blocks and stone tiles.
Tools:
- shovel
- putty knife
- rake
- a circular saw
- hammer
- bit
- connected water hose
- level
- sponges
- buckets
- rubber mallet
List of materials (approximate):
- Quikrete (40 bags of 30 kg each)
- Cement (18 bags of 50 kg each)
- concrete blocks 60 pcs
- 500 kg of yellow sand
- 500 kg of gravel
We will not dwell on the construction process in detail, the author picked up good step-by-step photos, where everything, in principle, is clear. If you have questions with any nuances, under the gallery is a link to the author’s site.
- Step 1: Prepare the site
- Step 2: Dig and Pour the Foundation
- Step 3: Make Dry Masonry
- Step 4: masonry with mortar
- Step 5: Prepare Your Patio Area
- Step 6: Fill a layer of gravel and sand
- Step 7: Find the Right Wall Tile
- Step 8: Install the tile on the wall
- Step 9: Lay out the patio slabs
- Step 10: Add The Solution


https://i.expert-h.com/en/kostry/1009#sigFreeId04be2052c1
Campfire place on the patio
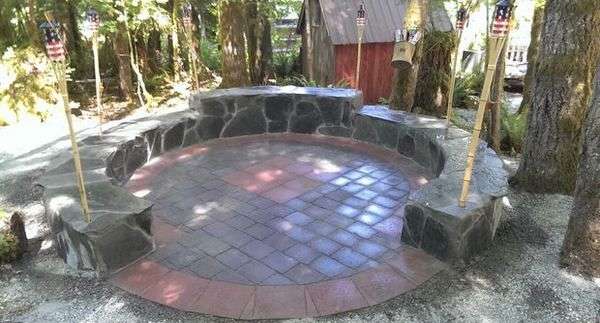 It’s necessary and useful to equip a place for a fire, but it’s kind of ordinary, but hearth for a fire on the patio, this is completely different, it sounds romantic. But in fact, what is a patio? Fenced yard. Even the ancient Greeks and the Romans came up with, and therefore sounds beautiful. The main task is to create the illusion of protection from external threats, it seems that in the Middle Ages this topic was very relevant. Today the times are different, but the desire to create cozy corners has been preserved. But closer to the topic.
Materials need a lot
Base: concrete cushion for 40 blocks wide with wire mesh for reinforcement
Wall: 8x8x16 brick blocks filled with concrete and reinforcement rods hammered into a soft concrete pad
Centre: stone-lined sand base
Wall cover: shale stones
Base: gravel
- Tools
- Shovel
- Hammer, sledgehammer
- Boards
- Laser level
- Roulette
- Concrete mixer
- Stone Slab Saw
- Master OK
- Pliers
Base
Determined the maximum diameter of the base. Drive a reinforcing rod in the center of the circle to use as a center for measuring and laying the foundation. In this project, it is 4 m in diameter of concrete with a 20 mm foundation. Remove soil by 10 cm. Make the formwork. Install a wire mesh around the foundation and fill in the mortar.
Brick wall
- When the foundation has dried, start installing blocks. Place the first block perpendicular to the rest and align, first the corners, and then center each block parallel to the row.
- When the first row is finished, move to the other side and repeat the procedure
- After the wall is folded and checked by level, install reinforcement.
- Fill the blocks with mortar to finish the wall structure.
Paving stones
Remove the gravel from the center of the pit, fill in the sand and flatten as far as possible. Then lay out the paving stones. If you are doing this for the first time, then the process will take a lot of time. But you can come up with your own design, depending on the source material.
As a last resort, you can always shift the paving stones as you like.
Installing slate stones on a brickwork wall
Apply the mortar and begin to set up the selected slate stones. Here the main task is to choose the material so that there is a large selection in shape and size, then you can cover almost every square centimeter of the wall with whole pieces. At the end, remove the excess solution.
Yes, if you are going to make such supports for torches, as in the photo, install PVC pipes into brick blocks before pouring the mortar. That's all, the patio is ready, now you can install a metal hearth for a fire in the center and enjoy the warmth in the company of friends.


https://i.expert-h.com/en/kostry/1009#sigFreeIdf774201c41
Campfire spot
 To create a cozy recreation area on your summer cottage, do bonfire. This is probably what absolutely everyone likes and what every happy owner of a summer residence should do. There are many ways to make a campfire. The author decided not to put a round hearth, but in the form of a square. A matter of taste, of course, some believe that it is more aesthetically pleasing, almost like a chimney at ground level. And then, laying out a square is easier and cheaper, since you do not need to use curved blocks.
Prepare a solution. The author recommends the use of refractory cement, which when heated form ceramic adhesions, which give special strength to the masonry.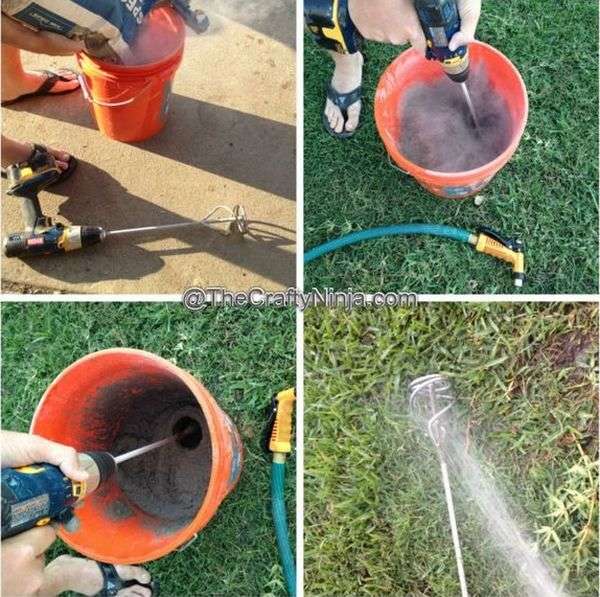
Near the site where the hearth for the fire will be built, the author assembled a model, that is, he simply stacked the stones “dry”. you want to build a stone pit, we made a layout. Two concrete slabs as the basis and natural stones for the walls.
Then wet the area where the stones will be installed. Then apply the solution and set the stones as in the photo. 
Continue masonry, remembering to add the solution to the compounds and smooth. Let it dry for about an hour, and when you finish spraying water on the stones, thoroughly clean the remaining cement that has fallen on the stones. 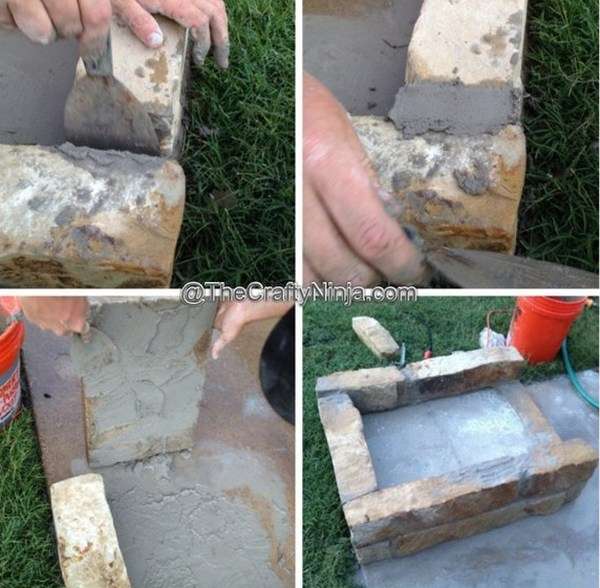
Fire pit in the country
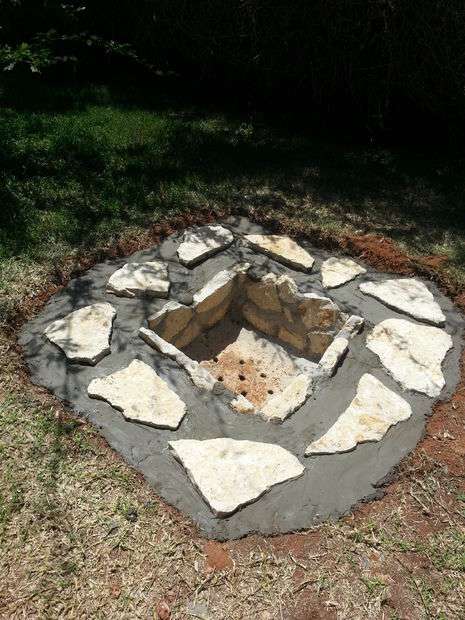 Here are step-by-step photos, as cheap and easy as possible. make a pit for a fire in the country do it yourself with such a square shape. This is actually very simple, though given that you have to work a little shovel.
So:
- Dig a hole about 50 cm deep, in this case in the shape of a square.
- Then prepare a solution, for this pit 15 kg of Portland cement and 45 kg of sand were required.
- Lay out the first row of stones. Pour concrete under and between the stones.
- When you finish making the first row, to drain to the bottom, install a grate, or a sheet with holes, as in the photo.
- Then finish the masonry and fill the space remaining between the walls with earth, which remained after digging a hole.
- At the end, make a platform around the pit.
Let the cement dry for a week, wetting it with water twice a day to make the concrete harder.


https://i.expert-h.com/en/kostry/1009#sigFreeId6dd98198bb
Fire barrel made of metal barrel
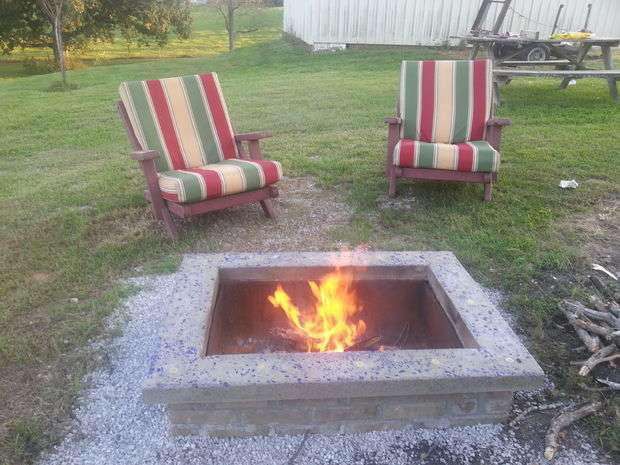 After reading this manual, you can build a great do-it-yourself fire center. As you can see in the photo, this building looks aesthetically pleasing, it is also easy to fold and another plus, this project will cost almost nothing, it cost the author less than a hundred dollars. I would like to emphasize that everyone can build a simple hearth for a fire, it’s not as difficult as you think, and when, finally, put it down, you can brag to your friends by inviting them to the light.
What was the author’s goal? Build a hearth for the fire, which will be:
- Strong and durable.
- To have a removable functional grill
- Cost much cheaper than the store option
- Safe for children
- It could be easily folded using everyday building materials.
Material List:
- 2 bags of cement
- Standard red brick
- 2x4 boards from old pallets
- Cut along a metal barrel
- One sheet of malamine 4x8 mm thick.
- 8 cm long screws
- Wire mesh
- Saw
- Putty knife
- Cars
- Cultivator and shovel
- Rubber mallet
- Gravel for leveling
What was the idea? Make square masonry from ordinary brick, and so that it does not collapse from high temperature, install a cropped metal barrel in the middle. Now that you know what materials you will use, draw a drawing.
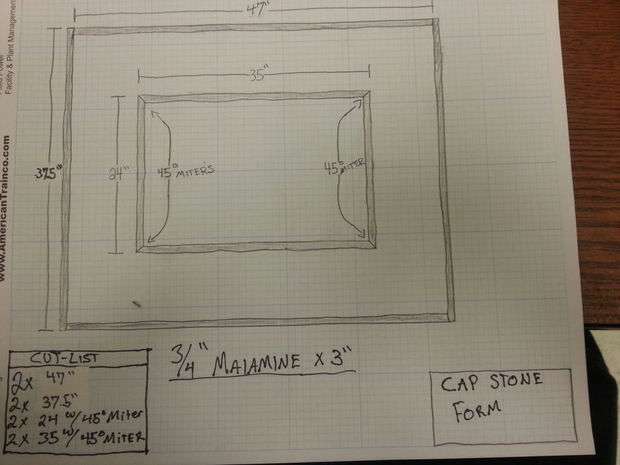
 Since the design will be based on a cropped barrel, you can determine the size. The barrel floor has dimensions of 60 x 90 cm, which means that the inner edge of the foundation should be larger. Start by drawing the formwork.
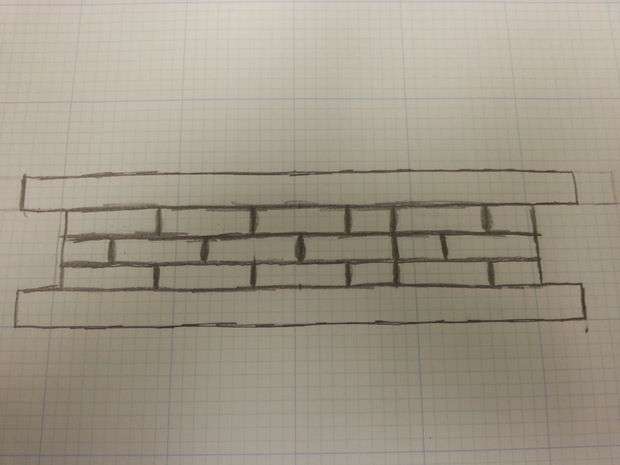 To create foundation drawings, start by drawing the actual dimensions of the foundation itself for scaling using graphic paper. Then designate the form to scale inside and out of the foundation. Thus, you can double-check the calculations and know exactly what size the boards should be.
Now take a shovel and scare the neighbors.
Detailed instructions, how to lay down a hearth for a fire perhaps you don’t have to rewrite it, everything is clearly visible in step-by-step photos, if something is not clear, you can get more information on the author’s website using the link located under the gallery. But it is worth saying separately about accessories.
Drainage system: Drill centimeter holes every 15 cm at the bottom of the installed barrel.
Ash extraction and damper: take the second half of the barrel and cut a piece of sheet metal; install it in the pit as a removable bottom from which ash is removed.
Grill: Locate the grill and attach the legs to the long stainless steel handles so that you can take them without gloves. In general, you can come up with a lot of things.


https://i.expert-h.com/en/kostry/1009#sigFreeIdc3c4cdc7d7
Square hearth for the bonfire
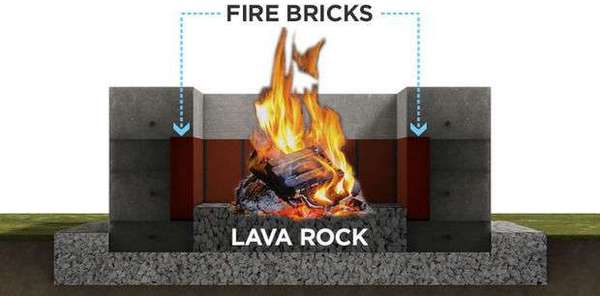
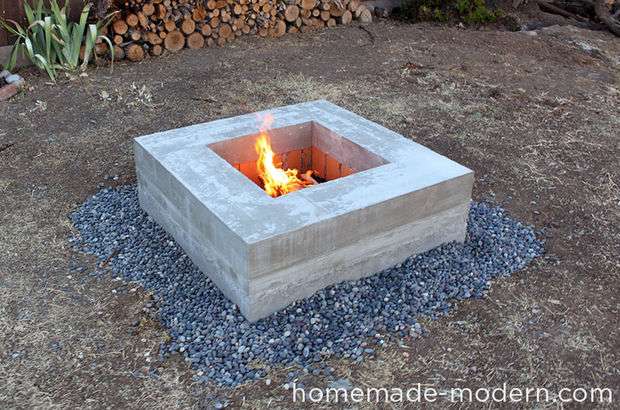 Presented in the photo contemporary fireplace can be folded in just one day. This is not a complicated project, but laborious. Outdoor stoves, concrete barbecues and stationary bonfires must be built very carefully. High temperatures affect the humidity inside the concrete, causing it to expand, causing cracks and explode in extreme situations. To avoid this, lay the inside of the campfire with refractory bricks and lay lava stones at the bottom.This ensures that most of the heat from the fire will not come in contact with concrete.
Campfire plan
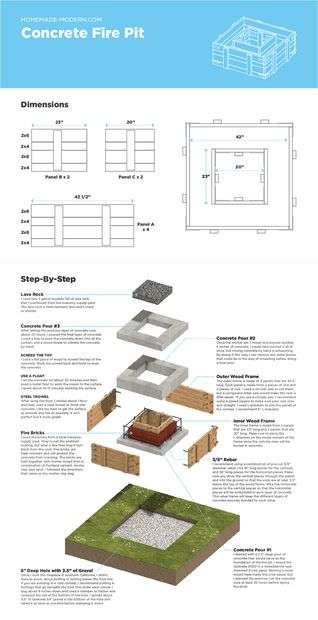 Step 1: Make the formwork. The outer frame will consist of 4 panels 110 cm long. Each panel is made of 2 2x4 boards and 2 2x6 boards. For connection use six L-shaped brackets
- Step 2: Assemble panels
- Step 3: Make the inner frame. The inner frame is made up of 2 panels 60 cm long and 2 panels 50 cm long. Make sure that the L-shaped brackets are located on the inner corners of the frame, as the outer ones will be recessed into concrete.
- Step 4: Install the frame and mark the hole. Replace the frame and mark approximately 15 cm around the outside perimeter.
- Step 5: Dig a hole. If you are building in a campfire site in a cold climate, the author recommends inserting supports that pass under the freezing line at an angle.
- Step 6: Pour gravel. Pour a layer of gravel 5 to 8 cm thick
- Step 7: Install the formwork. Replace the frames and measure the distance between the inner and outer frames to ensure that the inner frame is correctly centered.
- Step 8: Check the formwork level. After the boards are installed in the correct position, fix them with screws. Then check the formwork level. Use a rubber mallet to bring down high angles if they are not even.
- Step 9: Install fittings
- Step 10: Fill the first layer of concrete. Do this at least 20 hours before laying the brick.
- Step 11: Lay brick. Once the concrete has dried for at least 20 hours, get ready to install refractory bricks. Prepare the solution according to the instructions. Start from the base around the inner perimeter of the formwork, and then install the bricks one at a time.
- Step 12: Pour more concrete. As soon as the solution is full, mix and pour another 12 cm. When the 30 cm bars are already covered, add additional reinforcement.
- Step 13: Fill the final layer. After the previous concrete layer has stood for about 20 hours, fill the last layer.
- Step 14: Remove the top. Use a flat piece of board to level the top of the walls.
- Step 15: Steel spatula. Wait about an hour, and then use a steel spatula to clean the surface. Do your best to keep the surface as smooth and even as possible.
- Step 16: Cover. Cover the concrete with boards and a sheet to make sure not to damage the surface.
- Step 17: Remove formwork
- Step 18: Lay lava stones. Lay lava stones in the interior of the pit. This creates a good drained surface and covers the foundation of concrete.
- Step 19: Before you make a fire. The author recommends waiting 30 days before using the fire, and during the first three months not to burn a fire for more than 2 hours. It takes a long time for concrete to dry completely if you do not want the structure to crack. Concrete is protected by refractory bricks and lava stones, but if you make a giant bonfire and burn for hours, the concrete may crack.


https://i.expert-h.com/en/kostry/1009#sigFreeIdc6e6aee932
Stone bonfire site
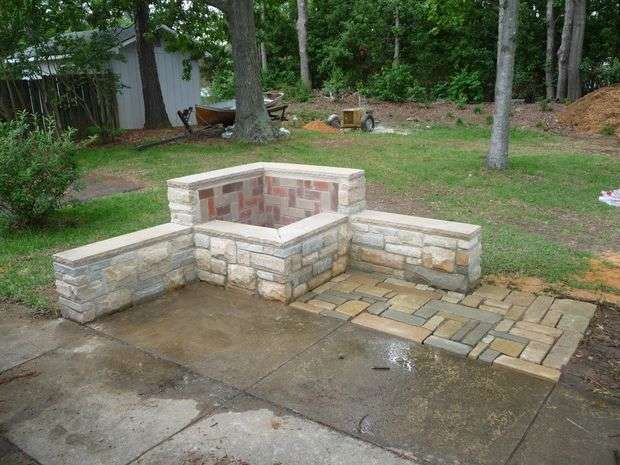 Such hearth for a fire can become the main attraction of your summer cottage. The main thing is to get creative. In this article you have already seen examples of bonfires, mainly a hearth of a round or square shape. In this case, the author decided to give his hearth for a bonfire such an interesting configuration. The high back wall, in theory, should cover the fire from the wind and direct the smoke, this is if your site is located in such a way that the wind usually blows from one side. Although, of course, this is more of a decorative component. The hearth is laid out of brick and tiled. The author did not write a fractional instruction, but he made good step-by-step photos, so the order of work is understandable.


https://i.expert-h.com/en/kostry/1009#sigFreeId5a1546d392
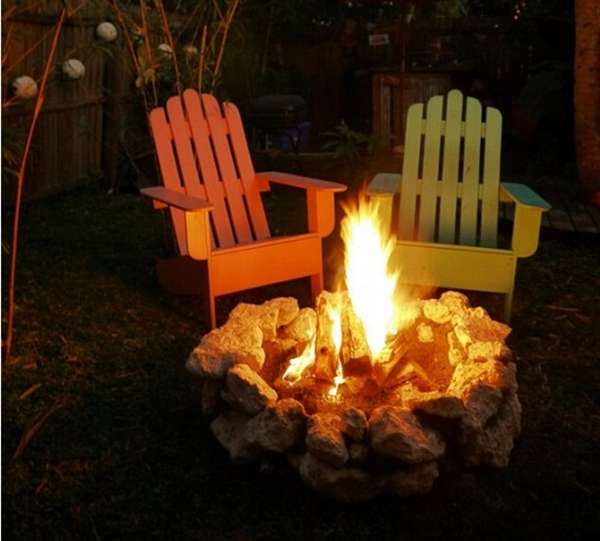
 And here is how to make beautiful Campfire made of paving stones and natural stone. This is not a step-by-step instruction, but just an example of what can be done from an ordinary pile of stones. In principle, this is not a fireplace in the usual sense, but a kind of mixture of a hearth for a fire and an outdoor fireplace. It seems like a simple idea to lay the blocks in different directions, one vertically, the other horizontally, covered with large plates from above - and here, please, the hearth, you can say in the Gothic style. And of course, prepare the site accordingly.
If you liked this composition, you can visit the author’s site, the link is under the gallery. Although the author did not provide step-by-step photos, he described the process in more detail, if interested, you can read it.


https://i.expert-h.com/en/kostry/1009#sigFreeId38fe2dc6b8
Campfire in the gazebo with a swing
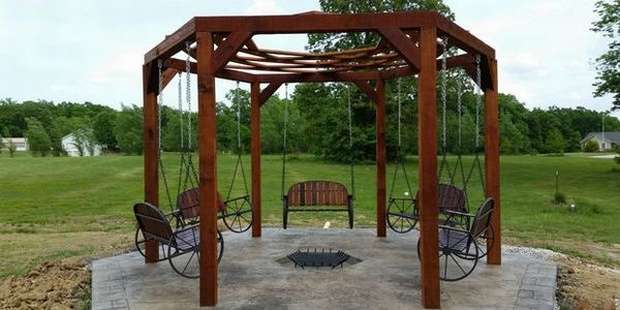 On the Internet you can find many examples of similar designs, it seems that similar pavilions with a fireplace in the center and hanging swings very popular. Although this hexagonal structure can be called a pergola rather than a gazebo. However, it doesn’t matter, the main element of this complex is still a hearth for the fire. The authorship of this idea belongs to Dave Chenango, at least everyone refers to it.
You can’t build such a thing in a couple of hours, there is something to work on, but it's worth it. The author did not provide either detailed instructions or detailed step-by-step photos, although the general idea is clear. Install poles with crossbeams, fill the platform, make a pit for a fire, hang a swing. Total business then. You can find out how to make a pergola here, and equip a place for a fire, dozens of examples are given above. By the way, the author chose to make a pit for a fire, rather than a classic masonry.


https://i.expert-h.com/en/kostry/1009#sigFreeId9b8cec3d2d
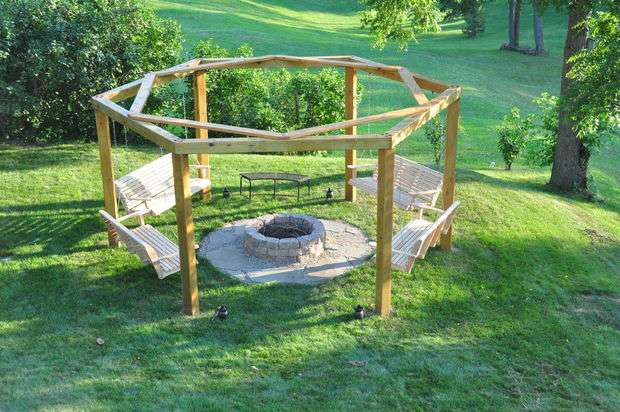 And this is another example arbors with a fireplace and a swing. The authorship of this idea belongs to Dave Chenango, at least everyone refers to it. The author of this project also recommends that you read the instructions from Dave bowhunters.com, however, on the Internet you can find many options. The first photo in the gallery shows a children's playground, in this place and using materials from the children's complex, a gazebo was built.
Here is a basic list of materials and tools that you will need.
Materials:
- Six bars for pillars 150x150 mm long 3 m
- Six beams 150 x 150 mm 2.5 m long.
- Boards 50x150 mm 2.5 m long.
- 24 bolts for attaching beams to racks.
- Galvanized Washers Half Inch
- 10 - 14 pine blocks 50 x50 mm by 2.5 m for use as brackets and layouts
- 6-8 bags of cement
- 6 drainage pipes
- Steel grid 1.2 m to mark the center point.
Campfire material of your choice
One or more tarps if you want to keep the grass intact.
Swing, if you can, do it yourself, the author of the project bought them in a store.
You will also need tools:
- Saw
- Shovel
- Stake sledgehammer
- Heavy steel scrap if you have rocky soil.
- Level
- Roulette
- Carpenters Pencil
- Paint for marking the layout on the ground
- Large plastic mixer
- Cordless drill
- Socket wrench
- Belt sander
- Gloves and safety glasses
Measurements, angles and markings
In hexagons, the distance from the center point to the outer edge of each column will be slightly less than the length of each beam. Here they are 245 cm long, and the distance from the center to the outer edge of each column was 242 cm. Thus, the crossbars located opposite each other were at a distance of 483 cm from each other. But for now, do not bother.
Another problem that needs to be solved is the angle of cut of the crossbars. 360 degrees, divided by 6, is 60 degrees, the separation between the two ends of each crossbar will be 30 degrees. Thus, it is necessary to saw off the end of each bar at an angle of 30 °.
The installation procedure for the pillars and the construction of the gazebo is better read on the author’s website, everything is very detailed, including various little things and nuances.
Concerning hearth for a fire, the author suggests to do it when you align all the structures. Thus, you can first level the hearth and make sure that the foundation for the fireplace is exactly or slightly below the level. If it is below the level, the foundation blocks will be completely hidden, which will give the fireplace a beautiful aesthetic appearance. Once you are happy with the layout of the hearth, use glue for the landscape block to secure at least the top two rows.
Then you can do as you wish, for example, plant grass under the benches and create a small pebble zone around the bone. And lay slate slabs. In the end, the author also bought a rolled lawn to beautifully design the complex.


https://i.expert-h.com/en/kostry/1009#sigFreeIde96c4f8b28
Round campfire with pallets
 it campfire place consists of a hearth and twelve wooden pallets. In general, such a gazebo without a roof.
First you need to prepare the site. Remove the turf approximately 10 cm so that gravel can be poured. You can make a big circle, stick a stick in the center, tie a rope of a long future platform to it and mark the border. When the site is marked, the soil is removed, cover the gravel.
Apply resin to the bottom of eleven pallets that will stand upright. Then staple eleven pallets together to form a circle.
Make a place to store firewood using pallets as shelves.
An iron barrel or any other option that you choose in this article can serve as a hotbed for a bonfire; there are many examples here.


https://i.expert-h.com/en/kostry/1009#sigFreeIddf3bc5db15
Hearth for the patio
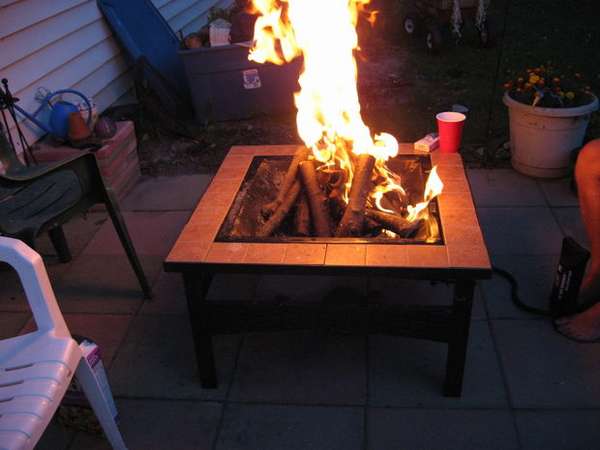 Fireplace for partyabout - A great idea to organize a pleasant outdoor vacation with friends or family on cool evenings. But it’s not always easy to start and maintain fire, for various reasons, raw firewood or something else. In general, the author of this project was tired of waving a newspaper to blow a fire, and he came up with a way to simplify this process.
- Find a suitable pot and drill a hole 1.5 cm in diameter in the center.
- Cut the iron corner in two. Drill a 3 mm hole on both sides and two 150 mm holes on the other two sides.
- You will also need an iron tube, a tee, two 10 cm nipples, two caps, one 90 ° turn signal, nipples 15 and 20 cm.
- Drill 10 holes of 3 mm evenly along the length of the tube and tee.
- Make slots on the brackets in the holes to facilitate centering the tube. Use 2 screws to secure the 2 brackets 8 cm on both sides of the center hole.
- Insert the air tube and weld.
- Screw in 15 cm nipple, then turn signal and 20 cm nipple
- Buy a pump, the author used an air pump from walmart.
Connect the pump hose and see how it works. According to the author, his design works perfectly.


https://i.expert-h.com/en/kostry/1009#sigFreeId645e4e2a21
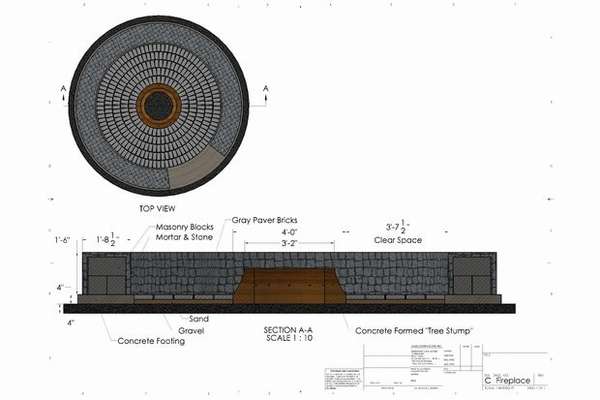
Fireplace Drawings


https://i.expert-h.com/en/kostry/1009#sigFreeId45735e4bc1
Campfire with their own hands 200 photos


https://i.expert-h.com/en/kostry/1009#sigFreeId3f04f9e564
Hello, I am the author of this article, so I look forward to asking questions for this article in the comments below, I will answer all !!!
If you have questions on another topic, ask them on our forum, we will answer you
- Two baskets of paper in 5 minutes (Master class)
- How to make a simple and compact table for a milling cutter from plywood
- How to make a soft headboard tile (Instructions + step by step photos)
- Cinder block benches: a convenient bench in 55 minutes
- How to make a bed with a niche: saving space (Master class)