DIY hammock 800 photos, step-by-step instructions, drawings
 DIY hammock
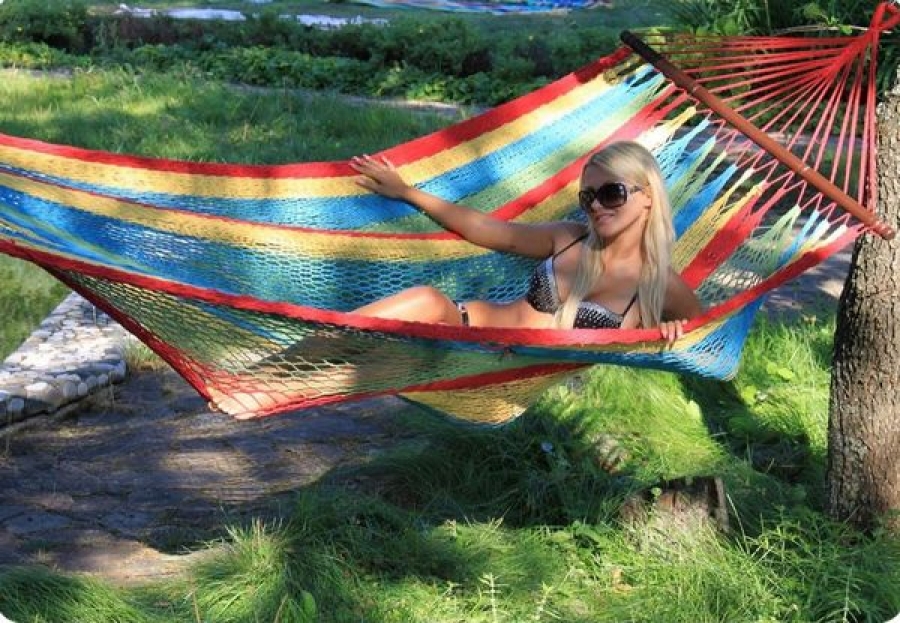
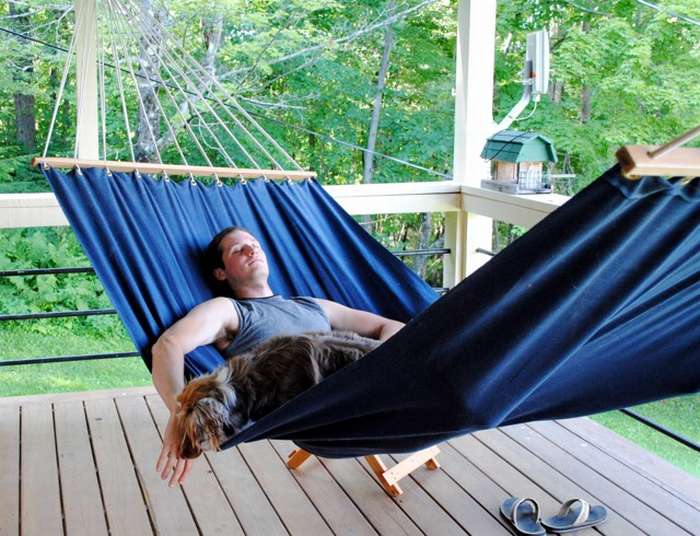
Hammocks are a great thing. When you go camping or skiing, you can get incomparable pleasure, comfortably sitting in a hammock over sharp rocks, on a steep slope or even over a mountain stream. It is also a great way to relax on a warm summer day in the garden or courtyard.
This article is for anyone who wants to know how to make a hammock with your own hands from accessible materials with simple tools. Here are selected specific examples with step-by-step photographs, master classes and instructions with links to the source.
The article has three sections on how to do:
- DIY hammock made of fabric
- Wicker hammock
- Hammock tent
From this article you will learn:
3 main types of hammock from fabric:
On the frame
Nautical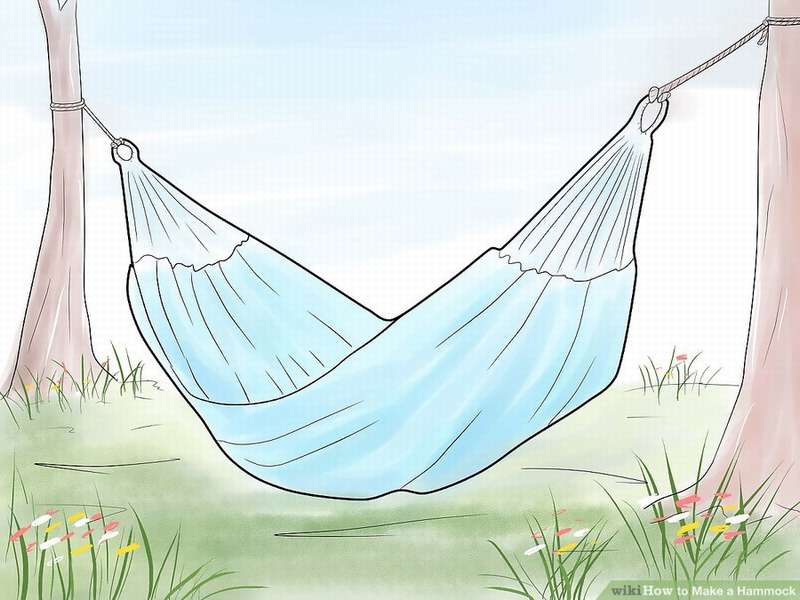
Plain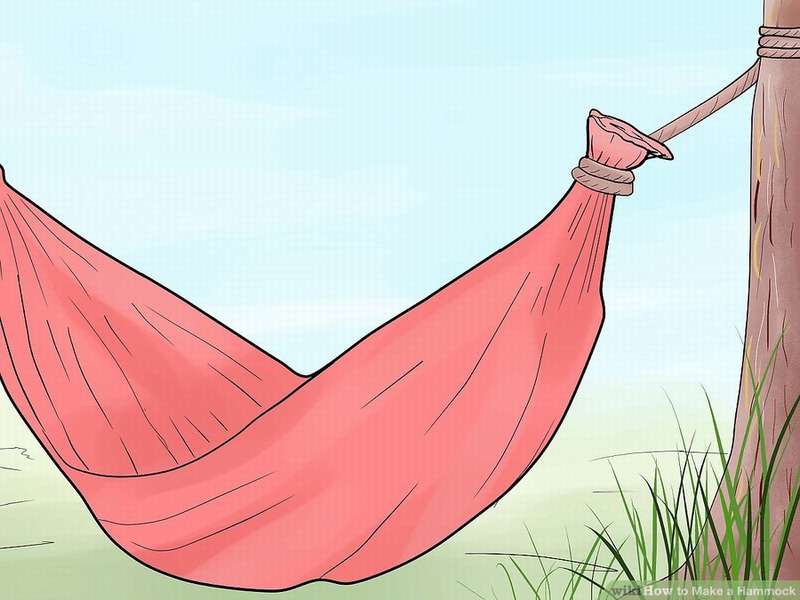
Watch and read master classes and step-by-step photos of making such hammocks in the article below.
Other models from fabric:
Mexican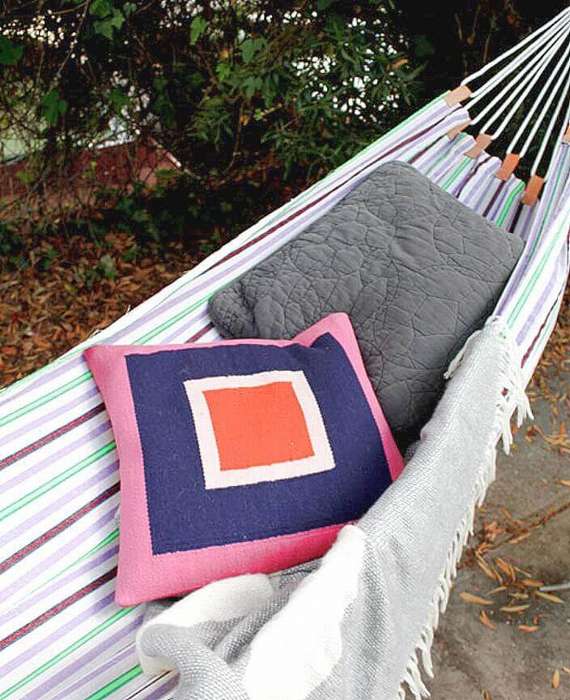
We give in 5 minutes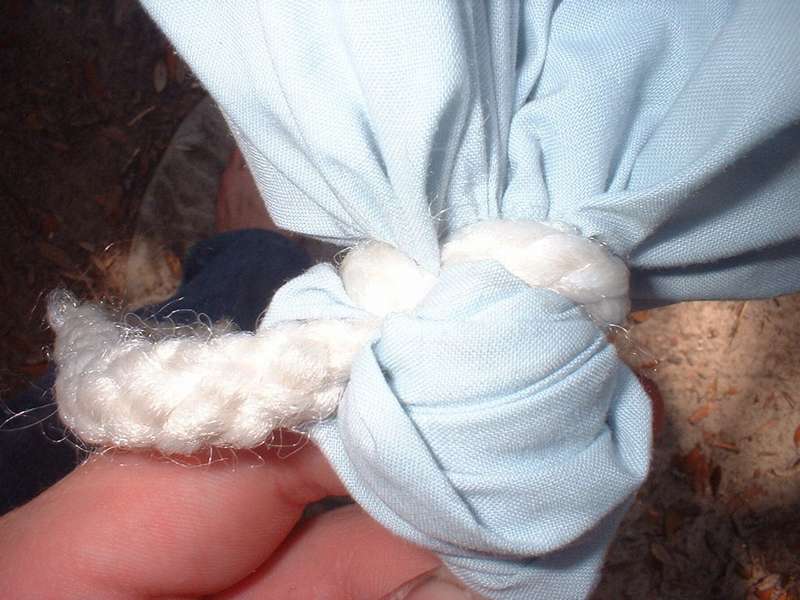
+ master classes::
- For the lazy
- To give
- For camping
- From tarpaulin
- The cheapest
+ Tips:
- Types of hammock mounts !!!
- How to fix it correctly
Watch and read master classes and step-by-step photos of making such hammocks in the article below.
Wicker hammocks (master classes):
Will withstand 38 tons
(weaving master class)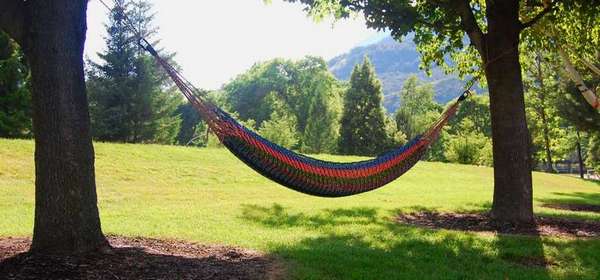
With wood plank
Hammock banana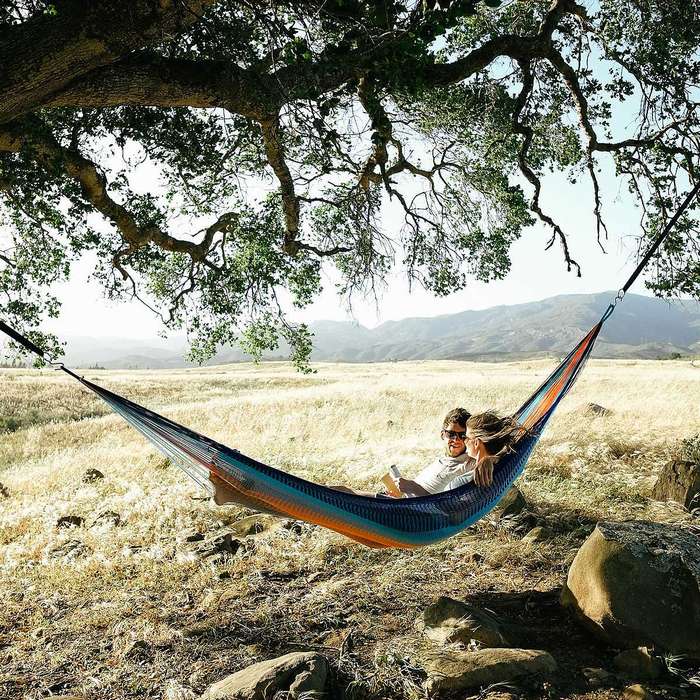
Rope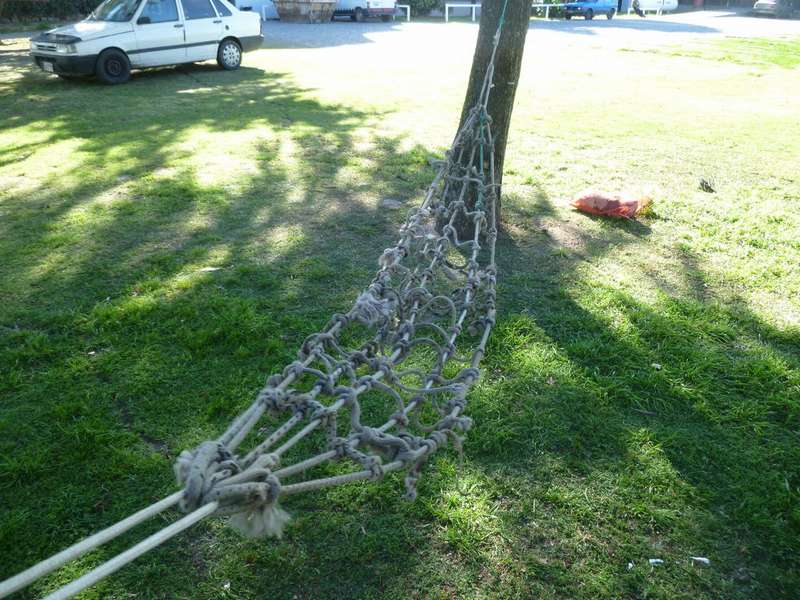
Triangular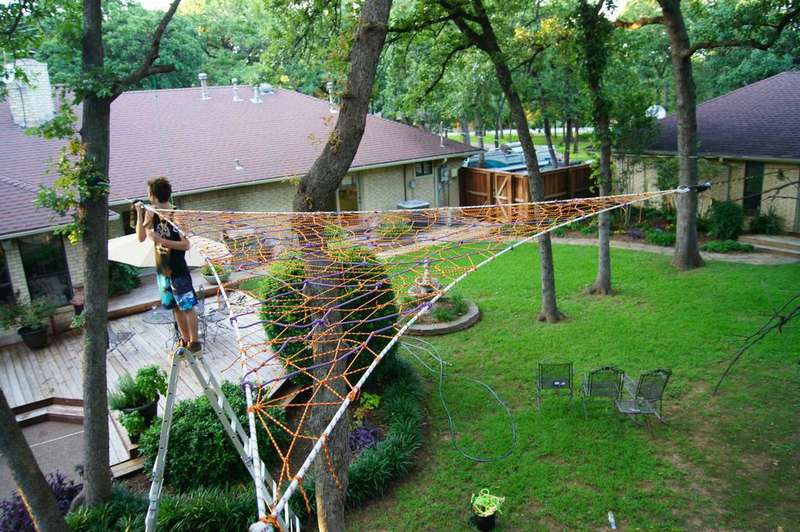
On a loom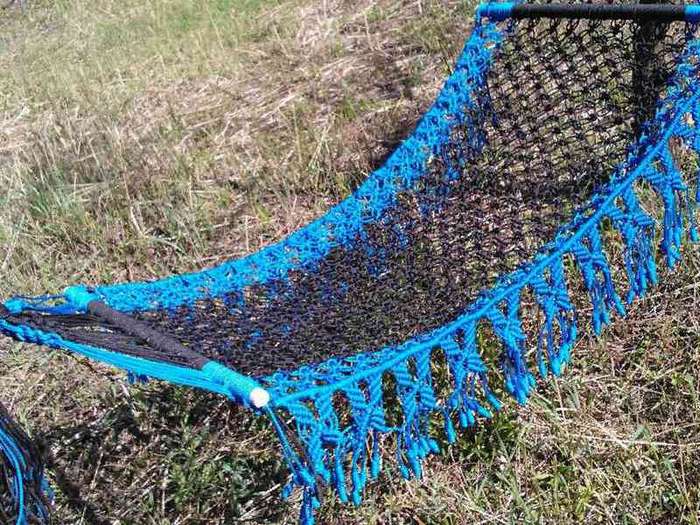
Master classes and step-by-step photos of the manufacture of such hammocks, read the article below.
Hammock-tent (8 models):
Hammock tent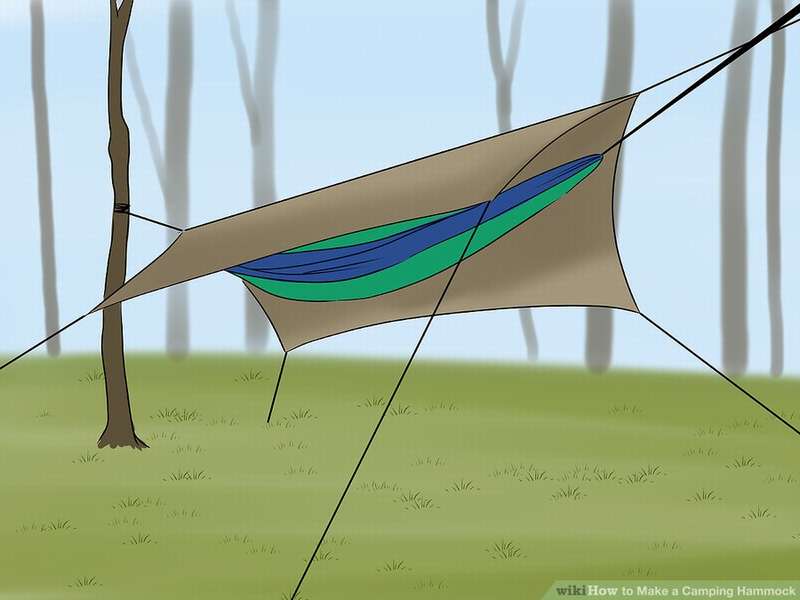
With awning and mosquito net 
Cot
Insulated to -10 °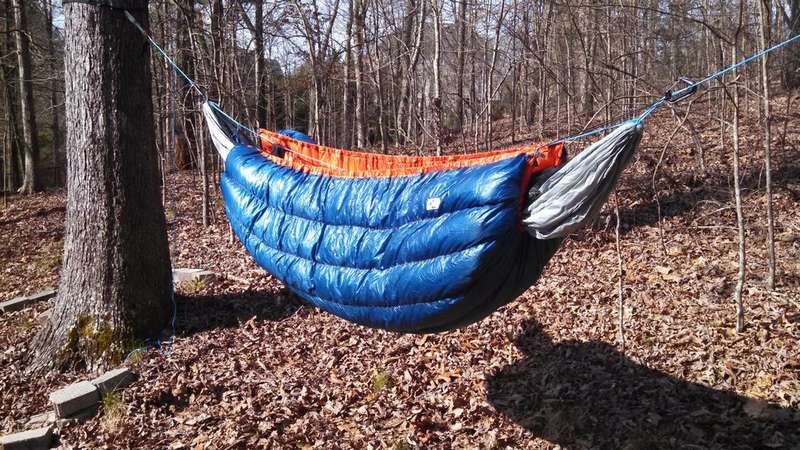
Insulated to -18 °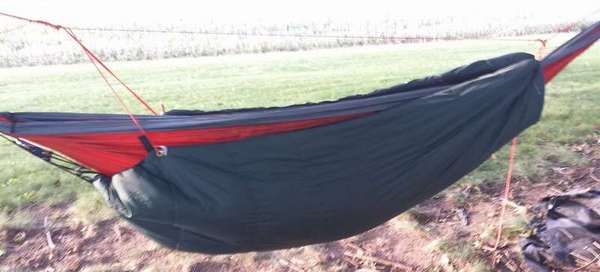
Large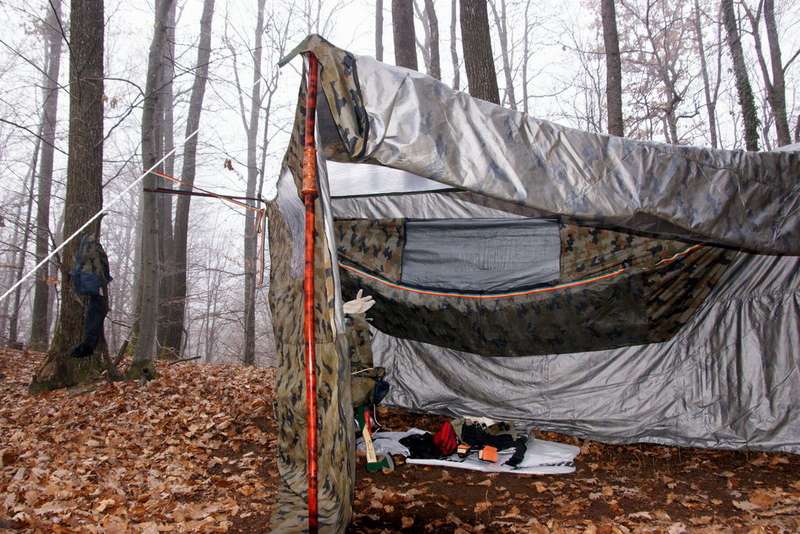
Master classes and step by step photos of the manufacture of such hammocks, read the article below.
DIY hammock made of fabric
How to make a hammock with your own hands 3 ways
 Hammocks are the main symbol for outdoor enthusiasts. These are essentially portable beds fixed between two solid structures from trees to pillars. Making a hammock is an art accessible to everyone. There are many ways do-it-yourself hammock, here are three of them
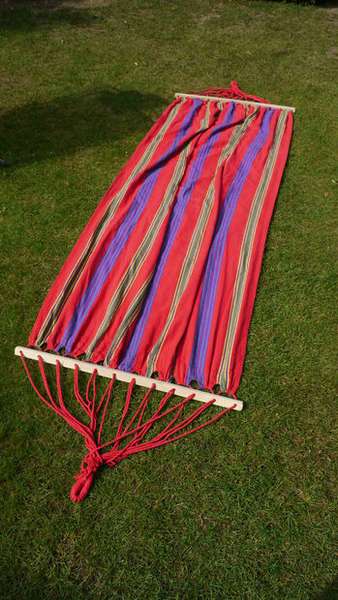
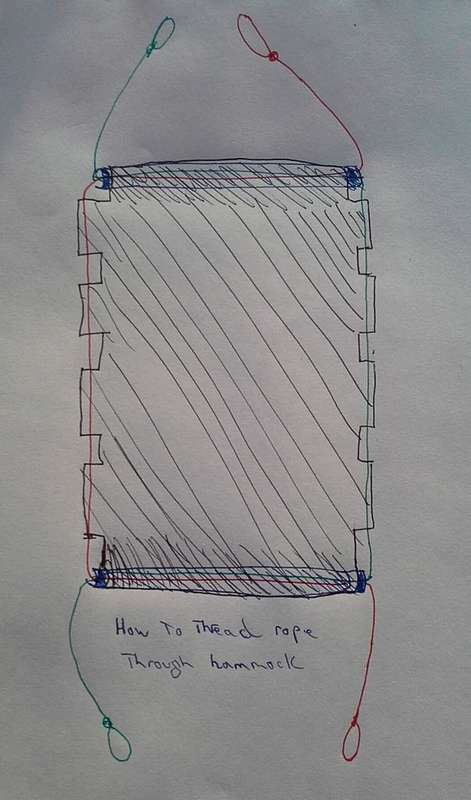
Method 1: Frame hammock
- Cut the fabric, measuring 225 cm in length and 128 cm in width.
- Make a seam allowance both top and bottom along the length of the fabric 1.25 cm and sew.
- Wrap 6.25 cm on each side along the long side twice. These will be the tunnels for the ropes.
- Measure the tape and fasten at each end, then turn and sew to the first part of the fabric.
- Make two rows for extra strength.
- Prepare two round wooden sticks. Drill a hole with a diameter of 8 mm at a distance of 3 cm from the ends.
- Pass the first half of the stick through the hemmed hem. Then the second through the upper end.
- Prepare the ski rope. Cut 9 meters. Pass the rope through the first hole of the stick. Then pull down and pass through the opposite hole at the other end of the hammock.
- Pull the rope and leave a distance of 1.6 meters. Then pass the rest of the rope down through another hole on the same short side, and then through the body down to another hole at the beginning of the end.
- The two free ends of the rope should be about 1 meter long.
- Weave at least 40-50 cm.
- Repeat at the end with an arc. Cut the rope in half, then wind the ends around the stick one-third. Or tie large knots to prevent the rope from slipping, then tie loose ends around a large object, such as a tree trunk, hammock racks, or porch or gazebo supports.


https://i.expert-h.com/en/gamaki/svoimi-rukami-i-foto-poshagovye#sigFreeIde1ca1b1faa
Method 2: Morc hammock
- Cut the fabric 2 meters to 1.2 meters. Keep in mind that 15 cm will be lost when creating a hammock.
- Wrap the edges of the canvas 3.8 cm and make a seam.
- Wrap the 3.8 cm short ends. Repeat again and then sew the pressed ends together using at least two or three rows of stitches. Make stitches at least 2.5 cm from the end to leave space for pads.
- Mark 20 evenly spaced points along each end of the hammock. They mark the location of the bushings. Use a fabric marker or chalk.
- Pass the gaskets along the marks.
- Cut the rope into 10 pieces 2.7 meters long.
- Make a braid. Fold the cords in half, thread into rings and tie knots.
- Attach the loose ends of the rope to the bushing. When attaching ropes, useA node, for example, a node for a boot.
- Hang on trees or poles. Test the strength of the sea hammock.


https://i.expert-h.com/en/gamaki/svoimi-rukami-i-foto-poshagovye#sigFreeId754ebc76fb
Method 3: Simple hammock
- Take a tarp or blanket.
- Tie one end of the tarpaulin or blankets into a knot, and then tie a strong rope.
- Wrap the rope several times around the tree.
- Repeat the process of wrapping and binding on the other end of the tarp or blanket.
- Pull another rope over the hammock.
- Also use tarps as protection against rain or shade.


https://i.expert-h.com/en/gamaki/svoimi-rukami-i-foto-poshagovye#sigFreeIdd7f421ddb8
DIY hammock
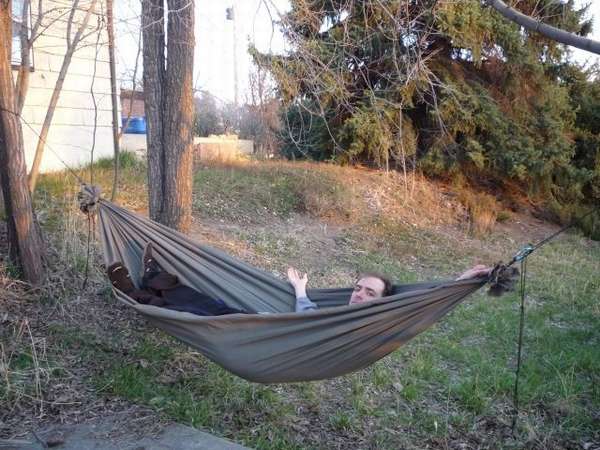
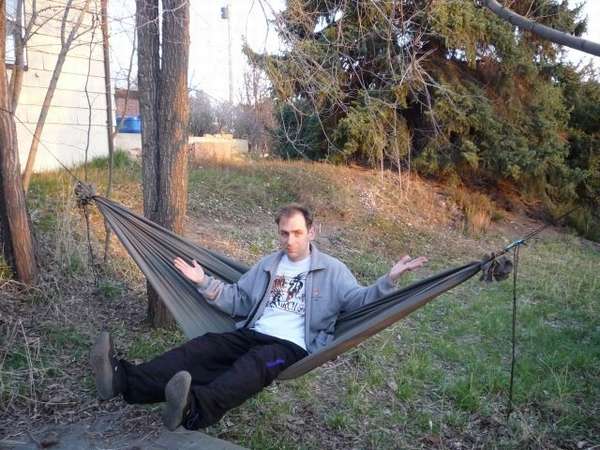
 Any hammock should be, first of all, durable, and then comfortable and beautiful. Therefore, the choice of material is very important, not without reason the author of this project suggests using rip stop - high-strength fabric combined with reinforced yarn. Many useful things are made of it: sails, kites, special suits, parachutes, in general, where strength is needed. The name is translated, stop, this is understandable, and rip means “tearing”, that is, a fabric that does not tear. This hanging hammock made of two sections of rip-stop nylon stitched together, although a single layer would have been enough. Do not worry if you do not know how to sew. Auto used a sewing machine for the second time in his life, and as you can see, it turned out pretty well.
Highlights are shown in step-by-step photos, if you are interested in instructions, how to sew a hammock with your own hands, you can read on the site using the link under the gallery.


https://i.expert-h.com/en/gamaki/svoimi-rukami-i-foto-poshagovye#sigFreeId59713e05af
Mexican hammock
It is the Mexican version of the hammock that is the easiest to manufacture. Consider how to make a mexican hammock with your own hands right and fast.
What do you need
- Materials will not be needed very much, but they, in addition to quality, must meet certain requirements.
- First, you need material for the hammock itself. The fabric should be very dense, preferably cotton, size 104X200 cm, not less. Coloring is not so important, but it will not hurt if the pattern will at least slightly resemble Mexico - we are constructing a Mexican hammock.
- It will take leather to make loops.
- Another material similar in rigidity is suitable - artificial or natural, if only it would be "tough" for a sewing machine.
- Tight tourniquet, nylon or nylon.
- Corsage tape fastening leather loops.
- Fixing safety pins.
- Thin twine made of cotton or nylon.
- Sewing machine, scissors.
Here, perhaps, everything you need to create mexican hammock do it yourselfand. Getting to work.
 Having hemmed the edges by 2 centimeters on each of those sides, which are narrower - 104 cm. As a result, we get a canvas of 100X200, not 104X200 cm, as it was at first.
- Cut 2 pieces of corsage tape 100 cm long. Or 2 pieces of dense cotton fabric of the same length, 4-5 cm wide. We wrap one of the tapes with the narrow edge of the fabric and attach it on a sewing machine. We perform the same operation with the second tape.
- From the skin we cut the blanks for loops 15X2.5 cm. They should turn out 18 - 9 loops on each side.
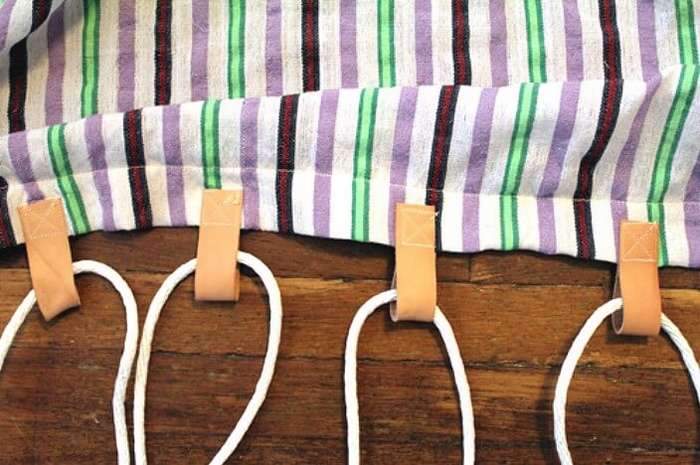
- We fold each piece in half and get a loop of 7.5 cm. We attach 9 such loops to each edge of the canvas, of course, at the same distance from each other.
- On the meter-prepared edge, 9 loops are placed after 10 cm. The third part of the length of the loop is superimposed on the fabric and sewn, first with a seam around the perimeter, then cross to the cross.
- For rope fastening into each of the loops obtained, we pass through one section of a 1.2 m tourniquet. We have 18 (9 on each side) double segments of a 60 cm long tourniquet.
- The free ends on each side are assembled into a single bundle and connected with a double simple knot.
- The remaining tips can be cut for accuracy, the loop formed is wrapped with the remains of the tow, and over it with thin twine.
We establish supports and we fix mexican hammock. Or between two trees, as appropriate. Now you can relax and rest in a Mexican-made hammock made by yourself.


https://i.expert-h.com/en/gamaki/svoimi-rukami-i-foto-poshagovye#sigFreeId954f92bc77
DIY hammock
 Summer vacation was wonderful, wasn't it? Perhaps for the sake of completeness, something small but important was missing. Next year you are sure to do DIY hammock - simple and beautiful. After all, it is so interesting to show your imagination, taste.The proposed version of the hammock is designed for placement under the roof, but you can, in principle, hang it in the garden.
First, select the fabric. Used in this case mattress teak, but you can take tarps or camouflage fabric, 3 meters long. We twist the ends of the fabric and fold the centimeters about 6 (you can slightly more) and iron, then repeat the procedure.
 We flash everything with a double edging. We fix 11 metal rings on each side. The process itself is not too complicated, everything is depicted in detail in the photo. The main thing is to pre-make accurate measurements and calculations. When cutting holes for rings, special care is not needed, you can just pierce them with a sharp knife.
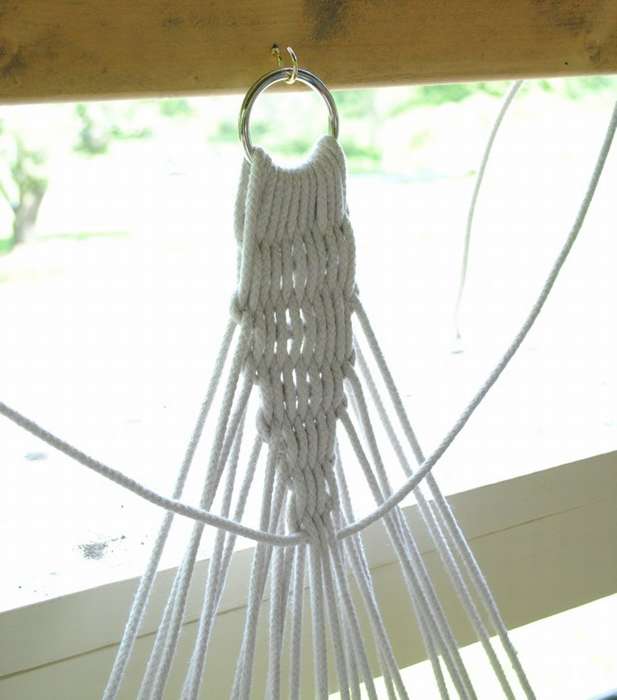
We install wooden beams for hammock
The photographs show how you can make a support frame for convenient fastening of the entire structure together, as well as for weaving. In the lower part, the thread is distributed over 11 pre-screwed hooks. In the upper part, you need only one hook for the ring. First, a piece of rope passes through this ring, then through the transverse bar, and only then through the ring of the hammock. The end of the rope is attached to the lower hook.
The rope ends can be woven into a beautiful pattern.
Materials and Tools:
- dense strong fabric - about 3 meters;
- 2 wooden beams 3X2 centimeters long equal to the length of a hammock;
- drill, drill Ø1cm;
- cotton rope;
- metal rings.
Only the main points are shown here, details can be viewed on the video on the author’s website.


https://i.expert-h.com/en/gamaki/svoimi-rukami-i-foto-poshagovye#sigFreeId7d7606cbb6
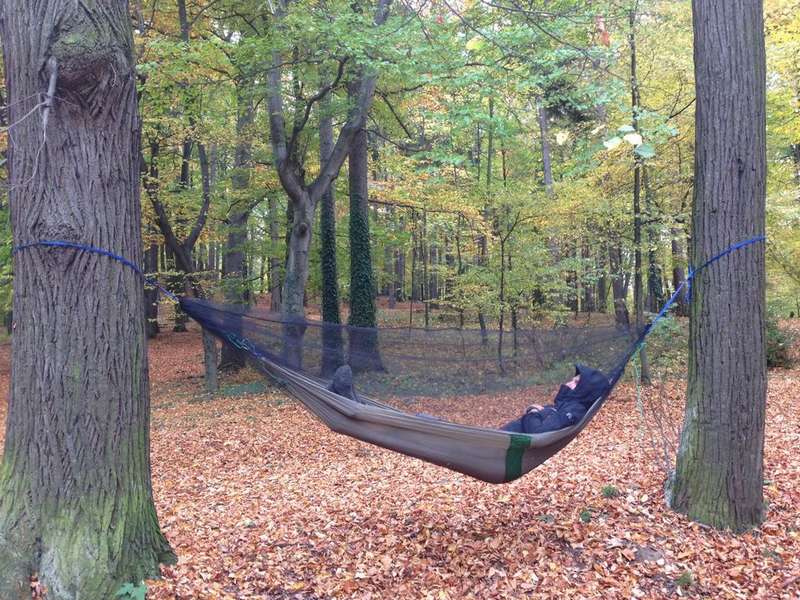
How to hang a hammock in the country
 The author has long dreamed (like many of us, probably) about a hammock in his garden and acquired such a blank. No ropes, fastenings or even instructions were included in the kit. Therefore, we thank the author for detailed photos and descriptions of the process, how to hang a hammock
 What do you need
- hammock;
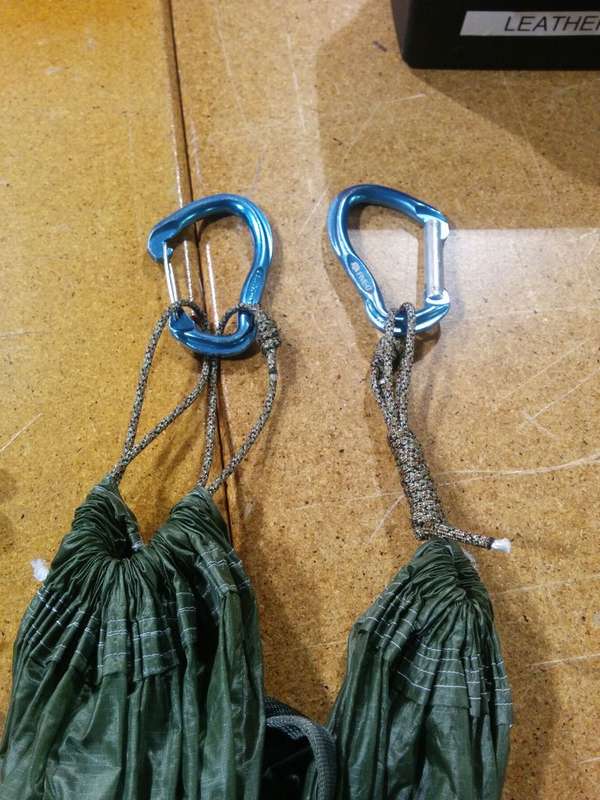
- 4 carbines (you can do two)
- strong kapron cord
The so-called “Gazebo node” - the simplest and, perhaps, the strongest, "king of knots." How to tie it, what loops and how to do it, what end to stick in - everything is described in great detail in the article and depicted in the photo. A carabiner is fixed in such a loop, a very reliable connection is obtained. The existing rope is previously cut into two fairly long parts, so we repeat the operation with the knot and carbine twice.
We twist the trees with ropes, the free end is passed through the attached carabiner, but you can not use the carabiner in this case. The ends are simply threaded into the loops formed, a carbine is needed for speed and convenience. On the remaining free ends of the ropes we tie the bow knots with carbines - then a hammock will be attached to them.
To the edges of the hammock we fasten carbines, fastened earlier at the ends of the ropes. Now we select the desired height of the hammock, lowering and raising the ropes.
The final chord is a spectacular appearance. The remaining long ends of the ropes are trimmed carefully with scissors. If a kapron cord was used, it is convenient to tidy the ends with a lighter, as in the photo.


https://i.expert-h.com/en/gamaki/svoimi-rukami-i-foto-poshagovye#sigFreeIdc5054ebe8f
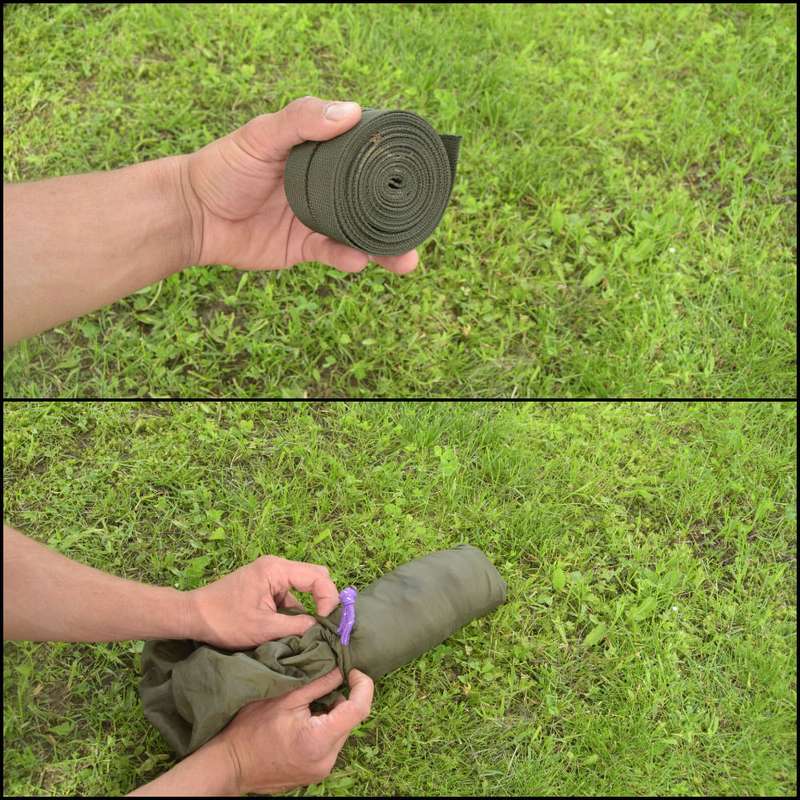
Cheap hammock
 Hammocks either cost decent money, or require a lot of time and effort. There are a number of solutions to this problem - here is one possible way. This design can be done in an hour.by spending a minimum amount. If you need a compact, easy to use, cheap hammockthen you will like this method.
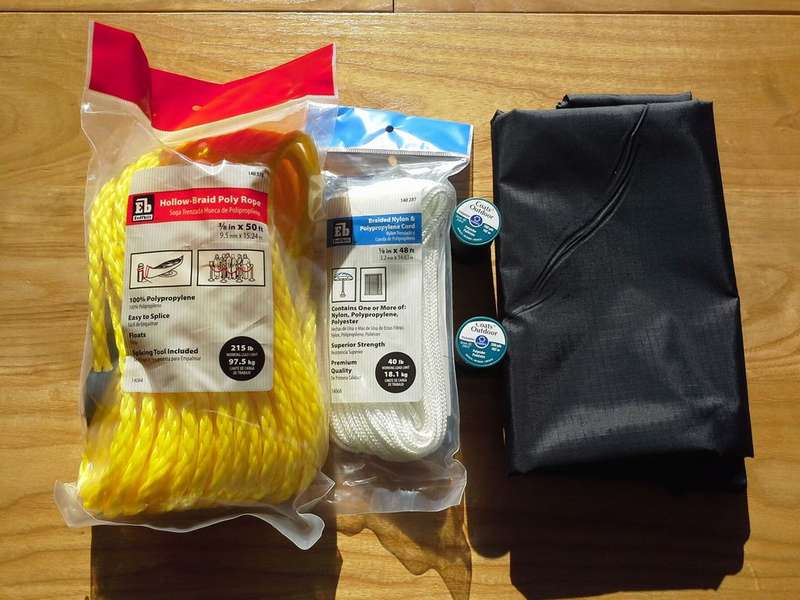
To do-it-yourself hammock, a lot of materials will not be needed. Prepare a fabric approximately 3 m long. You can buy something suitable in the store or use a sheet. The strength of the fabric is not a problem, so choose any material that you like best, provided that it has a width of at least 120 cm. Also prepare:
- 2 carbines. Any, calculated on 100 kg. If you prefer something more durable, try stainless steel carabiners. They weigh more, but are designed for higher workloads.
- About 10 m of paracord. In addition, you will need scissors or a knife, as well as a lighter (option).
 How to tie knots and fasten a hammock on the trees, look at the step by step photos, detailed instructions are on the site.
If you have doubts about mounting, here are some calculations. Parracord is designed for 250 kg. The wisdom is that a safe workload ranges from 1/3 to 1/5 of the tensile strength, which leads to a more conservative estimate of up to 50 kg of safe workload. Then we need to fix the nodes. Knots can weaken the rope by 50%. There are 4 threads, so we multiply 25 kg by 4 to get 100 kg. Therefore, according to calculations, gammonia must be able to withstand static 100 kg. If you weigh more, you can use a stronger climbing rope.


https://i.expert-h.com/en/gamaki/svoimi-rukami-i-foto-poshagovye#sigFreeId30fcf4e9e7
 Hammock for the lazy
Or how to make a hammockdoing virtually nothing. That’s why the author called his product “Hammock for the Lazy”. For its manufacture, you can use any scraps of littered fabric. It is even better if somewhere in the bins there are also trimmings of lace, furniture upholstery or an old patterned scarf. Then, according to the instructions, you will create an absolutely original, most personalized thing.
You will need a sewing machine, ropes and, of course, fabric, which will serve as the basis for the hammock. The author lists many more all sorts of necessary tools and materials. The process is very detailed in the photo.
When the panel is ready, you can connect the imagination and make some bright spot in the standard design. Somewhere to attach a fringe, somewhere to sew lace or colored fabric. That is, in any way to express your own individuality, so that no one else would have such a hammock. Then everything is as usual: find a suitable place, suspend a hammock there and enjoy the sunny weather. In the backyard of the cottage it will look just gorgeous and very attractive.


https://i.expert-h.com/en/gamaki/svoimi-rukami-i-foto-poshagovye#sigFreeIde7d289a6d1
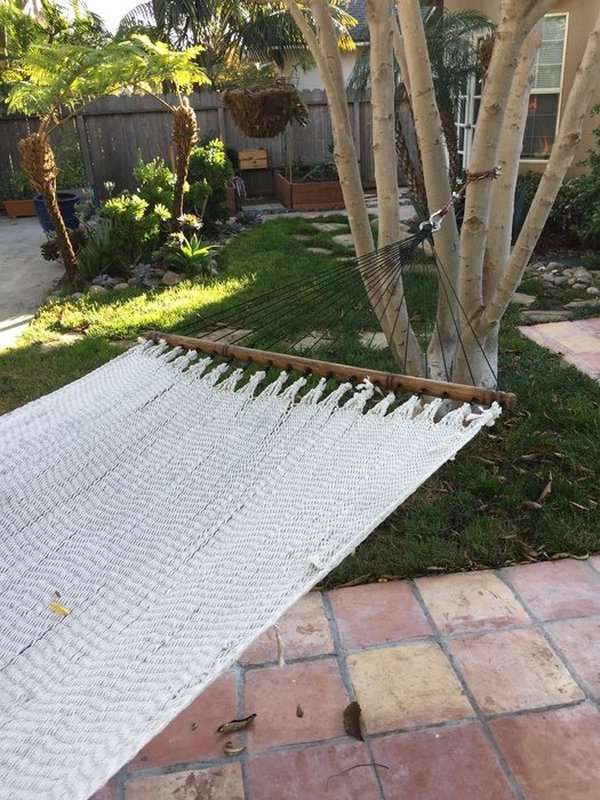
Outdoor hammock
 Without a hammock, it’s hard to imagine a complete outdoor recreation. It is a compact, comfortable and easy to use suspension device. Also do-it-yourself hammock it’s not at all difficult, at least it’s easier than it would seem at first glance. One of these homemade options you see in the photo, and the author wants to share his design and tips with you. Folded hammock smaller cans of beer and weighs only 520 grams! If step-by-step photos are not enough, there is a video on the author’s website (link under the gallery).
Tools and materials
- The most important thing, of course, is the fabric. It should be thin, but strong. Use a Ripstop fabric, in most cases this material is used to make hammocks.
- You will also need a 4.5 meter 5 mm synthetic rope. It is mainly used to tension slings of a rib line.
- Next, 8 meters of polyester belts (inelastic) in the range of about 2-3 cm wide. Ordinary ropes are better not to use, they will put more pressure on the bark, which can damage the tree. 4 meters at both ends of the hammock should be enough even for the thickest trees
- And last, four stainless steel metal rings. They are used to tighten the system. 4mm rings are strong enough.
 The most important tool is a sewing machine. You could technically do without it, but it will take a lot of time and patience. In fact .... need about 20 meters of sewingso it’s better to use a sewing machine!
In addition, cook
- A thread
- Sewing pins
- Scissors
- Matches or lighter
- Pencil or marker
- Roulette
The length of the fabric should be exactly 3 meters 28 cm. Do not ask why - it just should be so. Add an additional 5 cm on both sides. Usually the fabric is sold 1.5 m wide. Use a tape measure, straight edge, pen and scissors to mark and cut out 3.38 m long piece. Do not throw away the scrap!
This is the main point, if you need detailed instructions, the link below.


https://i.expert-h.com/en/gamaki/svoimi-rukami-i-foto-poshagovye#sigFreeIda3fbbbd1c3
Hammock in 5 minutes
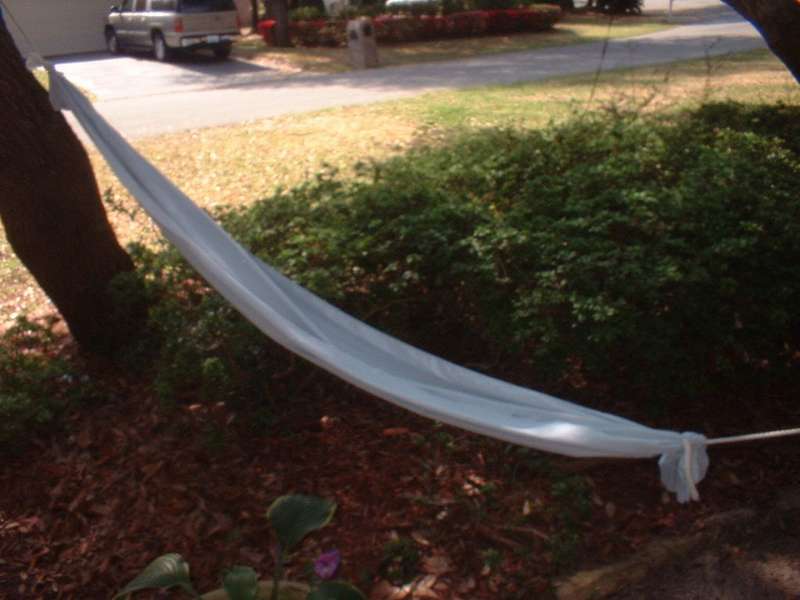 Here's how to do functional hammock in 5 minutes from household items.
Materials:
Any strong material, a knife (or anything that cuts), 3 m of rope.
How to do:
- Cut the fabric in half lengthwise, or about 70 cm from the edge.
- Cut the rope in half, tie corners at the ends of the fabric and tie the ropes.
- Last step: tie to a tree and relax.
Note: the hammock looks very narrow, but when you lie in it, the metea will be enough.


https://i.expert-h.com/en/gamaki/svoimi-rukami-i-foto-poshagovye#sigFreeId49f0340248
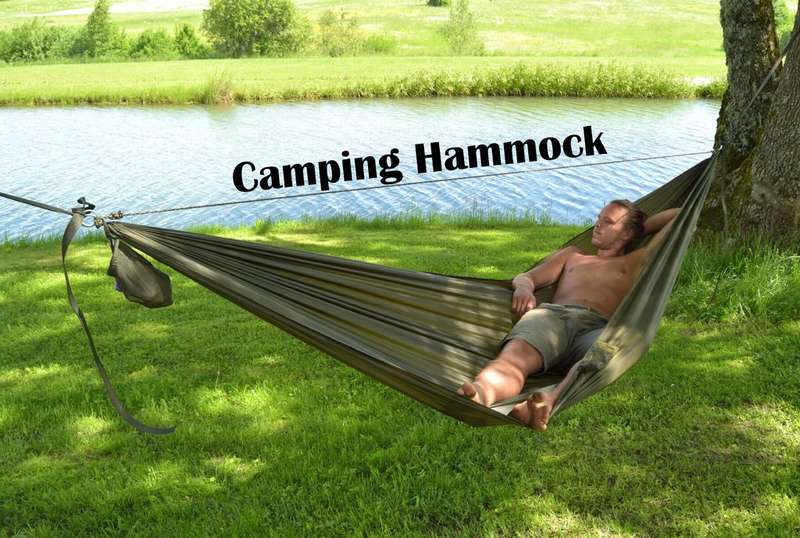
Camping hammock 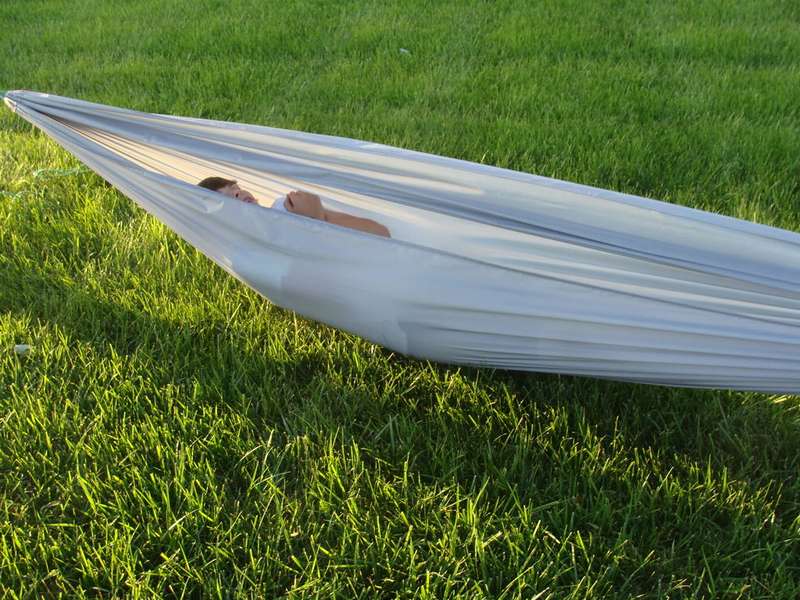
Necessary materials:
- A large piece of Ripstop nylon fabric - 3 m by 60 cm.
- Sewing machine
- Paracord is any type of rope that will hold your weight. The length of the cord will depend on the distance between the trees.
- 2 carbines or another type of mount.
How to do
- To make the edges look neat and the fabric does not wear out, hem the edges with a sewing machine.
- Take the 2 short ends of the fabric and fold to make room for the rope. Repeat at the other end.
- Insert the rope into the stitched space. Repeat at the other end.
- Hang a hammock on the trees. (4 to 5 meters would be ideal).
- Add a rug or thick fabric to the bottom of the hammock. It will be useful when the sun setsand it gets cold.
- You can also add a sleeping bag and lay on top of the mat.


https://i.expert-h.com/en/gamaki/svoimi-rukami-i-foto-poshagovye#sigFreeId492e42f7b0
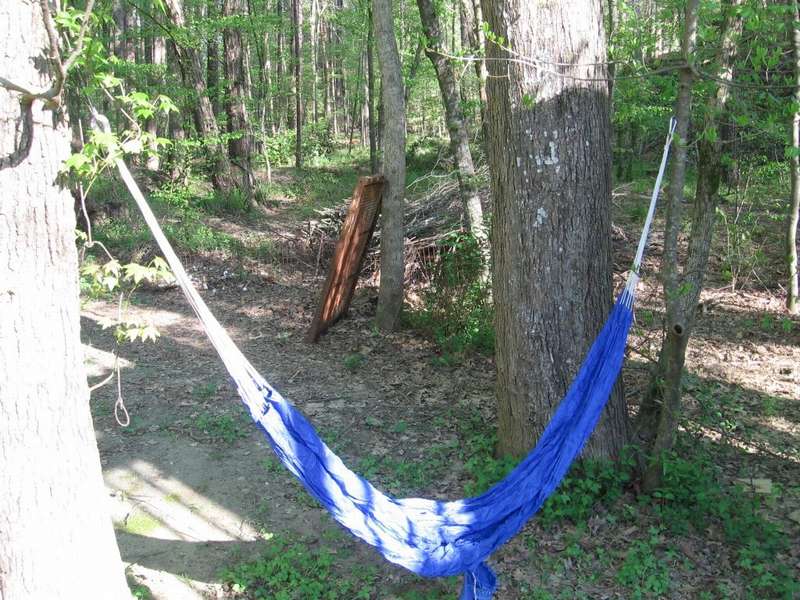
Tarpaulin hammock
 Everyone loves to relax, relaxing in a hammock. The proposed hammock model, as the author says, is elementary. You don’t have to use any special skills or tricks.
Materials
- paracord (any thin, light and durable nylon cable) - 50 - 70 cm;
- two clips of any size;
- tarpaulin - approximately 1.5X3 meters, at your discretion.
At the first stage, each end of the tarpaulin is connected with a cord. The ends of the canvas are folded in turn first vertically, then horizontally with a zigzag. How it looks in practice, look carefully at the photos.
Tie the ends on "knot". In his article, the author even gives a link to a description of such a site, there is a very detailed guide, photographs. Fasten to a rack or walls, this is for home use. Bonus is a pillow. It is not at all an obligatory action, but, according to the author, without a pillow a hammock will bring less pleasure. In principle, it can be any old clothes connected by a simple knot.


https://i.expert-h.com/en/gamaki/svoimi-rukami-i-foto-poshagovye#sigFreeId61fbfc8549
Another example how to make a hammock from tarpaulin
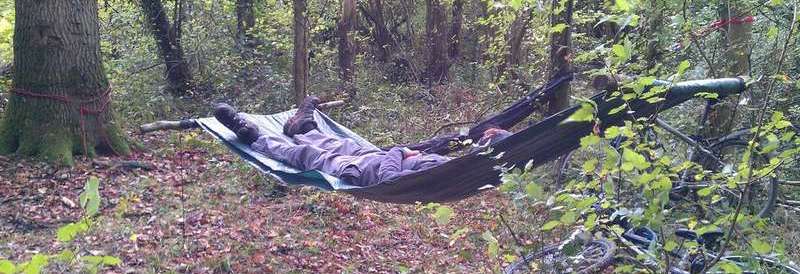 There are many ways do-it-yourself hammock, and here is a very simple method. It may not be better than any other, but it is a good idea to know several ways, to do the same, everything can come in handy.
Materials
- Tarpaulin, one meter larger than your height.
- 2 pieces of Paracord. The length depends on the distance between the trees.
- 2 durable straight sticks.
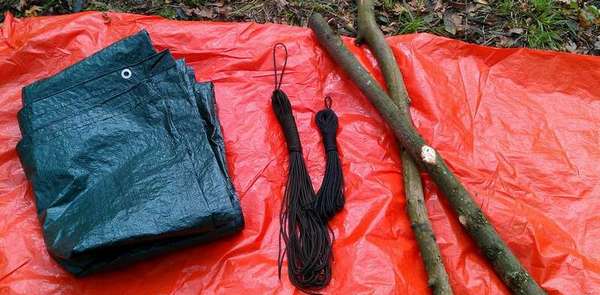 How to make a hammock, I think the idea is clear. The sticks are wrapped in a tarp at the ends of the canvas, secured by Paracord. Then pull the ropes tied in knots on sticks and fasten to the trees. It is in a nutshell. You can read more on the site.


https://i.expert-h.com/en/gamaki/svoimi-rukami-i-foto-poshagovye#sigFreeId7d6841da32
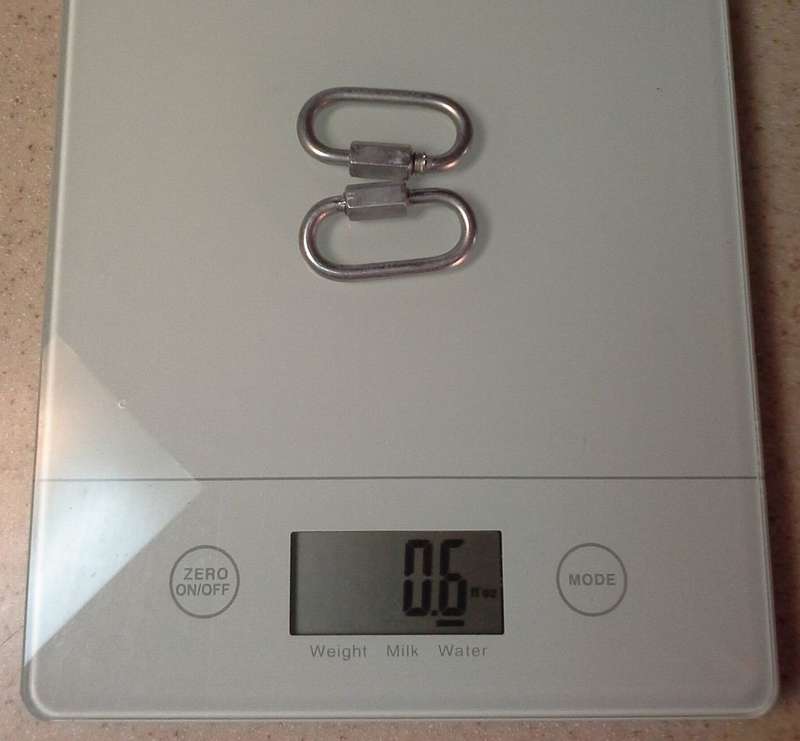
Hammock mount
 The concept of the method is a cord that has loops at both ends. Plus, loops between them that are regularly spaced apart. A cord goes around the tree and is pulled through one end of the loop. Then hammock is attached to the loop in the middle, at the height you select. The finished length of this cord is about 150 cm from the end of the loop, but you can make your own cord of any length.
Materials
- Paracord, approximately 2.5 m
- Lighter or matches
- Sharp knife
- Carabiner for fasteners 28 mm
- Hammock
After melting the ends of the rope, the first step, tie the gazebo. Great for creating a loop, very sturdy and won't accidentally untie. If the images in step-by-step photos are not entirely clear, you can type in “How to knit knots of bully” on Google or Yandex, there you will find many good instructions and videos. To attach the hammock, run the cord around the tree, and pass the end of the bowline through the last double eight knot. Secure at the desired height from the ground.


https://i.expert-h.com/en/gamaki/svoimi-rukami-i-foto-poshagovye#sigFreeId6ce3507a25
How to fasten a hammock
 Here is the way how to weave hammock mount with a simple device.


https://i.expert-h.com/en/gamaki/svoimi-rukami-i-foto-poshagovye#sigFreeId5fd6e9e991
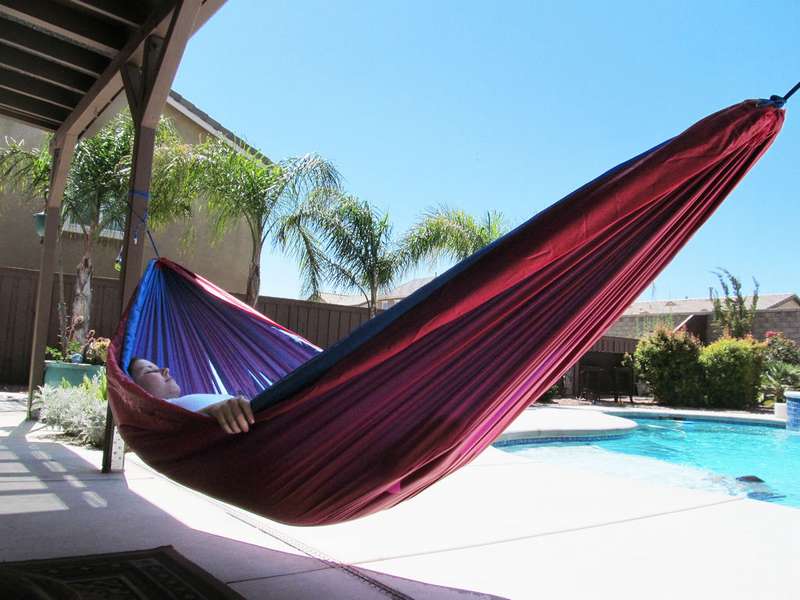
Seat belt hammock
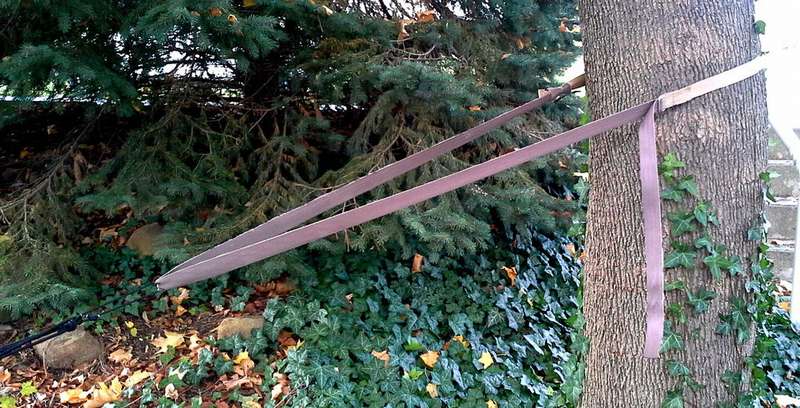 This instruction will give you the opportunity to make a screensaver of seat belt. The author tried to come up with a way that did not require sewing. This is a wide belt or belt that is used to tie to a tree. Thanks to the width, when fastening you don't hurt the bark. Harnesses are ideal for tying hammocksbecause they are wide and will not stretch even under decent weight.
 Tools:
- Screwdrivers (for removing automotive panels)
- Keys (for removing seat belts)
- Hand Saw (for removing equipment on a belt)
- Scissors (for trim tape)
- Lighter (for sealing edges)
Materials:
- Rings and carabiners (for creating tightening loops)
- Seat belts.
- fishing line
Additional Information:
One of the cheapest and easiest places to find seat belts is, of course, a car dump. You can agree for a nominal fee, just take sharp scissors or a knife, screwdrivers and wrenches to remove the belts, this will simplify the negotiations.
To detach the belts from the front of the car, you often need to remove the inner panels. Panels are usually unscrewed. To remove belts from the back of the car, you probably need to remove the bottom seat cushion. The seat cushions are sometimes fixed in place without screws or bolts.
You can take a tape measure so you can compare belts from different cars.
You can read all the details on how to cut the belt, remove the stop button, the sliding latch, remove the connecting bolt, and how to fasten the belts on a hammock and on a tree in the instructions on the author’s website.


https: // i.expert-h.com/en/gamaki/svoimi-rukami-i-foto-poshagovye#sigFreeId1d144273e2
DIY hammock made of fabric 100 photos


https://i.expert-h.com/en/gamaki/svoimi-rukami-i-foto-poshagovye#sigFreeId28f6696dfa
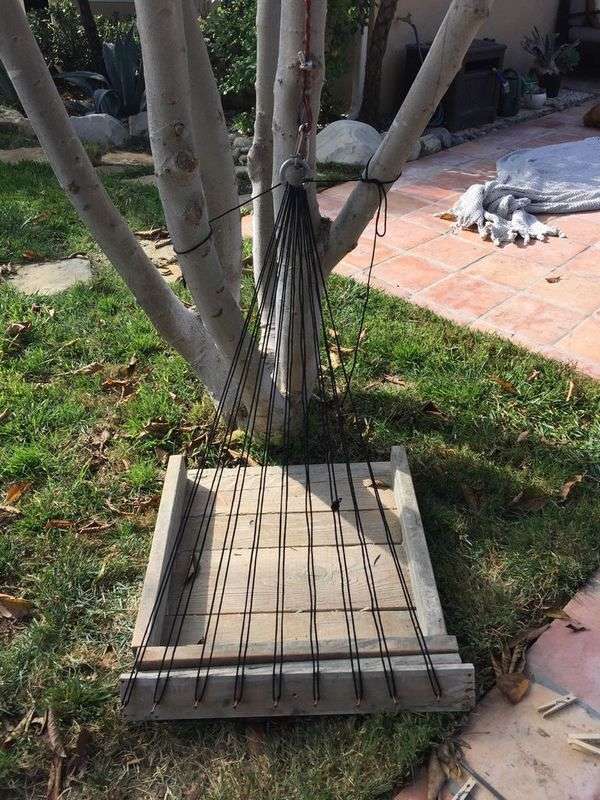
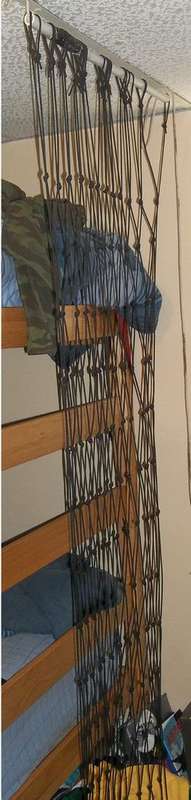
Wicker hammocks
DIY wicker hammock
 Admittedly, the project is time-consuming, do-it-yourself hammock not a simple matter. To do this, I had to build a home-made loom, but the author was very pleased with the result. So if you take it, be patient, the author immediately warns that it took him several months to do everything. If you succeed, you can put the production on stream, homemade hammocks are now in price. Here are very detailed step-by-step photos, divided into six stages. In addition, the author’s website has instructions with a detailed description of each step. So, if desired, the task, although not simple, but quite feasible.
 So the steps:
- how to make a hammock outline;
- how to make a needle for weaving;
- how to load a needle;
- how to weave a hammock;
- how to make a rope;
- how to weave fastening loops
Tools:
- Jigsaw
- Drill
- Drill
- Screwdriver
- Allen key (for threaded insert)
- Various screws
- Plane
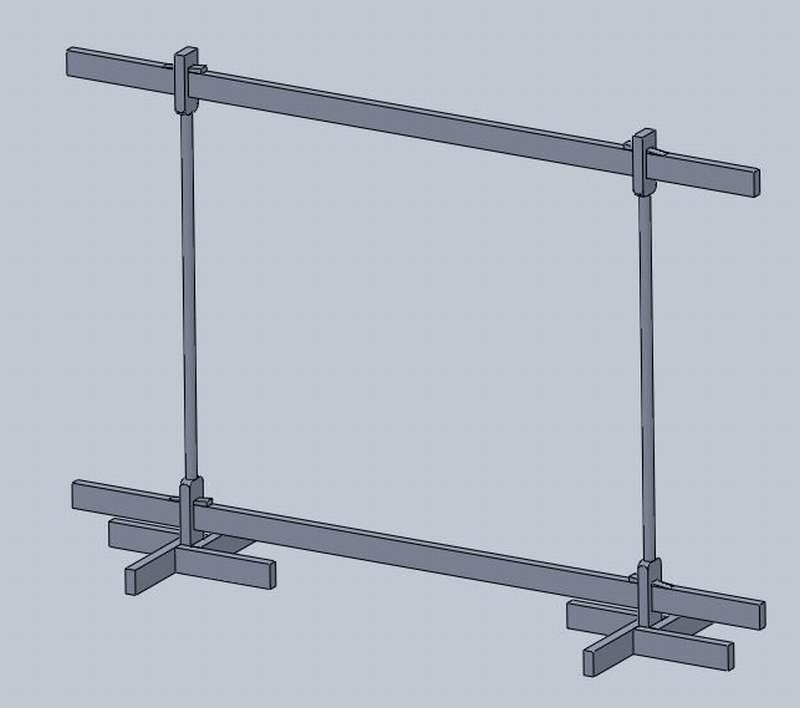
Hammock outline, or frame
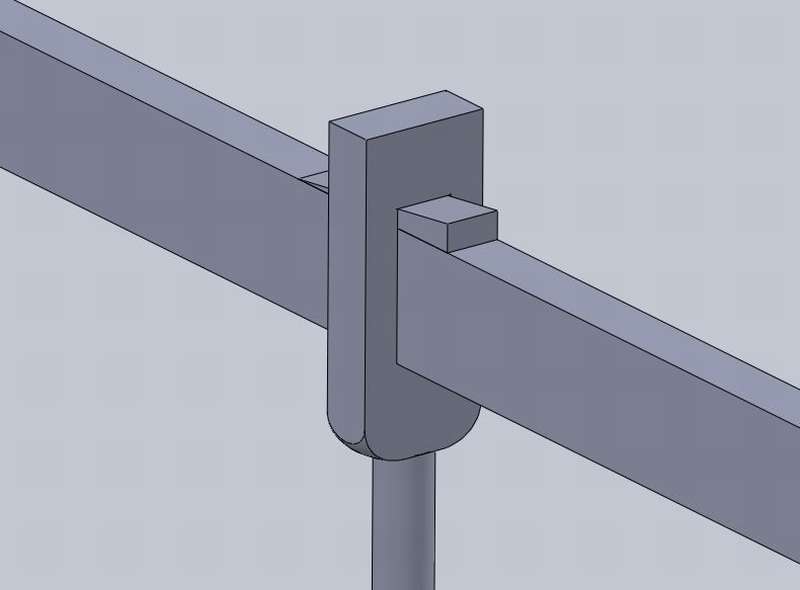 A mandatory element is boards, wooden poles, from which, in fact, a hammock frame will be built. A structure is subsequently attached to it, but only after the cloth is woven. As fasteners, the author proposes to use professional fasteners from the company Grabber. It goes without saying that such fasteners will last a long time, a really high-quality thing, but any other suitable options are perfectly acceptable.
Step-by-step photos clearly show how to make a frame and how to install it, what tools are needed for each smallest action.


https://i.expert-h.com/en/gamaki/svoimi-rukami-i-foto-poshagovye#sigFreeIdd9d1333efb
Needle for weaving
The next step is the manufacture of a mesh needle, which will require an oak board, a jigsaw and a template. Having placed the template on the board, it should be circled along the contour with a pencil and cut with a jigsaw. In addition to detailed photographs, on the site you can download a PDF file with a detailed drawing, according to which you can make pattern. Using glue, the needle should be made several centimeters longer than in the picture. This is so that it captures more threads, the author made 20 cm, you can slightly more or less. External coating is not necessary, but if you think that this will be better, then it must be resistant to abrasion.


https://i.expert-h.com/en/gamaki/svoimi-rukami-i-foto-poshagovye#sigFreeIda95f37bfcd
How to load a needle 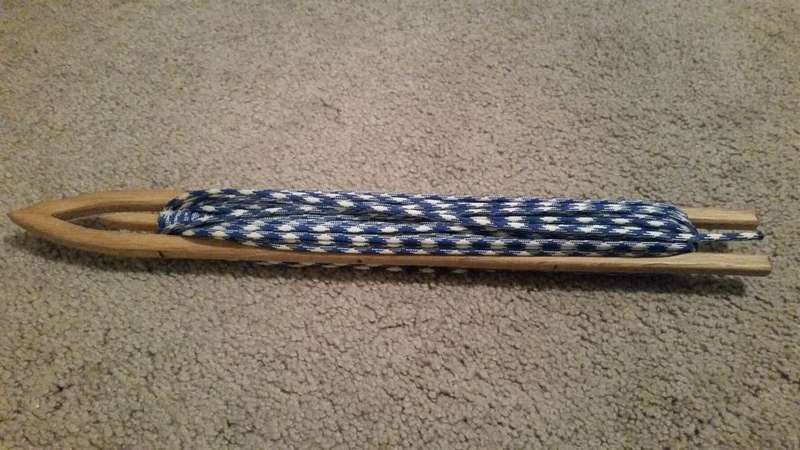
To load the needle, you need somewhere around 15 m of paracord, but, in principle, the length can be any. It is only necessary that this enough for four transitions of the front threads. The end is threaded around the tongue and secured in place by paracord pressure. Then the mesh needle flips over the reeds along with the end of the loop. This should be repeated until the exit from the paracord, that is, until the moment when it will end all.
Sufficient material should be taken care of in advance.. therefore, it is better to plan ahead the size of the future hammock and its intended color. In the manufacture of panels should pay attention to some little things:
- when you have to cut off a piece of paracord with scissors, the formed ends must be scorched to prevent them from breaking up;
- when a new strand is introduced, the end of the paracord is tied to the rack by the boot assembly. This is a maritime knot used on sailboats; how to make it, see the link given by the author.


https://i.expert-h.com/en/gamaki/svoimi-rukami-i-foto-poshagovye#sigFreeId0b7c063de5
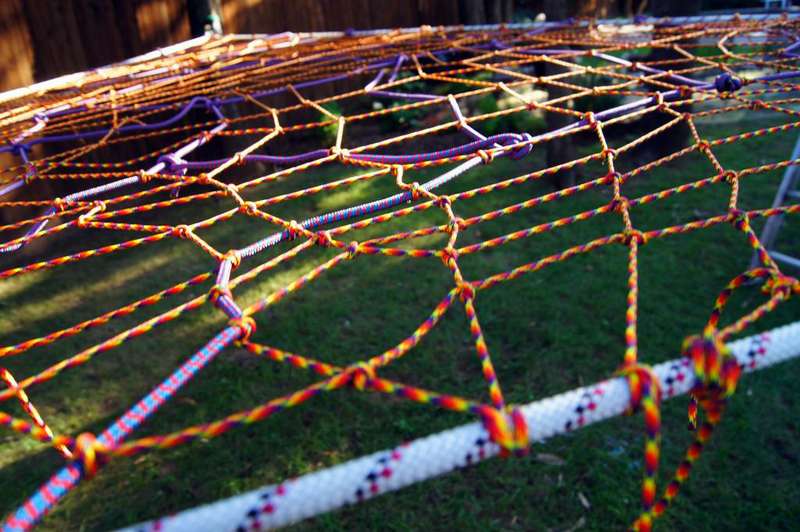
Hammock weave
This stage is entirely devoted to the manufacture of the hammock itself, its banner. Moreover, the first photos show the most common mistakes made by beginning manufacturers of wicker hammocks. How such errors look, you can look at the photo and not allow them in the future. It would be much more unpleasant to do most of the work wrong. After passing the following steps, the hammock (its cloth) can be considered done.


https://i.expert-h.com/en/gamaki/svoimi-rukami-i-foto-poshagovye#sigFreeIdddde5f5105
How to make a rope
Here we find further guidance all about the same ropes. What exactly this can mean is shown in photographs that are truly step-by-step.


https://i.expert-h.com/en/gamaki/svoimi-rukami-i-foto-poshagovye#sigFreeIda7fb4cdb98
Hinges


https://i.expert-h.com/en/gamaki/svoimi-rukami-i-foto-poshagovye#sigFreeId20b7ea55c2
Ready hammock.
It took almost a year to design and manufacture a loom. But such a hammock can withstand (in theory, of course) the load 38 tons.
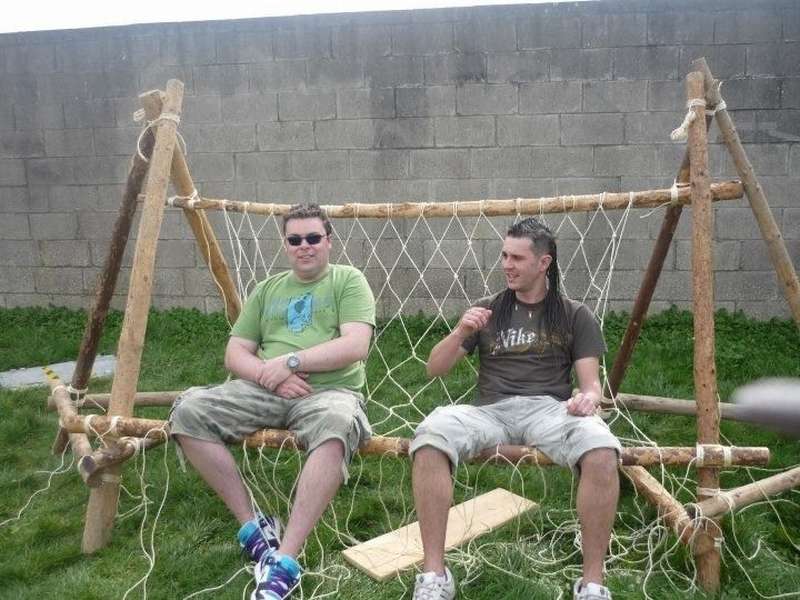
Triangular hammock
 See how to make a 15x15x15 hammock from a mesh. This is not so difficult, but there are many technical nuances that need to be considered. First of all, ropes are best used. static rope , because it has limited elasticity, that is, it will stretch less, since it is not designed to absorb large dynamic loads.
Rigging - here you can use many different methods. Belts, kaslaves and stuff. The author used slings with clamps and other climbing equipment to reduce sagging.
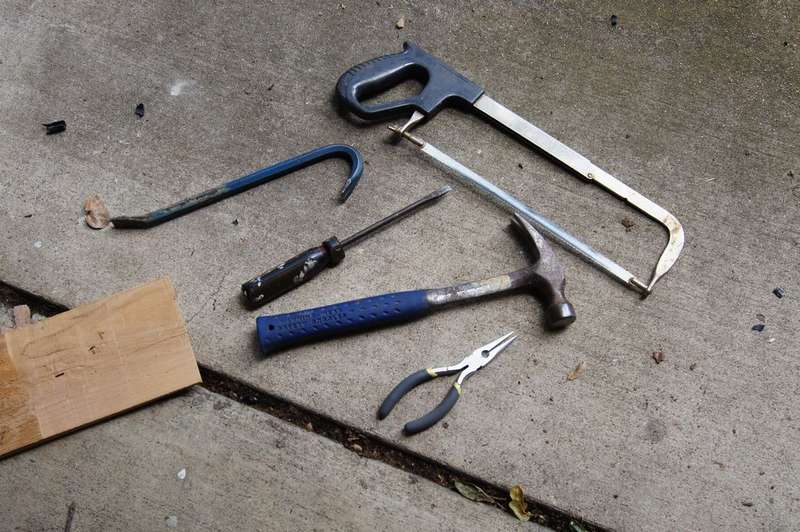 Other materials you will need
- Knife
- hammer
- screw
- hacksaw (for slings with ratchet)
- pliers
- nice set of trees
You can find out all the details of manufacturing and installing a triangular hammock on the website, the link is below the step-by-step photos.


https://i.expert-h.com/en/gamaki/svoimi-rukami-i-foto-poshagovye#sigFreeId6f772fd9ad
Cheap rope hammock
The author of the project, a tourist with experience, offers do-it-yourself hammock completely without financial costs. In addition to a strong rope, you will not need anything else. The main thing is to learn how to knit knots. Chief here gazebo, or a bowline, which is a loose loop at the end of a rope. This site is really secure. It is easy to untie it, but at the same time it will not untie itself. A great way to make a fixed loop on a rope, it is not without reason that it is used in a variety of areas - marine business, mountain climbing, hiking, etc. On the author’s website you can read very detailed cheap hammock manufacturing instructions, and below in the gallery see step by step photos.


https://i.expert-h.com/en/gamaki/svoimi-rukami-i-foto-poshagovye#sigFreeId7a66d3e0b0
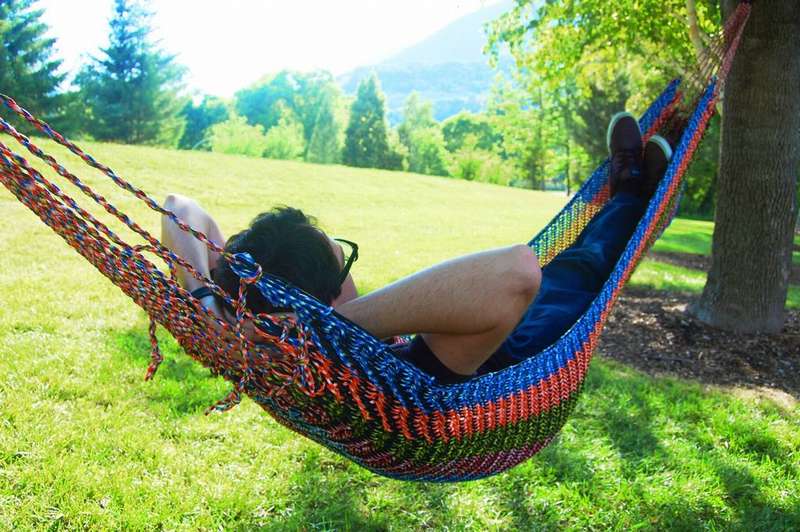
How to weave a hammock at home
Relaxing and relaxing in a hammock is very nice. It is doubly enjoyable if you made it yourself. See step-by-step photos on how to make a two-color sailing DIY hammock literally from "A" to "I". Weaving is a great way to relax; it is a pleasure in itself. So, prepare the materials:
- 300 m of rope of the main color;
- 30 m of rope in a contrasting color;
- 1.5 m wood plank 3 cm wide
- Scissors or knife (any sharp cutting tool);
- Measuring tape;
- Duct tape;
- Epoxy resin;
- Wall hooks (for what they are needed, shown in the photo on the right).
 Then follow the steps in step-by-step photos and instructions on the author’s website. The whole process is described in great detail there, including tying of sea knots. It’s not in vain that the hammock is called “sailing” - the ropes used for it are used in seafaring, in particular, in sailing. Accordingly, marine nodes will also be appropriate. The article also contains active links to various interesting materials that help to understand the process.
As a result, you can rightfully and with great pleasure relax in a hammock built by yourself.


https://i.expert-h.com/en/gamaki/svoimi-rukami-i-foto-poshagovye#sigFreeIdb4f12d39df
 See another example wicker hammock. To make it, you must be able to tie three kinds of nodes. Well, the first thing you see in the photo is the easiest, even a child can. The second is called the “Lark Head” and the third reef knot. How to tie them is shown in step-by-step photos. You can, of course, be described in words, but it is much simpler and more understandable to see a photo or video. If the step-by-step photographs are not clear, read the instructions on the author’s website, or use the search on the Internet and find a video. Deal with the nodes, fasten the hammock on the frame - a matter of minutes.
For work you need:
- 1 x 7.5m polypropylene rope
- 19 x 3.1m cord
- 4 pegs
- roulette
Thanks to the design of this hammock and the mounting points, there are many different ways to install it. You can attach a hammock to four or two trees. Use the pillars. Can also be hung at an angle to sit. In general, a convenient thing.


https://i.expert-h.com/en/gamaki/svoimi-rukami-i-foto-poshagovye#sigFreeId82f042dc24
Hammock banana
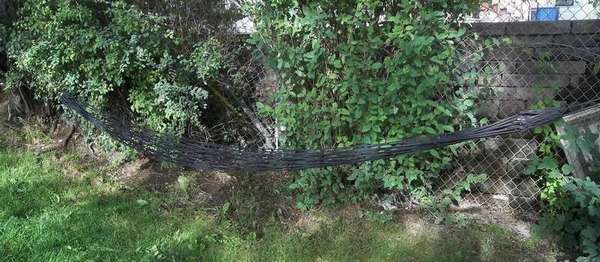 Hammocks of this type may not be the most convenient to use, but they are light and compact.
 You will need:
- about 100 m of paracord
- roulette
- any type of burner
- knife
- a piece of PVC pipe (not necessary, but it simplifies the task)
- time and patience
Then you need to measure and cut 24 to 40 - 50 cm pieces of paracode and melt the ends.
Gather one end of all the threads into a loop, then put them on the PVC pipe and find a way to hang it from the ceiling.
It will be necessary to make many nodes.
Then you need to weave the grid, as you can read in the short instructions on the author’s website.


https://i.expert-h.com/en/gamaki/svoimi-rukami-i-foto-poshagovye#sigFreeId2d513c1033
Wicker hammock 100 photos


https://i.expert-h.com/en/gamaki/svoimi-rukami-i-foto-poshagovye#sigFreeIdf21d1a9071
Hammock tent
Hanging tent hammock
If you are not comfortable with a camping tent with constantly breaking columns and tired of sleeping on the ground, DIY do-it-yourself hammock tent and forget about minor inconveniences. Options for diagonal tents are sold in stores if you are willing to pay a decent amount, but why, if you can do it yourself.
Why diagonal? This allows you to lay flat diagonals to the direction of the reference lines, which gives space for storing gear inside the tent for protection from the weather.
This hammock is made in three days for less than $ 50.
Material List
- Ripstop nylon (special reinforced fabric with increased strength)
- 2 m mesh
- 3 cm wide nylon braid - 6 m
- Paracord
- 6 mm cords 15 m
- Cotton braid
 Design
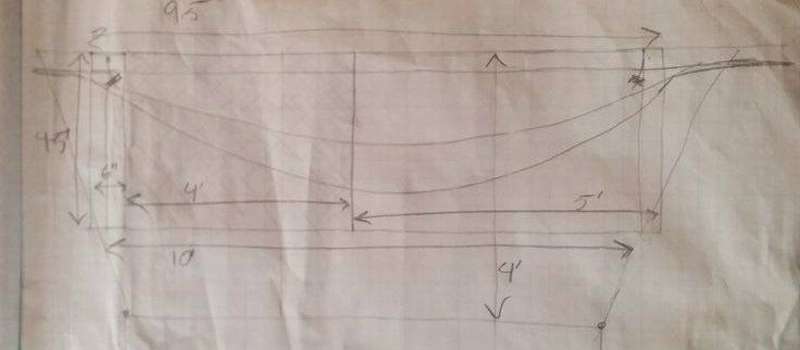
The hammock is designed for mounting at a height of 180 cm from the ground at two points that are located at a distance of 4.5 m from each other.
These sizes allow you to pull the cords at 120 degrees, which minimizes the vector forces at anchors. Reference points are located on one tReti lengths on opposite sides.
The anchor point allows you to adjust the voltage on the hammock.
To protect against rain, you need a piece of the same size so that the base goes beyond the edges so that rain water can freely drain. Need to hem the hem 6 mm around the perimeter and add loops for Paracord. Loops are sewn in a zigzag and anchored to anchor lines.


https://i.expert-h.com/en/gamaki/svoimi-rukami-i-foto-poshagovye#sigFreeIda3a9b51640
How to make a tent for a hammock
You will need: 5.5 x1.3 m tent canvas, tarpaulin 3.6 x 3.6 m, wide nylon belts 50 cm long
- Lay out the tent.
- Tie the corners on each end.
Now you have a hammock without tarps. Just align the tarpaulin on one of the straps and fasten on all sides except the middle.
In principle, the tent is ready, now a small improvement. Prepare a thick mesh, thick vinyl, strap, blanket, pillow and sewing supplies
- Sew the mesh to all edges of the hole,
- Cut out the middle and zip up
- Sew vinyl along one side of the net and a long zipper along the other.
- Cut openings for ventilation and sew a mesh
- Sew a blanket and pillow.


https://i.expert-h.com/en/gamaki/svoimi-rukami-i-foto-poshagovye#sigFreeId4ac15cc2a7
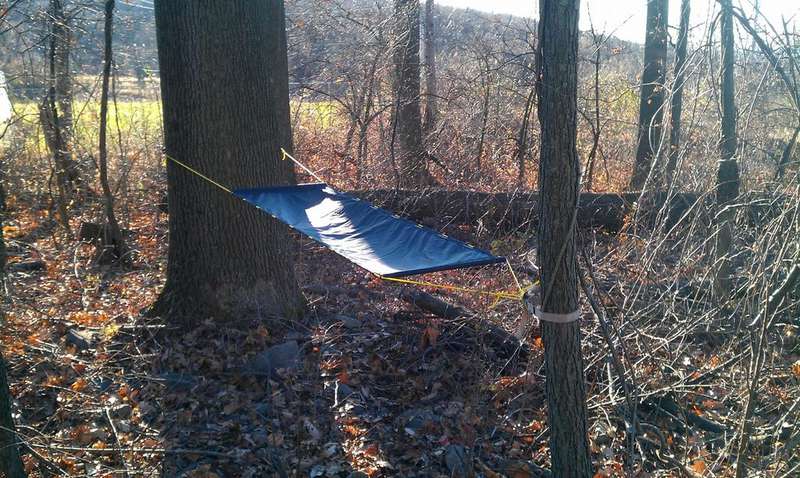
DIY hammock tent
Hammocks, a good alternative to tents, but what will you do if it rains?
 The right answer is to make it easy portable hammock tent. Installation takes about 10-15 minutes, it can be made using easily accessible materials.
Here is what you need
- hammock
- large tarp (at least larger than a hammock)
- rope or cord
- wide straps for fastening (wide so as not to damage the tree)
- tent pegs (or sticks, pins, etc.)
If the hammock is already attached, then you just need to pull the rope over it and fasten it with wide straps on the trees. Throw a tarp. Then hammer the pegs and make a stretch. That's all, you can relax in the sound of rain.


https://i.expert-h.com/en/gamaki/svoimi-rukami-i-foto-poshagovye#sigFreeId8ba60cf501
Hammock with Awning and Mosquito Net
 Instruction how to make a tourist hammock with mosquito net, rain canopy and sturdy fastening straps. The author took two days to make a hammock.
The tent hammock system consists of four components:
- nylon fabric
- mosquito net
- large rain canopy with separate suspension
- suspension belt system
The general design can be seen in this diagram, although, of course, it is not very legible.
Materials
 To make a hammock with your own hands you need:
- Ripstop fabric 3 x 1.5 m
- Ripstop fabric 2.5 x 1.5 m for the sleeve
- 2.5 x 1.8 mesh for the sleeve
- 3.65 x 1.5 + 3.65 x 0.8 m Ripstop nylon fabric for canopy
- 45 x 90 cm leftover fabric for the bag
- ~ 3 m tubular webbing
- ~ 45 m Paracord (author used 3 different colors)
- strong thread
- 4 tent pegs
- 2 carbines
Tools:
- Sharp scissors for fabric
- Sewing machine
- Blowtorch for melting the rope ends
The author sewed this hammock tent Using a Janome home sewing machine, no special equipment is required. The hammock itself is sewn according to the instructions presented in this article (gam10 www.instructables.com/id/Make-a-Rip-Stop-Nylon-Hammock), with a slight difference, in this case the hammock is not two-layer.
Hammock straps made according to this instruction. To make belts, the first thing you need to do is find the nearest store that sells climbing ropes and strapping material. Buy the Paracord as you need, 70 cm straps for each end and two reliable carbines. To protect the bark from damage, take belts at least 5 cm wide. How to make a hammock mount from them, see step-by-step photos.


https://i.expert-h.com/en/gamaki/svoimi-rukami-i-foto-poshagovye#sigFreeIdc693d6b5db
how sew the net and make the canopy, the description is on the site. True, not very detailed, but understandable. To make the canopy wide enough, sew pieces of 150 and 80 cm together. This creates an offset seam so that there is no leakage. Then sew 5 cm straps to the corners.


https://i.expert-h.com/en/gamaki/svoimi-rukami-i-foto-poshagovye#sigFreeId44acc1d9ed
Mosquito net hammock
If you already have a hammock, and want to buy a mosquito net, you will find that they are quite expensive. Here you can learn how to make it relatively cheap. DIY mosquito net for hammock. For this you need two tulles 1.5 x 2.1 m or a mosquito net and 5 m of cord.
Tools
- Sewing machine
- Scissors
- Roulette
- Lighter
In short, what will need to be done. The first step is to sew the two parts together. After completion, one large tulle should be approximately 3 x 2.1 m. Then, make a bias, that is, fold in half and cut a straight line from one mark to another, making sure to cut both layers.
Flash the bottom edge. Then sew a zigzag stitch along the diagonal edges together leaving about 3 cm at the corner closest to the folded edge. Make tunnels and insert the cord.
As a result the net should completely cover the hammock on all sidesas shown in the photo. But in short, detailed instructions can be found on the site.


https://i.expert-h.com/en/gamaki/svoimi-rukami-i-foto-poshagovye#sigFreeIdcb7074d0d3
 Here is another example. This is a simplified version. how to make a mosquito net for a hammock. All you need is a piece of tulle, a cord and two clips.
Just measure the length between the end points of your hammock.
Buy a tulle or mesh fabric of the same length approximately 180 cm wide and sew long edges together. You can use a sewing machine or do it manually.
Sew channels around the edges so that you cano thread the cord. Then thread the cords and insert the clips. Maybe it's not entirely clear, better look at the photo. In general, the idea is to sew a “cocoon” from a tulle, and with the help of cords fasten it around a hammock.


https://i.expert-h.com/en/gamaki/svoimi-rukami-i-foto-poshagovye#sigFreeId8a0eca9cfe
Clamshell hammock
 If you feel a little cramped in an ordinary hammock, you can always improve it a bit. This design combines hammock and sleeping bag system. It is very convenient that the hammock can be used separately. If you do not need mounting points on the sides, then you can always simplify the design. There is nothing complicated in this idea, to make such clamshell hammock according to the author, it is possible in one weekend. It can be set using 2, 3 or 4 tension lines. Attaching one end to a tree that is wider than the width of the hammock will create a stable configuration (it's almost like binding at 3 points.). Using the side rope, the hammock can be attached to the frame and used as a bed.
 Materials:
- 2.5 m nylon fabric (you will need to order material based on the length of the hammock)
- 2 pieces of rigid copper tube is slightly shorter than the width of the hammock (can be replaced with aluminum or PVC tube)
- Rope. Something is needed that will not stretch. (Paracord is not the best option) The author used a polypropylene rope designed for 100 kg.
- Polypropylene cord as a lanyard.
- Polyester threads.
 Note: The size and strength of the ropes and sticks that were used in this case are designed for a person weighing 70 kg. You may need stronger pipes. True, the author did not check the hammock with a greater load, and believes that the design can withstand much more weight, but it is better to play it safe.
Tools:
- scissors
- glue
- sewing machine
- hacksaw
- hammer
- knife (for PVC pipe)
- sandpaper
We will not fully describe how to make a hammock a cot, you can use step-by-step photos, or read the material on the author’s website, there is a very detailed instruction with mathematical calculations and an explanation of each step.


https://i.expert-h.com/en/gamaki/svoimi-rukami-i-foto-poshagovye#sigFreeIda00bf45780
And this is a slightly improved version. The hammock is made of nylon and weighs approximately 4 kg. For the manufacture of frames used 3/4 inch PVC tubes, which are easy to fold for packaging in a bag for carrying.
The tent above the hammock is made in the form of a cylinder, also using PVC pipes.
Ribs of 1.5 m are held in pockets sewn to the wall of the tent.
In the upper part of the tent, the ribs are kept on Velcro. A short canvas skirt on the sides helps rainwater flow down the edge of the roof. The awning is mounted on both ends of the folding bed, it is convenient for creating shade and protection from rain. At the ends you can fix the mosquito net. If it is cold and windy, it’s good to put a sleeping bag for thermal protection.


https://i.expert-h.com/en/gamaki/svoimi-rukami-i-foto-poshagovye#sigFreeId02ba649f49
Lightweight hammock tent
Here is described in detail how to make a hammock for hiking with effective insulation.
- size 196 x 114 cm
- weight 5 kg with suspension
- sleep comfortably even at -10 °
 Today, hammocks are becoming a popular alternative to tents. There are many potential benefits, but a common drawback is heat storage. Since the hammock is suspended, the air flow under the hammock draws heat. Without proper insulation, sleeping in a hammock is very cold when the temperature drops below 10 ° C. The traditional approach to hammock insulation is the same as for ground insulation: insulating pad under the sleeping bag. A pillow is necessary because the lower half of the sleeping bag is always under pressure. Combined mat + bag, of course, help, but it is not very reliable. It’s much easier, more efficient and warmer to use. two separate pieces of insulation instead of a sleeping bag. The main thing is that the “blanket” is mounted under a hammock, which eliminates the need for a pillow underneath. That is, a hammock will be twice as light. This approach to insulation simplifies installation and operation. In addition, the weight and size of the packed hammock will be less than just a traditional sleeping bag.
In order to warm hammock tent, you need to choose the right fabric and insulation methods. For this project, you can use any breathable, calendered fabric.
Tools:
- sewing machine
- sharp scissors
- pins or clamps
- measuring tape
Of course, perfect hammock different for everyone. Length, width, weight and temperature rating are the main indicators. You must decide the size yourself, as well as decide what type of suspension you need, style and height of the partition, packing, etc.
This manual describes the specific project that you see in the photo, but there is a lot of information available on all the options on the Internet.
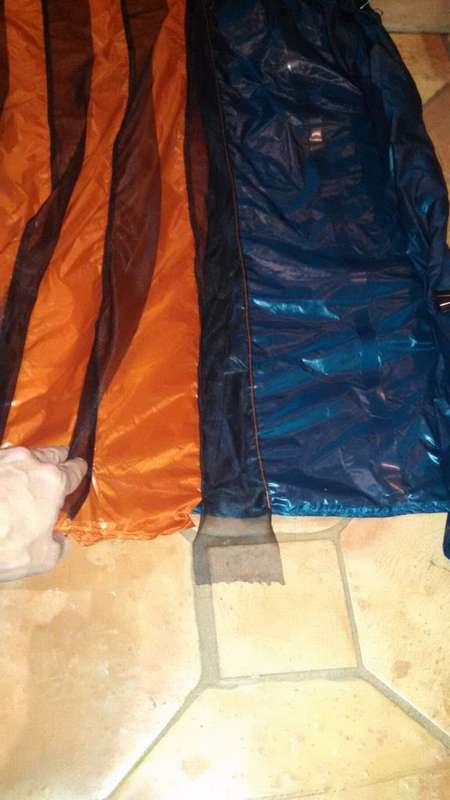
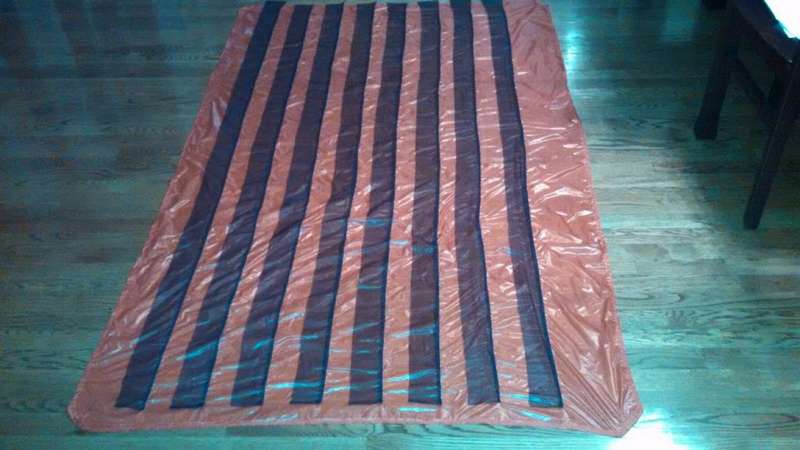 Selected style for this hammock tents very popular and similar to products that can be purchased at the store. The design has vertical, differential partitions. In order to make the same patchwork as here, you can use these sizes.
- Length: 195 cm
- Width: 114 cm
- Deflector Height: 57 mm
- Chamber height: 70 mm
- Partitions: 22 cm
- Padding: 5%
For more information on how to sew a warm hammock tent, read on the author's website.


https://i.expert-h.com/en/gamaki/svoimi-rukami-i-foto-poshagovye#sigFreeId2e79bbd946
DIY hammock tent
 The step-by-step photographs show how to make a tent hammock from waterproof tarpaulins. All materials can be bought online or at any fabric store, and even at some large retail stores that have fabric sections. Ripstop itself is not waterproof, and for a hammock better not waterproofingso that he can breathe. In other words, you wake up in a pool of your own sweat. The author mainly used 100% polyester thread. Your sewing machine should be set to a sufficiently long stitch length.
The author did not provide detailed instructions for sewing or waterproofing tarps. There are many wonderful instructions by other authors that describe these processes in great detail. It’s just shown here how to make a hammock nAlatka with convenient mount.


https://i.expert-h.com/en/gamaki/svoimi-rukami-i-foto-poshagovye#sigFreeIdc4d697f3f4
Big hammock
 If you like to spend time in the forest and you like spending the night in the fresh air, then perhaps this option is suitable for you hammock tents.
 The author developed the design design on his own, taking various types of hammocks as an example. Provided here canopy from the rain, insulation, a double bottom with an air layer and various devices for storing things necessary in the campaign.
The shell is a triangular shape, where one edge of the triangle is supported by a marching column (peg). Each edge has a zipper from the bottom up to a height of 90 cm, as well as Velcro tape at the upper end. Each side of the tarp with windows serves as the front door, depending on the direction of the wind. To insert a translucent roof and side windows made of 0.3 mm vinyl, the author used contact adhesive and adhesive tape.
You can sit inside on a chair under a tarp, look out the window left and right. A transparent roof allows you to see trees, clouds, rain, snow, stars, all lying in a hammock or sitting in an armchair.
Roof advantage in that during the day the infrared rays create a greenhouse effect - the internal temperature is 5 degrees higher than the external temperature. The hammock is warm and you are completely protected from the cold.
The hammock packaging is very simple, with tarpaulin 2.2 kg and 2.0 kg hammock mounts packed in two carrying bags in the form of a tube.
The whole process is perfectly shown in step-by-step photos, detailed instructions are on the site.


https://i.expert-h.com/en/gamaki/svoimi-rukami-i-foto-poshagovye#sigFreeIdb2b700b1d4
Hammock sleeping bag
This is another example how to make a warm hammock. But here everything is much simpler, the author simply remade the sleeping bag into a great hammock. Of course, there are some nuances, just sewn on the straps to the bedroom bag is not enough. How it happened with the author can be read on the site, the link can be found under step-by-step photographs.


https://i.expert-h.com/en/gamaki/svoimi-rukami-i-foto-poshagovye#sigFreeId1322c4c720
Hammock tent 100 photos


https://i.expert-h.com/en/gamaki/svoimi-rukami-i-foto-poshagovye#sigFreeIdfee93f1908
DIY hammock drawing


https://i.expert-h.com/en/gamaki/svoimi-rukami-i-foto-poshagovye#sigFreeIde75cf984ca
Hello, I am the author of this article, so I look forward to asking questions for this article in the comments below, I will answer all !!!
If you have questions on another topic, ask them on our forum, we will answer you
- Two baskets of paper in 5 minutes (Master class)
- How to make a simple and compact table for a milling cutter from plywood
- How to make a soft headboard tile (Instructions + step by step photos)
- Cinder block benches: a convenient bench in 55 minutes
- How to make a bed with a niche: saving space (Master class)