DIY hammock stand 700 photos, drawings, instructions
 DIY hammock stand
The hammock, installed in the right place and in the right position, guarantees an excellent rest. You can hang a hammock between two trees on a shady lawn, between rafters, on a porch - even in a bedroom, using belts, wall hooks, hammock rack or a combination of methods.
The best way is make a stand for a hammock with your own handsthen you will have no problems with adjustment. At first glance it may seem that this is a difficult task, but after reading the article, make sure that assembling such a design is not a problem at all. If you have a drawing and step-by-step photos, making a hammock stand is simple and inexpensive.
DIY hammock stand
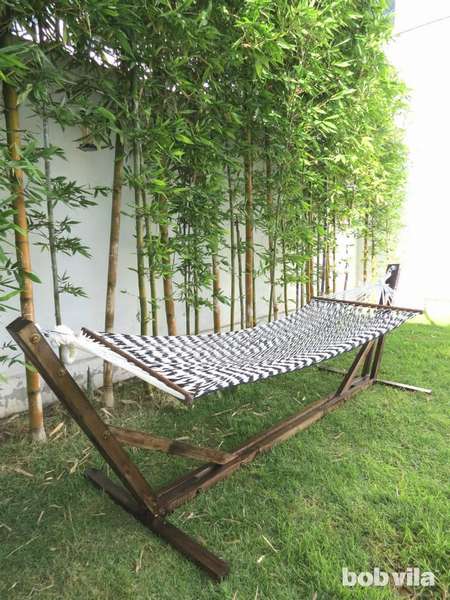
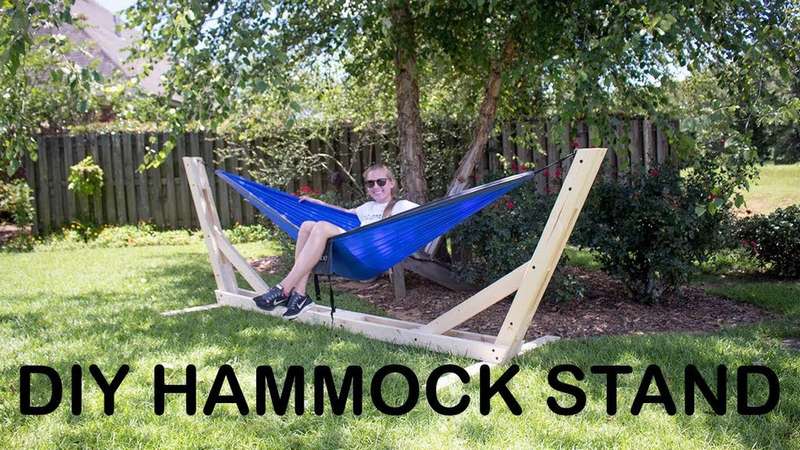
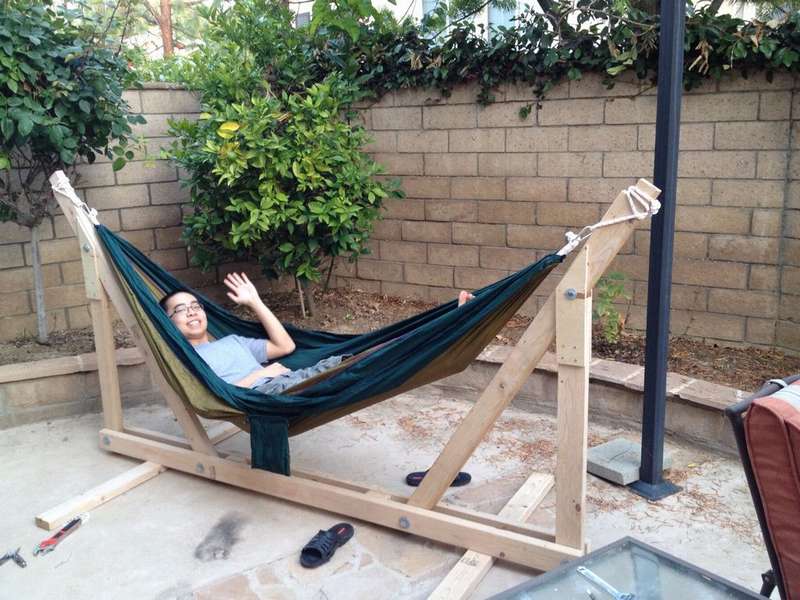 Summer is coming, and you will probably be interested to know how to make a stand for a hammock with your own hands. The example of a wooden stand presented here is made of the most common materials that can be purchased at any hardware store. This project is ideal for those who do not have trees of adequate size in the yard or in the summer cottage. But this annoying reason should not be an obstacle for those who like to enjoy long summer evenings, lying in hammocks in the fresh air. If you have a drill, a saw and 3-4 hours of free time, then you can easily make such a stand for a hammock with your own hands.
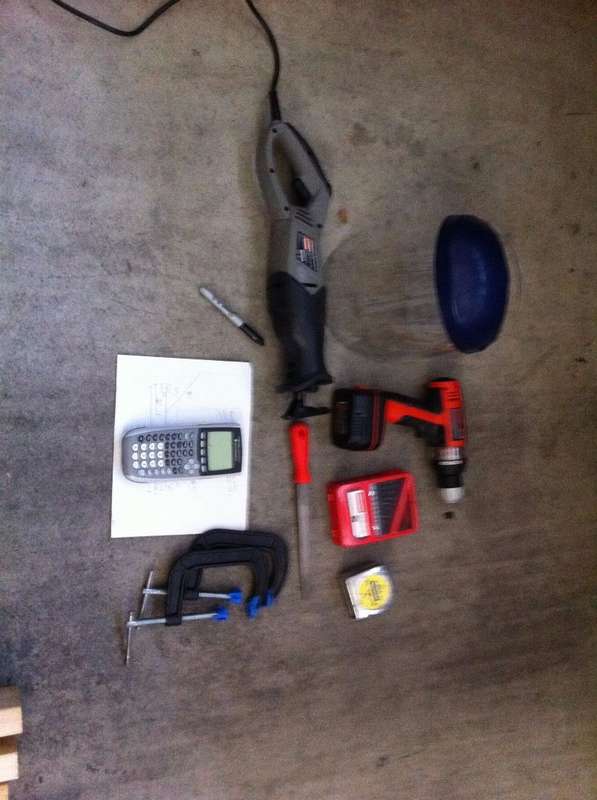
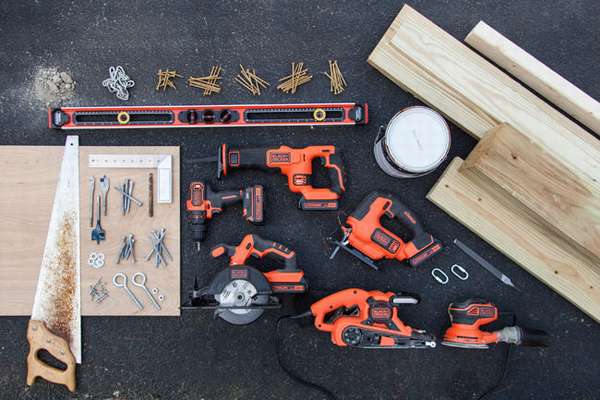
You can see the necessary materials and tools in the photo below.
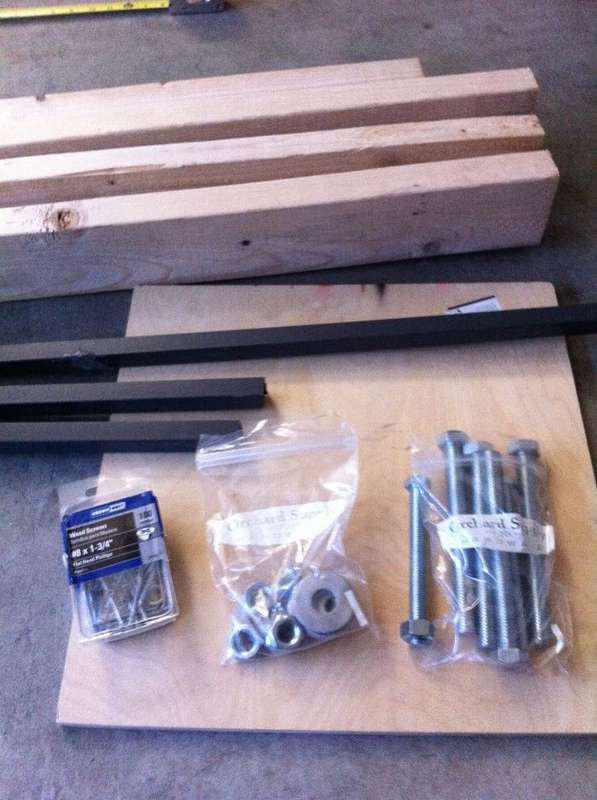
 Wooden boards can be used in any size. Steel bolts should be more than 3 times longer than the thickness of the boards. You will also need steel washers, screws. Plywood at your discretion, can be replaced with boards.
Remember that these are only those materials that the author used. Do not take instruction as a guide; take the description as a source of inspiration to create such hammock standsthat is right for you. You can use the author’s drawing, or adjust and make your own, with other sizes.
 Full instructions how to make a hammock stand, you can read on the site, we note only some points. First you need to make a base. For the basics, the author took two 2.5 m boards and connected them, as shown in the photo below.
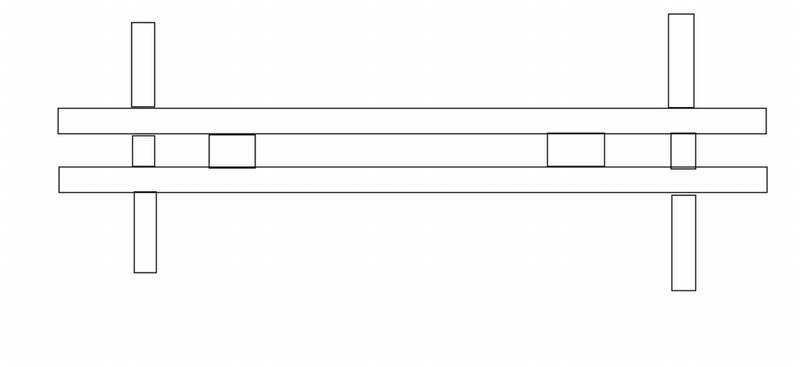 Then take another beam and make “legs”. Fasten them to the bottom of the base, making sure they are tight. The base is completed !!
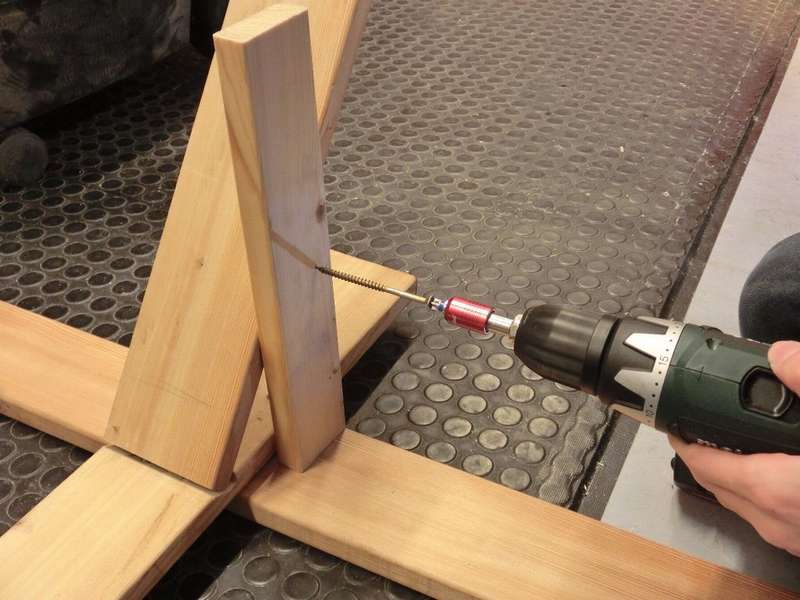
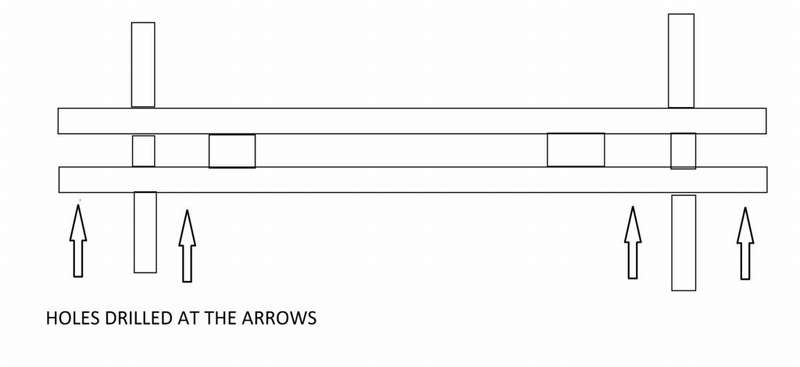 Tip: If the screws are too short to pass through two layers of wood, simply drill a larger through hole than the screw heads, then the hole is smaller than the diameter of the screw inside. The screw must hold the two parts firmly together.
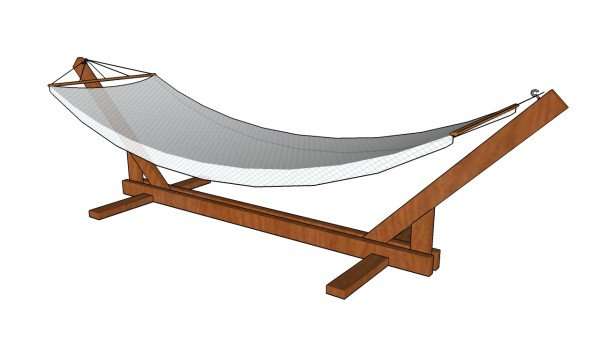
Side Rack Support. It will be necessary to cut a triangular piece to combine. Also, cut a notch at the end of the lever that will support the rope to hang the hammock. Between the vertical support and the side stand on which the hammock is mounted, you need to fix a piece of plywood or board.
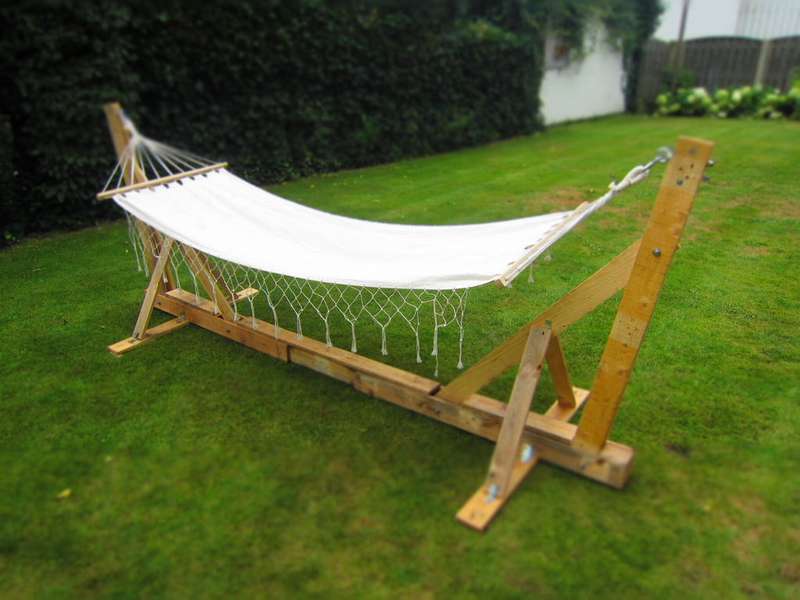
That's all, it remains to polish the surface and the stand for the hammock is ready. The author also hung a mosquito net and plans to make a folding table and a solar charger in the future.


https://i.expert-h.com/en/gamaki/stojka-svoimi-rukami-prosto#sigFreeId9a0e060de0
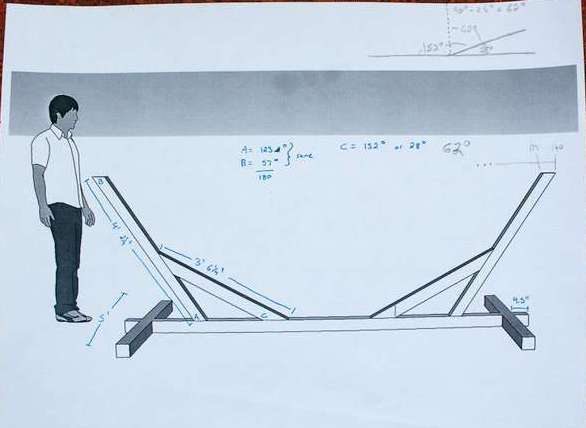
Hammock Rack Drawing
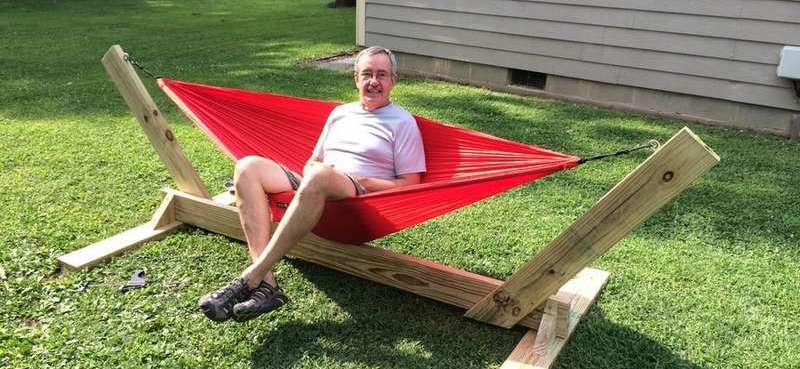
 To make a wooden stand for a hammock, the task is not so difficult. This design is not only convenient, it will improve the appearance of your site, while maintaining costs at a minimum. If you want to make a relaxation corner in the yard or on the patio, homemade hammockis a great solution. For a wooden rack, you do not need expensive materials and tools, so anyone who knows the basics of woodworking can do the job in a few hours. Cedar, pine or oak is an excellent choice if you want to create a solid structure. Choose the exact size to meet your needs, and of course, so that the costs fit into your budget.
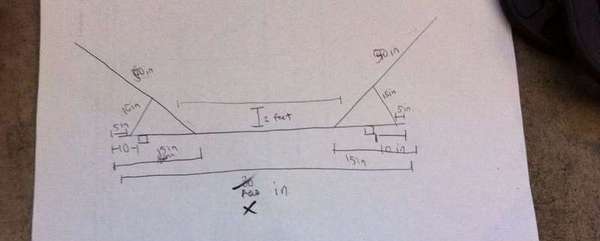
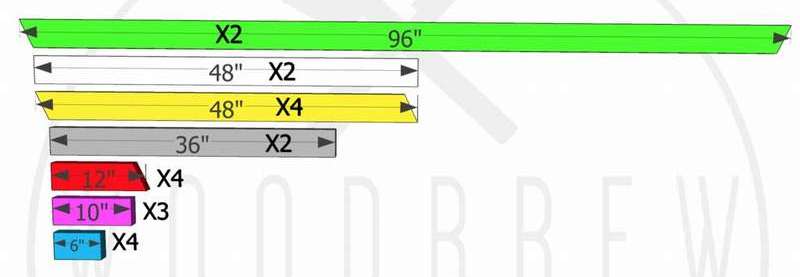
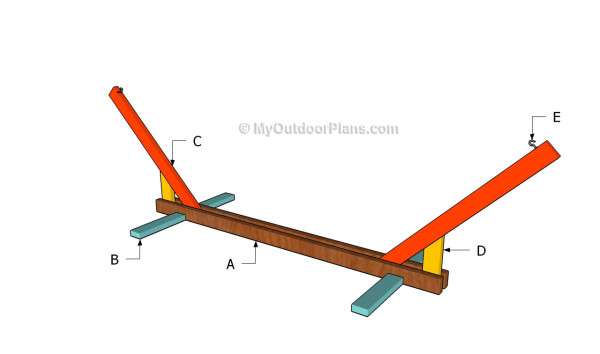 It is necessary to prepare lumber of this size. On the hammock stand drawing they are indicated by letters.
A - 2 boards 2 × 4 214 cm long
B - 2 boards 2 × 4 92 cm long
C - 2 boards 2 × 4 182 cm long
D - 2 boards 2 × 4 30 cm long
E - 2 hooks
As well as
- 5 boards 244 cm long
- 8 pieces of bolts, screws and a hammock.
Then just follow the instructions. You can customize the design and size of the hammock rack to your needs.


https://i.expert-h.com/en/gamaki/stojka-svoimi-rukami-prosto#sigFreeIdcc9bc5a511
How to make a hammock stand
 If there are no trees in your yard to drive a hammock, there are two options to resolve this issue. You can plant seedlings and wait a few years for the trees to grow, or make a stand for a hammockby buying finished lumber. If you choose the second option, then you will need such materials and tools:
- boards 2 × 4 2.5 m long 8 pcs
- square
- saw or hacksaw
- sandpaper
- clamps
- electric drill
- hex bolts with nuts 12 pcs
- wood glue
- metal staples 4 pcs
- screws 24 pcs
- stain
- varnish (optional)
- rings with a plate of 2 pieces
- springs 2 pcs
- carbines
In addition to step-by-step photographs in which hammock rack manufacturing process displayed in sufficient detail, you can use the instructions of the author of the project, you will find the link under the gallery.


https://i.expert-h.com/en/gamaki/stojka-svoimi-rukami-prosto#sigFreeId391949537f
Canopy for a hammock
 In this hammock you can relax in any weather. If you have mid-level skills, you can do something similar hammock rack in about one weekend. Experience is necessary because you have to use special tools. But even with minimal skills everyone can make a stand, the design is not complicated, it may take a little longer, but as they say, where to rush in such a heat. In general, the thing is fundamental, and if you still choose the right wood and process it well, then the design will last more than one year.
 What you need from the tools:
- drill with a set of drills;
- a circular saw;
- cordless jigsaw;
- grinding machine;
- building level
In addition to all this, cement and sand, various screws, screws, screws, drills of different diameters will be needed.
Of course, hammock canopy can be made simpler, without arcs and complex parts, but this is undoubtedly much more beautiful. If you want to make exactly the same design as the author suggests, detailed instructions are on the site.


https://i.expert-h.com/en/gamaki/stojka-svoimi-rukami-prosto#sigFreeId7ea1cf942c
Pergola for a hammock
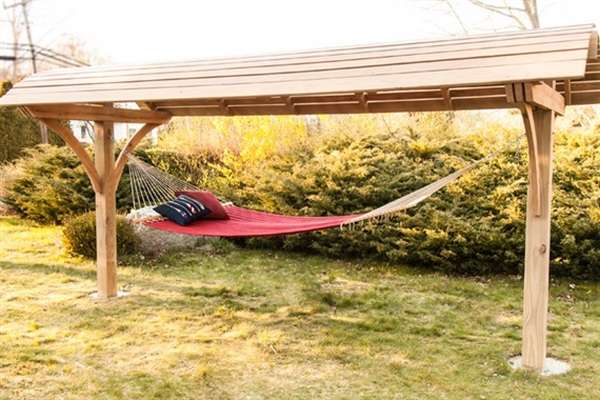
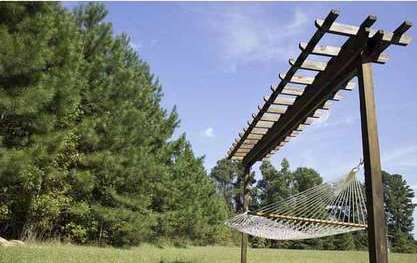 Not every plot or courtyard has trees to stretch a hammock. If you have such a problem, look at a great option, how to make a pergola for a hammock - conveniently, beautifully and without special expenses. The height of the structure is 240 cm, the distance between the supports is 440 cm. Of course, you can change the dimensions at your discretion, but if you are satisfied, then use the drawings of the author of this project.
The base of the pergola is two wooden posts 4 × 4 three meters high. The distance between them is approximately 4.5 meters, because standard hammock usually about 4 m long.
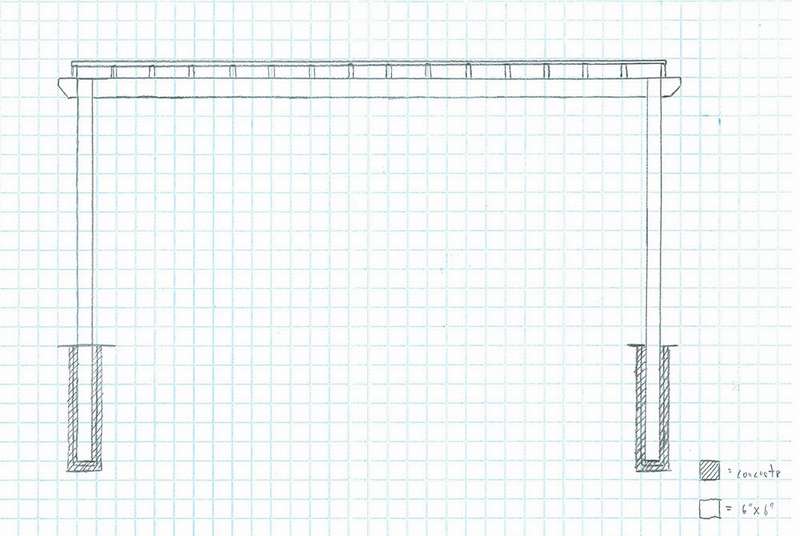
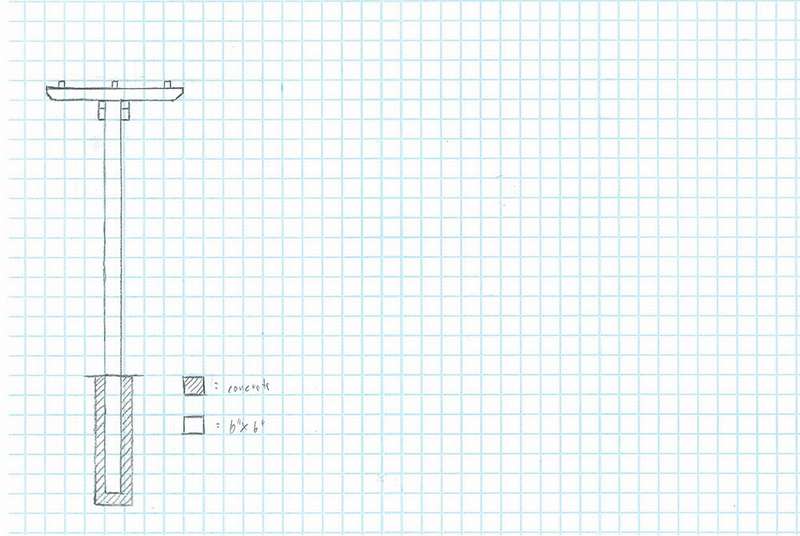 Standard hammocks, as a rule, have 30 cm of headroom for adjustments to achieve the most comfortable height. Hammock rings should also be suspended at a height of about a meter from the ground.
2 × 6 boards with a length of 488 cm are mounted on opposite sides to create a classic look.
 After you have determined the location of the supports, you can start digging holes. They should be approximately 30 cm wide and meter deep. This increases safety and stability, while ensuring a sufficient height (the lattice on top of the pergola will be at a distance of 215 cm from the ground).
This is the main part, fully instructions, how to make a pergola for a hammock, you can read on the author’s website, there it is very detailed, with a complete list of all the necessary materials and tools. For the overall picture, perhaps, step by step photos are enough.


https://i.expert-h.com/en/gamaki/stojka-svoimi-rukami-prosto#sigFreeId74c1831be3
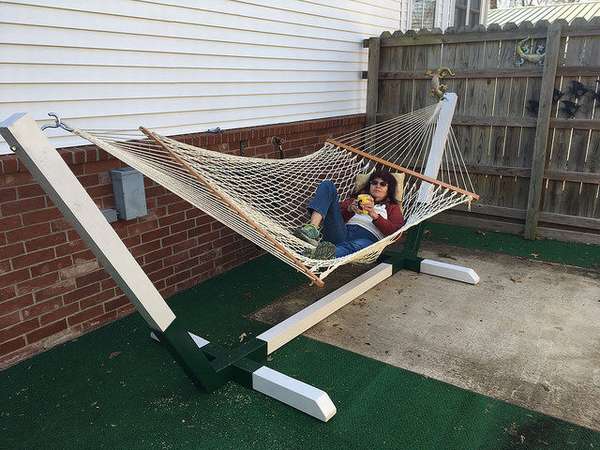
Wooden hammock stand
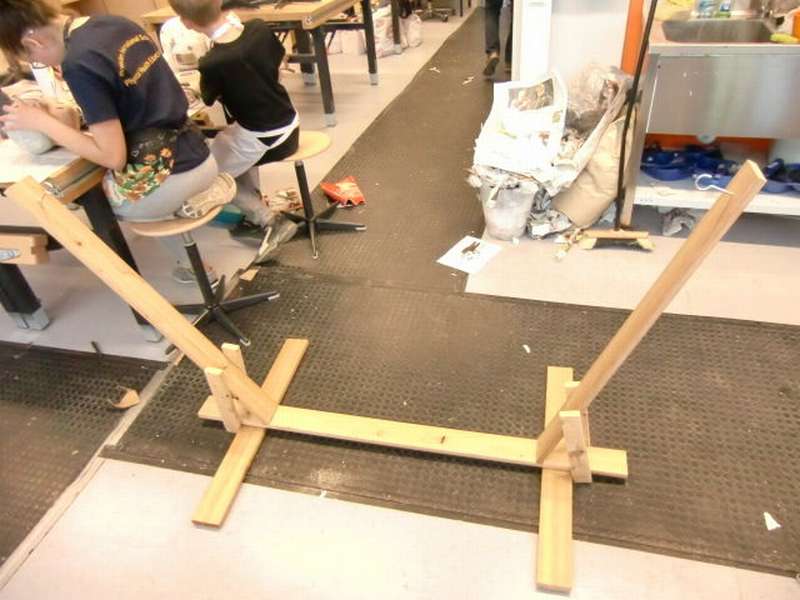
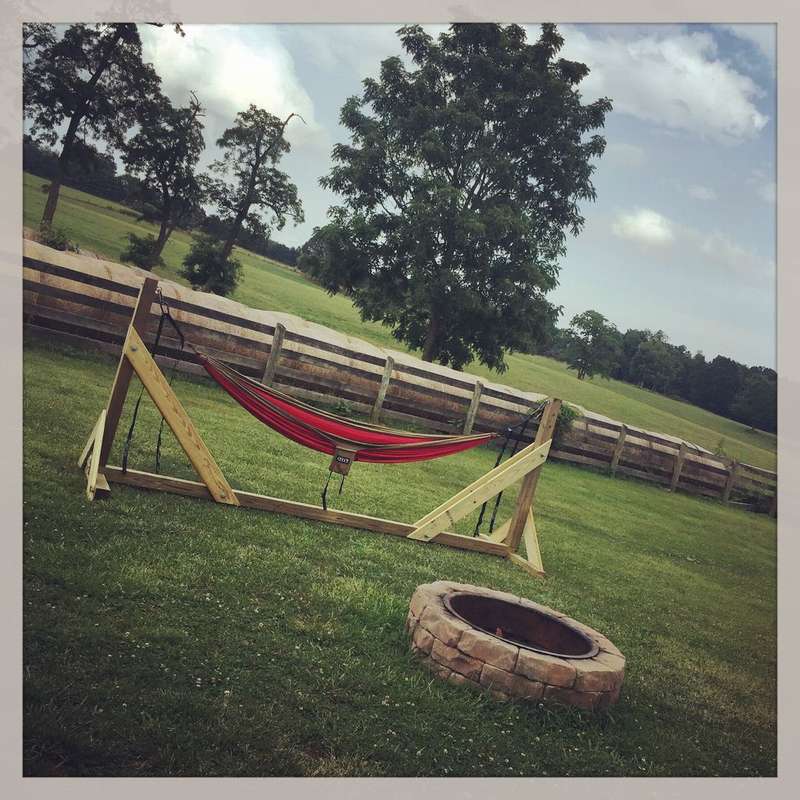 The original idea of the author was to make portable hammock rackbut in the end it’s only half portable.But it is very durable and comfortable.
Necessary materials:
- 2 4x4 bars 3.7 m long
- 2 4x4 bars 2.4 m long
- 4 boards 2.5 m long
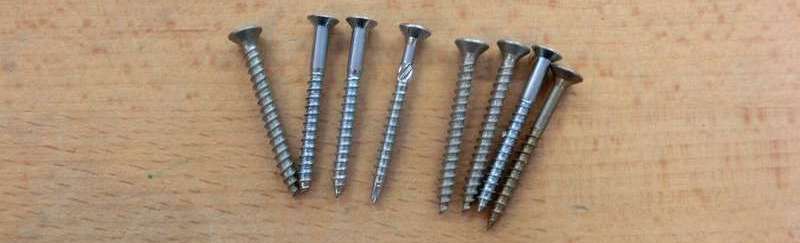
- 4 galvanized bolts 15 cm
- 2 eye bolts 10 cm
- long screws 8 cm
Tools:
- Roulette
- Circular Saw
- Cordless drill
- Level
- The keys
Assembly
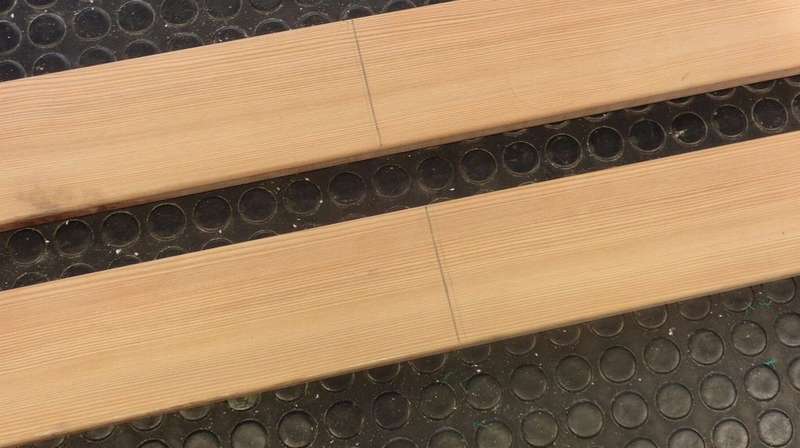
Basic and vertical messages. The author used a bar of 3.7 m as a basis. Saw off two bars of 1.4 m each, the remaining length will be used for the legs.
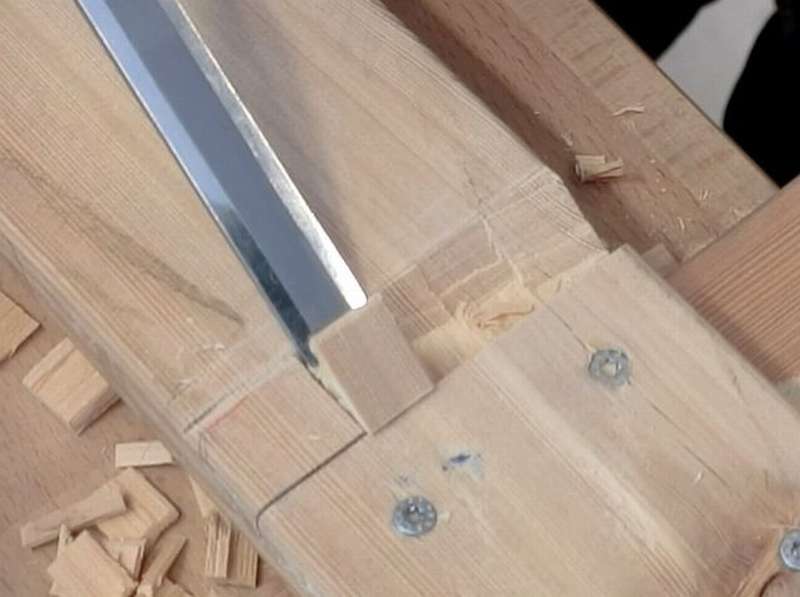
Corner supports. You can use one board on each side, but the author preferred a double emphasis for additional fixation, cutting the boards at an angle of 45 °. Look at the step by step photos.
Finally, tighten the eye bolts at the top of the rack and you can hang a hammock.


https://i.expert-h.com/en/gamaki/stojka-svoimi-rukami-prosto#sigFreeId0e5635edd5
Another similar example of a wooden stand


https://i.expert-h.com/en/gamaki/stojka-svoimi-rukami-prosto#sigFreeId0030c6d23a
Such an option how to make a simple wooden stand for a hammock
 Necessary materials:
- 7 boards 2x4 2.5 m long
- 2 stainless steel hooks
- Hammock
- Screws
Necessary tools:
Circular saw, drill
Saw boards according to the scheme. All angles 25º
 Assemble the two levers and the frame according to the drawing on the right.
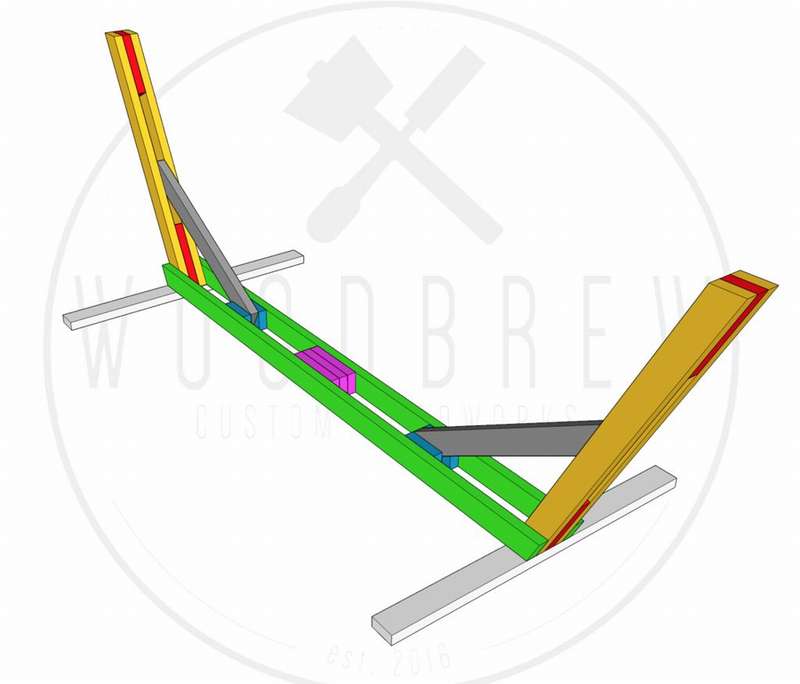 Then turn the frame over and secure the two legs.
Be sure to center them towards the frame.
Install the optional mount as shown in the diagram.
At the ends of the side posts, drill holes for the screws and tighten the stainless steel hooks.
Find a good place for a hammock and you can relax!
You did everything!


https://i.expert-h.com/en/gamaki/stojka-svoimi-rukami-prosto#sigFreeIdb7387bdbd6
See another example of a hammock stand
 The assembly order is almost the same, only the legs are slightly different.


https://i.expert-h.com/en/gamaki/stojka-svoimi-rukami-prosto#sigFreeId7cb2223e93
You can fix your legs in this way.
Wooden hammock stand
 DIY do-it-yourself hammock rack, it will be much cheaper than buying the finished one at the store.
You will need the following materials:
- Two wooden beams with a diameter of 120 cm
- Two wooden beams with a diameter of 150 cm
- One beam 180 cm long
- Twelve screws 6 cm
- Four bolts 10 cm
- Two hooks 8 cm
To make a hammock standYou will also need a pencil, ruler, hammer, chisel and drill.
Step 1: Take two planks of 120 cm and mark the middle. Draw a line of 25 cm from each end of the crossbar 180 cm.
 Step 2: Set the bar 180 cm from the marked line.
Step 3: Take eight screws and use four on each side to attach the 180 cm bar to the 120 cm bar. Place them in a rectangle. Each screw should be approximately two centimeters from the edge of the beam.
 Step 4: Mark where the crossbars overlap. Then mark a 40 ° angle facing the mark. Now repeat this on the other hand, but keep in mind that it is mirror-inverted.
 Step 5: Take a hammer and chisel and cut a tree in the places that you marked. Be very careful to stick to the lines and use sandpaper.
Step 6: Take two 150 cm planks and drill each hole as shown. The holes should be three centimeters from the short edges and 0.7 cm from the long edges.
Step 7: Make marks three centimeters from the outside and 0.7 cm from the edges of part of the crossbar. Do the same on the other side.
Step 8: Drill holes at an angle of 30 °, as in a 150 cm crossbeam.
 Step 9: Next Step - Insert the bolts into the holes to connect the two parts.
Step 10: Now you need to stabilize the stand for the hammock. To do this, you need to use four screws to connect them to the structure (two on each side).
Step 11: The last thing to do is screw in the hooks. Make a mark 15 cm below the upper edge of the crossbar with a diameter of 150 cm, in the middle and tighten the hooks. It can be tricky, but try screwing as much as you can.
Step 12: Everything is ready! Admire your work and be happy that you saved yourself some money.


https://i.expert-h.com/en/gamaki/stojka-svoimi-rukami-prosto#sigFreeId33af085994
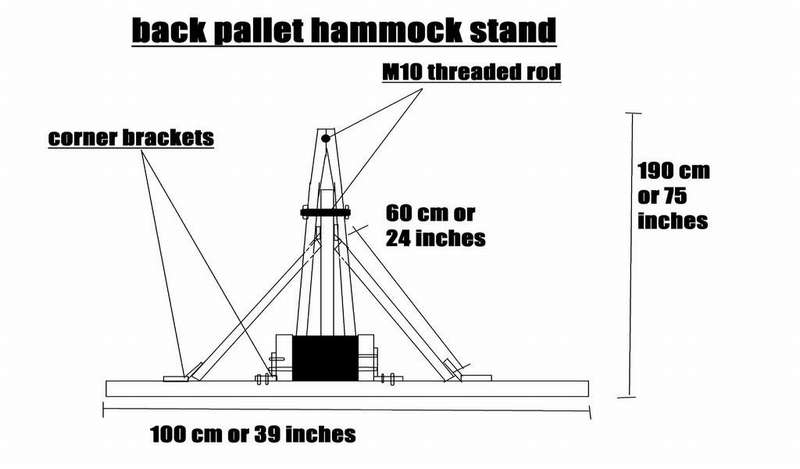
Rack for pallets hammock
 The beginning of summer, it's time to hang a hammock in the yard and enjoy the warm days. You can buy or sew a hammock yourself, this is not a big problem, but buy a hammock rack, business overhead.Better to spend some time and make a stand for a hammock with your own hands. This project is completely made of pallets. It is designed for approximately 60 kg. The whole structure is 290 cm or long and 100 cm wide. So just use the provided drawings and step by step photographsand you will have your own hammock stand in no time. By the way, this project was completed by a 16-year-old child who loves to do various things with his own hands.
This is how the stand on the drawing will look.
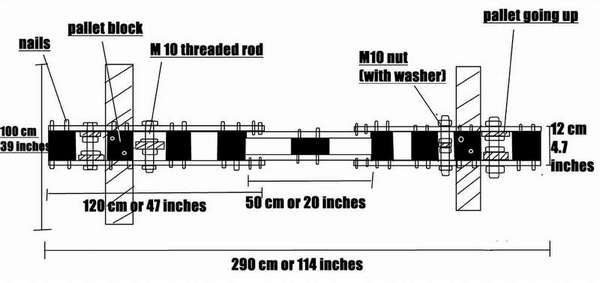 Start by installing the pallets as shown in the photo. In the middle you need to cut it in half. Drill holes for the M10. You can simply expand them in the middle of the board. In order to make sure that you drill in the right place, you can simply put all the other boards as in the photo of the finished project. When cutting the studs, you must first measure the width of the bottom. Then add 2 cm and screw in the nuts and washers.
In the next step, the photos talk about everything. Use these drawings, and the order of work can be seen in step-by-step photos.
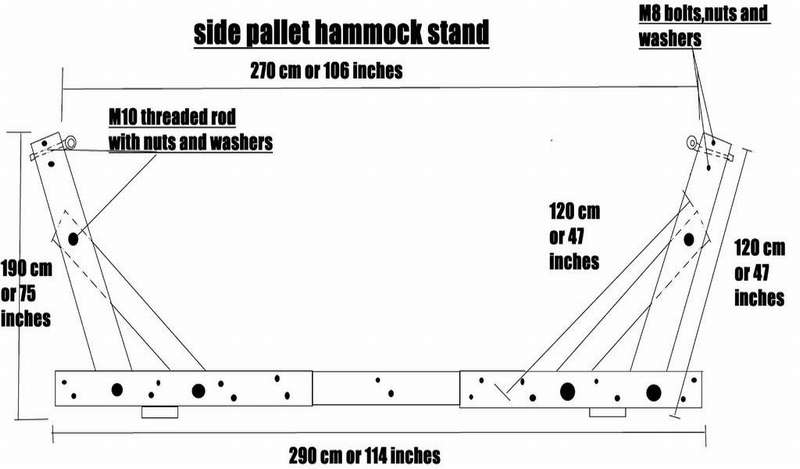
 F13.14 If you want to do even better, you can take two more boards of 120 cm each and set at the top of the bottom.


https://i.expert-h.com/en/gamaki/stojka-svoimi-rukami-prosto#sigFreeIdfeb86e217e
Portable hammock rack made of PVC pipes
 It’s summer and that you can enjoy the beautiful weather, lying in a hammock. But it is not always possible to find two suitable trees, and it is unprofitable to make a capital rack for a hammock, and experience is needed. Do not despair, you can always come up with something. The author of this project suggests making portable hammock rack made of PVC pipesthat can be installed anywhere exactly where you want. Making such a design will take about 2 hours, depending on your tools. After the rack is completed, installing the hammock will take only 5 minutes.
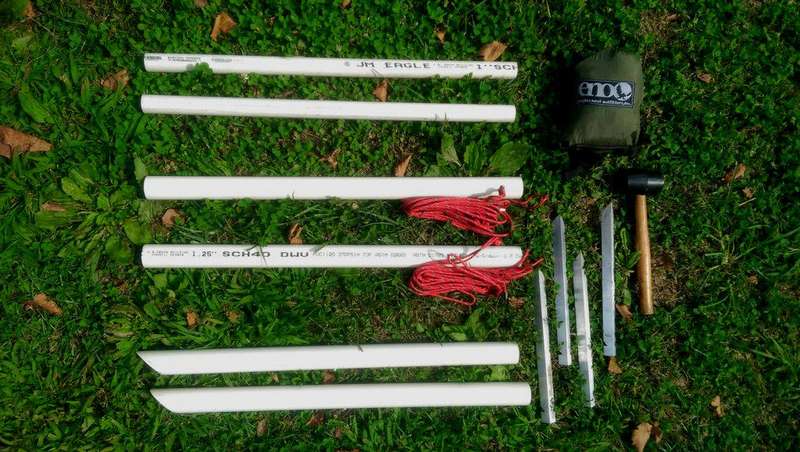 For work you will need such materials:
- 3 meters PVC pipe with a diameter of 32 mm
- 3 meters PVC pipe with a diameter of 25 mm
15 m Paracord - Corner aluminum corner 3/4 x 1/8 inches long 120 cm
- 2 screws
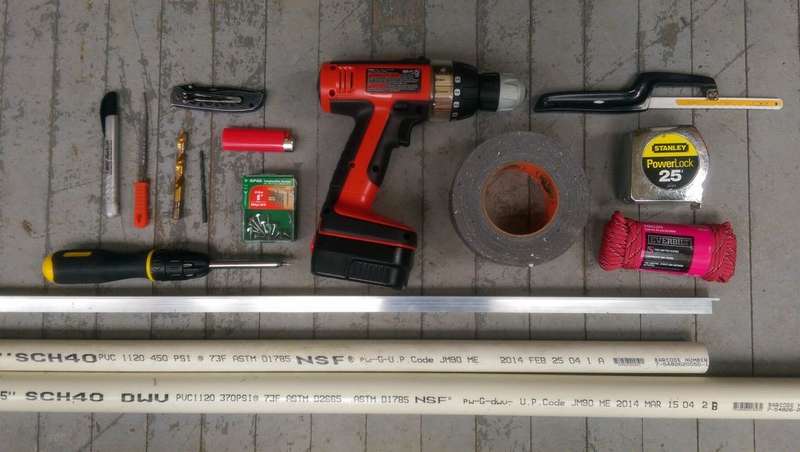
Tools:
Marker, knife, drill with 3/8 ”drill, round file, screwdriver, hacksaw
 The author’s site has a very detailed instruction on the steps of assembling a portable hammock stand.
Notes.
- This system can support two people (up to about 150 kg.)
- Use both joints to make a stable system, or use one leg to attach the hammock to an existing tree or pillar.
- Aluminum parts must enter the PVC pipe for storage and transportation.
- Rack can be installed in the sandif you want to take a hammock to the beach, you just have to get to the compacted sand.


https://i.expert-h.com/en/gamaki/stojka-svoimi-rukami-prosto#sigFreeId47de3925e6
Metal hammock stand
 If you have the appropriate equipment, a pipe bender and a welding machine, you can do this metal stand rocking chair for hammock. A solid design, but also a lot of fun. Read the manufacturing instructions on the website.
You will need
- 2 steel pipes 6 m long, at least 30 cm thick.
- steel sheet 90 x 120 cm 4 mm thick
- pipe bending machine
- welding machine
- hammock and rope


https://i.expert-h.com/en/gamaki/stojka-svoimi-rukami-prosto#sigFreeId376ed3f3b2
Wooden hammock stand with metal mounts
 To make such a stand for a hammock, it is clear that you need at least to have your own home workshop. Although, according to the author of this project, there is nothing complicated in this design. You do not need to have the best tools in the world to do something similar. In principle, the whole difficulty lies in the manufacture of a metal mount. But, in extreme cases, you can do hammock stand drawing and order parts in the workshop, and already make a stand out of the timber is not difficult. Of course, it is better to have your own welding, then not such things can be done. In general, if you liked it, you can read the instructions on how to make a stand for a hammock on the author's website.


https://i.expert-h.com/en/gamaki/stojka-svoimi-rukami-prosto#sigFreeId40439eabd2
Hammock stand 100 photos


https://i.expert-h.com/en/gamaki/stojka-svoimi-rukami-prosto#sigFreeId0f6ba75f0b
DIY hammock
 After the summer spent in nature, I want to continue the holiday. When the window is frosty home hammock It will bring not only pleasant memories, but will give the interior a certain originality.
Materials
- 4 bars 10 x 10
- 12 bolts with washers
- 8 bolts 5 cm threaded
- 3 bolts 8 cm with wooden thread
- 4 screeds
- Durable rope
Tools
- hand saw
- socket wrench
- drill
- sharp knife
- small linkage
 Design
Before assembly home hammock racksameDraw a drawing of the future design. At least such as that of the author. By the way, you can use it if you are satisfied with the size.
How to make a home hammockLook at the step by step photos. To ensure maximum stability, the screed should be connected to the main vertical crossbar at the highest point.


https://i.expert-h.com/en/gamaki/stojka-svoimi-rukami-prosto#sigFreeId512d985de8
How to fasten a hammock
 Here is the way how to fix a hammock in an apartment. Soft staples can be a good alternative to carabiners. Different uses range from mounting various objects to hanging a hammock. Insofar as soft ties made of cord, they are lighter than carbines, and take up less space. You will need: 60 cm paracord, a tool of your choice to make a hole in the paracord, scissors, a measuring tool, a lighter and a micro-paracord.
It’s quite difficult to explain in words how to fix it, just look at the step by step photos, there the process is shown in great detail. Short explanations are also on the site.


https://i.expert-h.com/en/gamaki/stojka-svoimi-rukami-prosto#sigFreeId608aae4ef9
How to fix a hammock in an apartment
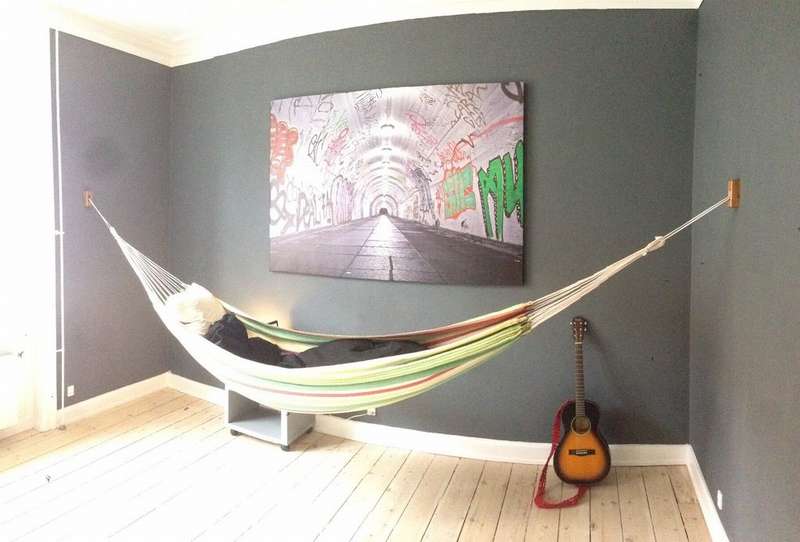 If there is a hammock, it is not necessary to wait for good weather, fasten it at home, open a window and fantasize. Here is one way how to hang a hammock in an ordinary apartment.
- Of the wooden parts, the author used oak: 4x 50 mm * 120 mm * 18 mm
- 2 metal pins
- 8 Screws + dowel (depending on your wall, in this case brick)
- Ropes and hammock
Notes:
The idea of installation, I think, is understandable. In the wooden parts, make the inner holes so large that the rope runs freely. The main thing is to firmly fix the mount, so the screws and studs should be of sufficient length.


https://i.expert-h.com/en/gamaki/stojka-svoimi-rukami-prosto#sigFreeId44185566e8
Light hammock
 The hammock is made of 100% polyester fabric, which is durable, non-stretch and comfortable. It is inexpensive and easy to do.
You will need:
- 4 m from 100% polyester fabric.
- Gutermann Polyester Thread
- Sewing machine
You will need to cut the fabric to make a rectangle 2.9 m long and 1.5 m wide. Usually the original width of the fabric is on sale.
Sew long edges. Fold the hem with long edges. This will prevent stretching of the fabric under weight.
Then sew the short edges. Make the edge of the roll, but with three parallel seams.
Now that you have the main part of the system, you just need to cut the suspension lines through the channels, and you are ready to spend long pleasant nights in your new hammock!


https://i.expert-h.com/en/gamaki/stojka-svoimi-rukami-prosto#sigFreeIdafe8e6449e
Home stand for hammock
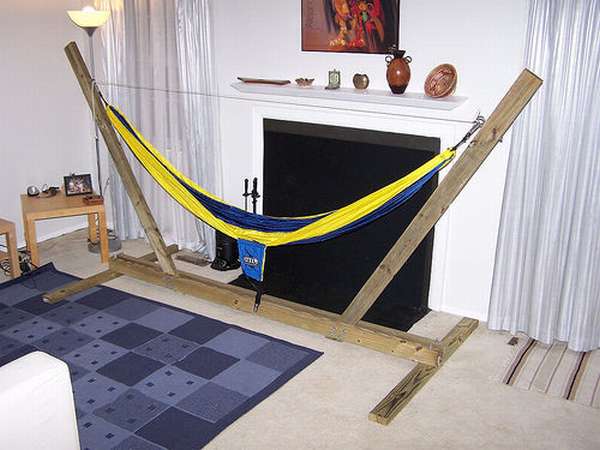 If you already have a hammock, then you do not have to wait for the summer, you can hang it at home. To do this, the author suggests making such a simple stand. To do this, you will need:
- 2 beams 2x4 2.5 m, 1.8 m and 1.2 m long.
- 8 bolts 14 cm
- 4 bolts 15 cm
- 24 washers and 12 pcs of clamping washers
First step, make corner cuts of the beams that will hold the hammock. The author made a 30 degree cut so that the angle to the floor is 60 degrees.
It is most difficult to drill holes through which corner beams will be attached to the base.
Inclined crossbars should be “clamped” between two 2.5 m beams and boltsthat will go through all three parts. It should also be noted that the inclined beams are not flush with the support beams. This is because the base will lie on the top and therefore must be raised approximately 5 cm from the floor.


https://i.expert-h.com/en/gamaki/stojka-svoimi-rukami-prosto#sigFreeIdbc9f8c8897
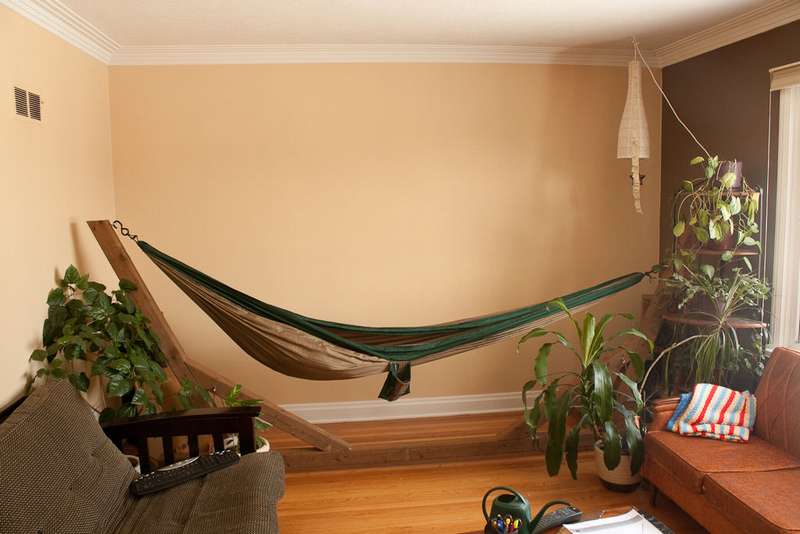
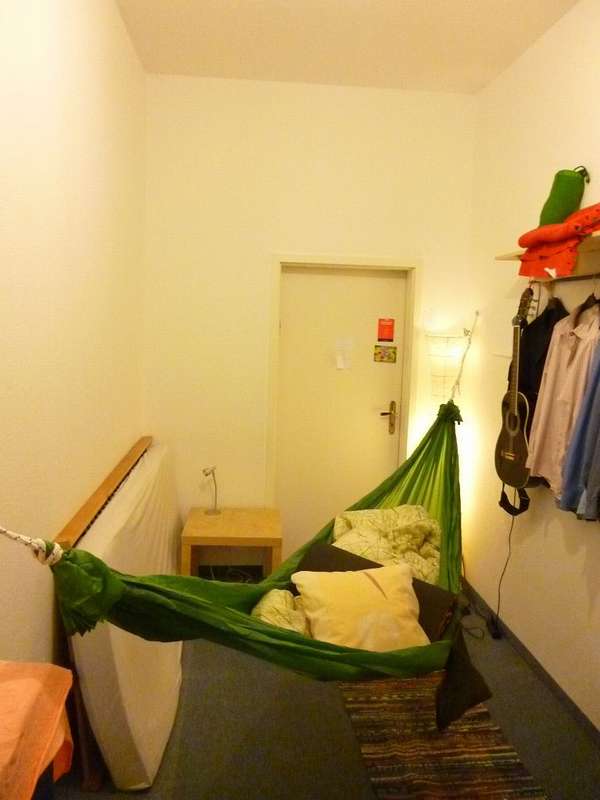
Indoor hammock installation
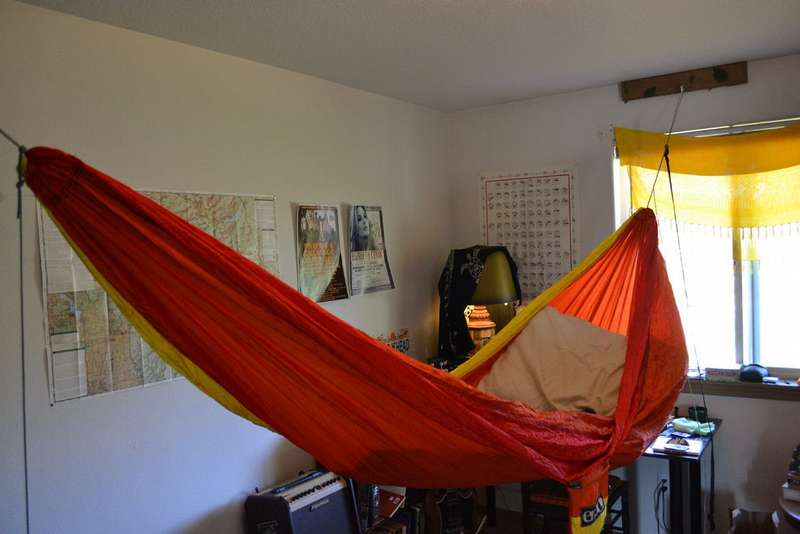 Motive installing a hammock in the room may be different, in this case, the author, thus, saves space with a small room. The main problem is to make strong fasteners and not spoil the wall. How the author solved this problem, you can read in the instructions on the author’s website, because you will not understand much from the photos in the gallery. You just need to do some calculations. Think about how high you want the hammock to hang, how far it should be from the floor, and what the distance between the attachment points should be. You should consider these factors when planning your place for hooks.


https://i.expert-h.com/en/gamaki/stojka-svoimi-rukami-prosto#sigFreeId72fdc3bc1d
Indoor hammock
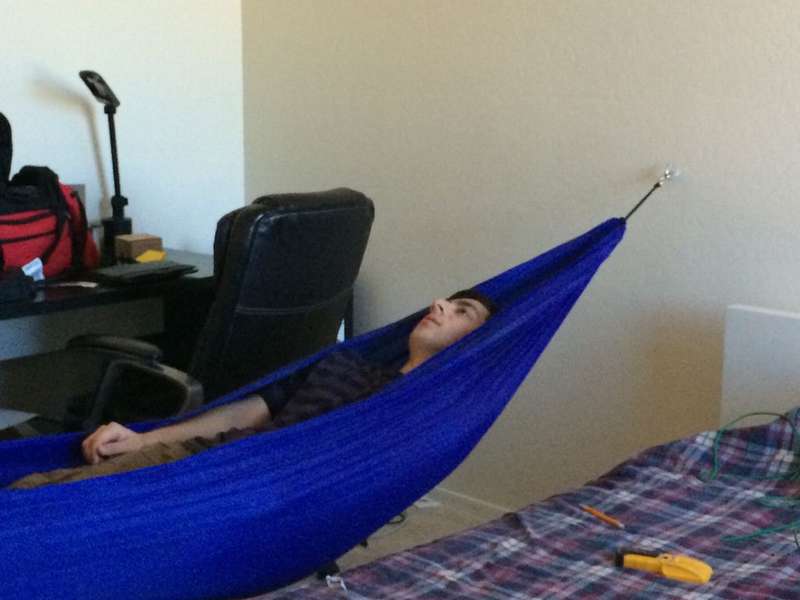 Materials:
- hooks for lag
- drill
- hammock
- pliers
- plastic bag
- paracord
Identify mounting locations.
Drill holes
Screw the hooks into the wall. Make sure that the screw enters the studs and not the hollow part of the wall.
If the hammock is too short, use a little paracord to connect the hammock to the hook.
 Use a rope folded in two with knots at the end. It's hard to explain, so just look at the photo. Complex nodes are not needed for this system.
Do not make the hammock too tight, let it sag, it will be more convenient for you.


https://i.expert-h.com/en/gamaki/stojka-svoimi-rukami-prosto#sigFreeIdfe1dce71fd
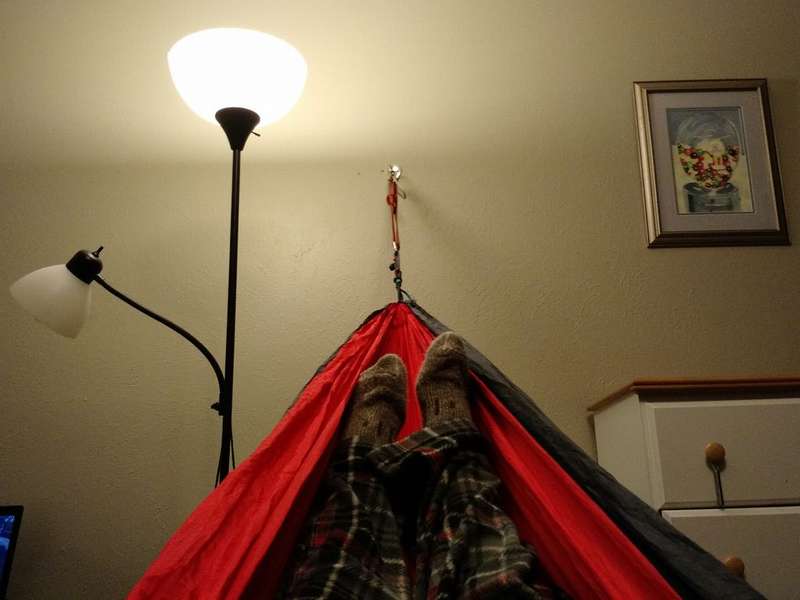
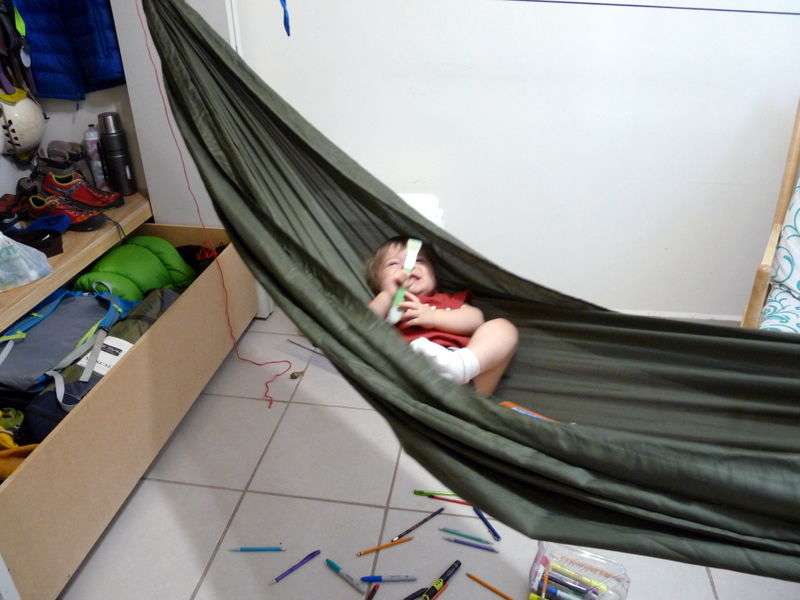
 How to make a hammock yourself at home
In fact installing a hammock indoors is cheap and easy.
Just drill a hole, screw in the screw (in this case 8x70 mm), and either fix the rope directly or through the chain ring!
If you are worried about reliability, then a special mount can be bought at the store. Or do it yourself, as already described in the previous article.
You can also sew a hammock with your own hands, then all the pleasure will cost you even cheaper.
Well, do not hang the hammock too high, even if something happens, in extreme cases, get off with a slight fright.
The photos in the gallery show the main points of fastening, I think there is no special instruction here.


https://i.expert-h.com/en/gamaki/stojka-svoimi-rukami-prosto#sigFreeIddad6166e0b
Hammock for home 50 photos


https://i.expert-h.com/en/gamaki/stojka-svoimi-rukami-prosto#sigFreeId207ec7fc46
Hammock Stand Scheme


https://i.expert-h.com/en/gamaki/stojka-svoimi-rukami-prosto#sigFreeId2ab397a155
Hello, I am the author of this article, so I look forward to asking questions for this article in the comments below, I will answer all !!!
If you have questions on another topic, ask them on our forum, we will answer you
- Two baskets of paper in 5 minutes (Master class)
- How to make a simple and compact table for a milling cutter from plywood
- How to make a soft headboard tile (Instructions + step by step photos)
- Cinder block benches: a convenient bench in 55 minutes
- How to make a bed with a niche: saving space (Master class)