How to make a fence from a wooden picket fence. The choice of material, installation and decoration of the fence Favorite
 do-it-yourself wooden fence fence
Content
Wood is the most widely used material and probably will remain so for a long time. Although today there are a lot of different new products, but still, many prefer to install a fence made of wooden picket fence. This is the simplest and most affordable material for fencing a summer cottage or a country house.
Since there are no problems with installing the picket fence, they can be enclosed with the entire plot or used as a demarcation inside the courtyard, kitchen garden and garden. Of course, this is not the most reliable fence, when compared with a brick or metal fence, but
it does not obscure the territory and performs its function as a demarcation of the site.
The choice of material for picket fence Be sure to read !!!
Any person who knows how to hold a hammer in their hands will be able to make a fence from a picket fence, no special abilities are needed here. All that is needed is to choose the right material, prepare, cut and knock down in a reliable design.
The material for the fence needs a variety, but everything you need can be purchased at the store. So what we need:
- Supports for the fence. Usually metal pipes are used in this capacity. In principle, not necessarily pipes, any metal products to which the strips can be attached can serve as supporting posts. Only you should pay attention to the height, since somewhere around half a meter of the support will be poured with concrete. Well, the thickness of the supports for the picket fence does not play a big role, an inch pipe is also suitable. Wooden poles are no less widely used.
- Reiki (shtaketin and vein). Shtaketin can be made independently from planed or edged boards. It’s even easier to buy ready-made ones by choosing the right size or making an order in the carpentry shop. We need bars for veins, they should be thicker than shtaketin, approximately 40 mm. Third-grade material can also be used only so that it is not rotten.
- Cord to align the shtaketin during installation.
- Nails or screws. Both are suitable, self-tapping screws are more expensive, nails are cheaper, so be determined. Self-tapping screws, of course, are more reliable.
- Concrete materials. Cement, crushed stone, sand, mortar tank.
- Sandpaper for stripping. The more you have to cut, the more sandpaper you will need, since the place of cropping will need to be sanded.
- Varnish or paint, as well as a brush to paint.
- Mounting screws to connect the crossbars to the uprights.
- Solvent.
Tool required:
- Chisel with a wide blade.
- Medium hammer and ax.
- Hacksaw for woodwork with medium teeth.
- Drill.
- Electric jigsaw or planer.
- Paint brush.
- Tape measure, construction level, nail puller, shovel.
Look like that's it. There are tools and materials, you can get to work.
The procedure for the manufacture and installation of the fence from a wooden fence
The principle of arranging a picket fence is the same as any other fence. First you need to prepare a site for work. That is, to remove everything that may interfere with the construction - trees, bushes, weeds. Then make a marking and determine the optimal distance between the supports. It is not recommended to do more than three meters, otherwise the crossbars simply can’t stand it.
First step. How to properly prepare and install poles
Let us dwell on a cheaper option, this is the installation of wooden supports. First, you need to prepare the logs - to clean the bark, with an ax to clean the knots, process that part of the column that will be underground. You can recall the ancient and reliable way, when the lower part of the logs was burned at the stake, although it is not necessary, you can use a burner or blowtorch. The purpose of this treatment is to make the wood char, then it is not afraid of dampness and insects. True, experience is needed in this matter, if you have extra logs, then you can experiment. If there is no such desire, just treat the wood with bitumen. It is better not to concrete the wooden poles; they quickly deteriorate.
Next, you need to prepare the pits 70 - 80 centimeters in depth. Put 10 centimeters of sand on the bottom and sprinkle with a layer of gravel. Up to half cover the installed pillar with stones or broken bricks, cover it with earth and tamp. The upper part of 15 - 20 centimeters should be left for the clay castle. The legs are aligned with a stretched cord and a building level.
Second phase. Lashing
The length was approximately six meters, so an assistant is needed for this work. First you need to prepare the grooves, two on each column, with a depth of not more than 30 centimeters. Using the construction level, try on the slots in grooves. If everything worked out smoothly, nail them with nails. Thus, tie all the posts.
The third stage. Fence installation
Fence rails should be carefully prepared, processed at the ends. Cutting them two meters, fasten to the slams. The first board should be well aligned with the help of the level, the second board should be fastened at a distance of about three meters. With a lace, check how evenly they are fixed. After that proceed to fastening the rest of the picket fence. Also make sure that the lower end of the shtaketin is above the ground more than five centimeters.
The fourth stage. Varnishing or painting
The assembled fence is coated with a protective decorative varnish or, if desired, with oil paint. This work requires scrupulousness, because poorly crafted areas can quickly become unusable.
Decoration and decoration of picket fence
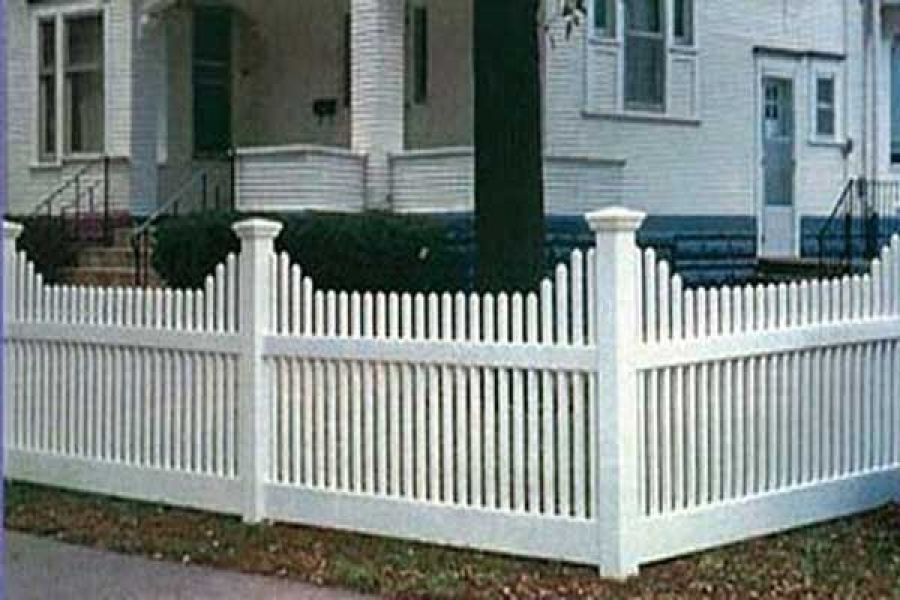
Wood, this is probably the most convenient material for decoration. Having shown imagination, a fence of a wooden fence can be made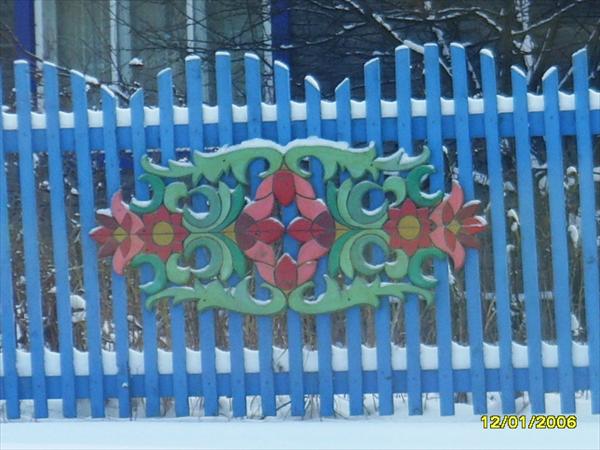 real decoration of the site. But even without particularly straining, give some decorative forms at all not difficult. For example, make the top of the fence semicircular or give some other original shape. It is easy to do, even for a person with a not very rich imagination. You need to cut out the template, it is better from plywood and mark it on the fence using it, then cut the desired configuration with an electric jigsaw. Thoroughly trim off the cut ends with sandpaper.
Also, various details of the ornament, both metal and made of wood, are very well attached to the fence. They are made separately, also according to the template, and then mounted on separate sections of the fence.
Hello, I am the author of this article, so I look forward to asking questions for this article in the comments below, I will answer all !!!
If you have questions on another topic, ask them on our forum, we will answer you
- Two baskets of paper in 5 minutes (Master class)
- How to make a simple and compact table for a milling cutter from plywood
- How to make a soft headboard tile (Instructions + step by step photos)
- Cinder block benches: a convenient bench in 55 minutes
- How to make a bed with a niche: saving space (Master class)