Do-it-yourself sliding gates. Drawings and schemes, step by step photos
 DIY sliding gates
It is no secret to anyone that when arranging their land, whether it is a private house or a summer residence, a fence is required.
And what can be a fence without a gate and a gate. In this article I want to offer you the option of sliding gates.
Sliding gates are of three types:
- cantilever
- hanging
- wheeled.
I will give you some huge advantages of sliding gates:
1. Sliding gates take up much less space when opening than, for example, swing gates.
2. You eliminate the possibility of scratching or hitting your car in high winds.
3. Wonderful appearance.
4. It is a very simple installation.
And so below examples of sliding gates with detailed photographs will be given, as well as some nuances in the arrangement and installation of sliding gates.
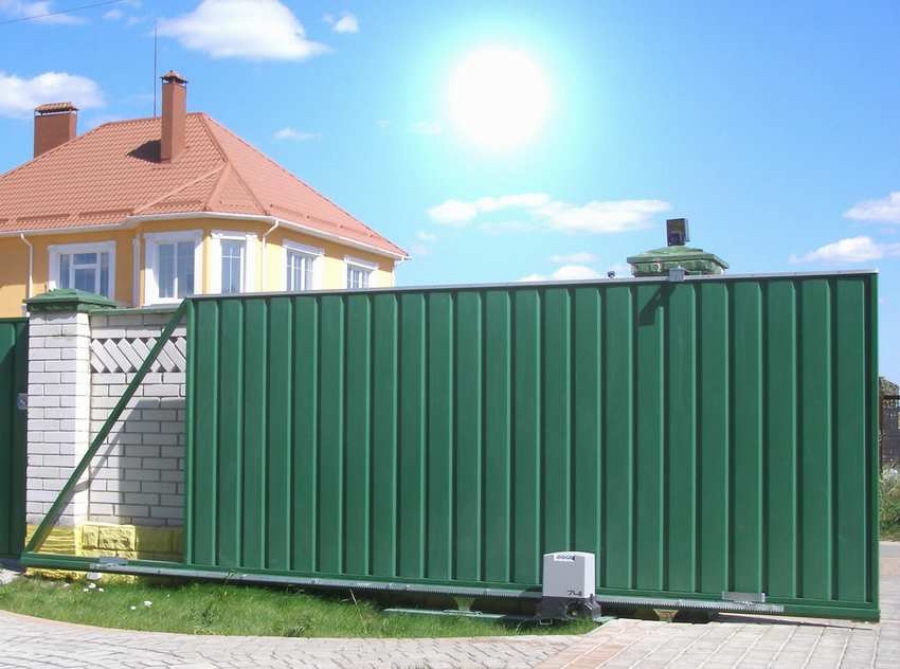
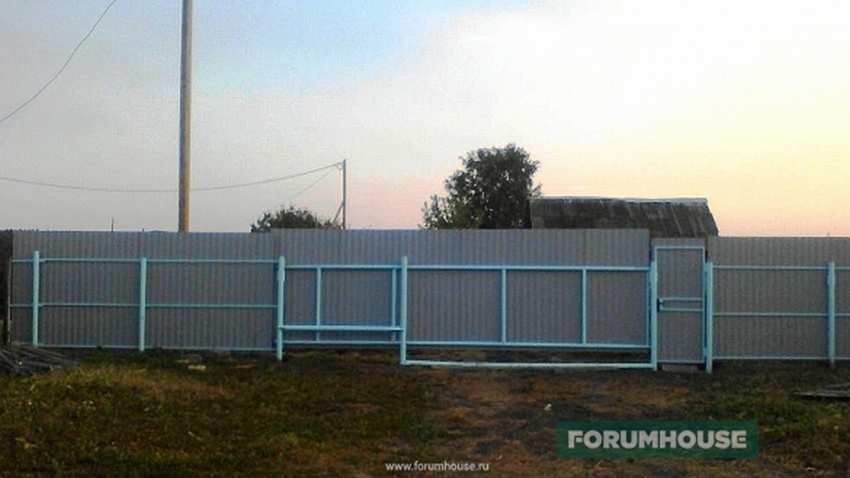
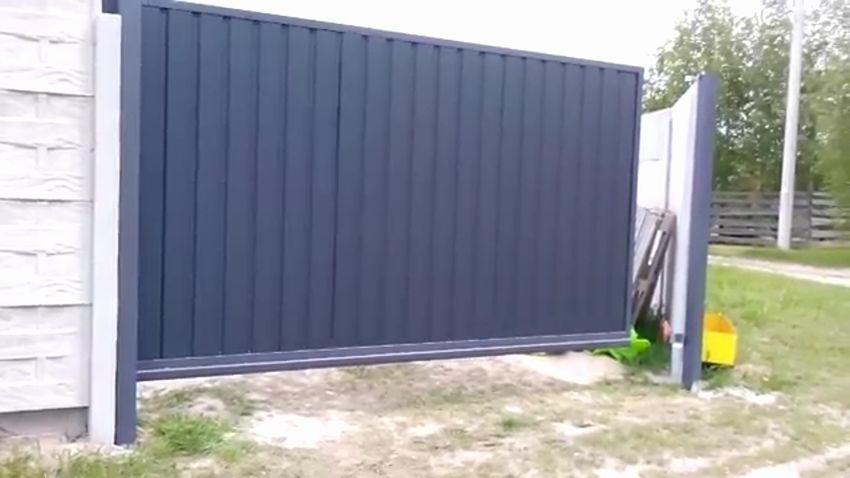
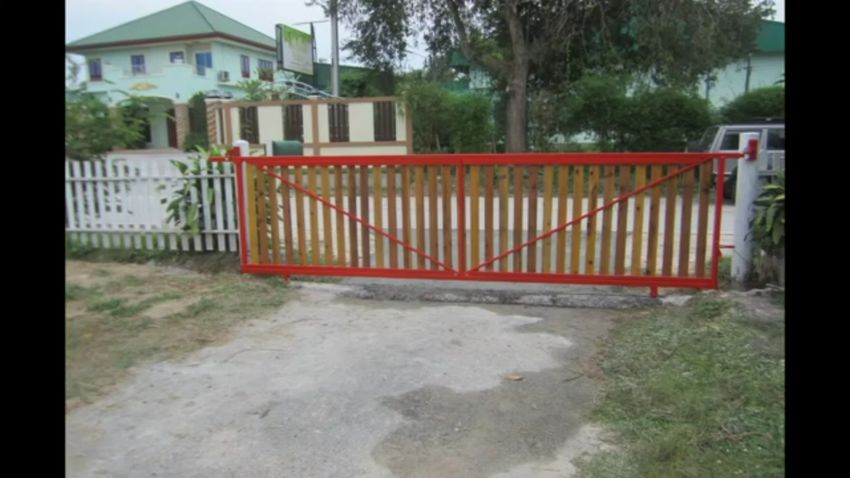
Cantilever Sliding Gate
 Cantilever Sliding Gate represent a structure in which a retractable web is typically mounted on a lower guide.
Very often, experts recommend manufacturing such an option, since there is no upper limiter, they do not take up much space, they are very burglar resistant.
Below are the schemes for the arrangement of console sliding gates, namely: marking, preparation of the base, calculations and, of course, installation.


https://i.expert-h.com/en/vorota/1011#sigFreeId6873ab961d
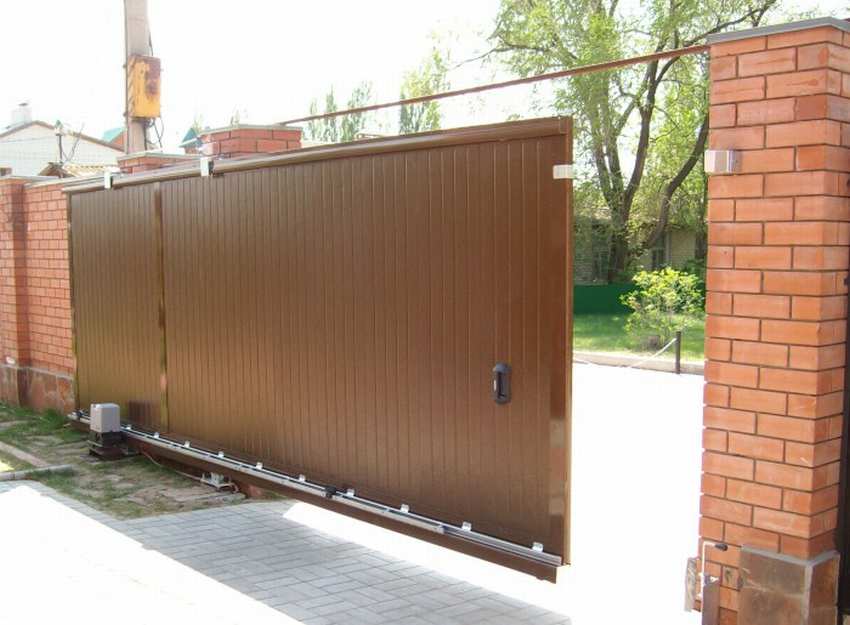
Overhead sliding gate
 Overhead sliding gate installed in places with an upper limit or roof. Therefore, they find their application more often in storage boxes or hangars.
The rollers and parts involved in the movement are located on the upper rails, which significantly reduces the possibility of passage of vehicles with high height.
But, an incomparable plus is the exclusion of sagging of such a design over time.
Below is a detailed photo report on the manufacture and installation of hanging sliding gates with your own hands.


https://i.expert-h.com/en/vorota/1011#sigFreeId1972d4c7d2
Wheel sliding gate
 Wheel sliding gate are made using a rail, which is placed in the ground or concrete. The sheet of wheel sliding gates is equipped with wheels at the bottom.
Most The main disadvantage of this design is the contamination of the rail and, as a consequence, poor sliding of the wheels.
Therefore, wheel sliding structures have found wide application in the manufacture of sliding interior doors.
In principle, the difference in the design of wheel sliding gates is observed only in the presence of wheels that slide along the rail in the lower part of the gate opening.
Below are the options for sliding wheel gates.


https://i.expert-h.com/en/vorota/1011#sigFreeIdb0e4295cd8
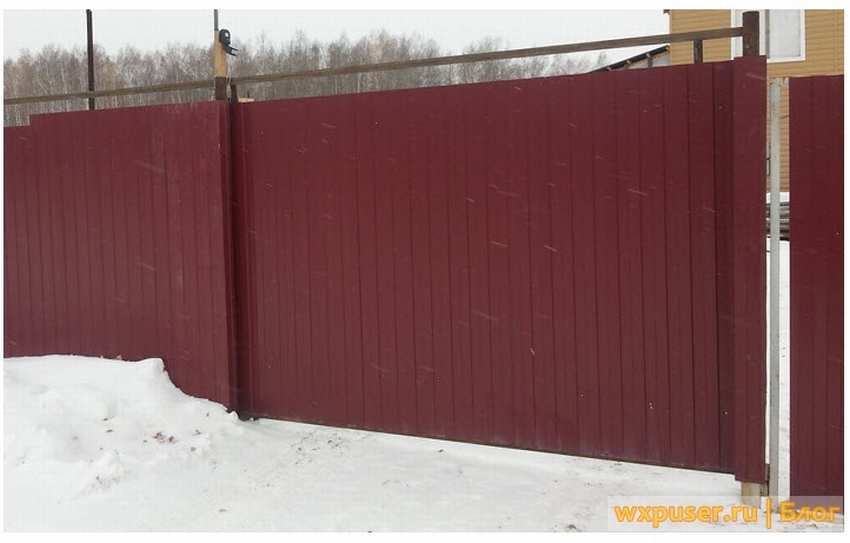
Production of budget sliding gates
 Budget sliding gate differ from non-budget ones in that it does not have an automatic gate opening mechanism.
This option is suitable for the case with a limited amount of finance. But in appearance such gates are not inferior to the most modern and high-tech factory analogues.
In addition, they save a lot of space when opening.
The photo below shows the assembly and installation options for this type of gate.


https://i.expert-h.com/en/vorota/1011#sigFreeIdea911d7b01
Material selection for sliding gates
To make quality and beautiful sliding gates good materials needed.
It is best to buy kit materials in specialized stores or online.
So, we will figure out what should be in the installation kit for sliding gates:
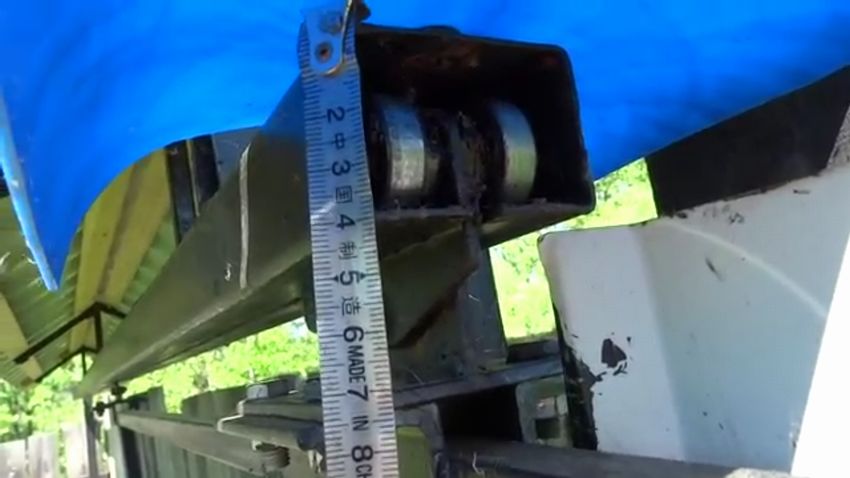
- 1. Roller carriages - 2 pcs. (for the movement of the guide).
- 2. Trap for sash lower and upper - 2 pcs. (for added strength when locked).
- 3. Slat with support rollers - 1 pc. (holds the top of the sash when moving).
- 4. Rolling wheel or trailer - 1 pc.
- 5. Plugs on the guide - 2 pcs. (to close the guide rail from excess debris).
- 6. Guide.
- 7.Electric motor with gear rack, wiring and automation system.

For the manufacture of a sliding gate frame, a metal profile of 50x50 or 60x40 for the outer frame and 20x40 for the inner is best suited.
Any material suitable for you, be it wood, professional sheet or something else, is suitable for covering the frame. When choosing, you should proceed from the design of the fence.
https://i.expert-h.com/en/vorota/1011#sigFreeId5f947aa0eb
How to do metal frame for console do-it-yourself folding gates.
(photos, instructions, video master class)
 Where does the creation of any gates and gates begin? Of course, with the manufacture of the frame, after all, this is the basis of the entire gate design. So we will begin to consider the whole process of assembling home-made sliding gates precisely with the creation of the frame.
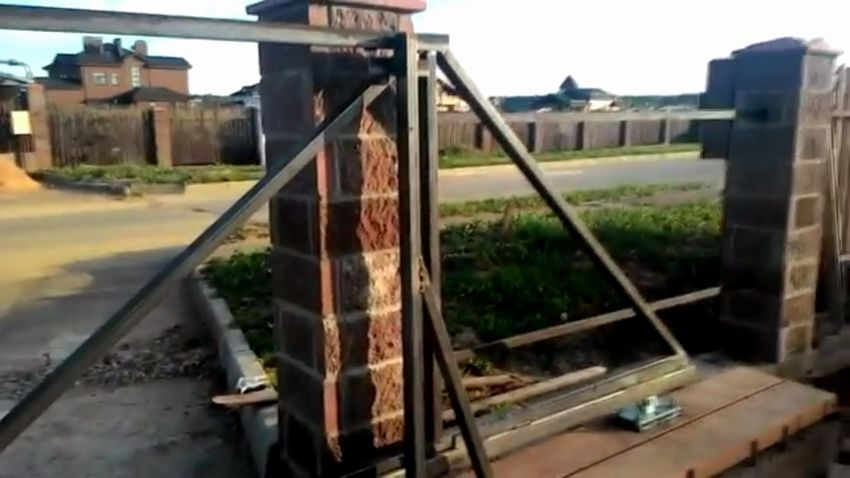
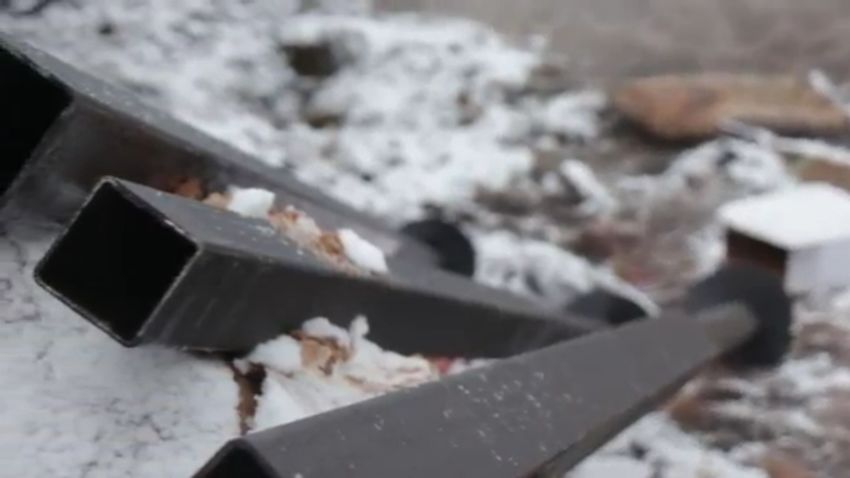
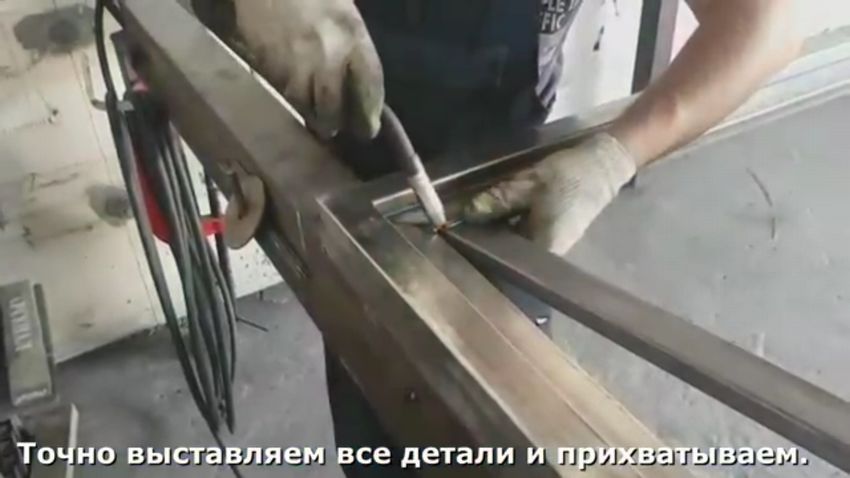
The simplest and, accordingly, the most popular method of creating a frame for sliding gates is This is the welding of the frame from the profile pipe. And they usually use metal pipes of standard section (60 by 40 millimeters) for this.
The frame for cantilever sliding gates is a rectangular (main) fastened together with diagonal jumpers inside and a triangular (located on the side of the main) frame. In this case, the ends of the pipes are cut at an angle, this allows you to firmly solder them together.
The finished frame is then installed on the guide with rollers, but this is another story, another stage in the creation of sliding gates, about which I will tell you below.
Step-by-step photos of the manufacture of a frame for sliding gates


https://i.expert-h.com/en/vorota/1011#sigFreeId32c67bbda8
Source of ideas and photos video master class: youtu.be/4-sJ4gQT2Bw
Original name: Progress LLC - Sliding gates (issue No. 1)
Video author: Progress LLC
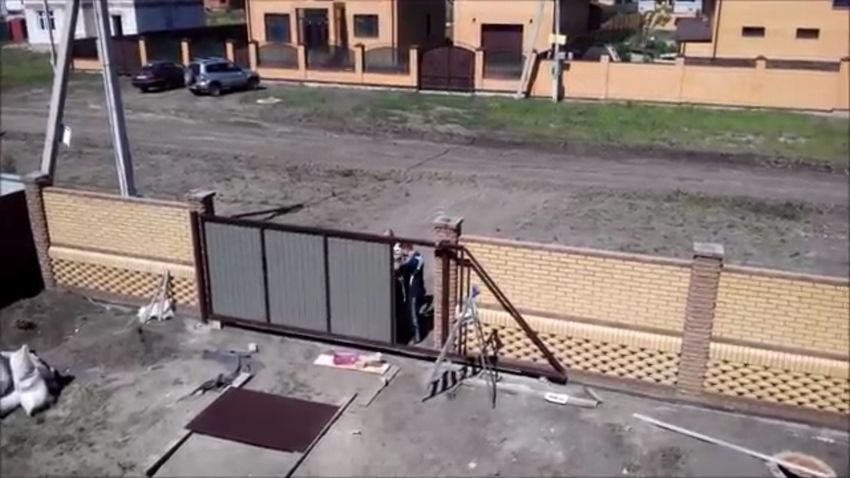
How to lay foundation for console do-it-yourself sliding gates.
(photos, instructions, video master class)
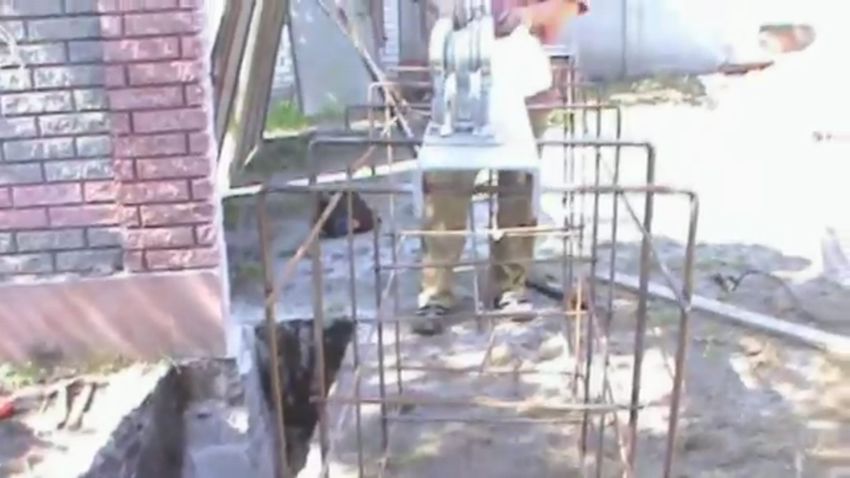 After the frame of the console sliding gate is created, it is necessary to prepare a place for the installation of the gate, namely, lay the foundation. To do this, in accordance with the dimensions of the frame you created (and to be more specific, in accordance with the length of its rectangular frame), you need dig a hole approximately one meter deep. Then, carriages are mounted on a metal bar, to which a strong wire corset is attached (its dimensions are equal to the dimensions of a dug hole). All this the structure is immersed in a pit and poured with concrete. That's all, the foundation for the console sliding gates is ready, you can begin to install them.
Photo master class for the manufacture of such a foundation:


https://i.expert-h.com/en/vorota/1011#sigFreeId30c366ebb2
Source of ideas and photos video master class: https://youtu.be/Lv_RXa3f0es
Original name: Base for sliding gates (installation of a mortgage)
Do guides, carriages and stabilizers
for sliding gates do it yourself
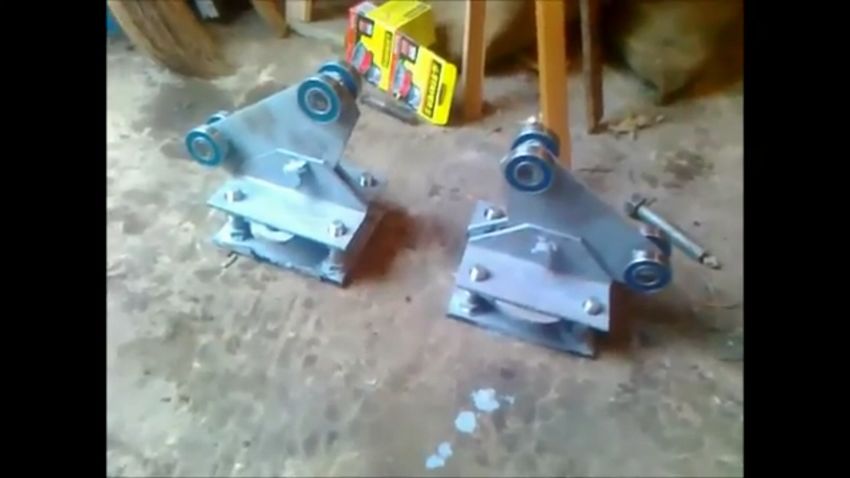 Many people who created sliding gates for their site on their own, limited themselves only to creating a frame and laying the foundation for cantilever gates. And guides, carriages, top rollers and the like, they purchased in the finished set. But what will happen if I tell you that even these parts needed to assemble the console sliding gates can be done independently at home? You will surely try, right?
Indeed, the creation of these spare parts for gates yourself
- firstly, it will allow you to save a little,
- secondly, it will be an occasion for pride in oneself.
Do you agree?
To create the guide, the same profile pipe was used, in which the creator cut the top, and to make the carriages to the author of the video of the master class eight bearings came in handy, and designs carved from metal sheets with their own hands. And the creator made metal stabilizers for sliding gates with his own hands.
All attention to step by step photos.


https://i.expert-h.com/en/vorota/1011#sigFreeId03ba9b0895
Source of ideas and photos of the video master class: https://youtu.be/5DwRumiS9Qk
Original title: HOW TO MAKE A ROLLING DOOR TO ONE! Detailed video instruction!
Simple cantilever sliding gate
(simplest construction without foundation)
 Can create not complicated do-it-yourself console sliding gates, and without foundation for them: the next model is just an example of such a variant of the gate. But why for such a gate does not need to lay the foundation? The thing is that the creator of this model of sliding gates has a concrete fence, on the basis of which he installed the carriages along which the gates move.
Frame this gate has a short length - only six meters, the author of the video of the master class made it a little in the wrong way that I described above, he not I cut the profile pipes for the frame with a corner, and immediately soldered them together. Well, it doesn’t make a stronger construction, but the creation process itself is a bit simplifies.
Pluses of model:
- Ease of creation, some stages of creating a cantilever gate in this case can be omitted;
- Cheapness;
- Pleasant appearance;
- The convenience of use;
See gallery of step by step photos of creating such a gate


https://i.expert-h.com/en/vorota/1011#sigFreeIda690b098d7
Source of ideas and photos of the video master class:
Link to the first part of the video master class: https://youtu.be/xPSNzfgPkgI
Link to the second part of the video of the master class: https://youtu.be/oK7hOeinrLI
Original title: Guide for sliding gates. DIY sliding gates
Cantilever Sliding Gate from corrugated board.
(another version of a simple design)
 The next model of console sliding gates is similar to the previous one. But I still want to show you the process of creating them.
So...
- First, poles are installed on the fence, on which the gates will be mounted, these poles are an ordinary profile pipe of wide cross section.
- Then, under the right pillar, carriages are installed along which the gates will move.
- The creators assemble the door frame directly during installation, so the next step is to launch the guide onto the carriage, to which the pipe is attached - the base of the frame of the door frame. Five vertical posts are installed on this pipe, which are equally spaced from each other.
- On top of the posts in a horizontal position, another profile pipe is attached. The upper and lower horizontal pipes are connected by a jumper.
- Then fasteners for sliding gates are attached to the posts, so that the gates do not move out of direction.
- After all these actions are completed, all that remains is to cover the frame with corrugated board, and the console sliding gates will be ready.
Step-by-step photo of manufacture:


https://i.expert-h.com/en/vorota/1011#sigFreeId7442393060
Source of ideas and photos of the video master class: https://youtu.be/ManBeegt-yU
Original name: Sliding gates "SOVA" for 2.5 hours with your own hands!
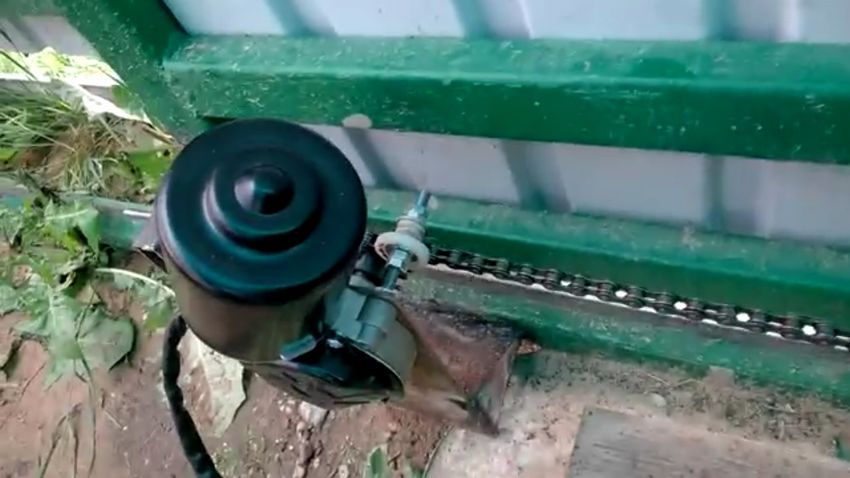
How to do automatic do-it-yourself console sliding gates.
(let's take an example of how to make the gate open automatically when the button is pressed)
 What is the main difference between sliding gates and swing gates? Of course, in ease of use, because to open the sliding gates there is almost no need for space, which you can’t say about swing gates. But the use of console sliding gates will be even more convenient and more pleasant if they are automated: one press of a button on the remote control, and the gate opened, great! Is not it?
But, unfortunately, not everyone can afford a set of automatic drive for sliding gates, what to do in this case? Do not despair! There is a solution, because even you can automate sliding gates with your own hands.
To do this you need:
- Motor (the creator of this video master class used a motor for the wipers of the VAZ-2108);
- Current source (in this case, a 3000 mAh battery);
- Stars: 2 pieces;
- Long bike chain;
Idea and essence
One star is attached to the motor, which is installed in front of the gate, and the second to the movable axis, mounted on the gate frame. Then you need to stretch the chain from the star on the motor (through the star on the gate frame) to the right edge of the frame, and fix it there. Almost done, it remains only to connect the socket plug to the motor wires, and connect the socket itself to the battery. Now, when the plug is plugged into the outlet, the motor will start to work, the chain will stretch, setting the gate in motion (attention to the photo instruction and video master class).
As a key to this system, instead of an outlet and plug, you can install a remote switch, and enjoy the automation.
See step-by-step photos of the master class


https://i.expert-h.com/en/vorota/1011#sigFreeId4874736283
Source idher and photos video master class:
Link to the first part of the video master class: https://youtu.be/0-NZNWShaeo
Link to the second part of the video of the master class: https://youtu.be/1UMVF4g6Hi4
Link to the third part of the video master class: https://youtu.be/IqWqVevKMFw
Link to the fourth part of the video master class: https://youtu.be/6UXLlfo8mpw
Original name: Homemade operator for sliding gates. Homemade sliding gates on a ground rail.
How to make simple metal cantilever sliding gates from corrugated board without laying the foundation?
(photos, instructions, video master class)
 If you are reading this entire article, then you probably already saw a model of cantilever sliding gates, the carriages of which are installed on the concrete base of the fence, so that there is no need to lay the foundation for fixing them. But such a case is one of only one hundredit can even be called “Exceptional”, because few people have fences with a concrete base, right? So what to do if you want to install console sliding gates on your site and, at the same time, avoid laying the foundation? There is an exit!!!
The creator of the following model of cantilever sliding gates from corrugated board did as follows:
He connected the carriages to each other with a jumper from a metal profile pipe (the same one from which the gate frame was assembled), and through the bases of the carriages he made metal "spokes", which he fixed with nuts on both sides. Then, in those places where the carriages were supposed to be located, he drilled one small hole, and inserted the whole structure with “knitting needles” into them, checked everything according to the level and concreted the holes, that’s all. Then he simply installed the gate according to the scheme, which you have already seen more than once in this article.
See step by step photos of the manufacture of such gates without a foundation:


https://i.expert-h.com/en/vorota/1011#sigFreeId614496ad51
Source of ideas and photos of the video master class: https://youtu.be/IU0uyA6YP3I
Original name: DIY do-it-yourself gates
Beautiful sliding gates from metal racks
(automatic do-it-yourself)
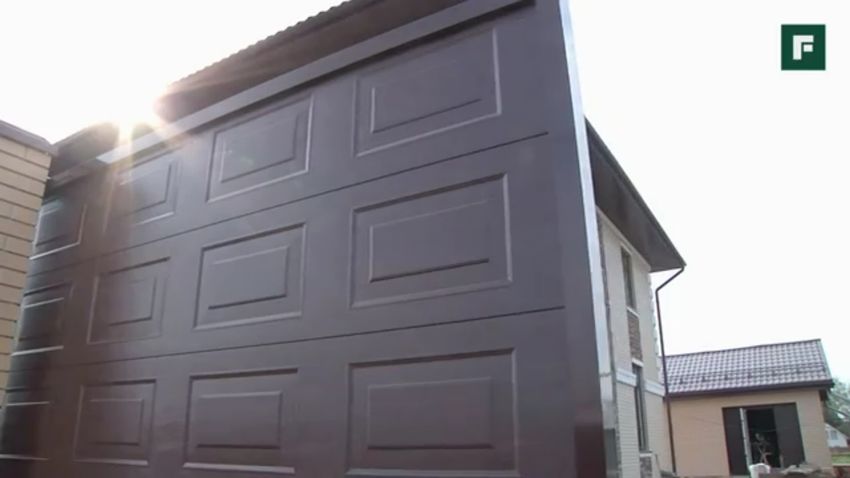 The next version of the console sliding gates is clearly not cheap, but when creating it can saveif you do it yourself. As for the automatic drive, I already told you how to create it yourself at home. The frame of this gate is made not from an ordinary metal profile pipe, but from metal rails, and processed, varnished and water-based paint. Outside, the frame is not covered with an ordinary profiled sheet, but with a metal embossed sheet (and this is only outside, because such gates have several layers of coating).
Over the gates corrugated roof, protecting the gate from getting water on it during rain. In a word, these gates were made qualitatively and for centuries, and with their appearance they cannot but please the eye.


https://i.expert-h.com/en/vorota/1011#sigFreeId33add6b46a
Source of ideas and photos of the video master class: https://youtu.be/5rvT9O09ID4
Original title: Installation of automatic sliding gates // FORUMHOUSE
Sliding gates on the screw stilts.
(for gates big size)
 Well, and in contrast to the model described above, I want to show you this option inexpensive console sliding gate from a professional flooring.
By the way, on the example of this model, we can consider the solution to one problem:
The lower guide with carriages for cantilever gates should be fixed in level on a level surface, but what if there are only solid holes at the gate installation site? Do not cover everything with earth?
In this case, the creators acted as follows: they buried small screw piles into the ground, on which a guide was installed. As a result of this, the gates, of course, are located a little higher above the ground than they could, but this is not scary.
For the rest, the process of creating this model is no different from those already described above, all the attention on the photo is a master class and video on YouTube.
Step-by-step photo of manufacture:


https://i.expert-h.com/en/vorota/1011#sigFreeId20a30a8252
Source of ideas and photos of the video master class: https://youtu.be/CeIqTly4ESo
Original title: Sliding gates and fence on screw piles. LLC "SV-Foundation"
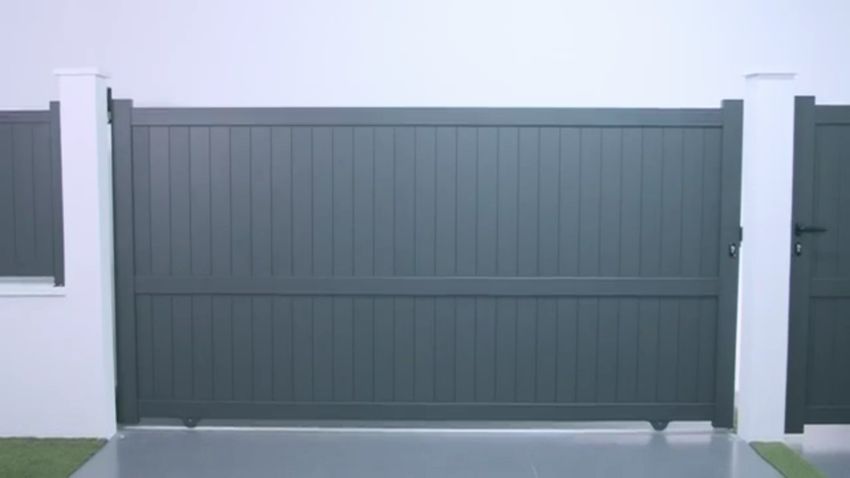
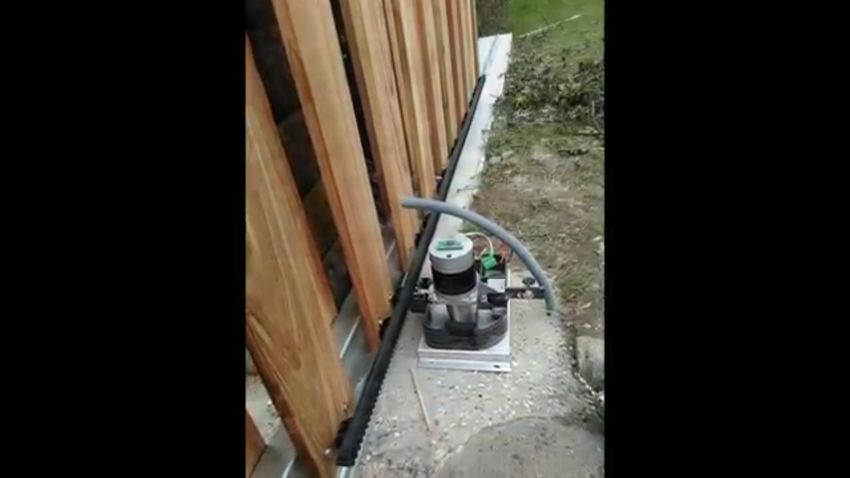
Wooden cantilever sliding gates with a metal frame
(do it yourself on screw piles fast and cheap)
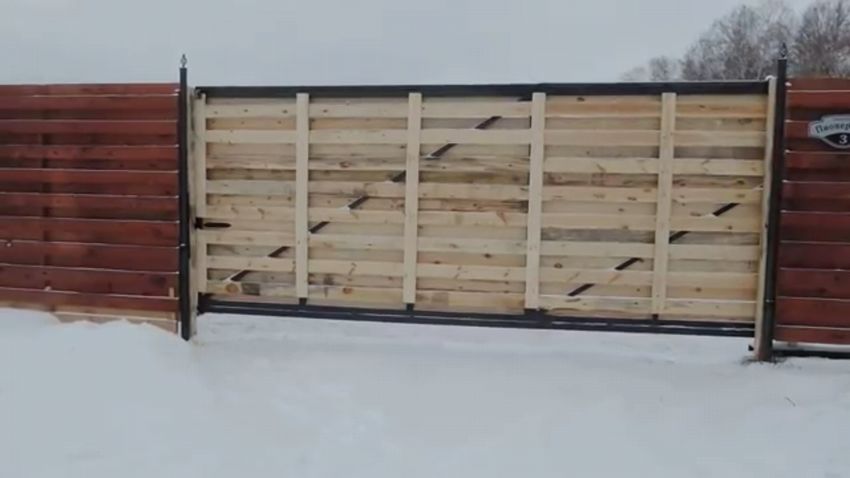 If you prefer wooden fences, and you still want to create console sliding gates, you can combine all in one: make wooden cantilever sliding gates with metalframing frame. In fact, the methods of assembling the frame and installing the gate do not change, just instead of the profiled sheet, boards are used to cover, so it will not be difficult for you to assemble this design. Such gates have a pleasant appearance for the eye and do not stand out against the background of a wooden fence. Oh yes, there is another plus, it’s easy to install any kind of lock on such a gate.


https://i.expert-h.com/en/vorota/1011#sigFreeId138a7d857d
Source of ideas and photos of the video master class:
Link to the first part of the video master class: https://youtu.be/dTUZd7OBRY4
Link to the second part of the video of the master class: https://youtu.be/xwPGUNAoAXA
Original name: Do-it-yourself sliding gates on screw piles
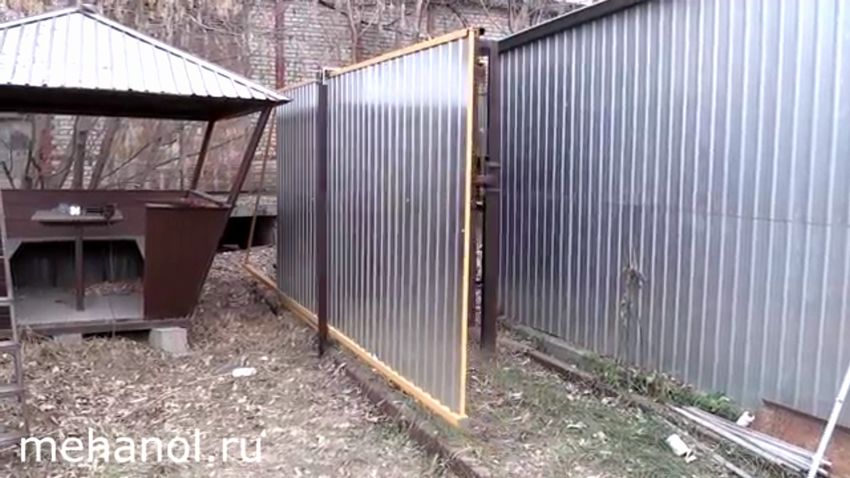
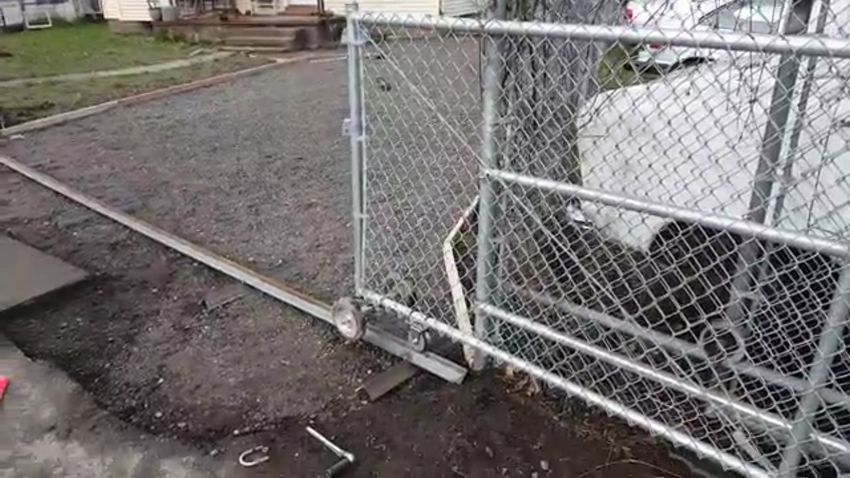
Simple wheel sliding gates with a gate
(from a professional sheet do it yourself photos, instructions, video master class)
 Wheel gates differ from cantilever gates in that they move not along the carriages installed in front of the fence, but along the rollers fixed to the poles of the fence itself. This type of sliding gate is a little less common, so let's look at the process of creating a wheel gate in more detail.
First step:
Before you start creating the gates themselves, you first need to think things through, decide on the necessary sizes and shapes, clarify for yourself the material from which it will be best to create your own sliding gates, and so on. And for this purpose is best draw a diagram the future design of the gate, and not only the gate, before creating any object, you must first depict it in order to clearly understand what you are doing. This is exactly what the creator of this model of sliding wheel gates from the profiled sheet did: he drew a diagram.
Second phase:
Well, the scheme is created, the sizes are determined, the materials are purchased, the tools are ready for work, you can begin to create wheel gates with a gate. For this it is necessary dig a hole under the pillars, its length should correspond to the size of the gate, and the depth should be at least seventy centimeters.
The third stage:
In a dug pit by level poles are installed, the pit is poured with concrete.
The fourth stage:
At this stage it is necessary create gate frame, which is an ordinary rectangular frame from a profile pipe.
The fifth stage:
For each pillar mounted on the axis of rotation of the rollers, the distance between which should be equal to the distance from the upper horizontal pipe of the door frame to the bottom.
Sixth stage:
Gate frame is covered corrugated board. The gates are mounted on posts between the rollers and fixed.
Seventh stage:
To the gate set handle. The readiness of the structure for use is checked, if there are no problems, such gates will last a long service.


https://i.expert-h.com/en/vorota/1011#sigFreeId3b9e0e6a8d
Source of ideas and photos of the video master class:
Link to the first part of the video master class: https://youtu.be/HLDJLDc18OQ
Link to the second part of the video of the master class: https://youtu.be/6dI-0sCTeq4
Original name: Do-it-yourself sliding gates with a simple and reliable design. Production of sliding gates.
Roller do-it-yourself sliding gates from corrugated board.
(photos, instructions, video master class)
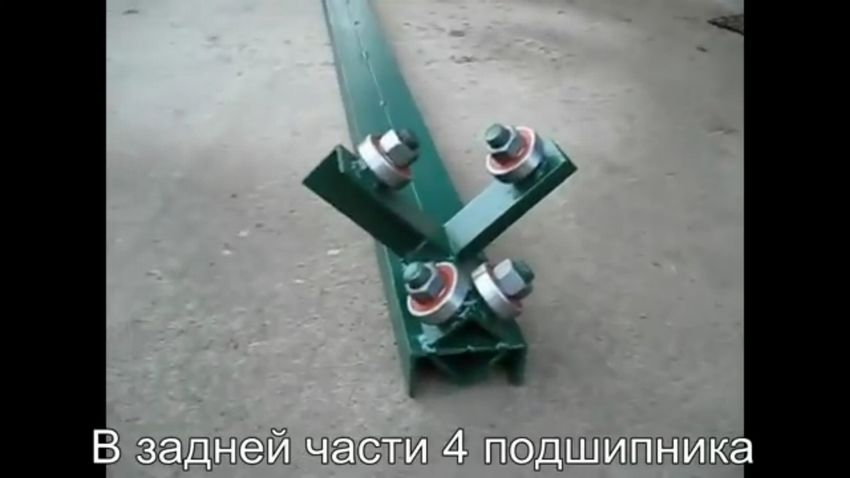 The next model of wheel gates is similar to the one described above, but for its assembly the creator used own system of installation of rollers, the creation process of which you can see in step-by-step photographs. It is interesting that this gate is assembled completely with its own hands from improvised materials, that is, a ready-made set with a guide, carriages, gate grabs and the like. Author of the video of the master class not bought. As the bottom rollers, he used the usual metal bearings, and for the upper rollers you can use any available wheels that only fall under the arm (from furniture supports, for example). The gates are small, only five meters in length.
According to the creator, they have been serving with him for four whole years !!! without the slightest error.
You can see the full process of creating such a gate in the following photo instruction.
Step-by-step photos of the manufacturing process:


https://i.expert-h.com/en/vorota/1011#sigFreeIda8a1f22aa6
Source of ideas and photos of the video master class: https://youtu.be/ElbfGoqFVfU
Original name: Do-it-yourself sliding gates Deshevo Scheme Yaksel Drawings
Hanging roller do-it-yourself sliding gates from the profiled sheet.
(photos, video master class)
 This model is another example of roller sliding gates, but, unlike the previous version, these gates are outboard. That is, the rollers fixed to the upper part of the gate frame are inserted into the upper horizontal guide located between the two vertical posts. Another feature of this version of the sliding gate is that the upper rollers and the guide protected from rain by a small sloping roof.
In general, these sliding gates have the following structure:
Two columns of a profile pipe are installed vertically at the edges, they are interconnected by a jumper - a guide. Thus, a frame is obtained from a profile pipe, on the upper edge (guide) of which a door frame is hung, covered with corrugated board, from below this frame rests on rollers mounted on the side borders of the frame. Small vertical posts are installed on the guide, the gate roof is installed on them (made, by the way, also of corrugated board).
There is no step-by-step photo instruction for creating this model, but I just could not help but show you, as this is an interesting idea for creating retractable gates that deserves your attention.
Photo gallery of key gate construction elements:


https://i.expert-h.com/en/vorota/1011#sigFreeId86580cf542
Source of ideas and photos of the video master class:
Link to the first part of the video master class: https://youtu.be/qRKo-3QDoBI
Link to the second part of the video of the master class: https://youtu.be/stCMwzHF8rY
Original name: Do-it-yourself sliding gates budget 4000r
How to make metal yourself frame for suspended sliding gates.
(photos, instructions, video master class)
 I somehow moved too imperceptibly from the console sliding gates to the wheel gates, but I did not tell you about how to create a frame for these wheel gates, but now we will fix it.
The frame for wheel gates differs from the frame for cantilever gates, in fact, only in shape (the triangular part is not needed in this case).
To create it is necessary to cut the profile of the desired size, fold the frame from the received parts, and grab the corners by welding in two places. Then you need to measure the diagonals of the product and lay out the diagonal jumpers according to the dimensions obtained and grab them. The joints are then coated with zinc-containing primer to prevent corrosion. After that, you can already scald the entire structure.
It remains to apply the paint and you can proceed with the installation of the gate.
Step-by-step photos on creating a wheel gate frame are always at your service!


https://i.expert-h.com/en/vorota/1011#sigFreeIde8a650bec9
Source of ideas and photos of the video master class: https://youtu.be/vEsTDHxbpRA
Original title: Sliding gates. Kit for self-production of gates. Do-it-yourself sliding gates.
Gate from a profile pipe and wooden laths
(Bright wheel sliding gate )
 If you don’t want to completely block your territory from prying eyes, you don’t need a hundred-meter gate, and you can limit yourself to a small one, eye-friendly railingthen the next option is best for you. These are small bright wheel sliding gates, the frame of which is made from a metal profile pipe, and covered with wooden slats. Roller wheels are attached to the bottom of the frame on the axis of rotation.
Instead of the guide, the creator of this model did the following:
Place to set the gate he sprinkled with soil, smoothed it, rammed, and made a small oblong holealong which the gates will move. This can be called a budget option guide.
As the top rollers, the author of the video of the master class secured in a vertical position to the fence posts, with the help of corners, bearings mounted on the axis of rotation (image No. 21).
The door frame itself is painted in orange, and the wooden slats are finished with sandpaper and covered with translucent varnish.
Simple and tasteful!


https://i.expert-h.com/en/vorota/1011#sigFreeId5494ff9745
Source of ideas and photos of the video master class: https://youtu.be/FaIOxhz1Yi0
Original title: Sliding gate DIY
As yourself to establish wheeled metal sliding gates?
(photos, video master class, instruction)
 The following gate model was assembled specifically to create a small video tutorial on installing wheel sliding gates with your own hands, so everything is quite simple, understandable and clearly shown in the photo instruction below.
- The creation of such a gate begins with taking the necessary measures.
- First, with the help of the level, of course, they clarify the evenness of the floor / ground surface on which the gates will be installed, then, with the same level, they check the fence posts.
- After this check and taking measurements from the doorway, a marking is created for installing the guide.
- After the lower guide is fixed, metal gate posts and locks for the upper horizontal of the gate are installed.
- Done, you can install the door frame on the rails.
As you can see, this is very simple.
See step-by-step photos of installing the gate:


https://i.expert-h.com/en/vorota/1011#sigFreeIdb0fef01ce7
Source of ideas and photos of the video master class: https://youtu.be/B3Vzo1HiEt8
Original title: Installation video - Sliding gate
How to do wooden automated sliding gates?
(Let's consider how to make another version of the wheel gates with your own hands)
 In this article, a little higher, I already talked about how to make console gates with a metal frame trimmed with boards on your own, so why not showyou also have the process of creating wheeled completely wooden gate? After all, as they say, to each his own, and if the method of creating a wooden cantilever gate can not satisfy someone, you can always consider alternatives, agree? Fine. So here you are photo instruction to create wheeled wooden sliding gates.
First, a guide is installed along the entire length of the gate. But if in the case of cantilever gates, the carriages are inserted into the guide, then when creating a wheel gate, the guide is a long groove along which the gates will move on the roller wheels.
Then the frame should be assembled, but to create this model gate frame absolutely not needtherefore next the stage will look like this:
- Opposite each other, in parallel, there are two metal pipes - these will be the horizontal of the gate.
- Then verticals are installed, in the role of which are boards fixed with screws to horizontal pipes.
- In total, the creator of this version of the gate needed twenty of these boards.
- The rollers are attached to the lower horizontal. And on the pillars of the fence are installed stabilizers of the upper horizontal, not allowing the gate to move out of the guide.
And the installation of an automatic drive completes the creation of the gate, about which I already told you above.
See photo instructions in the gallery below:


https://i.expert-h.com/en/vorota/1011#sigFreeId323822c561
Source of ideas and photos of the video master class: https://youtu.be/6cDyMfC_2Wo
Original title: how to make a low cost sliding gate / portail coulissant pas cher
Sliding gates from mesh (netting).
(Consider a video workshop on making do-it-yourself wheel sliding gates from a netting net)
 The next model will be the last of all presented in this article. Unfortunately, I could not find a step-by-step video master class on its creation. Here's the thing: this variant of wheel gates made of mesh (netting) was created, gates of this type, made using this material, are quite common in real life rarely (not many people want to install gates on their site), but, as it turned out, the process of creating them on the Internet is even less common (at least I could not find one). But, nevertheless, someone might be interested in or even inspired by such an option of wheel sliding gates, so I will demonstrate it to you anyway.
In principle, the process of creating them is no different from those described above. A frame of future gates is created from a round, rather than a square, metal pipe, in this case, rollers are attached to this frame according to the same scheme (which in this model are larger than usual, this is due to the large dimensions of the guide), and the finished frame is covered with a grid (chain link). Then a guide is installed along which the gate starts.
See the photo in the gallery below:


https://i.expert-h.com/en/vorota/1011#sigFreeId36b79a779e
Source of ideas and photos of the video master class: https://youtu.be/LhImy9lJdAs
Original title: 24 'ChainLink Custom Driveway Roll Gate on Rail
That's all on it! I sincerely hope that all the information presented in this article will be at least somehow useful to you. If you still have questions, do not keep them to yourself, but be sure to leave them in the comments below, and I, as the author of this article, will answer all.
Or maybe you are interested in other topics? And they also have questions? Feel free to ask them on the Site Forum, the response from our team will not take long!
Read us more often and it will be easier to create, your i.expert-h.com/en.
Sliding gates 700+ photo ideas. Huge gallery
Below we have collected ideas for sliding gates for you from all over the Internet and have been working on such headings as:
- sliding gates with a gate
- sliding gates with forging elements
- cantilever sliding gate
- hanging sliding gates
- wooden sliding gates
- sliding gates from profiled sheet
- beautiful sliding gates (different ideas)
Sliding gates with a gate inside 68+ photos
This gallery contains more than 68 photos of sliding gates both with a built-in gate (inside) and with a gate outside. Many models of gates and fences are made of corrugated board, made of wood, contain forging elements, there are options with electric drive.


https://i.expert-h.com/en/vorota/1011#sigFreeId004465be90
Sliding gates with forging elements 118+ photos
This photo gallery contains the best models of sliding gates with forging elements, many of which are made of metal, profiled sheet and wood.


https://i.expert-h.com/en/vorota/1011#sigFreeId0266d080ac
Cantilever sliding gates 57+ photos of the best ideas
A unique photo gallery with photographs of the sliding gates of the console type, most of which you can do yourself.


https://i.expert-h.com/en/vorota/1011#sigFreeIdabaaeaa09e
Sliding gates of the hanging type best photos
See interesting ideas for practical swinging sliding gates.


https://i.expert-h.com/en/vorota/1011#sigFreeIdb5d87fa36a
Sliding gates made of wood 89+ photos
The photo selection contains sliding gates sheathed in wood. Or made under a tree. We advise you to look at this gallery, there are very attractive options for wooden gates.


https://i.expert-h.com/en/vorota/1011#sigFreeIdcc012710d5
Sliding gates from profiled sheet 101+ photos. The best options !!!
101 photos of the best sliding gates and fences from corrugated board. Variousdoor sheathing options with corrugated board: vertically, horizontally and at an angle.


https://i.expert-h.com/en/vorota/1011#sigFreeIda8aaf99b9b
Sliding designer gates 110 SUPER ideas ideas
Here we have collected all the MOST INTERESTING options for sliding gates that are not included in the photo gallery above.


https://i.expert-h.com/en/vorota/1011#sigFreeId02b1d86864