DIY joiner's workbench 800 photos, drawings, step-by-step instructions
 do-it-yourself joiner workbench table
We all periodically have to do carpentry, often using chairs, stools as a stand or whatever comes up on hand. Probably many thought came, as if make a table do-it-yourself workbenchbut to think and do, of course, different things. This is actually easier than you think.
In essence, what is a workbench? A table that differs from the usual one by increased strength, and if you attach a vice to the countertop and put a box with tools nearby, then this is a hundred percent workbench. The main requirement is durability, everything else: racks, shelves, vice, clamps - only for convenience. It’s clear that a professional workbench bought in a store is a gorgeous thing, but if you are a beginner, there is no need for such costs, do it yourself, and how to do this, see this article.
 DIY joiner's workbench
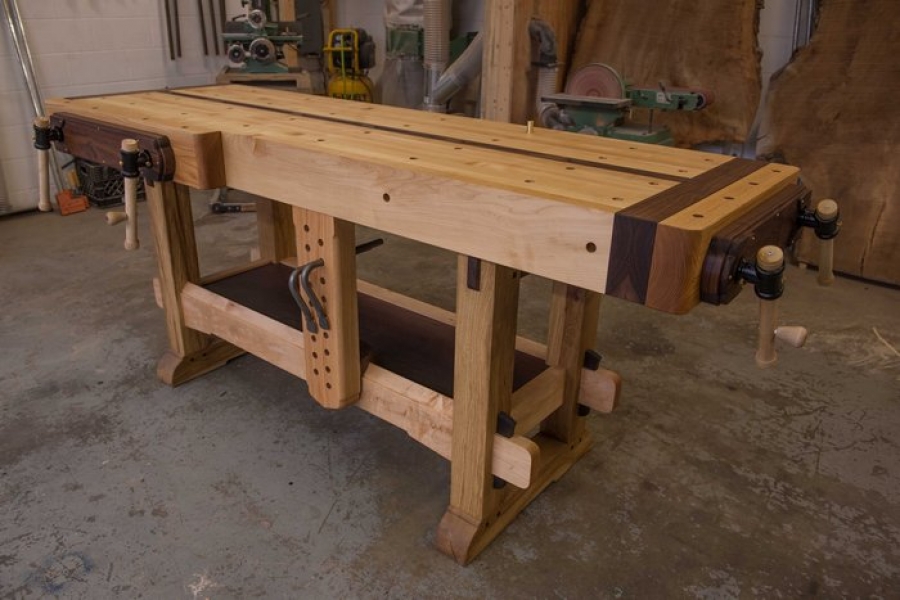
Robust and simple construction with clear lines and pleasant proportions. To make a DIY workbench do not need special knowledgebut a good tool is needed. The countertop has four rows of holes for installing thrust elements. In combination with other accessories (bench stops, cam stop lever, horizontal vice and clamps that provide vertical pressure), it is possible to process workpieces of almost any shape on it. The step-by-step photos show the main stages of assembly, more detailed instructions can be found on the website of the source, the link is indicated under the gallery.


https://i.expert-h.com/en/verstak/verstak-stolyarnyj-svoimi-rukami-foto-chertezhi#sigFreeId791dcbe4ff
The final stage of assembly, this do-it-yourself joiner's vise for a workbench, in this case, from metal. First you need to measure the width of the mount, sometimes the vice needs to be repaired or adjusted, so leave a small margin of 10 - 15 mm on each side. Then make a groove with a drill and a stamestka. To avoid damaging the workbench during work, cut the gaskets out of plywood, then the whole process is shown in step-by-step photos.


https://i.expert-h.com/en/verstak/verstak-stolyarnyj-svoimi-rukami-foto-chertezhi#sigFreeId5f57ce6725
 DIY wooden workbench
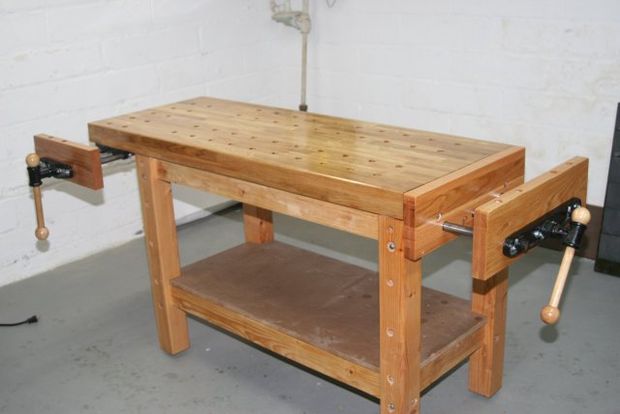
A good option if you need a reliable wooden workbench to work. The joiner's table is essentially a system, that is, a set of mechanisms ideally tailored to fit your needs. Workbench should be enough heavyto not move while you are working, and enough toughto withstand heavy loads. The step-by-step photos show how to build a classic wooden workbench from available lumber and using ordinary carpentry tools.


https://i.expert-h.com/en/verstak/verstak-stolyarnyj-svoimi-rukami-foto-chertezhi#sigFreeIdf1136ee36a
 Do-it-yourself cassette table
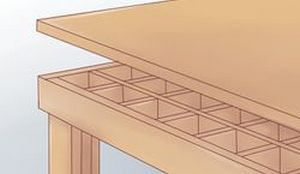
Durable and convenient cassette table workbench, for those who are not going to lay out their money for the joiner's table, which can be done independently. To build the workbench that works best for you, determine the right proportions. The mesh base makes the countertop very durable, it is also necessary to correctly calculate the dimensions in order to conveniently place auxiliary equipment. By the way, do not forget to pre-calculate where it will be attached. This workbench will cost you relatively inexpensively, and the assembly order is shown in beautiful pictures.


https://i.expert-h.com/en/verstak/verstak-stolyarnyj-svoimi-rukami-foto-chertezhi#sigFreeId76b4c97f56
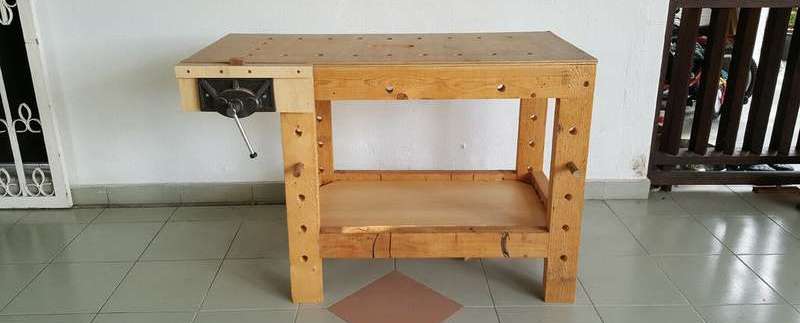
 Standard carpentry bench: assembly order
Thoughts on making your own do-it-yourself joiner's workbench occurs after the first self-made wooden shelf or stool. The idea is practical and fully feasible. A homemade workbench will save a lot of time and significantly expand your opportunities in the carpentry.
The main thing is to find a place, of course, it is ideal to have your own workshop, for example, in a garage, in extreme cases, you can equip a workplace at home, for example, make a folding version of a workbench. Of course, in this case, the opportunities for work will be limited, it is not very convenient when you can approach the table from only one side.
So, do it yourself do-it-yourself carpentry bench.
Everyone chooses their own sizes, typical, it is a width of 700 - 1200 mm, a length of 1500 - 2000 mm. Naturally, it is necessary to adjust the height to fit your height, you can also do it with adjustment, but this can affect the strength of the product.
- We collect the legs.
- Using glue and screws, we assemble the support bars, gluing them into the countercurrent of wood fibers.
- We connect horizontal and vertical elementy spike in the groove.
- In order to be able to “tighten” the structure, we close the splined joints with a wedge.
- We install vertical and horizontal jumpers in the grooves (just put it on the glue).
- We make the lower shelf of bars for carpentry tools.
- We make a countertop that can be strengthened with screws.
- We lay the countertop on the horizontal crossbars.
- In the center of the countertop we make a technological groove.
- The bed must be strengthened with power cross members, so the design will be more rigid.
- We cover the surface with carpentry varnish.
- At the end, we install the joiner's vice, a place for them must be prepared in advance.
And yet, if space permits, set the table so that it could be circumvented from all sidesif placed near the wall, the possibilities for the master to work are greatly limited.


https://i.expert-h.com/en/verstak/verstak-stolyarnyj-svoimi-rukami-foto-chertezhi#sigFreeId8e369ec010
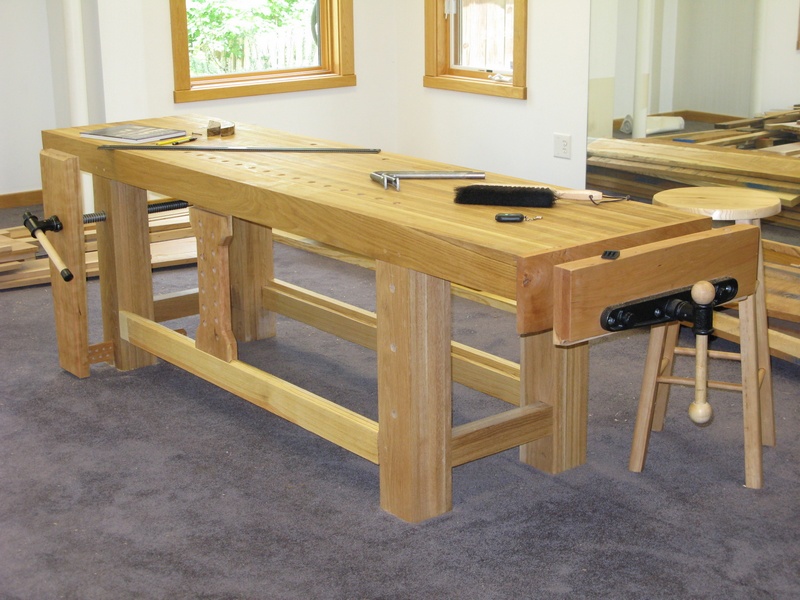 Homemade carpentry workbench
For this design, a suitable room is needed. The author made this homemade joiner's workbench from white oak in 10 days. The countertop is made of glued boards, which provides additional strength. The step-by-step photographs show that the front block is located in 2 wide grooves and also set on glue. In general, glue you will need five liters and clamps, the more the better. The design is quite heavy, so at the final stage, when the table will need to be turned over, you can’t do without an assistant.


https://i.expert-h.com/en/verstak/verstak-stolyarnyj-svoimi-rukami-foto-chertezhi#sigFreeId473419c446
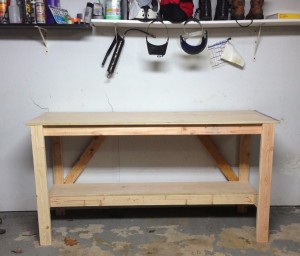 Simple do-it-yourself workbench table
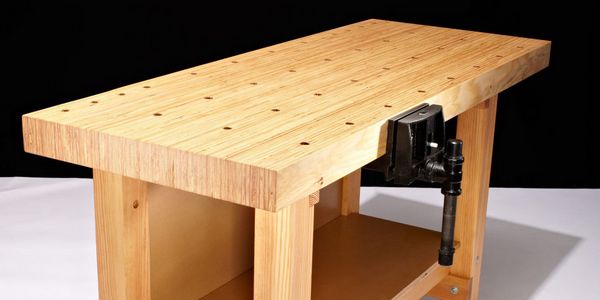
You may not be professionally engaged in carpentry, but even for the manufacture of ordinary home crafts, you can build such a simple table with your own hands, it will come in handy in any case. The design, as you can see, is very simple, but quite reliable for small carpentry.


https://i.expert-h.com/en/verstak/verstak-stolyarnyj-svoimi-rukami-foto-chertezhi#sigFreeId7b06a0588b
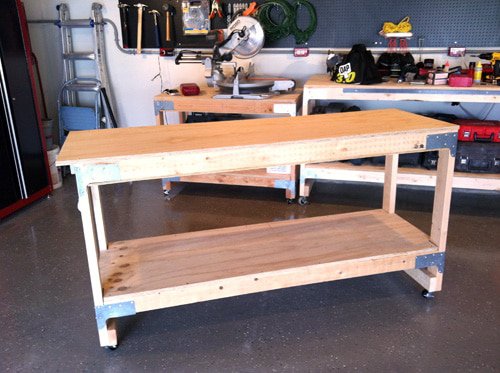 Do-it-yourself universal workbench
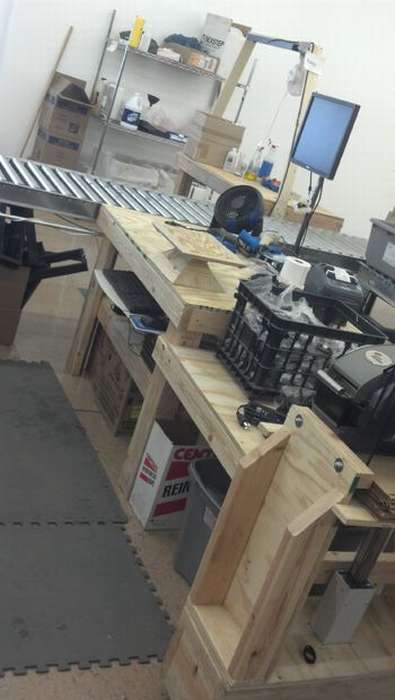
Most of us only need a workplace in order to sometimes repair a chair or put together a shelf in the kitchen. Therefore, a stool or a kitchen table often serves as a workbench, and tools that we rarely use are sometimes stored in the most unexpected places.
In short you need a proper place to work and store tools, that is, a universal workbench, and here you can learn how to make it yourself. Your workplace should have key qualities, such as strength, rigidity of the work surface, power for wired tools or chargers, shelves for storing tools and accessories, as well as wheels for mobility. For reliability, all thrust joints are reinforced with metal brackets., and also in the frame under the countertop is added the third horizontal crossbar in the center. The tabletop box below is closed by a sheet of plywood. It may seem strange, but such a design also helps to improve the rigidity of the work surface. note that wheels are mounted between the legs of the table to balance the load. Screw the extension box under the visor of the countertop. The universal workbench is ready.


https://i.expert-h.com/en/verstak/verstak-stolyarnyj-svoimi-rukami-foto-chertezhi#sigFreeIde6068469c0
Another option workbench, scheme
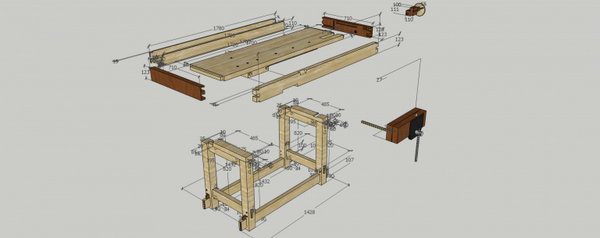
only here dovetail compounds


https://i.expert-h.com/en/verstak/verstak-stolyarnyj-svoimi-rukami-foto-chertezhi#sigFreeId9e08eba1e5
 DIY joiner's table
An economical option is a do-it-yourself joiner table. For the manufacture of boards needed for the frame, almost any wood, bars for legs and beams and two sheets of plywood. The assembly procedure is the same as a regular table, only for rigidity it is necessary to add additional boards and strengthen the countertop. It’s nice to put it on the work surface hardboard sheet convenient in the sense that, if necessary, it can be changed. Under the table you can attach a mobile tool box.


https://i.expert-h.com/en/verstak/verstak-stolyarnyj-svoimi-rukami-foto-chertezhi#sigFreeId7e1c7e4e35
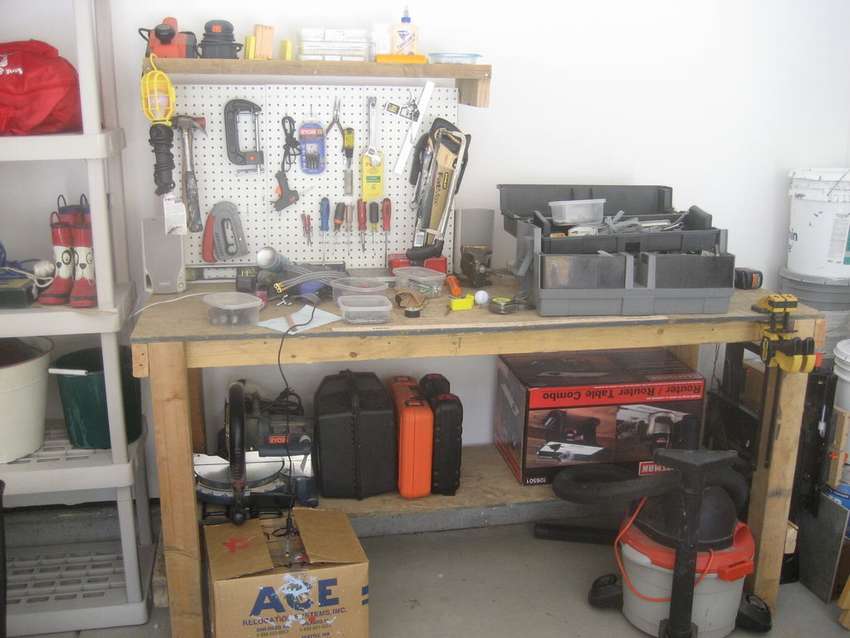
 Here is another similar example, long joiner table from 2x4 boards, this is if you need something stable and strong enough. Although at a cost it is cheaper and stronger than you can buy. In the instructions on the author’s website, you can familiarize yourself with the step-by-step process on how to replicate this project and even read some tips on how to save a lot of time!
The manufacturing process is shown in detail in step-by-step photos..


https://i.expert-h.com/en/verstak/verstak-stolyarnyj-svoimi-rukami-foto-chertezhi#sigFreeId17712cbce0
 How to make a cheap carpentry bench
Saving on the desktop is certainly not the best solution, but situations can be different. Here, the author shared his experience, how to make a carpentry do-it-yourself workbench from a hundredrykh boards and whetstones. Finding lumber waste is probably not a problem, but making a table from old wood or new, there is no fundamental difference, you just have to tinker a little longer. Of course, it depends on what you find. A good option is to find old pallets.


https://i.expert-h.com/en/verstak/verstak-stolyarnyj-svoimi-rukami-foto-chertezhi#sigFreeId45db3b8392
 Mobile carpentry bench for garage
What is the advantage of a homemade workbench? Because in terms of functionality and size, you get exactly what you need. At the same time, save money on which you can buy a good quality tool. Here is a good version of a carpentry bench. A simple and reliable design, with wheels, which provides mobility, there is enough space on it to fix various equipment and, as you can see in the photo, it is not at all difficult to make it yourself. A mobile desktop is a good option when there is not enough space and it can be installed in any room, a small workshop or garage.


https://i.expert-h.com/en/verstak/verstak-stolyarnyj-svoimi-rukami-foto-chertezhi#sigFreeId846cd32c16
DIY wooden workbench
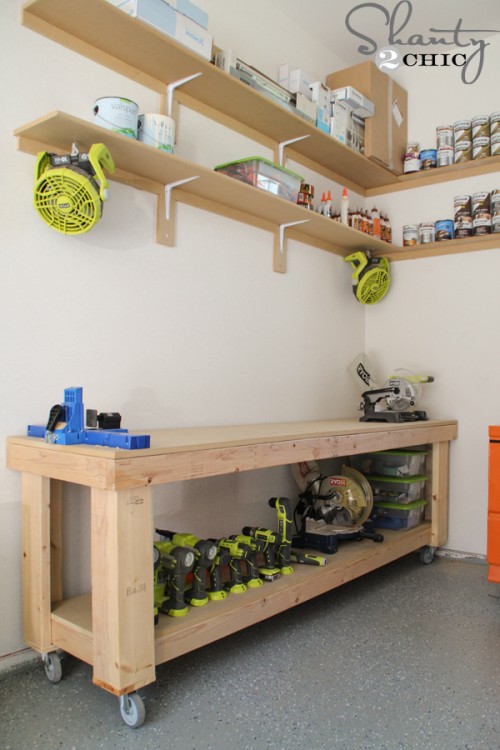
 Any beginner can assemble such a design. You don’t need any special tools, basically you need a saw to cut workpieces of the right size. Almost all joints run butt and glue onexcept legs. For their fastening, long screws were used. All shelves and drawers are made of plywood. A stand for tools attached to the table is also provided, that is, if you move the workbench to another place, you do not need to remove the stand from the wall.


https://i.expert-h.com/en/verstak/verstak-stolyarnyj-svoimi-rukami-foto-chertezhi#sigFreeIdaa954bcf09
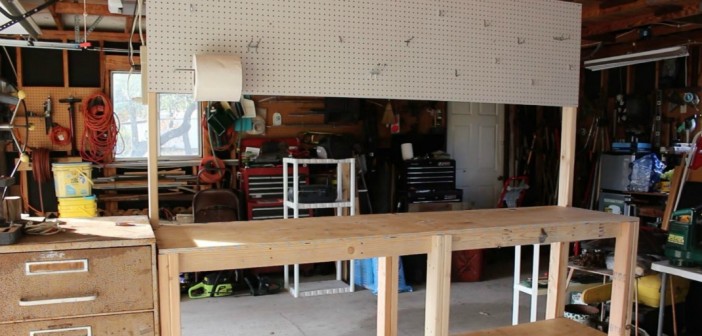
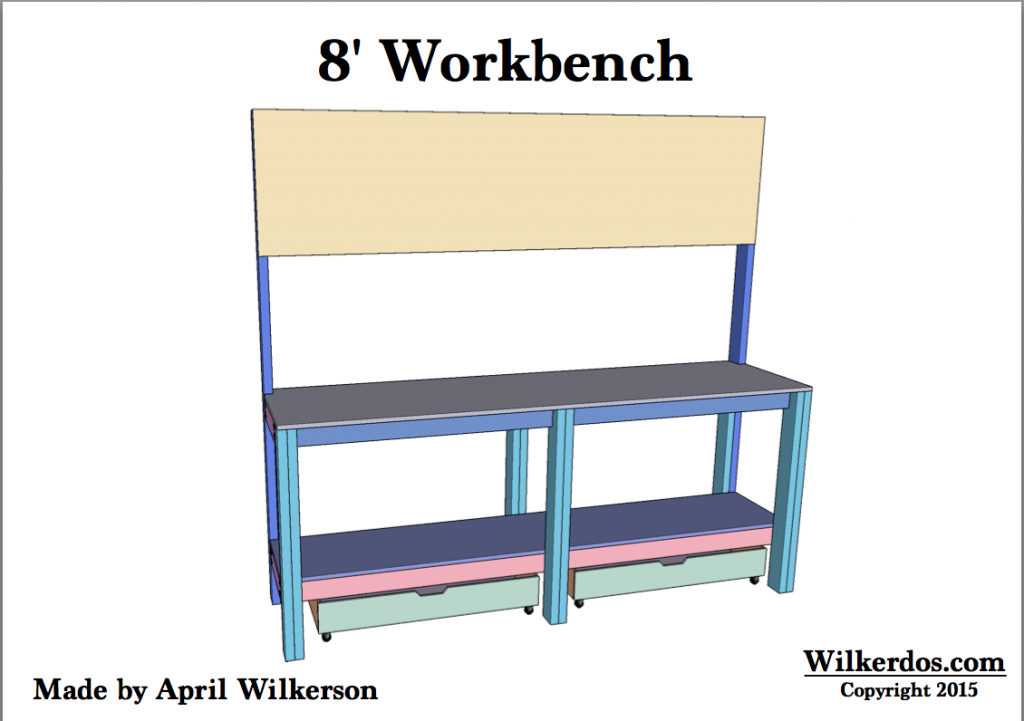
 How to make a carpentry workbench ruggedized
If you use the desktop all the time, eventually the legs become unstable or shaky. The author suggests Workbench design with special footing design, in the reliability of which you can be one hundred percent sure. There is no secret and no special tools are needed either. You will need a conventional drill with drill sets, a circular miter saw, a screwdriver and various clamps. Generally whole chip in L-shaped legs design and accordingly the mounting of the frame. In step-by-step photos you can see the whole assembly process. The great thing about the design of this table is that it is easy to change to add tools, as well as the ability to add side tables or overhead shelves.


https://i.expert-h.com/en/verstak/verstak-stolyarnyj-svoimi-rukami-foto-chertezhi#sigFreeId67411f6b0f
 Do-it-yourself wall table
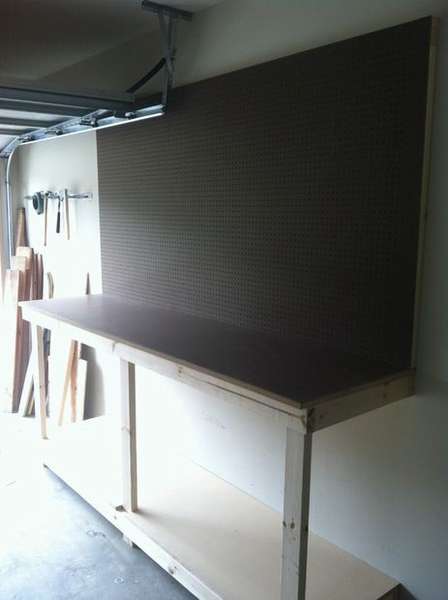
In order to save space, for the garage most often do wall workbench. Here is one of the options for an easy-to-make table with a large stand. For the manufacture of countertops and lower shelves, the author used MDF sheets. Which of course is rarely practiced for a work surface, if you are going to attach additional equipment to it. In its pure form, MDF is almost the same as particleboard, that is, you can not do without a final coating. Most often, veneer or laminate is used, but the author in this case simply pasted the surface with hard cardboard. Also an option, you can try.


https://i.expert-h.com/en/verstak/verstak-stolyarnyj-svoimi-rukami-foto-chertezhi#sigFreeId38f4982b9c
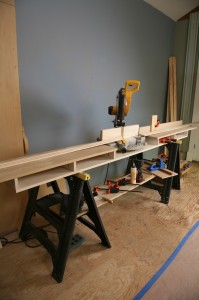
 Mobile work bench for a face saw
This a mobile workbench for a face saw allows you to cut workpieces of any lengths, and also easily move it if necessary. The main thing is to carefully adjust the side extensions. You can cut at an angle of 45 ° in any direction, without worrying about supporting a large workpiece, for example, when cutting a cornice. Use the 20mm screws to secure the wheels to the base of the legs. If the screw head is too small, add a washer.
The assembly order is well shown in step-by-step photos, also in the gallery there are diagrams with dimensions.


https://i.expert-h.com/en/verstak/verstak-stolyarnyj-svoimi-rukami-foto-chertezhi#sigFreeIdb12e9e25ea
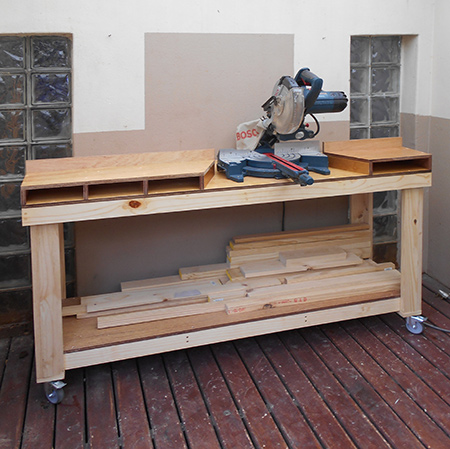
 DIY work bench for a miter saw
Miter saws are widely used in carpentry, as they can be used to solve a variety of problems. The main advantage, the ability to cut at the right angle, is an indispensable thing in the manufacture of cornices and baseboards. Of course, if you buy a factory product, the pleasure is not cheap.
If you decide to make a do-it-yourself bench for a face saw, save a ton of moneybecause the components for the assembly are not so expensive. Plus, you yourself can adjust the parameters you need, in addition, if necessary, repair them yourself.
So, we need such tools:


https://i.expert-h.com/en/verstak/verstak-stolyarnyj-svoimi-rukami-foto-chertezhi#sigFreeId5fdca70e12
The stand should have continuous expansion wings so that workpieces of various lengths can be supported.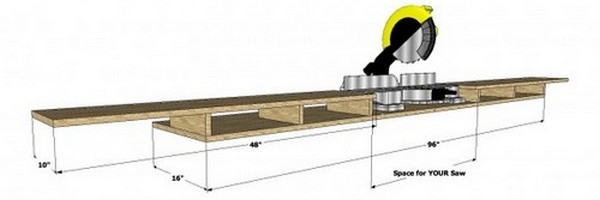
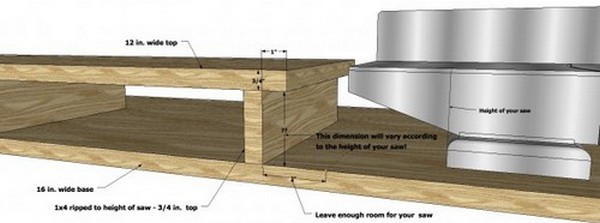
The platform should have a clean, flat surface, with a protrusion to clamp the material. The workbench consists of three main parts, the main thing is to precisely cut it. Base and top can bany length and width, but the supports should be the same in height. It is also important that the saw is installed exactly in the center between the pillar racks.


https://i.expert-h.com/en/verstak/verstak-stolyarnyj-svoimi-rukami-foto-chertezhi#sigFreeIdd15eee0066
 Wall miter saw table
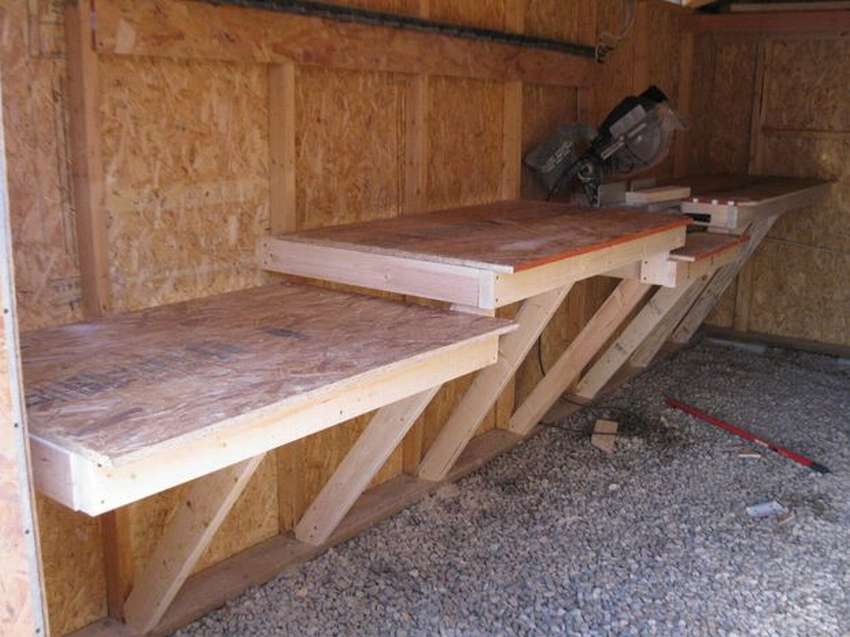
In this case the table for the end saw is attached to the wall. This design is more reliable, but as a disadvantage, the space is a bit limited. However, this is not so important for working with a face saw. The table is made with a notch on one level for installing the saw itself with an emphasis on two central legs, the main weight will be on them, the side parts are made with emphasis on the main table and additional racks from the wall. Below are step-by-step photos.


https://i.expert-h.com/en/verstak/verstak-stolyarnyj-svoimi-rukami-foto-chertezhi#sigFreeId9eb10288de
 Workbench metal joiner
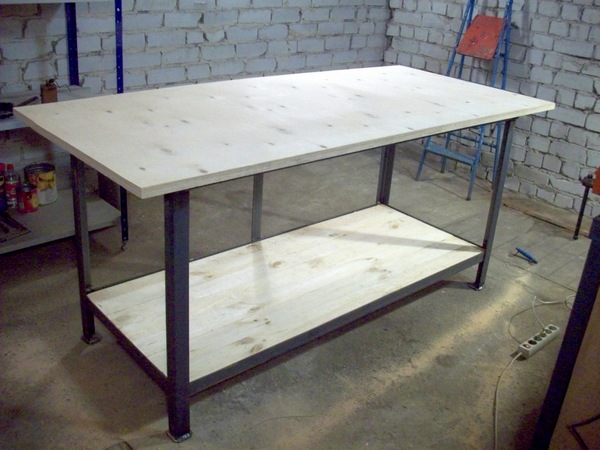
In most cases, the carpentry workbench is made entirely of wood, but if necessary, the frame can also be made of metal. This design also has its advantages, of course, that the working surface must be wooden. In some cases, if you have a welding machine and corners, this option is even easier to make. This product went for 19 meters of a 50x50x5 corner, a 27mm sheet of sanded plywood and a 40x100 board. The countertop is fixed with self-tapping screws every 150 mm, as well as the boards of the lower shelf - 6 self-tapping screws per board. The size of the countertops is quite large 2m by 90 cm, but the design turned out to be reliable, you can safely install additional equipment and carry out carpentry.


https://i.expert-h.com/en/verstak/verstak-stolyarnyj-svoimi-rukami-foto-chertezhi#sigFreeId12449aa30d
How to make a workbench on metal legs
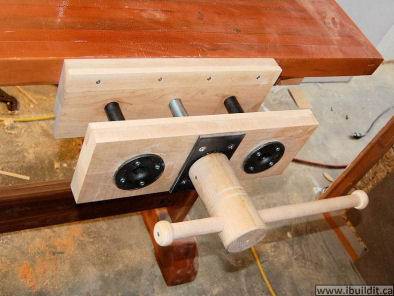
 Such carpentry workbench It is not expensive to make, moreover, it is easy to carry and it perfectly holds the workpieces during sawing, cutting or planing. There are many projects for this vice available on the Internet, this is just one version. Naturally, you can resize to fit your needs.
Consumables:
- About 5 meters of hardwood boards. It used birch, it looks beautiful and strong enough for a vise.
- Two hex bolts from 20 to 25 cm and two flange nuts
- Wood glue, epoxy resin
Tools:
Table saw, drilling machine, grinder, clamps.
Step 1: Front jaw
Cut two 32-inch (80 cm) pieces from one board. Glue them to make the front jaw of the vise. The jaw will be 32 "(80 cm) by 5½" (14 cm), 1½ inches (4 cm) thick.
Step 2: Back jaw
The back jaw is L-shaped. A short “lip” is used to clamp the back of the jaw. Attach the edge as shown in the photo.
Step 3: Make holes for hex bolts
On the back of the back jaw, drill small holes with a diameter of 25 mm to install the flange nuts.
Step 4: Make pens
You can use hex bolts and washers or make wooden handles for the hex bolt, as shown in the photo. Here's how to make a wooden octahedron.


https://i.expert-h.com/en/verstak/verstak-stolyarnyj-svoimi-rukami-foto-chertezhi#sigFreeId88d5f016c9
First insert the hexagon head into the hole, make sure the bolt is even with the octagonal handle, fill the hole with epoxy around the bolt and allow to dry. Your pens are made!
Step 6: Work with a workbench
Apply a little beeswax to the threads and through holes to facilitate turning the hand screws. To work with the workpiece, simply press the back jaw to the edge of the workbench, insert the workpiece and tighten the jaws.


https://i.expert-h.com/en/verstak/verstak-stolyarnyj-svoimi-rukami-foto-chertezhi#sigFreeId5269816679
DIY carpentry bench
Usually when do DIY joiner's workbench, aesthetic design issues fade into the background, the main thing is to be reliable and functional. But if there is an opportunity, why not make the design more beautiful, for example, like this stylish carpentry table. However, all the necessary characteristics are present: a sturdy design with conveniently located drawers for storing tools. According to the author, the work on the manufacture of a workbench will take two days.
The manufacture of the frame and countertops


https://i.expert-h.com/en/verstak/verstak-stolyarnyj-svoimi-rukami-foto-chertezhi#sigFreeIdb10181e892
Making tool boxes
If you have suitable old drawers from a chest of drawers or a desk, you can use them. You just need to carry out a small modernization: grind new grooves, replace the bottom and guide rails.


https://i.expert-h.com/en/verstak/verstak-stolyarnyj-svoimi-rukami-foto-chertezhi#sigFreeIdcbcb13ceb7
Making a drawer compartment


https://i.expert-h.com/en/verstak/verstak-stolyarnyj-svoimi-rukami-foto-chertezhi#sigFreeIdae76526acd
Manufacturing a module for drawers


https://i.expert-h.com/en/verstak/verstak-stolyarnyj-svoimi-rukami-foto-chertezhi#sigFreeId0da482e25a
Making a plywood drawer


https://i.expert-h.com/en/verstak/verstak-stolyarnyj-svoimi-rukami-foto-chertezhi # sigFreeIdd9708f2115
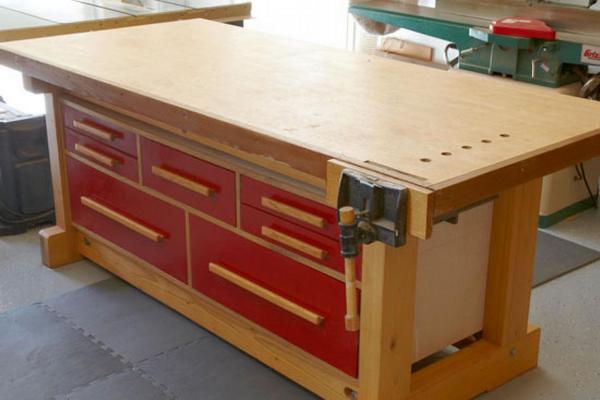 Joiner workbench with tool boxes
Another workbench table with a great design. This is not a shame to put at home. According to the author, his main function is the storage of tools, drawers extend on both sidesthat provides easy access to content. Although, of course, this is a real workbench with a strong worktop and a reliable frame. Birch plywood was used for the storage section to create a tight box.


https://i.expert-h.com/en/verstak/verstak-stolyarnyj-svoimi-rukami-foto-chertezhi#sigFreeIdf1d31700c1
 Sanding table with drawers
The idea is to create a special surface for grinding wooden parts and functionally use the lower space. To avoid deformation of the working surface during operation, the countertop is covered with thick rubber for flooring. The boxes are made of thick plywood, for the manufacture of the bottom used OSB plate, still a new type of wood composition, quite light and relatively light, this is when compared with the popular chipboard or MDF. OSB was also used for the back of the case and the bottom of the dust bag. Like the drawer bottoms, OSB is a good choice for these places, the material is strong and light enough. See assembly details for step-by-step photos of the master class.


https://i.expert-h.com/en/verstak/verstak-stolyarnyj-svoimi-rukami-foto-chertezhi#sigFreeId3e06869d47
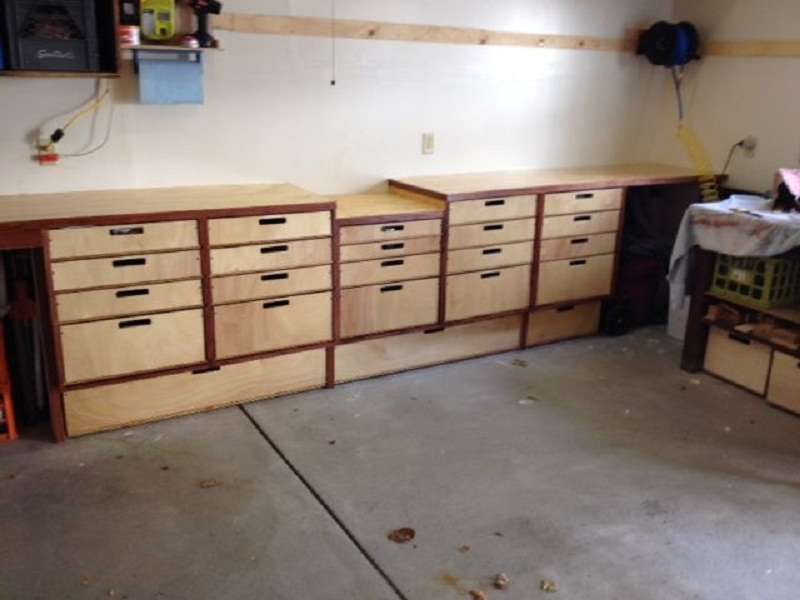 Long workbench with drawers
There are not many drawers for storage, probably the author of the presented workbench proceeded from this principle. The table was originally intended for a circular saw, but there seems to be enough space for a wide variety of equipment. Workbench height 1 meter, depth 60 cm. The racks are made up of plywood modular sections that house storage boxes. Four full sheets of 2-centimeter plywood went to all sections. See assembly steps for step-by-step photos, I hope this workbench solves all your problems with storing the tool and everything else.


https://i.expert-h.com/en/verstak/verstak-stolyarnyj-svoimi-rukami-foto-chertezhi#sigFreeId80d8ae031a
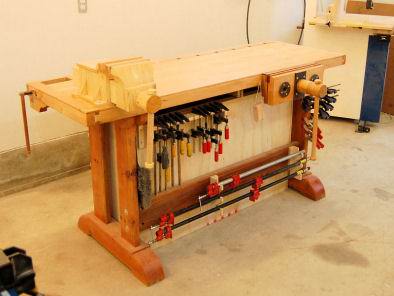
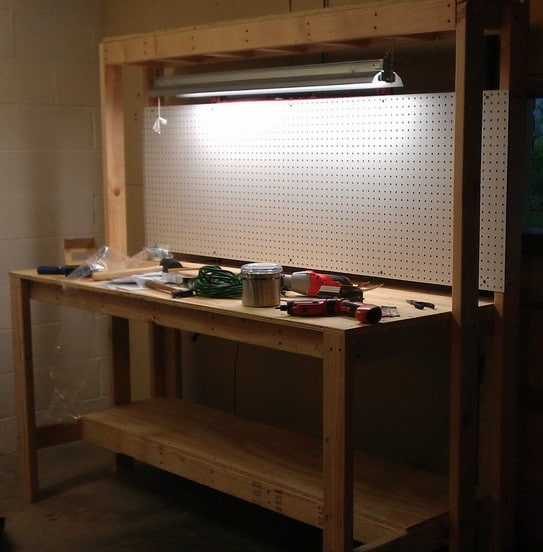 Illuminated carpentry workbench
There are many ways to organize a carpentry workplace in the garage, best of course make a joiner's do-it-yourself workbench. It will cost not so much, and the option proposed in the photo can be made in one day. The workbench is equipped with a tool stand, top light and a reliable countertop for additional equipment. The table is reinforced with longitudinal beams with cross members, a separate frame is made for the stand. In my opinion, a very good option for a garage.


https://i.expert-h.com/en/verstak/verstak-stolyarnyj-svoimi-rukami-foto-chertezhi#sigFreeIdc017955e84
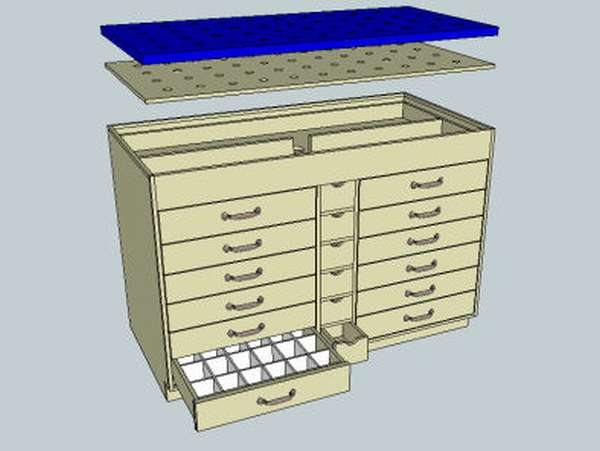
 Joiner workbench with drawers and a large tool stand
The equipment of one’s workplace is an individual matter and depends only on our imagination and, of course, capabilities, not everyone has a garage or a workshop room. This carpentry workbench, of course, is made on a grand scale, on a two-meter table you can do several things at once, the dimensions allow. And the key point is huge tool stand. I will not describe in detail what this carpentry workbench is made of and how, the operation procedure is well shown in step-by-step photos, and you can find out details on the author’s website, link under the gallery.


https://i.expert-h.com/en/verstak/verstak-stolyarnyj-svoimi-rukami-foto-chertezhi#sigFreeId7795927bdc
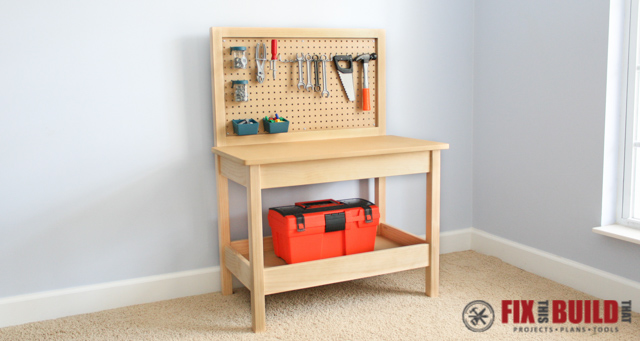 School carpentry workbench
Want to make a gift to a beginner joiner? Children's workbench for a child is a good idea. You can design a fully functional table, and let your child help you in its construction. Of course, we must take into account age, a school joiner's workbench can be made as a copy of the present, for younger age it can be a game option. Below is a master class in step-by-step photographs and a drawing with dimensions, if you liked this children's workbench, you can easily do it yourself.


https://i.expert-h.com/en/verstak/verstak-stolyarnyj-svoimi-rukami-foto-chertezhi#sigFreeIdfeceb6c3df
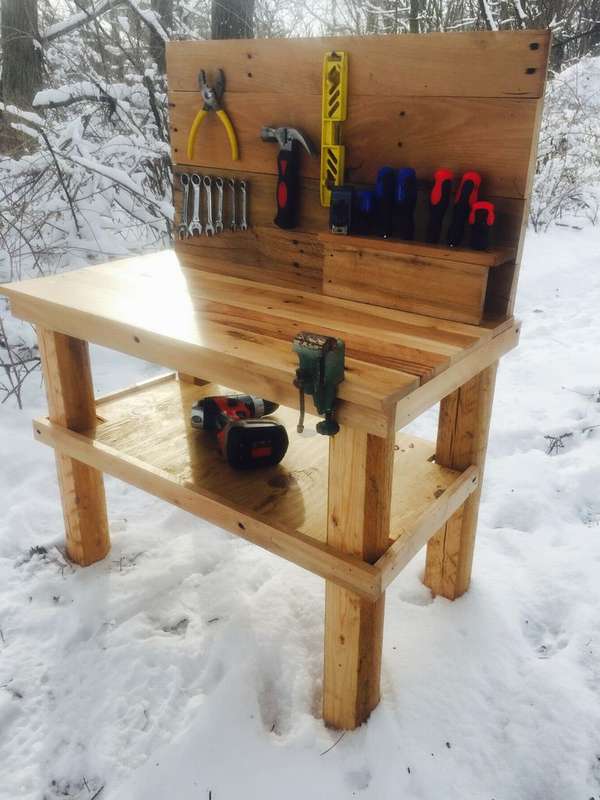
Children's workbench
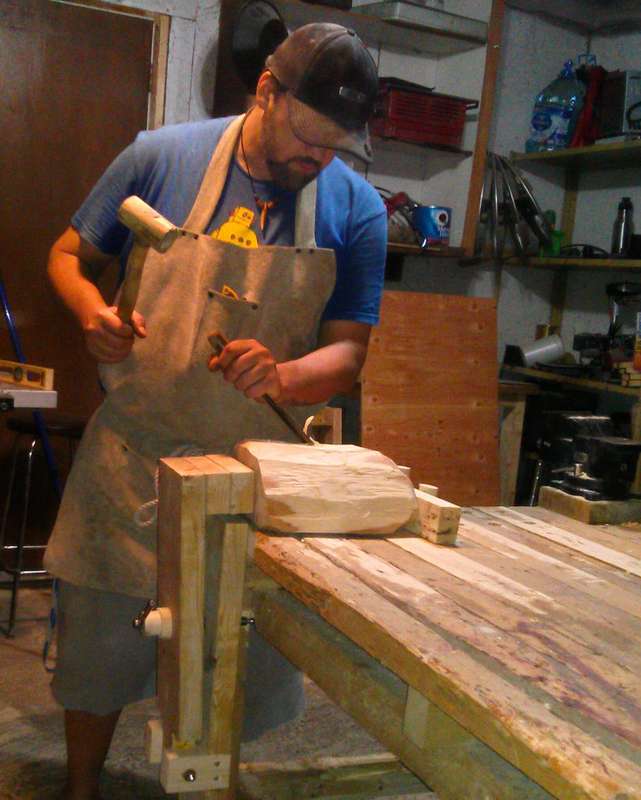
 Although this workbench is made for children, but if you like, the design can be very easily scaled to remake for an adult size. How to make a children's workbenchLook at the step by step photos. You can apply your own methods based on the skills, materials and tools that you have.
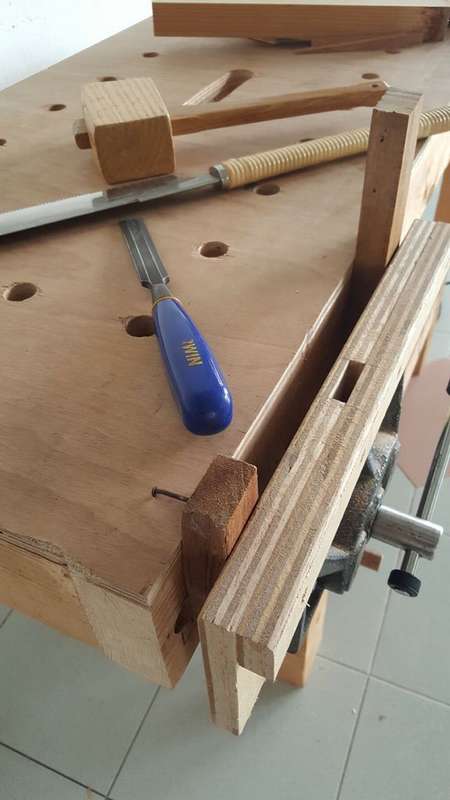 This workbench is made almost exclusively from scraps and old wood.
The assembly used mainly traction screws, dowels and pocket holes, with a semicircle and an offset shoulder, which added strength to the structure.
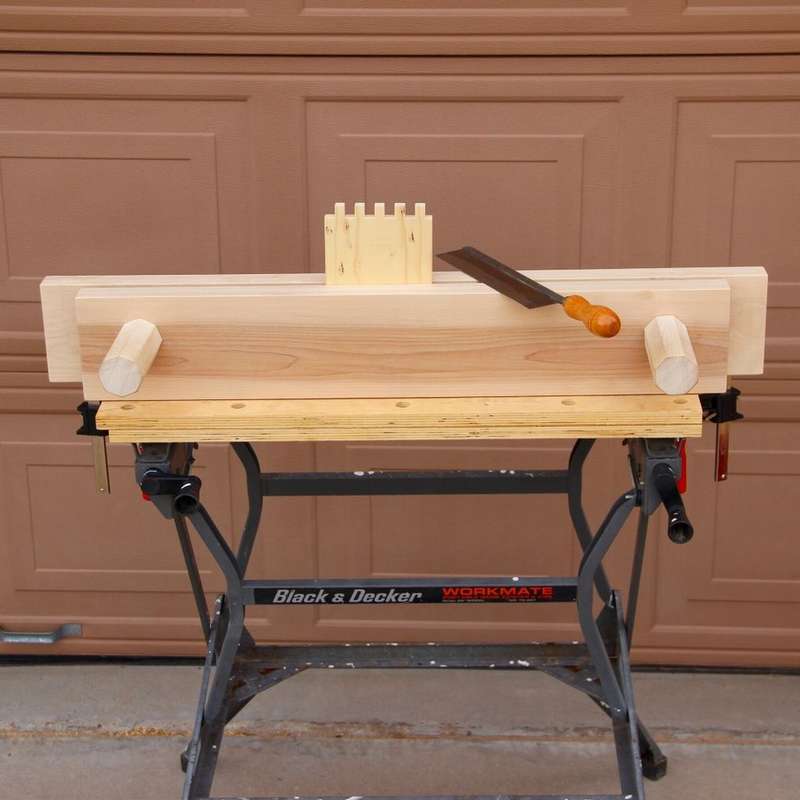
One of the first design aspects you need to decide is to choose vise type and then determine which side of the workbench to install them.
In theory, of course, it is better to install them on the left. It’s more convenient to use because you can use your left hand to hold the cut while you are cutting with your right hand.
One feature was used here, what makes the workbench versatile. When the front is coplanar, then the network is in the same plane, you can use the entire front to support and clamp parts. The possibilities are endless.
Vise feature. They provide fixation of small parts on a workbench for grinding, planing or cutting. Please note that the usual workpiece thickness is 20 or 18 mm. Consequently, the vise should actabout 12 mm. This leaves sufficient grip, but will not interfere with operations performed on the workpiece.
In general, read all the assembly details on the site.


https://i.expert-h.com/en/verstak/verstak-stolyarnyj-svoimi-rukami-foto-chertezhi#sigFreeIdc11b260d9a
Children's workbench from pallets
 If you think your child needs a workbench for development, look at this example. The design is assembled from disassembled pallets, so that the manufacturing costs baby workbench will be small. The main thing is to prepare the boards well. Pass them through the planer. Before doing this, pull out all the nails so as not to damage the blades. Check that all boards are the same thickness.
What do you need
- Nine boards from pallets
- Small foot stand
- Plywood Sheet Parts
- Saw
- Drill
- Planing machine
- Jointer
- Wood screws
- Polyurethane
Base
To get started, you just need to create a small plywood base. Cut legs 48 cm high, put a meter piece of plywood. Of course, you can make the height of the legs so that it is suitable for your child.
Rear part
The back is the same size as the base. Saw boards at 53 cm and fasten to the back of the legs. Then screw the back to the supports.
A shelf
Make a small shelf from the boards and nail them to the back. Drill six small holes to match the set of screwdrivers.
Finish
Use water satin polyurethane. Apply one coat when dry, sand, then a second coat.


https://i.expert-h.com/en/verstak/verstak-stolyarnyj-svoimi-rukami-foto-chertezhi#sigFreeIde844a0477e
Children's folding workbench
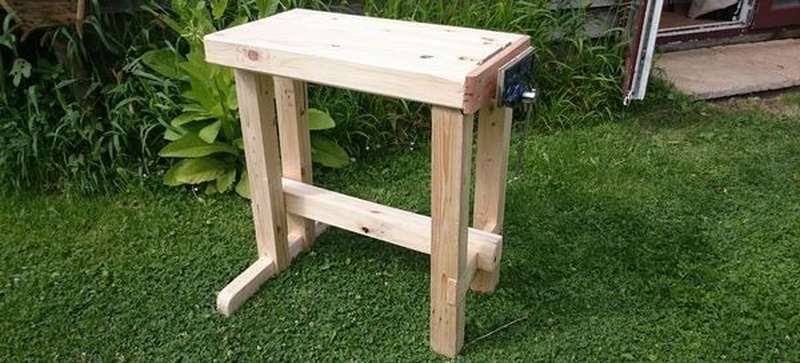 Here is another example how to make a children's folding workbench with your own hands for a 10 year old schoolboy.
 Tools:
- Cross Cut Saw or Table Saw
- Clamps, a lot
- The plane plane and the smoothing plane (or the thickness of the planer)
- Joiner's hammer and chisel
- Hand drill and bracket (or drill) 3 mm and 8 mm bit
- 2 Keys
Materials:
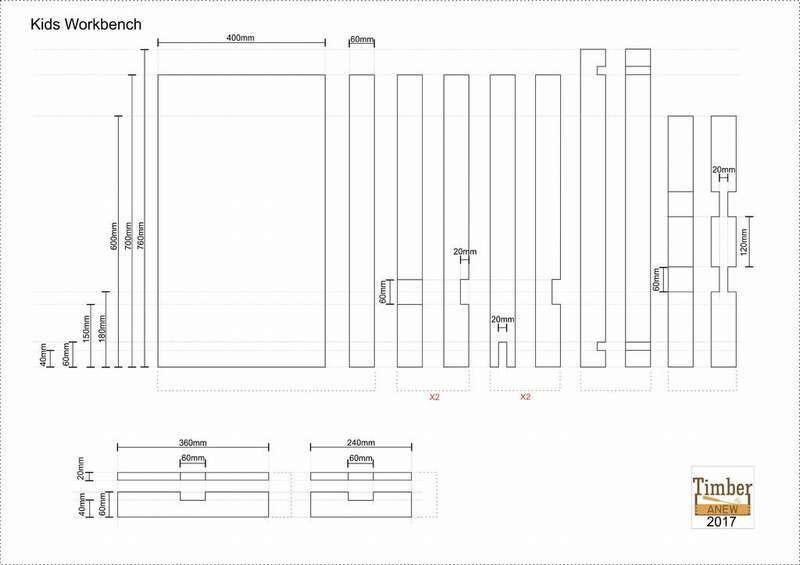
- Workbench: 20 boards 700 mm X 60 mm X 20 mm
- Feet: 12 planks 700 mm X 60 mm X 20 mm
- Cross parts for legs: 1 board 360 mm X 60 mm X 20 mm and 1 pc. 240 mm X 60 mm X 20 mm.
- Crossbars: 3 boards 760 mm X 60 mm X 20 mm
- Rear leg stabilizer: 3 boards 600 mm X 60 mm X 20 mm
 Parts Scheme a workbench with dimensions is shown in the drawing on the right. True, in this picture the dimensions are poorly visible, the full size can be viewed in the gallery.
Also need
- screws 16 x 40 mm screws
- screws 12 X 30 mm screws
- hinges 4 x 50 mm hinges
- 4 bolts, 8 mm X 80 mm
- 4 x 8 mm washers
- 4 bolts X 8 mm
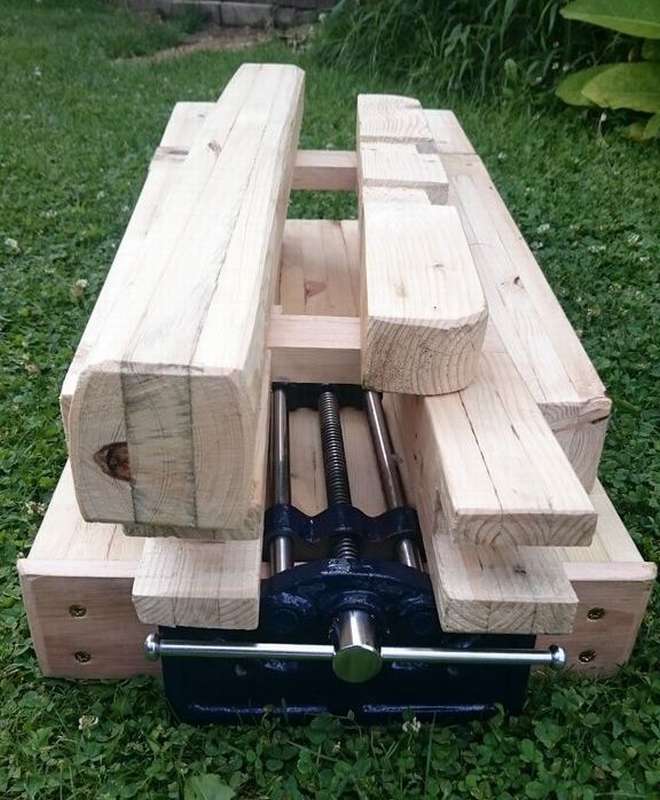
Assembly procedure for a children's workbench shown in detail in step-by-step photos. You will find detailed instructions on the website, the link is under the gallery.
Of course, assembling a workbench is a bit of a challenge, especially with dimensions that must be precisely adhered to, but generally feasible. The workbench can be folded and assembled very quickly, although it is quite heavy. Although you can refine it a bit, for example, add angle brackets and locking systemto keep your legs folded in place. You may need to add some kind of pen or something like that.


https://i.expert-h.com/en/verstak/verstak-stolyarnyj-svoimi-rukami-foto-chertezhi#sigFreeId1d5b2a2a81
How to make a workbench for children
 Children from an early age are interested in various crafts using tools. You can contribute to their creativity by creating a workplace that is suitable in size and with the same functions as work bench.
Such designs require a strong flat surface, organized storage of tools, proper lighting and a place to store materials and equipment. The workbench presented here meets all of these requirements..
Making a children's workbench will take about a week, but any beginner can implement this project. All the necessary materials and equipment are surely available in every home workshop, nothing complicated or expensive. Workbench is easy to modifyso that it matches the desired height. The work surface is also easy to replace if it is worn, so it can be transferred from the oldest child to the youngest.
Encourage the children to make this workbench so that they immediately know what it consists of and how to use it. When they master the basics of carpentry, they can solve any problem, from making a birdhouse to creating more complex products.
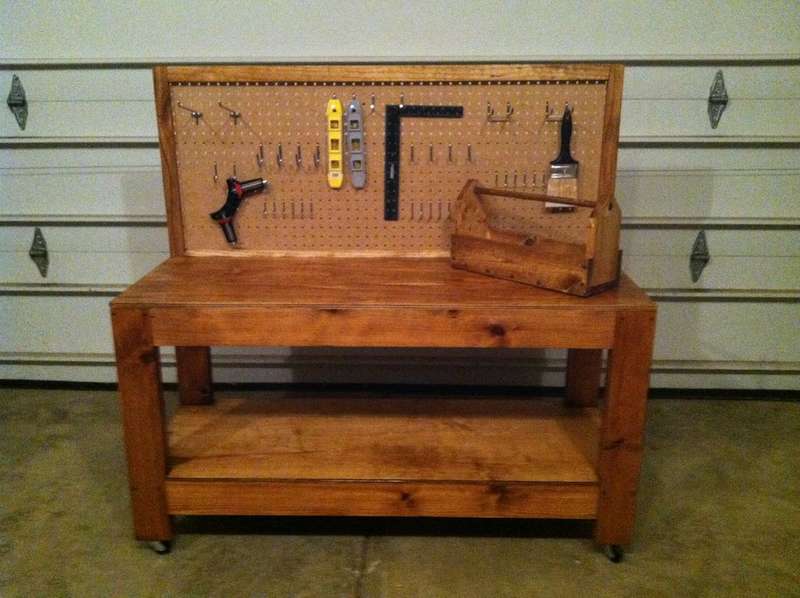
 Unlike most children's workbenches, this is not a toy. This is a real workbench on which you can do almost everything that you can do on an adult. A large work surface, ample storage space and built-in light make the workbench ideal for a number of projects.
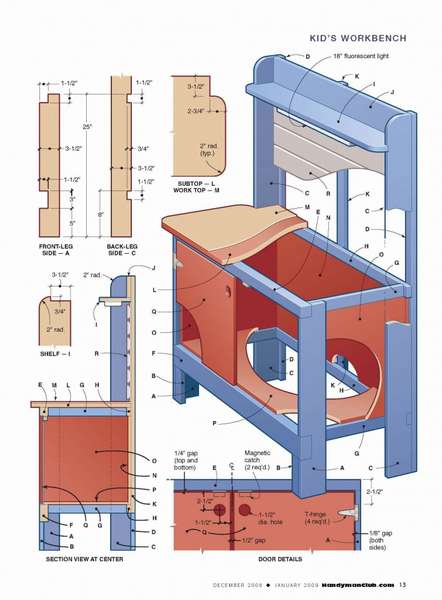
Below is shown drawing, which you can use to make a children's workbench with your own hands. If the sizes are right for you, great; if not, they are not difficult to change. Dimensions in inches are shown in the drawing. It was already mentioned above, but again, 1 inch - 2.54 cm, just multiply all the indicators by 2.54, and get the dimensions in centimeters. 1 foot - 30.48 cm.
Shopping list
- 4 boards 1 × 2 8 ft (244 cm) long poplar or pine
- 2 boards 1 × 4 8 feet (244 cm) long
- One board 1 × 6 8 feet (244 cm) long
- One 2 × 4 8 ft. (244 cm) long
- Sheet of plywood or MDF 1/2-in thick. x 2 x 4 feet (60 x 120 cm)
- MDF 3/4-in. x 2 x 4 feet (60 x 120 cm)
- Plywood 3/4-in. x 2 x 4 feet (60 x 120 cm)
- Cooker or grill
- Nails
- Wood screws and locknuts (12 pcs.)
- Wood glue
- T-loops (2 pairs)
- Plastic plates or similar containers (2 pcs.)
 Detailed instructions can be read on the site, here are a few highlights.
- Start by cutting boards, using a table saw, circular saw or jigsaw.
The upper part of the working surface has recesses that can be located between the legs, and open corners are rounded to 5 cm. - Most of the desktop frame is made of standard boards (1 × 2, 1 × 4, 1 × 6), so all you need to do is saw off the details in length. NastA saw is the best tool for this task, but if you don't have one, you can use a circular saw.
- The front and rear rungs are inserted into the cutouts on the front and rear legs, which can be cut with a jigsaw
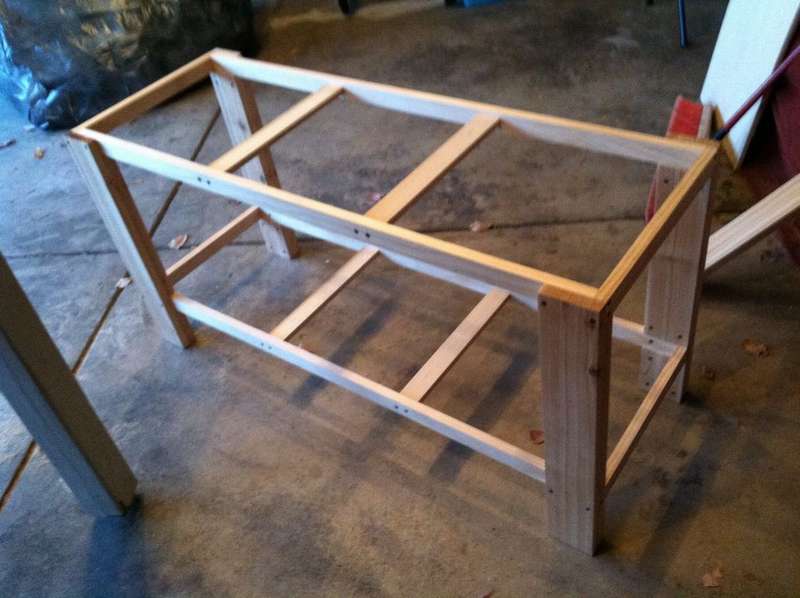
- Grind all sides of the frame parts, it is much easier to do before assembly than after.
- Gather legs and crossbars. Attach a shelf. Then attach the middle rear pillar to the lower rear rail and the upper shelf back.
- Color the details. Apply a primer coat to the frame and panel. Sand the parts lightly with 220 g sandpaper after the primer has dried. Then apply two (or three) coats of paint.
- After the paint has dried, complete the assembly of the workbench.
- Attach the side and back panels to the frame with glue and nails. Then attach the bottom panel.
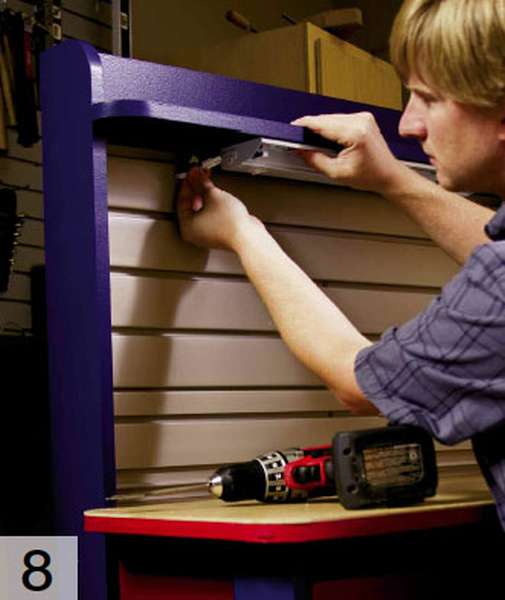
- The backlight is a 45 cm fluorescent lamp. Install it on the bottom of the shelf and drill a hole for the plug that should pass through the hanging panel.
- The last step is to attach the top.


https://i.expert-h.com/en/verstak/verstak-stolyarnyj-svoimi-rukami-foto-chertezhi#sigFreeIdb1dd313f9d
DIY workbench
 Here's how to make it durable and functional. workbench for children, but it can be easily remade to full size.
Parts List:
Frames and shelves. Boards 1x2 long:
- 4 pcs. 16 1/4 "(41.28 cm)
- 4 things. 46 1/2 "(118.4 cm)
- 4 things. 14 3/4 "(37.5 cm)
- 4 boards 1x4 41 "long (104 cm)
- 2 sheets of plywood 18 "x 48" (45 x 122 cm)
Legs. Boards 1x4 long:
- 4 things. 24 "(61 cm)
- 4 things. 5 "(12.7 cm)
- 4 things. 16 "(73 cm)
- Frame 24 "x 48" (60 x 114 cm)
- Boards 1x2 long:
- 2 pcs. 20 "(50 cm)
- 1 PC. 45 "(114 cm)
- Castors 4 pcs.
 Used means:
- Miter saw
- Table or circular saw
- Drill
- Nails or screws
- Clamps
- Drywall screws
- 3/4 "Brads
- 1 1/2 "Brads
- Wood tinting Minwax Golden Oak Stain
- Transparent polyurethane impregnation Minwax
- Foam brush for painting
- Polyurethane brush
- Sandpaper
Read the assembly instructions on the website


https://i.expert-h.com/en/verstak/verstak-stolyarnyj-svoimi-rukami-foto-chertezhi#sigFreeId80d500ed9d
Check out some more examples of children's workbenches.


https://i.expert-h.com/en/verstak/verstak-stolyarnyj-svoimi-rukami-foto-chertezhi#sigFreeId96bc9dde0b
Equipment for carpentry workbench
It is difficult to imagine a carpentry workbench without the equipment and devices that are necessary to fix the workpieces. For example, vise, without them it’s difficult to make any product. Usually, special holes are drilled for them and attached to the countertop. Also used for these purposes clamps and bench clamps. On the working surface must be provided special emphasis, these are ordinary wooden pegs located at a distance equal to half the stroke of the vise. With their help, you can fix the workpiece of any size. Also included in the carpentry bench required tool boxesretractable or portable stands or other kind of holders where tools and fixtures are attached.
 Do-it-yourself vise for a carpentry bench
To perform various technological operations with wooden products in most cases, it is necessary to fix the workpiece. To do this, you must purchase or make a vise for a carpentry bench with your own hands. Many use clamps for these purposes, but they can not always replace a vice, especially since they do not have such a complicated structure to abandon the idea of making them yourself. One of the options for making a joinery vice is shown in these step-by-step photos.


https://i.expert-h.com/en/verstak/verstak-stolyarnyj-svoimi-rukami-foto-chertezhi#sigFreeId8fd15f503e
How to make a wooden workbench clamp
 Clips do not work forever. The most common wear occurs when the swivel head becomes loose and falls from the movable jaw. This does not make them useless, but it can be annoying when you have to hold the hinge in place. Here is a way how using parts from an old clamp make a fully functional vise from old wooden parts, that is, practically at no cost. More importantly, all this can only be done with hand tools with a minimum amount of material, which means that this vice can be assembled by anyone, regardless of the size of the workshop.
Tools
- Hand Saw or Angle Grinder
- Circular or hand saw
- Spatula bit drill
- Chisel and hammer
Consumables;
- Broken Clamp C
- 2 x 6 board approx. 180 cm
- 2 x 3 board approx. 244 cm
- 7 cm column screws
- wood glue
- bolts with washers and additional nut
- dowel
How to make a clamp, look at the step by step photos, the instructions are on the site. I want to note that you can use pegs as a bracket or insert a piece of board. If you want, you can emphasize by installing the dowel. There are many options.


https://i.expert-h.com/en/verstak/verstak-stolyarnyj-svoimi-rukami-foto-chertezhi#sigFreeId8c5a528145
Wood edge clip
This special tool is used. for clamping solid wood when gluing an edge to the edge of a plywood panel. This is a relatively simple wooden clamp, it is easy to do it yourself using small pieces of wood. There is nothing complicated in the design, the principle of operation is the same as that of attaching the meat grinder to the table. So that the nut does not loosen, it is put on glue. Two locknuts leave enough space for the washer to rotate freely. The frame is glued together. Making a device is not expensive, cheaper than any clamp, so you can make a dozen at once. The author even came up with a device for storing clips.


https://i.expert-h.com/en/verstak/verstak-stolyarnyj-svoimi-rukami-foto-chertezhi#sigFreeId489f93b8f9
Schemes and drawings of joiner's vice, clamps, clips


https://i.expert-h.com/en/verstak/verstak-stolyarnyj-svoimi-rukami-foto-chertezhi#sigFreeId2ec9113094
100 photos of joinery vice, clamps, clamps


https://i.expert-h.com/en/verstak/verstak-stolyarnyj-svoimi-rukami-foto-chertezhi#sigFreeId13cb657677
 DIY tool stand
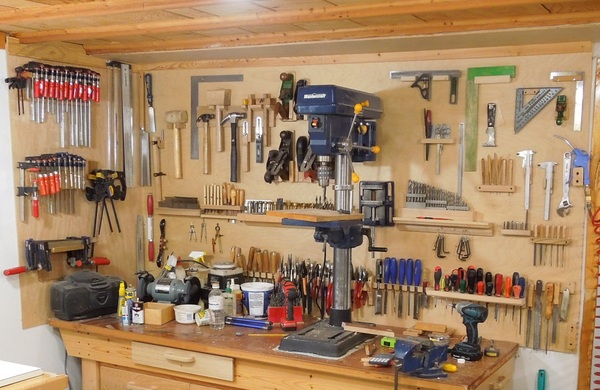
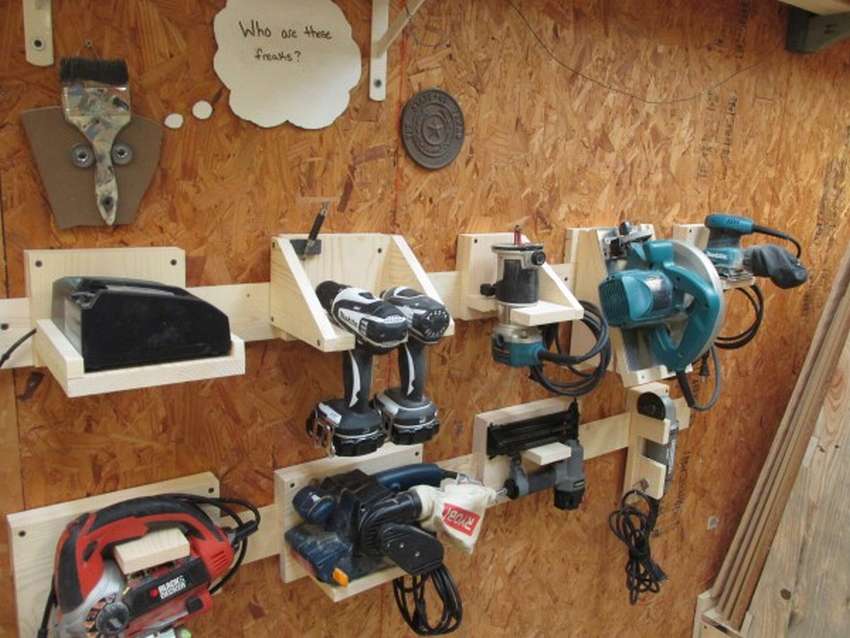
Many beforeRevered to use special stands to keep tools within easy reach on the wall. There are many ways to equip such a work wall. The author of this photo suggests making separate holders for each type of instrument.. Of course, this is a troublesome business, you need to make dozens of parts of various shapes, plan the placement on the stand, qualify the tool according to the frequency of use, in general, spend a lot of time. But how convenient it will be to use the result. The step-by-step photos show examples of holders for each type of instrument.


https://i.expert-h.com/en/verstak/verstak-stolyarnyj-svoimi-rukami-foto-chertezhi#sigFreeIdbf224bd969
 How to make a built-in drawer chest of drawers for tools
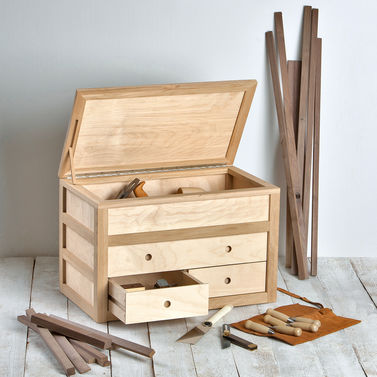
If you have a carpentry workbench, then somewhere you need to store tools. There are two options: buy in a store or do it yourself. The second option is preferable in that you can do exactly what suits your needs and adjust it to the design of the workbench. The author suggests chest type designconsisting of six boxes. The deepest lower and shallow depths for a shallow instrument upper. For manufacturing procedures and examples of the use of drawers, see step-by-step photos.


https://i.expert-h.com/en/verstak/verstak-stolyarnyj-svoimi-rukami-foto-chertezhi#sigFreeId5dfb13381b
 DIY Tool Box
Everyone has tools, or almost everyone, and everyone stores them in his own way. If they are still stored in your drawer of the kitchen table or on the cabinet, I propose the option how to make a DIY tool box. Dimensions: height 450 mm, depth 400 mm, width 700 mm - almost all hand tools that we use for minor repairs in the household can be stored in it. The upper compartment has a hinged lid, at the bottom there are three drawers. Assembly order: First we make the walls, then we fasten them, then we make drawers, and in the end we install the lid on the hinges. The whole process can be studied in detail in step-by-step photos.


https://i.expert-h.com/en/verstak/verstak-stolyarnyj-svoimi-rukami-foto-chertezhi#sigFreeId25bfd744f9
 Universal shelf for tool storage
The shelf is unique in that each particular shelf made for a specific tool, which helps more reliable storage. It is less likely that the tool will fall, and of course it’s more convenient to remove it from the shelf. In addition, the structure is fixed to "French spike", a very simple way of attaching cabinets, shelves, paintings, in general, everything that we hang on the wall 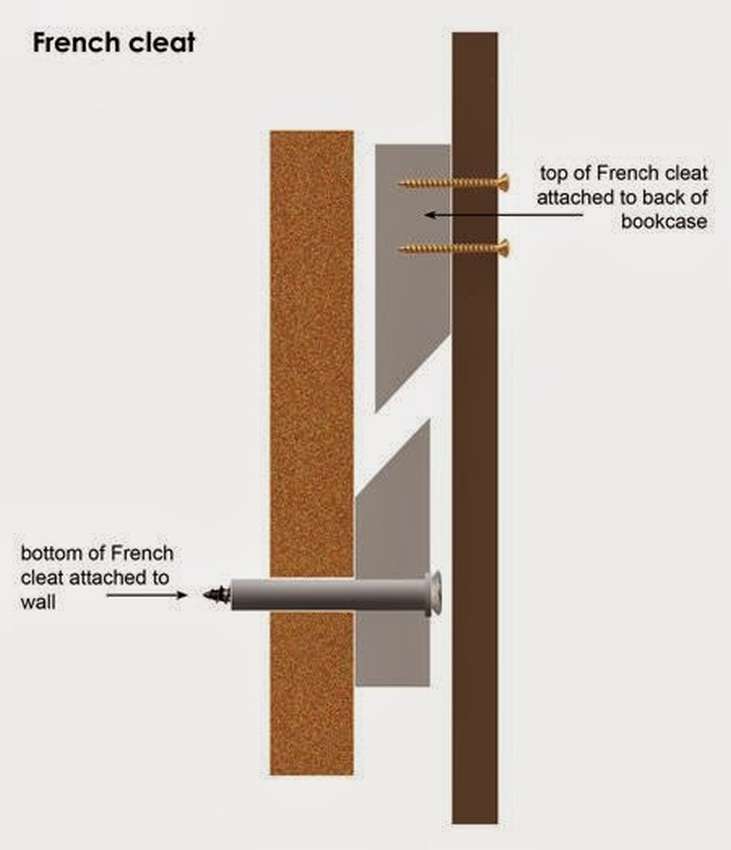 the wall. Who does not know what it is, on the left in the photo is a diagram of a French spike. That is, a board with a thickness of 8 - 10 cm is sawn at an angle of 45 ° and is attached with an oblique upward to the wall. The second part is attached to the shelf with the bevel down, and the shelf or cabinet is hung like a hook. The more massive the item you want to hang, the longer you make the spike. Everything ingenious is simple, the main thing is to precisely fix the spike, so use the level. Further, to make shelves and tool holders and fix them on a spike, I think, is not a problem. Everyone, of course, has different tools, if you have the same ones as in the photographs, you can use this example. The two last photos in the gallery have a similar version of the tool shelf.


https://i.expert-h.com/en/verstak/verstak-stolyarnyj-svoimi-rukami-foto-chertezhi#sigFreeId5f5662d5e5
DIY Tool Box
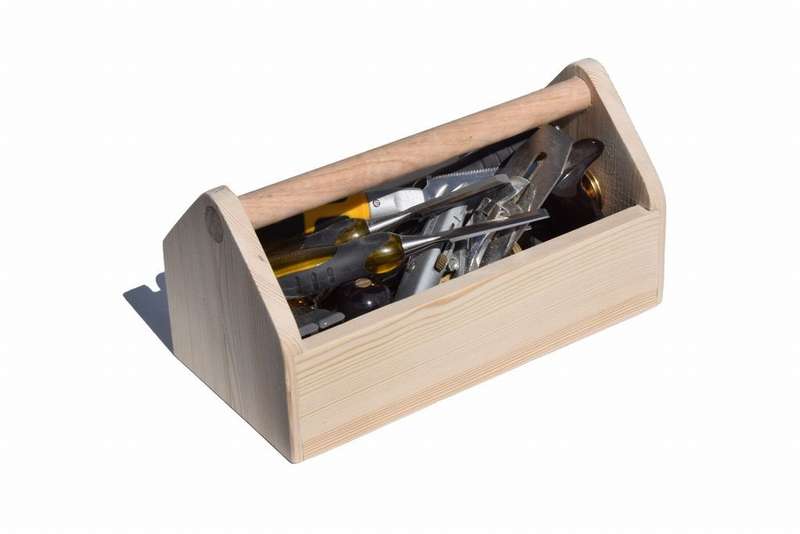 Look how to make a simple portable DIY tool box. The design is a wooden tray with triangular sides and a durable handle. The process is shown in detail in step-by-step photos, all details on the assembly steps can be found on the author’s website, the link can be found under the gallery.


https://i.expert-h.com/en/verstak/verstak-stolyarnyj-svoimi-rukami-foto-chertezhi#sigFreeId3cf3620fee
Schemes and drawings of a joiner's workbench


https://i.expert-h.com/en/verstak/verstak-stolyarnyj-svoimi-rukami-foto-chertezhi#sigFreeIdd917f51932
Do-it-yourself joiner workbench 200 photos
-

-
-
-
-
-
-
-
-
-
-
-
-
-
-
-
-
-
-
-
-
-
-
-
-
-
-
-
-
-
-
-
-
-
-
-
-
-
-
-
-
-
-
-
-
-
-
-
-
-
-
-
-
-
-
-
-
-
-
-
-
-
-
-
-
-
-
-
-
-
-
-
-
-
-
-
-
-
-
-
-
-
-
-
-
-
-
-
-
-
-
-
-
-
-
-
-
-
-
-
-
-
-
-
-
-
-
-
-
-
-
-
-
-
-
-
-
-
-
-
-
-
-
-
-
-
-
-
-
-
-
-
-
-
-
-
-
-
-
-
-
-
-
-
-
-
-
-
-
-
-
-
-
-
-
-
-
-
-
-
-
-
-
-
-
-
-
-
-
-
-
-
-
-
-
-
-
-
-
-
-
-
-
-
-
-
-
-
-
-
-
-
-
-
-
-
-
-
-
-
-
-
-
View the embedded image gallery online at:
https://i.expert-h.com/en/verstak/verstak-stolyarnyj-svoimi-rukami-foto-chertezhi#sigFreeId8f132634ff


https://i.expert-h.com/en/verstak/verstak-stolyarnyj-svoimi-rukami-foto-chertezhi#sigFreeId8f132634ff
Hello, I am the author of this article, so I look forward to asking questions for this article in the comments below, I will answer all !!!
If you have questions on another topic, ask them on our forum, we will answer you
- Two baskets of paper in 5 minutes (Master class)
- How to make a simple and compact table for a milling cutter from plywood
- How to make a soft headboard tile (Instructions + step by step photos)
- Cinder block benches: a convenient bench in 55 minutes
- How to make a bed with a niche: saving space (Master class)