DIY milling table 1000 photos, drawings, step-by-step instructions
 do-it-yourself manual milling table
You can talk a lot about the merits and the need for each master of such a tool as a milling cutter, but this is understandable. Just look around - cabinet doors, door boxes, wooden skirting boards, window frames and many more things were made using this tool. We’ll better consider what a milling table is for.
For the master, this is not a question if you have to work with a manual router, it is very difficult to do without auxiliary devices. To buy a good table for the router, you need about $ 150, it can be cheaper, but we are talking about a good table. therefore do it yourself more practical do-it-yourself milling table, especially since it’s not so difficult, but you will have a design, size and options that are right for you.
In the article you can learn how to do it yourself:
- Stationary table for a milling cutter
- Portable milling table
- Table for manual milling cutter and jigsaw
- Homemade table for milling cutter and circular
- Horizontal table workbench for milling cutter
- Drill Router
- Milling elevator
- As well as mounting the plate and stop in the milling table
Stationary table for a milling cutter
 How to make a table for the router
Milling is the process of processing various surfaces by feeding a workpiece to a rotating cutter containing several cutting edges. Working with a manual milling machine on a special table is more convenient and efficient. Therefore, the owners of the tool sooner or later think about buying a table or making it with their own hands. The step by step photos show how to make a table for the milling cutter, stationary version. For the manufacture you need a circular saw, drill and grinder. If something is not clear on the photo, you can find out the details on the website, a link to which is located under the gallery.


https://i.expert-h.com/en/verstak/944#sigFreeId15880e02eb
 Milling table for manual milling
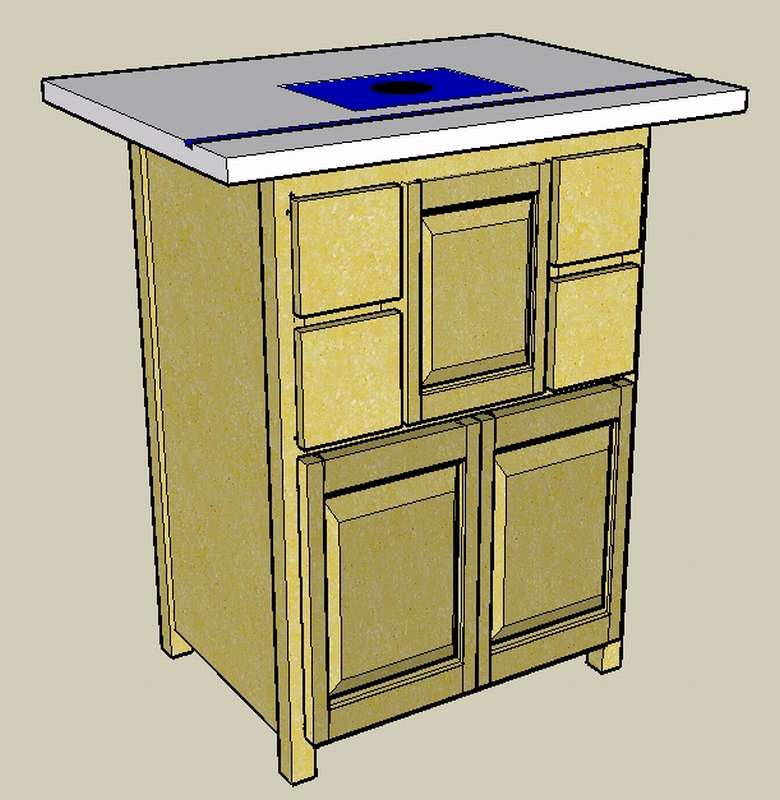
The essence of the design milling table for manual milling not only reliability, it is important that you are comfortable using it. Then the accuracy of part processing will increase, and it will be easier to work. In this case, a very simple option is presented, the working surface is a separate plate placed on two curbstones.
Such a table can be made in just a few hours and without any special material costs. Start by selecting material and making countertops. Below are presented patterns of cutting and determining the location of the holes for the working surface.
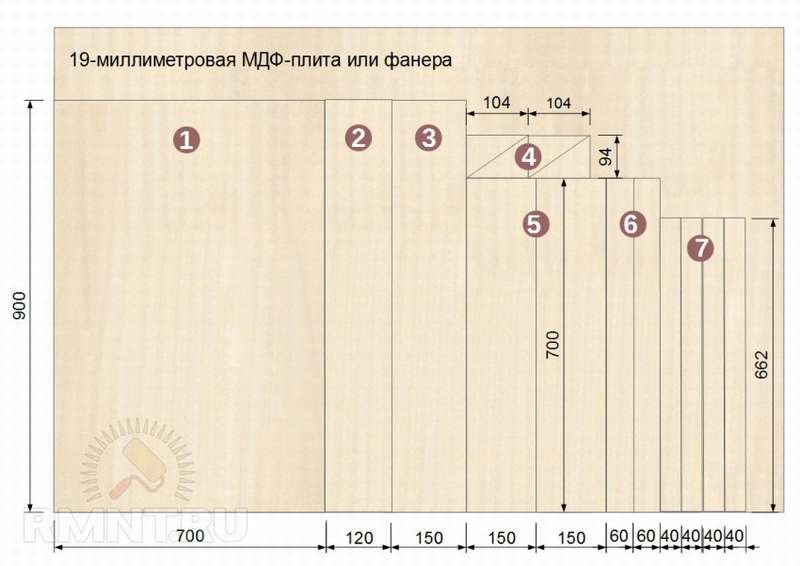

On a step-by-step photo, drawings of individual parts are presented, and it is also signed what to fix and where to drill. If this is not your first experience in carpentry, then you can easily figure it out.


https://i.expert-h.com/en/verstak/944#sigFreeIddf4e7cff18
 Homemade milling table
Milling cutter, a wonderful tool that opens up great opportunities for the master and an indispensable tool for wood processing and not only. The only problem is that manual milling is not always convenient to use, especially if you have to hold the workpiece during operation.
therefore a homemade table under the milling cutter will be a reliable addition to the tool. You just need to take your time, precisely mark and cut the blanks, thinking through each step. Follow the step-by-step photos, and you can make such a table in one day.


https://i.expert-h.com/en/verstak/944#sigFreeIdcdfc524c1d
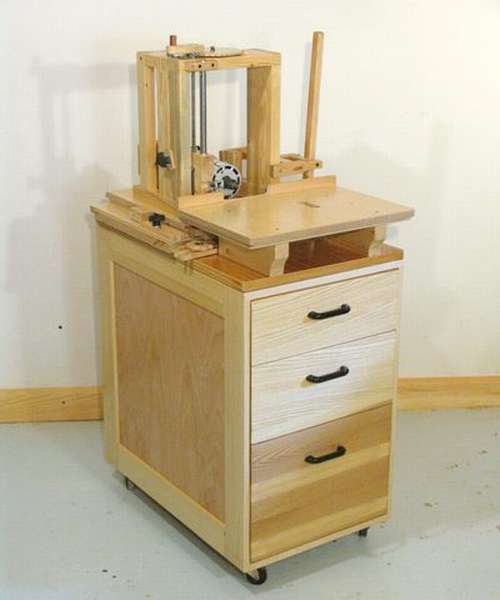
 DIY manual milling table
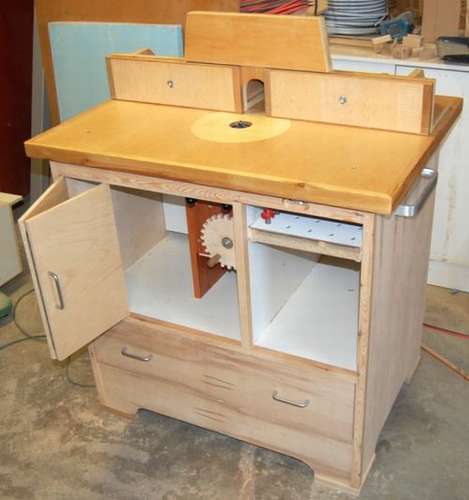
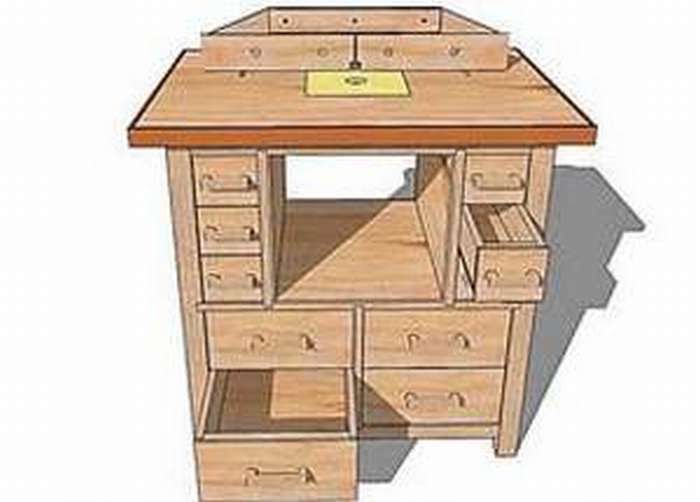
In this table designs for manual milling is used built-in elevator for a milling cutter, located in the right corner gear and threaded rodb to raise the manual router up and down. It also uses a stud for vertical movement, but the gear ratio is 24:12, instead of 20:12, as in a mine. This means that the two screws rotate on the crank, raising the assembly 3 mm clockwise by turning the handle.
Since the gear and the pin will be exactly in the center, it is difficult to put the lock in the center, so two locking knobs are made on both sides. Two black plastic handles lock the router in place. Small gears are made of hardboard, but there is also a minus, the board turned out to be too thin to use a T-nut. The milling cutter is sandwiched between two blocks of wood, not clamps, as is done in most cases. Chip removal hose connected to the hole in the cabinet when the front doorAFA is tightly closed, air is sucked in through this hole, effectively sucking out all the dust and chips.


https://i.expert-h.com/en/verstak/944#sigFreeId6313541495
Shown here how to make an elevator, a lifting mechanism for a milling cutter. The device is compact and completely autonomous, it is only necessary to fix it correctly to the supporting structure of the table. The lower gear is made of 6 mm hardboard. For durability, immerse it overnight in urethane in and as it dries out during the day, it will have the consistency of durable plastic. Only 2 gears, one on the front panel has a handle and drives the other at the bottom. The lower gear rotates the threaded rod, which raises and lowers the milling cutter. Used here 1: 2 ratioso that for each complete rotation of the front gear, the milling cutter will increase or decrease by 3 mm. Two hand screws lock the mechanism after adjustment is complete.


https://i.expert-h.com/en/verstak/944#sigFreeIdddf6fdc251
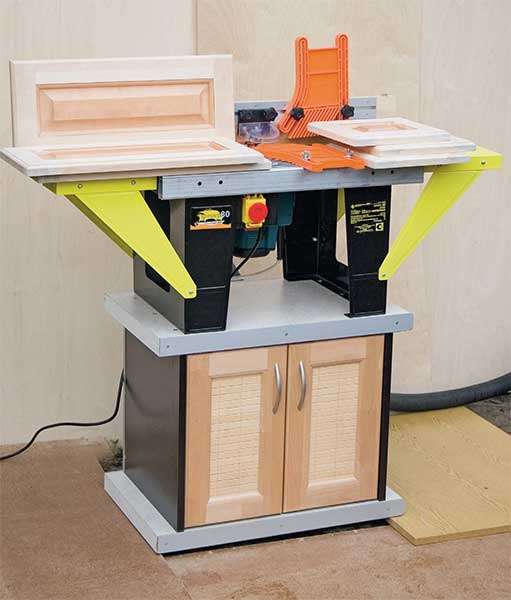
 Mobile milling table
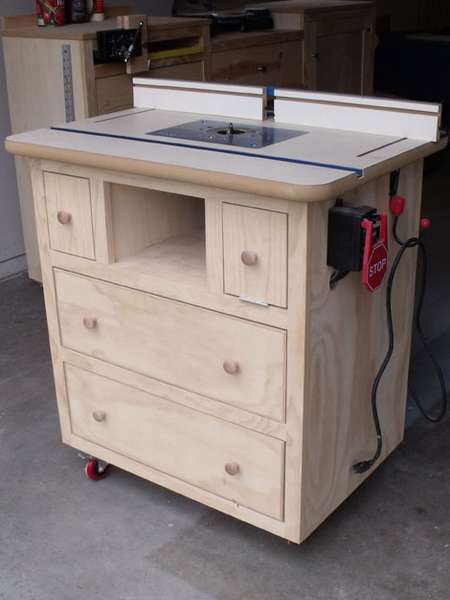
That's so cute mobile milling table offers to make the author of one popular English-language site. The first gallery shows all angles and possibilities, in fact a very convenient design, it is clear that the author paid considerable attention to the design of the table. Everything is thought out, including drawers, castors, switches and wiring.


https://i.expert-h.com/en/verstak/944#sigFreeId69dc7234d7
Further shown table assembly order in diagrams. The author’s remark, the slide needs to be fixed in advance, because you will have too little space to drill and fasten after everything is ready. Also, to separate the router from the drawers, attach a square wall plug to the cabinet, and then attach thin plywood to the square pin.


https://i.expert-h.com/en/verstak/944#sigFreeIdd4600d3468
 Do-it-yourself milling table for manual milling
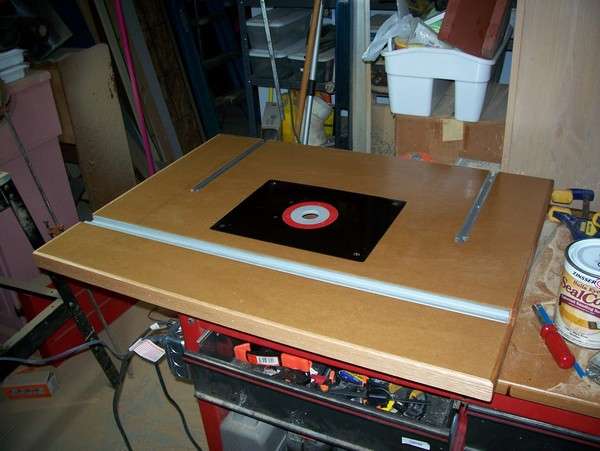
In order to make wooden products with the help of a manual milling cutter, which in quality will not be inferior to similar products made on special machines, a milling table is required for a manual milling machine.
 Designs are different in complexity, but it depends on what tasks you set for yourself. This option is quite simple to manufacture. On the left is a drawing, on the basis of which you can independently choose materials and tools, as well as calculate the estimated costs.
For this model was used plywood and chipboard, you will also need wooden blocks, 6 mm thick steel plate, metal profile and aluminum guides.
Next, the assembly order, see the step by step photos. What you need to pay attention to:
- as the carriage stop, you can use the guide from the old saw.
- when installing a steel plate, make sure that the edges do not protrude above the work surface;
- the milling cutter must not be fixed to the table, but to the plate;
- instead of the handles that need to be removed, screw the aluminum rails.


https://i.expert-h.com/en/verstak/944#sigFreeId4807e4491a
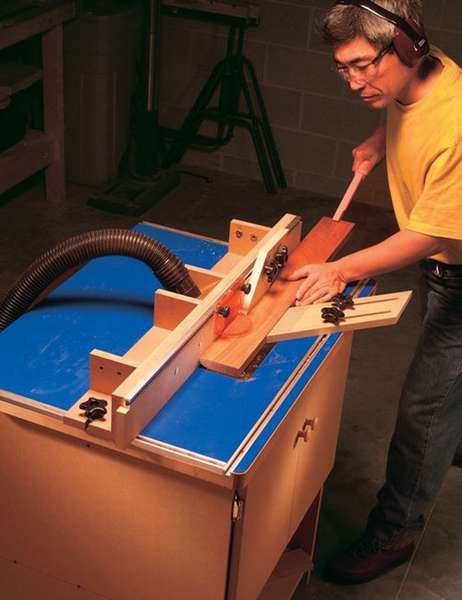 Table workbench for milling cutter
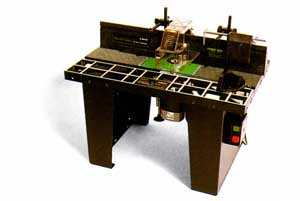
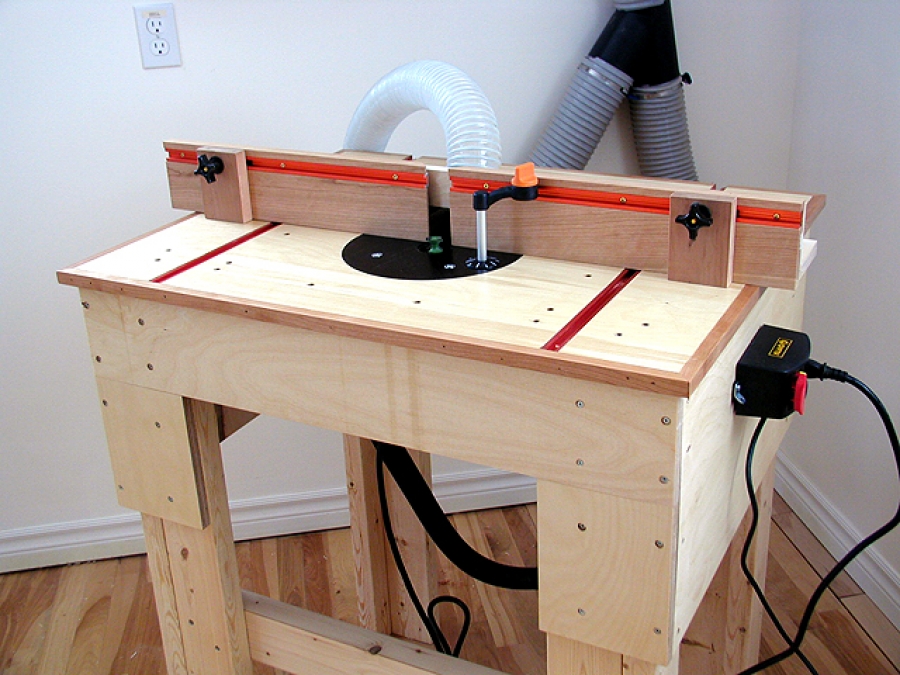
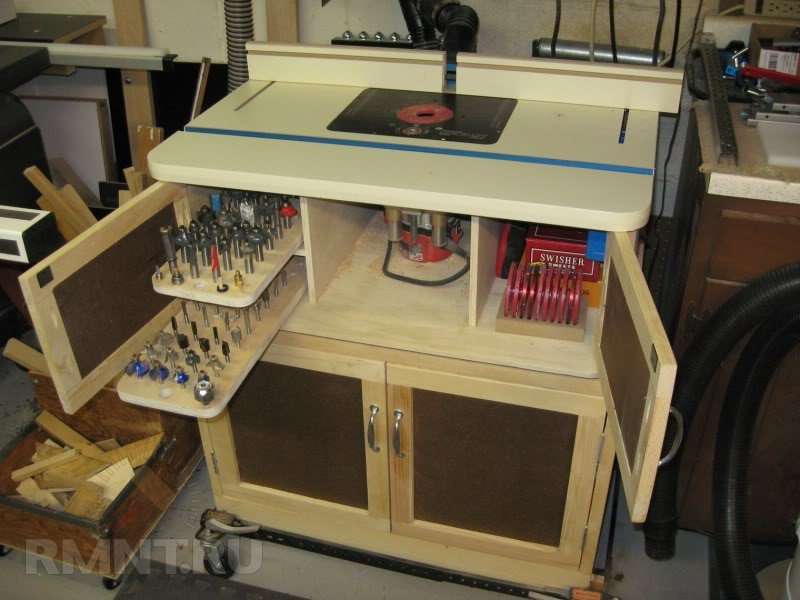
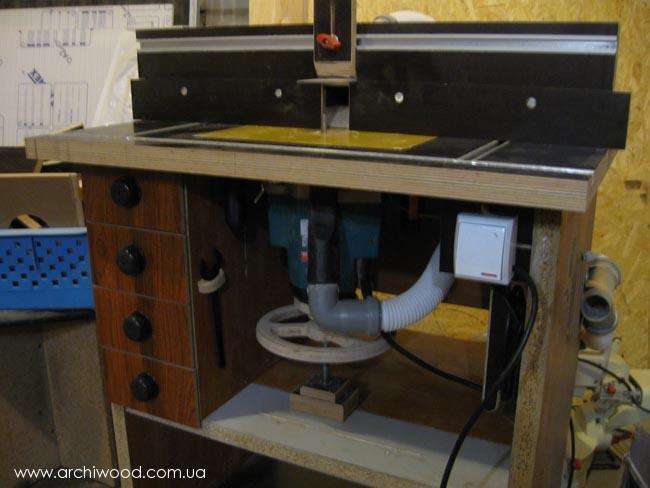
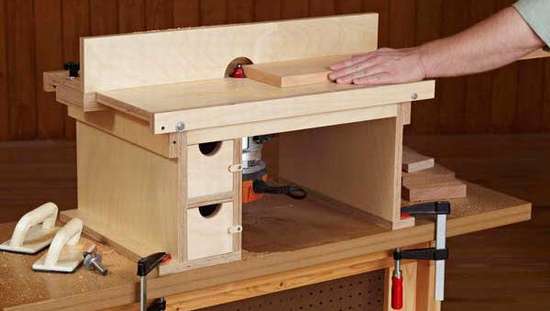
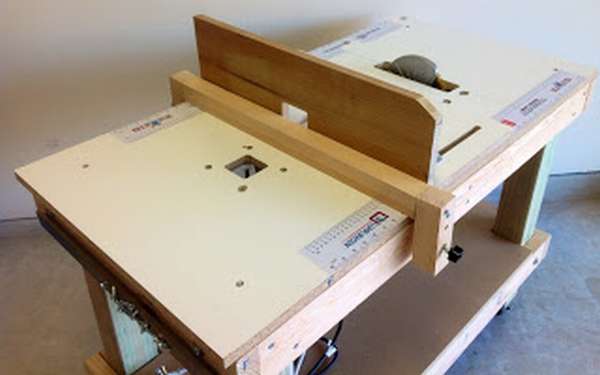
This milling bench workbench table includes all the best features of similar industrial models.which can be manufactured at minimal cost. You will save enough to buy a new router! At the heart of any milling table system is a well-designed emphasis. This option has all the necessary functions, the emphasis is easily installed without tools and it is easy to adjust. Simple recessed picks can be adjusted to cutters of any size or used to create holes with zero clearance. Simple fencing settings are made possible through the use of special profiles. For fine tuning, leave one latch tight to create a reference point for the stop.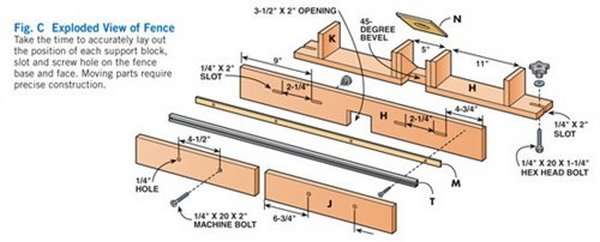 A dust collector and a T-shaped guide for mounting hardware are also provided. A large, easy-to-assemble housing made from vibration-absorbing MDF comes with butt welds and screws. It is roomy enough, has doors on the front and rear panels that reduce noise and give you access to the router on either side of the table. An external power switch simplifies and increases the safety of the mill. This is very convenient, because you do not have to bother under the table to turn on the router and it is safer in an emergency.
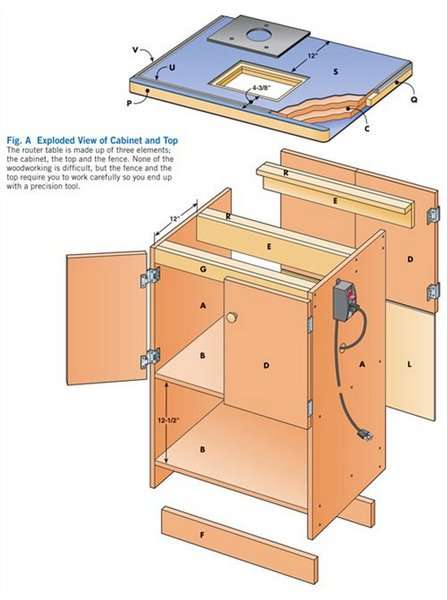
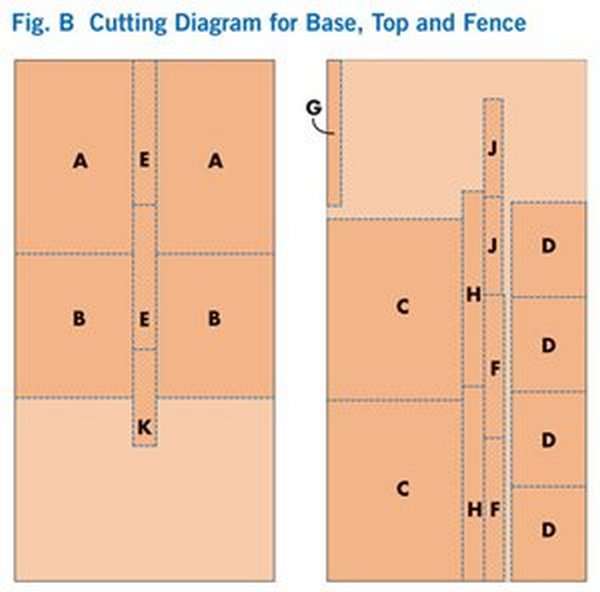
Start assembly from bottom to topstarting with the cabinet, which serves as a solid foundation for the working parts of the workbench. You can see the order of working with tips on step-by-step photos, although the inscriptions are in English, but everything is simple there, cut - incision, offset - cmwage length - long slip stick - a sliding bar, in general, you can figure it out.


https://i.expert-h.com/en/verstak/944#sigFreeId13f360a845
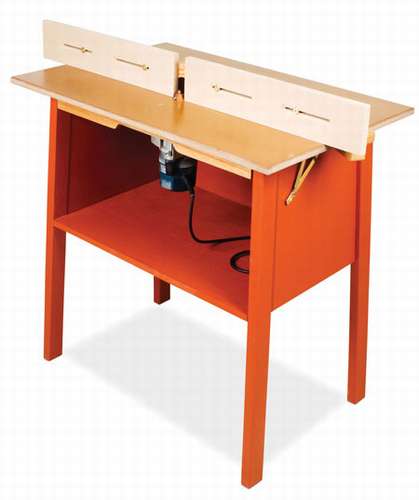
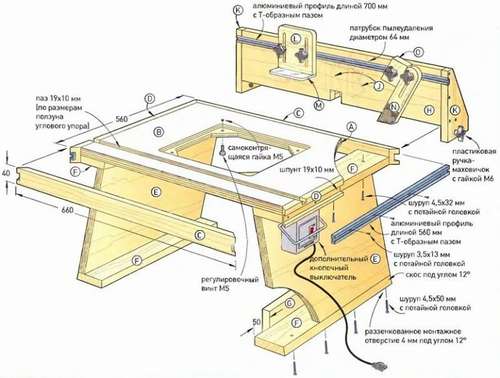
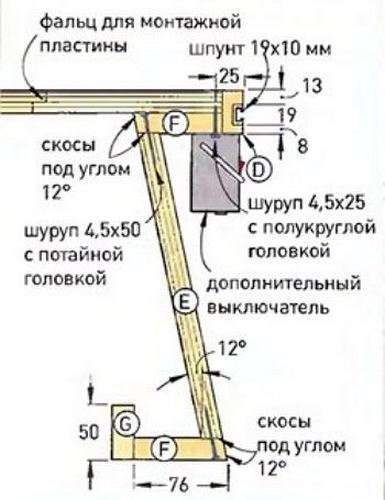
 Desk-based milling cutter
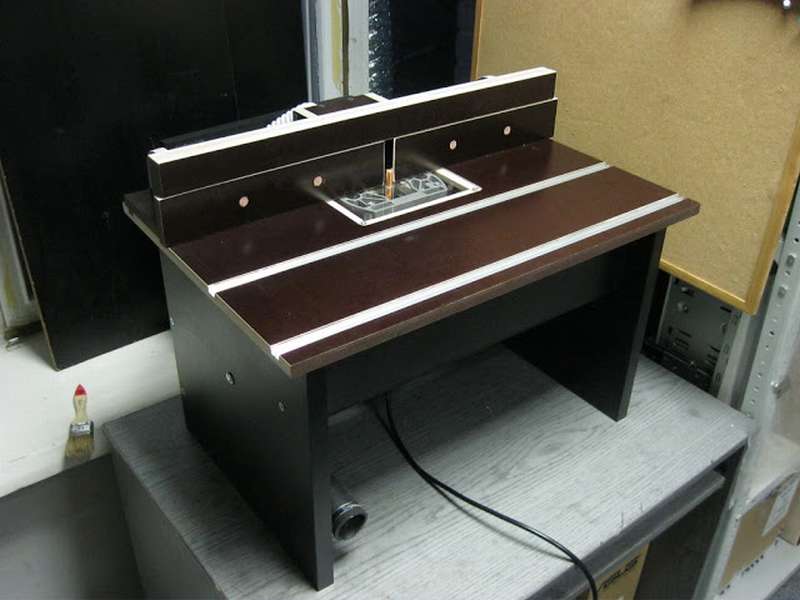
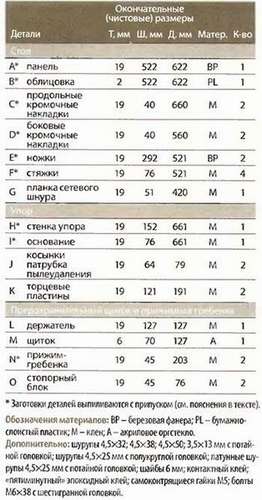
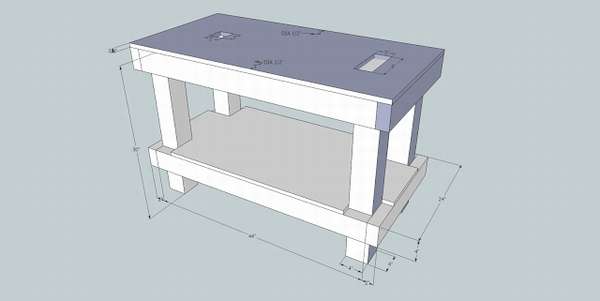
Using a hand milling machine, even in a home workshop, it is possible to produce products that were previously accessible only by professional furniture workshops. Table workbench for milling cutter further enhances capabilities, allowing you to make complex joints, make grooves, cut grooves, process edges, etc. Today, a wide range of woodworking equipment is presented on the market, although it is not a problem to make a simple milling table on your own. For example, if you have an old, but sufficiently durable desk, it can easily be converted into a workbench for the milling cutter. Below is presented table with a list of parts and materials.

In the gallery you can see photos of drawings and assembly diagrams


https://i.expert-h.com/en/verstak/944#sigFreeIdc6ce90a8cb
 DIY table under the router
Here is a simple option, how to make a table under the router yourself. The table itself, not a problem, the whole chip in the countertop. Main parts, emphasis and mounting plate for the router. A recess for the elevator is also necessary, it is better to fix the elevator itself on plastic surfaces or wood. Profiles for guides and accessories are mounted on the countertop. There are several inserts with holes for the cutter, for all cases. Install the plate, in this case it is fixed with screws, which, of course, is inconvenient, it is better to fix it with screws. The sliders can be made of the same material as the plate, in this case of fiberglass. The vertical emphasis is made of formwork plywood. Install the box for the vacuum cleaner. The flaps for stop are adjusted depending on the cutter, then the gap will be minimal, and the chips will be well pulled by a vacuum cleaner. C-profile to the stop, plant on liquid nails. Something like that, in short. More details can be found on the website, link under the gallery.


https://i.expert-h.com/en/verstak/944#sigFreeId968427e6df
DIY milling table with drawings
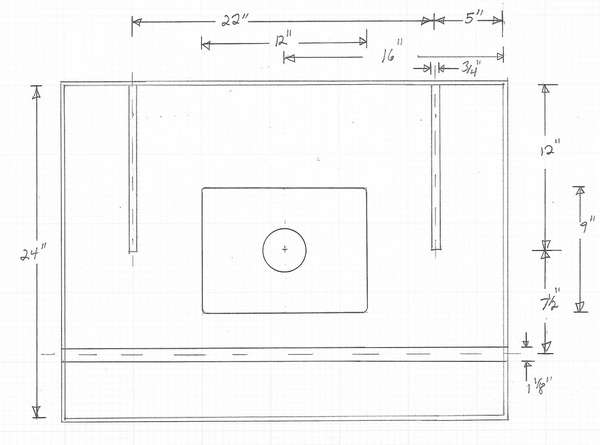
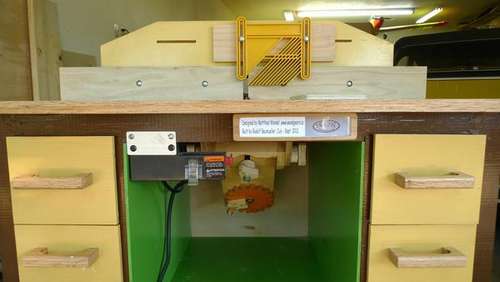 A table for Rudolf Baumeler's milling cutter, I don’t know who it is, but the table turned out to be beautiful, it’s immediately obvious that the person worked well on the design. Shown below are drawings with dimensions in inches (1 inch 2.54 cm).


https://i.expert-h.com/en/verstak/944#sigFreeId5cdfd12ca6
But Rudolph not only made a table for the milling cutter, he also came up with special lift. Even with all drawers loaded with tools, it is easy to lift and can be rotated using special handles. It's a pity there is no instruction on the site how to make it, but the main thing is the idea.


https://i.expert-h.com/en/verstak/944#sigFreeId6cc83d3ad3
 DIY plywood milling table
If you often do carpentry, over time you will definitely have a desire to purchase your own table for the milling cutter. But do not rush into the purchase, you can make a simple design yourself and it will work perfectly. The author of this photo offers simple and economical version of a small milling tablemade from scraps of plywood. The biggest plus of a home-made design, you can fully customize the sizes for yourself. Start with the legs, the author fastened the plywood blanks and glued them with carpentry glue. If necessary, add wheels for mobility. The countertop 80 by 50 cm is made of a piece of glued plywood and covered with a thick sheet of melamine. This laminate is smooth and durable, making it ideal for work surfaces. True, he has one drawback, when drilling and sawing, the edges crumble, you need a special disk. In principle, melamine can be replaced with MDF, which is also a good option. The milling cutter itself is attached to a removable middle section, the whole process is looking at the step by step photos.


https://i.expert-h.com/en/verstak/944#sigFreeId9a1bf969d3
 Homemade wood milling table
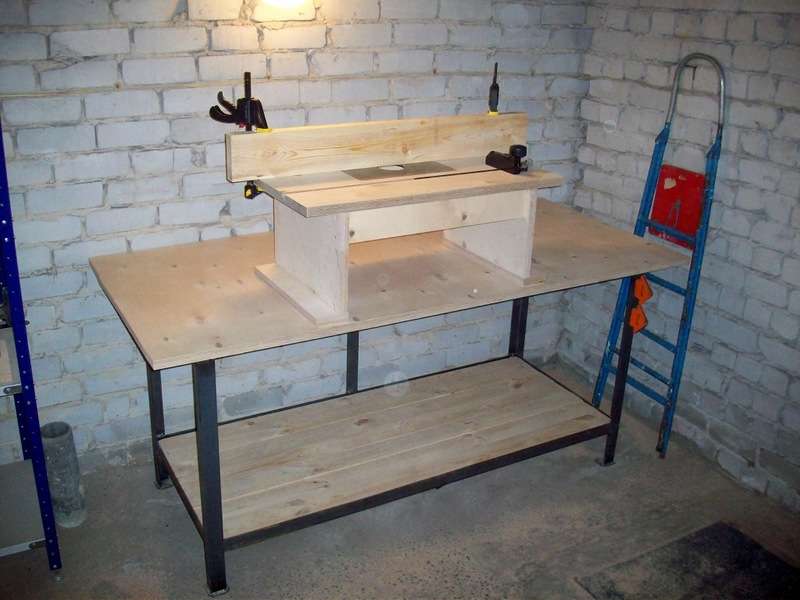
It is proposed here stationary version of a home-made milling table for wood on metal legs. However, the main thing is the work surface, and the legs can be made of wood or metal and the height that suits you best. The main requirement for the countertop, the surface should be even and smooth, this must be taken into account when you select the material.
It’s also very important to choose the right mounting plate material, taking into account that the thickness should be no more than 8 mm. In most cases, metal is used, but textolite, plywood, melamine, etc. are also suitable. In this case, the working surface is made of plywood, mounted on a metal frame. The manufacturing procedure in step by step photos.


https://i.expert-h.com/en/verstak/944#sigFreeIdce4bc4f8cb
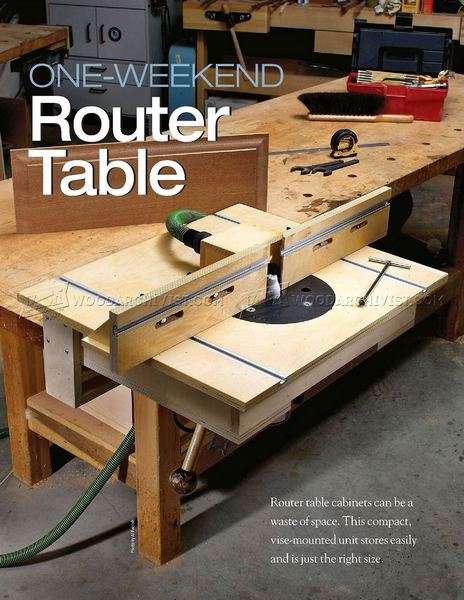
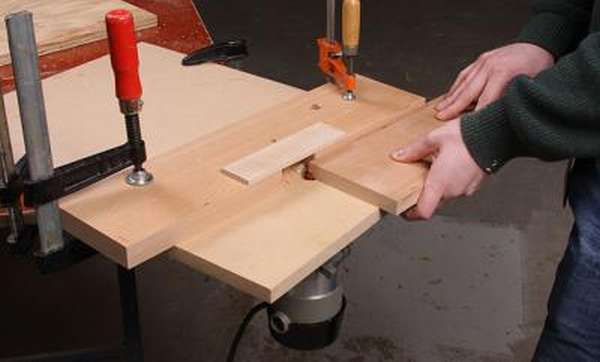
Portable milling table
 Milling table for manual milling
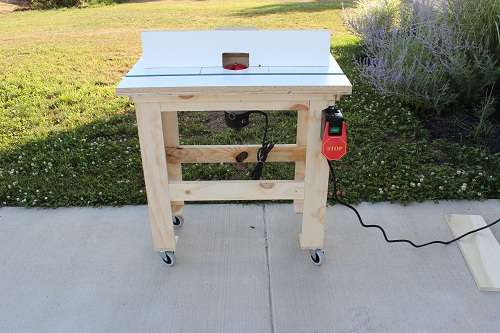
Reason to make a milling table for manual milling is that it turns a portable power tool into a stationary one and thus expands its capabilities. A simple, portable table for manual milling can be done at low cost and without compromising functionality. Such a portable option is very convenient if you do not use the router very often or have to work outside the workshop. How to make this simple design, look at the step by step photos.


https://i.expert-h.com/en/verstak/944#sigFreeIdcc422d58f4
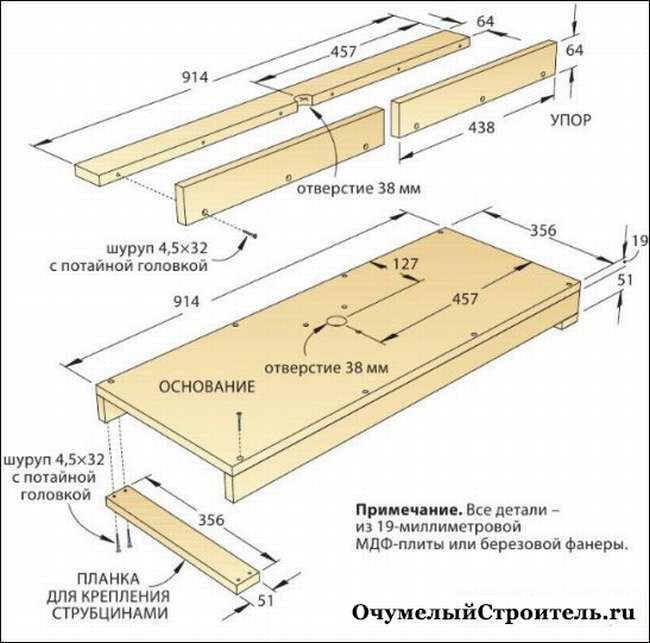
Milling table drawing and assembly features
Here is a drawing of a standard portable milling table
Of the materials you will need: plywood or boards, adjusting bolts with nuts, screws, axles for attaching the milling cutter, an aluminum guide and a metal corner for the frame. Shown on the left size chart.
Detail Drawings


https://i.expert-h.com/en/verstak/944#sigFreeIdc72442b552
 Homemade table for a manual milling cutter Caliber FE-650E
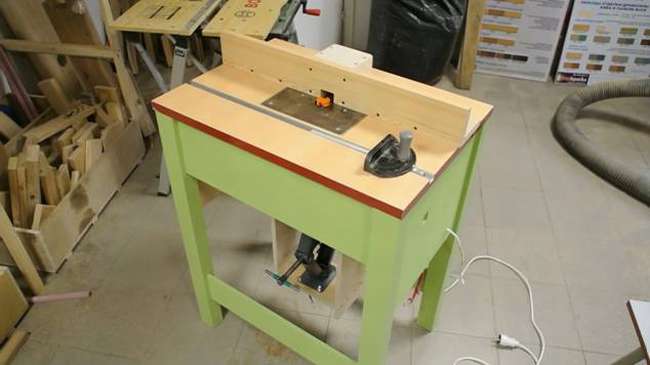
A small table with a height of 35 cm (45, if with a corner stop) is perfect for a small workshop. Main material - laminated plywood. In the lateral emphasis special grooves are provided, it easily moves and is fixed by two lambs. Above the legs of the chipboard there is a little free space, this indentation is needed if you need to attach something to the edge of the countertop, for example, clamps. An effective chip intake is also provided, the hose from the vacuum cleaner is attached directly to the box where the chips are collected. Using a special screw, you can adjust the depth. The assembly order is shown in the gallery on step-by-step photos, there is even a photo of the set of cutters, if you need details with the comments of the author of this table, a link to the site under the gallery.


https://i.expert-h.com/en/verstak/944#sigFreeId3488770582
 Functional Milling Table
This simple and reliable table is made from scraps of 27mm plywood. The frame is assembled using confirmations 50x7. A plate for a milling cutter 350x250 with a thickness of 6 mm, a lateral stop was used from a circular saw. To secure the structure with clamps, special protrusions are provided in the lower part of the leg. The advantage of this table is that the milling cutter will be attached to the plate with removable insert rings for different mill diameters.


https://i.expert-h.com/en/verstak/944#sigFreeId320a36f675
DIY milling table with drawings
 Here are detailed step-by-step photos from DIY drawings for making a table for a router. On the photos there are inscriptions with additional tips, detailed instructions on the website of the source, a link under the gallery. A few tips:
- When marking parts using a tape measure, it is easy to make a mistake, as often the nominal thickness of plywood differs from the real one.
- If you want to achieve greater accuracy, use the cropping or the parts themselves as a template.
- To speed up the gluing of parts, use screws, then you will not need to wait until the glue dries to fix the next part.


https://i.expert-h.com/en/verstak/944#sigFreeId44ddd5ccba
Table for manual milling cutter and jigsaw
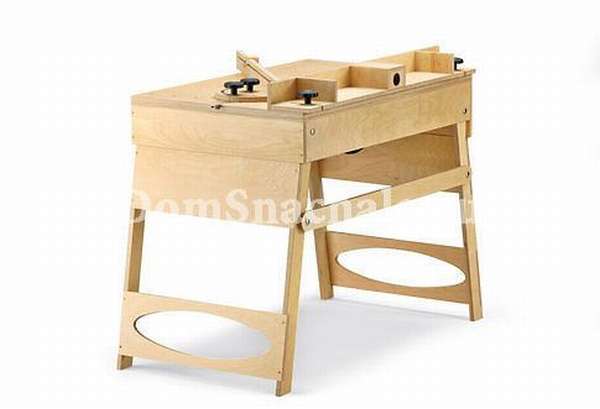
 A universal table with several functions undoubtedly has many advantages, moreover, it lightweight and portable designthat facilitates transportation and storage. But there is another side to the coin, a light emphasis does not provide sufficient rigidity, and folding legs make the table less stable. However, the requirements for their workplace are different for everyone, some may be quite happy with this option. If suits you, order of production look at step by step photos.


https://i.expert-h.com/en/verstak/944#sigFreeId4f920688e0
 DIY table for milling cutter and circular
Milling cutter and circular saw, one of the most popular tools in woodworking. Buying a table or workbench for each of them will be unprofitable, in addition, they will take up a lot of space. The author suggests making universal table for milling cutter and circular saw, in the photo you see what he did, not the embodiment of elegance, but a fully functional design. Undoubted advantages, this is a simple design, compact size, makes it possible to place even in a small room, for example, a garage. A sufficiently large work surface plus equipment can be easily removed if necessary. Good quality at a fairly low manufacturing cost.
 Milling cutter mounting feature, it is installed without mounting plate. You just need to remove the base plate with a fixed base and mark the holes on the underside of the MDF multilayer board. According to the author, it’s easier to remove and adjust. The main drawback is that adjustments have to be made under the table. By the same principle, a circular saw is attached, although it will be a little more complicated.


https://i.expert-h.com/en/ verstak / 944 # sigFreeId04ca326364
 CNC Mini Milling Machine
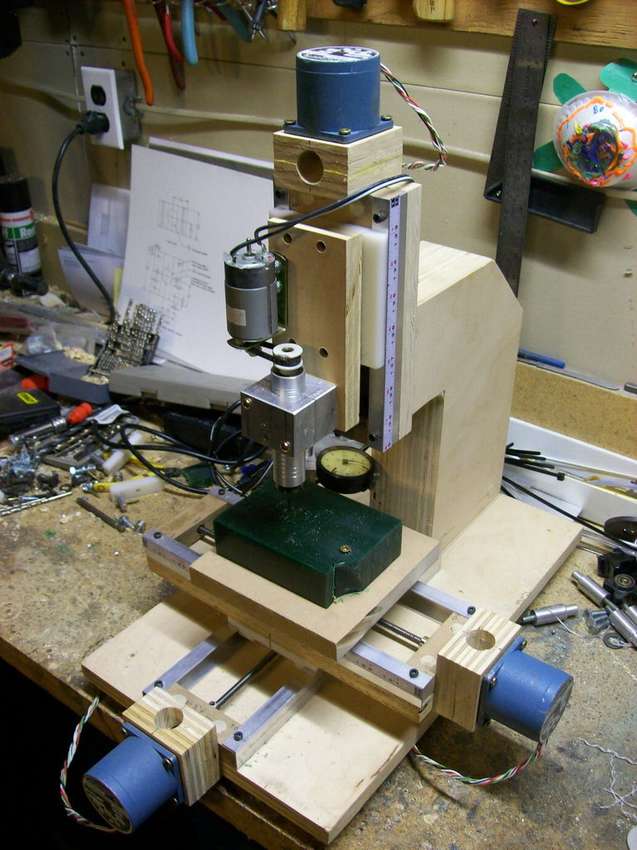
If you need miniature milling machine for processing plastic parts and making small, precise holes. The proposed home-made model may be of interest to you. The machine is designed so that it can be converted into CNC for PCB processing and repetitive operations. Also, depending on the engine used, it is able to process plastic, wax, wood and non-ferrous metals. For many novice craftsmen, making a do-it-yourself machine for a CNC milling machine will probably seem like some kind of fantastic project, but do not forget, the twenty-first century is outside. Of course, a CNC machine is not a bookshelf, but if there is a necessary drawing, suitable tools and material, then everything is real.
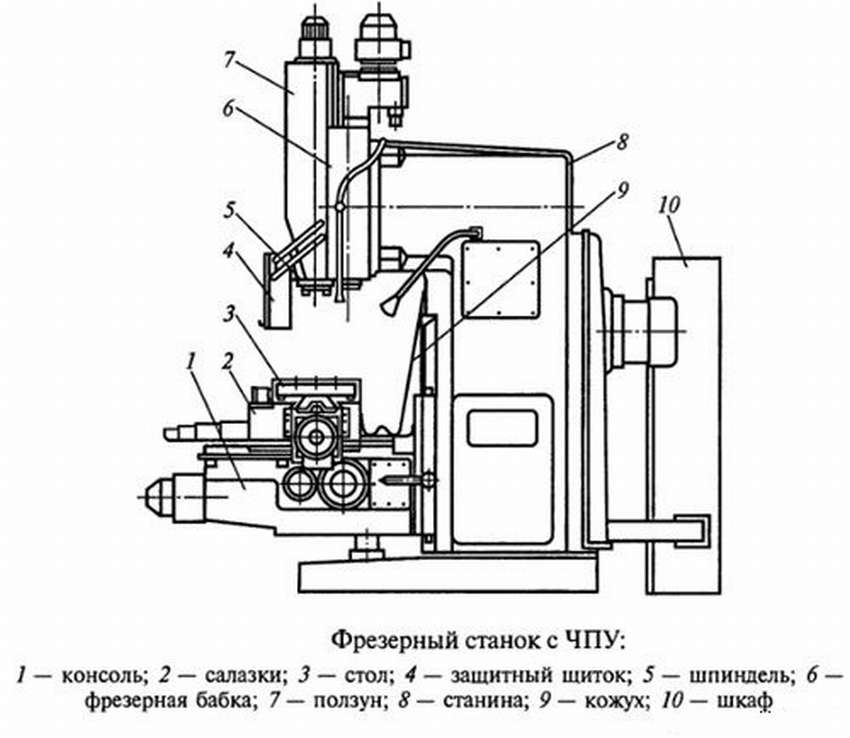 Conceptually, this design looks something like this.
Below are step-by-step photos with drawings and sizes, however, from an English site. If you are interested in various nuances, and there are many of them, you can click on the link located under the gallery.


https://i.expert-h.com/en/verstak/944#sigFreeId397f790da7
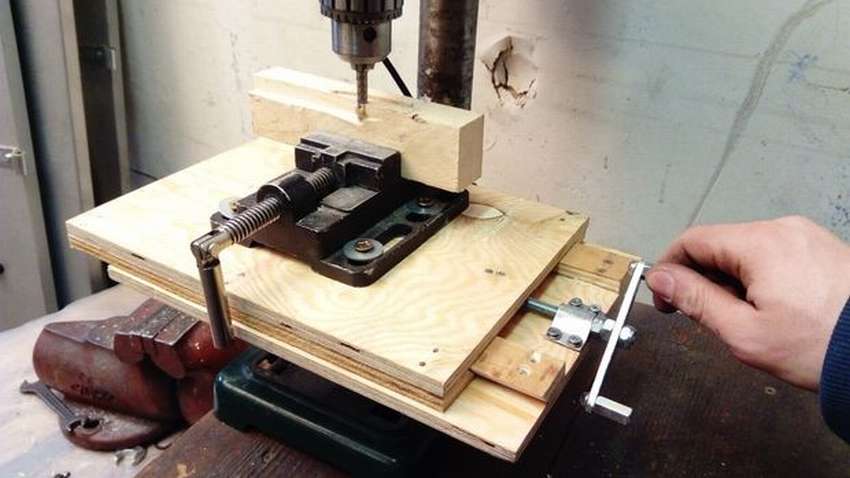 DIY router
Need to make a groove in a chipboard or process unevenly cut part? For this you need a special tool, the author suggests make a router from a drill with your own hands, it’s not expensive and then you can perform the above work without any problems.
What you need: 10 mm plywood, small screws with washers, M8 threaded rod, two connecting and five adjustable nuts, two M3 bolts, two T-shaped bolts with nuts. See the manufacturing procedure on step by step photos. The principle of operation is very simple. A working cutter is put on the spindle, turn on the drill and go. Just do not forget that this is a mill, you have to be careful with feed rate and drive very slowly to prevent damage to equipment.


https://i.expert-h.com/en/verstak/944#sigFreeId12f41c2b1f
 Hand Milling Table
Probably every happy owner of this beautiful tool probably thought about the necessity of a table for a milling cutter. The presence of a stationary installation significantly increases the processing capabilities, especially of small parts and workpieces. But the problem is usually an elementary lack of space, because not everyone has a garage or their own workshop, some equip their workplace on the balcony or in the pantry of a city apartment. Therefore presented here small table for manual milling, which the can be fixed to a regular table, or at best to a joiner's workbenchIf you have one, this is a great way out of the situation.
Any material of sufficient rigidity, but not very thick, is suitable for manufacturing, so as not to reduce the output of the cutter. Also, the main thing is not to forget about chip box, This is especially true in a small room. You can see the manufacturing procedure in a small gallery. What else does not hurt is to make an external switch for an emergency stop of the milling cutter and a protective screen.


https://i.expert-h.com/en/verstak/944#sigFreeId6d989c74a1
Here is another one option of a compact side table for a manual milling cutter


https://i.expert-h.com/en/verstak/944#sigFreeId79108c6278
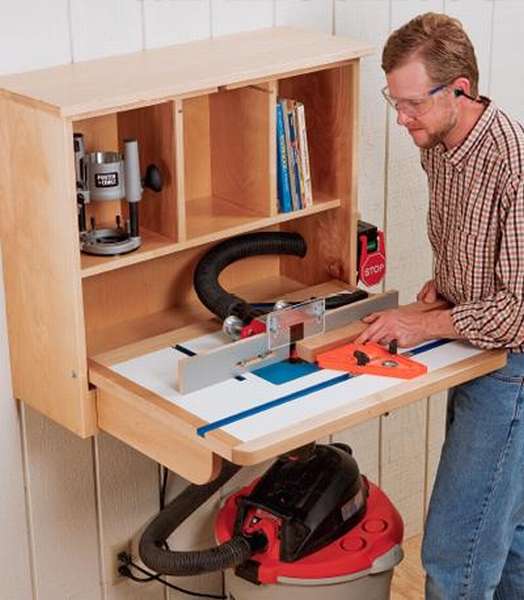 Wall-mounted table for milling cutter
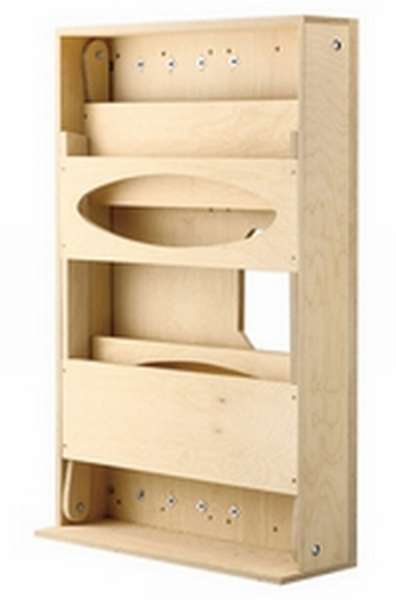
If you have a problem with free space in the workshop, then appreciate this project. Wall-mounted table for milling cutter represents a small countertop embedded in a wall cabinet attached to a wall and supported by a 2x4 bracket. Of course, many questions arise about strength and reliability, but it is clear that only simple work with small workpieces can be performed on the table.
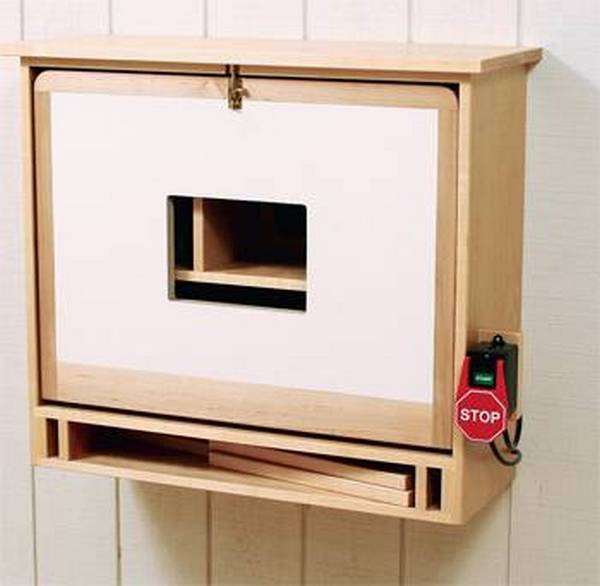 The design is equipped with a full-sized multi-layer worktop 60 x 80 cm in size, which is supported by a pair of removable support brackets during use. When it is not needed, the table is seated and laid in a cupboard only 32 cm deep. You can also easily adapt any emphasis that you have, or make a suitable size. The emphasis is mounted on T-tracks, bolts pass through long slots in the countertop. You do not even need to remove the emphasis to close the table, just slide it back, lock it in place, it will go right into the nightstand in the closet. The central part of the table is covered with a plastic laminate.


https://i.expert-h.com/en/verstak/944#sigFreeIdcb35e0cc13
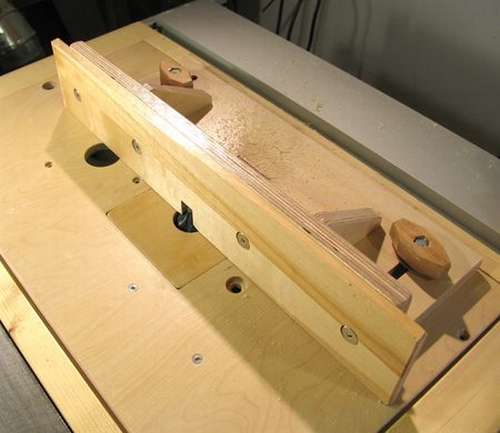
 Mini table for manual milling
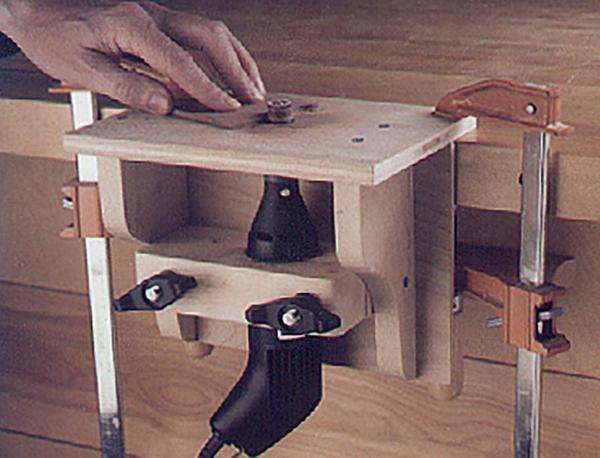
Small parts often require precise machining, which is simply not safe to do manually. To solve this problem, the author of this project, Chuck Middleton, made this mini table for milling cutter. Start with the clamping blocks, adjusting the size to the size of the mill body. The line inside the curved surface is aligned with foam, 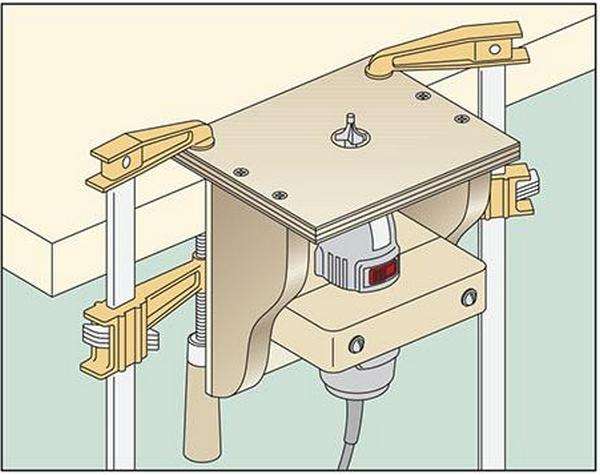 which allows you to place the tool between the blocks without cracks in the housing when tightening the blocks. Then it is necessary to cut out the platform, end supports in the sizes shown in the figure. Assemble the construction. Mark the location of the hole required for the largest cutter and drill. Replace the table. Hold the work bench mini-table as shown in the photo above, or slide one of the protruding ends back into a flush vise.
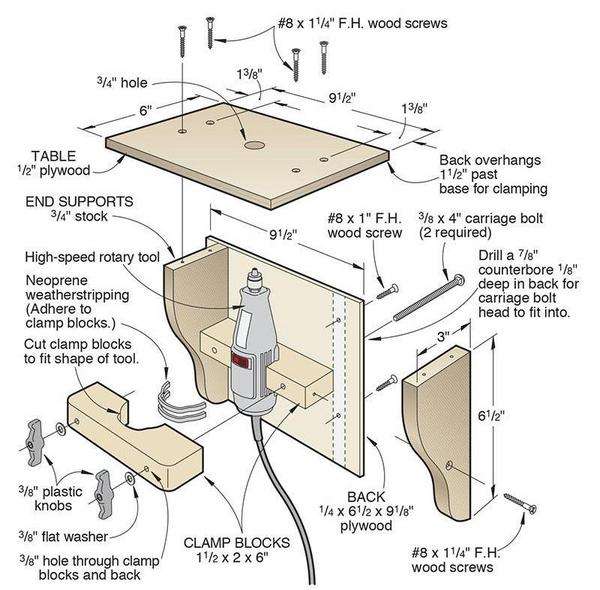
 How to make a simple milling table
It shows how from small plywood sheetbar and several screws to do a simple milling table in literally one hour. First, unscrew the sole at your hand milling cutter, usually they are fixed with three screws. Drill a hole for the cutter in a plywood sheet (closer to the edge, as in the photo). Install the milling cutter so that the milling cutter passes into the hole. Use an awl and hammer to mark the three holes for the screws that secure the base to the hand mill. Since the screw heads will be on the top side of the plywood, you must ensure that they are installed directly below the surface. Then screw the plywood to the corner or edge of the desktop. Install the emphasis simply by pressing it with clamps. Of course, you won’t do much on this table, but if you make boxes or other small items, this method works just fine.


https://i.expert-h.com/en/verstak/944#sigFreeId5be940c655
 Tuning milling table "Corvette-80"
Even if you dare not do the milling table do it yourself, but decided to buy ready-made in the store, anyway there will be a need to somehow upgrade it. Here you can see how you can make a comfortable bedside table stand for a finished table. For convenient work, the countertop should be approximately 850 mm high, near the Corvette-80 table 350 mm high, respectively, the bedside table should be somewhere about half a meter high.
You can take any material for the bedside table, in this case, chipboard was used - a kind of chipboard, which is a laminated laminate plate. How to make a nightstand, look at the step by step photos, the master class is painted in great detail.


https://i.expert-h.com/en/verstak/944#sigFreeId46cdfe061f
The design was not heavy, but rather stable, reminiscent of a whatnot. Further, in fact, the tuning itself. Here, too, everything is photographed and numbered. If you want to read detailed instructions, a link to the source site is under the gallery.


https://i.expert-h.com/en/verstak/944#sigFreeId4261bbc8d4
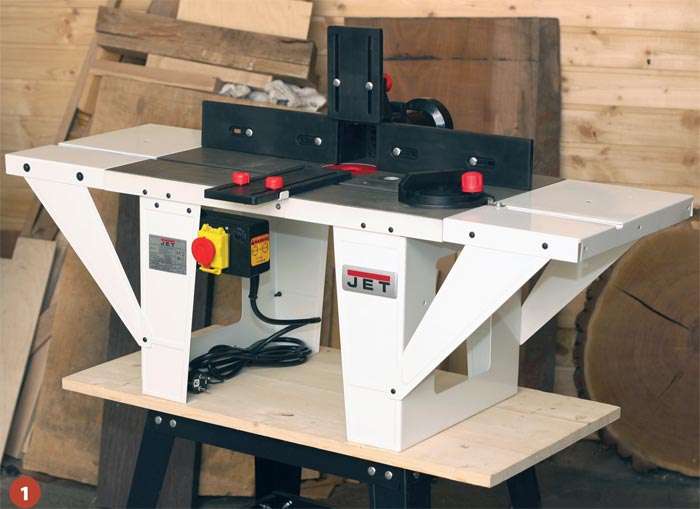 Installing the Triton vertical milling machine in a universal milling table
Hand milling, of course, is a good thing, but heavy. If accuracy is required, working on a weight with this tool is quite difficult. The ideal option is to buy a stationary milling machine, but there are enough of its drawbacks, not only will the purchase cost you a pretty penny, it’s also not very suitable for a small workshop - it’s heavy and takes up a lot of space. However, it all depends on the type of work that you are planning. Shown here how to install the vertical milling machine Triton in the universal milling table Jet JRT-2. Installation procedure in step-by-step photographs, if instructions are needed, link under the gallery.


https://i.expert-h.com/en/verstak/944#sigFreeId335005a57d
 Milling table stand
A small milling table can be installed on a workbench or even a chest of drawers, the main thing is that it is convenient for you to work on it. The author suggests making a functional bedside table with his own hands, or, as he called it, a tool stand of about the same size, complete with wheels. The bedside table is made specially for the milling table.although it can be used for any equipment that can fit on it. A problem arose like a table from slipping on this stand. The obvious solution would be to simply screw it onto the stand, but the author simply felt sorry for spoiling a good surface, with the prospect that the bedside table could be used for other purposes. Therefore, he drilled two holes in the upper part of the stand and the lower part of the installation of the router. That is, the milling table is simply inserted into the neatly made grooves. The bedside table is the same size as the milling unit, so that it occupies the minimum area when it is rolled into a corner.


https://i.expert-h.com/en/verstak/944#sigFreeId42f668fb06
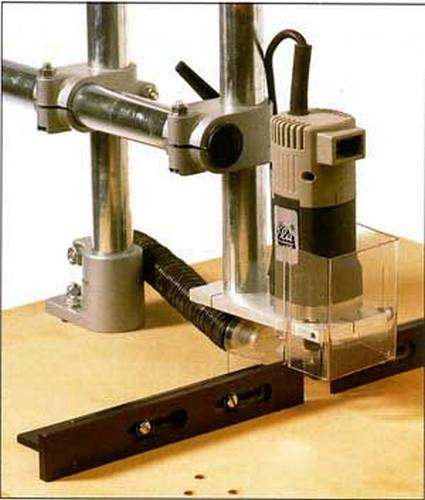
 Horizontal table for hand milling cutter
To make a tongue-and-groove connection, there are many devices, such well-known as benchtop mortiser, Festool Domino and others. Many do this work manually or by drilling, it is clear that in this case it is difficult to achieve great accuracy. The author proposes to make a device for selecting grooves on the basis of the milling cutter, using the project of a relatively simple groove from the Woodsmith collection "Bookcases, Shelves and Cabinets". The manufacturing procedure on step-by-step photos, with some interesting nuances, for example, a template made of plexiglass. Perhaps this is not the best option, there are difficulties with fine-tuning the height of the cutter above the table, but the project is not completely completed, so you can make your own changes.


https://i.expert-h.com/en/verstak/944#sigFreeIddec49721f3
You can try another one Mortiser horizontal milling table option


https://i.expert-h.com/en/verstak/944#sigFreeId64bc5ac73c
DIY elevator
Milling elevator turning mechanism
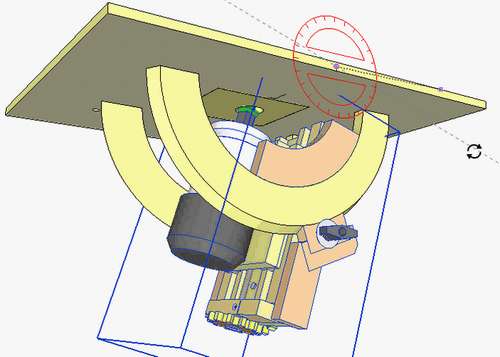
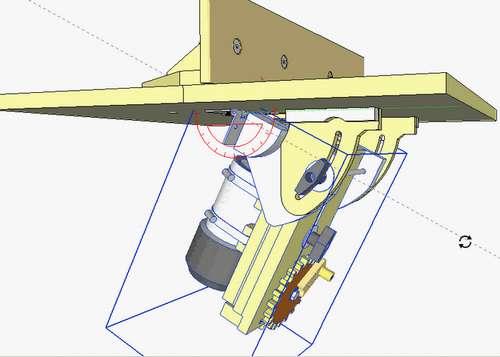 The original design of the elevator made by yourself makes it possible not only to adjust the reach, but also to accurately change the angle of inclination. An interesting solution for the manufacture of a worm gear pin drive is height adjuster. The gears are made according to the dovetail method, which gives several advantages at once: firstly, the soft adjustment and since the gears will be outside, there is no need to lubricate them. The basic design of the sliding mechanism is shown here. A square channel on one side ensures correct alignmente, while the beveled outline on the other hand always moves the slider to one side, which ensures consistency. To make square channels, make a series of cuts on the countertop. It is hardly worth inserting a blade when you are doing only one part. By making separate cuts, you can adjust the width of the protrusion, which can be reduced by simply changing the emphasis, instead of messing around with shims for each adjustment. When cutting a square channel, check the amount of lateral clearance. The sliding part of the elevator is pushed up and down with a T-nut on the threaded rod. When the shaft turns, the nut is screwed up or down. How to make angular gears and fix the router, look at the step by step photos.


https://i.expert-h.com/en/verstak/944#sigFreeIdd9d129b55b
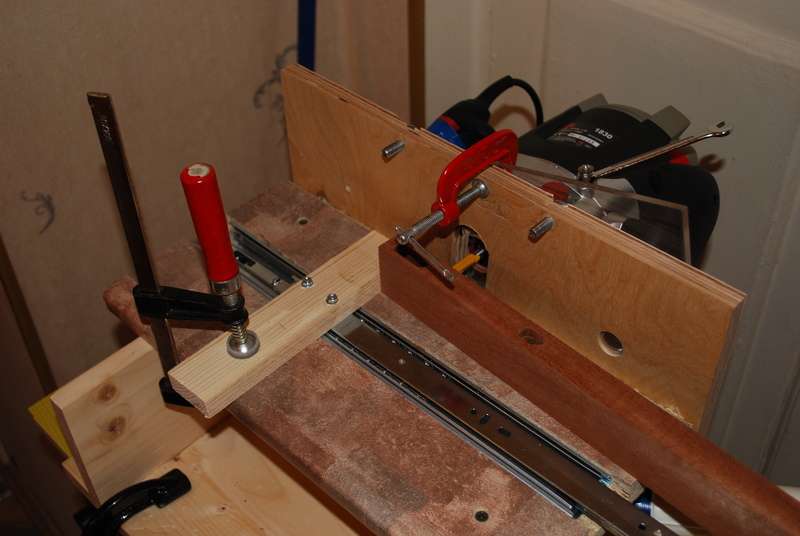
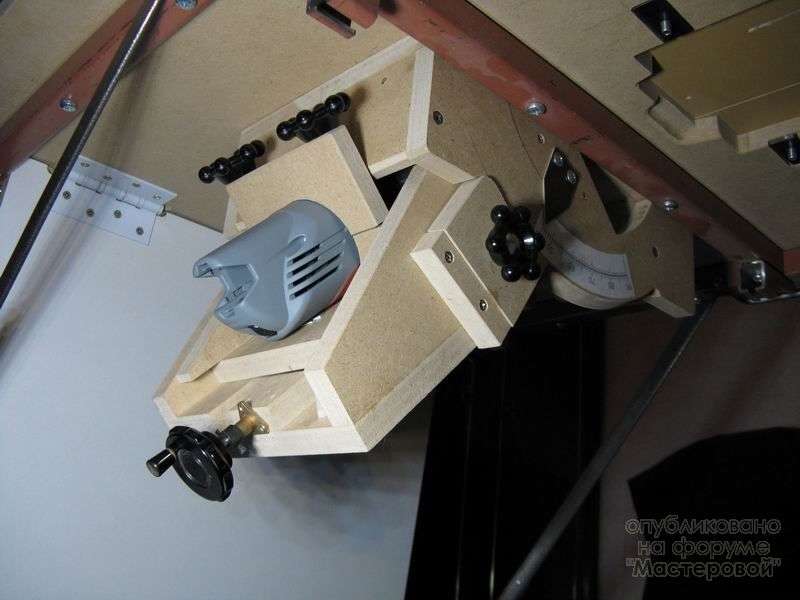 How to make a tilt unit
The MDF device allows you to make the axis of rotation at the level of the tabletop plane. One turn of the screw with a double thread gives a movement of 6 mm, which, when tilted 45-90 °, allows linear movement of the head 66 mm, the extension of the collet above the table surface 27 mm. The tilt clamps and the outer part of the semicircular guides are made using the same milling cutter for which the dovetail mechanism is intended, bevel edges 14 °. See below a master class with the main nuances in step-by-step photos


https://i.expert-h.com/en/verstak/944#sigFreeIde2334714ea
 How to make a tabletop for a milling table
For the milling table, the main thing is the work surface, therefore, if you have a suitable base, it is not necessary to make a fully stationary structure. Shown here how to make a tabletop for a milling table with your own hands. Start with MDF sheets. Using weights and clamps, glue them together with wood glue.
 Spread the glue evenly with a plastic knife. Take the time to align the width to 60 cm using the clamps. Do not worry about the length, you can cut to the right size at any time. If you use wider sheets of MDF, say, 64 by 84 cm, then do not worry about making the sides perfectly aligned. To make the surface smooth, use a few drops of DuPont, non-stick grease and polish it. Make a template for the milling plate. Place the plate on a flat surface and place the pieces as shown. Insert thin cardboard between the edge of the sheet and the wood as spacers. Make sure the cut-out insert is slightly larger than the milling plate. If you do not, it just does not fit in the hole cut into the table. Now use the mounting screws to assemble the template and attach it to the table. Note that the plate is in the center of the table. After laying the groove, drill a 60 mm hole in the corner and cut the center with a saw, leaving a lip of 1 cm. That's it, now the template is clamped.


https://i.expert-h.com/en/verstak/944#sigFreeIdde483d0d39
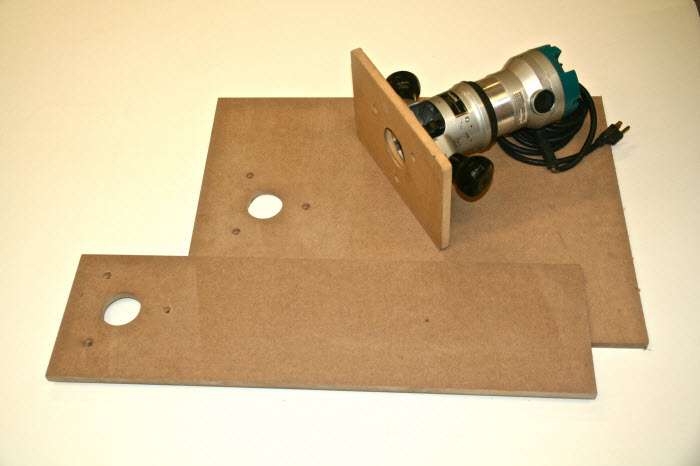 Plate for milling table
Everyone knows that the router is an incredibly versatile tool. Today there is a huge selection of various milling cutters, stops and guides, so the possibilities for processing workpieces are endless. But, to expand the capabilities of your router, it is not necessary to go to the store. Shown here how to make three base plates, each one takes about half an hour to make. The order of work in the photo may not be shown in great detail, but you can follow the link under the gallery to the site and find out all the nuances.


https://i.expert-h.com/en/verstak/944#sigFreeId40ff7a608b
 Production of a plate and an emphasis for a milling table
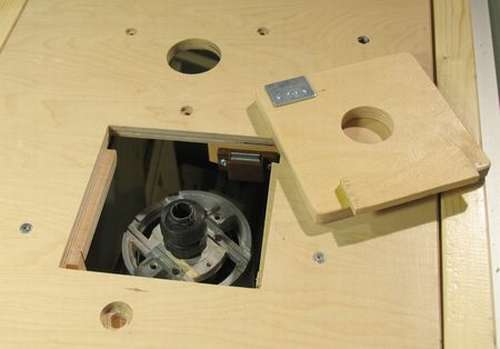
Factory-made milling tables often have concentric inserts for machining various sizes of milling cutters. Since it is too difficult to make them with your own hands, the author suggests making them yourself simplified version of inserts with different hole sizes.
The insert is supported by two protrusions screwed to the bottom of the countertop on the left and right side. In order to hold the insert, a protrusion is made that slides under the table on the near side, and is held by the magnet, which is needed so that the air flow from the front panel does not lift the insert. It is very difficult to get the correct shape for all additional inserts, so it’s better to make one large square hole and choose the hole shape for each plate separately.
 The emphasis is attached to the top of the countertop, held by two screws that go into the T-nuts on the underside of the table. Handles are hexagonal bolts. The bolt heads are mounted in holes, also hexagonal, to fit the screw heads. I also glued a small washer. A small washer is glued to the bottom of the handle. The emphasis is mounted relatively simply. The base is in the front, and the two spacer pins in the front with only one key, and end to end to the base. Butt joints are not the most durable connection, but if you do not give too much stress, it will hold.


https://i.expert-h.com/en/verstak/944#sigFreeId61890531fb
Another option equipment of the working surface of the milling table using a metal profile.


https://i.expert-h.com/en/verstak/944#sigFreeId048eb3786a
Homemade milling table
 Here in the pictures you can see how to make a homemade milling table with your own hands. This is not a concrete example, but rather a general guide. Homemade tables are usually made of plywood or MDF panels, of course, better if they are covered with plastic, a smooth surface plays a large role in precision machining of parts. The photo shows how to make installation, do table cutting, markup and cut holes. The list of works also includes milling of the rebate under the mounting plate, manufacturing and installation of the mounting plate. Production and fastening of an emphasis and clips, setup of a mill. In addition, there are various accessoriesand for safe operation. This is a special slide that slides in the groove under the trailing stop, auxiliary guide, bearings with rollers. You can find out all the detailed instructions on the website, the link to which is located under the galleries with photos.


https://i.expert-h.com/en/verstak/944#sigFreeId9f72322789
Here are some photos of examples of working with a desktop router. In this case, you can’t rush, it’s very easy to spoil the workpiece. It is better to make a few extra passes without applying much effort and remove the material in thin layers. The photo shows the use of mills with a guide bearing, how to process the edges and make a decorative profile. Use of mills with guide bearings. As well as milling grooves using:
- lateral emphasis;
- adjustable emphasis;
- blind grooves;
- "dovetail".
A milling cutter installed in the table is necessary for milling profiled joints in a groove and stud joints, it also shows how to use frame milling cutters.


https://i.expert-h.com/en/verstak/944#sigFreeId5e82aa0c4d
 The photo shows milling device, as well as how to make it yourself homemade milling rackwhat can be used for ordinary wood pads. Through the pads, it is necessary to pass the rods to stop the milling cutter, for which special holes are drilled. To adjust the height, it is also necessary to make distance blocks. Then everything is attached to the work surface and tightened with nuts and wing nuts. In conclusion, it is necessary to make emphasis with a semicircular hole for a mill.


https://i.expert-h.com/en/verstak/944#sigFreeId814d22e889
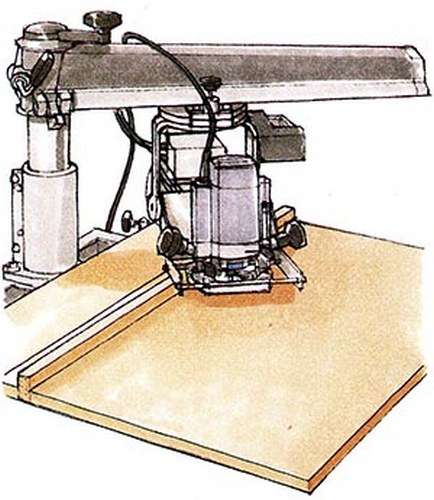 Radial saw is one of the most needed tools that is present in most home workshops. If you have little space, you can easily convert the saw table into a universal milling rack. To do this, it is simply necessary to install the milling unit mount instead of the saw blade with the casing. The photo shows how to set up a radial saw before milling, set the milling cutter at the required angle and make a back emphasis. On a converted table, you can perform almost all the work, milling edges, profiles, grooves, external curly edges, internal curves and blind and transverse grooves.


https://i.expert-h.com/en/verstak/944#sigFreeId12054102a4
Milling table drawings


https://i.expert-h.com/en/verstak/944#sigFreeIdf292bbe3fb
DIY milling tables 200 photos


https://i.expert-h.com/en/verstak/944#sigFreeId3bff8a51b5
Hello, I am the author of this article, so I look forward to asking questions for this article in the comments below, I will answer all !!!
If you have questions on another topic, ask them on our forum, we will answer you
- Two baskets of paper in 5 minutes (Master class)
- How to make a simple and compact table for a milling cutter from plywood
- How to make a soft headboard tile (Instructions + step by step photos)
- Cinder block benches: a convenient bench in 55 minutes
- How to make a bed with a niche: saving space (Master class)