DIY drilling machine 1500 photos, drawings, instructions
 homemade drilling machine
The first drill was invented back in the Neolithic era, even then without this tool there was nowhere to drill a tree, make a hole in the stone, and even make a fire. Since then, nothing has changed, the drill is still popular, only it has been improved a bit. Today, most drilling work, depending on complexity, is performed either on special machines or with hand tools.
It is clear that factory machines designed to perform serial operations in the home workshop are useless, but on the other hand, special drilling accuracy is sometimes necessary. Then the masters think how to make a do-it-yourself drilling machine and preferably from improvised materials. It’s unlikely that you can simply find the necessary parts in the store, so a special fantasy is needed for the manufacture.
Here are dozens of makeshift drilling machines - the best ideas that have been found on the Internet. You will also learn how to make a table for a drilling machine, a vice, an organizer for storing drills, a bedside table for a makeshift machine and even a device for cooling the drill.
How to make a do-it-yourself drilling machine
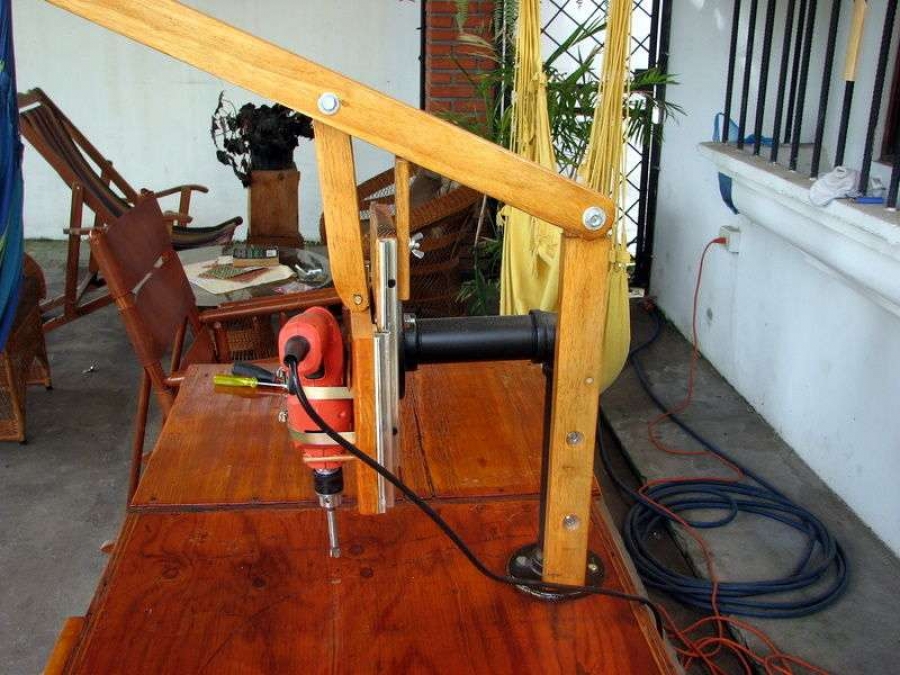
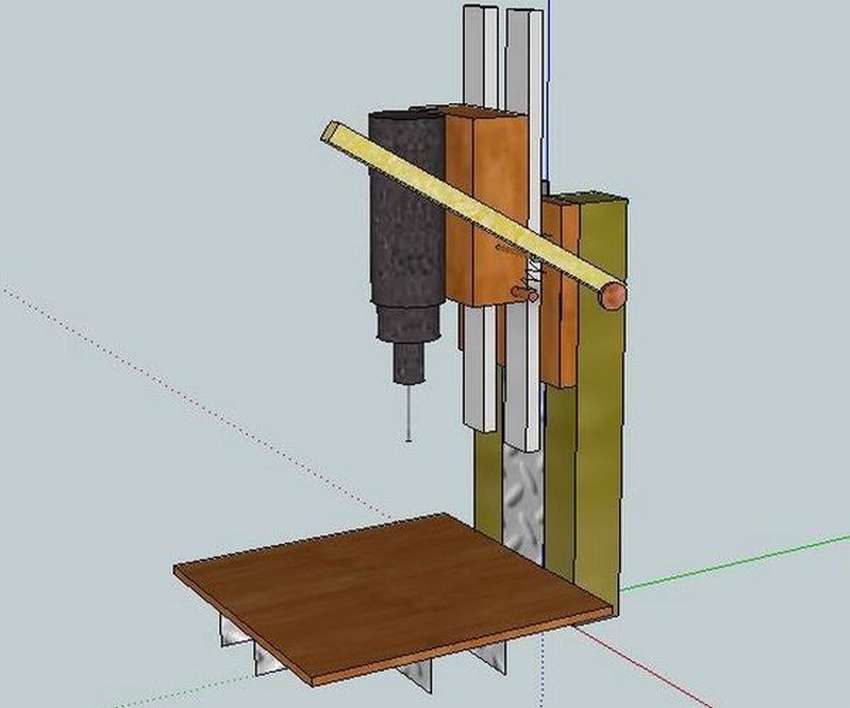
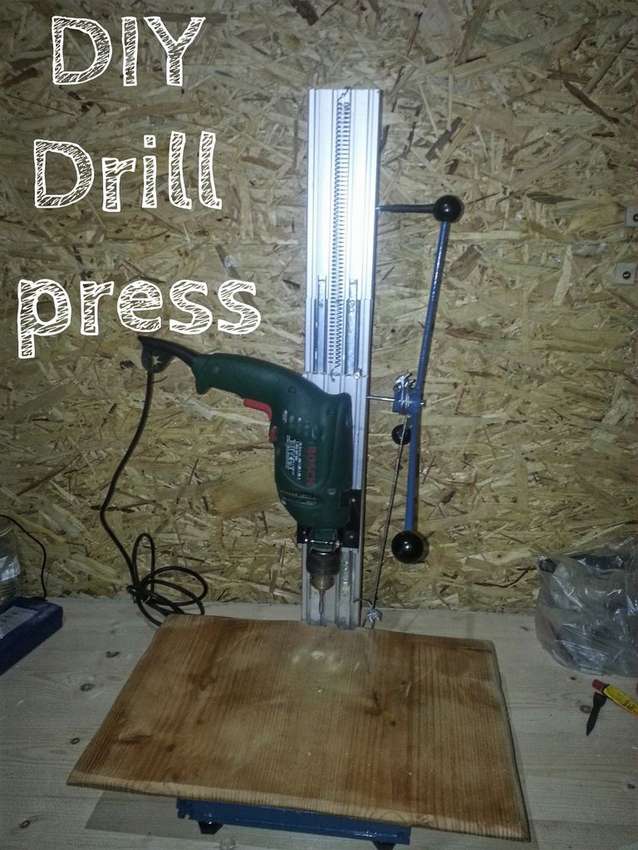
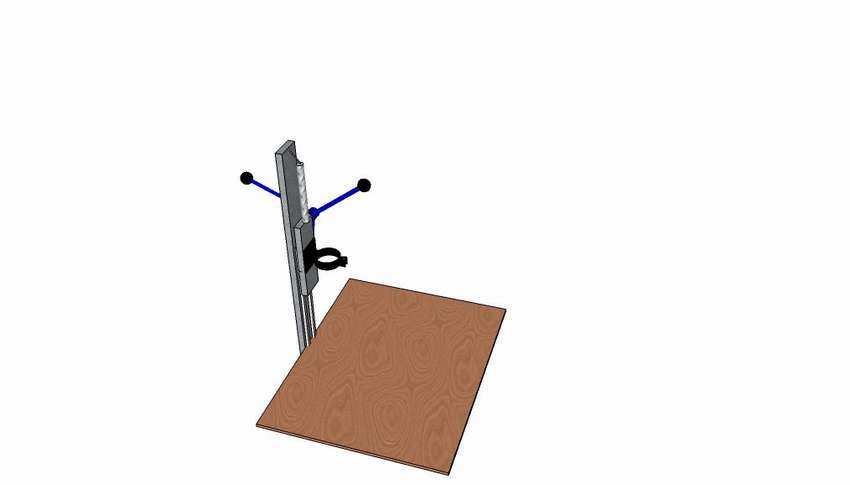
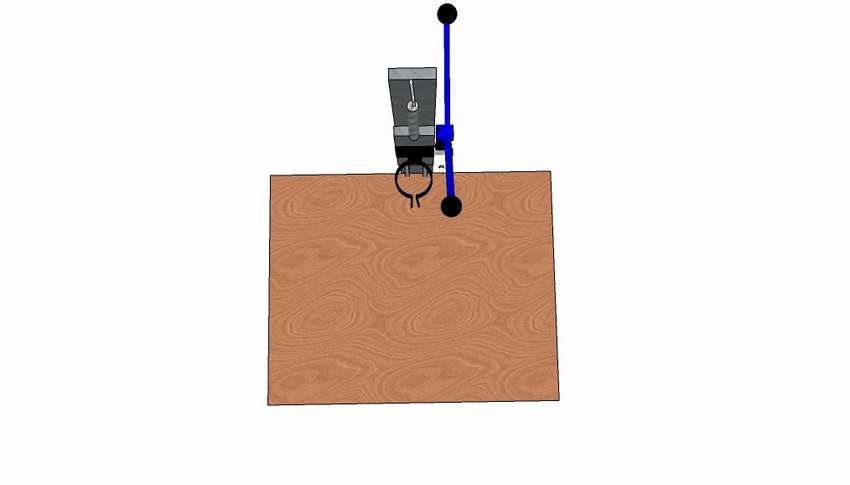
 Every craftsman who works with wood knows that it is impossible to manually make hundreds of holes completely straight and with the same depth. This detailed master class with step by step photos will show how to make a do-it-yourself drilling machine, which will help to save a lot of time and effort when drilling precise holes on wood, plastic, metal or in any other material that you work with. The tool is very useful for drilling straight holes with minimal effort, combined with high
 speed can be a good help to cut borders to the same height as shown in the picture. Also, thanks to the adjustable height of the tool, it is possible to cut sections of a certain size in the wood, for example, square blanks.
If desired, you can make some improvements, for example, add a spring at the top of the base to get the drill automatically raised. Only photos are shown here, if you are interested in a detailed description of the process, the necessary materials and tools, under the gallery there is a link to the source site.


https://i.expert-h.com/en/verstak/sverlilnyj-stanok-svoimi-rukami-1500-foto-chertezhi-instruktsii#sigFreeId8826d1b9ab
 Wireless wood drilling machine
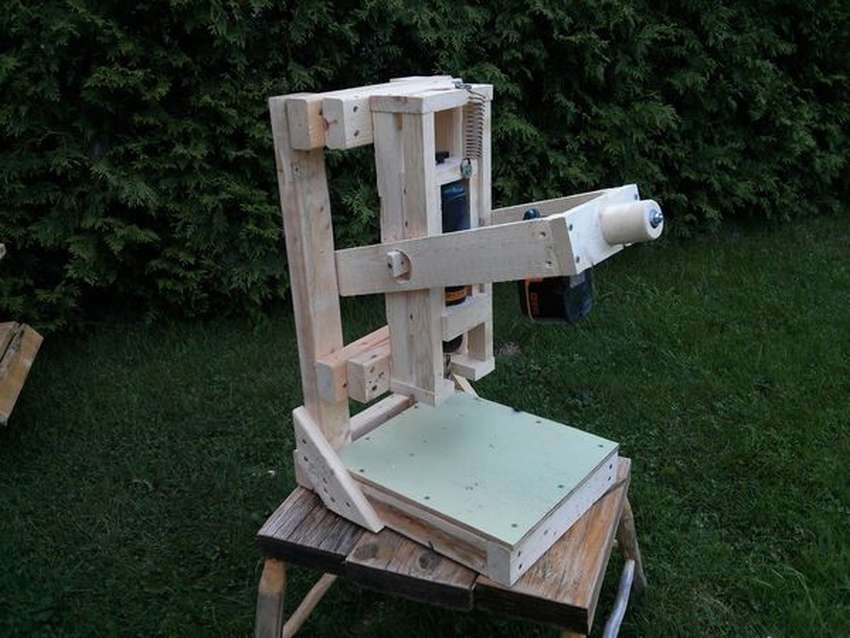
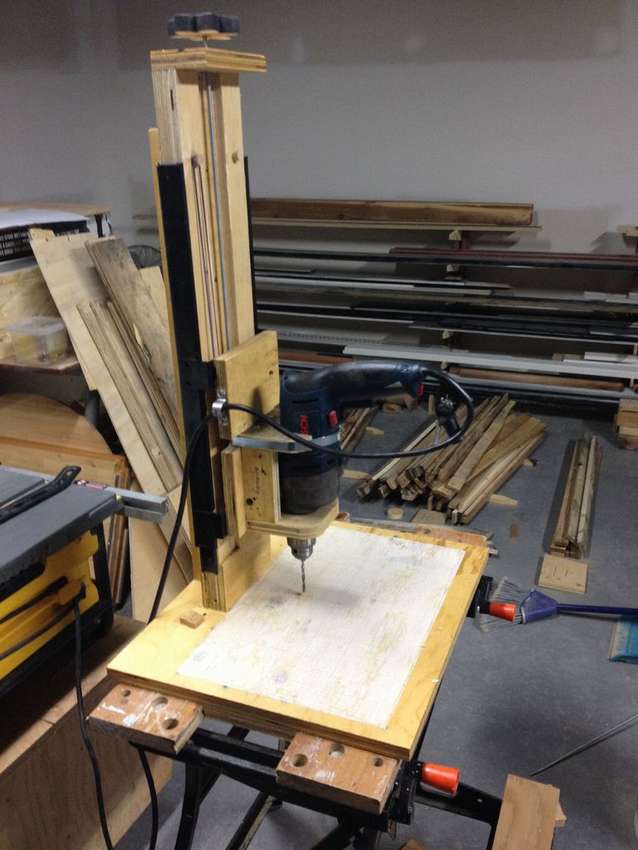
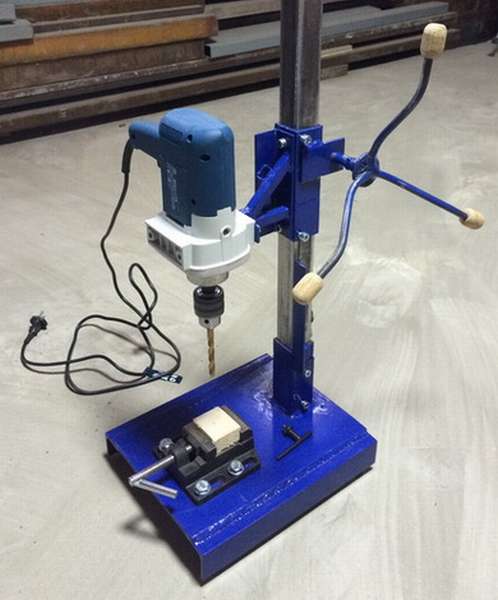
Interesting the idea of a home-made drilling machine made only of wood. The installation is completely portable, as the author used a cordless drill on batteries. The design includes a wooden box, which is convenient to use for drilling straight holes in large workpieces. The author considered it inappropriate to provide a specific drawing, since the machine was made for a certain drill, which the author had, so you may have to make some changes in the dimensions that will correspond to your drill.


https://i.expert-h.com/en/verstak/sverlilnyj-stanok-svoimi-rukami-1500-foto-chertezhi-instruktsii#sigFreeIdb24ae40331
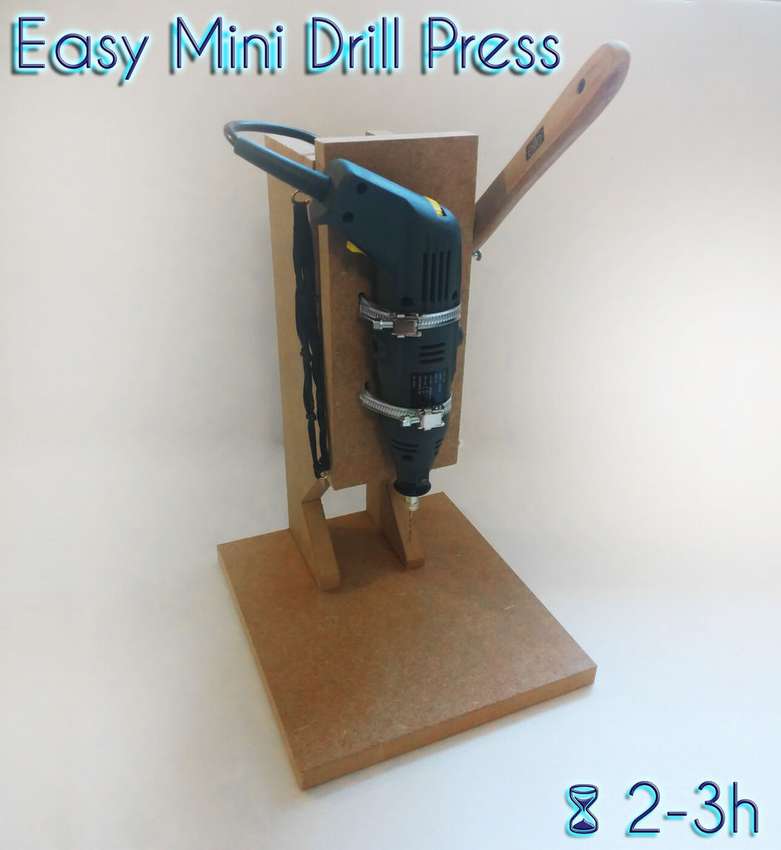 DIY mini drilling machine
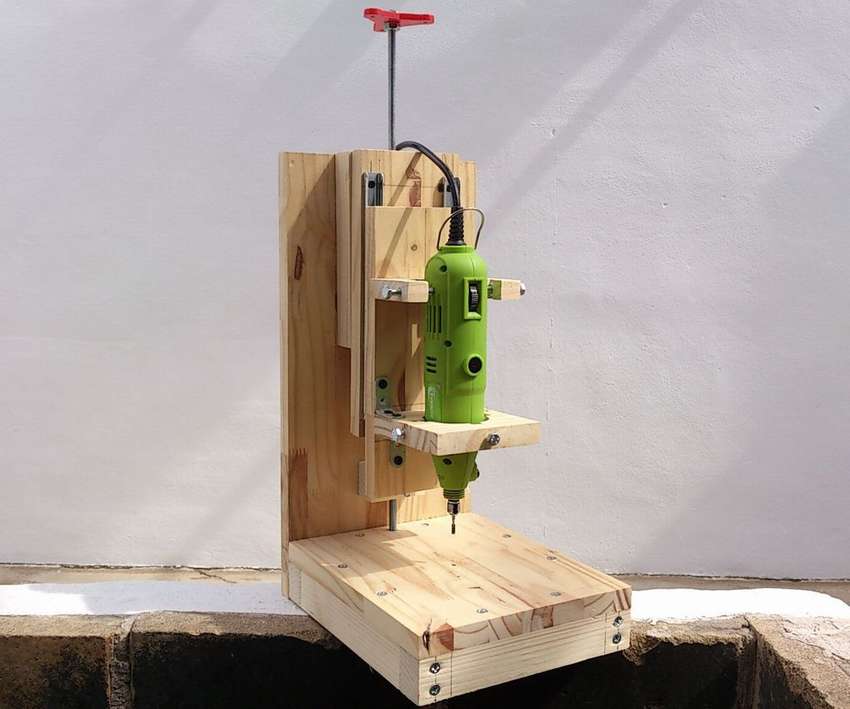
Accurate, durable and inexpensive homemade mini drilling machinewhich can easily be done with simple tools. All drills are different, so you first need to draw the details of the future design. The author used 1.8 cm thick MDF, I recommend that you also use this material. To attach the drill, you need to drill 4 holes in the MDF for attaching the clamps. Fold the left and right sides and align the back (see photo). Once this is done, drill 4 more holes for the screws, and glue all the parts, then you need to install a mini drill and screw on the bottom. An ordinary wooden stick, like the handle of a spoon, is suitable for the lever. And to tighten up mini drills, you can use rubber harnesses from the old air chamber. In the future, the author plans to add LED bulbs and make a small vise for mounting the printed circuit board during drilling.


https://i.expert-h.com/en/verstak/sverlilnyj-stanok-svoimi-rukami-1500-foto-chertezhi-instruktsii#sigFreeIda80b7a6bf4
 Homemade Drilling Machine
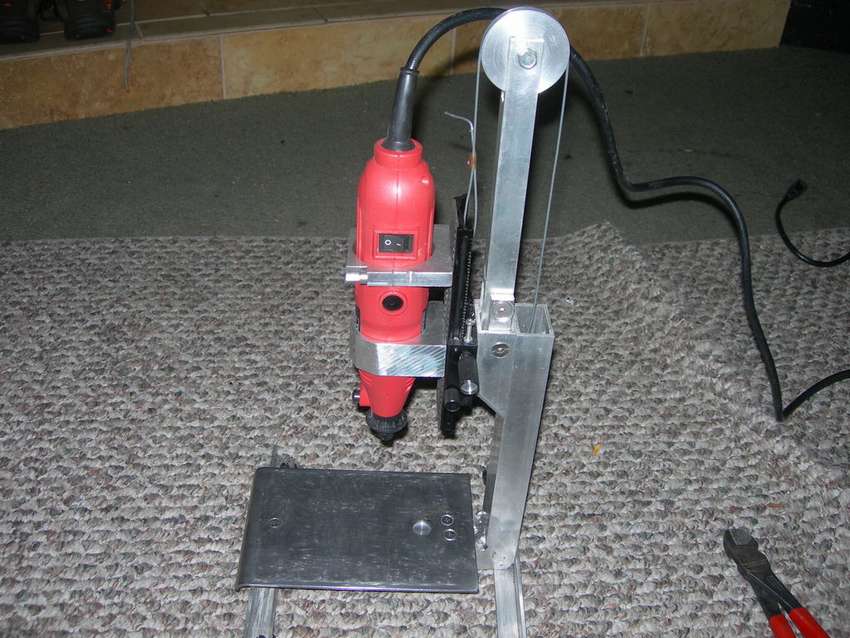
A drill, a multifunctional tool, but on weight, without good emphasis, is hammering with high accuracy, to put it mildly, quite difficult. Good way out of situnations homemade drilling machineIn general, any stand to secure the tool. Usually, craftsmen use those parts and improvised material that are available in any private garage. As you can see, the option presented here is not particularly difficult, the author used a pipe, angles and two flanges. The drill stand is simply bolted to the table. Aluminum tracks were taken from the picture frame, popsicle sticks were used for struts. The drill is fixed with ordinary clamps.
In general, everything is well shown in the photo, perhaps, no one will have difficulties with the manufacture of such a design.


https://i.expert-h.com/en/verstak/sverlilnyj-stanok-svoimi-rukami-1500-foto-chertezhi-instruktsii#sigFreeId34973de59f
 A similar option, only mounted on a wooden base. We fasten the furniture guide with screws. In the board, we make holes along the diameter of the drill, we attach a corner and a metal plate. We fasten the entire structure to the guide. Then we fix the steel plate on the platform, make a handle and fasten it with screws. We clamp the drill with clamps, fix the spring. Perhaps a little confused, but you can figure out the photos, nothing complicated.


https://i.expert-h.com/en/verstak/sverlilnyj-stanok-svoimi-rukami-1500-foto-chertezhi-instruktsii#sigFreeId0dccc05f49
DIY do-it-yourself drilling machine
Simple design of a home-made drilling machine, you can take it as a sample. You will need any thickness of plywood, a drawer mechanism, a wide board or PVC, a metal rod and the required length of screws. Yes, and glue, of course. Plywood is needed for the base, so it is desirable that it be smooth and even. The vertical back wall can be made both wooden and metal. The drill is installed on the slider of the box with the spacer. There is a special issue with electrics, the author came up with a drill to turn on when lowering the handle. This step is optional and highly discouraged, if you don’t know how to do it, and if you understand, then of course you can try, however, the author did not provide a detailed diagram, but it’s difficult to understand from the photos.


https://i.expert-h.com/en/verstak/sverlilnyj-stanok-svoimi-rukami-1500-foto-chertezhi-instruktsii#sigFreeId4c44394f82
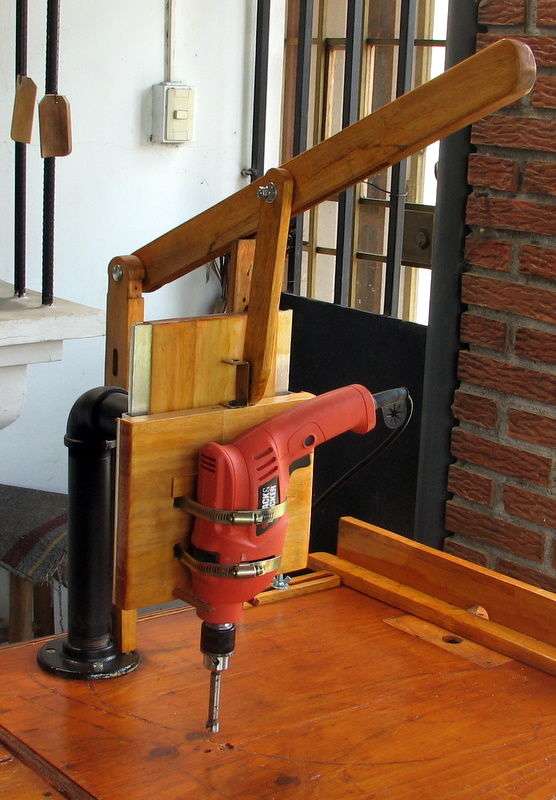
 Homemade Suspension Drilling Machine
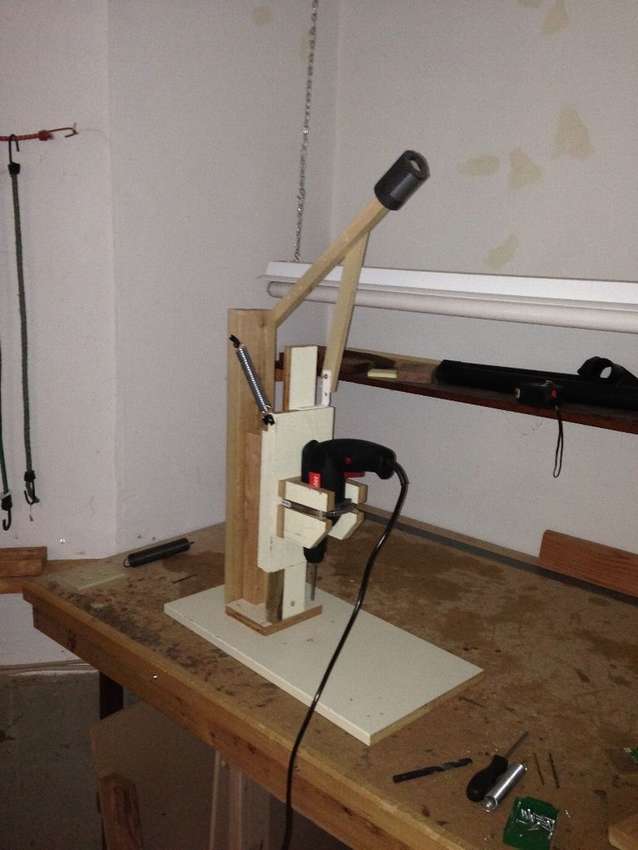
If carpentry is a hobby for you, and not a business, a professional machine tool is not needed. But to make a home-made drilling machineneed a creative approach. But it doesn’t matter whether you are a professional or an amateur, accuracy is required when performing drilling work. The author of the project decided to convert a wire drill into a drilling machine and that’s what he did. The main material of which the construction is made can be found in any garage, the main feature, which the author is very proud of, is four powerful rubber bands. Usually the drill is quite heavy, but with four elastic bands it will fluctuate about 20 cm above the surface of the table. In general, it’s worth a try, if you are interested in the details, a link to the author’s site under the gallery.


https://i.expert-h.com/en/verstak/sverlilnyj-stanok-svoimi-rukami-1500-foto-chertezhi-instruktsii#sigFreeId6aafa767e7
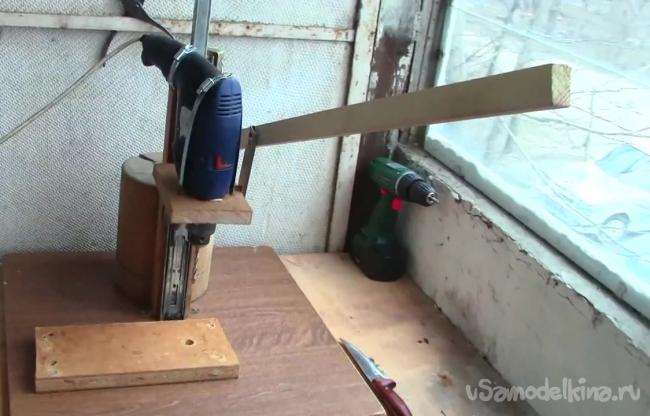
 How to make a cheap do-it-yourself drilling machine
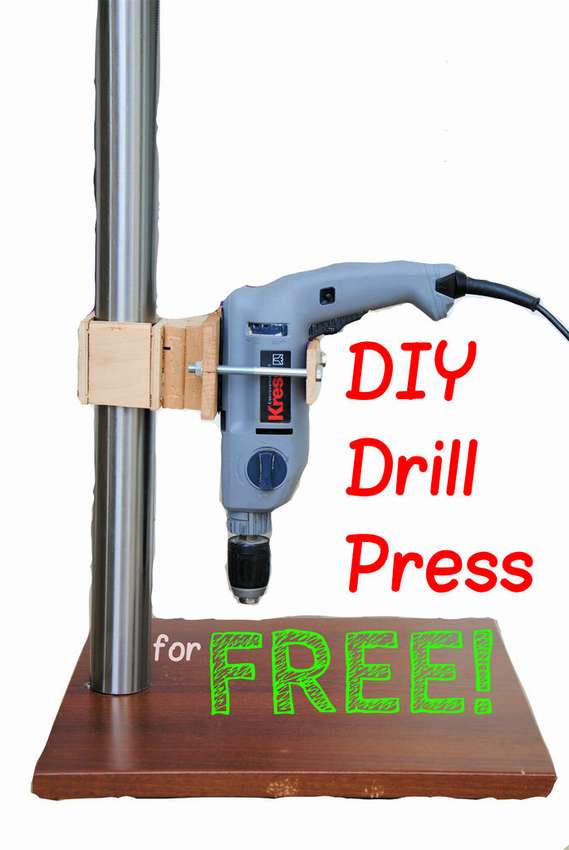
This simple homemade machine made from wood waste (a piece of board, a few bars and a sheet of thick plywood for the base) and an old wire drill. You will also need a hose clamp and screws. First draw a diagram and mark the parts, then put it all together, as in the photo, use paper as spacers between the wooden parts. Wax the sliding surfaces. Attach the hose clamps and fasten the drill on a sliding plate, use wedges if necessary. Add a handle for feeding the drill and a spring for the return mechanism to work. All this can be done in 2 - 3 hours and will cost almost free of charge.


https://i.expert-h.com/en/verstak/sverlilnyj-stanok-svoimi-rukami-1500-foto-chertezhi-instruktsii#sigFreeIdf86d5c5bca
Homemade PVC pipe drilling machine
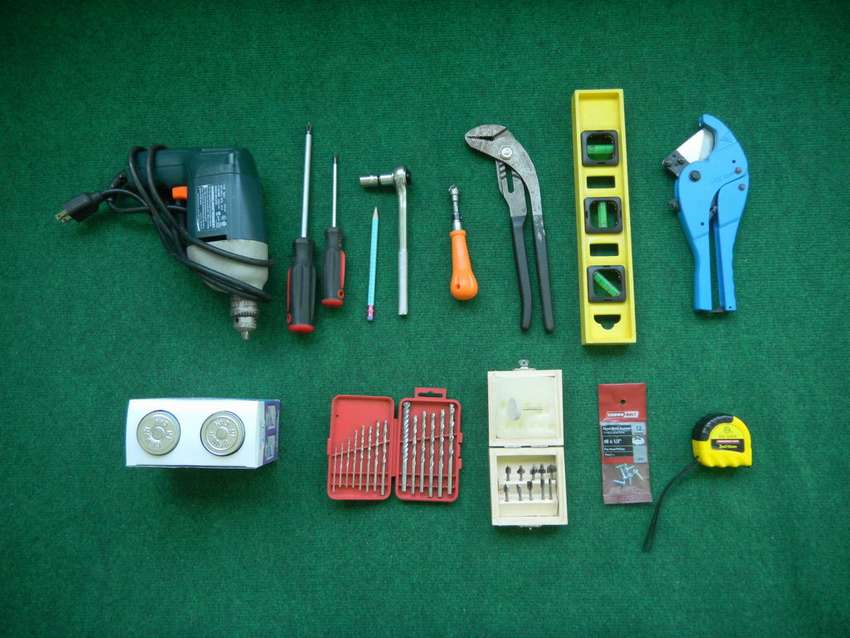
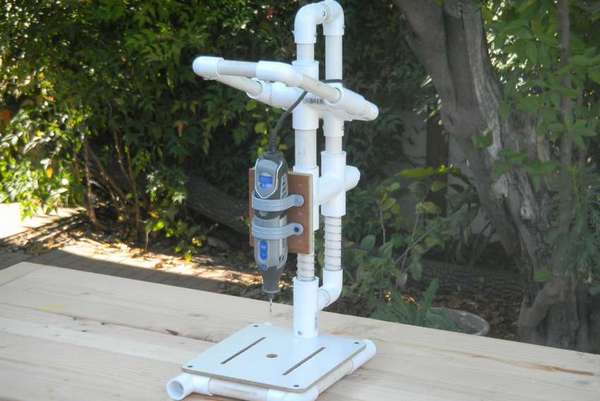 PVC pipes are a material that can be easily found. They are suitable not only for water supply, many useful things can be made from them, even homemade drilling machine. All materials can be bought in the store, the main thing is to choose the right package. The photo below shows necessary materials and tools.
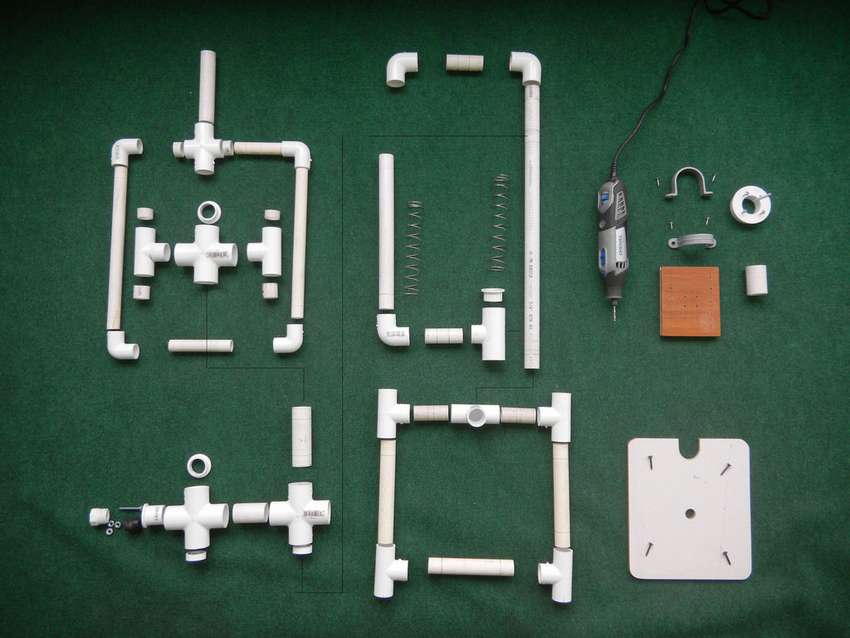
Look at the assembly order of the rack on step-by-step photos, no complicated operations, the frame is assembled like a designer. A little improvement and you can work to use it as a rack for the milling cutter.


https://i.expert-h.com/en/verstak/sverlilnyj-stanok-svoimi-rukami-1500-foto-chertezhi-instruktsii#sigFreeIdee5cac2c5b
 How to make a home-made drilling machine
This machine can be called universal, because according to this project you can make various options for size and performance. For this rack any hand drill will do, regardless of power. Of course, the homemade models made of wood presented above are easier to make, but metal, of course, is more reliable, although you can not do without a welding machine. For the manufacture you will need a metal plate for the base and corners for the stands.
The stand for the lifting mechanism is made of a square metal pipe.
 For the manufacture of the adjustment mechanism, different methods are used, in this case cable driveFor what it is necessary to make a bracket for fastening and a rotating drum. To fasten the loop of the cable, a bolt is welded into the base. The handle can be made any, from improvised materials, most importantly, to make it convenient to use. For the fixing device, a conventional clamp mounted on a metal plate was used. After completing work, paint all parts to protect against rust, and lubricate friction surfaces with technical grease.


https://i.expert-h.com/en/verstak/sverlilnyj-stanok-svoimi-rukami-1500-foto-chertezhi-instruktsii#sigFreeIdfc8d4cdda2
 Drill Machine
The author used a simple approach, why reinvent the wheel, if you can use ready-made aluminum profiles. You just need to cut 4 identical parts, process it with a grinder, drill holes and thread into them. Lifting sliders can be used from drawers. The stand is made of two parts connected to each other, but can only be made of one. It is connected to the base with four bolts and special nuts. The lever is installed using a long bolt, screwed into the nut. It is made of a piece of pipe with a diameter slightly smaller than the diameter of the drilling machine.
The pipe is cut in the longitudinal direction and two thin sheets with holes are added. On the reverse side, a square pipe and a piece of sheet are welded to fix it on a stand. In the role of the desktop, just a piece of wood glued with silicone glue.


https://i.expert-h.com/en/verstak/sverlilnyj-stanok-svoimi-rukami-1500-foto-chertezhi-instruktsii#sigFreeIdb6f9946a8e
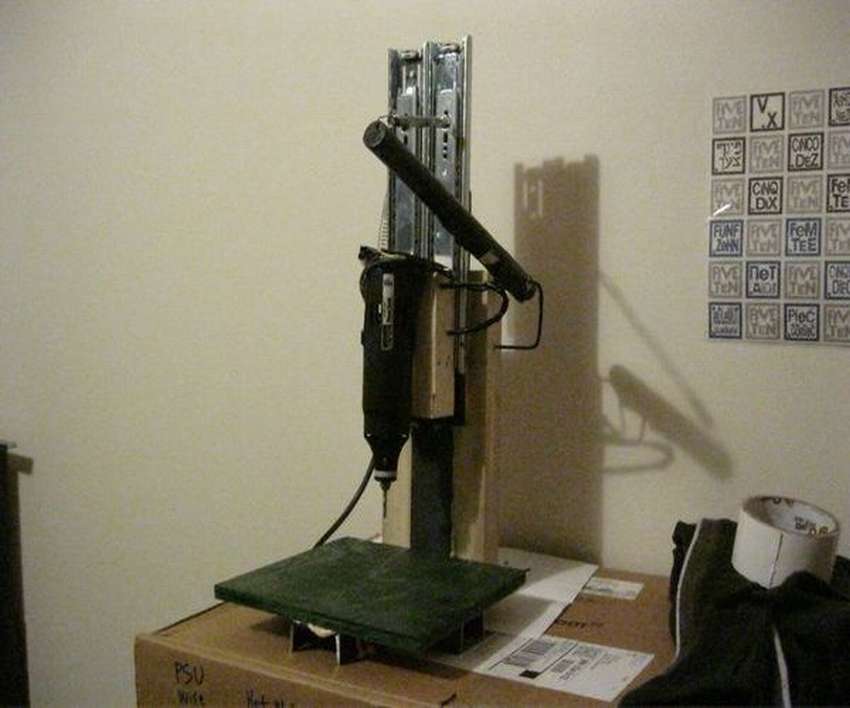
 Workshop boring machine
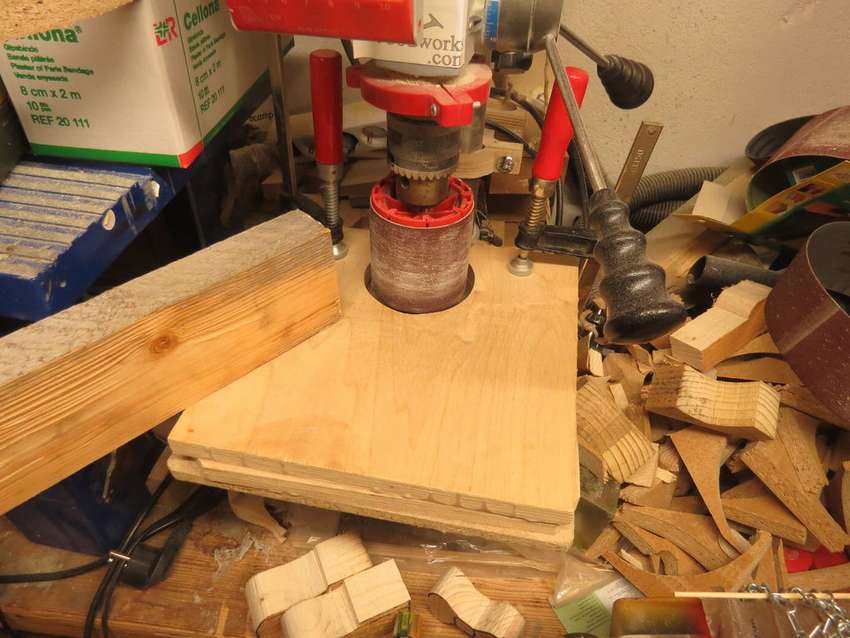
The author suggests a simple and functional version of a home-made workshop drill. You do not need a drilling machine to make this drilling machine! If necessary, it can be disassembled, this is done quickly and easily, and used as a conventional drill. As a stand, the author used standard table leg, and thanks to the design of this drilling machine, the load on the column will be minimal. You can use different types of drills, which cannot be done with most home-made machines, as they are usually not designed for hard work. There are no necessary parts and materials for manufacturing? Not scary.
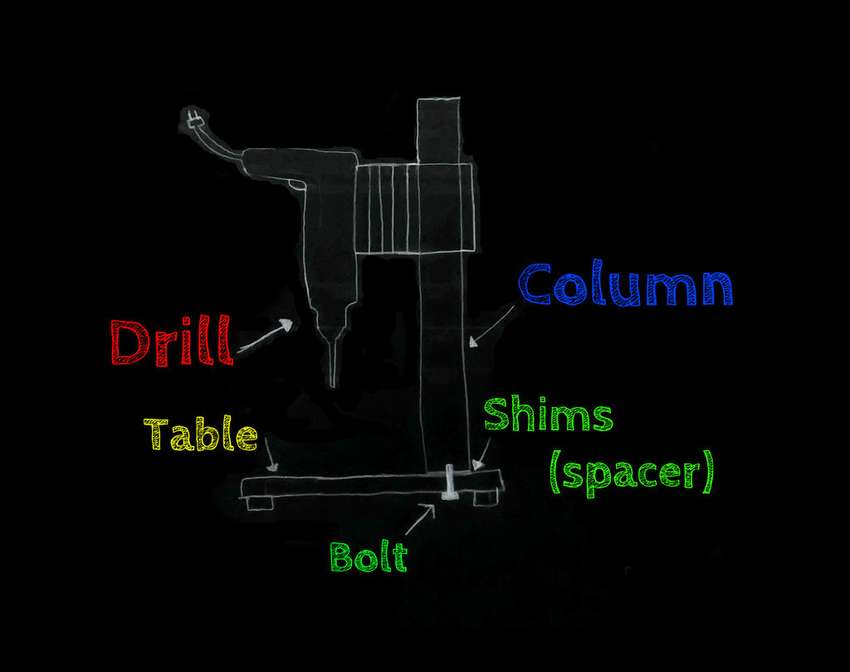 If you already have a drill and a table leg, then you will assemble the machine, to a large extent this is all you need. Specifications can be easily changed to suit your needs.. It is convenient to store the machine under the table, if the stand is too high, you can easily shorten the hacksaw, the height does not matter. Of course for work better to choose a large table, convenient and you can place additional accessories! The main part is a wooden box or cube that slides on a metal stand. Pretty simple idea. It is easy to tighten or disassemble in case you need to change something. Any accidental inaccuracies can be corrected with the help of gaskets. The pieces of wood that are between the cube and the drill are struts that increase the space between the chuck and the stand, which allows you to drill a large board using a large crown, or something like that. Opportunities can be increased by loosening the bolt that connects the table column and inserting a spacer between them. In general, see the manufacturing procedure in step-by-step photos. What is the special appeal of this homemade machine, there are many opportunities for improvement.


https://i.expert-h.com/en/verstak/sverlilnyj-stanok-svoimi-rukami-1500-foto-chertezhi-instruktsii#sigFreeIdfa9be17699
 Homemade steering rack machine
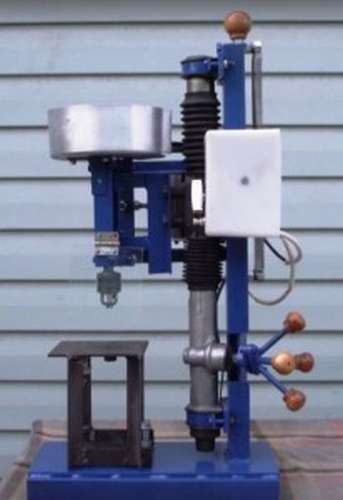
Before that, we considered hand drill machines, this option with a stationary electric motor, in this case, a motor from a Soviet washing machine is used. Of course, such a design is more difficult to make, but it has there are also advantages. It looks complicated, but in principle a lot of materials will not be needed. Steel corners, metal profiles, a cartridge for a drill and the main part, not much broken steering rack from any passenger car, but with disassembled amplifier elements. It is also necessary to choose good bearings, better new ones. Most problematic detal - an axis with a pulley, it is better to order from a professional turner, it will be necessary to cut the thread on the bottom of the shaft, the cartridge will be mounted on it. Particular attention should be paid to surfaces for thrust bearings.. It is important to evenly distribute the load, otherwise one of the bearings will fail faster. When assembling, be sure to check the verticality of the stroke, if necessary, put washers to adjust, otherwise you will be tormented by buying drills. The steering wheel can be made at your discretion, in this case it is made of a steel bar. Do not forget to make a reliable protective cover for the control unit and ground the case after completion of work.


https://i.expert-h.com/en/verstak/sverlilnyj-stanok-svoimi-rukami-1500-foto-chertezhi-instruktsii#sigFreeId9e8029bfed
 Compact drilling machine
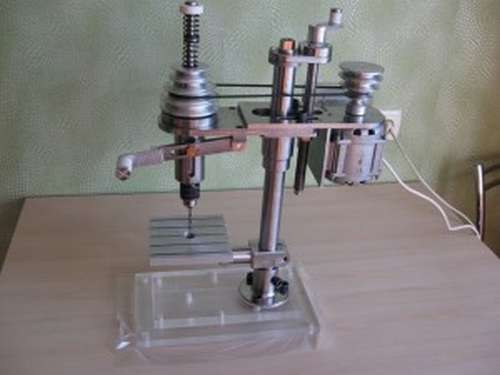
Powerful and large constructions are not always necessary, for a home workshop a small adaptation is quite enough, for example, like this compact drilling machinewhich can be used even in an apartment. It looks like a factory one, in fact, it is assembled with your own hands, although you will need to buy parts and an electric motor, and for the manufacture of most elements you will need a lathe and a CNC milling cutter. A two-layer bed made of plexiglas can be made independently, and a rack can be bought in a furniture store. The step-by-step photos show the assembly process in detail. The original idea was to make a device for drilling printed circuit boards, but a few improvements turned out to be universal drilling machine. For drilling holes at any angles made The last photo shows a homemade three-dimensional vise so that you can drill holes at any angle.


https://i.expert-h.com/en/verstak/sverlilnyj-stanok-svoimi-rukami-1500-foto-chertezhi-instruktsii#sigFreeIddb5651e04b
 DIY drill stand
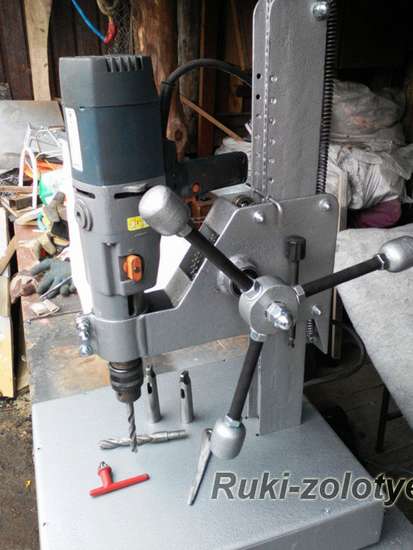
However, in terms of capabilities and characteristics, this full drill machine. The stand is welded from 4 corners and a rectangular pipe and mounted on the flywheel from the tractor. The gear of the lifting mechanism is taken from the gas distribution mechanism (timing) "Lada". The box, where it is located, moves along the rack on casters taken from the sliding doors of the Gazelle. The helm is welded from M14 nuts. The return mechanism works due to the spring installed inside the rack. Holes are drilled in the rack to limit free play. Also, four bolts welded to the bed serve to fine-tune the drilling angle. Legs from M8 bolts for hexagon. In this case, a 2 kW drill is used, with which you can drill 30 mm holes.


https://i.expert-h.com/en/verstak/sverlilnyj-stanok-svoimi-rukami-1500-foto-chertezhi-instruktsii#sigFreeIde59b0cd49e
Another option metal drill stands. Initially, amka is made from a profile pipe by welding. When ready, weld an inch pipe to it. For the movable part, it is necessary to make a small frame 11 by 12 cm. From the pieces of metal, weld to it the fixing ears with a hole for the bolt, and on the other hand a square mount from the corner. The movable part is made on the principle of a valve with movable core from a profile pipe. The base of the mount for the drill will be a plate with a corner welded to it. An ordinary door spring was used to raise the drill.


https://i.expert-h.com/en/verstak/sverlilnyj-stanok-svoimi-rukami-1500-foto-chertezhi-instruktsii#sigFreeId9b42032fa7
 DIY mini drilling machine
Author is homemade mini loom, master of advanced carburetors for motorcycles. He needed a drill to make accurate diameters from 0.035 mm and not more than 1.5 mm. It was very difficult to manually work with such diameters, so this idea came about. In the photographs, the manufacturing process is shown in detail, but not very clear. But the site has step-by-step instructions, with clarifications and explanations, if you are interested, you can read. The site is in English, use a translator, the text is basically understandable. Link under step by step photos.


https://i.expert-h.com/en/verstak/sverlilnyj-stanok-svoimi-rukami-1500-foto-chertezhi-instruktsii#sigFreeIda5c29598df
 Mini drill machine from a sewing machine
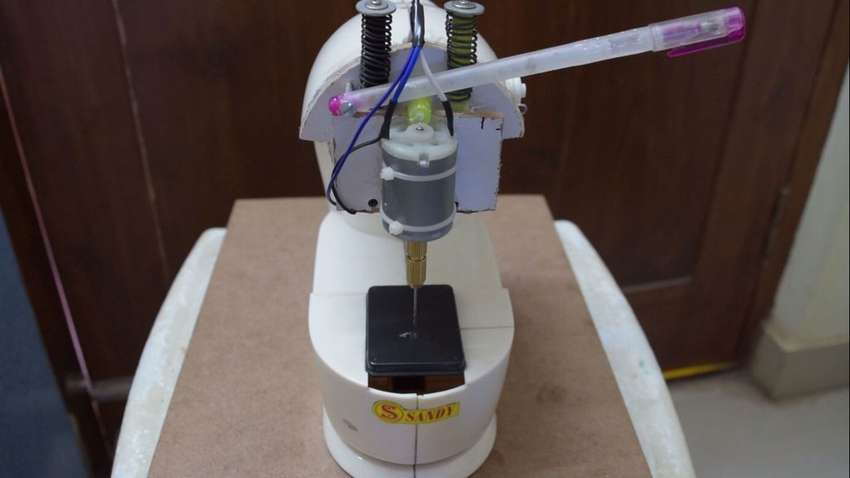
Author made this mini drilling machine from an old chinese sewing machine. A 12V DC power supply, can drill PCBs and wood, is equipped with LEDs for backlighting, it was very cheap, since it is almost completely made of waste, except for the engine, of course. In general, remove everything from the inside of the sewing machine, except for the switches and DC connectors. Cut the front as shown in the photo. Use a 6 mm thick MDF for the base plate. Make 2 knitting wire springs. Attach the screw washers to one end of the handle and insert the spring as shown in the photographs. Insert the handles into the caps and check the free play. Cut the handles to the desired length. The engine is fastened with a screed and glued. Fasten the handle to the MDF, so that when we push the handle, the motor should move down.Fix the plastic piece in the center as shown in the photo. In general, the photo shows everything well. Mini machine portable, runs on battery power.


https://i.expert-h.com/en/verstak/sverlilnyj-stanok-svoimi-rukami-1500-foto-chertezhi-instruktsii#sigFreeIdb09a5b36a0
 Mini PCB Drilling Machine
The idea is simple, but requires some knowledge and accurate work. Dimensions are not indicated, so the product was assembled from improvised materials, but diagrams and drawings according to which you can navigate are presented. For the manufacture of the lifting and launching part, you need a sheet of metal - cut out the desired shape, bend, make holes. The essence of the device is the lever mechanism - press, the drill with the engine goes down, let go - goes up. Yes, the last photo, this author shows how to use a dull drill, you just need to correctly break off the tip with pliers, and the drill is like new.


https://i.expert-h.com/en/verstak/sverlilnyj-stanok-svoimi-rukami-1500-foto-chertezhi-instruktsii#sigFreeId0e5ba4b8ea
Portable drilling machine
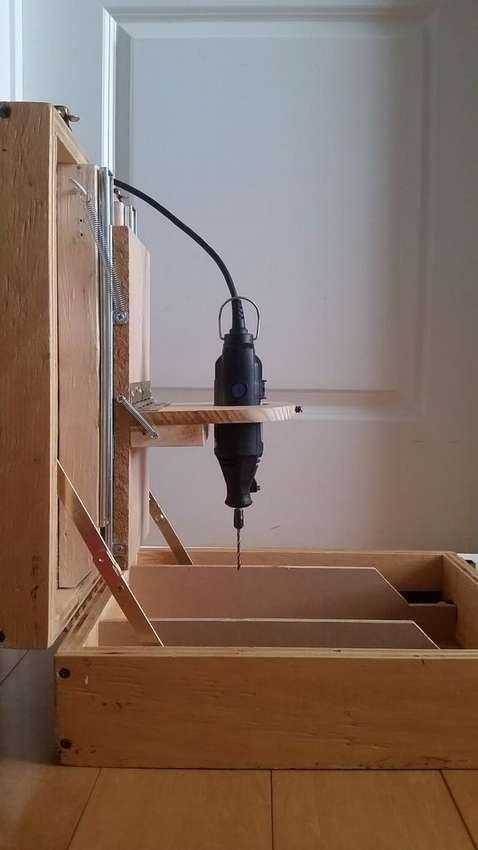

In this project, 14-year-old Samson Fullmer revealed how to make a standalone portable drill machine. First you need to make a wooden case of the required size with two latches, a handle and hinges. 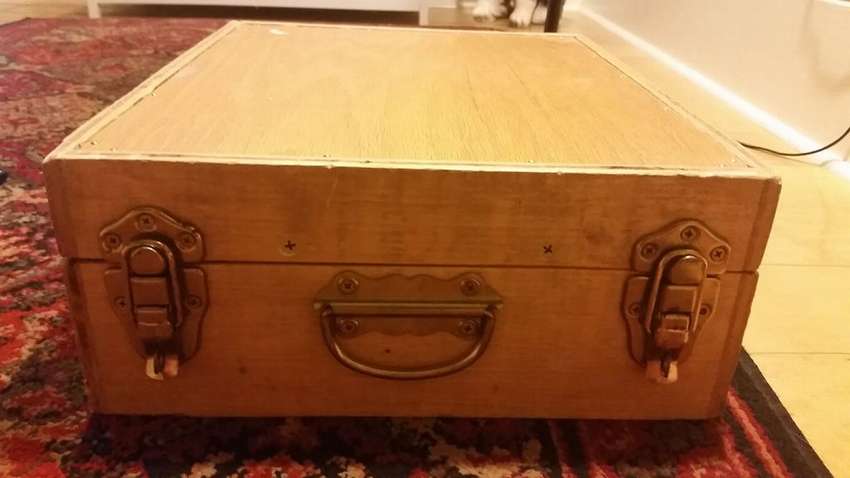 In the middle of the drawer there is a plank with a slide on the sides. They will have a moving part. For a drill, a wooden platform with a hole is made, a spring is attached to it. Well this, in short. A detailed description of the process can be found on the website, a link under the gallery.


https://i.expert-h.com/en/verstak/sverlilnyj-stanok-svoimi-rukami-1500-foto-chertezhi-instruktsii#sigFreeId98f6e19a2a
Boring grinding machine
Presented here three ways to make a home-made drill grinding machinea. The first is how to make a grinding device based on a stationary drilling machine. It is necessary to collect the base of the part of the material that forms the basis. They are held together with drywall screws. Then cut a circle of plywood to support the grinding pad. The diagram is simple: a drilling machine -> right angle adapter -> set screw -> sandpaper (the bearing holds the grinding disc in place). That's the whole design, see the step-by-step photos for details. And do not forget to grease the bearing with machine oil.


https://i.expert-h.com/en/verstak/sverlilnyj-stanok-svoimi-rukami-1500-foto-chertezhi-instruktsii#sigFreeId2186cb3678
 And this drum grinding table for rotary hammer, is a convenient addition to any drilling machine. Here's how to make an easy-to-use drum grinding table with a dust suction and grinding adjustment. Most machines work only on flat surfaces, although there are devices for grinding curves, such as the spindle of a grinding machine, but as a special tool it takes up space (and costs money). Thus, a cheaper solution is a drum grinder - basically sandwiched cylinder. You can make your own grinding drums, and make them as versatile as you need. If you don’t understand everything on step-by-step photos, on the source’s website, the link to which is under the gallery, the author has painted everything in great detail.


https://i.expert-h.com/en/verstak/sverlilnyj-stanok-svoimi-rukami-1500-foto-chertezhi-instruktsii#sigFreeIdc1fa2f0e8c
The third version of the drilling machine with a grinding plate. Drilling machines are of course created for drilling holes, but they are also suitable for other purposes, for example, they can be used as a lathe. Another practical use as an impromptu spindle is a grinding machine. Here is just an example of how this can be done. First, you need a grinding drum, then a plate to raise the work surface up above the bottom of the drum. If you don’t do this, the edge will not be smooth because you cannot hold the workpiece. Fortunately, a sanding pad is very easy to make, even in less than five minutes. The manufacturing procedure, see the photo. Yes use adhesive tape magnets on the back of the plate. Without them, the plate will slide with the workpiece. Despite the fact that the magnets are not very strong, they will hold the workpiece. More details and nuances on the site, link under the photo.


https://i.expert-h.com/en/verstak/sverlilnyj-stanok-svoimi-rukami-1500-foto-chertezhi-instruktsii#sigFreeId82c4e60999
Drilling machine table
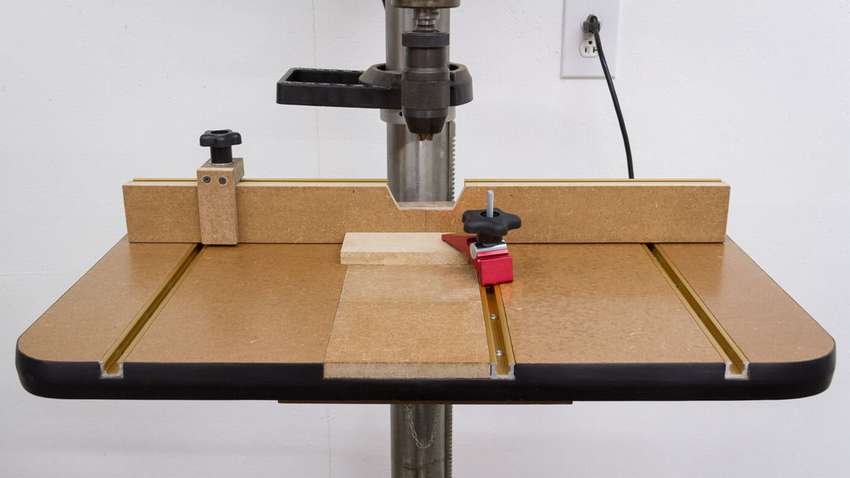

The built-in tables, which are installed on most machines, are slightly stunted for woodworking and have no emphasis to help with the drilling of repeated holes. So if you have an MDF sheet, you can make a more advanced table and emphasis for your drilling machine. The process can be viewed on a step-by-step photo of the master class, and a detailed description on the site, a link under the gallery.


https://i.expert-h.com/en/verstak/sverlilnyj-stanok-svoimi-rukami-1500-foto-chertezhi-instruktsii#sigFreeId01bca8602b
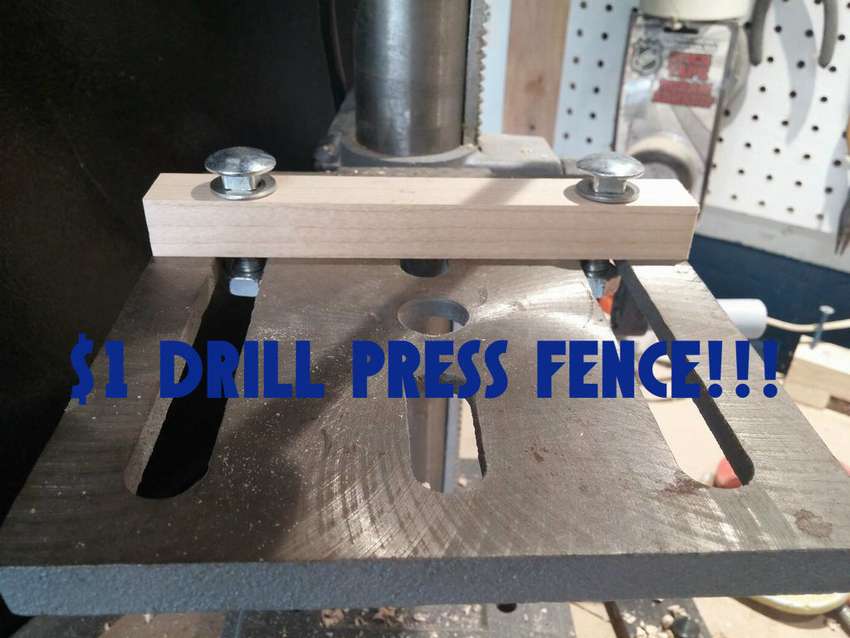 If the site allows, you can do this simple emphasis for a drilling machine. All you need is waste wood, a pair of bolts,nuts and washers. This project takes about 20 minutes or less, is very practical and useful for future use. In principle, there is nothing complicated, this is a simple bar that you clamp in the grooves for emphasis, but there are several nuances that you can look at step by step photos.


https://i.expert-h.com/en/verstak/sverlilnyj-stanok-svoimi-rukami-1500-foto-chertezhi-instruktsii#sigFreeIdb6b00205dd
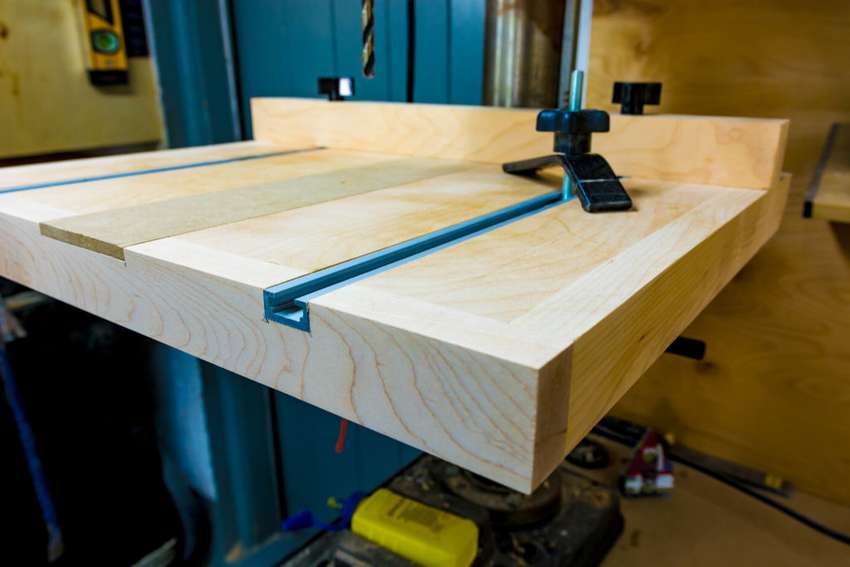 Another option, a simple table, no frills. In order to make a homemade table as simple as possible, the author made a deep cut exactly the same size as the platform under the drill. This should make the table move from left to right. For this, a CNC milling cutter was used to join two pieces of laminated plywood together, but you can cut a circle with a jigsaw. To protect the table from rotation, make a pair of keys of the same size as the slots in the site of the drilling machine, and put on glue. With emphasis, everything is also simple, look at the photo.


https://i.expert-h.com/en/verstak/sverlilnyj-stanok-svoimi-rukami-1500-foto-chertezhi-instruktsii#sigFreeId6373e1f238
 Vice for the boring machine
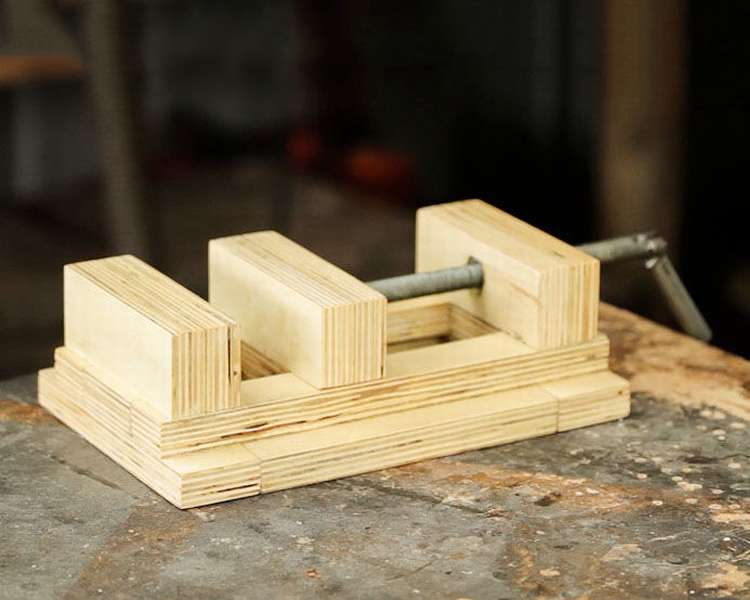
There are many different ways how to make homemade vise for a drilling machine, the author suggests The easiest way. In fact, most people want something simple that can be done quickly and easily. There is no need for any metal runners or hardwood processing. All made from 17mm plywood. 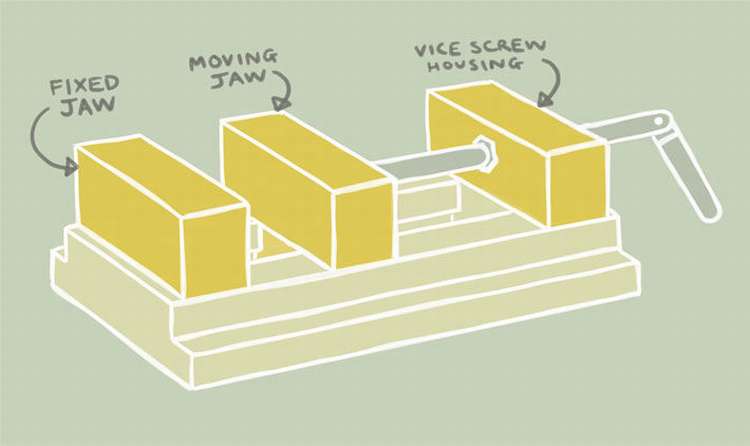 Main details: A traditional handle with a swivel joint at the end, can be made and glued to a threaded rod, if simpler. Parts from plywood are assembled with glue and screws. The fixed jaws and screw are glued and press each other. When dry, mark the center and drill a 13mm screw hole. The screw passes through the screw housing and is passed through the nut, which is fixed with epoxy resin, it is necessary that it passes through a movable clamp with a hole. In general, it’s easier to do than to explain, so see step-by-step photos, the author has taken as many as 70 photos of the process, so everything should be clear.


https://i.expert-h.com/en/verstak/sverlilnyj-stanok-svoimi-rukami-1500-foto-chertezhi-instruktsii#sigFreeId36034a4ec6
 Homemade vise for metal drilling machine
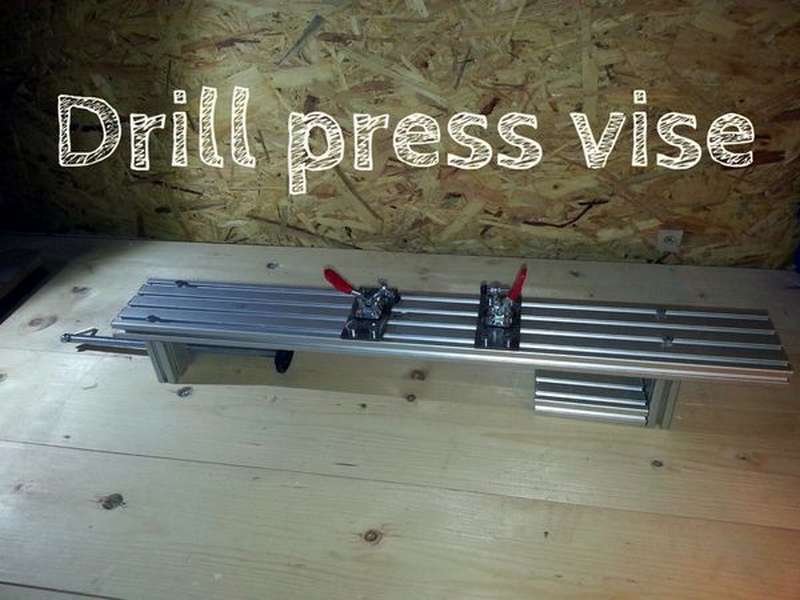
In the first photo in the gallery you can see the reason why the author had the idea to make this vice. To prevent the same from happening with your hands, you should think about the need home-made vise for a drilling machine. This design is made of a metal profile, you will also need a threaded rod, plastic or wooden pads, bolts, nuts. After you cut out the pieces of the profile, connect the two of them with the letter “L” using a drill, tap and screw. This will be the static part of the vise. Then drill a hole and cut the M10 thread for the studs. The space between the “L” and the focus should be greater than the width of your table. To make a lever, cut the end of the shaft with an angle grinder to get a flat surface, and then drill a hole for the screw. In the step-by-step photos, everything is beautifully shown, so that special difficulties with manufacturing should not arise. You can add some of your ideas to improve the proposed option.


https://i.expert-h.com/en/verstak/sverlilnyj-stanok-svoimi-rukami-1500-foto-chertezhi-instruktsii#sigFreeId2513b76510
 Drill stand
If you have drilling equipment but are stored in different places, so you must constantly move away from the drilling machine for various tools and parts, then this is the project for you. This convenient bedside table allows you to hold absolutely everything related to working on the machine in one convenient place. If necessary, you can put the machine in the middle, if it is of course quite portable, and small in size. Before you begin, make sure that the base of your drill press will match the sides of the nightstand. If not, you will need to make design changes. All step-by-step pictures schematically depict the assembly order, so it will not be difficult to figure it out.


https://i.expert-h.com/en/verstak/sverlilnyj-stanok-svoimi-rukami-1500-foto-chertezhi-instruktsii#sigFreeId5f5b309d95
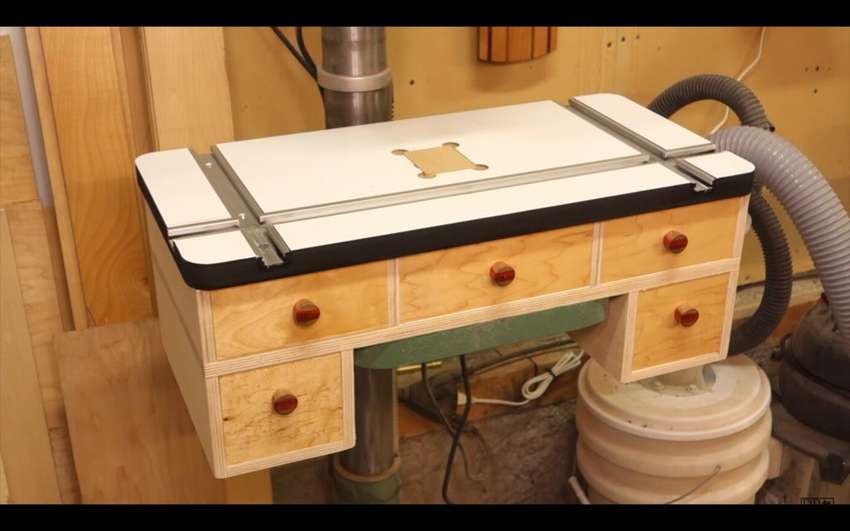 Drill table with drawers for storage
A drilling machine is one of the most valuable tools in any workshop, but often it takes up too much space. The author proposes to partially solve this problem by making drilling machine table with drawers. First you need to assemble the frame, knock down with nails or with glue. If self-tapping screws or nails is not an option, you can pinch the parts and wait for the glue to dry before moving on. The tabletop can be made of different materials, but it is more advisable to use thick plywood. Then make the base plate and mount the table. At the end of the plywood make drawers. The procedure for working in step-by-step photos is more detailed, and you can read the author’s comments on the site.


https://i.expert-h.com/en/verstak/sverlilnyj-stanok-svoimi-rukami-1500-foto-chertezhi-instruktsii#sigFreeIdb6a3417ad5
 Do-it-yourself table for a boring machine
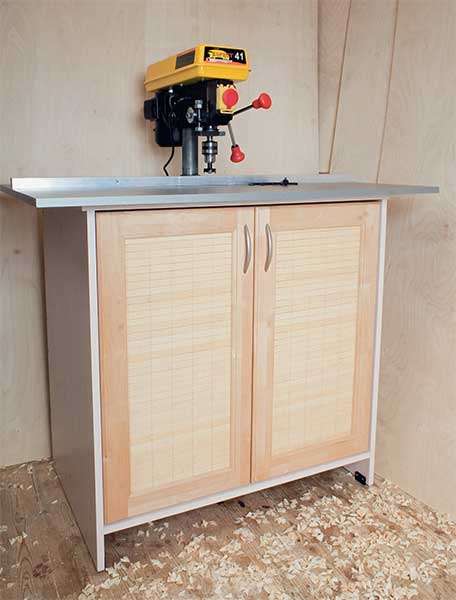
A table with a cabinet is made specially for the Corvette-41 drilling machine. In principle, the kit includes a small turntable, but the truth is very small. When you need to make a hole in a large workpiece, chipboard or furniture panel, the sense of it is malo. If you have to tinker with furniture accessories, you will need a more suitable desktop with emphasis. This will be discussed further. The presented version of the table-curbstone is made of chipboard. The table will house a support stand that can be easily rearranged, you just need to unscrew the screws and remove the upper part. Below is a master class with step by step photos. A detailed description with a list of materials and a description of the process can be viewed on the site, the link is under the photo.


https://i.expert-h.com/en/verstak/sverlilnyj-stanok-svoimi-rukami-1500-foto-chertezhi-instruktsii#sigFreeId988d82c03e
Drill storage - ideas, devices
Order is needed everywhere, especially in the workplace. If there is a drilling machine in your workshop, the question of storing drills will arise unambiguously. Of course, they can be laid out in cans of coffee or various boxes, which most do, but this is not the right hike, the drills should be kept clean and most importantly, sorted by size. It is this nuance, to take the right drill, takes the most time. Meanwhile, to make an organizer for drills elementary, in any workshop or garage there are a lot of materials from which you can make a simple rack or box with compartments.
 Magnetic drill storage tray
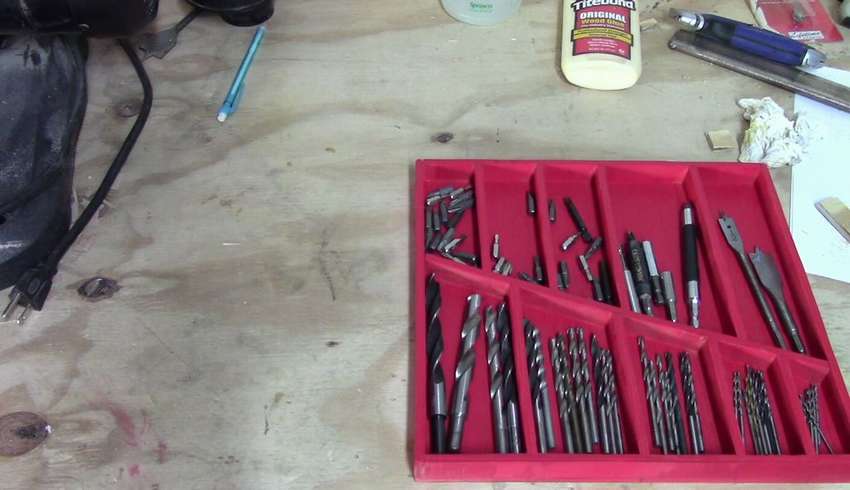
Here, for example, is a very simple option - homemade magnetic drill storage tray. All you need is a piece of plywood, slats, glue, magnets. Lay out all your drills in size and draw a plan for the future tray. Based on the drawn diagram, cut 2 identical sheets of plywood of the desired size. On the back, drill the recesses for the magnets. Connect the sheets, put on glue. Saw the slats, cut one end of the corner for the diagonal divider. Then the other end at an angle of 90 degrees to match the length. Glue them in place. That's all, it remains only to paint.


https://i.expert-h.com/en/verstak/sverlilnyj-stanok-svoimi-rukami-1500-foto-chertezhi-instruktsii#sigFreeId2b402e0627
Shown here how to quickly make compartments in a drill storage box. The trick is to lay the dividers in the prepared place. Just drill the guide holes for the mounting screws that hold the dividers on the underside. Nails are used to hold dividers while drilling the second hole. The system makes it easy to remove the dividers if you need to change the position of the sections.


https://i.expert-h.com/en/verstak/sverlilnyj-stanok-svoimi-rukami-1500-foto-chertezhi-instruktsii#sigFreeId3ee11fc535
 Wooden storage stand
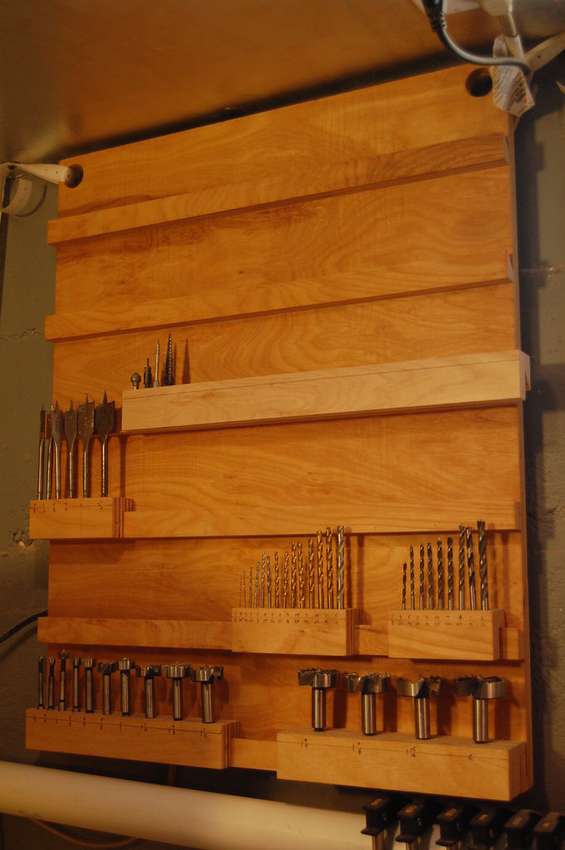
If you still use old cans of coffee or plastic containers for storing drills, in which sawdust and garbage are constantly accumulating, it's time to put an end to this madness. The author of this stand survived all this and offers his own version of making a wooden stand for storage. He wanted to be grouped into sets, portable and labeled. The booth consists of five evenly spaced rows. Most of the stored tools fit into this interval, but you can of course make a size that suits you. As you can see in the step-by-step photos, there are no special difficulties in manufacturing. After graduation, the author suggests impregnating all the holders with linseed oil.


https://i.expert-h.com/en/verstak/sverlilnyj-stanok-svoimi-rukami-1500-foto-chertezhi-instruktsii#sigFreeId5c6c550768
 Metal drill storage stand
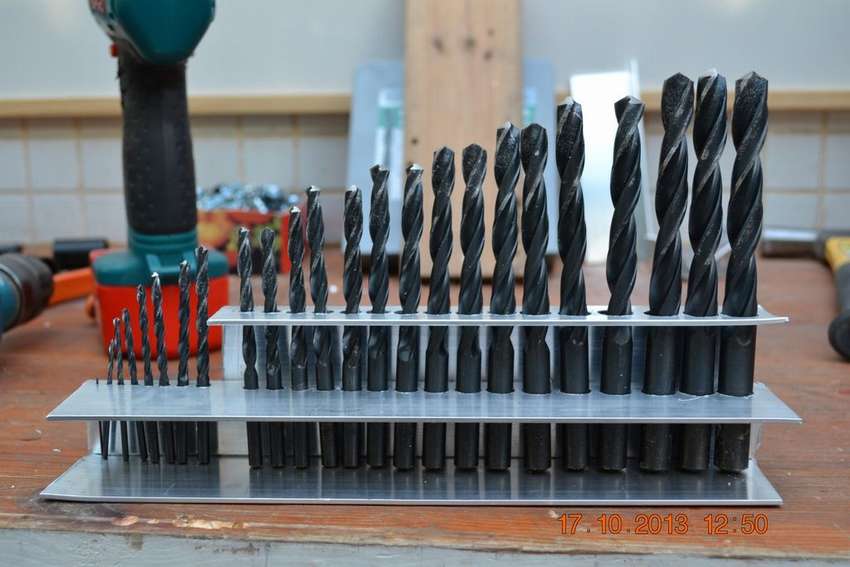
Practical, aesthetic, modern. To make such metal drill storage stand, you need to buy one long aluminum corner. Decide on the size, and cut the corner to the desired length. Drill holes to hold the cut corners together. Now the hardest part. In order for each drill to fit perfectly into the stand, drill holes in the following order: 1. Take the largest drill, and make a hole for it - one hole is ready. 2. Then insert the next drill from the kit, make a hole ... and so on in order ... In general, one set of 25 drills was taken from the author for more than an hour and a half ... Then grind the holes. Repeat the process with the other sets. Everything, install a rack where it is convenient for you.


https://i.expert-h.com/en/verstak/sverlilnyj-stanok-svoimi-rukami-1500-foto-chertezhi-instruktsii#sigFreeIde7730ea2e9
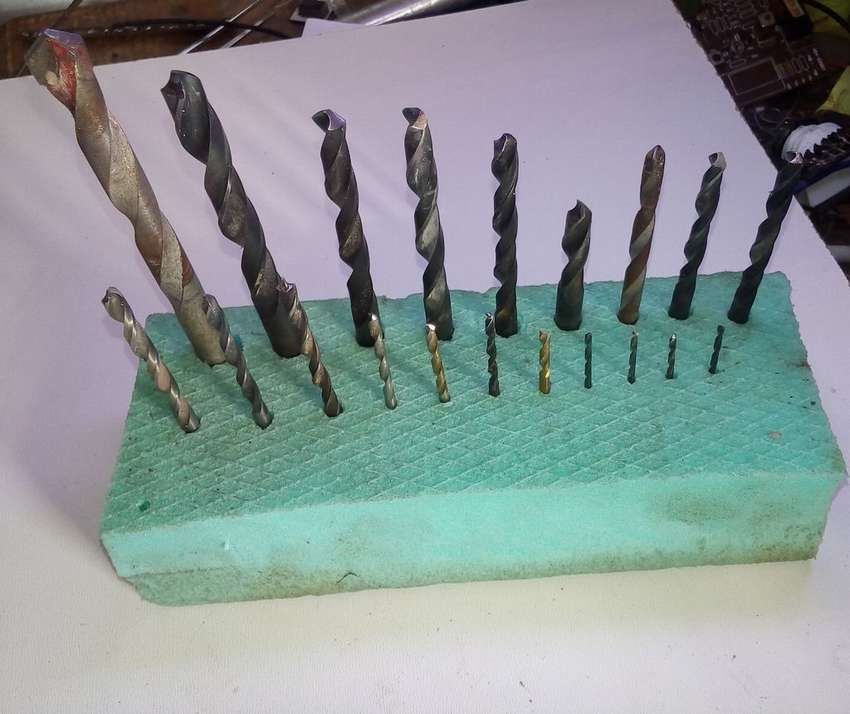 The easiest drill stand
A simple task - a simple solution. Of course, there are so many great ideas and design decisions to make such a simple thing as drill stand. From the first call I found on the Internet about fifty options. But if you don’t want to bathe much, then you don’t need to. Just take a piece of green polystyrene foam 5 cm wide (who does not know, this is a polymer gas-filled material obtained by foaming polystyrene and other components), drill holes for each drill in it and insert in the order that suits you. Everything.


https://i.expert-h.com/en/verstak/sverlilnyj-stanok-svoimi-rukami-1500-foto-chertezhi-instruktsii#sigFreeId210b67ce32
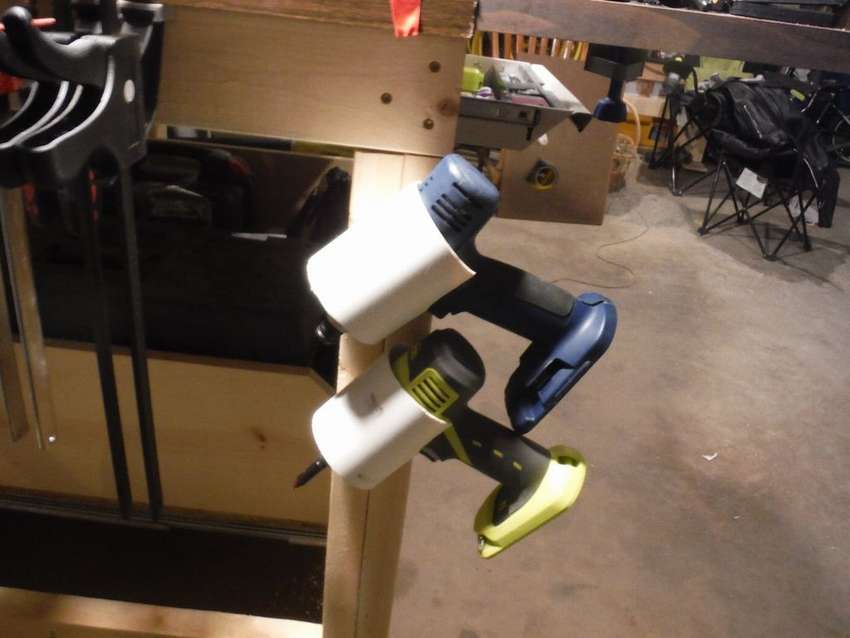 PVC hand drill holder
The author offers an easy way to organize a place to store a hand drill. You need to find a PVC pipe of the desired diameter, cut it, cut the recess for the handle with a jigsaw. Use a pocket knife to gently remove excess plastic. Drill two holes for the diameter of the screws from one side. Using 2 mounting screws, secure the pipe in a suitable place at an angle of 45 ° so that the drill is held under the weight of its weight. Here is such a simple holder, for a more detailed manufacturing process, see step-by-step photos.


https://i.expert-h.com/en/verstak/sverlilnyj-stanok-svoimi-rukami-1500-foto-chertezhi-instruktsii#sigFreeId126d53d41e
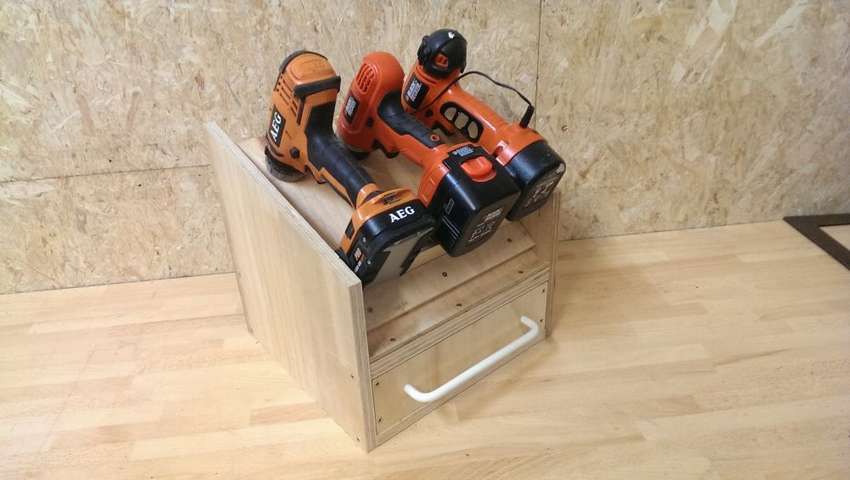 Homemade storage cabinet for hand drill
Unlike the previous method, the author decided not to hang his drillson holders made of plastic pipes or slots in plywood shelves. Instead, he made a home-made bedside table where the tool is stored in special recesses, that is, in a balanced state. The bedside table has hidden space for chargers below the storage space for drills, so that they can be charged. There is also a small drawer at the bottom for various accessories. The assembly order and the shelf in different angles in the photo in the gallery.


https://i.expert-h.com/en/verstak/sverlilnyj-stanok-svoimi-rukami-1500-foto-chertezhi-instruktsii#sigFreeId7ba73e4e87
 Simple homemade drill
The goal of this project is to create a simple tool so that you can easily make a hole in plastic and thin wood. Such it’s very easy to make a homemade mini drillwhat you will see by looking at the step by step photos. The main thing you need is a small DC motor - maybe from a toy or a hairdryer. Also, a cable with two wires, a grinding wheel, a piece of sandpaper, a battery or a power source (in the photo 7.2V Lipo battery), a connector for connecting to the battery or a push button switch. Of course, you need to be able to solder and understand a little bit in electricity. If you understand, then the photographs will be clear. I don’t need to explain how to use a mini drill either, turn it on and work, the photo shows how the author tests it on clothespins.


https://i.expert-h.com/en/verstak/sverlilnyj-stanok-svoimi-rukami-1500-foto-chertezhi-instruktsii#sigFreeId9ba11df687
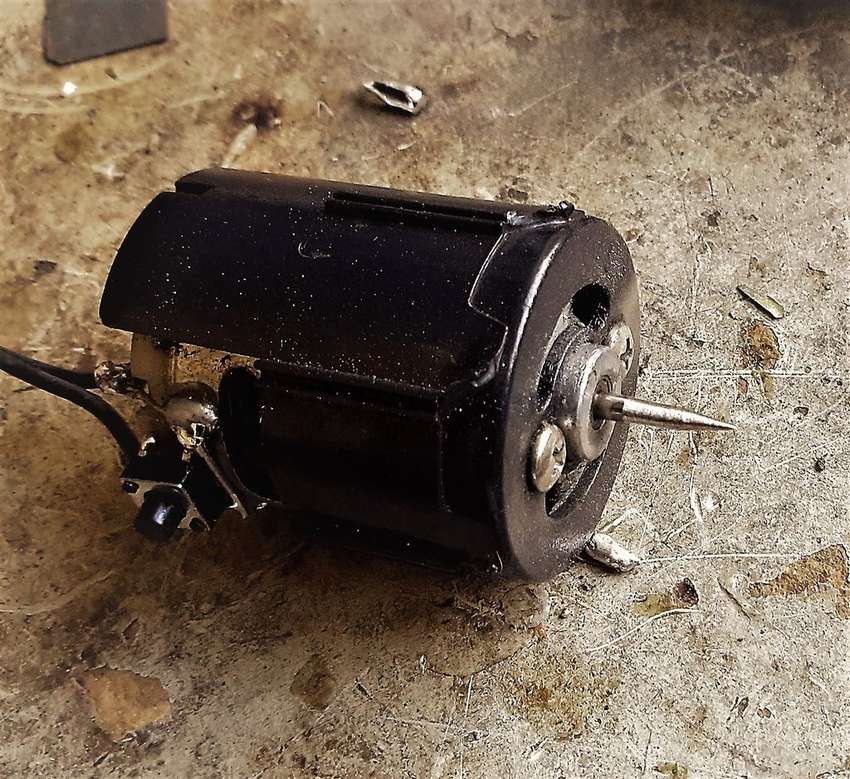
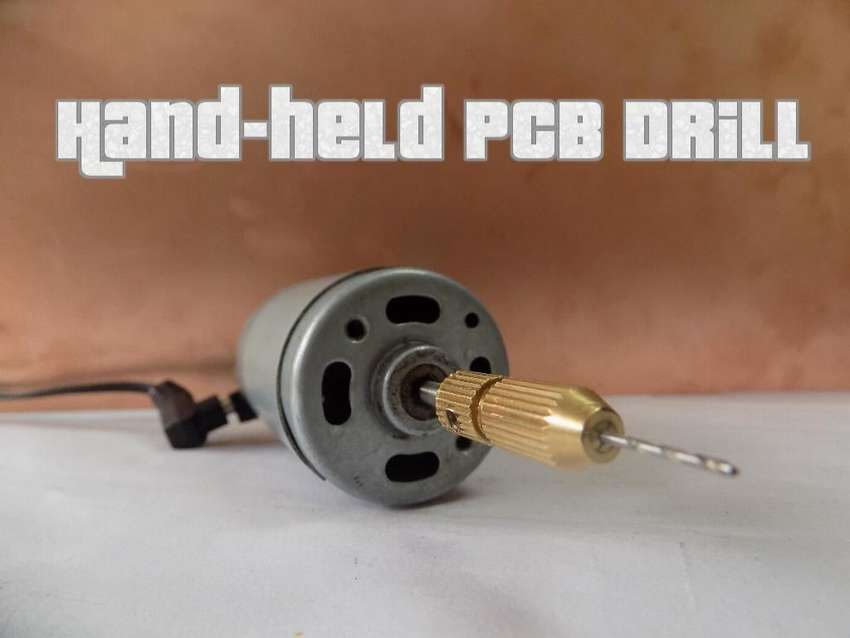 Another option, simple Homemade Mini PCB DrillIn other words, a motor with a collet. You only need 12v motor, the remaining parts can also be easily and cheaply found on the same Internet, so you don’t have to rack your brains while collecting the necessary things. The author used an engine speed of 4000rpm, which gives surprisingly good results, a drill of 1 mm. You will also need a drill chuck, a 6-pin switch, a short piece of wire, an adapter. In the photo, unfortunately, the entire assembly order is not shown, but if you are interested, you can read the author’s instructions on the site, the link is under the photos.


https://i.expert-h.com/en/verstak/sverlilnyj-stanok-svoimi-rukami-1500-foto-chertezhi-instruktsii#sigFreeId27ac7667ba
 Homemade Drill Cooling System
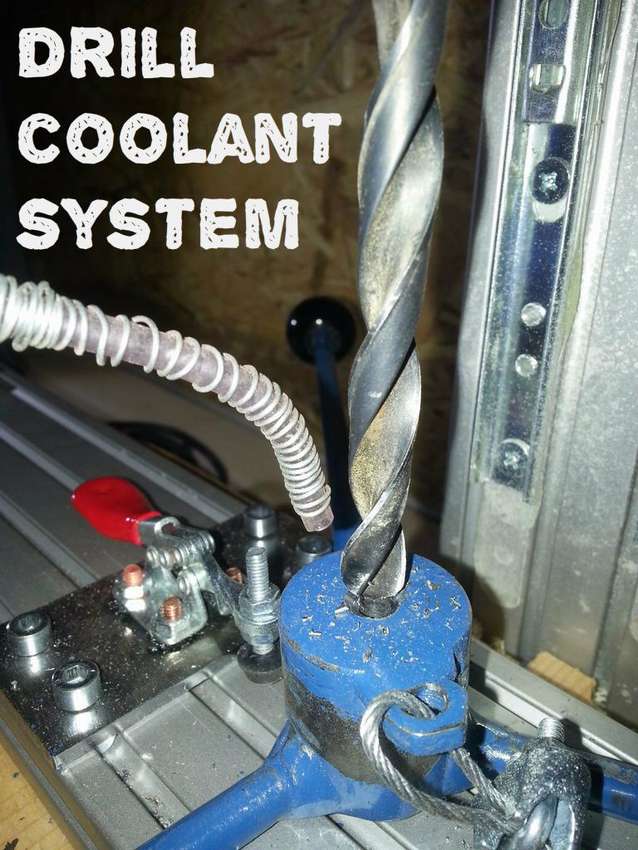
This is a device to protect the drill from overheating during the drilling of a thick sheet of metal. What do you need: mini pump, hose, wire, jar with lid, switch. Add the inlet and outlet hoses of the pump from the hole to the cover with a screwdriver, place the inlet hose in the cup. Make another hole in the cover for the switch. Then glue the switch at the hole and place the pump in a jar, directly into the water. Take the outlet hose out of the jug through the hole in the cap. Lay the thin wire along the hose and wrap it around with a thinner wire. Add the trimmed board as a stand. If something is not clear, the instruction is on the website of the source.


https://i.expert-h.com/en/verstak/sverlilnyj-stanok-svoimi-rukami-1500-foto-chertezhi-instruktsii#sigFreeId766628a1f9
 Drilling machine with a homemade laser designator
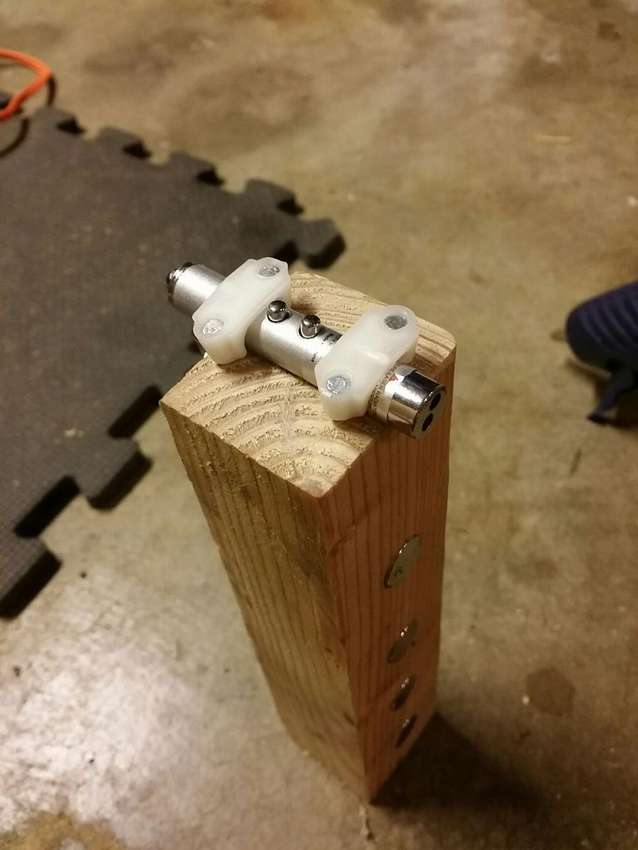
If during the work you need to change the drill, change the height or take other actions, the workpiece can move, then this simple device will help to return to the right direction. For the manufacture of a simple laser designator, you don’t need any special devices, although there are many options, perhaps you have your own ideas. The author, for example, used a cheap laser pointer, this is not a problem to buy. The device itself is really very simple, a wooden block with a laser mounted on the end and magnets built into the drilled recesses. How to do it and how it works, look at the step by step photos.


https://i.expert-h.com/en/verstak/sverlilnyj-stanok-svoimi-rukami-1500-foto-chertezhi-instruktsii#sigFreeId49ad1bb14e
 Hand drill modernization
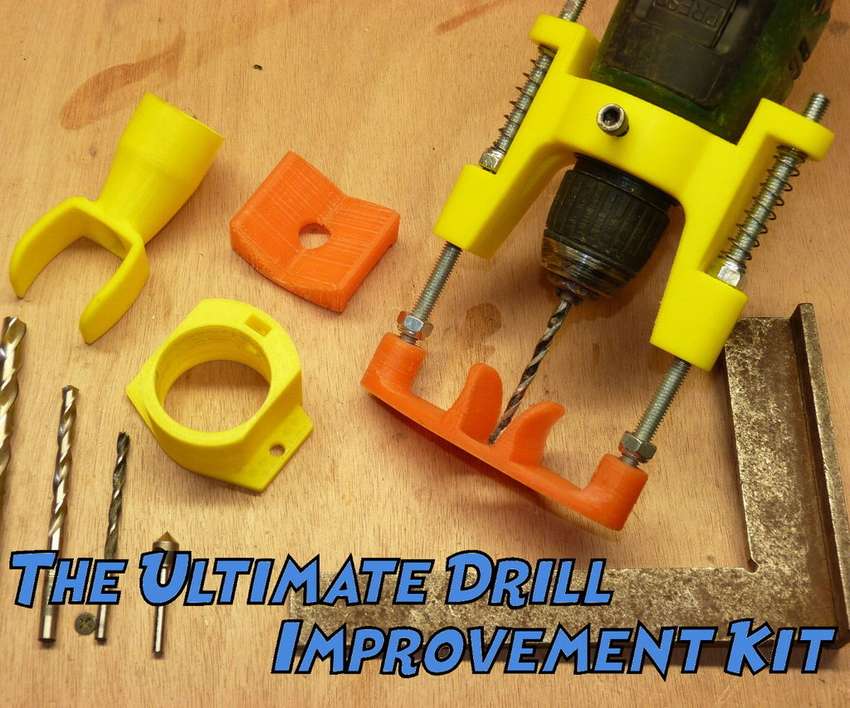
What will this device give? It will help: drill perpendicular to the hole, drill the workpiece to the desired depth, drill cylindrical parts. This design is for a standard 43mm drill mount, but can be redone for a different type of drill. Necessary details: 2 steel tubes - inner diameter 8 mm, length 30 mm; 2 springs with a diameter of 10 x 55 mm 4 with its own lock nut M8; 2 M8 threaded rods 165 mm long.; 4 M6 nuts; 4 M6 bolts. The order of production on step by step photos, detailed instructions on the site. Depth can be set using a 13mm wrench. Both M8 nuts must be at the same height. While holding the base plate, simply press on the drill. For an accurate countersink, fine tuning the M8 nut: 1/4 turn is about 0.3 mm (pitch is 1.25 mm). Drilling through pipes is possible up to 30 mm in diameter (the stroke length of the tool is limited to 35 mm). And thanks to the vacuum adapter, now you can drill a brick wall without dust.


https://i.expert-h.com/en/verstak/sverlilnyj-stanok-svoimi-rukami-1500-foto-chertezhi-instruktsii#sigFreeIde0c8df6c49
 Drill Lathe
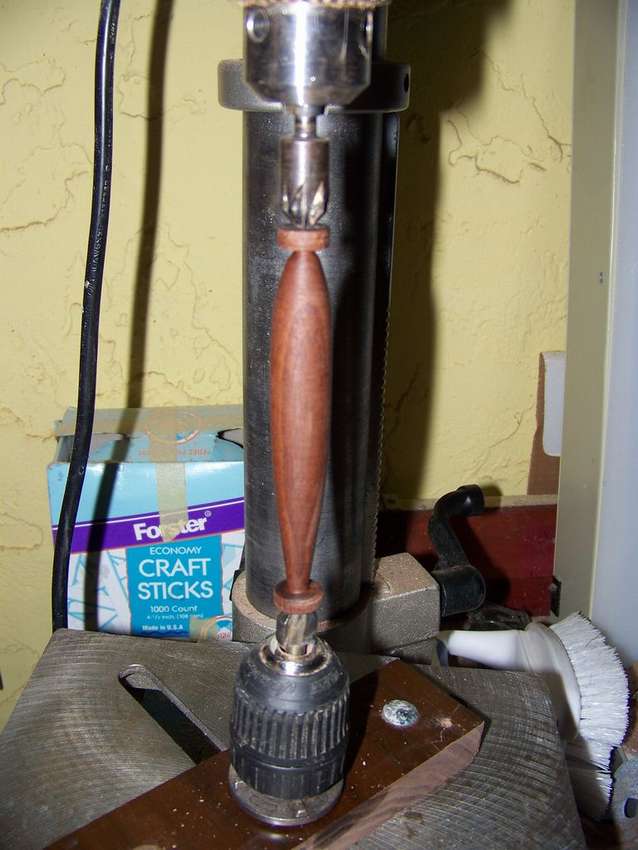
Perhaps every master involved in woodworking, dreams of his own lathe. But wood lathes are expensive, so the author proposes to adapt a drilling machine for him. The only thing you really need to do to create a lathe from your drilling machine is to get a chuck with a shaft and a thrust sleeve, the author dismantled the old hand drill for the purpose. That is, the whole idea is to fix the cartridge on a special wooden stand, a part is inserted between the upper drill and the lower homemade one, which should rotate freely. It’s hard to say how much this will work well, but the cost of manufacturing such a device is small, so you can try. The author’s website has instructions.


https://i.expert-h.com/en/verstak/sverlilnyj-stanok-svoimi-rukami-1500-foto-chertezhi-instruktsii#sigFreeId69fb43513a
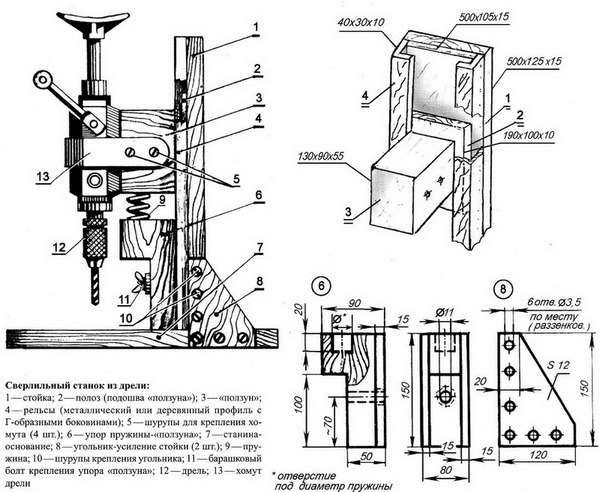
Drawings of home-made drilling machines


https://i.expert-h.com/en/verstak/sverlilnyj-stanok-svoimi-rukami-1500-foto-chertezhi-instruktsii#sigFreeIda103f63f0a
Home-made drilling machines 250 photos


https://i.expert-h.com/en/verstak/sverlilnyj-stanok-svoimi-rukami-1500-foto-chertezhi-instruktsii#sigFreeIdcc27f996a8
Hello, I am the author of this article, so I look forward to asking questions for this article in the comments below, I will answer all !!!
If you have questions on another topic, ask them on our forum, we will answer you
- Two baskets of paper in 5 minutes (Master class)
- How to make a simple and compact table for a milling cutter from plywood
- How to make a soft headboard tile (Instructions + step by step photos)
- Cinder block benches: a convenient bench in 55 minutes
- How to make a bed with a niche: saving space (Master class)