DIY clamp 1000 photos, 45 master classes, drawings
 do-it-yourself clamps
If you are a beginner, then at the first stage you can do with just one hammer or saw, but later you will definitely need a vice or clamp to fix the workpiece or glue individual parts. Making a clamp with your own hands is very simple., in this article 45 master classes are presented, how to make this simple, but very necessary device.
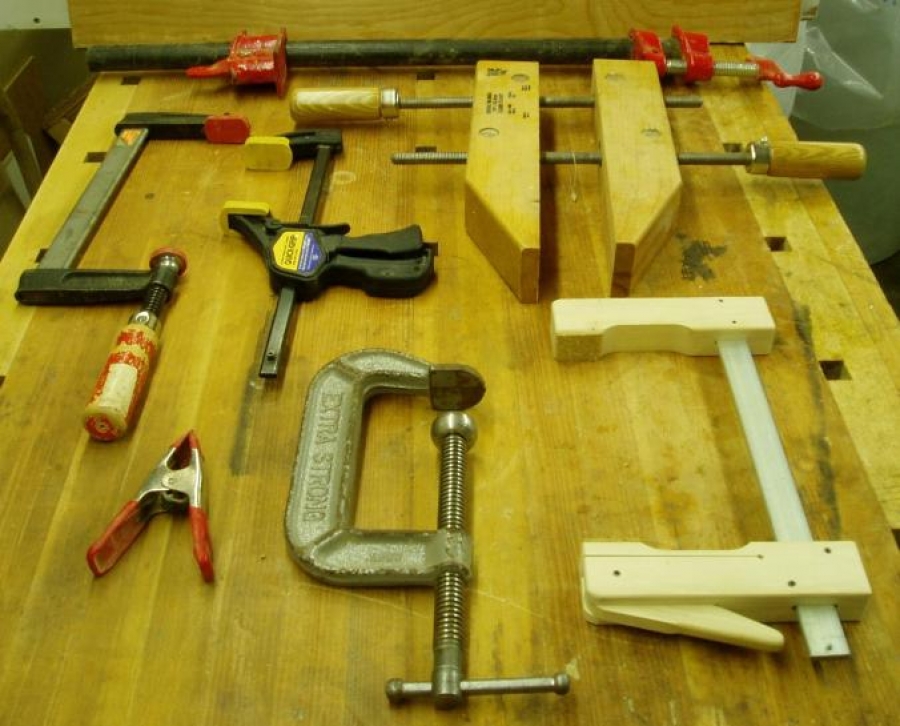
There is not a single clamp that will be versatile enough to satisfy all our needs for performing various types of work. Fortunately, Clamps come in many styles, sizes, and patterns, and as any craftsman will tell you, there are not too many clamps.. Here is a brief overview of the most necessary fixtures that may be needed to solve the problems of repair and woodworking. All clamps, clamps, clamps presented here can be made independently.
In the article you will find how to do it yourself:
- wooden clamps
- metal clamps
- angle clamps
- F-clamps
- C-clamps
- keyless clamps
- cam clamps
- G-clamps
- wire clip
- tape clamps
Other types of clamps and clamps, as well as clamp storage stands.
Wooden clamps
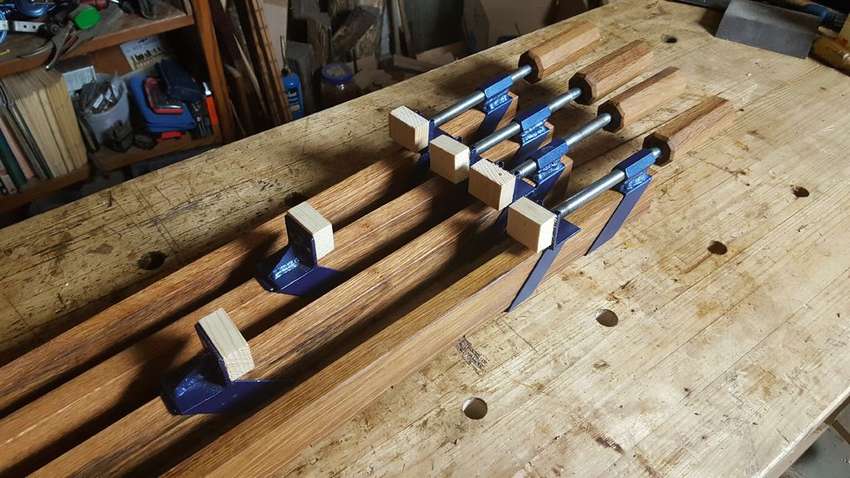
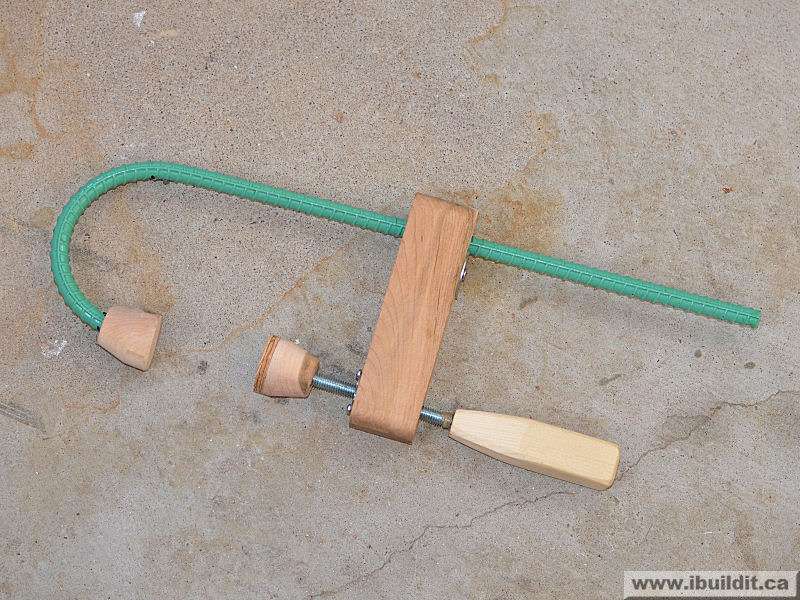
 F clamp
«There are never too many clamps"Is a very true expression. Of course, a clamp is not a fixture that is constantly necessary, so you can buy a couple of pieces to always be at hand, they are not so expensive. Unfortunately, even moderate-price clamps can pull large costs if large quantities are needed. therefore make wooden clamps with your own hands, as much as you need. This is a very popular model, not difficult to manufacture, easy to adjust and easy to operate.


https://i.expert-h.com/en/verstak/941#sigFreeId30b027b71d
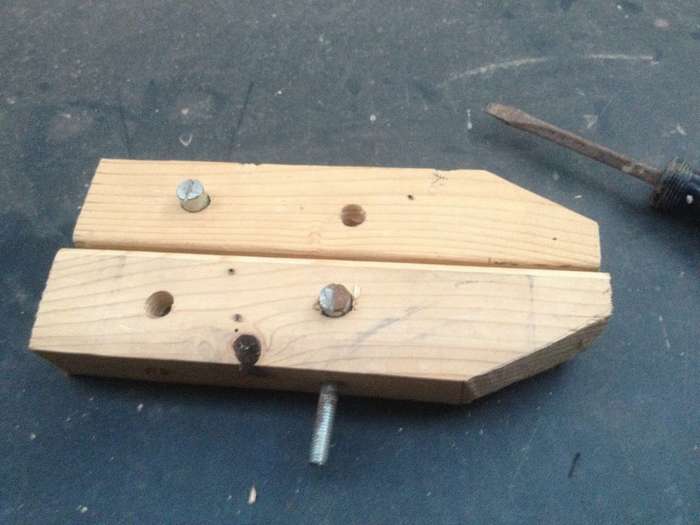
 The same model of the F-shaped wooden clamp, only slightly improved. For manufacturing, a maple strap was used, 5 cm wide and 0.6 cm thick., metal threaded rod and four nuts. To make a peny, you need a small wooden blank from any hardwood without defects. The operation procedure is well shown in step-by-step photographs, just pay attention that the moving part is well-dried and easily glides along the bar. The rod should be at the end two nuts tightened against each otherso that they do not diverge. You can also use a separate lock nut on the plastic insert or a regular lock nut. Two more nuts are screwed onto the screw outside the clamping block with the washer. You can use a lock nut or other mounting method. Double nuts jam each other, this is the cheapest and most reliable way. It is very important to leave some space for the screw so that it can rotate freely.


https://i.expert-h.com/en/verstak/941#sigFreeIde8fe7ccd9d
 Wood and steel clamp
A similar type is already presented at the beginning of the article. F-clampbut this model uses steel for some key parts where the strength and durability of the metal will be of the utmost importance. The goal was to make a lightweight clamp that is not too bulky, but also durable and easily customizable. The hardest part to do is the plate into which the bar is inserted. It is best to drill a series of holes, then cut out the material, which remains either a small round file. When most are cut to clean, use a grinder. It will not work out perfectly, but the bar should pass easily. A hole must be drilled at the other end of the plate to match the screw thread. The last metal part is the locking plate. The end must be chamfered to fit the notches., this can be done on a belt grinder. The manufacture of wooden parts has already been described above, however, everything is shown in step-by-step photos.


https://i.expert-h.com/en/verstak/941#sigFreeId0b83f37db0
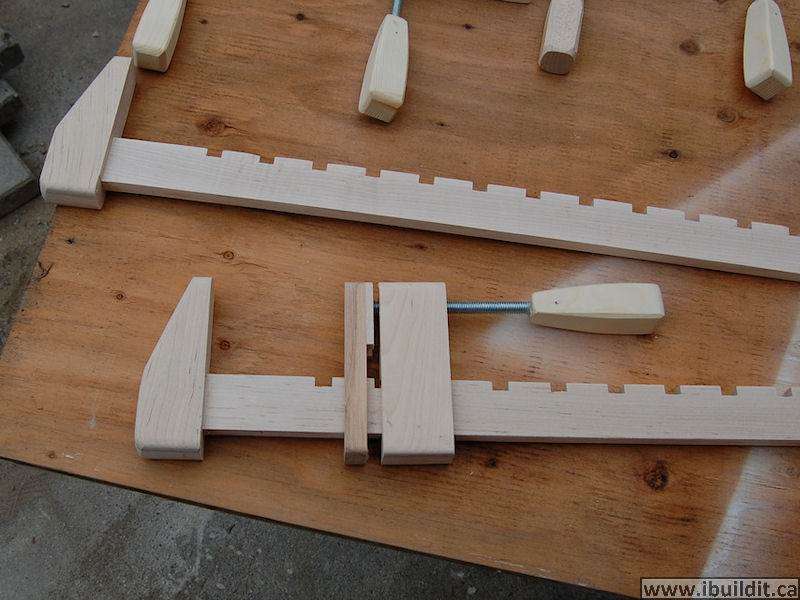
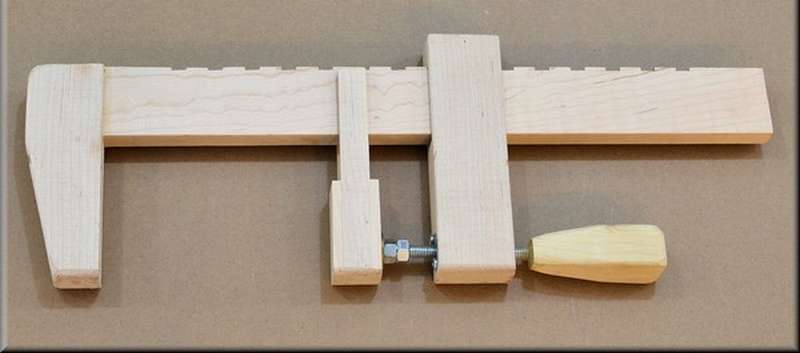
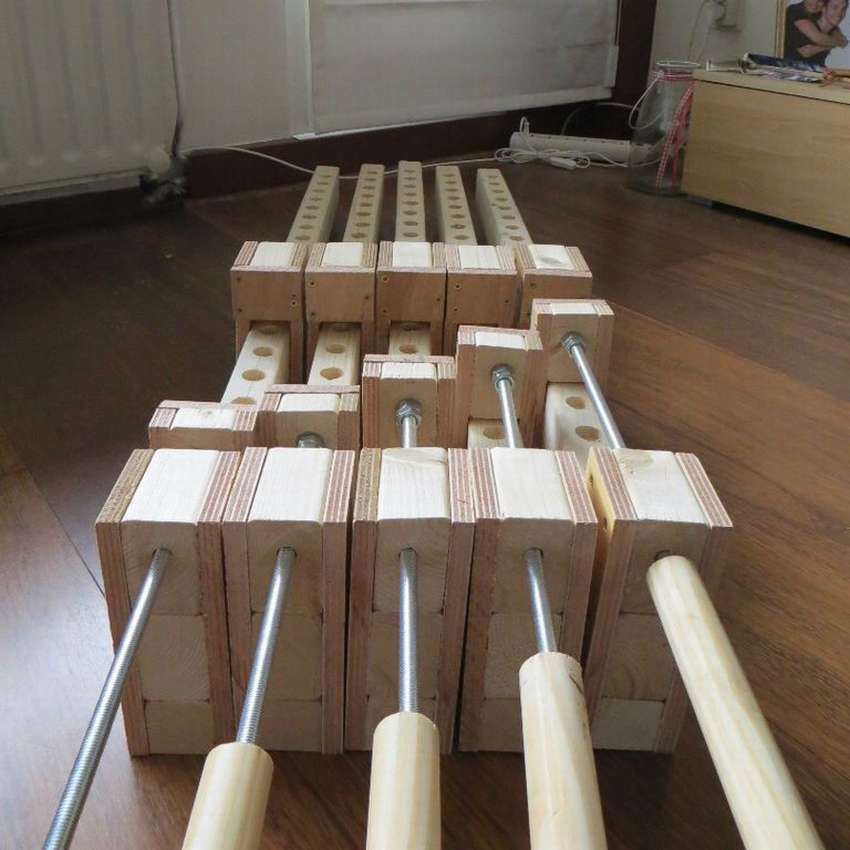
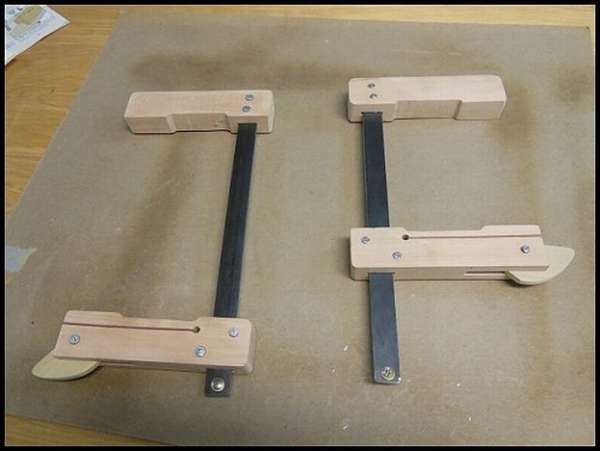
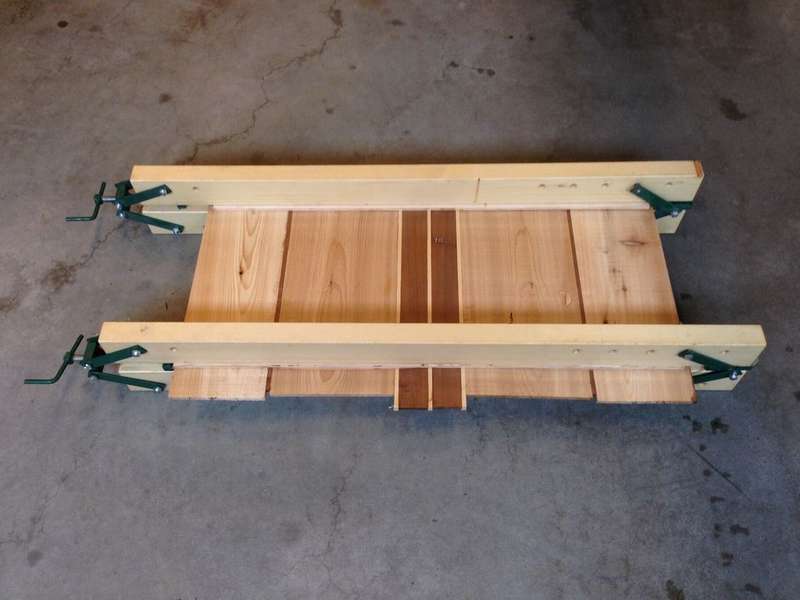
 Wooden clamp for screed
This clamp is easy to make, and you can make as many pieces as you need. You can use different types of wood, but hard rocks are better. At first, a wooden plank and sliding jaws are made. The process of how to make a clamp clamp, look at the step by step photos. Pay attention to the following details.
The end of the drive screw that enters the terminal block must be flattened to fix the nut at the end. The nut is unscrewed to the end and crushed on the shaft. Clamping Parts. The upper part has a depth of 6 mm and a through hole of 10 mm. The lower part is rounded so that it will not depend on the lower part of the rod. Two nuts jam so that they do not crumble. These parts are left at their original thickness to easily move around the thin rod. The bolt head of the movable jaw is fixed in the holes in the shaft. The upper block needs a slight bevel, which provides a larger gap for sliding the sponge on the bar. During assembly, the moving sponge must move freely when unlocked. When assembling a fixed jaw, there should be a small gap between the clamping pad and the barso that it moves freely. Usually, when drilling a hole in the clamping block, it will be slightly off-center, and this can be used by rotating the pad to make a clearance. When bonding the handle with epoxy, the flat side should be facing down so that the resin can flow freely.


https://i.expert-h.com/en/verstak/941#sigFreeIdb0153344f1
 Also shown here how to make a stand for finished clamps. Spread out the clamps to determine the distance and made the necessary measurements. They must be well fitted so that they can be easily taken and laid in place. Since the clamps are quite light and the rack is not exposed to heavy loads, wall anchors and glue will be enough.


https://i.expert-h.com/en/verstak/941#sigFreeId81f6e90643
Another variant of a wooden clamp clamp 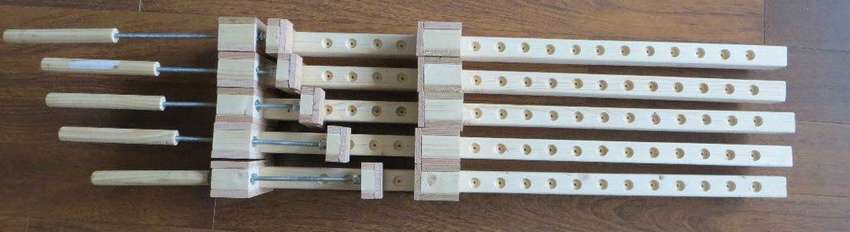
The standard size of 50x75 mm is used here (which actually turns into 44x69 mm after processing). The length depends on the size of the clamp. In this case, about 150 cm and a maximum width of 100 cm. Materials:
- Plywood. 2 sheets 70x175 mm, 2 sheets 25x175 mm, 2 sheets 90x175 mm and 2 sheets 69x (plywood thickness 44 + 2 *) mm.
- 38pcs 4x30 screws
- Threaded rod. M10, length 30 cm.
- Nuts 5 pcs. M10.
- Latch. 1 PC. M10.
Tools:
Saw, electric is better, but not necessary. Drill, wrench, screwdriver, hacksaw.
Here are the sketches of the author, according to which he made a clamp


https://i.expert-h.com/en/verstak/941#sigFreeId45904e4127
 If you took up the clamps, it’s better to do a lot at once, it’s more economical and cheaper, especially if you collect the same type of design. Using a miter saw, cut lumber into 1 sheet of 9 cm, 3 pieces of 7 cm and 2 pieces of 2.5 cm. The rest will serve as a clamping rod. Using a jigsaw, or a table saw or anything else you prefer, cut the plywood into 2 parts 70x175 mm, 2 parts 25x175 mm, 2 parts 90x175mm and 2 parts 69x (44 + 2 * plywood thick) mm. With a hacksaw, cut the threaded rod to 30 cm.

For the non-fixed end you first need to do additional incision on a block measuring 9 cm and 7 cm. After cutting the corners, you need to drill a hole and insert a tightening bolt.
- Make sure the holes are large enough to fit the bolt head.
- A threaded rod is located in the upper block of the fixed end.
- The hole must be large enough so that you can insert the nut on the side of the rod.
- When drilling holes, install the fixed end.
- During assembly, make sure that the end fixed at 90 degreesso that the threaded rod is parallel to the shaft.
- Before assembling the rod, we need to drill a hole in which you can go through the threaded rod and nut.
- Do this in the same block position as for the fixed end.
- Also make sure that the majority of the hole is wide and deep enough to accommodate the nut.
Since the bottom is small, it is difficult to insert enough screws to prevent twisting. You can solve the problem using wood glue.Another option is to round the corners of the lower part so that they do not grip the bar when clamped.
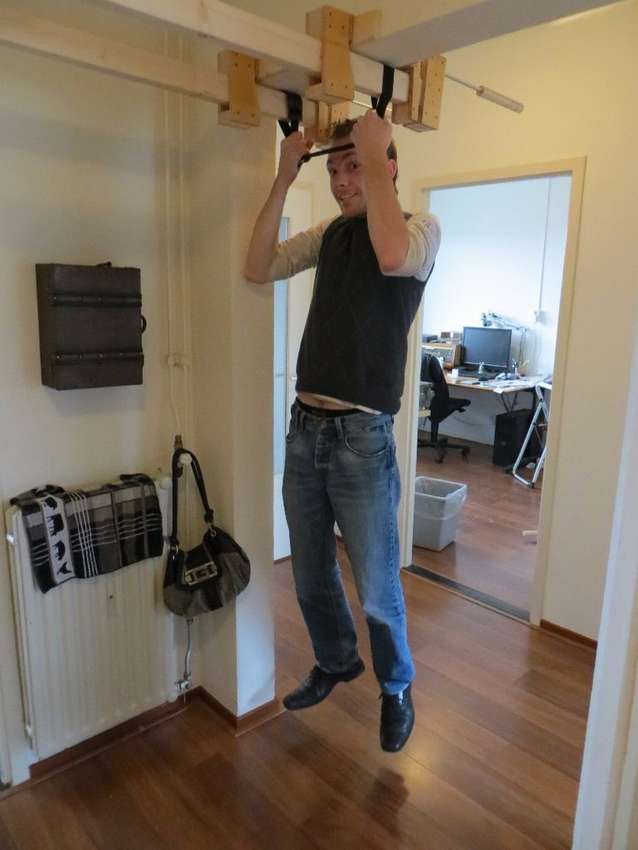 The assembly is almost complete, the last thing to do is handle for moving along the threaded rod. Drill a hole in the center slightly smaller than the threaded rod. Thus, the rod will only hold due to friction. Then fix the nut to the end of the threaded rod. This can be done by welding, other options are glued or fixed, for example, with a nail. Despite the fact that a wooden clamp is not as strong as a metal one, it does provide a very decent amount of downforce. For clarity, the author used them as brackets for pulling, see the result in the photo.


https://i.expert-h.com/en/verstak/941#sigFreeId7c373c00d5
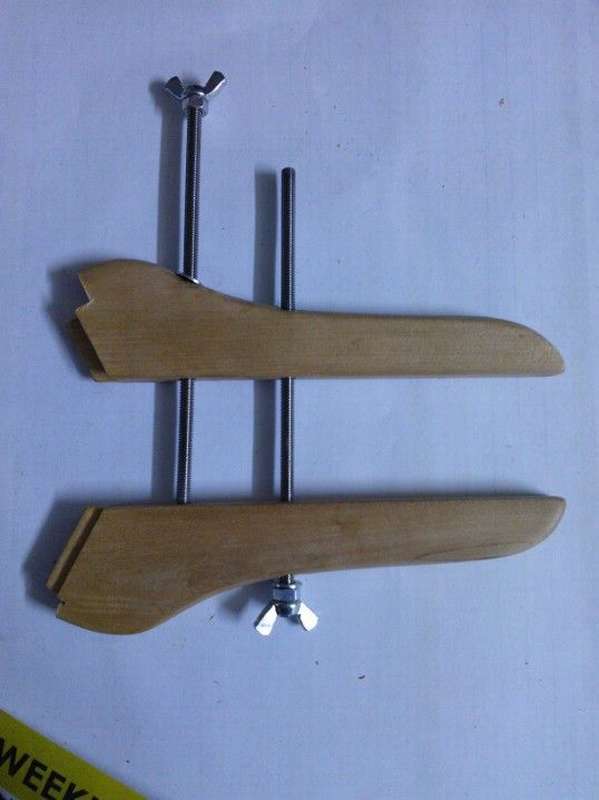
 One more homemade wooden clamp made of oak. First print an octagon pattern that matches the width you want. Then place the workpiece in a vise and use a plane to round the corners at both ends. On the handle, drill a hole in the center of the workpiece so that it matches the bolt on the clamp. The dimensions of the beam will be determined by the equipment available and the desired length.. Then cut all the details of the right size, cut out the sponge pads and drill all the necessary holes, as shown in the photo of the master class. The pens are glued in place with a 5 minute epoxy. After the screw shaft is serrated with a file or sandpaper, fix the handles with epoxy glue.


https://i.expert-h.com/en/verstak/941#sigFreeId9e1fffa685
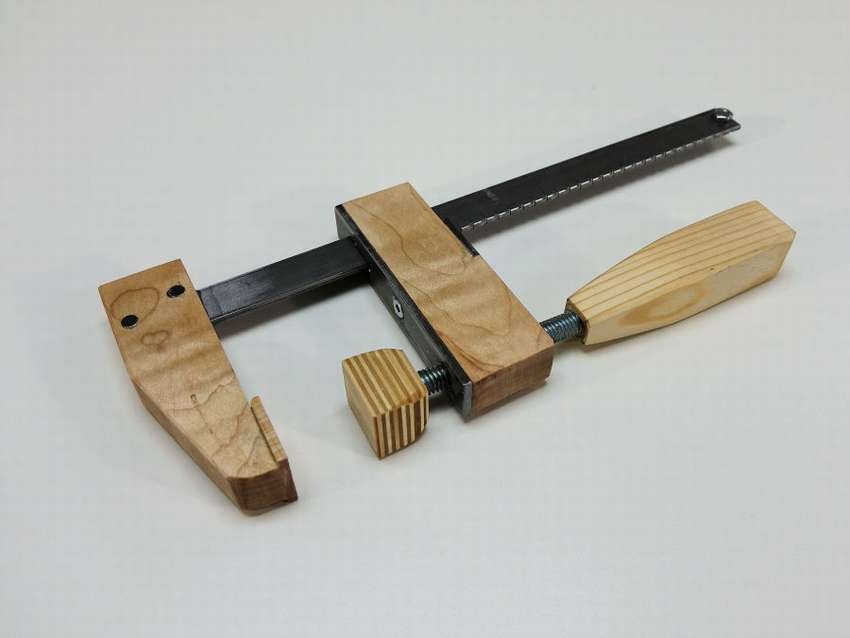
DIY do-it-yourself clamp
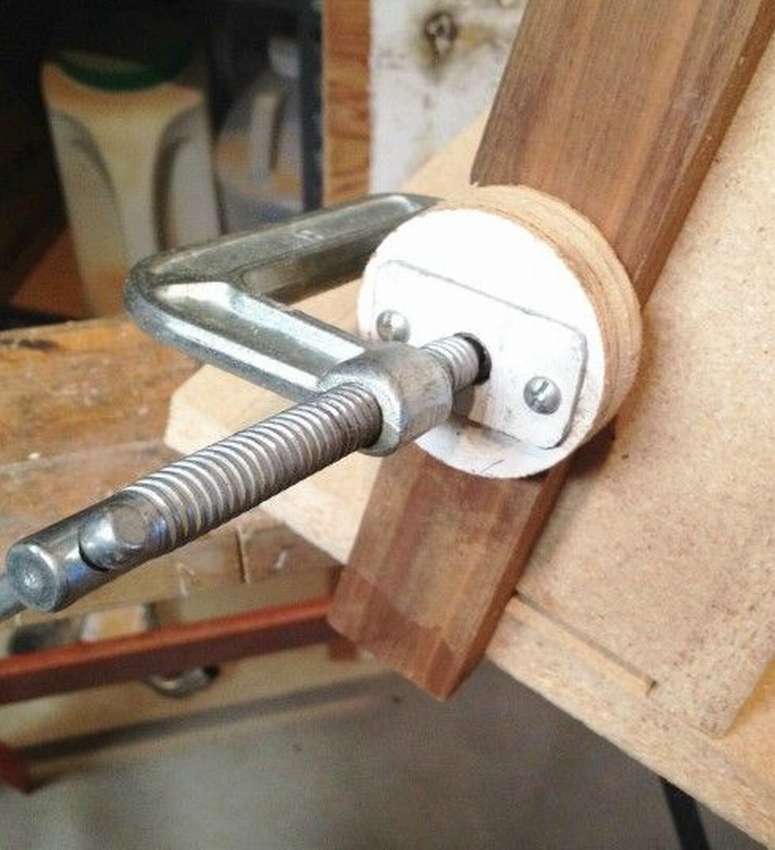
 Light homemade clamp made on the basis of a metal rod. These clamps, although not as powerful as steel ones, can still create quite a strong pressure pressure for any glue, and will last you a long time. The bar can be made any length you want. One thing to remember is the threaded rod must not extend over the entire length of the main shaft. The clamp head does not need a threaded rod at this end of the main shaft, and this simplifies assembly. The clamping jaws are made of plywood.
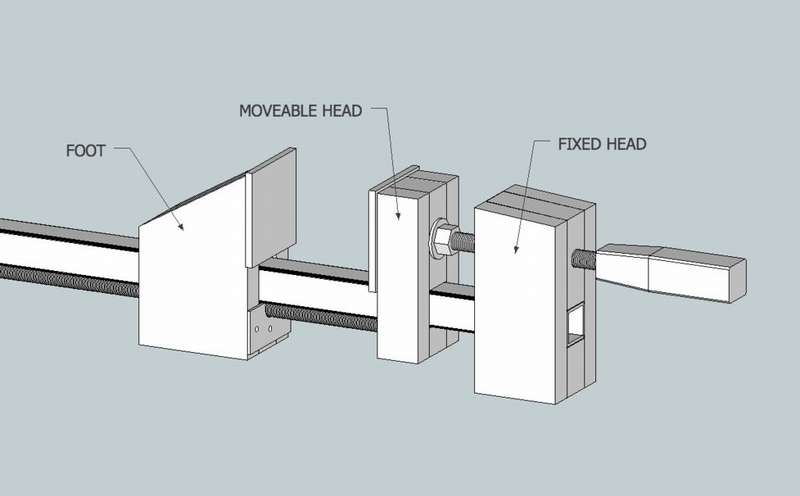 Lock nut - this is what fixes the clamping sponge on the shaft when the clamp is under pressure, the nut can be cut with a simple hacksaw, and it can be fixed to the heel with epoxy resin. A recess for a nut was drilled in the movable head at the end of the clamping screw for rotation. The recess must be wide enough to fit the washer and deep enough so that the washer and nut can rotate freely. A 35 mm washer is used here, so a 38 mm hole must be drilled with a bottom and 15 mm deep.
After drilling the recess, make a through hole for the clamping screw.. Then lock the movable head to a fixed one and mark the place where the hole should be.


https://i.expert-h.com/en/verstak/941#sigFreeIdc11d0cff9d
 Handle, clamping screw manufacturing and main assembly
Make square blanks of 25 mm and then cut 100 mm for each handle. Mark the center and drill 60 mm with a 10.5 mm drill. Alternatively, the hole could be drilled wide enough and then coated with epoxy, but this is not very reliable. Sand the workpiece to make it easier to use and glue it with epoxy to the clamping screw. Then proceed to the main assembly, it is a simple task to glue the bar to the fixed head. Fasten the lock nut and make end caps that should prevent the head from slipping on the boom. Also desirable screw a small plate onto the heel, which prevents the nut from slipping out of place - it acts like a hook that clings to the nut. The work is finished, the steel clamps are, of course, a little more reliable and heavier, but these clamps use the same rod and are still very strong and reliable and will last a very long time.


https://i.expert-h.com/en/verstak/941#sigFreeId4fb3d7e473
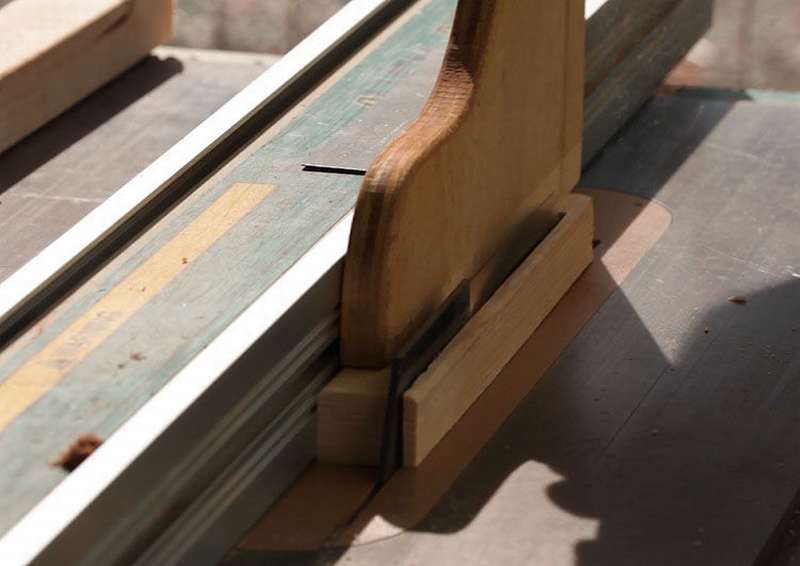
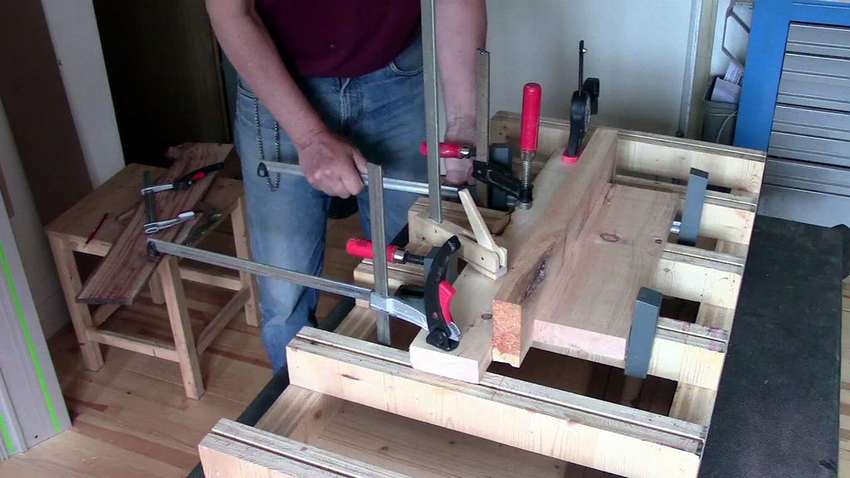
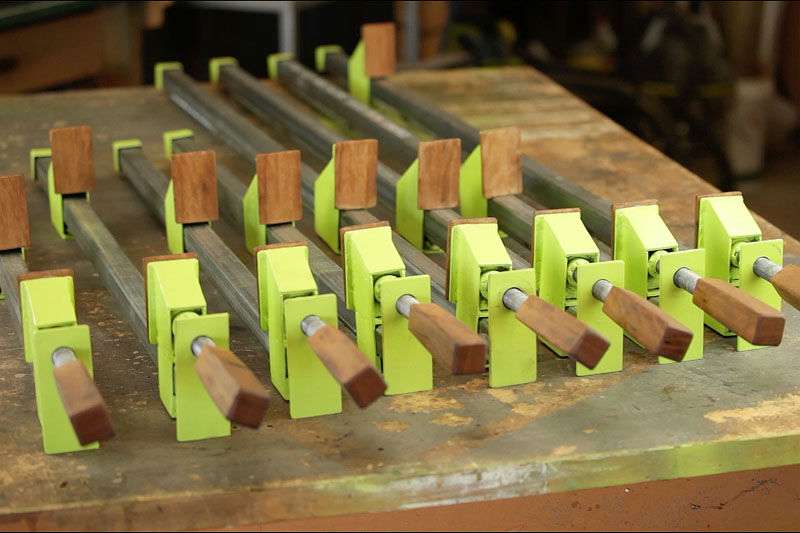 Homemade clamp
This clamp clamp is very powerful and extremely easy to use.. To make 8 clamps is a laborious task, of course, and the author also used welding. In the first step, you need to drill holes in the side walls of the heads and clamps to help align the parts for welding. To center half of the nut basedAnd heels, you need to make a stick of scraps of wood and hot glue. As well as blocks of wood, to clamp and align the remaining parts. 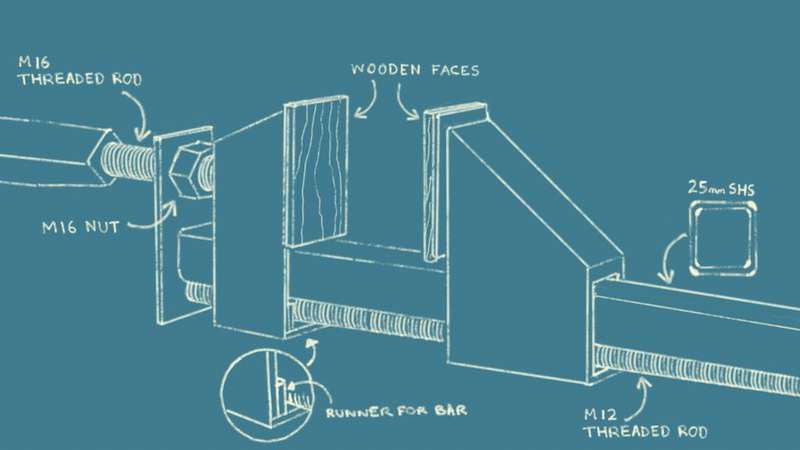 Then the main panel is created and the head joins it, you can see this process in step-by-step photos. In principle, nothing complicated, just a lot of work. To use the clamp, the foot needs to be slightly raised and it will slide freely along the timber until the workpiece, after which it can be clamped using the clamp screw.


https://i.expert-h.com/en/verstak/941#sigFreeId3d390551ae
Long clamp
Necessary materials:
18 mm plywood for one clamp you will need 3 parts:
- 100x200 mm
- 100x120 mm
- 100x160 mm
- 1x M10 x150 mm threaded screw
- 2x nuts M10
- 1x threaded plug M10
- 2x screw M6x40, nut and washer
- 1x screw M5 / M6 20 mm
- 1x square tube 1 m long 20x20 mm
- several screws about 40 mm long
The tools you need can be seen in the picture. Nothing special ... except CNC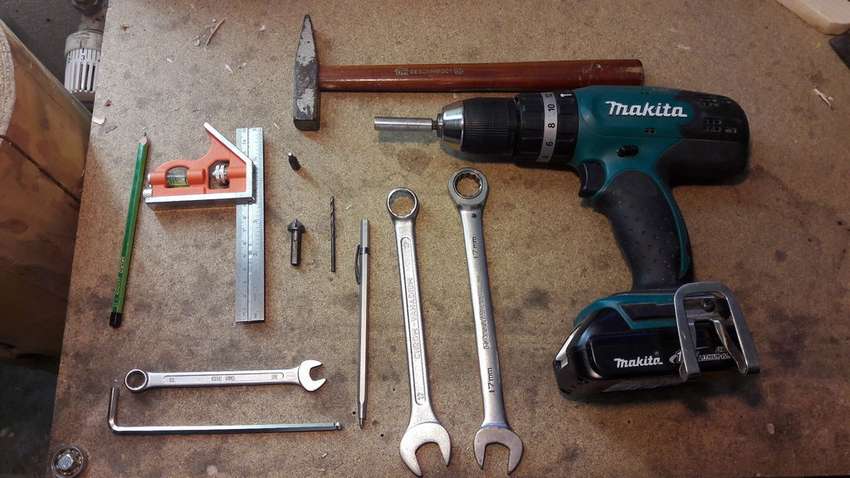
A master class for making step-by-step photos, in principle, it doesn’t differ much from the previous versions, so that can be done without comment.


https://i.expert-h.com/en/verstak/941#sigFreeIde4fb094f0e
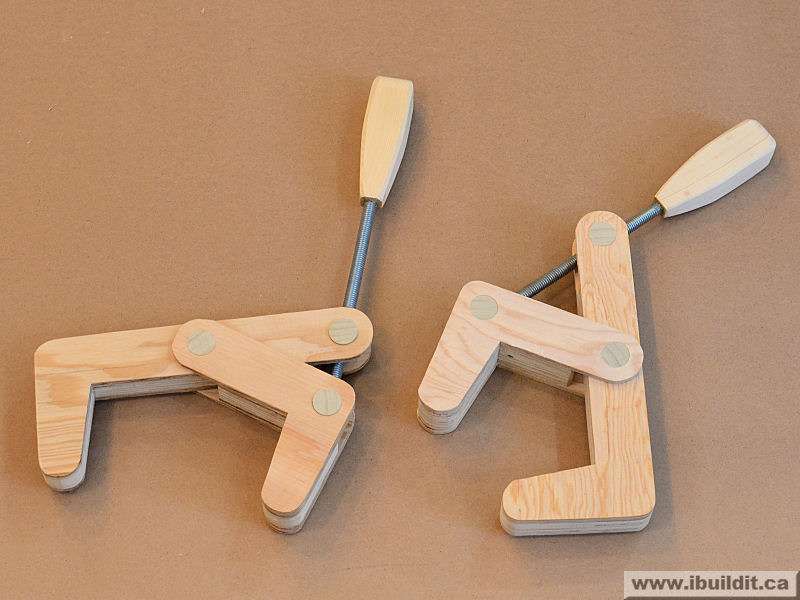
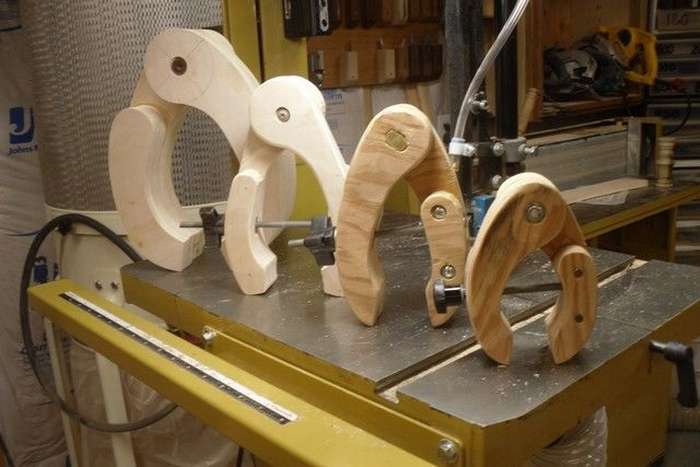
 Cam clamp
This is a very simple and useful device. Keep in mind, cam clamps although it is fast, but does not provide a large clamping force of the part, therefore, it is used only with relatively small cutting forces. They are not designed to work under high pressure, such as a pipe clamp, but they are extremely easy to use. The procedure for making the clamp, see the step by step photos. It should be noted that the French curve was used to create smooth curves (a template made of metal, wood or plastic made up of various curves. Used to draw smooth curves of varying radii). But cams are NOT a direct tracking of the French curve. The proper cam must have a profile that increases the distance from the axis of rotation to a constant speed, like a spiral drawn by a pencil tied to a rod with a string.


https://i.expert-h.com/en/verstak/941#sigFreeIda9ba37be82
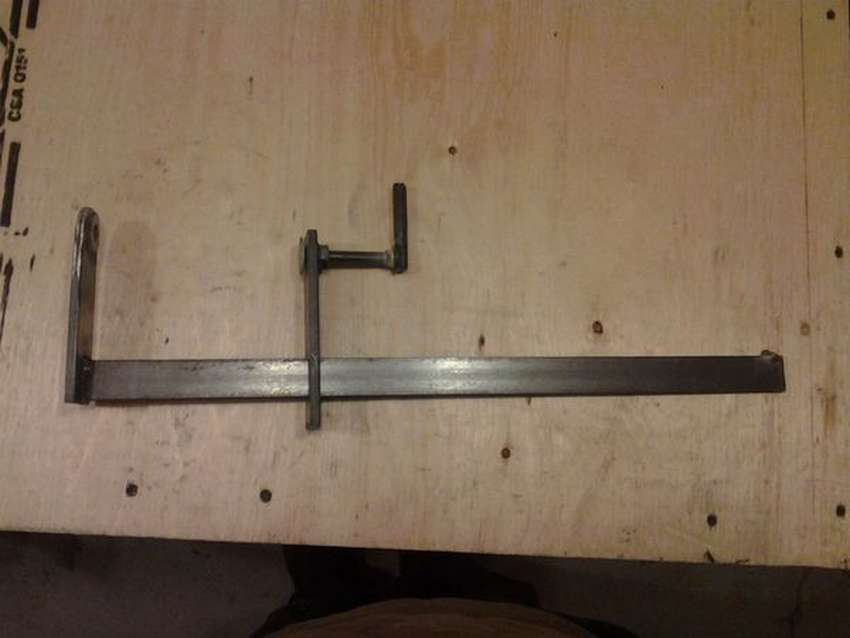
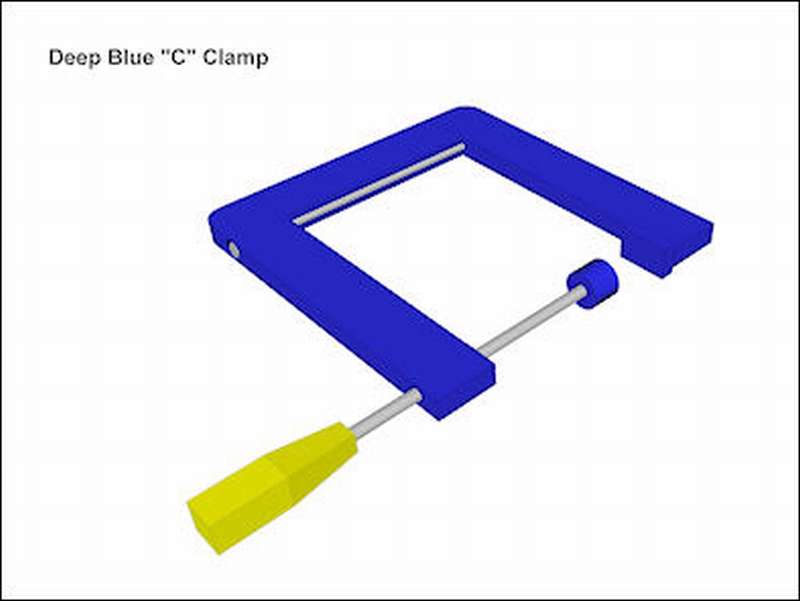 C-shaped wood clamp
This type of clamp can clamp a part up to 15 centimeters thick and strong enough for a wooden clamp of such a large size. This force is mainly due to the threaded rod of the “spine”, which holds the clamp brackets. The manufacturing process is not complicated, as can be seen in the step-by-step photos. It is worth noting that the clamping screw must have a nut on the endwhich will not rotate. To do this, slightly flatten the shaft to tighten the nut. For additional insurance, use epoxy. These are not the most powerful clamps, but they can provide a pretty impressive downforce.


https://i.expert-h.com/en/verstak/941#sigFreeIde1e2f81bf5
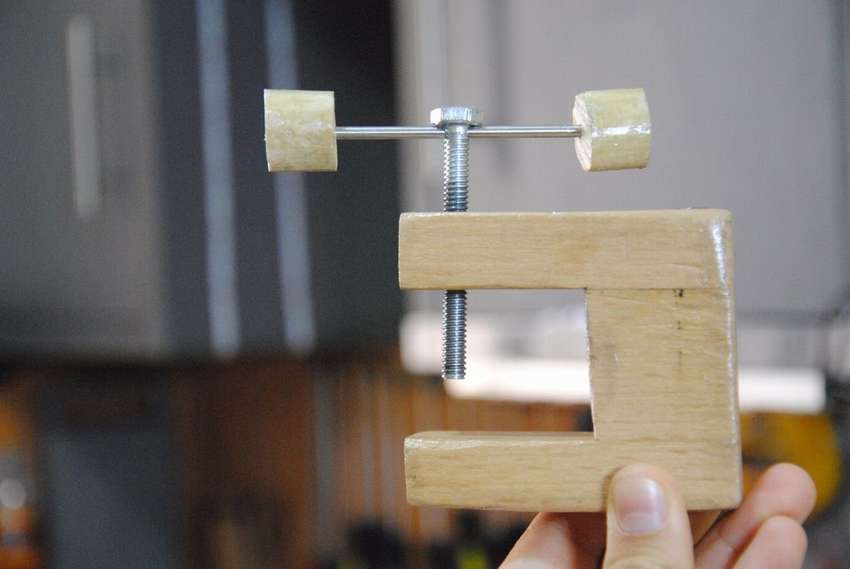 One more option C-shaped clamp made of wood made exclusively with hand tools. Drill a hole in the workpiece 1.8 x 3 x 7.5 cm. Although the size of the drill bit does not really matter, it is recommended to stay about a centimeter or two from the edge. Then select the outline of one of the hex nuts (since they are the same) around the hole. Make sure the hex nut is centered exactly above the hole. The depth should be like the height of both hex nuts when they are stacked on top of each other. Drill a hole in the bolt. If you use a bolt with a large head, it is best to drill it. Then glue the case, all the nuances in step-by-step photos.


https://i.expert-h.com/en/verstak/941#sigFreeId5d331e8cdf
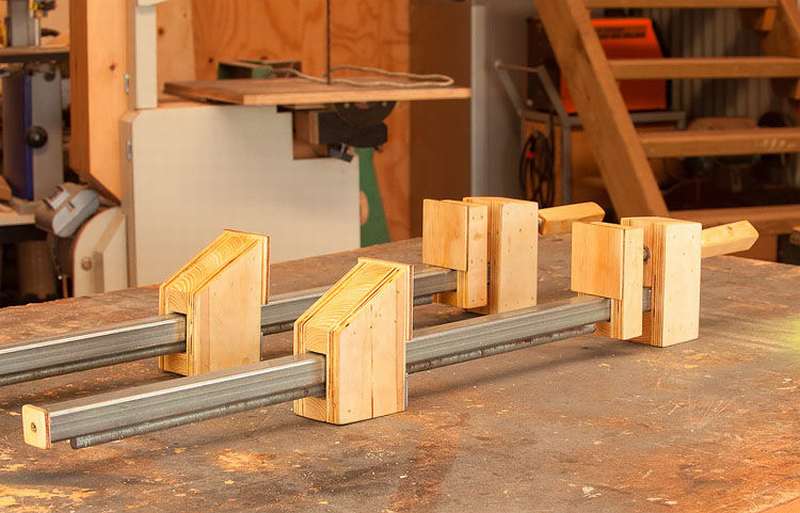
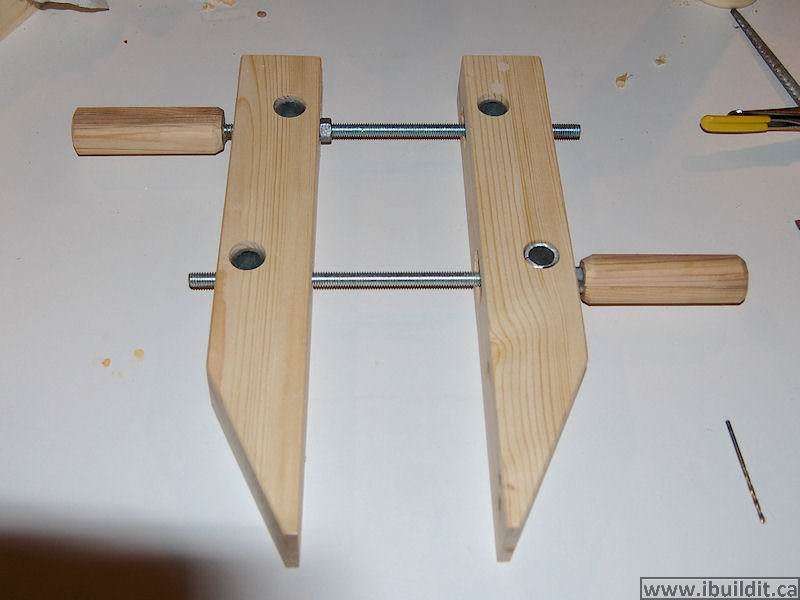 DIY wooden clamp
Made from publicly available materials and fairly easy to assemble, you can easily make one do-it-yourself wooden clampThis is a very common type of clamp. It is indispensable in the process of sawing and gluing various parts. Consists of frame, clamping jaw and movable elements. Each block consists of two parts, which will be glued later. Currently, the screws hold them temporarily for machining operations. The assembly process is shown in step-by-step photos of the master class.


https://i.expert-h.com/en/verstak/941#sigFreeId7e5379dade
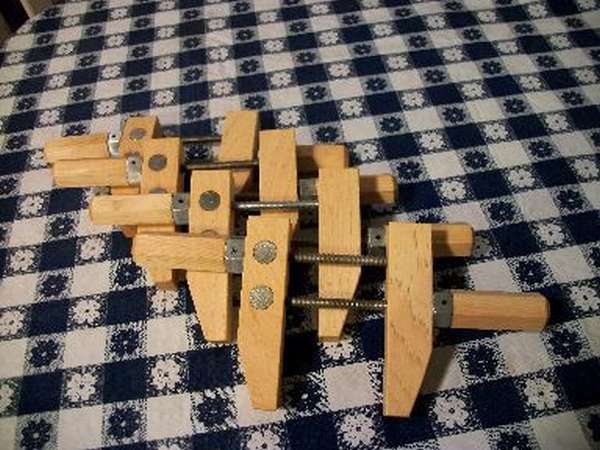 One more option of parallel wooden clamp. The order and manufacturing method is practically no different from the previous one, except that it is shown in more detail. Also here chamfers on handles are addedbut these are more decorative differences. So thatYou can use this option. You can also upgrade this clamp to clamp objects of various sizes, as well as change the size of the clamp itself.


https://i.expert-h.com/en/verstak/941#sigFreeIddadbccf2db
 Simple wood clip
Make like that DIY wooden clamp really everyone can. All that is needed is two 20-centimeter bars, two bolts and two nuts. Of the tools only saw, wrench for bolts, pencil and tape measure. Mark 5 cm and 2 cm and draw a line. The workpiece will be 12 cm, measure another 5 cm from the opposite end. Move the line to the other side and mark the center. All that remains is to drill and saw off. After the holes have been drilled, insert the nuts and bolts.


https://i.expert-h.com/en/verstak/941#sigFreeId84b74c5db3
 Wooden clip from a hanger
This hanger is designed for children's clothing - very durable, well-built, balanced with two straight edges. A little effort, and it can easily be divided into two parts, even without a tool. Here you have almost finished wooden clip from the hanger, it remains to measure the exact distances and drill holes, as shown in the photo. Make a small 8 mm groove for the lock nuts and insert them with a small hammer, if you want, you can use epoxy. Then insert threaded studs and secure with nuts. That's all, the wooden clamp is ready.


https://i.expert-h.com/en/verstak/941#sigFreeId674f7bc0bb
 Do-it-yourself clamp
Usually this type of clamp is made of metal, but the author tried to make do-it-yourself quick-clamp clamp made of woodtaking as a basis original Kant Twist. The designs are very similar, but without rotating clamping blocks - for woodworking, you can do without them. First, cut out all the details of the template from paper and stick on plywood. Then cut out the workpieces and grind. The next step is to carefully drill holes 3. After that, the parts can be separated and paper patterns removed. Then install the lock nuts and you can begin to assemble the wooden parts. The whole process is shown in step-by-step photos. Keyless clamp creates excellent clamping pressure, moreover they are light and compact.


https://i.expert-h.com/en/verstak/941#sigFreeId50e5dd337f
 3clamp for small parts
The clamp for small parts protects your fingers when working on a band saw, a belt grinder, drilling and in other cases. there is many options for clamps for clamping small parts. They can be made of any size, depending on the need. In addition, there are various ways to approach certain aspects of the design. For those who have experience working with wood, probably just looking at the clip to understand how to make it. Nevertheless, to make this clip, you can use the step by step photos presented below. They are fairly easy to make and fast, but most of the time it takes to wait until the glue dries. Note: the holes for the dowels must be tight enough to hold the key, but not enough to use incredible force to replace the replacement tip. When the assembly of the clamp is complete and you are not comfortable with reach, angle or grasping of the jaws, you can round the ends with a grinder or saw, and then glue the new ends.


https://i.expert-h.com/en/verstak/941#sigFreeIdc0760b09ad
Metal clamps
 Homemade metal clamp
Shown here how to make a homemade do-it-yourself clamp from reinforcement. Often, a metal clamp is needed to clamp various parts, it is much more reliable than a wooden clamp. But metal clamps, especially if several pieces are needed, are not cheap, an alternative is to make a metal clamp with your own hands. This task is not only difficult, but you can’t do without welding and metalwork tools, plus you need experience in metalworking.
 First of all, it is necessary to cut the reinforcement into the necessary parts, and the first thing we need to do is a fixed jaw
- To make the jaw move, start by creating a sliding part
- Then add the nut to the sliding arm.
- After that, a swivel stand and screw are made
- Now you need to cut the threaded rod and make a shoulder in it
- In the end, do the handles and panels of the fixed jaw
The process is shown in detail in step-by-step photographs. And also, so that the movable jaw does not bend, it is necessary to weld the bracket between the upper part of the coupling (part 2.5 cm) and the nut.


https://i.expert-h.com/en/verstak/941#sigFreeIde103be387b
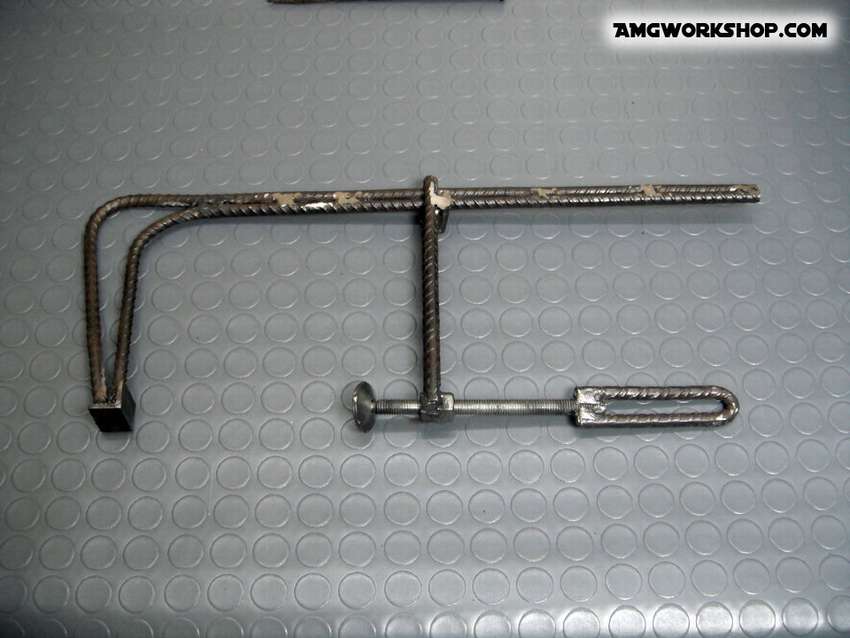
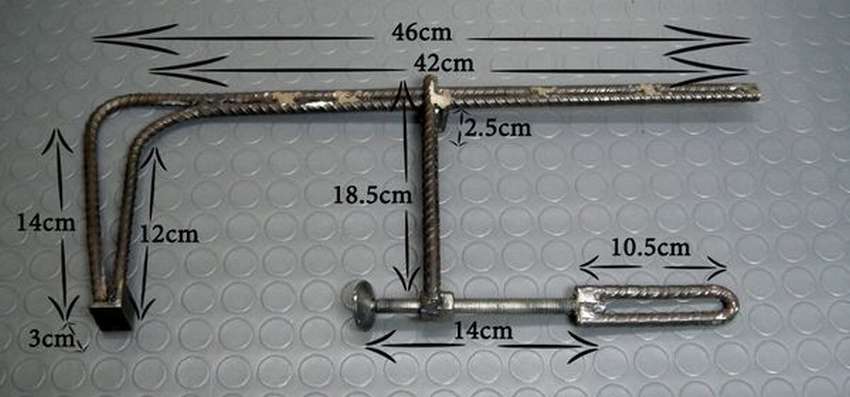
 Rebar and wood clamp
Another option, onlyabout with wooden details. For this homemade clamp used reinforcing steel for the bar. The first thing to do was to bend the rod into the shape of a reed. To bend, you can use two pipe clamps. To get the correct arc, make two marks on the rod - the first on 2 and the second on 8, making sure that the ribs on the rack are facing inward. After the rod was bent, cut off 2 centimeters to shorten the hook. The rod used in this case has a thickness of 10 mm and a length of 60 cm. It is coated with epoxy paint, but this is not necessary. A solid wood block is added to the hook. Then the movable jaw is cut to size and two holes are drilled, one at each end. One is drilled at an angle so that the rod passes. The purpose of this corner is help keep the jaw moving perpendicular to the shaft. The other end is for the screw. See the manufacturing procedure on step by step photos. This is probably the cheapest and easiest to make clamp.


https://i.expert-h.com/en/verstak/941#sigFreeIdbe07b5daf6
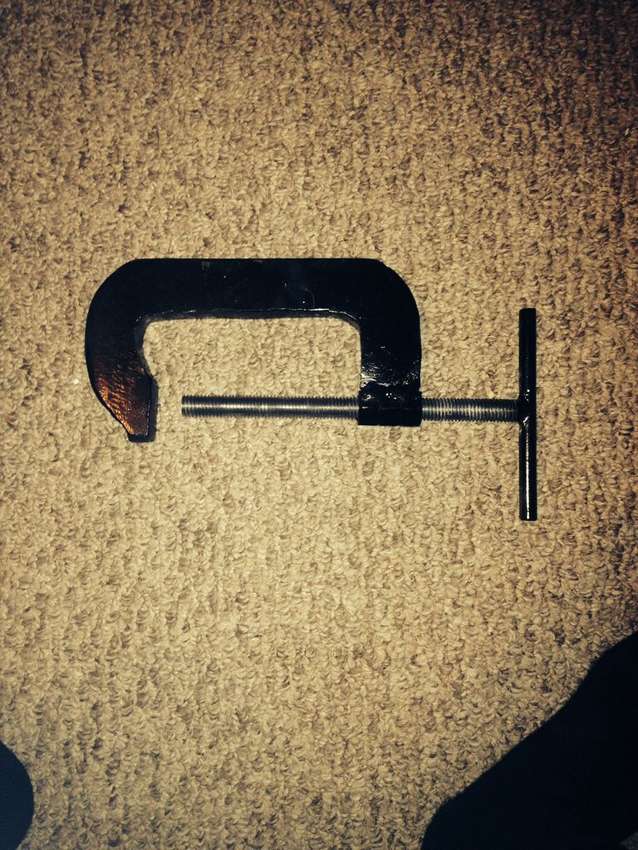 Homemade G-shaped clamp
The steel casing makes it possible to exert great compression forces. They can be used both in carpentry and metalwork, for example, for fixing metal beams during welding. Factory models are usually produced from cast iron, which, as you know, is not very durable and can burst from excessive force. Steel are very expensive. Here is an option how to make a metal G-shaped clamp do it yourself. This is not a simple matter, but it provides an opportunity to save.


https://i.expert-h.com/en/verstak/941#sigFreeIdf0261d1c00
 Wooden gasket for metal clamp
C-shaped metal clamps work great, but they can leave unsightly dents if not used with a piece of wood waste to prevent these dents. But the problem is that you have to hold it when you hold the clamp and tighten its screw, which is not very convenient. Shown here how to make a wooden block for a clamp, thus solving the problem with dents. You can always remove this terminal block by loosening one screw and removing another. Or make this clip a special clip for applications that will not leave a dent in the project of precious wood.


https://i.expert-h.com/en/verstak/941#sigFreeId1437ce7624
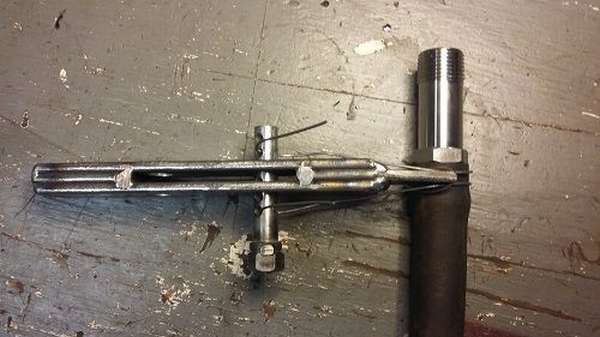
 Homemade metal clip
Very convenient clamp, Based on Bessey Clamp Design. Basically, it can be used to clamp metal objects during welding, for fixing on different materials (for example, wood). Step-by-step photos show how to make this useful. DIY metal clip. Pay attention that when tightening the sliding rod will deviate slightly backwards, forcing these two rods to “snap”, holding everything in place and preventing the sliding rod from moving. If you make the hole for the main shaft too large, the angle of inclination will be larger, therefore, and it should be tight, and at the same time could move freely.


https://i.expert-h.com/en/verstak/941#sigFreeIde94537984a
Wire clip
 This tool is used for forming a wire clip by simply tightening a piece of wire. The clamp is great for attaching rubber hoses, tying items, emergency repairs, etc. You can look at the industrial options offered in stores. They are certainly not bad, but the price to buy is quite high for such a simple device. Do-it-yourself wire clip, and it will work no worse than the factory. As you can see in the step-by-step photos, this is a very simple design. The key to making a clamp is universal pin. This is a hardened steel pin with holes already drilled! Everything is very simple! They can be found at any hardware store. or order online. How does the finished clamp work? The wire is formed in a simple cycle. The loop loop is trapped in the groove on the front of the wire clamping device. The free ends of the wire pass through the holes of the staple pin and are wrapped around. To tighten, simply grab a 14mm spanner or ratchet and turn the staple pin. The loose ends are tightened around the pin and the wire will fit snugly against the hose. Then just flip the handle of the tool to lock the wire in place. Trim the ends of the wires and smooth.


https://i.expert-h.com/en/verstak/941#sigFreeId36ad0ebb78
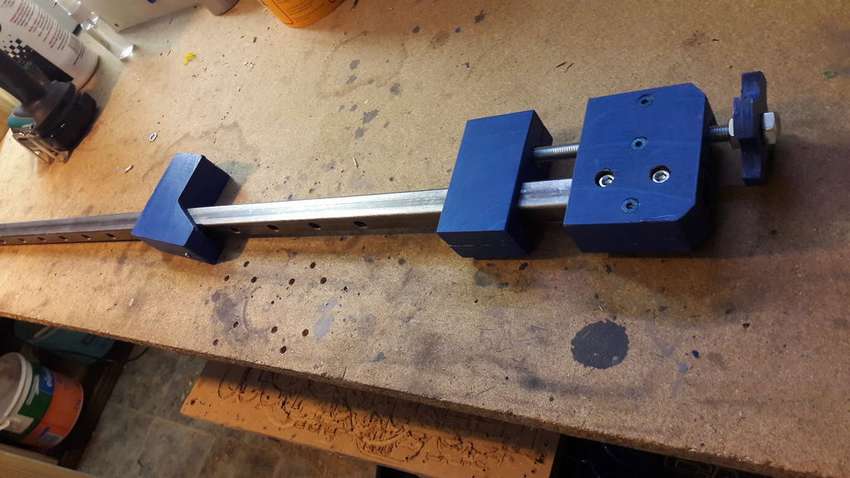
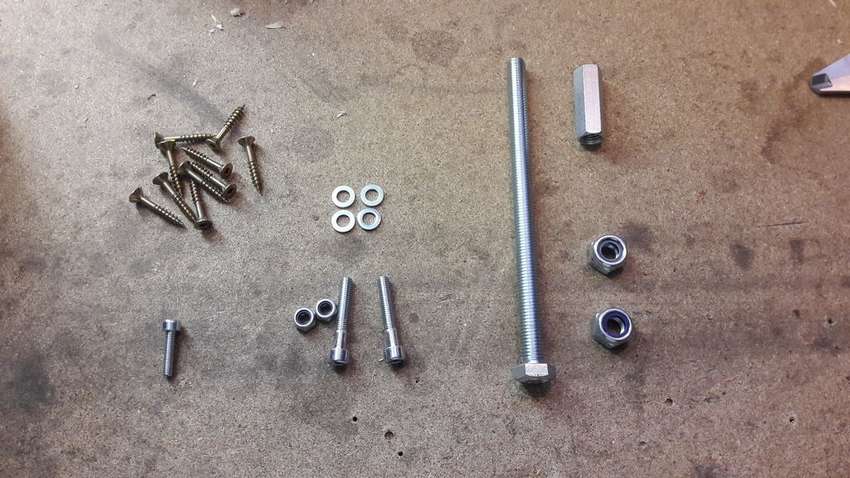
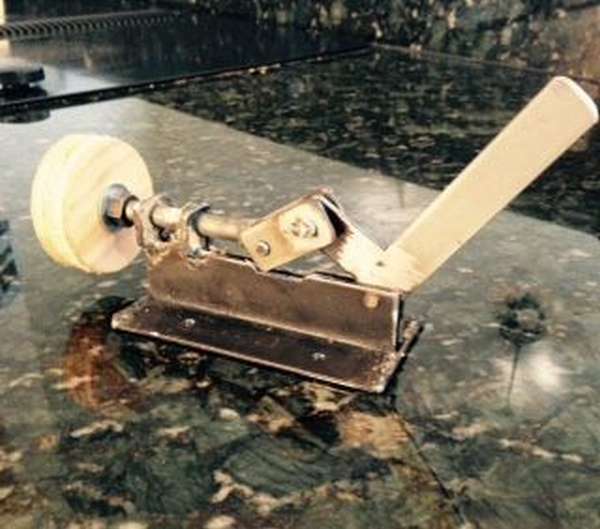
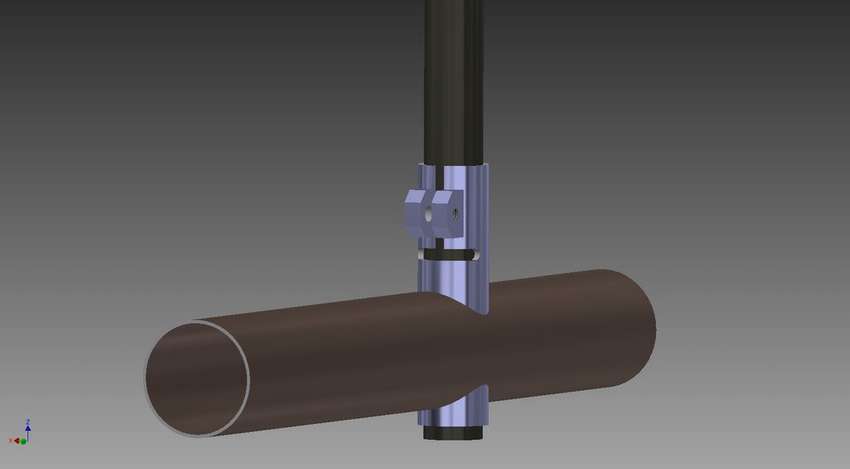 Telescopic clamp
Shown here how to make telescopic clampswhich provide an extremely durable, lightweight and adjustable length and swivel connection between the two pipes. The tubes can be made telescopic when one is adjacent to the other with a small gap. If you can squeeze a large tube, you can make a very strong grip that can be adjusted both in length andand rotation. There are a huge number of applications for this. The most familiar example is adjusting the height of a bicycle seatbut use your imagination and in a few minutes you will find dozens of ways to apply this clip. You can look at the manufacturing procedure in step-by-step photos, and if you need details and clarifications, click on the link under the gallery. I would like to add that the wall thickness of the innermost tube depends entirely on your strength requirements.


https://i.expert-h.com/en/verstak/941#sigFreeId1b5bce8550
 Central clamp
This clamp, also known as a push-pull latchas well as fixing the wooden workpiece during drilling with a clamping device. The price in the hardware store is about three times more than you can spend if you take on making this device yourself. How to do this, look at the step by step photos.


https://i.expert-h.com/en/verstak/941#sigFreeId1ea0f95790
Angle clamps
 DIY corner clamp
This device is used to fix the angle between parts. Perhaps the need arises not so often, but if you are constantly working at a workbench, you will eventually need an angle clamp. It is used both in carpentry and metal products. Great difficulty to make a corner clamp yourself No, besides, this can be done from improvised materials. For this product, residues from the profile pipe, studs and several bolts were needed. You can look at the process in step by step photos.


https://i.expert-h.com/en/verstak/941#sigFreeIdb1ede6bbbf
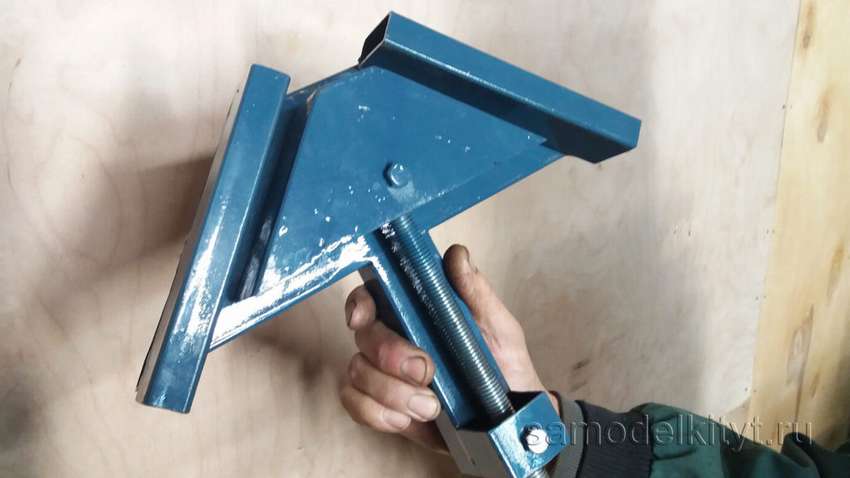
 Corner clamp
it 90 degree clamping device. Experience shows that there should not be an internal corner, that is, there should only be two sides not connected at right angles. For the greatest effect, the clamping pressure should indeed be perpendicular to the glued surfaces. Applying masking tape to the outside of the parts before bonding and “folding” helps a bit. There are also snap point spring clips for applying pressure through the connection. This tool is especially useful for ensuring that parts are held at right angles when glued.


https://i.expert-h.com/en/verstak/941#sigFreeIdeed6a0c503
 Clamp for any angle
Clamp is a joiner's best friend .... until you need to pinch two non-parallel surfaces. there is special clips for frames for paintings, making cabinets and other applications at 90 degrees, but you will also encounter a 45-degree or 30-degree angle, and you will face a problem that will have to be solved in a non-standard way. When you encounter an angle of 45 degrees, you will most likely try using a clip with a swivel head. Friction will allow the clamp to work if the surfaces are close to parallel or if the wood is rather rough. You will probably try to glue them, and then the surfaces will slip when you try to tighten the clamp. A wooden plank or bar, several basic tools and 5 minutes - that’s all you need to create an individual v-block for reliable clamping of any angle!
 First of all make a 45 ° angle from a sheet of paper, for this it is simply necessary to bend one corner and attach to the opposite long edge. Then draw a corner on a wooden plank with a piece of paper. Flip your template horizontally and mark the second line. Make sure that the intersection point between your first and second line is approximately in the center.
Draw a straight line so that V is approximately in the middle of the final block. Make a hole at the intersection of the two lines with 45 degrees, then cut each side of the v-shape. Be sure to hold the blade on the inside of the pencil lines to make the drilled hole as effective as possible. Now you can use this technique to make a special block v, and clamp any angle even with a conventional protractor.


https://i.expert-h.com/en/verstak/941#sigFreeId3b149bb18e
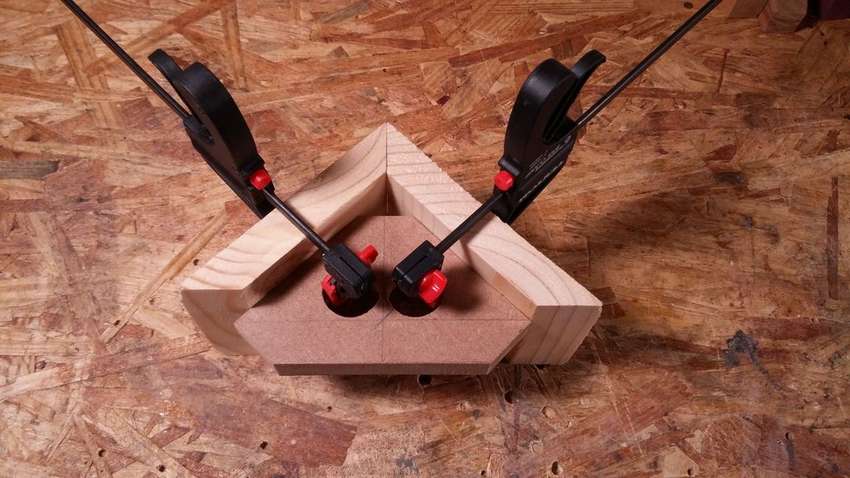
 Homemade corner clamp
Presented in the photo homemade corner clamp made of several squares, epoxy and several screws. The idea is to make a simple device that can be used for clamping at an angle of 90 degrees. Look at the prices in the store for how much it will cost you to buy three-dimensional corner clamps, and you will probably come to the conclusion that it is better to make this relatively simple device yourself. How this is done is well shown in the step-by-step photos below.


https://i.expert-h.com/en/verstak/941#sigFreeId66bc64ec92
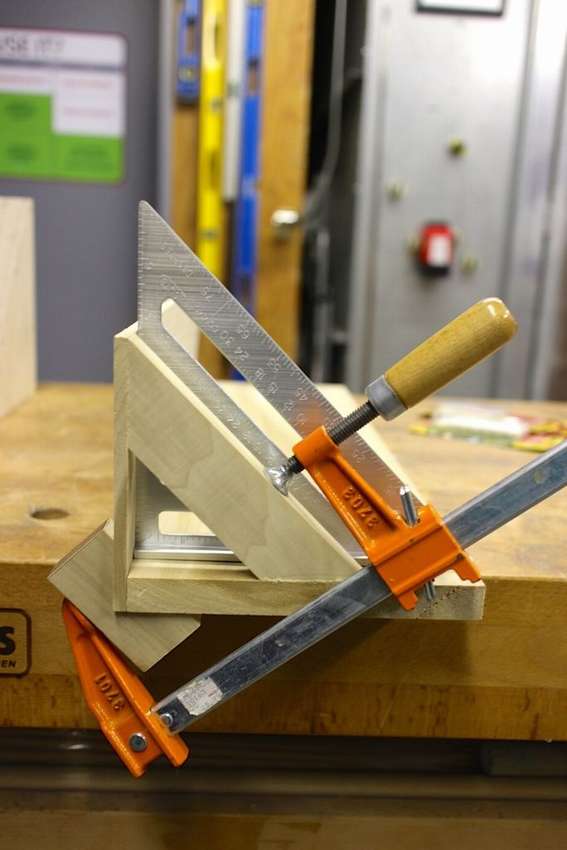
 Angle clamp for assembly
For the manufacture of this corner clamp you can use boards, chipboard or plywood. Cut four squares. Divide the workpieces into two equal parts. Drill a round hole with a diameter of 40 mm. In the end, along the holes it is necessary to cut one side, it is not needed and will simply interfere, moreover, without it, the clamp will be easier. It is advisable to file a little and other cornersthen it will be easier for you to remove excess glue from the corners. Clamp size asand angle, you can do as you wish.


https://i.expert-h.com/en/verstak/941#sigFreeId08e875bb6d
Other types of clamps
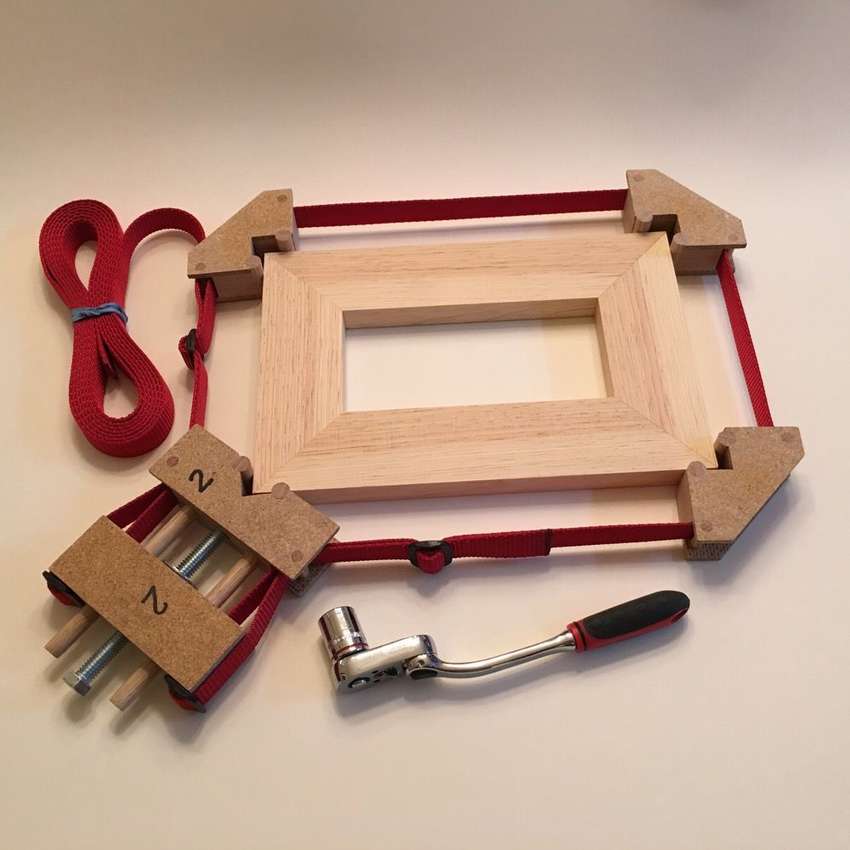 Tape clamp
The clip for the tape allows you to clamp many different forms for gluing, which will be difficult to pull out with standard clamps for the rod or pipe. Want to make a photo frame? Use a tape clamp! You can easily and inexpensively make a tape clamp with your own hands for the manufacture of rectangular frames, furniture, round structures, hexagons, octagons, n-gons .... And clamp almost anything of any size!
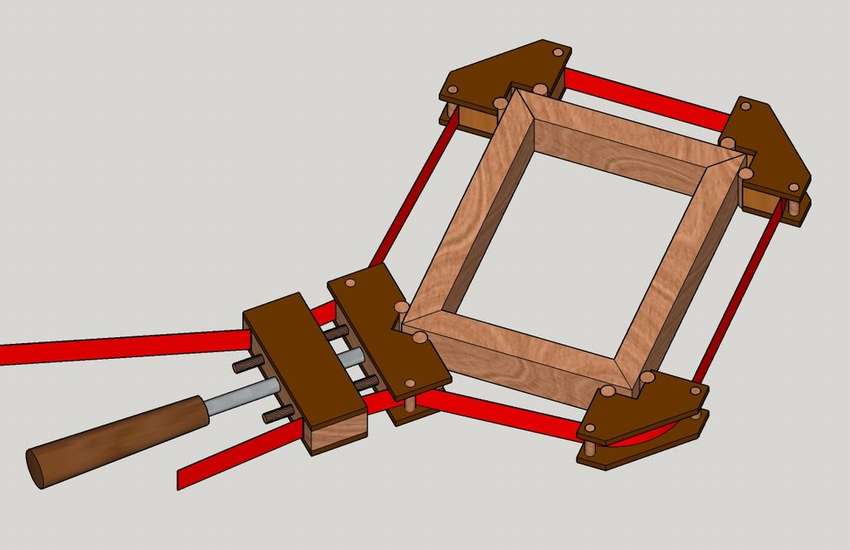
You will need a wooden board, dowels, a fully threaded hex bolt (or rod), a lock nut, a hex nut, three or more meters of nylon webbing, four sliding buckles and wooden glue. From tools table saw, band saw and drilling machine. The tape clip consists of several pads, a strip that wraps the pads, and a tension mechanism that pulls the tape around the pads to tighten them on the workpiece.
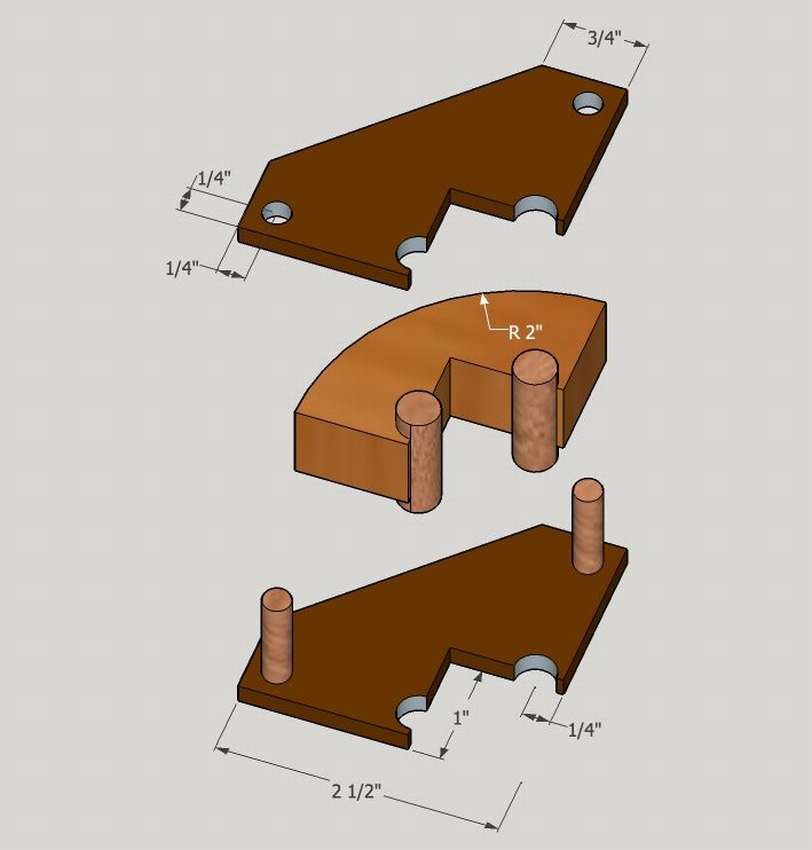 For a rectangular frame you need three jaws to hold three of the corners, a locking block and a tensioner for the fourth corner. To make these angular jaws, cut a circle. Drill a hole with a diameter of 3 mm. Cut two 12 by 12 cm squares, and also drill holes through their centers. Use nails to align the centers of solid wood in a circle. Glue the block together. The edges of the cardboard should align as shown in the figures. Further, the manufacturing procedure, see the step by step photos.
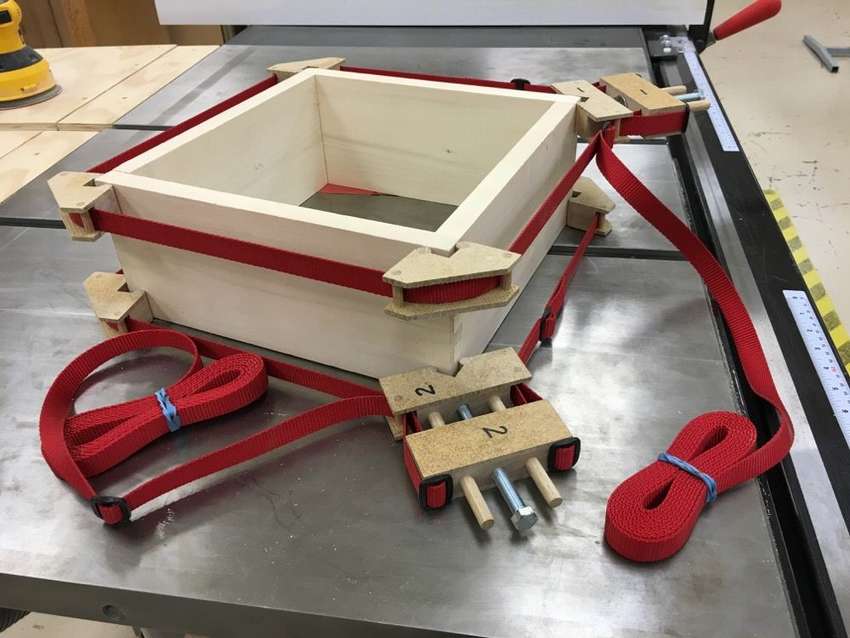
How it works. Adjust the length of the tape before applying glue to the workpiece and make a dry fit. Wrap the tape clip around the workpiece and align them with the corners. Pull the tape on the left side and adjust the sliding buckles. You can use masking tape to prevent adhesive from sticking. Make sure that there are no tension plugs and mechanism. Turn the bolt with the socket wrench to tighten the clamping jaws relative to the workpiece. Make sure the part is flat and square and let the glue dry. For rectangles, use 3 pads plus a fixed pad. For six-sided workpieces, 5 clamps plus a fixed block. For n-sided details ... ... well, you get the idea!


https://i.expert-h.com/en/verstak/941#sigFreeId67b08f3843
 Fixing clamps
Sometimes it’s quite difficult to find a clamp large enough to hold the structure while it dries after gluing or when tightening the parts with screws. A tape clamp is a convenient thing, but it can damage the edges of wooden structures. In addition, strong friction often occurs when the straps move around the corner, resulting in uneven tension. To fix it make some mounting clamps for yourself. These are wooden bars with rollers at the ends. If you use cheap pine, they will not crush the wood when you clamp it. How to make them, look at the step by step photos. And also, drill holes for the rods so that the rollers do not touch the ground. This is problematic because the clamp rolls when you lay the workpiece over them.


https://i.expert-h.com/en/verstak/941#sigFreeIda271ed686b
 4-way clamps for panels
Accurate bonding of large panels can be a real problem. When you increase the down pressure, the panels tend to move out of the upright position or worse the buckle. 4-way panel clamps solves both problemsbut the prices for finished clamps are really high, and they are cumbersome to use. The peculiarity of these homemade clamps is that the inner surfaces have a small convex curve that evenly applies pressure in all four directions. When auger pressure is applied, the curves are smoothed using a scissor mechanism, ensuring perfect alignment. Vertical pressure also eliminates the possibility of loss of structural stability.
Good alignment virtually eliminates the need for tedious surface planing after the glue dries. Since these clamps do an excellent job of this task, you can do them yourself using step-by-step photos. If you have questions, you can go to the source site, the link is under the gallery.


https://i.expert-h.com/en/verstak/941#sigFreeId79f43774bb
 Clamping box for workbench
If you don’t have enough desktop space, this clamping box partially help solve the problem. There is no need to use expensive clamps, when working with the box, the most ordinary clamps will do. Clips can be installed around the perimeter. So that the design does not slip, the author suggests use rubber mat. How to collect such a useful assistant, look at the step by step photos.


https://i.expert-h.com/en/verstak/941#sigFreeId97f5f1a4a9
 Homemade table clip
If you bought a table that has poorly fixed legs, the author of this device advises make a simple clamp that will solve this problem. This is a simple locking mechanism, small clips that are used to hold brooms on the walls, you can buy them at most hardware stores. The only criterion that must be followed when choosing is to make sure that it completely captures the crossbar of the support assembly. See the photo below for how to do this.


https://i.expert-h.com/en/verstak/941#sigFreeId1a3d059993
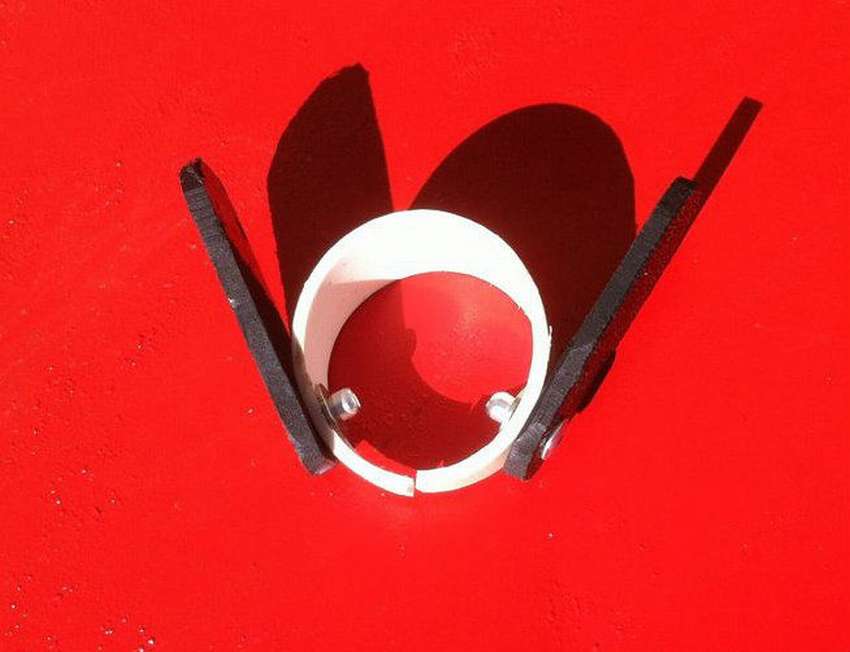 Inexpensive PVC pipe clamp
To make a clamp you needYou need a piece of PVC pipe, 2 small pieces of flat plastic for pens to open the clamp, washers and rivets. From tools saw for cutting PVC pipes, a grinder for forming handles, an electric drill, a knife to cut sharp edges. Making a clip is pretty easy. Cut the pipe into strips and separate each strip, then attach the handles and scrape off the sharp edges. Punch rivet holes and install them. That's all.


https://i.expert-h.com/en/verstak/941#sigFreeId78206ca434
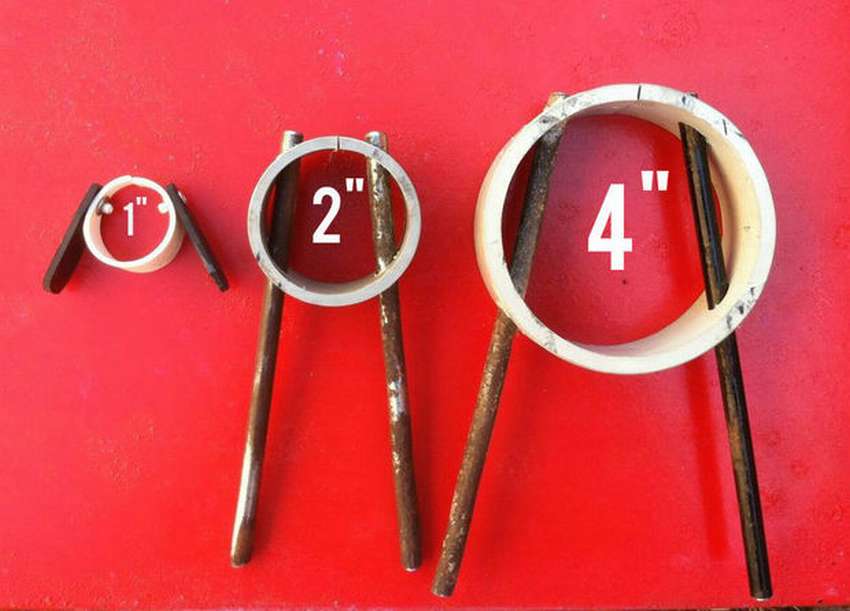 You can also make an improved version, only one hand is needed to use this clamp, unlike the previous one. In this option it is necessary cut more handle holes. To do this, grip the strip in a vice, aligning the pilot holes drilled on one side of the center with the top of the vice. It may look rather confusing, but your task is to align the drilled hole! Then drill two more holes and repeat this on the other side for the other rod. No bolts, no rivets ...... and you will get very durable rods. Look at the gallery, in the photo the process looks more clear.


https://i.expert-h.com/en/verstak/941#sigFreeId975091a60a
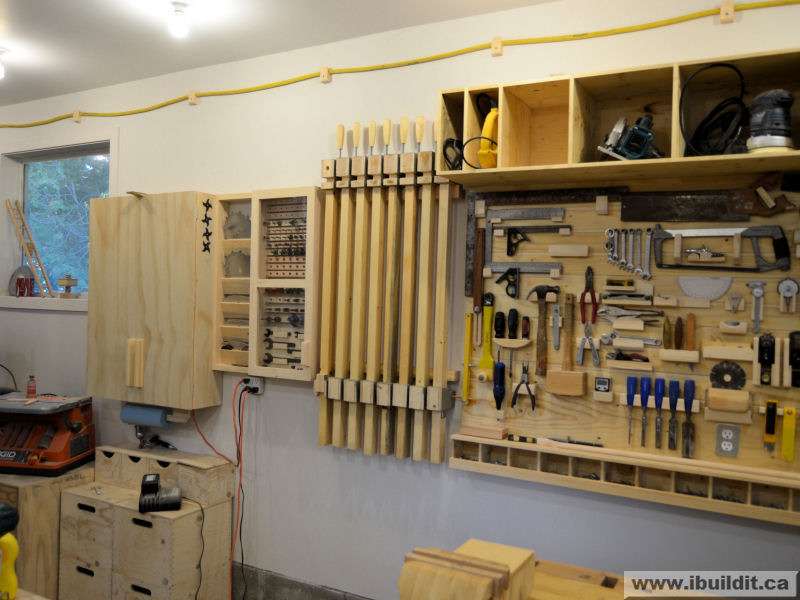
Clamp stands
 Clamp clamp stand
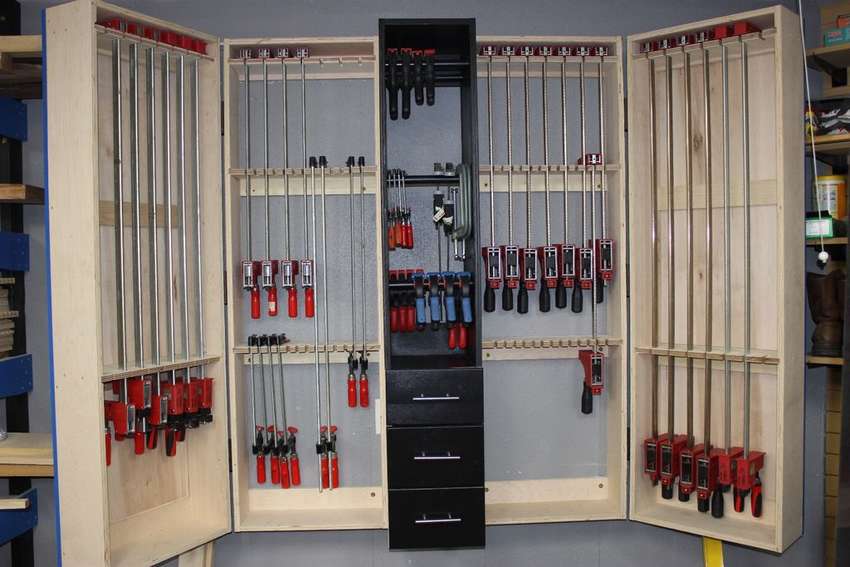
Most of the pressure racks that you find, even in stores, simply give you minimal storage space for the most common clamps. However, what about rare species that cannot hang, like F-shaped or body clamps. The author offers this option of a rack for clamps, where it is possible to place the most unusual clamps. Start by measuring the distances of the clamping rod and determining what is the most accurate tolerance you can make so that another set can fit between them. After all parts for the side cabinets and doors are cut, begin to cut the grooves. when you do, you can start assembling. Dowels are designed for the central cabinet, which contains non-essential clips, such as spring, C and quick-clamp clamps. Make sure that the mounting clip is visible on the top surface of the clip bracket. Use glue and screws to strengthen the joints. Now all you have to do is make door facades.


https://i.expert-h.com/en/verstak/941#sigFreeId1bdd1f9935
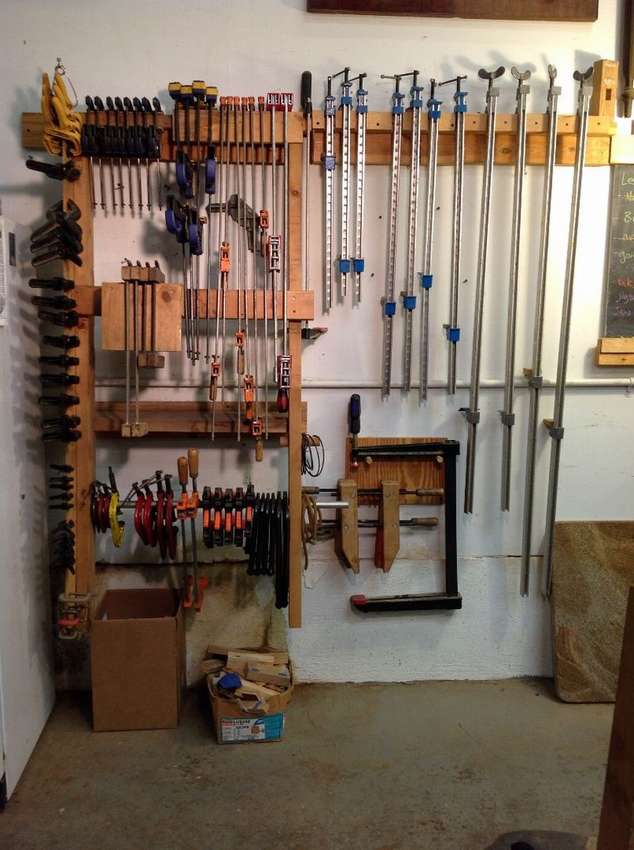 Clamp Stand Ideas
Here is an example of how compactly and conveniently organize a place to store clamps. This may come in handy if you want to build your stand according to your clamp collection and work environment. If you have difficulty visualizing the design, lay the clips on the floor and try sorting them to see how best to fit them together on a stand. Think which clamps do you use most, then lay them out accordingly and make sure you hang them to the correct height for your needs. Step-by-step photographs are close shots of various points of interest that can help you come up with your own stance. Hope it helps :)


https://i.expert-h.com/en/verstak/941#sigFreeId43b5aee850
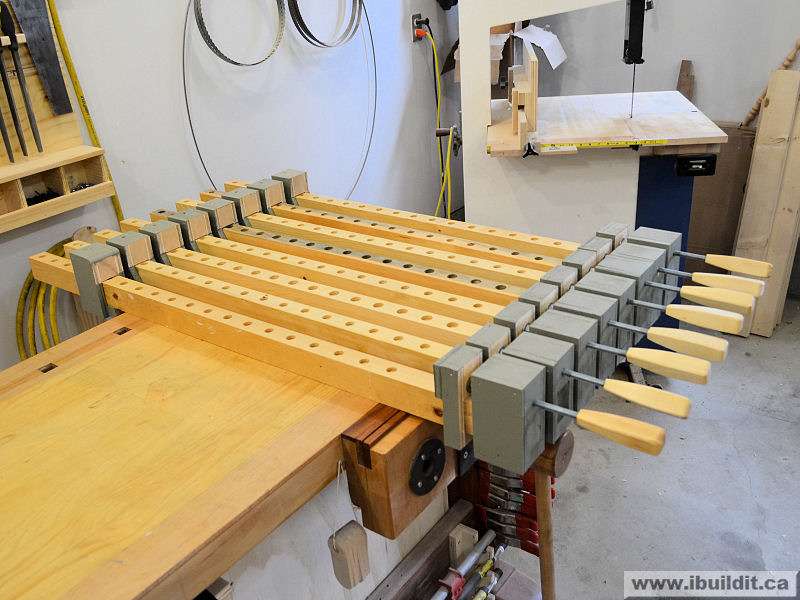
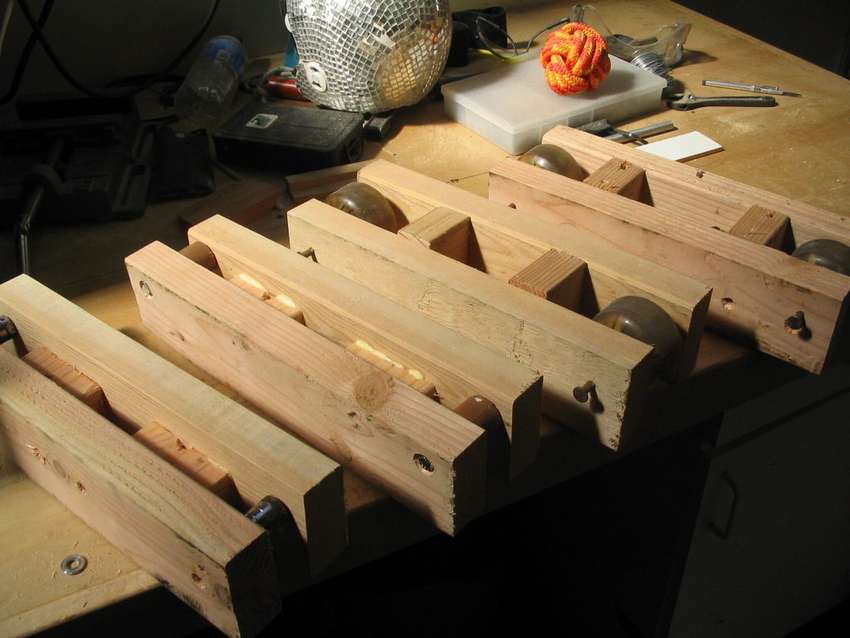
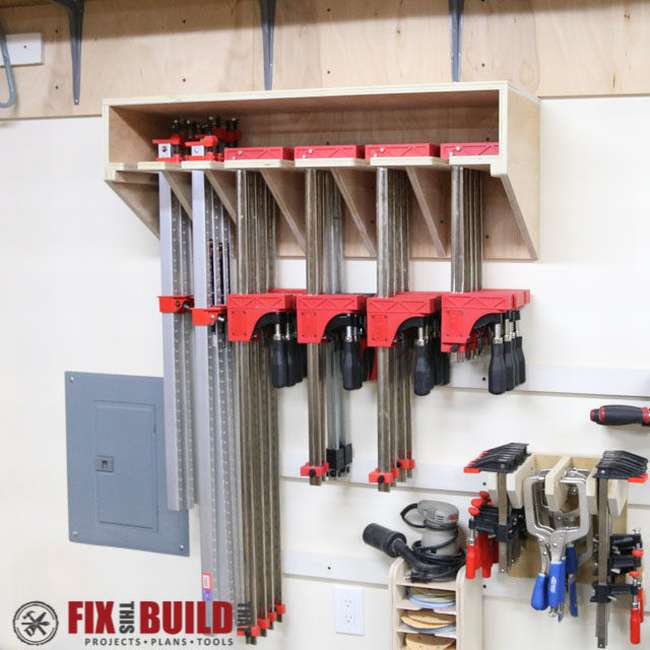 Compact clamp storage rack
In this embodiment, a non-typical approach is used, which suggests significant space savings. The rack holds 24 parallel clamps, stacked in 6 in 4 compartments. It also holds 12 bar clamps folded in six recesses in 2 compartments. If you used the side-by-side method, you would need 48 places for parallel clamps only! An upper shelf is also provided, which can be used as additional storage space. See assembly steps for step-by-step photos.


https://i.expert-h.com/en/verstak/941#sigFreeId9710688173
 Clamp stand
In the manufacture of this rack, the author used french system, this is a really interesting idea that allows you to approach the issue of storing tools creatively. The photographs below do not show the procedure for assembling plans, but simply depict plans and photos with the finished result. This should be enough so that you can use this idea or change it in accordance with your own clips.


https://i.expert-h.com/en/verstak/941#sigFreeIdfe1e0443ad
 Clamp shelf
There are many ways to store clamps. In this case, the idea is that the clamps are placed on the spikes. 20 cm of wall space can store several pipe clamps and even more clamps. The design decision is to cut strips at an angle of about 20 degreestherefore the clamps will not rotate. There are not many engineering developments, there are more advanced solutions. But you can use this idea as a basis, make adjustments and come up with your own design.


https://i.expert-h.com/en/verstak/941#sigFreeId923307f260
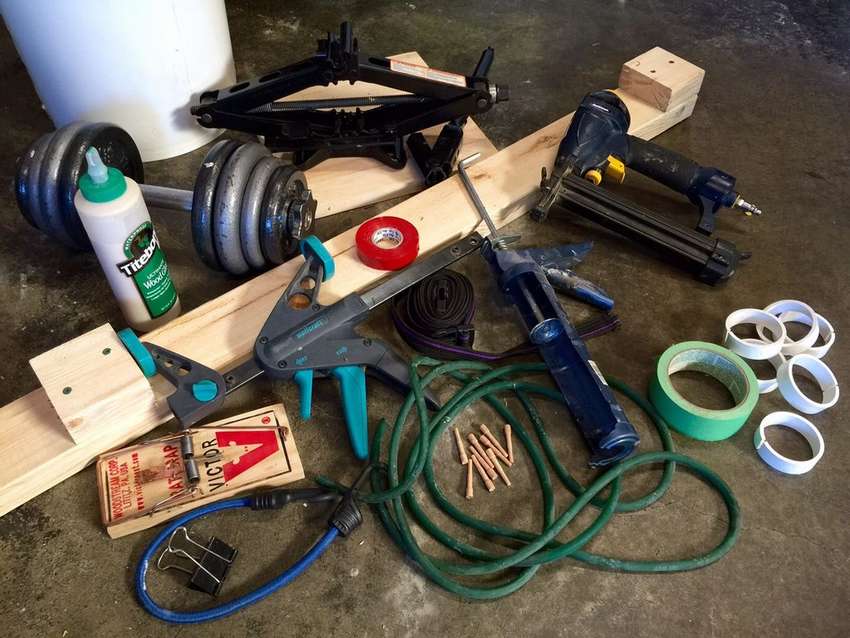 Makeshift clips
Real joiners always have tons of clamps. But if you do not have your own workshop or extra money, you can use improvised clips. Fortunately, today they produce very high-quality carpentry glue. So in most cases, the quality of glued joints does not depend on the force with which you compress the parts, but on the amount of glue. This gallery shows various types of makeshift clips, from office clothespins to dumbbells for gymnastics.
- Even an ordinary spring mousetrap essentially a great grip.
- PVC pipe can be cut and by adjusting the size of the pipe and the thickness of the ring, you can change the size of the sponge and the clamping pressure.
- Mounting Guns very similar to one-handed clamps.
- Complex parts are easy to clamp with ordinary scotch tape.
- Provided that you can balance their subject, any source of weight provides a good way to hold two surfaces together.
- Can be used dumbbells, paint cans, wood piles, beer crates, various bottles and buckets and other containers filled with water, in general, anything.
- Good for pulling together gangcords, surgical tubes, trolleys, but care must be taken that the ends of the metal do not damage the surface, and they require caution when using (they are dangerous when they suddenly release).
- For example, use nails allows you to quickly and accurately connect two glued surfaces due to several small (and easily filled) holes in the work surface.
- A few boards and car jack can create very good pressure. Just make sure you don't overdo it. Remember that the car jack is designed to give power to literally tons, and you have a huge number of levers at your disposal. Distribute this effort to the largest possible area using a large piece of wood
I hope this list will give you ideas when you need a clip for a one-time operation.


https://i.expert-h.com/en/verstak/941#sigFreeIdec37fdf5f5
DIY clamps drawings


https://i.expert-h.com/en/verstak/941#sigFreeId9671c29c52
100 photos of homemade clamps, clamps, clamps


https://i.expert-h.com/en/verstak/941#sigFreeId3371bdb187
Hello, I am the author of this article, so I look forward to asking questions for this article in the comments below, I will answer all !!!
If you have questions on another topic, ask them on our forum, we will answer you
- Two baskets of paper in 5 minutes (Master class)
- How to make a simple and compact table for a milling cutter from plywood
- How to make a soft headboard tile (Instructions + step by step photos)
- Cinder block benches: a convenient bench in 55 minutes
- How to make a bed with a niche: saving space (Master class)