DIY do-it-yourself workbench 1200 photos, drawings, step-by-step master classes
 universal workbench table
What should be the workplace in the home workshop? It is clear that everyone equips according to his needs, in this case we are not talking about professionals, they then know exactly what they need. And for the lover an ideal option to make a universal do-it-yourself workbench, so that as they say, for all occasions and fix a chair and cut off a metal tube.
It is unlikely that you will find a suitable desktop in the store to satisfy in every way, and buying separately, of course, is expensive. It makes no sense to invest in expensive equipment if you do not make money on it. therefore table workbench is better to do it yourself, and gain experience and save. True, this article presents not only multi-purpose workbenches, but also narrow-profile ones, but the main thing is that you can do all of them yourself.
So you can learn how to do it yourself:
- universal workbench for miter saw;
- workbench with a shelf for a grinding machine;
- universal workbench with drawers;
- mobile workbench for a grinding machine;
- universal table for the milling cutter;
- welding table;
- belt sander;
- manual drilling machine;
- universal rack for additional equipment.
 Universal workbench table
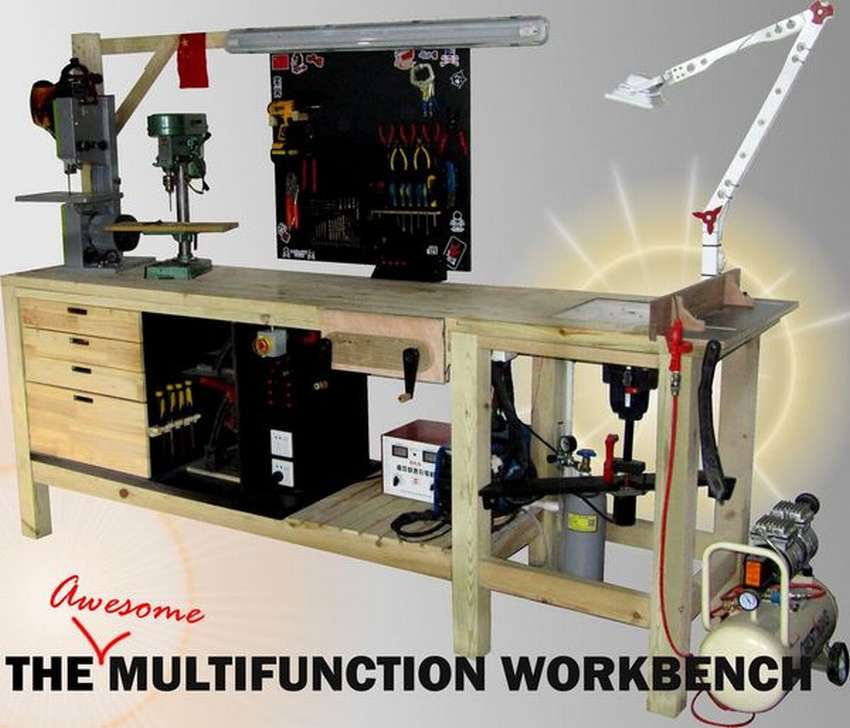
Do you need a workbench that is suitable for processing wood, metal and even repairing small household appliances? This versatile, versatile workbench table solves your problem.because it allows you to do everything from woodworking to mechanical work, that is, sawing wood, milling, grinding, etc. Great for a small room.It is better to have one multi-function table than several small workbenches. The main idea of the author of this workbench, the transition from one type of work to another in less than 30 seconds.
Among other features:
- very strong and solid construction, weight more than 150 kg;
- a lot of space for storing tools;
- several platforms for quick change of type of work in less than 30 seconds;
- automatic adjustment of the height of the working surface for the router;
- integrated power supply 5V, 12V and 24V for working with electronics;
- adjustable lighting;
- folding table and vise.
With the benefits sorted out, now closer to the point. I won’t describe the whole process in detail, a very large article will turn out. To find out more information, you can go to the author’s website, the link is under the galleries. However, the author presented very detailed step-by-step photographs, more than 200 pieces, so in principle, everything is more or less clear. This is how the finished workbench should look in the final.


https://i.expert-h.com/en/verstak/universalnyj-verstak-svoimi-rukami-1200-foto-chertezhi-poshagovye-master-klassy#sigFreeId7a90611537
What is necessary for work? In fact, many tools are not needed, enough hand and circular saws, electric drills, chisels and screwdrivers. Also, a lot of clamps and sandpaper are desirable. During the implementation of this project, you may have to buy some tools that will simplify the work and save some time. Sample list of materials:
Wooden blocks
- 90x90mm at least 10 meters
- for the manufacture of countertops from scratch 55 meters 40x40mm;
- 40x80mm at least 8 meters
- 15x80mm at least 8 meters
Besides about 10 sq.m plywood, a few square meters of vinyl tape, glue, screws, well, a complete set of electrical products, from the cable to the switches. To not list the list, everything you need is shown in step-by-step photographs.


https://i.expert-h.com/en/verstak/universalnyj-verstak-svoimi-rukami-1200-foto-chertezhi-poshagovye-master-klassy#sigFreeId2e9c0ead90
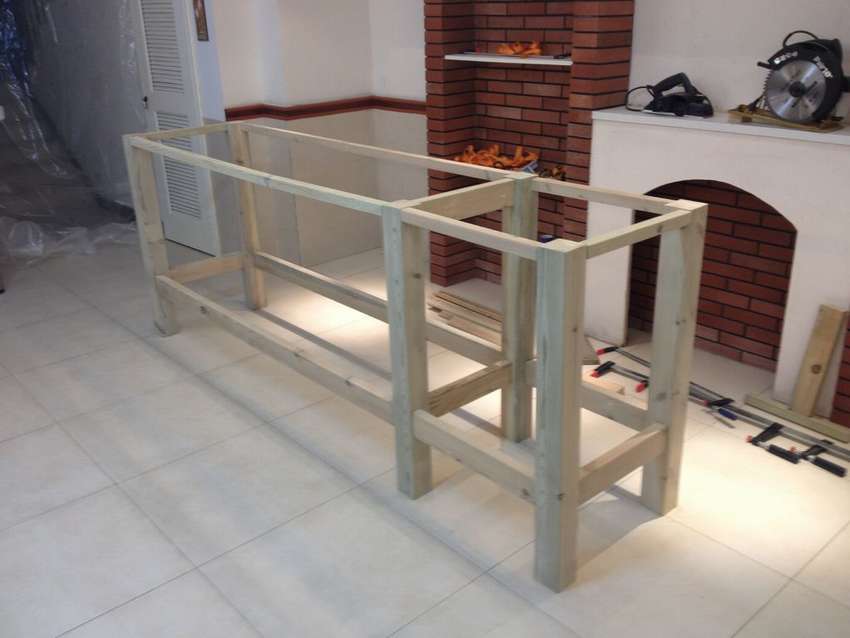 Shown here is the manufacturing process of the frame and countertops.. This is a rather lengthy process, especially at first, but as soon as you have experience, work will go easier and faster, most importantly, do not be afraid. The presented here is the option of manufacturing countertops from glued battens, is not the easiest. Of course, in this case, the working surface is very durable, but it doesn’t matter, you can use boards or other material. To attach the countertop to the frame, drill a few holes at the top, for each corner, and then use long 15 cm screwswhich deeply go inside the table legs. In the future, you can make caps to hide the screws using wood waste.


https://i.expert-h.com/en/verstak/universalnyj-verstak-svoimi-rukami-1200-foto-chertezhi-poshagovye-master-klassy#sigFreeIdff583048fourteen
Next comes installation of a circular saw, a very convenient tool, in this case, you can use it as an end saw, that is, saw off the edges of the boards, you can fit it in size, choose grooves if you need more precision and the like. True, a rather dangerous device, so when installing, be careful and take your time to do everything well. Also make sure you have the ability to quickly turn off the engine in case of any problems. As support it is better to use not plywood, but polycarbonate. Next comes order of installation of a milling cutter, it will take about fifteen minutes and come in handy when you make boxes. You just need to cut a square in 20 mm plywood 300x300mm, mark the places for fastening and drill holes.


https://i.expert-h.com/en/verstak/universalnyj-verstak-svoimi-rukami-1200-foto-chertezhi-poshagovye-master-klassy#sigFreeId2bea87f044
Production of the main frame, the central compartment, where the sockets will be located, as well as cabinets with drawers for storing the tool and an additional folding tabletop. This step is pretty simple. To base the bottom shelf, you can use glued plywoodso that the thickness is approximately 40 mm. Then gradually add the vertical panels, and finally the shelves. So that the surface of the plywood shelves do not wear out quickly, you can wrap them with a vinyl sheet. A small box has been built for outlets in the middle of the table, you can do it differently, take the panel out, but this option is safer. Drawers need a little 20mm wall plywood, 5mm bottom plywood and 20mm solid woodto make front panels. Now the basic construction of the workbench is almost complete. It is sometimes useful to have an extra work surface. You just need to add a few square meters of 20mm plywood and fix the retractable corner supports. Screw the corner support onto the legs of the table, saw off the plywood of the required size and make it flush with the upper surface. You can expand these extensions when you need more workspace, which is very convenient, especially if the workbench is mounted on wheels. This can double the work surface.which is able to support the weight of the workpiece without bending. At the end, put all the joints on the glue.


https://i.expert-h.com/en/verstak/universalnyj-verstak-svoimi-rukami-1200-foto-chertezhi-poshagovye-master-klassy#sigFreeId9644065bf9
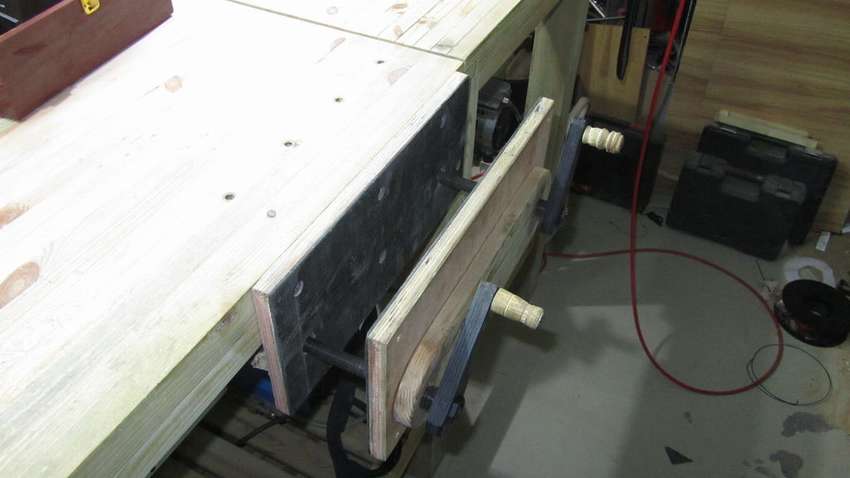 Installation of a vice of joiner's. Not the best option, but they are large enough to hold workpieces of various sizes. If desired, they can reinforce by adding several layers of plywood. For reliability, plywood can glue with rubber sheets. To make a vise, you will need several pieces of plywood, 2 steel rods with thread 16 mm in diameter, 16 mm nuts and rubber sheets.


https://i.expert-h.com/en/verstak/universalnyj-verstak-svoimi-rukami-1200-foto-chertezhi-poshagovye-master-klassy#sigFreeId5a0e887fbb
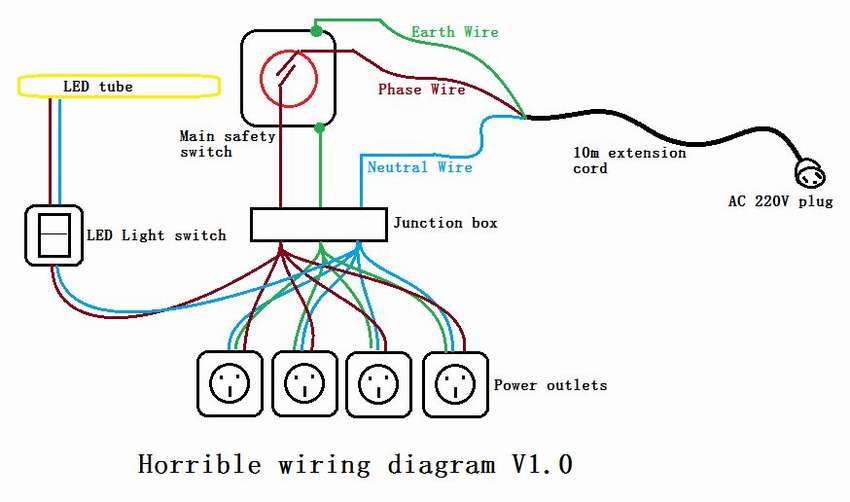 Electrician. At the workbench, several power points are always useful. Only if you have never dealt with wiring, is it better to invite a wizard. Well, for those who understand, special instructions are not necessary. The main thing is to provide a fuse with a switch so that if necessary, the workbench could be completely disconnected from the electrics. At lighting organization, the author proceeded from two principles, not to spoil the walls and that the lamps were located on the workbench itself. Also shown in these photos installation of an electric lift for the milling cuttera. To raise the installation of the milling cutter, a particularly powerful engine is not needed, you can copy the presented system, which is very simple, but quite reliable, or come up with your own.


https://i.expert-h.com/en/verstak/universalnyj-verstak-svoimi-rukami-1200-foto-chertezhi-poshagovye-master-klassy#sigFreeId4fb72b697a
Installing a dust extraction system. Of course, it is completely impossible to get rid of chips and dust, the main task is to remove the largest part, which primarily interferes with the work. Submitted system basically solves this problem and it’s quite easy to build, you just need a 30x30cm plywood sheet about 20 mm thick, and another 5 mm pieces to build the box. Drill holes, fasten the bottom of the box, make it airtight and connect it to the vacuum system through the PVC pipes.


https://i.expert-h.com/en/verstak/universalnyj-verstak-svoimi-rukami-1200-foto-chertezhi-poshagovye-master-klassy#sigFreeIdf692447eca
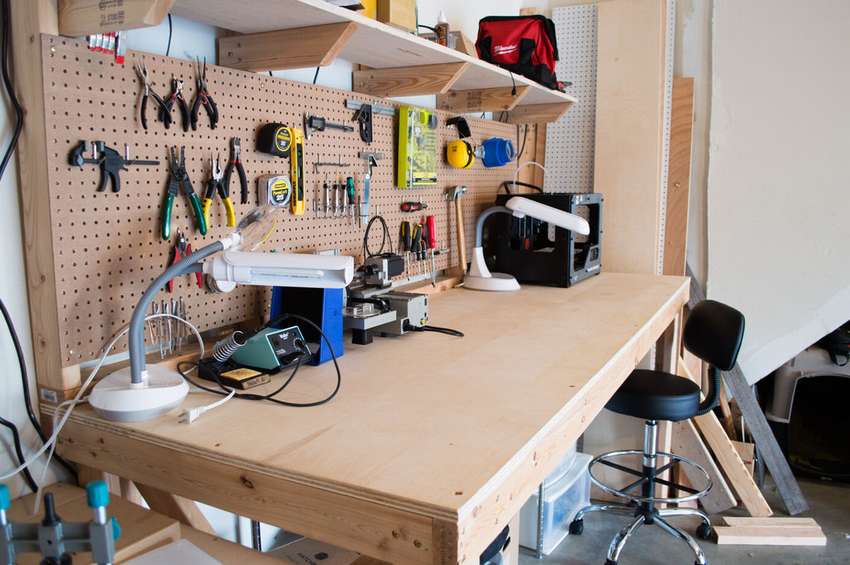
LED Desk Lamp Installation necessary when you solder or perform other work requiring precision. To install the lamp you need 4x4cm rail about 2 meters long, 10 or 20W LED floodlight, switch, wires, several screws and about 200 mm threaded rod. In order to attach it to the table, the author used tread inserts. It is necessary to drill a hole in the lower part of the lamp stand, put a threadedput inward, and use a long threaded rod. Whenever it is necessary to change the position of the lamp, turn the hairpin out and insert it into another hole, which will take several seconds. The advantage of this solution is that the lamp is firmly mounted on the table and the tripod can be attached to any positionfixing it by simply tightening the rod.


https://i.expert-h.com/en/verstak/universalnyj-verstak-svoimi-rukami-1200-foto-chertezhi-poshagovye-master-klassy#sigFreeIde77b85a3e2
Install the wall toolbar and the result is how it should look. The wall panel for tools is very simple to make. Take a sheet of plywood, drill four holes, one in each corner. Then sandpaper to make the surface perfectly smooth and even, and glue vinylby removing air bubbles. Let dry under pressure on a flat surface. Then make the fixtures for the tools you need. Well, the last five photos, this is what should result in the result.


https://i.expert-h.com/en/verstak/universalnyj-verstak-svoimi-rukami-1200-foto-chertezhi-poshagovye-master-klassy#sigFreeIdea95ca0724
 Universal garage workbench
If you need to equip a workplace in the garage so that it is possible to perform all types of work from soldering to wood processing, then the universal workbench presented here is just right for these purposes. The author provided that it was possible to work standing and sitting, for a universal model this is certainly preferable. Ergonomic working height is about 8 cm below the elbowso that the table is 110 cm high, but you can naturally adjust the height to your needs. Below the photo shows the necessary tools and sizes, though in inches (1 inch - 2.54 cm).
The assembly sequence in step-by-step photographs is shown in detail.


https://i.expert-h.com/en/verstak/universalnyj-verstak-svoimi-rukami-1200-foto-chertezhi-poshagovye-master-klassy#sigFreeId86ca882c21
 Do-it-yourself universal workbench
The simple and functional design of the presented universal workbench will help to maximize the use of work space in your garage or workshop. The design feature provides for an additional shelf and mobility due to the wheels. In general, the more moving parts, the greater the likelihood of crooked parts and losses. Therefore, on a workbench, everything should always be clearly attached and checked. Therefore, even for small-scale homework, the manufacture of a desktop must be approached responsibly. See assembly steps for step-by-step photos.


https://i.expert-h.com/en/verstak/universalnyj-verstak-svoimi-rukami-1200-foto-chertezhi-poshagovye-master-klassy#sigFreeId69a4a5d268
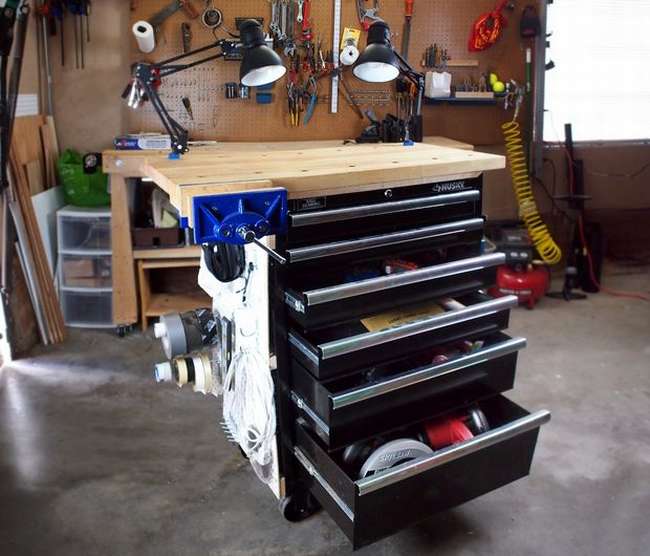
 Universal workbench for assembly
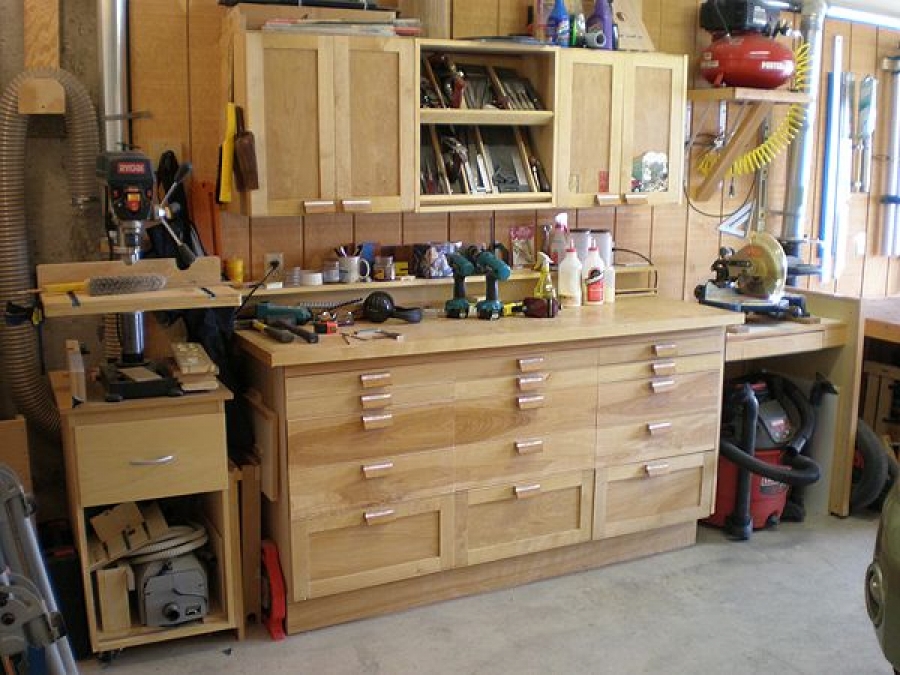
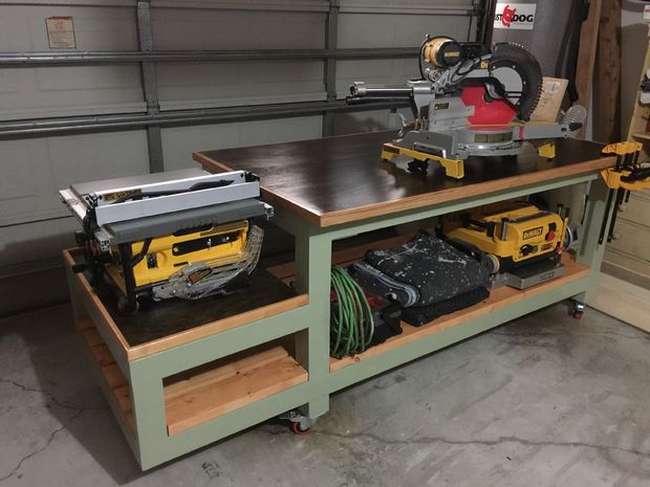
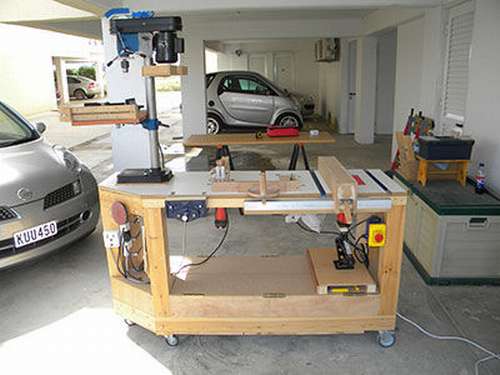
Organizing your workplace in such a way as to accommodate all the tools and install various equipment is not so simple. But here is an example showing that if you want everything is possible, the author made a universal do-it-yourself workbench on which you can perform most carpentry and other worksequipped with a compressor and even a place for a hose reel was found. Space saving is also due to separate and compact tool boxes. Also successful solution with the placement of the saw, it is convenient to cut long workpieces and there is no need to add additional countertops for support. Moreover, the design turned out, one might even say stylish. And most importantly, according to the author, this project cost only $ 60, that is, almost for nothing, since the main frame is made of an old desk, door, and all shelves and partitions from cheap chipboard.


https://i.expert-h.com/en/verstak/universalnyj-verstak-svoimi-rukami-1200-foto-chertezhi-poshagovye-master-klassy#sigFreeId8198129d6f
 Universal workbench for miter saw
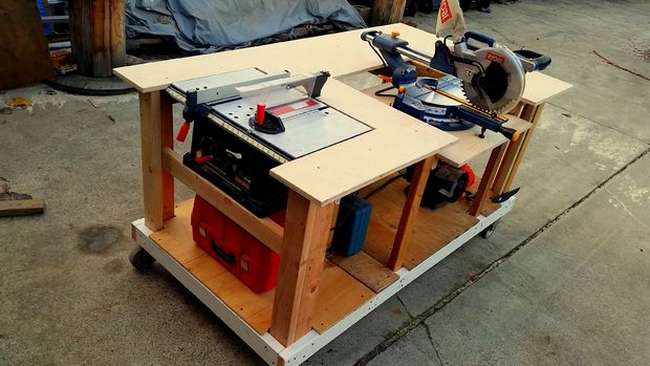
Miter saw is necessary in many cases when carrying out carpentry work. If you yourself want to make a desktop, then you need to take into account many nuances, usual difficulties, this is the abundance of sawdust and the need for additional emphasis when working with long workpieces. Presented here mobile universal workbench for a face saw, you can consider it as one of the options. If you often have to cut boards, then you can make some improvements, but in general for the garage a very good design. Here is a photo of the master class.


https://i.expert-h.com/en/verstak/universalnyj-verstak-svoimi-rukami-1200-foto-chertezhi-poshagovye-master-klassy#sigFreeIdc8f573cf31
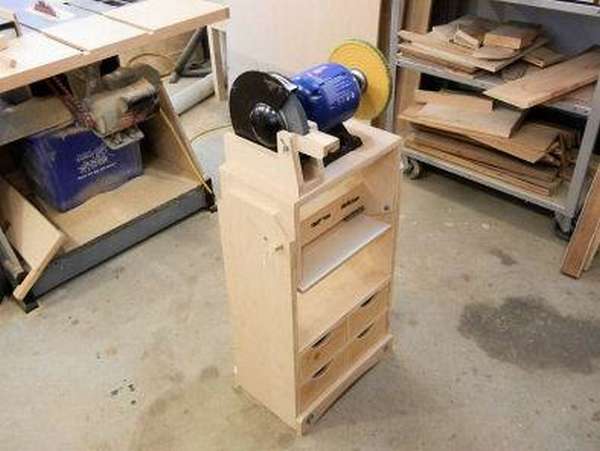
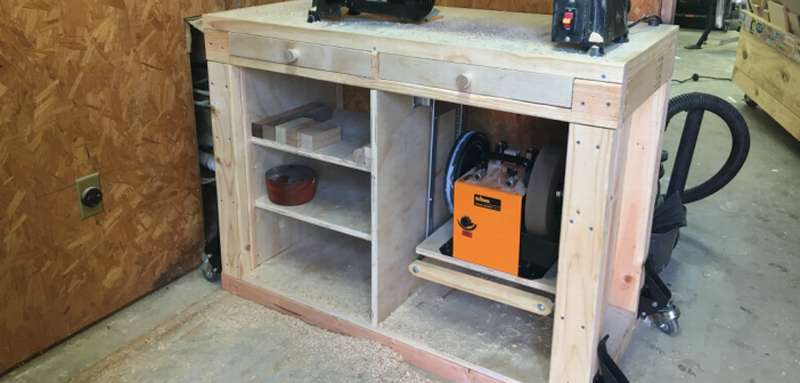 Workbench with shelf for grinding machine
Interesting idea, make a small extendable shelf for a grinding machine in a portable workbench. It allows grinding in any garage and workshop. Maybe not the most beautiful thing, but very durable and comfortable. You can use it as a regular desktop, open and pull-out drawers are provided, and if necessary, a shelf with a grinding machine is lifted by a special mechanism.


https: //i.expert-h.com/en/verstak/universalnyj-verstak-svoimi-rukami-1200-foto-chertezhi-poshagovye-master-klassy#sigFreeId346a5a0385
 Universal workbench with drawers
This universal mobile workbench can be stored in the far corner of the garage and extended when work appears. The working surface is made of glued solid wood blocks (in this case, maple), good lighting, metal joinery vice and, of course, all important tools in convenient drawers from below. This customizable workbench small and mobileso that you can move it in the garage or workshop and roll it out into the yard if necessary. When you are done, carefully push it back until the next time. Below are step-by-step photos, but, of course, this is just an example of one of the methods, there are many ways to improve, for example, you can make an additional work surface, such as a folding tabletop. Or add back mounts for larger tools.


https://i.expert-h.com/en/verstak/universalnyj-verstak-svoimi-rukami-1200-foto-chertezhi-poshagovye-master-klassy#sigFreeId1da73eb3c0
 DIY portable universal workbench
We decided that you need a workbench, but there is no place where to attach it? Here is an option - do-it-yourself portable universal workbench. This is a relatively complex project, the author took two days to make. The design is a bit heavy, but you will have a place to put all your tools, screws, screws, washers, nails and many other things. Which will now be stored in one place. Crafting table easy to move on wheels and if you ever need more space for work, you can simply extend the additional half of the workplace, and then insert it back. Side mounted Power Supplyso you can easily connect an electric drill or grinder. So just follow the simple steps of the master class below, and you can make a portable workbench as soon as possible.


https://i.expert-h.com/en/verstak/universalnyj-verstak-svoimi-rukami-1200-foto-chertezhi-poshagovye-master-klassy#sigFreeId5106c1e476
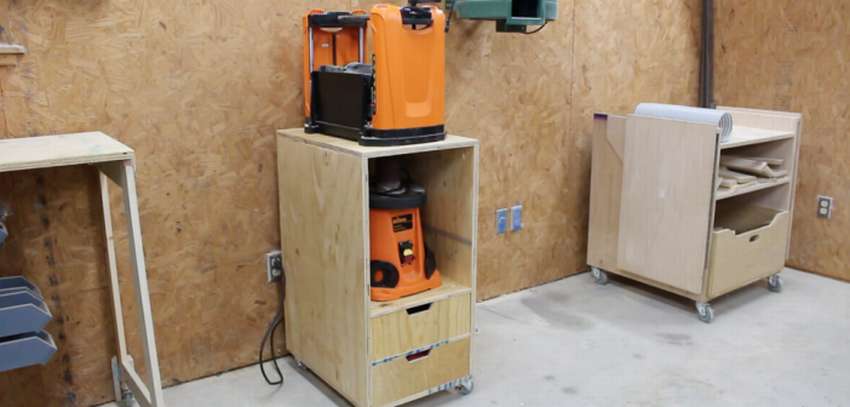 Mobile workbench for grinder
Sanding wooden workpieces is not the most interesting task, the main task is to remove traces of tools and put the product in order, that is, to “restore beauty”. But without this stage, too, no way. There are many tools for grinding. This is a master class, how to make a mobile work bench for a triton grinder, so called oscillating spindle grinding machine. By the way, a great option for a small workshop, both in price and performance. In principle, the author suggests making an ordinary small bedside table on wheels, any device can be installed on top, e.g. portable drilling machine, store the spindle in a niche. In general, it’s convenient, and it doesn’t take up much space, if you are interested, the manufacturing process is shown in step-by-step photos.


https://i.expert-h.com/en/verstak/universalnyj-verstak-svoimi-rukami-1200-foto-chertezhi-poshagovye-master-klassy#sigFreeIda78a5910b7
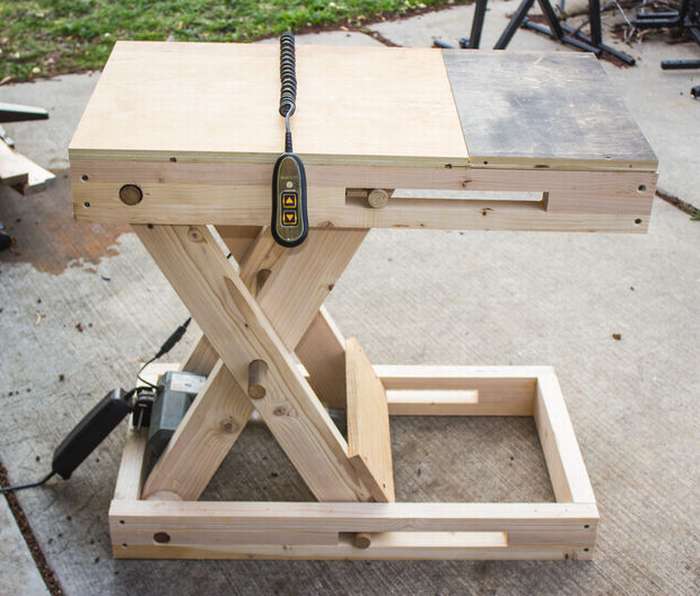 Folding workbench universal
The author came up with such a scissor-like structure that it was possible to work both standing and sitting. In theory, a circular saw or a planer can be installed on a workbench, and a motor with a drive is also installed so as not to be laid out manually. As you can see, the design is quite simple, such folding workbench universal can perform many functions, if slightly improved. How to make it is depicted in the photographs in the gallery.


https://i.expert-h.com/en/verstak/universalnyj-verstak-svoimi-rukami-1200-foto-chertezhi-poshagovye-master-klassy#sigFreeId19e254d88e
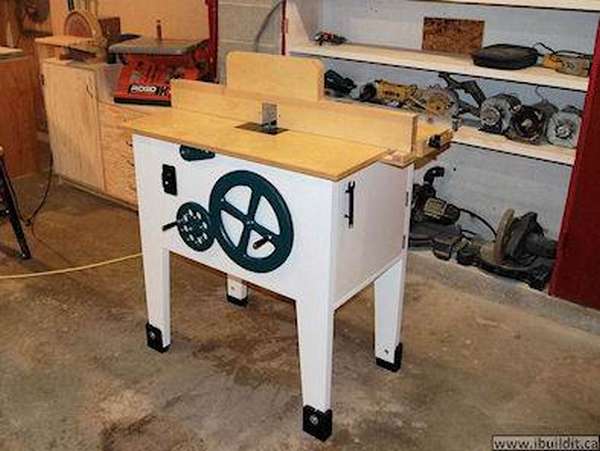 Universal table for milling cutter
If you have at least some relation to the carpentry, it is very difficult to do without a milling cutter. Work on the edge, make a stud connection, grooves, grooves - all this is done by the milling cutter. Moreover, a table or workbench is necessary, because it is impossible to concentrate simultaneously on the processing and the workpiece. Factory tables with expensive components are usually not very suitable for private use, mainly because of the cost. The author suggests independently make a universal table for the milling cutter, with an interesting design and simple adjustments.
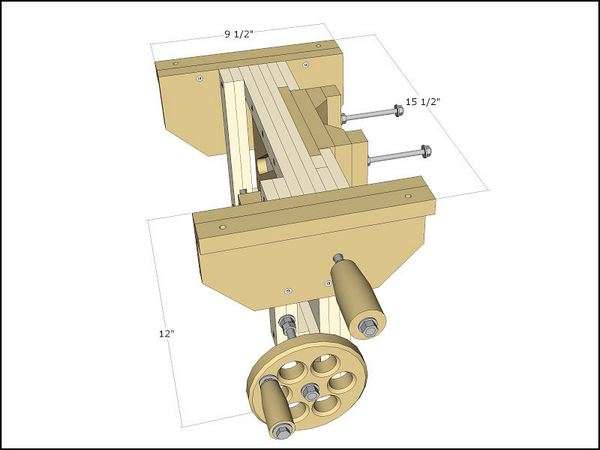 The main part of the table, the elevator for the router. It uses an inclined plane to raise and lower the engine. This is a rather simple design and, according to the author, is very reliable in operation. Making a lift yourself is quite easyThere are no complicated parts here. Errors are permissible, where without them, therefore, all connections must be tight, but this is necessary for any device of this type.
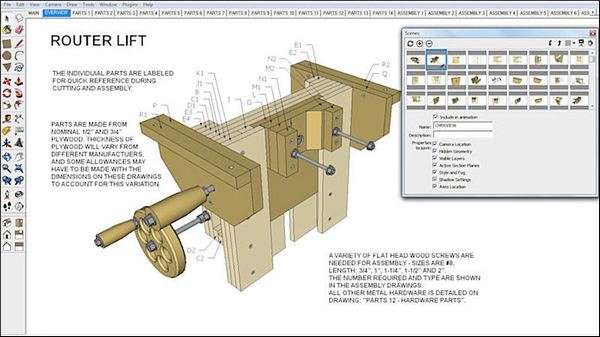
Unfortunately, the numbers are hard to see in the photo, but all the details are shown.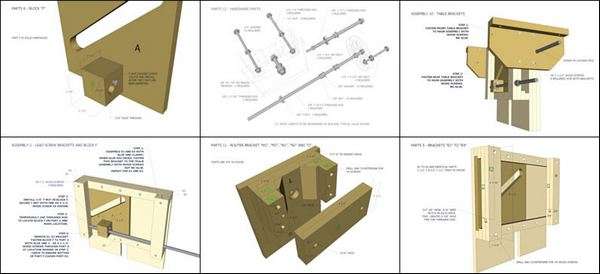
Below in the gallery are step-by-step photos of making the table. There are a lot of them, more than a hundred pieces, so the description will be short. In the first part, cutting an inclined plane, the top and bottom edges of the ramp should be smooth and parallel. Bearings should be as close as possible to the inclined surface, if there is a slight backlash, it does not matter much. Threaded rod passes through clamp and carriages. The holes for these rods are slightly enlarged so that the motor clamp can move to adjust the alignment of the milling cutter. Pay attention to the locking mechanism.. In this case, it is a short lever on the front panel. If rotatedIt is a quarter turn, it clamps the elevator carriage, so it will not move.


https://i.expert-h.com/en/verstak/universalnyj-verstak-svoimi-rukami-1200-foto-chertezhi-poshagovye-master-klassy#sigFreeId159b9cc6dd
Making a flywheel for a lift. Assembly of legs. This method of manufacturing the legs gives 2 advantages: firstly, the parts will be laminated, and besides glued wood is more durable. Secondly it simplifies work and reduces manufacturing time.
Start by sawing all the parts in width and length, and then grind the lower parts under the cone using a clamping device, mainly for aesthetic reasons - legs will look less bulky. Then install the lower shelf. The black arrow in the photo shows how the front panel passes under the bottom of the main body. Making a hole for the milling cutter and a plate. Then hose holeswith which dust and shavings will be removed.


https://i.expert-h.com/en/verstak/universalnyj-verstak-svoimi-rukami-1200-foto-chertezhi-poshagovye-master-klassy#sigFreeIdba0056d162
Install an electrician. Carefully mark out the place for the switch panel, cut out the box, conduct wiring. Be sure to install the protective plates.to protect the tumbler from damage and prevent accidental start. To speed up the work of the lifting mechanism, the author installed a second flywheel, which is two times larger than the first. The big one drives the smaller wheel in a ratio of 1: 2 - for each turn of the big wheel. Well, the assembly, of course, ends with painting.


https://i.expert-h.com/en/verstak/universalnyj-verstak-svoimi-rukami-1200-foto-chertezhi-poshagovye-master-klassy#sigFreeIde30044e0f6
Next, we make racks and doors for a cabinet with magnetic locks. Fence system.


https://i.expert-h.com/en/verstak/universalnyj-verstak-svoimi-rukami-1200-foto-chertezhi-poshagovye-master-klassy#sigFreeIdd958271802
If something is not clear, here is a link to the source site, where you can find out all the details.
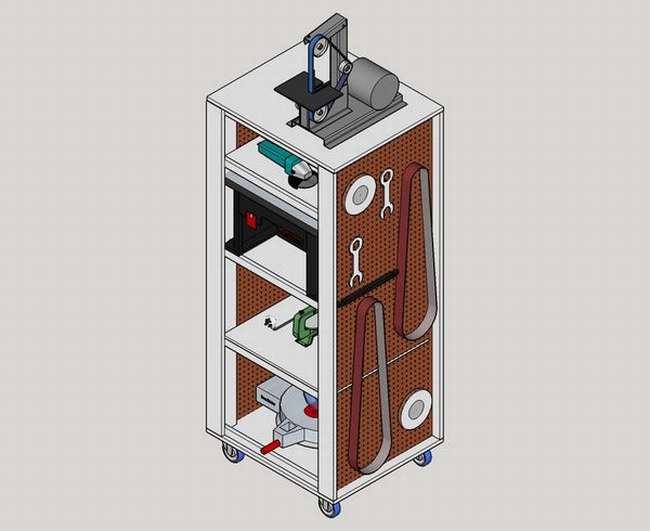
 Universal workbench combined
This amazing design is perhaps smallest universal workbench, although maybe there are fewer, but somehow did not meet. The author managed to fit into a small cabinet 1.5x0.5 meters in size, a circular saw, a milling cutter with an elevator, a grinding machine, a jigsaw, a vice and a drilling machine. The workbench also includes 5 small drawers and 8 electrical outlets with wiring. The author conceived this supercompact project not from a good life, just a person does not have his own workshop, only pantry 1.6X1.6 meters and he has to work on his workbench in the courtyard under a canopy, rolling it out as necessary. Here you want, do not want, you will be inventive. This is how the workbench looks in the schemes.


https://i.expert-h.com/en/verstak/universalnyj-verstak-svoimi-rukami-1200-foto-chertezhi-poshagovye-master-klassy#sigFreeIdf10e92cea9
Next, step by step photos are shown. manufacturing master class this miracle workbench. The most impressive part is drill standIt is installed on top of the countertop. Grinding machine mounted under the table with two threaded inserts on the tool stand. Jigsaw installed under the tool stand with t-nuts and 8 mm bolts. A circular saw held by 4 wing bolts and nuts. Make 4 holes in the base of 3 of which are elongated for fine adjustment. Reduce the insertion space of the plates from 0º to 45º and add 2 bevel slots to the tracks left and right. Emphasis milling cutter is located at the end of the table, for the elevator the author used a car foot jack.


https://i.expert-h.com/en/verstak/universalnyj-verstak-svoimi-rukami-1200-foto-chertezhi-poshagovye-master-klassy#sigFreeIdfcb1c45fde
And in these photos the author shows a whole tool rack systemwith which he equipped his mini-workshop, or rather a pantry for storage. Maybe you don’t need it, but since the person took a picture, why not see it. According to the author, this is the smallest workshop in the world and it seems he is very proud of his system of distribution of tools.


https://i.expert-h.com/en/verstak/universalnyj-verstak-svoimi-rukami-1200-foto-chertezhi-poshagovye-master-klassy#sigFreeId2eb5661c97
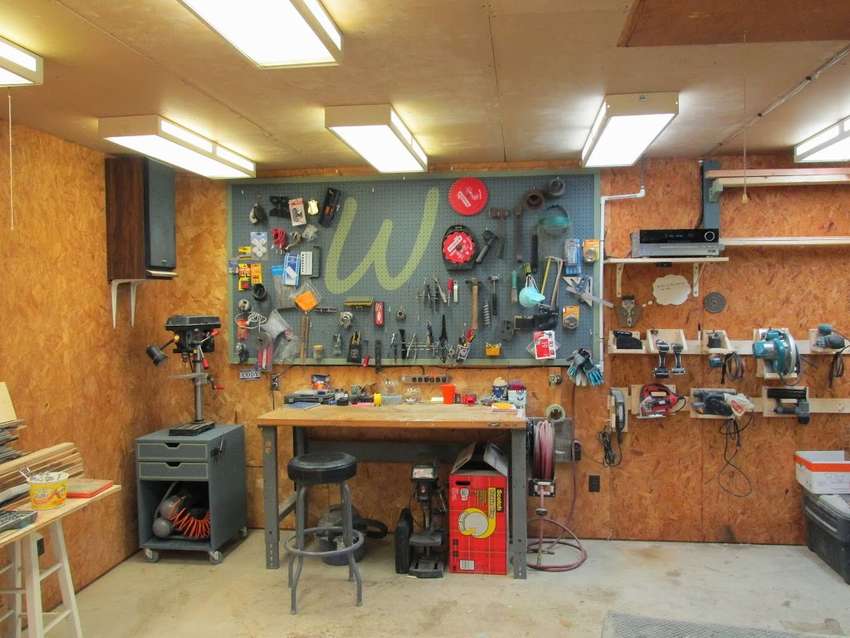
 Homemade universal workbench and stand for the workshop in the country
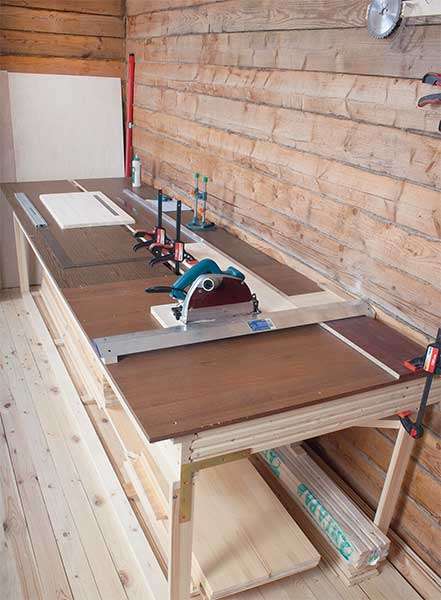
The arrangement of the workshop is not easy, but interesting. In principle, the main thing is to find a room for the workshop, and how to equip it is .... In short, an example is shown here, how to make a universal workbench with a basic tool kit. Dimensions of approximately 3x1 m, can be shortened and lengthened, as the area allows you. The space under the table remains free, a great place to store parts and blanks. The supporting frame will be near the wall, the front part consists of two racks reinforced with a beam. Between them, transverse beams are installed on which the countertop will be installed. Additionally, the design is attached to the wall with corners.


https://i.expert-h.com/en/verstak/universalnyj-verstak-svoimi-rukami-1200-foto-chertezhi-poshagovye-master-klassy#sigFreeId7b49e50878
Next in the photo the process of making a stand for a miter saw, which is better to assemble from chipboard. The same cabinet can be made for a drilling machine.


https://i.expert-h.com/en/verstak/universalnyj-verstak-svoimi-rukami-1200-foto-chertezhi-poshagovye-master-klassy#sigFreeIdf672f82843
 DIY welding table
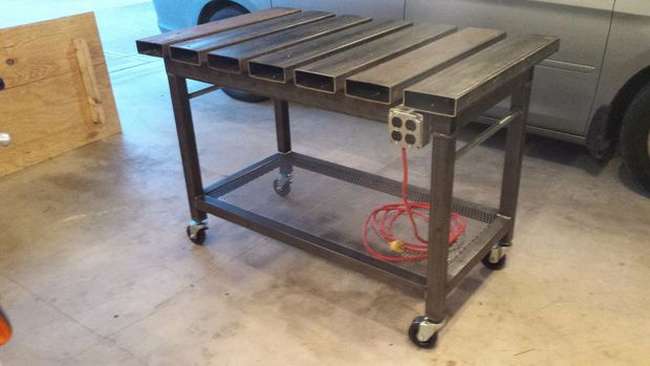
Thinking of buying a welding machine? Perfect solution. Now it remains to think about how to equip the workplace, the best solution,this do it yourself, at the same time practice welding. What are the requirements: this should be a design that is easy and inexpensive to do, with a flat, solid work surface and the ability to secure additional equipment. The author of this master class just offers such an option. The table is made of rectangular pipes, what much cheaper than metal plates, and the countertop is fixed in the frame to protect the work surface from bending during welding. The manufacturing procedure and the link to the source site, if something is not clear, see below.


https://i.expert-h.com/en/verstak/universalnyj-verstak-svoimi-rukami-1200-foto-chertezhi-poshagovye-master-klassy#sigFreeIddd2c207770
 DIY belt sander
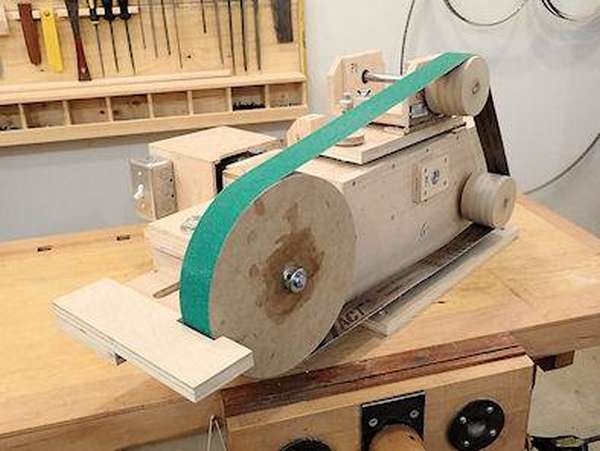
Grinding workpieces is an integral part of any work process, for this there are many different equipment. In this master class is proposed to do do-it-yourself belt sanderA great addition to the universal workbench. As you see in the photo, this is a very compact design, thanks to its small dimensions and relatively light weight, the machine can be mounted on any surface. It is also very convenient in work, there is an opportunity adjust the angle of the tape and the distance between the axles. The work process is shown in great detail in step-by-step photos.


https://i.expert-h.com/en/verstak/universalnyj-verstak-svoimi-rukami-1200-foto-chertezhi-poshagovye-master-klassy#sigFreeIdd74037310b
This shows all the parts that will be needed for assembly.. 
Then see the final stage of assembly.


https://i.expert-h.com/en/verstak/universalnyj-verstak-svoimi-rukami-1200-foto-chertezhi-poshagovye-master-klassy#sigFreeId1092fd889b
 How to make a belt sander
Another option how to make a do-it-yourself sanding belt machine. It was originally planned to make it of metal, but the author settled on a wooden version. What happened, you see in the photo. So you have a chance to become the owner of your own machine at a price not comparable to that of the factory model. Beautiful design, excellent performance, easy to use, you can grind a wide range of materials from wood, plastic, mild metal and even hardened steel. For work, a standard industrial belt is used and for adjustment you will need only one tool - a wrench. It is made mainly of plywood and conventional fasteners - screws, bolts, a threaded rod, bearings, door hinges and the like, in general, a serious machine for serious work.
Here you can see drawings of the main parts.


https://i.expert-h.com/en/verstak/universalnyj-verstak-svoimi-rukami-1200-foto-chertezhi-poshagovye-master-klassy#sigFreeId56fb2393fd
Although the manufacturing process looks complicated, but any person with an initial carpentry skill will be able to make this belt sander. All parts are made in a simple way., without any fantasies, connected mainly by screws or adhesive joints butt. There are a lot of step-by-step photographs to describe the whole process in detail, it will take several pages, so use step-by-step photographs with a very detailed image of the whole process, and if something is not clear, you can go to the source site, the link to which is under the gallery.


https://i.expert-h.com/en/verstak/universalnyj-verstak-svoimi-rukami-1200-foto-chertezhi-poshagovye-master-klassy#sigFreeId5dea5e994b
 Stand for grinding grinder
This idea is a good solution for a small garage or workshop. According to the author, he performs two functions, for its intended purpose and as an unloading stand for a table saw, and most importantly, it occupies a very small area. Of course, the main task is to serve as a stand for a grinding machine. Using a simple mechanism, the machine is cleaned inside the bedside table, very convenient. Plus, additional drawers, which does not hurt in any workshop. To make the stand, follow the simple steps presented in the gallery.


https://i.expert-h.com/en/verstak/universalnyj-verstak-svoimi-rukami-1200-foto-chertezhi-poshagovye-master-klassy#sigFreeId41987be9c1
 DIY drill stand
If you have a drilling machine, but you rarely use it, then a problem arises where to keep it. This thing is heavy, and periodically pulling it out of the closet or other secluded place is not very convenient. The author of this photo, faced with this problem, made a decision make a stand for a drilling machine with your own hands. You can also use this idea, the entire manufacturing process is shown in step-by-step photos.


https://i.expert-h.com/en/verstak/universalnyj-verstak-svoimi-rukami-1200-foto-chertezhi-poshagovye-master-klassy#sigFreeIdfc168e09e9
 Manual drilling machine
Electric drill, perhaps, can be attributed to one of the most popular tools, but it is not always advisable to buy a factory model, it is expensive, and it makes no sense if you do not do it professionally. But on the other hand, it is very difficult to obtain special drilling accuracy from a hand drill. The golden mean, make a manual drilling machine with your own hands. Cheap, but how it works will be up to you. Here a variant of such a machine is proposed, the basis for its manufacture was old tv stand.
In fact, everything is simple, look at the step-by-step photos of the manufacturing procedure.


https://i.expert-h.com/en/verstak/universalnyj-verstak-svoimi-rukami-1200-foto-chertezhi-poshagovye-master-klassy#sigFreeIda8fb5cb65b
 Universal rack for additional equipment
Such rack shelving Allows you to save about three meters of working space on the table. Of course, you can make a regular shelf near the wall, it’s even easier and there will be much more storage surface. But firstly, one does not interfere with the other, and secondly, this mobile stand has its advantages, if only because she canbeating. You can use it as a trolley to deliver the equipment you need to the workbench, especially since the side stands for storing tools are very conveniently located. Anyway, this is a wooden structure, it is not only lighter than a metal one, but it is also easy to make with simple tools. If you are interested, see below 60 step-by-step photos, the whole process, in full view.


https://i.expert-h.com/en/verstak/universalnyj-verstak-svoimi-rukami-1200-foto-chertezhi-poshagovye-master-klassy#sigFreeId36f8fd7e2c
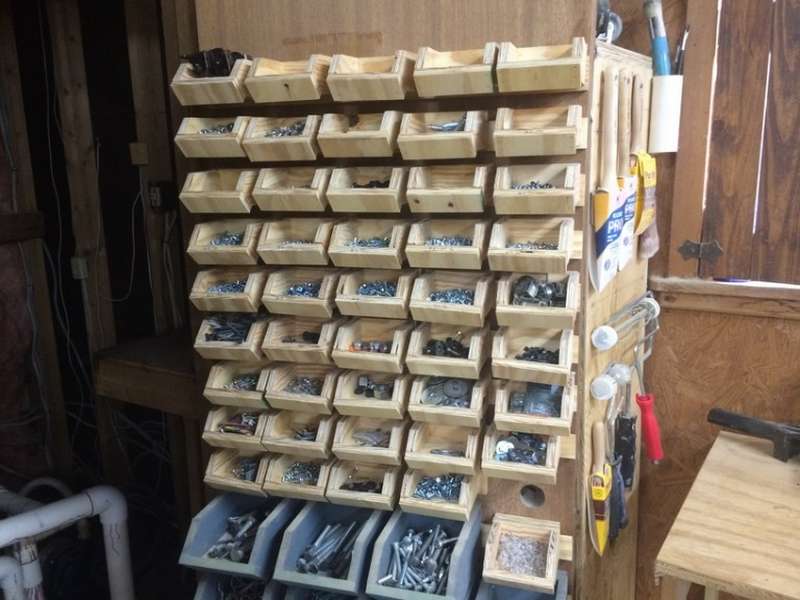 Workshop rack
Whatever your garage or workshop, you still need a storage rack. If with tools everything is more or less clear - cabinets, racks, special stands and so on, then with nuts, bolts and other trifles there are always problems. Jars and boxes are not the best option, although most do. But it’s better not to be lazy and make such a rack for the workshopconsisting of many open wooden boxes. Of course, the idea is not original, and there is a lot of monotonous work, but using the result is a pleasure. You can make it simpler and faster, chop plastic containers or cut bottoms from plastic bottles, but as practice shows, the tree is better. In general, if you liked it, here are step-by-step photos on how to make such a rack.


https://i.expert-h.com/en/verstak/universalnyj-verstak-svoimi-rukami-1200-foto-chertezhi-poshagovye-master-klassy#sigFreeId8fc797de37
100 photos of universal workbenches


https://i.expert-h.com/en/verstak/universalnyj-verstak-svoimi-rukami-1200-foto-chertezhi-poshagovye-master-klassy#sigFreeId8967e97a05
Hello, I am the author of this article, so I look forward to asking questions for this article in the comments below, I will answer all !!!
If you have questions on another topic, ask them on our forum, we will answer you
- Two baskets of paper in 5 minutes (Master class)
- How to make a simple and compact table for a milling cutter from plywood
- How to make a soft headboard tile (Instructions + step by step photos)
- Cinder block benches: a convenient bench in 55 minutes
- How to make a bed with a niche: saving space (Master class)