DIY folding workbench 500 photos, drawings, instructions
 folding workbench table
A work bench is needed in every home, even if carpentry or locksmithing is not your hobby. All the same, periodically there is a need to repair or do something. The problem is usually where to find a place for such a table. The best way, of course, is to make the workbench folding with your own hands, especially if you need it not constantly, but from time to time.
The best option fix the folding structure to the wallIt is convenient and reliable. The disadvantage is the limited space for work. Can be done completely collapsible workbenchso that it is possible to fold and remove, and if necessary, to decompose. Convenient in the sense that you can put anywhere and transport is not a problem. But the minus is obvious, such a design should be very light, that is, the list of works on such a table will be quite limited. The article presents different options, choose the one that is more suitable.
 Folding workbench table
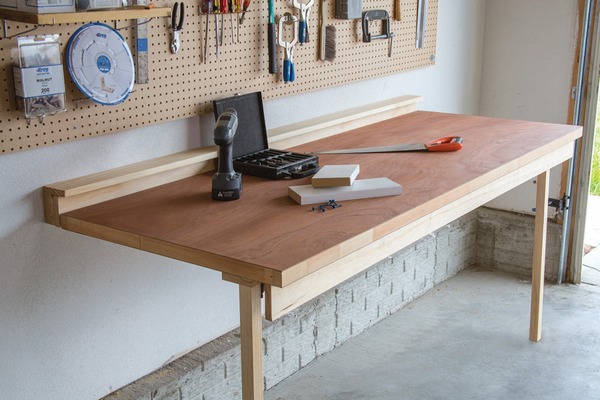
Here is an option how to make a folding tableif there is a suitable room. As you can see in the diagrams, the countertop will be supported by three supports mounted to the wall. Each support is based on hinges, which allows you to turn them close to the wall. With the racks retracted, the countertop (also hinged) drops down to rest on the upper parts of the supports. The design consists of three main parts - countertops, props and wall mounts. Moving parts at the joints are connected with butterfly loops. The countertop for this design turned out to be heavy, but strong, so use the most reliable door hinges that you will find in the hardware store.
Each support has a cut of 45 °, so the acute angle is removed and there is more space. Also provided for each support latch for fixing (as an option, an ordinary window shutter). Also note the photograph of the clearance around the bolt head to provide room for the socket wrench. Take a close look at the step-by-step photos; all the connections are shown there in large detail.


https://i.expert-h.com/en/verstak/936#sigFreeId7ca67aef05
 DIY folding workbench drawings
Everything is simple here. Manufacture folding carpentry bench start with the manufacture of countertops, by the way, you can use the old door, because such an integral plate will cost a lot. Then we assemble the shelf, here we have two elements, the upper shelf and the mount. Just make holes and draw the shelf with screws to the wall. For rigidity, we fasten the bar under the countertop. Then we collect the legs, there are different ways of attaching to the countertop, you can ask at a hardware or furniture store or screw on ordinary brackets. Then screw evenly three loops, fasten the extreme ones at a distance of 1 - 1.5 cm from the edge. At the end, assemble the entire structure.


https://i.expert-h.com/en/verstak/936#sigFreeIdc54bd2ce99
Folding Workbench
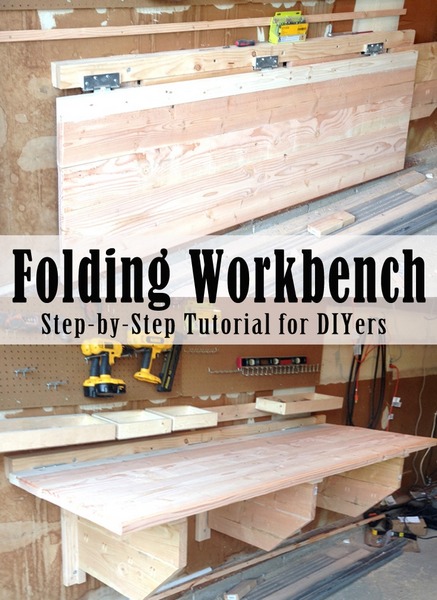
 Very simple and functional folding carpentry bench. In this case, the countertop does not fall, but rises and fastens to the wall, the legs fold into the middle of the frame. To avoid manually tilting the legs every time, a special design has been added stop block which you just have to pull from the wall and your legs stop in the same position every time. The procedure for manufacturing countertops and legs, as in previous versions, only the method of attachment to the wall is different.


https://i.expert-h.com/en/verstak/936#sigFreeIdf91c810fdb
Two more options for a simple folding workbench. how to make a folding table workbench with legs folding under the countertop, and the second option, when two sliding side frames supporton which the working surface rests. Both that and another little table have the advantages, the second is certainly more reliable, though it is more difficult to make it. Of course, both options are not suitable for serious work, they can soon be considered as auxiliary.


https://i.expert-h.com/en/verstak/936#sigFreeId048b28f183
 Wall-mounted folding workbench
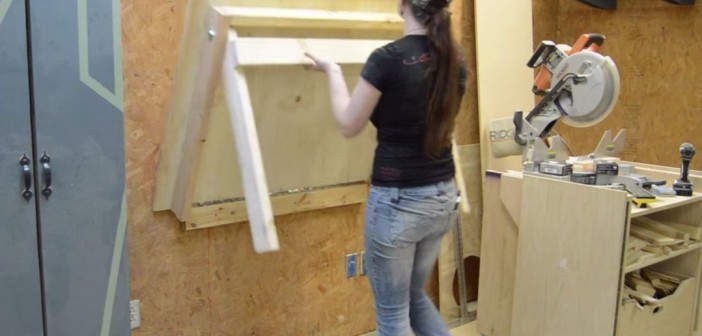
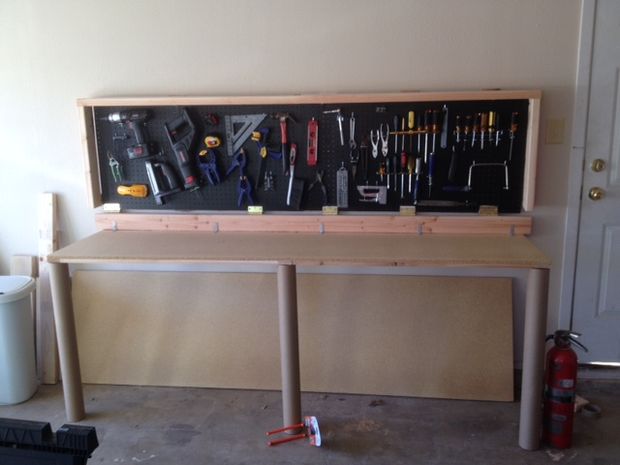
It is not always possible to organize a workplace in a small garage, usually there is not enough extra space on the sides when the car is inside. Instead of doing minor repairs on the kitchen table, it’s better make wall-mounted folding workbench. Several options have already been presented above, here is another one.
The whole structure just folds and closes, removable legs are stored on the top of the frame.
Necessary tools:
Drill with a cross head, various sizes of drill for preliminary drilling of holes, circular saw, tape measure, clamps, level.


https://i.expert-h.com/en/verstak/936#sigFreeIdf5349ea0a0
 Universal folding workbench
It's great to have your own big professional workbench, but for an ordinary garage or a small home workshop, most often this is simply unrealistic. As an option, independently make a universal folding workbenchsuch as you see in the photo. The multifunctional design allows you to save free space and fully perform almost all types of work. The main advantage is the same as that of the transformer table, it can be decomposed when necessary and assembled when it is not needed. Below are presented general drawings and diagrams.


https://i.expert-h.com/en/verstak/936#sigFreeId96acbb3bab
The idea is to make two-dimensional from a three-dimensional structure. Naturally, to make such a complex structure, accurate calculations are needed. The step-by-step assembly process is shown in the step-by-step photographs below. Of course, there are many nuances that need to be taken into account, the whole system will work fine if all jumpers and levers are correctly adjusted. Below the gallery is a link to the source, where you can find out more detailed information.


https://i.expert-h.com/en/verstak/936#sigFreeId4c3c354b8a
 Folding workbench portable
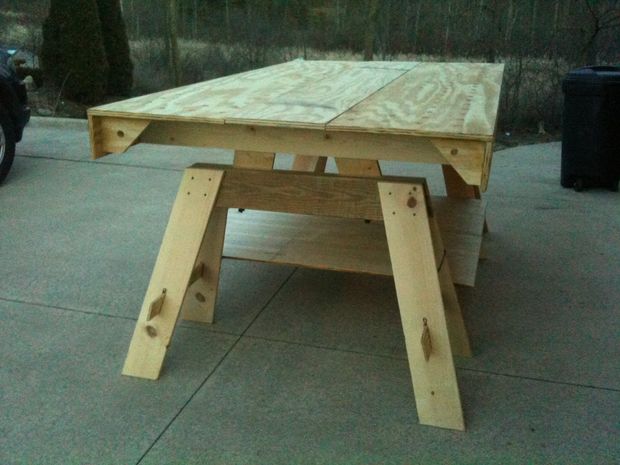
Here is a portable, portable folding workbench, with a sufficiently large work surface, but at the same time compact enough to be translated into a passenger car. It can be used for milling cutter, table sawthat is, it is strong enough to withstand the efforts of body weight to the workpiece.
It consists of folding goats, a lower rack and two sheets of a working surface. The step-by-step photos show the process of manufacturing and assembling the structure.


https://i.expert-h.com/en/verstak/936#sigFreeId22026cf424
 Workbench with an extra table
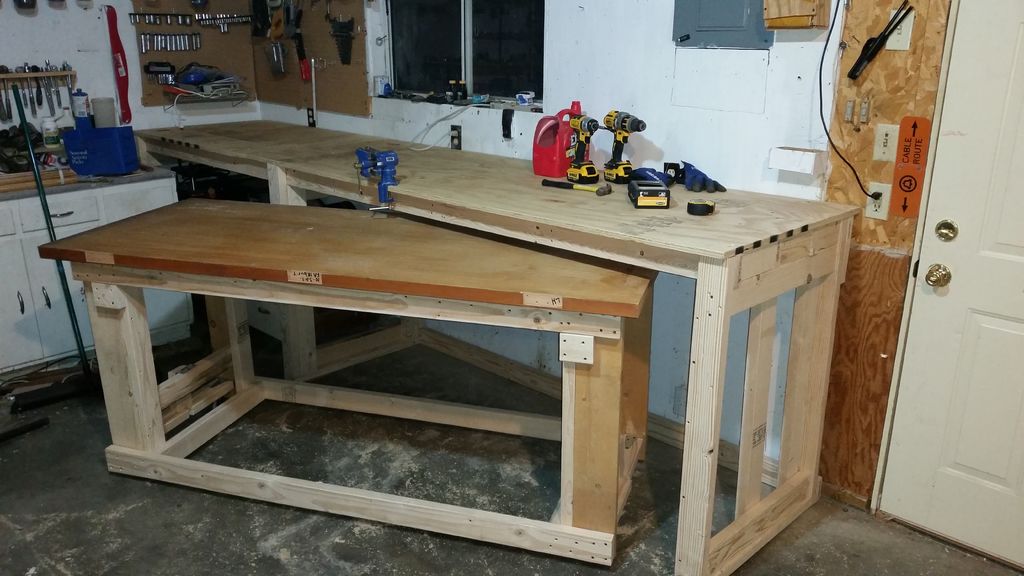
An interesting version of the carpentry workbench. Due to the additional table you You can double the working surface. The smaller table is equipped with wheels, which allows you to put it forward if necessary, and is also easy to clean if it is not needed. Look at the photo for an interesting solution for wheels, which can simply be removed in the middle. They are also equipped with special stoppers. In general, in step-by-step photos of the master class, the process is displayed in rather detail, so it’s not difficult to understand, you can find out more detailed nuances on the source’s website, the link under the gallery.


https://i.expert-h.com/en/verstak/936#sigFreeIda984764ebb
 Folding table for milling cutter
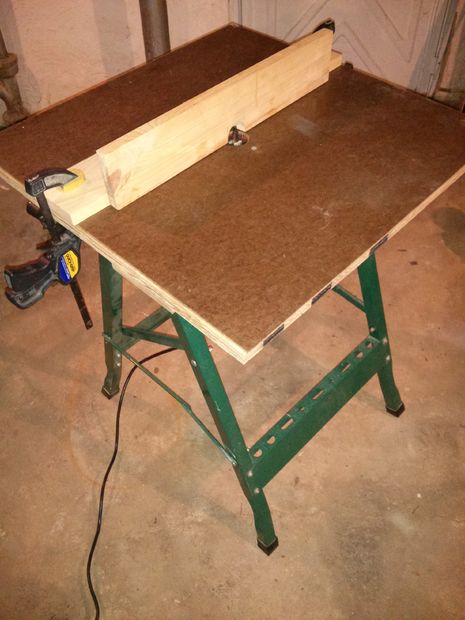
In many cases, a milling cutter is an indispensable thing. But does it make sense to buy a whole workbench if you use it once every half a year. Naturally, it is better to make a folding table for the router and install it as needed. You can use any kind of surface or make a simple surface with a slot. In this case, plywood and hardened hardboard were used. The main task - set the router correctly, how the author approached the solution of this issue, see step-by-step photographs. From below, do not forget to make an additional sample for the dust collector cover; a vacuum hose is installed on this workbench to extract dust and chips. Why two triangles were cut from the sides and one from above. Then you need to measure the diameter of the hose and cut a hole that will exactly match the dimensions. At the end of the base, attach the hose to the glue. Perhaps the resulting workbench can still be modified aesthetically and add a little weight to the legs for strength


https://i.expert-h.com/en/verstak/936#sigFreeId532ee6bb32
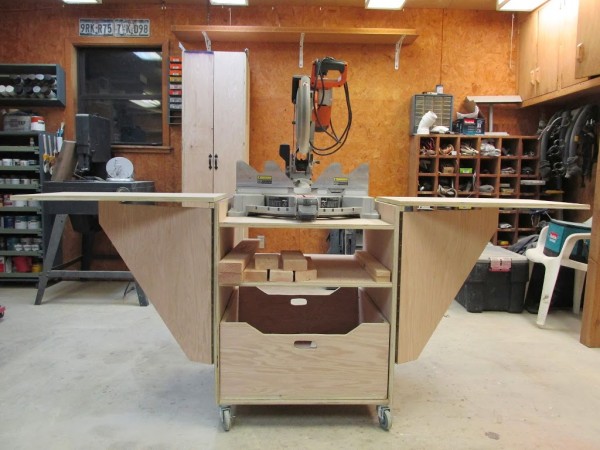 Folding work bench for a face saw
Not all miter saw models have sufficiently large side supports, so long workpieces sag, which of course interferes with quality work. Worse, security breachesawes, because the table may just tip over. Therefore, the lateral support legs should be of sufficient length, which is not very convenient. The best way out is make a folding workbench for a miter saw, that is, make expansion tables with stops on the sides. The options may be different, in this case, the author proposes to make a compact workbench, with side folding tables on flat supports. This is more appropriate than using legs, the load on the tables is negligible, so this option is more convenient.


https://i.expert-h.com/en/verstak/936#sigFreeIdf20d43d767
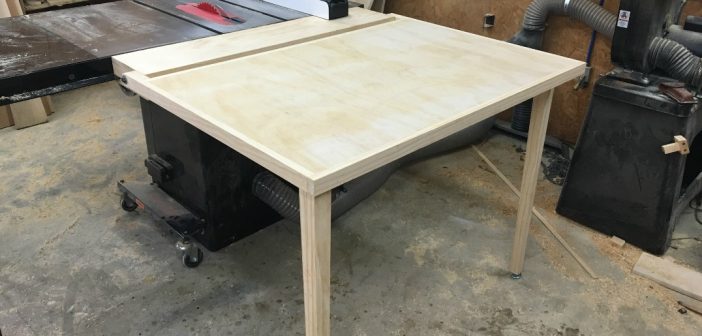 Folding table for feeding a circular saw
To work with long workpieces, additional support is sometimes necessary, you can solve this issue, making a folding table for feeding a circular saw with your own hands.
The photo shows an example of how this can be done. The table is attached directly to the workbench of the circular saw and has swivel mechanism. For the manufacture of needed: miter saw, grinder, plane, glue, clamps and electric drill. By the way, a drilling machine is a much more accurate tool for creating holes than hand drills. If you are careful, the drill can easily move away from the midline, which can result in the axis of the hole being not perpendicular. The most difficult part is to correctly make the hinges on which the cover will rise and fall. It is also necessary to attach small loops that allow you to fold and lock in the upper position of the table legs.


https://i.expert-h.com/en/verstak/936#sigFreeId0535bdb3a0
 Folding workbench for home
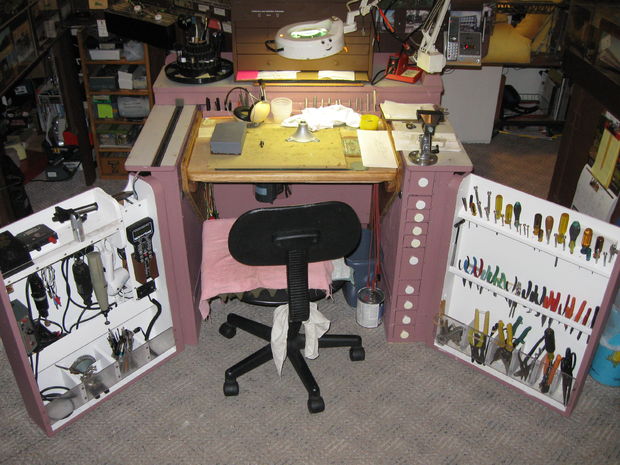
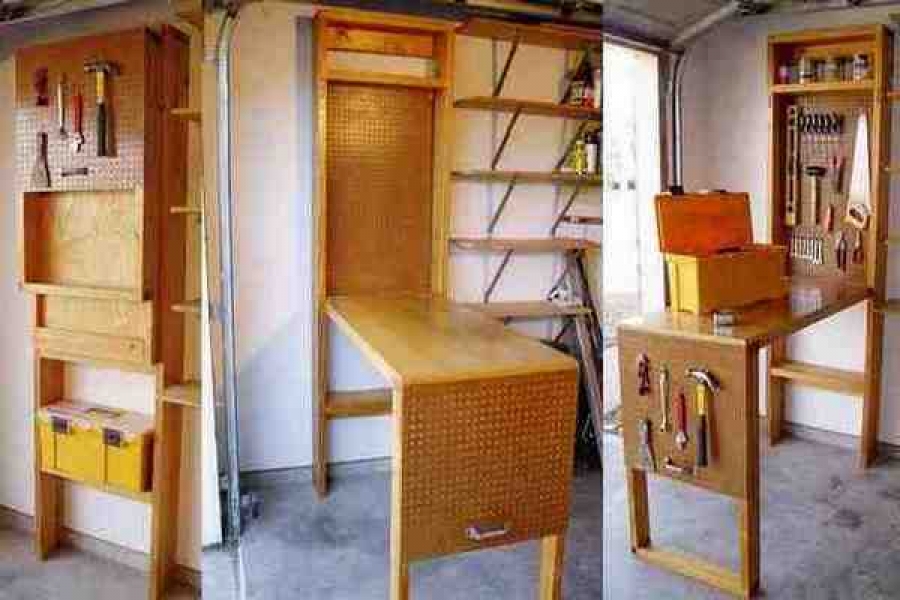
Very comfortable homemade folding workbench for the home, ideal for minor repairs or the manufacture of small crafts. Boxes are made of pieces of plexiglass with a plywood front wall. To hold plastic containers, ordinary Velcro was used.
Drawers on the right side are cut out from PVC tubes. The sides and bottom of the workbench are made of sheet metal. Height adjustable by screw jack from the hospital bed. The wings have hinged tool storage panels. The left wing has outputs for DC power supplyvarious power tools. Also network drawer tray, the frame of which consists of two pieces of plywood glued together.
In general, the main advantages are:
- Three unique style drawer designs.
- Adjustable height work surface.
- Rotary panels for tools.
- Tool grooves on the back of the work surface.
- Retractable Shukhlyad for storing long items.
- Compact size allow you to store it even in a small room.
As you can see, they were used for manufacturing conventional materialsthat can be found in every home. Such a compact workbench can even be put in Khrushchev, when folded it takes up little space, but you can place tools in it as for a small workshop.


https://i.expert-h.com/en/verstak/936#sigFreeIdf45ea63188
Workbench folding drawings


https://i.expert-h.com/en/verstak/936#sigFreeId7057afb767
Workbench folding photo


https://i.expert-h.com/en/verstak/936#sigFreeId768d079bc9
Hello, I am the author of this article, so I look forward to asking questions for this article in the comments below, I will answer all !!!
If you have questions on another topic, ask them on our forum, we will answer you
- Two baskets of paper in 5 minutes (Master class)
- How to make a simple and compact table for a milling cutter from plywood
- How to make a soft headboard tile (Instructions + step by step photos)
- Cinder block benches: a convenient bench in 55 minutes
- How to make a bed with a niche: saving space (Master class)