DIY pipe chair 500 photos, step-by-step instructions
 how to make a pipe chair
There is something surprisingly attractive about the design of furniture made from simple pipes. From them you can create perfect geometric shapes, original designs in an industrial style that create a unique atmosphere of an industrial interior. From pipes you can collect vases, tables, chairs, shelves, lamps and even beds, in general, which is enough for imagination.
In this article, we’ll look at specific examples, how to make chairs from pipes with your own hands, in particular from metal pipes and PVC pipes. Perhaps if you have not collected anything like this before, the idea itself will seem a little unusual. But worth a try, suddenly you have a talent. Having assembled a regular pipe chair, you may not want to rest on your laurels, and you will become an avid fan of industrial-style furniture.
In the article we will look at how to make two types of chairs from pipes:
- metal pipe chairs
- PVC pipe chairs
Metal Pipe Chairs
 Industrial aesthetics have become extremely popular these days. Usually this style includes many different elements, such as antique wood, lacquered pipes, old metal and much more. No matter where - in the house, restaurant or office, industrial style creates a special atmosphere. One of the ways to create an interior design in an industrial style is to furnish the room with furniture of an appropriate style.
There are many different projects where there are different types of pipes, but in this case we’ll talk specifically about industrial style pipe chairs. Many people prefer to use metal water pipes in the manufacture of industrial-style furniture, although this is not necessary, profile ones are also great.
 Classic pipe chair
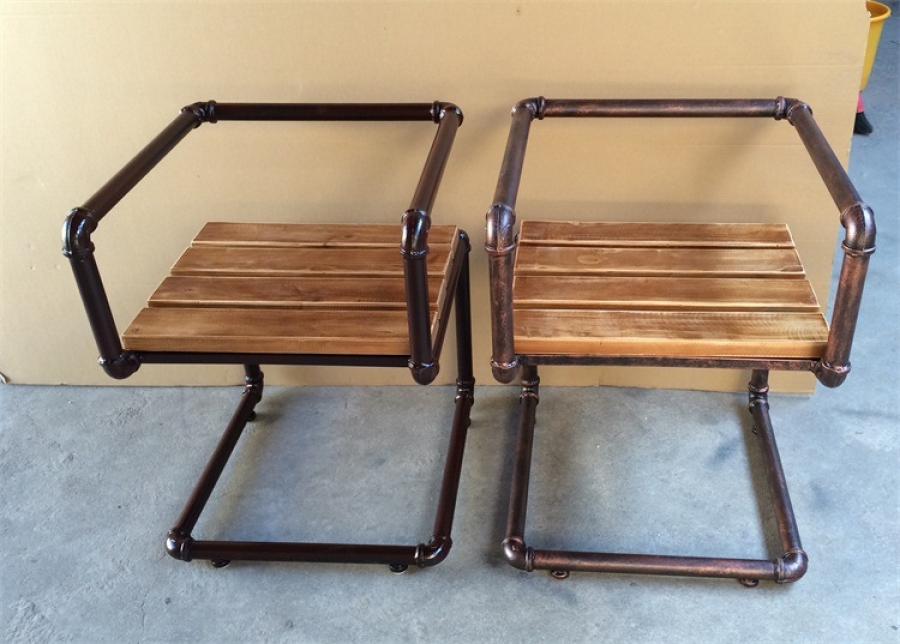
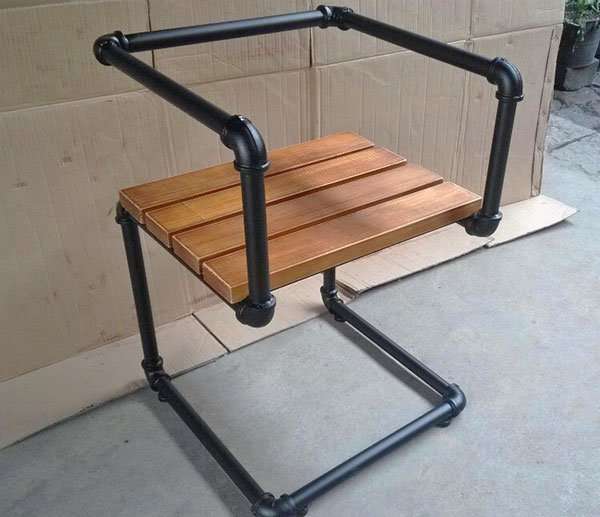
Here is the first example, this chair has a standard design, in which the frame is made of metal pipes, and the seat and back are made of boards. In this case, used Gatorshield coated steel pipes made of zinc and chromate with a transparent polymer coating. Such material has long-term protection against rust and corrosion, and a uniform and smooth surface retains an attractive appearance for many years.
Wooden parts are made from waste wood, sanded and varnished to improve the industrial look. For connections specially used open fittingsso that the design is more consistent with the industrial style.
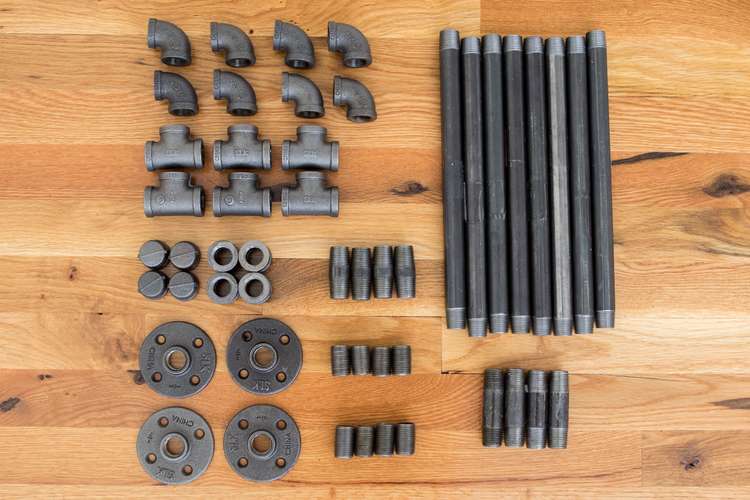
The photo below shows fitting connectionswhich you will need.


https://i.expert-h.com/en/stul/stul-iz-trub-svoimi-rukami-500-foto-poshagovye-instruktsii#sigFreeIdc7cad52a58
Start the assembly by creating the sides of the frame. To assemble the sides of the chair frame from pipes, start by arranging the parts as shown in the photo. Keep in mind that a one-way fitting will slide along the pipe that goes to the back. It is needed to connect the brackets to the rear of the frame. You can install it at any height, but you only need to install this fitting before you close the pipe from above and from below.


https://i.expert-h.com/en/stul/stul-iz-trub-svoimi-rukami-500-foto-poshagovye-instruktsii#sigFreeId53948d7018
And one more thing to pay attention to is side teeWith which you can adjust the angle of the back. When installing this fitting, set a suitable angle for the backrest, and then tighten the set screw to firmly fix it. How to assemble a frame, look at the photo, nothing complicated. How you will fix the boards is up to you. You can glue, fasten special fastenings to a tree or drill holes in pipes and fasten the backrest and seat with bolts.
 Metal pipe stool
Pretty simple design - used only two types of fittings. Pipes and fittings form the frame to which the wooden seat is attached. To assemble the stool, start by assembling the sides of the frame, which then connect as shown. Single output fittings allow you to create a frame shape. A fitting with a platform that slides along the upper pipe is used to secure the wooden seat to the frame.Put them on the pipe and evenly distribute. Then, tighten the set screw to secure the connection. After that, you can connect the two sides using one pipe, which is connected to the open ends on the fittings at the bottom of the frame. Insert the pipe into the socket and fix it with the screw. Then slide the second part of the pipe into the open end of the connector on the one-piece tee on the other side and fix it with a screw. Finally, attach the wooden seat with screws to the fitting pads.


https://i.expert-h.com/en/stul/stul-iz-trub-svoimi-rukami-500-foto-poshagovye-instruktsii#sigFreeId9e8c4dc1da
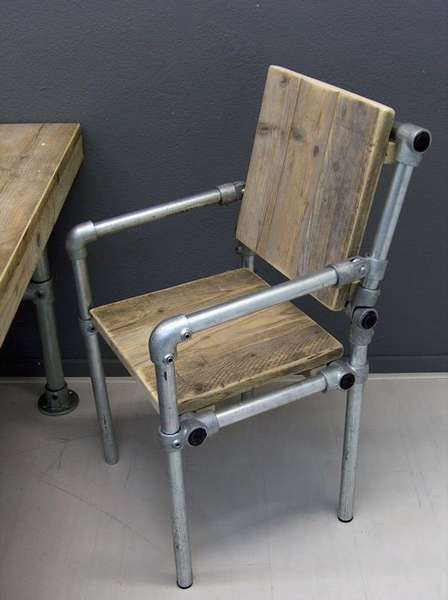
 Vintage industrial style pipe chair
Although the chair presented here is made of water pipes by welding, it is just as easy to assemble using fittings.
To assemble the structure, combine all the parts as shown in the picture.
- The first tee with one connector, which is necessary to set the height of the seat, will move along the pipe located on the back of the frame.
- The second, which is needed to mount the footrest, moves along the pipe in the front.
- Set these fittings to the desired height and tighten.
- Then connect the sides with two pipes as shown.
- Secure the seat in any way that suits you.


https://i.expert-h.com/en/stul/stul-iz-trub-svoimi-rukami-500-foto-poshagovye-instruktsii#sigFreeId3ef8f44480
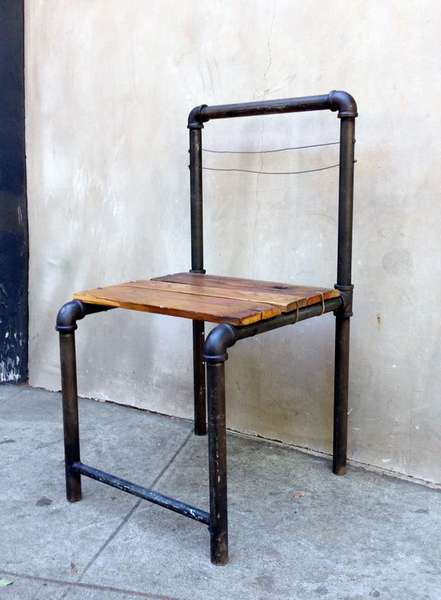
 Black pipe chair
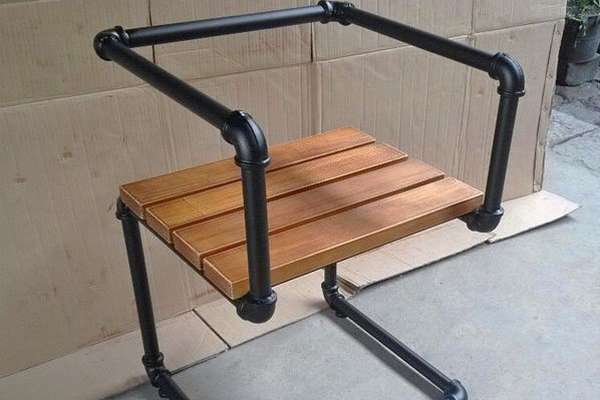
Only used here one type of fitting. The curved shape, although not original, looks unique for the industrial style. The frame is painted black and goes well with dark wood. To assemble the structure, lay out the pipes and fittings in the S shape, as shown in the figure. When assembling, only a 90 ° turn signal is used. Slide the fitting onto the top of the pipe and tighten the screw. Then move the second half of the pipe to the second fitting. Continue repeating these steps until you have the desired shape. You should get two sides in the shape of S. Make sure that the turn signals are looking out so that you can then connect the two parts of the chair. When the two parts are ready, connect them as shown in the photo. Then install the seat.


https://i.expert-h.com/en/stul/stul-iz-trub-svoimi-rukami-500-foto-poshagovye-instruktsii#sigFreeId8bba3b5cf0
 Tall pipe stool
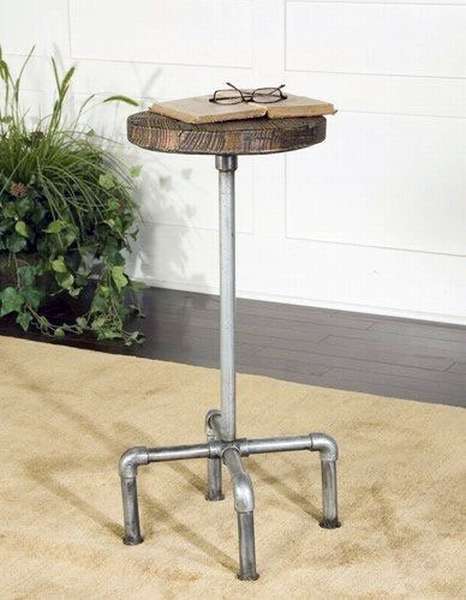
In this design, a single pipe is mounted on a base of four legs, and a seat is mounted on top of the pipe.
- Start the assembly with a tetrahedral cross, placing the pipes in the appropriate sockets, as shown in the figure.
- Tighten the set screws to secure the connection.
- Slide the 90 ° turn signals to the ends of the pipes and secure with screws.
- Insert 4 legs as shown in the photo.
- When the base is ready, adjust the pipe at the base to set the desired height as you wish.
- If you do not want the pipe to stick out in the upper part of the base, move it in the center of the cross so far as to fix it in the fitting.
- Now you can slide the flange on the top of the pipe and tighten.
- The seat is attached to the flange fitting with four screws. Insert them into the holes on the flange and screw them into the seat.


https://i.expert-h.com/en/stul/stul-iz-trub-svoimi-rukami-500-foto-poshagovye-instruktsii#sigFreeIda15c8f1dbb
Pipe bar stool
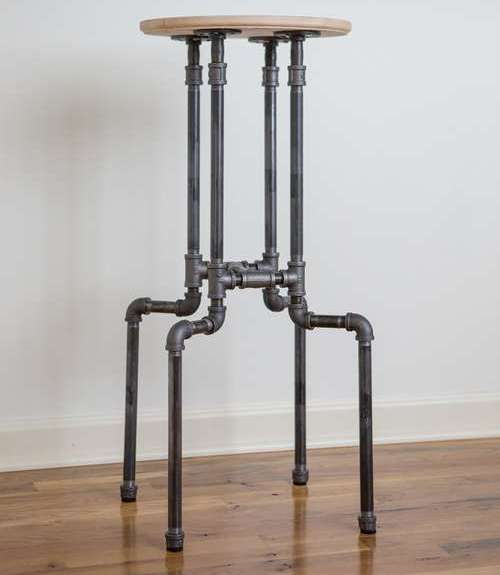 Many are attracted by the industrial style, but only the price often repels. And today it is fashionable - high ceilings, brick walls, open pipes, matching furniture and shelves from water pipes, and it’s also cool to hang lamps in the steampunk style. If you love all this, such industrial style pipe bar stool It will definitely suit you. Simple, elegant and fully made with your own hands. This chair is very easy to manufacture, and you will be surprised how cheap it will cost you. When deciding on the height of a chair, just keep in mind that 10 cm pipes for the lower base length create a chair about 55 cm high. The author used 30 cm pipes on the lower base of the legs to make a chair about 75 cm high.
What you need:
- 1 - round wooden seat
- 4 - 1/2 "floor flanges
- 8 - 1/2 "pipes of 30 cm
- 4 - 1/2 "8 cm pipes
- 5 - 1/2 "pipes of 10 cm
- 6 - 1/2 "tees
- 8 - 1/2 "90 ° turns
- 4 - 1/2 "caps
- 5 - Glue
Here are some tips to help make the build process a little easier..
- Remove all stickers and glue from the pipes.
- Use the vise as a lever for leveling. This project technically does not require any tools, you just screw the pipes into place, but the vice will make the work a little easier.
- Do not screw the end caps on the bottom to the end. This will allow the caps to be screwed to the correct height to balance the chair.
- In this project, the author used strong glue to connect the wooden seat to the floor flanges, but if you want it to be even stronger, buy screws to secure the seat to the flanges.
Instructions:
- Step 1: Attach a 30 cm pipe to the tee. Add a nipple to the end of the tee opposite the pipe. Add a 90 ° turn to the closed nipple. Screw the pipe 8 cm. Add another 90 ° turn. Add a 30 cm pipe (you can replace it with something short, for example a 12 cm pipe, depending on how tall the chair is.)
- Step 2: Repeat this process 3 more times, connecting the remaining three legs.
- Step 3: Add the nipple to the open end of the tee in each leg. Connect both legs with a tee in the middle.
- Step 4: Repeat step 3, with legs 3 and 4.
- Step 5: Use a 10 cm pipe to connect the two sets of legs. If you are making a taller chair, use a 12-15 cm pipe at this stage to create a wider base for better stability.
- Step 6: Connect the floor flanges to the legs, just remove the stickers first!
- Step 7: Apply glue and attach the wooden seat. Then you can paint it.
- Step 8: (Optional) Attach adhesive pads to the bottom of the foot caps to protect the floors.


https://i.expert-h.com/en/stul/stul-iz-trub-svoimi-rukami-500-foto-poshagovye-instruktsii#sigFreeIde50310326e
DIY pipe stool
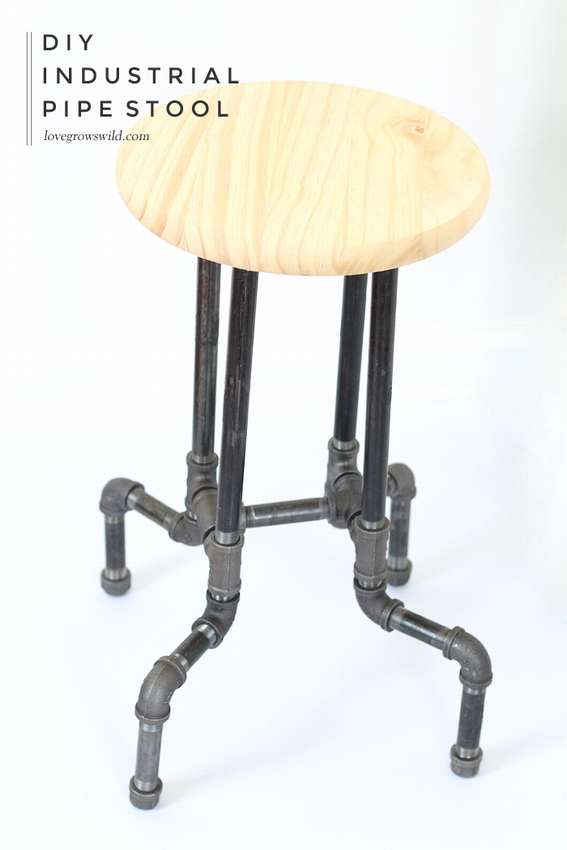 Another interesting example how to make a pipe stool with your own hands. Surely you have already seen many options if you are interested in this topic. All of them are different in complexity, but this stool from pipes can really be made by anyone, and very quickly and almost without tools. Do you like the idea? Then proceed, it's really easy.
Just before the start some tips from the author.
If the pipes have stickers, remove them before assembling, because if you put it off for later, when the chair from the pipes is ready, it is much more difficult to do. Buy black steel pipes, they are usually cheaperkeep this in mind when deciding. All that you will be during assembly is to screw one pipe into another, so you don’t need any special tools, but still vise may come in handy.
Here's what you need to buy to make 1 pipe stool: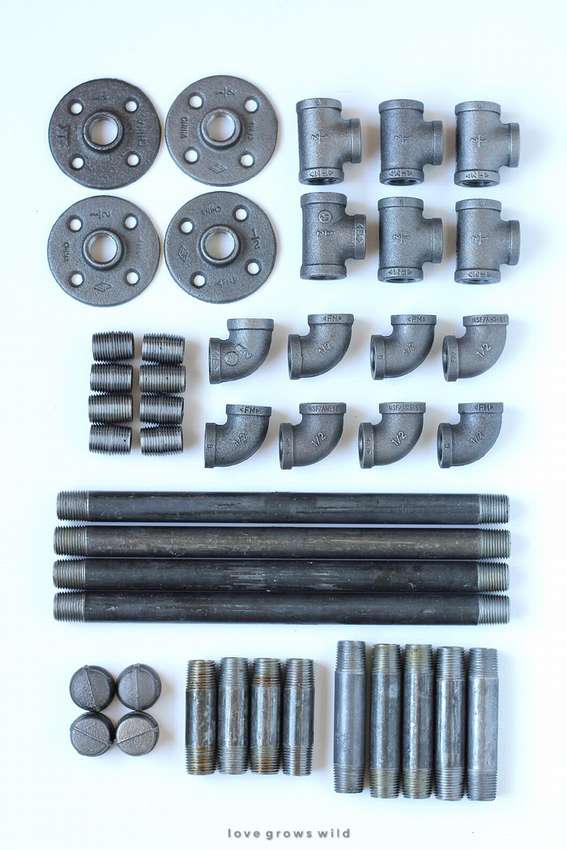 1 - a round wooden seat (you can buy ready-made)
4 - 1/2 "floor flanges
4 pipes 1/2 "30 cm
4 pipes 1/2 "8 cm
5 tubes 1/2 "10 cm
6 - 1/2 "tees
8 - 1/2 "90 ° turn signals
4 - 1/2 "caps
However, everything is shown in the photo on the right..
Instruction manual:
- Step 1: To assemble one leg: screw a 30 cm pipe to the tee. Add a nipple to the end of the tee opposite the pipe. Screw the 90 ° indicator to the closed nipple. Add an 8 cm pipe and another turn signal. Screw in a 10 cm pipe and cap.
- Step 2: Also assemble the second leg.
- Step 3: Add the nipple to the open end of the tee in each leg. Connect the two legs to the tee in.
- Step 4: Assemble the remaining legs.
- Step 5: Connect the third and fourth legs to connect the first and second.
- Step 6: Use a 10 cm tube to connect the ends of the open tee on legs 1.2 and 3.4.
- Step 7: Add a floor flange to the top of each leg.
If the frame is ready, it remains to fix the wooden seat. The author used Elmer ProBond glue designed specifically for bonding mixed materials, but this is up to you. Many, for example, praise Permabond ET51 epoxy adhesive5. Simply apply a thick layer to the upper flanges and press with something heavy. Of course, you can screw it with screws, you do just that, the author just wanted to prove that when assembling this chair from pipes, you can do without tools :)
Finally, paint or varnish the seat. Use the caps to adjust the legs so that the stool is level. In order not to spoil the floors, you can put on sticky felt pads on the covers.


https://i.expert-h.com/en/stul/stul-iz-trub-svoimi-rukami-500-foto-poshagovye-instruktsii#sigFreeId09867e351a
Metal rocking chair
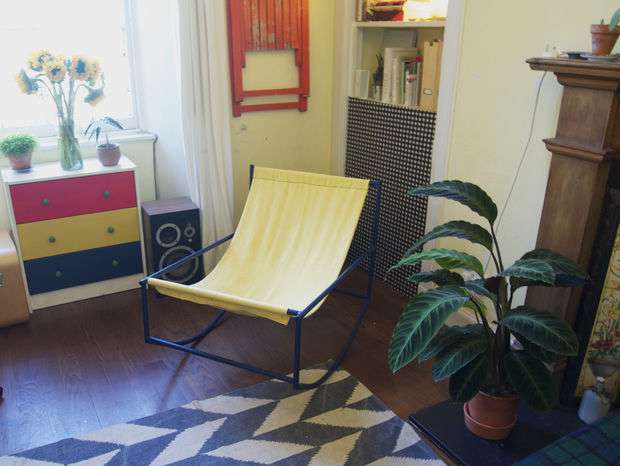 The design of this rocking chair is a shameless copy of the beautiful furniture of Müller Van Severen. Their collection, Furniture project, has been nominated for the British Design of the year Award. A vivid example of multifunctionality, minimalism and commitment to the Belgian views in design. About how much it costs, it’s better not to talk, but simply make a metal rocking chair do it yourselflet it be without claim to originality. Copying is a great way to learn, especially since you are provided with step-by-step instructions. You can significantly improve your metal skills. "Imitation is the most sincere form of flattery»
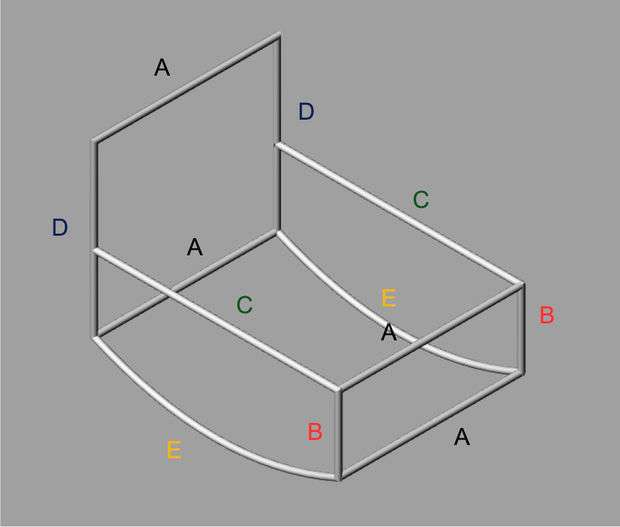 The first step is to buy materials. The author used a round steel rod with a diameter of 20 mm. Ideally, you can pick up the phone because the shaft is very heavy. In general, what you buy, from that you will make it, if you need a portable option, then of course, it is better to buy metal tubes.
- A: 4 x 650 mm,
- B: 2 x 268 mm
- C: 2 x 867 mm
- D: 2 x 600 mm
- E: 2 x 896 mm
Instruction manual:
- Grinding. You will need to carefully grind all the ends of the rods to ensure good contact when it comes to welding.
- Welding. Begin to weld two sides (B, C, D), for which provide a flat area. After welding, the sides at the top are joined together with the length “A”.
- Bend. The development of a method for bending a rod with a diameter of 20 mm from the author required a little imagination. If you do not have a special tool that can bend such a thick rod, use auxiliary material. The author, for example, bent the rod between the trunks of trees. Not the best option, but the main thing is the result.
- So, if the frame is ready, weld the parts “D” and “B” by making a small angle at the ends.
- Find the right fabric. In this case, they took an old carpet and cut a strip 600 mm wide. Very simple and excellent.
- If you are not a professional welder, then your welds are probably not the most beautiful. It is definitely worth spending some time here and putting them in order, having carefully cleaned them.
- Painting. This is the most enjoyable part of any project. Paint really really works wonders, and changes are happening right before our eyes. Do not rush, first thoroughly clean the frame with hot soapy water to remove dirt and grease. Rinse and dry well. Put, or rather, lead in a well-ventilated area. Choose on a hot and not too windy day. Start with a base coat of primer, apply two coats, with a break of 2 to 3 hours. Then leave to dry for a day. Finish with a matte varnish.
- Choose fabric color. You can act as an author. Buy 100% cotton in plain, natural white. Then I paint it in the washing machine, which is very simple. This allows you to completely solve your own color scheme. Endless possibilities!
- Stitch. Basically, the sling is made of a piece of material with a width of about 1200 mm and a length of 1300 mm. Then it folds in half to make a rectangle of 600 mm x 1300 mm. It is sewn in and the fabric is turned inside out to hide the seam.
- Sew to the frame. The method used to attach the test tissue is not suitable here. One sleeve can be sewn on a typewriter, and the second will have to be manually. Sew the fabric with double thread to ensure a strong connection.
Enjoy it!


https://i.expert-h.com/en/stul/stul-iz-trub-svoimi-rukami-500-foto-poshagovye-instruktsii#sigFreeId92b1a93942
PVC pipe chair
PVC pipe chairs they are frames made of polyvinyl chloride pipes - they are made according to the same principle as metal chairs made of pipes, only not wooden parts are used as a seat and back, but weaving from different materials, fabric coverings, pillows, etc.depending on the design. PVC pipe chair - This is an inexpensive alternative to ordinary furniture, which is easy to assemble and repair if necessary, simply replacing individual parts. Here are some examples. The assembly principle is almost the same, only there are some nuances with the creation of various configurations - all this is described in step-by-step instructions.
DIY PVC pipe chair
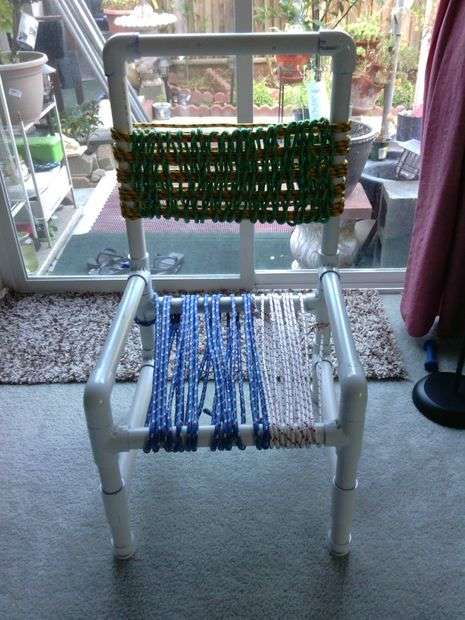
 Are you a creative person and do you need a chair? Here is a great option - PVC pipe chairwhich can be easily done with your own hands.
You will need inch pipes
- 4 pcs 60 cm long
- 8 pcs 55 cm long
- 4 pcs 122 cm long
- 9 pcs 15 cm
- Ruler
- PVC cutter
Four types of fittings are shown in the first photo in the gallery.
- Mark all the necessary sizes with a ruler and cut all the necessary parts with a cutter.
- Take 4 segments of 55 cm and lay out a square shape. Connect each side of the square with a fitting.
- Now take four 60-centimeter tubes and install the bases in the side outlets, turned up. These will be the legs of the chair.
- Then connect the adjacent legs with the fitting.
- Take two 55 cm tubes and connect the fittings at the top.
- Take 150cm PVC pipes and two T-shaped fittings. Lay them out as shown in the photo.
- Now connect so that the exits in the middle of the frame are perpendicular to the opposite side of the chair.
- Also do on the back and insert the tubes of the future seat. In order not to get confused, better look at the photos. Here you will have to make some effort to put the tubes in place.
- Take four 122 cm tubes and insert into the connectors on the back of the chair. It will be a back.
- The top is going, like a frame for a seat, look at the photo.
- In the photo you see how the chair should look. Use a hammer to tighten the clamp between the pipe and the connectors, so the chair will be stronger.
To make a chair seat, find a strong rope. Pass it through the four 55 cm pipes that make up the base of the seat. Tie a knot and burn the end. Tie the back in the same way. Weaving can be approached creatively by creating various patterns and using multi-colored material.


https://i.expert-h.com/en/stul/stul-iz-trub-svoimi-rukami-500-foto-poshagovye-instruktsii#sigFreeId8df808340c
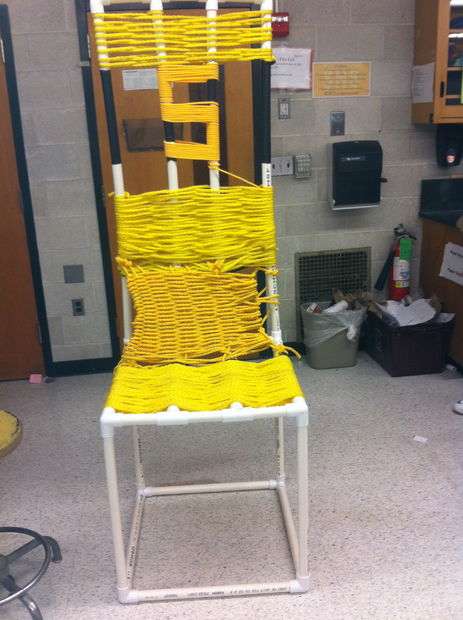
 Chair made of PVC pipes. Example No. 2.
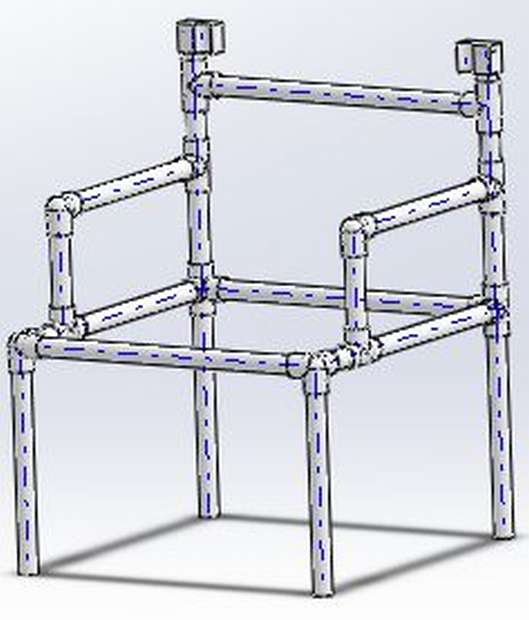
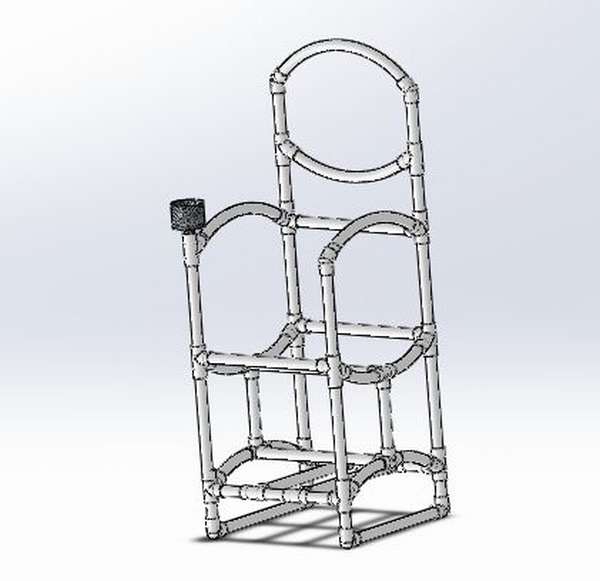
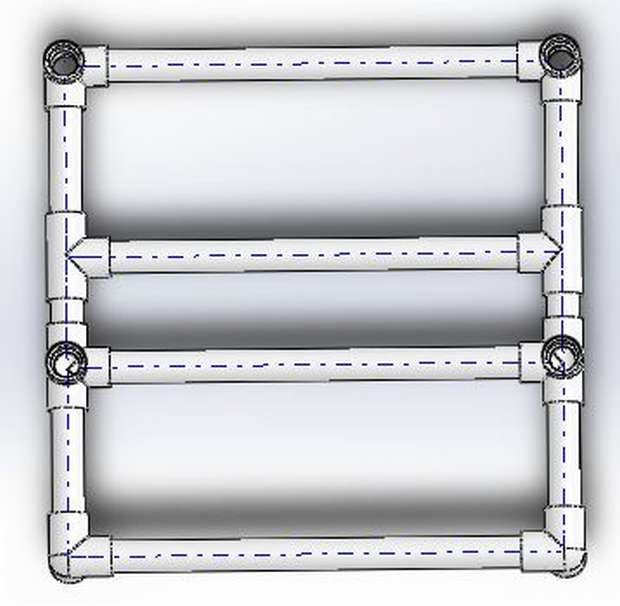
This is a step-by-step guide on how to make a chair that consists exclusively of PVC pipes. The diameter of all parts is 1 inch. Shown here 3 main steps. The design was created using Solidworks in the form of a 3D model, based on a program consisting of several stages, namely how to pick up pipes, how to connect and how to make a pillow.
The first part of the photographs is creating a model on a computer using Solidworks. Of course, you need to understand this program yourself, but when you understand the basic functions, these step-by-step photos will help you in creating a specific model. You can also follow the link to the source site, where the author describes in detail where to click on what.


https://i.expert-h.com/en/stul/stul-iz-trub-svoimi-rukami-500-foto-poshagovye-instruktsii#sigFreeId2c36a75849
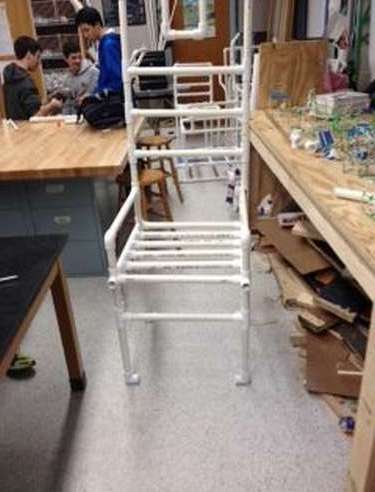
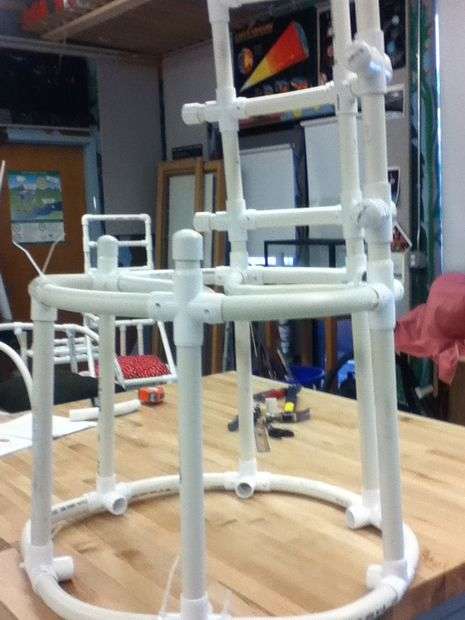
 The second part is how to assemble a chair from PVC pipes in real. The first part of the assembly is the lower construction with an emphasis for legs.
- Start assembling the chair from the square that connects to the bottom of the footrest. The upper 10 cm part is connected to the transverse outlet and to the side outlet.
- The lower 10 cm part is connected to a 90 ° outlet and a connector outlet T.
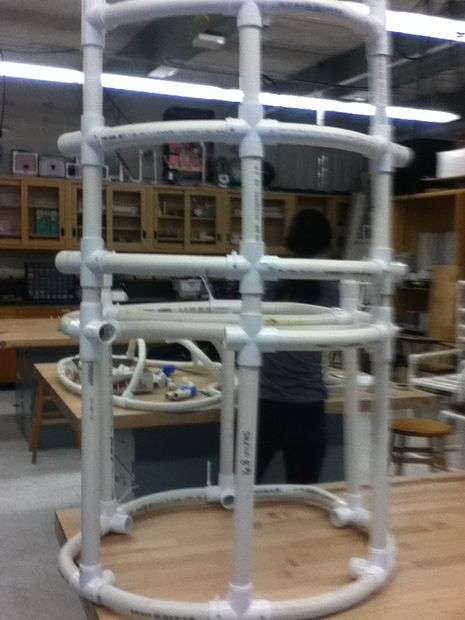
- The remaining parts of the lower part consist of pipes of 55 cm and 20 cm. The first level of construction is 55 cm. A large area is the basis of the entire chair. At the bottom 12x55 cm.
- To complete the construction, a square structure is created below, as mentioned above.
- The long part on the second level, consisting of 5 pipes, has a length of 55 cm.
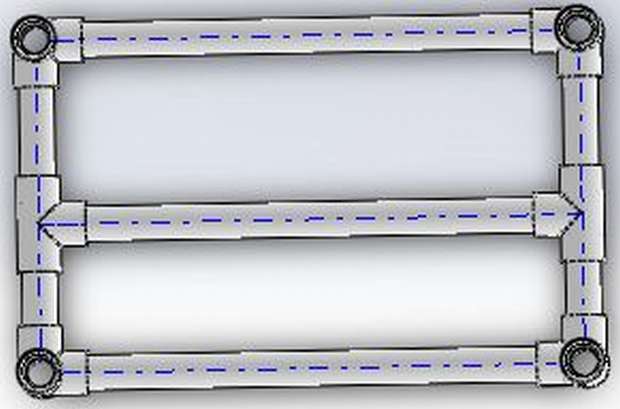
- The second part of the assembly is much simpler than the first. 30 cm pieces connect to another square where there will be holes for the seat.
- Since the chair has armrests, a square that connects with 30 cm lengths has different sizes on the sides than the front and back. The front and back of the square are 30 cm.Lateral parts - 52 cm, which are connected with 5 cm pieces on the side.
- Armrests and a pipe will allow pipes to the rear of the structure to create emphasis. The armrests are 50 cm long and have an angled part at the front and an outlet T of the fitting at the rear, which consists of 5x11 cm. The upper body supports the rear structure of the flexible parts from PVC pipes.


https://i.expert-h.com/en/stul/stul-iz-trub-svoimi-rukami-500-foto-poshagovye-instruktsii#sigFreeId481aa15c5b
 Chair made of PVC pipes. Example No. 3.
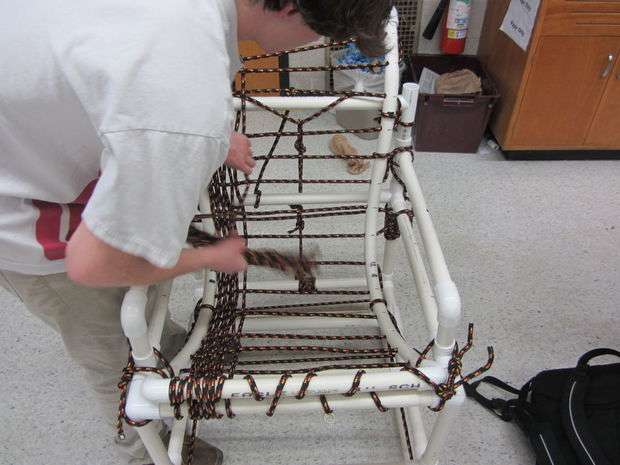
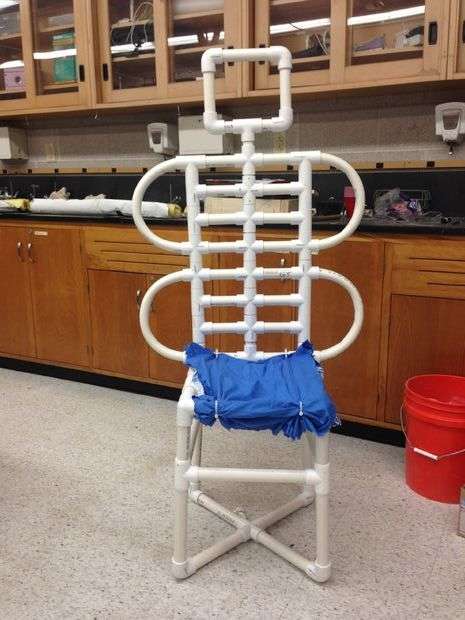
If you are interested in home-made furniture from pipes, then you have probably already seen many interesting examples homemade PVC pipe chairs. Here is a relatively simple option that you can do yourself.
This chair is relatively simple to manufacture and the author took only one day to assemble it, however, excluding the time taken to figure out how to assemble it. The design may look fragile, but meanwhile, it can easily support the weight of an adult, at least 70 kg (verified by the author). You can use a PVC primer and cement to make it stronger. The wicker seat and backrest are quite comfortable, but you can use fabric instead.
Materials you will need
- Saw 1/4 inch PVC pipes into pieces 12 cm, 44 cm and 48 cm long, as shown in the photo.
- end caps
- standard T connectors
- 90 ° turn signals
- primer and cement (optional)
- Rope or cloth
Legs. Reconnect the end cap, T-fitting and two 12 cm tubes. Repeat this four times. Then connect everything together using 44 cm tubes. These will be the legs of the chair.
Back and seat
Connect the two 48 cm tubes and 44 cm pipes using 90 ° turn signals. This will be the back of the chair. Insert the two T-connectors at the ends of the 44 cm pipe. Repeat this again to make 2 identical pieces. Then fit the ends of the turn signal and the T-fitting to the ends of the other 44 cm pipe. So make 2 similar shapes.
Seat assembly. This step looks complicated, but in fact, everything is quite simple. You already have pipe sections with upward-facing connectors that you made when making the legs. Install those with T-connectors on the turn signals perpendicular from above. In general, it is easier to look at the photo, there it is more clearly shown. Connect them using four short pipes so that they are together. It will be a seat.
The next few steps are pretty logical. Attach the foot parts to the bottom of the seat and the backrest to the top of the seat. The frame is ready.
Rope braid. So, the chair is ready, but you still can’t sit on it. Choose what suits you best - rope or fabric. The author, as you see, used a rope. With fabric, it will probably look more aesthetically pleasing, however, and it will be more difficult to do. The seat looks fragile, but it is very comfortable and can support enough weight.


https://i.expert-h.com/en/stul/stul-iz-trub-svoimi-rukami-500-foto-poshagovye-instruktsii#sigFreeId5971dd689a
 Chair made of PVC pipes. Example No. 4.
This chair is made entirely of inch PVC pipes.
The necessary materials can be seen in the photo, and if more detailed, it will be necessary:
- 14 pipes of 50 cm
- 20 pipes of 33 cm
- 4 cruciform fittings
- 10 corner knees
- 8 T-shaped fittings
- 12 pipes 30 cm,
- 4 pipes of 30 cm
- 12 pcs T-connectors
First, just cut all the PVC pipes to the specified dimensions.
The design consists of three main parts: backrest, seat and lower base.
- The base is made of 4 50 cm pipes connected by T-shaped fittings in the shape of a square.
- to make a bottom, each 5 cm pipe is laid out in the form of a square and connected to 90 ° degree elbows with side outlets. When the square is completed, another four 30 cm lengths are connected upward. - To connect the base to the middle seat, use 4 30 cm tubes that connect to the T-shaped base fittings.
- The base is assembled from 6 50 cm PVC pipes. They are connected to the T-connectors on the side.
- 90 ° pieces are also added in the corners to add support for the seat. - Two armrests of ten-centimeter pipes with corner fittings that are connected to the seat by 15 cm pipes are installed on the seat.
- The armrests are attached to the rear and are connected by T-shaped connectors on each side.
- 3 pipes of 50 cm connect each of the sides that create the back.
- The top of the backrest 2 parts of 30 cm are connected to the corner connectors and also connected to 10 parts.
It remains to add pillows.


https://i.expert-h.com/en/stul/stul-iz-trub-svoimi-rukami-500-foto-poshagovye-instruktsii#sigFreeId50f5a32ea6
 Chair made of PVC pipes. Example No. 5.
Do you have PVC tubes? Do you need a comfortable and practical chair? Well, the problem is solved, see step-by-step photos and make a PVC chair with your own hands - it's easy. It even provides cup holder, with this it's generally simple, you can make any holders and stands of plastic pipes, at least for a glass, at least for a bottle. Detailed instructions for making a chair from PVC pipes can be found on the website, although from the photo everything is clear what to insert. Unless you have experience, you may have difficulty with flexible pipes. There are different ways, most often they do this over a gas burner.
Just put a tin can with a hole in the bottom upside down on the stove, however, first you must spoil a couple of pieces, but you will gain invaluable experience. Of course, there is special equipment for this business, such as Bosch GHG 660 LCD hot air gun, a multifunctional thing, if you seriously engage in the manufacture of furniture from PVC pipes, then it will definitely come in handy. Or use a spiral, as one friend suggests forum.violity.com/viewtopic.php?t=888. In general, this is not a problem, the main thing is to observe security measures.


https://i.expert-h.com/en/stul/stul-iz-trub-svoimi-rukami-500-foto-poshagovye-instruktsii#sigFreeIdf46c843b71
Chair made of PVC pipes with a curly back
 Here you will find out how to make a chair from PVC pipes with your own handseasily enduring a person even with a decent weight. To make a durable chair, it is important to take the right measurements, and accurately prepare all the details so that all sizes clearly correspond to the developed plan. To create your own model, you can use Solidworks, the automatic design system used by the author of this project. There you can find the whole set of tools necessary for three-dimensional parametric design and design. If you are interested, there are similar programs on the Internet. Using Solidworks is not difficult, except at first, but it’s interesting and convenient, it shows you exactly how and in what order you can do very real things.
I will not describe the assembly procedure, the process is displayed very easily in step-by-step photographs, and if you are interested in the details, there is a link to the site under the gallery where there is detailed instruction, as well as a list of necessary materials and tools. By the way, there you can read a brief instruction, how to use solidworks. I just want to describe separately how to make curved back parts.
To do this, you will need the following materials:
- PVC heater
- Hand protection gloves
- A cold, wet rag to cool the pipe and harden.
First you must measure the length from the middle of one pipe to the middle of the other where the bending will occur.
- Cut the pipe to this length.
- Place the pipe in the heater.
- Heat the pipe for 5 minutes, rotating 180 degrees every 30 seconds.
- It is important to make sure that you rotate so that all sides heat up evenly.
- After 5 minutes, remove the tube and bend it into a semicircular shape.
- Attach in two holes and hold it there for a while.
- While holding, someone else should take a damp cloth and walk through the pipe to help it harden.


https://i.expert-h.com/en/stul/stul-iz-trub-svoimi-rukami-500-foto-poshagovye-instruktsii#sigFreeId2051aff864
Armchair made of PVC pipes
 Base consists of 4 PVC pipes connected at 90 ° bends. The second part is footrest, which is attached to the base (second layer). It consists of a square with a pipe, for resting the legs. The third part is seatconsisting of a rectangle with three pipes in between. The fourth part is armrest and backrest (last layer) of bent PVC pipes. Pipe bending is best done with an industrial hairdryer. To prevent the pipe from breaking, a bending spring is inserted in the middle. If this is not the case, the pipe can be tightly filled with sand preheated to 80 ° and the holes closed with plugs. It is necessary to warm up slowly, slowly rotating the pipe. The main thing is to prevent overheating, otherwise the plastic will become worthless. When you see that the material has reached the desired ductility, slowly bend to give the desired shape. Keep it in this position until it cools down. Can be wiped with a cold cloth.
 To create the base, use a 48 cm PVC tube and 90 ° turns.
- Connect the tubes to the corner fittings to make a square. Then at the top of each 90 ° insert a 15 cm tube.
- Attach tees to the back of the footrest.
- On the front side of the footrest, attach 90 ° downward turn signals.
- On the sides of the stop insert a 48 cm pipe connected to the outlets of the tee and the lateral outlets of the 90 ° turn.
- Glue a 16 cm pipe on the other side of the tee outlet.
- Attach 48 cm pipes to the sides of the tees to create a ladder view that will be used for the footrest.
- After completing the footrest, insert the pipe into the openings of the fittings pointing up.
- Wear tees at the top of all 30 cm pipes.
- Attach 10 cm of tubing to the holes on the 90 ° indicator in the back of the chair on both sides.
- Connect with tees.
- To put the ladder in place, insert another 8 cm tube, which will be where you are sitting
- To attach the armrests, when opening the two outlet openings of the tee, attach the 30 cm pipe on top and put on the fittings from the tee. From the front triple fitting, fit a curved pipe that was 70 cm before bending to the tee outlet located in front of the seat
- Backrest mount. The back of the chair is connected to the other holes of the tee, and the curved pipe creates an arch, which is convenient to lean on


https://i.expert-h.com/en/stul/stul-iz-trub-svoimi-rukami-500-foto-poshagovye-instruktsii#sigFreeId5c4f33367b
LED backlight for chair
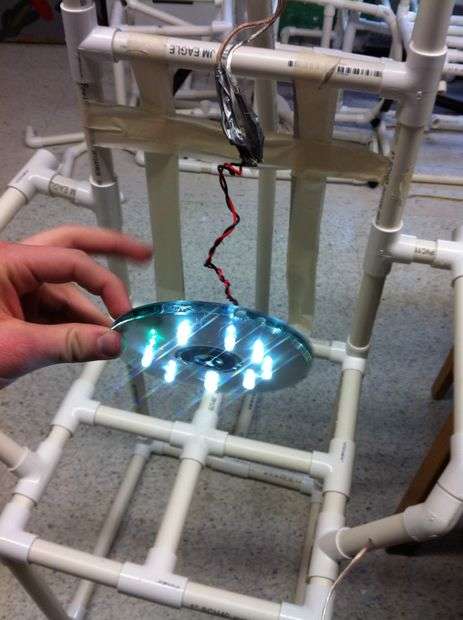 At the lowest cost you can make a chair from PVC pipes do it yourself and adding a small fixture to turn it into a convenient place to read in a dark room! All that is required is attach LED lights to a regular CD. Take a look at the step-by-step photos and you will see how simple and original such a design will look. How to make a chair from PVC pipes is shown above, now look at how to make a LED backlight.
You will need:
- 2 CDs (preferably unused)
- 9 LED backlight (color depending on preferences, with white it is better to read)
- 18 120 ohm resistors
- wire speaker
- ordinary wires - red and black (such colors are needed for positive and negative identification)
- soldering iron
- solder
- PVC pipe chair
Step 1: Assemble individual LED resistor pairs
- Carefully separate the ends of the LED to facilitate future work. Tails should form a V-shape.
- Hold 2 resistors to form an X-shape.
- Repeat step 2 with the other ends of the resistors.
- Screw the spiral end of the pair of resistors around the tail of the LED (no matter which one).
- Solder the connection between the pair of resistors and the tail of the LED.
- Repeat steps 1-5 for the rest of the LEDs. In total, 9 LED resistors are needed.
Step 2: Prepare a CD
Drill holes on the CD. This is not difficult to do, but you need to work carefully. The main thing is to firmly fix the disk and turn on the maximum speed on the drill.
Step 3: Connect the wires to the LED resistors.
- Cut about 12 cm of black wire and divide it into two ends.
- Wrap one end around the end of a pair of resistors in a pair of LEDs.
- Solder this connection.
- Insert the LED through the drilled hole on the CD, and pass it through the center hole of the CD.
- Glue the connections onto the CD.
- Repeat this all with all the LEDs.
Step 4: Soldering
- Twist together all the black wires that pass through the center hole of the CD.
- Solder together this large bundle of wires.
- Cut the long part of the black wire from the coil and split into two ends. Solder one end to a large bundle.
Step 5: Fixing the rest of the ends of the LEDs
Each LED still has one unconnected end. Now deal with them.
- Cut a long piece of red or black wire so that you can wrap it around the CD.
- Clean the entire wire.
- Wrap it around the CD.
- Put the resulting circuit on the free ends of the LEDs and one after the other and wrap them around the wire. The connection is parallel, and in principle, already working, despite the gaps between the ends of the loop. Make sure that there is a small gasket between one end of the loop wire and the small cover.
Step 6 Second wire
- Cut a piece of red wire so that the piece is longer than the cut black one and separate the two sides.
- Wrap one end of the red wire around the end of the loop of the wire that includes the CD. Solder this connection and thread the rest of the red wire through the hole in the disk with the rest of the wires.
Step 8: Fasten the second cd.
- Grasp all the wires that go through the center of the CD and pierce them through the hold of the second CD.
- Apply hot glue in several places between the CDs and hold tight until dry.
- Connect the red and black wires.
- Attach the split ends of the wires to the ends of the speaker wire through the chair.
- Solder these connections.


https://i.expert-h.com/en/stul/stul-iz-trub-svoimi-rukami-500-foto-poshagovye-instruktsii#sigFreeIdd13cad9754
How to make a chair from PVC pipes with a round base
 Want to make a chair but don’t know how? Yes, very simple. Dial from PVC: pipes, fittings, crowbars, elbows and prepare the cutter. And then see step by step photos and collect. Start by taking two 30 cm PVC pipes, bend them and insert them into the tees. Then lay six pipes 48 cm long on top of the tee to form part of the bottom. The front part is connected by a tee, and the rear part by a transverse tube.
 With six curved PVC pipes of 22 cm each, we connect two side T fittings with a pipe on the right and do the same on the left.
- Between two lateral T adapters in front, we install two more 22 cm pipes on each side of the tee, connecting them to each outlet of the fitting.
- We repeat the same process on the back side, except that we use a cross to connect the pipes to both sides of the T fitting.
- On the left side we add a cap, and on the right - an 8 cm PVC tube and a cover. This tube must be bent to connect each outlet T of the side to the corresponding outlet T of the fitting.
- Repeated the same process for the two rear side outputs.
- After that, we lay 8 cm of pipe over the rear left side T, the rear middle cross and the rear right side. Then, using three crosses, place them on top of each 8 cm pipe.
- After we have connected all the crosses together, add two 30 cm bent parts. At the end of the right side we put a cap made of PVC. At the end of the left cross, add an 8-cm tube and cover.
- Then we carry out the similar work that we did before, laying three 18 cm pipes on top of the crosspieces and at the end of each of these pipes we add three more crosspieces. Between them we fasten two curved pipes of 30 cm each.
- We put caps on the right side of the cross, and on the left we add an 8 cm PVC tube and a cover.
- We lay the last three 18 cm PVC pipes on top of the cross-shaped parts.
- In the upper left corner we put a tee and a cap. In the middle we add a cross and a cap, and on the right we put a tee, an 8 cm tube and a cap.
- The last step is to add the last two curved 30 cm and connect each side from the cross to the tee on the right. And from the cross to the left cross.
That's all, he said that everything is simple :)


https://i.expert-h.com/en/stul/stul-iz-trub-svoimi-rukami-500-foto-poshagovye-instruktsii#sigFreeIde9bfef4c5c
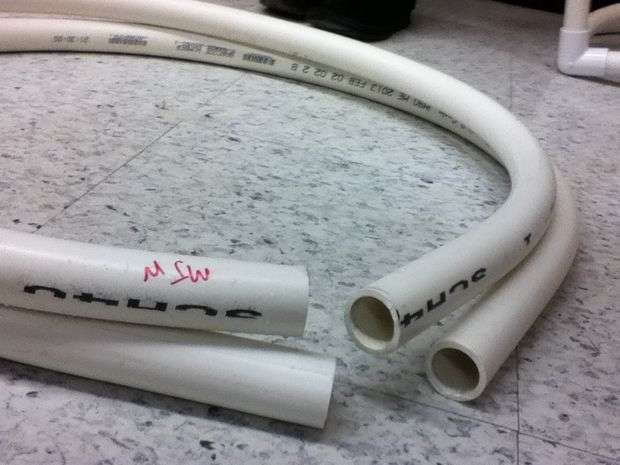
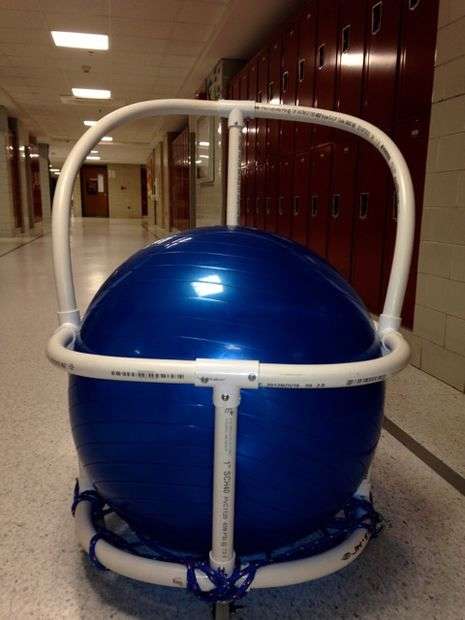
How to make a chair from PVC pipes and a ball for fitness
 Necessary materials:
- PVC 1 x 3 m (3)
- PVC Mount (7)
- PVC fittings (4)
- Wheels (4)
- Ball for aerobics (1)
- Nuts, bolts, washers (27 pieces)
- Rope
First, bend all the pipes that are needed. This allows for nuances to be provided so that all parts are available when the chair is ready for assembly. You can bend special hairdryerif you have it, or manually, using a spring or filler on a gas burner. Different methods are already described in this article above.
To start creating the base, you will need 4 crosses and 4 bent PVC pipes.
- After the pipe is bent into 4 semicircular pieces, start inserting them. Make sure that the hole of the crosspiece is turned upward, which allows you to install the pipes horizontally.
- Once the base wheel is in place, it's time to insert the wheels. Drill a hole in the bottom of each of the 4 pieces of fittings.
- On the inside, you will need to install a dowel, which allows you to hold the wheel tightly in the hole. Drill a hole and insert the dowel inside so that the wheel passes through the pipe and into the dowel.
- After the dowel is installed, check that the wheels are tightly clamped with nuts and washers.
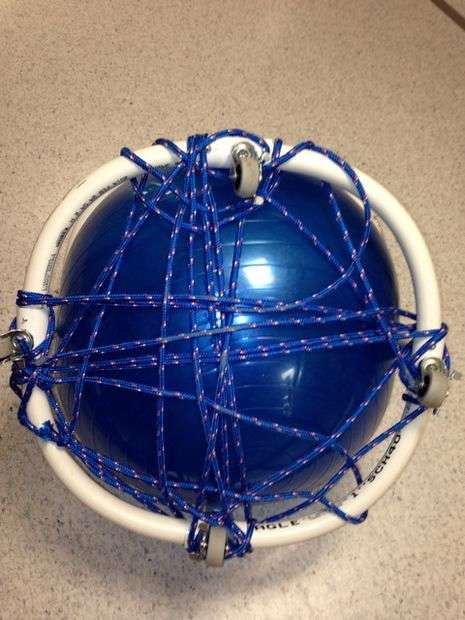
- Having finished with the base, braid the bottom with a rope so that the ball does not touch the floor, when you sit on a chair. The weave should be tight enough to support the weight of a person.
Completing the rest of the chair
- To fix the middle, 4 tubes are inserted horizontally into the fittings, which are located at the bottom of the base.
- The middle of the chair is almost the same as the base. That is, you do the same, bending 4 pipes in a semicircle.
- Then insert the curved pieces into the sides of the 4 crosses. At the bottom of these fittings will be a PVC pipe that rises from the base of the chair. The only crescent that should be in this part of the chair is at the very beginning, because this will be the place where the legs hang.
- Then insert a large length of pipe into the top of the crosspiece, which is installed in the back of the chair. It will be a back.
- A cross is installed in the upper part of the back stop. Insert the back gauge pipe into the bottom of the crosspiece.
- Install the armrests on the sides.
In conclusion, it is necessary drill holes and bolt the chair. This is a very important step that should not be neglected if you do not want your design to fall apart at the most inopportune moment. In general, drill all the joints, as shown in the photo, and tighten with bolts. All done, the original chair is ready.


https://i.expert-h.com/en/stul/stul-iz-trub-svoimi-rukami-500-foto-poshagovye-instruktsii#sigFreeId14880ca7ad
PVC pipe chair for toilet
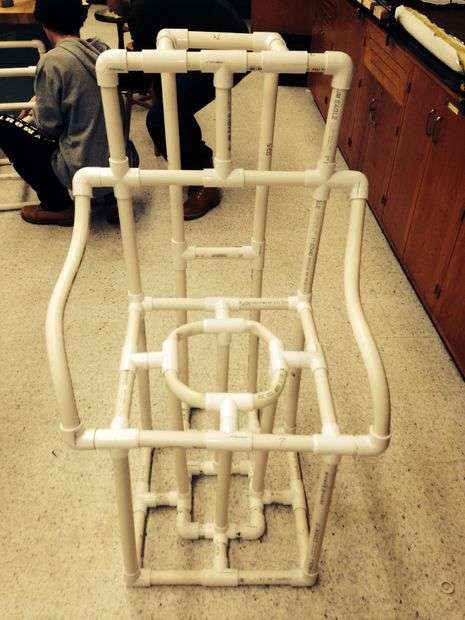 Interesting idea to do PVC pipe toilet chair. Where to find him practical application, decide for yourself. A good option for a summer residence is light, portable, cheap. It can also easily replace the toilet in the apartment if you are ready to give up porcelain. The project was previously created on a computer by Solidworks. If you are interested in how to work on it, on the site, a link under the gallery, there is a brief instruction. Just the first five photos display the assembly sketch on Solidworks. It seems not difficult, you can figure it out, but it is very clear.
- Come on Solidworks, choose assembly.
- Then open the fitting and pipe.
- Select connections on the top toolbar.
- Select the circular circumference of the pipe, and then click and select the inner lip, they will automatically connect to each other.
Now the practical assembly.
- Start by assembling the outside of the base. Use the 90 ° side corners and insert 18 cm of tubing on both sides. Do this at all corners of the base.
- Take the T-shaped fittings and install them in the middle of each side. Then insert the 8 cm tube on both sides so that they are directed inside the chair.
- Mounting on the sides is a square that will give stability to the structure. Use the tees to insert an 8 cm diameter tube that will connect to the inner square.
- Insert 6 cm of tubing to the left and right of the four-way outlets. These t-shaped side outlets will allow a smaller square at the base for greater stability.
- Now, insert the left and right sides of the outlet holes and install the 90 ° connectors on the other end. This will create four corners and a square for stability.
- The rise of the 4-way exits on the inner square will support the seat. Install 50 cm of PVC pipe at the top of each of the four outlets so that they rise up to support the seat.
Seat assembly
- To make a basisIn order to support the seat, insert 4 pipes below the base. The legs are inserted as in the photo, in four 4-way exits.
- Take the T-shaped fittings and insert them in the middle of each side. Also install an 18 cm pipe on both sides so that they can be connected in the inside of the chair.
- At the end of the PVC pipe, which is inserted inside the t-shaped connection, 4-way connections will be placed.
- Bend the circle from the pipe and cut off the excess so that you can fit into the 4-way exits.
- This will be the seat.
Assembly backrest and armrests.
- Insert two 30 cm long PVC pipes into the corners of the seat, this will be the backrest support.
- At the top, collect two squares.
- Insert the 18 cm tube into the 4-way connection and in the middle a three-way fitting.
- A 20 cm horizontal tube in the t-fitting will be the headrest.
- At the top, insert the other end of the pipe into the three-way socket, the outlet facing down.
- In the upper part of the back there will be two t-shaped exits connected by four eight-centimeter tubes. The exits should be facing outward and will be used to support the back of the chair.
- Connect the sides of the back in the corners.
Armrests.
- Heat the pipe 65 cm and bend it into a shape convenient for the armrests.
- When pvc is heated, it becomes softer. After 5 minutes of rotation every 30 seconds, it will be hot enough to bend.
- When the tube heats up, bend it the way you want, then wipe it with a wet towel so that it cools and hardens.
- Insert tubes immediately into the 90 ° side connectors on both sides of the chair.


https://i.expert-h.com/en/stul/stul-iz-trub-svoimi-rukami-500-foto-poshagovye-instruktsii#sigFreeIde233ec398d
Children's chair from pipes
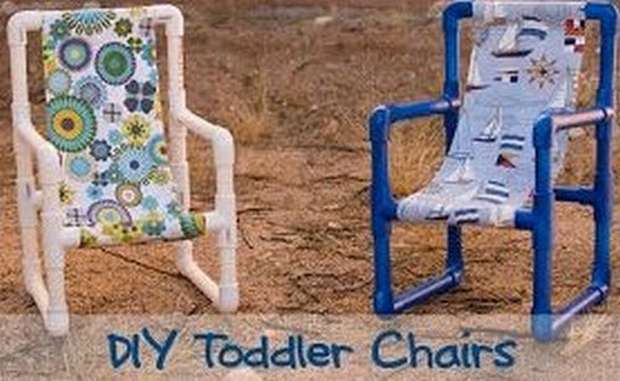 Shown here how to make a children's chair from PVC pipes with your own hands. The idea is not original, but the author assures that the design was developed without any clues, that is, the model can be considered exclusive. You can see the necessary materials in the photo. In principle, one three-meter half-inch pipe for one chair is enough for you, if you do several, then multiply the footage by the number of chairs accordingly.
And of course you will need standard set of T-fittings, 90 ° turn signals, possibly glue and cementalthough the author did not use them. How to assemble a structure from pipes was described above repeatedly, in this case, too, is nothing new. Than to read, what to insert where, it is better to look at step-by-step photos, everything is accessible and clear there. Assembling a chair will take about 30 minutes, and if you do a few, you can safely open your own business for the production of children's plastic chairs.


https://i.expert-h.com/en/stul/stul-iz-trub-svoimi-rukami-500-foto-poshagovye-instruktsii#sigFreeId978c9be476
Children's chairs from PVC pipes
 Summer may end, but this should not stop you from appreciating these amazing (and very easy to make) summer chairs for children from PVC pipes. If you are interested, read how you can make them as soon as possible.
Need inch pipes:
- 4 pieces of 40 cm
- 2 pieces of 25 cm
- 2 pieces of 18 cm
- 8 pcs 90 ° turn signals
- Bolts, nuts
- Durable fabric
- Primer and paint
- acetone
Cut lengths of pipe to the required size. Prepare and unfold the fabric seats. One good tip is to use a heavy duty canvas. He must maintain the weight of the child, the main thing is not to stretch, or worse, not to tear. Measure and sheathe the casing on each side so that the fabric slides along the pipe. Remove acetone inscriptions and marks on pipes, if any. Primer and paint. Define the middle of all four 40-cm pipes and drill a hole in the middle of each. Pass the seat through one 18 cm long tube and 25 cm long tube. Make rectangles from the pipes, then, crossing them, align the drilled holes and insert the bolts on each side of the chair. Tighten the connections with the nuts.


https://i.expert-h.com/en/stul/stul-iz-trub-svoimi-rukami-500-foto-poshagovye-instruktsii#sigFreeIdb6907fdadf
DIY PVC folding chair
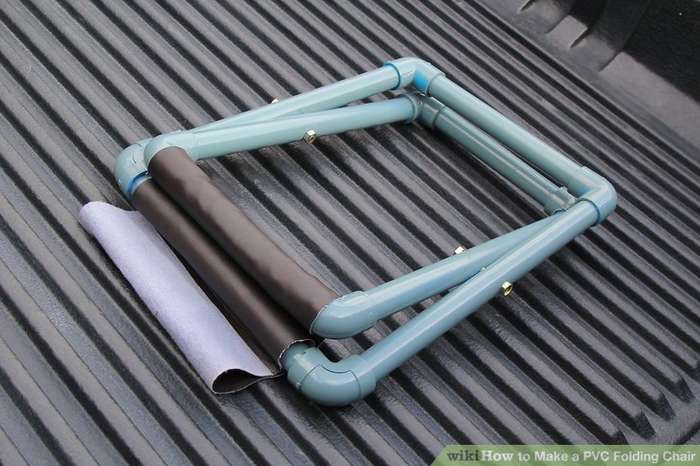 Here is another simple instruction, how to make a folding chair from PVC pipes.
- Select the fabric and cut to 18 cm.
- Fold and sew on each side.
- Then prepare and cut the PVC pipes to size.
- Find the center of all four 35 cm pipes and drill a hole in the middle of each pipe.
- Paint the tubes to your liking.
- Pass the stitched fabric through the upper rungs.
- Form two rectangles using 35 cm pipes, one of which has an upper and lower pipe with a diameter of 25 cm and one with an upper and lower pipe with a diameter of 18 cm.
- Cross the resulting rectangles and align them with the drilled hole.
- Bolt them together and tighten with nuts.
Everything is ready!


https://i.expert-h.com/en/stul/stul-iz-trub-svoimi-rukami-500-foto-poshagovye-instruktsii#sigFreeId26c78c1eb4
Chairsfrom pipes 100 photos


https://i.expert-h.com/en/stul/stul-iz-trub-svoimi-rukami-500-foto-poshagovye-instruktsii#sigFreeIda73f7ee716
Hello, I am the author of this article, so I look forward to asking questions for this article in the comments below, I will answer all !!!
If you have questions on another topic, ask them on our forum, we will answer you
- Two baskets of paper in 5 minutes (Master class)
- How to make a simple and compact table for a milling cutter from plywood
- How to make a soft headboard tile (Instructions + step by step photos)
- Cinder block benches: a convenient bench in 55 minutes
- How to make a bed with a niche: saving space (Master class)