DIY barn step by step instructions
 how to build a barn on the site
A barn is more than just four wooden walls and a roof. Wooden sheds very popular, and this is due to their many features. They are used to store a wide variety of things, for which there is not enough space in the house, but mainly for garden supplies and tools. In addition, small workshops are often equipped in the sheds, where you can do what you love, or just relax.
In this article we will talk about how to build a wooden barn with your own hands. When it comes to design choices, it’s important to find a design that fits your goals and lasts long enough. Building a barn with your own hands is not an easy, but profitable task, since you have to pay only for materials and tools. In addition, you build as you like and at your convenience, plus, at any time, you can make adjustments to the design.
DIY wooden shed step by step
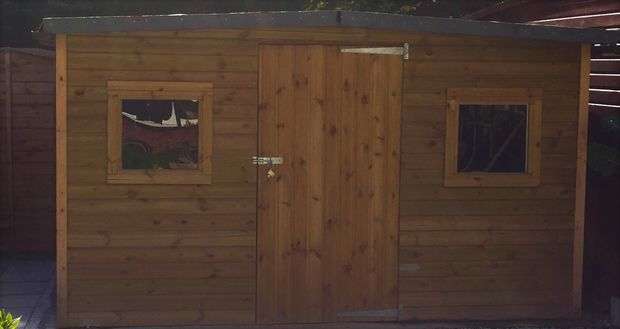
 This guide will show you how to build a shed 3.5 x 5 m modeled in the old style, complete with double doors, an attic, a barn-style attic roof and painted with classic red and white paints (of course, you can paint in any color). Although the barn is small, but this work is not for 1 person. At some steps, at least three are required. In addition, this manual is written for those who already have a basic experience in carpentry and the ability to independently determine small details. In addition, some of the steps in the photo are not shown in great detail, but the author tried to compensate for this with computer images. Let's start!
Step-by-step instruction
The list of tools and materials can be viewed on the site, the link under the gallery is very long, but you can adjust it according to your needs.
- Site Preparation
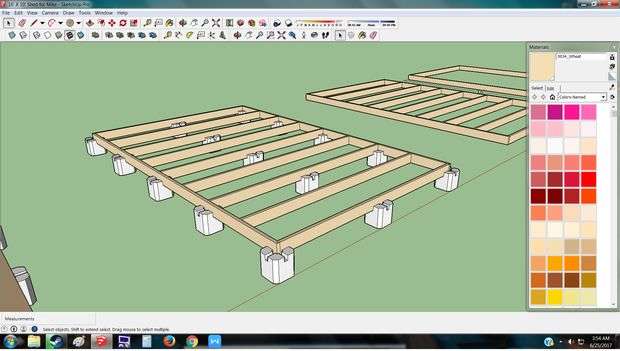
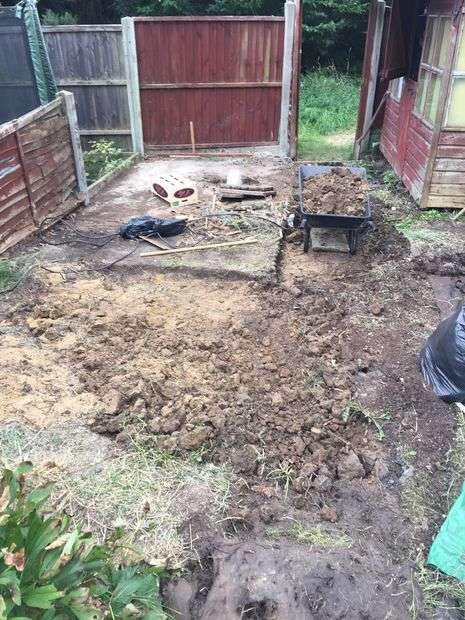
Before you begin to build a barn, prepare a place where it will stand. First, completely remove any vegetation on the construction site and 50 cm from all sides. Cover the area with agro-fabric from weeds, cover with gravel and flatten. Instead, pour a concrete pad if you want. - Make a floor frame with rungs.
Lay the beam 100x100 mm on the ground, as shown in the first photo. Between the bars there should be a distance of 15 cm. Then build the base from the boards. You need to assemble the flooring over the slide, and then fasten it with screws. - Level the Underground Layer
Before proceeding with the construction of the barn, you need to level the base. To do this, install the blocks under the runners in at least 4 places along each beam. Use a long straight board for accurate measurements. - Make the floor
The floor is made of ¾ inch plywood sheets (20 mm). Sheets are fastened with screws every 20 cm. The location of the sheets is shown in the diagram.


https://i.expert-h.com/en/stroitelstvo/1008#sigFreeId41146ab516
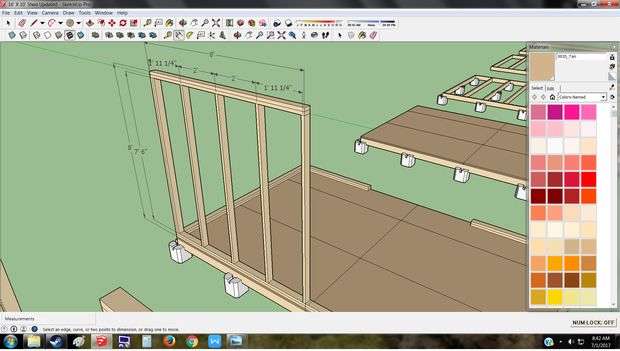
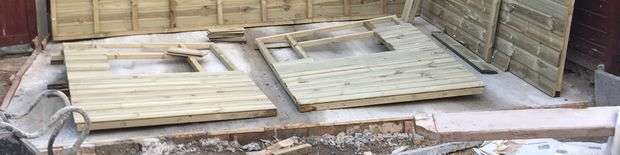
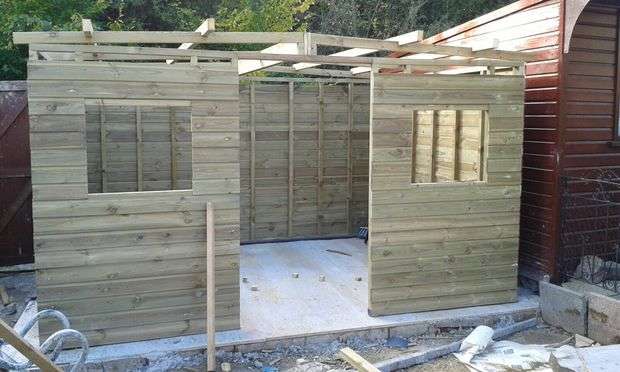
Side wall frames
 Prepare all the components before assembly, the two side walls are the same, so it will not take much time to saw all the details.
In the photo you see two "H" -shaped areas, they are slightly darker. They need to be assembled in advance, before being installed in the wall, otherwise you will not get to the screws. The upper part is a double board, and the upper board is 8 cm shorter on both sides than the bottom. Check the angles again by measuring the diagonals. Assemble the double top panel last. All double boards are twisted with screws every 20 cm in a zigzag pattern.
Back frame
 Assembling the back wall is quite simple. Unlike the side walls, the double top board is longer on top.
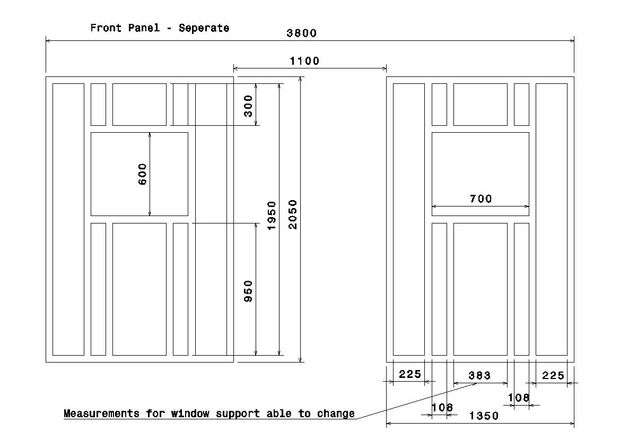
Front frame
The front wall is very different from the back, as it includes double door frame. Check the angles by measuring the diagonals. Saw off the small gaskets above the door frame so that they fit snugly.
Wall installation
To fix the walls, simply align them on the sides of the floor and fasten the base plates to the floor with screws every 15 cm in a checkerboard pattern. Connect the walls in the corners. At the top where the slabs overlap, tighten each corner with screws.It’s easier to start from the side walls, and then add the front and back.
Siding mount
 Attach the siding with screws through 20 cm on each rack, as well as the upper and lower plates.
- Draw lines on the siding using a large square of drywall to align the screws with racks.
- You will need to drill through holes in the sideline, because without holes it will be very difficult to tighten the screws.
- Pre-cut openings in the siding for doors and windows, it is important to measure everything very carefully here. In principle, in order not to take risks, you can cut openings after installation, however, it will be a little more complicated, but you will not be mistaken with the dimensions.
- Save trim siding for windows.


https://i.expert-h.com/en/stroitelstvo/1008#sigFreeId2b1a31303e
Roof arch clip
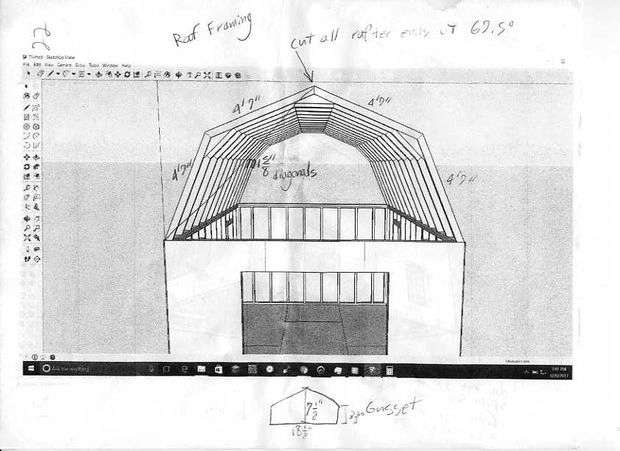 From sheets of plywood, make bushings for the roof arch. First mark every 28 cm on the short sides of the sheet and in the middle, then draw parallel lines between the marks. Mark every 23 cm along all the lines that are made, and along the long edges of the sheet. Now, starting with the first mark on one edge of the sheet, draw lines perpendicular to the first set of lines that extend 8 cm from each side of the line. Go to the third mark, then to the fifth, and so on. Repeat this with each row. Do the same on the remaining ones, except for the beginning at the edge of the sheet, and skip the second mark, then the fourth and so on. Now all that remains is to draw zigzag lines between the ends of the second set of lines. To cut, cut along the lines in the same order as you drew them.
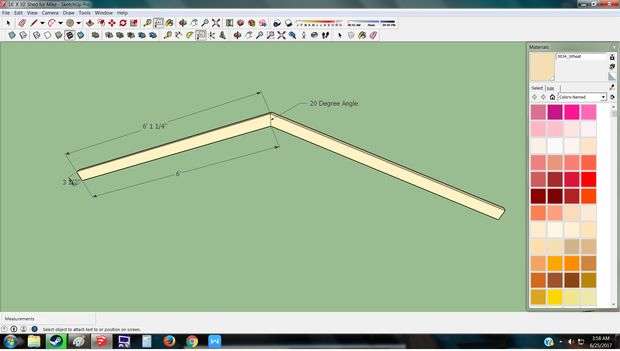
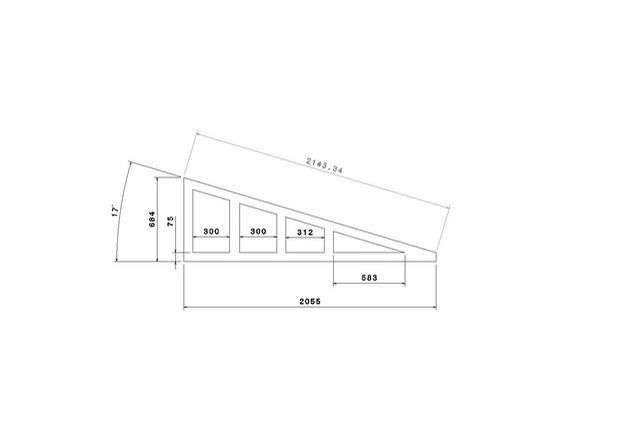
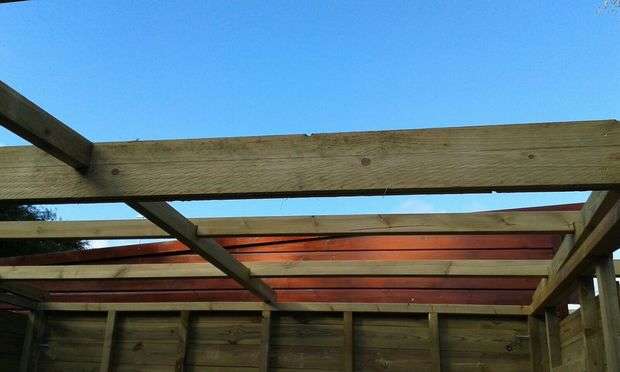
Saw off the roof beams
Cut the rafters, one end at an angle of 67.5 ° (set the saw to 22.5 degrees). Then measure 140 cm from the sawn end and cut the other end by 67.5 ° in the opposite direction. Thus, you need to make 60 pcs.
Make an arch clip
 So that when assembling the roof, the angles are accurate, you need to make a clamping device. You should get an isosceles triangle. That's all.
- Use the clip to assemble the roof arch
- Make the ends of the roof
Install loft beams
You need to install beams that will support the floor of the attic.
Strengthening the first and last arch
The first and last roof arches have both attic beams and 5 vertical 2x4s to attach the siding. They are distributed evenly along the base of the roof arch. Attach them with 8 cm screws. The arches that you will use are those that have bushings on one side only.
Raise the roof arches
As soon as all the arches were collected, it was time to raise the roof. This requires at least 2 stairs and 3 people. Start at the rear end of the barn and install both stairs on one of the side walls. People on the stairs direct the arch towards the person on the walls, who then positions it at one end of the roof, inserting it into the bushings. Then move the stairs to the ends of the arch and screw into place. Repeat the process for the remaining arches.


https://i.expert-h.com/en/stroitelstvo/1008#sigFreeIdbff7d6dcc8
- Install the rest of the siding
- Paint the walls of the barn, as well as the remaining pieces of siding, so that they are ready when you install the doors and windows.
- Attach the ends of the roof to the barn, for which you will need 2 stairs and 3 people.
- Roof sheathing. Lift the plywood sheets onto the roof and secure with screws or nails.
- Make an attic floor from the scraps and optionally from the roof sheathing.
- Cover the roof. Fix bitumen paper and droppers.
- Install tile
- Set the top rows
- Install the tiles on the upper sections
- Set the tiles on the crest


https://i.expert-h.com/en/stroitelstvo/1008#sigFreeId64e53c3015
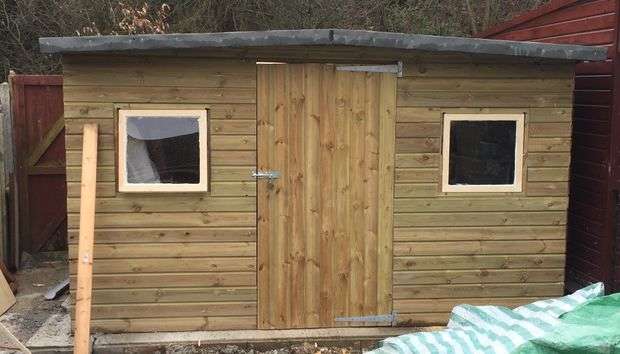
- Make and install windows and doors
Cut the doors out of two siding parts. Place the back of the doors as shown in the photo. Cut the doors to fit the door frame. Then cut 4 windows from the siding and frame. - Attach doors and windows
Ask someone to help you keep the doors in place while you fasten the hinges. Use 3 hinges on one door. Then install 4 windows in the same way, except that you only need 2 loops per window. - Paint the cladding
- Connect the corner trim.
- Attach a corner
- Attach the window trim. For window cladding, cut the pieces to fit around the outer edges of the windows.On three sides without hinges, the cladding should cover the gaps between the window and the wall.
- Install window latches
- Put the door latch and trim
- It's finished!
Everything is ready! Enjoy the new barn!


https://i.expert-h.com/en/stroitelstvo/1008#sigFreeId1fcd02b3b9
DIY barn scheme
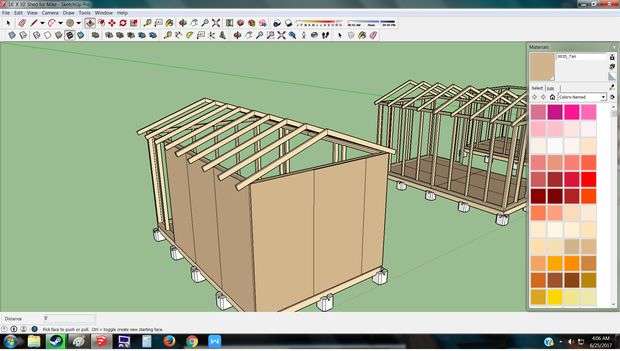
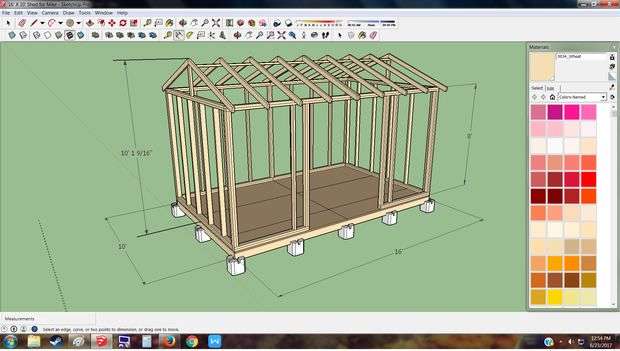 Here’s a detailed plan, how to build a do-it-yourself barn with instructions and step by step photos. If you look, then in fact there is nothing complicated, but if you plan to collect it in a couple of days off, then it is unlikely to succeed. Of course, it all depends on experience, the author took about a month of periodic construction from three to five hours a day. To create a model, the author used a well-known program. Google sketchup. This is a simple application with which you can create 3D models of sheds, garages, roofs, in general, anything, even an orbital station. The main advantage is a simple interface, so even an unprofessional user can use the program.
Design, as for such a small barn, was not cheap. But the cost can be significantly cheaper if everything is well calculated and look for cheaper alternatives. For example, you can replace corrugated steel siding with wooden wall panels. For canopies, one layer for walls is often used, the author has two.
 What is indicated on this section of the wall.
- A: Upper bar
- B: lower bar
- C: Window Sill
- D: Top window jamb
- E: Bottom stop
- F: Lock
- G: Emphasis
- H: Vertical hairpin
The following illustration shows the standard spacing, usually 40 or 60 cm in the center. For this shed is designed for 60 cm. 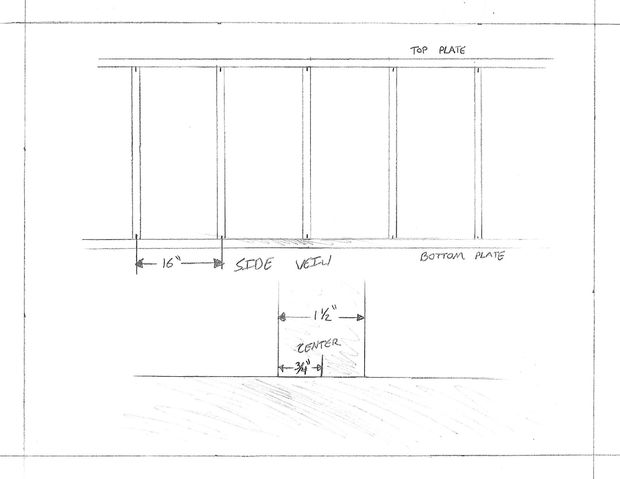 The reason is that when you mount drywall panels, plywood, etc., they can be fixed at least at several points across the width of the board.
Tools
Here are the tools that the author used to build the barn.
Essential earthwork tools: (optional)
If you decide to simply assemble the structure on the ground, you will not need any of these tools.
- Metal rake for gravel
- Bayonet shovel if you dig manually
- Shovel
- Hammer
- Level
- 0.5 kg of nails or screws for boards
- Roulette
- Necessary tools for building a barn:
- Cordless drill
- A circular saw
- Angle grinder with the function of cutting metal corrugated panels
- Generator
- Measuring tape or two
- Level
- Nail gun
- Air compressor
- Clamps (at least 4)
You can see the necessary materials on the author’s website, the address under the gallery, just copy and paste the link.
Site Preparation
If you made a decision build a wooden barn right on the ground, you can skip this step. If not, read on.
- To prepare the site, fold a rectangle from the boards.
- To check the angles, simply measure the distance from one corner to the opposite.
- Then do the same for the other two angles.
- If the distance is the same or very close to it, then everything is fine with the corners.
- Once you are satisfied with the shape of your rectangle, mark the border where you will dig.
- Once the excavations in this perimeter are completed, you will need to dig along the inner edge through the entire rectangle and go to the lowest end, side or corner of the shed so that rainwater can freely drain.
- As soon as you finish the pipe trench, lay the landscape fabric and cover it with gravel.


https://i.expert-h.com/en/stroitelstvo/1008#sigFreeId5ee37e1fbf
Base frame and floor
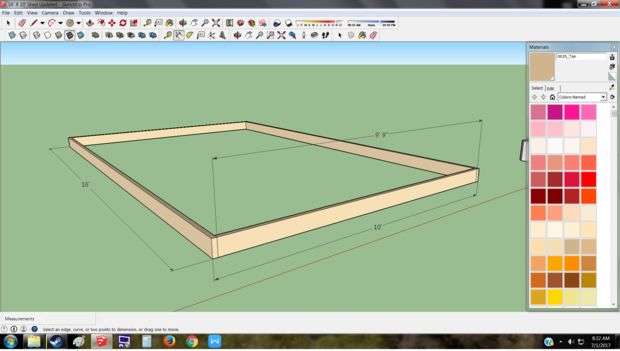 Cut all boards to size. Gather a rectangle from the boards, and check the corners. Once the perpendicular boards have a guaranteed angle of 90 °, fasten with nails. After the frame is ready, measure it to the middle of both sides and make marks in the places located in the center of the frame to fix the corners. Place the concrete blocks on the gravel at the four corners, and place the frame on them.
 When the floor beams are installed on the sides of the frame, secure the OSB casing. This is not an easy matter, as it is heavy and uncomfortable. Starting from one corner of the frame, securing with one nail, then fasten the plywood sheet compared to the edges of the frame on the opposite side or corner. After laying four sheets, it should cover most of the floor. Just cut the plywood sheet in half and fill in the remaining area. This design consists of two layers, just make sure that they do not overlap, so that there are no weak spots in the floor.


https://i.expert-h.com/en/stroitelstvo/1008#sigFreeId242aa53765
Wall mountedframe
 Measure, cut and measure again. There is a slight difference between the dimensions on the diagrams and the actual dimensions of the barn. Differences are what the author would like to present in the final product. These differences are in the Sketchup model, so if and when you create your own, it will be much better structurally. For example, in the model it includes a double upper and double lower crossbeam, and in the constructed barn they will be single. When you assemble the wall frame section, ask someone to help hold the wall so that the boards can be fixed.


https://i.expert-h.com/en/stroitelstvo/1008#sigFreeId2550ea61ad
Rafters
 Rafters are easy to cut and assemble. I installed a temporary clamping device so that all the rafters were sawn to the same length. It is recommended that you have two stairs and two assistants. Then they can help keep the rafters in place, and you can go to the opposite side to secure the other end in place.
How to make doors barn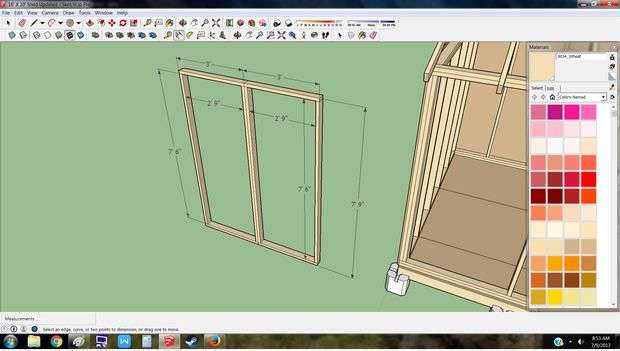 The doors are assembled in the same way as everything else. Measure, evaluate, measure again and cut. Then assemble the rectangular frame and fasten with nails. Check that the doors can move freely when opening and closing. Attach a plywood sheet to each frame and trim the excess.
Install the hinges 75 cm from the bottom. Measure down from the top 75 cm along the side for both doors and install the hinges.


https://i.expert-h.com/en/stroitelstvo/1008#sigFreeId4b2c0bed11
Siding and roofing
 Please track so that no one is in the middle of the barnwhen you nail plywood sheets on the walls. And another tip, fix the board across where the bottom plate starts. This will help hold the sheets of plywood until they are fixed in place.
 When fixing the siding, the same concept is used as when laying the floor, hammer the first nail in one corner and the opposite, this should be enough to hold the siding until you fix it. The first sheet along the wall is the one that matters for this step, because then you can install the remaining ones by sliding them onto the previous sheet and nailing with nails. If you notice, there is a gap in the front of the barn just above the top of the wall. You can not fill it, as the corrugated panels will be longer and still overlap it.
When installing the roof the same method is used as in the other direction with the placement of OSB sheets. Use L-shaped screws in small brackets to temporarily hold sheets of plywood on the roof without worrying about them sliding off before you can nail them. The author built a temporary fixture so that sheets could be moved from the ground to the roof, as shown in the photo.
Since the author had steel sheets for the roof, he also decided to use them as a siding.
The final moments can be seen in step-by-step photos.


https://i.expert-h.com/en/stroitelstvo/1008#sigFreeId372636d919
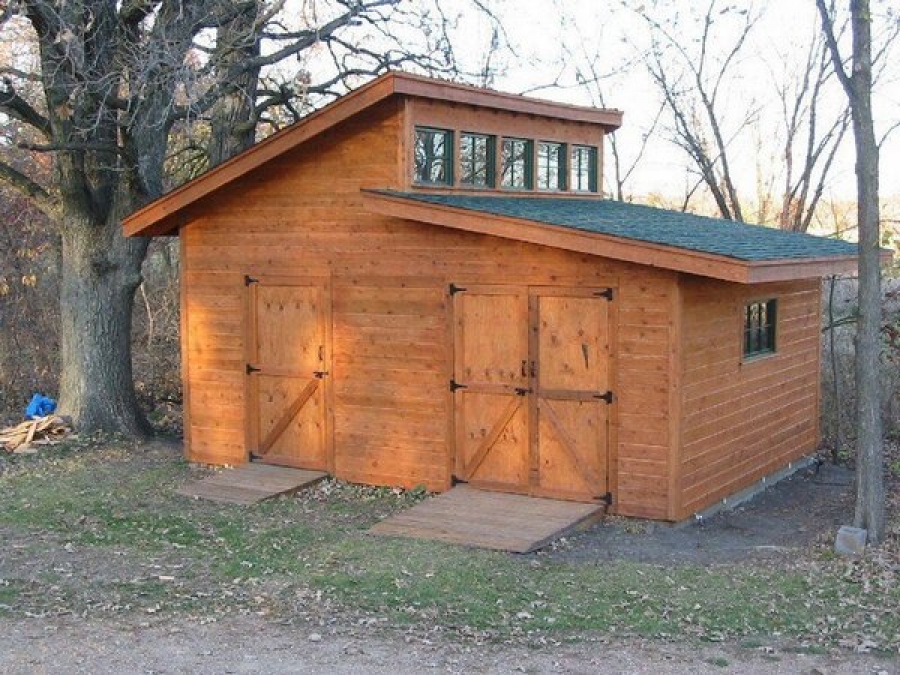
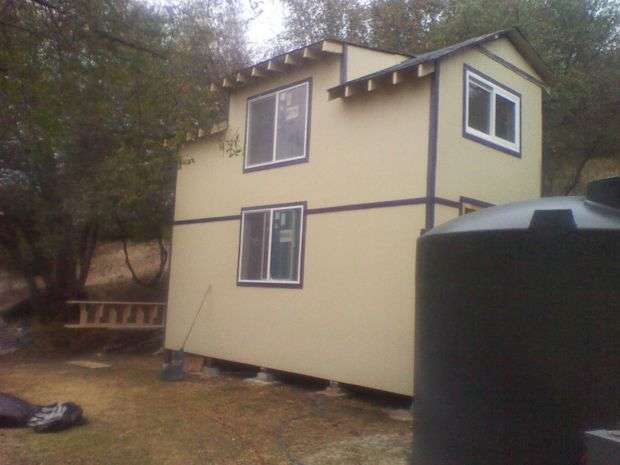
How to build a barn in stages
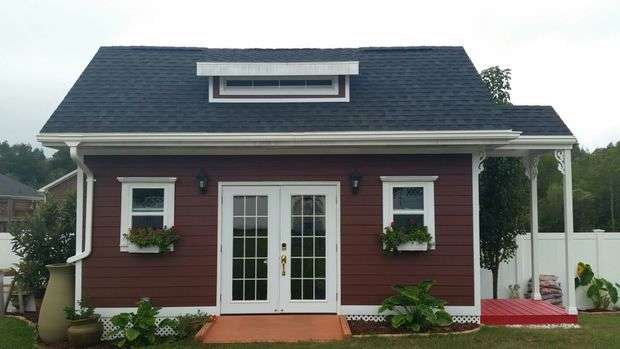 Looking at this beautiful building, you can hardly say that it is wooden barnRather, it looks like a suburban mansion of a non-poor official or businessman. The project of this barn was taken from a photo on the Internet, and the author has already added the second floor, porch and ramp, interior and exterior lighting, wall coverings, laminated flooring, a ventilated roof, windows of the second floor, gutters, attic stairs, water storage tanks , french door, window flower beds. The author coped with this project by 95%, he only had to invite electricians to take assistants in some situations.
Next step by step instructions, how to build a barn in stages I won’t rewrite it, it is very long and detailed, if you wish, you can read it on the author’s website, you will find the link at the end of this post. In addition, much will be clear from step-by-step photos, the author posted them as many as 200 pieces. so
Base, wall mount and vinyl flooring.
Unfortunately photo the construction of the base of the barn no. This is already at your discretion, you can fill the foundation or install on concrete blocks. In this case, the author assembled a platform from a processed (impregnated) beam and installed it on piles. Brackets are attached to the beams with logs from the boards. All exterior walls are load-bearing. The window and door frames were made at a time when the walls were ready. The flooring for garages is a heavy vinyl flooring already covered with glue, so you just need to clean and lay it on the floor. Next is the outer lining and installation of the attic stairs. For exterior shed The author used 1/4 inch thick plywood. The second floor has a simple structure, since the span was only 3 m from the outer wall to the outer wall, and the load is not very large. 1/2 inch plywood was used for flooring, leaving a hole for the attic door to be installedWhen the roof of the barn is finished.


https://i.expert-h.com/en/stroitelstvo/1008#sigFreeId634503d042
Do-it-yourself gable roof
The roof frame was built using a ridge beam. First, the author built the left and right pediments, and then the window frame and the central roof. The rear of the gable roof of the barn was made immediately after two front gables were made so that the roof remained flat. The roof pitch is approximately at an angle of 45 ° on the gables, therefore use ropes and seat belts.


https://i.expert-h.com/en/stroitelstvo/1008#sigFreeIdaad0ab9cdc
Insulation, windows and tile laying.
Start laying tiles from the front of the roof to protect the roofing from the wind. Install windows on the first and second floors.


https://i.expert-h.com/en/stroitelstvo/1008#sigFreeId4a221702b2
Doors and siding
Doors for the barn come with equipment for installation, but the author added fixing screws to the frame for additional support. For this shed was bought fiber cement siding, or as it is also called "hard siding." It is often used for external coating, as it tolerates extreme climatic conditions and is resistant to all kinds of damage, and as you can see in the photo, it is very beautiful. 4


https://i.expert-h.com/en/stroitelstvo/1008#sigFreeId4dd28dbff4
Porch, ramp and electrical wiring
The porch is made of 4x6 boards, with frame beams 40 m in the center. The ramp is made of the same material as the beams, sawn at an angle, so that you can easily roll up the lawn mower without touching the door threshold. The formwork is fixed with construction screws 8 cm long. The cable for electrical wiring is laid in a trench 50 cm deep. The barn also has its own ground. 5


https://i.expert-h.com/en/stroitelstvo/1008#sigFreeIdc1d10d8576
Vinyl flooring and interior wall cladding


https://i.expert-h.com/en/stroitelstvo/1008#sigFreeId6613903667
Landscaping and storage under the barn
Fill the pile foundation with a mesh, make a door. So garbage will not accumulate and pipes, boards and other construction materials can be stored under the shed. Very comfortably. The landscape can be invented at your discretion. The author covered the plot near the barn with geotextiles, installed borders and covered it with tuff.


https://i.expert-h.com/en/stroitelstvo/1008#sigFreeIda340499d9c
Veranda, decorative decorations, lighting, downpipes and the completion of landscaping.
For building a barn veranda the author used a bar 100x100 mm, and for rafters - boards 50x150 mm. For fastening, 75 mm construction screws were used. Decorative ornaments, it’s to your taste and possibilities, you can make such as in the photo. And the author placed on the corners of the building the old tanks for collecting water, which are filled with a gutter system. There is a built-in faucet and a separate hose, which can be used as needed. Consider a system for the location of sockets and switches and install lights.


https://i.expert-h.com/en/stroitelstvo/1008#sigFreeId59348f79a1
DIY do-it-yourself hut
 A little instruction about how to build a do-it-yourself barn. All the calculations that are presented here are just an example for a specific barn, you can, keeping the proportions, determine your size. Follow this guide, add some common sense and you will have a great barn. In developing this project, the author did not plan to write instructions and take step-by-step photos, so some of the photos do not have a chronological meaning, but will give a general idea of the project.
Step 1: Planning
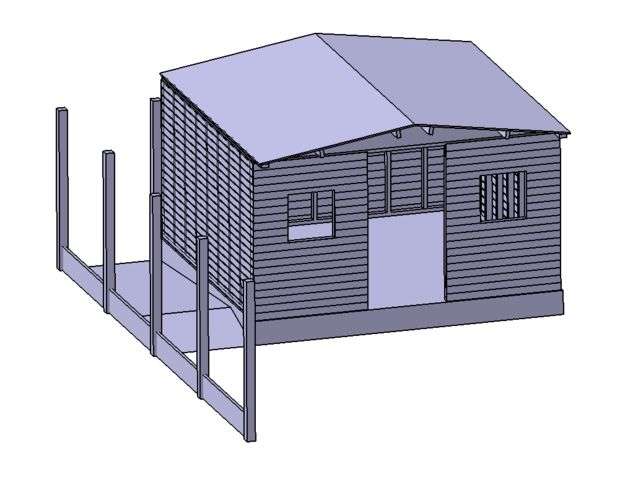 Any project begins with planning. Not everyone knows how to use computer programs, so you need to at least draw rough design sketches for the barn. Modify your designs or author's designs to suit your needs, including sizes. Just remember, no matter how hard you try, the plans that you initially make will change somewhat. This is not bad, just be prepared to change your projects in the process of work, any new idea may always appear, so do not be afraid to completely change it.
First of all, if you put the base, you you need to consider the height of the barn. This is the second decision to make after choosing a place. Height is crucial for the overall look, a too high barn in the garden doesn’t look very beautiful, and too small is simply uncomfortable, you will constantly bang your head and there is not enough room for a tool. The author chose a height of 215 cm, not very tall, but you won’t even bump your head.
Step 2: Making the pad
 This step is not too heavy. The goal is to create a box supported on all sides. You need to consider the height of the base, which could change the overall height of the barn. There are different ideas how to make a foundation for a barn, you could see them in other blocks of this article, in this case the author decided to fill in the concrete platform.
- To make the base box very simple, first mark the base area of the barn.
- itcan be calculated according to your style.
- If you have all four sides ready, assemble the formwork.
- What you need to do after marking the area, make sure that all angles are 90 degrees.
- You need to measure the diagonals of the opposite angles to get an equal value.
- Just in case, add about 5 cm from all sides to take into account errors and tolerances.
- When finished with positioning, set the boards along the edges supported externally with pegs.
- You should aim for a base depth of about 5 cm or higher.
If there is even a small problem with the site, do not console yourself, “do not worry, it will do,” later this will lead to big problems.
Step 3: Foundation pouring
 There are different ideas regarding the ratio for diluting the solution. The author recommends using such a 3: 2: 1, sand, gravel and cement. By the volume of this foundation, the author needed 0.67 m 3, that is, approximately 450 kg of cement. Well, everyone probably knows how to prepare a solution, in a pinch there are hundreds of videos on YouTube, which seems more obvious than describing in words.
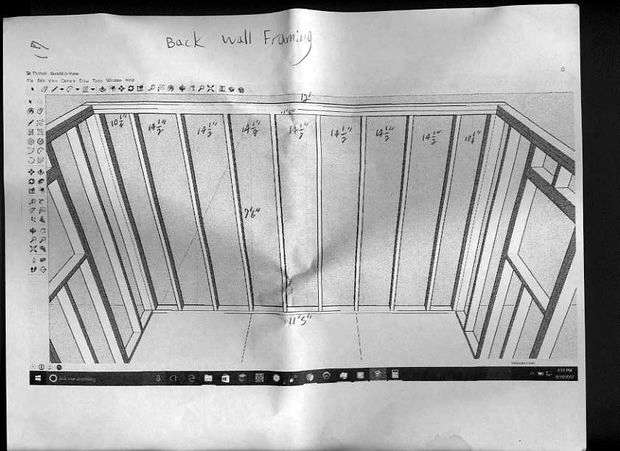
Step 4: Frames
The author does not have instructions in this part, so use the drawings presented here.
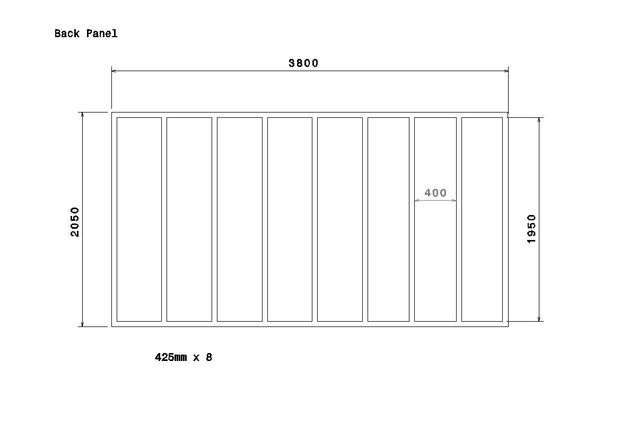
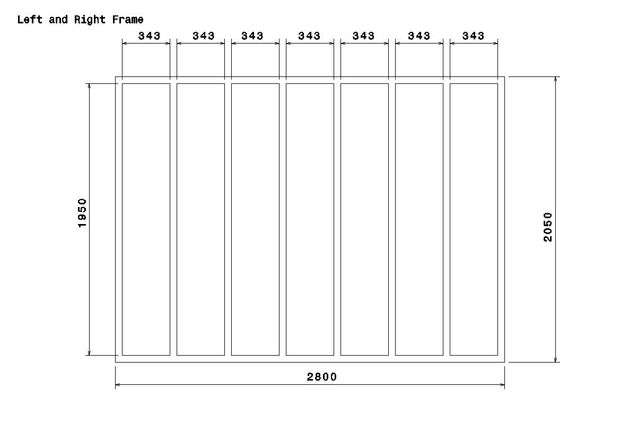
 For the back frame, use the drawings for the layout of the boards, and where to connect them, decide according to your drawings and sizes. The side frames are exactly the same as the rear, only smaller. (Depending on your design)
 The front frame is the most difficult part of the assembly because it contains two windows. That is, the author had to redesign the frame so that it could hold the window and the weight of the roof.
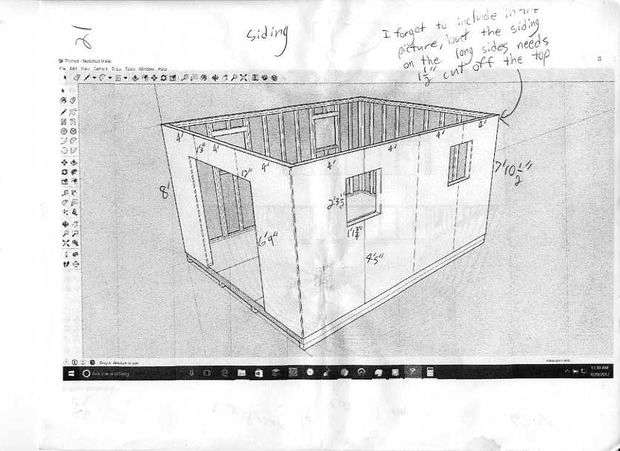
Step 5: Cladding
 This step can be done after the frame is attached, depending on your preference.
- Start the side walls from the bottom of the frame, then cut to the length of the frame for both side walls.
- It is very important to make sure that the first board is level.
- The rear wall lining is made in exactly the same way as the side walls, except for the lining that covers the end of the frame by 50 mm on both sides.
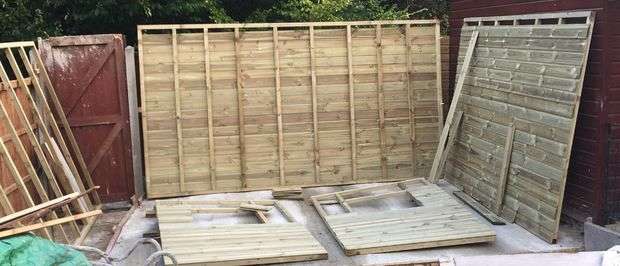
As you can see in the photo, the front wall is made in two sections. This simplified the creation of a common structure.
Step 6: Wall installation
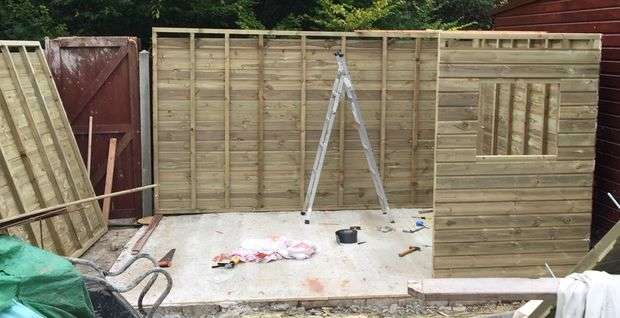 Fixing the walls is not difficult if you have helpers. Start with the back wall and attach one side wall to it, this is the difficult part, since you need to hold and align at the same time. By connecting them with bolts, you have already done half the battle. From this moment, the walls of the barn should support each other, and this facilitates the fastening of the others in any order. When the frames are standing, cut and screw the boards to the two front panels to get a common front frame.
Step 7: Barn roof
 The photo shows how the frames for the roof are made. Unfortunately, the size of the author is almost useless, because it all depends on the size and shape of your barn. But this gives an idea of the assembly order.
 The roof of the author is assembled from a mixture of boards and plywood, as can be seen in the photo. Make sure the plywood you use is made of them conifers, and if there is a birch, then one hundred percent will “twist” it. And it’s better, of course, to take processed OSB-3, the plates provide water resistance and fire resistance, and in general, more reliable.
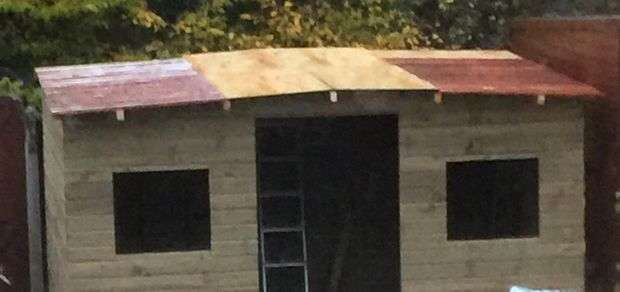
Step 8: Door and windows
 The final part, doors and windows. First you need to decide what the windows will be, “deaf” or open. If the first option, then just, just insert the glazed frame.
 Well barn door. The most important thing here is to make an even jamb. Then attach the hinges as shown in the photo above and below. A general rule of thumb is that the hinge should be one third of the width of the door.
The work is completed, if everything worked out, then now you can build whatever you want.
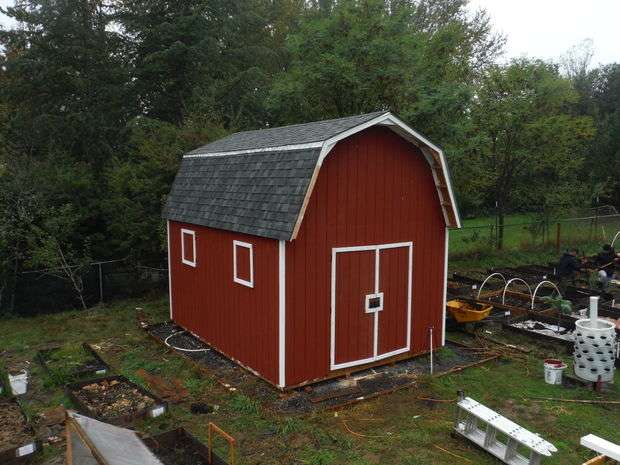
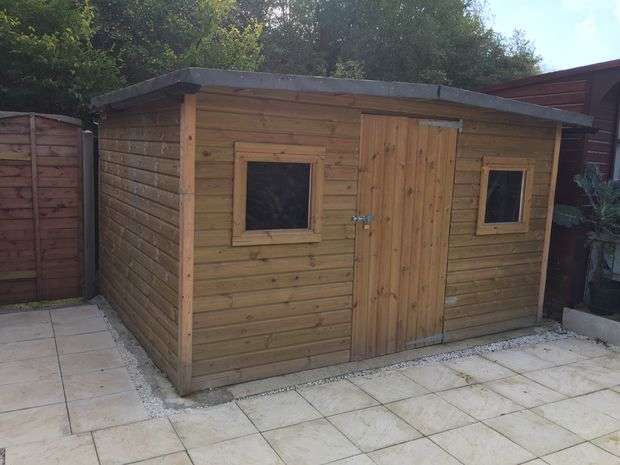
How to build a durable barn
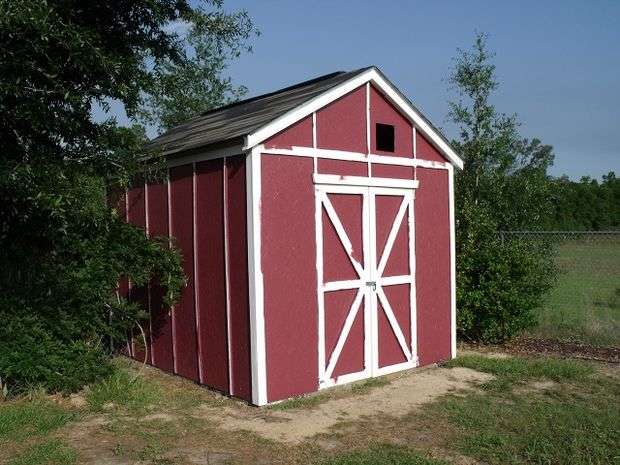 Another example of a pretty wooden barn. In its structure and assembly order, it does not fundamentally differ from the above examples, except that it does not stand on concrete blocks, like most structures of this size, but on cement base. In most cases, this will increase the cost of the building two times, at least. Although it depends on whether you fill the foundation yourself or hire someone. How to build a barn, look at the step-by-step photos, although they are not very detailed, but you can read about all the steps on the author’s website, the link under the gallery, just copy and paste.


https://i.expert-h.com/en/stroitelstvo/1008#sigFreeId914de38570
Cozy barn
 This is not a house, but a seven-meter cozy barn with a staircase and an attic. It looks gorgeous, but let it not scare you, this building differs from the usual barn only in size. Looking at the step-by-step photos, you will be convinced that to build such a barn with your own hands is as real as a regular barn in the area of your summer cottage. To get started, you need to install the support pillars, poured into concrete blocks. Then lay out the floor double overlap around the perimeter. This, so to speak, is the basis of the future building. Unfortunately, the photographs laid out by the author cannot be called step-by-step, and there is no specific instruction either, although you can read some comments on the author’s website, a link under the photo. In general, information is not enough, but the main thing is the idea.


https://i.expert-h.com/en/stroitelstvo/1008#sigFreeIdfc45070a27
Mini observatory in the barn
 Of course, this is not quite the topic, but maybe someone really wants to build a home observatory. Of course the observatory, it is said loudly, if simpler, then ordinary sliding shed and a device for installing a telescope. In fact, a useful thing, as long as there is no telescope, you can store bicycles or something else. And as you decide to buy a telescope, you already have a finished observatory :). It's a joke, of course, but maybe someone is really interested in how to build a shed with a sliding roof. I will not give instructions here, everything is shown step by stepphotos, and if you are really interested, there is a link to the website of the author of this project below.


https://i.expert-h.com/en/stroitelstvo/1008#sigFreeIdc759de721d
And here are some step-by-step photos of how to build concrete base for telescope and mount adapter.


https://i.expert-h.com/en/stroitelstvo/1008#sigFreeIde33e56b345
DIY barn drawings


https://i.expert-h.com/en/stroitelstvo/1008#sigFreeIda9bb290e07
DIY barn 250 photos


https://i.expert-h.com/en/stroitelstvo/1008#sigFreeId99659b3dfc
Hello, I am the author of this article, so I look forward to asking questions for this article in the comments below, I will answer all !!!
If you have questions on another topic, ask them on our forum, we will answer you
- Two baskets of paper in 5 minutes (Master class)
- How to make a simple and compact table for a milling cutter from plywood
- How to make a soft headboard tile (Instructions + step by step photos)
- Cinder block benches: a convenient bench in 55 minutes
- How to make a bed with a niche: saving space (Master class)