DIY barn in the country 500 photos
 wooden barn for a summer residence
No anti-corrosion coatings will save your garden tools if stored outdoors. Inventory needs a roof and you have a choice. You can build a barn in the country with your own hands from finished lumber over the weekend or buy a panel kit that can be assembled within an hour. It all depends on skills and financial capabilities.
Theoretically, you can build a barn with your own hands from anything. This is not such a complicated design. Here you will learn how to build a shed from pallets, residues of materials after building a house or just make a small mini shed for storing tools.
How to build a wooden barn
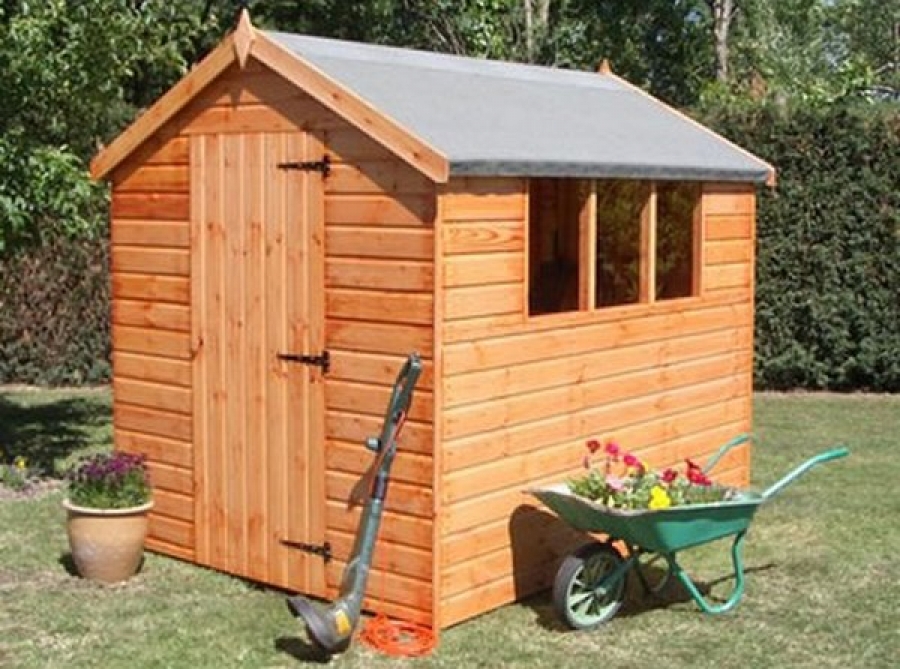
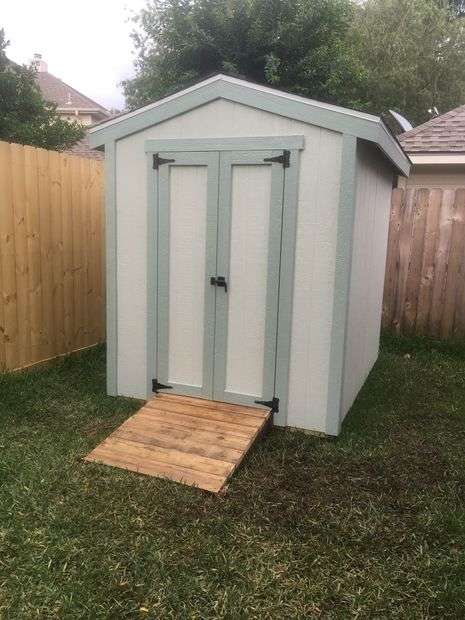
 A spacious barn, which every beginner in the carpentry can do. If you are the owner of a summer cottage, you are well aware that there is always not enough storage space, the garage and basement are not unlimited. A natural question arises - how to build a do-it-yourself barnand large enough to accommodate an arsenal of tools, while providing an organized space for everything: from rakes and shovels to fertilizers and fuel.
 There are two options when it comes to building wooden shed for summer cottage: You can buy a ready-made kit, or design a structure that suits your needs and tastes. This approach may cost more and last longer, but it is the best way to get what you want.
Foundation shed
Most wooden sheds are mounted on concrete blocks or processed timber. That’s all you need, even if the ground freezes deep enough. In this case, the barn stands on an inclined section, therefore it is installed on solid concrete blocks on compacted crushed limestone.
- Start by laying and marking the corners of the barn.
- Dig holes in the depth of 15 cm in each corner and in the center of the platform. Use a level to make sure the bottom of each hole is flat.
- If the platform is tilted, first install and compare the blocks above.
- When laying blocks, glue them with building glue.
- Then cover the area between the blocks with a landscape cloth and cover it with a 5 cm layer of crushed rock.
Wooden barn floor
- Saw off boards of the necessary size.
- Make a frame of beams and fix the corners with nails.
- To lay the floor, mark the first position of the beam from the outer edge and mark all subsequent beams with an interval of 40 cm.
- Then install the floor plywood floor.
Wall installation
- Cut wall plates for long walls. Install triple studs at both ends of each wall. You can use trimming instead of the center hairpin.
- For a wall with a door, mark the opening. Make a door frame whose length is an approximate hole plus 8 cm for the pins - shorter studs on each side of the hole that support the structure.
- In this case, plywood siding was used for the walls. Place the first part flush with the upper crossbar and glue it every 15 cm around the edges and every 25 cm in another place, then fix it with nails. Set the remaining sheets in the same way.
- Tilt the wall, tilt it and ask the assistant to fix with brackets. Then build the opposite long wall.
- Install the window frames, then siding, but leave a second top plate on each end wall until they are installed.
Shed Roof Installation
- Put truss details on the floor of the barn.
- Draw the center line on the plywood.
- Then attach a 2 x 4 straight board along the bottom of the plywood, which will serve as a stop for positioning the bottom base of the truss.
- Mark the places of the upper corner cuts on the two rafters and make cuts.
- Cut the rafters at an appropriate angle, which allows the use of 20 cm overhang.
- Assemble the trusses using construction glue and nails for fastening. Note that the inner trusses are simple triangles with inserts on both sides. End trusses have vertical struts for mounting siding, only with internal bushings.
- Install the siding on the ends and make protrusions from the back, securing with nails along the roof rail.
- Finish the bottom of the plywood roof, leaving small slots for ventilation.
- Cover the plywood with roofing felt.
Door
- Trim the corners and use the strips under the ledge where the spotlights meet the siding.
- When trimming the door, use 1 x 6 pine planks for the joint.
- Protect the plywood floor with sheet fringing.
- Align the rear surface of the window trim on the countertop slightly so that it fits over the flange.
- To make the door, lay the boards on a flat surface. Secure the dowels and struts.
- Wipe and paint both sides of the door, fasten the decorative T-shaped hinges.
- Install the latch in the middle jumper.
Roof covering
- Start by trimming the perimeter of the roof. Install the protective caps first.
- Expand the starter strip along the ledge so that it hangs about 1.5 cm.
- Install the tile from one edge using the intervals recommended by the manufacturer. Along the edges, let the tiles hang over the floor of a centimeter.
- Trim the tiles that cover the 5 cm ventilation space at the peak.


https://i.expert-h.com/en/stroitelstvo/1005#sigFreeId26e28ff8c6
How to build a barn on the site
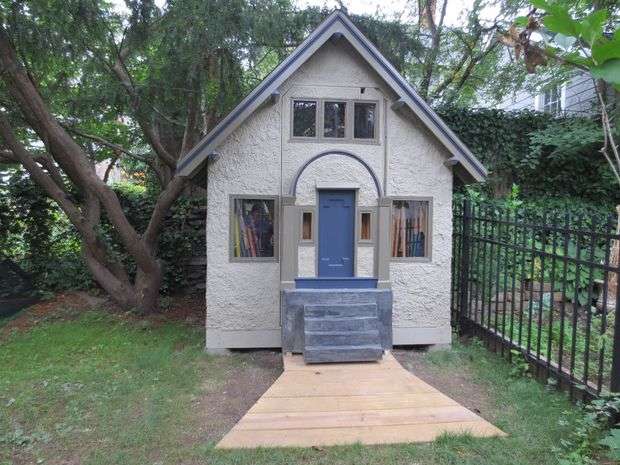
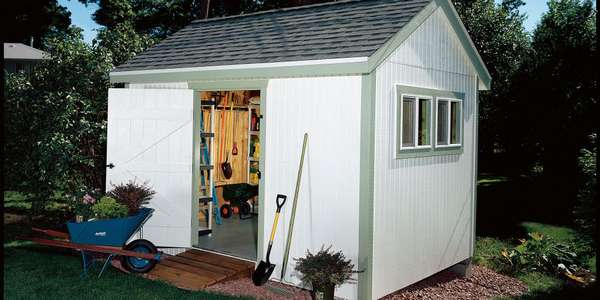
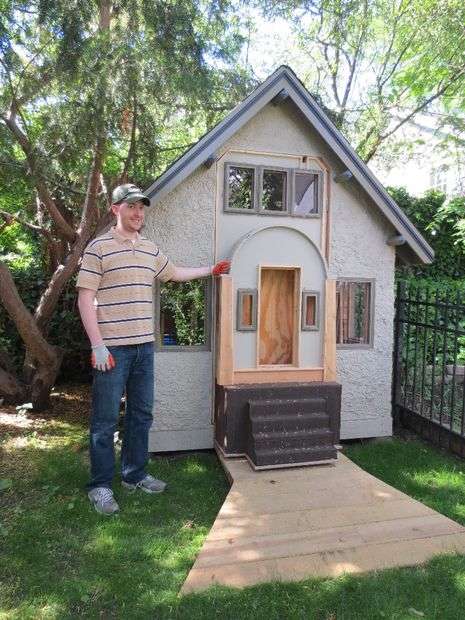
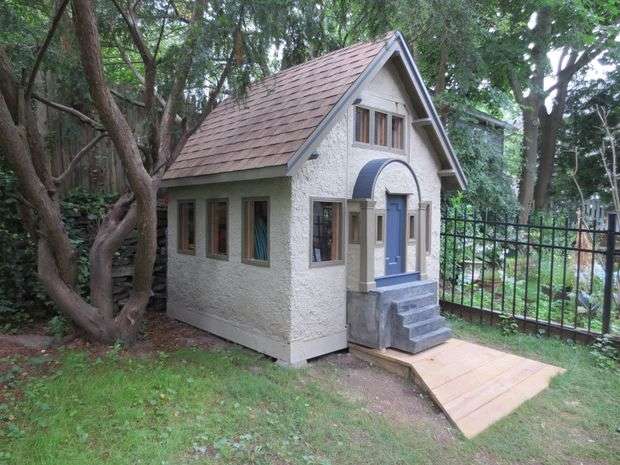 The author’s goal was to make a small copy of the main house. In my opinion, it turned out pretty well.
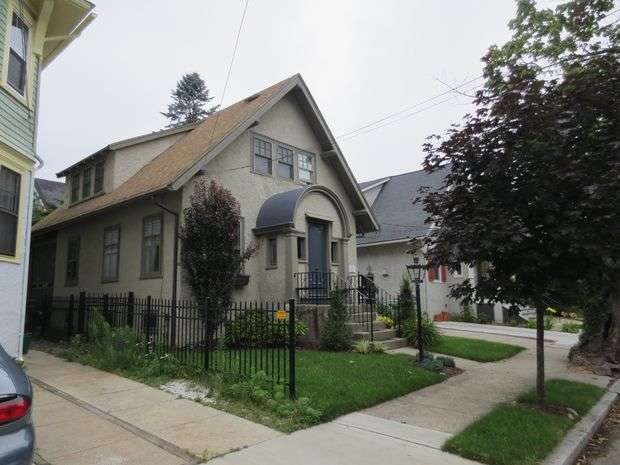 Below is the instruction, how to build a barn on the site. Perhaps you don’t want to transfer the design of your summer house to the barn, it certainly will require more work (most people do not need a plaster bathroom with 15 windows), but the same basic steps can be applied to a simpler design. In the photo above the barn, at the bottom right of the house - do not mix.
Tools you need:
- Table saw
- A circular saw
- Level
- Roulette
- Pencil
- Pneumatic stapler
- Air compressor
- Sheet Metal Scissors
- Milling cutter
- Shovel
Step 1: Start with a plan
 Step 2 Foundation installation
There are several ways to make the foundation, the author chose concrete blocks. They are concrete castings that have a recess for a 4x4 pillar and extend to the base of about 25 cm. To make everything level, dig holes for about 20 cm and fill the bottom with gravel. Then install the blocks. Level them by adding or removing gravel from the hole until all four blocks are at the same level.
Step 3: Make a base frame from the boards
On the floor of an open area, such as a canopy or gazebo, the boards are usually located at a distance of 5 mm from each other, but in this case this is not necessary. This floor will have a roof and walls on all four sides, so drainage (from rainfall) is not a problem.
Step 4: Build the walls and fix them in place
The walls are framed for 6 windows (3 on the left 3 on the right).
Step 5: Make rafters
Rafters must be installed horizontally. Connect the rafter parts to prefabricated metal connecting plates.
The roof pitch should be at least 6:12 if you live in a climate when it snows in winter.
Ready-made roof rafters simplify the installation of rafters on the structure and keep the roof from rising during strong winds.
Step 6: Attach the plywood sheathing
Sheathing is nailed to rafters and walls.
For this, this structure uses 12 mm thick roof sheathing and 19 mm sheet coating on the walls. 19 mm is redundant for most structures, but simple calculations show that the walls will hold half a kilo of plaster, so it’s better to reinforce.
Step 7: Fasten the roofing felt
Step 8: Install tile
Fix the tiles with roofing nails, starting from the base of the roof of the barn and further up. Use marks to estimate the number of overlaps.
It is very important to lay one row of tiles, which covers the topmost row on both sides of the roof. Work from one side to the other one by one.
Step 9: Install windows
Step 10: Prepare the walls for plaster
Roofing felt is attached to the walls of this structure, followed by a galvanized steel mesh.
Step 11: Plaster walls
Mix the first layer so that it is thick and sticky, use a texture brush.
Step 12: Primer and painting
Stucco is a hard surface for painting, it may require several coats of primer and several coats of paint to make sure that you have filled all corners and cracks.
 Step 13: Where is the door?
The door is a feature of the house, which the author is most proud of. The entire front facade of the barn, complete with plaster, windows, entrance and concrete steps - this is the door of the barn.
This was the only way to keep a 1/4 scale copy of the house. If you make the door standard, the proportions would be wrong.
The difficulty caused by this strategy was that now the door will be quite heavy, but 4 large hinges solve this problem.
The first photograph at this stage was taken before the cladding around the door was painted, and as a result, the door parameter was clearly indicated.
Step 14: Frontage
The front facade is made of ABS plastic - an elastic polymer with a high degree of impact resistance. Today it is widely used as a structural material. Parts of ABS have essentially the same luster and finish as painted wood surrounding it!


https://i.expert-h.com/en/stroitelstvo/1005#sigFreeId49a629d574
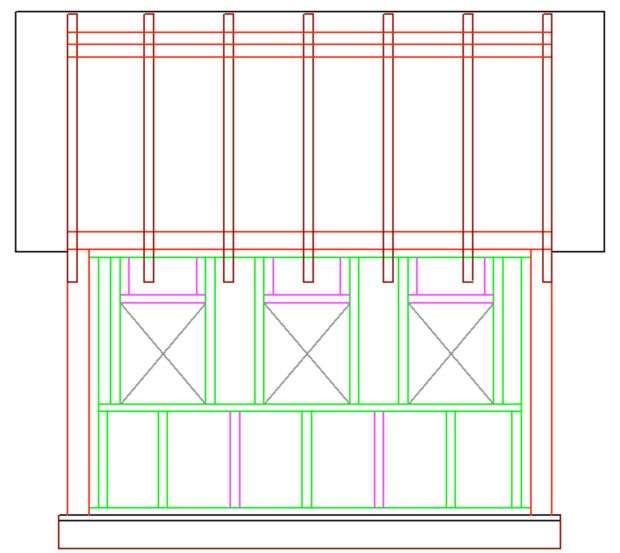
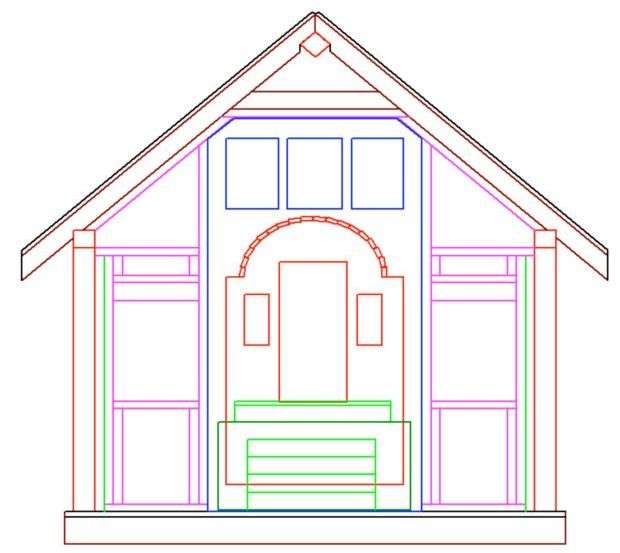
How to build a barn drawings
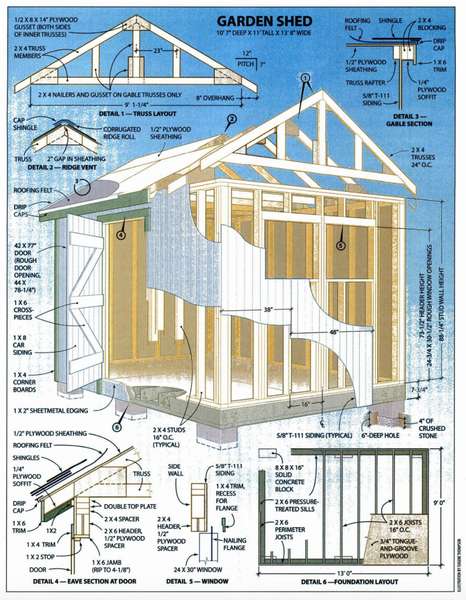
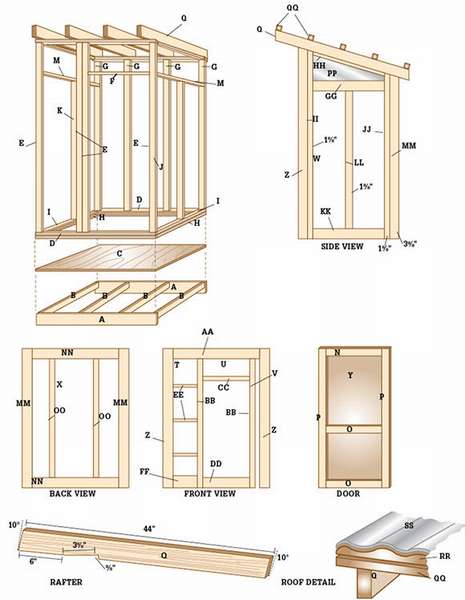
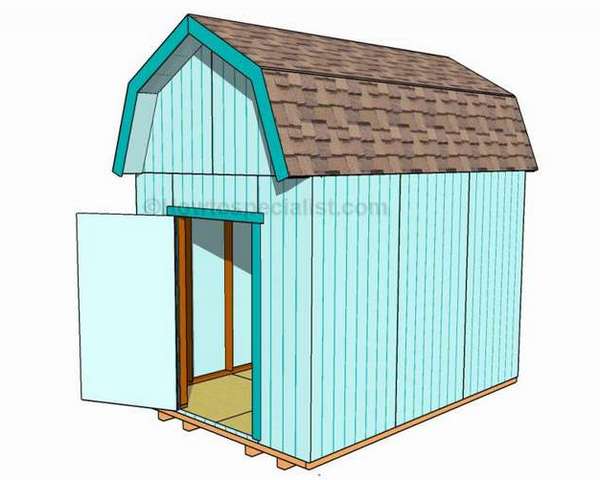 Here are the drawings, how to build a do-it-yourself barn. Schemes and drawings represent three stages - the construction of the main structure of the building, roof and doors. Build a Barn Size 2.45 × 3.65 m it’s not at all difficult, but you will solve many problems with storing various equipment and tools that have a mysterious property to accumulate. In addition, if you get creative, a beautiful building will only decorate your site. Unique shape attic roof allows you to build a basic loft and increase storage space.
Always plan everything from the very beginning, taking into account aspects of the design, such as total costs, materials or time required to complete the work. It is recommended that you buy pressure-treated lumber, as the components must be weatherproof. In addition, it is advisable to make holes in advance in order to prevent splitting of the wood when fastened with screws.
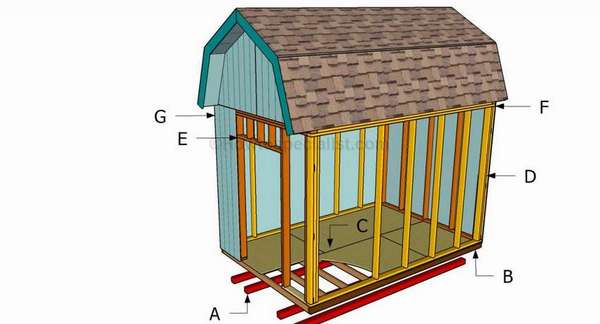
To build a do-it-yourself barn, you need the following:
- A - 4 whetstones 4 × 4 3.7 m long
- B - 2 boards 2 × 6, length 3.7 m, 10 pieces 2 × 6, length 2.4 m
- C - 3 sheets of plywood 1.2 × 2.4 m
- D - 4 boards 2 × 4 3.7 m long, 2 pieces - 4.5 m, 22 pieces - 2.3 m side walls
- E - 2 boards 2 × 4 2.2 m long, 1 pc. - 2.4 m, 4 pcs. - 2.3 m front wall
- E - 2 pcs. - 1.2 m, 2 pcs. - 76 1/2 ", 5 pcs. - 10" front wall
- F - 2 pieces 2 × 4 - 226 cm, 1 pc. - 193 cm, 5 pcs. - 230 cm back
- G - 14 pieces grooved plywood
screws, nails, putty, hinges + latch, rubiroid, asphalt shingles
Tools
- Protective gloves, glasses
- Miter saw
- Roulette, spirit level, carpentry pencil
- Drill and drill
Time 6-7 days
How to build a wooden barn
- The first step is installing the floor. Drill through holes through the rim mounts and tighten the galvanized screws. Make sure you get the correct rectangle.
- After you make the frame, install it on the slide. Drill through holes in the beams and fix the frame on the slide with screws. It is important to lay skids on a flat surface on several concrete slabs.
- Lay the sheets of plywood on the frame. The drawing shows that you need to cut the plywood of the right size and attach it to the beam gratings. Fasten with screws every 15 cm, but before that make sure that the sheets are flush with the frame.
- Making the side walls of the shed is not difficult if you use the right plans and professional methods. Saw off boards of the necessary size and fix them together with galvanized screws.
- Then assemble the front wall by securing the door opening.
- Now assemble the back wall. Install the pins every 60 cm in the center using the information highlighted in the picture.
- Once the walls are assembled, install them over the floor and secure with galvanized screws.
- Use a level to weigh walls and temporary brackets. Strengthen the barn structure by inserting screws into adjacent walls.
- Attach the corrugated plywood to the external walls as shown in the diagrams. The sheets should be flush with the top edge of the frame.
- Attach the siding to the front wall. With great care, use a jigsaw to cut out the door opening in the plywood.
- Attach the plywood sheets to the back of the barn.
Finally, fill the holes and gaps with wood filler and let it dry for several hours. Check that there are no protruding screws, if necessary, fix the problem. Apply several coats of paint to protect the wood from moisture.


https://i.expert-h.com/en/stroitelstvo/1005#sigFreeIdc9c26eef43
Shed Roof Drawing
If you want to effectively use the space of the barn, it is recommended to build a base attic. To do this, install 2 × 4 supports at the bottom of the trusses and secure with galvanized screws. Work carefully and carefully to avoid costly mistakes. Plan in advance all aspects of the assembly structure, starting with materials, and including all sizes. In addition, it is important to use quality materials if you want to build a solid roof for the barn. Always install components at both ends before fastening with screws.
In order to build a canopy for the roof, you will need the following:
- A - 14 boards 2 × 4 92 cm long, 14 pieces 105 cm
- B - 6 boards 2 × 4 56 cm long
- C - 4 boards 2 × 4 92 cm long, 4 pieces 105 cm
- D - 32 pcs. 18 cm
- E - 5 pieces 2 × 4 250 cm long
- F - 2 sheets of plywood 122 × 244 cm
- G - 7 sheets of plywood 122 × 244 cm
- H - 18 sq. M. roofing
- I - 18 sq. M. asphalt shingles
How to make a roof on a barn
- The first step is the construction of roof trusses. It is necessary to cut out the components of the required size and cut their ends at a right angle. After fastening the parts with screws, it is necessary to strengthen the joints by installing plywood bushings.
- Attach the trusses to the top and secure with galvanized screws. It is very important to distribute the trusses every 60 cm in the center and align at both ends. Install interlocks between trusses to increase the rigidity of the roof.
- Installation of protrusions. Attach the ends of the bar to the front and back of the barn using corrugated plywood. Subsequently, it is recommended that the front and rear projections be installed to add style to the structure and protect components from decomposition. As you can see in the diagram, you need to use ordinary trusses and set locks to get an overhang of 25 cm.
- Installation of roofing sheets. Attach the plywood to the roof truss, as shown in the diagram. Set sheets in farms and hammer with nails. In the same way, cover the other side of the roof.
- Installation of tiles. Cover the roof of the shed with roofing felt, making sure that the strips overlap by at least 5 cm. Using brackets, fix the roofing on the plywood sheet. In addition, cut a 30 cm part for the upper ridge. Before starting installation, always read the manufacturing instructions, as there are several aspects that vary.
- The construction of the attic. If you want to increase storage space, you need to build an attic. Therefore, attach the rafters to the bottom of the trusses, as in the diagram. Drill through holes and insert a few 8 cm screws into trusses at both ends.
- Setting sheets. Adjust the size of the two plywood sheets and attach them over the lower rafters. Nail the sheets to the rafters.
- Fastening of strips. The final steps are to install the slats on the front and back of the barn. Attach the slats to the end rafters and tighten securely.


https://i.expert-h.com/en/stroitelstvo/1005#sigFreeId1b6624d6b6
How to make a door to the barn
Anyone with basic skills can make a plywood door to the barn, and the drawings presented here will facilitate your task. You can adjust the door design by adding diagonal slats to the plywood panel, especially if you want to build a traditional barn. Use a plywood sheet cut when installing the siding on the front surface. Align the components at both ends and fix them with nails and waterproof glue. Insert the door into the hole and fix it on the jambs with metal hinges. After you check that the door opens correctly, you must install the hinges, as well as a strong latch.
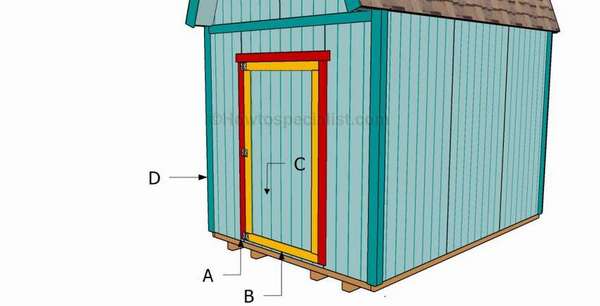 materials
- A - 2 boards 1 × 4 2 m long and 1 pc. 135 cm long
- B - 2 boards 1 × 4 180 cm long, 1 piece 1 × 4 110 cm long
- C - corrugated plywood 1.1 x 2 m
- D - 8 boards 1 × 4 for 245 cm and 2 for 230 cm
Building a barn door
After you have built the barn, you need to make a plywood door and install it in place.
- Installing the door stop. The first step is to install the door stop. You just need to fasten the bar. 1 × 2. This one is not necessary, but in this way you will improve the rigidity of the door structure.
- From the strips 1 × 4 and siding, make a barn door.The best idea is to make a door using a piece of plywood that was cut from the front panel. Attach the trim to the outer edges of the plywood and secure with nails.
- Installing a barn door. Attach the strips 1 × 4 to the outer edges of the doorway, as in the plans.
- Be sure to align the trims correctly before securing them in place. Insert the door into the opening and fix it on the jambs with metal hinges. Check how the door opens and install the latch.
- Fastening of strips. For beauty, we recommend attaching trim to the corners of the barn. Cut the trimmers to the correct size and secure with nails to the frame. Apply waterproof glue to improve durability.


https://i.expert-h.com/en/stroitelstvo/1005#sigFreeId2cd3d1326b
How to build a do-it-yourself barn
 What for do-it-yourself barnif you can buy a finished design in the store? There are many reasons, it is hard to find what is right for your site, and then, finished products are not cheap at all. But if build a barn for a summer residence independently, you can take into account all the needs and features of landscape design. Here, for example, a cube-shaped barn is convenient, practical, functional, and also beautiful, and shops usually sell rectangular structures. The author of this project was going to keep a lawn mower in the barn, so he provided for a wide door.
The barn does not swing, because the canopy has four quadrangular racks, which are an integral part of the structure, are 60 cm deep in the ground at all 4 corners, which ensures safety and stability.
The first step in building a barn is seat selection. Once you have decided on the location, clear the area of grass and weeds, and then dig holes for the corner posts and concrete. Fill the site with gravel so that there is a pillow between the floor and the ground. The author made the floor from OSB, so additional space under the base frame must be done.
Wall and floor assembly routine, see step by step photos. Walls are just planks stuffed onto a frame. Stability of the design is ensured by corner poststhat make up part of the wall.
The roof is made of OSB boards 18 mm, sawn into 4 triangles to make a pointed roof of the pavilion. Calculating the dimensions of the triangle and the angles of cuts is quite difficult, so check the calculations with the cardboard scale model, since 4 sheets of OSB are a lot to throw out if you make a mistake!
To make a strong roof, strengthen all joints and spans with additional boards.


https://i.expert-h.com/en/stroitelstvo/1005#sigFreeId85f7d33194
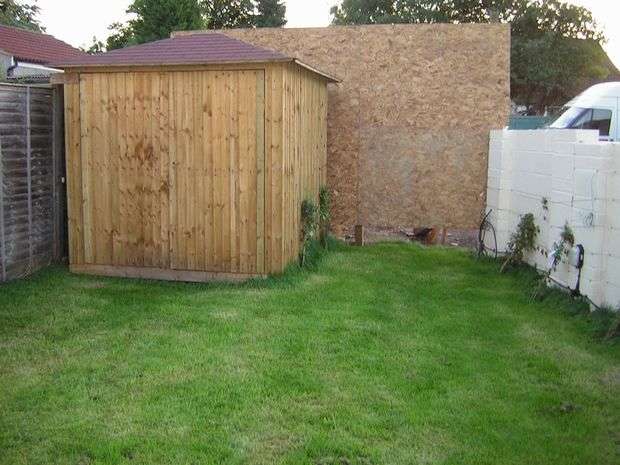
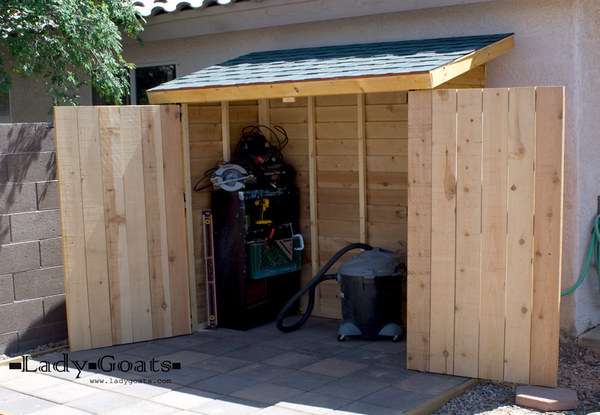
How to build a shed roof shed
This design, this is what you need to store equipment and garden equipment in your summer cottage.
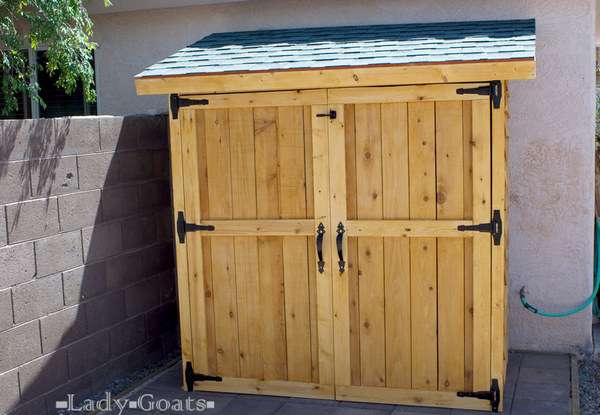
 The roof allows you to place the shed at a distance of about 20 cm from the structure (which means there is a 20 cm gap between the shed and another structure). If you want to reduce this gap, you will have to resize the roof.
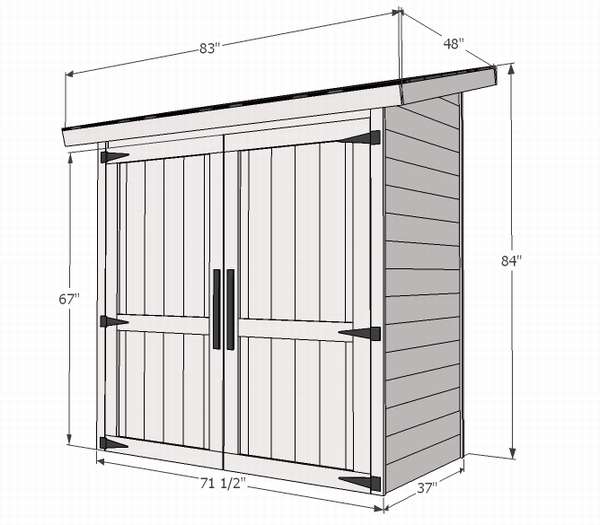 Drawing a shed with a shed roof
You will need
- bars 2x2 2.45 m long 18 pcs
- 44 planks 12 cm wide for trim
- 2.45 m long boards
1 - 2x4
4 - 1x3
8 - 1x4 - 1 - a large sheet of plywood for the roof
- 3 sq.m. roof tiles
- Roofing nails or glue
- Hinges for heavy gates
- Pens
Operating procedure
- Step 1: Assemble the back walls.
- Step 2 Starting from the bottom, attach the supports for the skin.
- Step 3 Assemble the side walls of the frame as shown in the figure, as did the back wall. You will need two side walls.
- Step 4 Fix the siding to the back wall as shown in the diagram.
- Step 5 Cut the side walls flush.
- Step 6 Once the side walls are ready, you can attach the back walls. Use screws or brackets for easy disassembly.
- Step 7 Add the crossbar to the front of the barn. Take a moment to make sure that the structure is square, especially the area of the door
- Step 8 Mount the roof as shown in the diagram.
- Step 9 Attach the roof to the top of the barn.
- Step 10 Add plywood and roofing to the top of the barn.
- Step 11: Make the doors to fit the openings.
- Step 12: Attach the trim to the rear doors.
- Step 13: Install the doors to the barn.
- Step 14: Add a stop block to close the doors.
- Step 15: Don't Forget Good Equipment!
Fill all openings with wood filler and allow to dry. If necessary, apply additional coatings for wood. When the wood filler is completely dry, sand the surfaces with sandpaper. Wipe with a clean, damp cloth.


https://i.expert-h.com/en/stroitelstvo/1005#sigFreeIdf97524b7a3
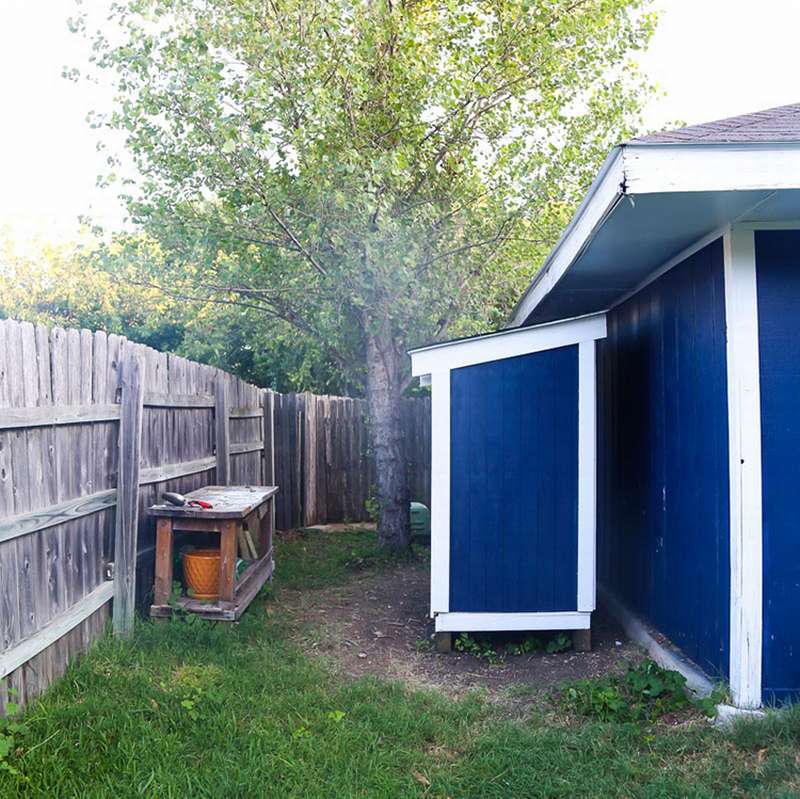
How to build a simple barn
 One of the problems building a barn in the country in this case, it was necessary to construct the structure on an inclined section. In addition, the author of this project did not want to damage the trees growing near the house. Therefore it was decided install cinder blocksinstead of pouring concrete foundation. True earthwork is still enough. A foundation is also needed for cinder blocks, plus a trench for an electric cable is dug. Clay bricks can be used only above the ground, otherwise they will collapse. Before you start installing cinder blocks, make in trenches gravel pillowlay the electric cable. Make sure that the wires are clearly marked so that in the future no one accidentally dug.
The construction procedure, see the step by step photos. When the barn assembly is completed, install the latches and locks. The windows are made of Plexiglas 6 mm thick which hold white silicone to match the finish. The floor is tiled with concrete. In the middle you can make shelves if you need them. The author also added a bicycle rack on the right side, which can hold five bicycles. Last Bar - Install an electrical outlet. There is a vent in the back wall.


https://i.expert-h.com/en/stroitelstvo/1005#sigFreeIda0afdd2103
Wall shed
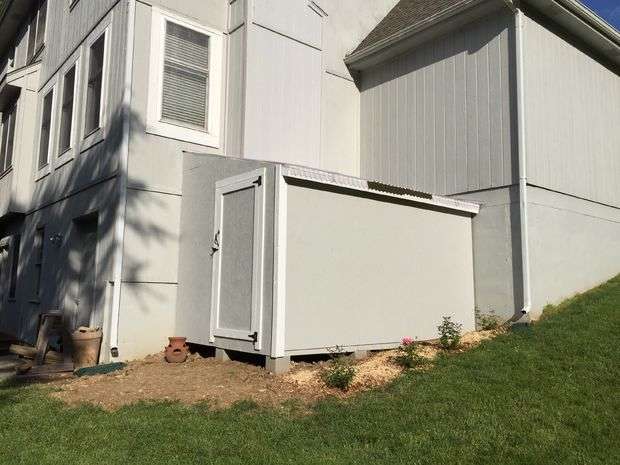
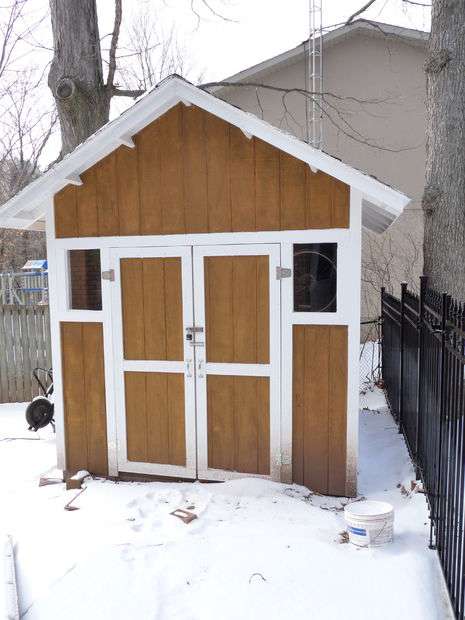
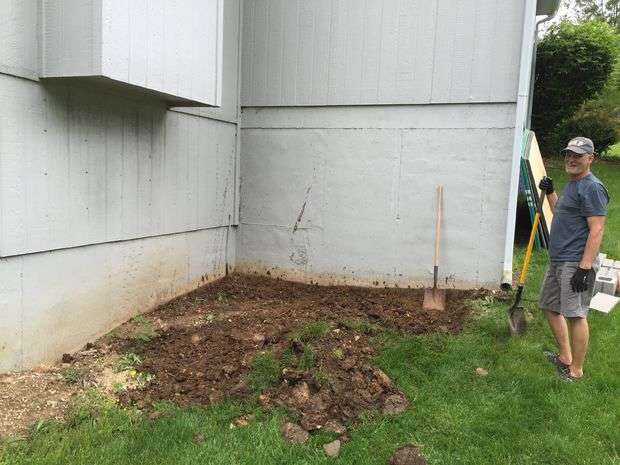 Sheds are most often built in order to make room in the house, but sometimes it is difficult to find a place for the utility room itself, especially if the site is small. The best option build a wall shed, you can always find a small place near the wall of the house. The author of this project found such an unused place that is ideal for a barn. If you do not have any construction skills, you can buy a metal or wooden collapsible shed, but you may run into the problem that the available sizes do not fit your place, and plus, they are really expensive. So it's still easier build a do-it-yourself wall shed, in fact it is not so difficult. Use the step by step photos provided by the author of this project, and you will succeed. This is a great barn. I like transparent roof - such a pleasant highlight.
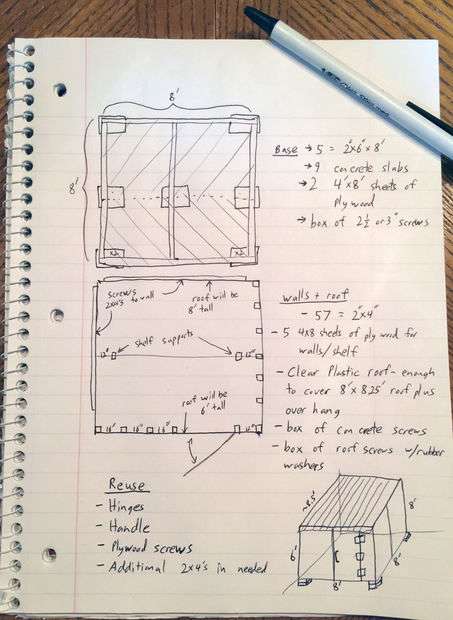 Plans and materials
- 2 sheets of plywood for the floor
- 5 sheets of siding sheets (4 for sides and 1 for shelf inside)
- 9 concrete slabs
- 5 barn boards
- 5 transparent plastic sheets for the roof (the roof will be longer than 2.5 m)
- 1 box of screws
- plywood screws
- 9 bars for doorway and corner
- 3 wide roof boards
- wall boards
- hinges, handle and latch
- Tools:
- shovel
- pickaxe
- gravel rake
- hoe
- level
- a circular saw
- electric drill
- roulette
- manual planer
- Miter saw
The assembly order is well shown in the photo, so probably there is no need to provide detailed instructions. The principle of building a wall shed is practically no different from the already presented examples in this article. But a step-by-step description is on the source site, if you do not understand something with the photos, you can read it.


https://i.expert-h.com/en/stroitelstvo/1005#sigFreeIdfed803ab22
DIY wooden barn
 As you can see, there are many options.Choosing which design is best for you depends on your location, budget, and needs. Wooden shed for a summer residence It looks traditional, durable and beautiful, wood structures are easy to paint in any color that you choose according to the appearance of your home or garden, they are available with an infinite number of design options, and they are much easier to build than metal structures.
The step by step photos show how to make a simple wooden shed for giving 2.5 x 1.8 m. You can see what materials, tools, and detailed instructions are needed on the website of the source using the link located under the gallery.


https://i.expert-h.com/en/stroitelstvo/1005#sigFreeId64b83e738c
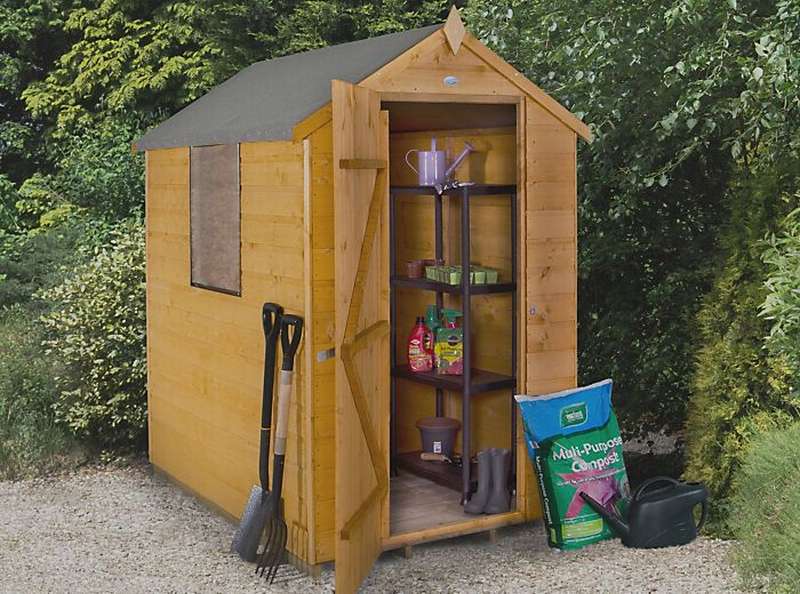
DIY garden shed
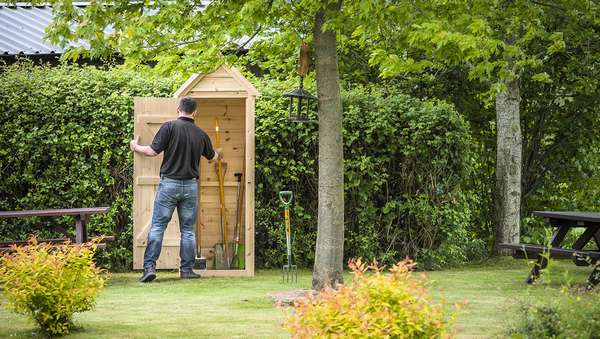
Building a barn will give you as much satisfaction as creating the garden itself; a small and neat barn fits organically into the landscape of any garden and is ideal for storing the necessary garden tools. How to build a garden shed? 58 step-by-step photos and a quick guide will help you.
 Part Dimensions
- 8x Frame racks - 45 x 45 x 1,770mm
- 10x Crosses - 45 x 45 x 600 mm
- 50x sheet piling - 150 x 15 x 770 mm
- 2x sheet piling - 150 x 15 x 620 mm
- 2x sheet piling - 150 x 15 x 360 mm
- 2x Protective tape - 45 x 18 x 1,840 mm
- 2x cover - 70 x 18 x 1,840 mm
- 2x Coating - 70 x 18 x 600 mm
- 4x Roof cover - 45 x 18 x 640 mm
- 2x Roof cover - 70 x 18 x 860 mm
- 7x Standard reed and groove panels - 1,700 mm
- 3x Door brackets - 70 x 18 x 540 mm
- 1x Roof - 45 x 45 x 680 mm
- 4x Roof corners - 45 x 45 x 470 mm
How to build a barn step by step
- Step 1. Cut out all the pieces according to the list.
- Step 2. Take all 8 racks to mark the screw holes. Use a square and a pencil to mark the drilling positions. Saw out all the parts and mark the drilling positions.
- Step 3. Drill and mark all marked holes.
- Step 4. To make the side and rear frames, take one vertical and three support posts, align the holes and fix them in place. Drill and mark all marked holes. Assemble the side and rear frames.
- Step 5. Make three support legs to complete the frame. Use the clamp to hold the frame in place when tightening. Connect the racks to the support posts.
- Step 6. Make a doorway in the front frame.
- Step 7. Connect all the frames together.
- Step 8. Install the frame on the supports.
- Step 9. Insert a cut-to-size sheet of floor.
- Step 10. Take the four roof supports and cut off a 45 degree angle at one end, then on all four parts.
- Step 12. Take the longer two parts and drill holes at the opposite ends.
- Step 13. Fasten the two supports on the roof, and then attach to the frame.
- Step 14. Starting from the bottom of one of the sides of the barn frame, attach the dowel boards to the frame. Continue the process to the last part. Here you need to cut to size. Repeat the same on the other side.
- Step 15. Attach the two side stripes to the frame and mark where the 45 ° bevel will be. Saw off and hammer with nails. Then take the front cover and glue the lower and upper parts to the frame.
- Step 16. Measure and assemble the front and rear of the roof end.
- Step 17. Starting from top to bottom, connect the sides of the roof.
- Step 19. Measure, cut and fasten the roof strips. Add decorative elements.
- Step 20. Measure the door opening and cut the tongue and groove to length.
- Step 21. Saw three straight supports and two crosswise staples at 40 degrees. It is important to cut straight supports 50 mm from the total width of the door so that there is room for opening and closing.
- Step 22. Make a mark 220 mm from the top of the door, prepare the keys and jibs, fix them in place.
- Step 23. On the front side of the door, mark where the bracket is and fasten.
- Step 24. Take the door hardware, 2 galvanized tees and a bolt. Align the upper and lower support brackets and secure them in place. On the opposite side of the door, screw the bolt into the middle support bracket.
- Step 25: Take a stopper and a 10 mm nail, allowing the door to close flush with the front of the barn. (see fig.)
- Step 26Install and attach the door lock and hinges.
- Step 27. Close the door bolt latch to the desired position.
- Step 28. Attach the door bolt latch and varnish.


https://i.expert-h.com/en/stroitelstvo/1005#sigFreeId224e4ad66c
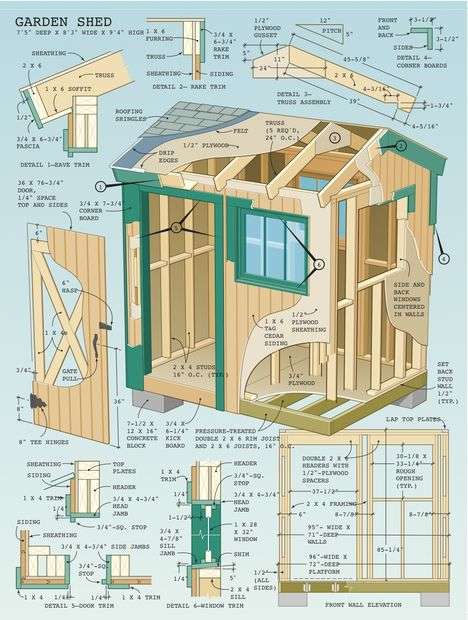
How to build a garden shed
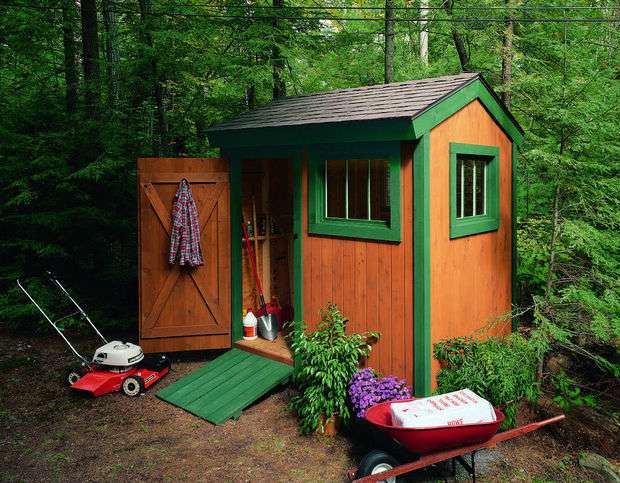 Not everyone needs a garden shed. But, if you no longer have space on the wall of the garage for new rakes, and garden shears are either on the shelf in the kitchen, then on the hanger in the hallway, if you want, if you don’t want, you’ll have to think, how to build a garden shed. Design can take any form, from a simple canopy to a large detached building. The barn presented here is modest 1.80 x 1.80 x 2.5 m. This is enough to store many tools, but at the same time, the house is quite small and does not spoil the landscape of the site. The simple design is easy to expand - up to approximately 2.5 x 3.5 m - to suit your needs.
 In most cases, a garden shed of this size does not require a complex foundation - four corner blocks are enough. Earthwork is inevitable to provide an even and solid base, but there is no need to dig below the freezing line. If the building settles unevenly, just lift the bottom corner and install the gaskets between the corner block and the floor frame.
In order to have enough light in the barn, the author installed 60 x 80 cm windows.
Work with the site
- Start by marking the location of the building on your site.
- Use 2 cm thick pine boards for the frame. Cut the sides to the exact size of the floor and use one screw in each corner to make a rectangle.
- Screw the diagonal bracket between the two sides of the frame so that it is square.
- Clean the construction site.
- Install the frame and adjust the position.
- Drive the stakes to mark each corner, stretch the rope between them, and then remove the frame.
- Find the highest corner of the site and dig a recess for the first foundation block.
- Spread 5-7 cm of crushed stone in the hole to form a stable base.
- Now you can install the first block. Make sure that it is level along the entire length and width, if necessary, adjust by adding crushed stone.
- Use a long, straight level to check the relative height of the second corner, then dig out the recesses for the block.
- Make sure the second block is on the first level, and add the remaining corner blocks in the same way.
Step 2: Lay the floor
Install the inner front and rear beams between the corner blocks. Fasten the beams in place, then attach the outer beams of the rim to the front and rear of the floor frame. Opposite diagonals should be square.
Step 3: Install walls
- Saw boards for door and window openings. Use pieces of 1.5 cm plywood as spacers between 2 x 6s.
- Cut the stem for wall studs and pins on windows and doors. Hammer with nails.
- Make four corner posts by nailing three gaskets between two studs.
- Start framing the back wall.
- Then lay out the frame elements on the floor.
- Open the window and attach the second top plate to the wall, holding the ends 10 cm from each end of the wall.
- Lift the rear wall by attaching it with a 2x4s board nailed between the wall and the external beam ceilings.
- Install the frame to the wall and attach it. Then fix the side walls one at a time. Use a level to check that the corners of the building are sanded and attach temporary diagonal braces to the inner surface of each wall.
Step 4: Carcass roof
- Cut the rafters and use as a template to make a second sling. Check the first two for a proper fit, then track and cut the remaining rafters.
- Use a plywood sheet as a pasteboard and draw a contour of the roof truss directly on the surface of the plywood. Align the two rafters above the pattern and nail with roofing nails.
- Cut the stem in length and glue the boards to the rafter ends using universal nails.
- Cut and install the end-end sheathing, and then attach over the rafters.
- Install the plywood roof frame so that it hangs 1.5 cm along the ledge.
Step 5: Roofing and siding
- Follow the manufacturer's instructions for installing the tiles.
- Since the siding groove is installed vertically, add blocks between the studs.
It is necessary to finish the roof before installing the siding. - Cut the siding to the end and start installing from the corner of the barn.
Step 6: Windows and doors
- After painting the siding, install door and window jambs.
- Cut the stop for windows and install the outer stops with galvanized nails.
- Then insert the windows into the openings and add internal stops.
- Cut the siding and boards for the door of the garden shed and screw them into the inner surface of the boards.
- Attach door hinges and mark the attachment points.
- Drill through holes and secure the hinges.
- Attach the door and mark the holes for the hinge.
- Drill through holes and install hinges.
- Cut the door stops and glue them on the jambs.
- Paint the window frames and the door.
- To build a ramp, use 2 x 6 boards, securing them at a distance of 1.5 cm from each other.
Now you have garden shed - A great haven for your outdoor tools.


https://i.expert-h.com/en/stroitelstvo/1005#sigFreeIdbd11525de1
DIY barn
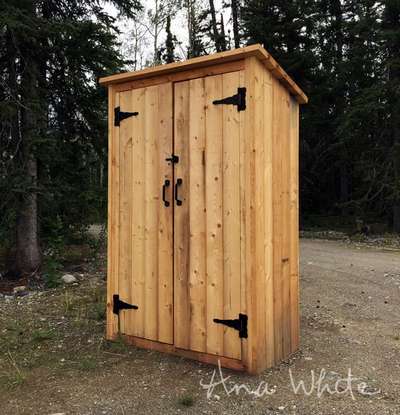
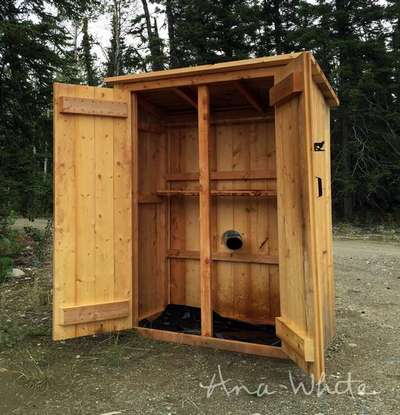 This is actually normal garden storage shed accessories, small, compact, but quite roomy. Just the author of this project decided to go further and installed a wood stove in it with an outlet pipe in the back wall. That is, now this design can be used as a smokehouse. If you liked this idea, step by step photos with drawings are at your disposal. It should be borne in mind that the author lives in Alaska and adapted this design for smoking salmon, so this topic will be relevant for residents of the northern regions.
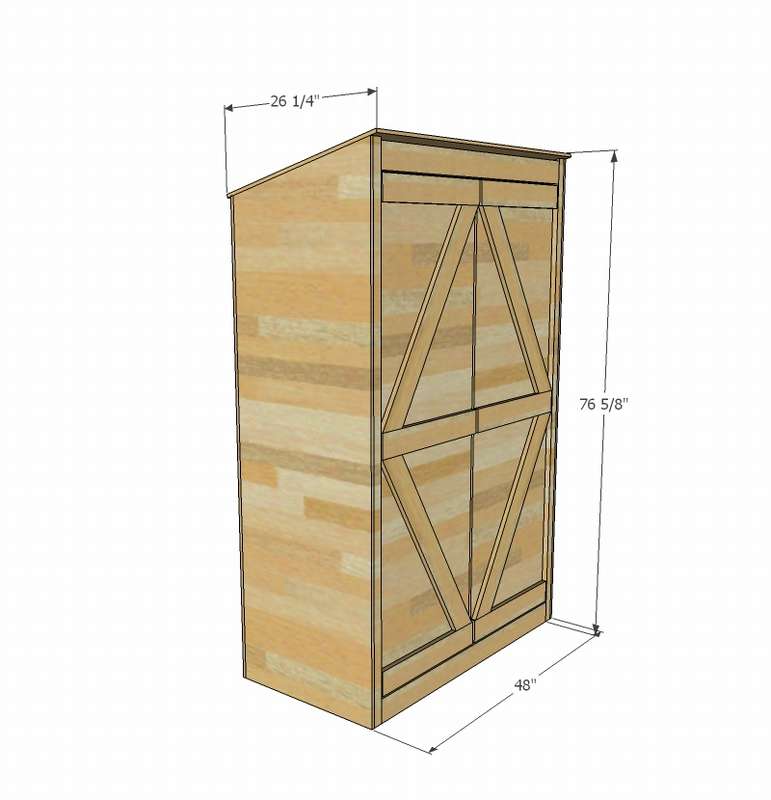 Material List:
- 2 sheets of plywood (does not include door material)
- 12 2x4 boards 2.45 m long
- 6 - hinges for gates
- 2 handles and latch
- Galvanized nails for fastening plywood or external screws
- Roof 122 x 68 cm
Additional materials needed for doors and shelving
- Step 1: Build two side panels with screw holes. Make the holes on the outside of both parts of the frame.
- Step 2 Fasten the two parts of the frame. Please note that the top boards of the frame must not protrude above the side frame. Otherwise, the outer edges will be flush.
- Step 3 Secure the rafters with screws. Make sure they are at the same height as the side parts.
- Step 4 Install the bars to support the doors.
- Step 5 Cover the sides with plywood.
- Step 6 Place the plywood on the back.
- Step 7 Use the tray on the back of the barn to cover the top. For added strength, roofing is recommended.
- Step 8 Doors should be made taking into account the openings and have a thickness where the hinges are installed approximately 2 cm. For strength, install three hinges on the door.
Finally, fill all openings with wood filler and apply additional coatings. When the filler is completely dry, sand all surfaces with sandpaper.


https://i.expert-h.com/en/stroitelstvo/1005#sigFreeIdfe0b6e6cb1
Garden Tools Shed
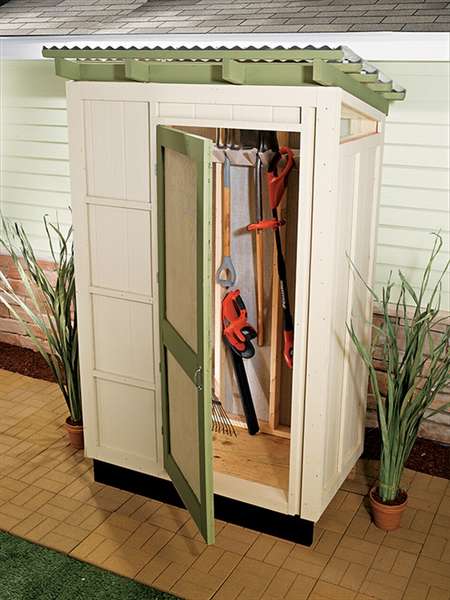 Regardless of whether you work in the garden or on the construction site, the work is always more efficient when the tools are at hand. Small garden equipment shed will provide storage of all your hand tools for gardening. The base is mounted on two 2 × 8 beams that protect the barn from contact with the ground. These beams can also play the role of a sleigh, which allows you to drag the shed like a sled after its construction.
The outer shell is lined with cement siding with a vertical board. This type of siding not only weather resistant, but also very stable and resistant to deformation. Cement siding is not intended for constant contact with humidity, you can choose the coordinates of the colors according to your preference. The roof is made of corrugated fiberglass roofing panels. They are easy to install and available in a variety of colors, including transparent, which will completely provide the barn with natural daylight.
 This drawing shows how to build a standard barnbut you can customize the interior with hanging hooks and shelves to suit your needs.
Build base
Although the structure can be moved, this barn is quite heavy and will require a few people or a vehicle to move it if you build in your workshop or garage. Therefore, if there is such an opportunity, it is better build on the place where you plan to install it. Align an area of 90 × 150 cm.The base of the barn is made of treated boards, so you can place it directly on the ground. If you want a solid and solid foundation, dig a recess of 15 cm and fill it with gravel.
Cut the front and rear support beams and jumpers to length. Place the base parts upside down on a flat surface and fasten the jumpers with screws. Work with parts upside down allows flush upper edges easily. Cut the base platform to the desired size. Turn the base frame over and secure the platform. Level the base where the barn will be built.
Canopy frame
- Saw to the desired size the details of the front wall of the frame, including the doorway.
- Lay out the front wall on a flat, level surface.
- Knock down all parts with nails.
- Then do the same with the rear frame.
- Saw the upper and lower sidewall plates along the length, and then the studs and jumper.
- The ends of the top plate must be cut by 10 °.
- Lay out and assemble the side walls on the floor.
- Install one of the side walls on the base platform.
- Align the outer edge of the wall so that it is flush with the outer edge of the base platform.
- When installing the wall, you will need an assistant, although you can try one if you attach the bracket to the wall.
- Install the rear wall to the platform and fasten with screws.
- Align the outer edge with the edge of the platform.
- Then also install the front and side walls.
- Saw the rafters of the desired length and cut the ends 10 degrees.
- Cut the rafter lock into length; these parts will be installed between the rafters in front and behind the barn to cover the area above the top slabs.
- Fasten the rafters to the lock.
- The lock can be used as a gasket to install the rafters.
Roof
The barn is sheathed with 60 cm corrugated panels. They are installed on top of the foam strips, which are attached to the tops of the girders, perpendicular to the rafters.
Drill 30 cm holes in the panel area and along the seams. Fasten only in corrugated parts. The diameter of the hole should be slightly larger than the diameter of the screw shanks. Secure the panels and rafters with hexagon screws and neoprene seals.
Fasten siding
Cut the siding panels to the desired size. Drill holes and fasten the sheets. Sawn the plywood door panel from the plywood. Attach the wall and door trim.
Windows installation
Windows are made of sheets of transparent plastic. To cut to size, mark the cut lines on the sheet. Drill through holes around the perimeter of the parts. Fasten the windows to the side wall framing the outside with screws.
Install the door
Make a door and secure the door handle. Attach the three door hinges, and then fasten the hinges to the edge of the doorway. Use a scrap piece of siding as a spacer to determine the correct height of the door.


https://i.expert-h.com/en/stroitelstvo/1005#sigFreeId70ba03db0d
Lawn Mower Shed
 This small wooden barn Ideal for storing lawn mowers. It also has a large stand for other garden tools. You will not need any unusual tools or know-how in construction. With a few basic tools that you probably have, you can build a barn for a summer residence over the weekend. The author mainly needed a place for a lawn mower, so the total construction area 180 x 90 cm.
Materials
- 2 beams 4 x 6 for a 250 cm long slide rail
- 23 2 x 4 boards 250 cm long
- 2 boards 1 x 6 180 cm long
- 8 boards 1 x 4 250 cm long
- Plywood sheet 125 x 250 cm 3/8
- Plywood sheet 125 x 250 cm 3/4
- Roofing materials
Tools: tape measure, drill, circular saw, nail gun.
STEP 1: Set the foundation
First of all, you will need some kind of foundation for the barn. There are many options, but since the author of this project lives in a warm climate, he decided set the shed just on the slide, that is, into two bars.
STEP 2: Build a base
- Create a rectangle the size of the barn, in this case 180 x 90 cm.
- Cut the board to be located along the base and attach it.
- Add support bars.
- Cut the plywood sheet to the right size.
- Stain with oil paint and let dry for at least 24 hours.
- Install the floor by simply screwing the plywood to the base.
STEP 3: Wall frames
Wall framing is very similar to building a base.
This barn has a sloping roof, so make one wall 168 cm high and the other 152 cm. At this stage, make only two side walls (those that run along the barn) - you will collect the back wall of the barn after they are installed.
STEP 4: Install wall frames
STEP 5: Assemble the last wall
STEP 6: Install ceiling beams
For ceiling beams, cut 4 parts to 120 cm, and then make small cuts to support the roof sheathing.
STEP 7: Installationand siding
Installation of siding is very simple, probably the most useful part of the process, because the design will in the end look like a barn!
Just cut off the siding, ask an assistant to help support it, and use glue and a gun for staples to attach in place.
STEP 8: Install the roof
Take the second (thinner) sheet of plywood, cut and screw it to the ceiling beams.
STEP 9: Make facing
STEP 10: Color shed
STEP 11: Cover the roof
This can technically be done earlier, but the author recommends that this step be moved to the final stage, so as not to accidentally paint the tiles. The process is relatively simple - first lay the felt pad, then fasten the tile one sheet at a time. Be sure to follow the instructions that you will find for the specific product that you are buying.


https://i.expert-h.com/en/stroitelstvo/1005#sigFreeId21c967a7af
How to assemble a barn
 To assemble a wooden barn, a lot of effort is not necessary, but the benefits are obvious. You can store garden tools, equip a small workshop or just sit and relax. Take advantage of these simple instructions and you will build a barn that will stand for years. This method can be easily adapted for more complex designs with additional windows and double doors. Before buying a barn, check out buying guideto explore the full range of options available and find the right one.
It is very important that the shed has a stable base and therefore must stand on a wooden, plastic, paved or concrete base to prevent water from flowing.
When buying a finished barn, make sure that the roof of the felt and all fixtures, including felt nails, are included in the kit, otherwise they will have to be purchased separately
tools
- Electric screwdriver drill
- Staple Gun
- Hammer
- Level
- Roulette
- The square of the builder
Assembly instructions may vary by type of construction, so always follow the manufacturer's instructions. For example, some sheds use screws, while others use cloves.
- Remove transport material. Center the barn floor on top of the base, then measure and mark with a pencil the center point of each edge. Repeat this on the bottom boards of the side panels.
- Starting from the back of the barn, lift into place and use the long wooden support to mount the panel vertically. Choose a panel without a door, it should go last.
- Screw the back and side panels along the support strips.
- Drill holes, and then install the three countersunk screws on top, middle, and bottom.
- Install the other side panel in the same way.
- Then install the last panel to close the door. Do not try to fix your barn frame to the floor - first make sure that the panels are aligned first.
- Install the roof support beam on the top of the barn, cutting it into the previously cut grooves at the top of the two pointed ends on the top. Make sure that the barn sits on its base and that the door opens easily.
- Fasten the beam with screws using the L-shaped metal bracket.
- Lay the roof panels on the ground, one at a time, with the sections below it.
- Drill holes and attach the cornice sections to the roof panels.
- Lift the panels and fasten along the inner beam.
- Check again that the corners of the barn are straight.
Even if roof felt is included in the kit, you still have to cut it to size using a universal knife and a ruler (you can use a flat bar). Before laying the felt, make sure that the roof is completely dry.
Roof.
- Expand the roofing felt, then measure and cut the required number of pieces depending on the size of the roof of the barn. Pieces covering the roof panels should extend along the entire length of the shed with a 50 mm protrusion at both ends.
- For the top roof, the felt strip needed to cover the gap in the felt should be the same length as the roof, and lay at least 75 mm above each roof.
Lay the first piece of felt on one side panel, leaving a 50 mm canopy on the ledge. - Nail it along the top edge with felt pads in the barn at a distance of about 300 mm.
- Then fasten along the skates and connect with the felt pads at 100 mm intervals. Repeat on the other side.
- Place the top strip of felt over the top of the roof and glue along each edge at 100mm intervals.
- Where the end end hangs over the front cornice, substitute a board under the fiber and carefully make a straight cut from the corner of the roof to the edge of the felt.
- Fold the lining and glue the felt material at an angle and along each edge, again at a distance of 100 mm.
- Depending on what comes with the barn kit, screw or hammer the roof with screws or nails. Place this on top of the felt on the front and rear ends.
- Fasten the corner trim.
How to install a barn window and door lock
- Slotted windows are usually made of perpex or styrene, which are easily inserted into the window frame. Most of the hardware or hinges for opening the windows are simply inserted into place after the window is cut through orand collected.
- For a non-opening window, simply install a metal window sill along the bottom of the window frame.
- Insert the window into place, laying it on the windowsill.
- Some doors come pre-assembled and installed inside the panel, but sometimes disassembled. Then they must be assembled, aligned and installed using the provided hinges.
- After the door is installed, drill control holes and secure bolts or padlocks. It is recommended to fix the door with two strong locks on the supports and brackets, tightly connected to both the door and the frame.


https://i.expert-h.com/en/stroitelstvo/1005#sigFreeId1545f4752a
Utility shed
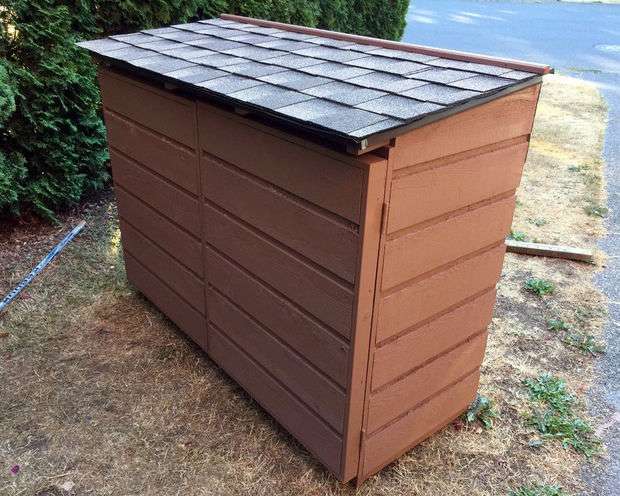 This is a great option when your garage is full of unnecessary things, or those that you rarely use, and there is no way to build a full-fledged barn. Then this will help you out utility shed, well, or you can call the container. In general, it doesn’t matter. Basically this large drawer with doors and roof, does not take up much space, but it can solve the problem of storing things that uselessly occupy the work space in the garage.
Design, materials and tools
To accommodate 4 bins, 2 bags and a large box, the author decided to divide the utility shed into 3 vertical compartments. The design was to fit under the garage window and take up as little space as possible. The following materials were used for construction:
- 3 boards 2 × 4 2.5 m long
- 4 boards6 1 × 6 1.8 m long for fencing
- 4 untreated 2 × 4 boards 2.5 m long
- 5 sheets of siding 3.5 m
- 2 sheets of plywood
- 4 loops
- 1 gate shutter
- roof tile
- roofing material
- paint
- galvanized carnations, screws, roofing nails
- 3 meters metal drip profile
- 3 m metal internal corner profile
Start by building a base. Nothing special, just knock down the frame from 2 × 4 boards and fix a piece of plywood on top.
- Then make 4 vertical frames with a slope of 5 °, see the photo. To maximize usable space, such a roof tilt is enough for an effective stack of water.
- Screw the frames to the base, one at each end, and distribute the other two accordingly to accommodate the bins.
- Install the shelves.
- The back wall is not necessary if the utility shed is attached to the wall. But if in the future you are going to rearrange it somewhere, then of course, it is better to sheathe the back as well.
- Make sure the frame is square before you screw the trim.
- Cover the sides with siding.
- Make the front frame of the cut rails, the thickness does not matter much.
The doors are a simple 2 × 2 connecting frame with a diagonal bracket. Before marking the bracket, measure the diagonals to make sure they are the same. The frames are lined with nails on the siding, and then trimmed with strips 55 mm wide. At this stage, screw the hinges. Doors can be installed later, when the barn is installed in its place, because any, even a slight displacement can skew the frame. In addition, the structure is easier to move and paint without doors - the utility shed is not large, but heavy. - Before painting, treat the surface, then apply two coats of paint on the outer surface.
- Roof. Cut a sheet of plywood for the roof. Install a metal profile on the sides and front. Cover with roofing paper and install roof tiles.
- Prepare the site where you are going to put the utility shed. Install blocks or fill concrete area
- Put the barn in place (you need help), and fix the corner to prevent water from entering the gap between the barn and the wall. Screw the shutter.
Fill in the boxes ... and enjoy the free space in the garage. It will last a few days if you're lucky!


https://i.expert-h.com/en/stroitelstvo/1005#sigFreeId3612edb14f
How to make a barn from pallets
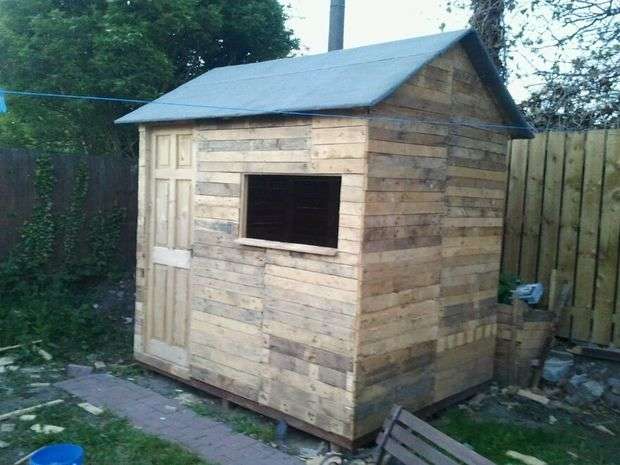 Almost free garden shed from pallets - this is what every happy owner of a summer cottage can use. homeowner. A structure assembled from wooden pallets is quick and easy to build, since most of the work has already been done. Recycling pallets is also environmentally friendly and helps reduce the amount of waste sent to landfill. In most cases, you can get pallets for free, which is undoubtedly a good motivation for construction. Here you can see step by step photos, how to make a shed of pallets with your own hands with minimal cost.
This is a regular garden shed 245 x 180 cm
- Step 1: Assemble the bases using wooden pallets as the floor.
- Step 2: Build the wireframe. You will have to buy blocks of 60 x 40 mm for corner supports.
- Step 3: Assemble the frame, it is possible from disassembled pallets.
- Step 4: Make frames around the door and window.
- Step 5: Install the walls from the pallets.
- Step 6: Assemble the roof and install the door.
- Step 7: Paint The Shed


https://i.expert-h.com/en/stroitelstvo/1005#sigFreeId21994c19cd
Improvised shed
 A barn can be built from virtually any building material.. Metal, concrete and plastic structures can be found everywhere. The advantage of these devices is that they are weather resistant and durable. If you decide build a barn in the country of good quality and at little cost, take an example from the author of this project. He collected as many materials as possible. Boards for the floor, rafters, polycarbonate sheathing, pallets, garage door and other things that can be collected in each household.
True, I had to buy something, but the basis is improvised materials. The main barn was built first. Base made of reworked bricks. Then the frames are installed. The door was a garage door, the author used self-locking bolts that were mounted in concrete. After making the frame, wall panels were installed. The author used 11 mm OSB boardspainted with waterproof exterior paint. The roof is assembled on the ground, covered with boards, and then covered with felt.
To the right of the main barn, another structure was built. It's a frame buried in the ground in bucketsfilled with concrete, which helps reduce concrete usage. The walls are made from a mixture of recycled wood pallets and a packing box. Three sheets of polycarbonate were used to diffuse light in the room. Then the tree was painted and the roof was covered tin sheets.
The barn on the left, used mainly for tool storage, is built in the same way. The walls and roof are made of metal sheet material.
The sheds have lighting and even a radio that runs from a 80 Watt solar panel on the roof, providing power to a 100-hour battery.


https://i.expert-h.com/en/stroitelstvo/1005#sigFreeId364a8693ff
Drawings of wooden sheds


https://i.expert-h.com/en/stroitelstvo/1005#sigFreeId9ed8f1b4be
DIY barn for giving 250 photos


https://i.expert-h.com/en/stroitelstvo/1005#sigFreeId3217e31a4b
Hello, I am the author of this article, so I look forward to asking questions for this article in the comments below, I will answer all !!!
If you have questions on another topic, ask them on our forum, we will answer you
- Two baskets of paper in 5 minutes (Master class)
- How to make a simple and compact table for a milling cutter from plywood
- How to make a soft headboard tile (Instructions + step by step photos)
- Cinder block benches: a convenient bench in 55 minutes
- How to make a bed with a niche: saving space (Master class)