DIY sewing table 500 photos, drawings, instructions
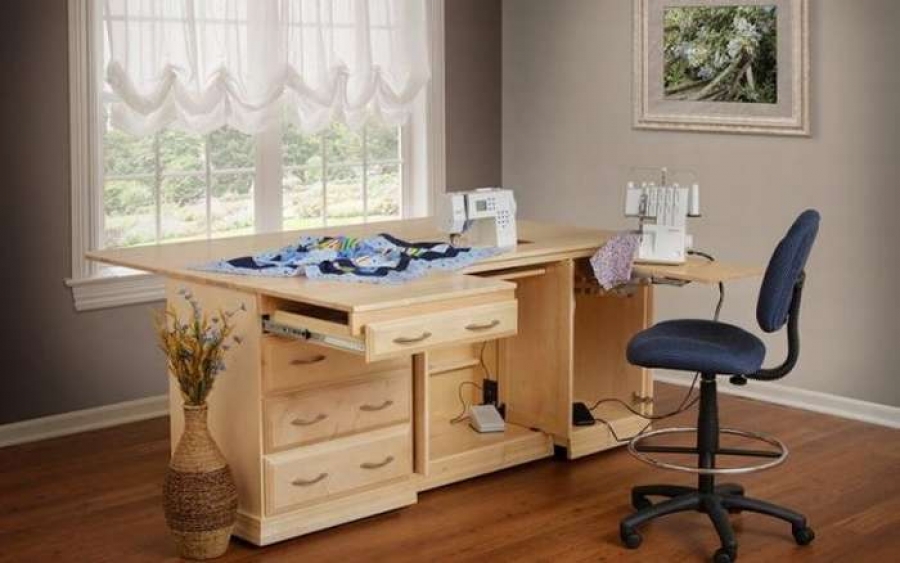 table for sewing machine and overlock
If your sewing machine is stored in a closet and you have to get it out every time, sit at a dining or writing desk, or even worse, bend over to sew on a coffee table, then this article is for you. Shown and told here how to make a do-it-yourself sewing table without special costs and with minimal experience.
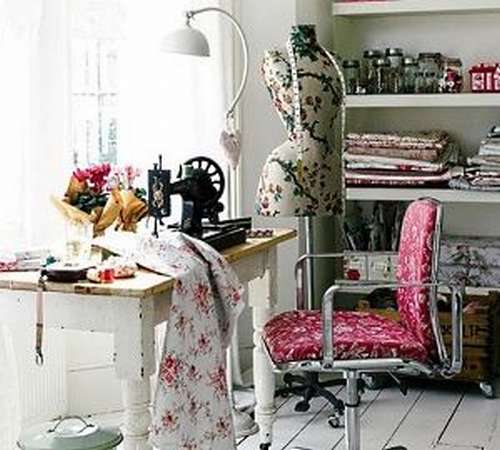
Every housewife, a happy owner of a sewing machine, dreams of her own corner for needlework. But always something is missing - space in the apartment or money for a new sewing table. These problems can be solved; here, various budget options for small-sized apartments are presented here. All tables are made by hand and far from professional craftsmen. So away doubts - choose the appropriate option and for work.
How to make a sewing table
 If you are looking how to make a table for a seamstress with your own hands, this option may interest you. A table with a height of 80 cm and a square work surface of 120 cm. A large work surface is great for cutting and fastening fabric, and will also provide a large tap area to facilitate the work with bulky garments. The table is hard and quite heavy, so it does not shake or vibrate during sewing. There are built-in drawers for storing the necessary items.
If you are interested in creating something like this, there are many ideas that will help you. The presented methods can be used for the manufacture of a sewing table of any size - for sewing, cutting and for other purposes. I hope you find out something useful.
- Step 1: Frame Structure
The table frame is the key that holds the entire structure together. The table top and frame are made of plywood, although any relatively smooth and free from defects surface can be used. Four corner brackets are 12 cm long, with both ends chamfered at an angle of 45 degrees. They must be glued and temporarily fixed in place with nails. Holes need to be drilled previously and securely fixed with screws.
The two remaining strips of plywood are sized and mounted on the inside of the frame with glue and wood screws to add support for countertops and drawers.
Boxes are made of pine boards and plywood, and supporting elements are added to the frame structure. - Step 2: Feet
Two 2-meter, 10 x 10 cm pine blocks were used for the legs. To fix them in the frame, you need to saw off the upper often of each leg at an angle of 45 °. For the top of the table racks, you can buy special bolts with coarse screw clamps. This is one option, but these fancy bolts are not cheap. The author went the other way and simply cut a regular 4-inch bolt through holes drilled from the outside of each leg, and then plugged the holes with a large dowel. The photo shows how to do this. - Step 3: Top of the table
The table top is a square sheet of plywood measuring 120 x 120 cm. - Step 4: Sewing Machine Hole
Here the fun begins! Much of what needs to be done depends on the type of machine. But the task remains the same. It is necessary that the surface of the sewing machine be close to the table level (slightly higher, this is normal, lower not), and easy access to bobbin setting and machine maintenance. In this case, the author used an older version of the sewing machine. Basically, they all have a universal base size. After careful measurements, it is necessary to cut a hole, which should be at a distance of 15 cm from the front edge and 10 cm to the side. - Step 5: Installing the sewing machine
The author used the pin hinges from the old case, which he installed in the countertop. Along with this, it is necessary to fix the adjustable supports to the front edge of the hole. - Step 6: Second Installation Option
The author made this small table under the hole so that, if necessary, use it as an alternative mounting option. It is mounted on supporting rails, but it is not in the finished table, if necessary, it can be easily moved from the bottom. In this case, he performs specific functions, just the author wanted to show the simplest installation option. - Step 7: table decoration
The legs, drawers and countertop are ground and coated with two layers of polyurethane. The top of the table is covered with furniture wax so that the surface ispleasant and smooth. - Step 8: Build
The countertop is screwed on from below. The legs are put in place when the table is turned upside down and the drawers are already installed. The author added small foam pads on the inner surface of the boxes, then the photo shows the finishing touches on how to cover the machine from dust, but this is at your discretion.


https://i.expert-h.com/en/stol/985#sigFreeId6d6f2bd682
 Universal sewing table
This sturdy table with a large working space is suitable for different types of sewing machines. If you buy a similar model in a store, it can cost three times more than a sewing machine and requires an insert, which also costs decent money. In this case, the shelf for the machine is fixed, but can be adjusted to fit a particular machine. The upper part can be adjusted to various sizes of machines. Prototype for universal sewing table served as a rectangular frame with legs made of an old pallet. The height of the upper part 60x120 is 30 cm from the floor. The upper part is in the shape of the letter "L", and the notch is saved to fill the hole when it is used as a table.
- The shelf for supporting the machine is smaller than the hole, so the cords can fit between the shelf and exit the bottom of the table. The convenient design allows you to slide the shelf to support the machine back so that the scraps fall through the slot into the trash below the table.
- When sewing, some machines require access to the lever to divert the feeders. The large opening and hinged top allow you to install an optional tray if you are not using the insert.
The legs are removable, they can be stored inside the frame. - To increase the working surface, you can attach an additional rectangular sheet to the front of the machine. There are several options for resolving this issue. One of them was to assemble a drawer that extends and supports the front sheet.


https://i.expert-h.com/en/stol/985#sigFreeId1b41917d7e
 Table for a sewing machine
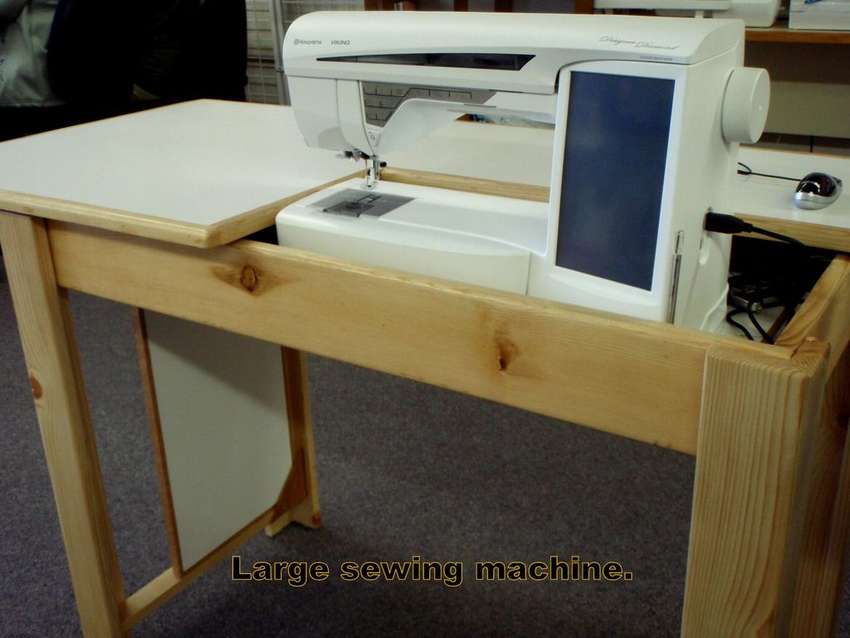
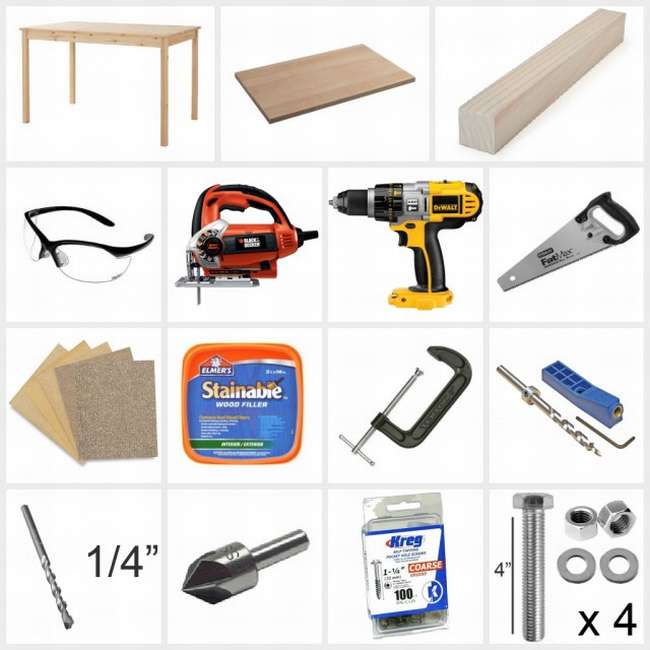
To make a table for a sewing machine, you must consider that the cars are different, which means that the tables will be different. Therefore, it does not indicate any specific sizes or list of materials, so here is a basic list so that you have something to start from. This is a fairly simple table that even a novice can make. In any case, you will need boards from the materials, the length will depend on your machine, plywood, bolts, washers, screws, nuts (best of all are flange locknuts with a nylon insert, so that the machine vibration does not slowly loosen the nuts), as well as plastic bolt covers . 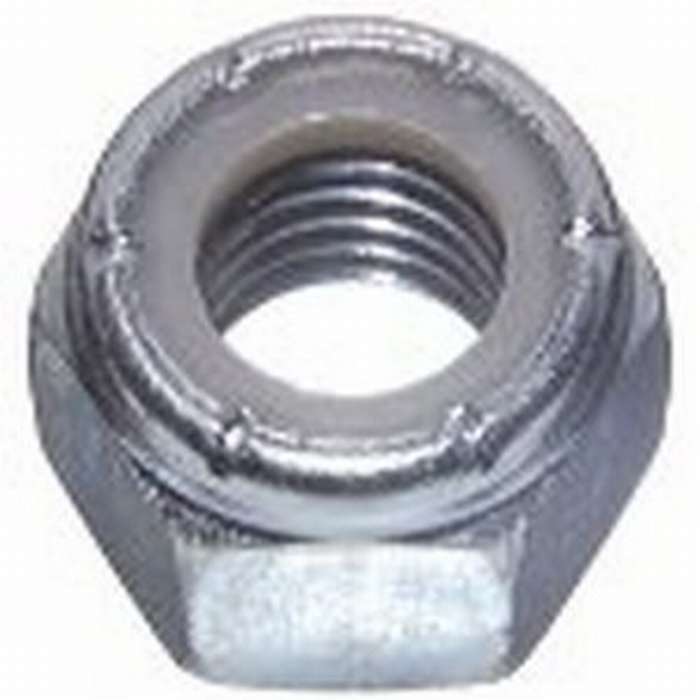
 Note: Be sure to leave enough space if the cords are under the table, or you can cut a small hole in the side.
- Before sawing with a jigsaw, drill a guide hole on the inside. Then insert the hacksaw into the hole and along the curved line start sawing from there. Using an emery cloth, smooth the corner radius. Continue sanding with coarse paper until you get the right size, and then go with thin sandpaper.
- Saw the board into two parts, each of which is the length of the distance between the table supports. (If necessary, you can cut it shorter and attach it to the right side or only on top ... it all depends on the materials, table and machine.) If the countertop is ready, you can attach it with screws on the front and back, but this is not necessary. Mark the 4 bolt holes for support only to the inside width of the machine, as shown in the picture. Then drill holes using the marks.
- Install the bolts in the holes and turn the table over to put the supports in place. The number of screws you use to attach to the countertop depends on the weight of the machine.
- Cut the long side to the width of the platform.Then mount the platform onto the bolts and secure with the washer and nut.
- Place the sewing machine on the platform and adjust the locknuts until it is flush with the surface of the table.


https://i.expert-h.com/en/stol/985#sigFreeIdf5c8f5db0a
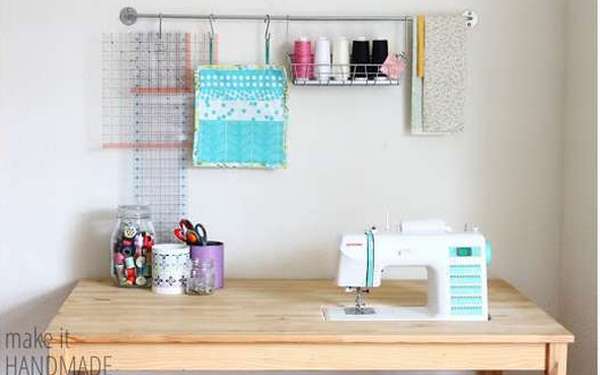
DIY sewing machine table
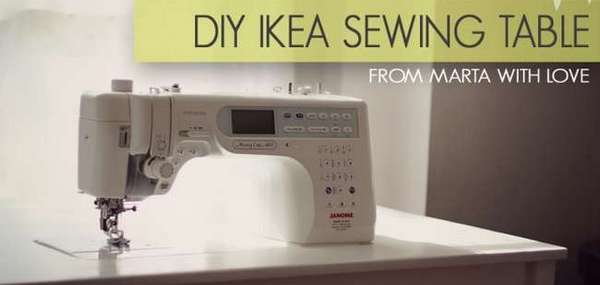 Here's how to do do-it-yourself sewing machine table from the dining table Ingo. It is much easier than you think! Just carefully review the step-by-step photos and, if necessary, read the instructions on the site, the link to which is under the gallery, to get a good idea of what you are going to do. It is sometimes easier to see photos in the later stages in order to understand the initial steps. If you bought Ingo's table, make sure it is fully assembled. Later you will need to remove the countertop, but you need a table fully assembled.
 Materials: Ikea INGO or another table with a bar under the countertop. It will be needed to attach the support beams that will hold the machine. You will also need two boards. One as a shelf, on which a machine will stand under a table, it should be at least 5 cm longer and wider than the machine. The second should be twice the width of the table.
- Put the sewing machine on the table and a suitable place for easy sewing. Draw the outline of the typewriter on the table.
- Carefully cut a hole along the lines. Walk slowly, especially in corners, to get beautifully rounded corners (if your sewing machine is at right angles, you need to cut a perfect rectangle).
- Now insert the clipper to make sure it fits snugly into the hole. If the shaft is a little narrow, sand the edges with sandpaper.
- After you have made the hole of the right size, smooth out all the edges, first with medium sandpaper, and then fine grain to make the surface smooth and flat.
- Then turn the table over and measure the distance between the front and rear tires. Saw into two parts of the same length as the distance between the crossbars and make sure they fit snugly between them. Screw the inserts to the bottom of the table using the Craig Jig jig.
- Identify the holes for the bolts that will hold the shelf with the sewing machine. Be careful not to mark too close to the front edge, leave at least 8 cm in front and back.
- Then unscrew the countertop; remove so far to the side. Drill 4 holes in the inserts. Insert the bolts, they should be flush with the top, but not protrude out of the countertop. Remove the bolts and set aside.
- Turn the table over and check how the shelf will stand.
- Now you can collect. First, insert the bolts into the holes that you made earlier.
- While holding the bolts in place so that they do not slip out, carefully turn the table back onto the countertop and fasten the parts.
- Finally, attach attach the shelf on which the machine will stand.
- After that, put the machine on the shelf and simply tighten or loosen the nuts until the machine stands tall, flush with the surface of the countertop. Pull the cords through the hole and put the machine back on the shelf.
- Connect the cords, turn on the machine, and check how it works.
It looks much better than plastic sewing tables. It is cheaper, and you have reason to be proud that you made this sewing table with your own hands.


https://i.expert-h.com/en/stol/985#sigFreeId922c366bae
Here are three more options. how to remake a regular table in a sewing.
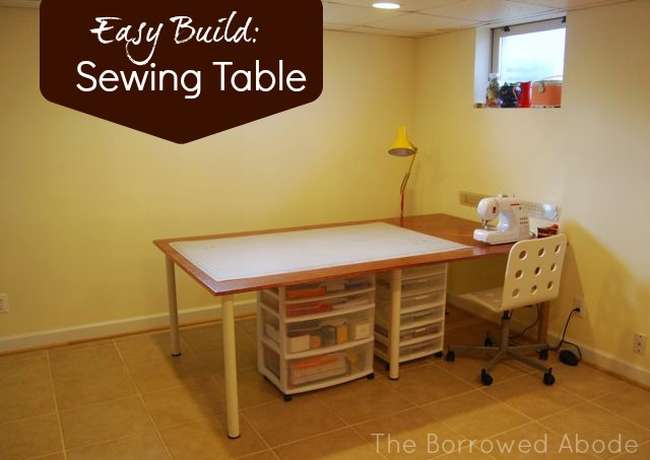
 To use a dining table for sewing, of course, is a way out, but you must admit that there are a lot of inconveniences. A specialized table is not cheap, it is much easier to remake an existing table in a sewing table. The task is not so difficult, to make a notch in the countertop, to install a sewing machine, plus think over drawers, shelves for placing sewing equipment, fix the wires, adjust the parameters for comfortable work. You see an example of such modernization in the photo.


https://i.expert-h.com/en/stol/985#sigFreeIdb41bcd08fa
Another example of a photo, if you need step-by-step instructions, under the photo there is a link to the site, there the process is described in great detail.


https://i.expert-h.com/en/stol/985#sigFreeId8bec946860
And the third example is how to make a modernized sewing table for comfortable work.


https://i.expert-h.com/en/stol/985#sigFreeIdca13aea0b0
 Simple sewing table
Of course, this is not just a board on legs, but to make such do-it-yourself sewing table really very simple. The size can be whatever you need. Surely, few people can afford a table size of 2 mx 1.5 m, and for good reason - most ordinary household garments can be sewn using a much smaller surface area. In general, it all depends on your needs. In this version of the sewing table there are no special devices, everything is simple, cheap and affordable. If you are interested, a few step by step photos in the gallery will help you in the manufacture.


https://i.expert-h.com/en/stol/985#sigFreeId3f55236eca
Sewing corner
 Sewing place from the cabinet
Equip sewing corner in the apartment, especially if it is small, the task is not easy, but feasible. Old furniture is quite suitable for this. For example, it shows how to make a convenient sewing table from an old cabinet with your own hands. If you have one, then the floor is already done. First, the cabinet will need to be disassembled.
Then one side must be sawn, it will be shelves, and from the second sidewall to make a countertop. Options with shelves can be different, if there is a lot of material, you can make a back wall. The main idea is a stand with shelves for sewing accessories and a side table for the sewing machine. The result you see in the photo.


https://i.expert-h.com/en/stol/985#sigFreeId3ddbf7a6f5
Here is another idea how to make a sewing corner for needlework from an old cabinet.


https://i.expert-h.com/en/stol/985#sigFreeId5237551cad
And this is an idea, how to make a sewing corner in the closet.
 Quite convenient, the whole problem is to find a table of suitable sizes or do it yourself.


https://i.expert-h.com/en/stol/985#sigFreeId3564a8e4af
 DIY sewing corner
For those who are engaged in sewing, needlework, and in general, arts and crafts, their place for work and creativity is simply necessary. The author planned and made this DIY sewing corner just for these purposes. This is the original design of the author, developed for your own needs, so the final dimensions you need to set yourself, depending on the size of the room and your needs.
 On the right in the photo is a drawing of the structure, you can use its basic model by resizing, but preserving the proportions. Briefly the manufacturing process. The first step is to make the main table. Then cut recesses at the corners of the countertop to secure the rear frame, and then attach it to the table. The next stage, the manufacture of racks with rungs for storing rolls with takany. One side should be open and the bottom board is shorter so that it is easy to unwind the rolls. Attach the stand with screws and angle brackets. Then we make a sliding table with shelves and fasten the wheels. That's basically it. More information is on the site, the link can be found under the gallery.


https://i.expert-h.com/en/stol/985#sigFreeIdfa5e413291
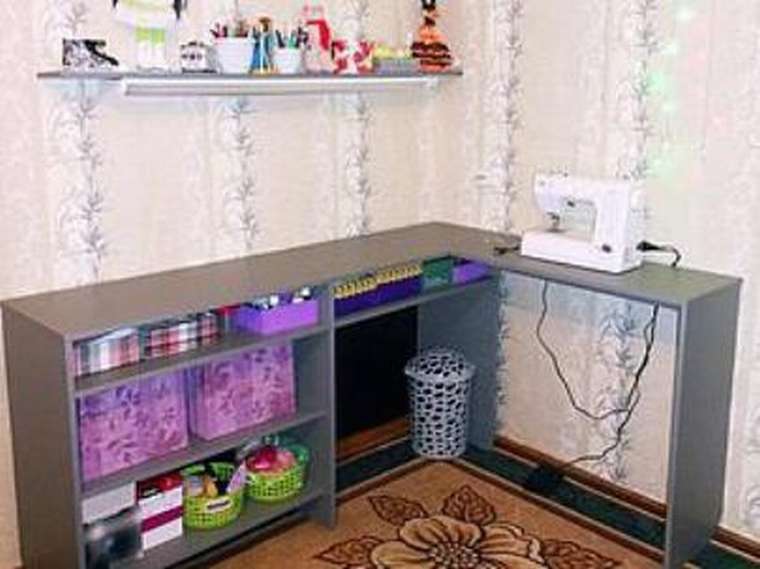
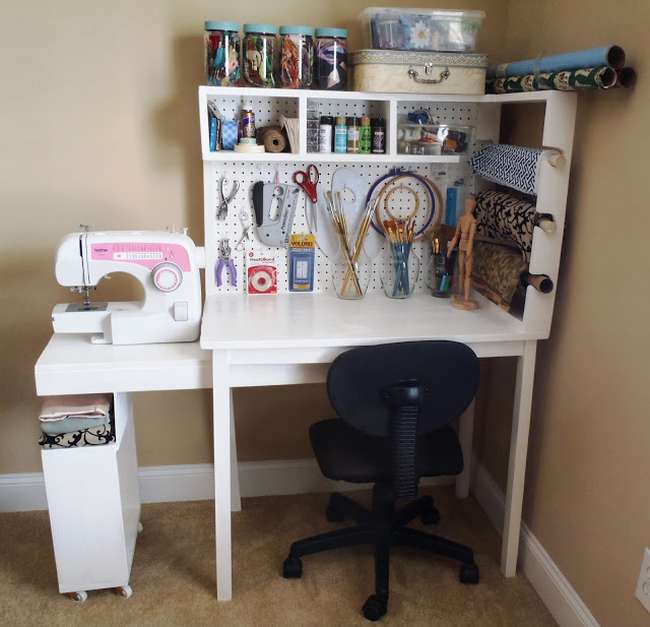
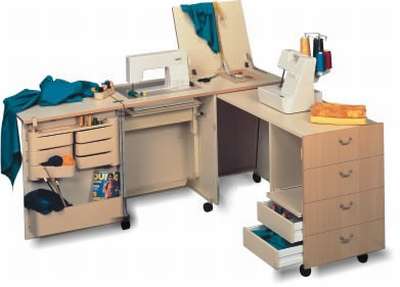
Table for sewing equipment
 There are no step-by-step photos, just a few examples are shown, how to make a table for a sewing machine, overlock and other sewing equipment with drawings of the main parts. Designs are different. For a small room, a folding table is ideal when you have to work with large volumes of fabric. In this regard, the book table is very popular when all sewing equipment can be cleaned in a special compartment. Corner tables are also very convenient, where a place will be provided for fabric, threads, accessories.
One part of the table can be made with a foldinga worktop to increase the working space if necessary, and to place various accessories, an iron and much more in another part. It will perfectly accommodate not only recordings with patterns or a laptop, but also an iron and much more. In general, there are so many different modifications, if you make a table with your own hands, you can add your ideas to the design development based on the models presented here.


https://i.expert-h.com/en/stol/985#sigFreeId2ba7ccae67
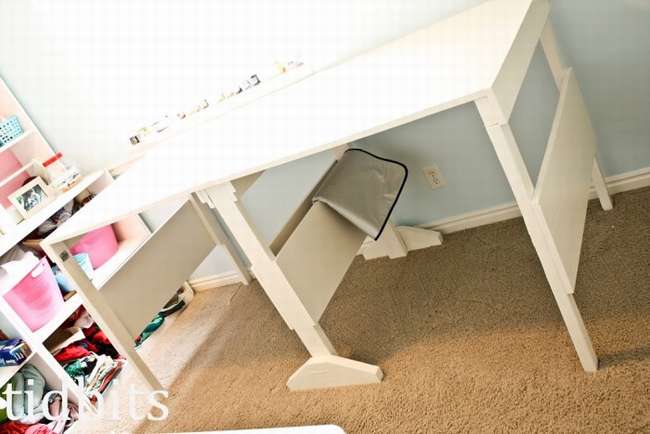
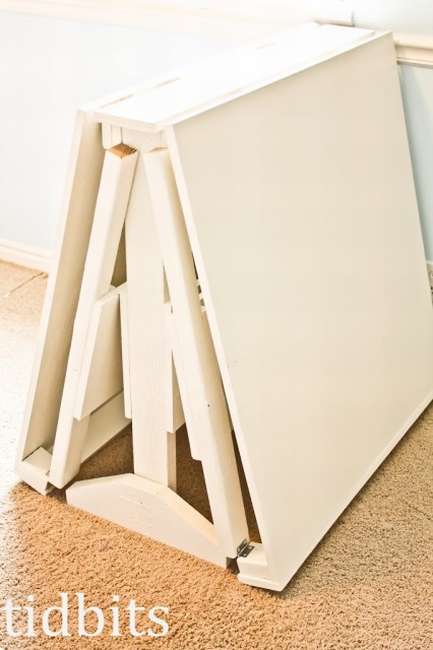
Folding sewing table
As mentioned above, 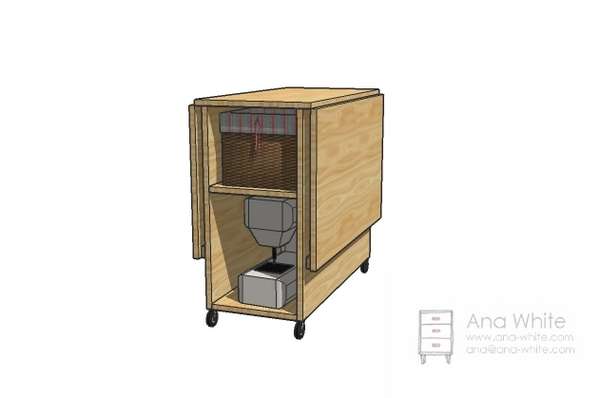 folding sewing table Ideal for a small room. Please note that this table is not designed to work with the sewing machine if the foot and tabletop lock is not installed. But this design is really very successful for the equipment of the seamstress workplace. There is a neat place to store the sewing machine, shelves for baskets and other accessories that are always at hand, and most importantly, all this can be folded and removed when work with the machine is finished. Below in the photo gallery with drawings and dimensions of the phased assembly of the sewing table.


https://i.expert-h.com/en/stol/985#sigFreeId0975b629dd
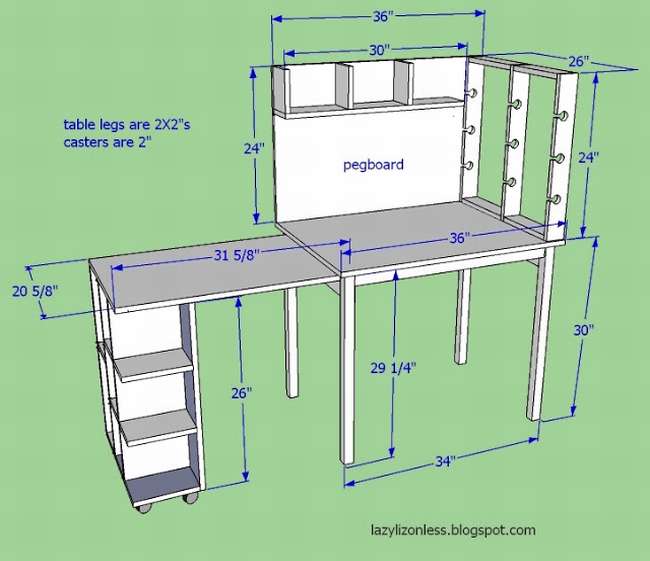
How to assemble a sewing table
 In this case, the word “assemble” is just right, since the sewing table is assembled from custom-made blanks. You can make a table from scratch, if you have your own workshop, the necessary equipment, and of course, experience. Only it will take much more time, and furniture accessories and other details will still have to be bought in the store. In general, if you liked this sewing table model, you can use the drawings presented here. Order wooden parts for these sizes, and to assemble, you do not need to be a great master. The table is very convenient in that it does not take up much space, when assembled, it is only 112.5x60.2x77, unfolded, a little more than two square meters. Adds space and a bedside table with a lid where the overlock is installed. Wheels are provided for convenient movement, and you can’t do without them, since the design is quite heavy, more than a hundred kilograms. Therefore, it is advisable to foresee in advance where the table will be installed so as not to move again.
Tools for assembling the table are required: a drill with M2, M6 drills, a file, a hacksaw, a 13 wrench. To assemble a bedside table: a drill with an M5 drill and a nozzle or a drill for confirmations, a key for confirmations, an awl.
 I would like to note that for fixing chipboards, it is best to use confirmations, as the people call it, Euroscrews, the correct name is a single-element screed, and not ordinary screws. Use a special drill to drill holes for confirmations.
If the material is ready and all the tools are available, the assembly of the structure should take 3 hours, no more. The assembly order is well shown in the detailed step-by-step photos in the gallery, instructions can be read on the website, the link is under the photos.
A few notes:
- The wheels must be installed in such a position that when cornering they protrude beyond the dimensions.
- When drilling holes in the ends, use a conventional M5 drill
- The hinged cover can be fixed in two ways: on two U-shaped slats or rings fixed on the inside of the door.


https://i.expert-h.com/en/stol/985#sigFreeId8e8de7825a
DIY sewing table
If you are looking for simple solutions, then this is a good idea. Two cupboards with cells, where you can put a whole bunch of sewing accessories and they have a large countertop.
Enough space for a sewing machine and for cutting fabrics. You will need 1 sheet of MDF or plywood, boards for rungs and drawers, screws, sandpaper, saw, pencil, tape measure. Dimensions are shown in the drawings in the photo gallery, there is also the assembly order in the diagrams. Do not use glue. This will allow you to easily disassemble the table if necessary. If you want, you can add equipment to the edges of the boxes.


https://i.expert-h.com/en/stol/985#sigFreeIdeb012a3a7a
Cutting table
 Sewing cutting table
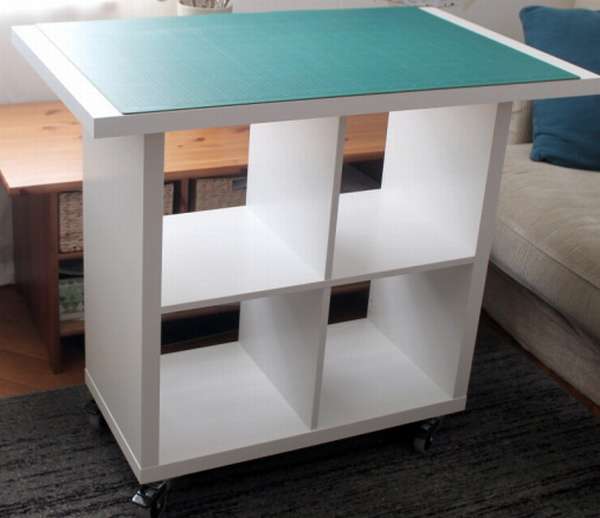
Here's how to do DIY cutting table from parts of Ikea. What was the author’s idea? A cutting table was needed: large enough to accommodate a 90x60 cm cutting mat, mobile so that it could be used in a limited space, and there was access from all sides, with a convenient working height.
What happened, you can see in the photo. First, according to the instructions, you need to assemble the shelves, it's simple. To install the countertop, you need to drill four holes for the screws. Mark where the screws should be installed, namely 8 cm on the short side and 2.5 cm on the long side. Then lay the countertop on the floor and use a ruler to mark the attachment points. Now put it all together and finally screw the wheels. The finished table has a working height of about 90 cm, the best option for a person of average height. which is very gentle on the back and enjoyable. Now you have a great sewing cutting table.


https://i.expert-h.com/en/stol/985#sigFreeIdebff230b12
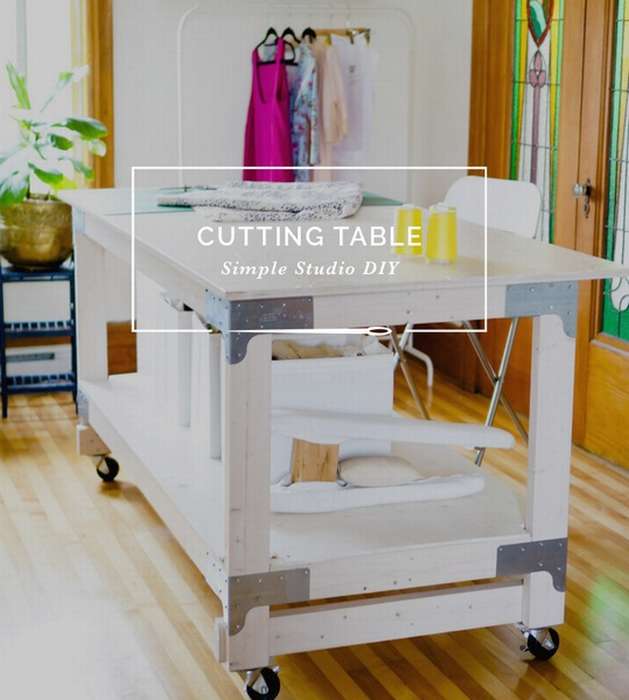 DIY cutting table
Here is one of the easiest and cheapest ways to make mobile, durable. do-it-yourself cutting table in one evening, at least according to the author. If you often sew, you know how important it is to have a well-designed and organized workplace. For most people, a comfortable working height of 90 cm, although you can adjust the height lower or higher, as you prefer. Just keep in mind that 90 cm and 110 cm, this is the optimal size, if you deviate too much, it will not work comfortably. The great thing is that manufacturing will require a minimum of cost. Here is a table with a width of 90 cm and a length of 180 cm. If you want something smaller, you have to determine the dimensions yourself.
Here is what you need:
- electric drill with a drill,
- electric grinder, although you can use sandpaper,
- level
- measuring tape
- hacksaws
From materials: one sheet of plywood 90x180 for countertops and long bars that will need to be cut to appropriate sizes. 4 will go to the legs, 6 long to the crossbars and 2 to provide additional horizontal support for the wheels.
After you have prepared everything, start by polishing all the details. If you do this at home, try to isolate one room, because dust will be EVERYWHERE! It is necessary to clean the surface to get rid of any fragments and roughness, but without fanaticism, absolutely smooth surfaces do not exist. Then wipe the wood with a slightly damp cloth to remove dust. After it dries, you can start painting. Apply at least three layers. You should read the step-by-step instructions for assembling the cutting table on the source site, the link is under the gallery, where the author describes the process in great detail, with additions and comments, so it will be informative.


https://i.expert-h.com/en/stol/985#sigFreeIdda05e504d5
Folding table
 It is large, sturdy, comfortable and portable cutting table made by hand. Ideal for a small apartment, as it can be used only when necessary, when not needed, the table folds easily and stands peacefully in the corner, not occupying space. If you know how to work with a saw, then easily make this completely complex construction with your own hands.
 Just use the plans below as a guide. So, how to make a folding cutting table with your own hands. We will need plywood, boards, dowels, door hinges, glue, nails and screws. Saw materials according to the dimensions indicated on the drawings. Tapering is optional; it is purely for aesthetics. The dowel for the cover of the central box, you will only need two 5-cm parts. Install the legs, connect them with jumpers along the countertop and put the third crossbar along the bottom to form a box. Attach the tabletop to the top of the center of the foot with hinges and dowels. As a result, the folded up table should look like in the photo.


https://i.expert-h.com/en/stol/985#sigFreeId14b9b1c874
 Folding sewing table
Even if you do not often use your sewing machine to sew fabric napkins or to sew curtains, it is still not very convenient when it is dusted on the floor in the pantry and periodically you have to pull it out and put it on the dining table. Although this is also an outlet for a small apartment, it’s much more convenient to equip a permanent place, for which it’s suitable folding sewing table, which can be done with your own hands. The author offers this option, as you see in the photo. To do this, you will need two 90 × 50 cm chipboard plates 2.5 cm thick and three 10 × 50 cm boards. Four metal pins 70 cm high, an electric drill, screws and a paint spray. Saw off the boards that make up the top and bottom of the table to the size you need
Use glue and clamps to assemble the countertop. Then clean and color the legs. If you bought new ones, you probably won't have to clean or paint them. Attach the legs to the countertop using drspruce and wood screws. Sand and paint the countertop. It took the author several hours, including the drying time of the glue and paint. As you can see, everything is very simple.


https://i.expert-h.com/en/stol/985#sigFreeIdc1e015a2d7
Folding table for sewing machine
 Of course, you can sew on the dining table, if only you carefully wipe it from the remnants of food, but after all, anyway, some greasy speck will remain. Are you tired of trying to sew on the coffee table? If this is a real scenario from your life, then you urgently need a workplace and this folding table for sewing machine perfect for you. What? Do not want to spend a lot of money, and you do not have carpentry experience? Fine. Then this option is for you. It uses the old Ikea Expedit shelving as a table that will fit the cabinet. In principle, any old furniture can be used. In addition, you will need a countertop, dowels, screws, door hinges, you can also remove the old door, primer, paint.
Firstly, you must make sure that the countertop is well-sized and conveniently reclines into a cupboard. Next we fix the leg. Then we fasten the hinges to the table. You need two people to help you attach the countertop. You just need it to be stable during fastening. Drill a small hole at the top edge of the table and screw in the hook. Then tilt the countertop against the wall and try how it holds.


https://i.expert-h.com/en/stol/985#sigFreeId69b11448b9
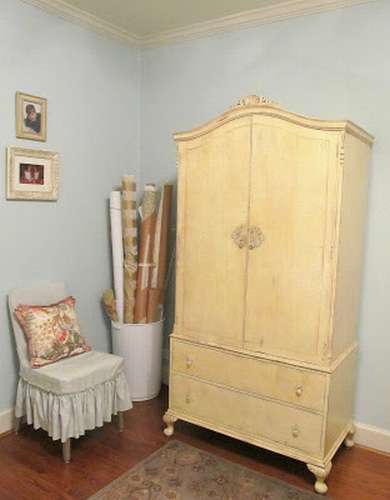
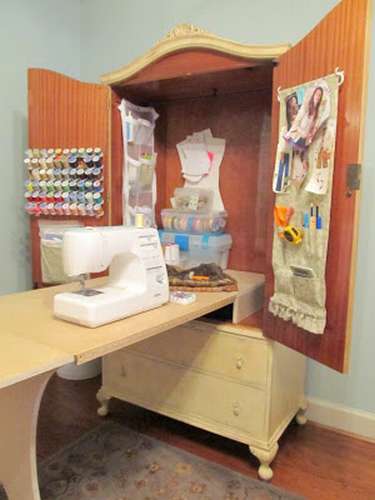
How to make a new base for an old sewing machine
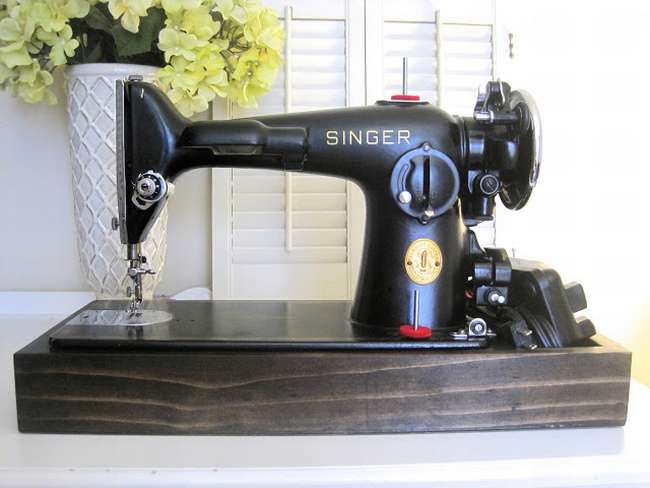 Most likely, if you have an old sewing machine, then the base looks something like the one in the picture. But it can be fixed and make a new box under the base, and a much better, enhanced version. The author is sure that the option proposed here for the Singer 201-2 is suitable for other brands or models, but you can make your own measurements according to your machine. Just compare angle brackets by thickness, etc. old base versus new base.
Here are the materials the author used: 5mm plywood for the bottom of the base, pine boards for the sides and trim for curly corners.
- It is necessary to saw off all parts in size, glue and clamp with clamps.
- Drill holes for the screws, tighten them so that they are “recessed” in the tree, use nails and glue to fix the plywood.
- Then gently glue the pieces and set in each corner.
- Use wood filler in the holes for screws, cracks and gaps.
- Sand the details to perfection.
- Make holes for the hinges.
- Cut a notch for the loop.
The author used hinges from the old base and bought equipment for a tab that holds the machine attached to the base. Then paint and lay a polyurethane layer. The machine easily swivels for cleaning. The base also mutes the sound of gears when the machine is running.


https://i.expert-h.com/en/stol/985#sigFreeId9cc4b09005
DIY ironing table
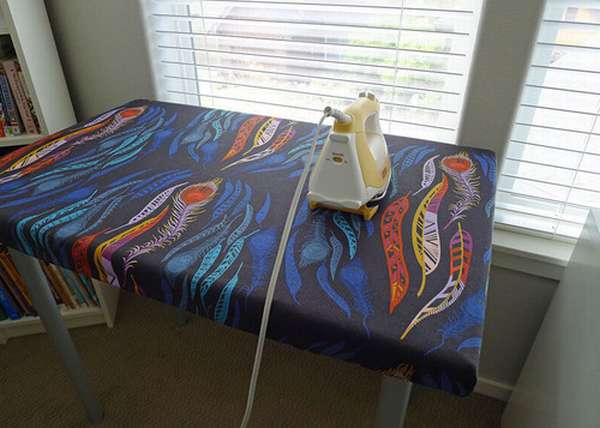 This table is wider and more durable than an ironing board. If you often have to steam things, then you’ll understand what the difference is. So how to do it.
Step One: Make the table itself. In this case, the design is an inexpensive IKEA countertop with adjustable legs. This is the base, but a normal surface cannot withstand prolonged exposure to steam, so it should be covered with something more substantial. The author used a sheet of plywood of the same size, a hundred and a countertop. Some comments: even with an additional plywood coating, the table may be damaged after some time. Nevertheless, plywood is quite solid, and this should not violate the function of the pressure board.
Step two: select material for the top cover. The author used low batting, which allows the steam to circulate and, much better, special insulation materials such as Brite insul. If you plan to wash the removable cover, make sure the fabrics are of good quality. It is recommended to use cotton fabrics. The amount of batting and fabric you will need will be calculated based on the measurements of your table. You can find detailed step-by-step instructions on the website of the source, the link can be found under the gallery.


https://i.expert-h.com/en/stol/985#sigFreeIda0a540fd4f
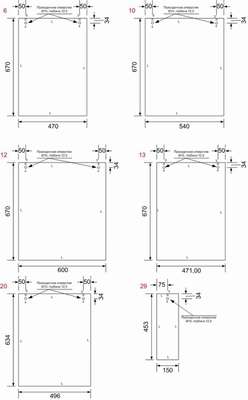
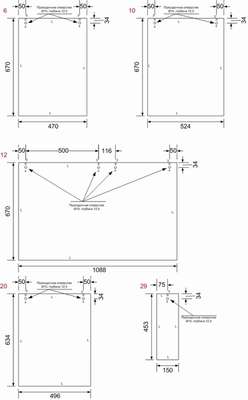
Sewing table drawings


https://i.expert-h.com/en/stol/985#sigFreeIddb2acfb53d
DIY sewing table 150 photos


https://i.expert-h.com/en/stol/985#sigFreeId753b6b5331
Hello, I am the author of this article, so I look forward to asking questions for this article in the comments below, I will answer all !!!
If you have questions on another topic, ask them on our forum, we will answer you
- Two baskets of paper in 5 minutes (Master class)
- How to make a simple and compact table for a milling cutter from plywood
- How to make a soft headboard tile (InsTraction + step by step photos)
- Cinder block benches: a convenient bench in 55 minutes
- How to make a bed with a niche: saving space (Master class)