DIY folding table 1000 photos, drawings, instructions
 folding picnic table
Usually an idea do-it-yourself folding table for home use does not come from a good life, but from the desire to optimize the space. Of course, another thing folding picnic tables or folding table for givingthat are needed for a comfortable pastime in nature. For them, the main requirement is ease of transportation.
Article menu:
In general, there are a lot of options for folding tables, in this article several dozen home-made designs are presented for different occasions. Folding, folding, for the house, summer houses on the veranda and portable for outdoor recreation. All presented folding tables are made by hand. How exactly, look at the drawings and step-by-step photos that the authors posted on the Internet.
How to make a folding table with your own hands
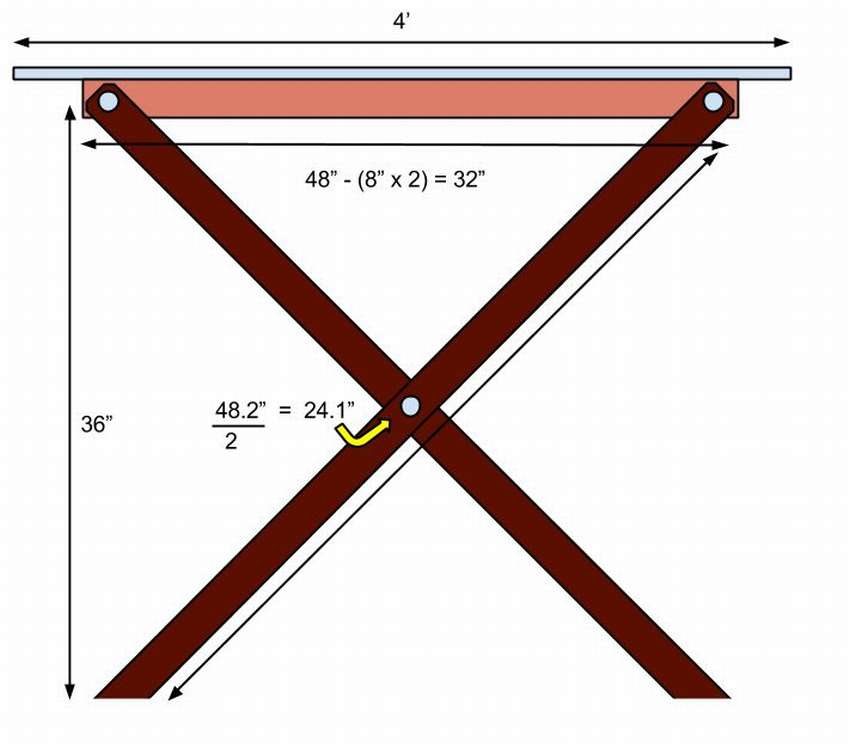
The table in the photo, of course, does not look like the usual models of quite common folding tables that can be found in furniture stores, although the design resembles a popular table-book. In this case, the countertop is made of a solid array and as you can see in the photo, the table is folded in a different way. In fact, the design is not complicated, do-it-yourself folding table is relatively easy, most importantly, find beautiful natural wood for the top. You will need wooden blocks:
- 8 meters 4.5 cm x 4.5 cm
- 10 meters 2 cm x 2 cm
As well as:
- 2 meter board 30 mm x 2000 mm x 36 ~ 40 cm
- 6 hinges
- Wood glue
- Screws
The step-by-step photos below show diagrams of the phased assembly process with arrows and sizes, so it’s not difficult to figure it out.


https://i.expert-h.com/en/stol/skladnoj-stol-svoimi-rukami-1000-foto-chertezhi-instruktsii#sigFreeIddb21bfb25b
 Do-it-yourself folding table made of wood
The idea of the author, make a folding table do-it-yourself wood 90 x180 in size and so that outwardly it was not noticeable that the table is folding. If you don't mind the seam, you can make traditional straight boards. This will simplify and speed up the process.
Materials:
- polished plywood;
- pine boards;
- door hinges
- bolts
- square tube.
- The first thing to do is cut the plywood base 90x90 cm in size. But laying out the pattern, you will have a tiny triangle at the bottom, so the author reduced the length by 2.5 cm to eliminate this triangle. Thus, the dimensions of the base will be 90x88 cm. In the middle of each plywood base, draw a line (parallel to the side of 90 cm), it will be a guide for installing the pattern for a folding table.
- Then draw a line at an angle of 45 ° from the middle. Measure the longest board and add 5 cm to each measurement for the overhang. Repeat and measure each board using the first board as a template.
Lay them out at an angle of 45 ° to the panel. Make sure everyone fits well.For the bottom boards, you need to draw a line through which they should not go, and cut them. - If you have a lot of wood, everything can be done much faster. Choose the longest board, add a couple of centimeters and saw off the remaining pieces along this length. Cut each at an angle of 45 °, spread them along the guide. Then measure and cut the lower parts. Then glue the boards to the plywood. Let the glue dry completely. Flip and push the boards down. Cut off the excess boards with a saw to get a neat straight line.
When framing the top, use the Kreg jig junction box to attach the frame to the countertop. - The most difficult part when making a folding table with your own hands is installing a hinge, you need to make sure that the table is stable when unfolded. For this, the author chose a metal tube. First you need to cut four 2x2 bars for the center of the table. Measure the distance between the frame and the cut. Make 3 cutouts for the tube. Indicate the tube width at each mark. Make small cutouts inside the marks.
- For installation, use the mounting holes at each end of the cross-pieces to lock to the edges of the frame.
- The metal tube should be short enough, but at the same time, so that it does not slip out and does not move. Measure from the bottom of the frame to the center of the table and subtract 5 cm. Inches. Cut and paste before attaching the external cross pieces.
- Check the hinge and make sure it folds properly. Then put it on the central jumpers.
- To fix the legs in place, screw the hinges as shown in the photo.


https://i.expert-h.com/en/stol/skladnoj-stol-svoimi-rukami-1000-foto-chertezhi-instruktsii#sigFreeIdc8eaaff6b2
DIY folding table for a small room
 The circumstances are different, for a small room the author suggests making very do-it-yourself convenient folding tablewhich can serve as a kitchen or work desk. The assembly process and the amateur drawing are shown in step-by-step photos, but in short, the procedure is as follows:
- Saw the plate of the right size (what you will use, fiberboard, chipboard, MDF or natural boards, it is not so important), sand and paint.
- Attach the bracket for the folding shelf, for which screw the two brackets with 2 cm screws
- Place the sheet on the brackets, align and lock.
- Cut the film to fit the sheet.
- Put the film on a sheet and fix it on the corners with tape.
- Secure the plastic with staples.
- Set your legs.


https://i.expert-h.com/en/stol/skladnoj-stol-svoimi-rukami-1000-foto-chertezhi-instruktsii#sigFreeId0fa56dfcc8
 Folding coffee table
Shown here how to make a folding coffee tablewhich can be easily folded and removed when not needed. At first glance, the folding legs system looks complicated, but all this can really be done. Start manufacturing by creating a frame that will support the countertop, the photo shows how to make a cross-shaped design.
- Now we need to make large and small supports. For large, you need to cut out 8 bars 60 cm long. In the middle, drill a hole and round it, as shown in the figure. The other end of the support will abut against the floor, so these ends must be cut at an angle of 35 °.
- Then we make small supports. Again we take 8 bars, only 30 cm long. Drill holes in the center, from each end. Connect 2 pieces to 1 piece of a round part, 8 cm long, and insert into the slots on the x-shaped frame.
- Connect all the supports as shown in the photo with large bolts.
- Rotate the circular ends of the large supports connected in the center of the x-frame, mounted in small sliding supports.
- Finally, assemble all the parts.
- To make the table more durable, you can add jumpers between the supports.


https://i.expert-h.com/en/stol/skladnoj-stol-svoimi-rukami-1000-foto-chertezhi-instruktsii#sigFreeId7a9c5b63eb
 Folding desk
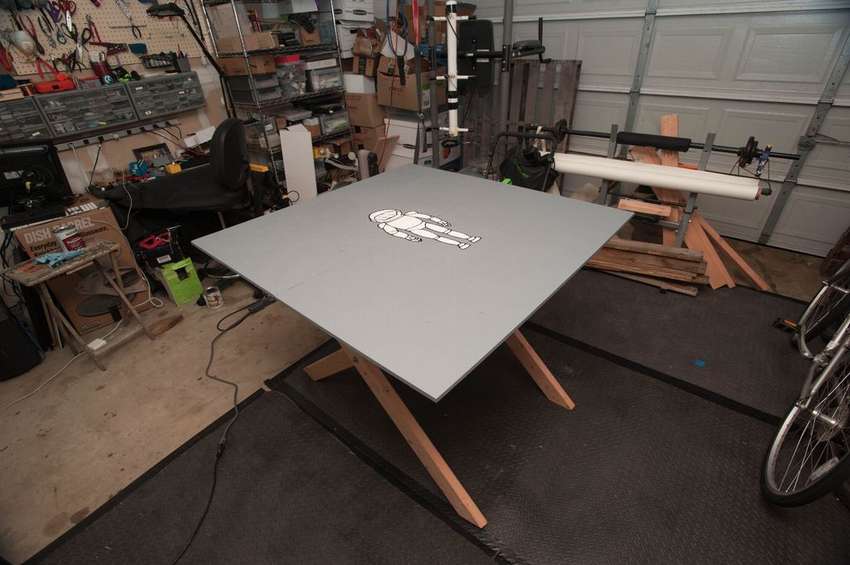
Step by step photo instruction, how to make a simple folding table for a summer residence. A bit like a large TV stand, but sturdy and reliable. Can be used as a desktop or laid out on the street for a family dinner. When not in use, it can be easily folded and put away in a secluded place. Materials and assembly are very simple and cost essentially a penny. The author also added a painted logo and base layer to protect the tree.At the expense of the logo, this, of course, is at your discretion, although in my opinion it looks nice.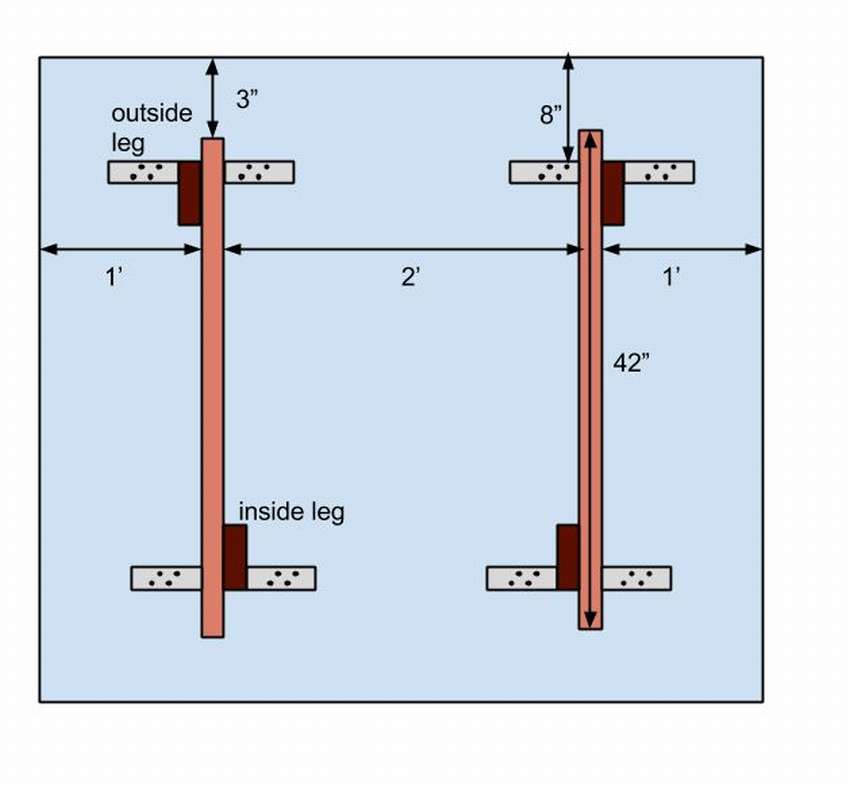
Another author added handle on the undersideto make it easier to carry. Also on the one hand, between the legs, you can install another crossbar, like a foot about 15 cm from the ground for a high chair. With the help of wing nuts, it is easy to remove the supports of the transverse beam, fold the table and remove it. As you can see in the photo, the table space is enough for many useful things.


https://i.expert-h.com/en/stol/skladnoj-stol-svoimi-rukami-1000-foto-chertezhi-instruktsii#sigFreeIdc17608c7fc
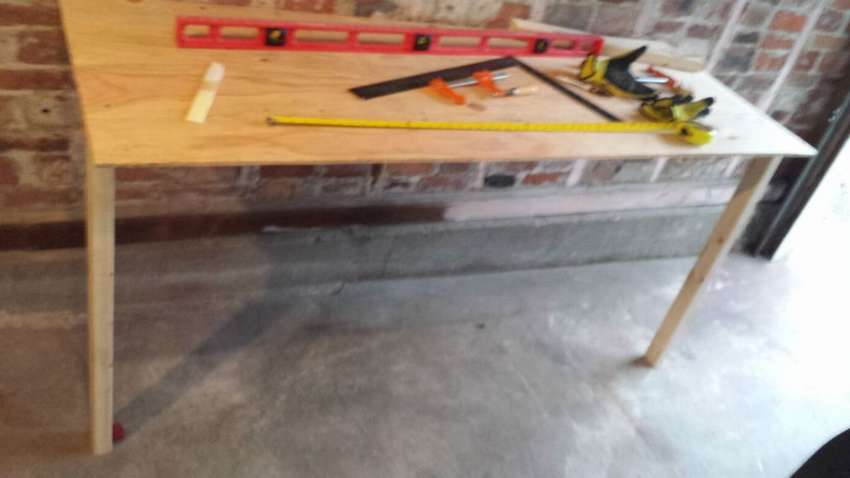
Simple folding tablethat does not take up too much space and can perform a variety of functions, from a dining table to a small workbench in the garage


https://i.expert-h.com/en/stol/skladnoj-stol-svoimi-rukami-1000-foto-chertezhi-instruktsii#sigFreeIda118974a34
Wardrobe with a folding table
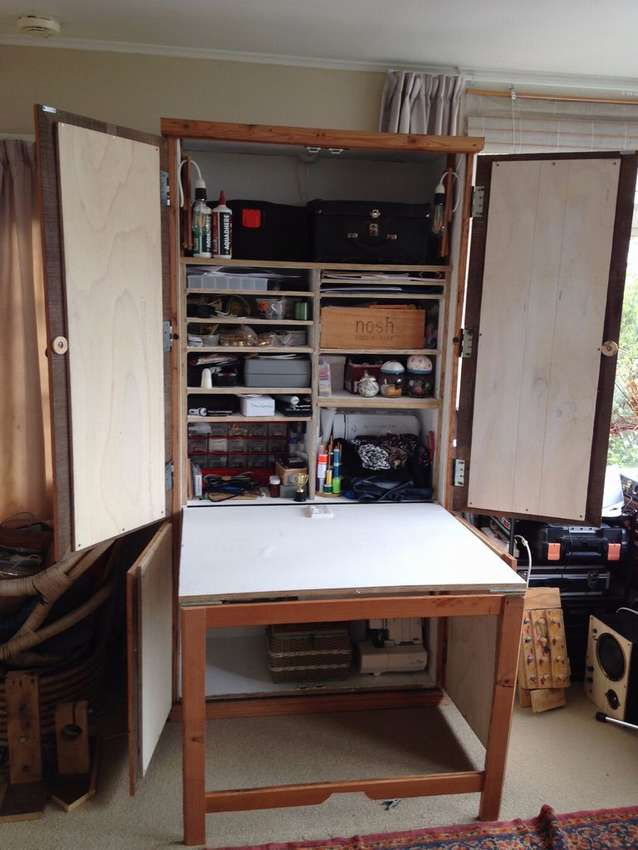
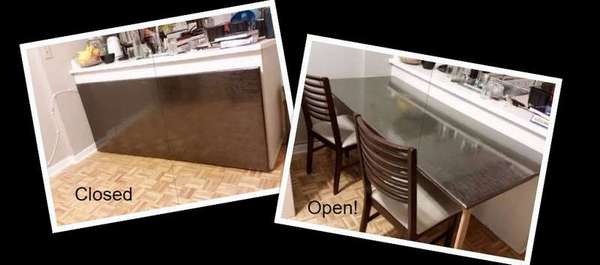
 Idea make a wardrobe with a folding table lies in the fact that everything can be hastily pushed back into the closet, the table folded, and the doors closed. No matter how dirty it is inside, it does not matter, because on the outside everything will look neat. (Perhaps a metaphor for how we live wrong?) Before you start doing anything, find out all the details. How big a table you want, what a cabinet design should be. It is important to determine the height, because the cabinet should be at least the height of the table, as well as its length, when one hundred will be folded. The width of the table will also be the minimum width of the cabinet, and you will need small gaps. The assembly order is shown in step-by-step photos, you can figure it out if something is not clear, there is a link to the site under the gallery on the site, the step-by-step instructions are written there in quite some detail, so I won’t post it here.
One caveat is cabinet lighting with folding table. Posting in these photos may vary for different countries, as the author himself is from Australia. Mainly due to different sockets and brand of connectors. You need to deal with the types of plugs, fixtures and cables that you will use.
- First, make sure everything is completely off!
- Keep in mind that 220 volts of electricity can kill. If you do not know what you are doing, contact a specialist.
- Cut a hole in the back of the cabinet and install the power supply in the folding table.
- In the power socket, which the author used, there were two connectors and three switches. Middle switch for lights.
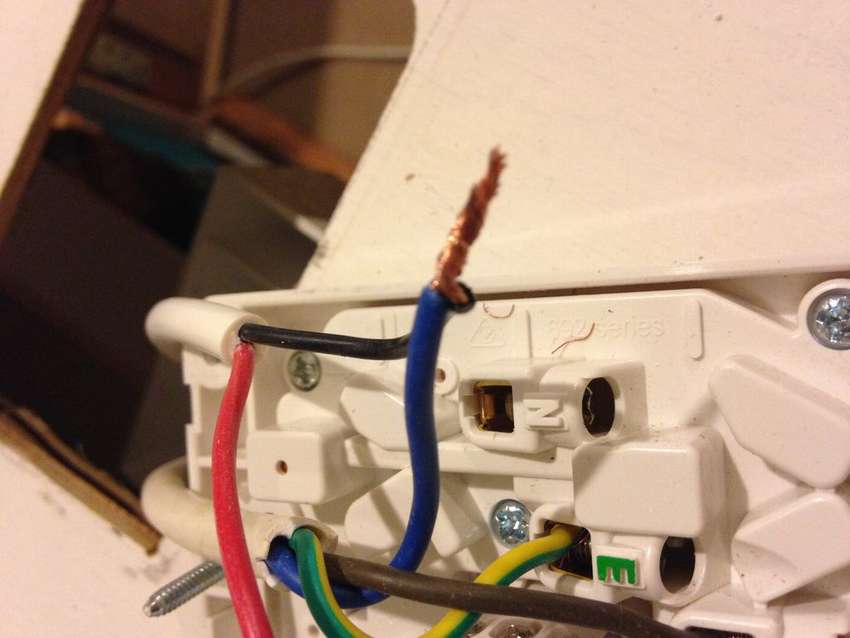 The photo shows how to connect the plugs: green wire - ground, blue negative and brown positive. On cheaper cables, they can be of a different color, all this must be checked with special devices. If you incorrectly connect the mass, you can turn on something simple, like a sewing machine, and get a shock from the needle.
It is also important to choose the cable that best suits your needs. It is important to tighten the wires well and tightly if you do not want the lamp to fall and leave bare wires.


https://i.expert-h.com/en/stol/skladnoj-stol-svoimi-rukami-1000-foto-chertezhi-instruktsii#sigFreeId62ed847afe
Folding table
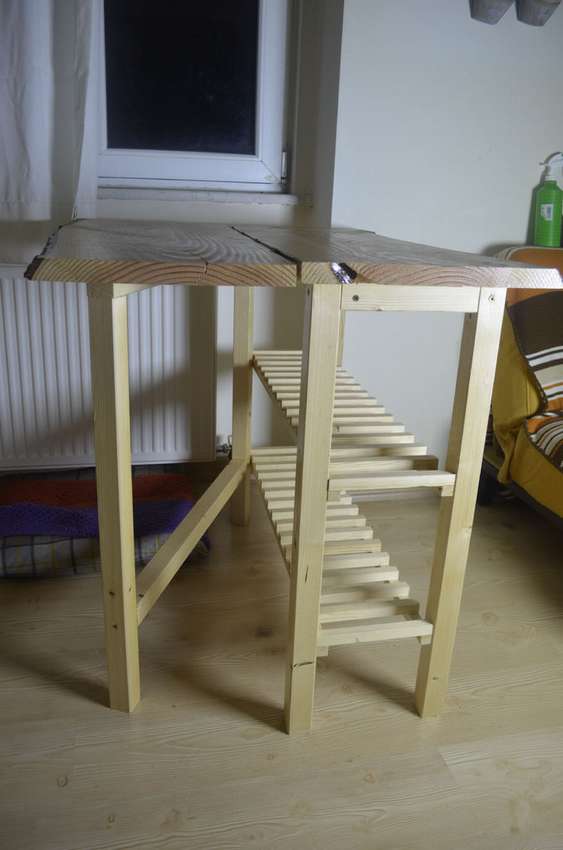
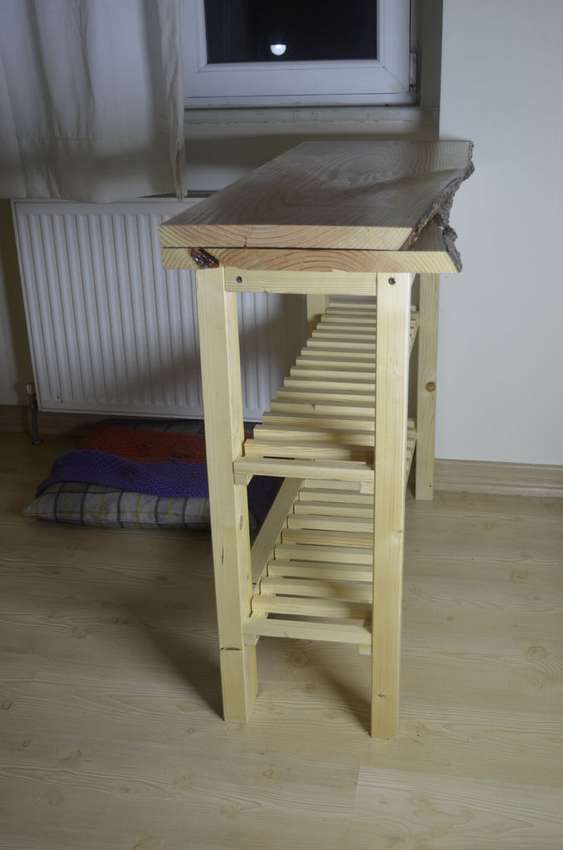
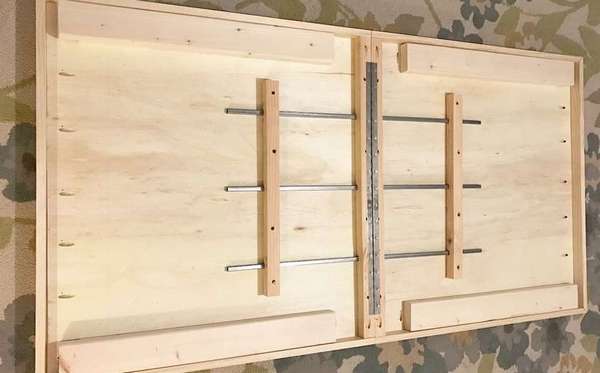
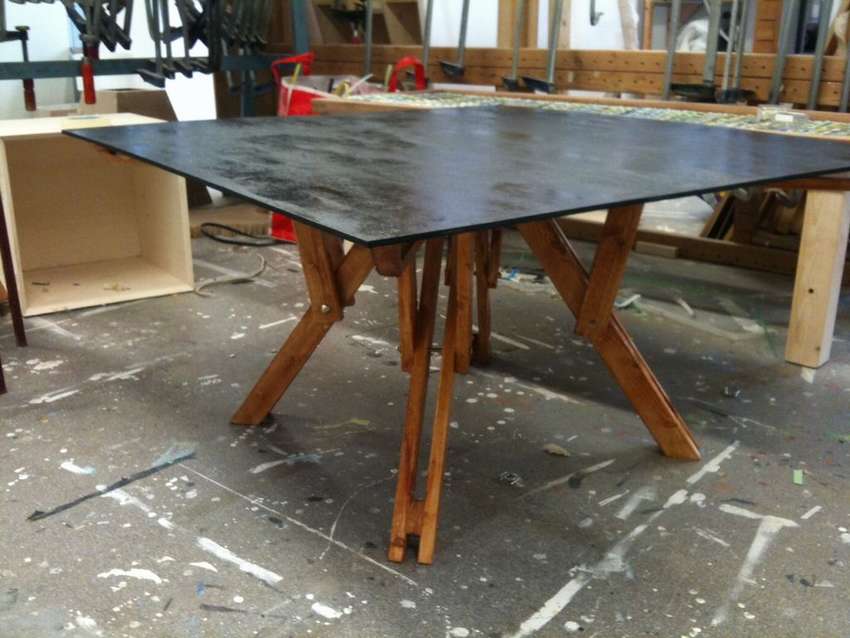
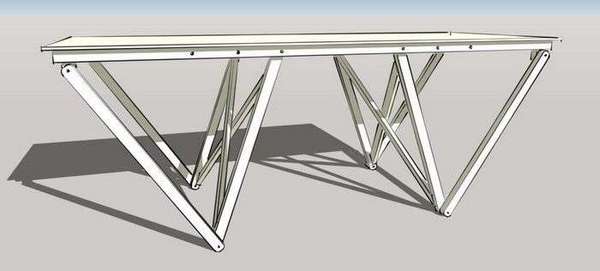 Theoretically, you can buy everything, but sometimes it is very difficult to find what you need so that you are completely satisfied. This is exactly the case when the author needed three stable folding desktops for needlework. According to his idea, they should have been light enough to be able to be transferred to another room and at the same time strong enough. With a sufficiently large size, this project can be called a budget option, because the costs are not so great. The second photo shows a sketch that is necessary to determine the correct calculations for a height of about 78-82 cm. The structure should consist of several triangles, so that the table is very strong and stable. Classic legs are not suitable for this design. In addition, the connecting leg holes will vary by a few centimeters the height of the table.
- The countertop is made of MDF, which may not be the best material for the desktop, but it is cheap and ideal for painting. For other parts, any wood suitable for size 20x40 or 30x40mm is suitable, the author used both sizes, thinner for surface reinforcement and crossed brackets, and more for legs and single brackets. Then you need bolts of the nut and washer - twelve long bolts of 7-8 cm with 8 mm thread. Plus 10 large washers and 10 smaller ones, 8 self-locking nuts and four butterfly nuts.
- The MDF layer is heavy, but not very hard, and to save money and weight, you can use a thickness of 10 mm instead of 20 mm. You just need to glue them in the correct position, fix them with nails and add a bunch of screws on top, before the glue dries. From the pieces of bars, make rods of 8.5 cm and drill 8 mm holes, as shown in the figure, then you need to glue and screw them in the four corners.
- Legs. Saw four 30x40 rods into pieces of 85 and 80 cm, and then make 8 mm holes of 18 mm at both ends and at the edges, as in the picture.
It's time to do the leg mounts. To be sure that they are perpendicular and with perfect dimensions, you can use the reinforcement template as a container. Install two large washers on each side, between the frame and the legs, and then install in the position through the legs one 20x40 strut, mark the diagonal ends and cut. Now you have the exact shape for all diagonals. Glue the parts to the floor with a press and wait a while, say, 10-20 minutes. - After this time, very carefully drill holes and tighten the screws on each connection. Add a couple of screws in the center of the X diagonals, one screw for each side.
- In order to drill the side holes where the moving part of the legs will be attached, a mold can be made. This will help make straight holes by hand more accurately and faster.
- The connection of the parts. Insert the bolts, place the large washers between the wooden blocks and the small ones in front of the locking washers.
If everything is ready, you can start painting. - As you can see in the last figures, changing the connecting holes allows you to change the geometry, style and height of the working folding table from about 77 to 82 cm. If you want, you can test new configurations by adding more holes.


https://i.expert-h.com/en/stol/skladnoj-stol-svoimi-rukami-1000-foto-chertezhi-instruktsii#sigFreeId26e5641c3e
Folding dining table
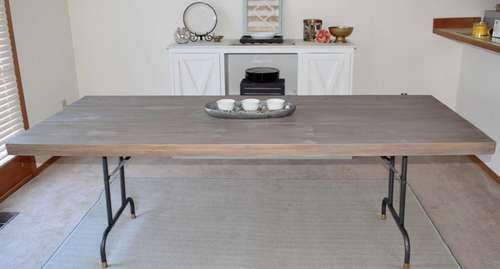 The analogue on which this folding dining table is made costs $ 2,000, you can see for yourself by looking at the offers of stores on the Internet. The author decided to make something similar, but for a much smaller amount! Well, if you believe him, the option in the photo cost only $ 45! Your cost will depend on what materials you already have. Even if you are a beginner, this do-it-yourself folding dining table. In principle, you will only need to assemble the structure, and buy the main parts separately. In general, start by looking for countertops, you can take it from an old table or buy cheap boards. A step-by-step process is shown in the photo, if you are interested in step-by-step instructions, you can read on the site.


https://i.expert-h.com/en/stol/skladnoj-stol-svoimi-rukami-1000-foto-chertezhi-instruktsii#sigFreeIde9d59bbac5
 Folding table on casters
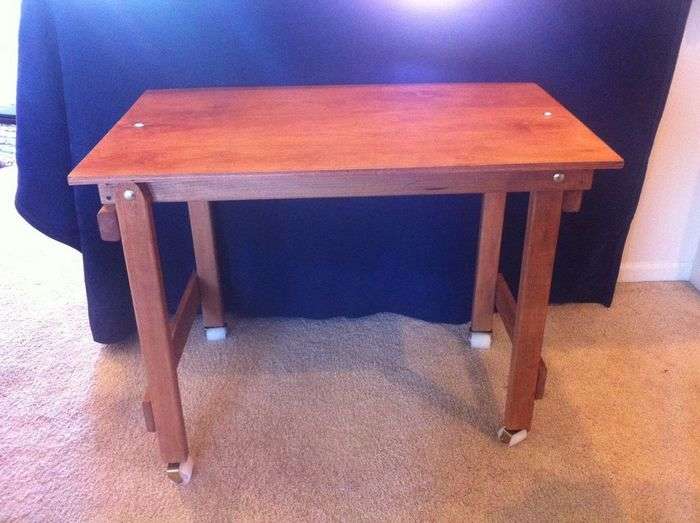
This option folding table on casters can be called a magazine, but the author used it to work with a laptop. The assembly order is well shown in step-by-step photos, you just need to take into account some nuances. Note that the author used two layers to create the vertex. The goal is to make rigid threaded joints between base plates and cheap plywood. Make sure the legs have room for articulation and note that one set is installed on the inside of the base and the other on the outside. Also note that one end of each leg needs to be sanded to make a clearance for rotation. Each leg must be secured with one bolt, one washer and one nut. Tighten the nut well enough to engage the lock washer. Make sure your feet are upright before screwing them into place. The roller nest is made to move heavy objects, so they have a low profile and smooth surface, can slide if they do not roll under weight, in general, they are ideal for this design.
Keep in mind that the rollers will add 6 cm to the height of the table so that you can fold the legs to this length. The latest photos show how you can raise this or another table to work with the laptop while standing.


https://i.expert-h.com/en/stol/skladnoj-stol-svoimi-rukami-1000-foto-chertezhi-instruktsii#sigFreeIdbd4259404b
 Portable folding table
A very convenient option, you can do this do-it-yourself portable folding table in a couple of hours. The size of each of these two parts is determined by the size of the finished table. It is important to install the hinges correctly, leaving enough space between the halves of the countertop. space between frames. Legs can be bought ready-made at the store.Pay attention to the position of the leg supports, which are folded using a metal lock. You can also buy a carrying handle, this is not a problem. The surface material of the table can be as beautiful or cheap as you want. The author used several sheets of cardboard glued together with contact cement and coated with fabric or vinyl.
Materials you will need:
- bars for the frame;
- plywood;
- foot supports;
- legs
- 2-door hinges or large hinge;
- a pen;
- about 50 screws of various lengths
- table top: masonite, plastic, vinyl or ???


https://i.expert-h.com/en/stol/skladnoj-stol-svoimi-rukami-1000-foto-chertezhi-instruktsii#sigFreeIdbe2c1adf2c
How to make a light folding table with your own hands
 Light tables are ideally suited for accurate and quick copying of drawings, contours, sketches. Anyway, the thing is very useful, who was engaged in copying over glass between two chairs and a table lamp on the floor, understands what is at stake. That's just for other functions, such a table is not very suitable, so of course it is more convenient to make it folding so that you can remove it when it is not necessary. It’s just shown here how to make a light folding table with your own hands, It is not so difficult. See the manufacturing process in the photo in the gallery, and step-by-step instructions can be read on the website, the link is under the photo.
Materials and tools you need:
- folding table
- small lamp holder
- plexiglass sheet
- wire fasteners
- wood glue
- four sturdy wooden sticks 6 cm
- stationery knife
- screwdriver
- pliers
- ruler
- pencil
- jigsaw
- electric drill


https://i.expert-h.com/en/stol/skladnoj-stol-svoimi-rukami-1000-foto-chertezhi-instruktsii#sigFreeIdf5c849d2e6
 Small folding table
First, the author had the idea of making a small coffee table. But in the manufacturing process, it turned out that he could have many appointments. This small folding table it can be, for example, a desk for a child, or a laptop table when you are sitting on the floor. Yes, even with a chair or footrest when sitting on a chair. In general, a unique design, although the idea is not new.
Materials and Tools:
- Two sheets of plywood approximately 45 cm x 15 cm.
- Two parts of the laminate (same size as above).
- 5 bars 20 cm x 5 cm x 1 cm (approx.)
- 6 bars 30 cm x 5 cm x 1 cm (approx.)
- Plywood glue.
- Six sets of bolts and nuts (depending on length and size).
- Screws for wood 8 pcs.
Necessary tools:
- drill;
- hammer;
- ruler;
- pencil;
- some nails.
Making legs.
- The design of the legs is shown in the photograph. Align all parts - five by 20 cm and four by 30 cm. Attach the hinged parts with bolts and nuts.
- Secure the carry handle with the screws.
- If you use bars 5 cm wide, then there will be 1.25 cm on top of the hole, i.e. a quarter of the width. The second and third bars are connected in the center vertically and horizontally. The third and fourth at the top. Remember to make them rotary. Do the same for the rest of the legs.
- Screw the handle
- Use the remaining two bars of 30cm to strengthen the legs.
- Place the table on a flat surface and level the legs.


https://i.expert-h.com/en/stol/skladnoj-stol-svoimi-rukami-1000-foto-chertezhi-instruktsii#sigFreeIdf27af49fa1
DIY folding coffee table
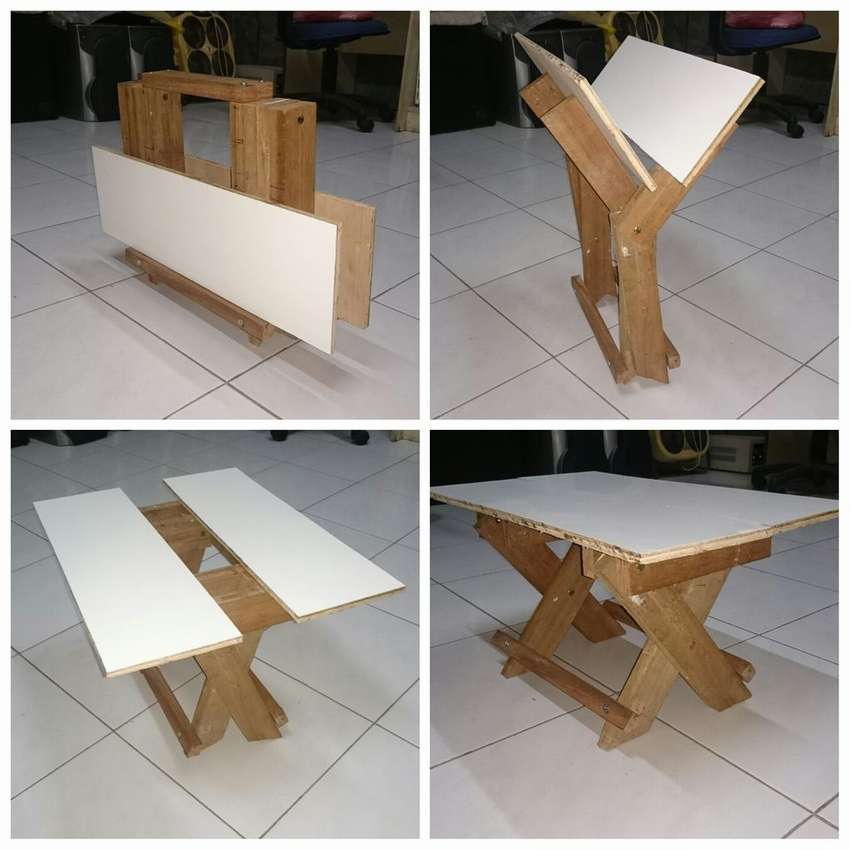
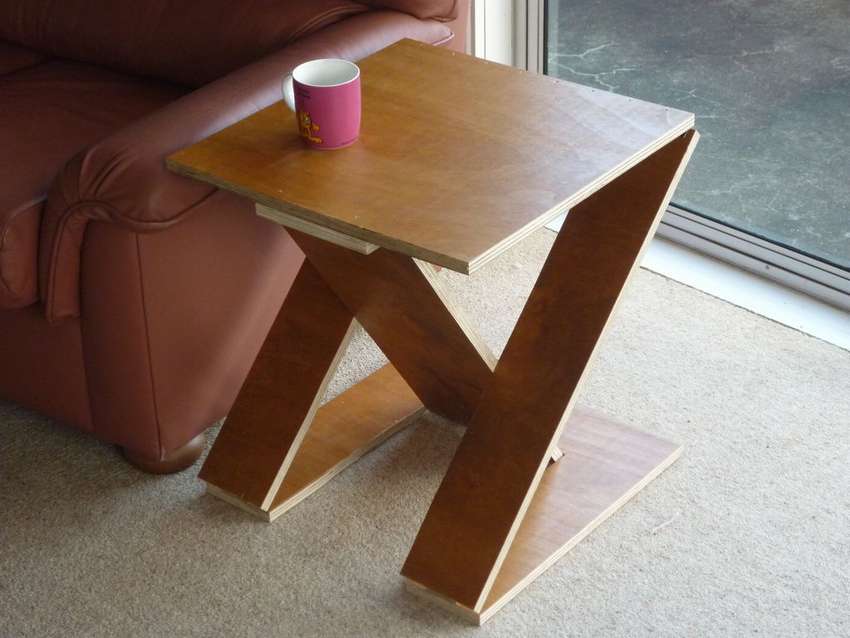 The design is a small table of ideal height to be placed next to an armchair or sofa, where it is convenient to put a book and a cup of coffee. The table can be completely folded and hung on the wall. The photo shows how he, when folded, hangs on the door. At first, the author cut out a model from cardboard. By the way, you can also start manufacturing do-it-yourself folding coffee table with the model, then it will be easier to figure out how the hinges in the wooden model will be folded to form a table.
- The total width of the table should be 500 mm, and both legs of equal width will be 125 mm for each side and 250 mm for the center. To get the perfect angle on each side, you need to make a cutout. Cut a square of 500 mm from plywood, this will be the upper part, then you can use it as a template to determine where the base can be cut. Mark the line with a pencil and install the first hinge. Then make a second cut and a second hinge is installed.
- After that, attach the upper part to the upper end of the U-shaped leg (actually more than the n-shaped, as it is turned upside down). A long hinge may not fit, it can be cut to the appropriate length and then screwed.
- Now the Z-shaped design consists of three pieces connected by hinges. The top square was used so that the top and bottom of the table were at the same angleom to the edge of the workplace. A long piece was cut to length with a handle, and then fixed to the base of the table with several loops.
- Then glue the bar to the open edge. After the glue has dried, you need to trim the edges, and on the underside of the countertop, set a lining to secure a single leg, and now the table can withstand the load without bending the leg.
- Use the bolts to lock the legs in place. Since the angle at which the legs intersect with each other is arbitrary, the bolts must be round in cross section.
- Set the table on a horizontal surface, check with a level, and mark the holes for the screws. Install the first bolt and align the second one with it.
After installing both bolts and receivers, check stability. Two triangles formed by intersecting legs give a solid and stable platform.


https://i.expert-h.com/en/stol/skladnoj-stol-svoimi-rukami-1000-foto-chertezhi-instruktsii#sigFreeId6cf8a3f82e
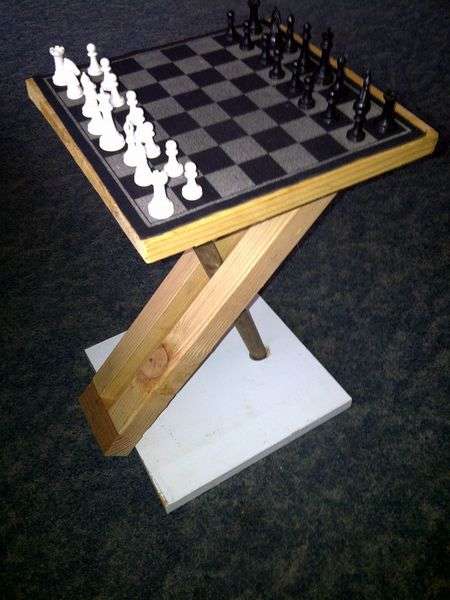
 Similar option small folding table. Here you will need two squares of 30 cm each made of plywood (or other material, it doesn’t matter) for the base and top. Two bars of 45 cm, two of 12 cm, a metal rod, a wooden dowel, the author used the handle of an old mop. Two hinges. A short wood screw to secure the hinges. Four long wood screws.
- Step 1: Supports. Drill a hole in the middle of a wooden dowel approximately 2 cm deep. Insert a metal rod through the dowel. Then insert the second one. Check that the pin rotates freely.
- Step 2: Loops. Install the hinges so that the base and countertop are flush in the horizontal position.
- Step 3: Drill a 2.5 cm hole for the dowel at the bottom of the countertop and at the top of the base. To fold the table, simply lift the countertop and fold the dowel into the frame.


https://i.expert-h.com/en/stol/skladnoj-stol-svoimi-rukami-1000-foto-chertezhi-instruktsii#sigFreeId5c88dc7d13
DIY folding table
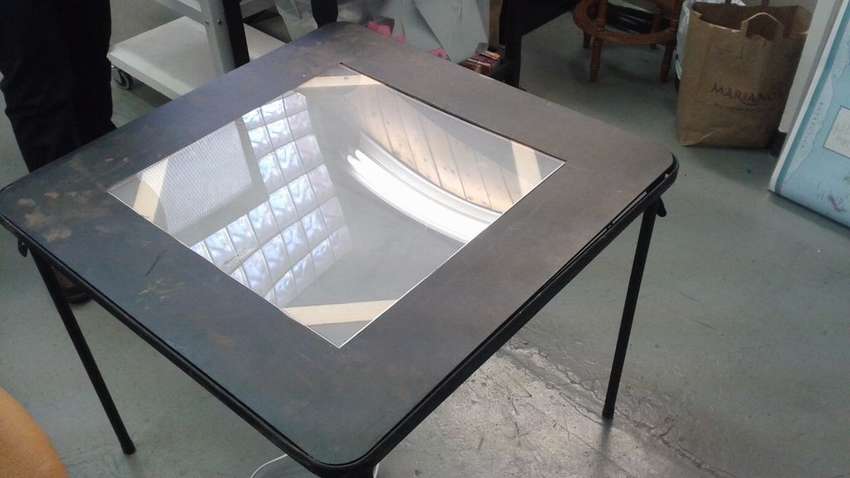
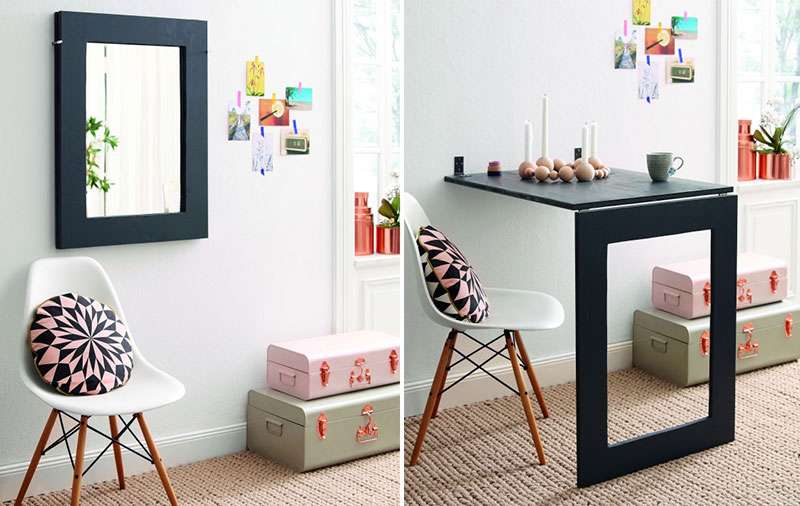 What is the most important rule for small apartments? Unfortunately, when searching for ideas to create a beautiful interior, we cannot focus too much on the appearance, because the main task is to use the floor space as rationally as possible. Of course, you can always come up with something, for example, make a folding table do it yourself with a mirror, as a decorative component. The main thing is that this is a rather simple design, it can be easily folded and fastened to the wall as shown in the photo, when folded it looks just like a mirror with a frame.
Brief instruction:
- First, you need to build a table from a wooden board. To do this, draw a rectangle at a distance of 10 cm from the edge of the board.
- Drill holes in the four corners of the rectangle. Starting from the corner holes, cut a rectangle with a jigsaw.
- Then sand the edges with sandpaper or a grinder. The table legs will serve as a wooden frame for the mirror.
- Paint the frame, panel and hinges with acrylic paint. When dry, connect the table leg and wood panel on the short sides with two metal hinges. Before tightening, check that they are in the correct position.
- Place the mirror in the middle of the bottom of the wood plate and mark its position with masking tape. Attach the mounting tape to the back of the mirror, place it in the indicated position and tightly clamp it. Remove the protective tape.
- Attach the tabletop to the base of the mirror in the wall using metal hinges. This will fold the panel. Use masonry drills, then insert suitable wall mounts and tighten the hinges.
- Fold the table up and attach two L-hooks to the right and left, directly to the board. Hooks fix the table to the wall. Turn the L-hooks clockwise to set the table.


https://i.expert-h.com/en/stol/skladnoj-stol-svoimi-rukami-1000-foto-chertezhi-instruktsii#sigFreeIdba0fcbde8e
You can assemble the structure for these step-by-step diagramsx.


https://i.expert-h.com/en/stol/skladnoj-stol-svoimi-rukami-1000-foto-chertezhi-instruktsii#sigFreeId40307c9bcd
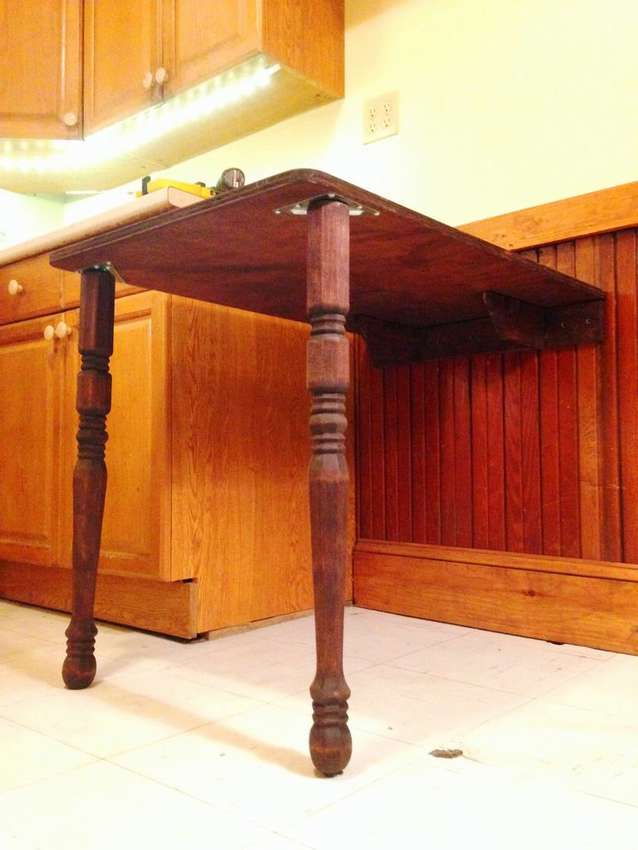
True, this is a different table, but manufacturing principle is the same, and in the diagrams the process is more clearly visible.
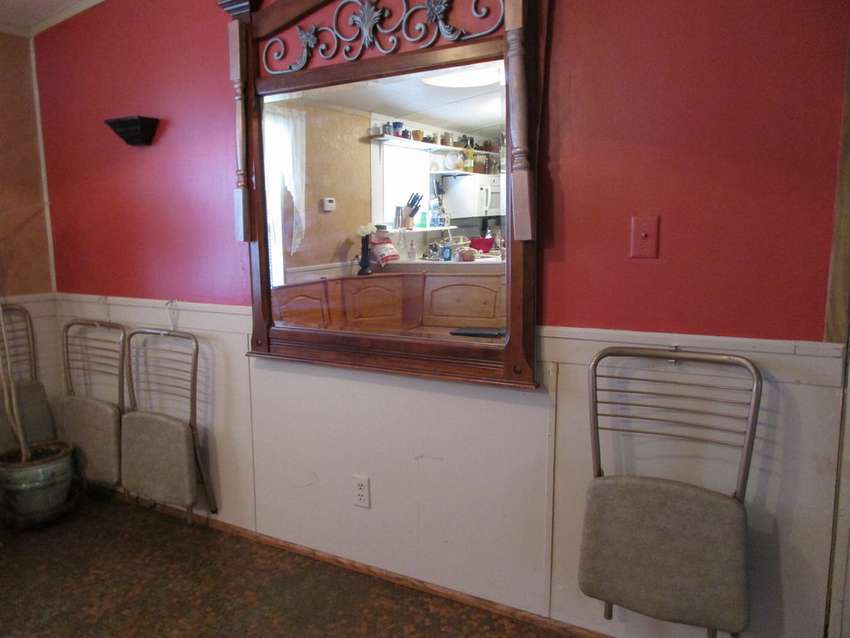 And one more folding table option for the kitchen. In this case, the author did not particularly bother, he found an old mirror and attached it to the wall with loops at the bottom and a hook to hold it at the top. Added 2 legs with small loops to the top. I glued a piece of plywood on the back. Sealed it with polyurethane. Basically, that’s the whole construction. There were also several folding chairs that the author carefully hung on the wall, so that a completely free room turned out.


https://i.expert-h.com/en/stol/skladnoj-stol-svoimi-rukami-1000-foto-chertezhi-instruktsii#sigFreeId20055d4a27
How to make a folding table with your own hands
 Create maximum eco-economyMiyu space with this folding table. When your room has limited space, this design is a great solution. Here you can find out how to make a folding table with your own hands without special costs and in a short time. Below are step-by-step photographs; you can find out about the necessary materials and assembly steps on the website, a link under the gallery.


https://i.expert-h.com/en/stol/skladnoj-stol-svoimi-rukami-1000-foto-chertezhi-instruktsii#sigFreeId1d920c37bc
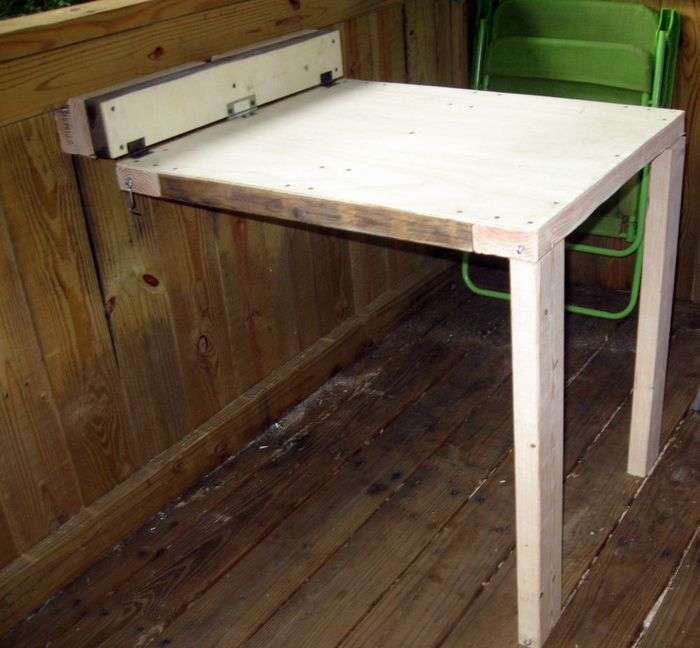 Similar folding table option, only it is installed in a treehouse. Basically this is a 2x4 frame covered in plywood. The legs are located on the bottom side, so they fold down from the bottom, and the top of the table is attached to a small bar attached to the wall. Place the folding table where you want. Use a bolt or screws to attach the top to the wall. In addition, you can add a latch so that the countertop does not recline by itself. Hope this inspires someone to try something like this.


https://i.expert-h.com/en/stol/skladnoj-stol-svoimi-rukami-1000-foto-chertezhi-instruktsii#sigFreeId54286804ec
Folding coffee table
 If you need a table that can be pushed into a corner of the kitchen, then this is the right option. In the kitchen, a folding coffee table is always useful. and looks very cute. The author wanted a small table, easy to install and easy to understand, and now made such a thing in three nights. In retrospect, you can do a lot differently or improve the design, everything is in your hands. On the site, the link to which is under the gallery, there is a very detailed step by step instructions, I won’t rewrite it here, you can read it yourself. Just a few nuances: no one likes to bump into the sharp corners of the table, so the author offers a simple way - you need to draw a radius, and make a stencil. The standard ink spray cap has a diameter of approximately 6 cm and is convenient as a circular stencil. Then, gently saw off the corners with a jigsaw and carefully scrub it with sandpaper.
Remember: if you use a table every day, the last thing you need is to get a splinter when you pass by. And yet, before finally assembling the structure, make sure that everything will stand upright. Screw your legs and set a table against the wall. Using the level and holding the table with your hands, mark the place on the wall where the mounting frame will be mounted.


https://i.expert-h.com/en/stol/skladnoj-stol-svoimi-rukami-1000-foto-chertezhi-instruktsii#sigFreeIde0ebee5cd7
Folding folding table
 A table can occupy a significant area, especially when the house has a lot of furniture. The problem can be minimized by doing folding table with folding table top. Then the free space can be used for other purposes.
Materials:
- A pair of folding brackets.
- 19 mm plywood
- 200 ml of varnish paints and brushes
- wood screws
- drill
Apply two coats of varnish to plywood at intervals of 6 hours. This can not be done if the surface is covered with a laminate.
- Step 1: Install the brackets
Position the folding brackets about 2.5 inches from the edge to allow access from above, but at the same time visually hidden. To keep the bracket perpendicular to the edge of the table, attach the structure to the wall. Mark hole locations on plywood - Step 3: Drilling Holes
Drill holes in the plywood. To prevent them from passing through the sheet, position the plate of the appropriate thickness so that a cartridge is installed on it to prevent drilling through the hole. Place washers between the plywood and the brackets if the folding mechanism of the bracket wipes the plywood. Attach the brackets to the board with screws. - Step 4: Setting the table height
Table height is an important part. A few erroneous centimeters can lead to great discomfort. Attach the table to the wall at a convenient height (about 70 cm). Mark the height on both sides using a ribbon and draw a line connecting them. Position the table at the required height using the formwork. - Step 5: Install the brackets on the wall
Mark the position of the holes on the wall. Take away the table and drill holes. Insert the wall mounts into the holes and screw the brackets to the wall. - Step 7. Check the folding mechanism.
Once the table is set, fold it a couple of times for verification. If the brackets are not installed parallel to each other, this will lead to friction when folding. This can only be avoided by correctly fixing the brackets.


https://i.expert-h.com/en/stol/skladnoj-stol-svoimi-rukami-1000-foto-chertezhi-instruktsii#sigFreeIdf107a21899
Similar folding table, only much easier, the author made it for the hostel, fits perfectly behind the door and does not bother anyone.


https://i.expert-h.com/en/stol/skladnoj-stol-svoimi-rukami-1000-foto-chertezhi-instruktsii#sigFreeId614f52b0de
Folding table shelf
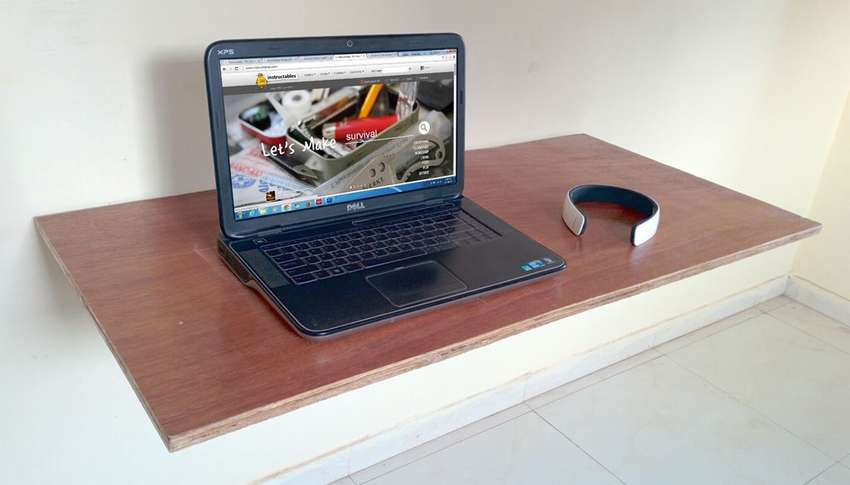
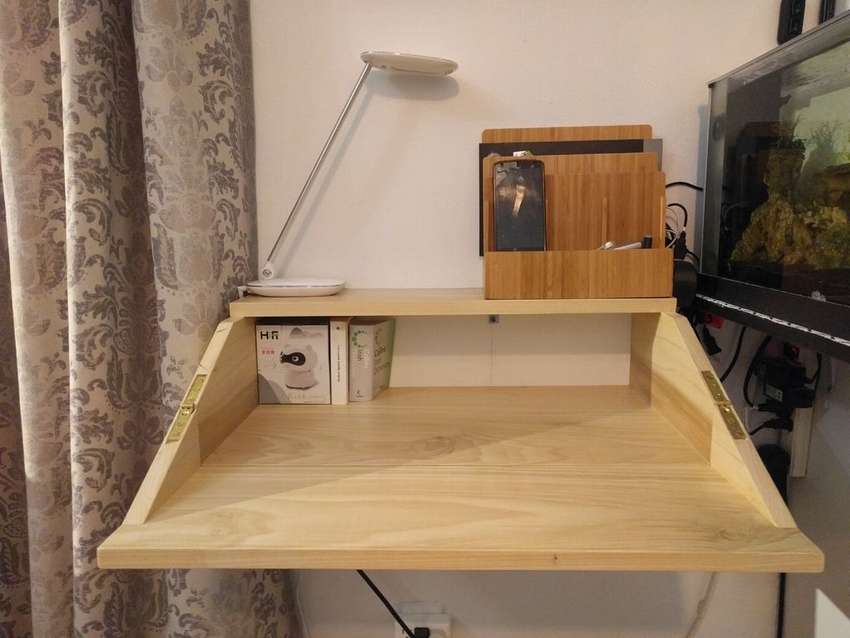 If you, as the author of this photo, live in a tiny apartment, then surely the proposed folding table shelf You will be interested. He has only one spare corner left inmnate, and not deep enough for a complete desk. The author needed something thinner so that it could be installed on the wall, but without legs. A TV is installed above, so any table that could be folded up did not fit. This table is 60 cm wide, on the back side, opposite the wall, there is a 15-centimeter “shelf” that does not bend, that is, the bottom remains fixed. The table is mounted with wall brackets so as not to clutter the floor and there is room for legs. There is enough space on the shelf to store a large laptop.
Below are presented blueprints, just keep in mind that they indicate theoretical sizes, not actual ones, so you will need to make your measurements for your premises, and you can take these sizes as a basis, saving the parameters.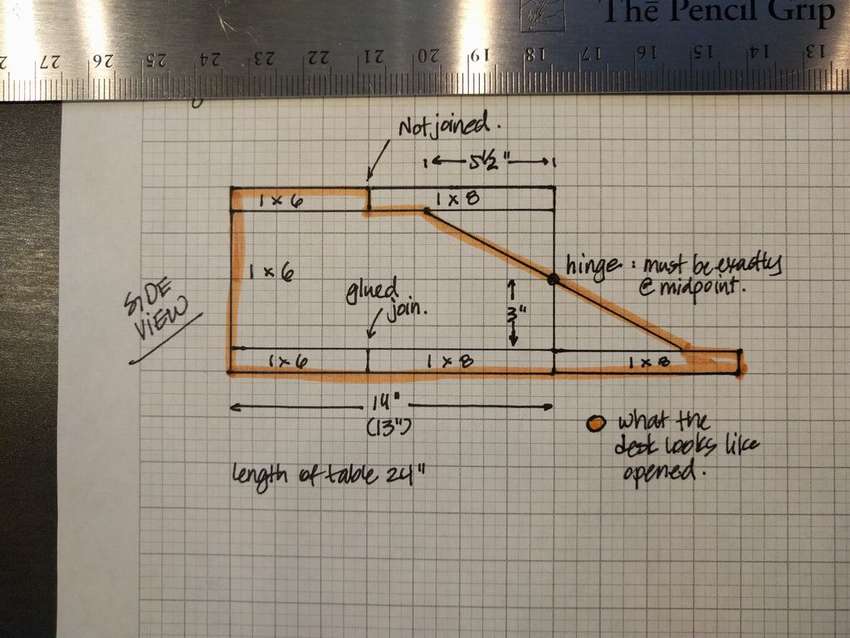
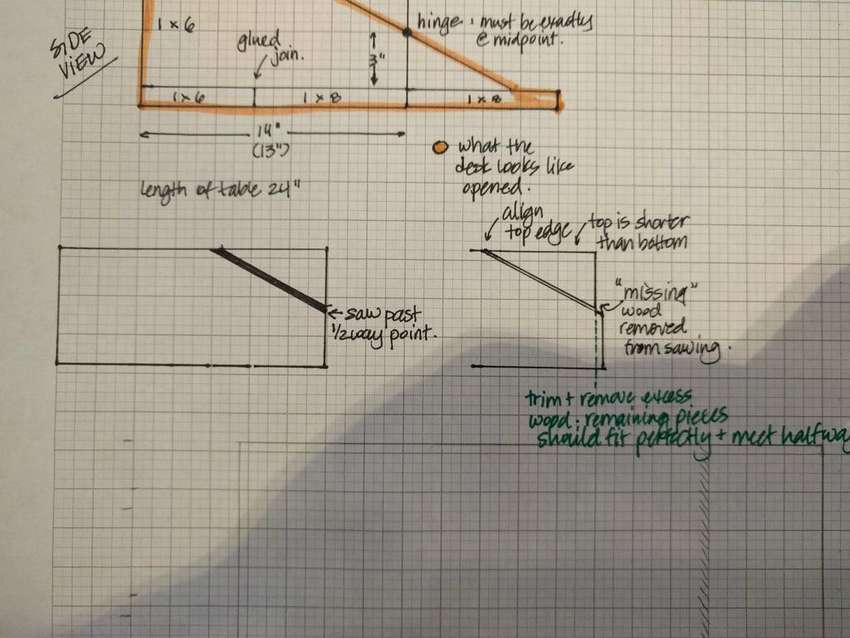 Most importantly, for everything to be smooth and smooth, the hinge should be in the exact vertical center. When you measure and then saw, select a point slightly below the middle.
- Make a corner cut.
- Then align the parts so that you get one flat line on top. The bottom will stick to the front of the table. Trim her to fit.
- Glue the bottom surface of the table.
- Attach the clamps to hold them together.
- Make sure that the edge with the corner cut is facing to the side.
- Glue the joints for reinforcement and use 2 screws on each side on the board to attach the lower parts to the side parts.
- Attach the upper part to the two side parts, glue and screw. This will be a fixed "shelf" that remains fixed and does not open with the rest.
- Take a small triangular piece, which will be the side of the bent part, and attach to the top with glue and screws.
- Make sure the right corner comes up from the bottom of the front edge.
Further installation of the hinges and trim. Follow the step by step photos, there, in principle, everything is shown accessible and understandable.


https://i.expert-h.com/en/stol/skladnoj-stol-svoimi-rukami-1000-foto-chertezhi-instruktsii#sigFreeIdf3790e2ffa
DIY folding console table
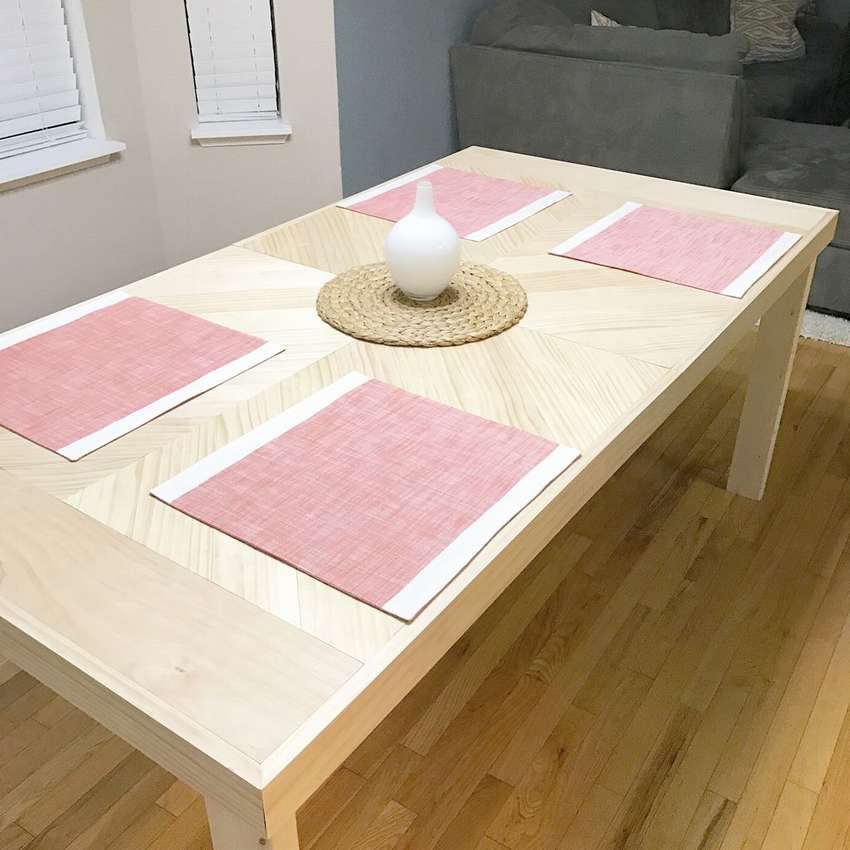
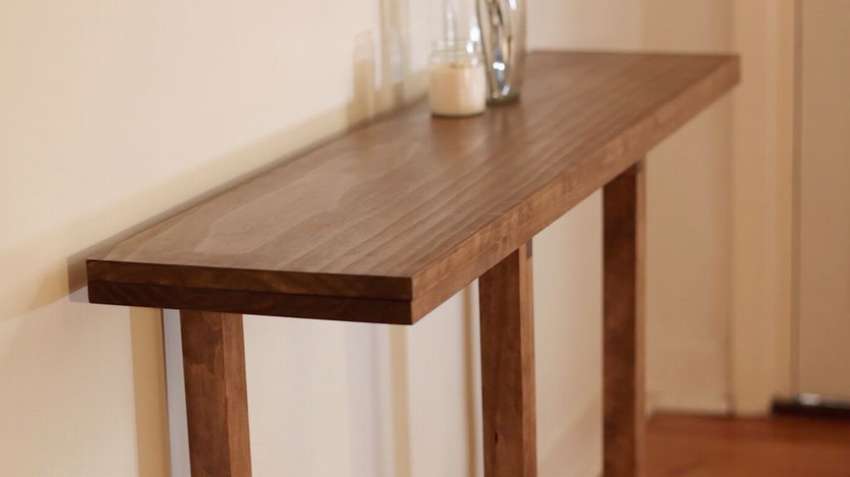 This folding console table made of inexpensive pine. The countertop consists of two parts, the author used 2,285 mm boards, but you can use a laminated plate. Align them with each other along a long edge and clamp them together using several clamps. Then attach the loops. You can use a milling cutter or chisel, at your discretion. There are many ways to mount the hinges, so we will not go into details.
- When the boards are still jammed, pre-drill the hinge holes. Now lay the table and cut the width. Usually the board is slightly longer than the length described, so you can cut it to a specific length. In this case, it is necessary to cut up to 1200 mm. Keep the plates clamped so that they are exactly the same length after cutting, and if you are using a circular saw, be sure to apply some kind of masking tape before cutting to avoid any ejection.
- Then dismantle the top. Sand the surface and paint. The author used oil paint to match the color of a walnut, then applied 2 layers of polyurethane.
- When dry, attach two legs to the center rail.
- Place all parts upside down on a flat surface and level. How to install in place, clamp.
- Now screw 2 loops of the belt, and then place the leg assembly on the lower half of the countertop and center it against the rear edge.
- Then turn the structure over and attach the hinges and the upper half of the countertop.


https://i.expert-h.com/en/stol/skladnoj-stol-svoimi-rukami-1000-foto-chertezhi-instruktsii#sigFreeId269fcc4b0f
Folding table for a small kitchen 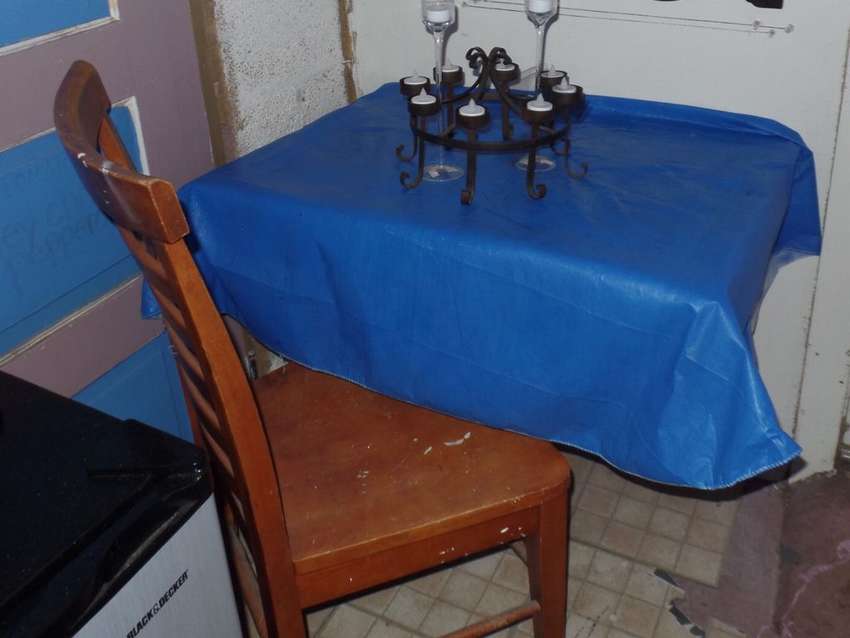
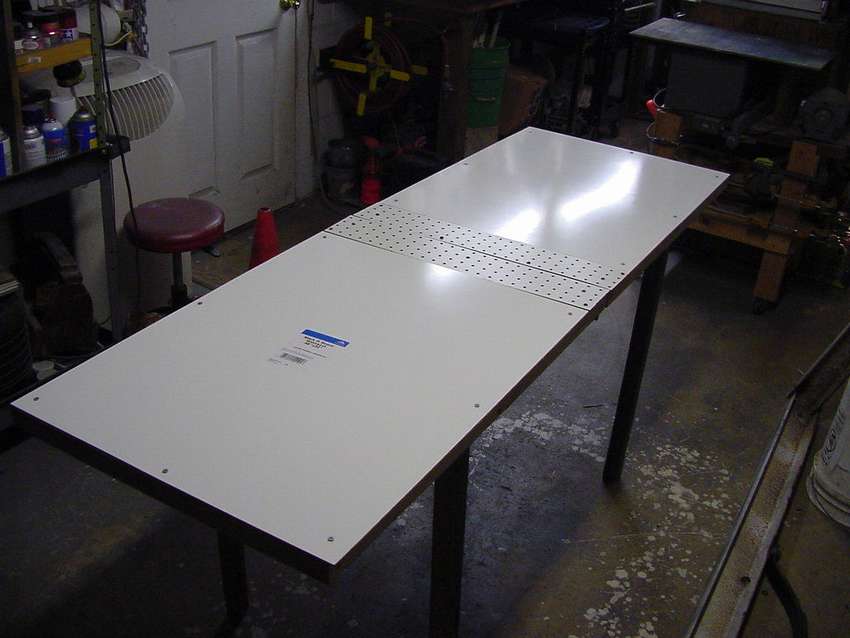
This simple folding table for a small kitchen It took the author less than an hour to do everything from start to finish. Uncomplicated design, almost no costs, in general, cheap and easy to do with your own hands, but you will have a practical table when you need additional work space. To make it more convincing, this project cost the author six dollars, because almost everything can be made from improvised materials and conventional tools.
- First cut the plywood sheathing. Measure twice before cutting, make sure you get a straight line.
- Attach two hinges to the very end of the plywood sheath with a drill and three screws to lay one hinge on each end, located at the required distance from each other.
- Mark with a marker the future holes on the wall you want to place the table on.
- Mark where the remaining hinge will be, indicating the three holes.
- Drill holes and install plastic plugs.
- Attach the hinges to the wall at each end with screws.
- To make the table look like a “floating” shelf, you need to cut out a piece of MDF 1X4 board, about 10 cm shorter than the plywood sheathing, and place it in the center towards the outer edge.
- Cut another piece of MDF board from floor to sheet that you just put on the plywood sheathing
- Use the level to make sure the table is level in front and back.


https://i.expert-h.com/en/stol/skladnoj-stol-svoimi-rukami-1000-foto-chertezhi-instruktsii#sigFreeId54c90579cd
You can also do this simple folding table in the kitchen from an old bookcase


https://i.expert-h.com/en/stol/skladnoj-stol-svoimi-rukami-1000-foto-chertezhi-instruktsii#sigFreeIddc1b93b1dd
Wall-mounted folding table
 Simple and cheap folding wall table will solve many problemsif you have a very small room. The author took about two hours to work with a lot of breaks and stops. In principle, making such a table is quite easy, and if you have experience, you can start and finish in an hour.
You will need to work: a sheet of plywood, about 6 hinges and screws, 4 loops for attaching the countertops to the wall, and the other two hinges will be used to fold the legs.
5 cm and 8 cm wall screws to secure the supports and support beam;
Tools:
- A circular saw
- Drill
- level
- Measuring tape
- Pencil or marker
You should have a free wall on which studs will be installed for fastening. Therefore, the first thing you need to do is determine the space that you will use and find the studs, they should be 40 centimeters apart. The author laid out the installation procedure in step-by-step photos, although some photos are blurry, but you can consider it.


https://i.expert-h.com/en/stol/skladnoj-stol-svoimi-rukami-1000-foto-chertezhi-instruktsii#sigFreeId57e2438336
Table of pallets for a summer residence
 Tables for a summer residence is an interesting topic. You can use your imagination to the fullest, no one will be critical of your crafts, a summer residence, it is a summer residence. Usually improvised materials, old furniture are used, and of course, wooden pallets are especially popular. If you need a table on the veranda, it is shown here how to make a table from pallets for a summer house. One of the first tasks is to make the table folding, easy to assemble and disassemble. Start by disassembling the pallet.
The easiest way to make a countertop, here, perhaps, there will be no problems. Then make the legs as shown in the photo and fasten them to the hinges. So that at the most inopportune moment the table itself does not form, make a simple crossbar that will fix the legs. Well, that's all. It remains to put in order to look as pretty as in the photo.


https://i.expert-h.com/en/stol/skladnoj-stol-svoimi-rukami-1000-foto-chertezhi-instruktsii#sigFreeId54aec4f325
Folding garden table
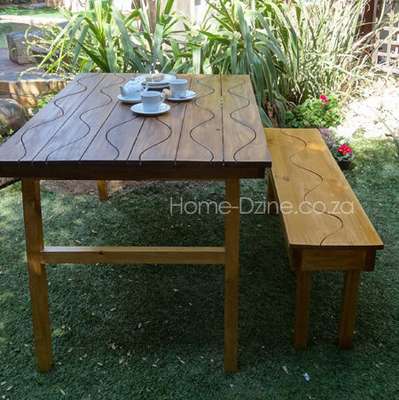 To dine at such a table in the garden is a pleasure, and the original design adds a decorative touch, you certainly won’t buy one in the store. Treat the countertop boards before assembly, in the sense of sanded, painted, then it will be difficult to do. While the paint is drying, you can begin assembling the upper frame. In order for the frame to support the upper boards, fasten the short sides to the long steel corner brackets and 16 mm screws. Corner clamps are very convenient when you work independently - this is like an extra pair of hands. When working on a flat surface, place the upper supports in the frame; one at the ends and one at the center. Leave a gap of 20 mm between the support frame and the apron.
- Pre-drill a 3 mm hole on the outside of the frame.
- To attach the top boards to the frame, place it over the corrugated boards.
- Remember to leave a uniform interval.
- Use 3 mm trim as spacers to hold the upper boards.
- Tighten the 3.5 x 35 mm screws through the upper supports to lock the upper boards in place.
- Tighten the screw through each section along the upper legs. It will take quite a few screws, but the table will be solid.
- To assemble the legs, measure and mark 200 mm from the top of each leg.
- Drill 3 mm holes so that the tip of the screw appears.
- Press the cross beam over the ends of the screw to make a mark.
- At the mark at the end of each crossbeam, drill a 3 mm inspection hole.
- Tighten screws with a diameter of 4.5 x 65 mm through the legs and into the cross beams. One set of legs will be narrower than another so that the table can be folded and removed when not in use.
- Attach the legs.
As you can see, when folded, the legs overlap and take up little space if you need to remove the table when it is not needed.


https://i.expert-h.com/en/stol/skladnoj-stol-svoimi-rukami-1000-foto-chertezhi-instruktsii#sigFreeId11d3192ba0
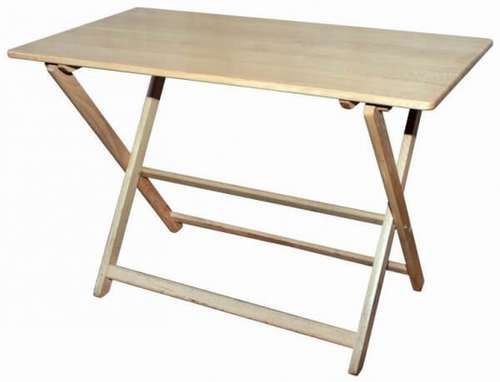
Wooden folding table for a summer residence
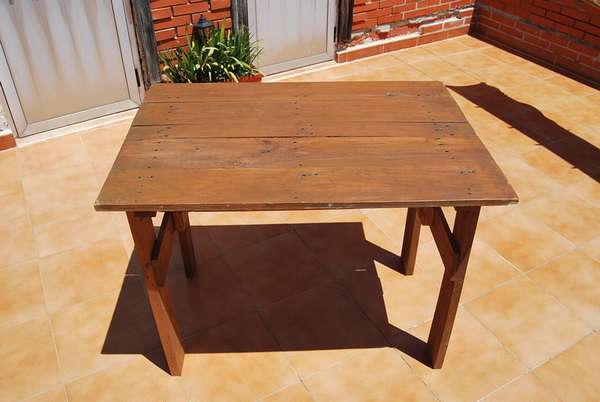
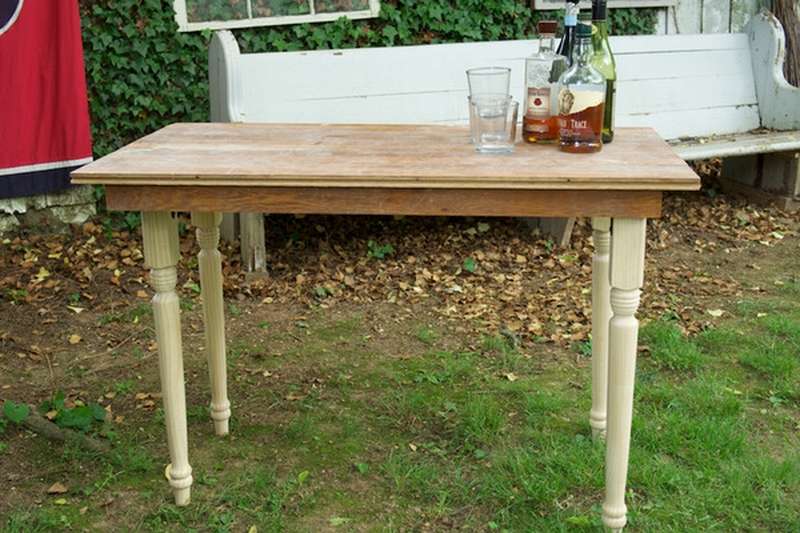 Today there is a lot of plastic furniture, light and comfortable, but how can it replace the good old wood. How do you like this option - portable wooden table for a summer residence, handsome and with a claim to sophistication. It can be used as an outdoor party dining table.
- Put boards on glue, allow to dry for several hours.
- Then saw off the length to the desired size.
- Measure two long pieces and two short ones to make a rectangle that goes under the table.
- Using the clamping device, make holes to create 4 butt joints, as well as holes for attaching the skirt to the table.
Since the table is very short, you need to increase the width so that the legs fit in the frame. The photo shows how it should look. Probably, you can make some improvements, see for yourself in the process.


https://i.expert-h.com/en/stol/skladnoj-stol-svoimi-rukami-1000-foto-chertezhi-instruktsii#sigFreeId0417979315
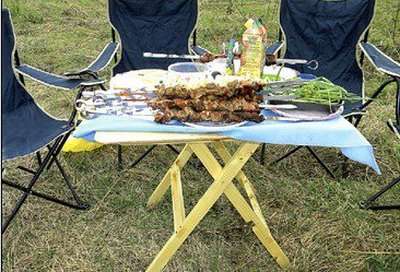
How to make a picnic table
 Everyone loves picnics, and a table is an integral part of outdoor recreation, maybe not the most important, but necessary. Like many things that are needed at the campsite, the table should be such that it can be easily packed. Suggested by authorThe manual is very simple, durable, the table is convenient to carry, store and most importantly, everyone can do it with their own hands. Although on the Internet you can find many options for this design, but nevertheless, if you liked this photo, see how to make a picnic table on step by step photos proposed by the author. Of course, this is a rather primitive and simple design, but the table functions perfectly. If you are interested in detailed instructions, a link to the author’s website under the gallery.


https://i.expert-h.com/en/stol/skladnoj-stol-svoimi-rukami-1000-foto-chertezhi-instruktsii#sigFreeId041172b620
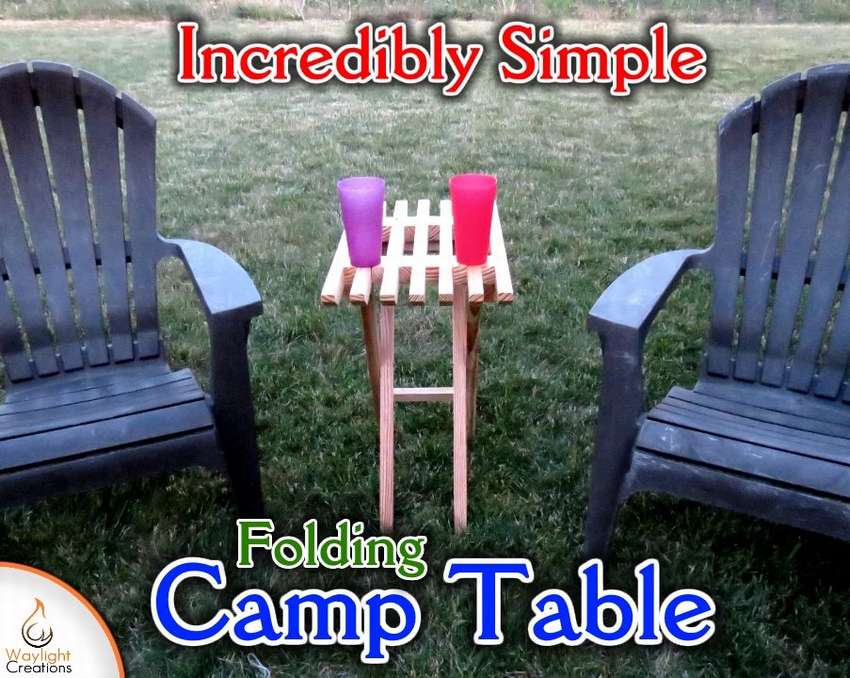
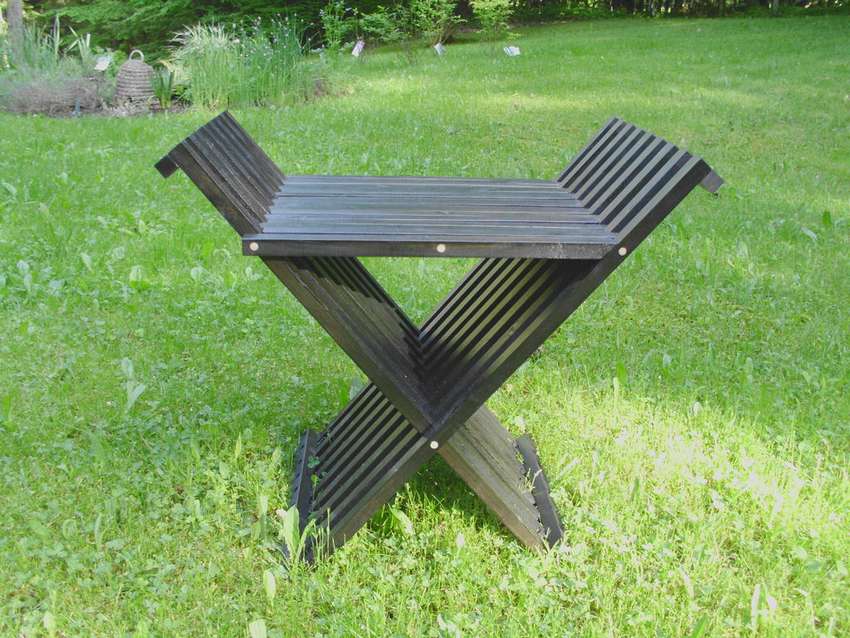
Small folding picnic table
 Although this is not an original project, there are probably readers who do not know this magnificent design. You can easily do this DIY folding picnic table, or a chair, it can perform this function. If you have your own ideas, you can change the design.
 The figure shows a side view of the table on a small scale to determine the proportions and size. Although they are not quite the same as those used in the manufacture, you can keep the proportions and resize.
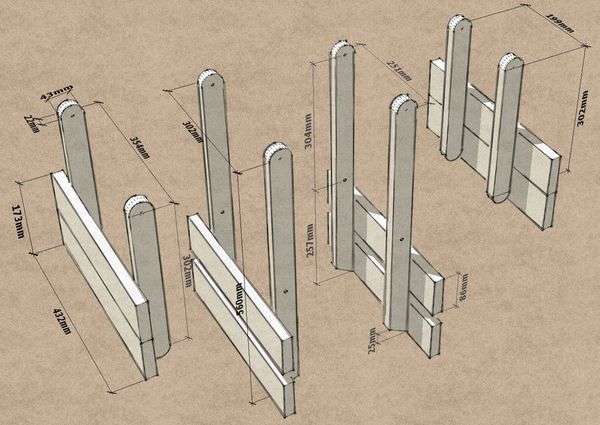
- Measure the boards, cut and drill holes at the desired height.
- To choose the right position for platform platforms, the best way is to place everything on a flat table, center each part and glue all the parts.
- Use multiple shims where multiple washers must be inserted between the rods.
- To strengthen the table, insert wooden dowels into each joint that is already glued.
- Drill holes of the required size (diameter 8 mm and length 3-4 cm in this case) on the axis of the rods on top of the boards.
- Then drill holes that are not too deep where you can insert the nuts. Cut the legs diagonally at a right angle. The best way to determine the angle is to place the assembled table on a flat surface and use the goniometer.
- It is necessary to pay attention to how the lower edge of the boards is in contact with the floor surface before gluing them.
- Use the clamps so that everything is compressed until the glue dries.
The assembly is very simple, everything is clearly visible in step-by-step photos. Finish your work with beautiful finishes. The author used added shellac and wax for a pleasant appearance. The carry handle can be slightly improved by adding a rope around the handle to improve grip and appearance. Simply apply a layer of glue to the surface of the cylinder and wrap it with rope.


https://i.expert-h.com/en/stol/skladnoj-stol-svoimi-rukami-1000-foto-chertezhi-instruktsii#sigFreeId9d16405c36
The same table, only with some modifications to the legs


https://i.expert-h.com/en/stol/skladnoj-stol-svoimi-rukami-1000-foto-chertezhi-instruktsii#sigFreeIda4595492c9
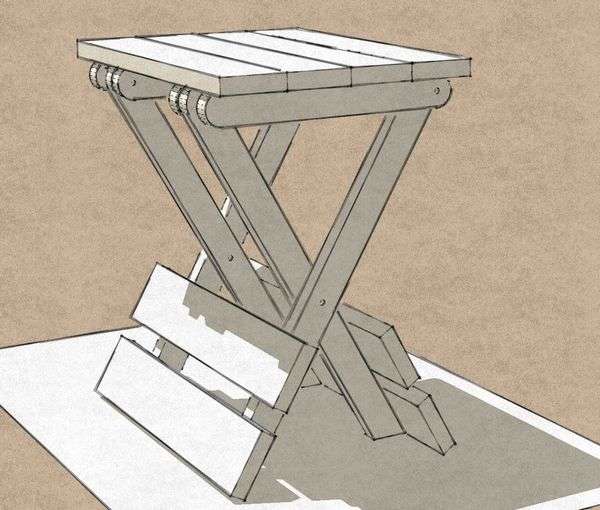
 DIY folding picnic table
A similar design, also a countertop made of two halves, and when folding the lower frames, they are legs, enter one another. The lower bars at the bottom of the frames reinforce the legs and at the same time serve as a carrying handle when the table is folded. The countertop is made of 6 mm plywood. The legs are made of 20x40 mm wooden blocks, fastened with bolts that are the axis. The countertop is bolted to the supporting bars with screws. As you can see, it’s easy to make everyone a folding picnic table.


https://i.expert-h.com/en/stol/skladnoj-stol-svoimi-rukami-1000-foto-chertezhi-instruktsii#sigFreeId20f430dc48
 Still picnic tableonly with solid worktop. The assembly order is basically the same. The legs are bolted, the foot of the support is fixed with screws. The holes for the bolts need to be made slightly larger than the diameter of the bolts, because they are the axes on which the legs will be folded. Therefore, the bolts do not tighten much so that there is free rotation. The foot supports at the bottom are fastened with self-tapping screws. The cross connection of the axial mount is fixed with locknuts.


https://i.expert-h.com/en/stol/skladnoj-stol-svoimi-rukami-1000-foto-chertezhi-instruktsii#sigFreeIdc167b76a8e
DIY folding picnic chair
 Of course, chairs, this is a slightly different topic, but if we are talking about a picnic, I would like to give at least one example. Moreover, the design really liked, the author tried to copy the work of the architect Robert van Embrix. This chair, by and large, has only two wooden parts that are repeated 17 times. There are longer parts that make up sides 70cm long and square at both ends. Then there are saddle parts that are square at one end and are sawed at a 40 ° angle at the other end.
The most effective way to cut the bars is to cut two side parts and two parts of the seat from each length. Another thing you need to know about when filing parts is the straightness of all parts. Your bars should be very close to perfectly straight lines, only then the folding mechanism of the chair will work as it should. I will not describe in detail the entire manufacturing process, everything is shown in step-by-step photos, there are as many as 90 of them. Of course there are different nuances, this is not the easiest picnic chair, so you can read the detailed step-by-step instructions on the site, the link under the gallery. The chairs look neat and a bit exotic. Despite the fact that the basic design of the chair has existed for hundreds of years, modern materials and production technologies have turned the design of the chair into aluminum or plastic structures. A matter of taste, but I like the warmth and beauty of wood. The final dimensions are fairly standard and make it convenient for a very wide range of sizes and shapes.


https://i.expert-h.com/en/stol/skladnoj-stol-svoimi-rukami-1000-foto-chertezhi-instruktsii#sigFreeId51ec023ff5
 DIY folding table
There are many beautiful home-made furniture, but we are looking for simpler options. Making a folding table for your own home is not difficult, and the design proposed here is not only easy to manufacture, but also pretty. At least different from the above wooden folding tables. Here the countertop is made of ten neatly cut planks fastened with two pieces of braid. The legs are attached to two bars. When folded, the countertop is rolled up and the whole structure can be carried in a travel bag. (Big bag).


https://i.expert-h.com/en/stol/skladnoj-stol-svoimi-rukami-1000-foto-chertezhi-instruktsii#sigFreeIdb6a4d41fe8
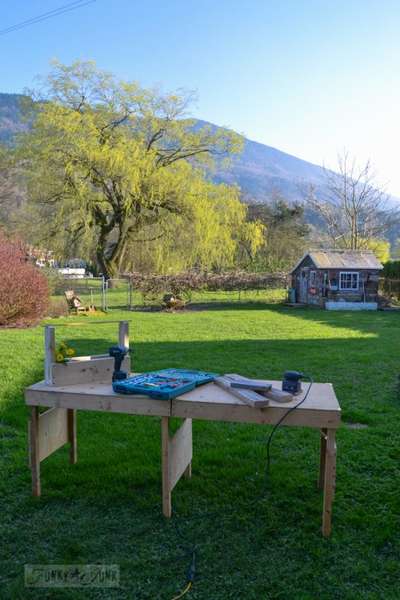 Large folding table for gardening
A good idea, a large folding table for gardening is always useful. The proposed option can be used as a dining table in the country or for a large company for a picnic. In addition, the design is quite durable, so the table is perfect as portable workbench for outdoor work. The table consists of two parts, if necessary, it can be folded, when assembled, it looks like a big box with handles. The latches are screwed on the sides so that the table does not open during transportation. The assembly order in diagrams with dimensions is shown in step-by-step photographs, step-by-step instructions for manufacturing on the site, a link under the gallery.


https://i.expert-h.com/en/stol/skladnoj-stol-svoimi-rukami-1000-foto-chertezhi-instruktsii#sigFreeId791bc049d3
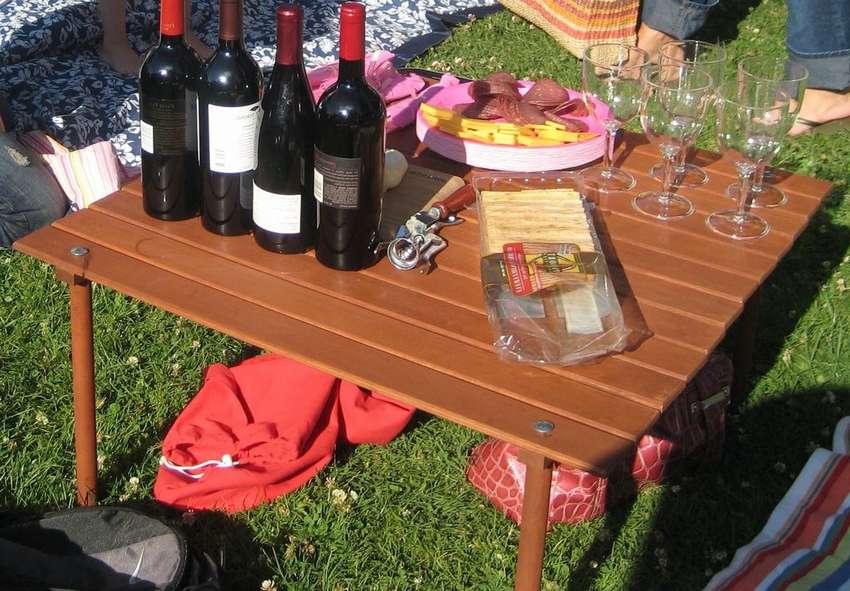
Round folding table
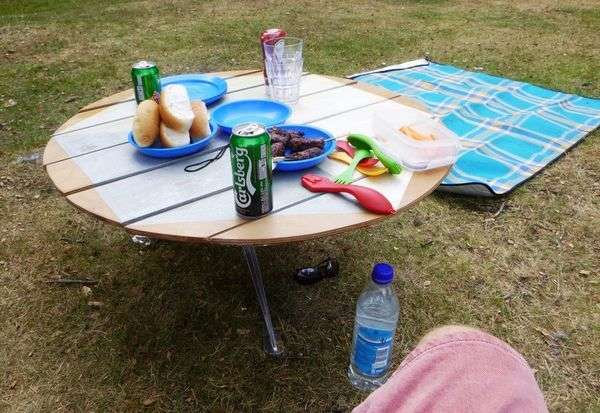 Initially, the author planned to make a hexagonal or octagonal table on a tripod, but in the end a compromise was obtained - round folding table. The tripod is stable on uneven surfaces, therefore good for a picnic. True, the base in this case was bought in a store, this is a classic tripod, so the author has to make a countertop and mount. The first step was to mark the top of the table.
- To draw a circle, define the center of the board by drawing diagonals from the corners.
- Then use a piece of cord attached to the center and a pencil to draw a circle. There will be a little stock of boards, you can use them later, but it depends on what size table you want.
- Use a jigsaw to cut a circle. Then you need to select the hexagon. If you take a radius and use it to mark the circle, it goes six times. Combining these labels will result in a hexagon. The hexagon can be used to create the effect of a 3d cube, and the author chose this design for the countertop.
- Use the four corners of the hexagon as starting points, and then randomly select other points to divide the circle into boards. Can be divided into pieces between the corners of the three boards and the edges into two boards on both sides.
- To board the countertops folded into a roll, you need to take the straps and using glue and staple, attach them to the countertop. At this stage, you need to be careful to leave even 10 mm gaps between the boards.
- Tripod mount Take the plywood, and glue it in two layers.
- Saw the square hole in both parts and fix them together with screws and glue.
- Drill two holes at the top of the table.
- Insert bolts with washers into them.
- For the leg, take a block with a square end to fit snugly on the nest.
You can also buy a tripod, or find another axle base for a table. In this case, the tripod is made of cast aluminum. The tapered end of the leg is included in the tripod and is tight enough to support the table. The author installed a washer and a round screw to fix the countertop on his leg - through the nest. This ensures that the top of the table does not swing on top of the leg.
The table and all its components can be folded into a bundle and simply tied with a rope. Ideally, you can sew a bag or bag.


https://i.expert-h.com/en/stol/skladnoj-stol-svoimi-rukami-1000-foto-chertezhi-instruktsii#sigFreeId27b686f745
Folding table with umbrella
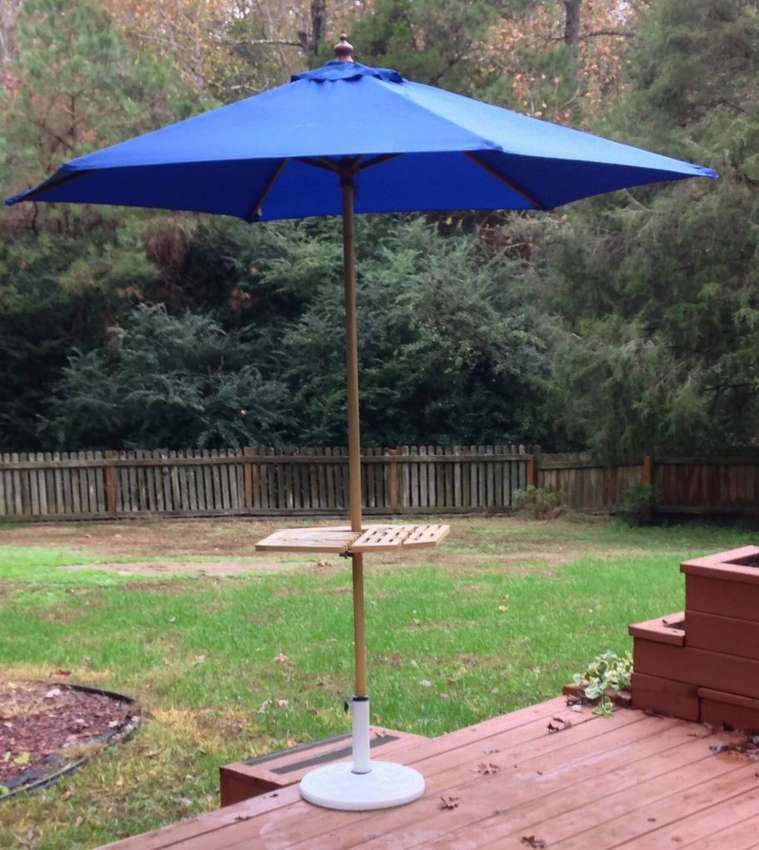 The idea was to make a small table attached to an umbrella, or vice versa :) What were the goals:
- The design must be unique.
- The table should be easy to fold.
- It should be small, but have enough space to put glasses and other trinkets.
- The table should be light.
- Minimum manufacturing costs
All points by the author have been successfully implemented, only at the expense of the first one is not exactly known, it is hard to verify. The table will have 3 interlocking folding sectionslocated 120 degrees apart. To make the table as small as possible, 3 sections must rotate and interact with the shaft of the umbrella. Each section can then be folded to make it as small as possible. You can buy a new umbrella for the roof, but it will be a violation of 5 points, or use the old one, as the author did. Another part that needs to be made. Each section will fold in half, so you need a hinge that folds on top and closes in the open position.
You will need such materials:
- Any bars.
- 2-1 / 2 inch bolts in 1 / 4-20 bolts
- 9 washers for 1 / 4-20 bolts
- 3 Nuts for bolts 1 / 4-20
- 3 spring-loaded sliding door locks
- 6 drum tray joints
- 1 old beach umbrella
- 96 dowels 1-3 / 12 cm
- Teak oil
Tools:
- Drilling machine
- Cordless drill
- 3D printer or 3D printing service
- Sander
- sponge
- bucket
- Several different varieties of sandpaper
The manufacturing procedure can be sorted out by step-by-step photographs, the author has a large, detailed instruction on the site, so you can use the link under the gallery and read. By the way, it is interestingly written :)


https://i.expert-h.com/en/stol/skladnoj-stol-svoimi-rukami-1000-foto-chertezhi-instruktsii#sigFreeIdb522e145a4
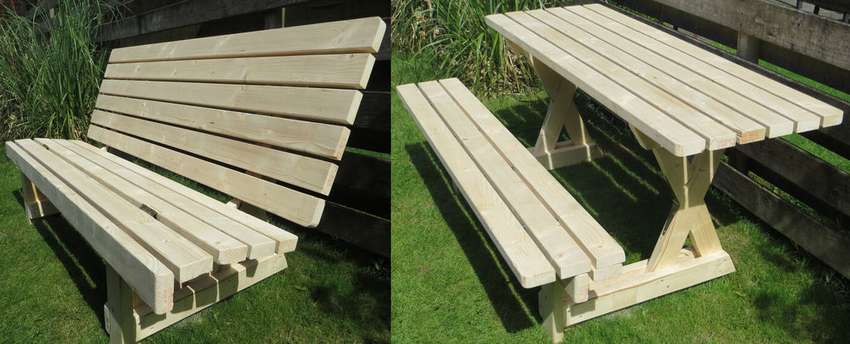
Folding picnic table and bench
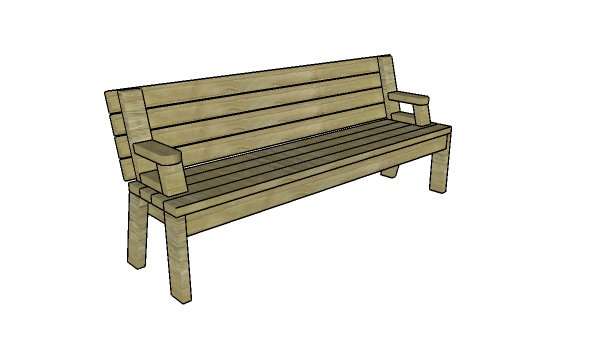
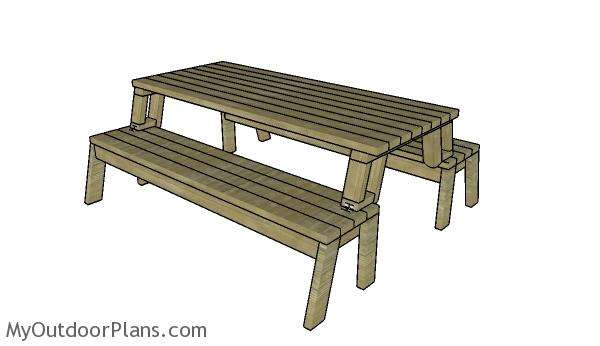
Simple picnic tablewhich turns into a bench in two seconds. Ideal for a site with limited space. All wooden blocks are two by four.
- A - 2 bars 2 × 4 - 35 cm, 2 pieces - 40 cm
- B - 2 bars 2 × 4 - 175 cm, 4 pcs. - 28 cm
- C - 4 bars 2 × 4 - 190 cm
- D - 1 block 2 × 4 - 14 cm, 1 pc. - 18 cm, 1 pc. - 38 cm, 1 pc. - 25 cm
- E - 4 bars 2 × 4 - 182 cm
- 14 pieces 2 × 4 - 20cm
- 2 screws
- nails for legs, self-tapping screws
- Wood filler, glue, paint
The first step is making the legs for the bench seats.
- Cut your legs according to the instructions on the diagram. Smooth the edges with sandpaper.
- The manufacture of the frame. Drill holes at both ends and insert the screws.
- Align the edges flush and make sure the edges are at right angles.
- Screw the legs to the seat frame as shown. Drill through holes through the top of the legs and insert the screws. Make sure the corners are square.
- Screw the rails to the seat frame, making sure that they are evenly distributed.
- To make equal intervals, you need to fit a sheet of plywood between the lamellas. Carefully align the edges. Drill holes through the rails and insert the bolts.
- After assembling the bench, it is necessary to make supports for the folding back. Start by trimming the components as shown. Trim the two ends of the components at an angle of 75 °
- Then trim the armrests for the bench. Round one end of the armrests with a jigsaw and strip the edges with sandpaper.
- After making parts for the armrests, drill through holes and fix all the parts with screws.
- Then attach the straps to the backrest supports as shown.
- Align the rails and drill through holes through the support before inserting the screws
- Place the backrest on the bench and align the supports as shown in the figures.
After that, you need to fix them in place with the help of hinges, so you can fold the table and turn it into a bench.


https://i.expert-h.com/en/stol/skladnoj-stol-svoimi-rukami-1000-foto-chertezhi-instruktsii#sigFreeIded119db2b7
Also table with picnic bench, with step by step photos, drawings
 manufacturing instructions can be read on the website.


https://i.expert-h.com/en/stol/skladnoj-stol-svoimi-rukami-1000-foto-chertezhi-instruktsii#sigFreeIdc0910f5dd8
DIY folding table


https://i.expert-h.com/en/stol/skladnoj-stol-svoimi-rukami-1000-foto-chertezhi-instruktsii#sigFreeIdc0982d917e
DIY folding table 200 photos


https://i.expert-h.com/en/stol/skladnoj-stol-svoimi-rukami-1000-foto-chertezhi-instruktsii#sigFreeIde1d8343b9d
DIY folding table 100 photos


https://i.expert-h.com/en/stol/skladnoj-stol-svoimi-rukami-1000-foto-chertezhi-instruktsii#sigFreeId7f1d6afaa2
Hello, I am the author of this article, so I look forward to asking questions for this article in the comments below, I will answer all !!!
If you have questions on another topic, ask them on our forum, we will answer you
- Two baskets of paper in 5 minutes (Master class)
- How to make a simple and compact table for a milling cutter from plywood
- How to make a soft headboard tile (Instructions + step by step photos)
- Cinder block benches: a convenient bench in 55 minutes
- How to make a bed with a niche: saving space (Master class)