DIY fireplace table 500 photos, step by step instructions
 a table with a fireplace in the country
In this article we will look at what constitutes table fireplace. In fact, this is a very interesting solution, both aesthetically and functionally. Furniture for the patio, where you can include a fireplace table, complement the interior of the patio and allow you to enjoy the good weather, fine cuisine and a group of friends.
But even if you live in an apartment, and you do not have the opportunity to do outdoor table with a hearth, nothing wrong. Can do do-it-yourself table with fireplace indoor, modern technology and smokeless fuel for fireplaces easily solve this problem. Here are some examples of outdoor tables for summer cottages and tables for indoor with table fireplaces.
Table with gas fireplace
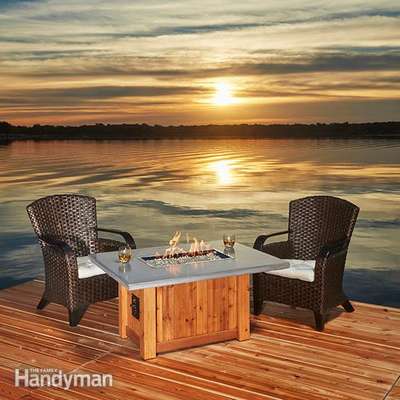
 If you like to enjoy the magnificent street view, table with fireplace - This is a great way to spend more time outdoors. The heat from the fireplace table will allow you to sit comfortably on the veranda or patio in cool weather. The design is often a standard-sized table with a fire center in the center. There are various options for the outbreak, usually this gas or biofuel, you can choose the one that suits you best. In this case, a gas burner is used. The step-by-step photos show the assembly order, so if there is a sofa on the veranda and you want to set up such a table with fire, this instruction will help you.
It’s hard to say how much this table will cost; it cost the author of the project practically for free. If you have a lot of wooden waste, a good friend who has a workshop and an old grill, you don’t have to spend too much money.
So what do you need:
- cement
- lava stones
- band-saw
- Miter saw
- a circular saw
- grinding machine
- welding
Concrete worktop
The top of the table is a rectangle of 112 x 53 cm. The middle is a piece of MDF, which is the space for the burner. It is cut into a cone on all four sides. This will simplify its removal after the cement has hardened. Fasten the wire and fill the solution. Leave the mold for a week so that the concrete dries well.
Burner and basket
Firstly, the burner and the container must be removable. Therefore, it is necessary to fix the iron corner, which is the flange and will be in the center of the table. Then make a mount that will hold the burner and the tray. The burner is made of a rigid pipe with holes drilled every 10 mm. Weld a piece of the coupling of the adapter for the gas tank.
Table frame
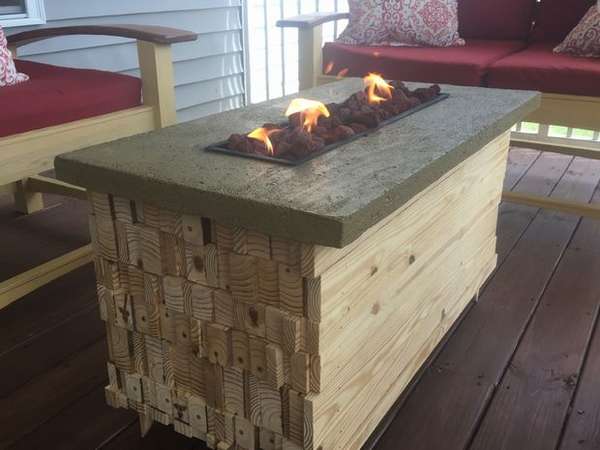
- The idea was to make the table look like a stack of bars with very small sharp legs.
- To do this, the author used mainly 2x10 wood trim. The legs are cut out with a square of 4 cm, and the ends are tapered to a point with a band saw and a grinder.
- Make the sides first. All boards are cut into several segments of different lengths, widths and heights.
- Then glue and nail the legs. The ends are made from a piece of chopped boards to match the height of the side board. The style is random. Just collect all the materials and glue them together.
- Then glue to the plywood sheet. One side is glued together as well. the other is pivotally mounted on the loop. Hold on dowels in the upper corner.
Lay lava stones
That's all, you can enjoy the cool fresh air with a cup of coffee.


https://i.expert-h.com/en/stol/1015#sigFreeIdce9733109c
Outdoor table with hearth
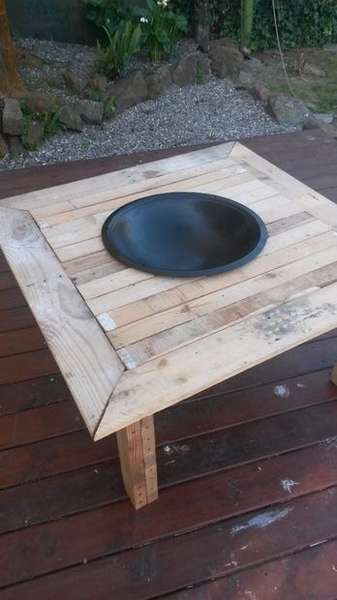 Actually very simple a table of pallets with a hearth in the center. You can certainly assemble it without any instructions, guided by step-by-step photos that the author of this project kindly posted on the Internet. The main thing is to prepare the material in advance and evaluate what will come of it. As experience suggests it’s much better to work with what you have than what you think you have. If you also intend to use old pallets, then be prepared for the fact that some of the material will be unsuitable.Therefore, when you find pallets, sort them, sort all the wood into categories, calculate the total dimensions. The author went to the manufacture of the table three pallets. The length connecting the legs is 1 meter in length and has been screwed and glued.
- Using the base, set two boards to make a square, the rest of the countertop is aligned and fastened from the bottom.
- Calculate the middle of the table and set the hearth.
- Then add 5 boards, 2 on one side and 3 on the other. This is enough to keep the hearth in place.
- Fastened the legs with a large number of screws.
- Nail two more boards to the legs, to the inside of the table, to make extra support. It does not look very beautiful, but they are not visible from the inside.
- Cut small planks of the required size to fill the gap.
- Buy a can of black heat-resistant paint and paint the hearth.
Look like that's it. True, the author did not say anything about how the hot center will interact with the tree, so I advise you to foresee this issue and add some insulation material to the points of contact of the metal with the tree.


https://i.expert-h.com/en/stol/1015#sigFreeId076815de58
Hearth in the center of the table
 Polished concrete table with a hearth in the center oak with sea shells, marble, broken glass, shredded. White cement worktop mixed with fiberglass threads and nylon mesh for durability. Everything that the author was able to find went into the matter - old boards, slate fragments, large stones from the beach, sea shells, pieces of glass and everything that, according to the author, makes the finish better. We can say that the table is made of "past" materials, but in the finished form it will decorate any veranda or patio.
The author did not provide step-by-step instructions, but took some photos. I think assembling a table is not a problem, the whole chip is in the concrete countertop. In this mixture, the author used ballast, yellow building sand, plaster sand, white cement, fiberglass threads, nylon mesh and insulating board inserts to make the table easier.


https://i.expert-h.com/en/stol/1015#sigFreeId50a53a8956
Street hearth in the country
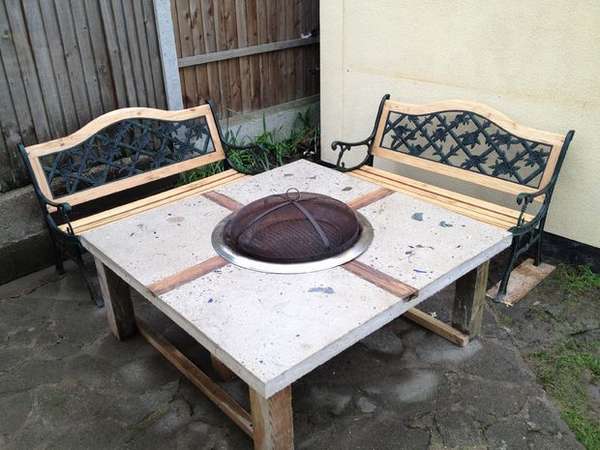
 According to this instruction, you can build a three-stage DIY hearth. All levels are made of different material, so you can learn several new skills at once. The lower tier will give experience on how to lay a foundation of stone. Medium - how to work with metal. Upper - how to make a metal frame and cover it with tiles. You can use the same skills for other projects that you might want to implement. More importantly, your campfire site can be made in any shape or material you want. Also here you can learn about some things that should be considered when building a hearth for a fire.
Below you can find step-by-step photos, a person with experience will find complete information there. If you are interested in more specific details, the author has more than detailed instructions on the site, with nuances and explanations. I did not undertake to rewrite it, it is really very long, you want to read, the link to the site is under the gallery.


https://i.expert-h.com/en/stol/1015#sigFreeIddb712890ae
DIY outdoor fireplace
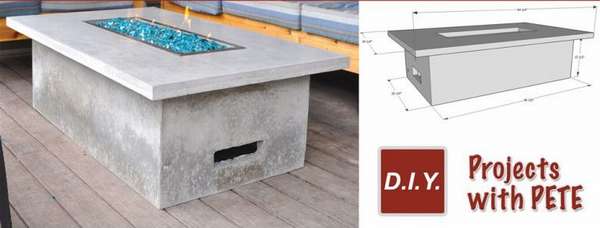
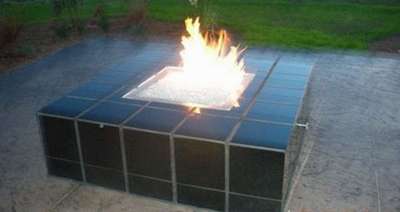
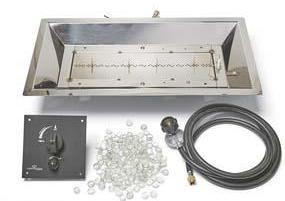
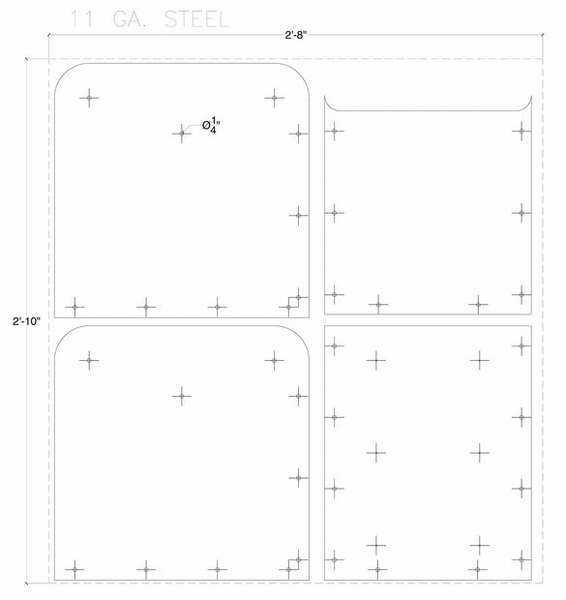
 This is a short instruction on how to do outdoor gas fireplace, consisting of two separate parts - the base in the form of a box and concrete countertops. You also need to buy a burner, a container for a fireplace, fire glass and a kit for connecting gas. For airflow, 2 ventilation holes were made on opposite sides of the base. To ensure safe operation of the burner, follow the instructions. Hire a good gas specialist and inspect the assembly before use. Yes, and do not use ordinary glass for filler.
Estimated construction weight 188 kg
How to make a street gas fireplace
- Cut melamine for countertops. Use a circular saw to cut out the base part for a concrete worktop.
- Cut side stripes. Side strips will hold concrete. You cut 4 side strips up to 57 mm wide.It will make a concrete cover 38 mm thick, because an additional 19 mm is attached to the side of the base element.
- Cut the foam. Used to create fireplace openings. You can choose all kinds of sizes. Typically, a fryer is 75 by 25 cm.
- Attach the foam and sidewalls. Attach the foam to the base. Tighten the sidewalls with screws.
- Seals. Apply silicone around the edges to give the concrete a slightly chamfered top edge. Remove excess with a paper towel.
- Install the steel sheet. Take a sheet of steel 4 × 8. Cut to size using a cutting tool. Leave 3 cm between the sheet and the side walls. Trim around the foam. Bend as necessary so that it lies flat.
- Assemble the mold for the base. The base mold mainly consists of a box placed inside the box. The outer box is screwed on.
- Base. A total of 2 ventilation holes of 15 and 8 cm are recommended.
- Inner form. Make an inner box. Drill holes to connect the boards from the inside.
- Fasten the inner box to the bottom with screws. Make sure there is a clearance of 38 mm. This is the channel into which the solution will flow.
Mounting
- Prepare and fill solution
- Mix the solution. Use the bucket to pour it into the canal. Stir the solution periodically to fill all areas of the mold and remove air pockets.
- Set the boards in the center and clamp them outside.
- Pour the solution into the upper form of the table. Distribute evenly until it is more than half full. Stir occasionally.
- Fill the rest of the mold and align.
- Allow concrete to solidify. It is recommended to wait at least 4 days.
- Move the sides of the form using a chisel.
- Clean the base with a grinder and sandpaper.
Gas kit installation
The kit is connected to a standard gas cylinder, has a valve switch and an air regulator that enters the bottom of the hearth.
Turn on the burner. The burner works like a regular gas grill. Turn on the gas and use the lighter to ignite the flame.


https://i.expert-h.com/en/stol/1015#sigFreeIdbd42a6a220
DIY fireplace
Four options are shown here. how to make a table fireplace. True, all these tables are made to order in the workshop, but they can serve as an example if you want to make something like this with your own hands.
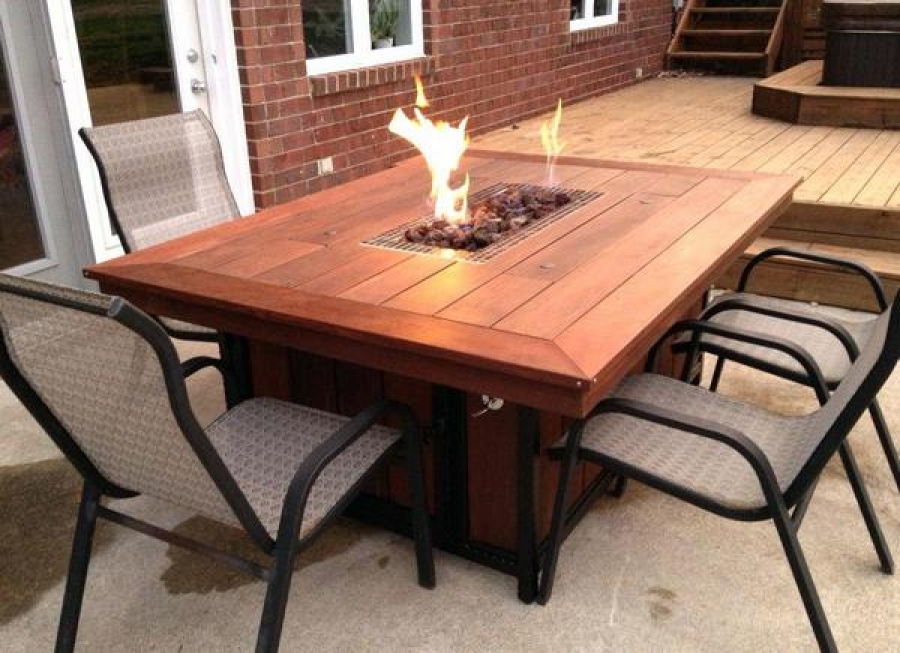
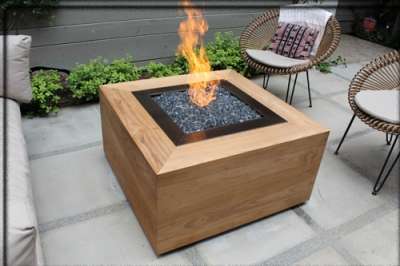 The first table with fireplace with teak trim, stainless steel interior. Battery ignition. This is a street version, designed for warmth and comfort, which can be installed anywhere on the site of a country house. The hearth runs on natural gas. In the photo in the gallery you can see how the burner bracket is installed and how it can be removed for battery maintenance. Electricity is installed to adapt the battery-powered ignition to the transmitter in the event of a power failure. These are not step-by-step photos, they just show what the design is.


https://i.expert-h.com/en/stol/1015#sigFreeId5536ebd63d
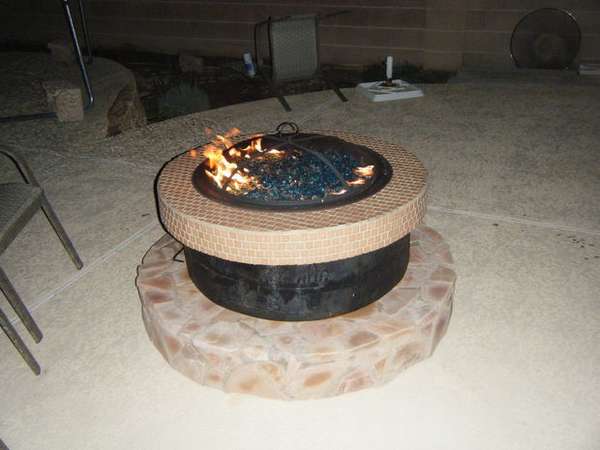
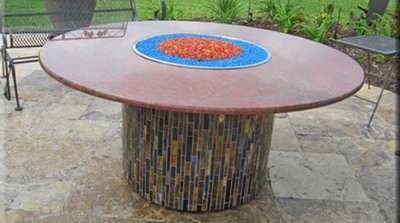
 This a table with a hearth works from a gas cylinder, therefore, the base serves as a housing for concealed placement of the tank. The most beautiful in this design is, of course, the countertop. In principle, everything can be done with your own hands, but if there is no such possibility, something like that can be ordered in the workshop. For the project, 3 kg of crushed lava stones, 2.5 kg of bronze glass, half a kilo of Starfire glass and 1.5 kg of amber glass were used as the base filler.
But again, this is just an example, there are many auxiliary materials that can be used as a filler.


https://i.expert-h.com/en/stol/1015#sigFreeId2de89e84e2
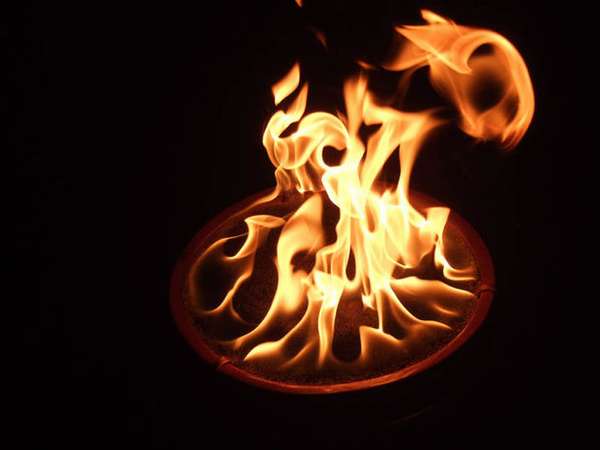
This is not quite a table, rather a hearth for a bonfire, but it can also serve as such, the main thing is that it is beautiful.


https://i.expert-h.com/en/stol/1015#sigFreeId73c91e13c5
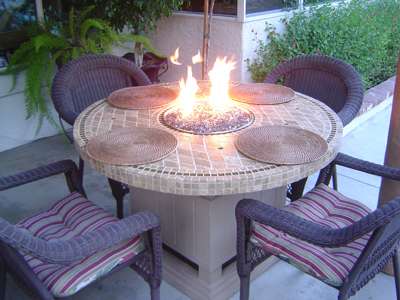
Another beautiful table, a distinctive feature, a beautiful mosaic base. The first two photos in the gallery show a 60 cm stainless steel bowl and a 45 cm ring also made of stainless steel.


https://i.expert-h.com/en/stol/1015#sigFreeIdd1dca28253
Gas fireplace table
 The fireplace table offers warmth, beauty and a place to eat, drink and socialize in the fresh air. With a wide range of products on the market, it is sometimes quite difficult to choose the right option. They are either too expensive or do not fit the needs. This author faced this problem, so I decided to make do-it-yourself table with a hearth. Of course, in the absence of skills, this is also not an easy task, but quite feasible. Propane gas will be used in this project, and, of course, there are some risks. Be careful not to do anything stupid and follow all safety instructions on the devices you use.
For those who already have metal skills, this project should not be particularly difficult. Basic operations - simple welding, metal bending, cutting and soldering
Necessary tools:
- roulette ruler
- metal cutting tool
- grinding machine, edging tool
- grinder and other paint removal and metal cleaning tools
- copper pipe tool
- welding machine, any
- safety glasses, good gloves
- black paint
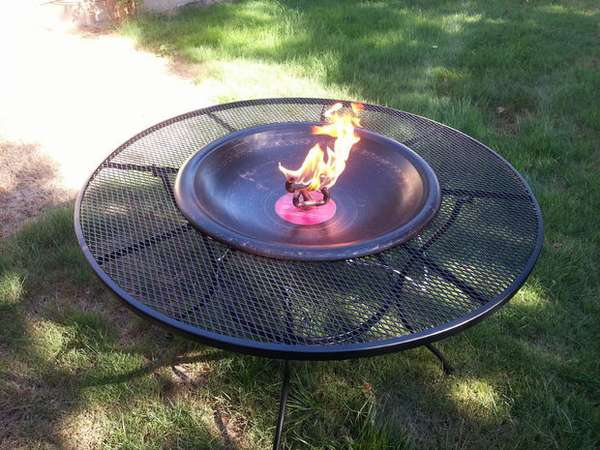
First of all, you need to purchase an iron garden table. You can buy a special bowl for the fire, but I don’t think there is any reason why stainless steel kitchen bowls cannot be used. You just have to keep the flame in the area with something that won't melt. No matter which steel bowl you use, it will determine how accurate you are when you carve the center of the table. The rim of the bowl will hold it on the table, so the wider the edge of the bowl, the better.
- Start from the table
Start by pulling the plastic center cover out of the table and throw it away ... The cover is no longer needed for this project, but using the center hole will help maintain the cutout and accuracy.
Set the table on the goats and cut a hole in the center of the table. The author used a dremel for this purpose, this is such a special device designed for cutting metal, well, whoever is not in the know. To define a circle in the center, you can use anything to mark the location of the radius around the table. - Saw the details
You can use a number of tools, regardless of what is at your disposal. The author used a grinder with a cutting disc to cut off the upper part and support rods. If you have a dremel, you can trim them, but that will take too many disks. A good thing is a plasma cutter, again, if you have one. However, even if you don’t have any equipment, you can always use hand tools! - Cut corner support
Turn the table over and make sure the goats are close enough to support the table when cut. When you cut the corner support, this will help prevent the table from bending. - Check how the bowl sits
Turn the table over and place the bowl to see if it fits. - Cut umbrella support
The bottom of the table support ring has an umbrella mount support. The author deleted it in order to deliver a gas bottle, as it just seemed like a good place to store it. Convenient, stands on the sidelines, no need for a long hose.
You need to make eight cuts. Do it slowly, cut along, but not on top of the frame. After the support rods are cut off, simply remove the umbrella support.
Now you need to bend and weld a piece of a flat rod, this is the support that has been removed from the center of the table. - Insert support plate
Place the table on the goats upside down. Pre-bend the flat rod into a “round shape” to prepare it for installation inside the cutout. To find out the length of a flat bar, you just need to use geometry, C = πD (circle = diameter pi) or technically C = πR2 (circle = pi radius 2). Thus, if the hole diameter is 610 mm, you can calculate the length of the flat bar, 6.10 cm X 3.1415 = 192 cm. Therefore, you need a piece of a flat bar with a length of at least 193 cm. - Clean metal
Use a grinder with a grinding disc for cleaning. Once the metal has been cleaned, you can begin to bend it in a circle. Then insert the strip into the hole using the clips. - Weld strip
When the circle is ready, fasten it inside the notch. Use a clamp so that the beginning of the strip is in the middle of the twoangular supports. Use the clamp to hold it, and then attach the second clamp between the first and second corner stops. This allows you to pull the bar right up to the notch and the next corner support.
Grasp the first corner support beam and the flat bar to lock the steel bar in place. Then simply install the clamps between the corner support rods to pull the metal in a tight position around the circumference of the cutout, and also firmly press it to the corner supports. Make sure you align the strip with the top of the table. When you turn the table back “to the right,” the flat strip will be flat around the top of the cutout.
Continue to work around the circumference sandwiched between the corner armrests of the countertop. - Cut and weld flat rods
Use a C-shaped clamp, as the metal will become very hot when cutting and welding at both ends. Align the two parts so that the top of the table is flush and the wide side is at the bottom. Grasp the two ends together and cut between the two parts.
Align and weld between the two end parts (butt joint).
Remove the C-clamps and make a seam on both sides of the butt joint. Continue cooking around the table to make a good seam on both sides
Once all the supports are securely welded to the flat bar, add a seam between the flat bar and the metal worktop to make sure it is tight, strong and reliable. - Check out
Turn the table back onto the supports so that the bowl is centered. Check if everything is holding tight. If you are going to use charcoal, firewood or any other source of fuel, then your table with a hearth is ready. If you want to use bottled gas, then continue. - Burner manufacturing
The author came up with a fairly simple way to regulate the flame. You need to buy a 1/2 inch small copper pipe, T-fittings and 90 ° turn signals, as well as a fitting going from the pipe to the FP brass fitting to the FIP fitting that connects the propane hose to the cylinder.
Start by cutting out several 1-inch (2.56 cm) copper pipes for use with the burner. Install the inch pipes in the center of the T fitting and attach to the FP fitting. At both ends, add another handset. At the two open ends of TI, put a 90-degree turn signal, and then another one on top of them, so that the flame from all 4 corner points gathers in the center. In general, it’s better to look at the photo, it will be clearer. - Soldering of copper parts
The author soldered the pipeline and fittings along with the brass filler, since the melting point of the solder is too low to work with this device. Regardless of the design, you must ensure that all joints are covered with a filler that will heat. Copper is an excellent conductor of heat and cold, so it quickly spreads through the burner and quickly heats up. - Attach the burner to the bowl
After the burner is ready, drill a hole in the center of the bowl. Place a large washer on both sides of the bowl, insert the burner into the hole, and screw the copper fitting on the bottom of the bowl.
Insert the bowl into the table and attach the gas hose to the bottom fitting of the burner. Open the cylinder and look at the flame level. - Fill the bowl with your favorite filler. It could be gravel, sand, marble, water, or something else. Propane in this environment burns dirty and leaves black soot above everything you have in the bowl. So it's up to you.


https://i.expert-h.com/en/stol/1015#sigFreeIddfd5197fe1
Here is the same option, only the burner is made differently. Here, the flexible copper tube is bent into a coil, and a cap is soldered to the outer end, and the outer reducer to the inner end. Soldered to the gearbox in the short part of the pipe at an angle of 90 degrees.


https://i.expert-h.com/en/stol/1015#sigFreeId7bd4e7ca27
Outdoor gas fireplace
 Just a gas street hearth made of copper fittings and a flower pot. The author of the project presents his manufacturing method. outdoor gas fireplace. In principle, a similar project was already described in this article, just the author took a slightly simplified approach. Here, the author uses easily accessible copper pipes and fittings, where you can do without welding, only soldering is required. In addition, the fire bowl is a simple ceramic flower pot, not a stainless steel boiler.
Before you start work, keep in mind that the construction and use of this gas fireplace is associated with the likelihood of a fire. When creating and using this device, follow all safety precautions. Remember, following these instructions, you do everything at your own peril and risk.
Step 1: Materials (inches 1, 2.54 cm)
- 10 'roll of 1/2 "flexible copper tube
- 10 'roll of flexible copper pipe 1/4 "
- 5 '3/4 "rigid copper tube section
- 3 3/4 "copper pipes
- 3 T-shaped copper fittings 1/2 "to 3/4"
- 3 T-shaped copper fittings 1/2 "
- 1/2 "copper FPT adapter
- Nipple 1/2 "MPT pipe length 1.5 inches
- Turn signal 90 ° 1/2 "FPT
- 1/2 "MPT to 3/8" torch adapter
- 2 large stainless steel washers
- 2 large silicone o-rings (with an inner diameter greater than 3/4 ")
- High pressure gas regulator
- Ceramic flower pot
- Sand or similar fill for flower pot
Tools and equipment:
- Lead free solder
- Lead Free Soldering Flux
- Wire brush or sandpaper
- Pipe cutter or hacksaw
- Teflon tape
- Drill and 1/16 "bit for drilling holes in the burner
- Spring hose
- Soapy water for leak testing
Step 2: Making a stand
- First make a stand for the flower pot. Depending on the size and shape, you may have to slightly modify the design presented. This stand is a three-leg construction based on a ring for stability and strength. The first and most difficult part will be 3 arcs that span the flower pot. Use 1/2 "tubes, gently and slowly increase or decrease curvature. Also use a pipe cutter to cut 3 identical arc segments.
- With the 3/4 "section of the pipe, you can make each leg up to 50 cm long, but this is at your discretion, just the author did not want the stand to be tall and heavy.
- Once the three legs and arcs are cut out, you can start the installation to check the correct fit. You may need to bend the arcs or shorten them to fit the supports. You can increase the number of contact points by straightening the arcs so that they touch the pot in the middle. Take a 1/2 "flexible tube and make a circle, carefully bending it until it reaches the required size. You may have a lower circle inside or outside the legs.
- Finally, you must cut 4-6 "sections of 1/4" copper pipes that will eventually be bent over the edge of the pot to serve as the pot holding mechanism on the stand.
Step 3: Solder stand
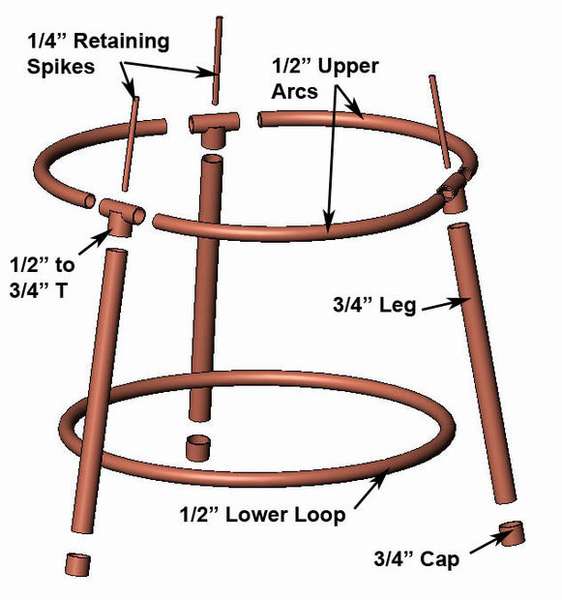 The burner must be gas tight, so it is important that the connections are reliable, while the stand just needs to be sturdy.
- The basis for brazing copper fittings is that you first clean the outside of the end of the tube, which must be inserted into the fitting using a special wire brush or sandpaper. For work you need pure shiny metal.
- Take care of the soldering procedure. It is easiest to solder the stand when it is fully assembled.
- Use high temperature tape to hold parts in place while soldering. This tape is burned by direct heating, but will not melt when touched by hot copper pipes.
- Take a look at the photos to get an idea of how the connections are arranged.
Step 4: Assembly and soldering of the burner
- Some worry that when using soldered joints for a burner, at high temperature and gas pressure they will blow out, that is, a leak will occur. In fact, this is unlikely. In addition, modern tanks have a valve that closes automatically if the gas flow increases too quickly, indicating a sudden leak.
- The burner mainly consists of two arcs connected by 2 fittings. The center spoke has a T fitting in the middle that points to a hole in the bottom of the flower pot. To make it clear, see the photos.
- First you must bend a circle of 1/2 inch tube that fits inside the flower pot and is approximately 5 cm from the side walls when it is 5 to 8 cm below the sand. It’s hard to bend this 1/2 ”tube without breaking it, so if necessary, use a spring bend or fill the tube with sand. The circle does not have to be perfect.
- Depending on how tall you want the burner to sit in the flower pot, you will need to adjust the 1/2 "tube length between the center T-fitting and the FPT 1/2".
- After all parts are ready, clean them and then connect for soldering. Solder it all together. Do not drill holes.
Step 5: Assembly and leak test
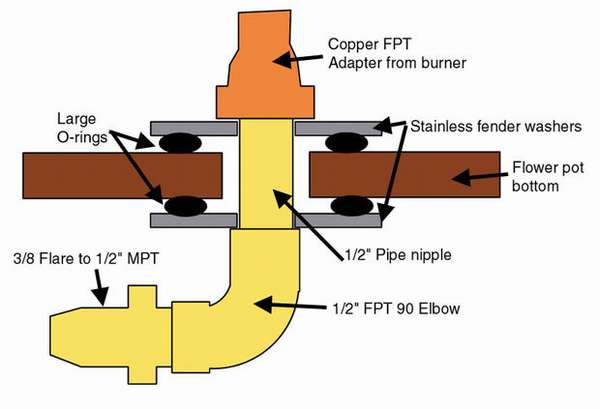 The next step before drilling holes in the burner is to assemble everything and check for leaks. Then you will be sure that the gas does not flow in any of the solder or pipe connections. Depending on the thickness of the bottom of the pot, you may need a longer or shorter nipple to connect the hole. Washers and o-rings are needed in order to firmly grip the pot, this will provide a cushion when tightening the fittings, and sand will not wake up.
- Check out the photos to get a feel for the installation. The sketch shows a cross section of the author’s installation ..
- Be sure to use Teflon tape on all pipe thread fittings, but not on the torch adapter to the gas hose.
- Reassemble all fittings and burner. Connect to the cylinder and create a little pressure. Apply soap and water to the tubes and burner and watch for bubbles. If you do not see bubbles, then there is no leak.
Step 6: Drill holes in the burner
First, disconnect the burner from the rest of the system and remove all Teflon. Then take a 1/16 inch drill and every 3 to 4 cm drill holes at the bottom of the burner.
Step 7: Fill with sand and experience
- Fill the flower pot with sand.
- Connect the gas hose to the flare fitting at the bottom of the flower pot, and then the hose to the regulator and the regulator to the cylinder.
- Place the pot on a copper stand, and then bend the holding spikes along the rim into the sand so that they hold the pot firmly.
- Turn on the gas valve on the cylinder. Slowly turn the pressure control knob to gradually increase the pressure until you hear a gas flow noise. If you turn the handle too fast, the safety valve may turn off, it will sound like a click. You will have to stop feeding until you hear the valve open again. As soon as you hear the noise of the incoming gas, hold the burning match or paper torch to the sand. You may have to wait until the sand is filled with gas. Once the gas has ignited, adjust the flame level by turning the pressure regulator valve.
Step 8: The work is done
Cooking on a gas fireplace is not recommended, but you can certainly fry bread or marshmallows. Have a rest and enjoy!


https://i.expert-h.com/en/stol/1015#sigFreeId446f769a08
DIY grill table
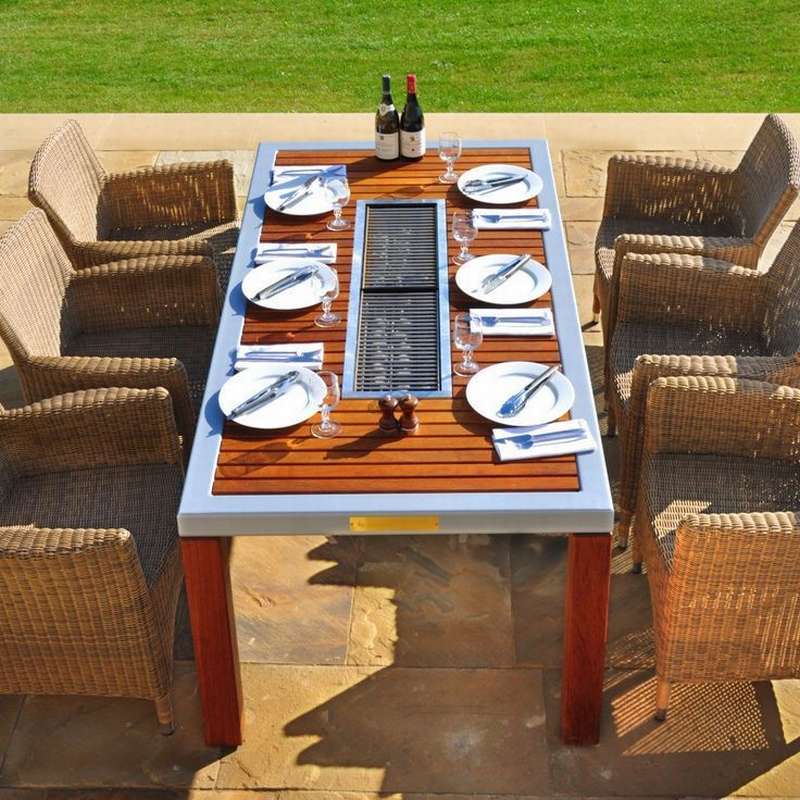 So original grill table any company will be pleased. Indeed, its design allows you to control the cooking process. And do not be afraid to burn your feet on a hot metal box. The comfort of the guests is provided by the thoughtful arrangement of this specific furniture. Fire safety is also taken into account to the smallest detail.
So, we are building this miracle with our own hands. To work, you will need the following tools and materials:
- square metal profile;
- boards or plywood;
- wood glue;
- fiber cement boards;
- paint and varnish for wood;
- silicone sealant;
- wood glue;
- epoxy resin;
- screws, bolts and nuts;
- welding machine;
- Bulgarian;
- magnetic corners;
- grinder, jigsaw, tape measure;
- drill with drills, screwdriver;
- protective equipment - mask and gloves;
- roulette.
Not only the table as a whole, but also every detail of it should be carefully calculated to a centimeter. Therefore, it is recommended that before starting work, it is very thorough to think through everything, schematically depicting all the details of the structure. We proceed in stages:
- We cut the metal profile into segments, from which later we weld the frame of the future table.
- We weld a rectangular frame from the segments. We measure the same distance from each edge of this frame and weld 2 transverse crossbars.
- We weld 2 more - longitudinal ones to these crossbars. This will form the basis for the metal box and its wooden protection.
- We weld the legs to the base using magnetic corners. So the legs will be welded at the right angle - strictly 900.
- We grind the places of the welds with a hard nozzle for cleaning metal.
- We make a countertop. Suitable for this plywood, but quite durable and waterproof. If boards are used, they must be properly processed. The deck board has proven itself very well in this role.
- The corners of the table should be rounded off, cutting them off with a jigsaw, and the edges of the countertop should be sanded. The table should not have any sharp corners and edges.
- We insert rubber plugs into the table legs, specially prepared for this in advance.
- In the countertop, strictly in the center, we make a rectangular cutout.
- Bending a sheet of metal, we make a box in which there will be coals.
- We attach a wooden case for a metal box to the countertop.
- For fire safety we fasten fiber cement tiles in all places where metal parts come in contact with the tabletop.
- We put the legs of the table in wooden covers, the sharp edges of which are also gently sanded, and fastened with sealant.
- We paint the wooden parts with black paint.
- We cover the inner metal box with insulating material.
- We drill holes for bolts in the countertop.
- We fix the tabletop to the frame with bolts and nuts.
- The surface of the table should be sanded again with the smallest sandpaper.
- We fill the syringe without a needle with epoxy resin and fill it with bolt caps.
- From the remaining board we make a cover for the table, it will cover the recess when no one will use the grill.
- The surface of the table with the lid is varnished. When it dries, the table is ready to eat.
Now it’s enough to place burning coals in a metal box, put the box on the table and cover with a wire rack. A table with a grill is ready to host friendly companies.


https://i.expert-h.com/en/stol/1015#sigFreeId046497d719
Fireplace table
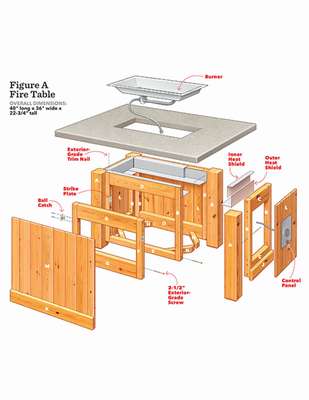
 Fireplace table - A great addition to the summer cottage or the courtyard of a country house. This is also a great opportunity to demonstrate your abilities. Assembling this design is an interesting lesson, because it is necessary to use various skills: woodworking, masonry, working with metal. This requires several additional tools. The author built this project with the help of simple hand tools, a miter saw, a circular saw and a trimmer.
You can do all the cuts with a circular saw and fasten with nails, but it will take much longer and the final product will look rough. You will also need a drill, concrete spatula, large wire cutters or small bolt cutters, a wheelbarrow or a mixing bath.
Burner kit
 The burner runs on propane and lasts from 6 to 12 hours. You can warm your hands with the heat of the fire, but you should not count on more; this gas fireplace can’t replace a real big fire. So this flame can be called more decorative than practical. A gas bottle is stored under the table, but you can route a pipe or extend a hose to connect to the natural gas in your home.
Drawings of the table
- The cone of the feet. Saw off the bars on the miter saw. Fasten the bottom edges approximately 1/2 inch.
- Saw and assemble the frames.
Prepare 3 boards of 2.5 m each, cut them in half to make 6 pieces of 1.25 m.
Fasten the sides of the frame to the top and bottom with two screws. Connect the bottom of the frame with one screw to each side. - Attach the side frames to the uprights
Drill three holes on the sides of the side frames. Mount the frames on a work surface. Align the frames and secure the frames to the poles with three screws. Pay attention to the direction of the fibers. - Attach the front and rear frames
Install the side frames and posts upside down. Align the inside corner of the front and rear frame with the inside corner of the posts and fasten them with three screws through the drilled holes. - Set angle brackets
Cut off angle brackets. Use the square to check that all poles are at right angles to the work surface. Install the brackets on each side through the pre-drilled hole. - Fasten the side strips
Cut the side cladding plates and the back casing to the desired length. Apply building glue to the frame and set the bar. - Fasten the boards
Saw off the back and side boards of the necessary size. Apply glue and fix the boards, two at the very top and two at the base. - Make a door frame and install the latches
Cut the sides of the frame and the upper and lower door frames and screw them together.  Latch and plate
The plate can be installed on a wooden surface, there is no need to make a tie.- Attach the pressure plates
Install the door frame in place, the lower part of which should rest on the lower frame of the table. Mark the top and bottom positions of the plate. Use the locking plate to grip the washer on the door frame as a guide. Set the plates back so that the curved portion is facing inward. - Fasten the boards
Cut the boards to the desired length. Apply glue to the frame and install gaskets for boards that you can lean on. Fasten the boards with two nails. - Fasten the trim
Apply a seal to the upper side of the door strip. Do not plug the tops of the other three boards so that water falling over the boards can drain freely. - Install an external heat shield
Cut parts from galvanized metal. Flush with the top of the box. Secure the pieces with decorative studs or small screws. Seal the corners with high temperature silicone. - Install an internal heat shield
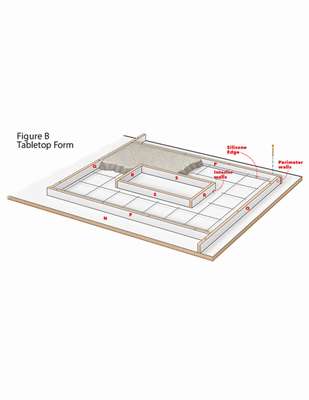
Cut galvanized steel handle. Bend the bottom edge with a hammer. Set each side so that the bottom is up and the curved edge is on the outside of the box frame. This will create the required small air gap. - Make a table form
Cut the melamine base with a circular saw. Use the frame to mark the outline of the shape. Before trimming the inner walls, measure the burner. Fasten the walls with screws located at a distance of about 25 cm. Melamine easily breaks, so be sure to drill holes for the screws beforehand. Fix the corners with decorative studs. - Round the edge with silicone
Spread the silicone around the perimeter. Insert it into the mold using a wall plug with an end cut at an angle of 90 °. Do not use silicone on the inside edges that will be covered by the burner. 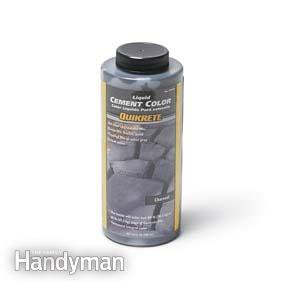 Prepare a solution
Mix the solution in a wheelbarrow or mixing tank using a rake or garden hoes. The author decided to darken the top by mixing Quikrete Liquid Cement Color in two bottles of paint. It is very important to get exactly the same amount of dye in each bag of the mixture. If you mix each bag individually, first mix the dye in a small amount of water and divide it into three equal parts, one for each bag.
Follow the directions for any product you use.- Fill the form
Set the form on several boards, leaning on the goats. The shape should be fairly even. Spread the concrete with a spatula. Remove voids and air bubbles. - Set to grid
A wire mesh reinforces the top. Regardless of the size of the mesh you are buying, keep it at least 5 cm from the edge. Once the mesh has been laid, lay the mortar on top. - Clean up excess solution
Walk along the edge of the board to scrape off excess concrete. Try not to shake too muchGet the whole shape. Allow the solution to harden a little before smoothing with a spatula. The surface should not be absolutely smooth, because no one will see it. - Completion
Take out the screw and remove the mold walls with a hammer, a rod or a durable scraper. Have someone turn her upside down. Seal the countertop with sealant for external use. Place the table in its intended place before mounting the top. Apply the remaining heat-resistant silicone to the top edge of the table.
Insert the burner and connect the gas hose in accordance with the manufacturer's instructions. Fill the burner with the recommended amount of stones. Too few stones will cause overheating; apply too much - the flame will be too high.
The work is finished, you can invite friends and enjoy the admiring glances.


https://i.expert-h.com/en/stol/1015#sigFreeId32caee1e71
Table hearth
 You do not have your own site where you can organize a place for a fire? There is no way to build your own fireplace? The simplest and most feasible option is table hearthas the author of this project, a college student, did.
You need a few things for this tabletop.
- Cement 10 kg
- Disposable cup (for cement)
- Large kitchen bowls with a diameter of 35 cm Lip brush
- Biofuel for fireplaces
- Lava stones, if you get it.
- Gloves
Operating procedure
- Prepare the cement, follow the directions on the packaging.
- Set the mold by placing a smaller bowl inside the cement.
- Check cement every 5 minutes until proper positioning is achieved.
- Level the cement to the line drawn inside the bowl.
- Depending on the temperature and humidity of the surrounding area, remove the smaller internal container.
- Flatten the top edge.
- Shape and texture the hearth using a brush or sponge.
- Wait another half hour or so before removing the pit for final drying.
- While drying, prepare the stones for the bowl. Sort the small pieces to fit inside.
- When done, set the fuel can in the middle and surround it with small pieces of lava stone.
- Perhaps a simple cement look is not exactly what you would like, so you can paint it in your favorite shade.
About security.
Since you are creating a fire for a room, there is always a potential fire hazard. Therefore, never leave the fire unattended and use it in a safe place.


https://i.expert-h.com/en/stol/1015#sigFreeId552b4908f1
Biofuel tabletop fireplace
 This is an instruction about how to make a decorative table fireplace. The flame in the photo may look small, but actually burns perfectly. You will not need a lot of materials for this simple design. Find a plastic container, or box, or something else that looks beautiful. The upper walls of the bowl can be made of plexiglass or ordinary glass. Any grate, even from an old refrigerator. And dial beautiful pebbles. The main element is fireplace biofuels, an excellent type of fuel, which today is widely used in Europe for the combustion of eco-fireplaces. You don’t need special tools - a saw, a razor blade, and buy silicone sealant.
- Take one of the glass panels and place it on a solid, flat surface.
- Apply silicone along one edge of the glass. Take the second glass and set its edge in silicone. Lock in an upright position until the silicone dries. Do the same on the opposite edge with the third glass.
- Once the two silicone edges dry, lift the three panels vertically and apply silicone to the remaining edges. Take the fourth glass and attach to the box. You can also use a wooden plank to hold the glass upright until the silicone dries.
- Do not worry if the silicone is smeared, it can be removed with a razor blade as soon as it dries.
- Place an object on which your fuel tank will stand. In this case, the author used an ordinary tin can of coffee. For reliability, you can fix it with stones.
- Cut the metal grill so that it fits inside the glass box and rests on the edges of the container. Just mark it with a marker, and then saw it to size with a hacksaw.
- After that, install the grate on the container, place the glass structure on top to see how the grate enters the glass box.
- After trimming the outer edge of the grill, cut out the square in the center and attach it to the rings to make a snap. This makes it easier to remove the fuel tank when it runs out. Install the fuel can inside and place the net on top. Draw a square around the outer edge of the can, and then cut the shape.
- The rings used by the author are small items used to make jewelry.
- When you make a glass box, place the grate on the container, and then lay the glass box on top. Make sure the grill is inside the glass box and rests securely on the inner lip. If all goes well, remove the grill and use silicone sealant to attach the glass box. Apply silicone to the rim of the glass box, and then install on the container. Add more silicone to fill any gaps.
Put stones on the grate and you can light a fire to see what happened.


https://i.expert-h.com/en/stol/1015#sigFreeId79786f787f
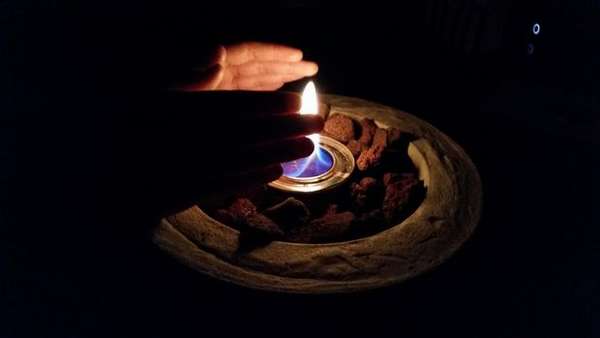
Table hearth
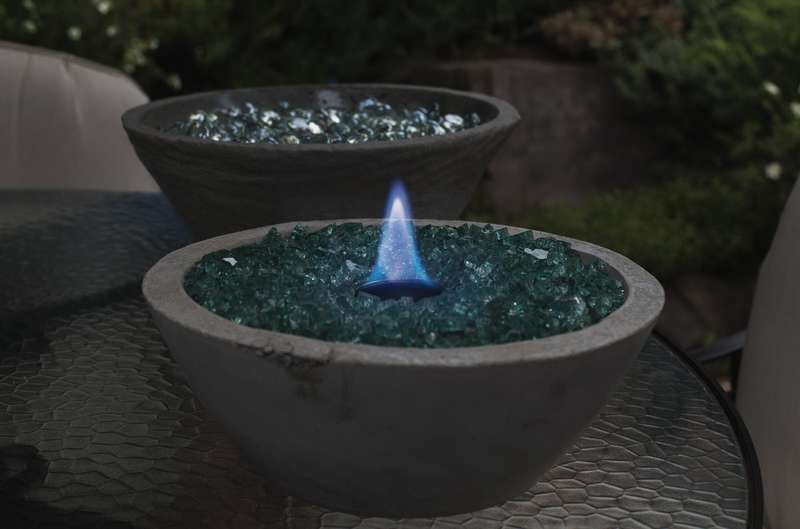 This miniature campfire bowl small enough to fit on a small table on the veranda or patio, but at the same time its flame is enough to create a comfortable atmosphere, fry marshmallows and just sit with the company in a cozy atmosphere. At least, for lighting a small veranda or arbor, this mini-fireplace is definitely enough. To make such a cup with your own hands you will not need a lot of materials and tools, just a pair of disposable gloves and pliers.
In principle, all the materials you need are shown in this photo.
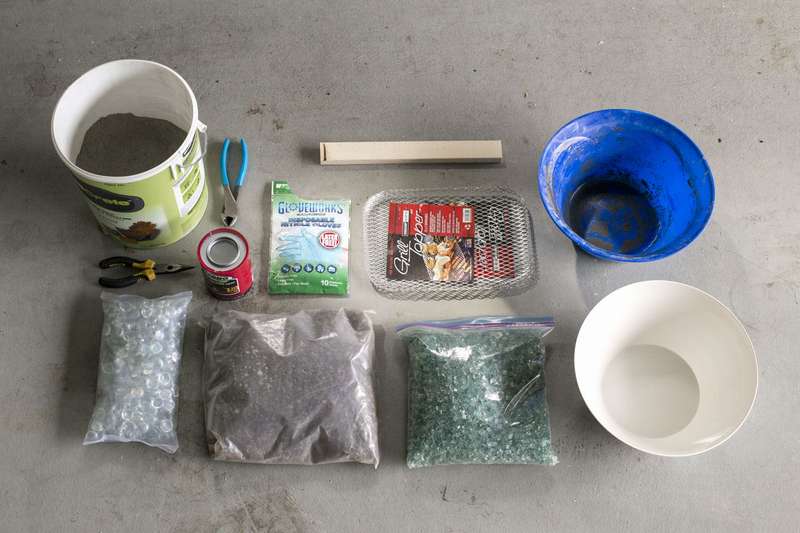 Materials
- Large plastic mold bowls
- Mixing bowl or ladle
- Lava stones for the bowl
- Fire glass
- Disposable grill
- Biofuel for fireplaces
For this project, the author used ShapeCrete, which is an easy-to-use, high-performance concrete capable of molding. You just need to add water and get clay-like concrete, with which you can do everything from home decor to daily repairs. It is like clay, but it becomes hard and strong in about 24 hours. Do we have a similar thing, I don’t know, but you can experiment with clay or ordinary cement. But if you find ShapeCrete, then of course buy, judging by the description, a really wonderful thing.
- In general, prepare a solution, cover with a piece of plastic and let it dry.
- When the concrete has dried, remove it from the bowl. Use bowl oil so that the cement can easily move away from the plastic!
- Sand all roughnesses with sandpaper.
- Prepare the hearth
- Fill the bottom of the concrete bowl with a layer of lava stones or other filler. It is important to use fire-resistant stones and glass, which will not collapse when exposed to heat.
- Create space for the flame.
- Make a circle of wire of the same height and width as the fuel can, making it easy to replace after use. Squeeze the ends of the ring together.
- Final steps
Once the wire mesh and fuel tank are installed, fill the space with lava stones. We made a small circle of wire to cover the top of the can, and then place it on top of the fuel tank. When you cover the container with glass crystals, you can easily remove the top to open the flame.
At the end, add fire glass to hide the lava stones.


https://i.expert-h.com/en/stol/1015#sigFreeId0eb46859e6
Coffee table with fireplace
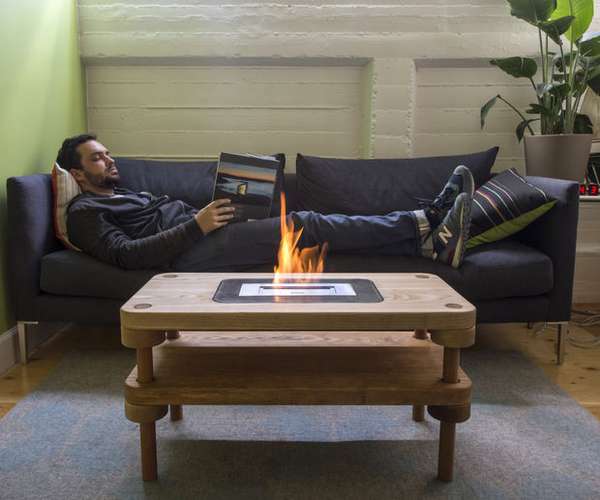 Nothing makes you feel comfortable on a cold day, like an open flame warming the living room. But a real fireplace, it is expensive and not always technically possible to do, especially if you live in a modern apartment. But to do coffee table with fireplace smokeless fuel is quite real, and you can use it anywhere, even in a hostel. It is completely safe to use a burner with ethanol, the main thing is to choose a quality fuel that does not emit harmful fumes and does not violate the quality of the air in the room. In general, a thing is convenient in every respect, if only security measures are followed.
Step 1: Tools and materials
- circular saw, band saw, drill
- grinder machine
- clamps
- cement
- acrylic mold
Materials
- hardwood boards
- solid wood dowel
- wood filler, wood glue, nails, liquid nails.
- linseed oil, polyurethane.
- ethanol burner
- burner insert Ignis EB1200
- bioethanol fireplace fuel
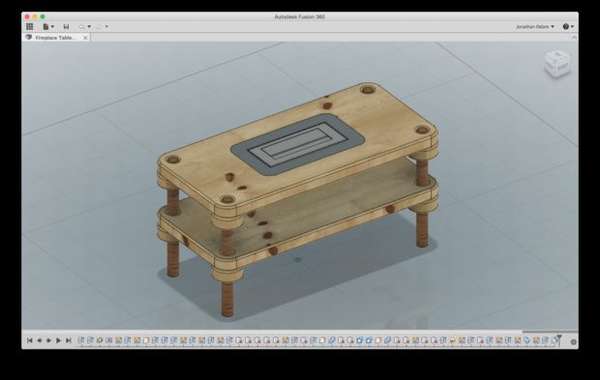
Step 2: Design
The table design was developed using the Fusion 360 program - a free tool for design and engineering. The table is based on 4 threaded wooden legs with nuts for stiffness. The author developed it as a two-level one, it is really very practical: you can rearrange all books, magazines and empty cups to the lower tier, when you need to put a laptop on the upper tier or light a fire!
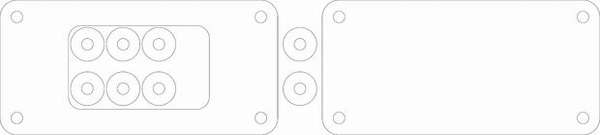 Manufacturer's instructions require special clearances around the surface of the burner. Therefore for safetyOf course, the author has developed a table with a cement niche 7 cm deep. It is necessary that the top of the burner is flush with the top of the table, so the concrete part is made with a recess of 3 mm thickness. Leave a gap of 2 mm for the room for maneuver between the burner and the concrete.
Step 3: Wood details
 To make a solid solid wood array 40 cm wide, unfold two 23 cm wide boards and glue them on the edge of one panel.
- The holes should be flush and perpendicular to the surface of the table, otherwise you will get crooked legs. Please note: the upper tier of the table (with a hole for concrete) has threaded holes (this means that you start with 320 mm), and the lower tier without cutouts has 380 mm openings that allow you to freely slide up and down.
- Cut the dowels into segments of 40 cm for the entire length of each leg, which allows you to adjust the levels. There are 4 legs and 8 nuts - 4 nuts to hold the free lower tier and 4 nuts to tighten the threaded holes on the upper tier.
Acrylic Mold:
For the form, the author used acrylic mold because it is rigid and provides a very smooth concrete surface that does not require grinding or machining. With acrylic cut to size and welded with plastic, it is easy to get durable airtight seals on all parts.
Cement mold
- Cover the inside of the cutout on the table with several layers of polyurethane on top so that water does not absorb into the wood and it does not swell.
- Align the cutout from above by cutting the bottom surface of the mold the same size as the countertop.
- Before pouring the mortar, add a few connecting dowels to the inner edge of the concrete cut-out so that the concrete slab does not fully rest on the inner edges for structural support.
- Prepare the solution, fill it in the cutout and let it dry for 2 to 3 days.
Step 4: Polishing
Use Concreteworks concrete polish or a different type of hardener for the finished surface. The result is a smooth, shiny surface.
Step 5: Assembly
- Install one nut halfway down the length of each leg. This position sets the height of the lower level.
- Insert your foot into the uncut hole in the lower tier.
- Fasten another nut down the top of the leg.
- Set the upper tier and screw the leg until its upper part is flush with the countertop.
- Tighten the second nut on the bottom of the countertop until it becomes stiff.
- Repeat these steps for each leg.
- The great thing is that the table can be adjusted. Turn the table upright and adjust the nuts.
Step 6: Done
Universal coffee table is ready. The ethanol burner is closed with a steel cap. You can use the design as a functioning coffee table with a flat surface, then clean the top, pour some fuel and read a book by the fire on a cold night.


https://i.expert-h.com/en/stol/1015#sigFreeId2072d9e893
DIY wood fireplace
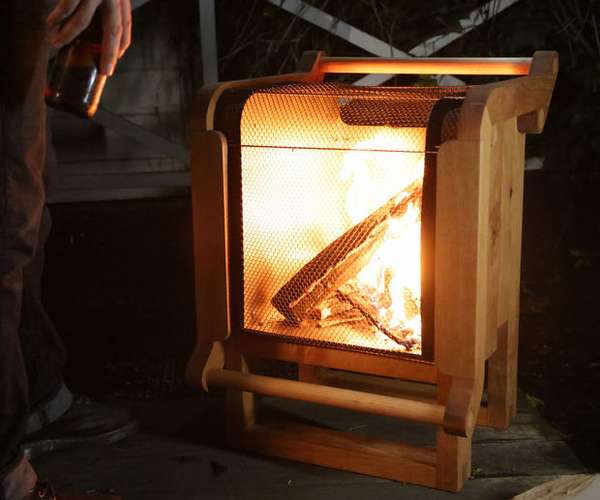 It is always interesting to do something original. The author of this project liked the controversial idea. make a wood fireplace, so I had to figure out a long time how to implement what, in essence, seems incompatible. But everything ingenious is simple - the author simply takes a container of sheet metal and sheathe it with wood, leaving a 3-cm air gap. You can call this the principle of the shell when the fire is in the middle of the screen, which does not directly contact the tree.
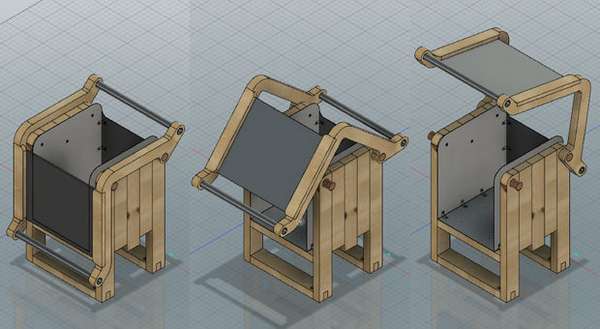
For design, the author used Fusion 360Great tool for modeling. It has mechanical assembly functions that allow you to check the movement of the lid, making the entire design process much faster. The main thing is that Fusion 360 is a modeling tool with free software for fans, and it has a lot of educational support. If you want to learn the 3D model, this is the best choice on the market.
 Tools and materials
- Table or circular saw for straight cuts
- Saw for curved cuts.
- Drill
- Bits: 1 1/2 "front bit, 1 1/4" bit, countersink bit
- Chisels: for joints.
- Clamps
- Hand drill with 1/4 "metal drill.
Materials
- 4m hardwood boards
- Dowels
- Stainless steel sheet. You can use mild steel, which is much cheaper, it just lasts only a couple of years, then it burns out. If you are tired of this option, then you can save.
- Fireplace curtains. They create a protective shield that covers the metal case.
Step 3: Cutting using patterns
For detailed information on how to use patterns for cutting complex geometry, you can see the author’s manual for manual digital assembly at www.instructables.com/id/Digital-Fabrication-By-Hand/. These templates have a 1: 1 scale, and if you print them at a rate of 100%, you will have everything you need for cutting. The example uses plywood, but the same technique works with metal and hardwood.
Step 4: Laminate
The sides of the fireplace are laminated to make one panel. Two longer ends with rounded tops form the legs, and the board in the center protrudes to attach to one of the three shelves that hold the metal container. The plates have a thickness of 38 mm.
Step 5: Handle Parts Attachment
- To fasten the handle in the form of an L, use the connecting pins. Clamping device allows idealbut align the holes between the parts and ensures that the holes are perpendicular to the surface.
- Fasten the two parts together so that they are aligned along the edge.
- Mark the center lines of the holes in both parts with a square.
- Align the marks with the center lines and drill holes. Make sure that each hole is a little more than half the dowel depth.
- Pour glue into the holes and insert the dowels, then connect the parts.
- Pinch the parts to eliminate the gap between the faces.
Step 6: Shelf fixing
Attach the shelf elements to the panels. But there is a problem, 2 dowels at each end are required on each board. This means that there are 12 holes for alignment between 3 separate boards. This is almost impossible, so you only need 3 holes that need to be aligned right away.
Step 7: Shelf rotation
To hide the screws, drill a test hole for the screw plus a wide hole for the screw head.
As soon as the screws are screwed in, add a drop of glue and drive in the connecting dowels.
Step 8: Attach the legs
 The diagram is shown in measurement templates. When cutting, it is important to fix the guide plate, located in accordance with the edge that you want to cut.
- The lower parts of the legs have male ends. After cutting one on a band saw, use it as a template for the other leg.
- Then I glue and clamp the sawn parts. Secure with screws.
Step 9: Shell assembly
The dowel attached to the large hole on the top of the sleeve serves as a hinge for lifting the cover. It fits snugly to the hole on the side of the wooden cabinet.
The dowels in the back serve as hinges, while others work as pins that hold the cover in the closed position. All four dowels are 76 mm long.
Step 10: Grinding and finishing
As soon as the glue is completely dry, start grinding the surface, the author used an orbital grinder for this.
After sanding, coat the wood with varnish.
Step 11: Gather the hearth of the fireplace
Hearth templates are configured for angle brackets, so they simply connect with screws. The hearth is open in front and has additional holes for attaching to the tree through the racks.
Step 12: Fix the hearth
- If you cut out all the details in size, then from all sides you should get a 3 cm gap between the tree and the hearth. Using pieces of wood, pinch the hearth and level so that it is centered on all sides.
- Make racks by cutting the steel tube 1/2 inch. Using them, using pliers, aligned with the holes in the steel tank, and screw the wooden parts to the hearth.
- Secured in 4 places at the top of the side walls and in 4 places at the bottom.
Step 14: Assemble screen
The screen is very important, it protects wooden parts so that sparks do not fall on them.
- In this case, the screen is a grid for a brick fireplace - it comes in two sections, which are 45 X 60 cm. The author designed the fireplace so that the screen covers the open side of the hearth, wraps on top and covers the back. Thus, you will have full protection over the open part, plus an additional barrier at the back of the box, which will undoubtedly become very hot.
- To connect the two parts, simply thread the wire through the open end of each side.
- The author also used welding rods - they are stiff enough so that the screen does not fall in the middle.
- When connecting the two screens at the front end, install the boom.
- Then wrap the screen over the fireplace. To do this, you can use the bolts on the fire for fire. For this, it is important to use two nuts - the first reliably fixes the box, the second nut with washer just holds the screen.
- Having fastened the two ends, add a few more rods at the top of the screen so that they do not fall.
Step 15: Light a fire
Do not worry about the wooden handle on the top, which is in close proximity to the flame, everything will be fine. The fireplace can be installed both in the house and on the street, even in the rain it works fine, at least according to the author.


https://i.expert-h.com/en/stol/1015#sigFreeId869a7c9969
Table with fireplace 200 photos


https://i.expert-h.com/en/stol/1015#sigFreeIdfe9d40f229
Hello, I am the author of this article, so I look forward to asking questions for this article in the comments below, I will answer all !!!
If you have questions on another topic, ask them on our forum, we will answer you
- Two baskets of paper in 5 minutes (Master class)
- How to make a simple and compact table for a milling cutter from plywood
- How to make a soft headboard tile (Instructions + step by step photos)
- Cinder block benches: a convenient bench in 55 minutes
- How to make a bed with a niche: saving space (Master class)