DIY birdhouse 700 photos, step by step instructions
 do-it-yourself simple birdhouse
This article talks about how to make a bird house with your own hands. Making birdhouses is an interesting activity, especially if you show your children how to work with different tools and how to turn an ordinary wooden board into something unique. In addition, a birdhouse, a good gift to friends or acquaintances. To do-it-yourself birdhouseusually one board and a couple of the simplest tools are enough.
There are a great many different designs of birdhouses, they are made both for a certain type of bird, and purely from artistic preferences for decorating a garden or yard. Just remember, the birds do not care how you decorate their house, the size of the hole of the notch and the internal volume of the birdhouse are important to them, so when you make a house for the birds, first think about functionality, and then about decor.
The birdhouses presented here are basically a classic style - simple and functional. If you have never done such projects before, you can choose the suitable option from this selection, here are collected examples of the simplest and most accessible constructions for beginners.
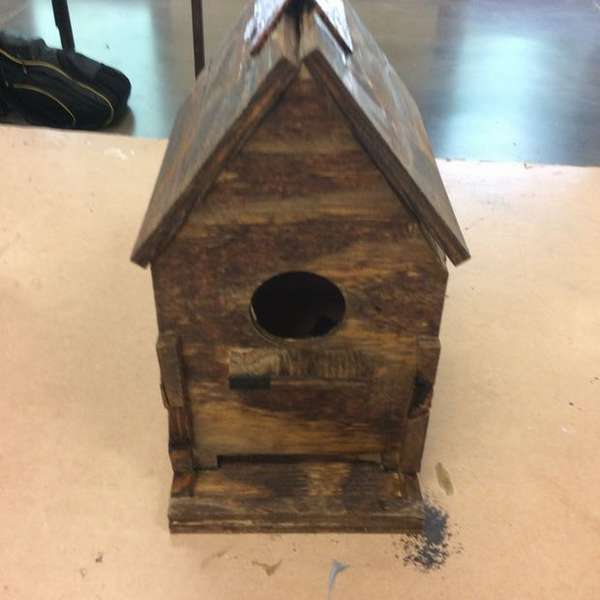
How to make a simple birdhouse
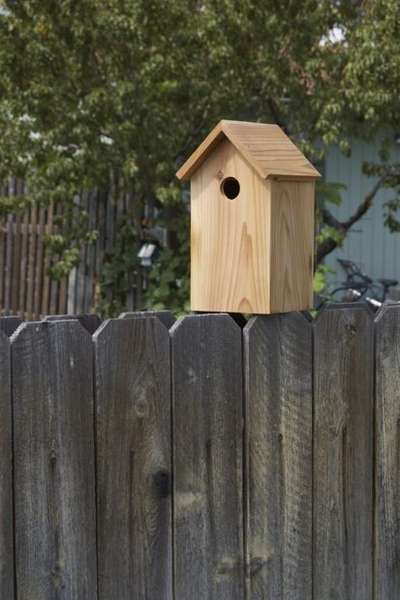
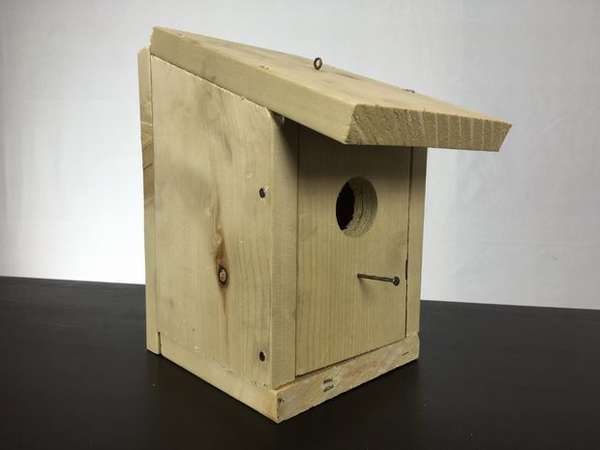
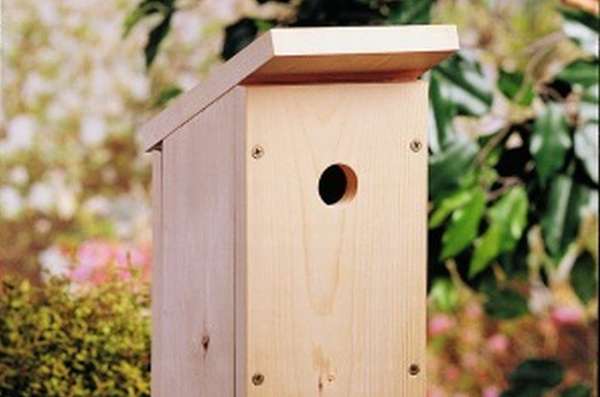 Birds do not require fancy designs when choosing a nesting place. This simple birdhouse made from a single pine board and requires only a few assembly tools. You can assemble it in just a couple of hours, although, of course, it depends on your skill. However, why rush, if this is your first project, then how much time you spend on it does not matter much, because the main result is the final result.
 Materials:
- One 1 x 6 pine board 1.5 m long.
- 5 cm galvanized screws
- Galvanized Finishing Nails
- Electric drill
- Hand saw
Step-by-step instruction
- Saw the parts as shown in the diagram.
- Screw the front part to the sides with screws.
- Drill holes in the front to prevent wood from splitting.
- After the nesting season, when it is time to clean the birdhouse, remove the screws for easy access.
- Attach the back to the sides with 5 cm nails.
- Saw about 1.5 cm from each corner of the floor for drainage.
- Level the floor 6 mm up from the bottom, then with nails on the side and back.

Screw the roof to the sides with screws. Done!
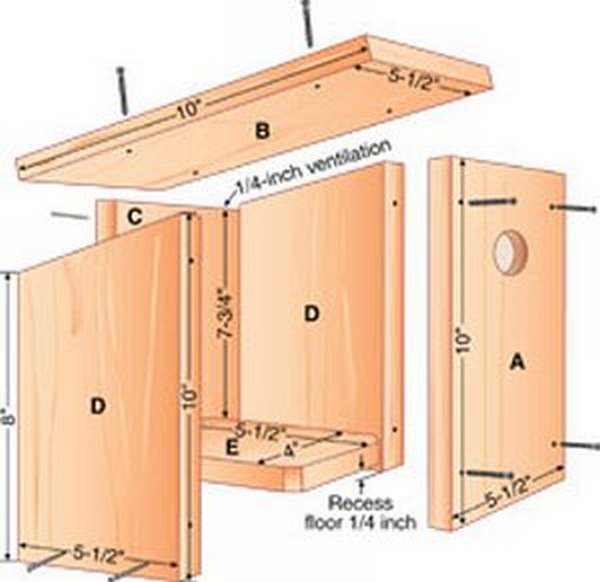
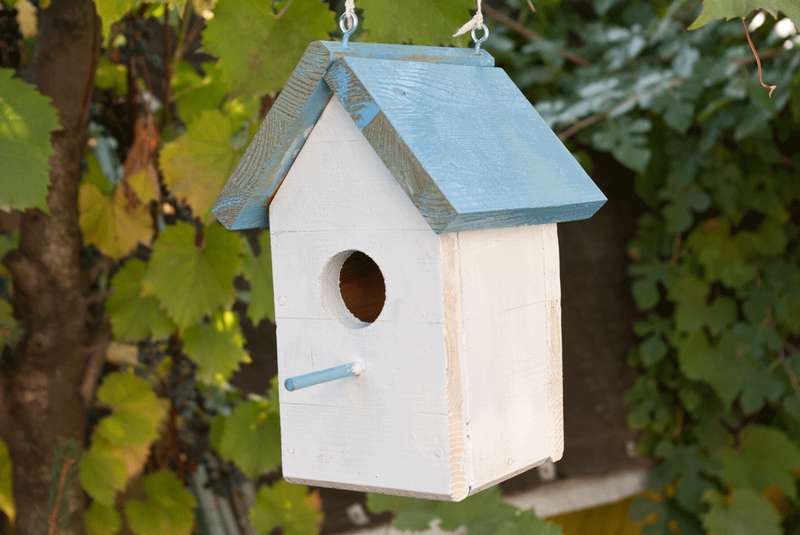
How to make a birdhouse for birds with your own hands
 Make a wooden birdhouse very simple, and a good reason to work out with your child is a useful thing. Just make sure that the wood is weather resistant, such as oak or beech, or you can use waterproof plywood. Install a birdhouse at least 1.5 meters above the ground to protect birds from predators such as cats. It’s best to mount a birdhouse on the north side of the tree to better protect it from rain.
Necessary materials
 Here, as an example, sizes are used for small birds, such as, for example, finches. You can make all the walls from one board with a width of 15 cm. The optimal thickness is about 20 mm. Make the roof at an angle so that water can easily drain off the surface during rain.
Need such details:
- 1 back wall 38 cm long
- 2 side walls 22x26 cm
- 1 roof 18 cm long or slightly longer for water to drain
- 1 front wall 23 cm long with inlet ø32 mm
- 1 base 12 cm long
- wood glue
- wood screws
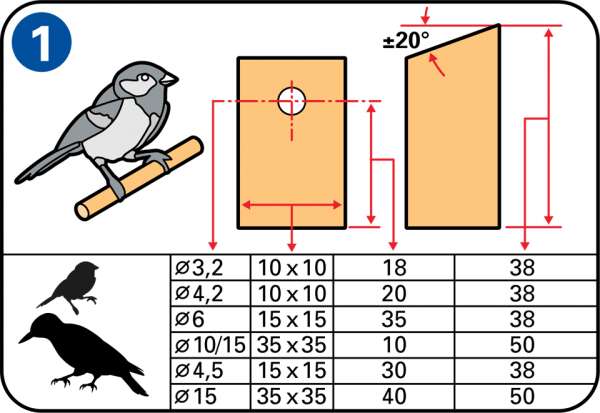
Determine the correct size of the notch
- The size of the birdhouse and the entrance hole of the notch is determined by the type of birds that are expected to settle in the birdhouse. The correct size for finches is 3.2 cm, and for a rook or jackdaw, it should be at least 15 cm.
- Mark the dimensions on the board and you will see the details in the correct sizes.
- Saw the board into parts.
- Sand the edges with sandpaper.
- Drill an entry hole 18 cm from the bottom of the front board.
- Using waterproof wood glue and nails or screws, install the side panels on the back wall.To prevent the tree from splitting during fastening, pre-drill holes. Then drill the mounting holes for the birdhouse.
- Also, with glue and nails, assemble the front panel
- Install a roof with a slope of 20 °.
- If you want, you can make hinges on the back of the roof, as well as install additional boards under the roof. They should be 5 mm smaller than the internal dimensions of the walls so that the roof is more or less fixed. Then close the roof of the birdhouse with a piece of roofing felt.
- To provide drainage, drill several holes 10 mm long under the birdhouse.
As an alternative to a round hole, you can make the front side lower. The advantage of this entry is that allows you to use a birdhouse with various birds.


https://i.expert-h.com/en/skvorechnik/svoimi-rukami-masterklassy#sigFreeIda479aaa9ca
DIY birdhouse
 This article talks about how to make a bird house with your own hands. Making birdhouses is an interesting activity, especially if you show your children how to work with different tools and how to turn an ordinary wooden board into something unique. In addition, a birdhouse, a good gift to friends or acquaintances. All you need to make a simple and cheap birdhouse in less than an hour is to take a 15 cm wide wooden board and several tools (jigsaw and drill). However, before you buy materials, you need to make a plan, starting with the dimensions of the wooden birdhouse until its final assembly. In general, start by choosing a birdhouse design, otherwise you may not like its final shape.
Remember that you need to use a good wooden board, otherwise the bird house may not be as durable as you plan. Also, make sure that wood is not treated with toxic substances. On the other hand, if you want a unique design, you can reuse several old wooden boards after making sure that they are not rotten. And last but not least: boards should have the same thickness over the entire surface.
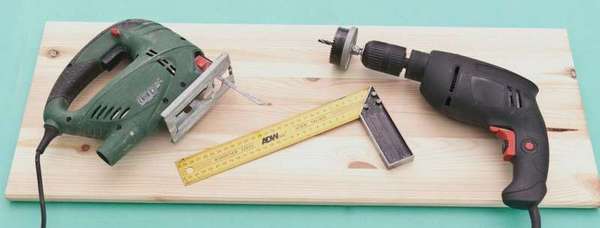 You can use different tools to make a birdhouse. First of all, you need a jigsaw or a circular saw, although hand tools are also suitable, it just takes more time.
materials
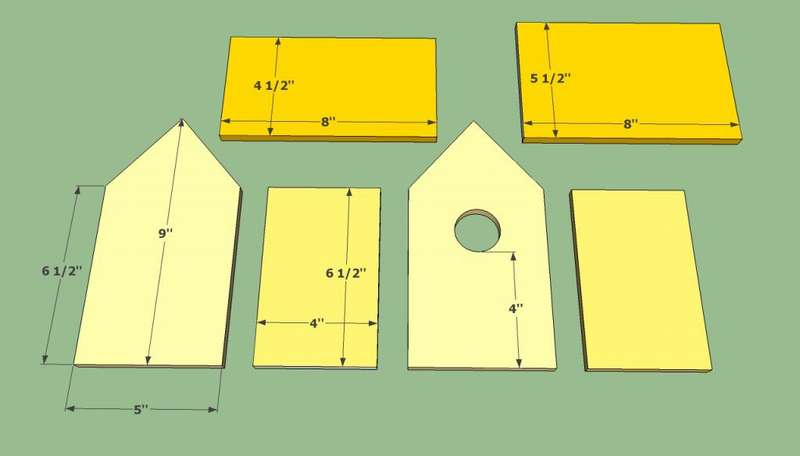
- A - 2 pcs. 1 × 6 - 13 x 23 cm front
- B - 2 pcs. 1 × 6 - 10 x 16.5 cm
- C - 1 pc. 1 × 6 - 11 x 21 cm, 1 pc. - 14 x 21 cm
- D - 1 pc. 1 × 6 - 9 x 10 cm
- 4 cm nails, glue, paint
Step 1: Determine the dimensions. If you have not made birdhouses before, use the diagrams presented here. Making birdhouses much easier if you already have a ready-made design and size. Do not forget that these sizes are the starting point, you can change them to suit your needs and tastes.
Step 2: Use the right tools, a jigsaw or a circular saw, a drill to cut wooden parts and a punch to make a round entrance.
Step 3: Mark the dimensions of the parts on the board.
Step 4: Cut out the necessary parts. Be sure to fix the board before starting work so that it does not move.
Step 5: Sand the sharp edges of the wooden parts with an emery cloth.
Step 6: Apply glue to the edges as shown in the photo. Although it is not necessary to glue, it is desirable to strengthen the joints. In addition, if the details are not even, the glue will fill the gaps.
Step 7: Assemble all sides as shown in the photo and tighten with clamps to tighten. Leave to dry.
Step 8: Drive in nails to secure the front wall. It is advisable to drill through holes so as not to split the tree. Two nails for each side of the front wall will be enough.
Step 9: Attach the other side of the bird house in the same way as described above.
Step 10: Fasten the back wall.
Step 11: Mark the center of the entrance of the notch.
Step 12. Drill a hole. You can use different methods and tools to cut out the input. Regardless of the choice, the hole should be approximately 4 - 5 cm. After you make an entrance, you must thoroughly clean the birdhouse with a vacuum cleaner.
Step 13: Cut a narrow part of the roof and replace it. Secure with glue and nails.
Step 14: Attach the other side of the roof.First of all, you should cut it a little longer than the first side, since it should cover the first part. After reinstalling, make sure it is perfectly aligned with other components. Then secure the roof by driving nails into the through holes.
Step 15: Make a floor and attach to the birdhouse. Use tape measure to size. Then use a jigsaw to cut the floor 3 mm less so that it normally fits into the box. You can fix it with nails, but if you want to have access inside, you can make loops. Make sure the floor is aligned with the sides before hammering in nails.
Step 16: 5 cm below the entrance of the tap hole, drill a hole for the perch. If the board is too thick, a through hole is not necessary. Pour a small amount of wood glue into the hole and add a few slivers. Thus, glue and slivers will fix the perch in place.
After installing the perch, the bird house is ready to welcome its tenants. Just make sure you hang it to a height of at least 2 meters.


https://i.expert-h.com/en/skvorechnik/svoimi-rukami-masterklassy#sigFreeId84ee38d47a
Simple birdhouse
 Classical do-it-yourself simple birdhouse make it very simple. You will need several planks, wood glue, clamps and just a set of tools - a saw, drill, sandpaper, as well as a ruler and pencil.
- The first thing you need to do is determine the dimensions for the bird house. Then cut out the walls and floor. In this case, the length is 18 cm and the height is 14 cm.
- Then you need to cut the front and back of the house. The front should be 28 cm high and 15 cm wide.
- To make corners in the front and back, measure 18 cm and draw a line, then measure the angle of 45 degrees from the top and cut. Do this on each side on the front and back, then you will have a good point for the roof.
- Then glue both side and back walls both to the floor and align all edges. Wood glue will stick in about 30 minutes, so be sure to make no mistakes and all sides are even. Wood glue will completely harden after 24 hours, so leave the birdhouse to dry overnight.
- Define the center in the front wall, and then drill a hole.
- Then glue the front to the walls and let it dry.
- To make the roof, you need to cut the boards, one 20x20 cm and the other 20x19 cm. They will be glued to the top of the birdhouse and connected from above so that there is no gap between them.
- When gluing the roof, make sure that there are no gaps. Glue the smaller part to the side of the larger part.
- Install a wooden dowel under the inlet.
When the birdhouse is finished, set it on a tree. You can nail to the trunk or just firmly fasten between the branches. And another option is to attach hooks and chains and hang on a branch.
Just make sure the birdhouse is in a safe place.


https://i.expert-h.com/en/skvorechnik/svoimi-rukami-masterklassy#sigFreeId99da82bbba
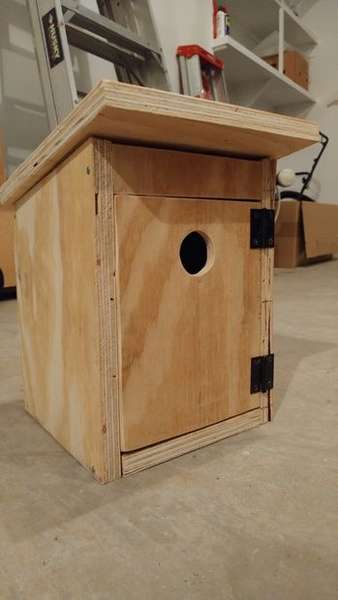
Cheap birdhouse
 Making a birdhouse is a great project for beginners, but more detailed information will help you approach the task more creatively. Even children can cope with a simple birdhouse plan, of course, with a little help from adults. Before choosing bird house design, you need to decide where you are going to install the finished house. This will help determine the type and size of birdhouse you should choose.
The birdhouse presented here will be an excellent project for the novice master. The design can be called classic, this is a common common style birdhouse made of wood with a gable roof. This is not a difficult project at all, so you can always change the design a little and colorize it to revive the look.
Therefore, if you are looking for a project that you can do on your own or with a child, this would be a good start to improve the experience. Below is a gallery with step-by-step photos, and under it you will find a link to the author’s website, where you can read detailed instructions.


https://i.expert-h.com/en/skvorechnik/svoimi-rukami-masterklassy#sigFreeIded74a2e851
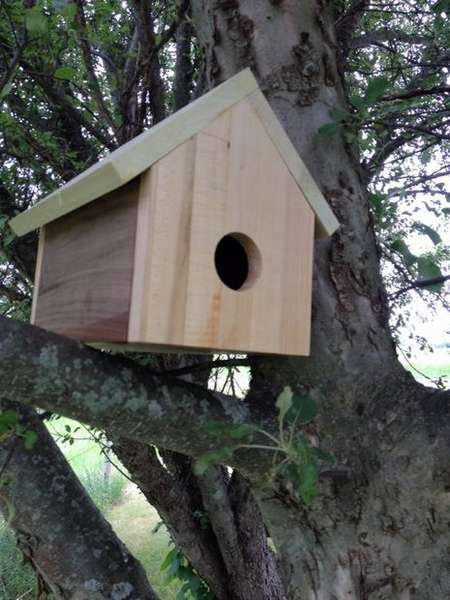
How to make a birdhouse step by step instruction
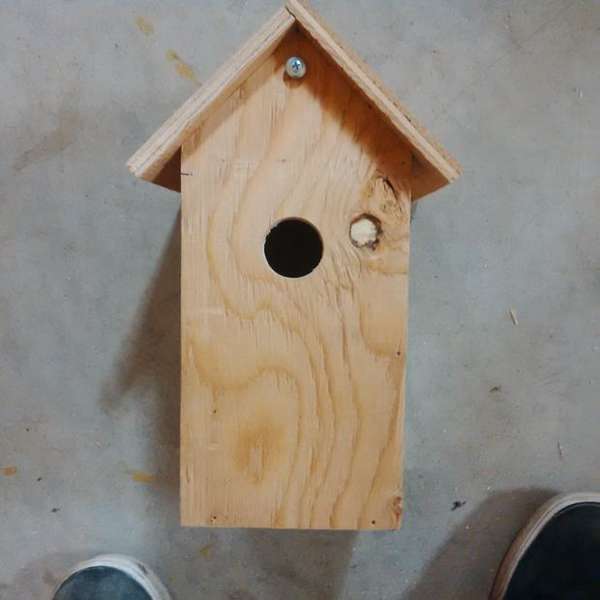
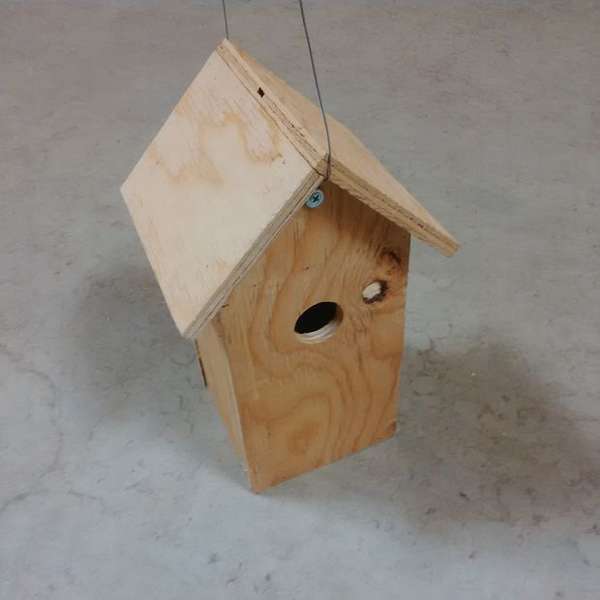 Short instructions with step-by-step photos on how to build a birdhouse.
You will need: finishing nails, 8 mm plywood, wire, large head screws
From tools: hammer, tape measure, screwdriver, drill
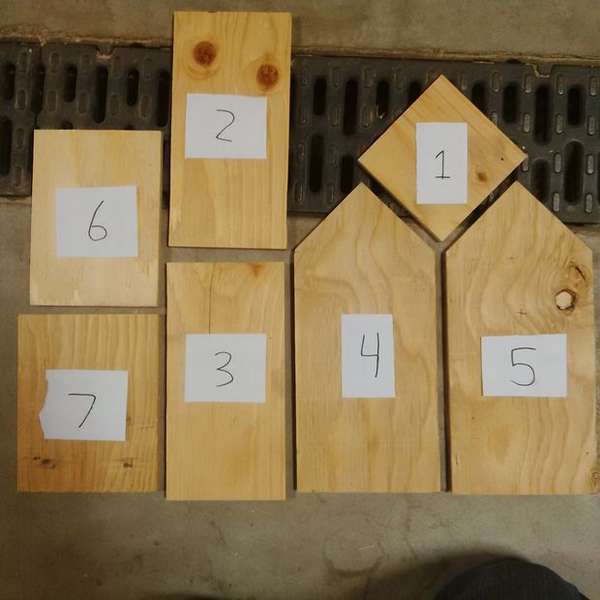 Right photo with numbered birdhouse parts, there are only 7 pcs.
It is necessary to cut out stitches in such sizes:
- Gender (No. 1) 10 x 10 cm
- Side walls (No. 2 and 3) 10 x15 cm
- Left side of the roof (No. 6) 11 x 15 cm
- Roof on the right (No. 7) 12 x 15 cm
- Front (No. 4 and 5)
Step 1: Creating the front and back
- The front and rear parts of the birdhouse overlap the sides, so you make the front and back parts 12 cm wide.
- Cut the plywood to 12 x 25 cm. On one side of the plywood, mark the middle (6 cm)
- If you are using a hand saw after you have marked the middle of the board, measure 6 cm down on each side. Mark from the middle to these lines.
- Ideally, the angle should be 45º. Then saw off the board 20 cm from the bottom, where the roof will be (below, where there will be eaves).
Step 2: Drill hole
On parts 4 or 5, mark 15 cm from the bottom and in the middle. Drill a hole.
Step 3: Assembly
Bend the front wall to the side of parts No. 1 and 2. Attach the rear wall (No. 4) in the same way as the front.
Step 4: Make an open side
Mark 19 cm (bottom) on the front and back walls, on the left side for attaching the hinges. Replace the board and pinch.
Then, in the lower left corner of the front, amass a nail. Bend it, it will be a clamp so that you can open the wall if necessary.
Step 5: Roof
First, attach part No. 6-4 to the left side, then fasten No. 7-4 to the other side
Step 6: Set birdhouse
A birdhouse does not have to be hung on a tree; you can simply screw it onto a tree or fence post. To do this, screw on the screw on the front and back, right where the two roof boards meet. Cut 5 cm of wire and wrap under each of the screws. Screw in and hang.


https://i.expert-h.com/en/skvorechnik/svoimi-rukami-masterklassy#sigFreeId92c7a3114b
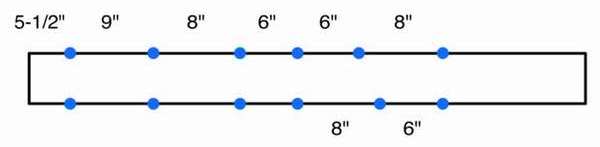
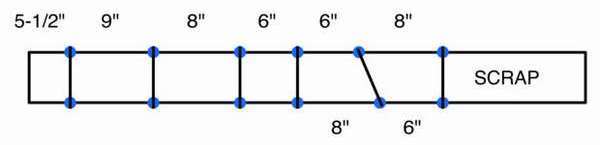
Here is another one classic birdhouse. All parts have a thickness of 12 mm.
Need to cut:
- Bottom (1) - 5 1/2 "14 X 5 1/2" 14 cm
- Sides (2) - 5 1/2 "14 X 8 3/4" 22 cm
- Front and back walls (2) - 6 "15 X 12 1/4" 31 cm
- Top (2) - 5 "13X 7" 18 cm
Start by copying all the details in width. Then, using a measure, cut the pieces to length. It will be convenient if you mark all the details at this time. Next, the usual assembly of a typical birdhouse, everything is shown in step-by-step photos. More detailed instructions are on the site.


https://i.expert-h.com/en/skvorechnik/svoimi-rukami-masterklassy#sigFreeId6e183d8725
And here is shown how to make a simple birdhouse for little birds of four planks, glue and a piece of plywood (at least 35 x 48 cm). This is a great project for children! If you are interested in all stages of the assembly, you can read the detailed instructions on the website, the link is below the step-by-step photos.


https://i.expert-h.com/en/skvorechnik/svoimi-rukami-masterklassy#sigFreeId69b3729763
How to quickly make a birdhouse
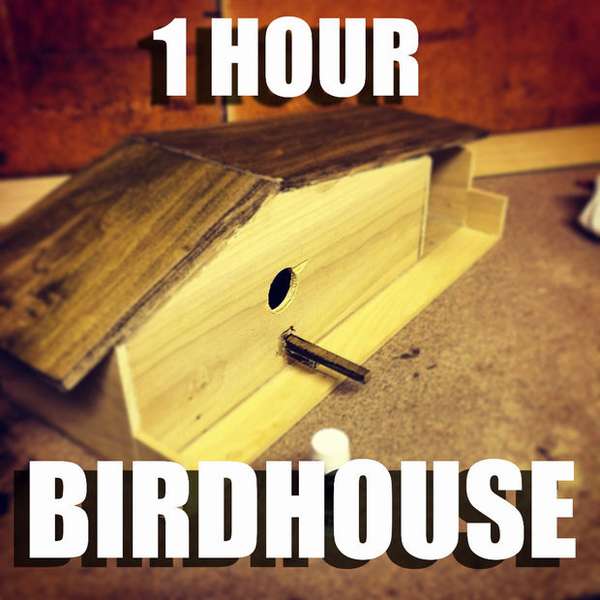 Instructions that describe an easy way to make a reliable birdhouse, which was designed, built and painted in just 1 hour! The author wanted to create an original birdhouse, so he paid more attention to architectural design, and as you can see, the design is slightly different from the traditional form. The model was developed in Google sketchupbut this can easily be done on paper. Both methods are shown here, you can choose as you prefer. In addition to the drill, the author used hand tools and hot glue to make the inlet.
Materials:
- For the birdhouse, 6 mm thick wood was used
- Saw
- Graphic paper
- Pencil
- Glue
Step 1: Collect materials
Step 2: Design
 F5.6 For designing, take graphic paper and draw a layout. Then build a scale model in Google Sketchup. The whole process took the author about 20 minutes.
Step 3: Measuring, cutting and drilling
- Now that you have the design and material, cut the necessary details.
- Once the side roofs in front and back are ready, drill an inlet
Step 4: Glue the structure
- When everything is cut out, heat the glue and start collecting the birdhouse.
- Glue all the pieces, and then add more glue to each seam and to all the cracks so that the birdhouse turns out to be completely waterproof.
Step 5: Painting
The author used walnut oil. It is perfect for the roof, providing protection from water, and also gives a unique color.
Let it dry for 10 minutes, then wipe it dry and you're done. Birdhouse is ready, you can install where you like.


https://i.expert-h.com/en/skvorechnik/svoimi-rukami-masterklassy#sigFreeIda6e1978425
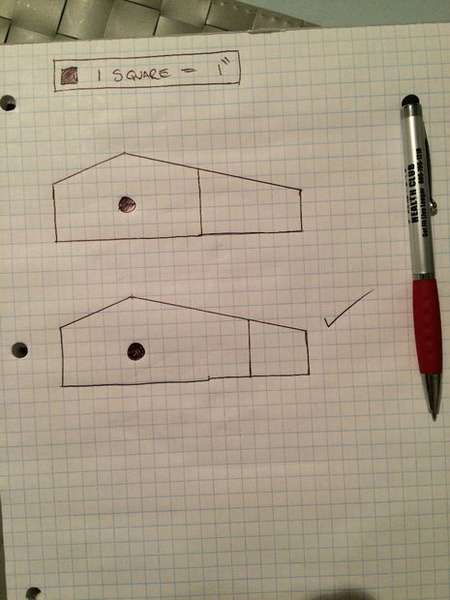
Birdhouse in five minutes
 This is a project for those who are looking for a simple and cheap way to make a birdhouse. In fact, sometimes it’s better to do something cheap and simple than constantly putting it off, dreaming of some kind of grandiose project. You can make a birdhouse presented by the author with the help of a very small number of tools, supplies and previous experience in carpentry. It may not be suitable for a craft exhibition, but the birds do not care, the main thing is that there is a roof over your head.
You will need:
Wooden board 2 cm thick, 14 cm wide and at least 120 cm long.
Nails, screws, tape measure. Hammer. Drill.
Make notes as shown in the diagram.
 Measure from one end of the board and mark the intervals as in the first image.
 Before you saw off the lines. Sign the name of each part. In order not to get confused.
- Now make the front wall. Cut the width from 14 cm to 10, make marks and saw off.
- Finally, make a hole in the center of the board about 1.5 cm up from the bottom of the board.
- Now put it all together. Start by attaching the sides to the base. Once you have assembled the sides, slide the front wall and snap it into place. Finally, nail your back.
- To fix the roof, drill 4 holes and tighten with screws.
- Finally, attach the hook or screw at the top.


https://i.expert-h.com/en/skvorechnik/svoimi-rukami-masterklassy#sigFreeIde9209191c0
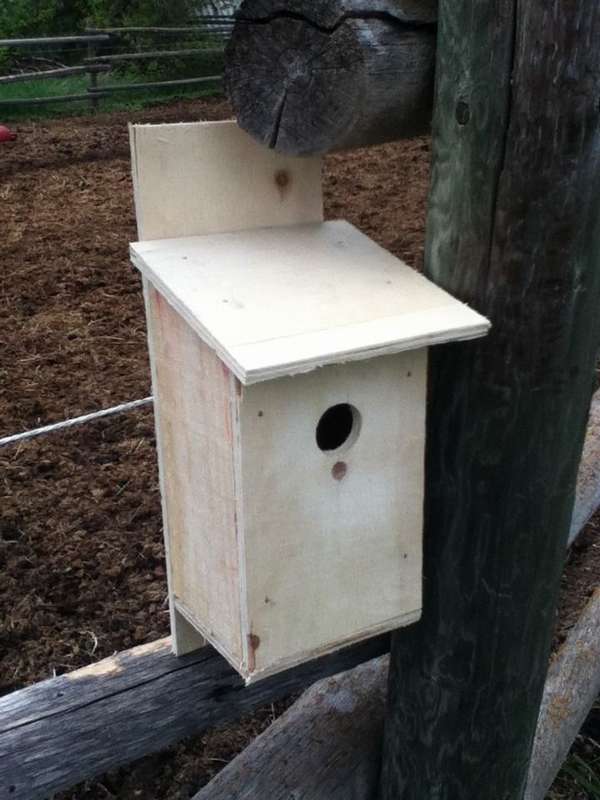
DIY plywood birdhouse
 As you can see, the idea is very simple to make such do-it-yourself birdhousecomplete 5 steps. Feel free to improvise to add your details.
- Step 1: Trim the four main sides
Firstly, you need to cut out the sides of the birdhouse to get a solid structure. The length and height of the parts may vary depending on what sizes you plan to make a birdhouse. In this case, the walls are 15 cm high and the sides 30 cm inches long. For shorter sides, front and back, connect the square part to the triangular part and saw them as shown. Then fasten the parts together with hot glue. - Step 2: Install the roof
Make the two sides of the roof equal in length and width and glue one side to the house. You will need to install the hinge on the other side of the roof, so do not glue it. - Step 3: Fasten the hinge
It's time to hinge. This is probably the hardest part of the process, as you have to be very careful. Attach the hinge to the smaller side and glue one side of the hinge to half already glued to the house. Then attach the other side of the hinge only on the roof. It turned out to be an ideal roof, since one side can turn over onto the other, which makes it easy to clean the house. - Step 4: Set the floor
The floor is relatively simple. Just line it perfectly on all sides, but add 5 or 7 cm to protrude on the front of the birdhouse. Then cut about 2 cm in front and turn over to get a small barrier, will serve as a feeder. True, it will be necessary to cut a gap of about a centimeter in front of the wall of the birdhouse. Look at the photo how it should look. - Step 5: Painting
There are many different shades of brown if you like it. In general, the best option for a birdhouse.


https://i.expert-h.com/en/skvorechnik/svoimi-rukami-masterklassy#sigFreeId05e018aa2c
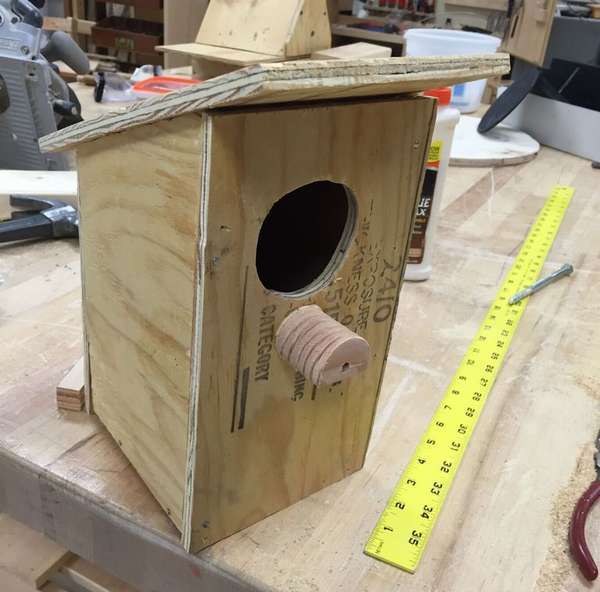
Plywood Birdhouse
 If you want to make a birdhouse in your yard to attract birds and revitalize your site a little, or just for fun, then this instruction is for you. Keep in mind that the dimensions indicated in this article are not necessary at all. If there is a certain type of bird that you want to attract to your yard, then learn more about their size and habits, and based on these data, select the sizes for your birdhouse including the size of the hole.
If it doesn't matter to you who flies into the yard, then just follow these instructions.
For this birdhouse you will need:
- Plywood 12 mm
- Plywood 19 mm
- Drill
- Good hand saw
- Sandpaper
- 2 hinges with screws
- Pencil
From 12 mm plywood you need to cut 2 rectangles with the following dimensions:
- 22 x16 cm - door
- 16 x 4 cm - wall between the door and the roof
From 19 mm plywood, cut 3 rectangles with dimensions:
- 25 x 22 cm - roof
- 16 x 22 cm - back
- 16 x 20 cm - base
- In addition, you also need to cut 2 trapezoid with dimensions:
- 20 cm - basic
- 24 cm - one side
- 28 cm - the other side
When all these parts are ready, collect the birdhouse, as shown in the step-by-step photos. Of course, if you want, you can color, add a perch or something else. I hope this instruction will serve as a good guide for making SLE.doorka. If you have any questions, you can read the detailed information with a description of each step on the author’s website by simply inserting the link that is located under the step-by-step photos.


https://i.expert-h.com/en/skvorechnik/svoimi-rukami-masterklassy#sigFreeId5560c36b1a
 Simple plywood birdhouse
Step 1: Materials
- Tape measure and pencil
- Wood glue
- Hammer
- Nails
- Saw
- Drill
- Clamps
- Screwdrivers
- 2 screws
- From sawn wood trim from the pallet and plywood sheet 8 mm thick
Step 2: Cutting
- For the sides of the birdhouse, the author used a board from the pallet. The remaining parts are cut out of plywood in the following sizes:
- Front - 20 x 13 cm with a 15 ° angle at the top
- Back - 35 x 13 cm
- The sides are 23 (highest point) x 10 cm. Cut a 15 ° angle on top of this to slope the roof. You will need two.
- Bottom - 13 x 11 cm
- Top - 15 x 15 cm with an angle of 15 °, cut vertically.
- Remember to cut a 3 cm hole in the center of the front panel about 14 cm above the base.
Step 3: Assembly
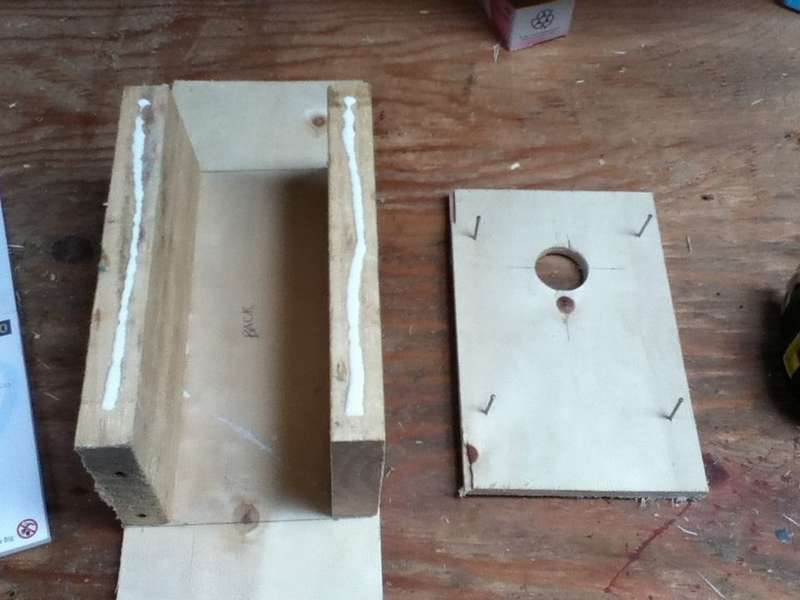 Take the two side boards and the back panel. Set the side boards 5 cm 2 "up from the bottom of the rear panel, which allows you to get an 8 cm gap at the top. Using glue and 6 nails, connect together.
- Attach the front panel in the same way using 4 nails and wood glue.
- Fix what is. How long it will dry depends on what type of glue you use.
- Remove the clips and attach the top panel with glue and 4 nails. Make sure that the corner is in the right place (see photo).
- Screw the bottom. This makes it easy to clean old nests!
- Now pinch the top
Step 4: Done
Coat with oil or primer. When dry, you can install. If you paint, it’s better wait a few days for the smell to disappear. Additional tabs on the rear panel make it easy to hang a birdhouse anywhere!


https://i.expert-h.com/en/skvorechnik/svoimi-rukami-masterklassy#sigFreeIdc7e748f60d
 The easiest birdhouse
Perhaps nowhere is easier.
You will need:
- Pine board or plywood 1 x 6 1.5 m long
- 5 cm nails
- Hammer
- Hand saw
- Band-saw
- Wood glue
Simple five steps and plywood birdhouse ready
Step 1: Cut the plywood as shown in the diagram below
Step 2: Make a 5 cm hole in the front
Step 3: Nail the front and back sides to the sides.
Step 4: Nail the bottom and top to all 4 sides.
Step 5: Attach a piece of wood to the front to make the platform.


https://i.expert-h.com/en/skvorechnik/svoimi-rukami-masterklassy#sigFreeIdf6173285ec
Baby birdhouse
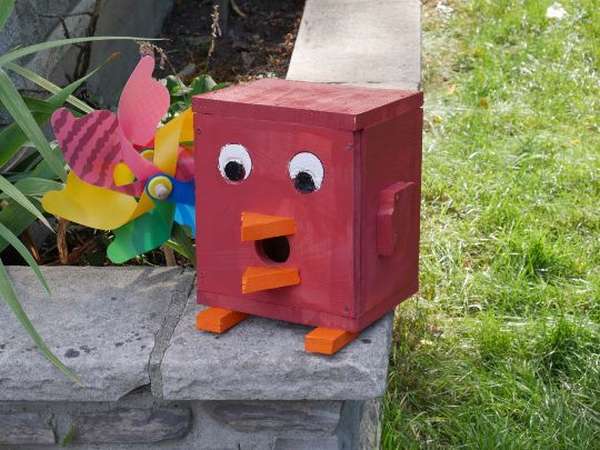 This guide will show you how to make a children's birdhouse do it yourself. Why children? Look at the photo! This is a project for beginners, so if this is even your first carpentry work, you can safely take it together with your child, without worrying that something might not work. So you will do a useful job and gain the authority of a great master in the eyes of your children.
Necessary materials:
- board 1.2 m 1x10
- clamps
- drill
- wood hacksaw
- paint brushes
- pencil or pen
- ruler
- wood screws
- screw drill
- wood glue
- sandpaper
If all this is there, you can get to work. Nothing complicated, you need to measure, mark and saw off. You can adjust the size according to your details. But if you need exactly such a birdhouse, as in the photo, need to cut 6 parts:
- Two 23 cm x 23 cm
- Two 15 x 23 cm
- Two 19 x 23 cm
If everything goes according to plan, you will have a small strip that you can divide, as shown in the photo above. These will be the features of your bird (beak, legs, wings). It probably makes no sense to rewrite the instructions, everything is shown on step-by-step photos, but if interested, the description of the process is on the site, a link is under the gallery.


https://i.expert-h.com/en/skvorechnik/svoimi-rukami-masterklassy#sigFreeId19321a57d4
How to color a birdhouse
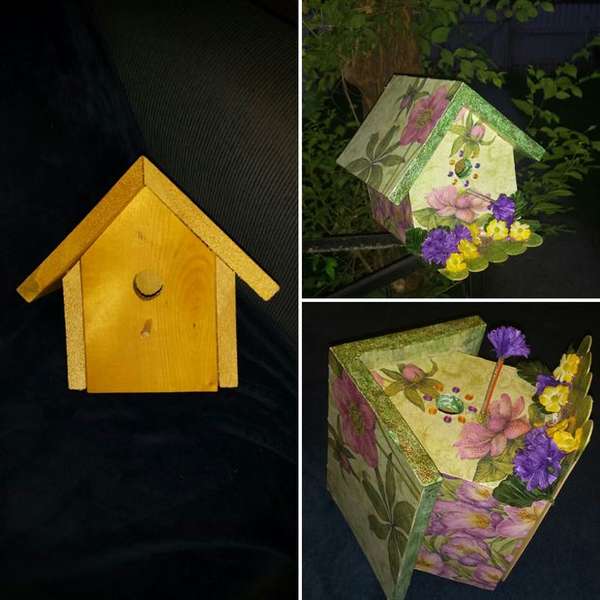 Is it possible paint birdhouses? Do not worry, the coloring of the birds is not scary, they take it calmly and settle in such birdhouses with no less enthusiasm. You can color the house as you like, here is shown one example of how this can be done. What technologies the author of this project used and what materials he used, you can find on the site, the link is under the gallery.


https://i.expert-h.com/en/skvorechnik/svoimi-rukami-masterklassy#sigFreeIdbe886a0776
How to care for a birdhouse
 Proper maintenance is very important for birds and if there are birdhouses near your house, give them a little attention. IN birdhouse care there is nothing complicated, read below a few points that need to be done.
Step 1: End of season cleaning
At least once a year, but preferably twice at the end of the season, the birdhouse should be cleaned. First get to the birdhouse and listen if there is activity inside. Shine a flashlight carefully to make sure thatthere are no eggs or chickens inside. Look diagonally into the hole, because a frightened bird can fly out. When you are sure that the house is not in use, open the hatch and pull out the old nesting material. Use gloves that are then rinsed thoroughly.
Step 2: Inspect the birdhouse for integrity
While the house is still open, inspect it for danger. Check for chopped wood that could scratch the chick or protruding nails. Searches for signs of wasp nests and other insects. If the house is attached to another structure, inspect the equipment attached to it and make sure it is still firmly held. Close the hatch until next season.
Step 3: Check entry
Beware of birdhouses with an increased entrance, especially if the edges are gnawed. Remove and repair (if possible) all bird houses with an enlarged entrance, because the predator turned the nest into its food pantry. Leaving such a nest, you doom the offspring of future residents. On the damaged area, you can replace the part of the board or metal with a hole of the proper size, or just remove the birdhouse and replace it with a new one.
Step 4: Birds do not settle in the birdhouse
Some birdhouses are never used by birds, why? Hanging houses are generally used less than those that are securely attached to a fixed object. In addition, heat is an important factor. If you are discouraged why your wonderful birdhouse does not attract birds, try attaching the bird house directly to the house or barn and make sure that the birdhouse is under a canopy and is protected from the sun.
I hope this material was useful to someone.


https://i.expert-h.com/en/skvorechnik/svoimi-rukami-masterklassy#sigFreeIdbb56edac79
Wooden birdhouse project
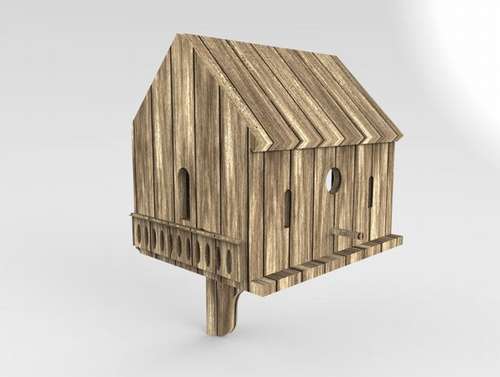 This birdhouse is made using the program. Artcam Express with functions that allow you to work with raster images and vectors, as well as CNC-MACHINE CNC milling machine. If you understand these things, then here you will find detailed instructions on how to use this software product to make this cute birdhouse. There are other programs besides ArtCAM Express where you can create wood birdhouse project and process 3-dimensional reliefs with the calculation of the processing path, but the author used this one. CNC milling machines are also not new today, they are ideal for woodworking, milling of metals, plastics and other materials.
Now point by point
1. Open the new model dimensions 1500 x 1000 x 15 mm
2. Using the Create Rectangle tool, create a rectangle 350 mm wide and 200 mm high
3. Center in the middle of the model by selecting the Center in Model icon or pressing F9
4. Create a circle with a radius of 32 mm so that the bottom of the circle and the bottom of the front wall are divided by 125 mm
5. Create ventilation holes by selecting Create Rectangles and manually drag and create a rectangle to one side of the front wall until you get the dimensions you need.
6. Use the Create Arcs tool to create an arc that connects the top two corners of the rectangle and uses the Vector Crop tool to remove the top side of the rectangle.
7. Hold Shift and select both new vectors and use the Join Vectors With A Line tool to combine the two vectors and create a closed vector
8. Flip this vector over the model using the mirror vector to create a symmetrical hole on the other side of the front wall, ensuring that the original vectors are not removed
Step 3: Side Walls and Back Wall
1. Create a rectangle using the Create Rectangle tool with a height of 200 mm and a width of 250 mm
2. Move it to the left side of the front wall with the Transform tool
3. Draw the line vector vertically up from the center of the vertex of this new rectangle, which has an approximate height of 125 mm, using the Create Polyline tool
4. Create a new polyline that starts at the top left corner of the rectangle and is snapped to the top of the vertical line, and then ends at the top right corner of the rectangle, ensuring that the smooth polyline is turned off
5. Use the Trim Vector tool to remove the vertical line and the top side of the rectangle, leaving a pentagon
6. Connect the two remaining vectors with Join vectors using the Line tool, so that the closed vector is created
7. Create two parallel vectors using the Create Polyline tool, which intersects the width of the wall. They will make up the railing
8. Use the Create Ellipse tool to create an ellipse between the bottom of the wall and the railing.
9. Use the Block Copy / Rotate tool to copy it with 1 row, 12 columns and a 10 mm space. This will complete the balcony effect.
10. Select all the vectors that make the side wall, and open the Mirror Vectors menu and flip the vectors by model. Now both sides should have the same side walls
11. Select all the vectors in the model and use the Transform tool to drag them to the left side of the model.
12. Select the vector that covers the front wall and holding the Ctrl button, drag it to the side of the right wall, this should copy the vector and create the back wall
Step 4: Creating a Roof
1. Using the Create Rectangle tool, create a rectangle with a height of 200 mm and a width of 350 mm
2. Drag this rectangle so thatso that it is located above the front wall
3. Use the Create Circles tool to create a circle with a central click in the upper left corner of this rectangle and a radius of 17.5 mm
4. Open the node editing menu and hover over each of the two nodes halfway up the circle. This should cut the circle in half. Remove the top half of the circle, leaving a semicircle centered around the corner of the rectangle
5. Use Block Copy / Rotate to block copying with a clearance of 0 mm, 11 columns and 1 row
6. Select all these vectors, and while holding the Ctrl key, drag left 17.5 mm and down 17.5 mm
7. Select all the semicircle vectors and use the Block Copy / Rotate tool to block copying vectors with a gap of 0 mm, 1 column and 7 rows
8. Group all semicircular vectors
9. Select the rectangle vector, and then re-select the grouped semicircles using the Vector Crop tool to limit the vectors inside the rectangle, cutting off any vectors that overlap
10. Create a rectangle above the back wall with a height of 176 mm and a width of 350 mm
11. Drag the semicircle tile vectors opposite the front of the roof, holding Ctrl to copy the vectors. Repeat vector cropping process
Step 5: Create Sex and Support
1. Create a rectangle with a size of 300 mm and a width of 350 mm under the back wall
2. Create a rectangle with a height of 400 mm and a width of 50 mm and a position under the front wall
3. Create a 200 mm side length square and use the node editing tool to cut a square in the upper right and lower left corners
4. Remove the bottom of the square and use the Create Polyline tool to create a wavy line when closing the vector
Now the design is complete.
Step 6: Creating Paths
1. Select all the tiled semicircle pattern vectors, click on the “Toolbars” in the project tree and then select “Profile Path”.
2. Create a tool path running along the vectors, cutting a depth of 2 mm and selecting the V-Bit Carving tool
3. Select the four vectors that make up the railing and create a profile path along these vectors to a depth of 1 mm using the V-Bit Carving tool
4. Select all the elliptic vectors in the railing and create a path of transparency of the region to a depth of 3 mm inside these vectors
5. Select all the windows and input vectors and create the “Zone Cleanup” tool in them, which is cut to a depth of 15 mm
6. Select all the remaining section boundary vectors and create a profile path that extends beyond these vectors to a depth of 15 mm to cut sections
7. Click "Simulate all paths" to see how the sections will look after processing
8. Save these paths for export.
Step 7: Build
1. After cutting the various sections, or glue them together
2. Attach the front roof with a hinge so that it can be opened. You may need to clean the nest box in the fall.
Leather or rubber from a bicycle wheel can be used as a hinge
3. Drill a hole in the front of the nest box and insert a cylindrical wooden dowel perch
4. Attach to the tree


https://i.expert-h.com/en/skvorechnik/svoimi-rukami-masterklassy#sigFreeIde4abfcba06
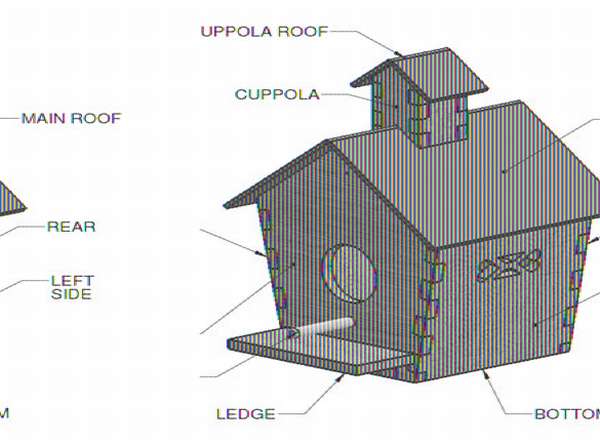
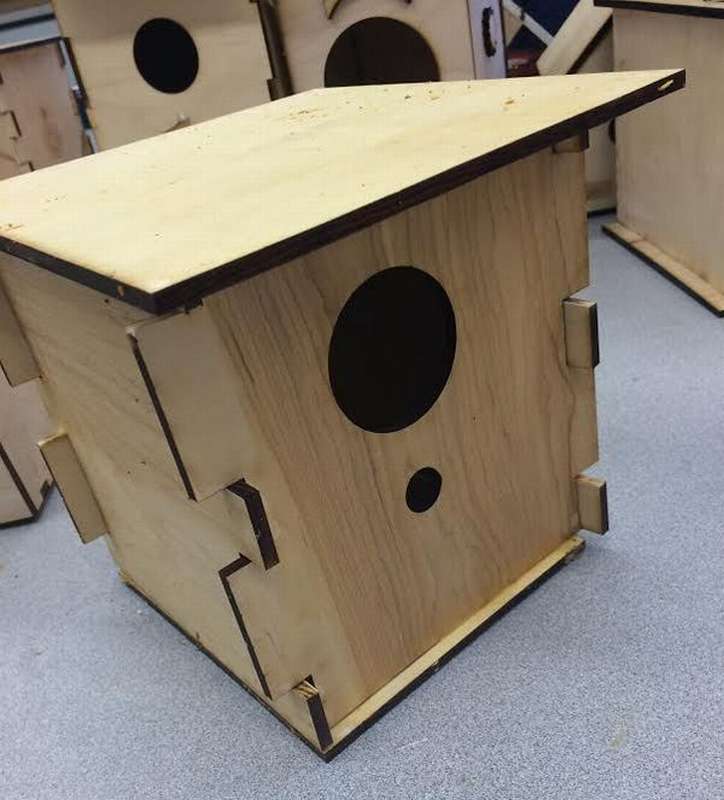
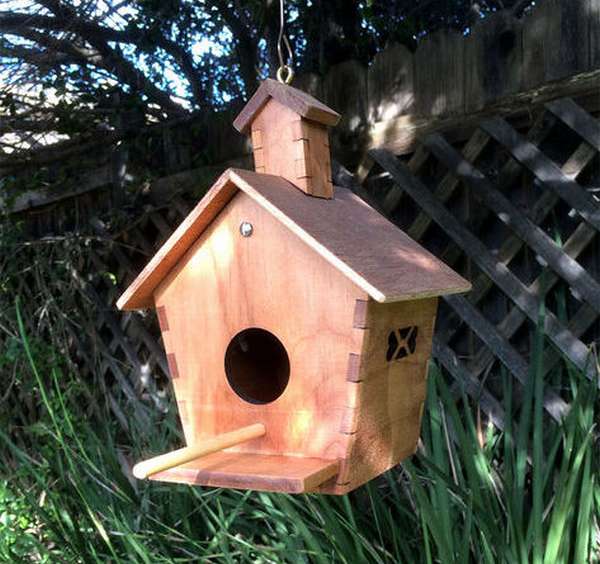 And here is an example of how to make a birdhouse using laser cutting using Solidworks, which is a 3D drawing application similar to AutoDesk Inventor.
First you need to define the design. However, the design has several corners on the sides and roofs, with the exception of the front, on all sides of the birdhouse are flat parts.
Then they can be transferred to a 2D design and cut with a laser cutter.
These parts are then removed and glued together to create the basic structure for the birdhouse.
 The photo shows images of these projects. The author converted SolidWorks drawings to DXF files through AutoCAD, which Corel Draw easily reads to cut parts using the Epilog laser cutter. Despite the fact that AutoCAD is no longer the best graphics application, the author preferred DWG and DXF, which are used by Corel in the laser cutter.
The outlines of the two boards below: the top board contains the side and bottom parts for the main structure for the birdhouse, as well as the sides for the dome; the lower board contains the sides of the main roof, as well as a support stand for the roof, which also serves to attach it to the main section of the birdhouse.
 You can read the full instructions on the author’s website.


https://i.expert-h.com/en/skvorechnik/svoimi-rukami-masterklassy#sigFreeId5c58b1b8fd
 Another example of a birdhouse made with a laser cutter and computer program Auto desk Inventor. This program began to be released back in the last century, 1999, so the system can be considered a veteran of three-dimensional design. one of the oldest systems of three-dimensional design.
The main advantage of Auto desk Inventor is that you can learn it literally in one day - graphics, interface, everything is very clear and accessible. Another advantage is that you can use two-dimensional elements of the Autocad program to create three-dimensional models, as well as work with the DWG format.
The step-by-step photos show how to make a birdhouse using this program.


https://i.expert-h.com/en/skvorechnik/svoimi-rukami-masterklassy#sigFreeId7193928575
A few examples of birdhouses made on a CNC machine


https://i.expert-h.com/en/skvorechnik/svoimi-rukami-masterklassy#sigFreeId9c57b5701c
DIY birdhouses drawings and sizes


https://i.expert-h.com/en/skvorechnik/svoimi-rukami-masterklassy#sigFreeId8f405697f8
DIY birdhouses for birds 200 photos


https://i.expert-h.com/en/skvorechnik/svoimi-rukami-masterklassy#sigFreeId8ef7d189de
Flat roof birdhouses


https://i.expert-h.com/en/skvorechnik/svoimi-rukami-masterklassy#sigFreeIdc297ee0485
Hello, I am the author of this article, so I look forward to asking questions for this article in the comments below, I will answer all !!!
If you have questions on another topic, ask them on our forum, we will answer you
- Two baskets of paper in 5 minutes (Master class)
- How to make a simple and compact table for a milling cutter from plywood
- How to make a soft headboard tile (Instructions + step by step photos)
- Cinder block benches: a convenient bench in 55 minutes
- How to make a bed with a niche: saving space (Master class)