DIY birdhouse from DIY materials 500 photos, step-by-step instructions
 how to make a birdhouse from improvised materials
Mankind has been producing birdhouses for hundreds of years. Historically, wood and clay have been the main material, but there is always room for creativity in this matter. In this article, you will learn about interesting ideas and unexpected solutions and find out how to make a birdhouse from improvised materialsusing the simplest things from our everyday life.
The world is changing, but the design of the birdhouse remains essentially the same. No matter what you do birdhouse out of the juice box or handmade wood, shape and function are the same. The main thing is that the house should be a reliable shelter for the nest from the weather and predators.
DIY birdhouse out of the box
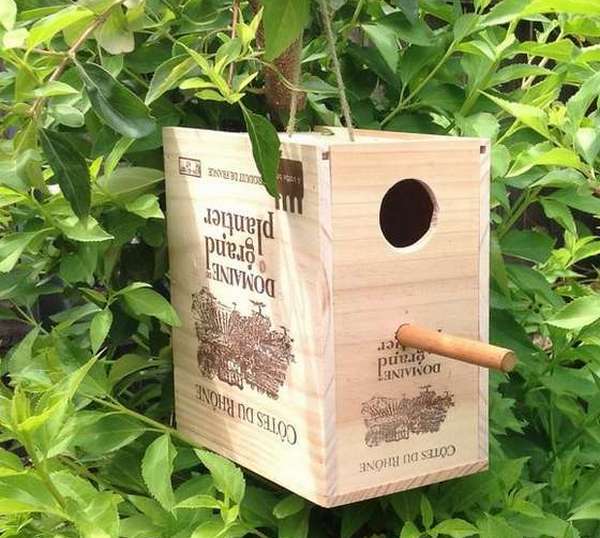 If you have an empty plywood box or box, such as the one you see in the photo, do not rush to throw it away, better make her a big birdhouse. In principle, here you don’t need to do anything special, all you need is a small box and a wooden hearth with a diameter of 5 cm and a length of at least 10 cm.
Of course, you still need a pencil with a ruler, a saw, a drill and scissors. If you hang a birdhouse, then a thin but strong rope.
In general, to do-it-yourself priest out of the box, special tools are not necessary, only if you do not completely disassemble it. If you have approximately the same wooden packaging as in the photo, then the procedure is as follows:
- Remove the lid from the box and pull out the handle.
- Turn the box upside down.
- Glue the hearth so that it is 10 cm long.
- Mark a spot 5 cm below the hole in the box.
- Start drilling after making a small hole with a chisel.
- See if the six is suitable for the new hole you have drilled.
- Install a new pen
- Drill two holes in the cover, approximately 8 cm apart. They must be large enough to fit the rope.
- Pass the rope through the holes.
- Trim and tie the rope to any length necessary for fastening.
- Set the birdhouse in a suitable place.
If the birds are not attracted to your house, think about building nearby feeders.


https://i.expert-h.com/en/skvorechnik/1029#sigFreeIdf5ab95f8ce
How to make a birdhouse out of the box
 This is a very simple project that everyone can handle. To make a birdhouse out of the box for cigars, or something else of the same size, you need simple tools and a little time, but it’s definitely worth it.
What you need:
- A wooden or plywood box, in this case from cigars, is preferably deep.
- Drill with drill
- Clamps or heavy objects
- Wood glue
- Stick (used an old drum stick here)
How to turn boxes into a birdhouse? Very simple:
- drill two holes on the front part, one large for entry and a small for pole;
- then insert a drumstick into a small hole, or whatever you will use as a perch;
- seal the box and clamp it with a clamp or just put something heavy on the box;
- fix the finished birdhouse on the wall or tree in any way.


https://i.expert-h.com/en/skvorechnik/1029#sigFreeId34a4e040be
Just an interesting example.. This modern packaging of wine bottles is made of their wooden box, which, in fact, is already a birdhouse.
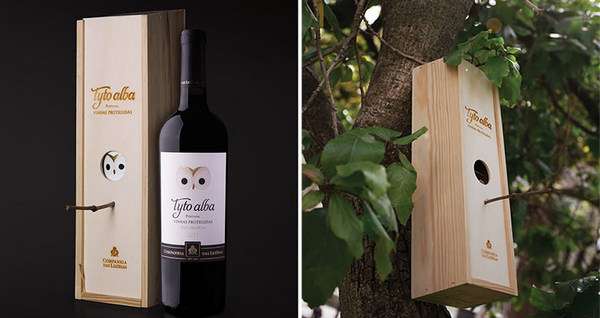 Designer Rita Rivotti has created an amusing packaging for the Tyto Alba wine collection at the Companhia das Lezírias vineyards in Portugal. The design features the eyes of an owl on a white label. When the bottle is inside the wooden box, you see them. After enjoying the wine, a wooden box with an attached twig can be installed on a tree and used as a bird house.
The photo below shows homemade birdhouses from the boxesmaybe some will inspire you on your own projects.


https://i.expert-h.com/en/skvorechnik/1029#sigFreeId8e8eaa5ae7
Birdhouse Birdhouse
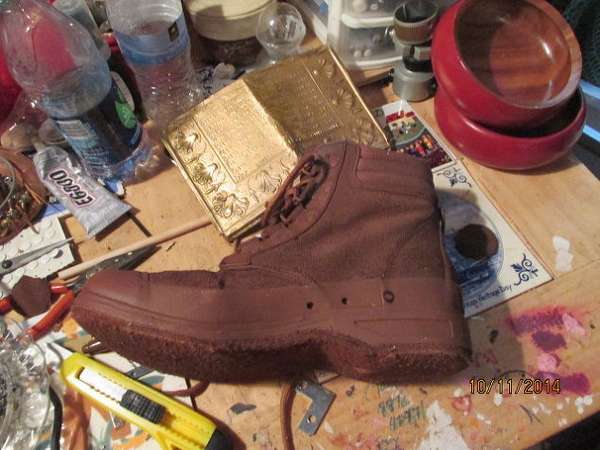
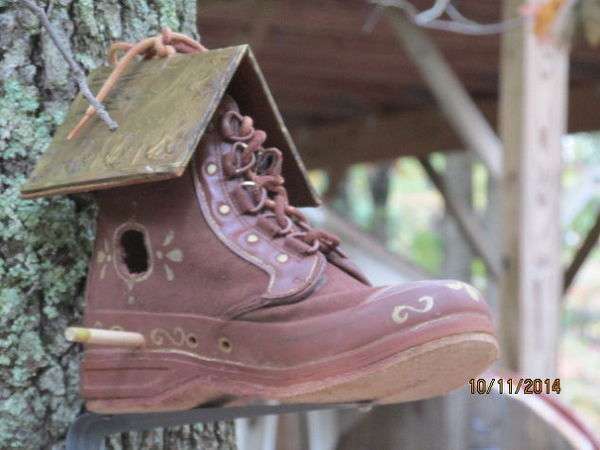 Do you have old shoes? Do you like birds? If you answered yes to both questions, read on, this information is for you. As you see in the photo, from old shoes turns out to be a good birdhouse.
You just need to make two holes, for the entrance and for the perch. Find a metal plate, cut to the desired size and bend in half. That is, make a roof. In principle, this can be done from any material - plastic, wood, the main thing is not to leak. Then glue it to the top of the boot.
That's basically it. Establish a perch and nail or tie to a tree, a fence, a pole.
Old sneakers come in handy too. Your old, worn, unusable, or simply uncomfortable boots can come in handy for birds.
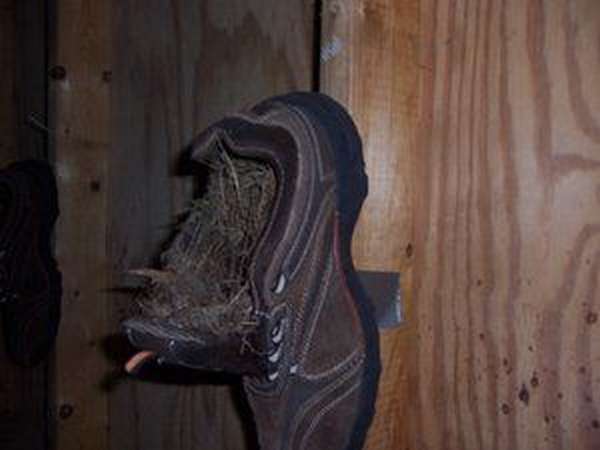
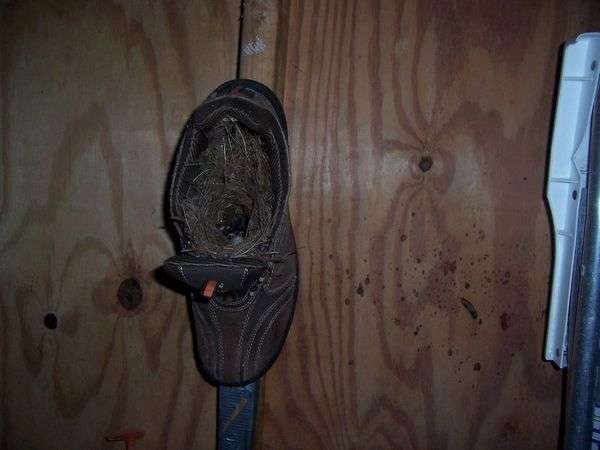 How to make this shoe nesting boxperhaps the instruction is not needed. Just grab your shoes and nail them to the tree. Put in the middle, sawdust, moss, although if the birds have a desire to settle in your shoes, they can do it without you. I hope the birds make a nest out of your old shoes.
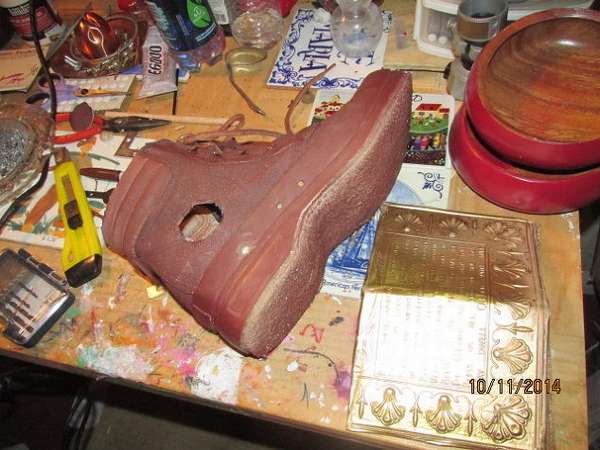
And if you have old high bots, birdhouse can be improved a bit.
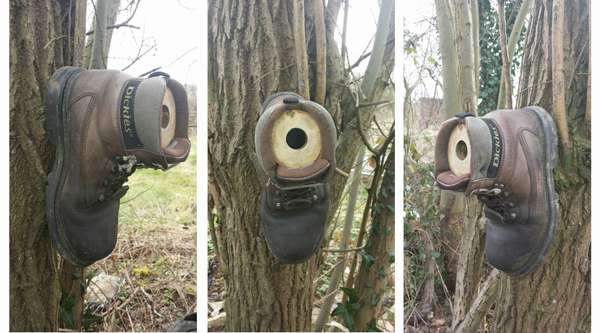 You just need to cut a circle out of plywood to fit the boot, drill a hole for the tap hole in it and fix it, as shown in the photo.
Birdhouse from the boot
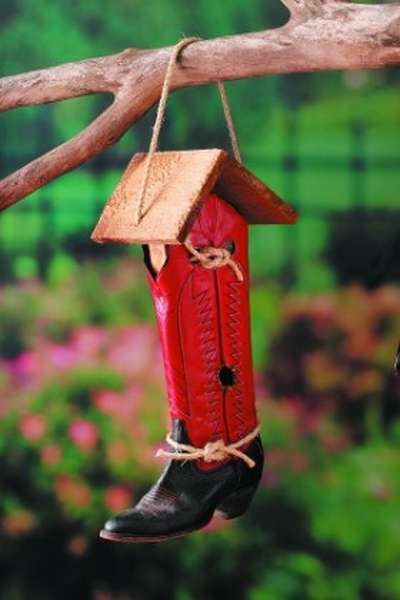 Why not? If you can make a birdhouse out of a boot, then a boot is also suitable.
Materials:
- One boot
- 2 meter pine board
- 1 meter leather lacing
- Nails
- Two brass screws
- Screwdriver
- Scissors
- Hammer
- Drill
- Hole puncher
Instruction manual:
- Make a hole on one side of the boot as shown in the photo. Tie a double knot on the inside of the boot.
- Using a hole punch, make two holes in the front and back of the boot at the top. You will use them later. Drill two or three holes in the sole of the shoe for drainage.
- To determine the correct length of frame boards, insert a pine board into the front of the boot. Add about 5 cm and cut two parts of this length. Saw a 45 ° angle at one end of each of these boards. (This is the hardest part of the project, so if you can do the rest is nonsense)
- Saw off two wooden gaskets, 6 and 8 cm.
- Cut two parts from the roof board. To assemble the frame, 45 ° angles will oppose each other. To prevent the plates from cracking, drill through holes.
- Connect the two parts of the roof at right angles. Drill and glue them together, hammering at least six nails. Then install the roof over the frame and hammer in at least three nails on each side.
- Drill two holes in the eaves of the roof and attach the rope for hanging.
Insert the wooden frame into the boot. Use brass screws to secure the boot to the wooden frame (through the holes you made earlier). These screws will not rust, and you can easily remove them for cleaning.
Decorate as you like. Hang the boot on a tree or other support approximately 2.5 to 3 m above the ground.


https://i.expert-h.com/en/skvorechnik/1029#sigFreeId4a30e43303
 Here is another example from wikihow in pictures.
- Find an old boot and wash it with warm water and soap.
- Fill the sock inside with a clean rag.
- Glue the hook to the back of the boot, it will be needed for attaching to a tree.
- Drive in a small but sturdy U-shaped nail to support the weight of the boot and its occupants.
- Attach the boot to the side of the tree trunk.
- Put the hook on the U-shaped nail and make sure it sits firmly.
Depending on the weather, a birdhouse can last a season or two. If after the first season it remains in good condition, remove the boot from the hook and clean for the winter in the barn. It’s better to put it in a stocking to prevent the entry of insects, and in the spring hang it on a tree again.


https://i.expert-h.com/en/skvorechnik/1029#sigFreeId503906be21
What else can be done shoe birdhousesSee this small selection of photos.


https://i.expert-h.com/en/skvorechnik/1029#sigFreeId86a76a9b79
Birdhouse from a can
The idea is to use coffee cans and wooden parts.
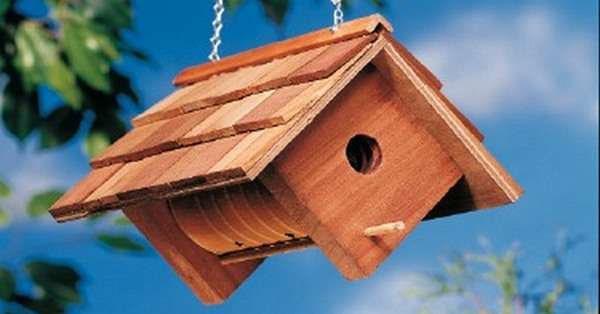 Here is the list of materials you will need to make this cute birdhouse out of the can:
- two pine boards 2 cm thick and 11.5 cm wide
- sheet of two-layer plywood 15 x 22 cm and a thickness of 2 cm
- nails, a can of coffee, hooks, wire or a chain for hanging a birdhouse.
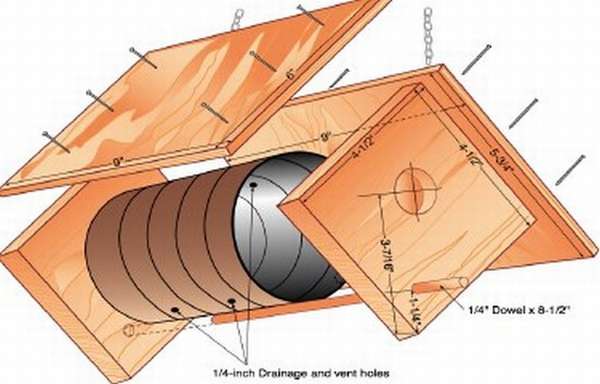
Now all you can do is make your own coffee and follow these instructions.:
- Cut the ends of the birdhouse 4-1 / 2 inches square from the boards of a pine board.
- Identify the inlet on one board by measuring the distance from one corner. (When measuring, place the ruler diagonally from corner to corner and draw a line.) Be sure to mark the angle from which you are measuring, you will need to measure it again in step 4.
- Drill a 3 cm hole.
- Clamp the front and back in a vice. Locate the hole for the perch by measuring 4 cm from the same angle as in step 2, and mark.
- Then drill a hole through the front (with the inlet) and the back.
- Cut out the roof details from plywood, one part is 14 x 23 cm and the other 15 x 23 cm.
- Install the roof parts on the front and rear panels. Most of the roof should overlap the smaller at the top. Leave enough space between the front and back so you can easily insert the jar.
- Wash and dry the jar (pay attention to sharp edges). Drill two holes on one side for drainage. Drill two more holes on the opposite side of the can for ventilation.
- Install the perch.
- Attach a chain, hooks or wire to hang the birdhouse.
 Let's fight together for a clean environment.
How to make a birdhouse from a can
 This project is great for older children or younger, only under the supervision of parents. The pictures show how to make a birdhouse from a can and wooden parts.
Necessary materials:
- Medium Bank
- Hammer and nails
- Wooden plank
- Wood screws
- Saw
- Two hook screws
Instruction manual:
1. Wash and dry the can. Punch two holes in the bottom as shown in Figure 1.
2. Attach the jar from the inside with screws on a 15 x 15 cm wooden square.
3. Make a roof by folding two 20 x 30 cm planks
4. Take another 15 x 15 cm wooden square and cut a hole in the center.
5. Put a square with a hole on the open end of the can and install another square on the closed end, fix the roof on top that will connect these two squares.
6. Screw in the two screws at the corners of the roof (A and B) and the two screws at the bottom of the birdhouse (C and D). Pull the wire through the two lower screws and fasten as shown in Figure 6.
Birdhouse from the can is ready.


https://i.expert-h.com/en/skvorechnik/1029#sigFreeId556e0ce7f9
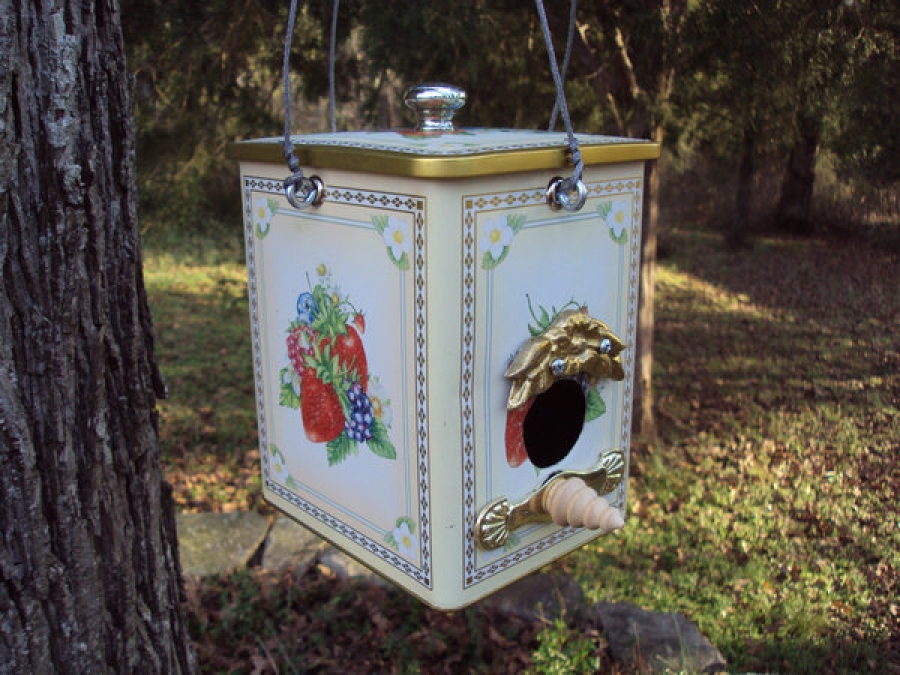
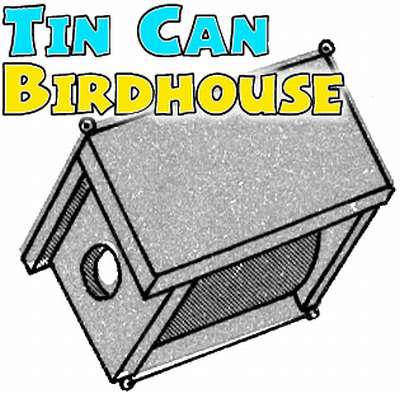
Tin Can Birdhouse
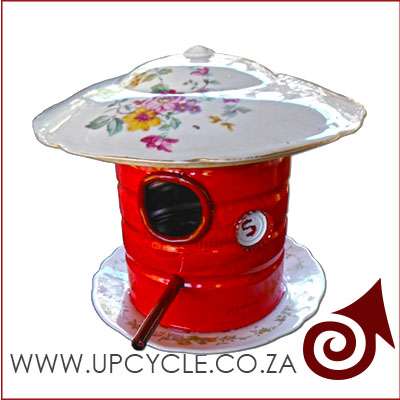 See how you can make a cute birdhouse out of a tin can and old ceramic dishes. Summer is fast approaching, birds are returning after a long winter. They will probably like such a surprise in the garden. Also make such a beautiful birdhouse it’s not at all difficult, a can and old dishes can be found in any home, so there are practically no costs and this work is ideal for children. Besides the fact that you will take them on a useful job, the children will surely enjoy watching the birds settle in and breed in the do-it-yourself nesting box.
What do you need to make a birdhouse out of a can:
- Large can
- Enamel spray paint
- Epoxy adhesive
- Rubber tube
- Pliers
- Metal spike
- Hammer
- Bottle cap
- Old ceramic plate
- Ceramic lid
- Craft knife
- Dowel
- Wash and dry all the components of a future birdhouse
- Color the can
- Make a hole for entry. Punch a hole with a nail, and then widen the hole with pliers, turning off the sharp edges.
- Take the rubber pipe and cut to fit the inlet.
- Cut the tube lengthwise and put it on the bent edge of the inlet.
- With a nail, make a small hole below the large one to put on the rubber-coated handle.
- Cut another piece of tube, put on the wall plug and insert into a small hole.
- Apply epoxy to the bottom of the can outside and stick to the plate.
- Then glue the ceramic lid on the top of the can with epoxy glue.
Well, for fun, you can glue the bottle cap where the house number will be written.


https://i.expert-h.com/en/skvorechnik/1029#sigFreeId6adfb2eada
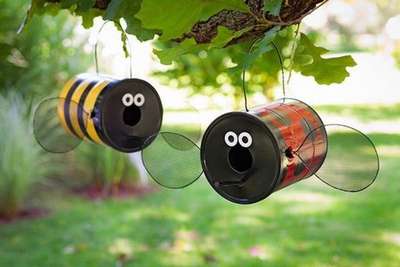
How to remake an empty coffee can into an original birdhouse
 Used here plastic coffee can, but in principle, any tall plastic container with a lid will do.
What you need:
- plastic coffee can or similar container with a plastic lid
- acrylic paints (colors depend on your design)
- paint brushes
- knife or scissors
- awl or something to poke holes
- glue
- piece of dowel or strong twig
- plastic mesh for wings
How to do:
- Think of who you want to portray. To the author, this is a ladybug and a bumblebee. You can do everything you imagine.
- Paint the cans with acrylic paints. Apply several layers and allow to dry.
- Cut a large hole in the entry cover and a small hole for the perch.
- Glue your eyes or, if you want, draw.
- Pass the wire and bend in the shape of wings.
- Cut the plastic mesh to the desired shape for the wings and paint with acrylic paint. Cut the cuts on the sides of the can and insert the wings.
- Cut the two holes at the top and insert the black electrical wire to hang the birdhouse.


https://i.expert-h.com/en/skvorechnik/1029#sigFreeId60c52c79c2
Unusual birdhouse from a can
 A good idea for those who love birds, but are not ready to spend extra money on a birdhouse. The author of this unusual house found the perfect project to solve this problem, and figured out how to make a cheap, simple and beautiful birdhouse. True, at the expense of functionality, the issue is debatable, perhaps the birds in this house will be hot, so it is advisable to slightly improve the design.
Recommended tools: knife, hammer, drill.
Assembly:
1. Remove all stickers.
2. Cut a hole in the jar and paint it in the desired color
3. Drill a hole for the perch and attach a suitable sized stick
4. Make a roof from a plastic bottle and paint.
5. Glue the top of the bottle and decorate as desired


https://i.expert-h.com/en/skvorechnik/1029#sigFreeId98481f0da8
Birdhouse from a can in 15 minutes
 Here you can find out how to make a birdhouse from a can in 15 minutes! Do a useful job, help the birds, it will not cost you anything.
Materials:
- coffee can
- metal clothes hanger
- piece of board
- three screws
Featured Tools:
- Saw
- Drill
- Roulette
Step 1 Drill two holes in the can on the opposite side of the vertical seam. Use a tape measure to evenly align the holes at each end. Drill a pair of holes on the opposite side for drainage.
Step 2 Carefully unwind the top of the clothes rack.
Step 3 Pass the hanger through the holes inside the can, then twist the loose ends again.
Step 4 Measure and cut a piece of the board in a semicircle to enter the jar.
Step 5 Insert the wooden semicircle inward.
Birdhouse is ready! Now pull the hanger to the desired length and hang it on the tree. If desired, you can paint and add some decorative elements.


https://i.expert-h.com/en/skvorechnik/1029#sigFreeId469e0b63fd
How to make a free birdhouse from an empty plastic coffee can?
 Very simple. They are too convenient to give up such an idea. So, find an empty can. Have you found?
- Drill a hole and work a little with a sharp knife to expand to the desired size.
- Sand the edges with sandpaper.
- Punch 4 holes at the bottom of the can.
- Paint the can.
- Install the finished birdhouse.
That's all. You can also write with black marker the year of manufacture of your masterpiece. As you can see in the photo, this birdhouse was made back in 2011. I hope nothing has happened to him in 7 years.


https://i.expert-h.com/en/skvorechnik/1029#sigFreeIda088eb0b5a
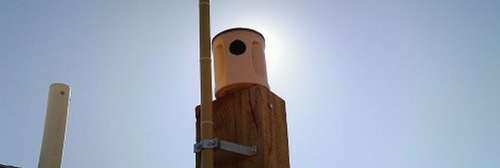
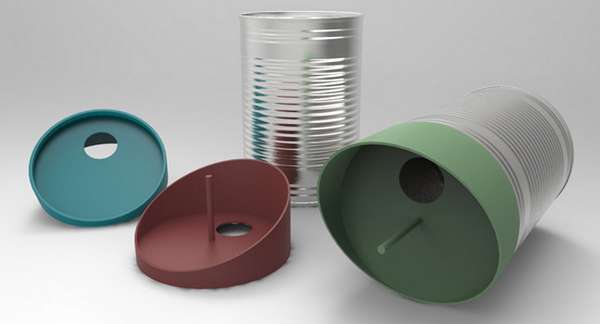
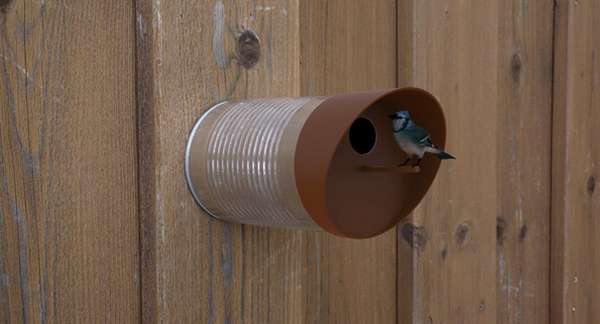
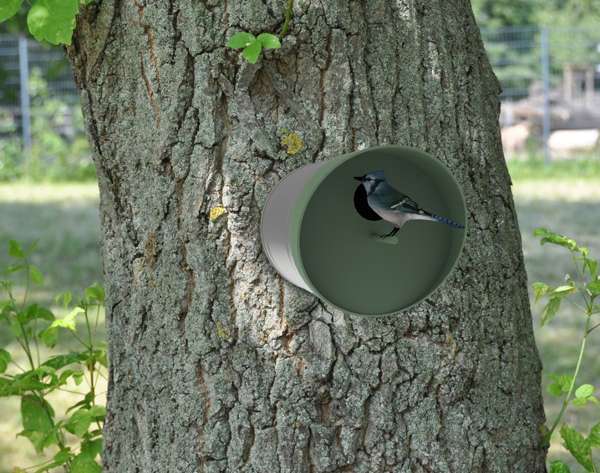 And this is InDezign's know-how, the reusable TweeTin plastic cap, specially made to create birdhouses from empty tin cans of coffee. You just clean the old jar, attach it to any vertical surface, such as a wall or a tree, put on a TweeTin lid and ... voila!
Agree, great invented. The lid is made of recycled plastic, safe for birds. The company produces TweeTin caps of various sizes, so that you can choose not only coffee cans, but also other common types of running containers. The cover can be used repeatedlyjust changing the jar every season.
 Very comfortable in every way.
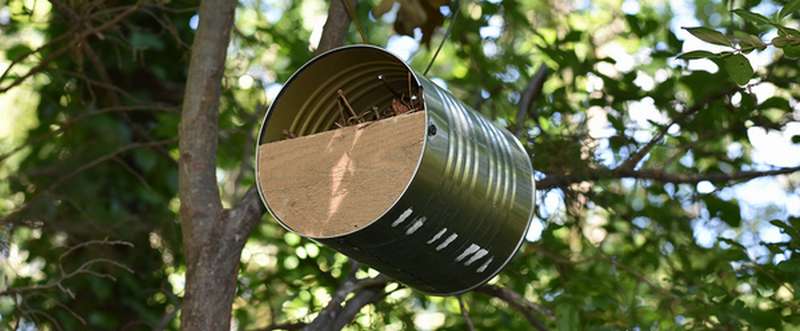
Beerhouse Birdhouse
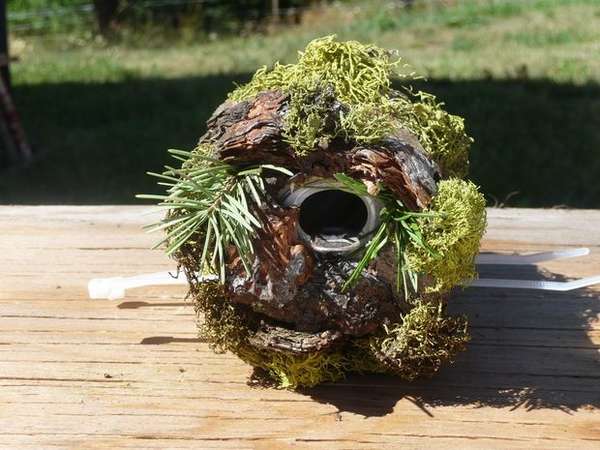 This design does not require much time, tools or materials. "House" is empty beer can or another drink that is perfect for little birds. The lid ring is a natural perch, and large birds or predators cannot pass through a 3-cm “doorway”. Using glue, bark and natural moss, the house can be insulated and masked. In the manufacture of nails, screws and other materials were not used., so from the tools you only need a dremel, and perhaps a saw to trim the bark. But this is optional, such work can be done with bare hands.
How to assemble a birdhouse from a beer can
First you need to thoroughly wash the jar in hot water, especially if it is from lemonade, so that the remains of the contents do not attract ants, wasps and other sweet lovers. Mark the locations for the holes, making sure that the entrance and the perch are in the correct position.
- Using the dremel tool, drill holes on both sides of the can.
- Pass the plastic cable tie through the holes
- Drill a couple more holes in the bottom for drainage.
- Use glue to fix the bark on the jar.
- When the bark is fixed, add spruce twigs and moss.
- Set the birdhouse on a tree at least 2.5 m above the ground.


https://i.expert-h.com/en/skvorechnik/1029#sigFreeIdab2ae1cf6e
Small photo gallery with examples of birdhouses from cans


https://i.expert-h.com/en/skvorechnik/1029#sigFreeId73e7d9a3e5
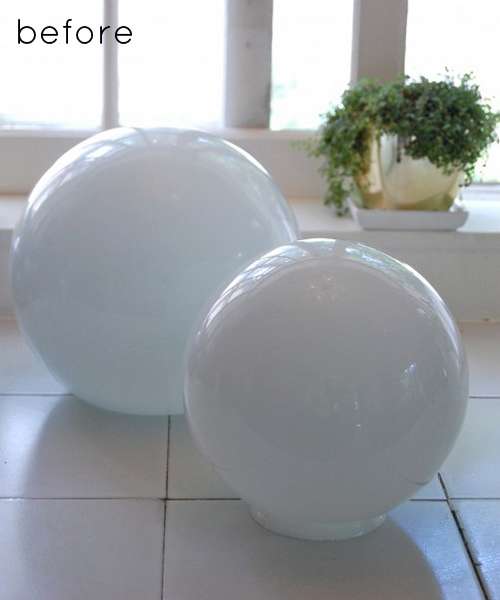
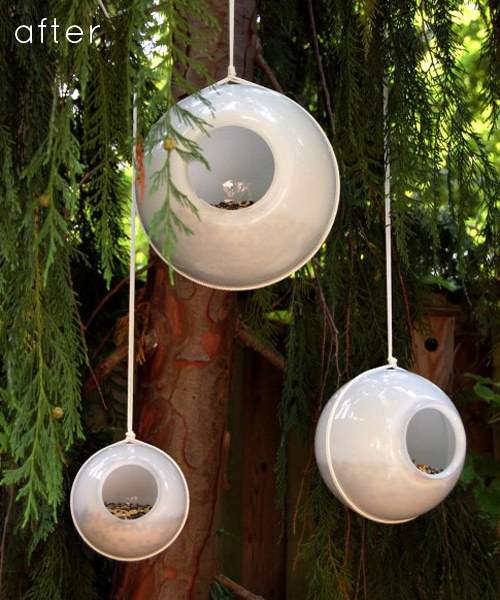
Flower pot birdhouse
 Since this bird house is small, it is ideal for installation in dense vegetation. You will learn from the short instruction how to make a birdhouse from a flower pot in just a few steps. The only difficult part of this project is to make an inlet in a flower pot. The hole should be 26 mm in diameter. Drilling best with a special drill for ceramic tiles is not expensive. But it is also possible with an ordinary drill, just stick a piece of adhesive tape with a hole, make a small recess with something sharp and drill without pressure, at low speeds, blowing off crumbs and pouring with some water. True, if the pot is covered with glaze, then you need to be especially careful, but if not in a hurry, then everything will be fine.
 Materials:
- 20 cm clay pot
- 25 cm plywood sheet with a minimum thickness of 6 mm
- One 20 cm eye bolt and nut
- Two washers
- Hook or chain for hanging
- Electric drill
- Reciprocating saw or just a hacksaw on wood
Instruction manual:
Define place to enter and drill a hole with the largest drill.
 Then increase it to the desired size with a round file and an emery cloth. This may take up to 30 minutes. Perhaps you know another way, but be careful, patience is indispensable here. Once the entrance is large enough, the most difficult part of the work is completed. But be careful ... it’s not the right time to accidentally drop a flower pot!
Make plywood floor. Only from plywood, do not use chipboardthat absorbs water like a sponge. Cut the round base with a saber saw or hacksaw 5 mm more than measured.In the center of the plywood base, drill a hole large enough for the eye bolt to pass through.
Set the flower pot upside down on top of the plywood base.
Put the washer on the eyebolt and pass it through the drain hole and the plywood base.
Install another washer at the end of the eyebolt and secure with a nut. (Be careful not to overtighten the nut - you may break the pot.)
You can hang a birdhouse. Using a hook or chain, hang the house 2.5 - 3 m above the ground and wait for the arrival of feathered residents!
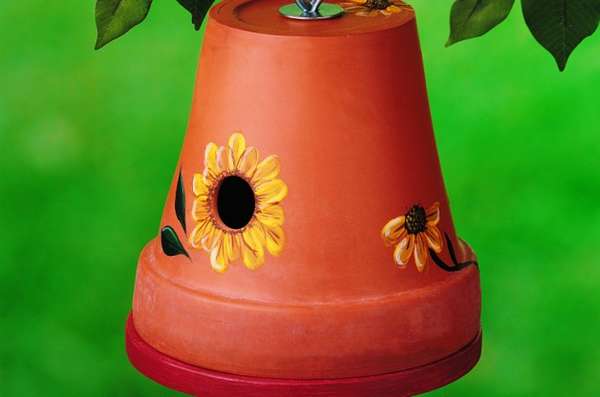
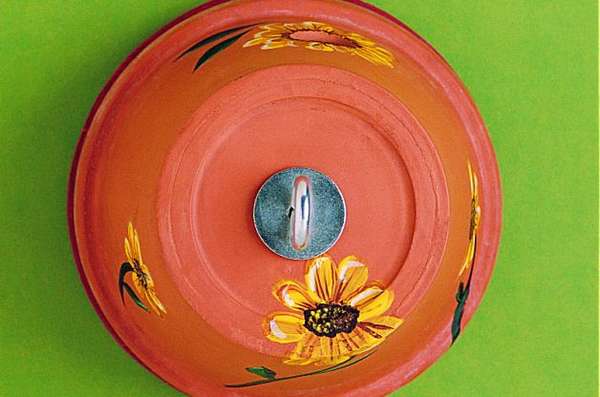
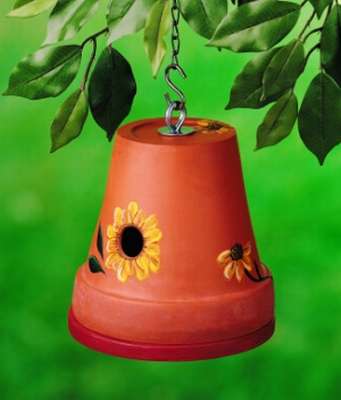
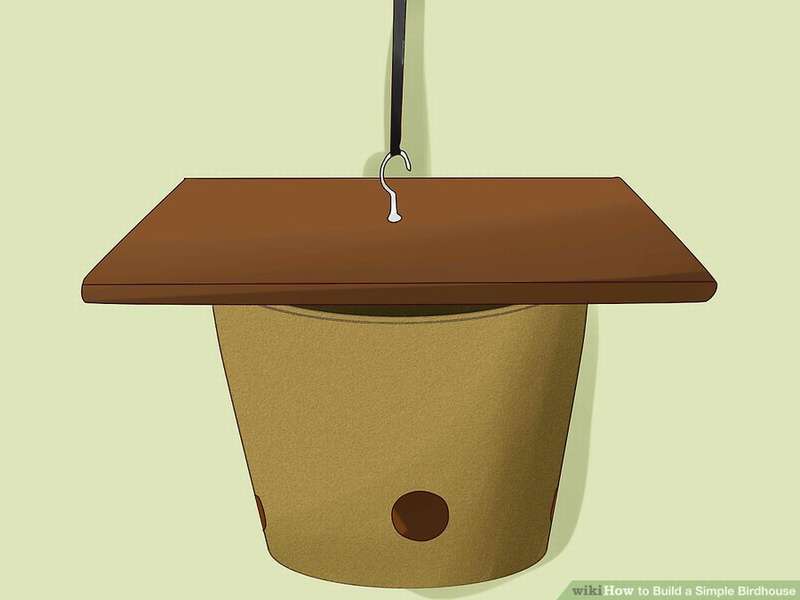 Here is another example terracotta pot birdhouseonly with a roof.
- Choose a terracotta pot of the right size for the birds you want to attract. For the sake of example, suppose that a pot is about 160 mm x 160 mm in diameter.
- Measure the diameter of the pot about 5 cm from the top, this will be the diameter of the wooden circle.
- Draw a circle on the board and saw it with a jigsaw.
- Make a hole in the tap hole of approximately 5 cm.
- To protect the tree from weathering, use non-toxic food coloring or sealant. Birds are sensitive to many chemicals.
- Attach a small hook to the wooden part.
- Attach the pot to the wall.
- Place straw or other material in the birdhouse. Replace the wooden circle.
- Birdhouse is ready to accept birds. To clean, simply pull out the wooden circle, clean the inside of the pot and reinsert it.


https://i.expert-h.com/en/skvorechnik/1029#sigFreeId0eb916d237
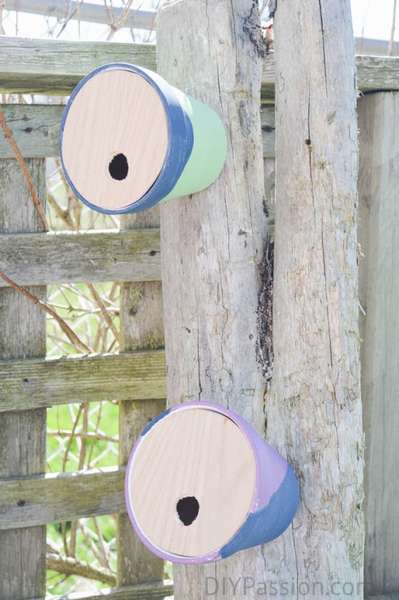 And so it is possible make a birdhouse out of a flower potwithout making a side hole, but by making a special insert from wood or plywood.
Necessary materials:
- Terracotta pot
- A small sheet of plywood or a piece of board.
- Cardboard for the template.
- Jigsaw
- Large Countersink Drill
- Big screws
Manufacturing procedure
- The first step is to make a template and fit it so that it fits perfectly into the pot.
- Paint the pot of your choice.
- While the paint is drying using a cardboard template, use a jigsaw to cut a circle out of plywood.
- Countersink a hole for the tap hole, anywhere, only no less than 5 cm from the edge.
- Now check how tightly the circle cut from plywood enters the pot.
- Screw the screws into the pole and secure the birdhouse.


https://i.expert-h.com/en/skvorechnik/1029#sigFreeId7c8413e912
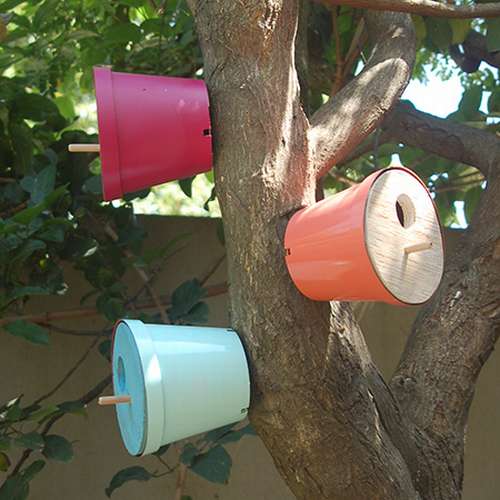 If you don’t have pottery, it’s even easier make a birdhouse out of a plastic pot. They are cheaper and you can very easily make several colorful bird houses for the garden.
Will need to prepare:
- Plastic flower pots 3 pcs.
- Rust-Oleum 2X slate paint of your choice
- Primer Rust-Oleum 2 X
- Plywood or board
- 8mm dowels 3 pcs.
- Newspaper or some fabric
Tools:
- Drill plus various bits
- 38 mm bolt
- Jigsaw
- Tape measure and pencil
The manufacturing procedure of the birdhouse is the same as in the previous example, so I will not repeat it. One difference, here is added a perch, but this is at your discretion, most masters recommend doing without this detail.


https://i.expert-h.com/en/skvorechnik/1029#sigFreeIdb569610ddf
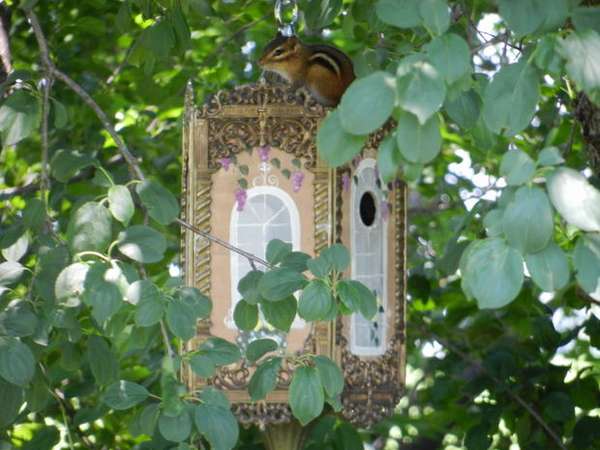
How to make a birdhouse from clay
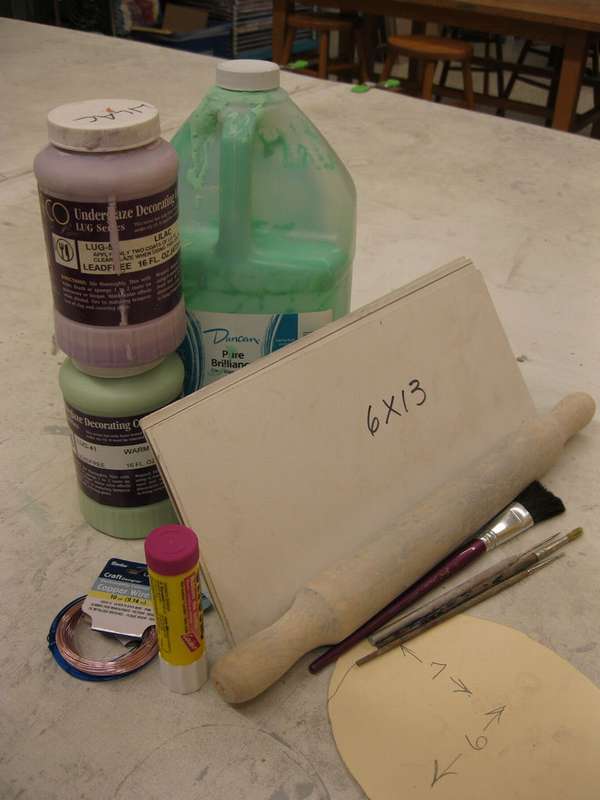
 This beautiful clay birdhouse easy to make from polymer clay and ordinary household tools. A birdhouse can be made in any size or color. To work as tools, you can use household materials for clay, so the project does not require special equipment. Important: If you are using household items as clay tools, do not use them in contact with food after working with clay. How to make a birdhouse from clay, shown in step-by-step photos, instructions on the site, the link can be found under the gallery.
What is necessary
- Glue
- Texture mat
- Rolling pin roller
- Cutting stack
- Metal plate
- Knife
- Roller


https://i.expert-h.com/en/skvorechnik/1029#sigFreeId93baff0917
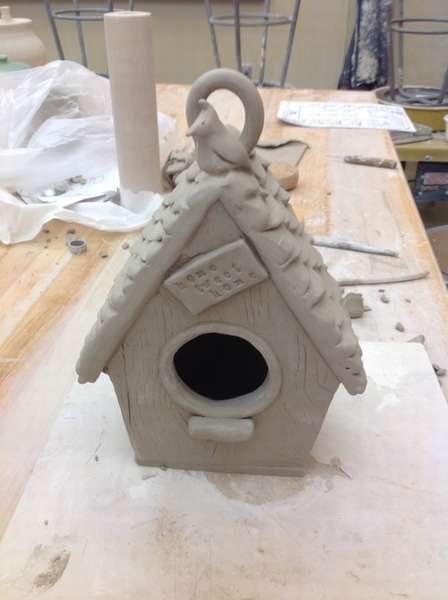
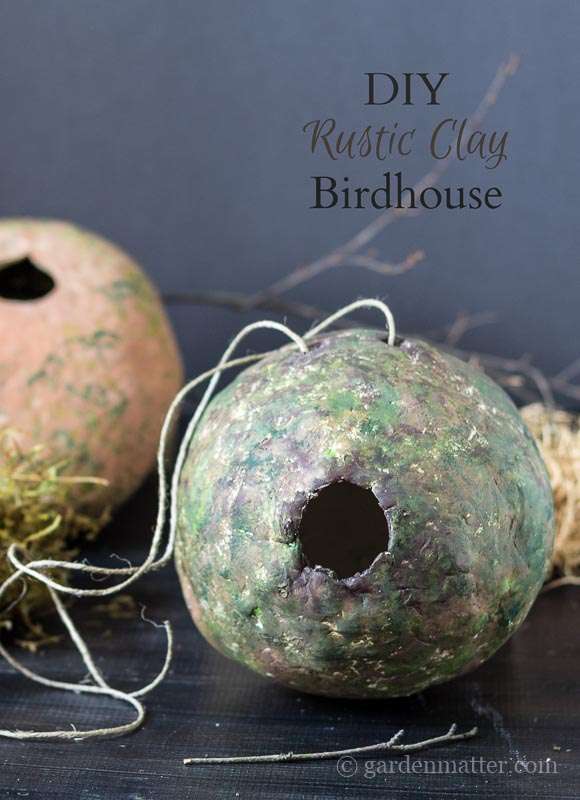
Clay Birdhouse
 Blind clay birdhouseprobably a good idea. What you need for this, you can see in the photo on the right. However, if you have never worked with clay, then you should probably look on the Internet to have a clue, because there are likely to be a lot of questions about step-by-step photographs. The instruction provided by the author on the site is also very superficial, but if interested, of course you can read, the link is under the gallery.


https://i.expert-h.com/en/skvorechnik/1029#sigFreeIdfb5f827708
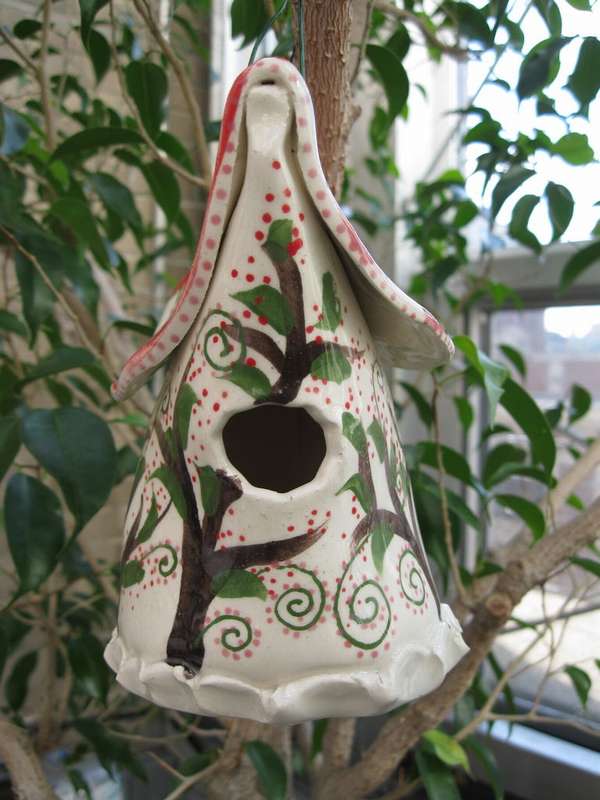
 Or such an option.It doesn’t look very beautiful aesthetically, but for birds this design turned out to be very attractive, well, this is according to the author.
An interesting technology was applied here, the author used an inflated balloon to create a birdhouse shapewhich is overlaid with polymer clay. How he did it, you can read on the site, the link can be found under the gallery with step-by-step photos.
You can hang a birdhouse when the clay dries, or it can be painted to blend with the landscape. Perhaps this will help to attract birds better.
At the end, wind a piece of jute through the holes in the upper part, and you can install.
Clay birdhouse is very easy to make, so you can attract children, they will surely like such an activity.


https://i.expert-h.com/en/skvorechnik/1029#sigFreeIdf1e6dfe57a
See more examples of clay birdhouses


https://i.expert-h.com/en/skvorechnik/1029#sigFreeId182e6aa115
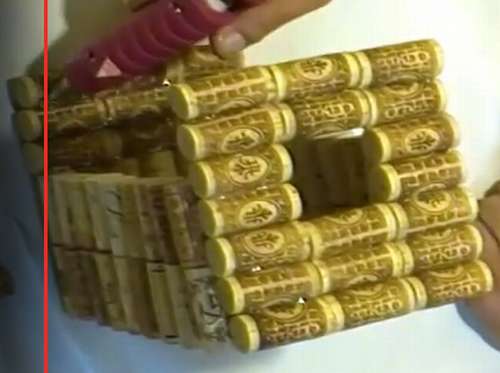
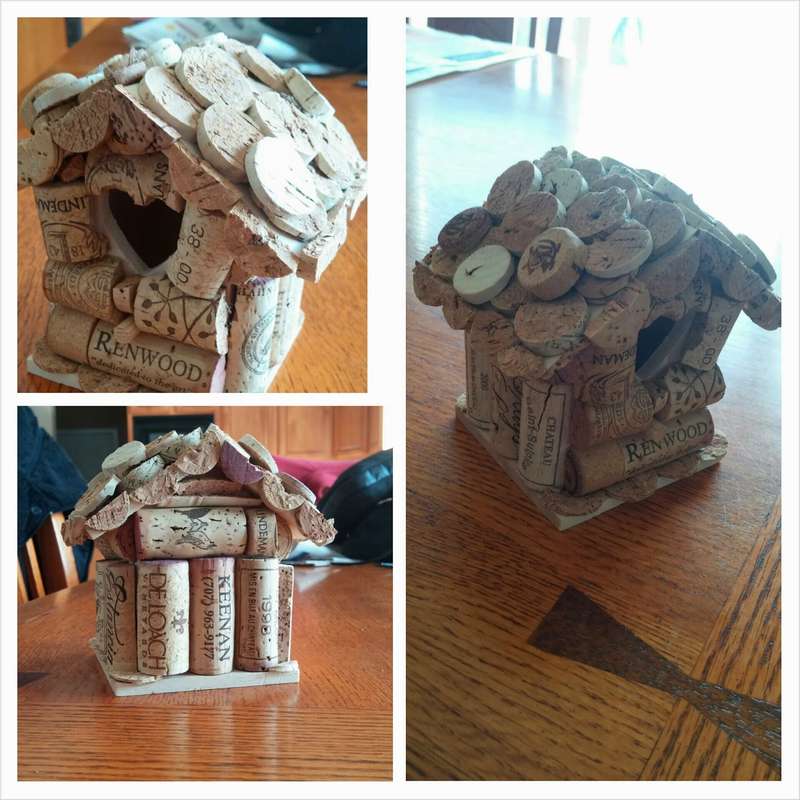
How to make a birdhouse from wine corks
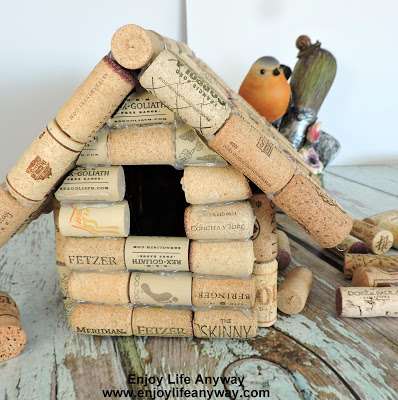 Prepare 180 wine corks, glue gun and knife. Spread the cork and evaluate what you have. Not all wine corks are the same length, so you will need to sort them by length.
Then the order of work is:
- Make a bottom 5 x 4 out of 20 plugs.
- Assemble the walls by gluing the plugs vertically on the sides. You will need about 9 on each side and 5 for the back wall. Only 23.
- Continue gluing the walls with another layer of cork, directly on top of the first layer. (23 traffic jams)
- Now the roof. Glue 3 wide and 12 long together (36 plugs) for each side of the roof. (72 total)
- Create a front by gluing 19 corks together horizontally, leaving the middle cork in the 4th and 5th rows.
- Cut the plugs at the front and back at an angle.
- The next step is to glue two roof sections and about 6 plugs in the center of the roof peak.
- If you need extra support, you can cut the cork in half in length and stick it under the ridge on both sides.
So, the costs:
- Bottom 5x4 = 20
- Walls 2x23 = 46
- Roof 3x12 = 36 x2 = 72
- Front 19
- Back 9
- Comb 6
- 2 additionally for support, if necessary.
A total of about 174 traffic jams.


https://i.expert-h.com/en/skvorechnik/1029#sigFreeId424b5f1b9c
 Wine cork house
If you drink a lot of wine (for health reasons, of course), and rarely throw away anything that might ever be useful, then you probably have accumulated tons of wine corks for work. Although in order to assemble this birdhouse from traffic jams, you need only 172 pieces. In this case, the author used synthetic plugs, well, he just didn’t have others, although it is preferable, of course, in kind. So, first you need to drink 172 bottles of wine. Already? Well then you can start.
Materials: From 150 to 200 wine corks. Natural corks are easier to work with, but synthetic ones hold their shape better and are more resistant to weather conditions.
Glue gun and glue sticks. Buy universal adhesive E6000, ideal for gluing wine corks, as well as for other materials, it is most often used for making jewelry, because it glues almost everything in any combination.
Very sharp knife or hacksaw. Tip: Better take a hacksaw, especially if you use synthetic plugs.
 Step 1: You will need 20 floor plugs to make 5 rows of 4 plugs glued at the ends.
- Step 2: Glue 23 vertical plugs glued to the three sides of the base for the first row of walls.
- Step 3: And 23 more corks for the second row of the back and side walls.
- Step 4: You will need to make two identical rectangles for the roof. The side walls have a length of about 10 plugs, so each side of the roof should be long enough to cover it and leave a little overhang. Use 72 corks to make 2 rectangles, each of which consists of 12 rows of 3 corks.
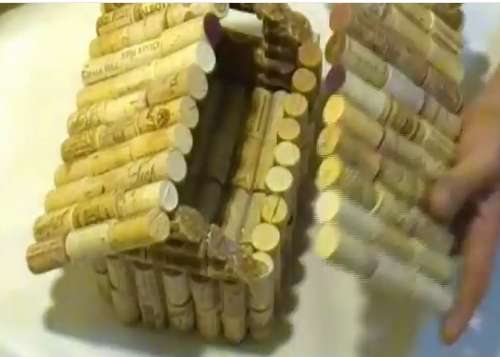 Step 5: The front wall needs to be done differently because you need to create an inlet. There are 19 horizontal corks, with 3 rows of three at the bottom, 2 rows of just 1 cork per row along each edge and 2 rows of 3 on top. Note that you expand the front wall about 3 plugs above the side walls, so you need to add 9 plugs to the back wall in 3 horizontal rows of 3 to make it the same height as the front one.
- Step 6: Now comes the hard part. To install parts of the roof, it is necessary to cut two angles of 45 ° on both the front and rear walls. The tip of the inverted triangle will be the exact center of the center plug in the top row. The sides will tilt down to match the height of the side walls.
- Step 7: Apply a generous layer of glue along each corner of the roof, both the front wall and the back. Then set the itemyou're roofing over corners. The tops of the roofs do not overlap!
If you used natural corks and hot glue, then apply an additional layer of glue to all the seams.
That's it, the wine cork birdhouse is ready.


https://i.expert-h.com/en/skvorechnik/1029#sigFreeIdddaa80ed1e
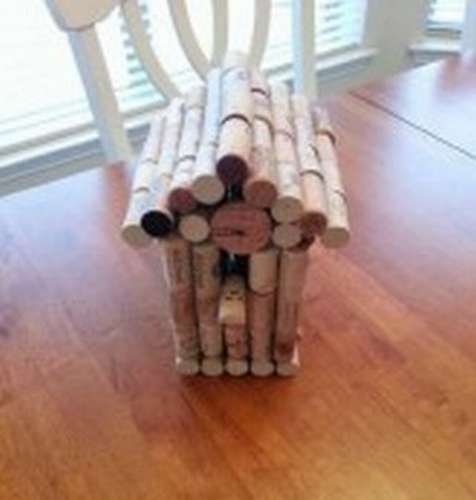 Wine cork nesting box
Keep corks from wine and do not know what to do with them? You are not alone, many do this. Well, now you have an example for inspiration - make a birdhouse out of traffic jams. It is almost free!
All that is needed is wine corks and a hot glue gun (with lots of glue) and, possibly, a knife to cut corks (optional).
This is the kind of craft that everyone can do for their own pleasure. Something that you can spend time on, show your creativity without having any experience. After all, there are no criteria - rightly done or wrong, most importantly, creatively. How to do this, look at the step by step photos.


https://i.expert-h.com/en/skvorechnik/1029#sigFreeIdd50b2050b2
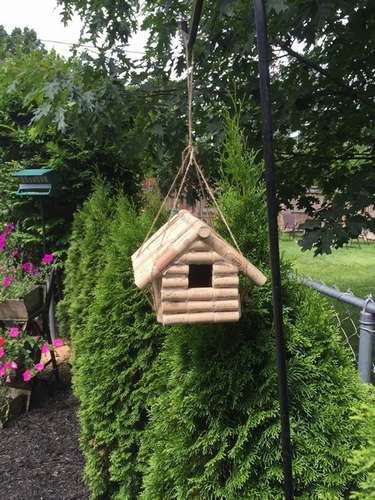
Cork Birdhouse Decor
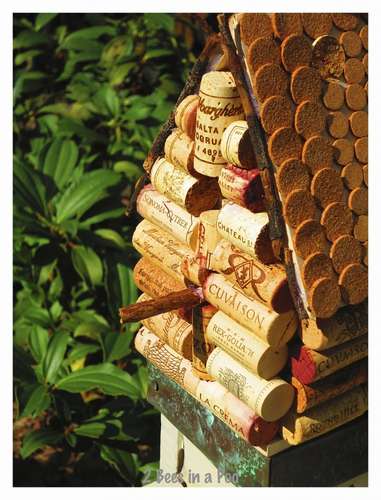 And here is shown how to decorate ordinary birdhouse with wine corks. As you can see, the idea is simple, you can use wine corks to do anything. In this case, the instruction is probably not needed. Just some nuances.
First, of course, it’s necessary buy or make an ordinary wooden birdhouse. Then lay out the main pattern for each side and make a frame out of the corks by gluing them to the edges of the sides. Screw the hook on the roof to secure the birdhouse. Now you can start sticking wine corks. Use different combinations, cut to the desired size and very soon your birdhouse will begin to look like a log cabin.
For the roof of the cork you need to cut very thin layersto get such a beautiful "tile". This step can be a bit complicated, or rather boring, because it will take a lot of time. Therefore, it is better to buy double-sided adhesive tape, then things will go faster. It can be found in any home decor store.


https://i.expert-h.com/en/skvorechnik/1029#sigFreeIdeb0a6af0ea
Decorative Birdhouses
 For those who are interested in creating various decorative things from unusual materials, working with wine corks is a pleasure. An interesting project, a corkhouse of wine corks - easy to make and look amazing. Perfect for decoration or gift.
You will need: wine corks, wooden birdhouse, glue gun, knife and cutting board.
To cut the cork in half, it is best to use a blade. Champagne corks look great when mixed with regular corks. Cool plugs can be made from artificial plugs and are much easier to cut than real ones.
Before gluing, first you need to carefully lay out the picture. For the top, leave whole corks on the sides to give the birdhouse the look of a log cabin. As you can see in the photo, you should cut the pieces towards the top to fill the holes, doing everything possible to make them fit together!
For the roof, cut the whole cork into about 8 circles, and make a tile. In general, sliced circles look attractive on any project. Here are a few different types of bird house.
A smaller birdhouse is much more difficult to make than a larger one! Just keep in mind that a larger design gives you more options.


https://i.expert-h.com/en/skvorechnik/1029#sigFreeIda14930a4ed
Author Jessica Nelson
Wine cork nesting boxes photo


https://i.expert-h.com/en/skvorechnik/1029#sigFreeId0c741c4a07
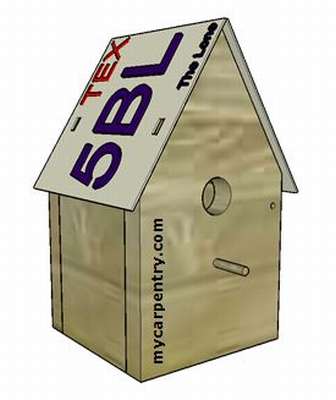
Cheap license plate nesting box
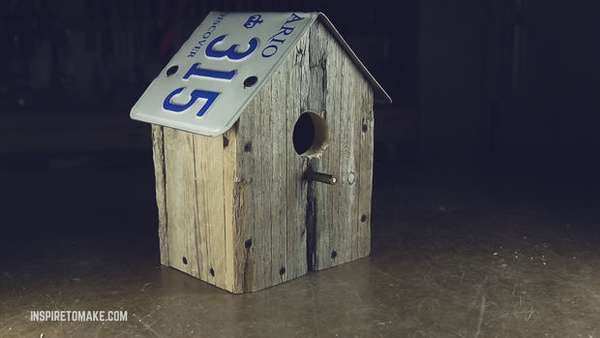 A home birdhouse is, as a rule, for many the first independent work, when children first learn how to work with carpentry tools. This is a quick and easy project that does not require large expenses. But most importantly, you help our beautiful feathered friends. Children are especially interested in such things, so take out a saw, find a couple of old boards and devote a day to make a birdhouse with a child. Or ten days, that's how it goes. To build this house, the author used disassembled pallet and old license plate as a roof.
- Here's the roof and start. Just grab the old license plate, mark the center and bend it at a 90 degree angle.
- Then the roof can be used as a template to indicate the shape of the front panel.
- Saw the front and back walls, they should be the same.
- Make side walls.
- Assemble the entire structure with drywall screws. It is advisable to drill holes in advance to prevent splitting of the tree.
- Make a summer and a perch.
- Attach the roof


https://i.expert-h.com/en/skvorechnik/1029#sigFreeId204adeec06
 Birdhouse scheme. If you liked the idea with numbers, you can usedrawings here. it simple birdhouse design, which can become a house for tits, finches, sparrows and other small nesting birds. If you do not have an old license plate, you can replace the roof with a galvanized sheet of 30 x 15 cm.
You will need a 1.5 meter board, an old license plate, seven galvanized steel screws, and about twenty galvanized finish nails. The dimensions on the drawings are in inches, this 2 "means two inches, one inch 2.54 cm, then 5.08 cm. So translating everything into centimeters will not be difficult.
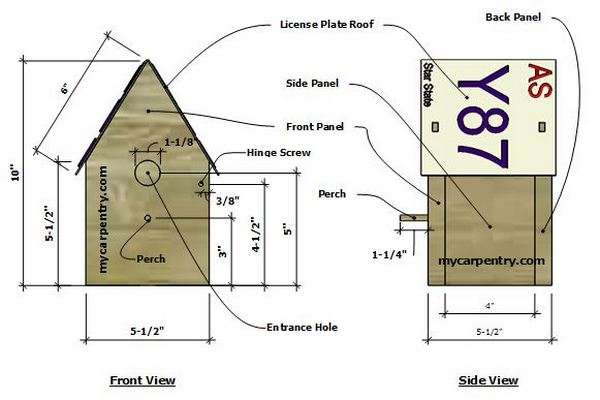
 Cut the front, back, side walls and base to the dimensions indicated on the diagram.
- Assemble the sides together as shown in the drawings.
- To attach the door, drill a hole through the front and rear panels (see diagram)
- Replace the door and drill smaller holes for the door hinges.
- Finally, with the door closed, drill a small hole for attaching to the base of the birdhouse (not shown in the drawing)
- Drill a 3 cm diameter inlet in the center of the front panel and a small one for the pole. Fasten the perch to the glue.
- Roof mount. Carefully bend the license plate to the desired angle and fasten with four screws through the existing holes on the license plate to the assembled birdhouse frame. If the holes do not line up evenly, drill new ones in the license plate.
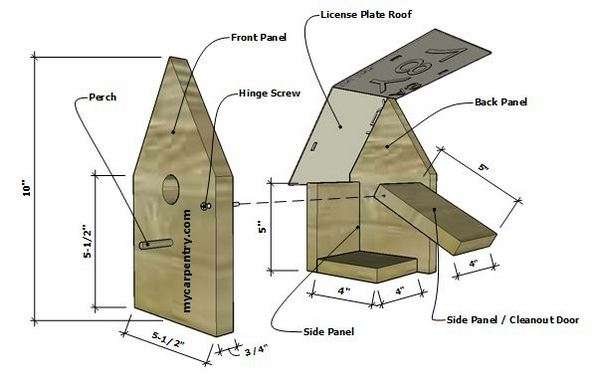 I hope you enjoyed it. This is one of the simplest birdhouses, with a convenient side door for cleaning.
You can do something like this birdhouse with a license plate roof with three entry holes. Also nothing complicated, the instructions can be read on the author's website.


https://i.expert-h.com/en/skvorechnik/1029#sigFreeIde8e3f6c617
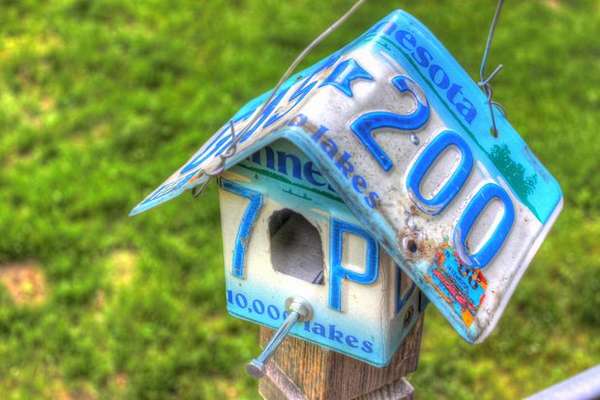 But you can make a birdhouse not partially, but completely from license plates, as shown in this example. For this project, only three plates were required, and as you can see, there is even a door for easy cleaning at the end of the season. By the way, the design can be easily redone if, say, a rear wall is made of wood and, therefore, only 2 plates are needed.
Necessary Details:
- 3 standard steel license plates
- 3 screws
- 1 bolt 6 x 60 mm and 2 nuts
- 4 rivets
- Wire or rope if you will hang a birdhouse
Necessary tools:
- Dremel Rotary Tool
- Scissors for metal
- Pliers
- Screwdriver
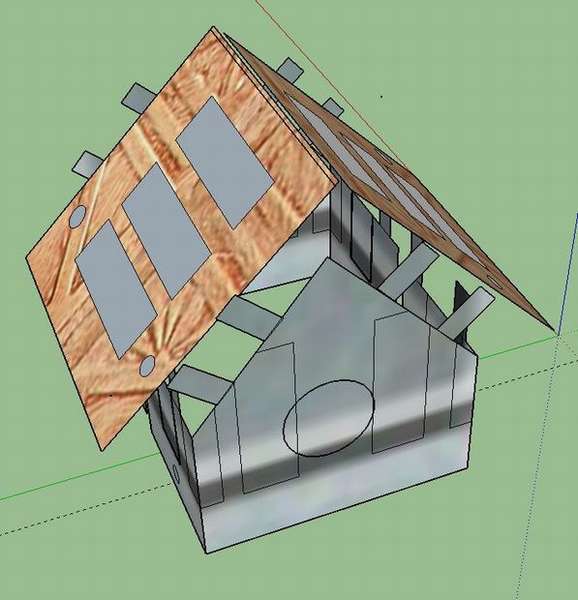 The author offers a sample sketch for this birdhousebut this is a fairly simple project and you probably want to resize. An easy way to do this is use cardboard to simulate design.
- Prepare the stove door plate,
- Mark the door opening in the center of one of the plates. Drill 5 holes, one in each corner and one in the center top, then use Dremel to connect the dots.
- Switch to the grinding wheel on the Dremel to smooth the curve of the door and remove sharp edges.
- Mark the shape of this plate, including at least one tab
- Cut the shape with scissors
- Then from the second plate also make a second wall.
- Bend the plates, it’s not difficult, you can do it simply with your hands without tools.
- Plates 1 and 2 should be bent by a third
- Plate 3 "Roof" just needs to be bent in the middle at about an angle of 90 degrees
 Collect a birdhouse
- Sliding plate 2 (rear wall) to plate 1 (door plate)
- Drill a hole in the side plate, insert a rivet on each side to support the front and back half.
- Drill holes in the roof
- Use a rivet gun to secure the roof to the tabs (one rivet on each side of the roof is all that is needed)
- Trim a piece of the board so that it fits to the bottom of the birdhouse
- Use 2 screws to attach the tree and 1 screw to serve as a “door drive”,
- Drill a hole under the birdhouse door and fasten the bolt, it will be a perch.
- If desired, bend the wire, and attach it to the roof, this will allow you to hang a birdhouse on a tree.
The project is completed!


https://i.expert-h.com/en/skvorechnik/1029#sigFreeId6e83119299
Judging by the photos on Pinterest, birdcages from car license plates are quite popular, below you can rate more 50 original bird houses.


https://i.expert-h.com/en/skvorechnik/1029#sigFreeId7206d6a2fc
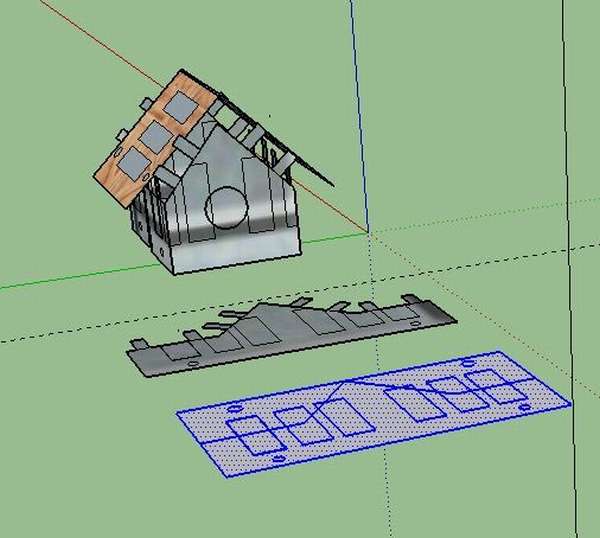
Pumpkin Birdhouse
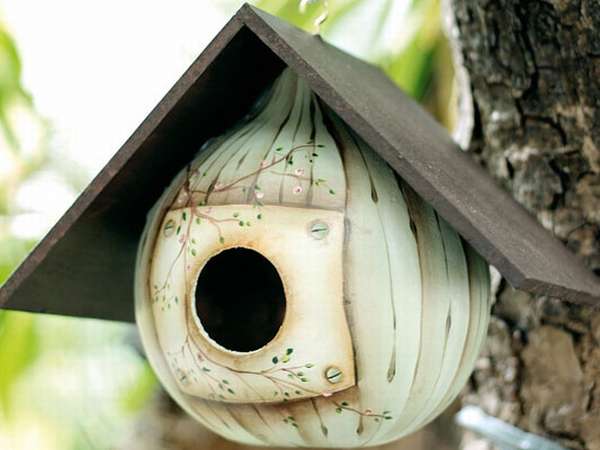 If you grow decorative pumpkins in your garden, I suggest using them creatively. For example, make a unique and beautiful birdhouse, which will be the perfect decoration for the garden. For this you will need:
- acrylic paint and brushes
- MDF sheets for roof
So, let's start making this beautiful pumpkin tenderloin.
- Take the dried pumpkin. Angle two holes on top and one on the front with a diameter of about 4 cm.
- Smooth the edges with sandpaper and paint with white paint.
- Wait for it to dry.
- Paint again by adding a light green tint.
- With a pencil, draw a rectangle around the hole.
- Paint the wooden stick and other decorations as shown in the photo.
- Decorate the edges of the rectangle as the entrance to the birdhouse.
- Cut the MDF sheet for the roof and paint with brown acrylic paint.
- Create a palette of different colors and sponge paint the roof of the birdhouse.
- Use a roller to paint the whole pumpkin.
- To install cruse hot glue
- Use a hot glue gun to install the roof.
Pumpkin birdhouse is ready.


https://i.expert-h.com/en/skvorechnik/1029#sigFreeId0ad4abfdaa
Coconut Birdhouse
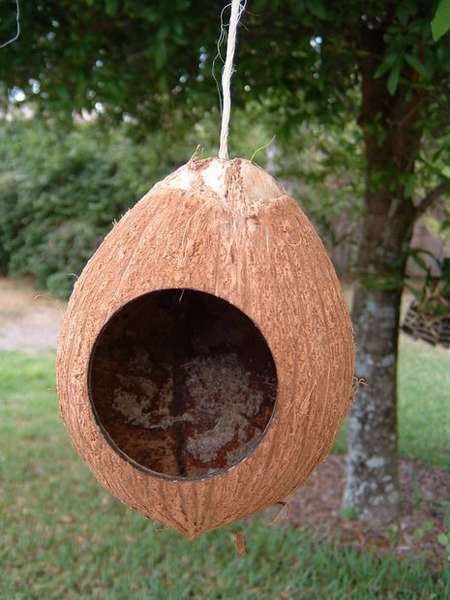 Today, exotic fruits are not a problem, although coconut is a fruit or nut, a moot point, but not important. The main thing is that you can make an excellent birdhouse out of it. Like, see below.
Required Items:
- Coconut
- Drill
- Rope
- Flat head screwdriver
- Coconut slice or other item
Step 1: Open coconut
- Punch the coconut with a screwdriver. Gently turn the screwdriver to enlarge the hole.
- Pour out the liquid.
- Use a drill to enlarge the hole. Using a circular bit, cut a hole.
- Using a flat-head screwdriver, remove the flesh.
Step 2:Make drainage holes
Using a small drill, make three or four holes in the bottom of the coconut.
Step 3: Fasten the rope
Pass the rope through the top hole. At the end, make a knot that will hold the coconut.
Step 4: Nesting birdhouse


https://i.expert-h.com/en/skvorechnik/1029#sigFreeIddc81db7993
Coconut Birdhouse
 I hope this will be helpful.
Everything you need to create this bird house.
Tools :
- Drill (it is better to use a wire drill instead of a cordless one, because coconut is very durable).
- Saw
- A knife or something to extract the flesh.
Materials:
- Big coconut
- Small wooden stick (10 cm is enough)
Operating procedure:
- First of all, you need to peel the coconut and cut off all the hair.
- Then open the coconut with a knife and pour the sweet water.
- Decide what the hole should be, for example 50 mm is well suited for finches.
- Choose a location for the hole
- In the center of the area chosen for entry, drill a 5 mm hole
- Use a hole punch to make an entrance and a smaller perforation hole
- Carefully remove the pulp through the inlet, if cracks have crept in, fill them with wood glue
- Apply glue and insert the perch into the hole
The house is basically ready, it remains to fill it with any material that, in your opinion, is suitable for birds - sawdust or cotton products. There are many ways to fix the bird house in the cage, the author used a thick wire and hung it on the top,
Hope this was helpful information.


https://i.expert-h.com/en/skvorechnik/1029#sigFreeId6ee3a4d06a
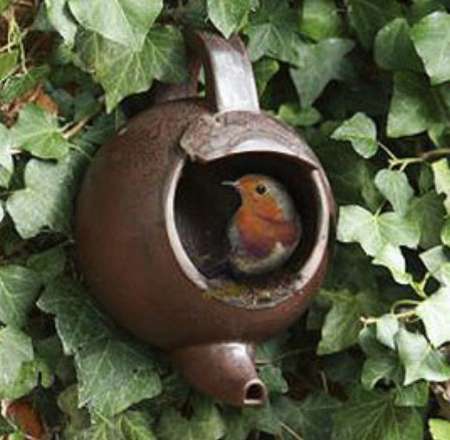 Birdhouse in the teapot
You can turn an old kettle into a cute bird feeder. Just attach the kettle to the tree or wall of your home.
Can be used as simple birdhouse. True, for this we need to figure out how to reduce the inlet.
Otherwise, this is a good option, according to the author, the guests did not have to wait long.
But even if it doesn’t work with a birdhouse, the feeder from the teapot will turn out to be excellent in any case.
Birdhouse from the old lantern
 A great example of how to do it original birdhouse from an old street lamp. The thing, of course, is antique, but for such a noble cause it’s not a pity. There is no step by step instructions, just the idea of the author. If an old flashlight is found, you will also need: primer spray, sealant spray, acrylic paint and drill. The walls are made of floor tiles. You will be pleasantly surprised by how easy it is to cut it. All you have to do is measure and cut.
Apply a primer spray to the panels, the rest depends on your creativity. Fill all slots with sealant. In the end, just fasten the perch, insert the panels and find the perfect tree.


https://i.expert-h.com/en/skvorechnik/1029#sigFreeIdde886defa0
Lampshade feeder
If it came to lighting, then here's another interesting option - a lampshade feeder. Such a house can be done in half an hour, all the difficulty, fasten the rope with silicone glue.
 The main steps:
- Cut the required amount of rope based on the height of the tree.
- Make a loop out of rope.
- Apply silicone glue to the rope and lampshade.
- Everything is ready. Hang on a branch and sprinkle the seeds.
But heed the advice do not use ordinary glue, only silicone designed to come in contact with water, such as marine silicone or the like.
Ecovative birdhouse
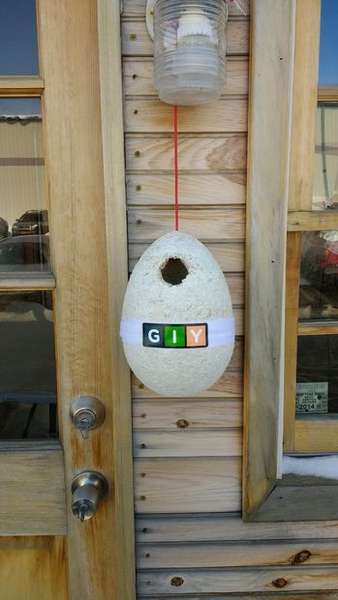 This is an instruction on how to create Ecovative birdhouse. Perhaps not everyone knows what it is. This is actually an amazing material that is grown in greenhouses. In general, we are talking about mushrooms. More precisely, mushroom mycelium is used for production, which is mixed with agricultural waste. The final product in its properties resembles polystyrene foam, only absolutely safe and without any chemical impurities, in general, it is ideal for a birdhouse. To be honest, I don’t quite understand how the process is going on, but it seems that the author of this project is in the know, so if you are interested, the link is under the gallery.
Materials required for the project:
- Tap water
- Flour
- Cellophane
- Plastic bag
- Bag of Ecovative Material
- Plastic egg shape
Step 1: Find and prepare a form
Buying a plastic egg shape is not a problem. Rinse them thoroughly, the author did this with isopropyl alcohol.
Step 2: Follow the instructions
If you bought Ecovative material, there should be instructions. All you have to do is add water and some flour. This step takes 4 days, so just remember where to put it.
Step 3: Fill out the forms
Fill the molds in two halves so that you can remove the plastic mold from the inside before splice the two halves together. Be sure to pack the material all the way. As soon asfill to the top, cover with cellophane and make a few holes in the top with your thumb so that the mushrooms can breathe. Also make several holes in each of the plastic eggs.
Step 4: Let it grow!
After 24 hours, you need to grow the pieces together to keep in shape. Take the parts, put them in a plastic bag and fasten the two halves with toothpicks. This will provide additional support so that parts can grow together at a seam. Let it grow another 24 hours.
Step 5: Drying
To dry parts, place in a conventional oven at 80 ° C for 2-3 hours. If this is not an option, the parts can be left in a dry, well-ventilated place for 24 hours.
Step 6: Make a tap hole
The hole can be cut after the bird house has been grown and dried, or before the two halves grow together.


https://i.expert-h.com/en/skvorechnik/1029#sigFreeId140efee2cd
DIY birdhouses from do-it-yourself materials 200 photos


https://i.expert-h.com/en/skvorechnik/1029#sigFreeId835751864d
Hello, I am the author of this article, so I look forward to asking questions for this article in the comments below, I will answer all !!!
If you have questions on another topic, ask them on our forum, we will answer you
- Two baskets of paper in 5 minutes (Master class)
- How to make a simple and compact table for a milling cutter from plywood
- How to make a soft headboard tile (Instructions + step by step photos)
- Cinder block benches: a convenient bench in 55 minutes
- How to make a bed with a niche: saving space (Master class)