Original birdhouse for birds do it yourself
 original birdhouse do it yourself
A birdhouse is not only a shelter for birds, but also part of the design of our garden or yard. Convenience and safety are important for the inhabitants of bird houses, but we want the birdhouse to look beautiful too. You need to find a middle ground, so this article contains original birdhouse ideasto meet the urgent needs of birds and aesthetic - people.
All the options presented are just examples, how to make an original birdhouse do it yourself. Understandably, you can give free rein to your imagination and experiment with various materials, shapes and designs. I hope that the material selected in the article will inspire you to your own projects.
DIY birdhouse
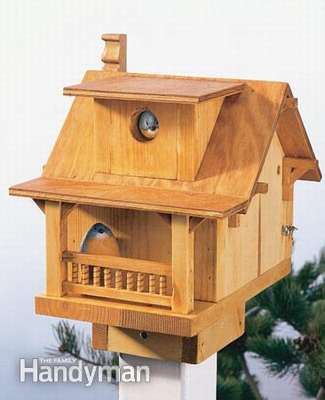 Do you like the photo? Do it and you are as neat DIY birdhousewhich the birds will surely enjoy. It can be made in about half a day if you follow the step-by-step instructions. It is only necessary to observe several parameters that are specific to the species of birds that you are trying to attract. Follow the step-by-step photo, study the drawing and assembly order to make a similar project.
Most conifers (pine, cedar, mahogany, fir) are perfect for a birdhouse. In this case, used pine for walls and foundations, plywood for roofs and birch pins for balusters. You will not need any complicated tools.
Just like people, one house is not suitable for everyone. In fact, many bird species do not use “houses” at all, except for nests on branches or in grass. In birdhouses, birds that live in hollows prefer to live, these are starlings, tits, sparrows, woodpeckers, and blackbirds. It is not migratory tits and sparrows that usually seek shelter in them in winter, and nests are built by starlings and other birds.
The size of the inlet and the size of the inner room can significantly affect the type of birds that your birdhouse will attract. This birdhouse can be called universalsince it is suitable for many species of small birds. To attract very small birds, you can make the floor area a little smaller by gluing an extra piece of wood to the front inner wall of the birdhouse.
Keep in mind that you will need to maintain a birdhouse by regularly cleaning it after the nesting season. To simplify the process, in the house sliding back door providedheld by small hooks and latches. Just lift the latch and slide the door to the side to remove the socket and wipe it from the inside.
 Step 1: Make the ground
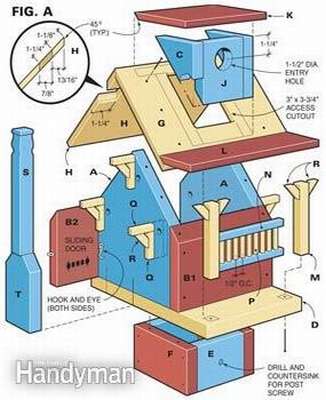
Cut all the pieces with a jigsaw. Before you do the details A, B and D, saw a solid board up to 18 cm wide. When all the parts are ready, assemble the base.
Step 2: Mount walls and roof
Place the jigsaw base at a 45 degree angle and cut the end pins on the roofs G and H. Use the ruler clamped on the workpiece as a guide for a perfectly even cut. With glue and nails, put it all together.
Step 3: Make a hole
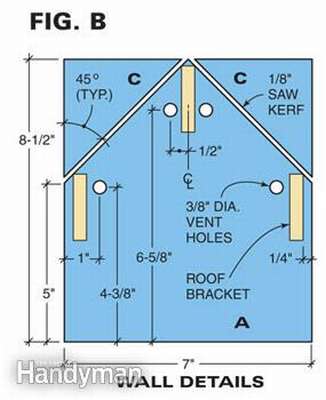
Cut a hole in the front of the roof (G) for access through the ear canal. Drill a 10 mm hole in two opposite corners to easily start cutting. Cut a chimney hole on the back of the roof.
Step 4: Add decor
Gather the railing of the veranda and attach it to the posts. Then nail the porch roof (L) to the racks. Glue the seam along the roof and fix it with duct tape. When the glue has dried, hammer nails from the bottom of the base into each column.
Step 5: Apply oil
Matte finish gives the wood a natural look and protects against rot. The color will turn gray within a year or so. You can also color the birdhouse, but keep in mind that birds are color sensitive, some scare them away.Try to use colors that are found in natural conditions, and avoid bright colors. Never paint the birdhouse from the inside, so that the smell of paint does not deter birds. After external painting, wait 2 to 3 weeks before installing the birdhouse.
 Step 6: Set birdhouse outdoors
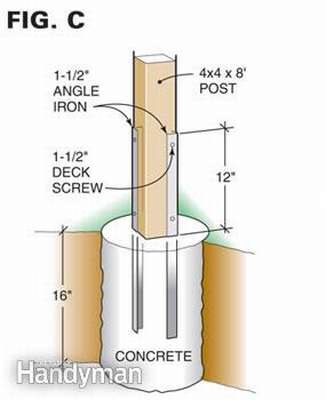
For this nesting box, a wooden flange was made to fix the nesting box on the fence post or decorative porch rack attached to the concrete base, see the photo on the right. You can also install a birdhouse in a tree; just remove the mounting flange and fix the hook in the roof, then attach the chain. Keep in mind that some bird species like to nest in open-air homes, while others feel more protected near buildings or in wooded areas.
Necessary tools for this project:
- Clamps
- Drill and drill
- Hammer
- Jigsaw
- Miter saw
- Wood glue


https://i.expert-h.com/en/skvorechnik/1026#sigFreeId284ea80591
Original birdhouse for birds
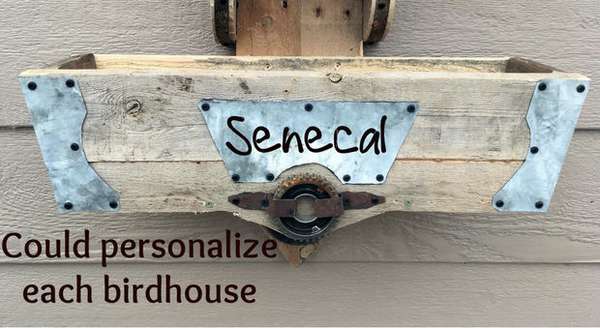
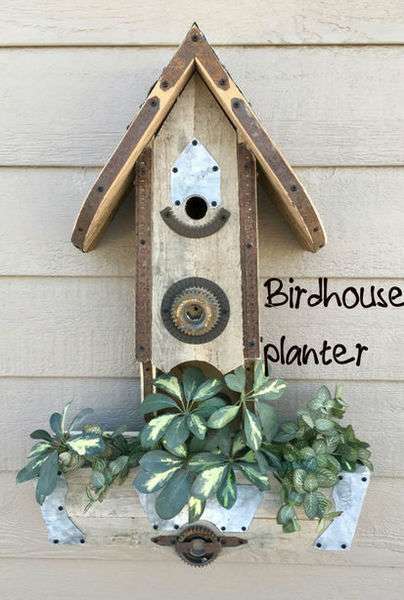 The author of this original birdhouse for birds for several years engaged in the manufacture of birdhouses in a variety of styles, well, a person has a hobby. Most of the construction projects he made include the use of materials that are usually discarded as waste. This birdhouse with a flowerbed was built from boards from old pallets and trimmed with rusty metal gears and other metal waste.
Step 1: Used tools and materials.
The list of materials and tools that the author used to make this original birdhouse.
- Used pallets
- Rusty gears and scrap metal
- Countertop, circular saw, circular saw,
- Clips and glue
- Nail gun
- Drill
Step 2: Boards
To make a birdhouse, you need boards 18 and 23 cm wide. To do this, you need to connect two or three panels of the pallet.
Using glue and clamps, connect the boards together. You should get three panels of about 110 cm.
The roof needs 23 cm wide shields. Saw two boards of 9 cm and one 5 cm, and then divide these 3 boards as shown in the photo.
Step 3: Design
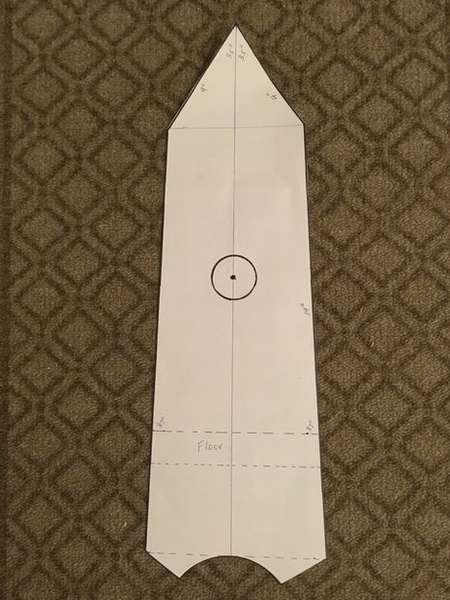 Take a large sheet of paper and draw a full-sized diagram of the details of the birdhouse. The rear part has a length of 105 cm, the front is about 46 cm. Both sides have a width of 18 cm about 50 cm. Two parts of the roof are 23 cm wide and about 38 cm.
The internal cavity is approximately the size recommended for small birds, such as sparrows, finches, etc.
Step 4: Schema transfer
After cutting out pieces of paper, transfer the scheme to the boards using a marker, as shown in the photo.
Step 5: Cut out panels
- Using a circular saw, cut out all the details of the birdhouse.
- The two side panels must be cut off at an angle that corresponds to the height of the roof.
- Finally, using a drill with 1.25-inch holes, make a hole on the front panel in the recommended position (10 to 15 cm above the floor of the house).
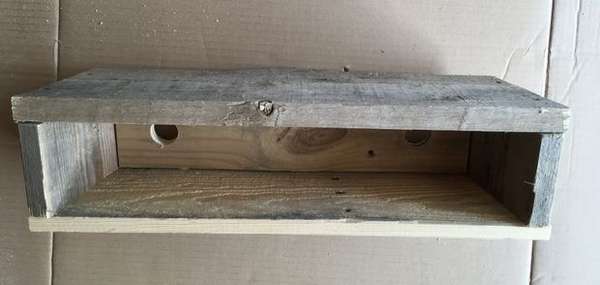
Step 6: Assembly
To assemble the birdhouse, use wood glue and clamps.
- First, attach the two sides to the back. Then measure and cut a rectangular piece to make a birdhouse floor.
- If you want the birdhouse to be opened for cleaning, do the front panel as follows. Replace it and drill two holes in the side and front walls. Then, using the two clamping bolts as hinges, insert them into the side holes. This will allow the front panel to open when cleaning is required. Note: This must be done before installing the two parts of the roof. Bolts cannot be inserted after attaching the roof.
- Add a few screws on the sides and the roof so that the birdhouse remains tightly connected.
Birdhouse section is completed. Now make a box for plants
Step 7: Make and attach a box for plants

- Make trapezoid-shaped drawers in front and back to add some style. These front and rear trapezoidal shapes are approximately 56 by 12 cm wide.
- Saw the sides of the box and then screw the 4 sides.
- To make the floor, measure and cut a piece to fit to the bottom of the box.
- Drill two holes for drainage in the bottom.
- Glue and screw in the center of the birdhouse.
Note. The author did not use a sixth, as cats often use him to get to the nest.
Step 8: Make a birdhouse unique
Adding rusty metal parts is probably the most interesting part of the assembly. You can repeat what the author of this project did, or come up with your own tuning, it depends on the scrap metal that you can collect. It seems like a very exciting experience.
Step 9: Birdhouse Cleaning
If you are lucky enough to attract birds, it is advisable to clean the house after they leave in autumn. To open the birdhouse, you just need to take the bottom of the front panel and raise it. Drill a hole through the side panel and insert a nail there, to prevent the panel from opening arbitrarily.
Step 10: Plant plants
The box is designed to accommodate three or four planting pots. This makes it easy to place plants in a box and clean the box.


https://i.expert-h.com/en/skvorechnik/1026#sigFreeId8065cd61f9
Check out a few more examples of birdhouses in a similar vintage style.


https://i.expert-h.com/en/skvorechnik/1026#sigFreeIdc61193c913
Round birdhouse
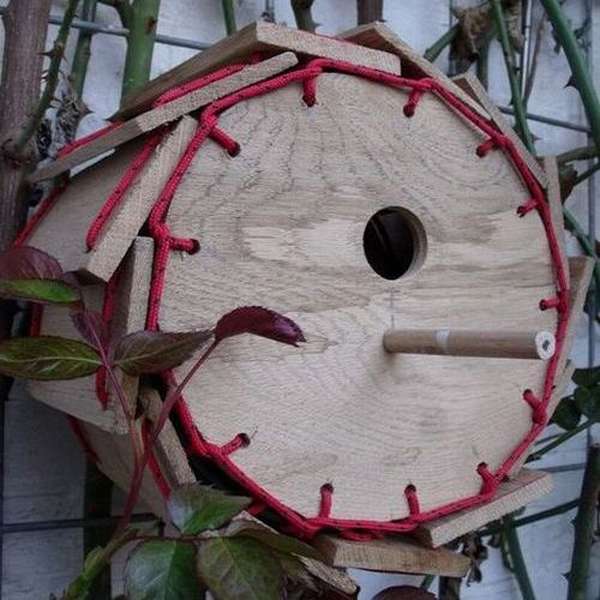 By chance, the author of this project had many oak planks left after installing the parquet floor. All are the same size 7 x 13 cm. It took a while to figure out what to do about it. But the idea was not long in coming, so it appeared several round birdhouses of original design. If you liked it, then making such a birdhouse with your own hands is not at all difficult.
You will need:
- Thirteen planks measuring about 7x13 cm, not necessarily oak
- Two metal wire circles with a diameter of 20 cm (you can buy, finished or made of garden wire 2.5 mm in size)
- Two wooden discs with a diameter of 20 cm
- Perch
- Metal wire for connecting all parts
- Drill and drill (including to make a hole with a diameter of 30 mm)
Assembly
- Step 1: Drill holes in the corners of all 13 boards. It is best to use a 6 mm drill; special precision is not needed here.
- Step 2: Place all 13 boards in the first circle. Paracord is the most decorative material for this, but the author used wire. Pull the string through the first hole. Go in a circle and pass through the same hole again. Then pull the tread through the second board and the second hole of the first board. Repeat the process until all the boards are fixed. Complete the knot to connect both ends of the cord.
- Step 3: Pull the structure into the shape of the barrel.
- Step 4: For the birdhouse, the author used a circle with a diameter of 20 cm from the same tree. Mark in a circle at each place where the paracord connects around a metal circle. Drill thirteen holes around the periphery, as well as a large hole in the notch (about 30-32 mm) and a hole to attach the perch.
- Step 5: Make a facade. Start with a piece of cord and thread it through one of the holes in the front. Go through the metal wire of the circle between the side and the front panel. Repeat with the entire hole in the front, making sure that the cord crosses the last seam each time.
- Step 7: To make the back wall, I drilled three holes, and connect the wall with three small pieces of wire. The big advantage of this fastening method is that when necessary, you can easily unwind the wire to clean the inside.
- Step 8: To install a birdhouse on a tree, attach a metal hook to the back of the house. You can connect it with a metal circle inside to make it more reliable.


https://i.expert-h.com/en/skvorechnik/1026#sigFreeIda276fa6c75
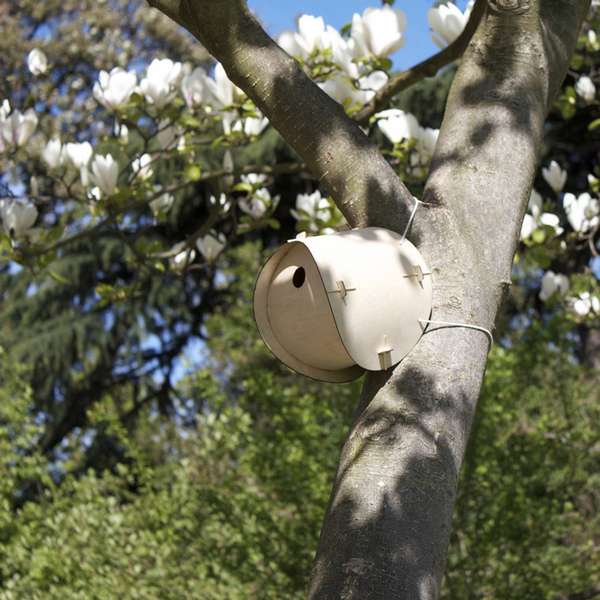
Birdhouse - Cracked Egg
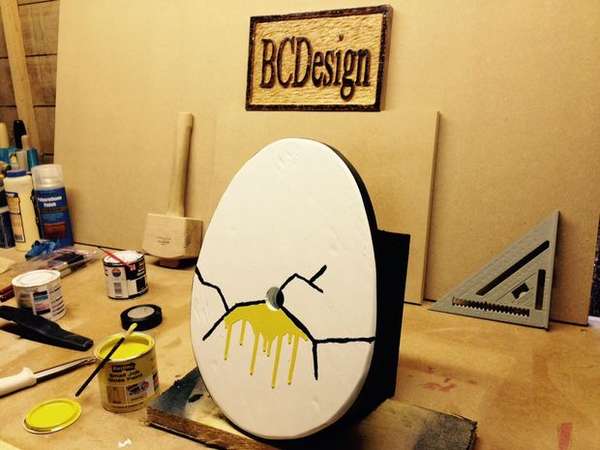 The feature of this project is that the bird seems to hatch from the egg every time it leaves the hole of the notch. This is actually a simple and fun project, which is very simple and inexpensive to do.In fact, the design is an ordinary wooden birdhouse square in shape, just with an egg-shaped front wall. You just have to be creative and believably color the front part.
It will be necessary to cut 5 wooden parts to make a simple open box, this is the main body of the birdhouse. Then you need to cut the facade in the shape of an egg and make a hole in the notch.
The author secured the back of the box with 4 screws without glue, so that the back could be easily removed and, if necessary, clean the inside of the birdhouse.
To fix the facade, apply glue to the edges of the box. Press it to the back of the egg and pinch. When the glue dries, you can proceed to the artistic part. Simple, cheap and fun!


https://i.expert-h.com/en/skvorechnik/1026#sigFreeIdbd77c70281
Unusual birdhouse
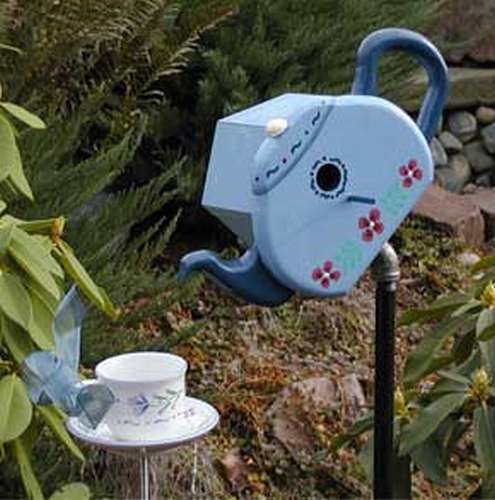 Spring is the time to think about birds. They will look for a good place to create a nest, here our help would be very helpful. Here is a construction project original birdhouse in the form of a teapot and a feeder, naturally in the form of a cup and saucer.
Here is what you need:
- 2 cm thick 46 cm long and 1.5 cm thick 90 cm long
- 1/2 inch water pipe with thread at one end
- 1/2 "flange
- Fitting 1/2 "X 1"
- Nails
- Glue
How to do
- Cut out all parts as shown in the diagram.
- Connect all parts with glue.
- You should get a box without a front wall
- Cut the kettle, pen and spout using the thumbnails in the photo.
- Connect all three parts.
- Drill a hole centered on the kettle about 10 cm from the bottom.
- Cut the perch 5 cm.
- Glue the kettle on the front of the birdhouse.
- Color the kettle the way you like.
- Attach the flange pipe.
- Screw the short tube, then the 45-degree indicator and 10 cm part of the pipe.
- Set in the ground next to the feeder.
I hope you enjoyed this project.


https://i.expert-h.com/en/skvorechnik/1026#sigFreeId8834b36856
Original birdhouse with a flowerbed from a chandelier
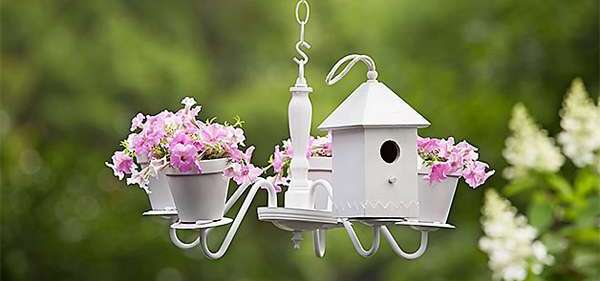 Materials:
- An old chandelier with a chain of five horns
- Terracotta Flower Pots
- Wooden birdhouse, approximately 22 x 10 cm
- Epoxy putty
- External primer and spray paint
- Large S-shaped hook
- Solid wood sheets or rods
- Newspaper
Step-by-step instruction:
- Disassemble the chandelier and remove all wires.
- Fill all openings in the chandelier with epoxy putty.
- Attach a birdhouse using putty.
- Fasten flower pots in the same way.
- Primer the chandelier.
- Apply at least two coats of spray paint to the chandelier.
- When dry, fasten the chain to a tree branch and attach it to the chandelier with an S-hook.
Log birdhouse
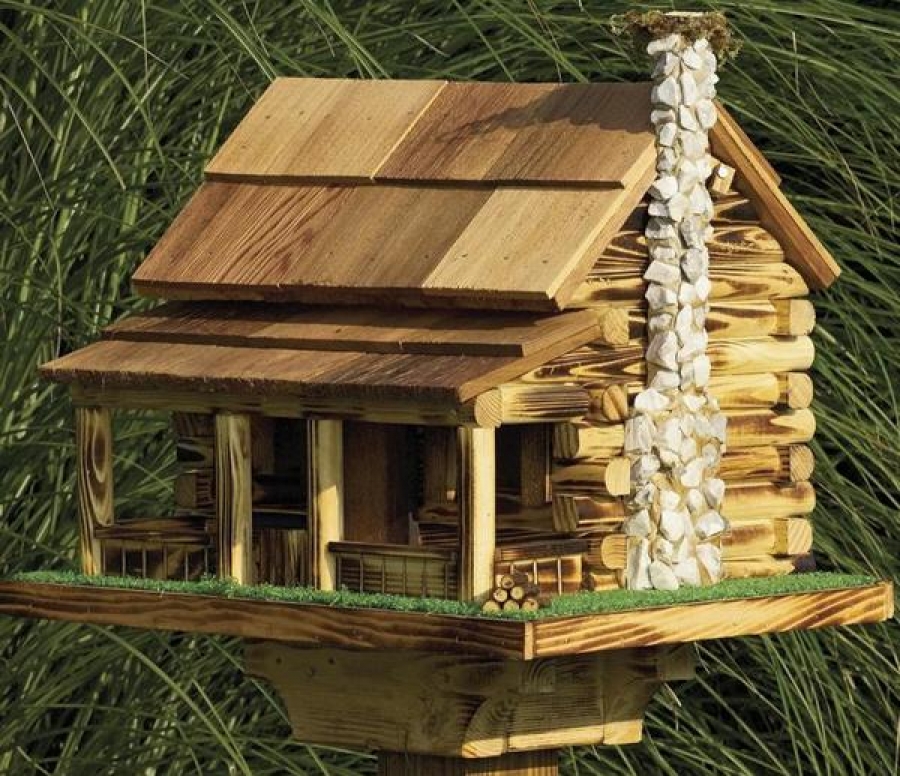
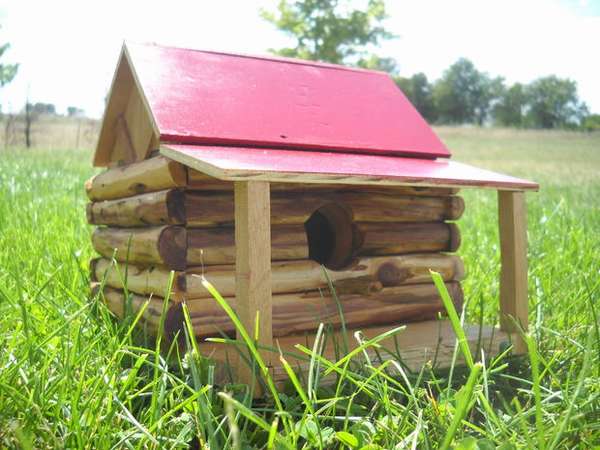 Many people like log houses ... large logs, huge stone fireplaces and a pleasant appearance. There is something special about log cabins. But if you set a log house for yourself, it’s not a simple matter, then make a log birdhouse for birds, anyone can. So while you are dreaming of your own log cabin, you can realize your dream on a small scale by building a log cabin for birds!
- First you need to measure and cut all the details, as shown in the first photo in the gallery.
- Then glue the walls to the base and the gables to the walls.
- Dial the appropriate "logs" for the house, that is, thick branches from a pine, oak, or other tree. Peel them from the bark.
- The branches should be thick enough to be cut along.
For this birdhouse, the dimensions are.
- Front: 5 pieces of 18 cm of sawn branches
- Right side: 3 pcs. 14 cm.
- Back: 5 pieces of 19 cm
- Left side: 3 pieces of 15 cm and 2 of 14 cm
Different lengths are alternating floors. The number of "logs" will depend on the diameter.
- Now glue the “logs" as shown in the photo.
- After the "logs" are glued, make a hole and attach the perch
- To make a porch, cut a notch for protrusions from the base. Glue the porch rack and prepare the porch roof! Apply some glue to the top of the porch and to the far edge of the porch roof. Replace the roof and tighten it until the glue dries.
- Then apply glue to the front of both gables and glue the front roof.
- Install the rear roof in the same way.
To paint or varnish, decide for yourself. If you do not want to wait for the smell to disappear and the birds could settle in this season, leave it as it is. If you plan to hang a birdhouse on a tree, add a few hooks.


https://i.expert-h.com/en/skvorechnik/1026#sigFreeIdced60a0e76
Here is another one original birdhouse made under the "log cabin". This project was created using only hand tools.
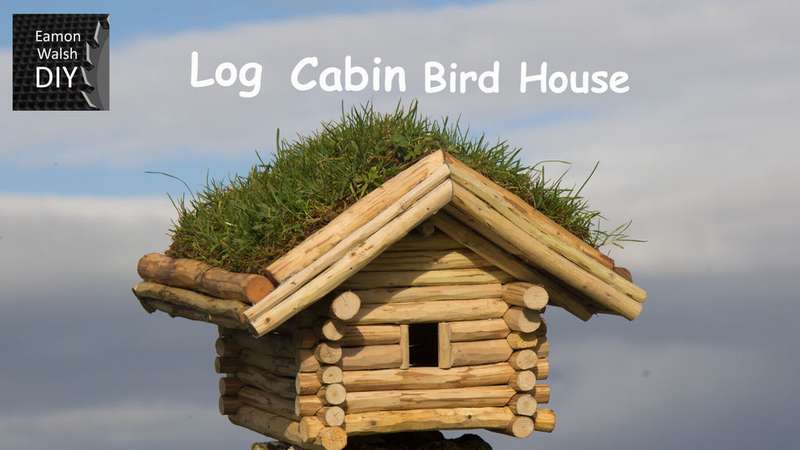 The only hand tools needed for this assembly are:
- Hammer
- Hand saw
- Styrofoam
- Hatchet
- Stationery knife and blades
Materials:
- Sticks
- Boards from pallets (for roof)
- Polyethylene
- Grass turf
- Wire
- Staples
- Glue
How to assemble
- Disassemble the pallet and prepare the parts for the base.
- Gather a suitable branch size and remove the bark with a knife.
- Lay the bottom row of the "log house" to indicate the shape of the future house.
- Assemble the “blockhouse” by fixing the sticks with glue and nails. For the last two “logs”, go a centimeter longer so that there is a base for the canopy.
- Installation of the roof in increments of 25-30 degrees. Cut a few rafters and squeeze together before attaching. At the edges, fill the turf sides. This should hide the edges of the grass, as well as the edges of the boards of the pallets.
- Install the base.
- For waterproofing, cover the roof with polyethylene and secure with wire.
- Cut and lay the sod on the roof, carefully pack and cut off the excess.
And it's all! Ready house for the birds. I hope you enjoy it, and you might want to do the same. This is a simple project that allows you to use only a few hand tools.


https://i.expert-h.com/en/skvorechnik/1026#sigFreeId5e2fd897ba
Original birdhouse drawings
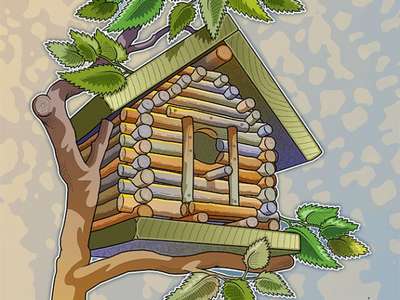 And here are the drawings of how to make a log birdhouse.
How to assemble.
- Cut out all parts of the birdhouse, including branches.
- Paint the roof and floor. Screw the roof together.
- The notches should be 1/8 "3 mm deep and 1/2" 15 mm wide. They should be approximately 15 mm 1/2 inch from the end.
- Attach the first two branches of 18 cm.
- Leave space in front to make room for the porch.
- Nail the porch branches to the floor and add two 8 cm jumpers, as shown.
- Continue adding branches at the front, back, and sides until you reach the eighth branch.
- Each cut is 1.5 cm from the one below, as shown in the diagram. So climb to the top. Install the door frame. Drill a hole 1 1/2 At a height of 10 cm from the floor, drill a hole with a diameter of 4 cm in the door frame. Also drill a small hole for the perch. Cut the ends of the ends as shown in the diagram.
Nail the roof and the birdhouse is ready.


https://i.expert-h.com/en/skvorechnik/1026#sigFreeIdbc59432d07
Birdhouse bird feeder
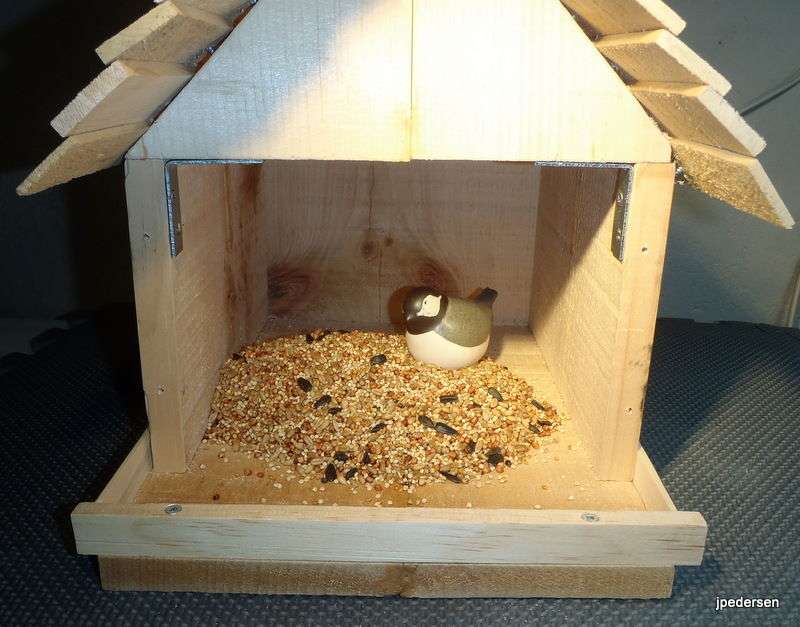 Original design by the author, birdhouse in summer, manger in winter. Idea of transformation birdhouse in the manger and vice versa in a removable front wall. You can do this in different ways, the author offers such a method as you see in the photo. It is necessary to saw parts of such sizes:
- Bottom 30 cm
- Two sides of 15 cm
- Back 29 cm
- Front part 15 cm
Assembly
- Connect the sides with screws and screw the back.
- The front of the roof support is attached to the front with two screws, the corner brackets are screwed to the bottom and to the sides.
- Using screws, secure the roof through pre-drilled holes using a screwdriver. Start from the bottom so that the upper bar overlaps the previous one, which creates the appearance of a tile.
- The removable front part with the entrance of the tap hole is simply mounted on the screws in pre-drilled holes.


https://i.expert-h.com/en/skvorechnik/1026#sigFreeIdf7c86bafd7
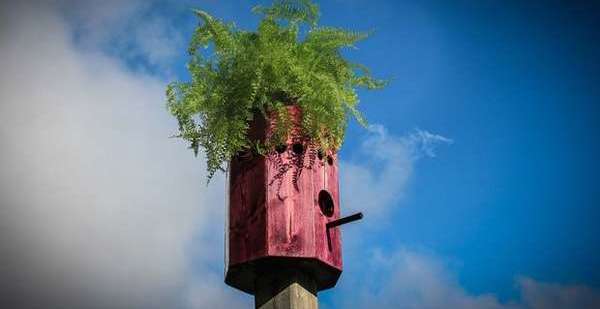
Birdhouse with flowerbed
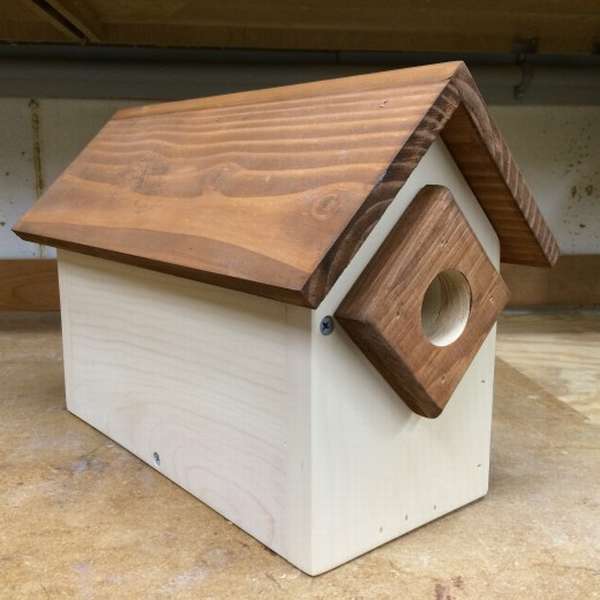
 Shown here how to make an original roof for a birdhouse with a flowerbed. It was built so that the bird house was fixed on a 10 by 10 cm post. All you need to do is add an edge along the roof that is deep enough for landing. In this case, the edge height is 5 cm.
Making a flower bed is not difficult
- It is necessary to cover the inside of the roof with roofing paper.
- For drainage, drill holes in each corner of the makeshift flowerbed.
- Then fill the drawer with a layer of soil and add organic fertilizers.
- Then lay the moss.Try to cover the entire surface of the flowerbed, because moss will maintain soil moisture.
- You can plant a flower bed with any suitable plants, the author suggests using succulents, these plants do not need frequent watering and are not very whimsical. Both humidity and hot, dry weather are well tolerated. Succulents grow slowly, so during the summer your attention is not particularly required.
Try to make such a birdhouse - both beautiful and comfortable for the birds.


https://i.expert-h.com/en/skvorechnik/1026#sigFreeIdd6ad2fef14
Flexible plywood birdhouse
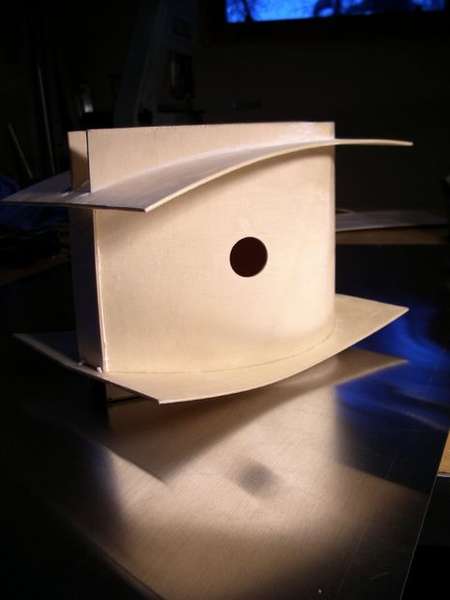 Making birdhouses is one of those classic things we do with our own hands, starting in high school. Therefore, the first disappointment with poorly selected plywood and nails bending in the wrong direction usually leads to the fact that any interest in the project disappears. This is an original solution in birdhouse design different from the usually boring birdhouses of the same type, and includes fun building technologies unusual for this type of project. The process uses flexible Italian poplar plywood, which can be bought at most specialized stores. It is a composite epoxy structure, lightweight, waterproof and elegant.
Step 1: Materials
- Flexible Poplar Plywood Sheet 4x8
- Epoxy 800 g
- Foam for brushes
- RotoZip (slightly average between a drill and a milling cutter)
- Joiner's knife
- 4 sheets of cardboard 20 x30 cm
- Wood filler
- Hot glue.
- Sandpaper
- Bits: 1/4 "1 1/2"
- Clamps
Step 2: Modeling
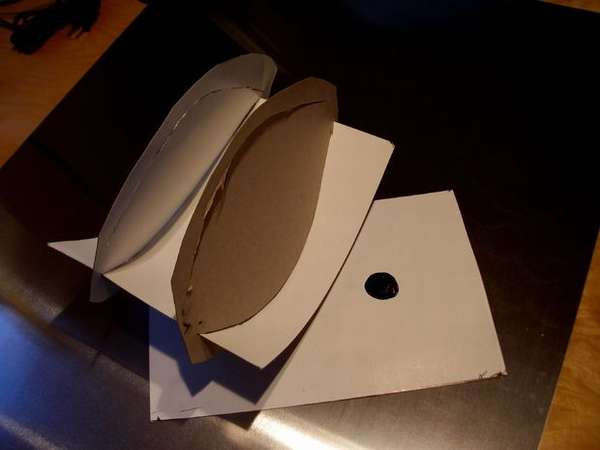 This birdhouse design is a simple four-piece layout of 20 x 30 cm poplar plywood. Start with a model design consisting of 4 pieces of cardboard. The roof and floor are made up of identical parts that hold the curved sides in place. The cuts in the cardboard model should be mirror images of each other and should not extend further than 1.5 cm from the edges of the cardboard. The type of curve you draw and the model are up to you, but the curve must be long enough to accommodate the length of the side parts.
Step 3: Cutting parts
Four identical pieces of poplar plywood should be curved in size. 20x30 cm can be marked on a large sheet to get 6 objects from the 122 cm side of the sheet. Plywood is easily cut with a ruler and a razor knife.
Step 4: Section Outline
Birdhouse design is based on the shape of the wing. The lines should be extended so that they stop 1.5 cm from the ends of the plywood and are mirrored on the long axis of the piece. You can experiment with the design, the roof and part of the floor extend in the same way.
Step 5: Grooves
Before cutting, it is better to fix the sheets. Make holes at the end of each line with a 1/4 "bit, and then continue to cut long channels. This will create a tight slot in which parts of the wall will be held. To get an even cut, it takes a little practice, but with slow movement the line will be pretty stable .
 Step 6: Tap hole
The hole should be cut about half up on the side in the part that is least curved.
Step 7: Assembly
The fun part. It takes a little effort, but with a slight bend you can assemble all the parts. First make the top or bottom, and then move it down to stabilize. After a rough connection, carefully adjust the upper and lower parts to fit the curved sides of the wing.
Step 8: Seal
Measure the holes at the two ends and cut off the side parts. The structure can be temporarily attached by several hot glue spots. The side and the upper part are self-tightening and usually do not require fastening - only the end parts.
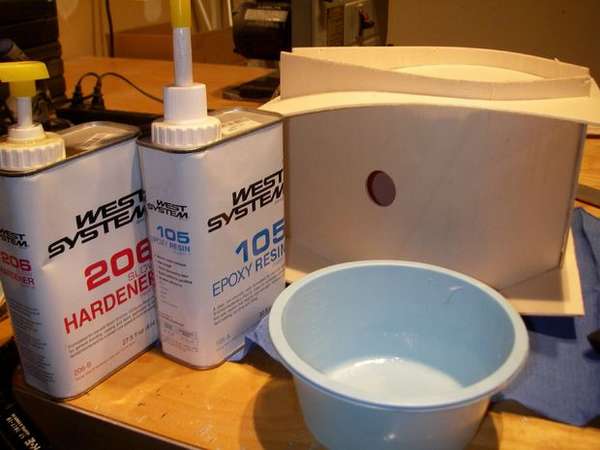 Step 9: Epoxy coating
If you have not used epoxy before, read the instructions from the manufacturer. The material is easy to use, you need to take a sponge to mix the two components and then apply the finished composition to the structure. Epoxy resin not only glues the structure, but also protects against weather conditions. The material hardens all night, so you have at least 20 minutes to apply. Make sure that all cracks and cracks are filled. Sealing and bonding the structure requires only one layer of epoxy. Wear latex gloves for this procedure.
Step 10: Grinding
After the epoxy has dried, holes will appear in the structure. Fill them with wood filler of the appropriate color. The structure can then be sanded to smooth out minor defects that occur when applying epoxy. Finished constructioncan be painted in a natural color using a polyurethane coating or exterior paint.
Note. You can change the design so that you can open one of the small end panels to clean the birdhouse between seasons.


https://i.expert-h.com/en/skvorechnik/1026#sigFreeIdb30ff19bd3
Another such option is a birdhouse made of flexible plywood 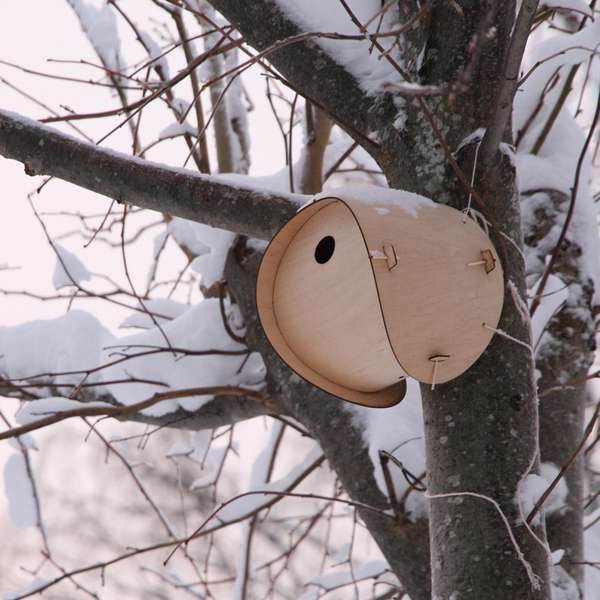
 A folding house consists of two 1.5 mm plywood parts that require assembly with little creativity. Parts are made using laser cutting.
 The birdhouse is designed without a pole, with a hole diameter of 28 mm, and is intended for small birds of the passerine order. More information can be found on the website.
Birdhouse Laser Cutting
 Freaky decorative birdhousewhich can be used for poultry or outdoor use. You see the prototype of this design in the second photo in the gallery. Birdhouse created with AutoCAD to create a DXF file for laser cutting.
Tools and materials:
- computer and AutoCAD
- laser cutting or access to laser cutting services
- plywood
- plexiglass
- polyurethane
- wood glue
- plexiglass adhesive
Step 1: Wood preparation and laser cutting
The author used two sheets of plywood 30 x 60 cm with a thickness of 3 mm.
- Created a laser cutting file for wood and plexiglass.
- Laser cutting of wood and plexiglass.
- Smooth the edges with fine sandpaper and cover with polyurethane.
 Step 2: Plexiglass assembly
- First, collect plexiglass with glue.
- Coat the edges of both parts so that they stand 30 seconds before fixing.
- After fastening the pieces together for two minutes, apply an additional layer of glue along the edge.
- The glue will drain and fill the cracks.
Step 3: Assembly of wooden parts
- Lay out wooden pieces for assembly.
- Use wood glue, apply a thin layer to the inner edges of the grooves.
- Put the back side of the birdhouse face down, and glued the sides.
Step 4: Assembly of sides
- As can be seen in the photographs, the parts are connected using grooves.
- Use wood glue and assemble each part separately until all sides are installed.
Step 5: Front
- Apply a thin layer of glue to all edges (top) that are already installed.
- Set the front surface of the birdhouse.
- Leave to dry overnight.
Step 6: Last Step - Fasten Plexiglass and Tree.
Plexiglass contains three L-shaped connectors on each side. They come in six holes on the front surface of the birdhouse.
The last detail is the “key”, also made of plexiglass, and contains two small cloves. The key slides into this gap, fills the holes and does not allow the pool to rise.
The leading edge is 15 mm shorter than the sides to provide replenishment of water during rain.


https://i.expert-h.com/en/skvorechnik/1026#sigFreeId7082e02be7
 Three-story birdhouse
See how to make modern, classic birdhousewhich is as functional as aesthetically pleasing. It will look very nice on a tree, near your house or in the garden. Maybe some birds will even settle. Feel free to resize as you see fit to your liking. For simplicity, all cuts have an angle of 45 or 90 degrees. It took the author about 3 hours to fully complete the birdhouse with such an interesting design. The photo in the gallery also presents drawings and model in Solidworks.
Dimensions in the drawings are in inches 1 inch - 2.54 cm.
Necessary materials:
- 2 cm thick boards
- wooden stick for perch
- acrylic paint
- wood glue
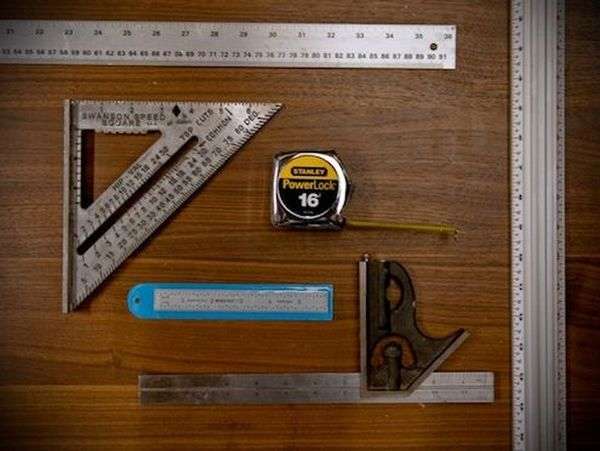 Necessary tools: saw, grinder, drill, standard ruler for measuring angles, tape measure.
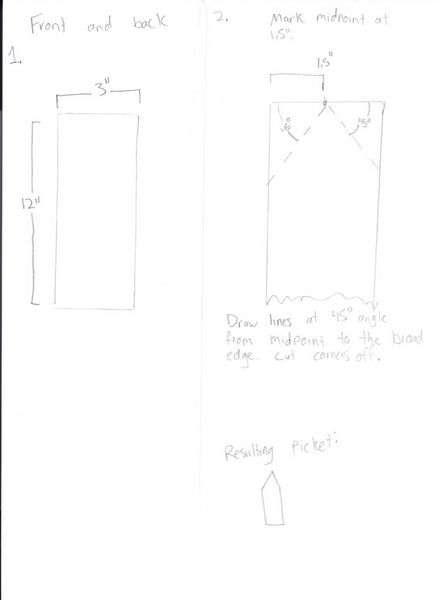
- The first step is the foundation. This is just a 75 by 75 mm square.
- To draw cut lines, draw a few dots 75 mm from the edge in each direction, then draw a line connecting the dots. Pinch the board and cut out the base.
- Make the side walls, the sides are just rectangles, 38 X 260 mm
- Make the front and back walls. Cut a rectangle of 75 x 305 mm. Mark the middle of 38 mm on one side. Using a protractor or similar instrument, measure 45 ° down from the narrow side. Draw a 45 ° line from the middle to the wide edge. Cut corners.
 Birdhouse roof
- Start with a square of 9 X 9 cm. From the short side down, mark an angle of 45 ° and draw a line from the corner to the wide side. Repeat this for the other side. The resulting form should not be a symmetrical parallelogram. Two lines should be parallel to each other. Make cuts along the lines. The profile should be a parallelogram.
- Cut a 38 mm long wooden stick.
- The floors. Cut a square 38 X 38 mm
- Sand the surfaces from the outside.
Assembly
There are two ways to assemble a house - screws or glue.
Screw Advantage:
- It’s easier to fit the edges tightly.
- Birdhouse can lawread and install on the same day.
- Get a sturdy construction.
Glue advantage:
- Assembly takes less time and effort
- No need to make holes, more beautiful appearance.
 In this case, you will need patience to wait until the project dries, moreover, several times.
You can choose any of these methods or combine them if you are worried about the strength of the structure. I think there will be no problems with glue, just do not forget to thoroughly wipe the surface.
If you twist with screws, then:
- Always insert screws in the corners and in the middle.
- Make a test hole with a slightly smaller diameter than the diameter of the screw, it will be easier to tighten.
- Pre-drilled screw holes can really save a lot of time and effort.
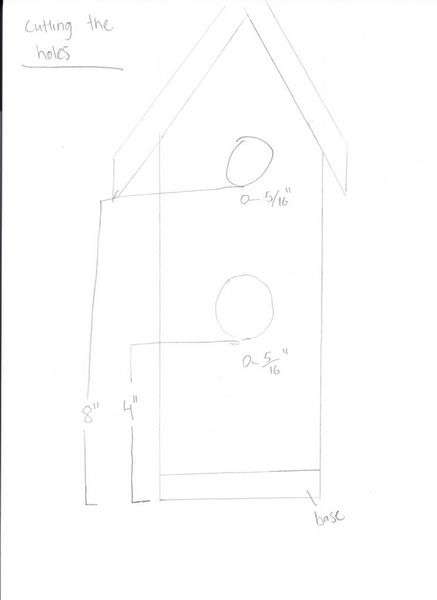
Make holes in the tap hole.
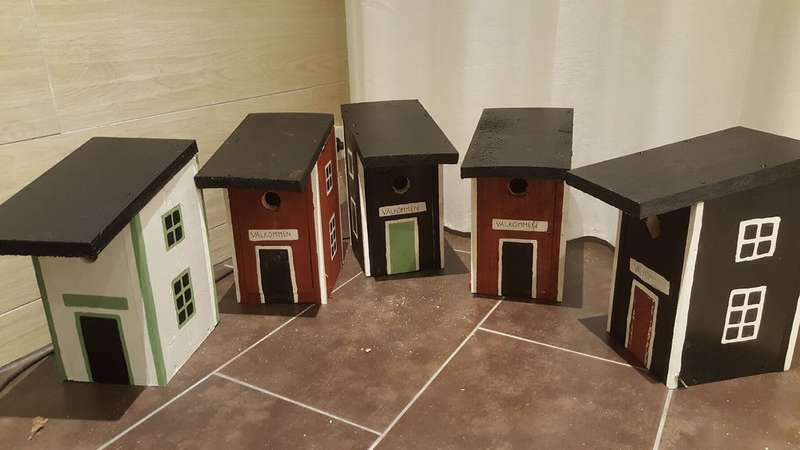
Color the birdhouse or birdhouses if you have done a few.
The two yellow birdhouses in the photographs are latex painted, and the brown are transparent enamel.


https://i.expert-h.com/en/skvorechnik/1026#sigFreeIde1df8d7632
Single-Board Birdhouse
 A simple birdhouse that is very easy to make. You need only one board, a few screws and a drill. And if you have the ability to draw, then the design in the form of houses is very nice.
Materials
The bar is 170 cm long, 17 cm wide, 1 cm thick. The bottom should be -4 wide (17-4 = 13 cm) wide. 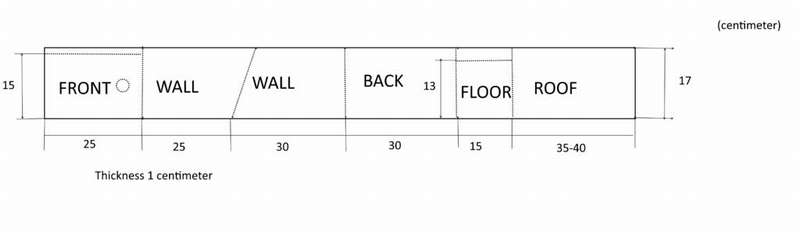 Assembly
- Saw the parts in size.
- Screw the sides to the back and bottom.
- It is necessary to make the front wall removable. Bend the nail on each side of the front (red arrows on the sketch). They must be horizontal in order to use them as a hinge.
- Drill a hole in the bottom of the front wall (blue arrow in the sketch). Use a nail that is slightly thinner than the hole, about 7-8 cm. Tilt the head of the nail to hold it in place better.
- Install the roof and tighten with screws.
- Now you are ready to decorate
- Be sure to use a color intended for outdoor use!


https://i.expert-h.com/en/skvorechnik/1026#sigFreeId5b5e87aa3b
Sunny birdhouse
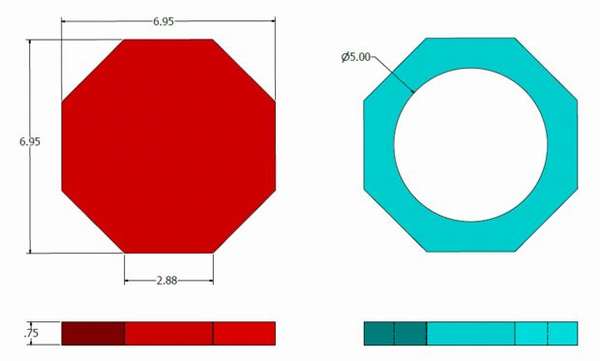
 This birdhouse made of wood and solar panel. The shape of the octagon can be increased or decreased, depending on which birds, in your opinion, will be able to settle in this house. There are many sites where you can find out the optimal size for birdhouses, there will be no problem with this.
Tools:
- table saw
- drill
- hammer
- Sander
- roulette
- pencil
Materials:
- Solar panel
- 8 feet 245 cm long 1x4
- 2 feet 62 cm long 1x8
- 2.5 "6 cm long dowel with a diameter of 7/16" 10 mm
- Wood screws or nails
- glue

 How to collect a birdhouse
- Find or buy a solar panel.
- Saw boards 1x4 to 30 cm in length. Repeat the process 7 more times. You must have 8 walls.
- Cut a hole with a diameter of 5 cm (or other suitable size for birds).
- Calculate the size of the octagon
To do this: measure the width of the wall. If the saw is installed correctly, the external size should be 9 cm and the internal size 7 cm. If not, do not worry. Measure the inner size. You will need to change the octagon pattern to fit the new dimensions. With the measured lateral distance, calculate the shape of the octagon. - Saw out the main square for the octagon. You must have 3 octagons.
- Attach Walls to Octagons
- Make light holes.
- Sand, paint, install the perch.
- Plug and add the plant to the top
This, of course, is an abridged version of step-by-step instructions, you can read the full version on the website, the link is under the gallery.


https://i.expert-h.com/en/skvorechnik/1026#sigFreeIddbd4516415
Illuminated Birdhouse
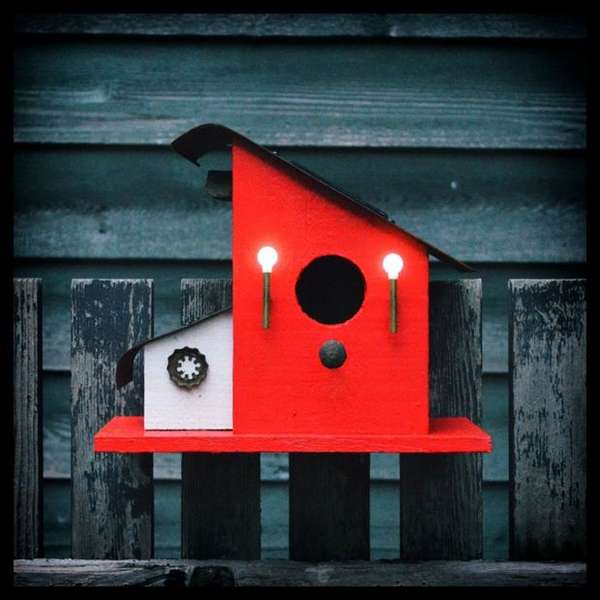 The idea is that a small solar panel is installed on the roof of the birdhouse, which recharges the solar battery. In the evening, the sensors fire and the lights begin to glow. It looks beautiful, especially in the night garden. Shown here how to make a birdhouse with backlight on photodiodes. In fact, this is not very difficult, but a voltage stabilizer is needed to ensure the correct operation of the circuit. Normal voltage is 1.2 and should be increased to 3.6 V using a 3 x 1.2 V battery. If you use only 3 batteries, it will not be very bright. The problem is that the circuit board does not cope too well with the extra voltage that causes the LEDs to turn on during the day. These LEDs will be very dim because the solar panel will not be able to fully charge the batteries. The voltage regulator fixes this problem. and ensures that they appear at night. Theoretically, lights will attract some insects so that birds can eat! How practical this is is not known, but when you make such a birdhouse and install, you will know for sure. Remember that you must make sure that the house receives a lot of sun, so the batteries will be charged every day.
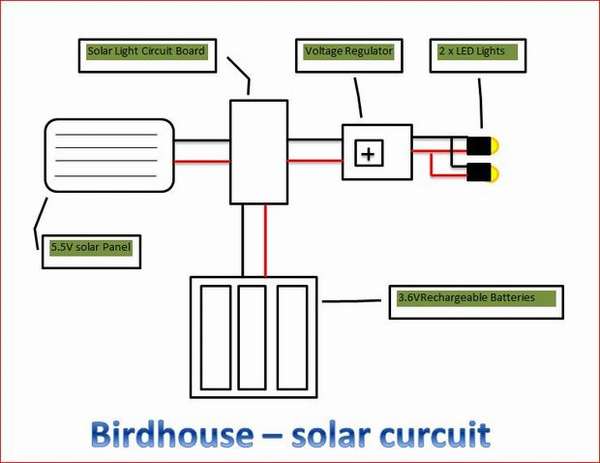 How to assemble such a birdhouse and LED connection diagrams can be found on the author’s website, there is a very detailed and long instruction, so I did not go hereto carry. And below you can see step-by-step photos. I think first you need to assemble the circuit, so you can make sure that everything works as it should before setting the lighting on the birdhouse.
Photographs are probably not very helpful in this matter, but if you follow the diagram in the drawing, which is very easy to create, then you will not have any problems.


https://i.expert-h.com/en/skvorechnik/1026#sigFreeId147d8ba46a
Blueberry style birdhouse
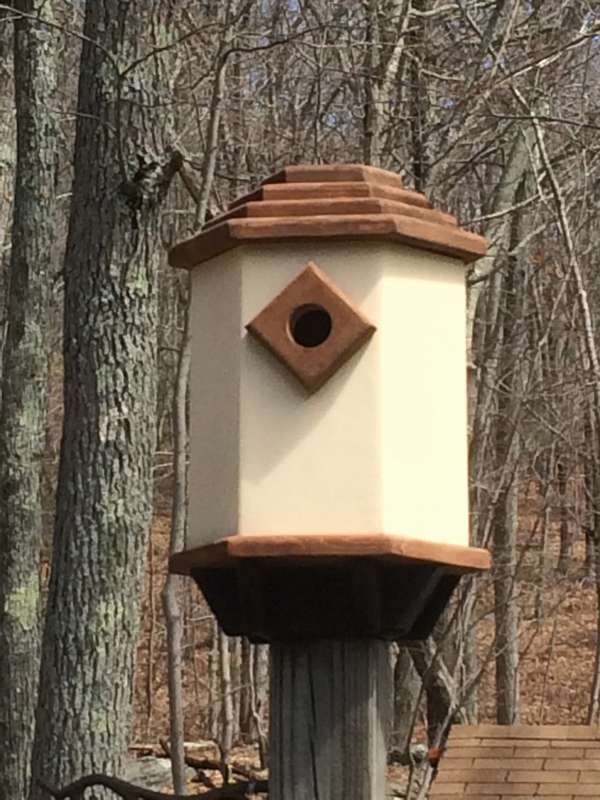 Hexagonal birdhouse imitates traditional pigeons with fantastic roofs and complex corners, but this version is much easier to do. The birdhouse has a stepped roof without any complicated angles. Such a house looks very nice in the courtyard, mounted on top of a pillar.
For many, making a round structure goes beyond the skill level at the weekend, and even the corner roof of a traditional structure can be complicated. The author’s decision is a simple six-sided box with basic angles that are easily cut with a table saw. A stepped roof consists of gradually decreasing layers stacked on top of each other to create a “sloping” roof line. The upper part is a decorative finale that gives the birdhouse the style of a pigeon.
The birdhouse is made of pine, it is an inexpensive and easily accessible material that is easy to work with. If properly painted, the paint will last for several years. The widest board in this project is 30 cm across, and the author used it as a starting point for determining the size of a birdhouse. One section forms the base, and the other becomes the first section of the stepped roof.
You can find detailed information on the manufacture of this birdhouse, as well as the sizes and quantity of materials on the author’s website - you will find the link under the gallery. But some more information.
- The main section of the birdhouse consists of six parts. To create a hexagonal socket box, the edges of each side part are cut at an angle of 30 degrees. When the two beveled parts are aligned, they create an angle of 60 degrees. Six side parts, multiplied by six angles of 60 degrees, create a 360-degree hexagonal shape.
- Cut the bevels at each edge, then the beveled board in a section 25 cm long to form the side parts. Milling chamfered edges on a long stock part is simpler and safer than trying to cut chamfers in short sections.
- In this version of the birdhouse there are two compartments, each with its own entrance. Two separate sections mainly play an aesthetic role.
- Do not install a perch perch. Most birds do not need it, the perch only makes it easier for predators to get into the birdhouse.
- The box of the house is essentially a cylinder, and the six-sided box is quite difficult to assemble. Corners make it difficult to hammer in nails evenly, and traditional clamps do not hold parts well until the glue dries. The solution is a universal and inexpensive tape clamp: a special belt that loops the outer parts of the cylinder with a loop. How to make a tape clip with your own hands can see here.
- When gluing all the edges of the hexagon, place the ribbon clip around the middle of the hexagon and slowly tighten. Make sure that the beveled edges are aligned along the seams. The glue will take hold in a few minutes, so you will have time to adjust each of the six parts. Then tighten the tape clip and set it aside to dry all night.
The roof, although it looks complicated, is easy to make..
- Use the assembled hexagon to lay out cuts for the base and largest section of the roof.
- Place the hexagon on the base with two opposite angles centered on the widest part of the board.
- Use a straight edge to lay out and mark cutting lines along each side of the hexagon, keeping a distance (about 2 cm) between the side and the straight edge.
- After the hexagon is laid out, and it evenly protrudes on each side of the cylinder, cut out the base.
- After you cut out the largest part of the roof, use it as a template for laying out the next section.
- Place the next part on top of the hexagon, then use a straight edge to draw lines to this part.
- The resulting hexagon will be approximately 5 cm smaller than the base section.
- Continue the process by laying out the following sections.
Birdhouse consists of three sections: roof, box and base. Each part is stacked on top of the other, starting with the base section. Attach a simple pair of brackets to hold the drawer. To set the brackets, place the box in the center of the base, trying to align all the corners of the hexagons.
Drill several holes in the base for drainage.


https://i.expert-h.com/en/skvorechnik/1026#sigFreeId086effddba
 Here too original birdhouse into two "apartments". The long sides were designed for old license plates, you can attach them to each side. It is also an empty canvas on which you can show your creativity or attach some interesting decorative details that will make the birdhouse interesting and unique. Simple carpentry makes it easy to assemble a birdhouse with waterproof glue, and if you additionally use nails and screws, it is advisable that they be made of stainless steel. Begin assembly by dry fitting the end parts along with the floor and one of the long sides to make sure that all parts are properly aligned. If necessary, make the necessary adjustments. If everything is nearIf it works well, fix one end piece to the side section, then the second and finally attach the floor section.
However, you can read the detailed instructions for assembling this wonderful birdhouse on the author’s website, everything is described in great detail there.


https://i.expert-h.com/en/skvorechnik/1026#sigFreeId5e31173e53
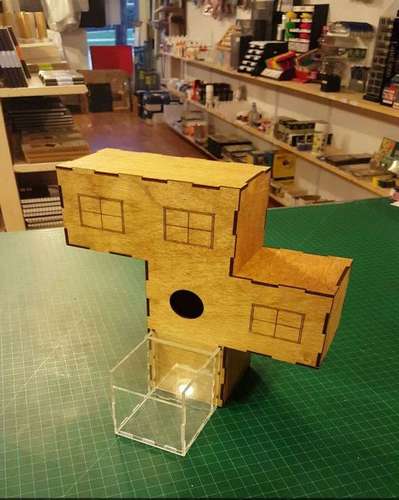
Original Birdhouse R2-D2
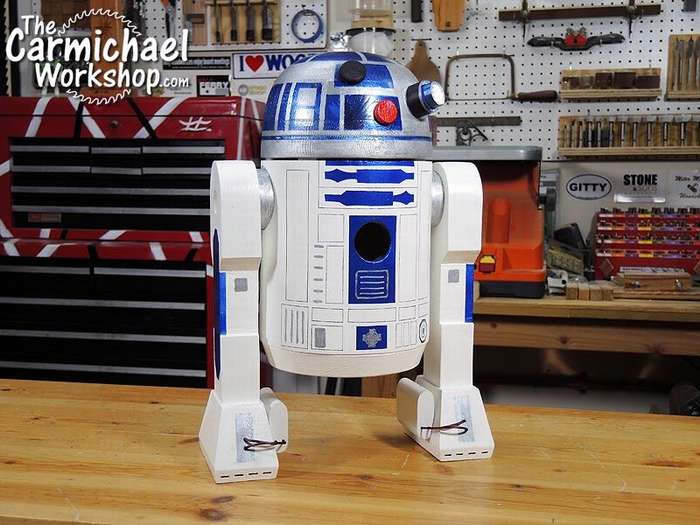 A project for Star Wars fans. Of course, make an original birdhouse in the form of a robot is not easy, you need a home carpentry workshop and a set of necessary tools, but for the real Jedi, nothing is impossible. Would Anakin Skywalker be stopped by any difficulties? And here is just a birdhouse.
So if you liked this idea, the step-by-step photos presented below will help to realize it.
You can read the detailed instructions on the website of the author, a true fan of Star Wars.
May the force come with you!


https://i.expert-h.com/en/skvorechnik/1026#sigFreeIda7a3a27595
Hi-tech birdhouse
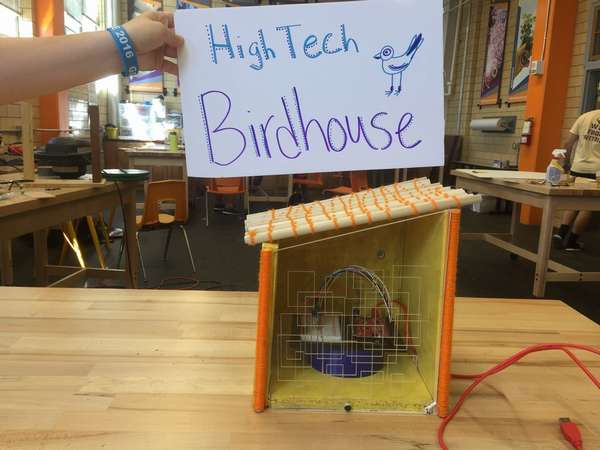 There are also such birdhouses
- Determine the size of the birdhouse. Prepare the wood and mark the cut areas.
- Choose the paint color of your choice.
- Spray paint on all sides except Plexiglass.
- Using Arduino software, set the power of the LEDs. In this case, 6 flashing lights were used.
- Use laser etching software to create a unique design.
- The design must be etched on plexiglass.
- Drill a hole in the front of the birdhouse. Also drill a small hole in the back for the Arduino USB cable.
Roof
- Cook the little sticks.
- Determine the dimensions of the roof and cut sticks from these sizes.
- In this case, it took 17 pcs. use a cord and glue to join them together.
- The design should resemble a thatched roof.
- Cut 4 more sticks to fix on the corners. They will serve to decorate and to hide any deformations.
Collect a birdhouse
This is a job for two people. Start with the plexiglass by drilling it in the opposite direction to melt the glass. This will prevent cracking. Fix the roof and sticks at the corners with hot glue.


https://i.expert-h.com/en/skvorechnik/1026#sigFreeId873c667ec6
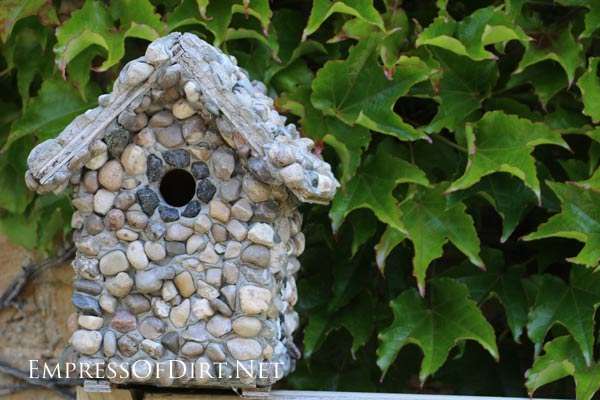
Birdhouse with stone decor
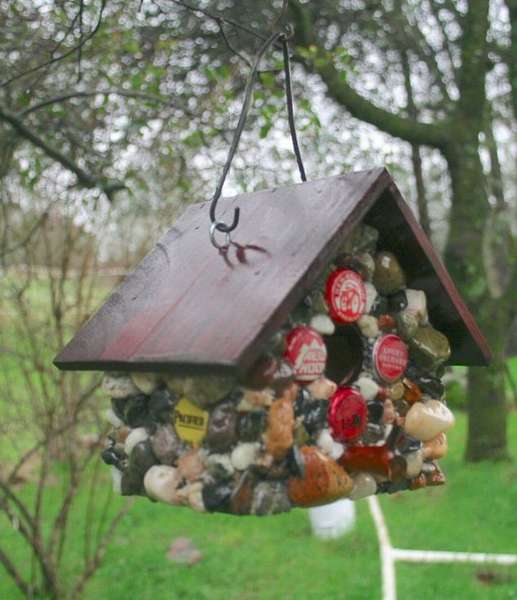 See how you can decorate a birdhouse pebbles and corks from bottles. You will need a solid base, in this case the house is made of plywood. Pay attention to the small pieces of wood attached inside. How to make a birdhouse, I won’t tell, we will focus on the decor.
- Paint the roof first.
- Remember to apply a primer around the inlet and under the eaves of the roof. Make sure that all places where you will not fasten the stones are painted.
- Gather the materials. Beautiful pebbles, a twig for perch, a few bottle caps. Go to the hardware store and buy a can of polyurethane.
- Paste all prepared materials on the birdhouse in any way that suits you.
- Set strong hooks and lead the birdhouse.
Materials for this project:
- Waterproof plywood
- River stones
- Glue
- Primer


https://i.expert-h.com/en/skvorechnik/1026#sigFreeId644c45875a
Stone birdhouse
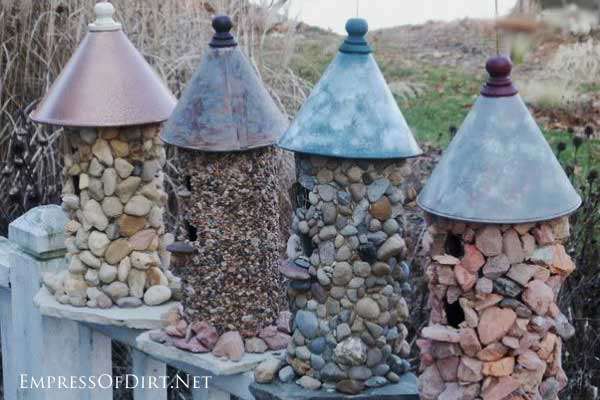 The birdhouse itself is clearly not stone, but simply decorated with stone. But beautiful. Stone Birdhouses easy to manufacture and with suitable materials can be stored in the garden all year round. The trick is to use a strong wooden birdhouse as a base and stick the stones with good glue.
Before you begin, a few notes
One thing that people often overlook is the difference between a decorative and a real birdhouse. The bird houses you see here are for decoration, not nesting birds. Therefore, for safety, block the front door from use.
Decorative birdhouses are used as garden art and may be unsafe for birds. Real birdhouses for nesting are designed for specific birds; they cannot be decorated too brightly.
The cost of your project will depend entirely on whether you have a free birdhouse for work or if you need to buy it.
Before you begin, decide how you want the birdhouse to look. A search on Pinterest for “stone birdhouses” will provide many ideas.
Decorative choice
When designing a stone birdhouse, there are many possible design options: consider the color, texture and location of the stones, and whether you want to add small touches such as window frames, door frames, etc. It is best to first set the structures, and then continue decorating.
Examples of wooden birdhouses
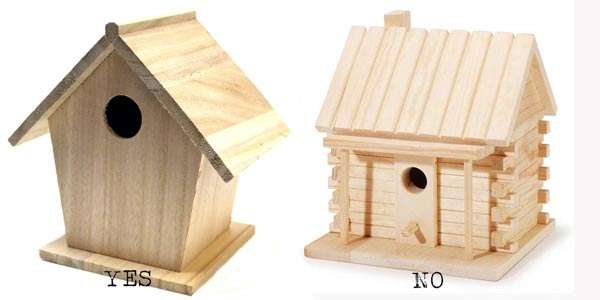 The one on the left is a good choice for a base for a stone birdhouse. On the right there are too many details that would be difficult to work with.
In any case, choose a simple design. Make sure that you can stick small stones wherever you want, that is, nothing will interfere (for example, window frames or other design details).
Glue
The first option is GE Silicone II silicone sealant.
The second option is the universal adhesive E-6000.
In recent years, these products have improved significantly and work very well.
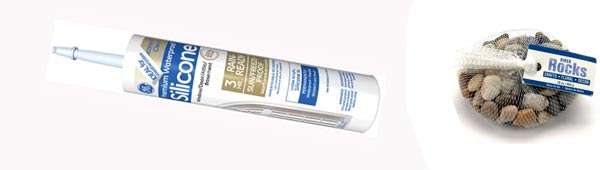 Stones
 The difficulty is to find the stones so that they have one side flat.
Lay out the stones on a flat surface and sort by color, this is if you want to lay out drawings with flowers. For example, you may need darker stones above windows or doors or around the base of a house to form an accent.
Stick the stones from bottom to top so that a new row of stones rests on the bottom while the glue dries.
Install the stones as close to each other as possible, then the gaps can be filled with the solution. In an extreme case, you can simply break up the stones to make smaller pieces. (Tip: put some stones in a plastic bag, put on a hard surface and hit several times with a hammer)
That, tHow to say basic tips. If you want to know how to beautifully decorate the roof and other daedals, visit the website of the author of this project.
Original birdhouses 2000 photo


https://i.expert-h.com/en/skvorechnik/1026#sigFreeIdac5e2fbcbb
Hello, I am the author of this article, so I look forward to asking questions for this article in the comments below, I will answer all !!!
If you have questions on another topic, ask them on our forum, we will answer you
- Two baskets of paper in 5 minutes (Master class)
- How to make a simple and compact table for a milling cutter from plywood
- How to make a soft headboard tile (Instructions + step by step photos)
- Cinder block benches: a convenient bench in 55 minutes
- How to make a bed with a niche: saving space (Master class)