DIY bench. 300 models (+ Step-by-step photos)
 do-it-yourself bench in the gazebo
Look for instructions how to make a bench with your own hands? A wise decision, do not rush to the store, spend money, it’s not a tricky thing, you will always be in time. So welcome to the world of homemade benches. Do you already know what you want?
If you have a beautiful tree growing in the yard, make bench around a tree. Maybe you plan to build a gazebo, then you need a bench in the gazebo. We decided to equip a resting place with a fireplace, then it’ll look great next semicircular bench. Love flowers - make a bench with a flowerbed. I want something unusual, here you will find a dozen examples of how to make original do-it-yourself bench.
In the article you will find step-by-step photos, instructions on how to make:
- a bench around a tree;
- do-it-yourself bench in the gazebo;
- do-it-yourself semicircular bench;
- original bench;
- bench with flowerbed.
Benches around a tree
DIY bench around a tree
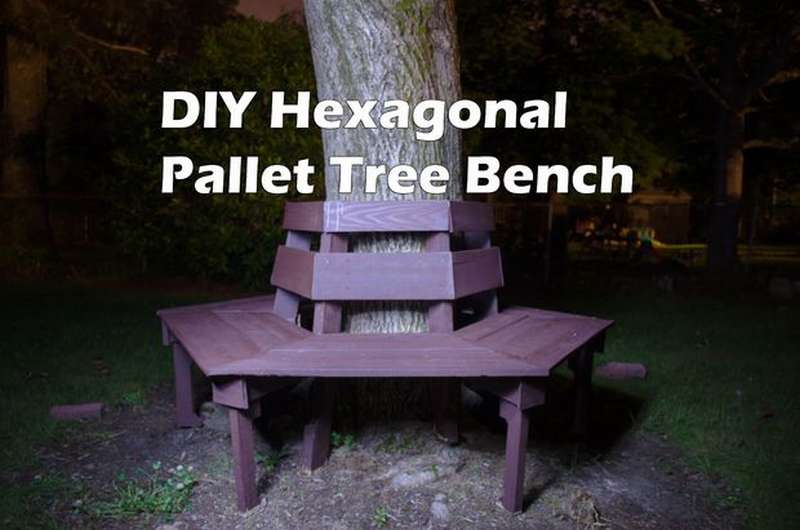
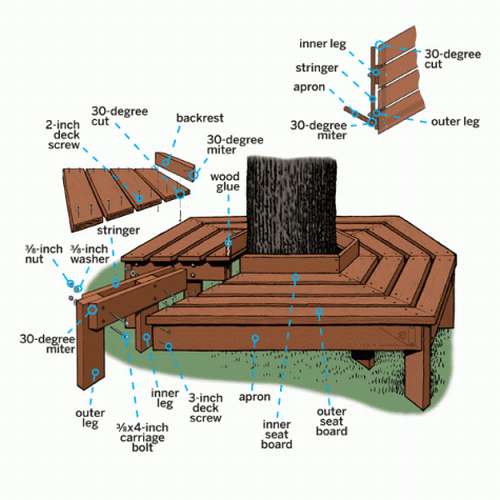
 Do you need the perfect place to relax under a shady tree? Make a gorgeous hexagonal do-it-yourself bench around the treeusing these step-by-step photographs, drawings, and instructions. It really looks beautiful, your patio will take on a completely different look. In addition, you can not just make a bench around a tree, but add, for example, a small flower boxor embed into a bench portable container for cooling drinks.
Start by assembling the frame; it's pretty simple.
- Make the upper row of the back using 5 cm screws.
- Carefully lay out all parts of the seats and attach with two screws, leave a gap between the strips of approximately 2 cm.
- When the bench is assembled, sand it with sandpaper. Coat the surface with wood oil.
- Before you start, carefully look at the drawings. They show how many parts need to be cut, and at what angle.

 A little effort, and you will have a beautiful bench around a tree that you can enjoy for many years!


https://i.expert-h.com/en/lavki/1074#sigFreeId7244071deb
How to make a bench around a tree
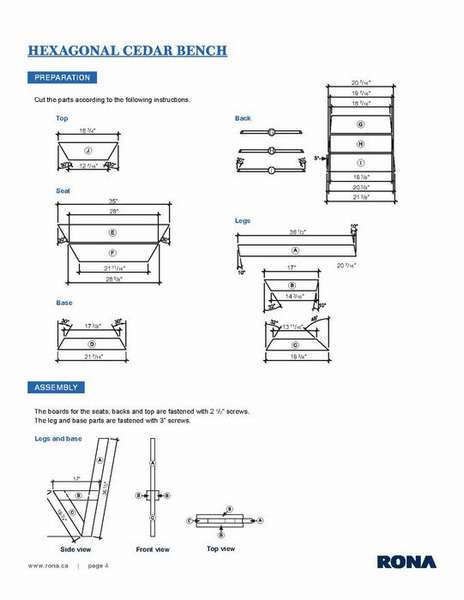
 This is another example of a hexagonal bench.
Make a bench around a tree it’s not difficult, perhaps more difficult to calculate the correct dimensions.
First you need measure the diameter of the tree. You can calculate the circle in different ways, so as not to suffer, just type in Google "determine the circle using the diameter", then add a few more centimeters taking into account the growth of the tree and you're done.
Start with circles. After the “tree circle” is drawn, add a second 5 cm circle to mark the bench closest to the tree. With the same radius as the second circle, start at the edge of the 4x8 sheet and mark the hexagonal corners around the larger circle.
Draw a hexagon. Connect the four points together to create a hexagon.
Add a connection line.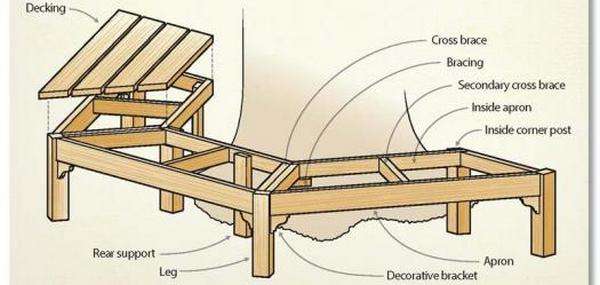 The inner edge of the flooring. When overlapping two lines, add four more lines parallel to the hexagon, which create a tangent with a large circle. These lines, forming half the hexagon, are the inner edges of the bench.
The outer edge of the flooring. Mark a line 55 cm from the inner edge of the flooring and extend around half the hexagon.
In general, all this is described in detail on the site. There are no step-by-step photos of making a bench around a tree, but with a drawing it will not be difficult to do.


https://i.expert-h.com/en/lavki/1074#sigFreeId1769f1eaac
Photographs of Rob Brown; James Provost illustration
Bench Around Wood Drawings
 Difficulty: medium. Time: 2 hours. Help needed: 4 volunteers
Materials:
- 2 boards 2x6 12 '(365 cm) long
- 2 boards 2x6 10 '(348 cm) long
- 1 board 2x4 8 '(244 cm) long
- 1 4x4 block 8 '(244 cm) long
- 6 galvanized screws ½ "8" (20 cm)
- 6 ½ "galvanized washers
- 6 ½ "galvanized nuts
Necessary tools: miter saw, pencil, tape measure, drill, screwdriver, hammer
Instruction manual
Prepare two 2x6x12 boards. Saw into three pieces 43 "(110 cm) long, for a total of 6 pieces 2x6x43" (110 cm).

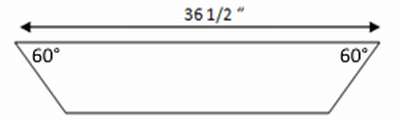
Then take two 2x6x10 boards. Saw into three pieces 36 ½ "(93 cm) long, for a total of 6 pieces.
![]()
Cut a 2x4x8 board into 12 parts.
![]()
Saw a 4x4x8 block into 6 pieces of 16 "(40.5 cm).

Corner cuts:
Take 6 sawn bars, set the end saw to an angle of 30 ° and cut on both sides to make trapezoid.
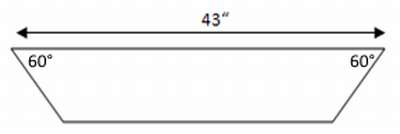
Take 6 sawn boards 2x6. Install a torch sawta angle of 30 ° and cut the angle on both sides to make trapezoid.
The diagrams below show how to assemble a bench around a tree. The instructions can be read on the website.


https://i.expert-h.com/en/lavki/1074#sigFreeIda451200ad7
Bench around a tree made of pallets
 There are many impressive projects to do. do-it-yourself bench around the tree. But if you are looking for an opportunity to save money, then do not forget about the pallets. Here is a great example using this cheap and affordable material, the bench is 100% made of disassembled pallets.
Materials: 4 or 6 pallets, depending on the condition and screws 1 1/2 "
Tools
- roulette
- pencil
- mitral saw - or similar cutting tool, such as a circular saw or conventional
- hand saw
- Sander
Below are detailed step-by-step photos, and on the site you will find no less detailed instructions with all the explanations. I hope this inspires you to have a great place to relax!


https://i.expert-h.com/en/lavki/1074#sigFreeIdec2bb231bc
How to make a bench around a tree with your own hands
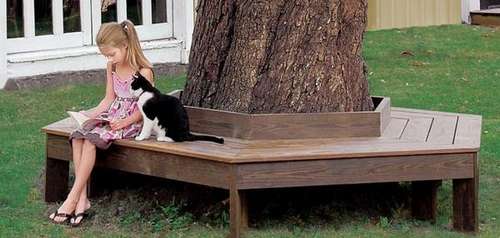
 It is charming and comfortable. bench around a tree could be your favorite outdoor place. This is a simple project that you can do over the weekend.
Friday: make a bench template and calculate the section sizes. Cut and lay out the boards for the seats, collect the legs.
Saturday: attach the seat boards to the leg supports, set the bench around the tree, screw the back and front apron. Finish the bench by polishing any rough spots.


https://i.expert-h.com/en/lavki/1074#sigFreeId7f59f5bc6d
Author Jennifer Stimpson
Photos by Matthew Benson
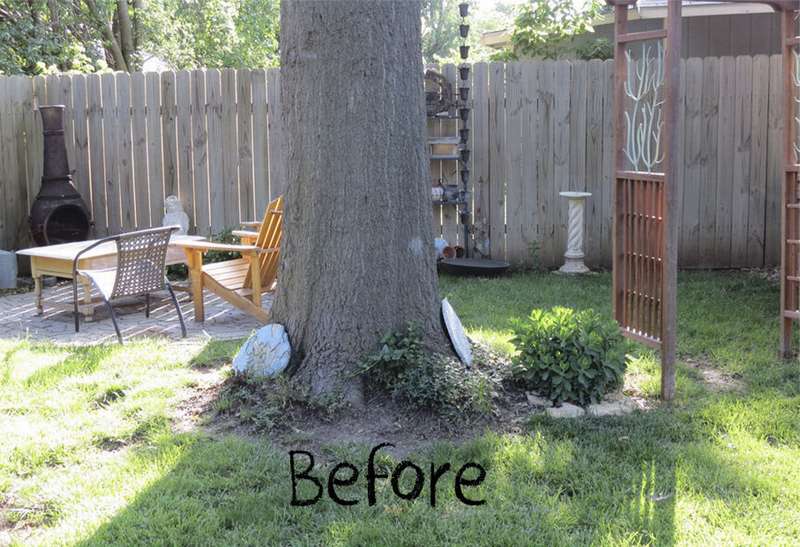
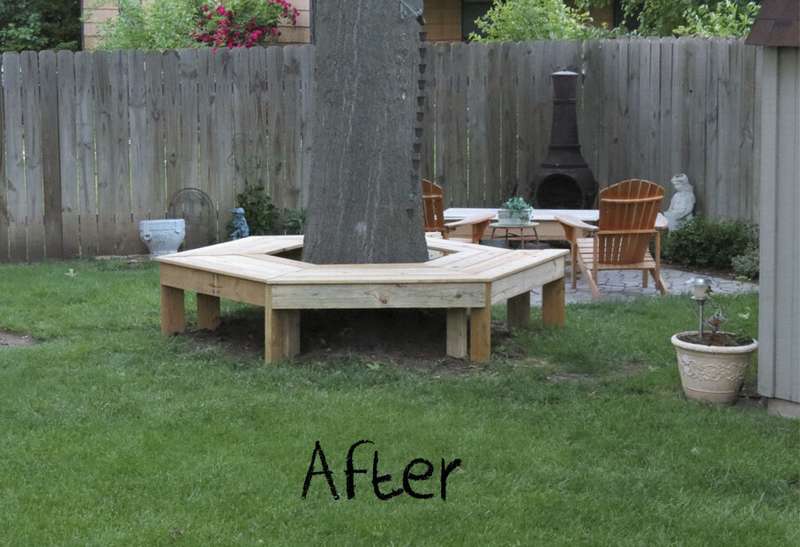 Such an option how to make a bench around a tree. Look how your yard will be transformed. The photo shows the “before” and “after”.
If someone could do it, you can too!


https://i.expert-h.com/en/lavki/1074#sigFreeId30a77db2e6
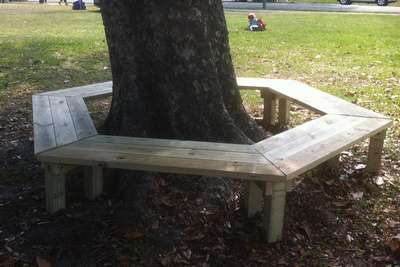
Another example how to make a simple hexagonal bench around a tree. The geometry of constructing a hexagonal structure is simpler than a round bench, but due to its symmetry it provides uniform comfort and practicality from all sides. Make sections with supports to go around the protruding roots, and then assemble the bench sections around the tree.
Plan the dimensions of the hexagonal tree bench to cover the tree trunk without damaging it and without inhibiting growth.
Cover the bench with sealant to keep it in good condition and prevent the top from weathering. This will reduce maintenance costs and make the bench more comfortable.


https://i.expert-h.com/en/lavki/1074#sigFreeIdb0a17dab80
Bench around the tree 100 photos


https://i.expert-h.com/en/lavki/1074#sigFreeIdd385be2e39
DIY bench in the gazebo
Arbor bench for a summer residence
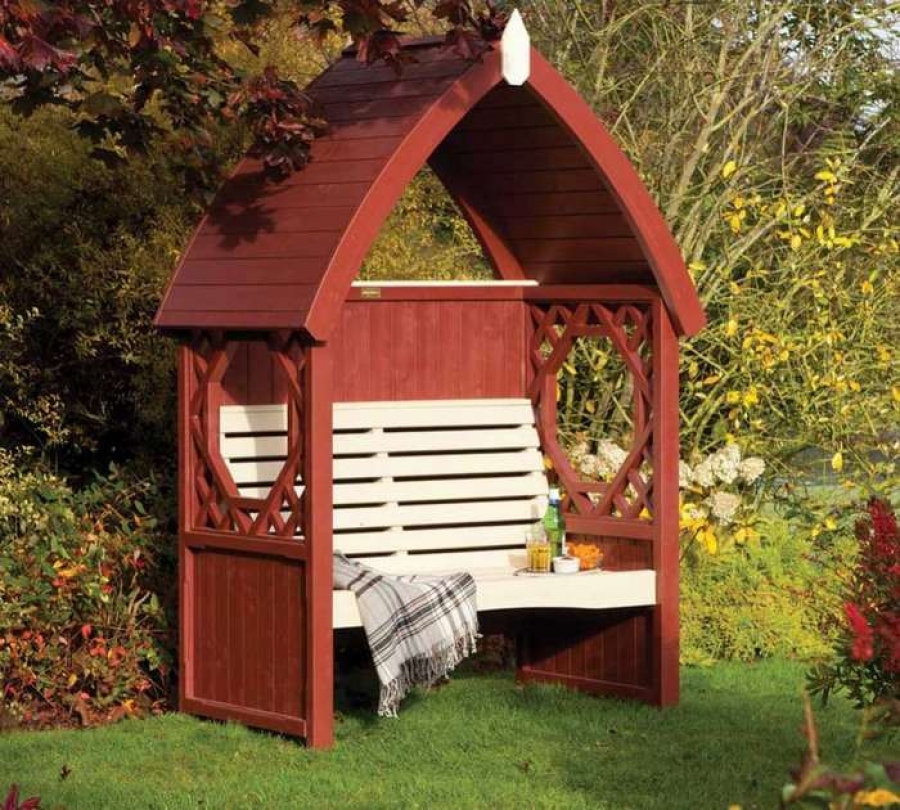
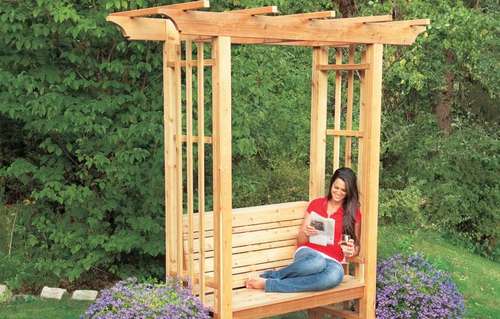 Of course, you can just put a couple of sun loungers in the garden or in the yard. But handmade bench in the gazeboIt is not only a great place to relax in hot weather, but also adds an elegant architectural feature to your garden. The design includes classic touches, such as profiled rafter tails, alternating wide and narrow boards for the seat and back, as well as trellised side walls that allow climbing plants to rise to the upper structure. Although you can leave the bench free of greenery - it is quite attractive in itself.
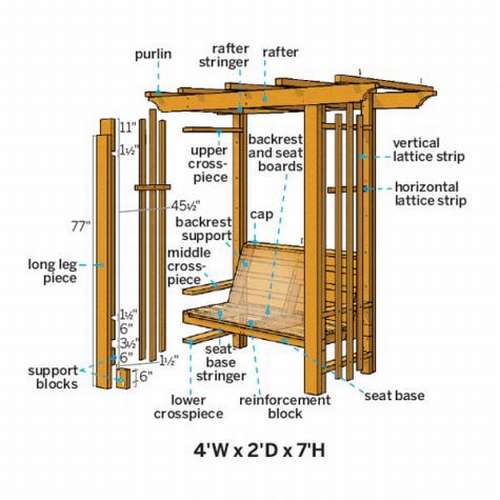 To make a bench in the gazebo, you will need boards and bars of the following sizes:
- 3 pcs. 2x4 18 inches long (46 cm)
- 2x4 board reinforcing block for the central seat: 14 inches (35.5 cm) from the square edge, one end is cut at an angle of 30 degrees.
- 2x4 boards back support: 3 pieces. 22 inches (56 cm) long, with parallel 30-degree cuts at each end.
- 3 pcs. 1x4 48 inches (122 cm) long
- 3 pcs. 1x2 48 inches (122 cm) long
- 4 things. 1x4 backrest 40 ¾ in. (103.5 cm) long
- 3 pcs. 1x2 backrest 40 ¾ inches (103.5 cm)
- 1 PC. 1x4 back cover 40 ¾ inches (103.5 cm)
- 4 things. 1x2 grill 70 ½ inch (179 cm)
- 2 pcs. 1x2 grill 75 ½ inch (192 cm)
- 2 pcs. 1x2 grille 17 inches (43 cm)
- 2 pcs. 2x6 rafters 72 inches (183 cm)
- 3 pcs. 2x6 slings 21 inches (53 cm)
- 5 pieces. 2x2 runs 36 inches (91.5 cm)
You will need to assemble a square and even structure, so you have to tinker a bit with the fit. Although there should not be any special difficulties, step-by-step photos and instructions on the website of the author of this project are at your disposal.


https://i.expert-h.com/en/lavki/1074#sigFreeId38ab07177b
Author Jennifer Stimpson
Photos by Colin Smith
How to make a bench in the gazebo
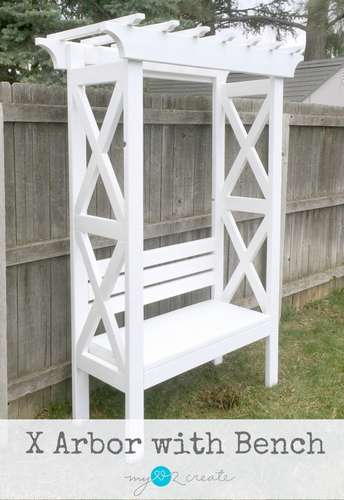 Look how to make a beautiful pergola with integrated bench.
- First, cut all the boards to the required dimensions, drill holes.
- Then make the walls, mark where the crossbars should be and attach them to the legs.
- Saw off the corners on the X bars and drill holes for pockets at each end to secure the side boards.
- Attach the long X bars with glue and screws. After that, you can add a short X crossbar.
- Start at the bottom, and then add the top. Do it on both sides.
- When the sides are ready, attach them together with the upper support boards and the front aprons.
- Establish support for seats.
- Fasten the seatbacks with screws in the pockets and make sure they are even.
- Use the clamps to hold the lower rafter (upper left), and then nail. For the upper rafters, mark a distance of 8 cm and secure.
- Apply several coats of paint.
If in a few words, that's all. Although the step-by-step photos are much clearer. If you already have experience, it is better to see once than to read five times.


https://i.expert-h.com/en/lavki/1074#sigFreeId1b11eebf68
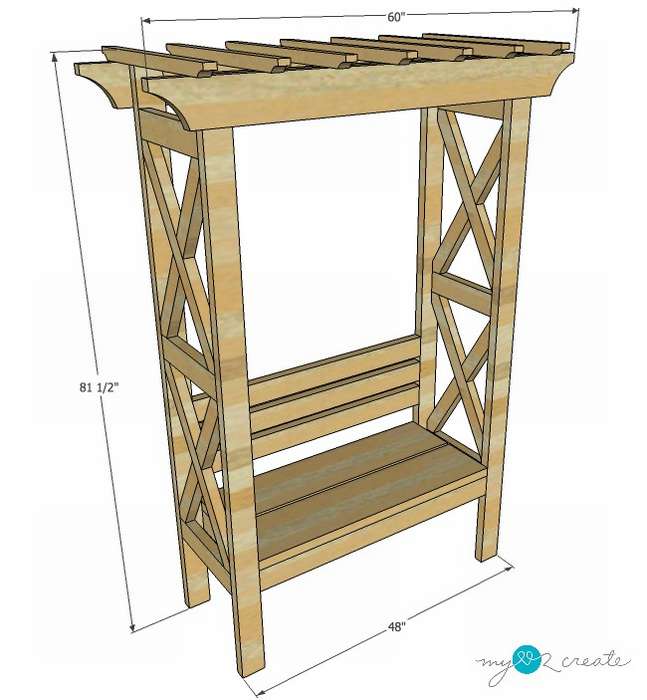 DIY bench in the gazebo
And here you will find the drawings for the bench above. It is not only beautiful and reliable, but also an ideal place to relax. Paint the bench according to your preference, and plant beautiful climbing plants so that they rise along the openwork side panels. The dimensions in the drawings are shown in inches, you just need to multiply these figures by 2.54 and get the dimensions in centimeters.
Step by step photos to make this benches in the gazebo presented in the preceding block, and here the process is depicted in phased schemes with dimensions.


https://i.expert-h.com/en/lavki/1074#sigFreeId6f2ee29914
Bench in the gazebo with a flowerbed
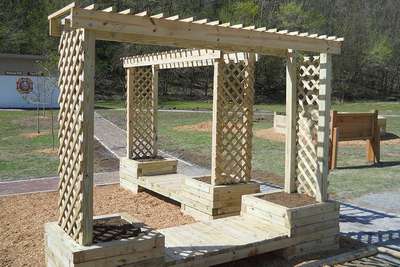 Estimated time for the manufacture of the bench: 6 hours.
This project can be called three in one, it combines comfortable benches, gazebo with trellises and flower beds. Trellis is an important feature of the garden that allows you to grow plants that need support, such as roses and grapes. In general, aesthetically pleasing, comfortable and beautiful.
Materials:
- 2 boards 2x6x10 '(348 cm)
- 5 boards 2x4x8 '(244 cm)
- 19 bars 4x4x8 '(244 cm)
- 2 bars 4x4x10 '(348 cm)
- 7 bars 2x2x8 '(244 cm)
- 1 grill 4x8 '
- galvanized nails
- 8 galvanized screws ½ "15 cm long
- 8 bolts galvanized carriage ½ "15 cm
- 16 pcs. galvanized washers
- 16 pcs. galvanized nuts
Necessary tools: crosscut saw, circular saw, drill, screwdriver, hammer
¾ "ratchet connector or ¾" public key
Instructions
Prepare 8 4x4 bars with a length of 244 cm. Saw into three pieces each 31 "(79 cm), for a total of 24 pieces.
![]()
Saw 7 bars into 4 pieces of 24 "(61 cm), for a total of 28 pieces.
![]()
Saw 5 2x4 boards into three pieces of 31 "(79 cm), for a total of 15 pieces.
![]()
Saw 7 2x2 bars into three pieces of 32 "(841 cm), a total of 21 pieces.
![]()
Take the 4x8 'grille. Saw into two pieces 24 "x 66" (61 x 168 cm).
DO NOT cut the following parts:
4 bars 4x4x8

2 boards 2x6x10 '

2 boards 2x6x10 '

Assembly instructions are shown in step-by-step diagrams.


https://i.expert-h.com/en/lavki/1074#sigFreeId6f244b69e4
Arbor bench with backrest
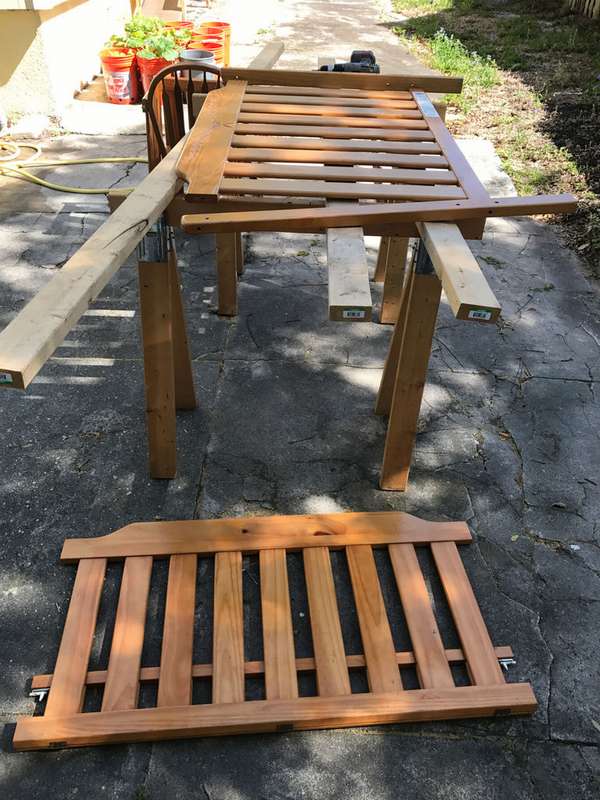
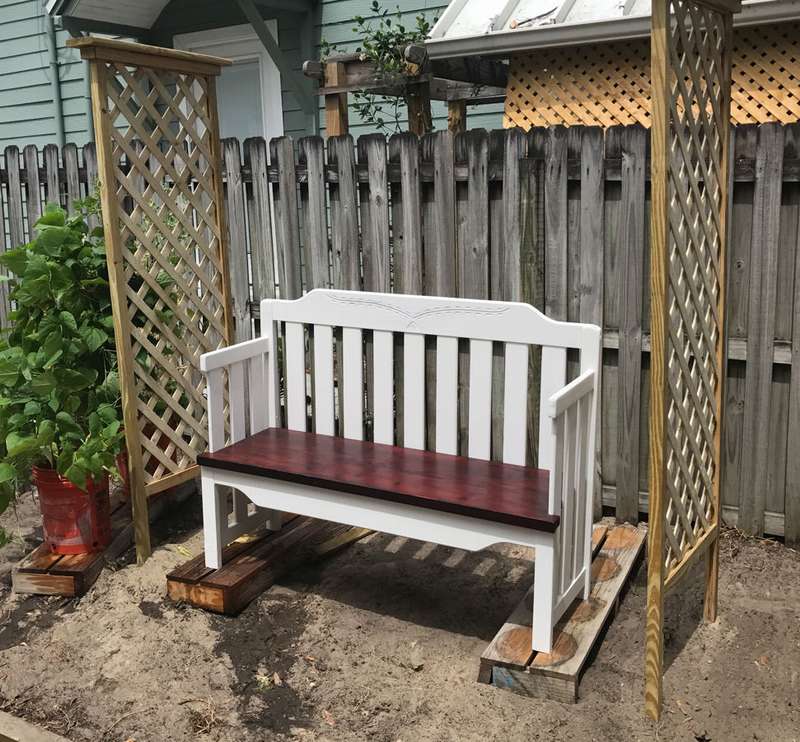 Got an old crib? Do not try to throw it away. Better look how to make a beautiful bench in the gazeboGive old furniture another opportunity to serve you.
Materials:
- wooden crib
- two crossbars 2 x 8 required length
- 2 2x4 boards 2.5 m long.
- wood glue
- long wood screws or similar crib material
If necessary: a wooden dowel of the appropriate diameter for the manufacture of corks for extra holes needed for the crib, but not for the bench.
 Tools:
- Saw, tape measure, pencil, drill with drills.
- Clips and strap if necessary. Improvise with what you have.
- Paint brush.
- Orbital sander or just sandpaper.
Additional tools:
Kreg jig. A very useful tool, helps to drill holes at a controlled angle and depth to connect parts at right angles. You can do without it, but if you buy Kreg ji, you will find many places to use it.
Other tools as needed and available.
Each crib will be slightly different. Most designs are assembled at home, so they have some kind of fastening system that holds the ends on the sides to form a crib. See where you can use these fasteners to add strength to the bench. As an example, look at step-by-step photos on how the process of assembling a bench from a crib of this type went, if you haveguessing, make your corrections.


https://i.expert-h.com/en/lavki/1074#sigFreeIdd92a9adda5
Bench sofa in the gazebo
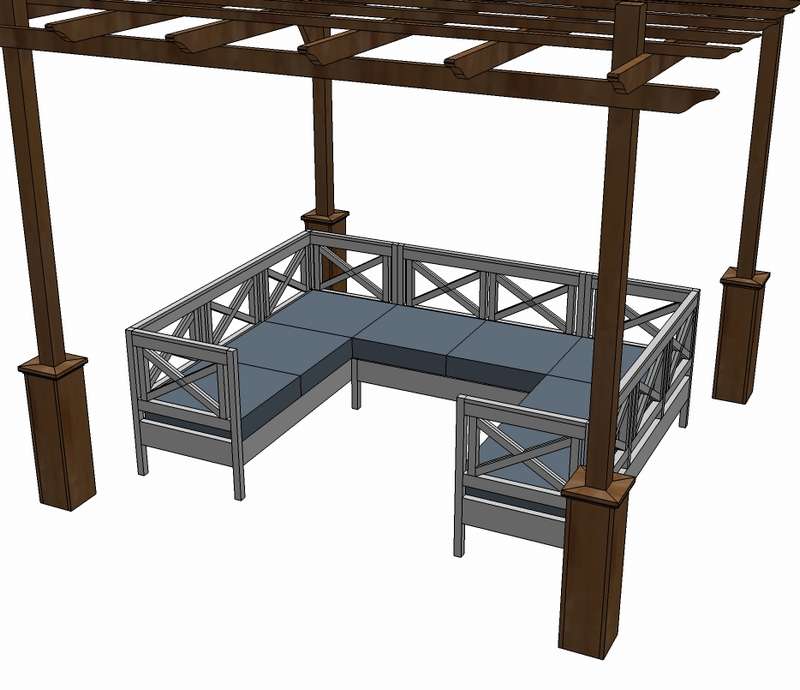 Schematically shows how to make a sectional bench sofa for pergola
You will need boards and bars 2.5 m long
- 3 pcs. 1x3 strips
- 3 pcs. 1x2
- 4 things. 2x2 bars
- 1 PC. 2x3
- 2 pcs. 2x6
- 5 cm screws
- 3 cm nails
- 5 cm nails
- 1-1 / 4 "Screws for Pocket Holes
- 2-1 / 2 "Screws for Pocket Holes
- Wood glue
- 120 sandblast sandpaper
- primer
- wood conditioner
Bench Sofa Dimensions 48 inches (122 cm) wide, 33 1/2 "(85 m) high, and 27" (68.5 cm) deep. See the assembly sequence in the diagrams.


https://i.expert-h.com/en/lavki/1074#sigFreeIdfe7cf69f07
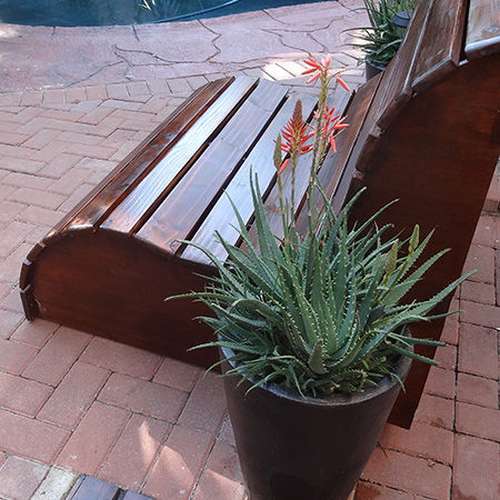
Do-it-yourself bench in the gazebo made of wood
This is the third part of the project, how to make a bench in the gazebo. If you also want to learn how to make a foundation for pillars and lay out a platform for a canopy, you can visit the author’s website, there are these instructions in the first and second parts.
 Now more specifically about the benches.
Materials
- 4 pillars 4 "x4" (10 x 10 cm) 10 ft (345 cm) high
- 3 beams 8 "x2" (20 x 5 cm) 8 '(244 cm) long
- 9 beams 4 "x2" (10 x 5 cm) 8 '(244 cm) long
- 12 boards 0.65 "x4" (16 x 200 mm) 8 '(244 cm) long
- Screws 75 mm
- Nails
- Minwax clear outer wood sealant
You will find all the instructions on the site, everything is painted in great detail there.


https://i.expert-h.com/en/lavki/1074#sigFreeId997088eaa0
Bench for the gazebo 100 photos


https://i.expert-h.com/en/lavki/1074#sigFreeId7c8a7de579
Semicircular benches
Curved bench
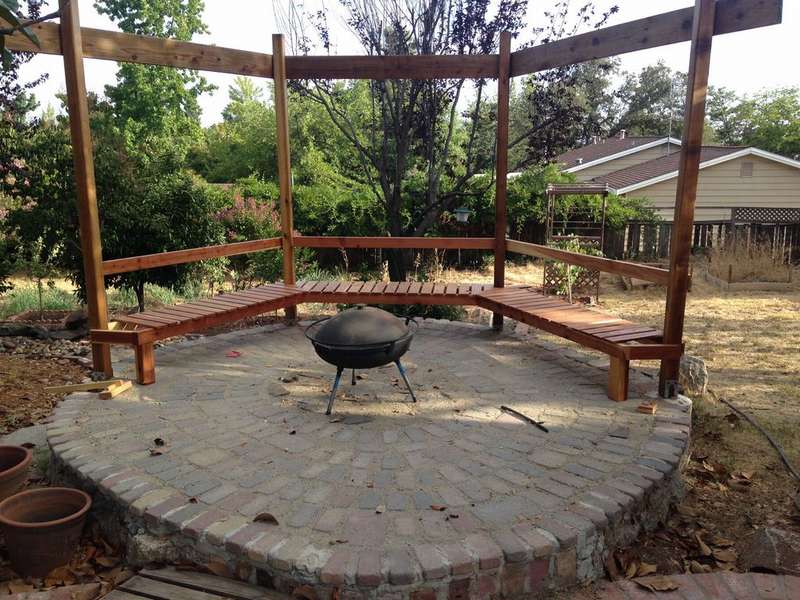
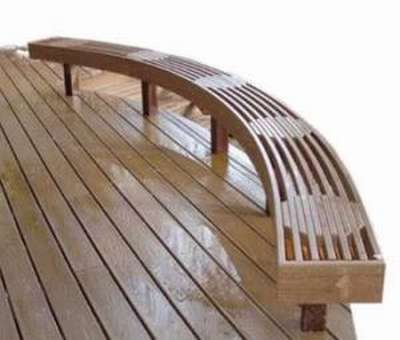
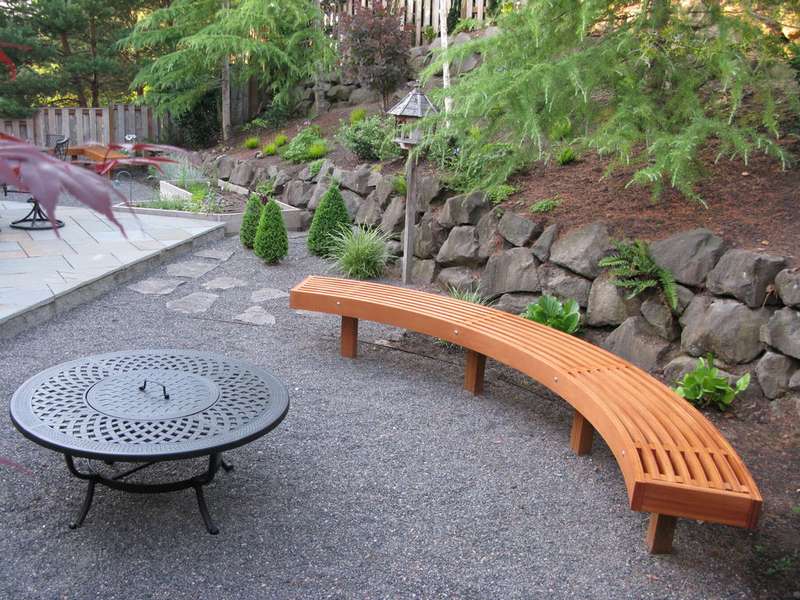 If you want to equip a recreation area with a fireplace for fire in the center, do curved garden benchto fit more people. In this case, the shape of the bench was dictated by the radius of the gravel area in terms of the landscape. The inner radius is 83 inches (210 cm) with eight curved beams 1.5 inches wide (38 mm) spaced 2.5 cm apart. This gives an outer radius of 92 inches (234 cm) and a bench 19 inches wide (48 cm). The idea is for the bench to expand 90 degrees to fit the design and fit at least 5 people.
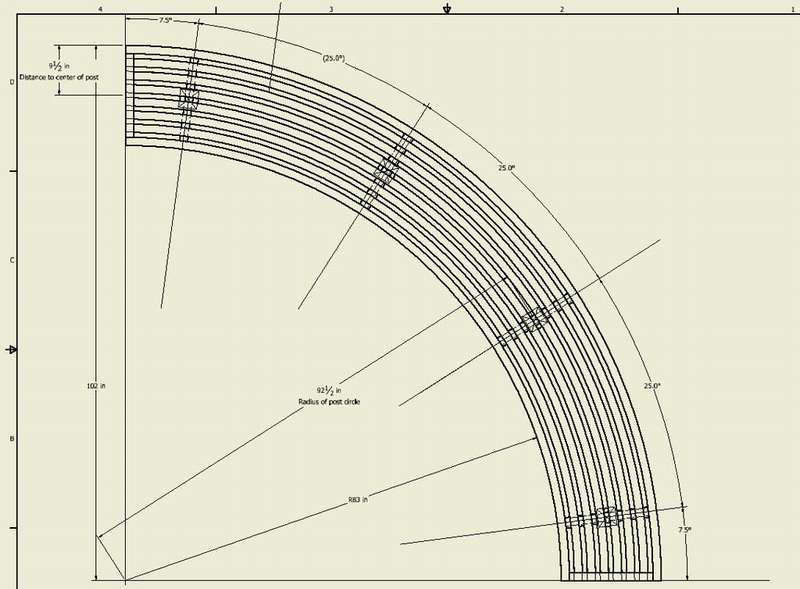 Design
The bench is made by gluing thin strips with a thickness of 1/4 inch (6 mm) in slats. The thickness was chosen so that the strips could be bent.
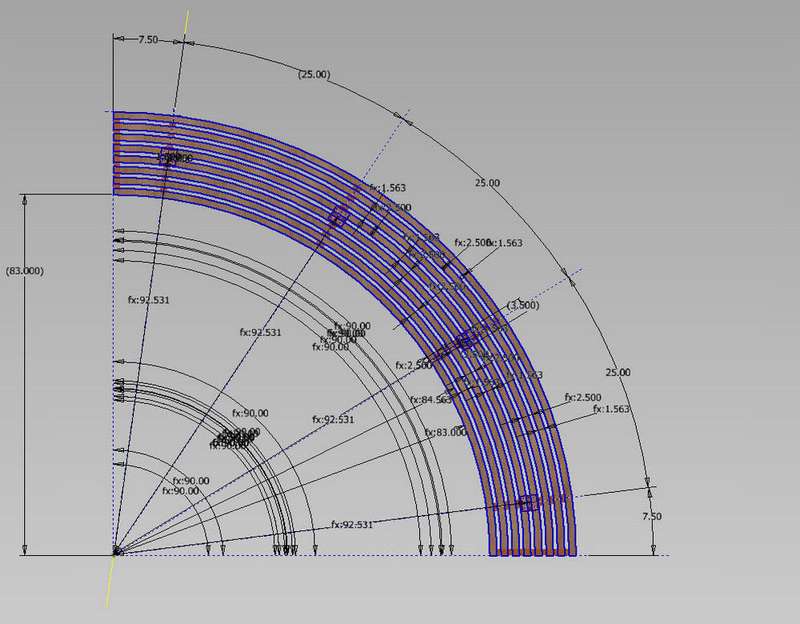
To ensure that all dimensions are correct, the shape was modeled using 3D modeling software.
Below are two more drawings, on the left there is a sketch of the dimensions with the position of each plank of the inner radius, plank width and distance. The second shows a 3D model created from a sketch, including poles and support bars.
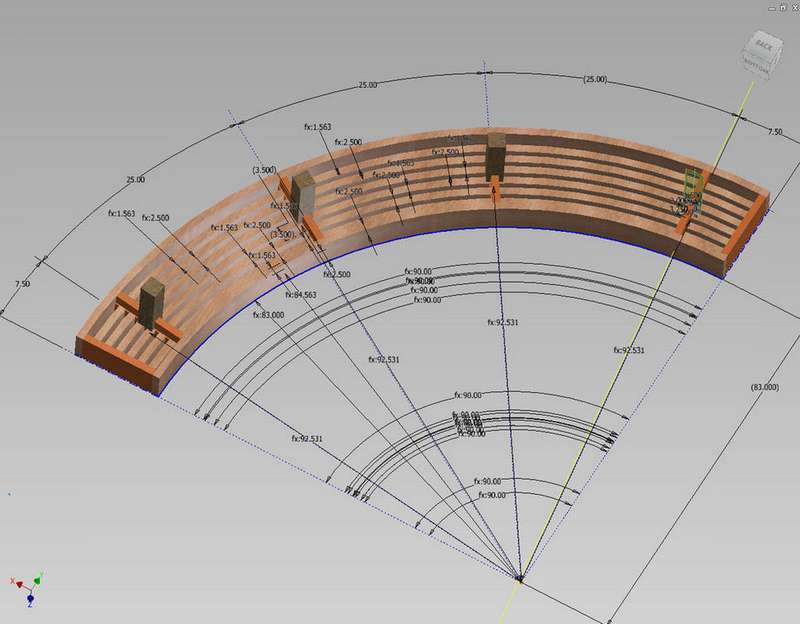 The final step in design is to figure out how to attach the bench to the supports. This is a large bench for 5 to 6 adults.
Since the bench is curved loads are distributed very efficiently around the bench. On the site you can watch a video showing the load distribution and confirms that you only need a simple locking bolt in the center of each rack to secure the bench.
Unfortunately, step-by-step photos of the whole process are not here, but if you are interested in this model, detailed instructions for making a curved bench can be read on the website.


https://i.expert-h.com/en/lavki/1074#sigFreeId0f43a57e23
Do-it-yourself semicircular bench
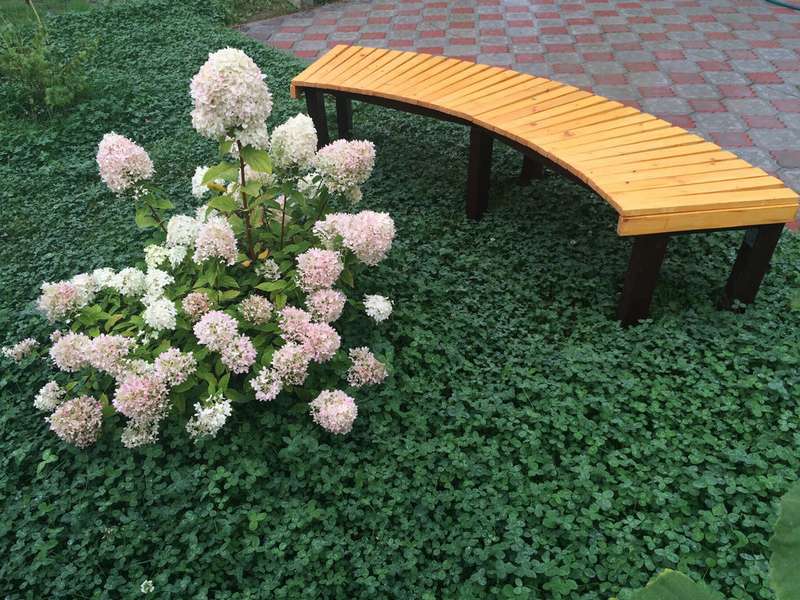
 Ideal for a large terrace or around a campfire spot semicircular benches. But of the three approaches to curve formation, there are two serious problems. The most difficult method is to bend a tree or composite to the desired shape. If you heat the material or stick thin strips on a curved shape, you need expensive equipment and a lot of time.
Second way - cut curved parts from wide boards. This is a good method if you know how to consistently cut curves, and you do not care about a lot of waste. But only longer benches should be assembled from segments, which will require joints on the surface of the bench.
 In this case, the author offers a simpler method.
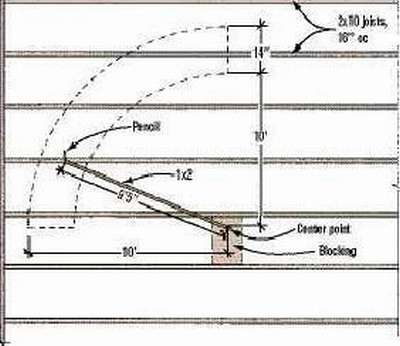
The seat must be supported in at least four places to determine the curve. Using only three legs will give you a V-shape. Set the supports approximately 30 cm from each end of the curved bench and other posts evenly within the remaining gap. Most likely, it bends more than 120 cm. In the places of supports, struts are installed, which, in addition, provide drainage.
You should read more about the method of manufacturing a curved bench on the site, where the author describes in detail the points that you need to pay attention to.


https://i.expert-h.com/en/lavki/1074#sigFreeId8231ca783c
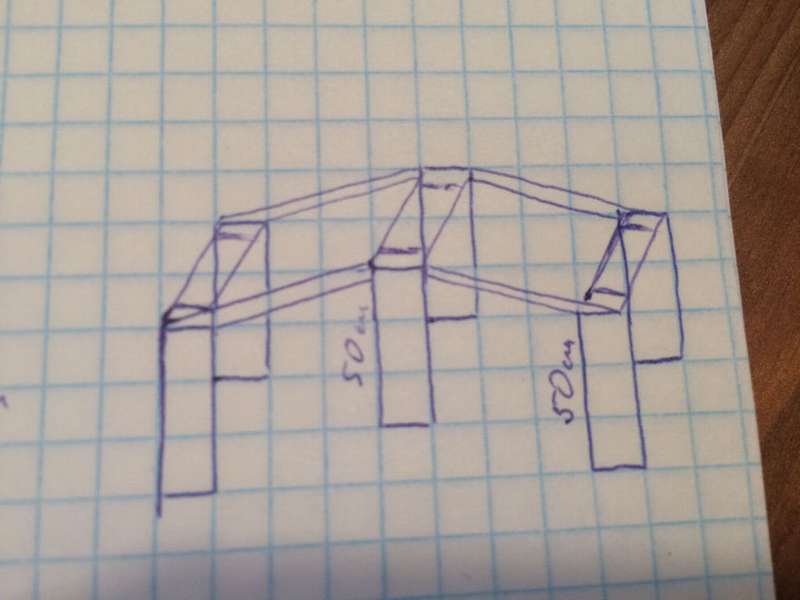
Semicircular campfire bench
 Size 2m x 0.5m x 0.5 m
Time: 3 days
Idea, make four identical benches and set them around the fire. Project: radius withthe pebbles should be such that four benches can be placed close to each other, forming a semicircle around the fire.
Dimensions:
- distance to fire - 2 meters
- the far edge of the bench - 2 meters
- proximal edge of the bench - 1.5 meters
- bench width - 0.5 meters
- bench height - 0.5 meters

 Step 1: Measure, saw, edge
Dimensions:
- 34 seats: 2 x 5 x 50 cm
- 6 legs: 5 x 7 x 50 cm
- 2 rails for the seat (far edge): 4 x 4 x 100 cm
- 2 rails for the seat (proximal edge): 4 x 4 x 80 cm
- 3 crossbars from the far edge to the proximal edge: 4 x 4 x 40 cm
Step 3: Painting
Step 4: Frame for the bench. Feet connect with metal corners.
Step 5: Seat
The seat boards should be aligned in a semicircle. This can be done with a rope tied to a stick. Boards are connected from the inside of the frame.
Step 6: The final stage
To complete the bench we connect the side boards.
Step 7: Invite friends


https://i.expert-h.com/en/lavki/1074#sigFreeId0f523de8f9
Curved plywood bench
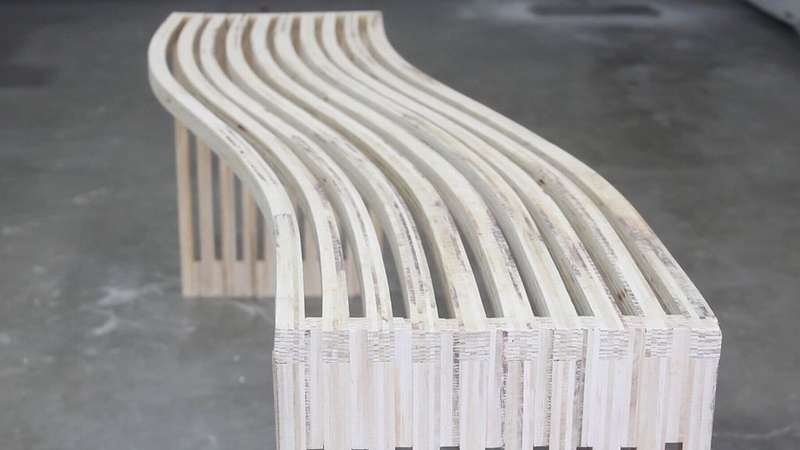 See how you can make something cool from a single sheet of plywood.
Yes, for this project, we needed a sheet of plywood 120 x 240 cm and a sheet of MDF 60 x 120 cm. Below are the step-by-step photos, how to make a curved bench, and under the gallery is a link to a site where you will find a video and detailed instructions.


https://i.expert-h.com/en/lavki/1074#sigFreeId583089a8fa
Drawings of semicircular benches


https://i.expert-h.com/en/lavki/1074#sigFreeIdd8bf592982
100 photos of semicircular benches


https://i.expert-h.com/en/lavki/1074#sigFreeId43780ddb4a
Original benches
Memphis style bench design
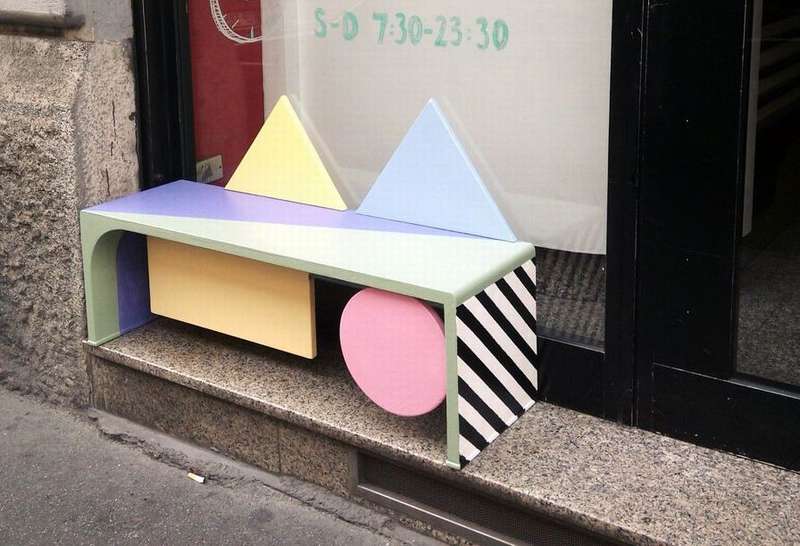 Look how to make a memphis style bench. If you know little about this art, below is a large photograph with examples of Memphis-style furniture so that you understand what is at stake.
To learn more about Memphis’s style, just enter it in a Google search and look at the images. After that, try to imagine a bench with the necessary dimensions, made geometric asymmetric shapes. That is how this project was born.
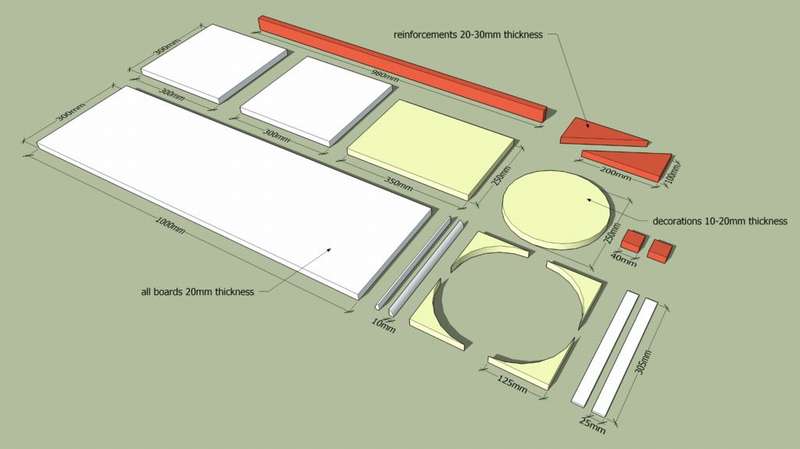
 The material used was a long wood board, several sheets of plywood, screws and four metal plates for the backs.
Look at the photos shown here all shapes with exact dimensions. Please note: nothing is wasted, the four parts advanced from the disc are used to create a rounded corner and at the same time strengthen the structure.
Step 1: Structure assembly
First glue the parts together, then drill holes in the boards, and fix with screws.
Step 2: Add Mounts
Now you need to mount under the seat. Two triangles on the back side help to avoid horizontal movements, and a full-length board gives rigidity.
Glue these parts, then drill and tighten the screws.
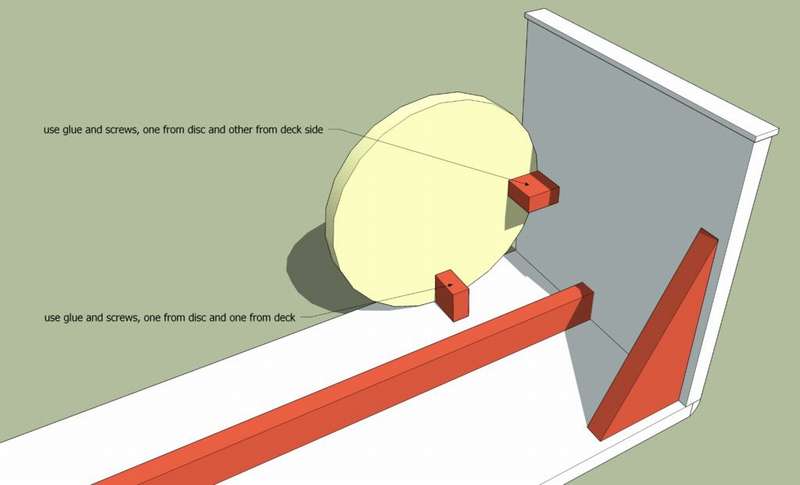 Step 3: Add a round corner
The round corner is more stylish and also helps improve bench stability. Glue all four pieces together, tighten a couple of screws, and using a rasp try to make the surfaces homogeneous.
Step 4: Fix geometric shapes
These two forms are actually for appearance only. Fill the area under the seat with a colored circle and a rectangle. Use glue and screws again.
Step 5: Putty
 Step 6: Do the backs
They are not identical to show the asymmetric feature of the architectural current, but high enough to be able to lean slightly. To support a person’s weight, use metal plates, two for each back.
Step 7: Painting
Apply two coats of acrylic paint with a roller. Use masking tape to identify colored areas.
Step 8: Fasten the backs
When everything is dry, screw the backs and admire your work.
Tips
If you will use glue clips, do not forget to insert a small wooden plate between clamps and partTo avoid scratches and surface damage. This is very important if you need a flat surface for drawing. Use plaster to hide crevices and bonnets.


https://i.expert-h.com/en/lavki/1074#sigFreeId5210f9d17e
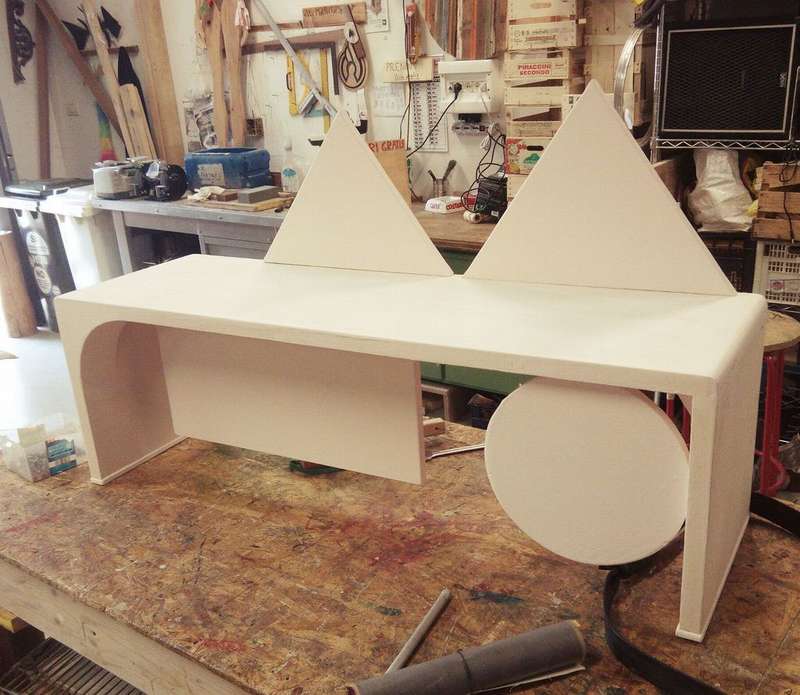
Original DIY bench
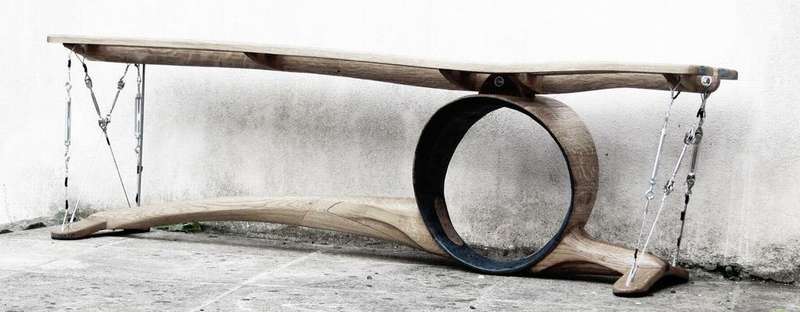 Gantry original bench for indoor and outdoor use. The idea is that the axial loop connects to two legs, each of which is cut manually (with a little help from the grinder) into a smooth shape. Bent legs and trims add aesthetics. The upper part aligns above the loop thanks to the stretched cables at both ends and a thin stand.
 Dimensions: 1600 mm long, 450 mm high and 300 mm wide.
Tools:
- Hand saw, circular, mitral and jigsaw
- Milling cutter
- Wood angle grinder
- Drill
- Bit
- Clamps
- Measuring equipment
- External wood glue
- Sandpaper, paint, oil, etc.
 Materials:
- European oak - suitable for bending and using the exterior
- Aluminum pipes
- Galvanized rope
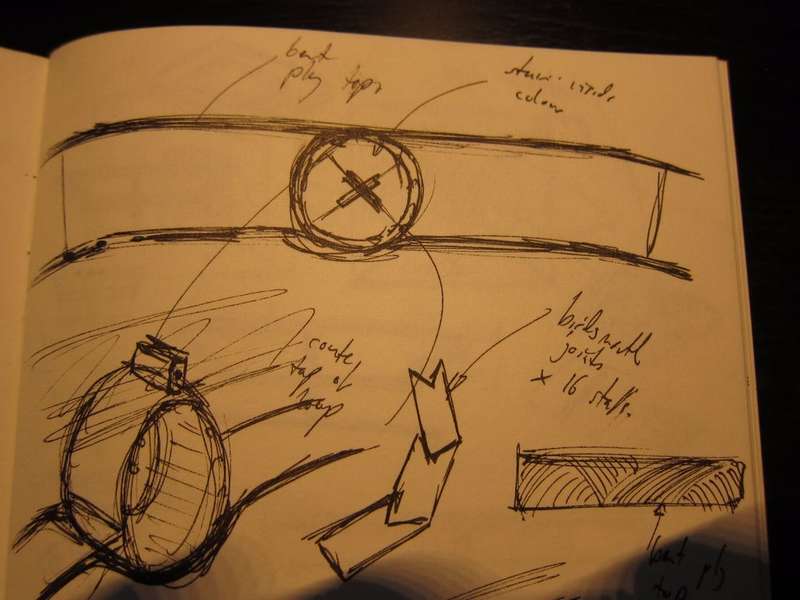
Design
In the original sketch, the loop was centralized, which would only allow the top to be supportedcables ... But, as usual, "wouldn’t it be cooler if ...", so the design was slightly modernized.
Thin piece added steel rodto give the bench a little extra support.
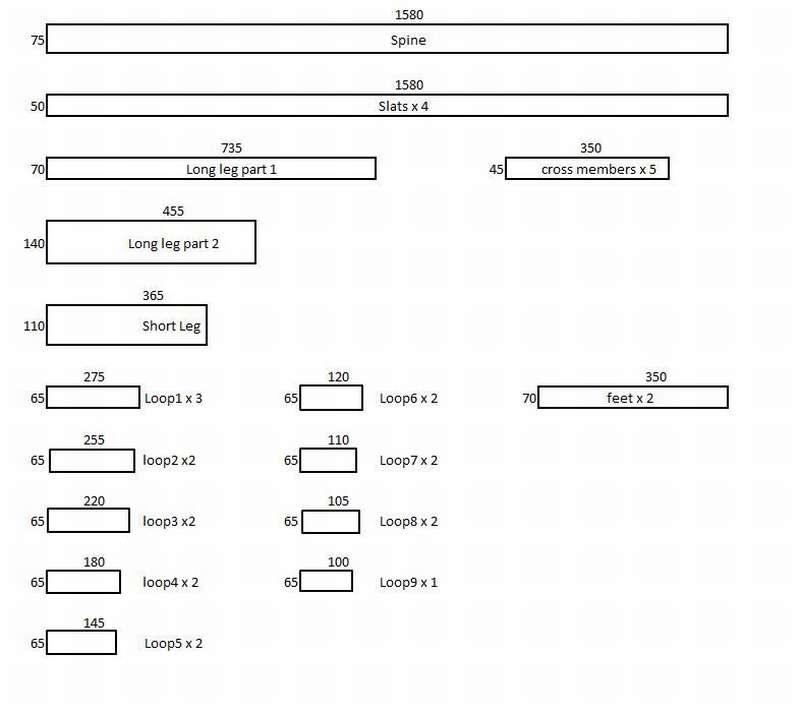 The top is mounted on a round base (loop) and secured with an aluminum pin. A thin rod is added at the end of the offset side, and then the cables are tensioned to prevent rocking. The latter was to add some rubber to the underside of the legs.
The finished bench is very stable and functions as it should..
On the right you see a drawing and a diagram of parts.
You can read the detailed instructions for making this amazing bench on the site, the link can be found under the gallery with step-by-step photos.


https://i.expert-h.com/en/lavki/1074#sigFreeIdf7b8518bea
Dating bench
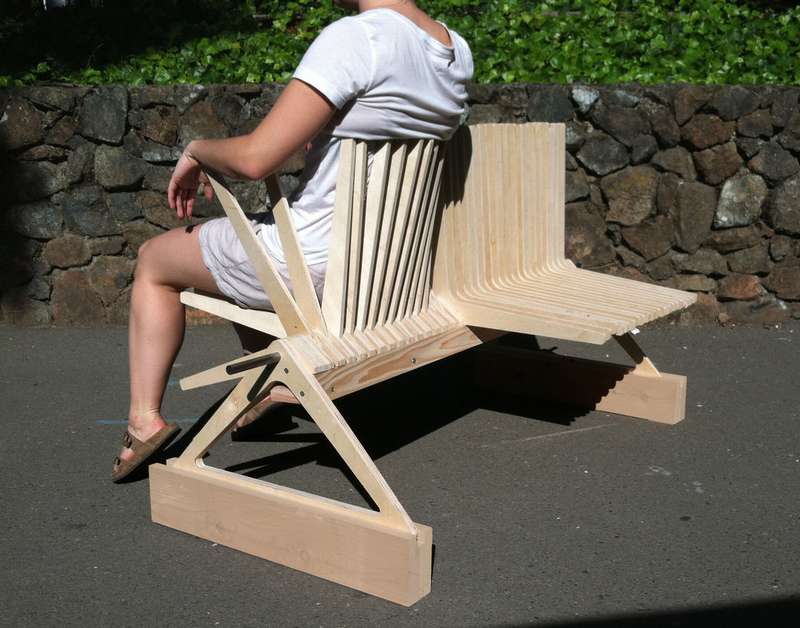 This is a project that explores the concept of a place to meet. Planks rotate around a steel bar, which creates dynamic seat, which allows you to change the boundaries of personal space - the range between proximity and separation.
Seat depth and back height 43 cm long, with an angle of 10-15 degrees. A steel rod with a diameter of 20 mm passes through all elements of the seat, foot and rotating support elements.
Details original bench calculated using CAD CAM software and manufactured on CNC.
Detailed instructions can be found on the website.


https://i.expert-h.com/en/lavki/1074#sigFreeIdddddb1cdfa
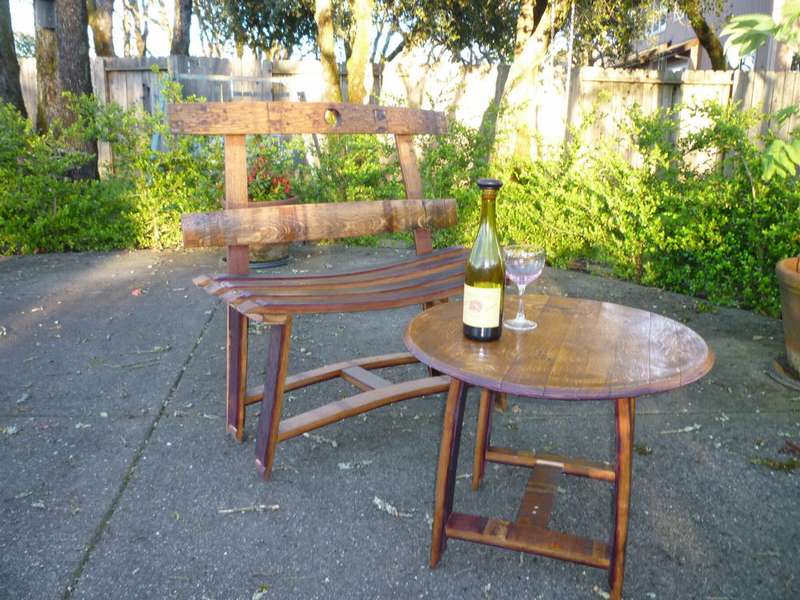 Barrel Garden Bench
See how to make a small garden benchusing planks from a disassembled wooden barrel.
This is a fun and simple design that is very easy to do with your own hands, of course, if you have a wooden barrel. Today, this is not the thing that rolls around every corner. If you find, making a bench is very simple.


https://i.expert-h.com/en/lavki/1074#sigFreeId2f801ebac2
Bench of branches
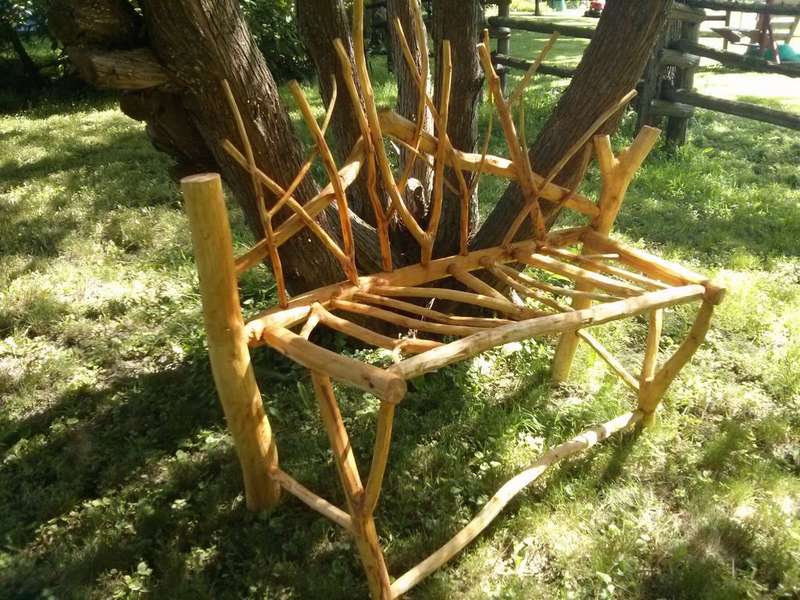 This original decorative bench was made by the author under the influence of the movie “Lord of the Rings”, he saw something there in the elven forest, which encouraged him to develop the design of this bench. But in any case, the design turned out to be unusual, and if in a couple of years it all grows with surrounding plants, it will definitely look like fabulous furniture.
This whole project designed without the use of power toolsbut that doesn’t mean you cannot use them. If the tools listed here are not suitable for you, you can replace them as you wish.
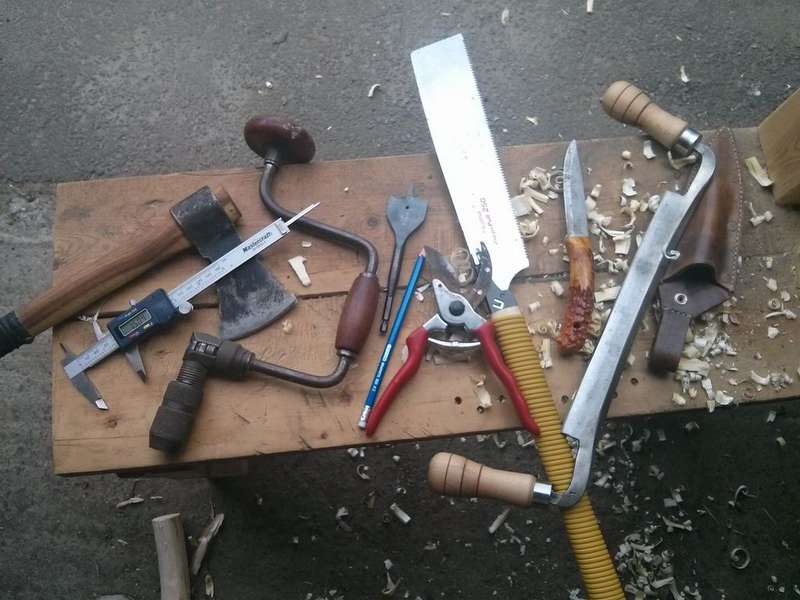 Tools:
- Hand saw
- Ax
- Sharp knife
- Various wood bits (1/2 ", 5/8". 3/4 ", 1", 1.25 ")
- Staple and drill
- Calipers
- Screwdriver
- Clips (belt clips are very useful)
- Finishing scissors
Consumables;
- Branches ... many branches, preferably green.
- Wood glue
- Outdoor screws
- Sandpaper
Noteused in the project fallen branches, not cut. Think about nature, take care of trees.
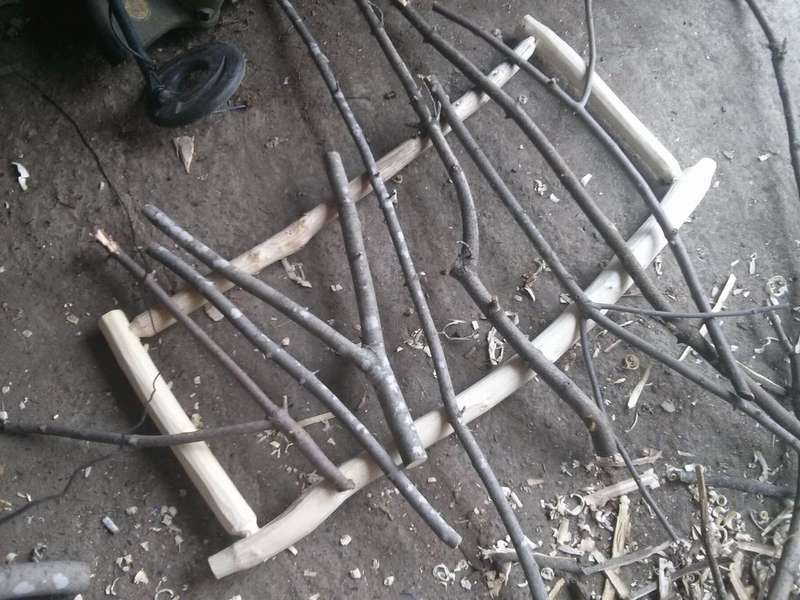 For this design, you need vertical racks that will protrude both the hind legs and the back, with two Y-shaped limbs acting as front legs. The bars that stabilize the legs are only between the two front legs, and between the front and side legs - with an open back. The back will act as a subframe, preventing the displacement of the hind legs.
Strength is an important indicator, especially if you want your bench to be decorative. Therefore it is very important to choose proper seat supports, especially considering that you are working with raw materials, and not with finished lumber. The frame is made of branches 5 cm thick and leaner, and branches with a diameter of 2-3 cm are used in the seat core.
Creative note. The location of the branches is chaotic, this is the charm of this bench.
Read the instructions and useful tips for making a forest bench on the site.


https://i.expert-h.com/en/lavki/1074#sigFreeIdb2948008da
Rope Seat Bench
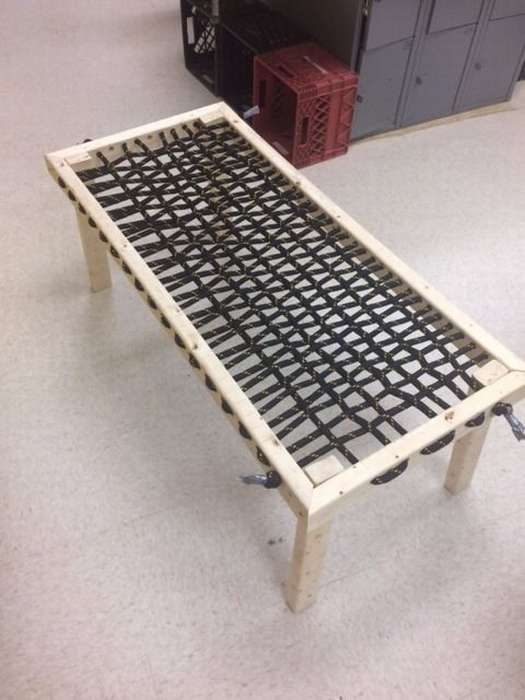 Original benchif you like hammocks.
You will need:
- 30 meters of rope
- 4 bars 2 "x2" (5 x 5 cm) 96 "long (245 cm)
- Screws 70 mm,
- 5/8 inch bit for drilling.
- Board trimming
You need to make a bench frame and 4 legs. For the base you will need 4 parts of the board: 2 by 48 inches (122 cm) and 2 by 22 inches (56 cm).
- After sawing boards, cut off the ends at an angle of 45 degrees. The design should look like a trapezoid, not a rhombus.
- Make legs, each should be 19 inches (48 cm).
- Drill holes
- Then you need to make holes for the rope. Draw marks every 1.5 inches (38 mm). After that, measure 1.75 inches (45 mm) from the bottom of the base, this will be the place where you need to drill holes. Make a hole at each intersection of lines.
Assembly
- Screw the legs on the sides of the bench. Add a screw to the front and back of the legs for extra support.
- Fasten the rope.
- Measure how much rope you need plus 15 cm in reserve. Tie a knot at one end and start inserting and stretching. Be sure to tighten as tightly as possible, wrapping the end to maintain tension.


https://i.expert-h.com/en/lavki/1074#sigFreeId4169109b83
Japanese bench
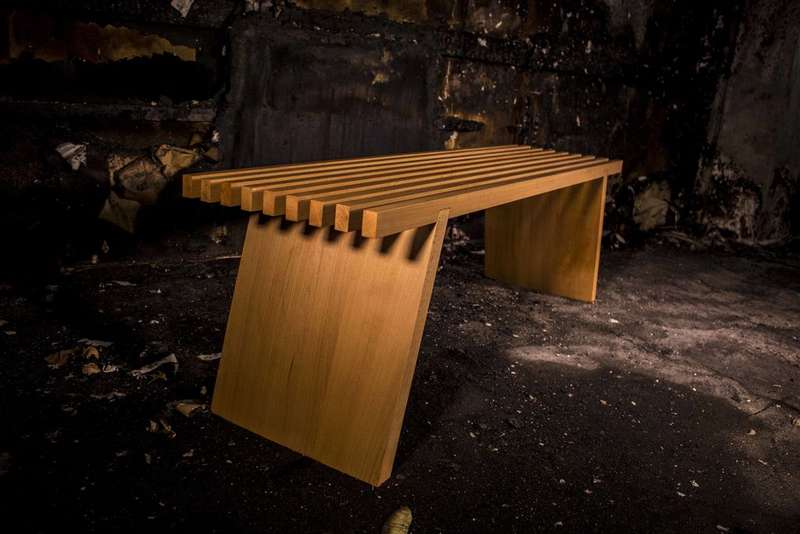 Shown here how to make a modern japanese bench. Why Japanese? It’s hard to say, but since the author of this project says that this is a Japanese bench, thenmouth will be so. Theoretically, you do not need power tools for Japanese woodworking, each step of this instruction can be mastered without the use of any power tools. But this is theoretically, in this project they are used to the full extent.
The dimensions of the bench are 400 x 36 x 398 mm.
You need a 40 mm board that needs to be cut into 9 pieces 22 x 36 x 1300 mm
- It is necessary to glue a three-part bench.
- Trim the legs of the bench at an angle of 15 degrees down and top.
- Work the ribs on a milling machine, they should be below 15 degrees 12 x 36 mm.
- The left one is at an angle of 75 degrees 5 x 18 x 36 mm, and the right one with 105 degrees.
- Sand all surfaces, soften corners and polish. Then assemble the structure.


https://i.expert-h.com/en/lavki/1074#sigFreeIdf184278493
Legless bench
 This garden bench Perfect for the garden. Very easy to do.
You will need:
- 1 sheet of marine plywood 900 x 900 mm 16 mm thick
- 7 pine boards 20 x 94 mm long 1040 mm
- 12 boards 20 x 69 mm 3 cut to 1000 mm and 9 to 1040 mm
- 5 x 50 mm screws
- Wood glue
- Wood filler (tinted)
- Mineral Turpentine
- Rags
Tools:
- Drill
- Jigsaw
- Orbital sander plus 60-, 120- and 240-sanding pads
- Brush
- Tape measure and pencil
Marine plywood - A better option than laminated pine, which over time can crack along the seams if left in the open.
Apply sealant as recommended. Three layers are applied with easy grinding between the first and second layers.
Apply sealant to all sections, including the bottom. You need maximum protection for the bench, if it is constantly on the street. You must also reapply the sealant as soon as the finish begins to disappear, or annually. Pine - coniferous wood that requires regular maintenance.


https://i.expert-h.com/en/lavki/1074#sigFreeIdb5a8a814a7
Original street bench made of wooden beams
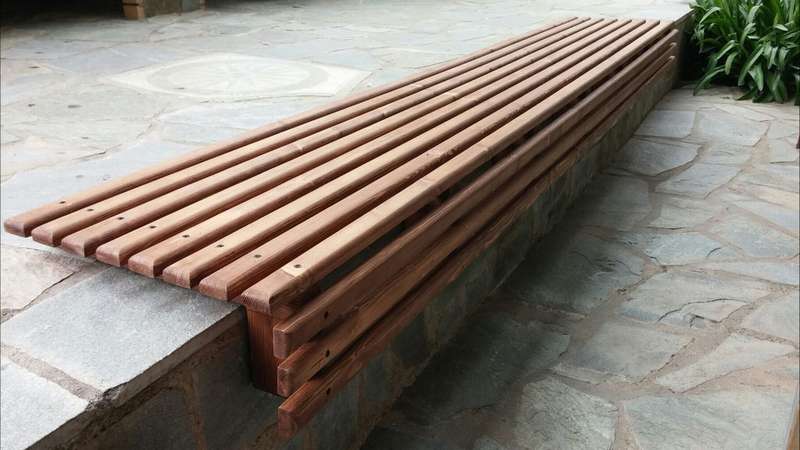 Prepare the beams, measure and saw.
- Sand thoroughly on all sides.
- Gather all these things! Take the longest beams, mark the center, drill holes and fasten with screws.
- Grind again by rounding off all edges.
- It's time to finish. Use a water-based impregnating varnish of the color of a walnut, it will be beautiful.
- Screw the upper beams to the lower mounts. Use a spacer for each gap between the bars so that they are the same.
- Install several foot pads on the underside to avoid damage to the tree.
- Tighten the screws around the edges and in the middle to make the bench more stable.
The bench is finally ready!


https://i.expert-h.com/en/lavki/1074#sigFreeId49086c86f8
Torn bench
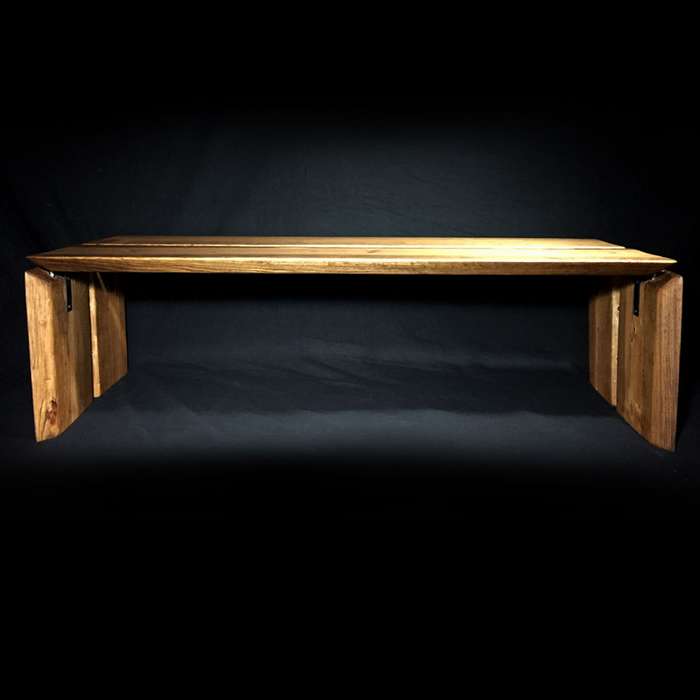 The idea was to make an original bench, which looks as if it is in a “disassembled” form. That is, the design is assembled, but some details are at some distance from each other.
The bench is made of 2 x 8 boards with a length of 2.5 m, centimeter fittings and L-shaped brackets. Screws and construction glue were also used.
This is a fairly simple assembly that does not require a lot of tools or precision.
If you liked this project, detailed instructions and videos can be viewed on the site, the link can be found under the gallery. But first, look at the step by step photos, they are made in great detail and fully reflect the entire process of manufacturing the original bench.


https://i.expert-h.com/en/lavki/1074#sigFreeId58c5e1800d
Modern wooden bench
 Materials:
- 9 boards 2x4
- 3 boards 1x4 8 feet (244 cm) long
- 5 cm screws or finish nails
wood glue
Parts Listto be cut:
- 7 pcs 2x4 72 "long (183 cm)
- 14 pcs. 2x4 14 1/2 "(37 cm) long
- 12 pcs 1x4 18 "(46 cm) long
Tip: Paint parts before assembly.
The assembly of the bench is shown schematically in the gallery. Instructions on the site.


https://i.expert-h.com/en/lavki/1074#sigFreeIda646a82d04
Plywood strip bench
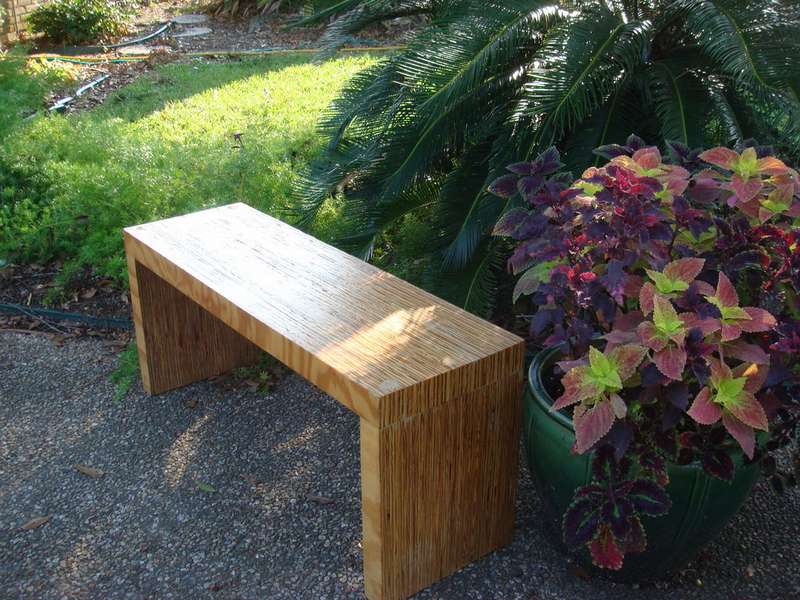 it cheap way to make a cool unique laminate bench. You just need to take a sheet of plywood 2.5 cm thick, glue and several power tools. The only fasteners used in this project are are glue and wooden pins.
For this project, the most the best tool is logic. Take the time to sit down and figure out what size you will have to cut. For this particular bench, a standard plywood sheet was used, cut into strips of 4.5 x 122 cm. The thicker the plywood, the wider the strip.
You can resize based on the width and height of the bench you want to make.
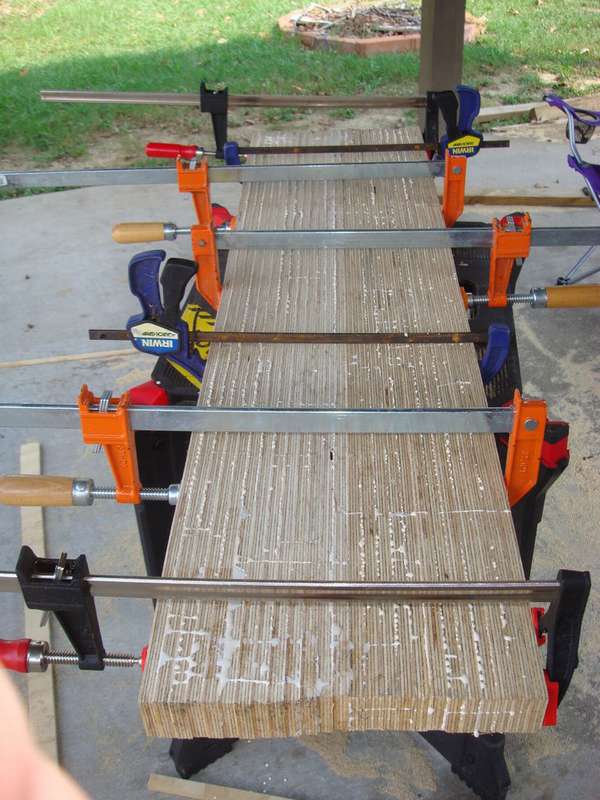 Once you have determined the width of the strip, begin to cut the sheet into many strips.
- Get ready for gluing, for this step you will need to have several long clamps, as well as 2 or 3 bottles of glue.
- Start by dividing the strips into two equal piles. These will be sections for the upper part and legs.
- Now you need to lay the first board and apply glue to the surface. After that, lay the next board on top and repeat the process until you reach the last board! Do not apply glue on top of the last strip.
- Hold the stack, first the ends, then in the middle. Make sure the clamps are tight. Remember that no screws or bolts are needed; everything should be held only by glue.
- When the glue dries, according to the time indicated on the bottle, slowly remove the clamps. You will have an excess of glue over the entire surface, and the stacks may be uneven, you will need to sand well.
- Now that you have done the hard part, it's time to cut the portion of the laminated strips to the right size. One ncut the olos to 92 cm.
- For another set, you need to make small calculations. The thickness of the upper part is approximately 4.5 cm, so to get a total height of 46 cm, we need to subtract 4.5 cm from 46 cm, 41.5 cm will remain. Continue to make two legs, cutting two sections of the second set of laminated stripes into 41.5 cm long.
- Then drill holes for the wooden pins.
- The work is done. If you want to leave the original finish, apply several layers of transparent varnish.
Necessary tools
- roulette
- clamp
- pencil
- drill


https://i.expert-h.com/en/lavki/1074#sigFreeIdf6dd198c7a
Original benches 100 photos


https://i.expert-h.com/en/lavki/1074#sigFreeId6223dd8075
Bench with flowerbed
Here are 5 examples of how to make a bench with flower boxes with your own hands..
First example, how to make a bench with a flowerbed.
 Instructions with drawings and step-by-step photos on how to make a combined bench with a flower bed.
Complexity: Easily. Estimated time: 4 hours.
Materials:
- 2 4x4 bars 10 '(348 cm) long
- 15 4x4 bars, 8 '(244 cm) long
- 5 boards 2x4 8 '(244 cm) long
- 8 mm screws
Necessary tools: mitral saw, tape measure, drill, hammer, screwdriver.
Preparation instructions
Prepare 7 4x4x8 bars. Cut each into 4 pieces of 24 "(61 cm) for a total of 28 pieces.

Take the 8 remaining 4x4x8 'bars. Cut each into 3 pieces of 31 "(79 cm) for a total of 24 pieces.

Saw 5 boards of 2x4x8 'into 3 pieces of 31 "(79 cm), for a total of 15 pieces.

DO NOT cut 2 4x4 bars 10 '(348 cm) long

Assembly instructions
- Make flower boxes using (2) 4x4x24 "and (2) 4x4x31" bars. Using the 6 squares you just made, collect 2 bases of flower boxes, each of 3 levels (or squares).
- Connect the two stands to the 4x4x10 'beams as shown. Fasten both parts 4x4x10 'and 4x4x24 "with long nails.
- Make three more levels above the 4x4x10 'crossbar. Attach 2x4x31 "boards to the crossbars with 5 mm spacing.
- Strip out all the rough edges and put the bench in place. Fill the boxes on ¾ with stones and soil, pour special soil for flowers on top and plant the plants.


https://i.expert-h.com/en/lavki/1074#sigFreeIdba18712d90
Second example. A bench with a flower bed will be a great addition to the cottage.
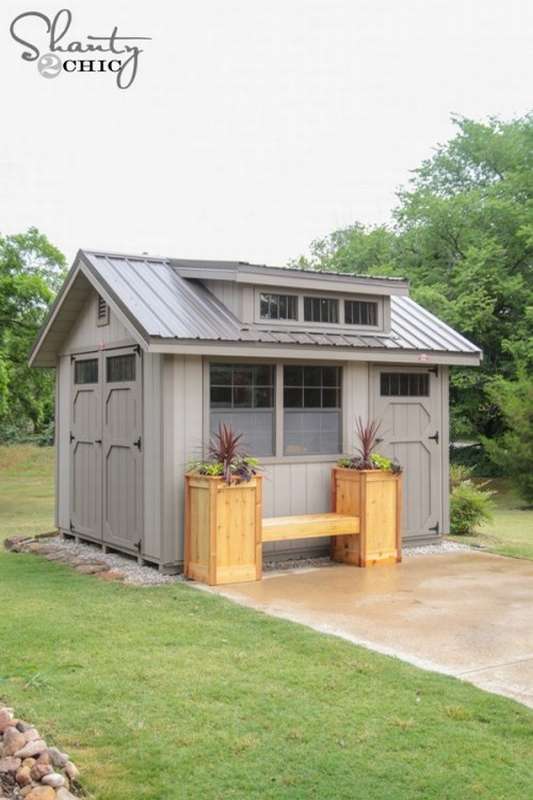
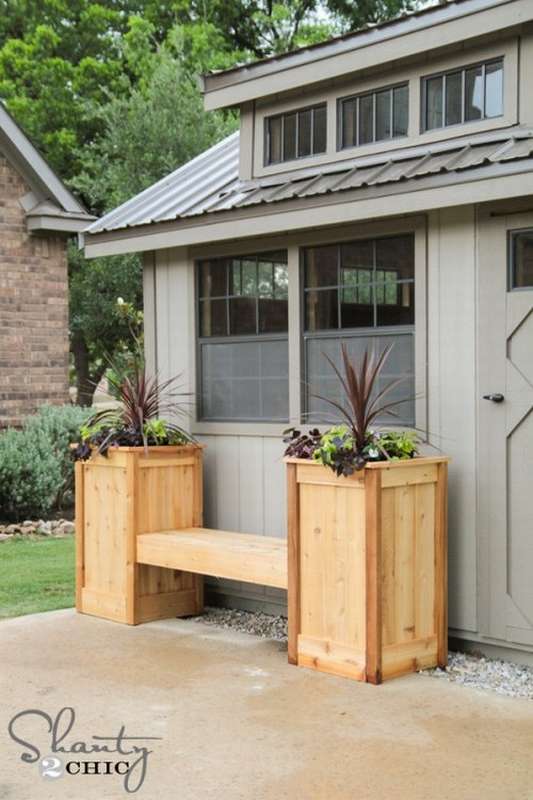 Set up a bench by the barn, this will completely change the look of your site.


https://i.expert-h.com/en/lavki/1074#sigFreeIdfced37b204
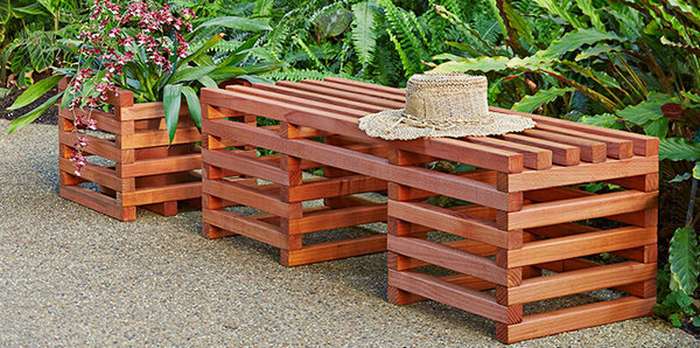
 Third example. The bench is assembled from a round beam, which makes it even more attractive. It will look great in the garden or in the summer cottage.
You will need:
- twelve thin logs 245 cm long
- wood screws
- impregnation
- polyurethane
- dowels
- wood glue
- saw
- drill bit
- level
- hand grinder
- flowers and soil
You will find detailed instructions on the website, a link under step-by-step photos.


https://i.expert-h.com/en/lavki/1074#sigFreeId78b5f10e0f
Fourth example. Read the full instructions, as well as find out what materials and tools are required on the site, a link to which is located under the gallery with step-by-step photos.


https://i.expert-h.com/en/lavki/1074#sigFreeIdce5de3cad2
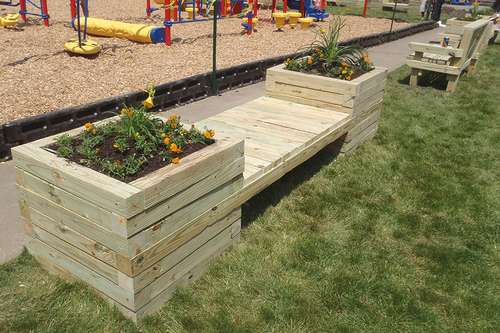
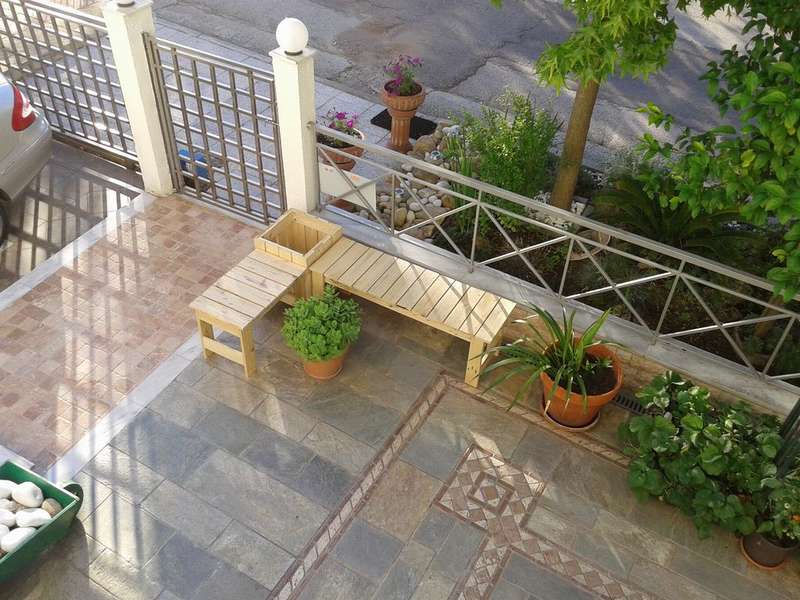 Fifth examplealmost finished combination corner benches and flower beds.
In fact, there are two benches, one (120x40 cm) and a smaller one, half the length (60x40 cm) in combination with a flower box (40x40 cm), which can be installed in the garden or in the yard. The attractiveness of this design is that it provides the ability to fix the benches in the shape of an "L" or install independently in any positionwhich you like. Use your own creative ideas, and you will find many solutions for making such a model.
In order to make a bench, a lot is not needed - simple tools, about 4 wooden pallets and a carpentry bench.


https://i.expert-h.com/en/lavki/1074#sigFreeIdb7e57188cf
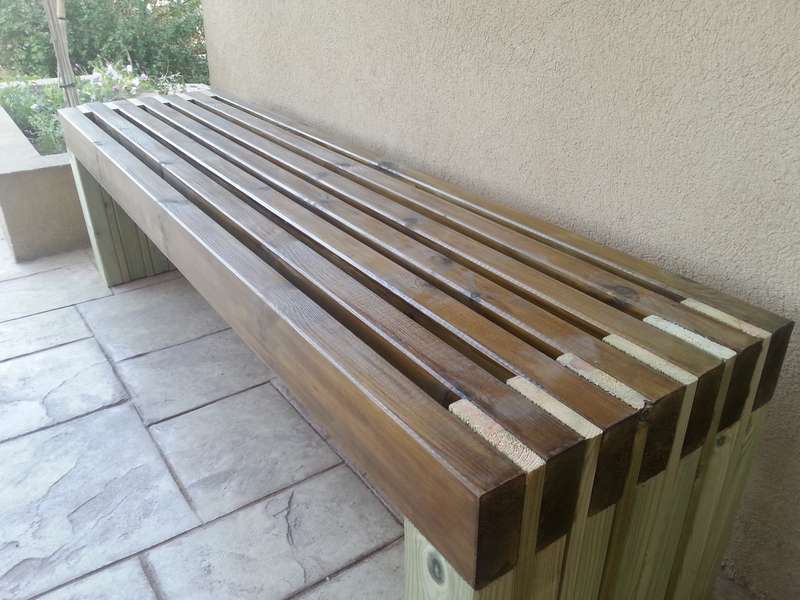
And this is another option.
 Very simple Reiki bench. Nearby you can make a box where to install a clay pot with flowers. Style and tasteful. The bench can be placed on the garden path or on the porch.


https://i.expert-h.com/en/lavki/1074#sigFreeId73819ad83e
Original bench with drawers for flowers
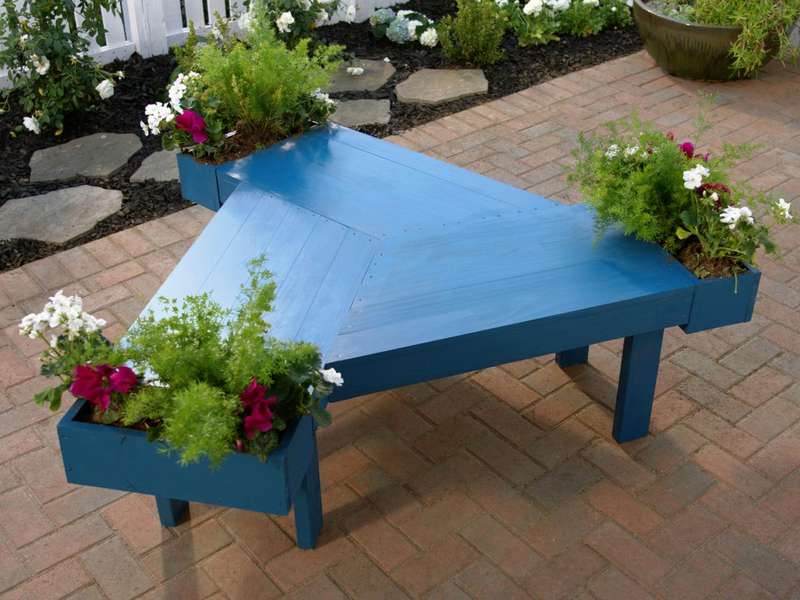 The bench does not have to be rectangular or square. See how to make a three-sided spiral bench with built-in flower boxes.
Tools and materials
- Boards 8 '(244 cm) long
- 3 boards 1 × 6
- 7 boards 2 x 4
- 8 boards 1x4
As well as:
- mounting screws 70 mm
- external paint
- brush
- Miter saw
- roulette
- a circular saw
- landscape fabric
 Seat assembly
Make frames using three 2x4 boards. Cut them to the following sizes:
- 20-3 / 16 "(51 cm) both ends 30 degrees
- 24-3 / 8 "(62 cm) one end at 30 degrees
- 34-1 / 2 "(88 cm) one end at 30 degrees
- 17-1 / 2 "(45 cm) both ends straight
- Attach the seat frames. Connect three identical frames with bolts to make the base of the seat.
- Make seats. Saw five 1x4 boards at the same angle of 30 degrees at one end. Attach to the edges of the frame section. Repeat for the other two sections of the bench.
- Trim the ends. Use a circular saw, cut off excess 1x4 boards from the end of each section of the bench.
- Attach the legs. Turn the bench over to attach your legs. Make your legs out of 2x4 boards cut off about 17 inches (43 cm) so that the bench is about 18 inches (46 cm) from the ground. Six legs are fastened with screws at the outer corners of the frame. Add an extra leg to the middle of the spiral.
- Paint the bench.
 Make flower boxes
This step is optional; you can leave the bench as is. But if you liked this idea, then:
- to make one drawer, cut two 17-1 / 2 "(45 cm) walls from the 1x6 board for the back and front of the box.
- for the sides, saw off two parts of 5-1 / 2 "(14 cm);
- for the bottom of the box,cut a piece from the board 1x6 by 16 "(41 cm).
Color the boxes according to the bench. Cover the inside with a landscape cloth. Fill the soil and plant your favorite flowers.


https://i.expert-h.com/en/lavki/1074#sigFreeId4a8660a8d2
Tall flowerbed and bench
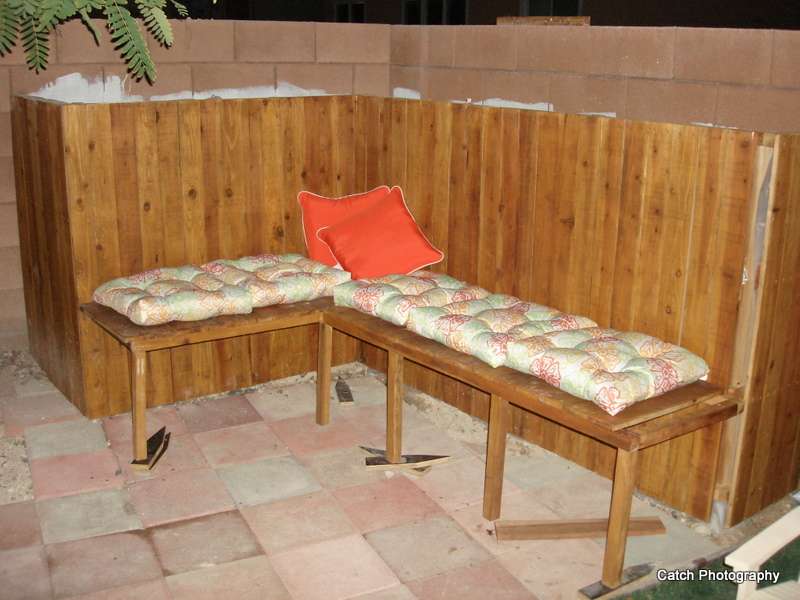 It is not clear what kind of structure it is? In fact, everything is simple. The author of this project has a very small courtyard, and without a bench and a flowerbed he was very sad and lonely. So such an idea was born: to make a wooden wall along the fence, to arrange flower beds at the top, and to install benches under the wall. Not everyone will think of such a thing, but it’s convenient to water it, I stood on a bench, watered the flowers, you sit and enjoy.
If you liked the idea, there is a link to the site under the gallery, read the instructions on how this project was implemented. There you will find a list of materials, dimensions of parts and other things necessary for work.


https://i.expert-h.com/en/lavki/1074#sigFreeId349d0cfd61
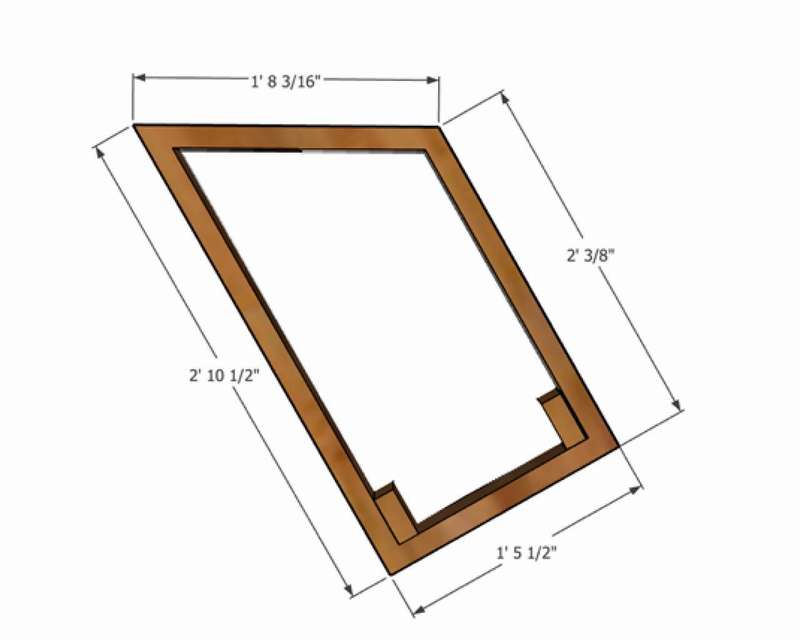
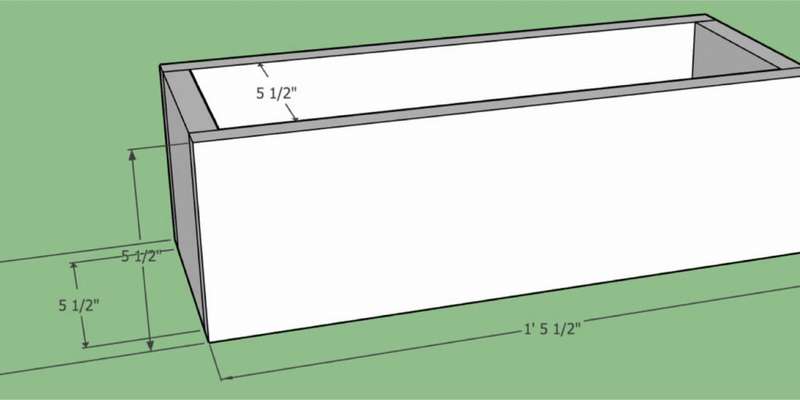
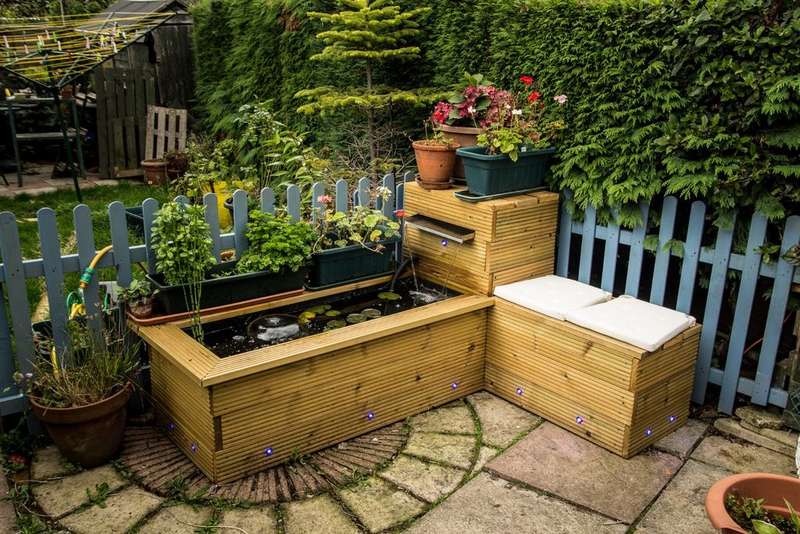
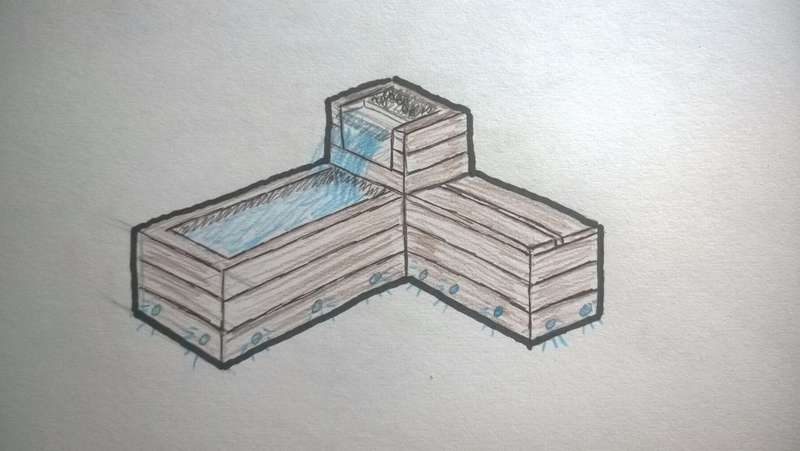
Raised pond with a waterfall and a bench
 Another interesting project. In this manual you will learn how to design and make a small raised pond with a capacity of about 300 liters, using 47x47 mm bars dried in an oven and 140 mm thick boards. The design is 1800 x 600 mm on the side of the pond (including the tower for the waterfall) and 1400 x 450 mm on the side of the bench (including the tower), with the pond and seat at a height of 445 mm, and the waterfall tower - at a height of 865 mm.
It also provides accent lighting, a device for a stack of water (waterfall) made of stainless steel and a bench with a hinged seat.
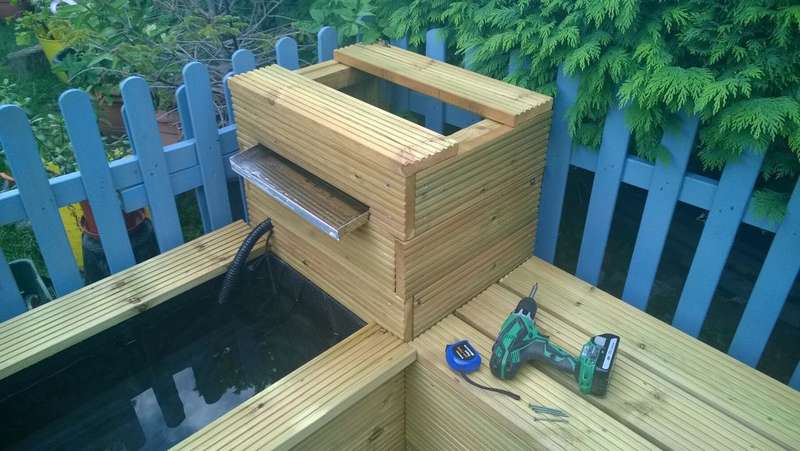
 The project provides for the possibility of modification, which will allow you to design a pond according to your needs. In general, there are many different ways in which you could design and make your own version. Although the photos give a general idea of how to build this grandiose design, it is unlikely to succeed without instructions. If there is a need for more detailed information about the exact design, a link to the author’s site is under the gallery with step-by-step photos.
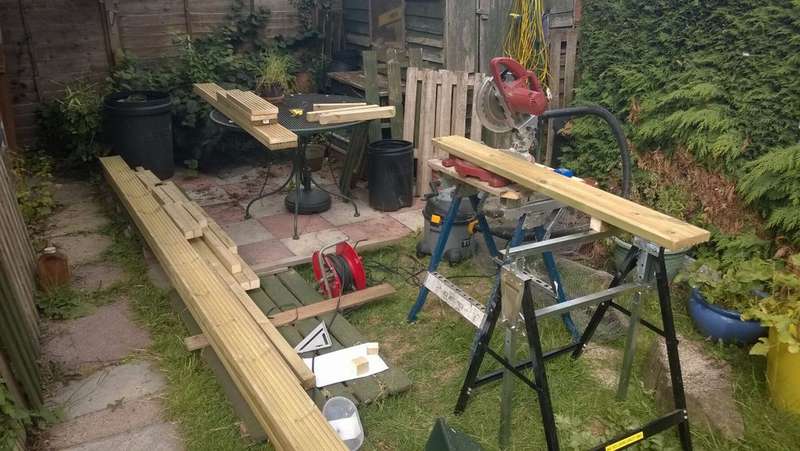
Tools:
- Crafting table
- Miter (preferably with a blade over 210 mm)
- Electric drill
- Hand saw
- Craft knife
 Materials: (the amount of each depends on your design)
- Bar 47x47 mm
- Formwork (140 mm wide)
- Rectangular brackets (used 77x77x16.5 mm)
- Galvanized T-joints (for the manufacture of a swivel seat)
- Pond lining
- Old carpet (optional)
 Fitting:
- Fixing screws 4.2x65 mm
- 3.5x30 mm wood screws
- Pump + filter
- Stainless steel waterfall (optional depending on your design, in this case a 400 mm wide tray)
- 25 mm corrugated plastic pipe (when using an external filter or waterfall)


https://i.expert-h.com/en/lavki/1074#sigFreeIde375d037ba
Mini flowerbeds for succulents
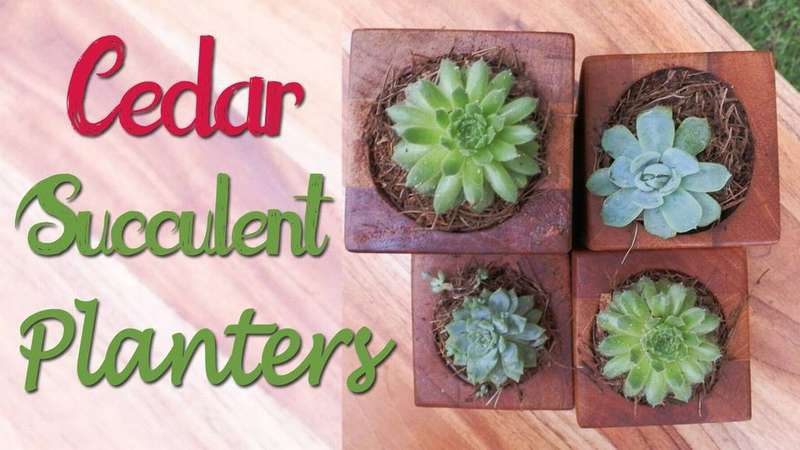 Although this is not related to benches, it might be interesting to someone.
You need a plate to set on the table.
Glue 3 parts (2.5 cm thick) and cut the required length.
- Base 7.5 x 7.5 cm.
- Height: 12, 15, 17 and 21 cm.
- Mark the center of the hole.
- Fasten the parts before gluing.
- Drill a hole of 5 cm for installation on top and a small hole in the bottom 1 cm for drainage.
- Sand with sandpaper.
- Apply several coats of the outer finish of your choice. You can use beeswax.
Plant succulents or flowers, set on the table and enjoy.


https://i.expert-h.com/en/lavki/1074#sigFreeId4cf966fed3
DIY bench with flowerbed 100 photos


https://i.expert-h.com/en/lavki/1074#sigFreeIdfa4286ccdb
Hello, I am the author of this article, so I look forward to asking questions for this article in the comments below, I will answer all !!!
If you have questions on another topic, ask them on our forum, we will answer you
- Two baskets of paper in 5 minutes (Master class)
- How to make a simple and compact table for a milling cutter from plywood
- How to make a soft headboard tile (Instructions + step by step photos)
- Cinder block benches: a convenient bench in 55 minutes
- How to make a bed with a niche: saving space (Master class)