DIY cupboard. 700 photos, drawings, step-by-step instructions
 do-it-yourself cabinet to the kitchen
Looking on the Internet how to do do-it-yourself cabinet to the kitchen? You must have been amazed at the number of articles and photographs with images of cabinets of all types and sizes. But strangely enough, there are very few good detailed master classes. To make your search easier, in this article you will find specific examples selected on the Internet, how to make a cupboard in the kitchen with drawings, step-by-step photos, overview instructions and links to the source.
Also learn how to make retractable drawers for the kitchen cabinet, assemble a construction from finished materials, secrets and home-made devices for organizing storage in a kitchen cabinet. Information for those who prefer to do things with their own hands.
Content
- Corner Kitchen Cabinets
- Lower kitchen cabinet
- Kitchen cabinet under the sink
- Kitchen cabinet for fridge
- Kitchen cabinet installation
- Built-in kitchen cabinet
- Kitchen cabinet on casters
- Drawer for kitchen cabinet
- Storage in the kitchen cabinet
- Cupboard with computer for the kitchen
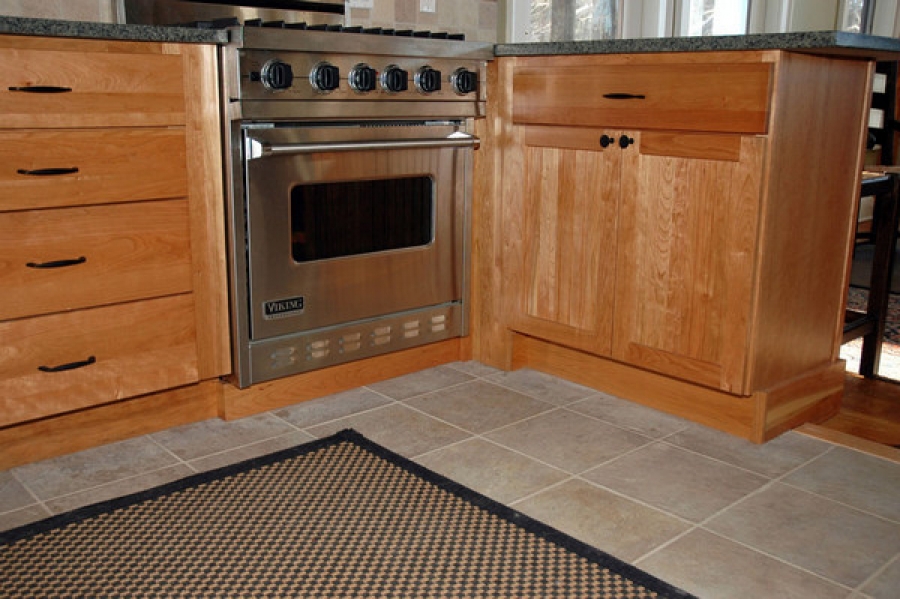
Corner kitchen cabinet drawing
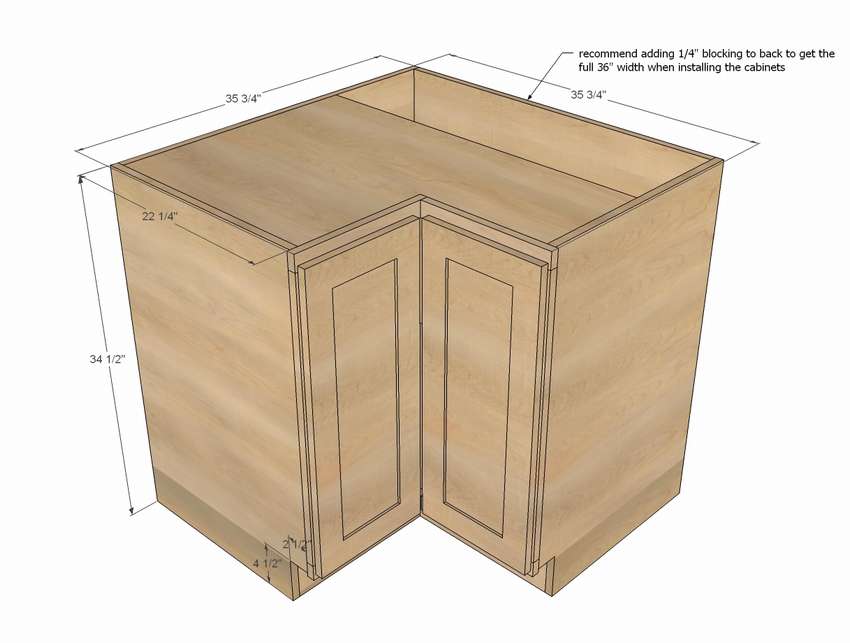
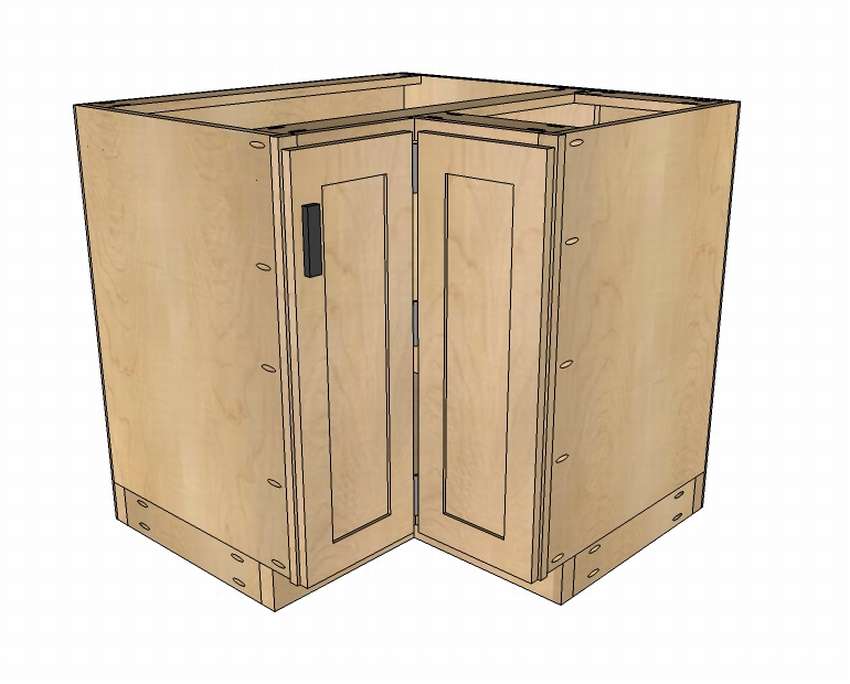 See the drawings how to make the bottom do-it-yourself corner cabinet to the kitchen. This is a simple and economical design option that has many advantages. In particular.
Maximum use of materials. There are no weirdly protruding square-edged scraps. Instead, boards are of standard width from which you can make more furniture. Bonus: The standard practice is to cut plywood to a width of 30, 40 or 60 cm for the least amount of waste.
 Simplified cutting. Everyone who cuts out rectangles from plywood knows that this is easier said than done. If you can’t cut through the plywood with a saw, you must make an incision and finish cutting the part with a jigsaw. When cutting wide, all you have to do is straight cross sections.
When performing full and transverse cuts, you always make long straight cuts that are more accurate. Flat cut is very important for the manufacture of square cabinets - especially when they all line up!
Of course, it is not difficult to cut plywood meter by meter, it will turn out to be a very durable case. But you have to use a ton of plywood and create a lot of problems. And here is more economical optionwhich can be made from a single sheet of plywood or MDF.
 The main thing you should remember is drill all pocket holes first. And if you fasten the front frames with holes for the pocket, drill them before assembly. Alternatively, you can drill holes for the pockets of the front on the outside, because they will still be closed.
See the diagrams of how to assemble a kitchen cabinet in step-by-step photos and you will succeed.


https://i.expert-h.com/en/shkaf/1099#sigFreeIdf1471b3ad4
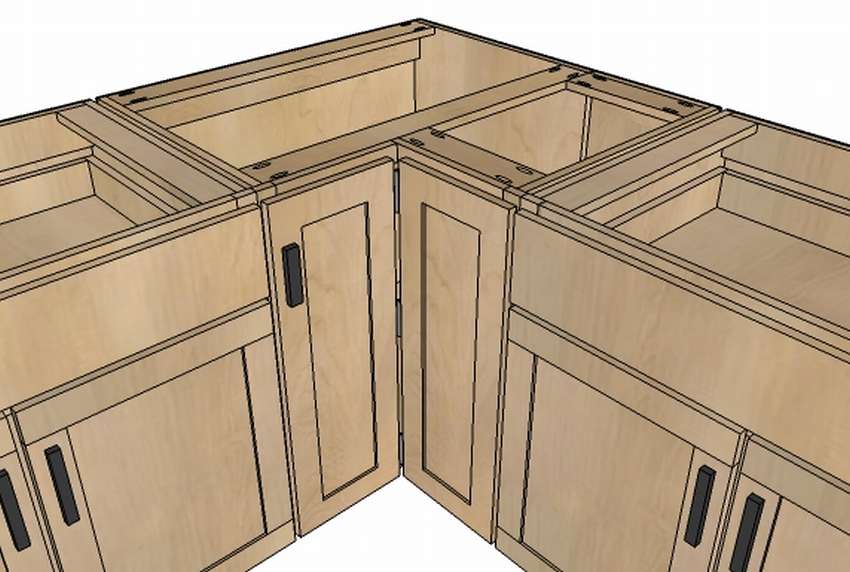
Corner kitchen cabinet with shelf
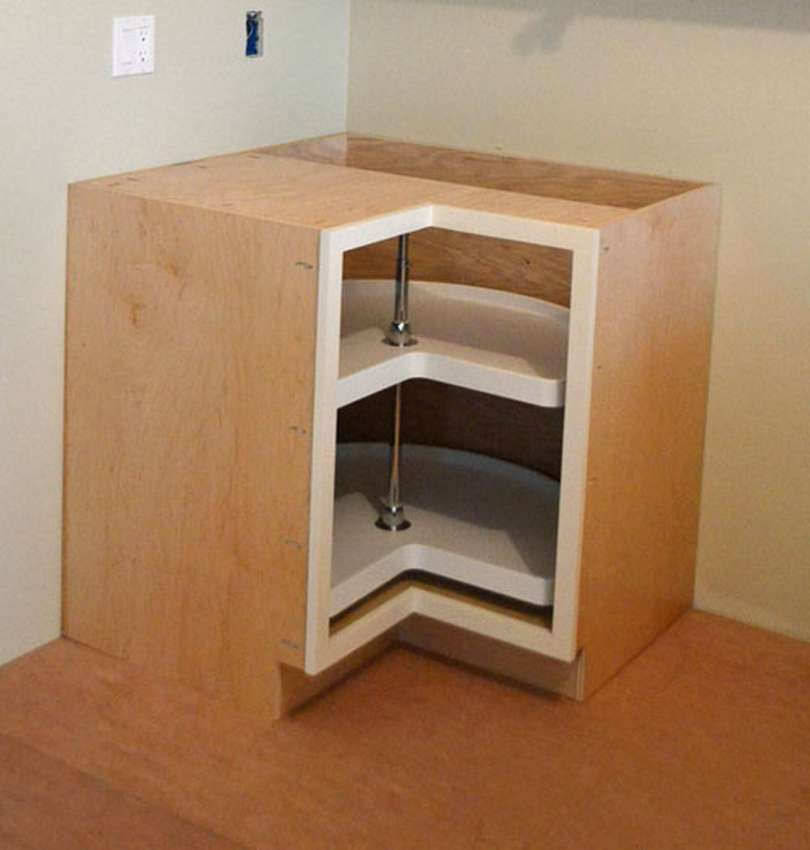 See an example how to make a corner kitchen wardrobe with rotating shelf. An interesting design, in fact it is a large box with an end cut, as if they cut a piece of cake.
The sides are attached to the back and bottom. Be sure to leave a 12 cm gap under the bottom shelf on the sides. Instead of buying another sheet of plywood for the top, you can use the waste from the back to raise the top. Plywood sheet must be at least 86 x 50 cm.
Note. Drill holes in pockets at the leading edges cut from above to secure the front bezel in subsequent steps.
Make face frames separatelyand then fasten with screws through pre-drilled holes.
 Doors should correspond to the height of your other cabinets in the kitchen and the width is a centimeter wider than the inner opening of the front frame.
See step-by-step photos with drawings on step-by-step photos. The dimensions on the diagrams are in inches, do not forget to convert the values to centimeters, multiplying by 2.54. Instructions for assembling a corner kitchen cabinet with a list of the necessary materials and tools, as well as the dimensions of the necessary details, you can read on the website.


https://i.expert-h.com/en/shkaf/1099#sigFreeIdb16e93b356
Drawing of a corner cabinet for the kitchen
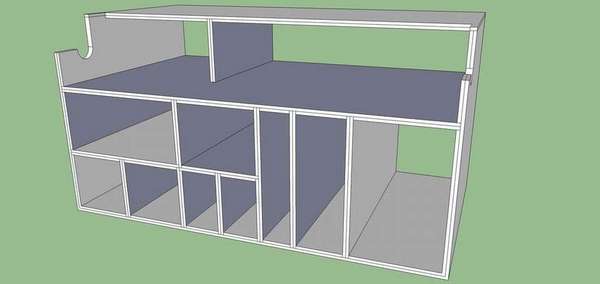
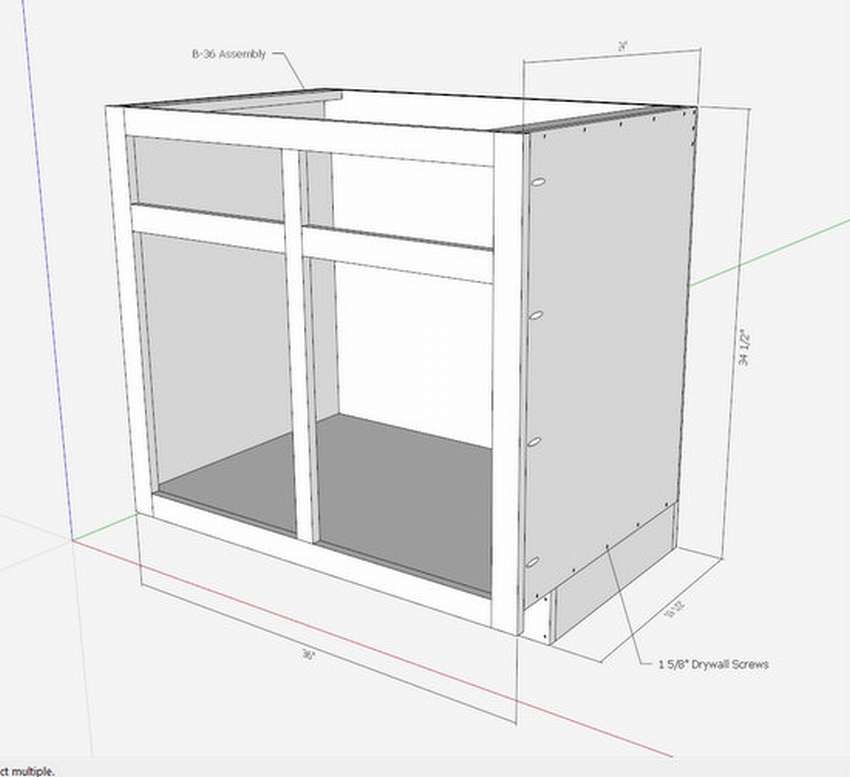 Some believe that, with minimal experience, to assemble a regular kitchen cabinet with your own hands. On the one hand, the cabinet is not a complicated structure when it comes to simple models. But still, it’s important to know what you are doing, because when it comes to working with corners and joints, it’s better to be confident and understand what to do and how to do it. Therefore, the first step in manufacturing do-it-yourself kitchen cabinets - this drawing. Here is a plan of a standard baa closet from which you can build on to create your own drawing.
The step-by-step photos show the assembly order of this design..


https://i.expert-h.com/en/shkaf/1099#sigFreeIde6b31ba304
How to make do-it-yourself kitchen cabinets
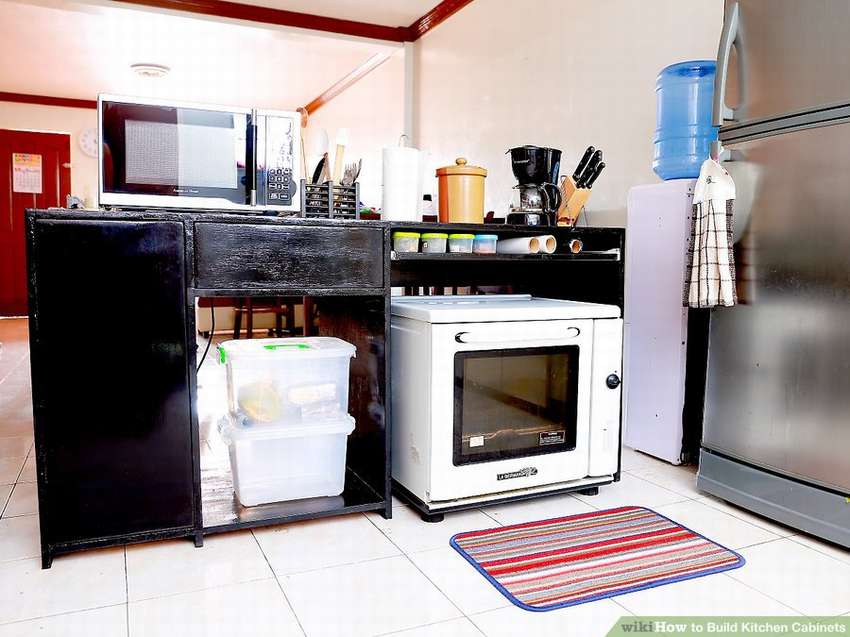 Today, many people prefer to make home furniture on their own. This, of course, has its advantages, you can do individual design while saving significantly. If you have basic knowledge in woodworking, then this is not so difficult. Here is an example from a famous wikihow site, how to make simple kitchen cabinets with your own hands. As you can see in the step-by-step photos, making the box itself is quite simple.
 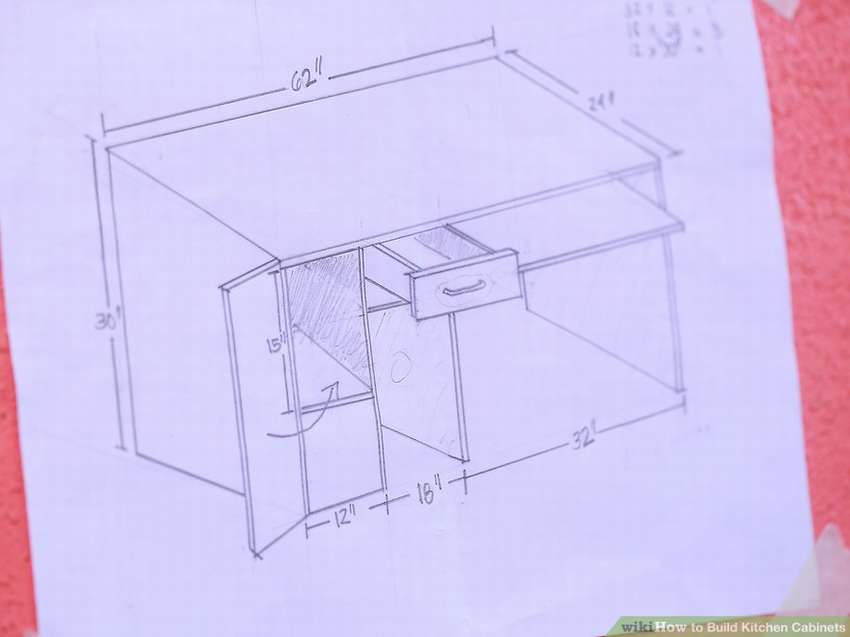 Difficulties can only arise with the doorstherefore, it’s cheaper to buy than to get or buy all the necessary equipment to do something more than the simplest doors. Install them in accordance with the manufacturer's instructions.


https://i.expert-h.com/en/shkaf/1099#sigFreeIdb221b0e9f5
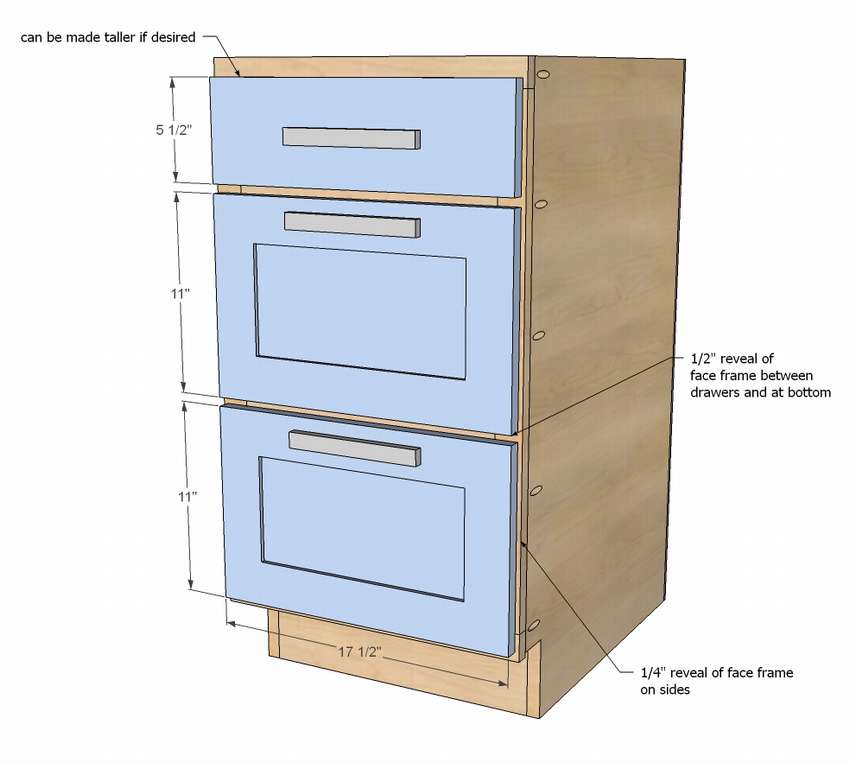
Kitchen cabinet for a small kitchen
Here's how to make compact kitchen cabinet for a small kitchen.
Of course, you can and should change these schemes to suit your specific needs. Here are some general guidelines for kitchen cabinet design. Drawings with dimensions in inches, here in parentheses the sizes in centimeters will be indicated, in the drawings you can also do this by multiplying the figures by 2.54.
 The height of the lower kitchen cabinet should be 34-1 / 2 "(88 cm)
- Worktops typically have a thickness of 1-1 / 2 inches (3-4 cm), so the total cabinet height is 36 inches (91 cm), which is the standard worktop height.
- The depth of the lower cabinet is usually 24 inches (61 cm), including the rear, door and front frames, but sometimes it can be deeper, so you can raise it to 24-3 / 4 "63 cm), but you can do more, because the standard the depth of the countertop is 25 inches (63.5 cm) and you need a little canopy on the countertop.
- The sides of the base cabinets must always match. Adjust the length of the horizontal board to adjust the width.
And some more tips for making frameless cabinets
- It is especially important to work with good plywood using square sheets. Any problems can lead to the fact that the cabinets will not match each other.
- The same can be said about the boxes, because they are installed directly on the plywood, if you do not have high-quality material, the boxes will have many problems.
- Avoid overloading the cabinet without supporting the central part.
So are you ready make a kitchen cabinet with your own hands? The base of the drawer, the standard width is 45 cm, but you can change these sizes.
Below see step by step photoswhere the diagrams show the assembly process.


https://i.expert-h.com/en/shkaf/1099#sigFreeIde6ab2ac3a3
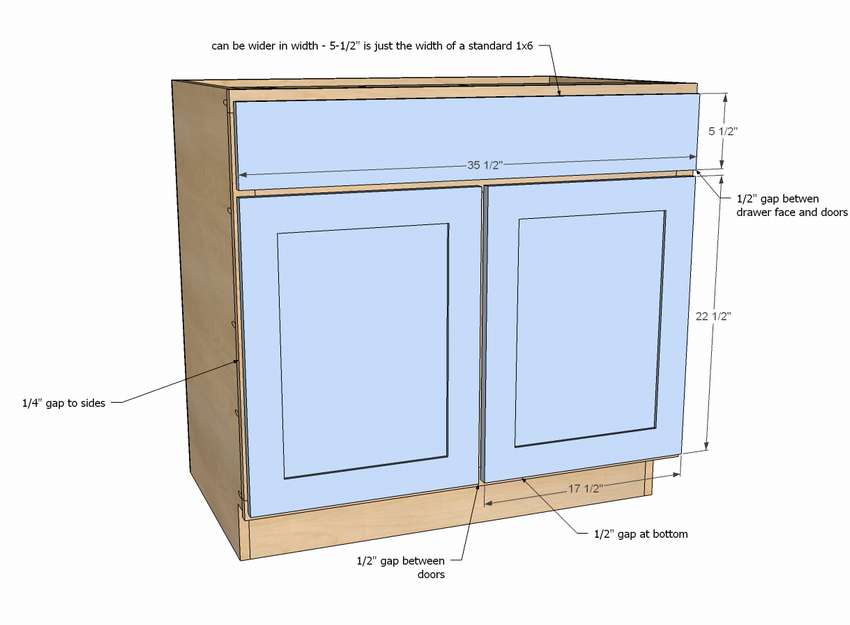
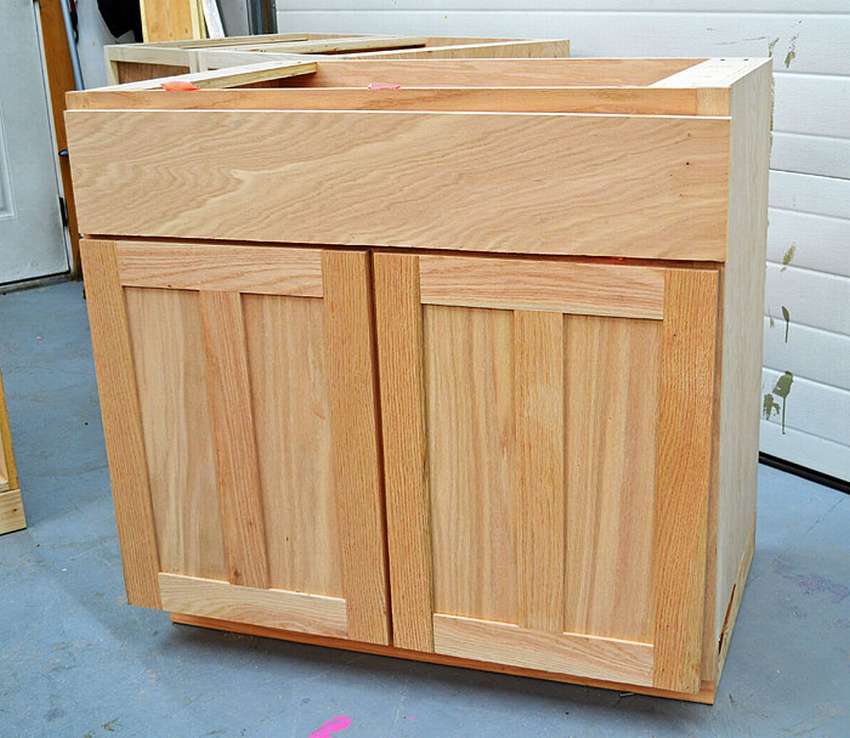
How to make a floor kitchen cabinet
 Want to make a kitchen cabinet with your own hands? Why not? Cabinets with a front frame are just plywood boxes made of hardwood, but you can buy doors. Although the doors too can do it yourselfbut it is a complex process that requires experience and expensive equipment. And still need a lot of clamps and even more space. Better think about buying ready-made doors, it will be faster and cheaper. You can search the Internet where prices are always lower.
To learn more about how to make a kitchen cabinet with your own hands, use the link under the gallery, the site has detailed instructions, and see below step by step photos.


https://i.expert-h.com/en/shkaf/1099#sigFreeIda60a4c7758
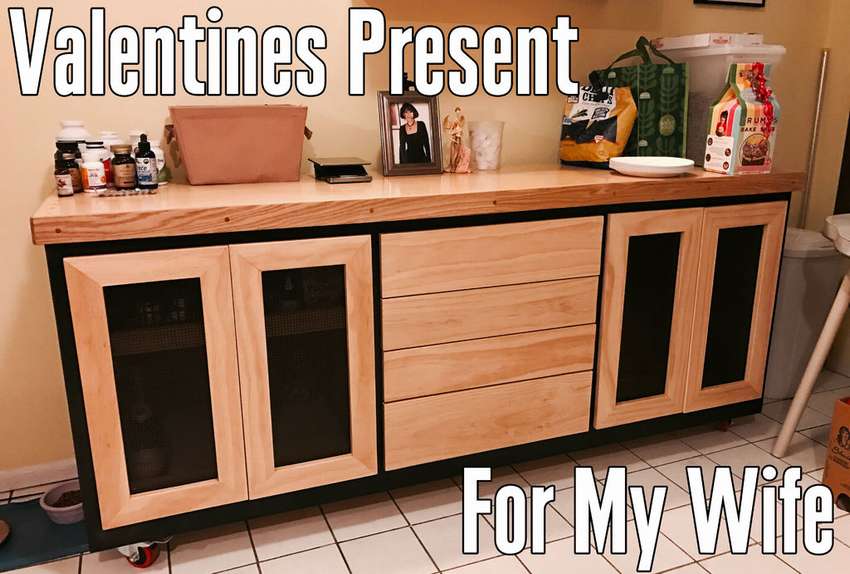
Do-it-yourself lower kitchen cabinet
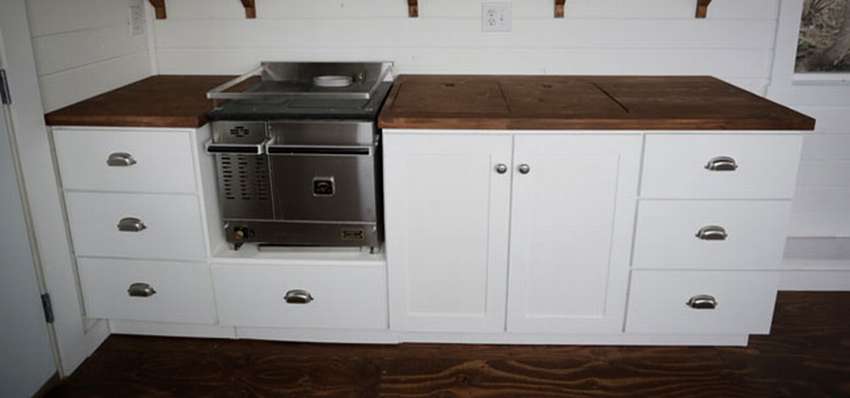
 Here is the easiest and fastest way to make a kitchen cabinet with your own hands!
To make it cheaper and easier, the author came up with his own style. This is one closet, not three. Almost 2.5 m in length, and the center is the base of the sink. This is much faster than building three cabinets (and using twice as much material for the side and front frames).
Another way to save plywood, use of old boards 2x4 to create the foundation. Later they can be painted or finished, so it does not matter how they look. The boards simply raise the cabinet and no need to cut out the protrusions on the side panels.
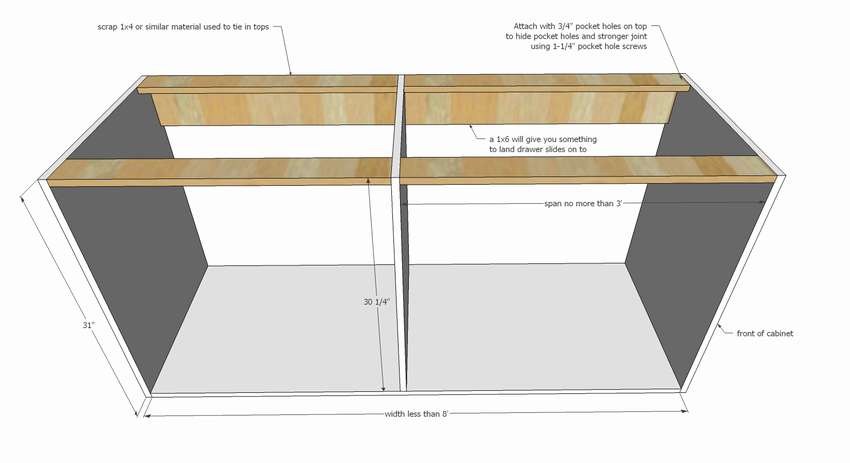 The lower part of the cabinet is continuous, in all three cases, which helps to make the case more durable and easy to manufacture.
Also original solution with drawers. This is not a lot of small boxes, but just decoration, as in a pharmacy, but the design turned out to be interesting.
How to make a cabinet with your own hands, see below for step-by-step photos.


https://i.expert-h.com/en/shkaf/1099#sigFreeId985663ed70
DIY cupboard
Example, how to make a kitchen cabinet with a drawer. Before you begin, watch the video on the website of the author of this project, a link under the gallery.
 Start by preparing plywood - p side panelstake it to the width of the cabinet, door to door 61 cm. This width can vary - just make sure that all cabinets are made with the same depth.
- Drill holes in the pockets along the side panels - remember that the two panels are mirrored - for attaching the front frame in subsequent steps.
- Attach the two supports to one side panel.
- Then install the lower shelf on the lower supports and the first side panel.
- After that, attach the remaining side panel to the lower supports and the shelf.
- Attach the upper legs.
- Apply glue to the back and hammer with nails.
- Make the front frame separately, and then attach to the front of the cabinet.
- One hole for the drawer is slightly larger than the other - this is done on purpose, so that the front side is the same size, and the lower guide 1x2 between the drawers.
- Make the boxes to fit the holes and slides and install. Then attach the front sides of the drawers.
Sequence, how to make a kitchen cabinet with your own hands, look at the step by step photos.


https://i.expert-h.com/en/shkaf/1099#sigFreeId4c56af5fcb
Outdoor kitchen cabinet drawing
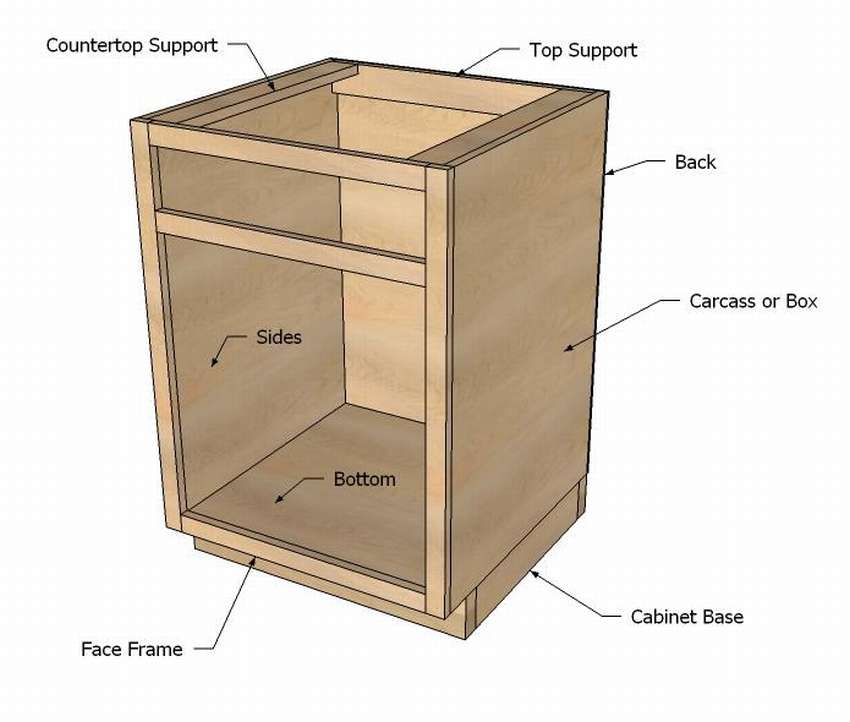 Floor-standing kitchen cabinet has a very simple design. In this case, the lower base can be replaced with legs. A frame or box is a plywood construction. The supports are made from scraps of plywood and are used to support and fasten the upper part and rear wall. Front frames add support and cover the leading edges of the plywood. The back is lined with six mm plywood. You can also use a 1.5 cm insert, but 6 mm is enough.
See below cabinet assembly sequence diagrams on step-by-step phabout


https://i.expert-h.com/en/shkaf/1099#sigFreeId2cddd114a4
 You will never have enough drawers in the kitchen. See another example how to make a cabinet a nightstand with drawers.
Make the front frame separately, and then attach it to the front of the cabinet. One hole for the drawer is slightly larger than the other - this is done on purpose, so that the front side is the same size, and the lower guide 1x2 between the drawers.
In this case, for drawers used Metabox guidesbut it’s not necessary, any will do. Just make sure they match your holes. At the end, attach the front sides of the drawers.


https://i.expert-h.com/en/shkaf/1099#sigFreeIdf1e0130e55
Kitchen cabinet
 Here it is shown how to do 90 cm with your own hands from scratch kitchen cabinet under the sink. Overall dimensions: 91 cm sink - total 61 cm with doors - internal dimension 56 cm deep x 86 cm wide. The assembly sequence is shown in step-by-step photos in diagrams, where all sizes in inches are indicated. Multiply the 1 "indicator by 2.54 to get the value in centimeters. You can read the list of materials and dimensions of the parts on the website, the link can be found under the gallery. There is also a detailed step-by-step instruction and video.


https://i.expert-h.com/en/shkaf/1099#sigFreeIdce4a366689
Cupboard under the sink
 Instructions, how to make a kitchen cabinet under the sink do it yourselfquite simple. If you have at least basic skills in the field of woodworking, then you can easily cope with this task. For this project, you will need 18 mm thick solid wood oak plywood for the frames and base, screws, a miter saw, a grinder and a drill.
How to make a kitchen cabinet under the sink, depicted in diagrams with dimensions in step-by-step photos, don't forget to convert inches to centimetersmultiplying by 2.54. The instructions can be read on the website, use the link under the gallery.


https://i.expert-h.com/en/shkaf/1099#sigFreeIdda55710cf9
How to make a kitchen cabinet under the sink with your own hands
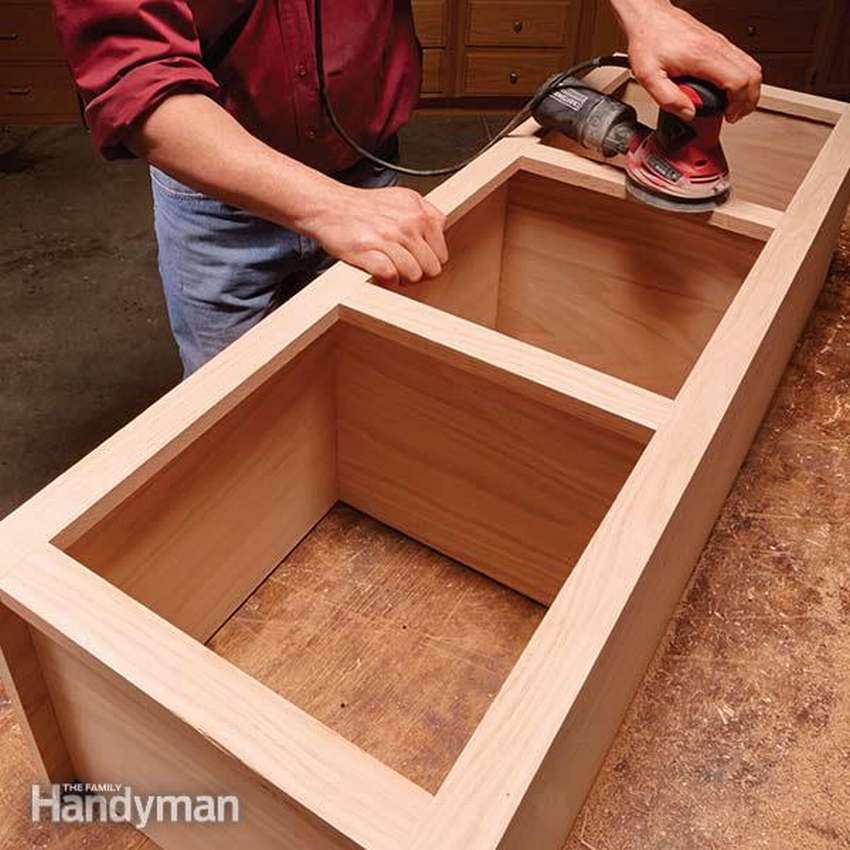
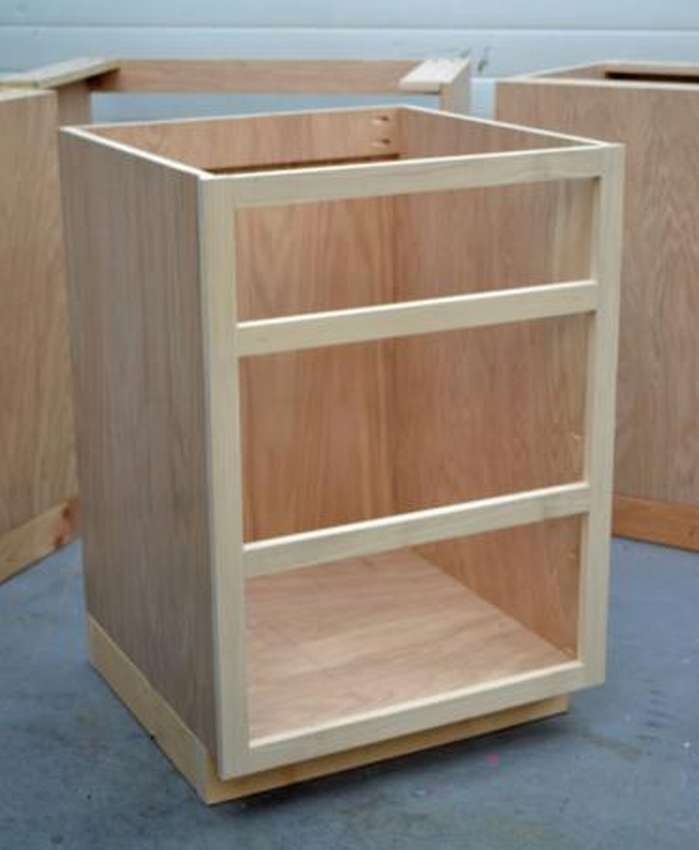
 Any kitchen remodeling project starts from the bottom cabinet. But the thought of actually making two dozen drawers may seem complicated. You need a starter project: base cabinet with drawer, shelf and a pair of doors. You will get practical experience, and, hopefully, the desire to do more.
Exists two main styles of kitchen cabinet. In the traditional approach to the edges of the box is attached solid wood frame. The second approach - the one that was used for this project - is known as “Euro style". This option is more efficient, as the basic design provides maximum versatility for shelving or drawers.
Instruction how to make the bottom cabinet for the kitchen, you can read it on the site, it is large and very detailed, but everything is painted down to every screw. See below the master class on step by step photos..


https://i.expert-h.com/en/shkaf/1099#sigFreeIdfacc2f055a
How to make a sink under the sink in the kitchen
Cabinet under the sink 100 photos


https://i.expert-h.com/en/shkaf/1099#sigFreeId64b8128f82
Kitchen cabinet for fridge
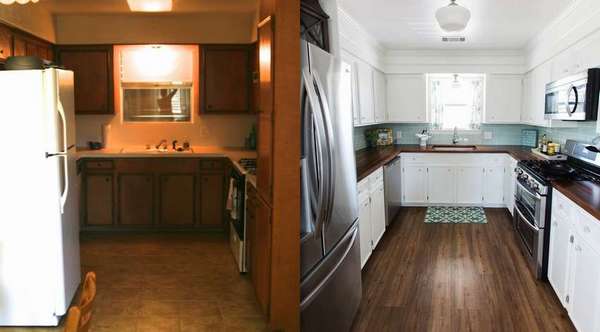 Interesting solution make a cabinet for the fridge. First of all, the design of the kitchen looks more attractive and, SecondlyYou’ll gain some work space from the top drawer. For projectthey used 3/4 "plywood to assemble a cabinet that includes a shelf above the refrigerator for cookbooks and other useful things. In general, this cabinet is worth the money and effort. Moreover, the cost is minimal and the payoff is huge! You only need 2 plywood sheet, trim, moldings, wood filler and pocket screws.


https://i.expert-h.com/en/shkaf/1099#sigFreeId3fa920cd40
And this is another example, how to make a kitchen cabinet for a refrigerator with an upper cabinet.
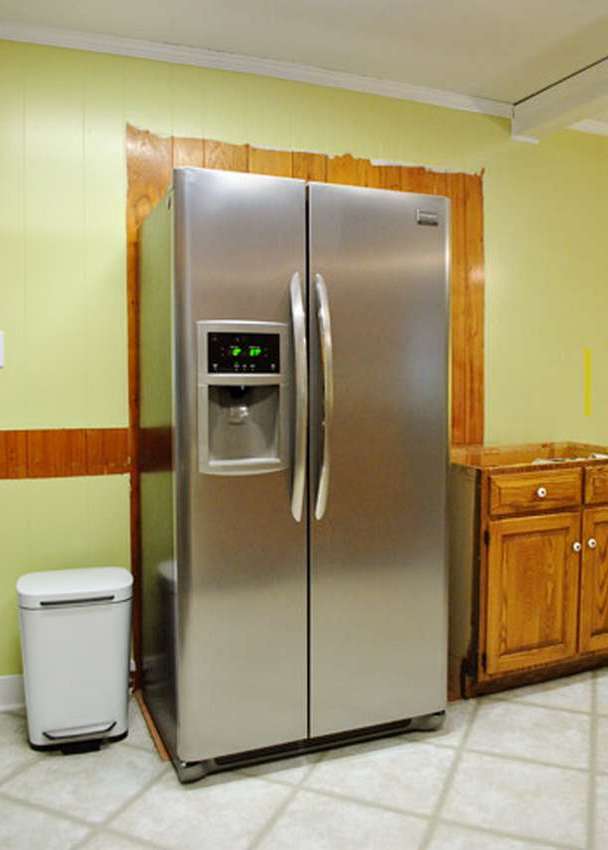
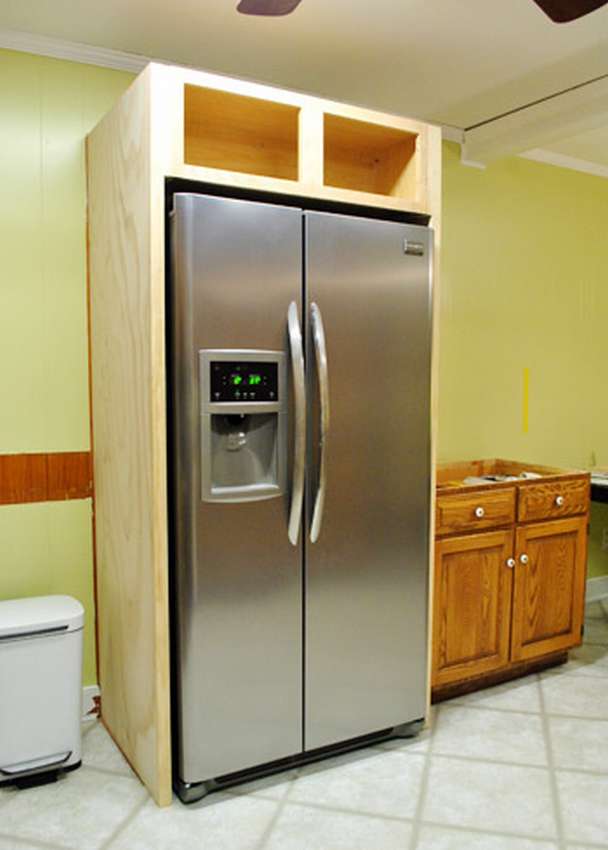 Saws, drills and a grinding machine can be rented at any workshop. Advantage of this cabinet for fridge is that there are very few pieces of wood left, and leftovers can be built into the back of the cabinet.


https://i.expert-h.com/en/shkaf/1099#sigFreeId6b4c23ffaa
Cabinet for refrigerator drawing
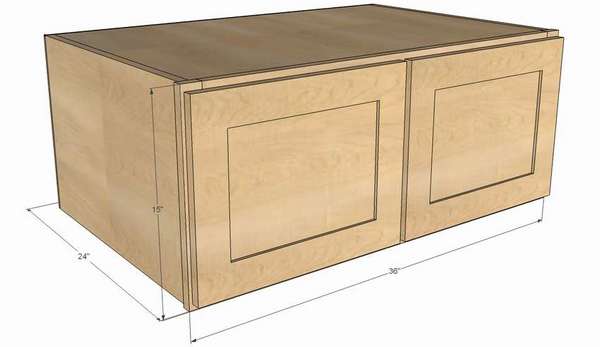
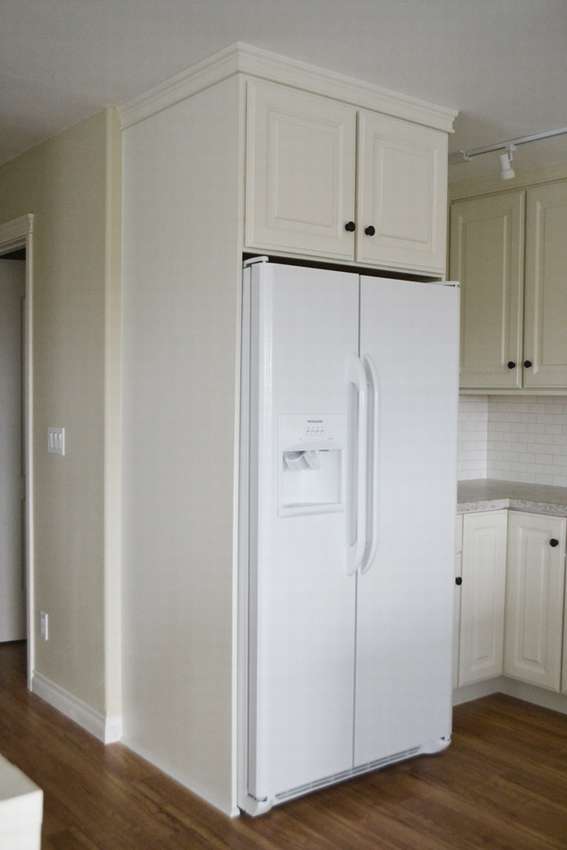 Upper Cabinet Size: width 91 cm, depth 38 cm and height 61 cm. If you want to do the same cabinet for fridge and to keep the gap between the refrigerator and the cabinet and still raise to the ceiling, this will require some changes. Each refrigerator is different, and the ceiling height can vary (in this case it is 240 cm).
For the assembly of the housing used here decorative plywood PureBond Formaldehyde Free, so there was no need to do finishing work inside the cabinet. The front frames of poplar, they were painted before attaching to the cabinet.
Drill holes along the top edge and at the ends of the back support. Attach the back of the insert, this piece will be used to hang the cabinet. You can also add a second part to the base for additional support. You can use the remaining plywood or 1x3 or 1x4 boards. The back is not part of the structure - It only completes the inside of the cabinet. Attach it with finishing nails and glue.
 Make the front frame separately, and then attach to the front of the cabinet. Doing it yourself is difficult, it’s better to buy or order.


https://i.expert-h.com/en/shkaf/1099#sigFreeIddb71d88e5c
Drawing of a cabinet for a refrigerator


https://i.expert-h.com/en/shkaf/1099#sigFreeIdbc77ce3bbd
Case for a refrigerator in the kitchen photo


https://i.expert-h.com/en/shkaf/1099#sigFreeId43c21fc6bb
How to install kitchen cabinets
With these simple methods you can find out how to install kitchen cabinets evenly, firmly and for a long time.
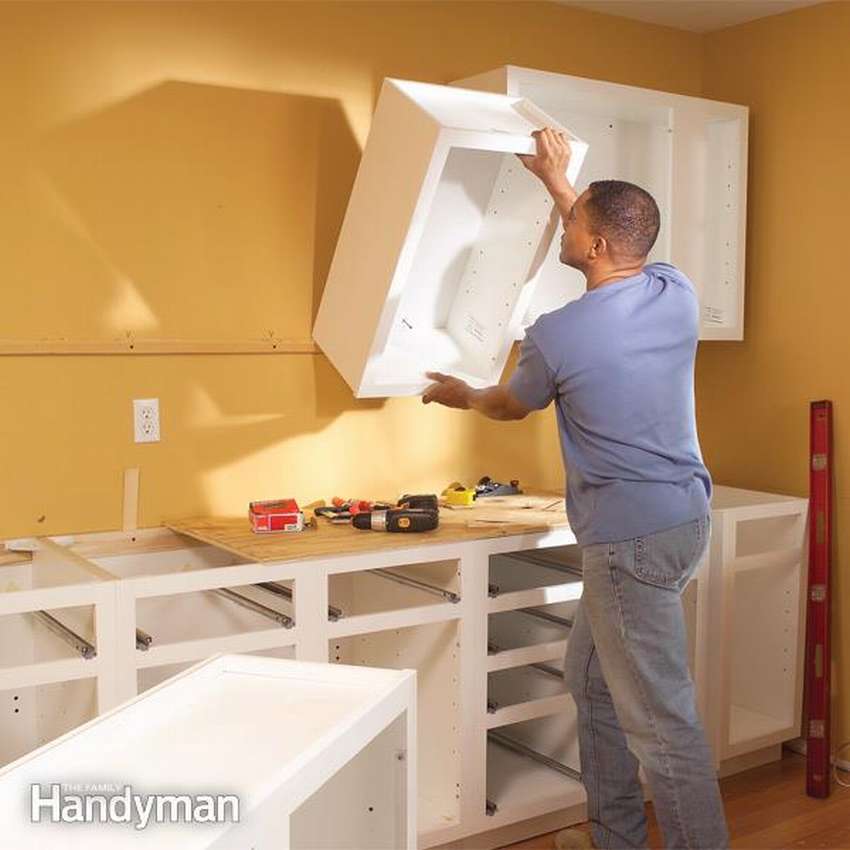 The study of how to install kitchen cabinetsmay seem intimidating, but the methods are really very simple. Just think that you need to fasten several wooden crates to the wall in the correct sequence. The main task - find the best starting point and save all levels. The presented step-by-step photos show the key points on how to install kitchen cabinets in a simple and affordable way. More detailed instructions You can read on the website, which tells how to put positions in the closet in advance to avoid mistakes. You will also learn how to install base cabinets so that they are perfectly aligned, and simple installation method for wall cabinets. The whole process usually takes less than a day, depending on the size of the kitchen.
You only need a few basic tools to do the job. This is a one and a half meter level, a screwdriver, a couple of good clamps that open at least 20 cm. A belt grinder and half a kilo of screws.


https://i.expert-h.com/en/shkaf/1099#sigFreeId7b8eb8ab8b
How to fix furniture hinges to the cabinet door
Furniture hinges are different, in this case it is shown how to fix cabinet hinges with a diameter of 35 mm.
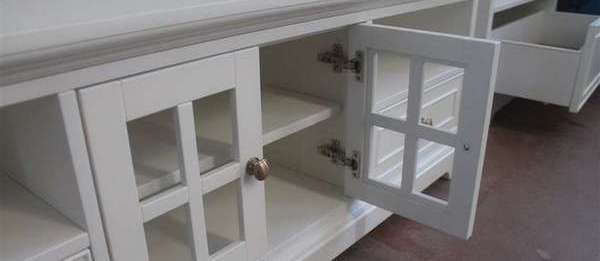 You can read the instructions with a list of necessary tools on the website. Below see a small photo gallery where there is mounting schemes and individual points of installation of hinges on a kitchen cabinet.


https://i.expert-h.com/en/shkaf/1099#sigFreeIdd71a4ba739
How to make a simple kitchen cabinet
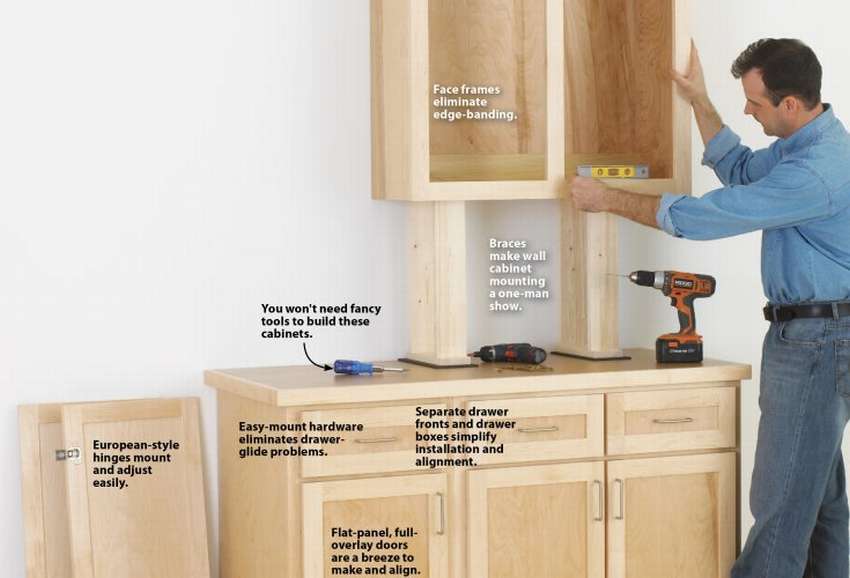 If you have woodworking knowledge and a few tools, why not try your hand at crafting kitchen cabinets from scratch. You can choose boards, impregnation, finishes and calculate the exact size that suits your needs. With minimal skills, a table saw and conventional tools you can make a kitchen cabinet an easy way. The main task that even a novice master will cope with is the manufacture of wooden boxes and installing them on walls with brackets.
 The kitchen cabinets presented here are made of birch veneer, medium density fiberboard (MDF) - plywood for savings. Instead, you can use hardwood plywood, MDF, glazed or melamine chipboards and boards.
Twice check the thickness of the materialbut before calculating the dimensions of the cabinet.
 Over the years, craftsmen have standardized cabinet sizes based on practical considerations such as average height of a person. You should not strictly adhere to these rules, change them according to your personal needs. With a depth of 60 cm, standard lower cabinets allow you to comfortably lean in and get something from the rear shelf.
Make cabinets as wide as you like, but remember that the wider the doors, the greater the tendency to warp. Also, the wider the door,the more free space in front of the cabinet.
Standard wall cabinets have a depth of 30 cm. If you go deeper, access will be limited countertop bottom cabinet.
 Wall cabinets are usually installed at a height of 45 cm above the countertop of the lower cabinet.
More information can be obtained on the author’s website, where there is a detailed instruction, as well as all the main nuances that are worth paying attention to. See below for step-by-step photos on how to make a kitchen cabinet with your own hands..


https://i.expert-h.com/en/shkaf/1099#sigFreeId50f96e08f6
Kitchen cabinet on casters
 If you liked the photo and you plan to make the same kitchen cabinet on casters, be sure to watch the accompanying video on the author’s website, the link is under the gallery. And at the same time read the instructions. This design is not that complicated, but there is some nuancesthat are not shown in step by step photos. You will also find some useful tips on the site, so anyway the information will be useful. Below, see step-by-step photos on how to make a mobile cabinet for your own kitchen.


https://i.expert-h.com/en/shkaf/1099#sigFreeIdf53a6184f2
Separate kitchen cabinet floor
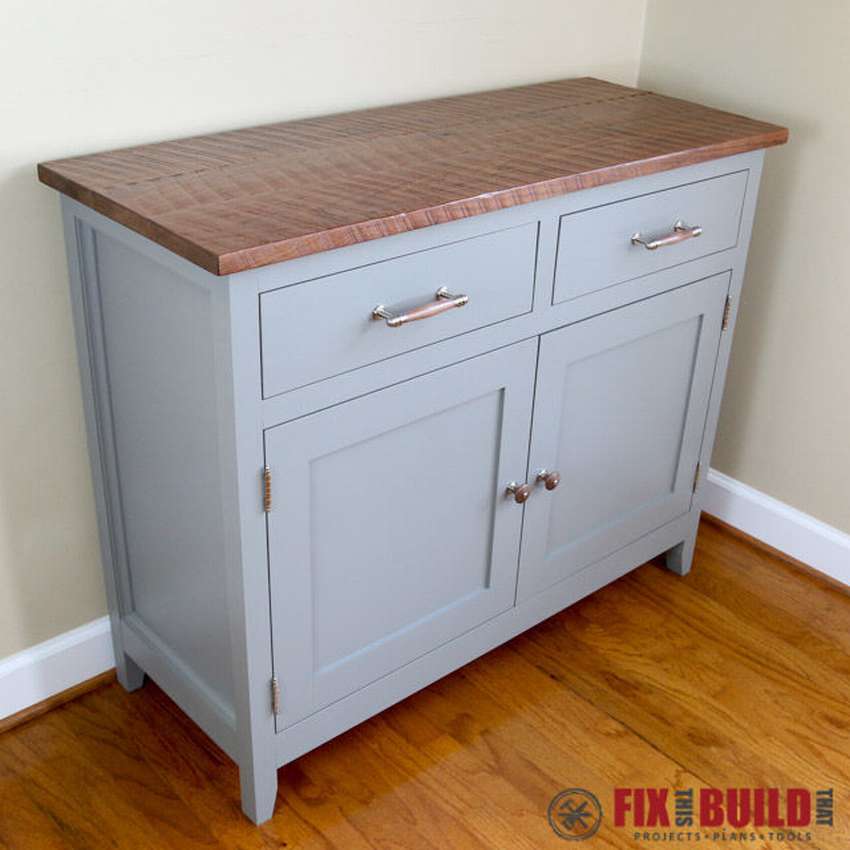 It is small table cupboard for the kitchen with drawers that you can do with your own hands. The sides are made of plywood, the legs below the cone. The sides are connected by a plywood subframe; there are two drawers made of 3/4 "plywood. The drawers are mounted on sliders 35 cm. Doors of planks and 5 mm plywood panels, which are held in a groove inside the frame, are mounted on hinges. Doors are easy to install because no need to cut groovesyou just screw them into place. Set magnetic latches on the doors and the upper frame. Then attach the door handles and drawers. The upper part is attached L-shaped brackets from below. After that, you can fix the back with nails.
That’s all done. If you want more information, you can go to fixthisbuildthat.com/diy-sideboard-cabinet-woodworking-plans/
And watch the video on YouTube www.youtube.com/watch?v=VsUXSyviLS8


https://i.expert-h.com/en/shkaf/1099#sigFreeIdcad71b4d7e
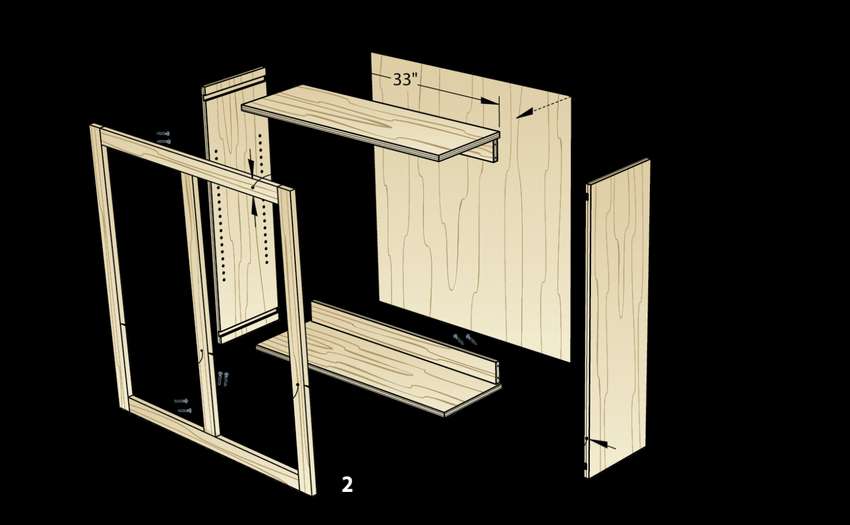
DIY kitchen cabinet
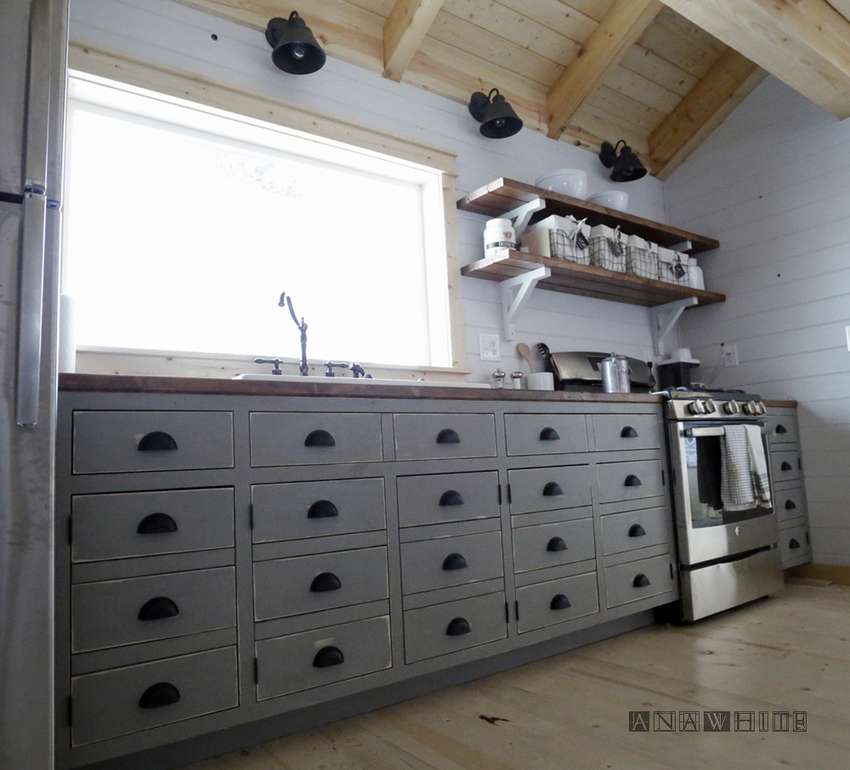
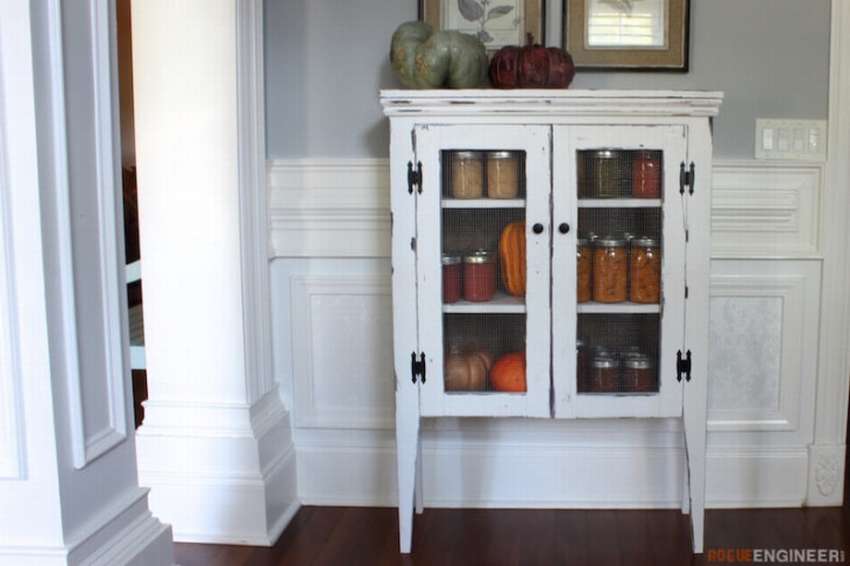 If you like to do conservation for the winter, then this kitchen cabinet It will be a great exhibition for your achievements.
You can read the full manufacturing instructions on the website, the link is under the gallery. Or just carefully see step by step photos, the process is shown in great detail, plus drawings and diagrams. A few nuances. After assembling the door, you will need to finish the cabinet and door frames. You can add trim to the top edge, this one just for beauty.
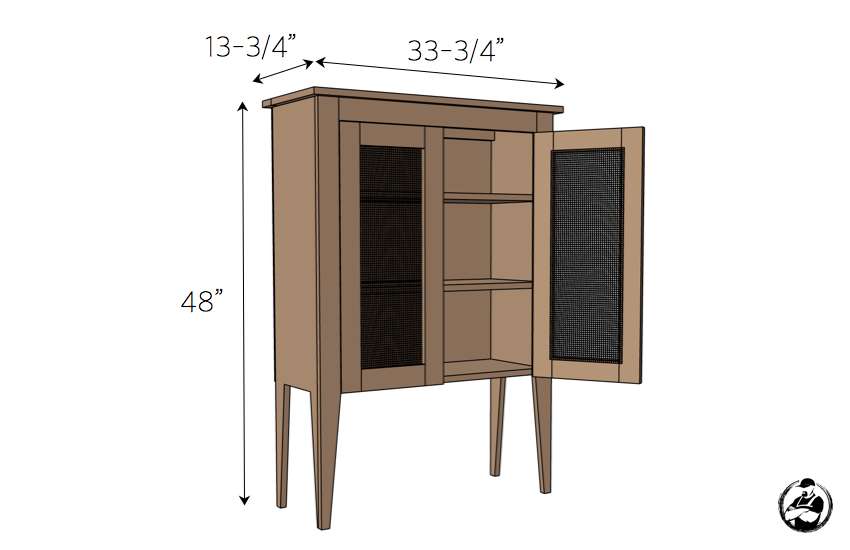
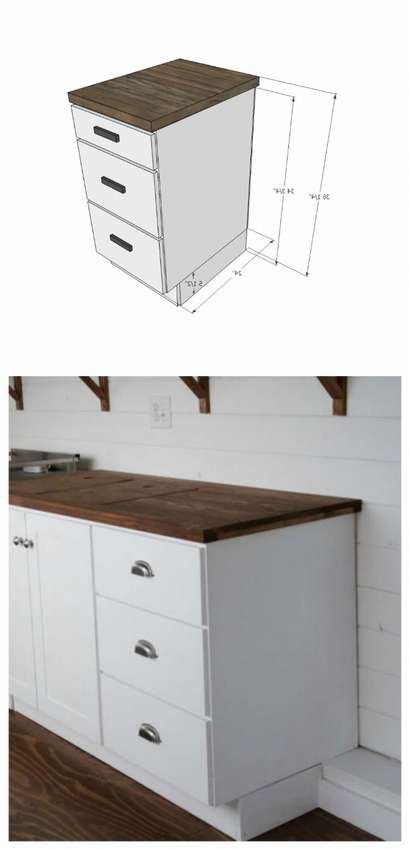
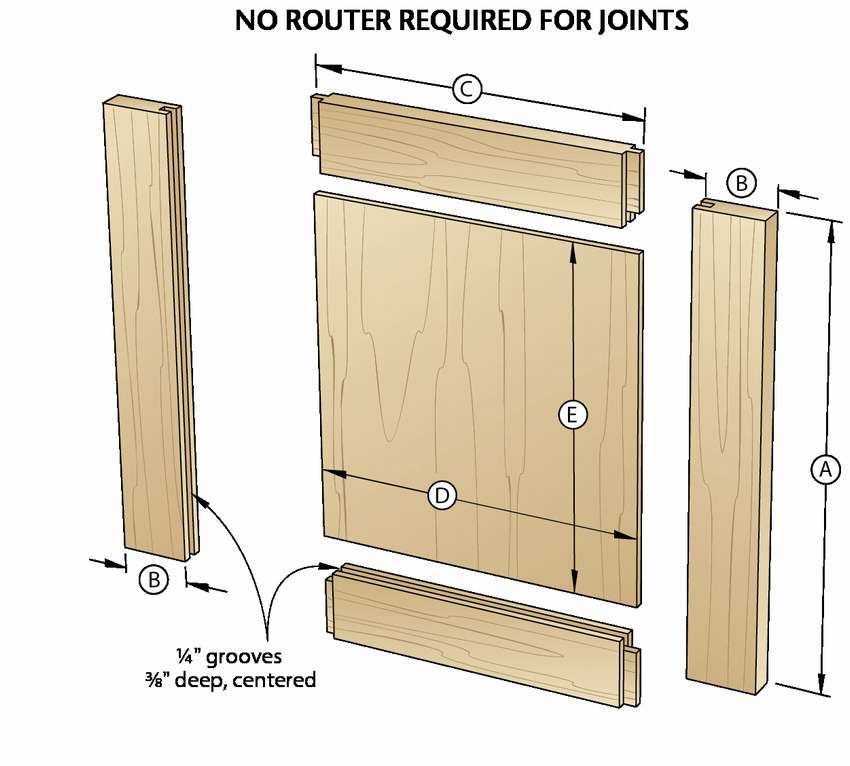
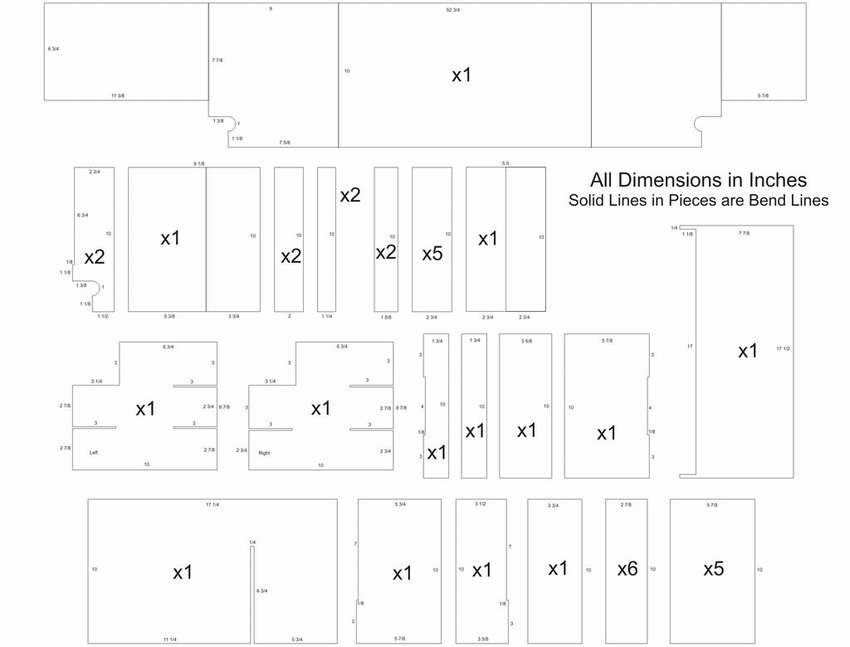
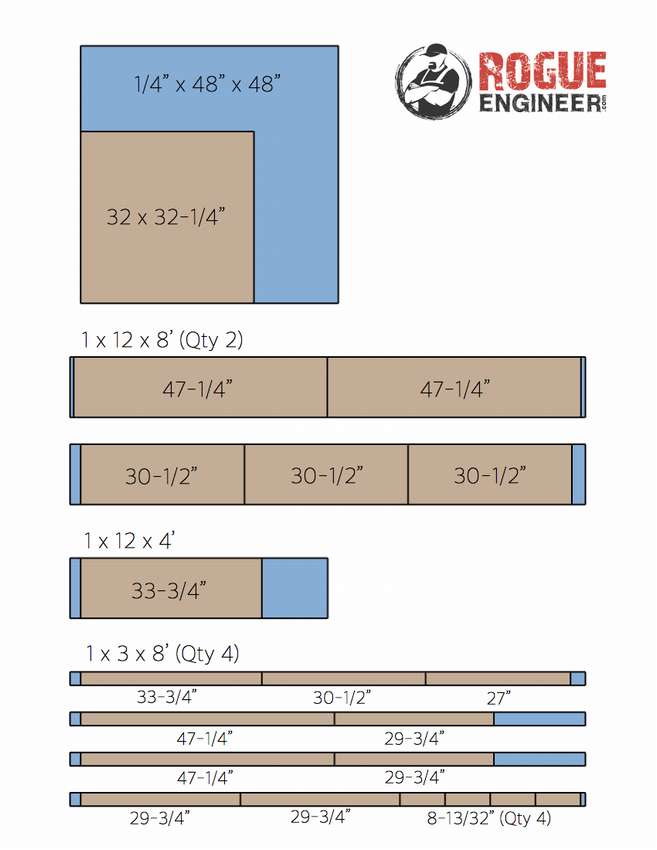 Here you see kitchen cabinet drawing and on the right in the photo are the dimensions of the parts necessary for assembly.
Dimensions are in inches, you just need to multiply these figures by 2.54 and get the dimensions in centimeters.


https://i.expert-h.com/en/shkaf/1099#sigFreeIdc4fc9be88b
Do-it-yourself kitchen cabinet
 This is of course a custom design for the kitchen, but it may come in handy.
The author of the project, unfortunately, did not write instructions, but did very detailed step by step photos.


https://i.expert-h.com/en/shkaf/1099#sigFreeId2716e6fd49
How to make drawers for a kitchen cabinet
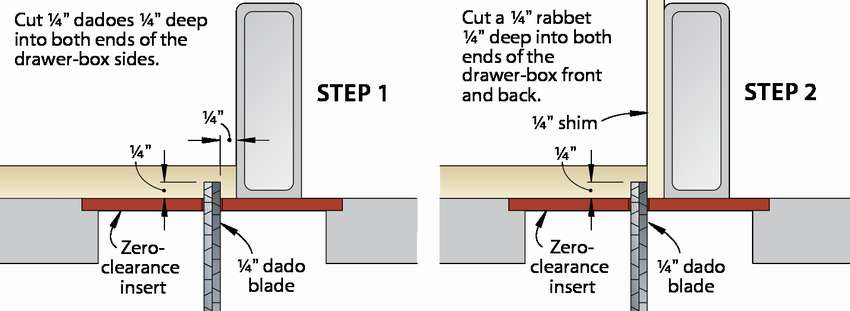
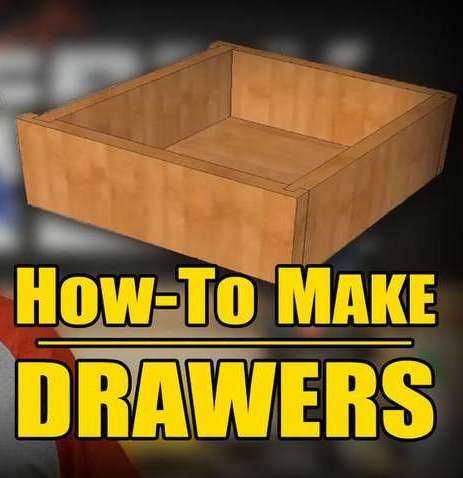 If you have been engaged in carpentry for a long time, then in the end you will certainly come across a task make a drawer for the cabinet, tables, bedside tables or other furniture. This is not a very difficult task, but sometimes there are problems with installation or measurements, and in some cases unpleasant nuances with gluing parts. Of course have dozens of different ways to make cabinet drawers, the dado method is used here, that is, a groove cut into one part of the board into which the other part fits snugly. The presence of this method gives a much deeper idea of how the drawer is advanced. This relatively simple and universal way works great, of course, if everything is done correctly.
Detailed instructions on this method can be found on the website.. Although if you are not new to carpentry, the step-by-step photos presented below will suffice.


https://i.expert-h.com/en/shkaf/1099#sigFreeIde6c6c7f800
And this is another example, how to make drawers for cabinet spices in the kitchen.
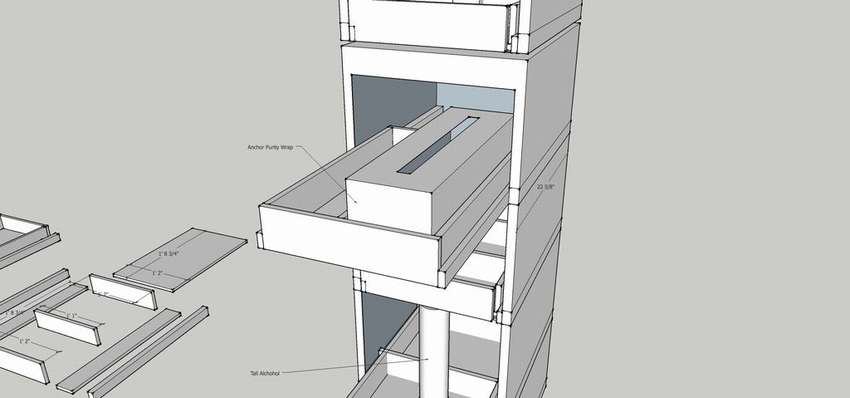 You can read the detailed instructions on the website of the author of this project, and look very detailed below in the gallery step by step photos with drawings and dimensions of each part. Just translate the inches in centimeter (multiply the figures, one inch is 2.54 cm).


https://i.expert-h.com/en/shkaf/1099#sigFreeId774d4cfd88
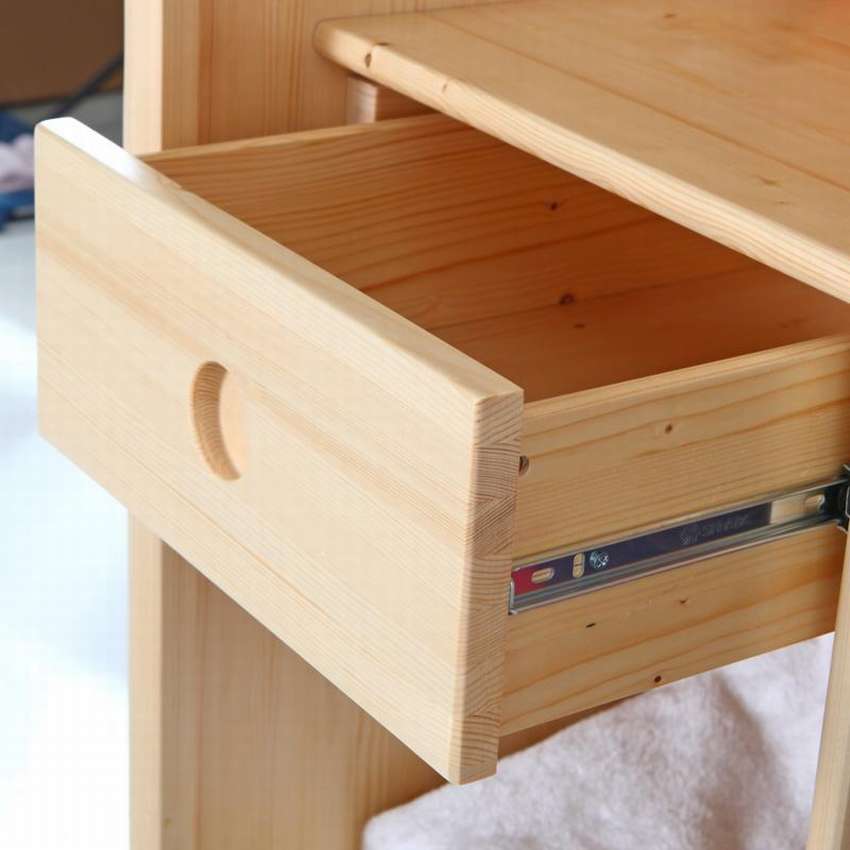
This option is how to make drawer for kitchen cabinet do it yourself.
 Drawers add new functionality to cabinets. The step-by-step photos below are a detailed guide to help you build. They show how easy turn a kitchen cabinet shelf into a much more functional drawer. All you need is drawer guides, a few plank boards for boxes and conventional power tools.


https://i.expert-h.com/en/shkaf/1099#sigFreeIdcc975cce18
Drawer rail mount
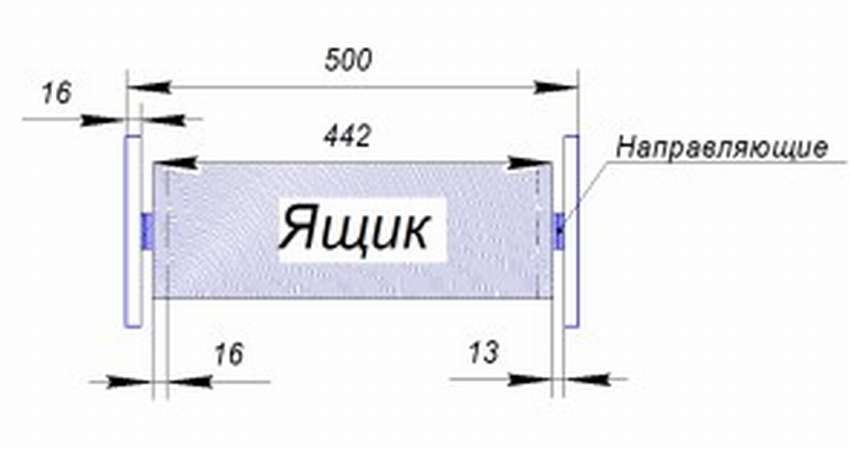 Here's how to fix it properly. drawer telescopic rail. The work is not complicated, but it requires accuracy.
Although there are many types of guides that you can buy or make, but this type has many advantages.
 The full extension range allows you to fully open the drawer without worrying that it will pop out of the grooves.
- Acceptable price.
- The setting is the same for each style.
- Smooth running.
- It is very easy to install and adjust.
How to install ball guides, you can read in the instructions on the site, see below schemes and step-by-step photos in a small gallery.


https://i.expert-h.com/en/shkaf/1099#sigFreeId9ffb7ebb19
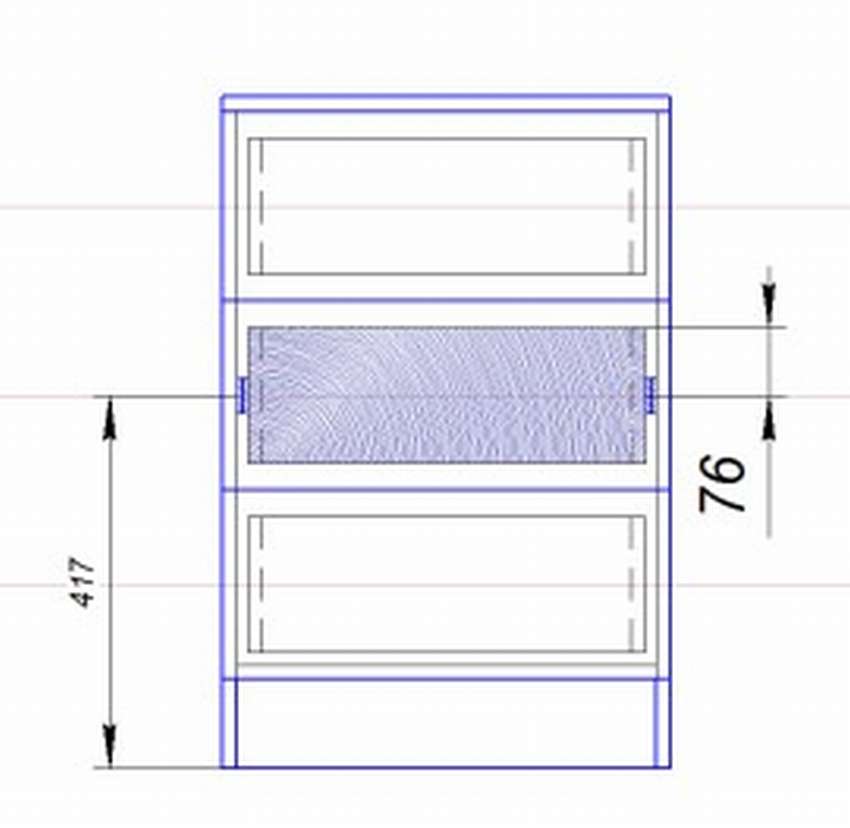
Modernized kitchen drawer
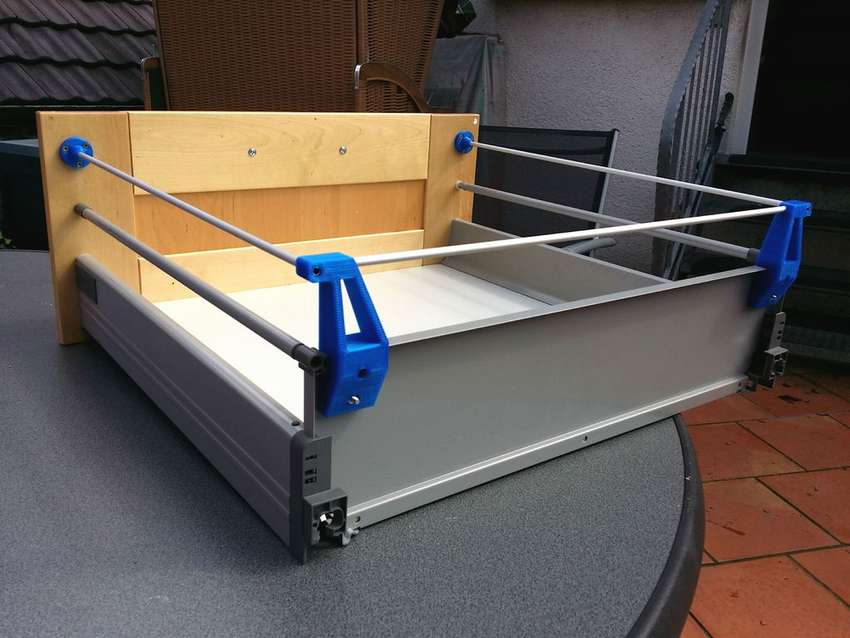 The main problem was that in the manufacture high drawers use the same basis as for ordinary ones, as well as one adjacent rod line at half the height of the boxes. When you fold a lot of things, some may fall through a not high enough rear side, and the lower box will be blocked by discarded objects. Sometimes you have to dismantle the box to get the fallen things. So not with all cabinets, this is an example from Ikea's furniture. In general, the idea is to somehow raise the rear side of the drawer. How to do it, see below for step by step photos.


https://i.expert-h.com/en/shkaf/1099#sigFreeId803bd53c04
Storage in the kitchen cabinet
Organization storage in the kitchen cabinet
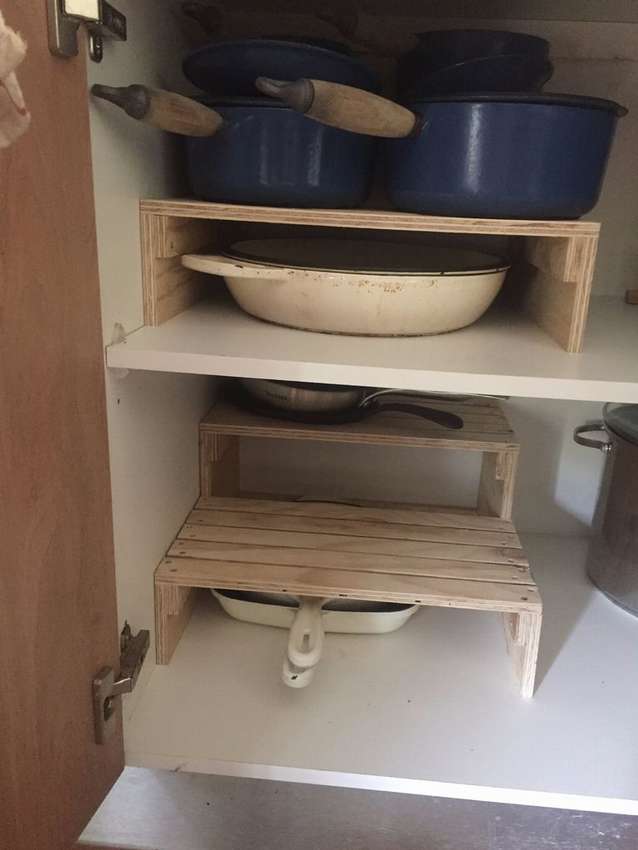 Tired of constantly rearranging a bunch of pots to get the one you need? Then this project may interest you. Look how to organize storage in the kitchen cabinetto solve your problem with pots and other accessories. The rack is designed to provide multiple configurations. It is a simple but durable design. The design can be changed depending on the requirements and sizes of each cabinet..
- Make legs (400 x 200) on the countertop, cut 12 mm planks on the table saw (200 x 35) and strips (400 x 35)
- Glue the strips to the base as shown in the photo.
- Pre-drill two holes at each end of the bar. For maximum strength, slightly offset the holes.
- Apply glue to each part and tighten with screws.
- In this case, the straps are fixed to the eye. If you want a uniform grid, you can use a gasket.
The stand can be sanded, varnished, this is optional. This is a simple fixture. provide convenient storage and free up space in other cabinets.


https://i.expert-h.com/en/shkaf/1099#sigFreeId01f75e28ed
Kitchen cabinet organizer
 Tired of the mess in the kitchen cabinet? Here is an example of an interesting solution to a problem, how to make a do-it-yourself organizer for a kitchen cabinet. To simplify and speed up the work, for the manufacture of the structure was chosen cardboard.
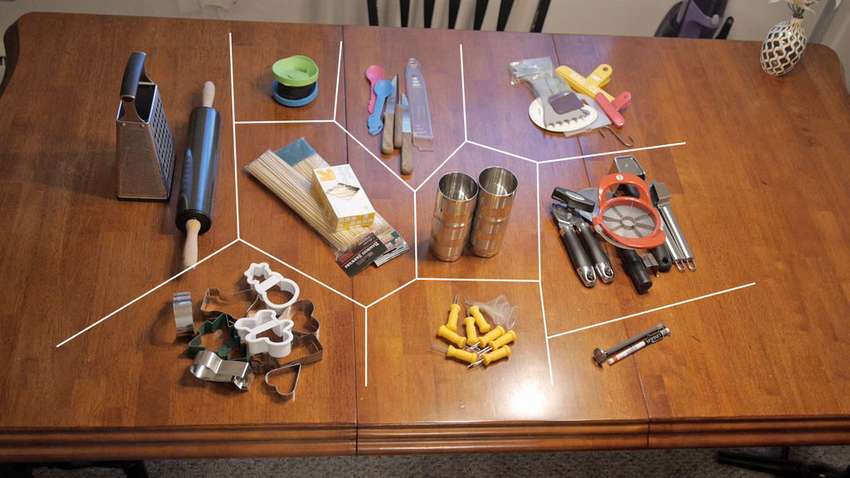 First, remove all items from the cabinet. This will give you an idea of how many departments you need in the finished organizer. Then you need to carefully measure everything. This includes the space that was supposed to fit organizer for kitchen cabinetas well as the dimensions of the required material.
Designed by Sketchup which makes it easy to ensure that everything works in 3D.
 The organizer is designed from corrugated cardboard 1/8 inch thick. If you want to get a complete plan, on the author’s site you can download the Sketchup file, a link to the site under the gallery.
 But, instead of delving deeper into the design, it is more useful to study a few elements that were used to connect the cardboard. First of allnecessary double cardboard for the whole structure. Since the weak points of this design are angular joints, you just need to trim them. In step by step photos You can get an idea of the three types of compounds that were used here. Chess connection used only in one place where it was necessary to connect the joints on both sides of one vertical support. Otherwise, it was a two-layer compound.
Bend long pieces of cardboard to form the outside of the organizer, this will reduce the load on the corners. You can read the detailed instructions on how to glue the kitchen organizer on the website.
Advantages: can be done cheaply and quickly.
disadvantages:
- cutting, bending and gluing cardboard is not as easy as it might seem;
- you can’t perfectly paint the cardboard; it is better to use color;
- cardboard does not like moisture, so for many years it will not work to use the organizer.


https://i.expert-h.com/en/shkaf/1099#sigFreeIdfa9b05e3bd
Storage on the cabinet door
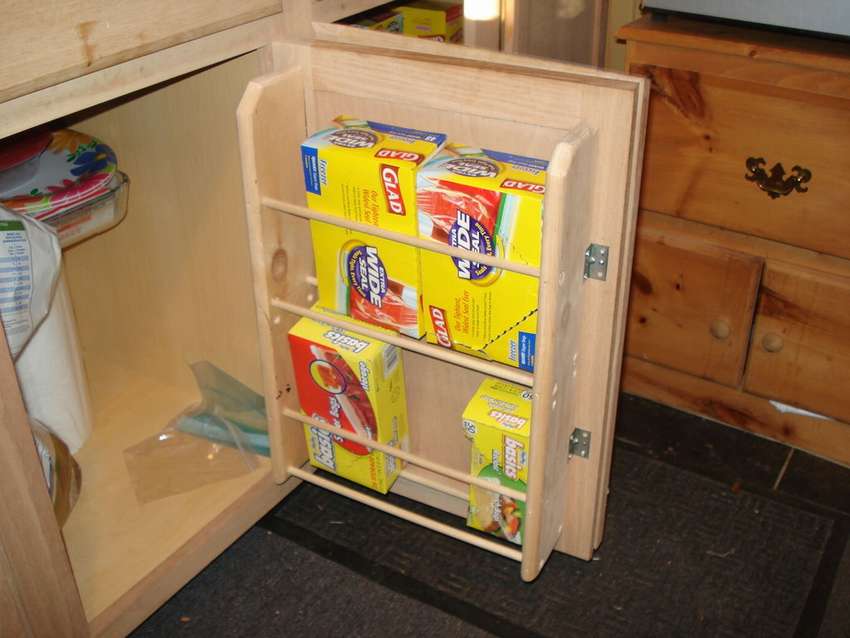 Here's an easy way to save space in kitchen cabinets. This is a great way. organize storage on the door of the kitchen cabinet various boxes, cans and other things, so as not to load the main space with them. Just take a 2m long 1x6 pine board. Measure and cut 50 cm in two. Mark the holes for the dowels. Use bit 3/8 to drill 12 holes in the boards. Install dowels in the holes of one board. Make sure he flush with the outer edge. Pre-drill a hole on the outer edge of each hole using a 1/8 inch drill. Install on the door with four brackets 2 x 2 cm. Mount the brackets flush with the outer edge. In short, that's all.


https://i.expert-h.com/en/shkaf/1099#sigFreeId8dd408ac8a
Lid storage in the kitchen cabinet
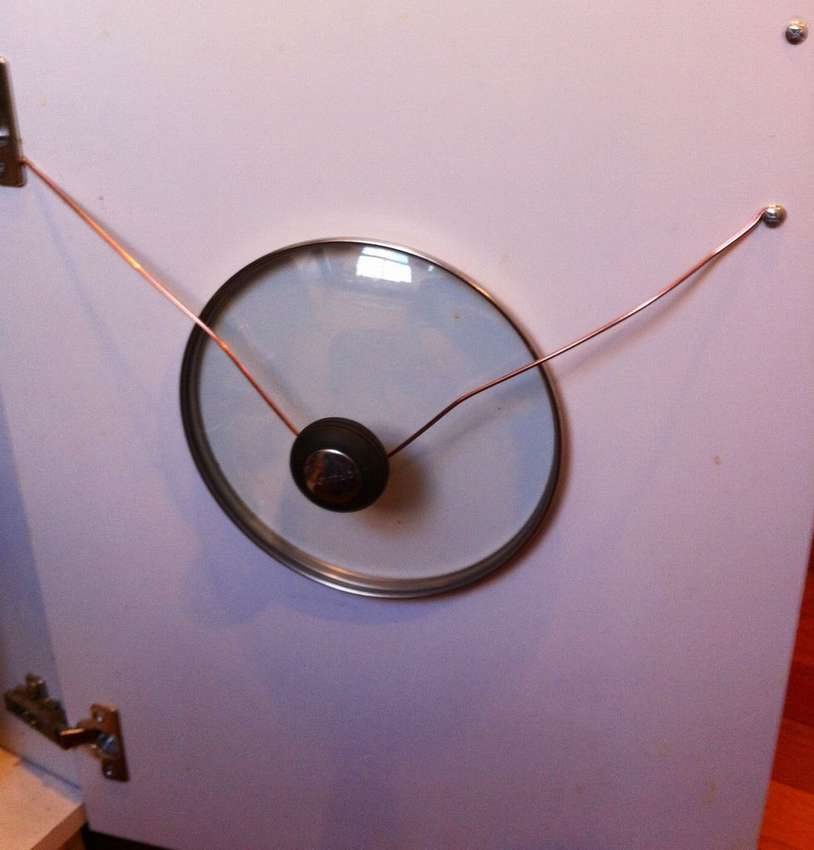 It’s a good idea for her kitchen to make a hanger for storing lids in the kitchen cabinet. The main thing is that it will take less time to make such a device than to view step-by-step photographs presented here. You just need to find piece of durable wire, and then everything is simple. Measure the distance and make pliers for the screw loops. If you make a little mistake with the length, it's okay, in the worst case, take another piece of wire or straighten and bend the rod again. Attach the wire rod pin to the cabinet handle screw. How to proceed further is better look at step by step photos, and if some nuances are not clear, the instructions can be read on the site.


https://i.expert-h.com/en/shkaf/1099#sigFreeId47b5c58ca2
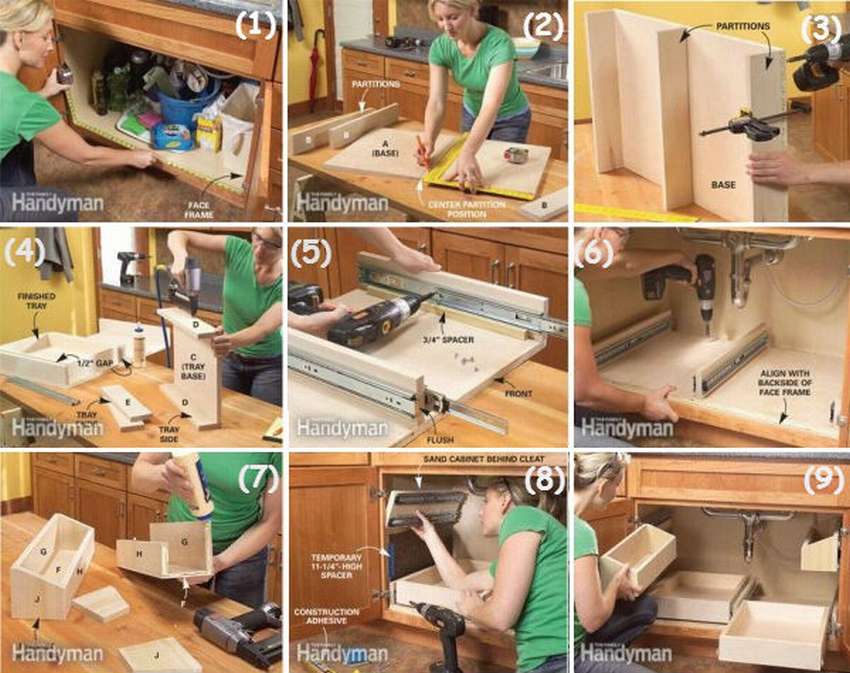
How to make lower drawersTo increase the volume of the kitchen
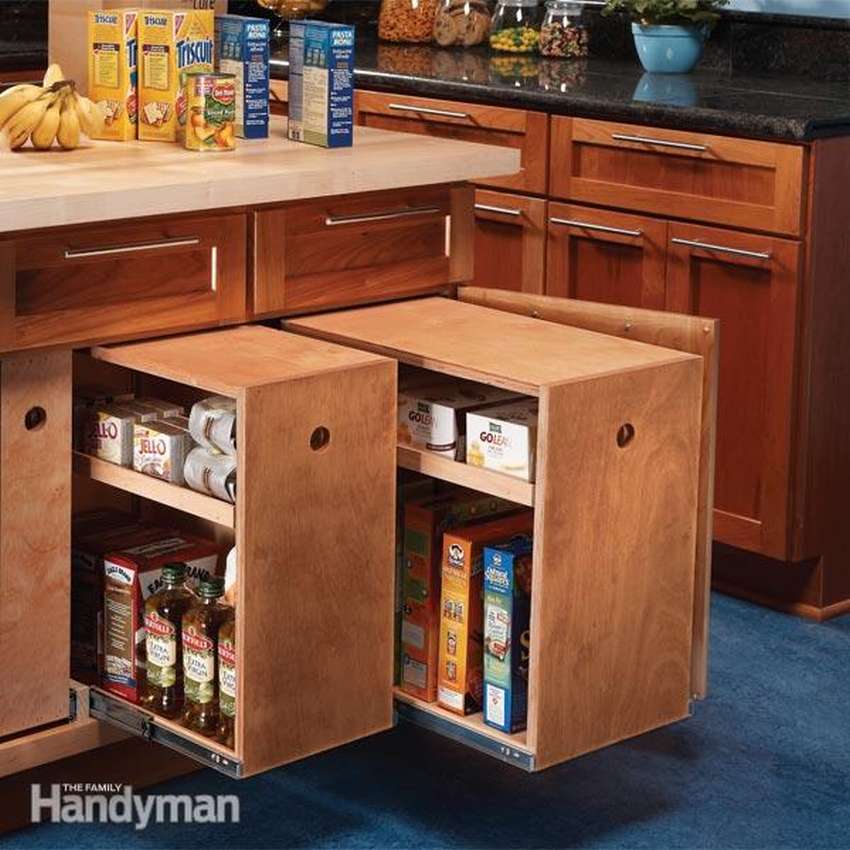 Vertical drawers can save a lot of time in the kitchen, because their convenient design makes it easy and quick to find everything you need. The big advantage is that these silos can be adjusted under any kitchen cabinet. Such vertical drawers are essentially plywood boxes that are equipped with adjustable shelves. Materials for the manufacture of boxes include hardwood plywood, sandpaper, table saw, tape measure, miter saw, nails and screws. All this can be done during the day and require only the initial skills of carpentry.
Vertical drawers - A great way to turn a semi-empty base cabinet into a large-capacity food storage cabinet that can be custom made to fit your storage requirements in a kitchen cabinet.


https://i.expert-h.com/en/shkaf/1099#sigFreeIdc2d70a3042
Organization of storage of cans in the kitchen cabinet
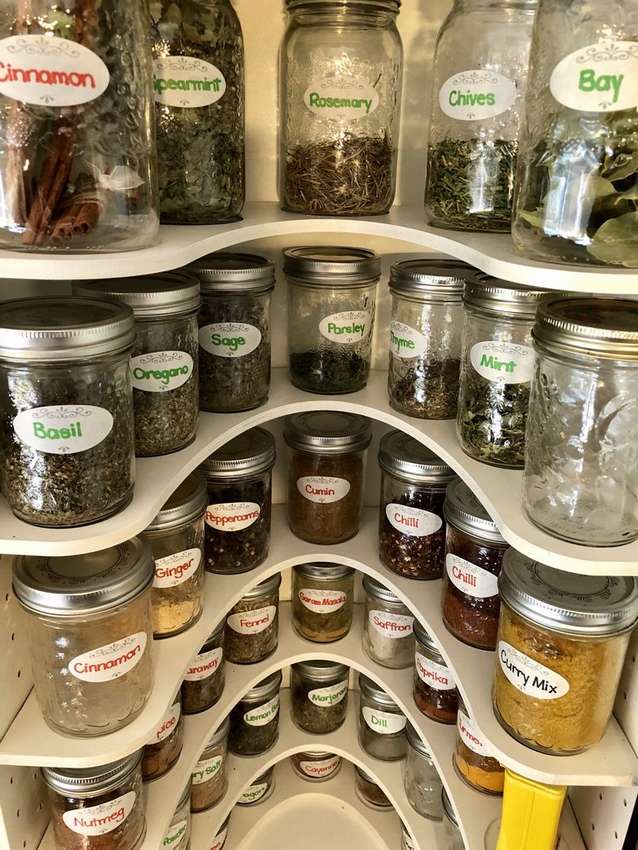 See how to make it comfortable rack in the kitchen cabinetto place cans with herbs and spices. Since the rack is designed for a specific type of can, you can redesign it using any size that best suits your needs. main ideaso that you can immediately see all your stocks, at least easily get them. To make a rack, for the design of the shelf, the author used Fusion 360. note that for each shelf there are two forms: one must be cut out of plywood (6 mm) for the base of the shelf, and the other of plywood (3 mm) for the rings. If you have a milling cutter and want to save money on laser cutting, just cut one of the horseshoe-shaped parts and use it as a template, then pull out each shelf and cut the holes to a fixed depth. No gluing! You can read more detailed instructions on the website of the author of this interesting project. Below are a few step by step photos.


https://i.expert-h.com/en/shkaf/1099#sigFreeIda517e50cc9
Storage in the kitchen cabinet 100 photos


https://i.expert-h.com/en/shkaf/1099#sigFreeIdcd1623eb7f
Computer for the kitchen from a laptop
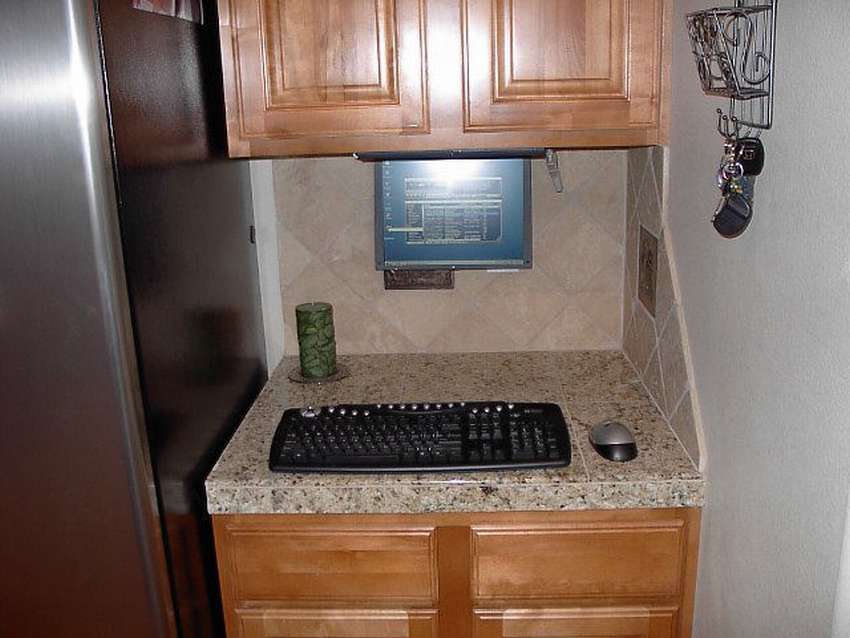 Today, in the age of technology, kitchen computer, a necessary thing. The first, Honeywell Kitchen Computer, was launched back in 1969. But this is a different story. In general, it is shown here how to make a kitchen computer from a laptop. You can create bookmarks with recipes, series, etc., not to list the possibilities. The laptop is mounted onand upside down bracketsto watch, there is a software function for the graphics adapter that allows you to switch the image 90 °, 180 °, etc. It's just -Ctrl + Alt + ↓ (down arrow) and the screen will rotate 180 °. Pluses do not need to click! If your laptop doesn’t know this, there is a program Pivotprowhich will do the same.
A simple way to fix the laptop to the bottom of the hinged kitchen cabinet, read on the site and look at the step by step photos.


https://i.expert-h.com/en/shkaf/1099#sigFreeId83c4450c49
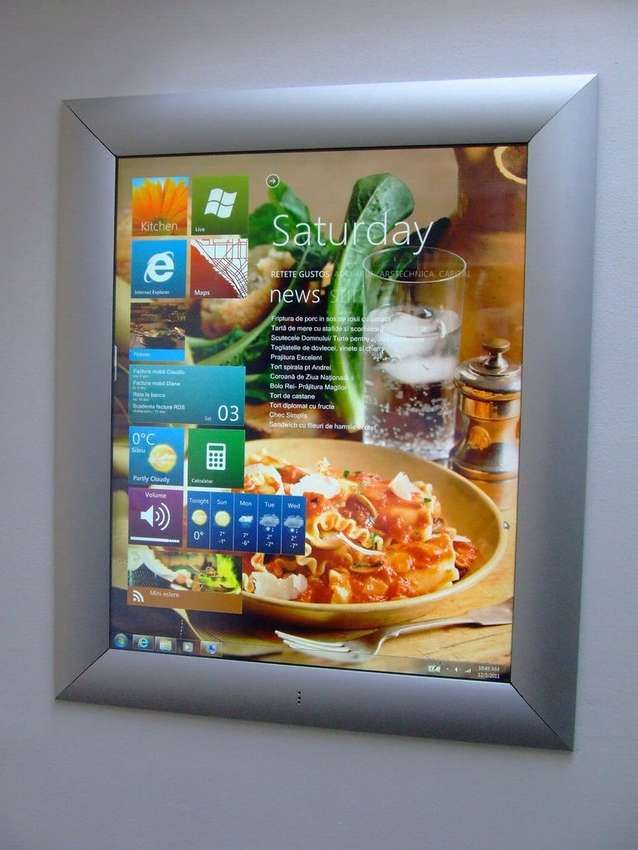 But if you take the matter seriously, you can do wall-mounted kitchen personal computer with internet access for recipes, email, music and photo sharing. This task is more complicated, but quite solvable. Of course, there will be several problems. The keyboard in the kitchen, do not handle it carefully, it will very quickly become dirty. So the only viable option is touch screen. Will you be able to realize this idea, largely depends on the design of the kitchen.
Read the full instructions on the author’s website, there are described many nuances that had to be taken into account when developing this project, including not only technical issues, but computer software, materials and much more. The implementation took more than a year, but it's worth it.
To get an idea of how the process went, see step-by-step photos.


https://i.expert-h.com/en/shkaf/1099#sigFreeId6783d23bb7
Drawings of kitchen cabinets 100 photos


https://i.expert-h.com/en/shkaf/1099#sigFreeIdf244c740d3
DIY kitchen cabinets 150 photos


https://i.expert-h.com/en/shkaf/1099#sigFreeId20223fd787
from
Hello, I am the author of this article, so I look forward to asking questions for this article in the comments below, I will answer all !!!
If you have questions on another topic, ask them on our forum, we will answer you
- Two baskets of paper in 5 minutes (Master class)
- How to make a simple and compact table for a milling cutter from plywood
- How to make a soft headboard tile (Instructions + step by step photos)
- Cinder block benches: a convenient bench in 55 minutes
- How to make a bed with a niche: saving space (Master class)