Do-it-yourself sandbox from Anyuta
 Do-it-yourself sandbox
In this article we will consider the manufacture of children's sandboxes with their own hands for giving, for a country house, for a kindergarten and for a playground. Let's study step-by-step photos of making wooden sandboxes.
At the end of the article you will find a huge gallery with photos of unusual and unique models of wood and all kinds of building materials.
Making sandboxes with step by step photos
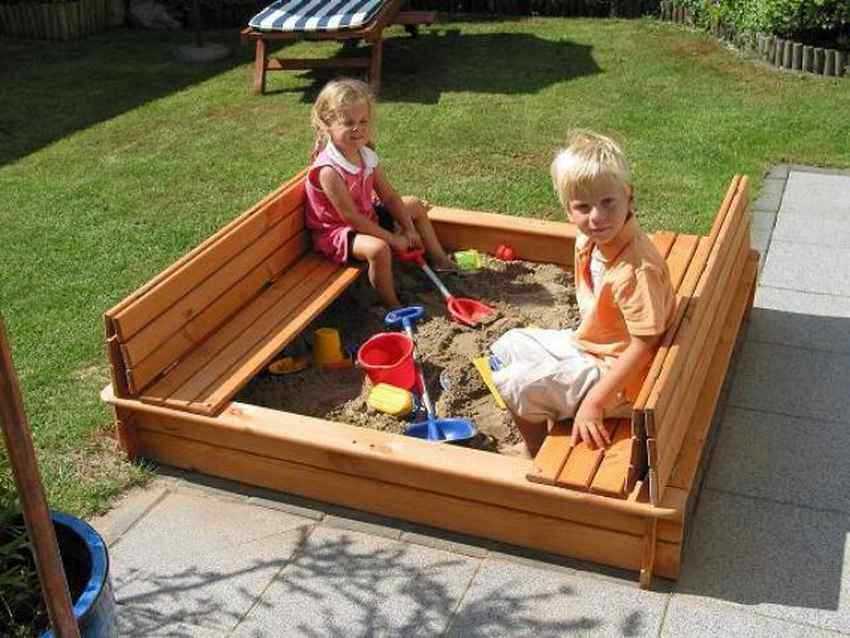 The photo shows step-by-step sandbox production with cover with step-by-step drawings and diagrams, which with an easy movement turns the lid into a convenient bench. This version of the sandbox with a bench cover is perfect for kindergarten.
This wooden sandbox project was developed on a computer by the author of the ana-white.com blog. To make a sandbox, you need boards (note that the wood must have been dried. Otherwise, when dried, the raw boards are deformed and spoil the appearance of your building, its geometry), hinges, handles, screws, wood glue.
- Before screwing in, drill holes with a drill. For added strength, use wood glue. (Excess glue must be cleaned immediately, otherwise the paint will not work well).
- We fill the holes with wooden filler. Let it dry completely.
- We grind all boards and filling places. Coat with a primer and leave to dry completely. We paint.


https://i.expert-h.com/en/pesochnitsy/946#sigFreeId6af4ab4068
Making sandboxes with step by step photos
 The photo shows step-by-step sandbox production with cover with step-by-step drawings and diagrams, which with an easy movement turns the lid into a convenient bench. This version of the sandbox with a bench cover is perfect for kindergarten.
This wooden sandbox project was developed on a computer by the author of the ana-white.com blog. To make a sandbox, you need boards (note that the wood must have been dried. Otherwise, when dried, the raw boards are deformed and spoil the appearance of your building, its geometry), hinges, handles, screws, wood glue.
- Before screwing in, drill holes with a drill. For added strength, use wood glue. (Excess glue must be cleaned immediately, otherwise the paint will not work well).
- We fill the holes with wooden filler. Let it dry completely.
- We grind all boards and filling places. Coat with a primer and leave to dry completely. We paint.


https://i.expert-h.com/en/pesochnitsy/946#sigFreeIdbd41d1b455
150+ photos of sandboxes with your own hands


https://i.expert-h.com/en/pesochnitsy/946#sigFreeId6465e7d0e7