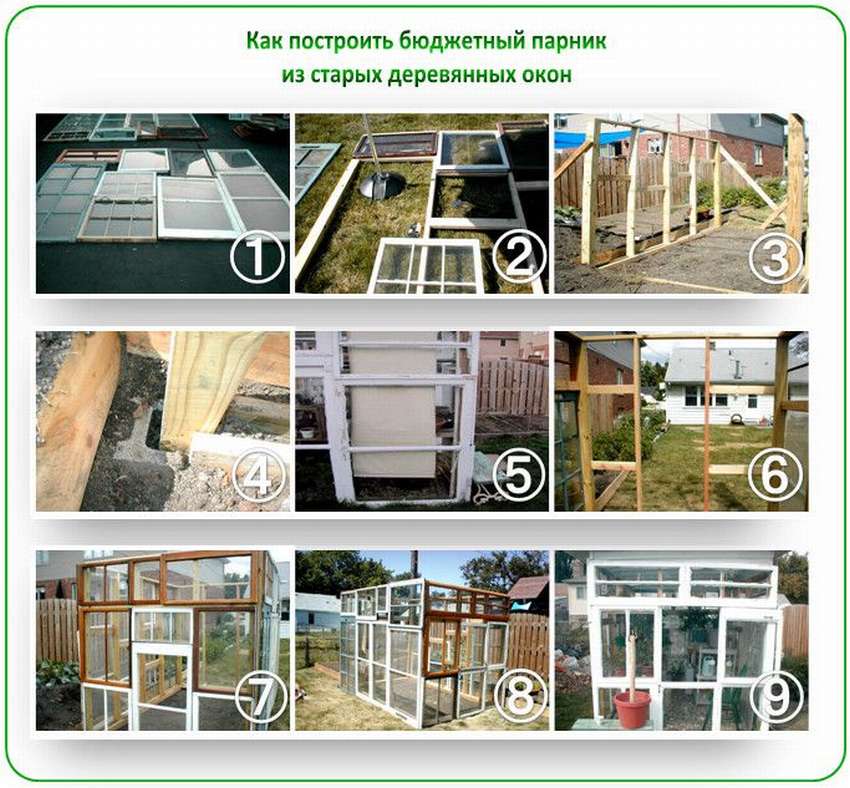
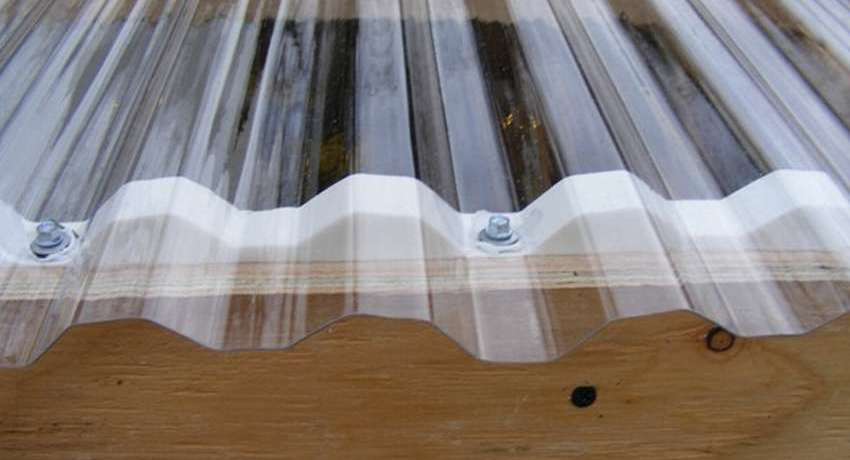
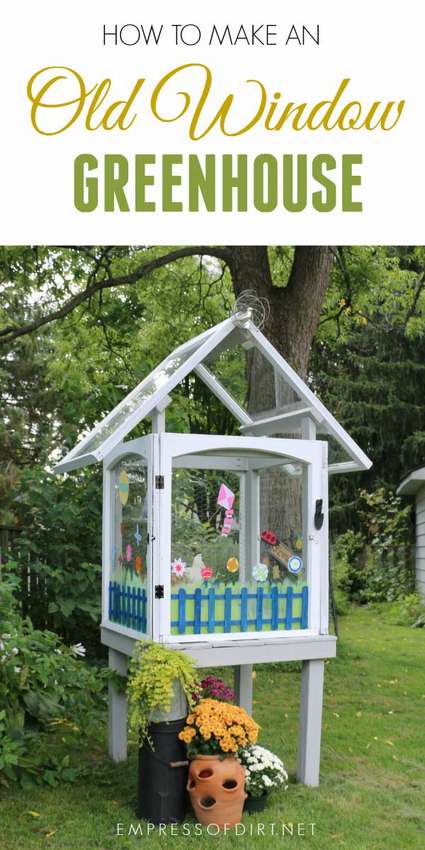
Do-it-yourself greenhouse from window frames. 700 photos, step by step instructions
 greenhouse from old window frames
A greenhouse is a kind of shield between nature and what you grow. Often the main obstacle to building your own greenhouse is its cost. One solution to the problem is do-it-yourself greenhouse from window frames. Great idea to protect your plants and keep your family budget.
This article contains examples of the best window frame greenhousesposted by gardeners by amateurs on the Internet. In addition, see and read how to do it yourself:
- Greenhouse from window frames
- Greenhouse for a balcony
- Greenhouse to the wall of the house
- Greenhouses from window frames
- Mini greenhouses from the windows
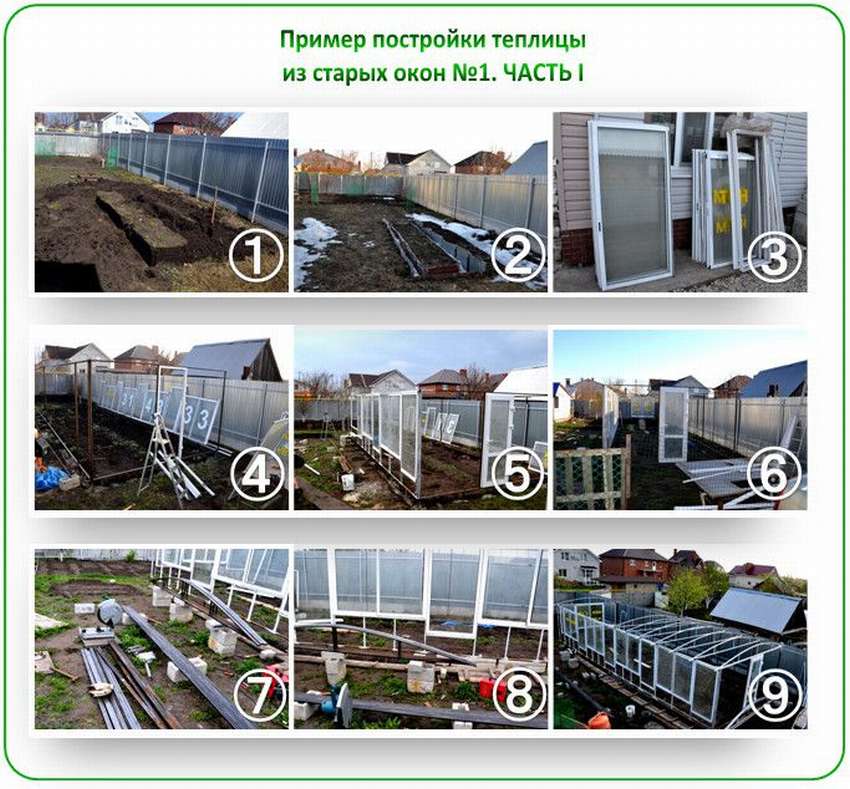
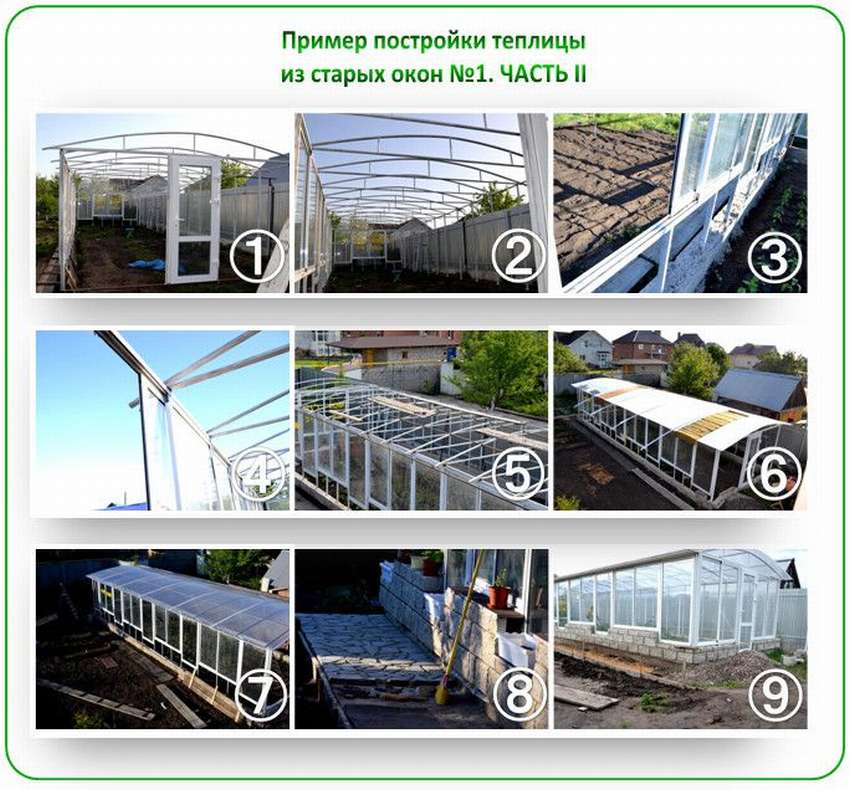
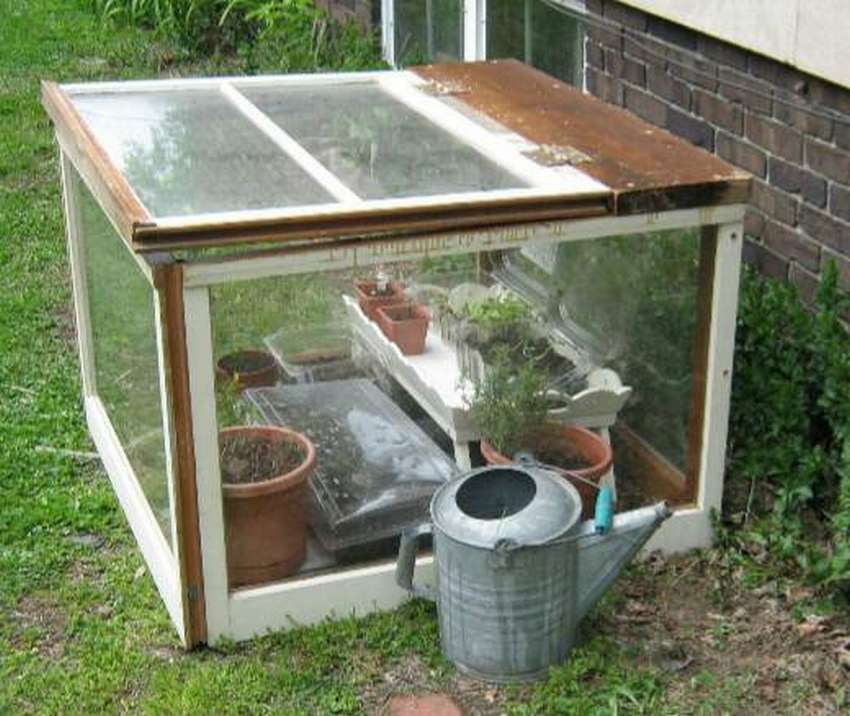
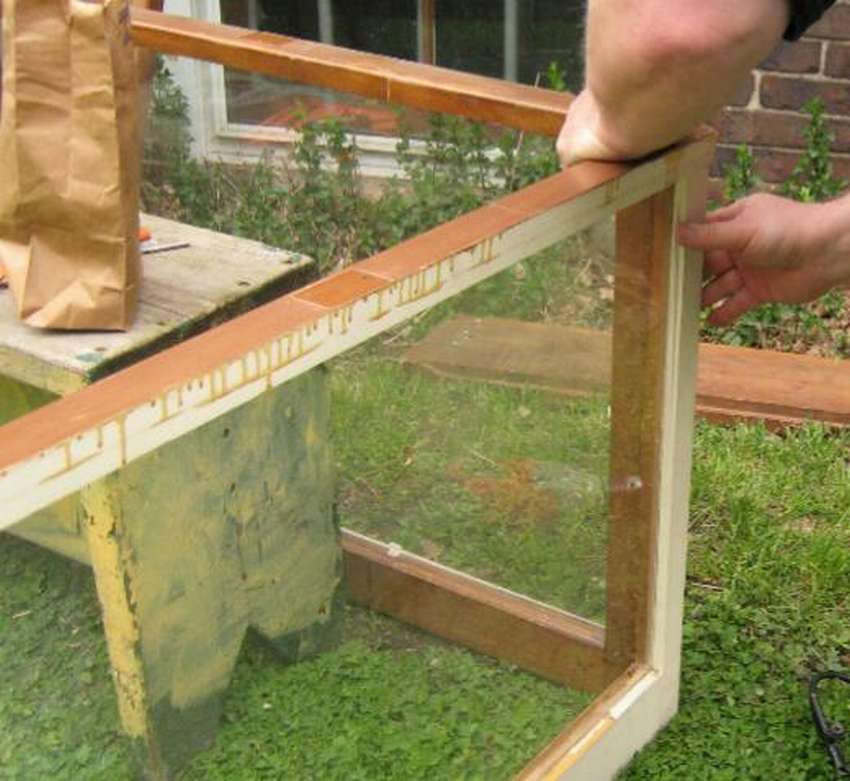
Greenhouse from old windows
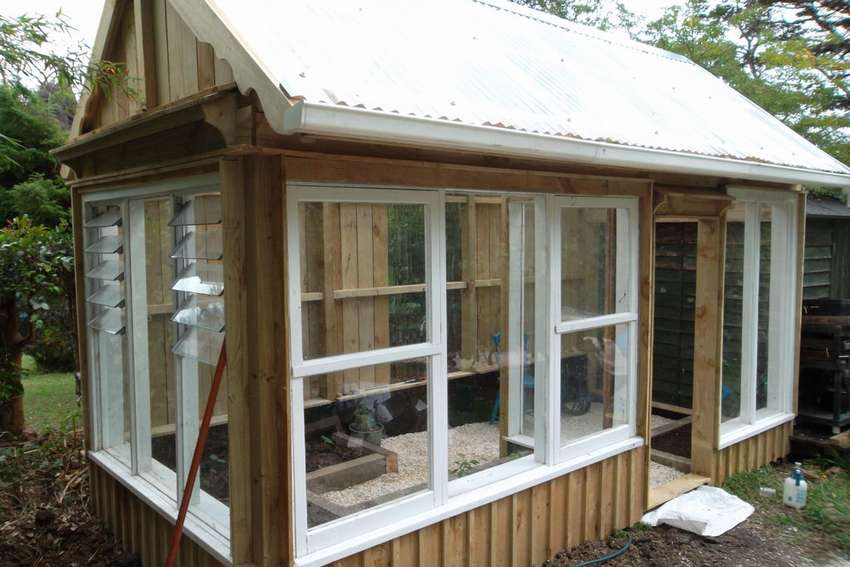
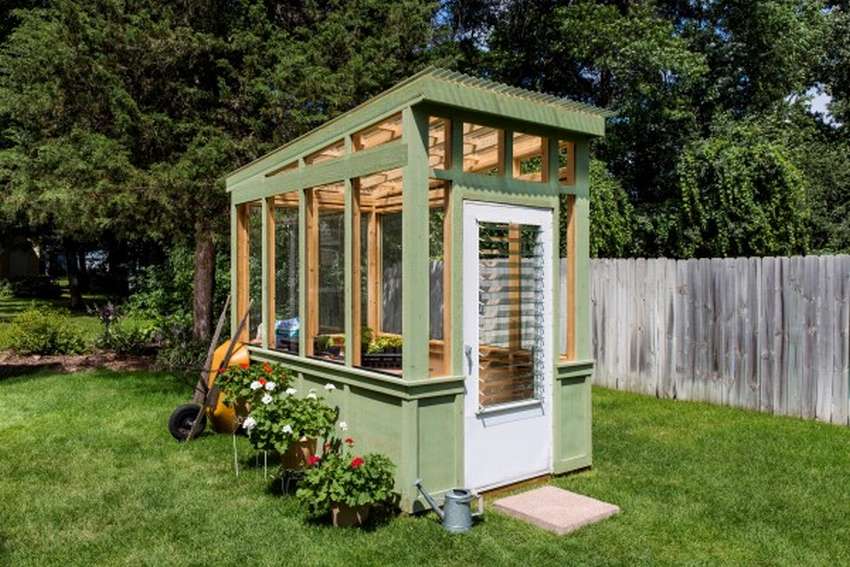
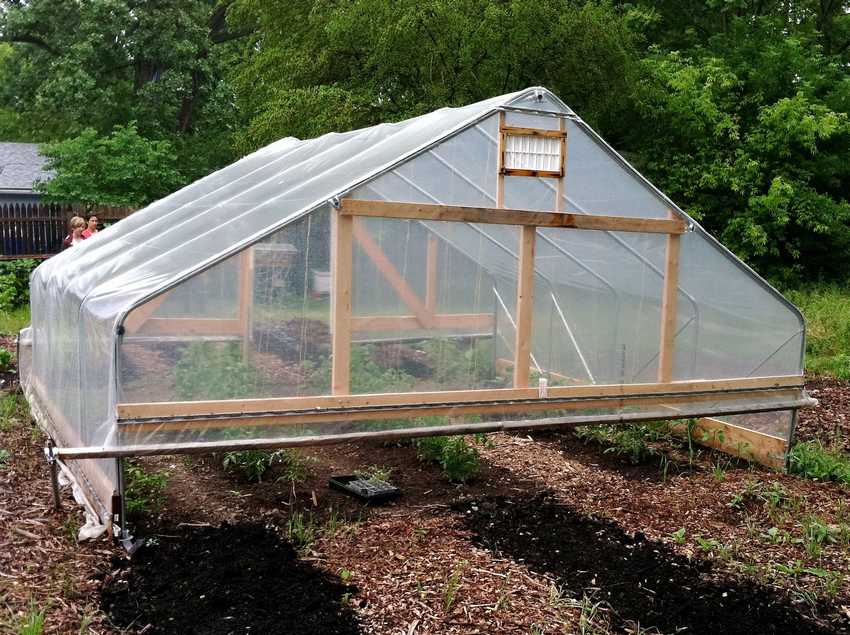
 This is a small step-by-step guide on how to turn a few old windows into a small greenhouse for your site. make a greenhouse from old windows you will need lumber for the frame, screws, sealant, latches, etc. This is almost 10% of the cost of a greenhouse kit. The size of the greenhouse from old window frames is 215 cm high x 350 cm deep x 182 cm wide. But your design will depend on the windows that you can find and the time spent on your project. The entire assembly process is described in an article on the site, you will find the link under the gallery. And below see the master class, how to make a greenhouse from old window frames with your own hands in step-by-step photos.


https://i.expert-h.com/en/parniki-teplitsy/iz-okonnyh-ram#sigFreeIdbabaaf93f0
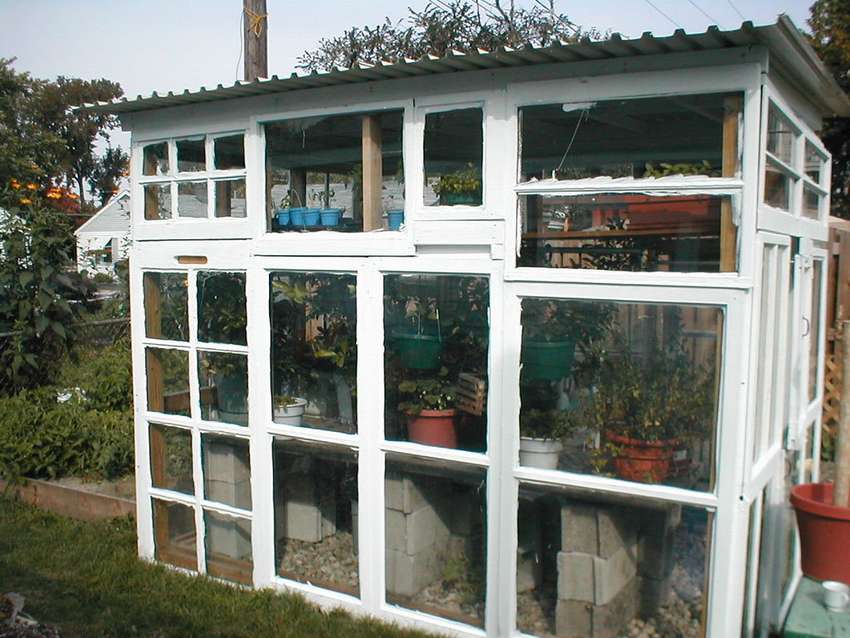
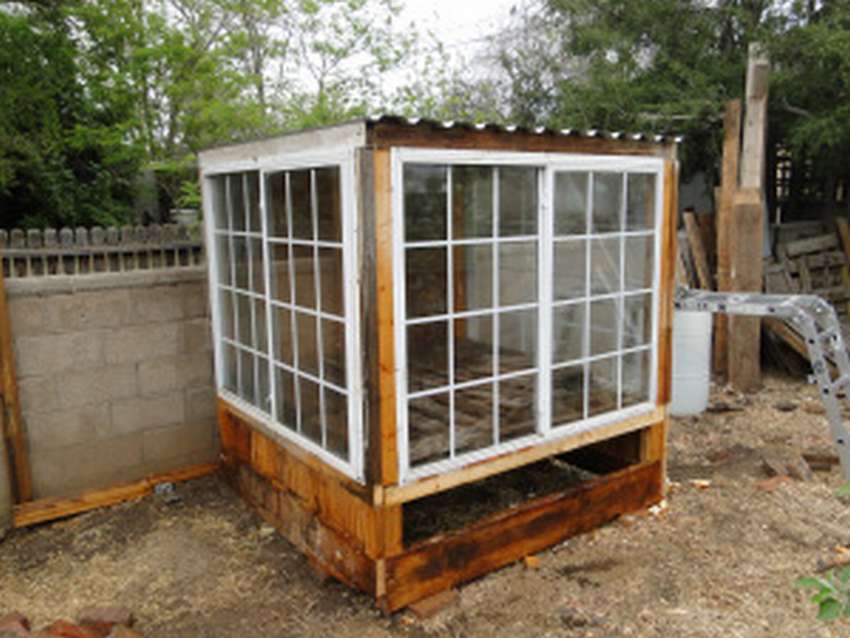
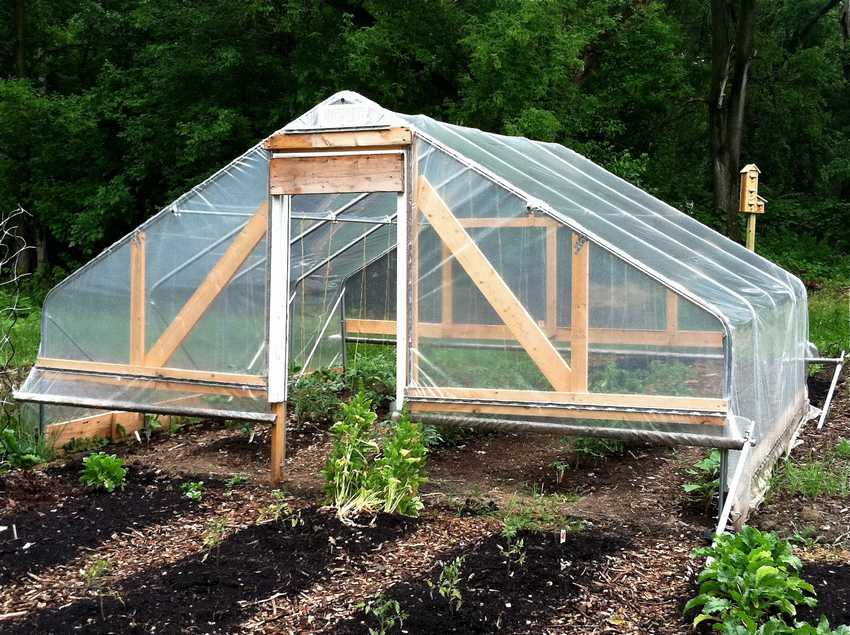
 Here is another similar project, hydroponic greenhouse from old windows. Pride of the author of the project, two-level roof. All wood is pressure treated, primed and painted before assembly. Used tools: circular saw, gear saw, cordless drill, hammer and measuring tools. The plastic coating is made from UV stabilized recycled plastic, 6 "x 2.5" wide (15 by 6 cm). Suitable for large leafy plants and grape varieties such as tomatoes, cucumbers, paprika and zucchini, in which processed nutrients pass through the roots. How to build a greenhouse with your own hands See below for step-by-step photos.


https://i.expert-h.com/en/parniki-teplitsy/iz-okonnyh-ram#sigFreeId2b2d965b96
Here is another example of how to make strong and inexpensive greenhouse from old windows. Your first step is to assemble the windows, frames of any shape and size will do. Secondly, apply this method. Make paper “miniatures” to represent windows. You can use grid paper to count the squares on the grid ... for example, if the window was 90 x 60, cut out a piece of grid paper and attach. To avoid wasting tons of paper, divide it in half so that the representative portion is 46 x 30 squares, with each square grid representing a 5 cm square. In detail about greenhouse assembly methods and techniques read on the author’s website.


https://i.expert-h.com/en/parniki-teplitsy/iz-okonnyh-ram#sigFreeId67966cd6c9
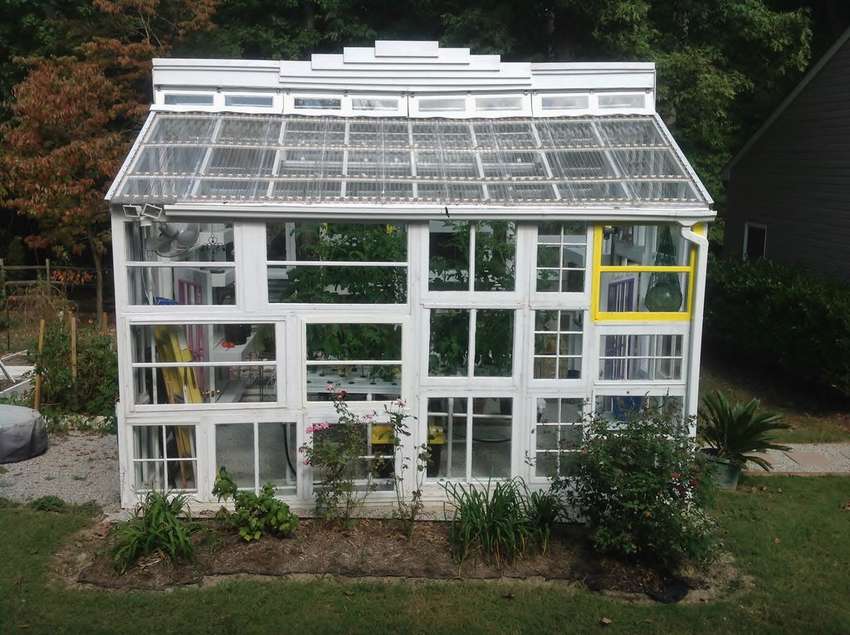
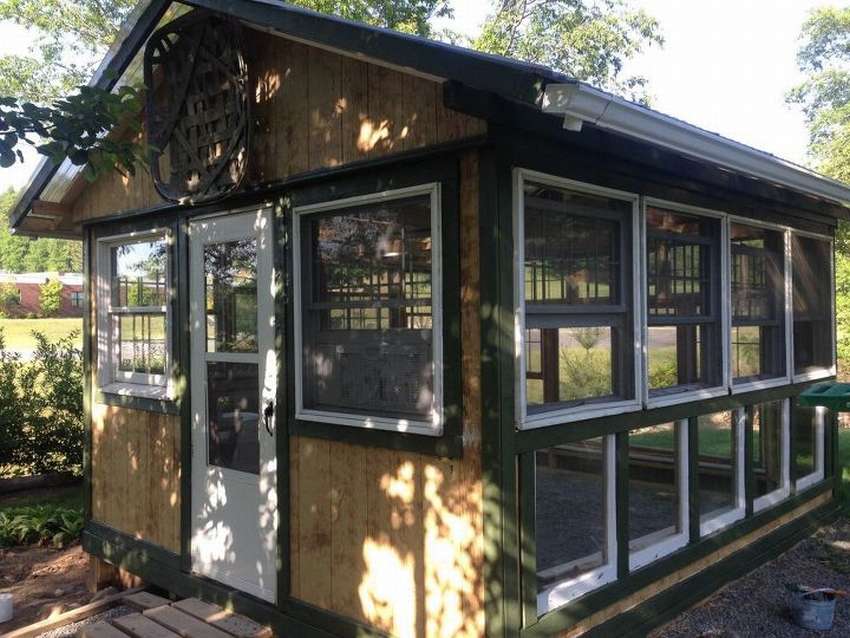
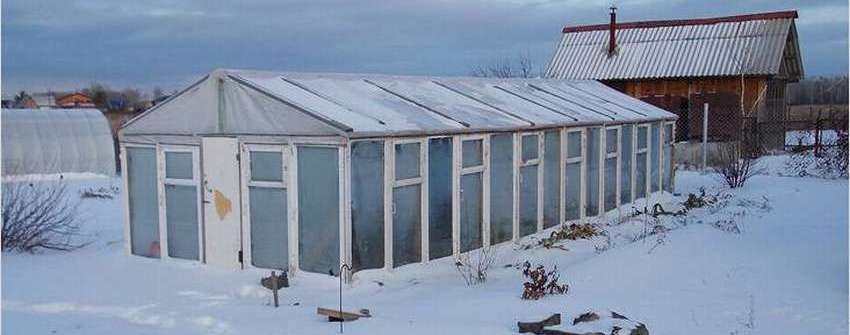
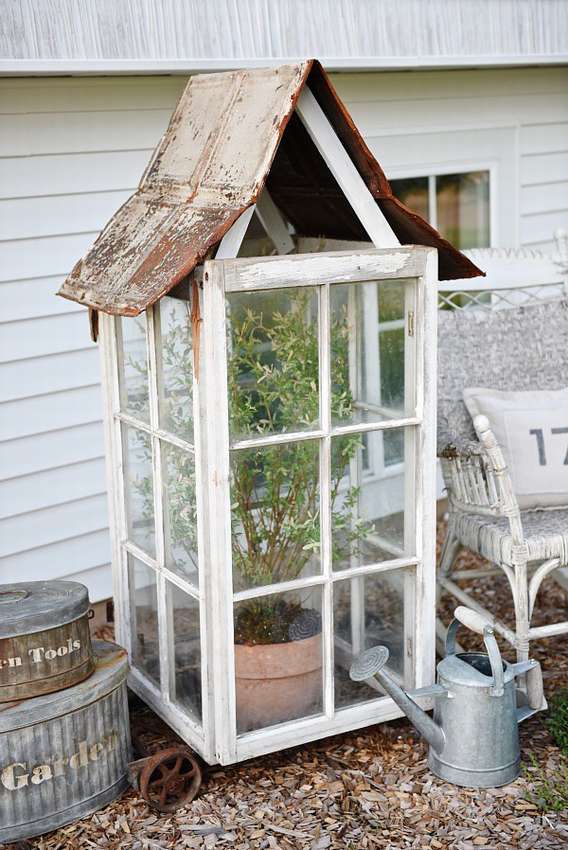
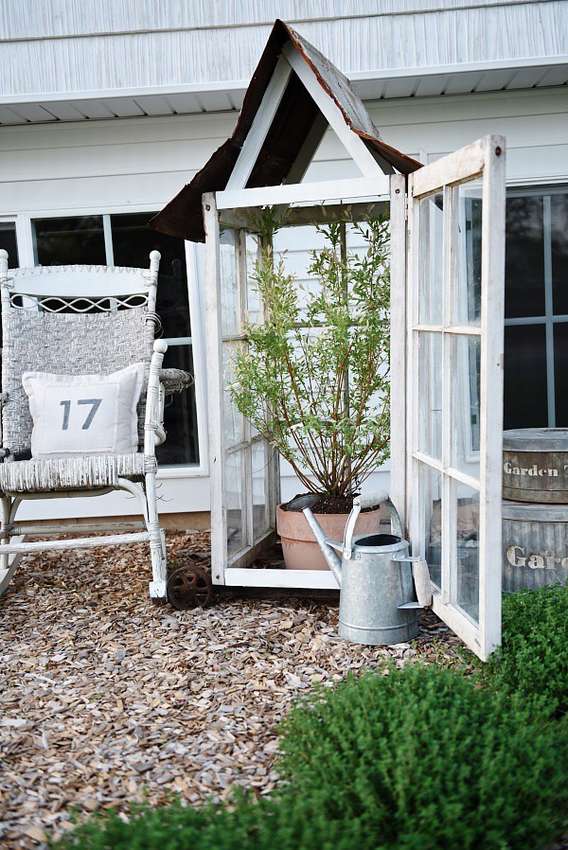
 This is not an instruction, how to make a greenhouse from old windows, but just a good example for inspiration. The author had several old windows and desperately needed winter greenhouse. The result was a beautiful house. Not to say that all this is free, the bars for the frame and the roof made of polycarbonate require certain costs, but the design is very beautiful. Bars laid on the ground serve as the foundation, doors can be ordered separately. Mostly all construction details are shown in step by step photos.


https://i.expert-h.com/en/parniki-teplitsy/iz-okonnyh-ram#sigFreeId925dd547bb
Greenhouse from the windows
 It's hard to believe, but this beautiful window frame conservatory used to be a bunch of discarded old windows. But creative thought and little know-how turned them into a magnificent structure, which you see in the photo. As everyone gradually switches to insulated glass units, old windows are moved to landfills. These include wood frameswho have survived better times; aluminum-framed windows that are no longer in use today. Even modern plastic bagsthat have reached their service life. You can find them in garbage containers or buy them on the cheap through various sources - and often get them for free. The trick to reusing these windows for the greenhouse is that you have to take what is. Dimensions change, sometimes radically. The design shown here is typical, has a small footprint and a simple hinged roof. How to do this do-it-yourself greenhouse from windowsLook at the step by step photos.


https://i.expert-h.com/en/parniki-teplitsy/iz-okonnyh-ram#sigFreeId6367afbe85
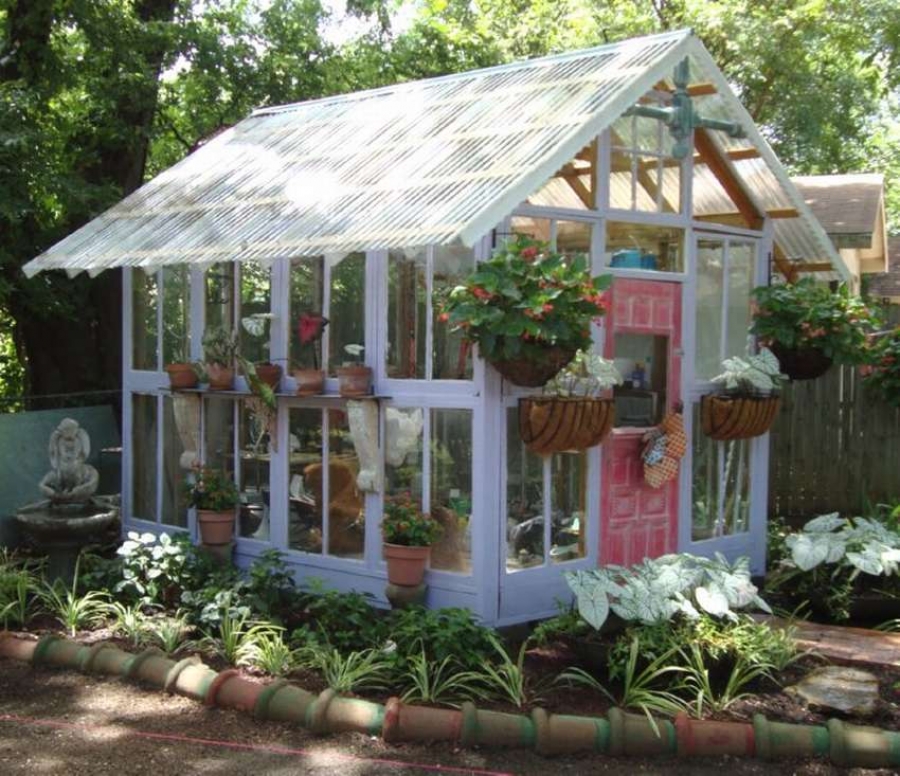
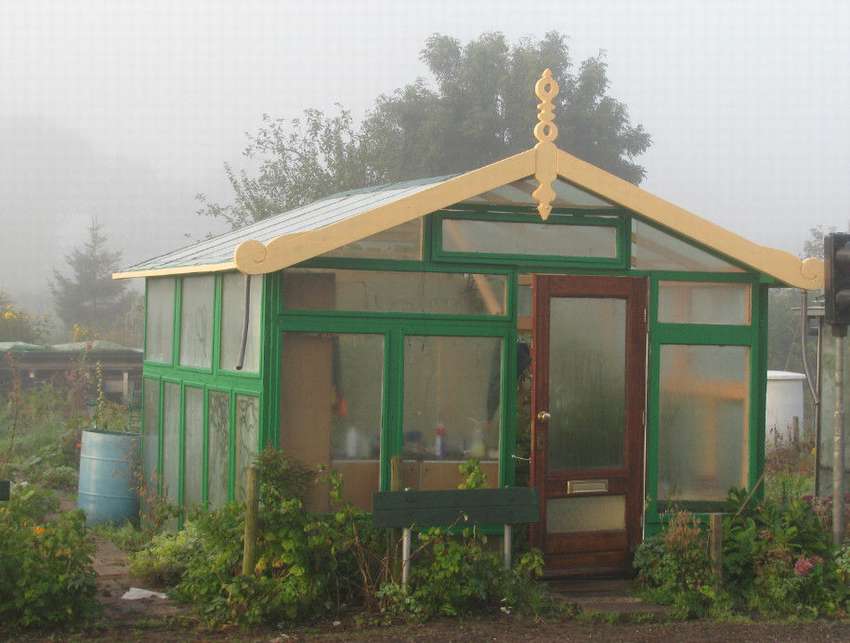
Do-it-yourself greenhouse from old window frames
 This greenhouse from old windows more like a small garden house. Look, from the photo it seems that this is a complex structure, but if you read the description on the site, you will understand that it is quite simple to build such a greenhouse. Sounds like a constructor, assemble the frame and fill it with old windows. Add siding in the corners and under the windows. The roof is two layers of polycarbonate panels with a two-inch air gap between them. Set up shelves and make plenty of basket hooks. Set gutter complete with rain barrel for irrigation. Of course, you will have your windows, so the view of the greenhouse will be completely different, but this is a very interesting activity.


https://i.expert-h.com/en/parniki-teplitsy/iz-okonnyh-ram#sigFreeIdf6a485b7ad
How to build a greenhouse from window frames
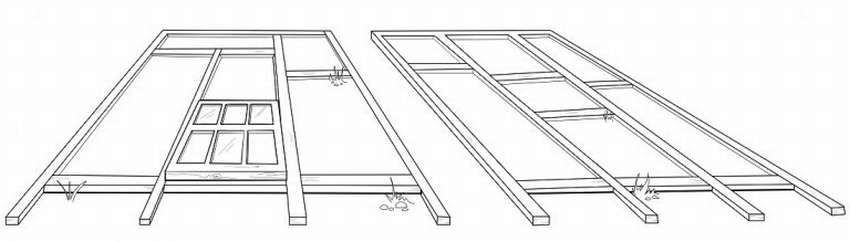
 To make such greenhouse from old window frames, the main task is to find a set of identical windows. In this version, there was already an old greenhouse from the windows, so in the step-by-step photos you can see how it was dismantled and a new one was assembled. The construction of such structures is a creative thing, one has to proceed from what is. Install two pin corner postsby pre-cutting them to make slots for the guides along the bottom of the windows and along the top. Add a frame around the windows and do a test fit and pay attention to the diagonal connection outside the window.


https://i.expert-h.com/en/parniki-teplitsy/iz-okonnyh-ram#sigFreeId888e4df9b2
The scheme of the greenhouse from the windows
 Is it possible to turn something old into something new? Of course you can, and here's a great way to recycle old windows. Look at the diagrams how to make a greenhouse from old window frames do it yourself.
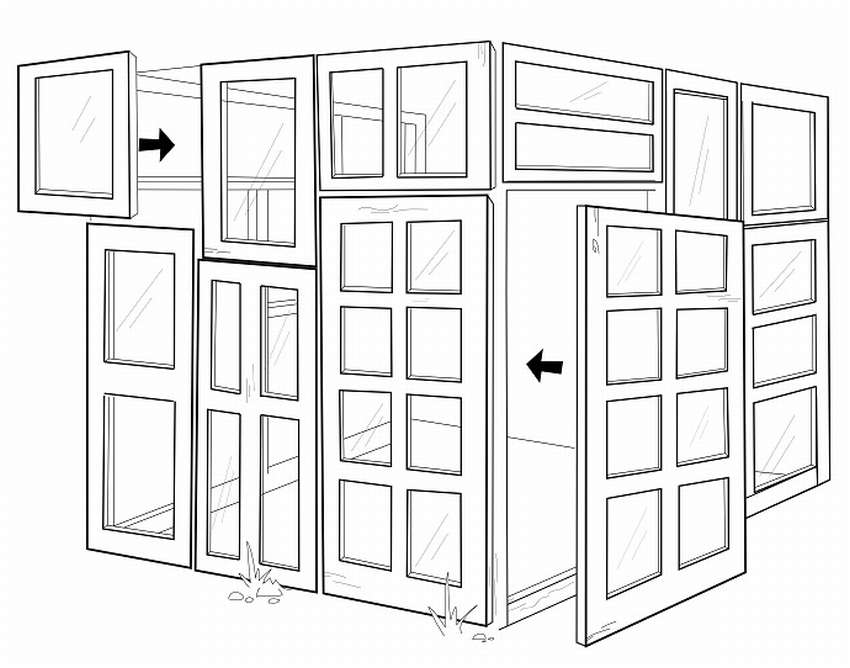
Step 1. Find old windows. Collect and as many old windows as possible. Fold them together and then try to align both sides with windows of the same size. If there are holes or gaps of 5 - 8 cm, do not worry, they can be easily covered with boards, and smaller holes covered with glass trimmings. Make sure that there is room for the door on one side and a fan for the other.
Step 2. Frame shape. With the windows, make a guide and build a frame for each of the four walls. It’s better to use good quality treesince the frame will hold all the weight from the windows.
 Step 3. Make the walls of the greenhouse. To fix the walls, you need to put them in place. Be sure to hold them well so that they are level and do not fall.
 Step 4. Make a foundation for a greenhouse from windows. It is necessary to dig in 4x4 beams or fix them with cinder blocks.
 Step 5. Install windows. Use screws to secure the windows in the frame. This will make it easy to remove and replace if necessary.
Step 6. Make the floor of the greenhouse. Use stones, they are great for drainage and help keep warm.
Step 7. Make a greenhouse roof and old windows. Be sure to use lightweight and waterproof materials. Do not forget about a 4 degree slope for a stack of water from the roof of the greenhouse.
Step 8. Fasten the shelves and install the fan.
And finally: using sealant, cover the holes and cracks between the windows. Then paint the wood so that the window frames last longer.


https://i.expert-h.com/en/parniki-teplitsy/iz-okonnyh-ram#sigFreeId2f170c5b50
How to make a greenhouse from window frames
 Idea make a greenhouse from old window frames can be quite useful for many reasons.
First of allwill save you a lot of money if you have the time and patience to fix the windows. If everything is done well, this will give you a charming result that you can not even realize with new windows. And, of course, to reuse material that would go to landfill is an environmental good. Shown here how to make a greenhouse from old window frames with your own hands on the foundation.
 This is a review article, step-by-step photographs show not a specific example, but general information on how to make a greenhouse out of old window frames. You can learn how to make a foundation for a greenhouse, make a frame for window frames, lay the floor with raised beds and a drainage system. Moreover, there are different options for laying tracks: from sawdust, porcelain stoneware, boards, gravel. Also a lot of useful information and tipshow to assemble the walls and install the roof, also in different versions: from film, polycarbonate. There are drawings and calculation schemes. In general, the link under the gallery, read, delve into and plan how to build your own greenhouse.


https://i.expert-h.com/en/parniki-teplitsy/iz-okonnyh-ram#sigFreeId69d5c36910
Below, see a couple more options in small collages and some tips.
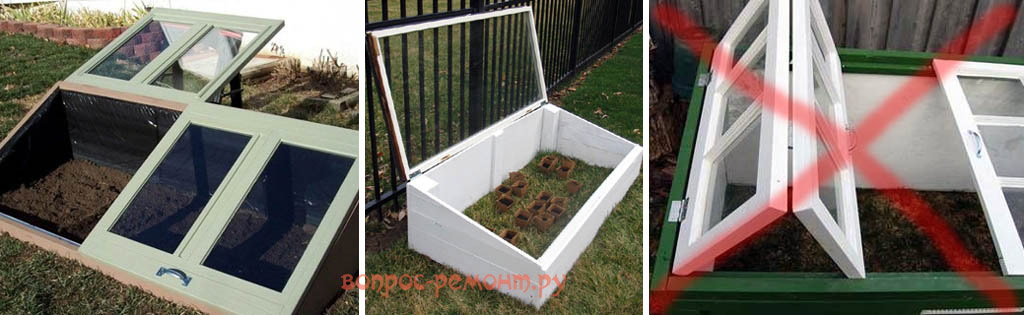
Security is a major concern. If you make a greenhouse from old windows, never use them for the roof. Glass can break if something falls on it, due to snow, wind, there can be many reasons. Falling glass, it is very dangerous, can hurt or worse.
 The same applies to glass doors. Make sure every door a, ideally every window has safety glasswhich, when struck, will break into small dull pieces, and not into sharp wedges that can cut. (Home safety glass is similar to a car windshield.)
 Window should not be double glazed, this increases resistance to heat loss by about three times than single glazing.
 To maintain a greenhouse with single or double-glazed windows with heating, you need to throw a bedspread overnight or use a lot of energy to heat the room. Single glazed windows are perfect for a small garden greenhouse.
See another example, how to make a greenhouse from old window frames do it yourself.
 Read the information on the site, link under the gallery.


https://i.expert-h.com/en/parniki-teplitsy/iz-okonnyh-ram#sigFreeId9dfabf29c4
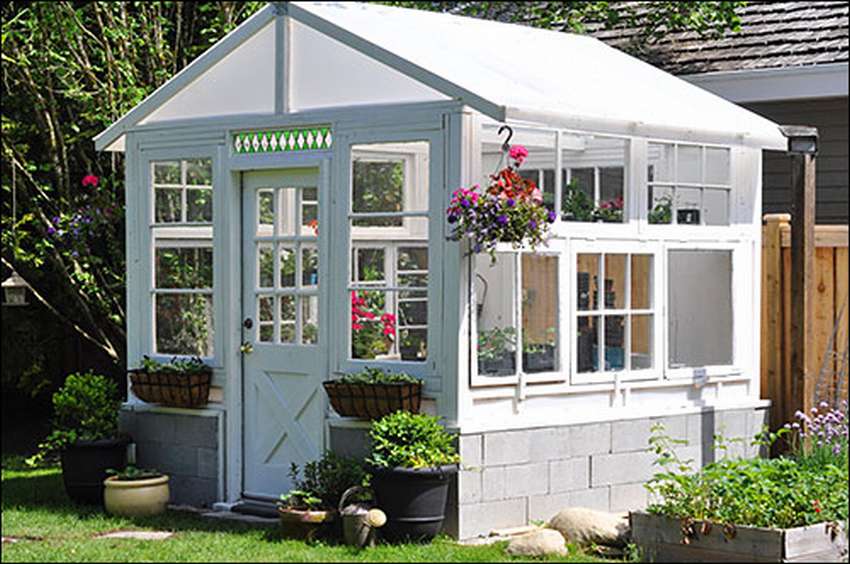
Wooden greenhouse from the windows
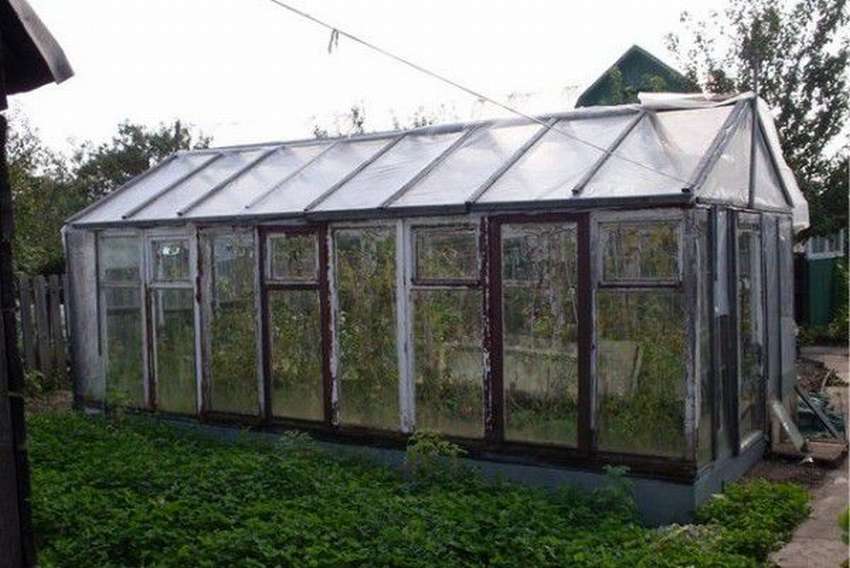
 So beautiful greenhouse from old windows can become a real decoration of the garden, and almost nothing will cost you, as it is made 100% recycled. How to build such a greenhouse, you can read on the site, a link to which is under the gallery. It makes little sense to specify the dimensions, since you will assemble your design based on their existing window sizes. Since this is a full-fledged greenhouse, there are many nuances in laying the foundation, for such a solid construction it is necessary, because the window frames are pretty heavy. Very important point on roof installation. In general, visit the site and read, you will learn a lot of interesting things, and below see step-by-step photos on how to make a greenhouse from windows with your own hands.


https://i.expert-h.com/en/parniki-teplitsy/iz-okonnyh-ram#sigFreeId837c8e714f
 Here is another very beautiful example. greenhouses from old window framesbuilt using vintage windows.
The instructions on how to build such a house can be found on the website of the author of this project. Everything is described there in great detail, from pouring the foundation to covering the roof, so it is advisable to visit the site, because there are not so many step-by-step photos.
Such a greenhouse will be the real pride of your site.


https://i.expert-h.com/en/parniki-teplitsy/iz-okonnyh-ram#sigFreeIdb88485b60e
Text and photos of Tara Mikhaleh
City greenhouse
 If you are a city dweller and have a little space in the yard, see how you can do a small greenhouse from old windows. The instructions can be read on the website, the link can be found under the gallery. Some tips. Based on experience, it’s easier to design frame around the windowsthan trying to find windows suitable for the frame. First draw a plan, and only then get to work. A corrugated plastic roof, built-in insulation, and special fasteners made of neoprene washers can be bought at hardware stores. Usually there are 2 grades of clear plastic, in which case wiser to buy expensive things.
 A cheaper grade of plastic is destroyed during a sharp load (cutting, drilling, falling), it is not even clear why they are selling it, so in this case it is better not to be stingy. When drilling holes for the hex head screws, be sure to make a hole approximately 5 mm larger than the screw (or as recommended) to compensate for the expansion or contraction of the structure. To improve the water resistance, add a little puttyand in every hole. In addition to information on how to make a greenhouse out of window frames, you can read a lot of interesting things about hydroponics on the site.
 If you need an effective irrigation system that will recycle drained water and save a bill for water and sewage, then you can find out how to design a gutter system, one of which will flow into the other, and all the water will collect in the right place. Each shelf is slightly tilted to direct water down and at a certain angle. The system will work without maintenance all season.


https://i.expert-h.com/en/parniki-teplitsy/iz-okonnyh-ram#sigFreeIddc0b35095f
Greenhouse for a balcony
 Do you want to build a greenhouse for your balcony, terraces or verandas, but due to lack of space, giving up your plan? If so, then here's a great option for you, how to make a small greenhouse with your own hands in just five steps.
What do you need:
- Four equally sized window frames with clear glass.
- One window is slightly smaller, but the same width.
- Wooden pallets and a handle for opening.
- Drill, two loops and screws.
Then:
- Clean the windows and paint the frames with your favorite color. Drill holes in each frame so that you can then screw and connect them.
- Fasten and join all windows of the same size on all four sides. Leave the top and bottom of the structure.
- Install a smaller window on top of the structure and measure how much space is left open.
- Take the pallet, trim and fasten over the remaining open space of the window structure.
- Screw both hinges to the wooden board and screw the fifth window to the hinge, as well as fasten the handle to the frame of the fifth window so that you can easily open and close the greenhouse.
That's all, the greenhouse is ready to use. Set in a warm corner of the balcony or porch and place potted plants and seedlings. It does not take up much space and will be a cozy green oasis in winter.


https://i.expert-h.com/en/parniki-teplitsy/iz-okonnyh-ram#sigFreeIdd95eaa50b2
Spring greenhouse
Spring is just around the corner, see how to make simple and beautiful greenhouse from an old window under the wall of your house.
 The box is large enough to hold a shelf and grow two levels of seedlings! The instruction is probably not needed here, just an example for inspiration.


https://i.expert-h.com/en/parniki-teplitsy/iz-okonnyh-ram#sigFreeId4567fa020f
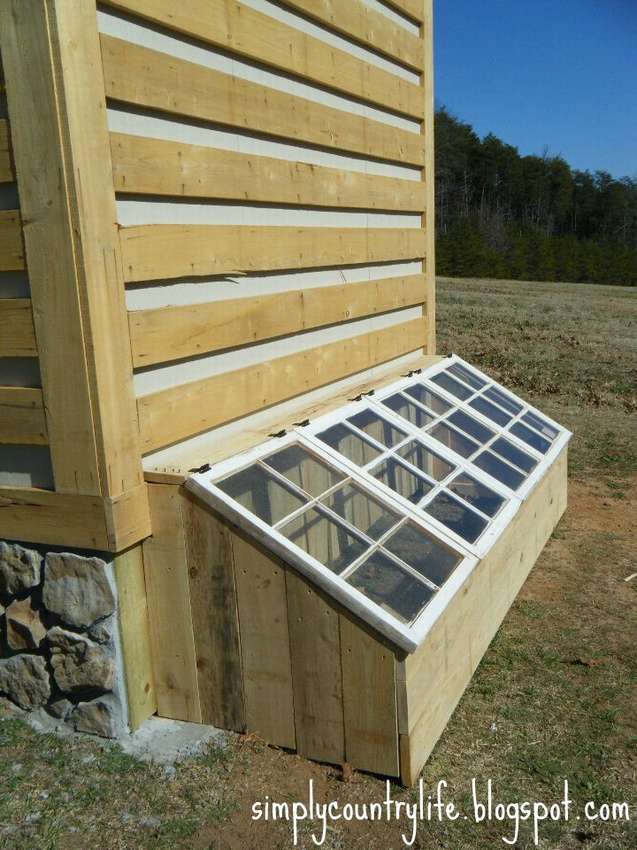
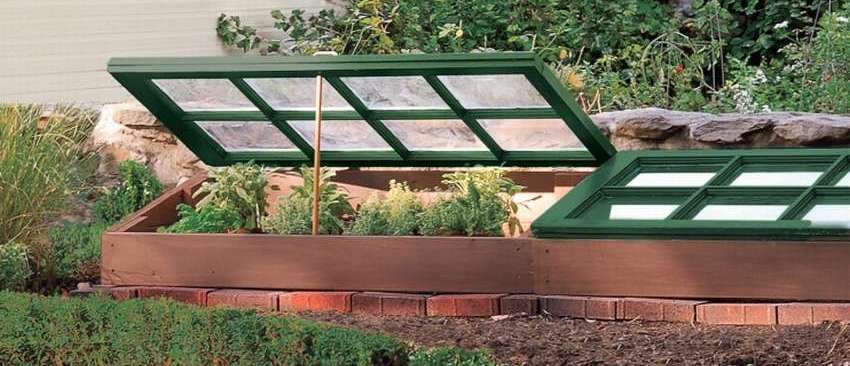
Greenhouse attached to the wall
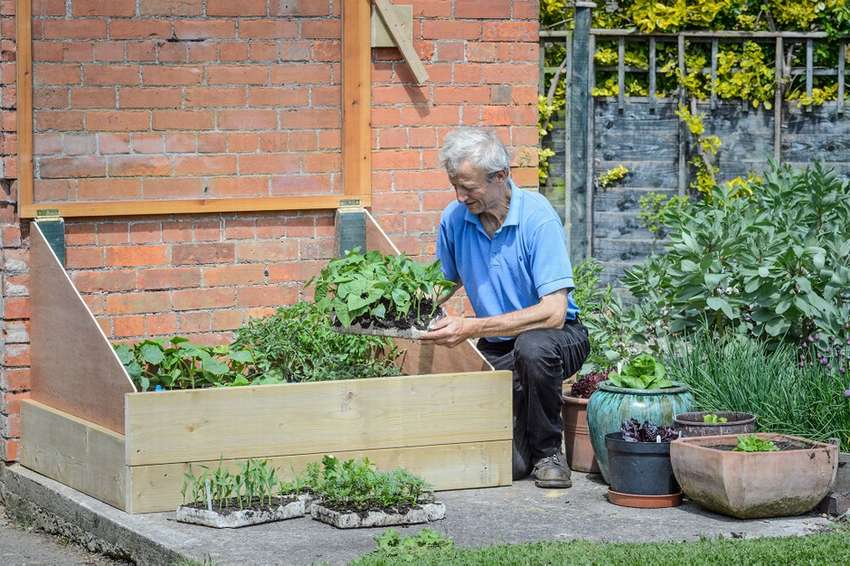 A cold greenhouse is a very useful part of the garden kit - it can be used for sowing seeds, seedlings of young seedlings in spring, picking cuttings, and growing early and late crops. You can make a greenhouse do it yourself cheap and easy. A standard pallet of 100 cm x 120 cm was used here to create the base and an old window 115 x 130 cm to create the top. The total assembly time for this design is no more than an hour. From additional materials you will need a sheet plywood and hinges. You may need the help of another person to help you hold the window against the wall while you fasten it to the wall supports with 7.5 cm hinges.


https://i.expert-h.com/en/parniki-teplitsy/iz-okonnyh-ram#sigFreeIde086aceade
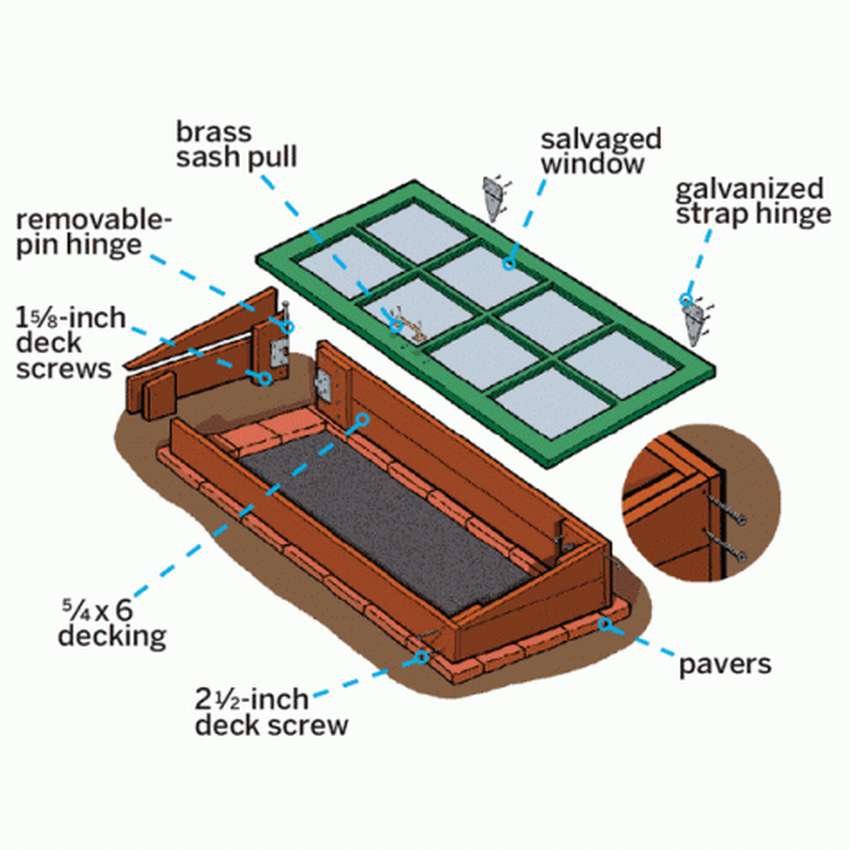
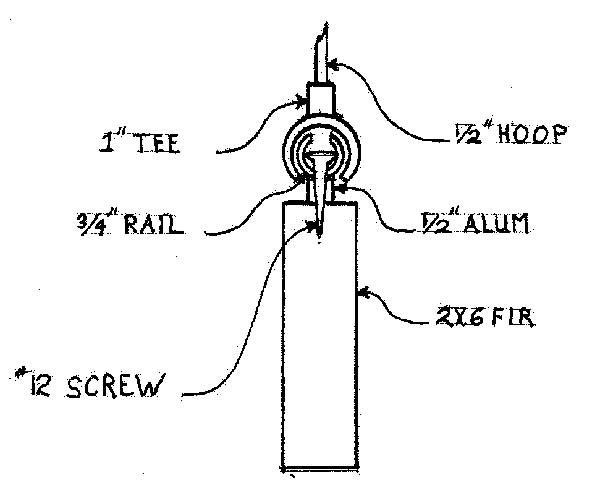
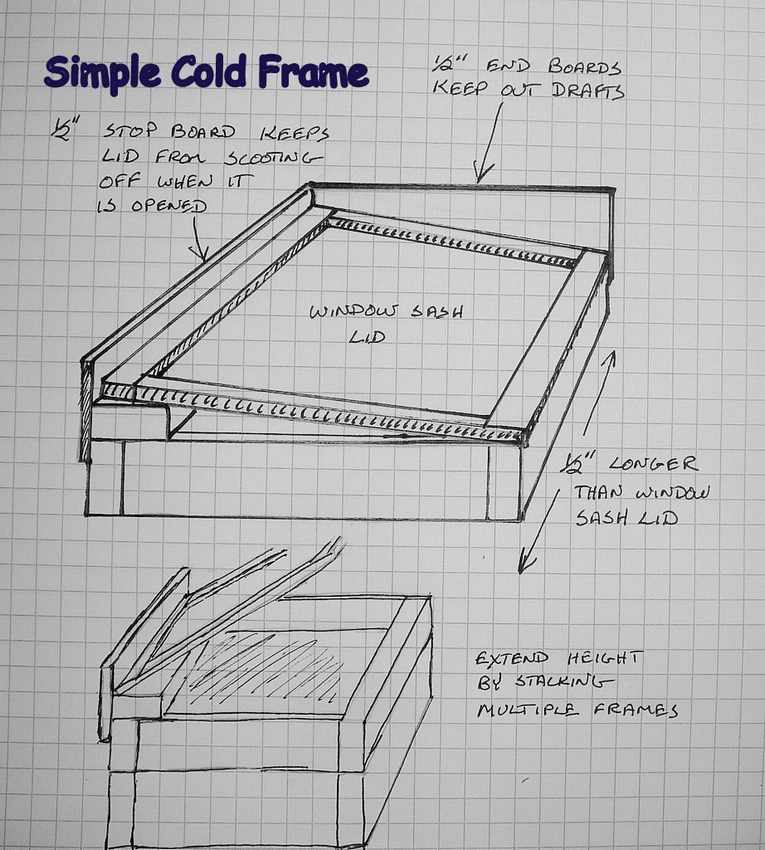
DIY greenhouse
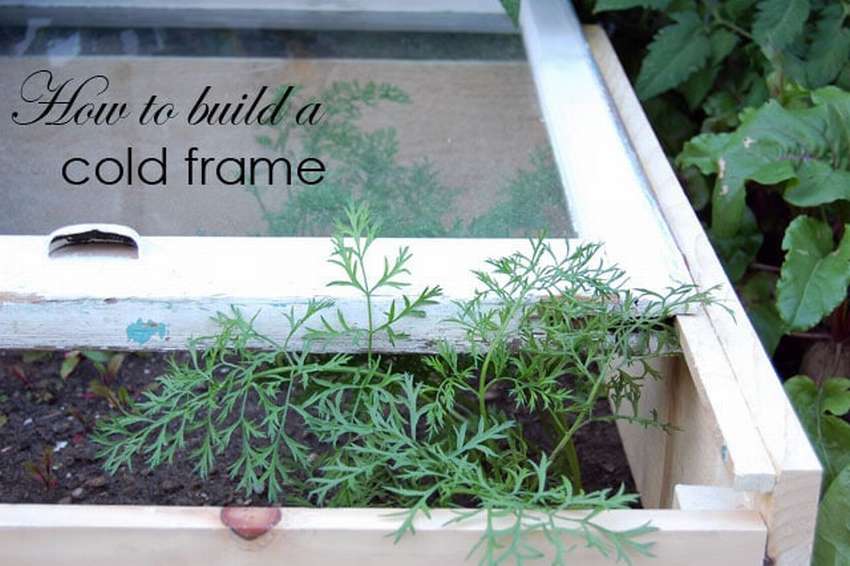
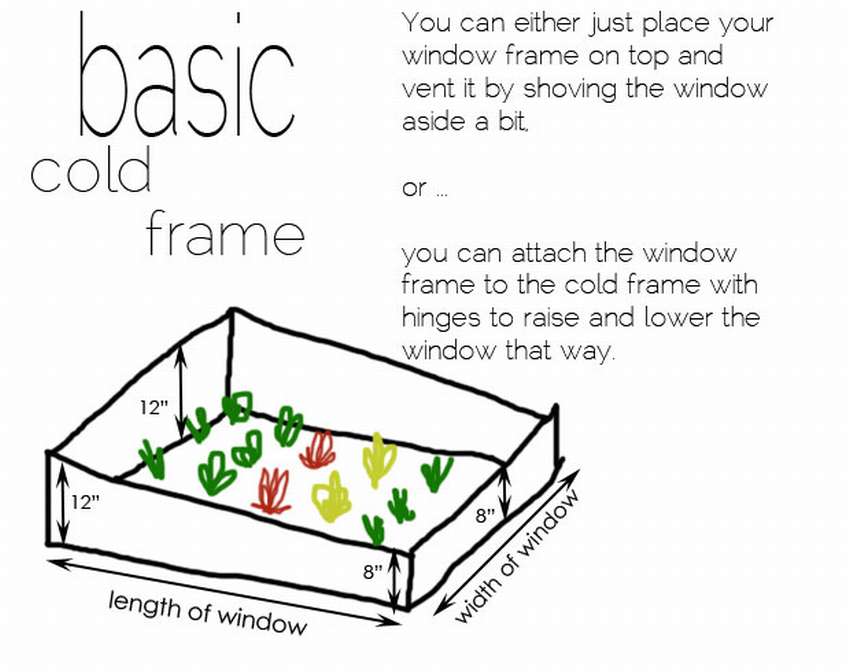
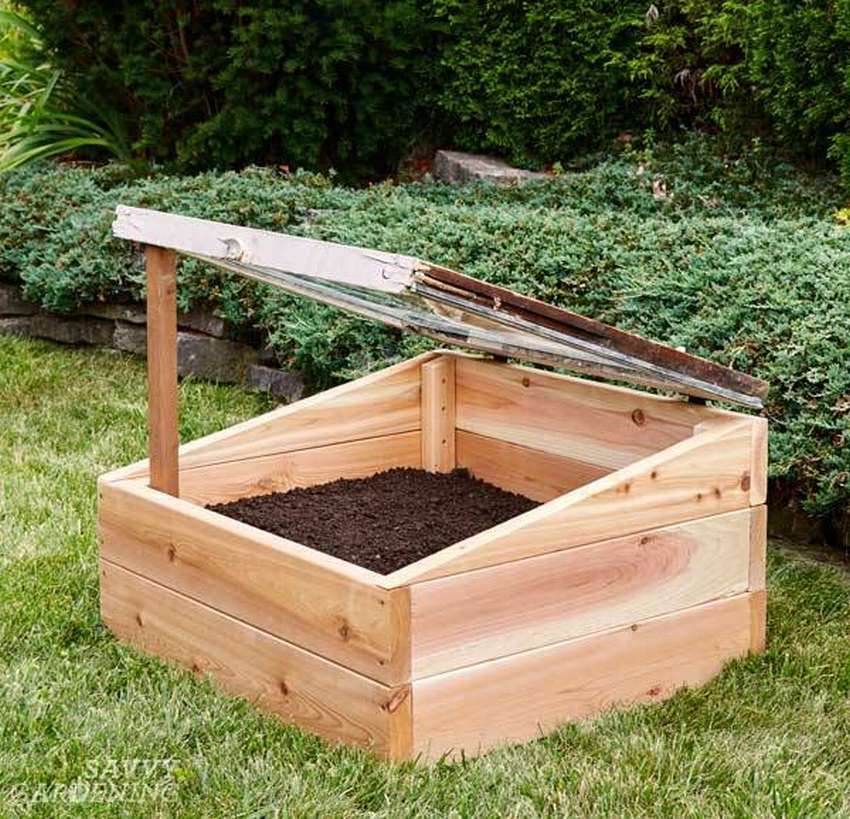 A hotbed, a great way to protect your plants from external weather. There are many options for this simple structure. Here is a simple example how to make a cold greenhouse do it yourself from a wooden box and an ordinary old window frame. Of course, you can use clear plastic for the cover. The idea is that glass or plastic let in the heat of the winter sun, creating plants comfortable conditions for growth. Now we are not talking about tomatoes, but there are several things that you can grow, including root vegetables and herbs. One thing you need to know about cold frame designs is that the back should be approximately 8-15 cm above the front, which helps to capture as much solar energy as possible.
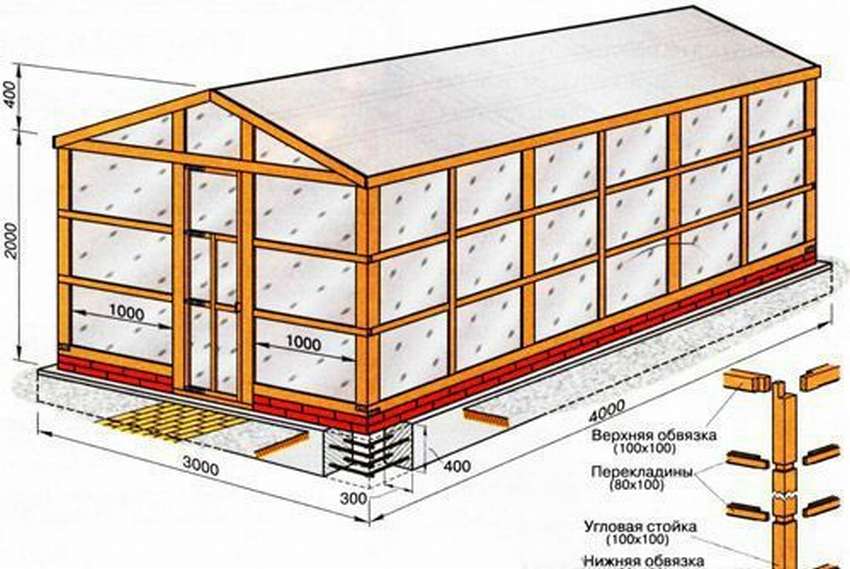
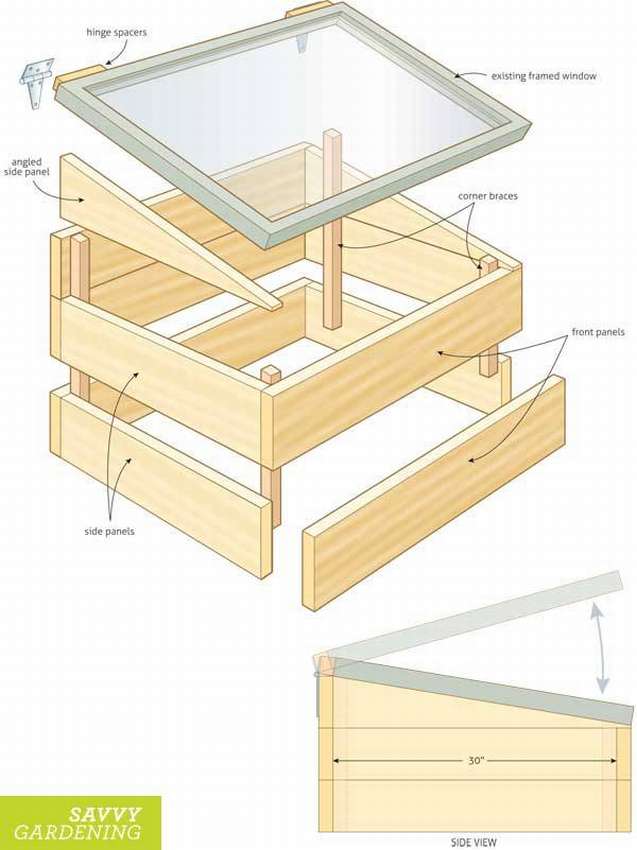 Shown on the right greenhouse drawing, but you can change the size depending on the size of the cover you want to use.
For this design you will need parts of this size. Here the dimensions are in inches, that is, multiply these figures by 2.54. For example 16 1⁄2 ″ is 422 mm or 42.2 cm.
- (5) front and back 1 1⁄2 × 5 1⁄2 × 32 1⁄4 ″
- (4) 1 1 × 2 × 5 × 2 × 30 ″ side portions
- (2) angled side parts (see Instructions) 1 1⁄2 × 5 1⁄2 × 30 ″
- (2) angle brackets (carved from scrap) measuring 21⁄2 × 6 × 16 1⁄2 ″
- (2) angle brackets (carved from scrap) measuring 2 1 × 2 × 6 × 11 ″
When you start using a cold greenhouse, it is important to know that it can be too hot inside, so sometimes it’s important to open the cover, even in winter. If you take the matter seriously, you can install automatic ventilation openers that will measure the temperature and open the greenhouse when necessary.


https://i.expert-h.com/en/parniki-teplitsy/iz-okonnyh-ram#sigFreeId3ffea859ff
The project was developed by Deon Haupt and Tara Nolan.
All photos of Donna Griffith.
Technical illustration of Len Churchill.
The greenhouse from the old window
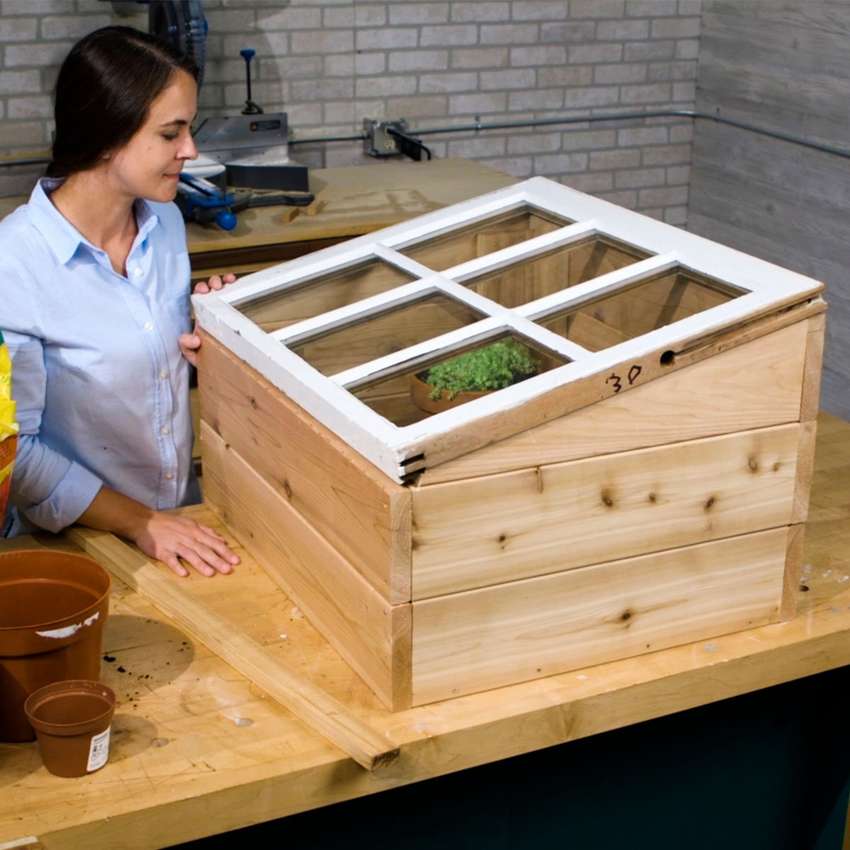 Give the old window a new life by turning it into a mini-greenhouse. If you want to extend the growing season for your plants or start spring planting, this mini greenhouse from the window for you. Prepare a few boards and the necessary tools, and you can make this little greenhouse from the old window in just a couple of hours! There is nothing complicated, just to tilt the window cover of the greenhouse, which allows more sunlight to penetrate inside, cut two inclined pieces of the board. To determine the dimensions for corner parts, turn the box right-side up and carefully install the window on top of the structure, as shown in the photo. Measure the back, bottom, and front of the holes and mark the dimensions on the board. Use a ruler to connect the top of the back marks and the top of the front marks. Then cut two pieces. Carefully remove the window and screw the corner side parts to the upper back. Add braces from the back to the inside of the box.


https://i.expert-h.com/en/parniki-teplitsy/iz-okonnyh-ram#sigFreeId3690711327
How to make a mini greenhouse for free
 Want to have a greenhouse to enjoy fresh vegetables even after the season ends? Do-it-yourself mini-greenhouse from old windows and wood waste, it will not cost anything, just spend a couple of hours on the weekend.
- Start by measuring the size of the windows and making some simple frames, cutting down the tree to the desired size, and then fasten it together.
- They stacked the frames on top of each other and assemble the base of the mini-greenhouse, only be sure to alternate the boards, this will make the structure stronger.
- Then cut the boards so that the window on top is at an angle. This will help to get sunlight for all plants. Both of these boards should be cut at the same angle so that the window is securely located on the top of the frame.
- Screw them to the two sides of the mini-greenhouse and put another board on the back to finish the base.
- Then in each corner install racks to better fix the frame, and twisted everything together.
Install the mini greenhouse in a suitable place and fill the inside with earth. To open the window when you need to water the seeds, you can use a regular stick.


https://i.expert-h.com/en/parniki-teplitsy/iz-okonnyh-ram#sigFreeId85d45a96f3
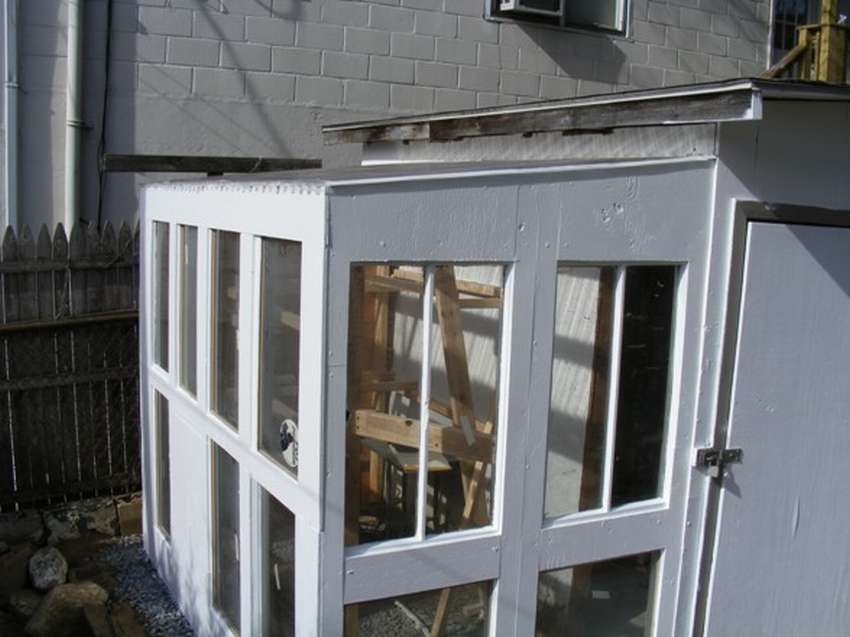
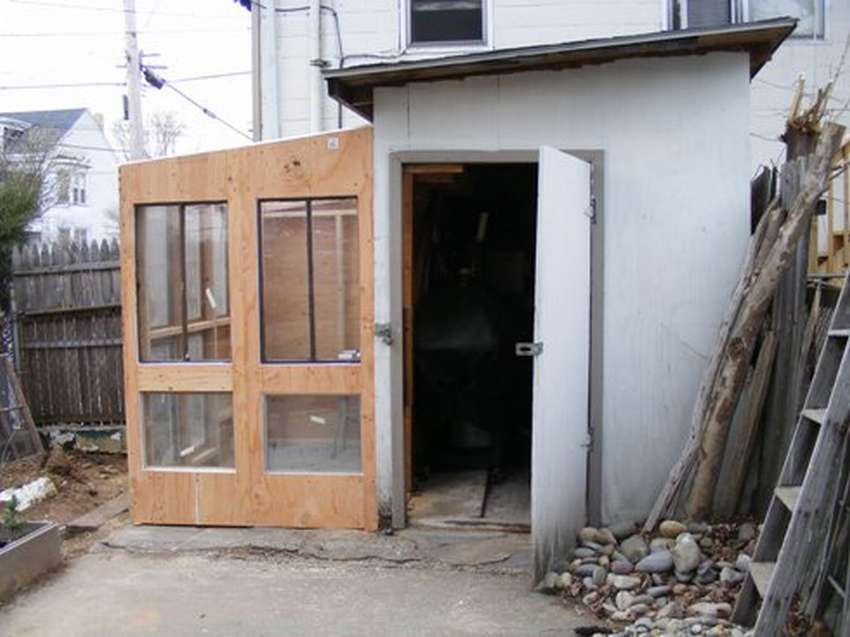
DIY greenhouse
 The climate of Canada is not very conducive to early vegetable growing, so the author of this project, a resident of Canada, proposes to make this simple greenhouse from old windows, which not only partially solves the problem with a cold climate, but also protects plants from cats, dogs, small rodents and other troubles. Such a design easy to do on the weekendusing conventional tools and materials. You will need only basic tools. Since the cold greenhouse will be quite large, it is better to do it outside or in the garage, so that you do not disassemble it later, so that it can be taken outside. See the wizard below for detailed step-by-step photos.


https://i.expert-h.com/en/parniki-teplitsy/iz-okonnyh-ram#sigFreeId965c74b9c6
DIY window frame greenhouse
 Not all gardeners are lucky to live in a temperate climate.
 Instead of fighting the frost make a cold greenhousethat will protect your plants. Natural heat allows you to grow seedlings in early spring and preserve vegetables during the fall and even in winter.
This guide shows how to make a box of dosok and the old window. When complete, select south oriented in the area where water will not accumulate, and enjoy this extra plant growth time.
Trimming the corners on the sides requires accurate calculations, but attaching the cover from the old window is quite simple. You can read the assembly instructions for the greenhouse on the site, the link can be found under the gallery, see step-by-step photos below.


https://i.expert-h.com/en/parniki-teplitsy/iz-okonnyh-ram#sigFreeIdcef7a76c6f
Photo by Matthew Benson
Mini greenhouse for a summer residence
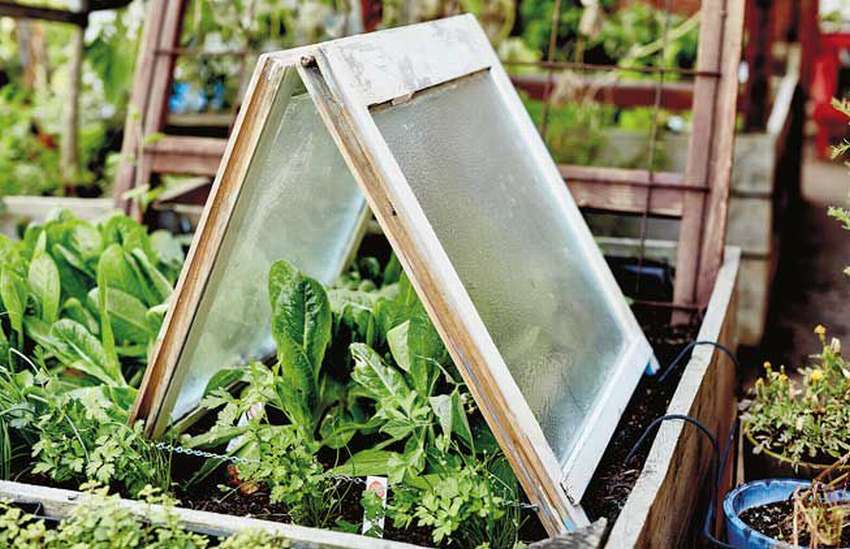
 A cold greenhouse allows plants to grow throughout the fall, when they usually stop growing due to lack of heat and affordable sun, making them ready for harvest in November and December. IN mini greenhouse there is really no weeding and not much water. All you do is plant a few seedlings at this time of the year (or a little earlier), and then go out and choose what you need in the cold winter months. If you find old windows, half the work has already been done. Creating the rest of the carcass is easy, even for those with limited carpentry skills. The easiest way make a cold greenhouse do it yourself - It’s easy to build a bottomless box on which a glass window is installed. If you cannot find the old glass window, you can use plexiglass on top or even thick transparent plastic. Best glass, then plexiglass and plastic coating.
 Leave some space between the back and the window frame so that it can easily slide on the back of the frame. If it rests directly on the window frame, it hits the back when you slide the frame back. In this design nothing is better than simplicity.


https://i.expert-h.com/en/parniki-teplitsy/iz-okonnyh-ram#sigFreeId21d1dee3fa
How to make a greenhouse from a window frame
 To make it so small greenhouse for seedlings will need some old windows and a pallet, this material is quite enough. All you have to do is attach a couple of 2x4 boards to a makeshift drawer. You can still add a lower rack at the bottom of the structure. Then install a vertical sliding wooden window with hinges for the top and add support, in this case with antique hinges. Set window sash lock. The author also added an antique doorknob with a rope attached to the ceiling board to prevent the lid from slamming in case someone forgot to put the support correctly.


https://i.expert-h.com/en/parniki-teplitsy/iz-okonnyh-ram#sigFreeId023e4fdbfe
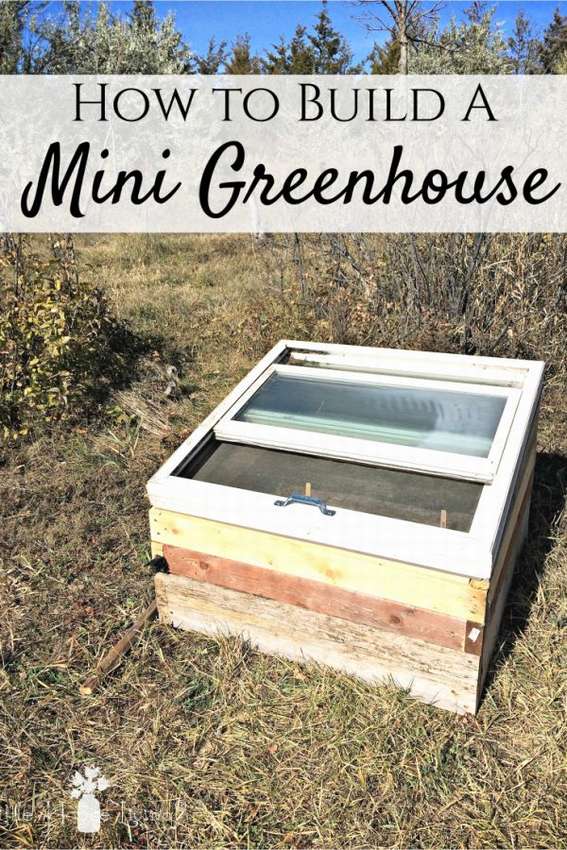
Mini greenhouse from the windows
 Mini greenhouse - A great option for a small space to protect seedlings from early frost. It's amazing how much heat can be held inside by this simple design, so don't overdo it. when the air starts to heat up. This design allows you to collapse the structure so that it can be carefully stored somewhere in the barn until the next season, while it is needed. Such a greenhouse from the windows is not only functional, but, no less important, will make your garden aesthetically attractive garden, which you can be proud of.


https://i.expert-h.com/en/parniki-teplitsy/iz-okonnyh-ram#sigFreeIde343257931
Greenhouses from window frames photo


https://i.expert-h.com/en/parniki-teplitsy/iz-okonnyh-ram#sigFreeIdd5328bddbb
Mini greenhouse from the windows
 Obviously, in such window greenhouse you can’t place many plants, but, of course, it will add a “cute” factor to your site, as it is fully functional for several small plants.
All you need to do is install a few base supports. Then insert and secure several medium-sized windows on the sides. Finally, install two gable roof windows. It’s pretty simple to make such a mini greenhouse under the force of any beginner. The dimensions of the structure are 60 x 60 cm. Each window of this greenhouse has its own size, which is slightly different, so the author came up with a way to simplify framing.
Table assembly
- As you can see in the photographs, a square frame is formed with external elements 2 × 4 and then legs are attached to the inner corners.
- Additional 2 × 4 sawn bars at a 45 ° angle are attached to make the structure truly safe.
- 1 × 6 desktop boards (not shown) are cut to fit on top of the frame.
Greenhouse window framing. Now that the base of the greenhouse table has been built, it's time to create a structural frame to hold the windows in place. The main task is to create a solid structure. You should read the full instructions on the site, it describes in detail how to fix the windows, make a roof and many more different nuances for painting and decorating the greenhouse from the windows.


https://i.expert-h.com/en/parniki-teplitsy/iz-okonnyh-ram#sigFreeId7bec1bca97
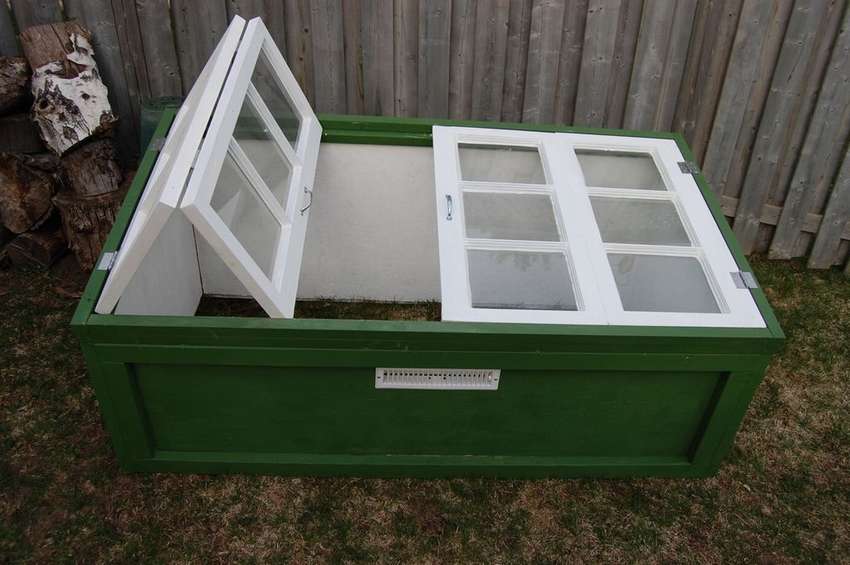
 Here's anotherone simple mini greenhouse from old windows. Greenhouses provide ideal conditions for growing plants, retaining heat, allowing you to receive a lot of sunlight and retaining moisture inside the environment. This the mini-greenhouse is made almost entirely of old windows and has a hinged lid for easy access to the small garden inside. There is no bottom in the structure, so you can raise the greenhouse and set it aside for more serious plant care or move it to another place where there is more sun. This bizarre thing will be wonderful piece of design of your site, in the garden or on the veranda, breathing new life into these old windows.


https://i.expert-h.com/en/parniki-teplitsy/iz-okonnyh-ram#sigFreeId3d99ca577b
Liked here mini greenhouses from the windows? See another option.
 This greenhouse is for those who want to add some style for your home. Such a cute touch of landscaping. The neighbors will be impressed when they see what you have built.


https://i.expert-h.com/en/parniki-teplitsy/iz-okonnyh-ram#sigFreeIdf941a84864
Drawings of greenhouses from window frames


https://i.expert-h.com/en/parniki-teplitsy/iz-okonnyh-ram#sigFreeId14615d8e4c
Greenhouses from window frames 300 photos


https://i.expert-h.com/en/parniki-teplitsy/iz-okonnyh-ram#sigFreeIdf66642a91f
50+ greenhouse pics
Below you can view the gallery of greenhouses with an opening lid, which you can do yourself. We collected photos from all over the Internet, below we indicated the sources from which we could determine the authorship.
-

-
-
-
-
-
-
-
-
-
-
-
-
-
-
-
-
-
-
-
-
-
-
-
-
-
-
-
-
-
-
-
-
-
-
-
-
-
-
-
-
-
-
-
-
-
-
-
-
-
-
-
-
-
View the embedded image gallery online at:
https://i.expert-h.com/en/parniki-teplitsy/iz-okonnyh-ram#sigFreeIdc5beefab98
https://i.expert-h.com/en/parniki-teplitsy/iz-okonnyh-ram#sigFreeIdc5beefab98
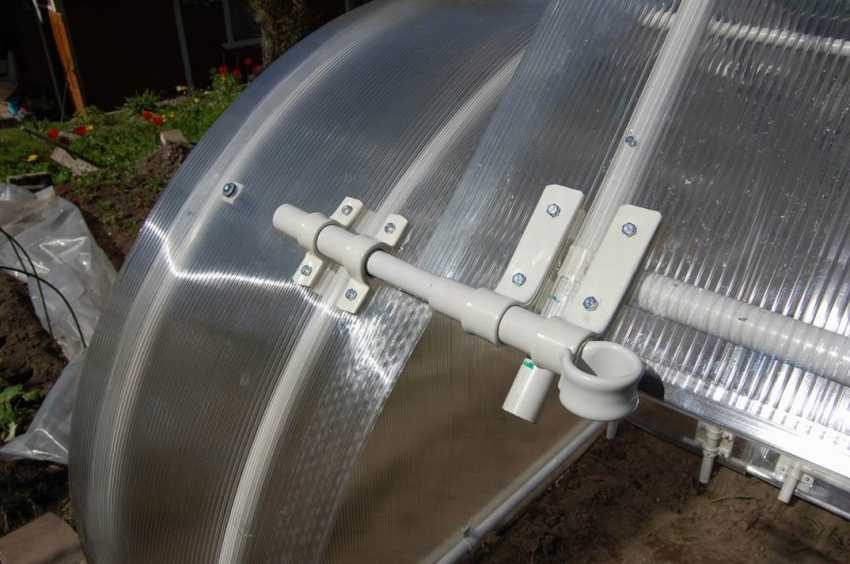
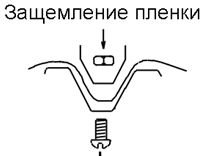
Mounting Methods
How to fix the opening greenhouse cover
|
Here is one reliable way.
|
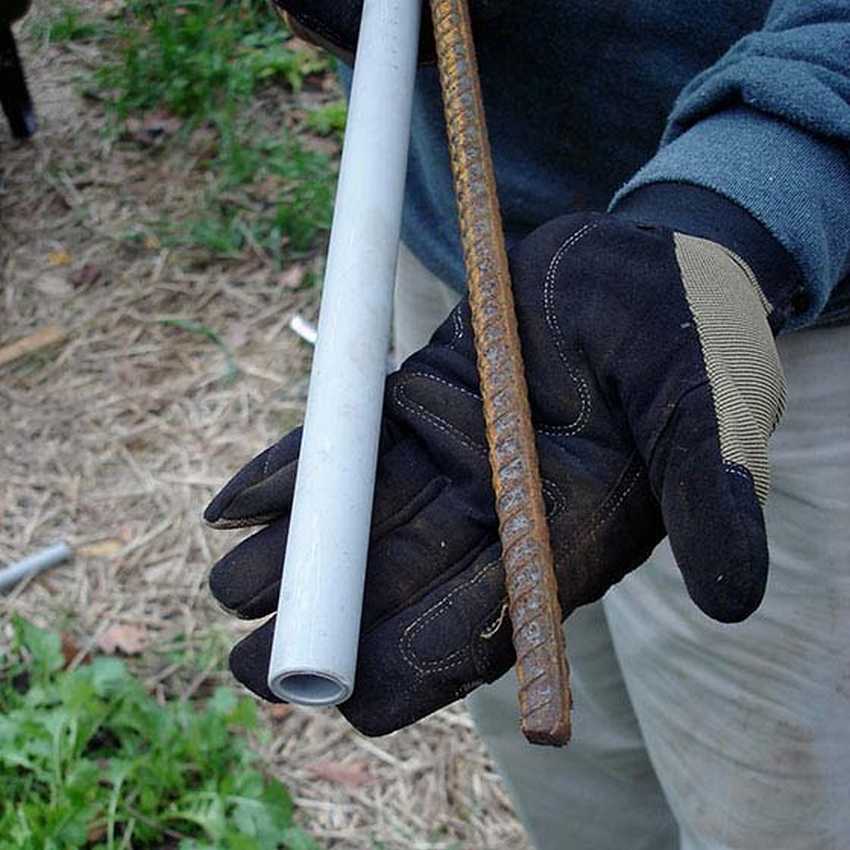
How to fix arches or PVC pipes of a greenhouse under a film
|
Clamps |
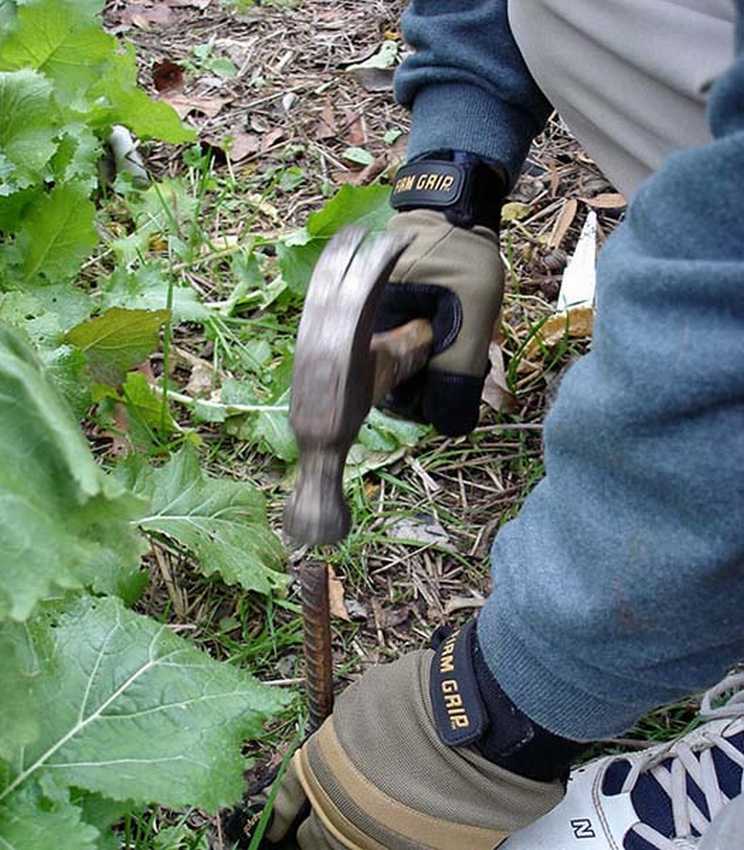
Insert into the ground The method consists in the fact that we are installing PVC pipes on fittings driven into the ground. Instead of reinforcement, wooden rods can come off (enough for a season) Click on the photo to enlarge
|
How to fix a film in a greenhouse
|
Hose lengths
|
 |

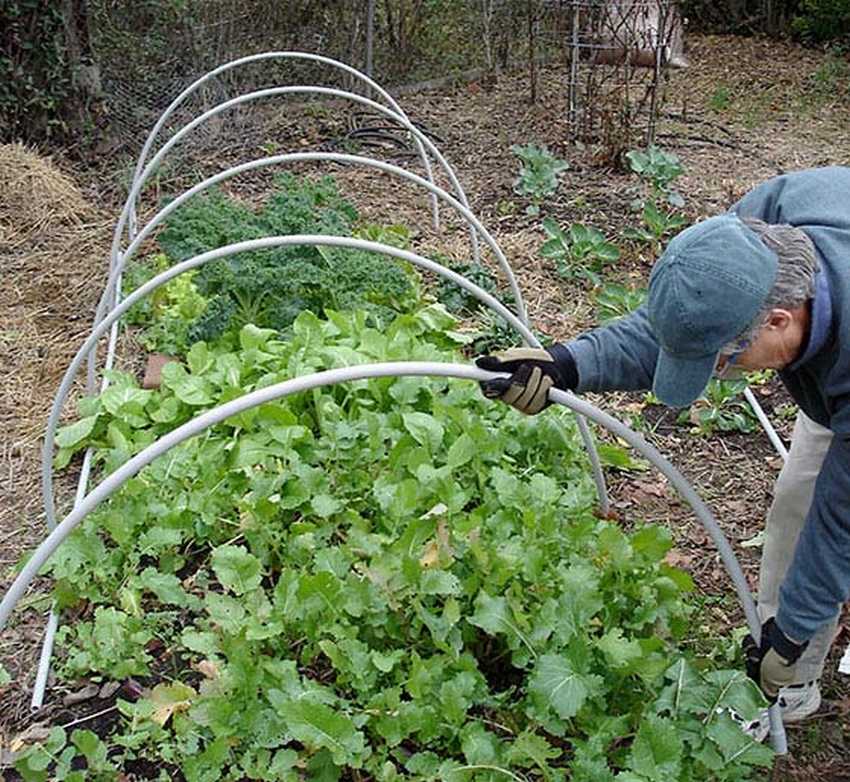
The easiest PVC pipe greenhouse

Very simple greenhouse design. Easy to assemble, and just as easy to disassemble. It can be moved, increased, reduced.
It is cheap and easy to manufacture..
ADVISE this greenhouse
Step by step photos. Click on them

https://i.expert-h.com/en/parniki-teplitsy/iz-okonnyh-ram#sigFreeIdfca49e1727
How to make a greenhouse from willow or cedar branches.
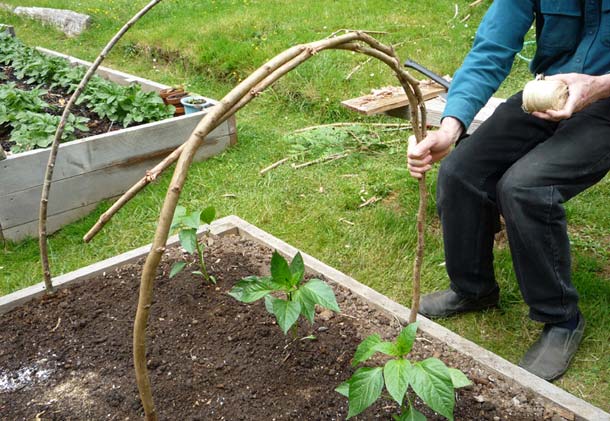
Such a greenhouse is suitable for those who did not expect sudden frosts.
This mini greenhouse can be done in 45 minutesaccording to the author of the photo. 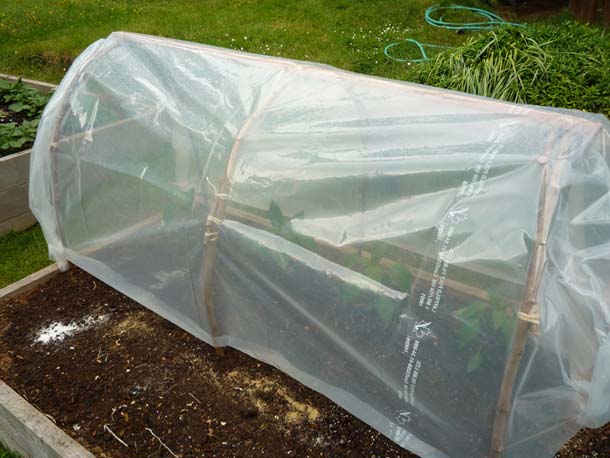
For the manufacture of arcs, not PVC pipes were used, but cedar branches, but I think that willow branches will come down in our conditions. The branches are interconnected by a nylon thread (not fundamentally what) to give an arcuate shape. When arcs from branches are stuck in the ground, a bar is attached over them, to give one damage, which is also attached to each arc.
In order to transfer such a greenhouse to another place, the author advises putting two long bars along the base of the arcs, then link each arc to these bars. As a result, we get something like a stretcher. Taking such stretchers from both ends, it is quite easy to pull our greenhouse out of the ground and move it to another place.
Below you can see step-by-step photos, to enlarge, just click on them.
-
-
-
-
-
-
-
-
View the embedded image gallery online at:
https://i.expert-h.com/en/parniki-teplitsy/iz-okonnyh-ram#sigFreeIdfec62abad9


https://i.expert-h.com/en/parniki-teplitsy/iz-okonnyh-ram#sigFreeIdfec62abad9
Telescopic greenhouse or greenhouse
And here is a very interesting variation of a telescopic greenhouse or greenhouse. I moved the arcs and nothing interferes, below you can see the mounting mechanism, click on it to enlarge.
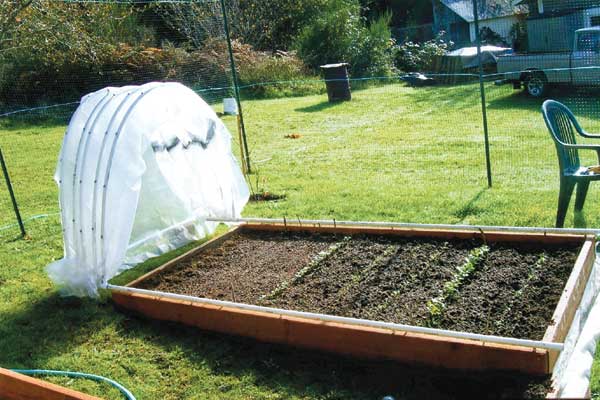
DIY Convertible Hotbed
See step-by-step photos of making such a greenhouse. First we make a pallet for soil, then we make a frame on which we will fix the arcs, and which will recline. Then we fasten this frame to the pallet on the hinges and cover with a film.
Step-by-step photo of the manufacture.
Click on the gallery to enlarge
-
-
-
-
-
-
-
View the embedded image gallery online at:
https://i.expert-h.com/en/parniki-teplitsy/iz-okonnyh-ram#sigFreeId967c9b6600


https://i.expert-h.com/en/parniki-teplitsy/iz-okonnyh-ram#sigFreeId967c9b6600
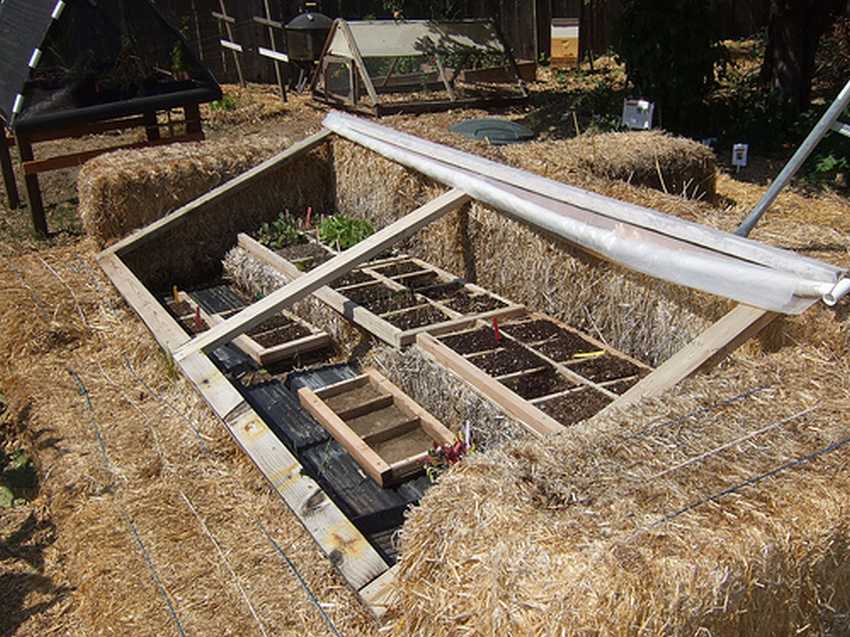
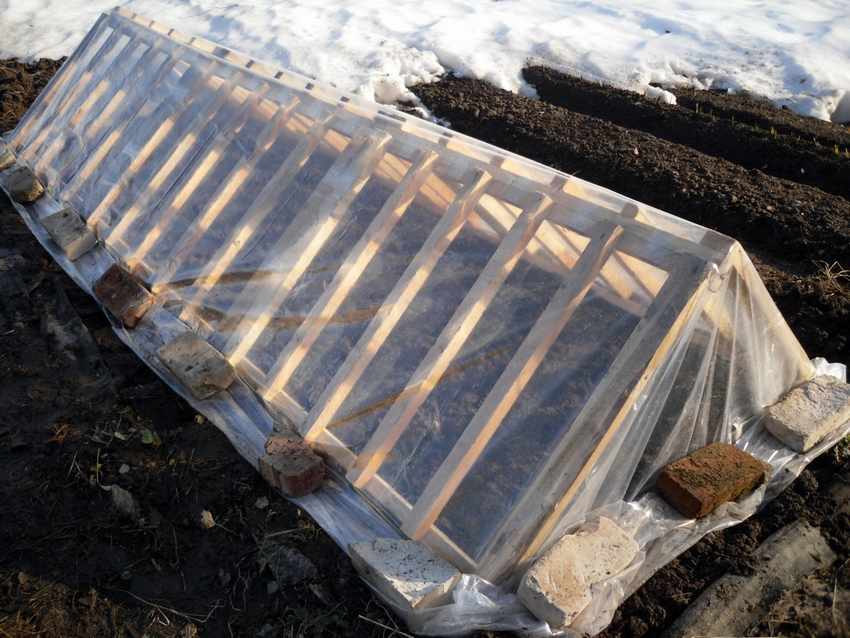
A greenhouse made of straw or hay.
As we see in the photo there is a greenhouse whose walls are made of briquettes (or bales) of straw (hay). A frame with an opening top is simply piled on the walls of straw. The film rolls onto a bar. These greenhouses are usually directed south. Such a design helps well when the slope of the soil in your area is directed to the north side, in such cases the sun weakly heats the earth. Such a greenhouse your help out in this situation.
Greenhouse to collect water
(Roots Up Dew Collector Greenhouse System)
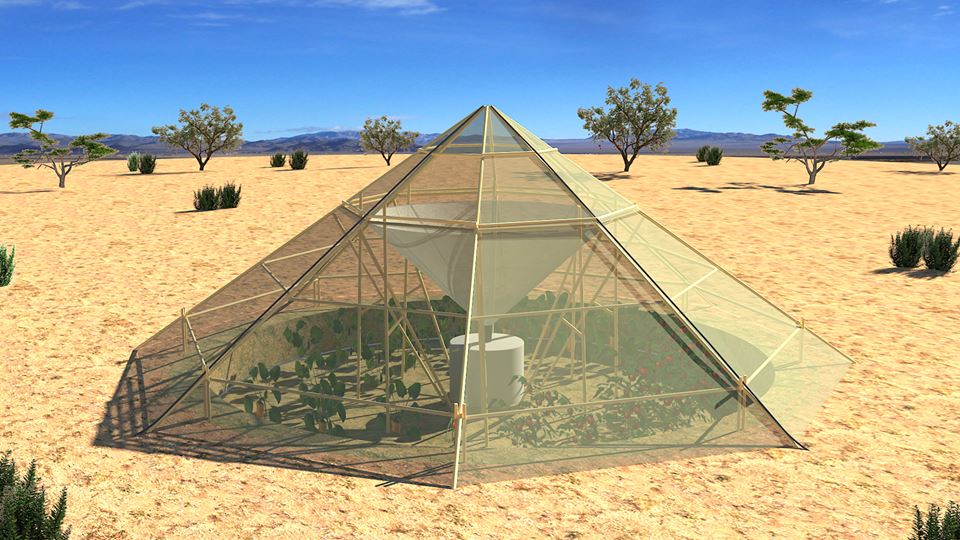 In a day, the greenhouse condenses to 80 liters of water !!!
Thanks to such greenhouses, Ethiopia will soon flood the world with food. The greenhouse was created for arid countries to solve the problem of drought.
In the afternoon, steam accumulates in the upper part of the greenhouse. When night falls, special valves for intake of cold air open, due to which water vapor cools and condenses, afterbringing the liquid into a special storage tank.
Excess water left after watering can be used for drinking.
-
-
-
-
-
-
-
View the embedded image gallery online at:
https://i.expert-h.com/en/parniki-teplitsy/iz-okonnyh-ram#sigFreeId5e342fb7f8


https://i.expert-h.com/en/parniki-teplitsy/iz-okonnyh-ram#sigFreeId5e342fb7f8
Portable greenhouse (greenhouse) from a barrel
Easy and simple to make (45 minutes)
This portable greenhouse is suitable for growing seedlings, or plants such as parsley, cilantro, etc.
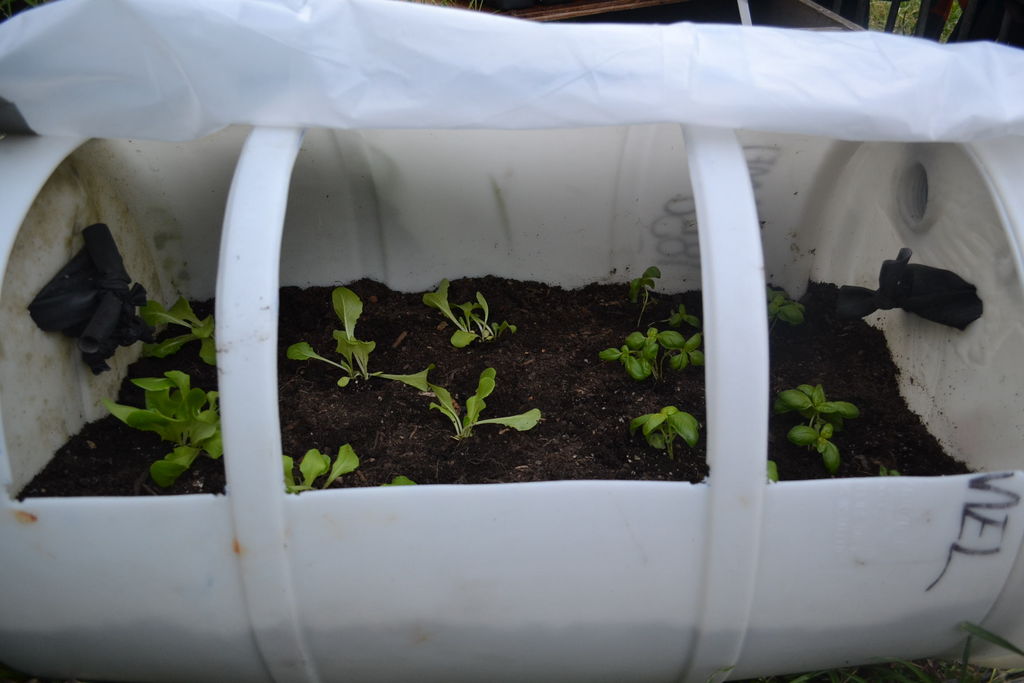
- 2 photos - cut square holes with a jigsaw in 1 quarter of the circumference of the barrel.
- 3 photos - a hole with a drill so that a jigsaw could be inserted.
- 4 photos - holes in the bottom to drain water from the drainage.
- 5-6 photos - attach the handles on the sides for transfer.
- 7-12 photos fasten the film.
- 14 photos - drainage.
The greenhouse can be painted green to blend in with the landscape of the cottage
-
-
-
-
-
-
-
-
-
-
-
-
-
-
-
-
View the embedded image gallery online at:
https://i.expert-h.com/en/parniki-teplitsy/iz-okonnyh-ram#sigFreeId588bd29eff


https://i.expert-h.com/en/parniki-teplitsy/iz-okonnyh-ram#sigFreeId588bd29eff
Portable film greenhouse
As you can see from the photo, the greenhouse has a lightweight version. It does not have a massive base; it is attached to the ground by reinforcement fixed on the base. It is transported as on a stretcher with the help of two long boards pinned to the base. A gardener will come in handy when it becomes necessary to close some weak plants at the time of cooling.
Greenhouse butterfly
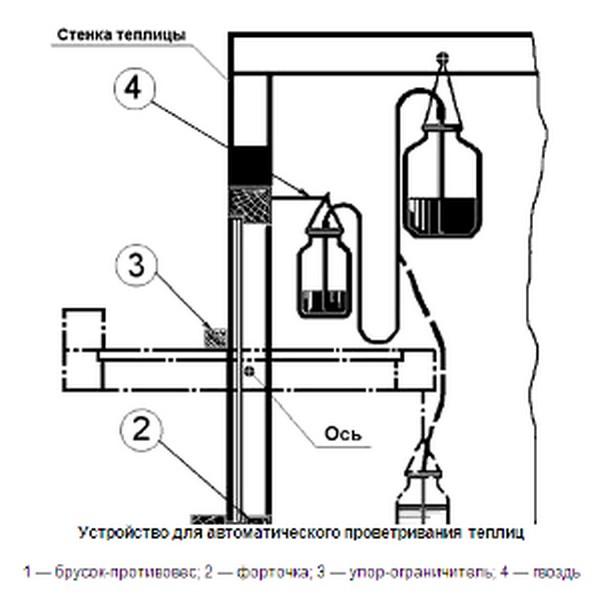
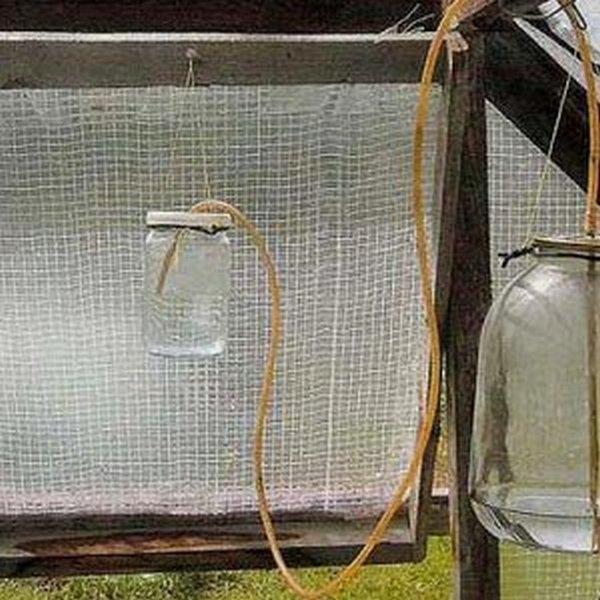
How to do automatic opening window leaves in a greenhouse?
Very interesting and simple design to automatically open the window, depending on weather conditions. The principle is as follows. A tube in the form of a communicating vessel passes between the large (3l) and small (0.5l) cans. A large jar is suspended from the base of the greenhouse, and a small one from the window. Moreover, the small one must be balanced with the window in such a way that, with a minimum amount of water in it, the window must be closed. In a hermetically sealed large jar with increasing temperature in the greenhouse. water due to atmospheric pressure moves into a small can, opening the window
A simple version of the greenhouse side opening.
As you can see, a very simple design of the film greenhouse. Such a greenhouse can be easily moved and put into a new place.
Dome greenhouse from scraps of pipes
it's ugly but it works
 The authors of the blog booth555.com moved to a new home, and they had to independently sew themselves. As a result, they left a lot of pipe scraps, and they were used by an enterprising young family to create this greenhouse. The advantages of these pipes are that they are easy to bend and at the same time they are stable and easy to pin.
See step-by-step photos of creating a greenhouse.
-
-
-
-
-
-
-
-
-
View the embedded image gallery online at:
https://i.expert-h.com/en/parniki-teplitsy/iz-okonnyh-ram#sigFreeId2d1e4b1eb3


https://i.expert-h.com/en/parniki-teplitsy/iz-okonnyh-ram#sigFreeId2d1e4b1eb3
As I understood from the translation of the article from English, the pipes are attached to the wooden cross-pieces using tape. I didn’t really understand about the film, somehow the film scraps were fastened together, the cord was most likely threaded into the holes, and there is also a hint for 6 photos.
The film below is pressed to the ground by bricks, this makes it possible to pull the film up on hot days.
I could not translate the purpose of the star (in 4 photos), but suggested that it was attached to the dome to make the structure more stable.
Write your star assignment options in the comments.
Greenhouse from a double-glazed window or frames
The author of the doorgarden.com blog made here such a recumbent greenhouse from a glass door (double-glazed window), into which a stone from under a lawn mower accidentally fell.
According to the author, such a hotbed allows him to collect greens for salads in January, well, America, I can’t say exactly what kind of staff it is.
See the drawing of this greenhouse. Everything is very simple. As we see from the photo, the double-glazed window is not attached to any hinges, it just lies, resting against the side board from slipping.
The double-glazed window can be replaced with any large glass or window frame.
-
-
-
-
-
-
View the embedded image gallery online at:
https://i.expert-h.com/en/parniki-teplitsy/iz-okonnyh-ram#sigFreeIdd949a42e36


https://i.expert-h.com/en/parniki-teplitsy/iz-okonnyh-ram#sigFreeIdd949a42e36
In summer, in hot weather, when there is no need for such a greenhouse, you can throw it on strawberries to protect the berries from birds.
Attention!!! An important point about greenhouses from window frames
Whatever frames you have at your disposal, you need to make the transparent roof folding (lifting up), and not hinged or folding, as on the right in Fig. Through any vertical gap, all the warm air will instantly disappear and the plants will strike cold, and the horizontal one can be adjusted with props according to the weather and local conditions.
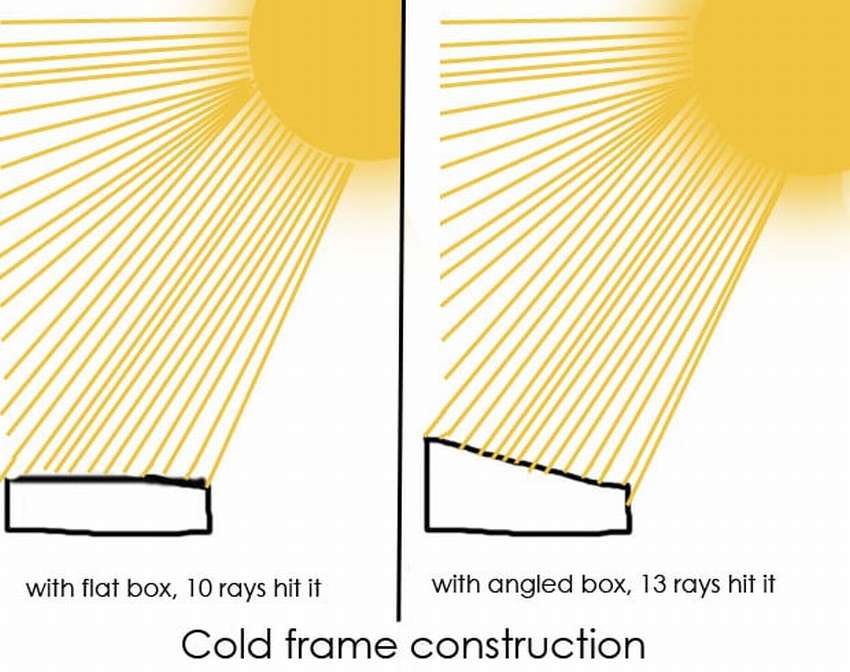
What should be the inclination of the greenhouse cover ???
Note: the optimal slope of the roof slope of a single-pitch greenhouse from the vertical (90 degrees) –φ, where φ is the geographical latitude of the place; and (90 degrees) –φ is the angular height of the Sun at noon of the spring / autumn equinox. See below for a greenhouse with a heat accumulator.
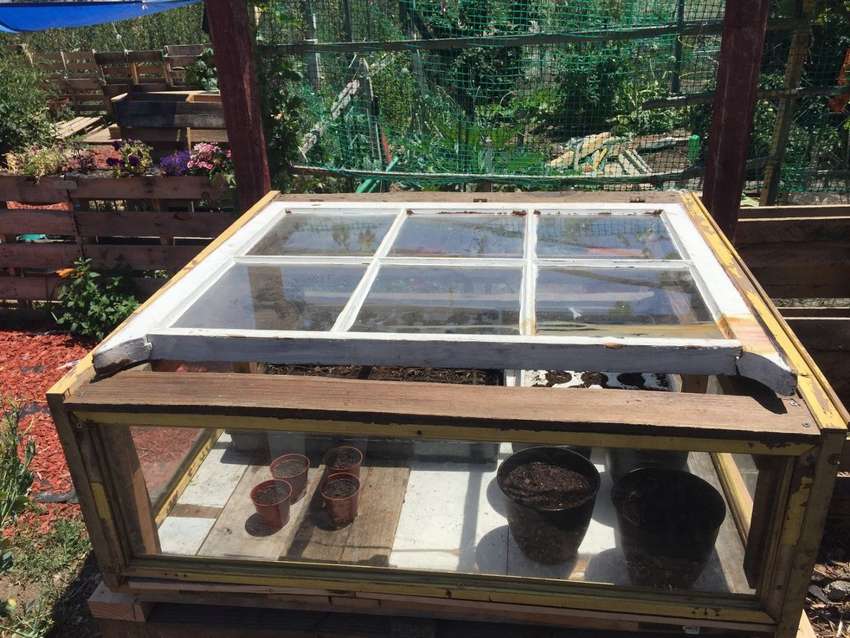
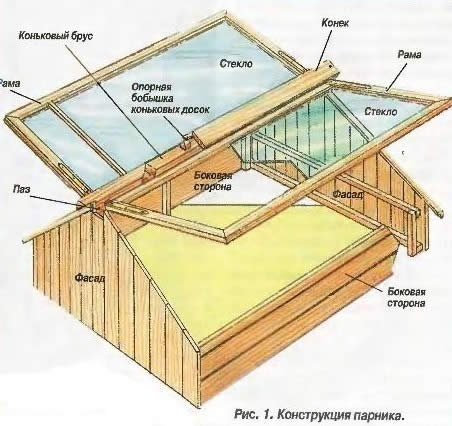
Cold greenhouse. (drawing diagram)
Do it yourself
The greenhouse consists of a wooden frame and a glass lid. The glass of the lid should always be inclined to catch as many rays of the weak winter sun as possible.
The author claims that even in winter in sunny weather, this greenhouse can heat up to very high temperatures, so the lid must be able to open upward. In order to regulate the temperature, a thermometer must be placed in the greenhouse (see photo 5), and it should also be a mechanism for fixing the open cover at different angles was made (see photo 4).
Vegetables that can be grown in the early winter in a cold greenhouse
BUT, nevertheless, the main secret of such a greenhouse is not in its arrangement, but in the plants grown in it. These should be plants that easily tolerate cold. According to the author’s research, five crops: spinach, green onions, mâché, claytonia, and mOrcs can be successfully grown in the northern states of the USA. As well as arugula, Escarole, Mizuna, parsley, sorrel, European salad, mustard, spinach and turnips.
The author sows vegetables usually from mid-August to mid-September.
-
-
-
-
-
-
View the embedded image gallery online at:
https://i.expert-h.com/en/parniki-teplitsy/iz-okonnyh-ram#sigFreeIdc6a1d9f617


https://i.expert-h.com/en/parniki-teplitsy/iz-okonnyh-ram#sigFreeIdc6a1d9f617
My advice: make a cardboard sheet glued on one side with foil. At night, you can cover the greenhouse with this foil, which will reflect the heat coming from the earth back into the greenhouse.
Window frame and hay greenhouse
Greenhouse (greenhouse) IN plastic bottle
or "How to grow seedlings if the apartment is cold"
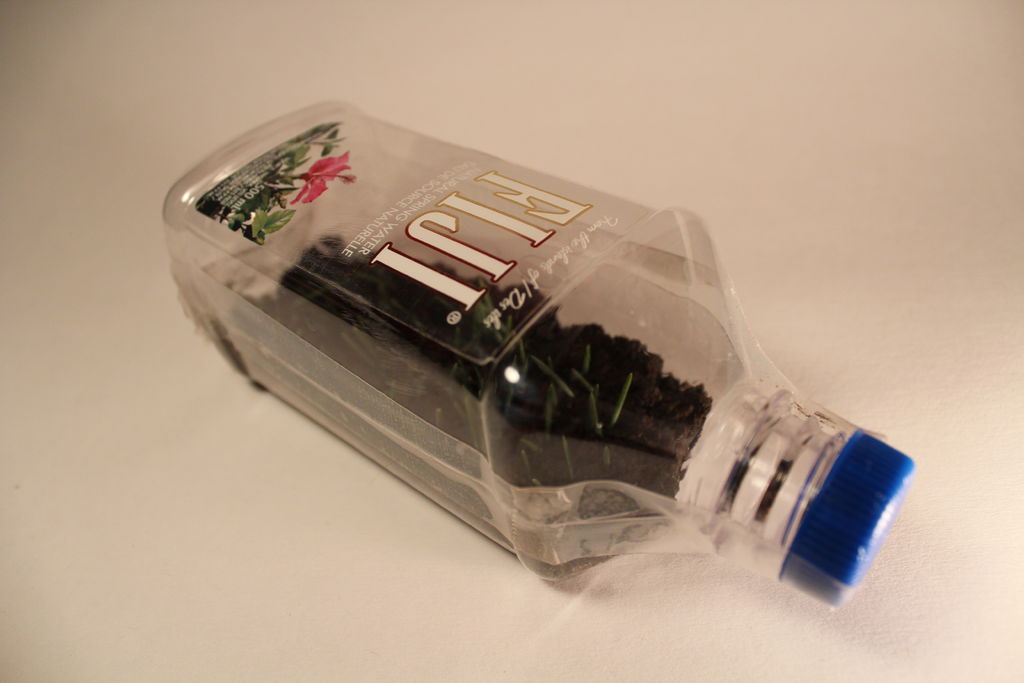 It often happens in our domestic apartments that for growing seedlings the room is not warm enough. Such a greenhouse in a plastic bottle can serve as a way out of this situation.
When sunlight enters such a greenhouse, the air in the greenhouse begins to heat up and remains warm for a very long time, even after sunset.
An important plus will be high humidity inside the bottleand, which will be created by heating pre-moistened soil. Such humidity significantly accelerates the process of seedling maturation.
The manufacturing process is simple.: Cut the bottle, rinse, place the soil with the seeds inside and seal it tightly with tape.
-
-
-
-
-
-
-
-
-
-
-
-
View the embedded image gallery online at:
https://i.expert-h.com/en/parniki-teplitsy/iz-okonnyh-ram#sigFreeId2ec7d391ec


https://i.expert-h.com/en/parniki-teplitsy/iz-okonnyh-ram#sigFreeId2ec7d391ec
How to do quick DIY greenhouse
Greenhouse made of wooden trellises
Advantages of such a greenhouse:
- - quickly build
- - is steady
- - easy to manufacture
Minuses:
- not suitable for tall plants, you can use for growing early greens and seedlings.
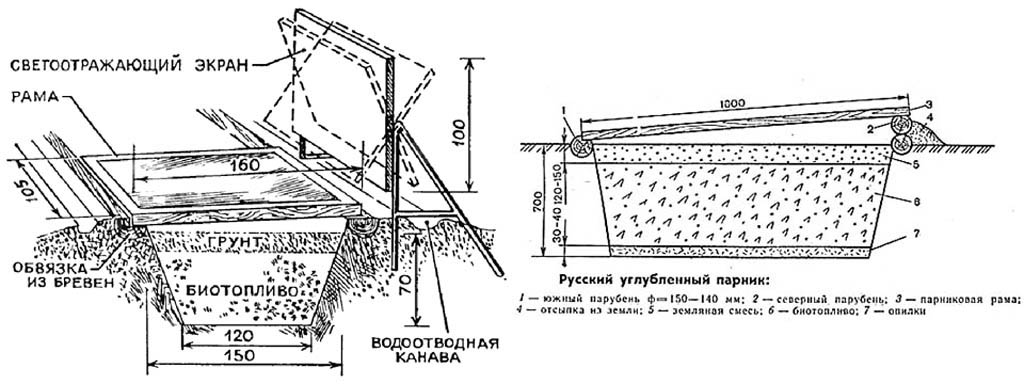
Russian in-depth greenhouse on biofuel
About Russian pits
The simplest greenhouse is a single-pitch greenhouse, recessed into the ground, with biological heating. For its construction choose a dry, well-lit and sheltered from the winds place. It is desirable that this was a low slope with a direction to the south. To protect the greenhouse from the wind, green spaces, fences or special reflective screens that are arranged on the north side can serve. Particularly convenient are swivel flat screens painted with white paint, which allow maximum use of solar energy. Illumination with reflected light increases the temperature in the beds by 2-3 °, which is equivalent to transferring your site, for example, from the Moscow region to the black earth regions of the country: Lipetsk or Voronezh.
Note: you can use any flat panels glued with aluminum foil for baking.
Construction begins with a strapping device around the perimeter of the greenhouse of four sanded logs with a diameter of 10-14 cm. The north side of the strapping should be slightly higher than the south. On the south side in the harness, a groove (quarter) is selected to support the frames.
At one time, the Russian greenhouse was a revelation to European farmers. It was from the “Russian pits” that the nobility of the time received in the winter a green onion, lettuce, dill, parsley, radish, and strawberry.
The foundation pit is dug to a depth of 70 cm. In cross section, it has the shape of a trapezoid. In dense soils, the walls can not be fastened, and in loose and floating soils, fastening with horizontal boards is used. To ensure that the greenhouse is not washed away by rain, a drainage groove is arranged around it, which can be closed with wooden shields that facilitate approaches.
Frames for the greenhouse are most convenient in the size of 160x105 cm. They are made of 6x6cm bars, joined for strength with wooden studs, and then properly stained with weather-resistant varnish PF-166 (“6 = s”). Glass reinforced with putty or glazing bead. To drain rainwater in the lower bindings, grooves are cut.
Biofuel in greenhouses is horse or cow dung.. Horse is considered the best, it gives more heat. Harvest it in the fall. Manure is collected in piles and carefully insulated on all sides with straw, sawdust, peat and covered so that the manure does not freeze. In the spring, before stuffing the greenhouse, it is transferred to another, more loose pile and warmed up. To do this, make several holes in it and pour a bucket of hot water into each, after which the stack is covered with burlap or matting. In two to four days, when the manure warms up to a temperature of 50-60 °, they fill a greenhouse. It is laid colder at the bottom, and hot from above and from the sides. After precipitation, after two to three days, a new portion is added. The manure must lie loose, and only at the walls it is necessary to slightly compact it so that voids do not form.
Greenhouses - pits were usually made 3-4, which ensured year-round use: while 1 pit was heated after refueling, the rest gave production. An indispensable condition for the successful operation of the Russian greenhouse is the stroke of the entire complex with a clay castle with a drainage ditch, otherwise the biofuel will become acidic.
Click on it to enlarge it.
After stuffing, the greenhouse is covered with frames and mats made of matting, straw or burlap. From above, on heated manure, soil is poured - garden or sod soil, compost or fertilized peat. An average of 0.2 cc per frame. m of land. Exceeding this amount is not recommended, since under the weight of the earth manure is compacted, air flow is hindered to it, and it ceases to burn. For the same reason, do not over-moisten the soil.
A greenhouse of even such a simple design will make it possible to grow vegetables much earlier than expected.
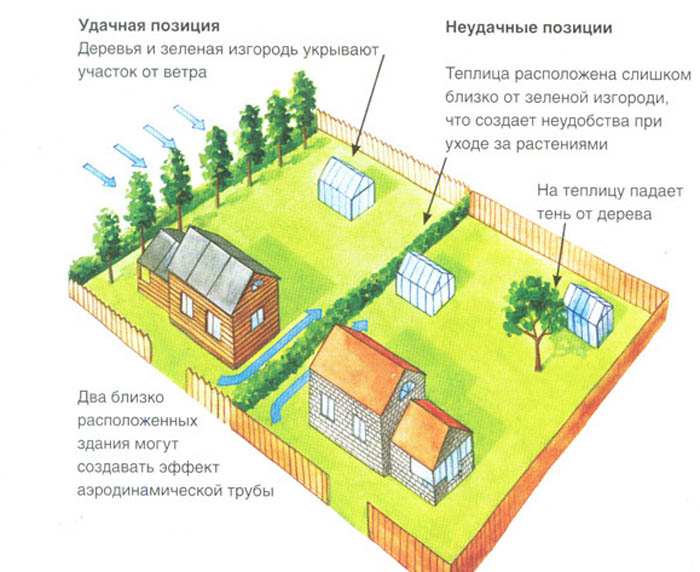
Greenhouse layout
where it is better to put a greenhouse on the site
Hello, I am the author of this article, so I look forward to asking questions for this article in the comments below, I will answer all !!!
If you have questions on another topic, ask them on our forum, we will answer you